


Quick Installation Guide
AVerMedia→ DVD EZMaker 7
C039
English Slovenský Magyar Slovenčina Polski Česky
Български
Русский
Українська
Türkçe
Hrvatski
Quick Installation Guide
FCC NOTICE (CLASS B)
This device complies with Part 15 of the FCC Rules. Operation is subject to the following two conditions: (1) this device may not cause harmful interference, and (2) this device must accept any interference received, including interference that may cause undesired operation.
Federal Communications Commission Statement
NOTEThis equipment has been tested and found to comply with the limits for a Class B digital device, pursuant to Part 15 of the FCC Rules. These limits are designed to provide reasonable protection against harmful interference in a residential installation. This equipment generates, uses and can radiate radio frequency energy and, if not installed and used in accordance with the instructions, may cause harmful interference to radio communications. However, there is no guarantee that interference will not occur in a particular installation. If this equipment does cause harmful interference to radio or television reception, which can be determined by tuning the equipment off and on, the user is encouraged to try to correct the interference by one or more of the following measures:
Reorient or relocate the receiving antenna.
Increase the separation between the equipment and receiver.
Connect the equipment into an outlet on a circuit different from that to which the receiver is connected.
Consult the dealer or an experienced radio/television technician for help.
CAUTION ON MODIFICATIONS
To comply with the limits for the Class B digital device, pursuant to Part 15 of the FCC Rules, this device must be installed in computer equipment certified to comply with the Class B limits. All cables used to connect the computer and peripherals must be shielded and grounded. Operation with non-certified computers or non-shielded cables may result in interference to radio or television reception.
Changes and modifications not expressly approved by the manufacturer could void the user’s authority to operate this equipment.
EUROPEAN COMMUNITY COMPLIANCE STATEMENT Class B (EMC)
This product is herewith confirmed to comply with the requirements set out in the Council Directives on the Approximation of the laws of the Member States relating to Electromagnetic Compatibility Directive 2004/108/EC.
DISCLAIMER
No warranty or representation, either expressed or implied, is made with respect to the contents of this documentation, its quality, performance, merchantability, or fitness for a particular purpose. Information presented in this documentation has been carefully checked for reliability; however, no responsibility is assumed for inaccuracies. The information contained in this documentation is subject to change without notice.
In no event will AVerMedia be liable for direct, indirect, special, incidental, or consequential damages arising out of the use or inability to use this product or documentation, even if advised of the possibility of such damages.
TRADEMARKS
AVerMedia is registered trademarks of AVerMedia TECHNOLOGIES, Inc. IBM PC is a registered trademark of International Business Machines Corporation. Macintosh is a registered trademark of Apple Computer, Inc. Microsoft is a registered trademark and Windows is a trademark of Microsoft Corporation. All other products or corporate names mentioned in this documentation are for identification and explanation purposes only, and may be trademarks or registered trademarks of their respective owners.
COPYRIGHT
©2009 by AVerMedia Technologies, Inc. All right reserved. No part of this document may be reproduced or transmitted in any form, or by any means without the prior written permission of AVerMedia Technologies Inc. AVerMedia Technologies Inc. reserves the right to modify its models, including their characteristics, specifications, accessories and any other information stated herein without notice. The official printout of any information shall prevail should there be any discrepancy between the information contained herein and the information contained in that printout.
THE MARK OF CROSSED-OUT WHEELED BIN INDICATES THAT THIS PRODUCT MUST NOT BE DISPOSED OF WITH YOUR OTHER HOUSEHOLD WASTE. INSTEAD, YOU NEED TO DISPOSE OF THE WASTE EQUIPMENT BY HANDING IT OVER TO A DESIGNATED COLLECTION POINT FOR THE RECYCLING OF WASTE ELECTRICAL
AND ELECTRONIC EQUIPMENT. FOR MORE INFORMATION ABOUT WHERE TO DROP OFF YOUR WASTE EQUIPMENT FOR RECYCLING, PLEASE CONTACT YOUR HOUSEHOLD WASTE DISPOSAL SERVICE OR THE SHOP WHERE YOU PURCHASED THE PRODUCT.
№ РОСС TW.MP18.B01001
Срок действия с 07.09.2009г по
06.09.2010г
MP18 Москва

Quick Installation Guide |
|
|
|
|
1 |
Package Contents |
|
|
|
|
|
|
|
de |
|
|
|
tionGui |
|
|
|
Quick |
Installa |
7 |
|
|
→DVD EZMaker |
||
|
|
AVerMedia |
|
|
|
|
C039 |
|
|
|
|
English |
|
|
|
|
Slovenský |
|
|
|
|
Magyar |
|
|
|
|
Slovenčina |
|
|
|
|
Polski |
|
|
|
|
Česky |
|
|
|
|
Български |
|
|
|
|
Русский |
|
|
|
|
Українська |
|
|
|
|
Türkçe |
|
|
|
|
Hrvatski |
|
|
|
AVerMedia→ DVD EZMaker 7 |
Quick Installation Guide |
||
CyberLink DVD Suite CD |
Installation CD |
USB Cable |
2 System Requirements
Intel® Pentium® 4, 2.4 GHz or higher or equivalent AMD processor. 512 MB RAM or above
USB 2.0 port Sound card
Graphic card with 256 MB of memory CD / DVD burner
1 GB for VCD/ 5 GB for DVD or higher of available hard disk space Windows XP SP2 / Windows Vista / Windows 7
English
ENG-1
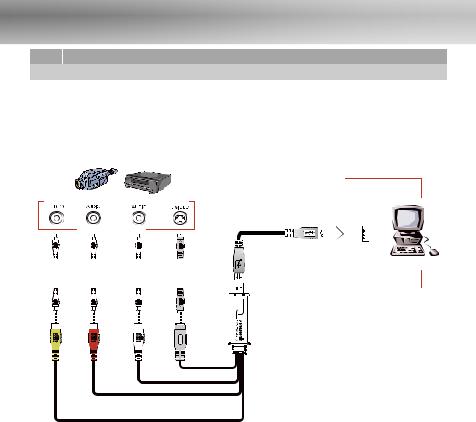
3 Hardware Installation
Connecting AVerMedia DVD EZMaker 7
Use the figure below to connect your AVerMedia DVD EZMaker 7. To record video with sound, you need to specify the audio input source and make sure the sound is NOT muted and have enough volume. To do this, double-click the yellow speaker volume icon on the taskbar or click Start, point to Programs > Accessories > Entertainment and then click Volume Control. Refer to the Volume Control Help Contents and look for “Adjust the recording volume” for more information.
Example:
Camcorder VCR
|
|
|
|
|
|
|
AV Output Port |
|
|
|
|
|
|
|
|
|
||||
|
|
|
|
|
|
|
|
|
|
|
|
|
|
Cable Video-S supplied) (not |
|
|
|
|
USB Cable |
USB Port |
|
|
|
|
|
|
|
|
|
|
|
|
|
|
|
|
|||||
Cable RCA supplied)(not |
|
|
|
Cable RCA supplied)(not |
|
|
|
Cable RCA supplied)(not |
|
|
|
|
|
|
|
|
||||
|
|
|
|
|
|
|
|
|
|
|
|
|
|
|||||||
|
|
|
|
|
|
|
|
|
|
|
|
|
|
|||||||
|
|
|
|
|
|
|
|
|
|
|
|
|
|
|||||||
|
|
|
|
|||||||||||||||||
(Yellow) |
|
|
|
(Red) |
|
|
|
(White) |
|
|
|
|
|
|
|
|
|
|
|
|
|
|
|
|
|
|
|
|
|
|
|
|
|
|
|
|
|
||||
|
|
|
|
|
|
|
|
|
|
|
|
|
|
|
|
|||||
|
|
|
|
|
|
|
|
|
|
|
|
|
|
|
|
|||||
|
|
|
|
|
|
|
|
|
|
|
|
|
|
|
|
|||||
|
|
|
|
|
|
|
|
|
|
|
|
|
|
|
|
|
|
|
||
Computer
ENG-2

Quick Installation Guide
4 Installing the Driver
After you have properly installed your AVerMedia DVD EZMaker 7, turn on your computer. The system will automatically detect the newly installed device on the first time you reboot your computer. Simply skip the wizard, and insert the accompanying installation CD to install the driver.
Important notice :
BEFORE installing the driver, make sure your system has DirectX 9.0c or above installed. You can find the latest version of DirectX on CD in the folder DirectX9c.
The CyberLink DVD Suite software must be installed only AFTER the drivers are completely installed.
Windows→ XP
1.The “Found New Hardware Wizard” dialog box will appear. Just click Cancel to skip the Wizard installation procedures.
2.Place the Installation CD into your CD-ROM drive. The installation main screen will appear.
Click Install Driver. The InstallShield Wizard will install Drivers for AVerMedia DVD EZMaker 7 on your computer.
3.If you are instructed to restart your computer, select Yes.
4.Click Browse CD to access the content of the CD.
Click Exit to close the installation main screen.
English
ENG-3

Windows→ Vista
1.The “Found New Hardware Wizard” dialog box will appear. Just click Cancel to skip the Wizard installation procedures.
2.Place the installation CD into the CD-ROM drive.
3.When the “AutoPlay” dialog box appears, select Run Autorun.exe.
4.When the installation main screen appears, choose Install Driver.
5.If the “User Account Control” dialog box appears, select Allow to continue the process.
Windows→ 7
1.Place the installation CD into the CD-ROM drive.
2.When the “AutoPlay” dialog box appears, select Run Autorun.exe.
3.When the installation main screen appears, choose Install Driver.
4.If the “User Account Control” dialog box appears, select Yes to continue the process.
ENG-4

Quick Installation Guide
5 |
Installing CyberLink PowerDirector and CyberLink |
English |
|
PowerProducer |
|||
|
|||
|
|
||
1. |
After you have completed installing the |
|
|
|
driver, you can install CyberLink |
|
|
|
PowerDirector to edit the video or install |
|
|
|
CyberLink PowerProducer to make movie |
|
|
|
disc. Or install PhotoNow! to automatically |
|
|
2. |
and manually adjust images. |
|
|
Eject the installation CD from your |
|
||
|
CD-ROM drive and insert the CyberLink |
|
|
|
DVD Suite CD. The installation main |
|
|
|
screen will appear. |
|
|
3. |
Click on the Install Now and follow the on |
|
|
|
screen instruction to install the softwares. |
|
|
4. |
For more detailed information regarding |
|
|
|
editing please refer to the Cyberlink |
|
|
|
instruction. |
|
6 Uninstalling the Driver
Windows→ XP
1.Click Start, point to Settings, and then click Control Panel.
2.Double-click Add / Remove Programs icon.
3.In the add/remove programs list, select AVerMedia C039 USB Capture Card and then click on the Change/Remove or Add/Remove button.
Note: AVerMedia DVD EZMaker 7 requires the system to support isochronous transfer. At present, VIA KT400, KT333 and K266A chipset motherboards are not supported; VIA 8235 and VT6202 chipsets can only operate on Windows® XP & 2000.
ENG-5

Windows→ Vista / Windows→ 7
1.Click on the START button and go to Control Panel.
2.Double-click Programs and Features icon.
3.Select AVerMedia C039 USB Capture Card and click on the Uninstall/Change button.
ENG-6
Inštalačná príručka |
|
|
|
|
1 |
Obsah balenia |
|
|
|
|
|
|
|
de |
|
|
|
tionGui |
|
|
|
Quick |
Installa |
7 |
|
|
→DVD EZMaker |
||
|
|
AVerMedia |
|
|
|
|
C039 |
|
|
|
|
English |
|
|
|
|
Slovenský |
|
|
|
|
Magyar |
|
|
|
|
Slovenčina |
|
|
|
|
Polski |
|
|
|
|
Česky |
|
|
|
|
Български |
|
|
|
|
Русский |
|
|
|
|
Українська |
|
|
|
|
Türkçe |
|
|
|
|
Hrvatski |
|
|
|
AVerMedia→ DVD EZMaker 7 |
Inštalačná príručka |
||
CyberLink DVD Suite CD |
Inštalačné CD |
USB kábel |
2 Systémové požiadavky
Intel Pentium 4, 2.4GHz alebo vyšší, alebo zodpovedajúci AMD procesor. 512 MB RAM alebo viac
USB 2.0 port Zvuková karta
Grafická karta s 256 MB pamäťou CD / DVD mechanika
1 GB pre VCD/ 5 GB pre DVD alebo viac voľného miesta na hard disku Windows XP SP2 / Windows Vista / Windows 7
Slovenský
SKY-1

3 Inštalácia hardvéru
Zapojenie AVerMedia DVD EZMaker 7
Použite ikonu pre spojenie AVerMedia DVD EZMaker 7. Na nahrávanie videa so
zvukom potrebujete špecifikovať zvukový zdrojový vstup a uistiť sa, že zvuk NIE JE umlčaný a má dostatok hlasitosti. Urobte tak dvojklikom na žltú ikonu reproduktorov na ovládacom paneli a kliknite Start, Programs > Accessories > Entertainment a potom Volume Control, Volume Control Help Contents a vyhľadajte “Adjust the recording volume” pre viac informácié.
Príklad |
|
|
|
|
|
|
|
|
|
|
|
|
|
|
|
|||||
|
|
|
|
|
|
Kamera |
|
Video zariadenie |
|
|||||||||||
|
|
|
|
|
|
AV výstupný port |
|
|
|
|
|
|
|
|
|
|||||
|
|
|
|
|
|
|
|
|
|
|
|
|
|
kábel Video-S (Nedodané) |
|
|
|
|
USB kábel |
USB port |
|
|
|
|
|
|
|
|
|
|
|
|
|
|
|
|
|||||
|
|
|
|
|
|
|
|
|
|
|
|
|
|
|
|
|
|
|
|
|
|
|
|
|
|
|
|
|
|
|
|
|
|
|
|
|
|
|
|
|
|
kábel RCA (Nedodané) |
|
|
|
kábel RCA (Nedodané) |
|
|
|
kábel RCA (Nedodané) |
|
|
|
|
|
|
|
|
||||
|
|
|
|
|||||||||||||||||
|
|
|
|
|
|
|
||||||||||||||
|
|
|
|
|
|
|
|
|
|
|
|
|
|
|
|
|
|
|
|
|
|
|
|
|
|
|
|
|
|
|
|
|
|
|
|
|
|
|
|
|
|
|
|
|
|
|
|
|
|
|
|
|
|
|
|
|||||||
(Žltý) |
|
|
ervený)Č( |
|
|
(Biely) |
|
|
|
|
|
|
|
|
|
|||||
|
|
|
|
|
|
|
|
|
|
|
||||||||||
|
|
|
|
|
|
|
|
|
|
|
|
|
|
|
|
|
||||
|
|
|
|
|
|
|
|
|
|
|
|
|
|
|
|
|
||||
Počítač
SKY-2

Inštalačná príručka
4 Inštalacia ovládača
Po správnom nainštalovaní karty AVerMedia DVD EZMaker 7 , zapnite počítač. Systém pri prvom zapnutí automaticky rozpozná nainštalovanú kartu a spustí inštaláciu ovládača. Jednoducho preskočte wizard a vložte inštalačné CD na inštaláciu drivera.
Doležité upozornenie:
PREDTÝM ako začnete inštalovať ovládač, presvedčite sa, či máte nainštalovaný DirectX 9.0c alebo vyššiu verziu. Poslednú verziu DirectX nájdete na priloženom CD v adresári DirectX9c
CyberLink DVD Suite software musí byť nainštalované iba PO predchádzajúcej kompletnej inštalácii driverov.
Windows→ XP
1.Na obrazovke sa objaví okno “Found New Hardware Wizard”(Nájdený nový sprievodca inštaláciou). Kliknite na Cancel (Zrušiť) pre začatie inštalačného procesu.
2.Vložte inštalačné CD do CD-ROM mechaniky. Objaví sa inštalačné okno. Kliknite na Inštaluj ovládač. Sprievodca inštaláciou (The InstallShield Wizard) nainštaluje ovládač pre AVerMedia DVD
EZMaker 7.
3.Ak sa Vám podľa inštrukcií doporučuje reštart počítača, vyberte ÁNO.
4.Klinite na Browse CD pre pokračovanie CD.
Kliknite na Exit pre zatvorenie ištalačného okna.
Slovenský
SKY-3

Windows→ Vista
1.Na obrazovke sa objaví okno “Found New Hardware Wizard”(Nájdený nový sprievodca inštaláciou). Kliknite na Cancel (Zrušiť) pre začatie inštalačného procesu.
2.Vložte inštalačné CD do CD-ROM mechaniky.
3.Ak sa zobrazí dialógové okno pre „ Automatické prehrávanie“, zvoľte Run Autorun.exe (Spustiť Autorun.exe).
4.Keď sa zobrazí hlavná obrazovka inštalácie, vyberte položku Install Driver.
5.Ak sa zobrazí dialógové okno „ Nastavenie konta užívateľa“, zvoľte Umožniť pre pokračovanie procesu.
Windows→ 7
1.Vložte inštalačné CD do CD-ROM mechaniky.
2.Ak sa zobrazí dialógové okno pre „ Automatické prehrávanie“, zvoľte Run Autorun.exe (Spustiť Autorun.exe).
3.Keď sa zobrazí hlavná obrazovka inštalácie, vyberte položku Install Driver.
4.Ak sa zobrazí dialógové okno „ Nastavenie konta užívateľa“, zvoľte ÁNO pre pokračovanie procesu.
SKY-4

Inštalačná príručka
5 |
Inštalácia CyberLink PowerDirector a CyberLink |
|
PowerProducer |
|
|
|
|
|
1. |
Po ukončení inštalácie ovládačov môžete |
Slovenský |
|
||
|
nainštalovať CyberLink PowerDirector pre |
|
|
editáciu videa alebo inštalovať CyberLink |
|
|
PowerProducer pre možnosť vytvorenia |
|
|
filmu. Alebo nainstalujte "PhotoNow!" na |
|
|
automatické alebo manuálne uprávy |
|
|
obrázkov. |
|
2. |
Vyberte CD z CD-ROM mechaniky a CD |
|
|
tam vložte znova. Okno inštalácie sa znova |
|
|
objaví na obrazovke. |
|
3. |
Kliknite na Inštaluj teraz a nasledujte |
|
|
inštrukcie na obrazovke pre nainštalovanie |
|
|
softvéru. |
|
4. |
Pre detailnejšie informácie súvisiace s |
|
|
editovaním, prosím nasledujte Cyberlink |
|
|
inštrukcie. |
|
6 Odinštalovanie ovládačov Windows→ XP
1.Kliknite na Start, Settings a potom Control Panel.
2.Dvojklik na ikonu Add/Remove Programs.
3.V zozname programov zvoľte AVerMedia C039 USB Capture Card a kliknite na
Change/Remove alebo Add/Remove.
Poznámka: AVerMedia DVD EZMaker 7 nie je podporovaný pri VIA KT400, KT333 a K266A chipsetom na základných doskách; VIA 8235 a VT6202 chipset funguje pri Windows® XP.
SKY-5

Windows→ Vista / Windows→ 7
1.Kliknite na tlačidlo START a prejdite do části Control Panel (Ovládacie panely).
2.Dvakrát kliknite na ikonu Programs and Features (Programy a funkcie).
3.Vyberte položku AVerMedia C039 USB Capture Card a kliknite na tlačidlo Uninstall/Change (Odinštalovať/zmeniť).
SKY-6

Telepítési útmutató |
|
|
|
|
1 |
A csomag tartalma |
|
|
|
|
|
|
|
de |
|
|
|
tionGui |
|
|
|
Quick |
Installa |
7 |
|
|
→DVD EZMaker |
||
|
|
AVerMedia |
|
|
|
|
C039 |
|
|
|
|
English |
|
|
|
|
Slovenský |
|
|
|
|
Magyar |
|
|
|
|
Slovenčina |
|
|
|
|
Polski |
|
|
|
|
Česky |
|
|
|
|
Български |
|
|
|
|
Русский |
|
|
|
|
Українська |
|
|
|
|
Türkçe |
|
|
|
|
Hrvatski |
|
|
|
AVerMedia→ DVD EZMaker 7 |
Telepítési útmutató |
||
CyberLink DVD Suite CD |
Telepítő CD |
USB kábel |
2 Rendszerkövetelmények
Intel® Pentium®4 2.4 GHz vagy nagyobb vagy azzal megegyező AMD processzor 512MB, vagy több RAM
USB 2.0 port Hangkártya
256 MB-os videokártya CD / DVD író
Minimum 1 GB terület VCD/ 5 GB lemezterület DVD-hez Windows XP SP2 / Windows Vista / Windows 7
Magyar
HUN-1

3 Hardvertelepítés
Az AVerMedia DVD EZMaker 7 csatlakoztatása
Az AVerMedia DVD EZMaker 7 -t csatlakoztassa az alábbi ábra alapján. Hanggal együtti videó felvételhez meg kell határozni az audio bemenet forrását és meg kell győződni róla, hogy a hang NEM némított és a hangerő is megfelelő. Klikkeljen kétszer a sárga hangerő ikonra a tálcán,
vagy a Start gombra, majd a Programok > Kellékek (Accessories) > Szórakozás (Entertainment) útvonalon a hangerőszabályzás (Volume Control) gombra. További információkhoz tekintse át a Volume Control Help Contents segédlet “Adjust the recording volume” c. fejezetét.
Példa
Kamera Videofelvevő
|
|
|
|
|
AV kimeneti csatlakozó |
|
|
|
|
|
|
|
|||||||||
|
|
|
|
|
|
|
|
|
|
|
|
|
|
|
|
|
|
|
|
USB kábel |
USB port |
|
|
|
|
|
|
|
|
|
|
|
|
|
|
|
|
|
|
||||
kábel RCA tartozék) (nem |
|
|
|
kábel RCA tartozék) (nem |
|
|
|
kábel RCA tartozék) (nem |
|
|
|
kábel Video-S tartozék) (nem |
|
|
|
|
|
|
|||
|
|
|
|
|
|
|
|
|
|
|
|
|
|
|
|||||||
|
|
|
|
|
|
|
|
|
|
|
|
|
|
|
|||||||
|
|
|
|
||||||||||||||||||
|
|
|
|
|
|
|
|
|
|||||||||||||
|
|
|
|
|
|
|
|
|
|
|
|
|
|
|
|
|
|
|
|
|
|
|
|
|
|
|
|
|
|
|
|
|
|
|
|
|
|
|
|
|
|
|
|
|
|
|
|
|
|
|
|
|
|
|
|
|
|
|
|
|
|
||||
(Sárga) |
|
|
|
(Piros) |
|
|
|
(Fehér) |
|
|
|
|
|
|
|
|
|
||||
|
|
|
|
|
|
|
|
|
|
|
|
|
|
||||||||
|
|
|
|
|
|
|
|
|
|
|
|
|
|
|
|
|
|
||||
|
|
|
|
|
|
|
|
|
|
|
|
|
|
|
|
|
|
||||
Számítógép
HUN-2

Telepítési útmutató
4 A meghajtó telepítése
AVerMedia DVD EZMaker 7 kártya helyes beszerelése után kapcsolja be a gépet. A rendszer automatikusan megkeresi az új eszközt az újraindítás után. Egyszerűen ugorja át a varázslót és helyezze be a mellékelt telepítő CD-t és telepítse arról drivert
FONTOS FIGYELMEZTETÉS:
A meghajtó telepítése ELŐTT ellenőrizze, hogy a DirectX 9.0c, vagy újabb verziója telepítve legyen. A DirectX legfrissebb verzióját megtalálja a CD-n a DirectX9c mappában.
A CyberLink DVD Suite szoftver csak a driverek komplett telepítése után telepíthető.
Windows→ XP
1.Megjelenik az „Új hardver” varázsló párbeszédpanel. A Mégse gombra kattintva lépjen ki a varázslóból.
2.Helyezze a telepítő CD-t a CD-ROM meghajtóba. A telepítőablak megjelenik. Klikkeljen az Install Driver gombra. A telepítő varázsló telepíti az AVerMedia DVD EZMaker 7 meghajtókat a számítógépre.
3.Amint figyelmeztet a számítógép az újraindításra, válassza az Igen-t
4.Klikkeljen a Browse CD opcióra a CD tartalom megtekintéséhez.
Klikkeljen a Exit opcióra a telepítőablakból történő kilépéshez.
Magyar
HUN-3

Windows→ Vista
1.Megjelenik az „Új hardver” varázsló párbeszédpanel. A Mégse gombra kattintva lépjen ki a varázslóból..
2.Helyezze a telepítő CD-t a CD-ROM meghajtóba.
3.Amikor az “AutoPlay” ablak megjelenik, válassza a Run Autorun.exe parancsot.
4.Amikor a telepítő főoldala megjelenik, válassza az Install Driver -t.
5.Ha a “User Account Control” ablak jelenik meg, válassza az Allow opciót a folyamat folytatásához.
Windows→ 7
1.Helyezze a telepítő CD-t a CD-ROM meghajtóba.
2.Amikor az “AutoPlay” ablak megjelenik, válassza a Run Autorun.exe parancsot.
3.Amikor a telepítő főoldala megjelenik, válassza az Install Driver -t.
4.Ha a “User Account Control” ablak jelenik meg, válassza az Yes (Igen) opciót a folyamat folytatásához.
HUN-4
Telepítési útmutató
5A CyberLink PowerDirector és a CyberLink PowerProducer telepítése.
1.A meghajtók telepítése után telepítse a
CyberLink PowerDirector programot a videoanyagok szerkesztéséhez, vagy telepítse a CyberLink PowerProducer programot filmlemez készítéséhez. Vagy installálja a PhotoNow!-t, hogy automatikusan vagy manuálisan állíthassa a képeket.
2.Vegye ki a telepítő CD-t a CD-ROM meghajtóból és helyezze vissza a telepítő CD-t. Megjelenik a telepítőablak.
3.Kattintson az Install Now-ra és kövesse a képernyőn az utasításokat, hogyan telepítse a szoftvereket
4.További részletes információért a video szerkesztésre vonatkozóan kövesse a CyberLink utasításait
6 Meghajtó eltávolítása Windows→ XP
1.Klikkeljen a Start gombra, majd a Settings beállítások ablakra és a vezérlőpultra (Control Panel).
2.Klikkeljen kétszer az Add/Remove Programs ikonra.
3.A programlistában válassza ki az AVerMedia C039 USB Capture Card elemet és klikkeljen a Change/Remove vagy Add/Remove gombra.
Megjegyzés: Az AVerMedia DVD EZMaker 7 egységhez szükséges a folyamatos szinkronkapcsolat. Jelenleg a VIA KT400, KT333 és a K266A chipkészleteket nem támogatja a rendszer; a VIA 8235 és a VT6202 chipkészlet kompatibilis a Windows® XP rendszerekkel.
Magyar
HUN-5

Windows→ Vista / Windows→ 7
1.Kattintson a Start gombra és válassza a Control Panel-t.
2.Dupla klikk a Programok és Features ikonra.
3.Válassza az AVerMedia C039 USB Capture Card -öt és kattintson az Uninstall/Change gombra.
HUN-6
 Loading...