


AVerTV CaptureHD

A
A
V
V
e
err
T
T
V
V
C
C
a
a
p
ptt
u
urr
e
e
H
H
D
D
Quick Installation Guide
EEnngglliisshh
DDeeuuttsscchh
FFrraannççaaiiss
IIttaalliiaannoo
NNeeddeerrllaannddss
ΕΕλλλληηννι
ι
κκήή
LLiieettuuvviiųų
RRoommâânnăă
EEeessttii
РРууссссккиийй

European Community Compliance Statement
Class B
This product is herewith confirmed to comply with the requirements set out in the
Council Directives on the Approximation of the laws of the Member States relating to
Electromagnetic Compatibility Directive 2004/108/EC.
DISCLAIMER
No warranty or representation, either expressed or implied, is made with respect to the contents of
this documentation, its quality, performance, merchantability, or fitness for a particular purpose.
Information presented in this documentation has been carefully checked for reliability; however, no
responsibility is assumed for inaccuracies. The information contained in this documentation is
subject to change without notice.
In no event will AVerMedia be liable for direct, indirect, special, incidental, or consequential
damages arising out of the use or inability to use this product or documentation, even if advised of
the possibility of such damages.
TRADEMARKS
AVerMedia is registered trademarks of AVerMedia TECHNOLOGIES, Inc. IBM PC is a registered
trademark of International Business Machines Corporation. Macintosh is a registered trademark of
Apple Computer, Inc. Microsoft is a registered trademark and Windows is a trademark of Microsoft
Corporation. DVB is a registered trademark of the DVB Project. All other products or corporate
names mentioned in this documentation are for identification and explanation purposes only, and
may be trademarks or registered trademarks of their respective owners.
COPYRIGHT
© 2009 by AVerMedia TECHNOLOGIES, Inc. All rights reserved. No part of this publication may
be reproduced, transmitted, transcribed, stored in a retrieval system, or translated into any language
in any form by any means without the written permission of AVerMedia TECHNOLOGIES, Inc.
THE MARK OF CROSSED-OUT WHEELED BIN INDICATES THAT THIS PRODUCT MUST NOT BE
DISPOSED OF WITH YOUR OTHER HOUSEHOLD WASTE. INSTEAD, YOU NEED TO DISPOSE OF THE
WASTE EQUIPMENT BY HANDING IT OVER TO A DESIGNATED COLLECTION POINT FOR THE
RECYCLING OF WASTE ELECTRICAL AND ELECTRONIC EQUIPMENT. FOR MORE INFORMATION
ABOUT WHERE TO DROP OFF YOUR WASTE EQUIPMENT FOR RECYCLING, PLEASE CONTACT YOUR
HOUSEHOLD WASTE DISPOSAL SERVICE OR THE SHOP WHERE YOU PURCHASED THE PRODUCT.
IMPORTANT SAFETY INSTRUCTIONS
• Read Instructions - Read all the safety and operating instructions before connecting
and operating your TV tuner to help ensure your own personal safety and to protect
your product from potential damage.
• Retain Instructions - Retain all the safety and operating instructions for future
reference.
• Heed Warnings - Adhere to all warnings on the product and the operating instructions.
• Grounding - For continued protection against risk of electric shock and fire, this
accessory should be installed/connected only to the products, such as a computer,
equipped with a three-wire grounding plug, a plug having a third (grounding) pin. This
plug will only fit into a grounding-type power outlet. This is a safety feature. If you are
unable to insert the plug into the outlet, contact your electrician to replace the obsolete

outlet. Do not defeat the safety purpose of the grounding-type plug.
• Lightning - For added protection and to prevent damage due to lightning and power-
line surges, unplug the host system, such as a computer, from the wall power outlet
and disconnect the antenna or cable system. Unplug the host system from the wall
power outlet when left unattended or unused for long periods of time.
• Never insert anything metallic into the TV tuner openings. Doing so may create the
danger of electric shock.
• Openings in the TV tuner cabinet are provided for ventilation. To prevent overheating,
these openings should not be blocked or covered. Avoid using the TV tuner on a bed,
sofa, rug, or other soft surface, as doing so may block the ventilation openings in the
cabinet. If you place the TV tuner in a bookcase or an enclosed space, be sure to
provide adequate ventilation and air flow.
• Power Lines - An outside antenna system should not be located in the vicinity of
overhead power lines or other light or power circuits, or where it can fall into such
power lines or circuits.
• Antenna Installation - When installing an outside antenna system, extreme care
should be taken to prevent it from touching such power lines or circuits, as contact
with them may be fatal.
• Outdoor Antenna Grounding - If an outside antenna is connected to the product,
ensure that the antenna system is grounded so as to provide some protection against
voltage surges and built up static charges. Article 810.21 of the National Electric
Code, ANSI/NFPA No.70, provides information with regard to proper grounding of the
mast and supporting structure, grounding of the lead-in wire to the antenna discharge
unit, size of grounding conductors, location of antenna-discharge unit, connection of
grounding electrodes, and requirements for the grounding electrode.
• Caution for users/installers in Norway - In Norway, there exists a possibility of a
hazardous situation due to voltage difference between the screen of the coaxial cable
of the cable distribution system and the local equipment earth (typically, earthed
chassis of the computer). To avoid any hazards, antenna/cable input connection from
the TV tuner card to a Cable Distribution System must be provided through a galvanic
isolator (not included).
Note: (for CATV system installer) This reminder is provided to call the CATV systems installer's
attention to Section 820.93 of the National Electric Code, ANSI/NFPA 70:2005 (for US/Canada)
and/or EN60728-11:2005 standard (for Europe), which provide guidelines for proper grounding and,
in particular, specify that the coaxial cable shield shall be connected to the grounding system of the
building, as close to the point of cable entry as practical.
Quick Installation Guide
ENG-1
English Deutsch Français Italiano Nederlands Ελληνική Lietuvių Română Eesti Русский
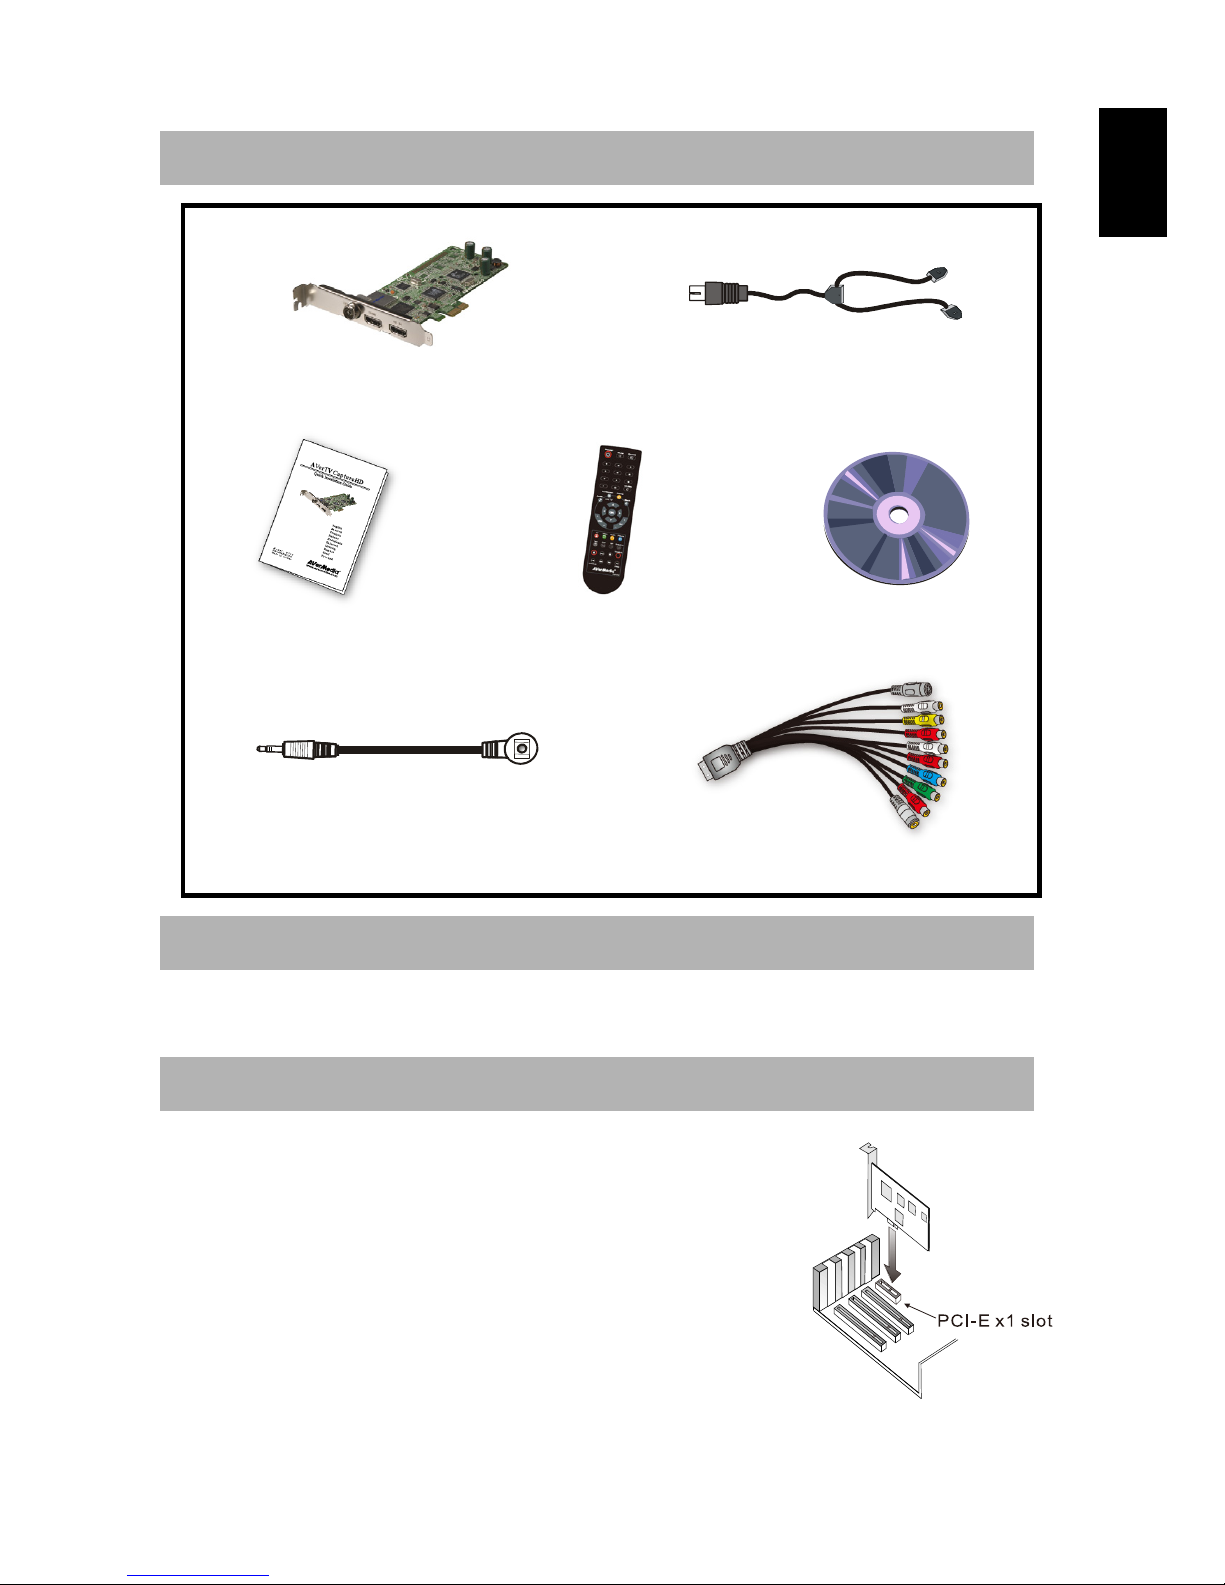
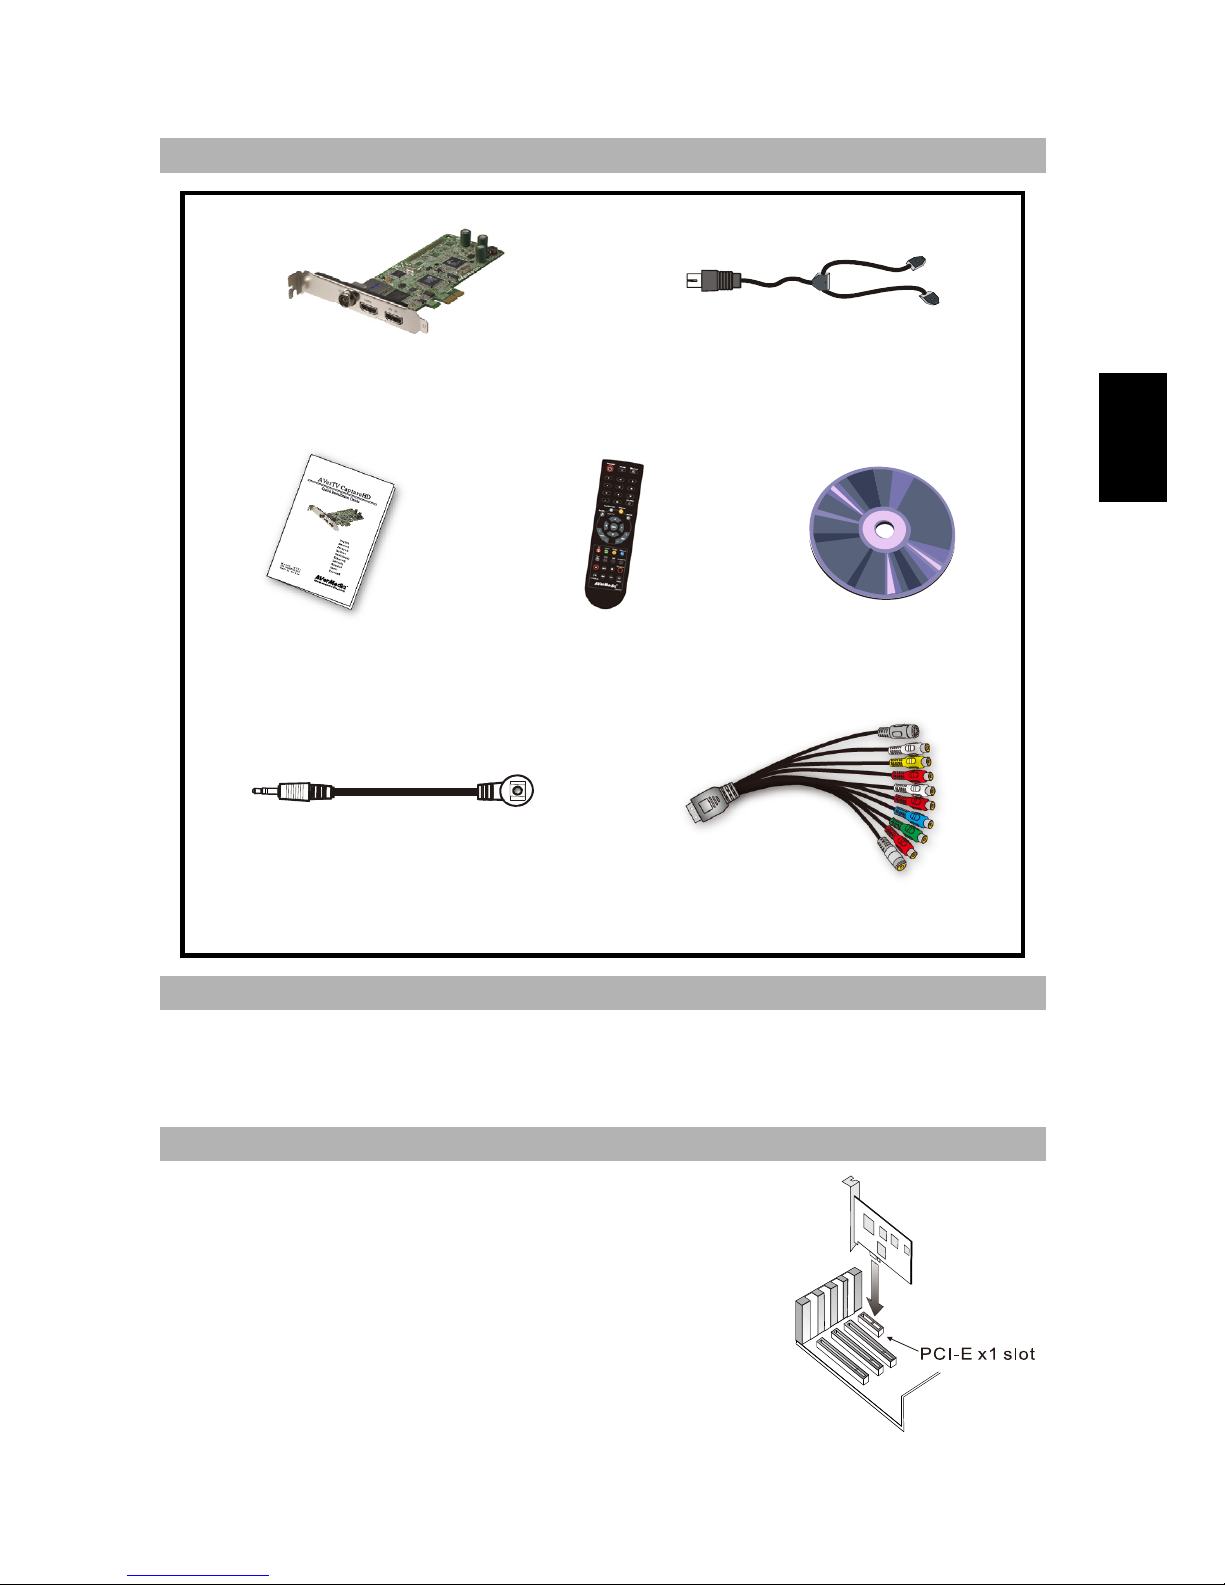
Package Contents
AVerTV CaptureHD FM Radio Antenna
Quick Installation Guide
Remote Control
(Batteries included)
Installation CD
Infrared Sensor Cable 10-in-1 Cable
System Requirements
System requirements are described in detail on the package box. Before installing AVe r T V
CaptureHD, verify that your PC meets the described requirements.
Hardware Installation
Step 1. Installing the TV Tuner Card
1. Turn off the PC.
2. Remove the cover.
3. Insert the tuner card into an empty PCI Express expansion
slot on the motherboard.
4. Replace the cover back.

AVerTV CaptureHD
ENG-2
Step 2. Making the Connections
1 TV Antenna 12 S-Video Cable (not supplied)
2 TV Antenna Port 13 (Red)
3 TV Cable 14 (White)
4 OR 15 (Yellow)
5 FM Radio Antenna 16 Composite Cable (not supplied)
6 HDMI Cable (not supplied) 17 (Blue)
7 Camcorder 18 (Green)
8 Video Game 19 Component Cable (not supplied)
9 VCR/VCD/DVD Player 20 Infrared Sensor Cable
10 10-in-1 Cable 21 Remote Control
11 (Black) 22 Example
NOTE:
1. Video from component input that contains the
Macrovision copy protection cannot be previewed.
2. HDMI source with HDCP (High-Bandwidth Digital
Content Protection) cannot be recorded.
3. You can simultaneously enjoy HDMI or
Component video in one window and watch TV,
composite video or S-video in the other window in
PIP (Picture-in-Picture) / PBP (Picture-by-Picture)
display mode. For more information, please refer to
the user’s manual.

Quick Installation Guide
ENG-3
English Deutsch Français Italiano Nederlands Ελληνική Lietuvių Română Eesti Русский
Installing Drivers and the TV Software Utility
After the device is installed properly, turn on the computer. The system will automatically
detect the new device. Simply skip the wizard, and insert the accompanying installation CD to
install the driver and TV software utility simultaneously.
Installing Drivers and the Application in Windows XP / Windows XP Media
Center Edition
1. The “Found New Hardware Wizard” dialog box will appear. Just click Cancel to skip
the Wizard installation procedures.
2. Place the installation CD into the CD-ROM drive.
3. When the installation main screen appears, choose Install AVer MediaCenter.
4. Click Next to continue the installation process.
5. Read the license agreement and if you agree to the terms, select “I accept the terms of
the license agreement” and then click Next.
6. Choose Complete to install all the necessary softwares, including AVer MediaCenter,
Acrobat Reader, DirectX 9.0c and Drivers. Then click Next. For advanced users, it is
recommended to choose Custom to select the software you want. To choose a different
destination folder, click Browse.
7. In the “InstallShield Wizard” dialog box, if you are instructed to restart your computer,
select Yes. Then click Finish to complete the installation.
Installing Drivers and Application in Windows Vista™ /Windows Vista™
Media Center Edition
1. The “Found New Hardware Wizard” dialog box will appear. Just click Cancel to
skip the Wizard installation procedures.
2. Place the installation CD into the CD-ROM drive.
3. When the “AutoPlay” dialog box appears, select Run Autorun.exe.
4. When the installation main screen appears, choose Install AVer MediaCenter.
5. If the “User Account Control” dialog box appears, select Allow to continue the
process.
6. Click Next to continue the installation process.
7. Read the license agreement and if you agree to the terms, select “I accept the terms
of the license agreement” and then click Next.
8. Choose Complete to install all the necessary softwares, including AVer
MediaCenter, Acrobat Reader, DirectX 9.0c and Driver. Then click Next. For
advanced users, it is recommended that you choose Custom to select the software
you want. To choose a different destination folder, click Browse.
9. Then click Finish to complete the installation.

AVerTV CaptureHD
ENG-4
NOTE:
1. If DirectX 9.0c or above is not installed in your system, usually the installation CD will
automatically install it during the process of installation. Make sure your system has
DirectX 9.0c or above installed so that the TV software utility can function properly.
2. If your system is not equipped with Acrobat Reader, the installation wizard will
automatically be called up during the process of installation.
3. The product does not come with a software DVD decoder. If users can playback DVD or
MPEG-2 video files on the computer, there is no need to install a DVD decoder. However, if
the Decoded Error message appears on the screen, please install the compatible DVD decoder
via the Windows
®
XP Media Center Edition Partners site.
Activating AVer MediaCenter Application
To run the application from the Programs menu, choose Start Æ Programs Æ AVerMedia
Æ AVer MediaCenter Æ AVer MediaCenter.
Uninstalling Application and Drivers
--Windows XP / Windows XP Media Center Edition--
To remove the installed TV software utility from the system, simply choose Start Æ
Programs ÆAVerMedia Æ AVer MediaCenter Æ Uninstaller Æ Remove All Æ
NextÆOK Æ Finish.
-- Windows Vista™ / Windows Vista™ Media Center Edition --
1. To remove the installed TV software utility from the system, simply choose Start Æ All
Programs Æ AVerMedia Æ AVer MediaCenterÆ Uninstaller.
2. When the “User Account Control” dialog box appears, select Allow.
3. Select Remove All Æ NextÆ OK Æ Finish.
Remote Control
After installing drivers and applications, you can use a remote control to turn on/off the
programs, select channels, adjust volume and so on.
Remote Turn-on Function: When the PC is in turn-off mode, users can use remote
control to turn on the PC and the application. To use, just point the remote control at the
receiver and press button to turn on the PC. Then press button again to turn on
the application.

Quick Installation Guide
ENG-5
English Deutsch Français Italiano Nederlands Ελληνική Lietuvių Română Eesti Русский
NOTE:
1. The Remote Turn-On Function may be disabled depending on your PC motherboard.
2. To enable the Remote Turn-On Function, please make sure you’ve enabled the PCI wake-up
function in the BIOS setting. To do so, first enter the BIOS setting; then choose Power Management
Setup and set PCI device to “Power On” (please note that the BIOS setting and descriptions may
vary).
Remote Control Buttons
Button Description
(1)
Turn on/off the application.
(2)
Turn off/on the sound.
(3)
Use numeric buttons to select a channel.
(4)
Display TV in full screen.
(5)
Change between available audio modes.
(6)
Main Screen: Use the arrow button to
navigate all on-screen items. Use OK to
confirm the selection.
PIP Mode: Change size or position of the
selected screen by the arrow buttons.
(7)
Volume up / Volume down.
(8)
Main Screen: A shortcut to the main menu--
“Video”.
Tele tex t Mo de: Jump to the teletext page of
the corresponding color according to this
button.
(9)
Main Screen: A shortcut to the main
menu--“TV”.
Tele tex t Mo de: Jump to the teletext page of
the corresponding color according to this
button.
(10)
View Teletext / Close Caption information.
(11)
View EPG information. (This function is only
available for digital TV)
(12)
Record the current program.
AVerTV CaptureHD
ENG-6
(13)
Play the selected file or temporarily freeze the
playback.
(14)
- Go to the previous item in the playlist.
- Set the time to bring your computer out of
Stand By or Hibernate mode. (This function
is only available for AVerTV 6)
(15)
Move backwards in intervals.
(16)
Skip forward in intervals.
(17)
- Go to the next item in the playlist.
- Set the time to put your computer into Stand
By / Hibernate mode, exit the application or
turn off the computer. (This function is only
available for AVerTV 6)
(18)
Stop the playback, recording, TimeShift, etc.
(19)
- Switch from real-time TV or Radio to
TimeShift mode.
- Temporarily freeze the playback. (This
function is only available for AVerTV 6)
(20)
- Activate the Picture in Picture (PIP)
- Multi-Channel Display function.
(21)
Capture an image or a continuous sequence of
images.
(22)
Main Screen: A shortcut to the main
menu--“Pictures”.
Tele tex t Mo de: Jump to the teletext page of
the corresponding color according to this
button.
(23)
Main Screen: A shortcut to the main
menu--“Music”.
Tele tex t Mo de: Jump to the teletext page of
the corresponding color according to this
button.
(24)
Channel up and channel down.
(25)
Go back to the previous page.
(26)
- Go to the main menu.
- Exit from CI/CA Information dialog. (This
function is only available for the device
supporting CI/CA interface)
(27)
Return to previously accessed channel.

Quick Installation Guide
ENG-7
English Deutsch Français Italiano Nederlands Ελληνική Lietuvių Română Eesti Русский
(28)
Change between available signal sources.
Battery Safety Information:
- Store the batteries in a cool dry place.
- Do not dispose of used batteries in domestic waste. Dispose of batteries at special collection
points or return to point of sale if applies.
- Remove the batteries during long periods of non-use. Always remove exhausted batteries
from the remote control. Battery leakage and corrosion can damage this remote control,
dispose of batteries safely.
- Do not mix old and new batteries.
- Do not mix different types of batteries: alkaline, standard (carbon-zinc) or rechargeable
(nickel-cadmium).
- Do not dispose of batteries in a fire. The batteries may explode or leak.
- Never short circuit the battery terminals.

AVerTV CaptureHD
ENG-8

Schnellinstallationsanleitung
DEU-1
English Deutsch Français Italiano Nederlands Ελληνική Lietuvių Română Eesti Русский
Packungsinhalt
AVerTV CaptureHD FM-Radio-Antenne
Schnellinstallations-
anleitung
Fernbedienung
(einschließlich Batterien)
Installations-CD
Infrarot-Sensorkabel 10 in 1 Kabel
Systemvoraussetzungen
Systemvoraussetzungen sind auf dem Verpackungskarton angegeben. Bevor Sie die AVerTV
CaptureHD installieren, stellen Sie sicher, dass Ihr PC die angegebenen Voraussetzungen
erfüllt.
Hardware Installation
Schritt 1. Installieren der TV-Tunerkarte
1. Schalten Sie den Computer aus.
2.
Entfernen Sie den Gehäusedeckel.
3.
Stecken Sie die TV-Karte in einen freien PCI-Steckplatz Ihres
Mainboards.
4.
Schließen Sie den Gehäusedeckel wieder.

AVerTV CaptureHD
DEU-2
Schritt 2. Anschlüsse
1 TV-Antenne 12 S-Video-Kabel (Nicht beiliegend)
2 TV Antennenanschluss 13 (Rot)
3 TV Kabel 14 (Weiß)
4 Oder 15 (Gelb)
5 FM-Radio-Antenne 16 Composite Kabel (Nicht beiliegend)
6 HDMI Kabel (Nicht beiliegend) 17 (Blau)
7 Camcorder 18 (Grün)
8 Videospielkonsole 19 Komponenten Kabel (Nicht
beiliegend)
9 Videorecorder/ VCD/ DVD-
Spieler
20 Infrarot-Sensorkabel
10 10 in 1 Kabel 21 Fernbedienung
11 (Schwarz) 22 Beispiele
HINWEIS:
1. Video vom Component Eingang, dass den Macrovision Kopierschutz enthält kann nicht in einer
Vorschau gesehen werden.
2. HDMI Quellen mit HDCP (High-Bandwidth Digital
Content Protection) kann nicht aufgenommen
werden.
3. Sie können gleichzeitig HDMI oder Component
Video in einem Fenster und das TV Programm,
Composite oder S-Video in einem anderen Fenster
mit dem PIP (Picture-in-Picture) oder PBP (Pictureby-Picture) Modus sehen. Für mehr Informationen
lesen Sie bitte die Bedienungsanleitung.

Schnellinstallationsanleitung
DEU-3
English Deutsch Français Italiano Nederlands Ελληνική Lietuvių Română Eesti Русский
Installieren von Treibern und dem TV-Anwenderprogramm
Sobald Sie die Karte korrekt eingebaut haben, können Sie ihren Computer einschalten. Das System
wird beim ersten Hochfahren automatisch das neu installierte Gerät finden. Überspringen Sie den
Installationsassistenten und legen die beiliegende Installations-CD ein, um gleichzeitig Treiber und
TV-Anwenderprogramm zu installieren.
Installieren von Treibern und Anwenderprogramm unter Windows XP /
Windows XP Media Center Edition
1. Die Dialogbox “Assistent für das Suchen neuer Hardware” erscheint. Klicken Sie auf
Abbrechen, um den Installationsassistenten zu beenden.
2. Geben Sie die Installations-CD in das CD-ROM-Laufwerk ein.
3. Wenn das Installationsfenster erscheint, wählen Sie Installieren AVer MediaCenter.
4. Klicken Sie auf Weiter um mit dem Installationsprozess fortzufahren.
5. Lesen Sie bitte die Lizenzbestimmungen und wenn Sie diesen zustimmen, wählen Sie
„Ich akzeptieren die Lizenzbestimmungen“ und klicken dann auf Weiter.
6. Wählen Sie Vollständig um alle benötigten Softwarekomponenten zu installieren,
inclusive AVer MediaCenter, Acrobat Reader, DirectX 9.0c und Treiber. Dann
klicken Sie auf Weiter. Erfahrenen Anwendern wird empfohlen, Individuell anzuklicken
und so die gewünschte Software auszuwählen. Um ein anderes Installationsverzeichnis zu
wählen, klicken Sie auf Durchsuchen.
7. Wenn Sie in der Dialogbox “Installationsassistent” angewiesen werden, den Computer
neu zu starten, klicken Sie auf Ja. Klicken Sie dann auf Beenden, um mit der Installation
fortzufahren.
Installieren von Treibern und Anwenderprogramm unter Windows Vista™ /
Windows Vista™ Media Center Edition
1. Die Dialogbox “Assistent für das Suchen neuer Hardware” erscheint. Klicken Sie auf
Abbrechen, um den Installationsassistenten zu beenden.
2. Geben Sie die Installations-CD in das CD-ROM-Laufwerk ein.
3. Wenn die “AutoPlay” Anwendung erscheint, wählen Sie Run Autorun.exe.
4. Wenn das Installationsfenster erscheint, wählen Sie Installieren AVer MediaCenter.
5. Wenn das “Nutzer Zugangskontrolle” Fenster erscheint, wählen Sie „Zulassen“ um fort
zu fahren.
6. Klicken Sie auf Weiter um mit dem Installationsprozess fortzufahren.
7. Lesen Sie bitte die Lizenzbestimmungen und wenn Sie diesen zustimmen, wählen Sie
„Ich akzeptieren die Lizenzbestimmungen“ und klicken dann auf Weiter.
8. Wählen Sie Vollständig um alle benötigten Softwarekomponenten zu installieren,
inclusive AVer MediaCenter, Acrobat Reader, DirectX 9.0c und Treiber. Dann
klicken Sie auf Weiter. Erfahrenen Anwendern wird empfohlen, Individuell anzuklicken
und so die gewünschte Software auszuwählen. Um ein anderes Installationsverzeichnis zu
wählen, klicken Sie auf Durchsuchen.
9. Klicken Sie dann auf Beenden, um mit der Installation fortzufahren.

AVerTV CaptureHD
DEU-4
HINWEIS:
1. Falls DirectX 9.0c oder eine neuere Version nicht in Ihrem System installiert ist, wird
dieses Programm in der Regel während des Installationsvorgangs automatisch von der
Installations-CD aus installiert. Stellen Sie sicher, dass in Ihrem System DirectX 9.0c
oder eine neuere Version installiert ist, so dass die TV-Software-Utility korrekt
funktionieren kann.
2. Wenn kein Akrobat Reader installiert ist, werden Sie während der Installation gefragt, ob diese
automatisch installieren wollen.
3. Dieses Produkt wird ohne DVD Decoder geliefert. Wenn Sie DVD oder MPEG-2 Filme
auf Ihrem Rechner abspielen können, müssen Sie keinen DVD Decoder installieren.
Wenn jedoch ein Decoder Fehler in Windows® Media Center Edition erscheint, dann
überprüfen Sie bitte auf der MCE Partnerseite, ob Ihr DVD Decoder Windows® Media
Center Edition kompatibel ist.
Aufrufen des AVer MediaCenter-Anwenderprogramms
Um die TV-Applikation aus dem Programm Menü heraus zu starten, klicken Sie auf Start,
wählen Programme, AVerMedia, AVer MediaCenter und klicken dort auf AVer
MediaCenter.
Deinstallation von Anwendung und Treibern
-- Windows XP / Windows XP Media Center Edition --
Um das installierte Programm von Ihrem System zu entfernen, wählen Sie Start Æ
Programme Æ AVerMedia Æ AVer MediaCenter Æ Uninstaller Æ Alles entfernen Æ
Weiter Æ OK Æ Beenden.
-- Windows Vista™ / Windows Vista™ Media Center Edition --
1. Um das installierte Programm von Ihrem System zu entfernen, wählen Sie Start
Æ Alles Programme Æ AVerMedia Æ AVer MediaCenterÆ Uninstaller.
2. Wenn das “Nutzer Zugangskontrolle” Fenster erscheint, wählen Sie „Zulassen“.
3. Wählen Sie Alles entfernen Æ Weiter Æ OK Æ Beenden.
Fernbedienung
Nach Installation der Treiber und Anwendungen können Sie die Fernbedienung verwenden, um
Programme ein- und auszuschalten, Sender auszuwählen, die Lautstärke zu regeln usw.
Anschaltfunktion Fernbedienung: Wenn der PC ausgeschaltet ist, kann der Nutzer über die
Einschalttaste der Fernbedienung den Rechner und das Programm starten. Richten Sie die
Fernbedienung auf den Receiver und drücken Sie die
Taste. Drücken Sie die Taste ein
weiteres Mal, um das Programm zu starten.
HINWEIS:
1. Die Funktion des Anschaltens per Fernbedienung könnte, abhängig vom Motherboard,
deaktiviert sein.

Schnellinstallationsanleitung
DEU-5
English Deutsch Français Italiano Nederlands Ελληνική Lietuvių Română Eesti Русский
2. 2. Um die Fuktion zu aktivieren, vergewissern Sie sich, dass die PCI Aufweckfunktion im Bios
aktiviert ist. Um diese zu aktivieren wählen sie „Power Managment Setup“ im Bios und setzen
sie die PCI Schnittstelle als „Power On“. (Bitte beachten Sie die Anleitung ihres Computers, da
die Einstellungen im Bios unterschiedlich sein können.
Fernbedienungstasten
Taste Beschreibung
(1)
Anwendung ein-/ausschalten
(2)
Schalten Sie den Ton ein/aus.
(3)
Wählen Sie einen TV-Sender.
(4)
Zeigen Sie TV- oder Video-
Vollbildschirm an.
(5)
Wechseln zwischen den verfügbaren
Audiomodi.
(6)
Hauptmenü: Bewegen Sie sich mit den
Pfeiltasten zwischen den Unterpunkten auf
dem Bildschirm. Ihre Auswahl bestätigen
Sie dann mit OK.
PIP (Bild-im-Bild) Modus: Position oder
Größe des ausgewählten Bildfensters ändern Sie
mit den Pfeiltasten.
(7)
Lauter / Leiser.
(8)
Hauptmenü: Direktverbindung zum Menü “Video”.
Teletext-Modus: Springen Sie zur
Teletextseite der entsprechenden Farbe
dieser Schaltfläche.
(9)
Hauptmenü: Direktverbindung zum Menü “TV”.
Teletext-Modus: Springen Sie zur
Teletextseite der entsprechenden Farbe
dieser Schaltfläche.
(10)
Teletext / Closed Caption anzeigen.
(11)
EPG-Informationen anzeigen. (Diese
Funktion ist nur bei digitalem Fernsehen
und Radio nutzbar)
AVerTV CaptureHD
DEU-6
(12)
Aktuelles Programm aufnehmen.
(13)
Abspielen der ausgewählten Datei oder kurzes
Pausieren.
(14)
Zurück zur vorigen Datei in der
Wiedergabeliste.
(15)
In Intervallen zurückspringen.
(16)
In Intervallen vorspringen.
(17)
Zur nächsten Datei auf der
Wiedergabeliste.
(18)
Anhalten von Wiedergabe, Aufnahme,
TimeShift etc.
(19)
Wechseln Sie von Echtzeit-TV- oder
Radio- zum TimeShift-Modus.
(20)
Bild-im-Bild (PIP) / Multi KanalAnzeigefunktion aktivieren.
(21)
Nimmt Einzelbild oder Bildsequenz auf.
(22)
Hauptmenü: Direktverbindung zum Menü “Bilder”.
Teletext-Modus: Springen Sie zur
Teletextseite der entsprechenden Farbe
dieser Schaltfläche.
(23)
Hauptmenü: Direktverbindung zum Menü “Musik”.
Teletext-Modus: Springen Sie zur
Teletextseite der entsprechenden Farbe
dieser Schaltfläche.
(24)
Kanal aufwärts und Kanal abwärts.
(25)
Zurück zur vorherigen Seite.
(26)
Zurück zum Hauptmenü.
(27)
Zurück zum vorher angezeigten Kanal.
(28)
Wechsel zwischen verschiedenen
Signalquellen.

Schnellinstallationsanleitung
DEU-7
English Deutsch Français Italiano Nederlands Ελληνική Lietuvių Română Eesti Русский
DER SICHERE UMGANG MIT BATTERIEN:
- Achtung! Im Lieferumfang befinden sich Batterien. Batterien gehören nicht in den
Hausmüll. Sie werden vom Hersteller, Händler oder deren Beauftragten kostenlos
zurückgenommen, um sie einer Verwertung bzw. Entsorgung zuzuführen.
- Wenn Sie Fragen zur Entsorgung haben, wenden Sie sich bitte an Ihre Verkaufsstelle
oder an unseren Service.
- Batterien können brennbare Stoffe enthalten. Bei unsachgemäßer Behandlung können
Batterien auslaufen, sich stark erhitzen, entzünden oder gar explodieren, was Schäden
für Ihr Gerät und ihre Gesundheit zur Folge haben könnte.
- Bitte befolgen Sie unbedingt folgende Hinweise: Vermeiden Sie Hitze und werfen Sie
die Batterien nicht ins Feuer.
- Zerlegen oder verformen Sie die Batterien nicht. Ihre Hände oder Finger könnten
verletzt werden oder Batterieflüssigkeit könnte in Ihre Augen oder auf Ihre Haut
gelangen. Sollte dies passieren, spülen Sie die entsprechenden Stellen mit einer großen
Menge klaren Wassers und informieren Sie umgehend Ihren Arzt.
- Vermeiden Sie starke Stöße und Erschütterungen.
- Entfernen Sie die Batterie aus der Fernbedienung, wenn diese über einen längeren
Zeitraum nicht benutzt wird.

AVerTV CaptureHD
DEU-8
Guide d’installation rapide
FRA-1
English Deutsch Français Italiano Nederlands Ελληνική Lietuvių Română Eesti Русский
Contenu de l’emballage
AVerTV CaptureHD Antenne de radio FM
Guide d’installation rapide
Télécommande
(Piles incluses)
Cédérom d’installation
Câble sonde infrarouge
Câble 10-en-1
Configuration système requise
La configuration système requise est décrite en détails sur la boîte de l’emballage. Avant
d’installer AVerTV CaptureHD, vérifiez que votre ordinateur possède la configuration requise
donnée.
Installation du matériel
Etape 1. Installation de la carte tuner TV
1. Mettez votre ordinateur hors tension.
2. Retirez le couvercle du boîtier.
3. Insérez la carte tuner dans le port PCI-E de la carte mère.
4. Replacez le couvercle.

AVerTV CaptureHD
FRA-2
Etape 2. Les connexions
1 Antenne TV 12 Câble S-vidéo (non fourni)
2 Port d'antenne TV 13 (Rouge)
3 Câble TV 14 (Blanc)
4 OU 15 (Jaune)
5 Antenne de radio FM 16 Câble Composite (non fourni)
6 Câble HDMI (non fourni) 17 (Bleu)
7 Camescope 18 (Vert)
8 Jeux vidéo 19 Câble composant (non fourni)
9 Joueur du Magnétoscope VCD/
DVD
20 Câble sonde infrarouge
10 Câble 10-en-1 21 Télécommande
11 (Noir) 22 Example
REMARQUE:
1. Les vidéos importées à partir de l'entrée composante ne pourront pas être prévisualisées si elles
sont protégées par le système d'anti-piratage Macrovision.
2. Les sources HDMI avec HDCP (Protection des
Données Numériques) ne pourront pas être
enregistrées.
3. La fonction PIP (Picture in Picture) / PBP (Picture
by Picture) vous permet de regarder simultanément
une vidéo provenant d'une source HDMI ou
composante dans une première fenêtre et, dans
une autre fenêtre, vous pourrez regarder la TV, ou
une vidéo provenant d'une source vidéo
composite/s-vidéo. Pour plus d'informations, merci de vous référer au manuel d'utilisation.

Guide d’installation rapide
FRA-3
English Deutsch Français Italiano Nederlands Ελληνική Lietuvių Română Eesti Русский
Installation des pilotes et du logiciel utilitaire TV
Une fois la carte correctement installée, mettez l’ordinateur sous tension. Le système détectera
automatiquement le nouveau périphérique. Passez simplement l’assistant, et insérez le CD
d’installation fourni pour installer simultanément le pilote et l’utilitaire de logiciel TV.
Installation des pilotes et Application sous Windows XP / Windows XP
Media Center Edition
1. La boîte de dialogue “Assistant du nouveau matériel trouvé” apparaît. Cliquez
simplement sur Annuler pour passer les procédures d’installation de l’assistant.
2. Placez le cédérom d’installation dans le lecteur de CD-ROM.
3. Lorsque l’écran d’installation apparaît, choisissez Installer AVer MediaCenter.
4. Cliquez sur Suivant pour poursuivre le processus d’installation.
5. Lisez l’accord de licence et si vous êtes d’accord avec ses termes, sélectionnez
« J’accepte les termes de l’accord de licence » et cliquez ensuite sur Suivant.
6. Choisissez Complète pour installer tous les composants nécessaires, AVer MediaCenter,
Acrobat Reader, DirectX9.0c et les Drivers. Cliquez ensuite sur Suivant. Pour les
utilisateurs expérimentés, il est recommandé de choisir « Personnalisé » pour sélectionner
les composants désirés. Pour choisir un répertoire de destination différent, cliquez sur
Parcourir.
7. Dans la boîte de dialogue “Assistant InstallShield ”, si vous êtes invité à redémarrer votre
ordinateur, sélectionner Oui. Puis cliquez sur Terminer pour achever l’installation.
Installation des pilotes et Application sous Windows Vista™ / Windows
Vista™ Media Center Edition
1. La boîte de dialogue “Assistant du nouveau matériel trouvé” apparaît. Cliquez
simplement sur Annuler pour passer les procédures d’installation de l’assistant.
2. Placez le cédérom d’installation dans le lecteur de CD-ROM.
3. Lorsque la boîte de dialogue “AutoPlay” apparaît, sélectionnez Run Autorun.exe.
4. Lorsque l’écran d’installation apparaît, choisissez Installer AVer MediaCenter.
5. Si la boîte de dialogue “Paramètres du Compte Utilisateur” apparaît, choissisez
“Autoriser” pour continuer la procedure.
6. Cliquez sur Suivant pour poursuivre le processus d’installation.
7. Lisez l’accord de licence et si vous êtes d’accord avec ses termes, sélectionnez
« J’accepte les termes de l’accord de licence » et cliquez ensuite sur Suivant.
8. Choisissez Complète pour installer tous les composants nécessaires, AVer MediaCenter,
Acrobat Reader, DirectX9.0c et les Drivers. Cliquez ensuite sur Suivant. Pour les
utilisateurs expérimentés, il est recommandé de choisir « Personnalisé » pour sélectionner
les composants désirés. Pour choisir un répertoire de destination différent, cliquez sur
Parcourir.
9. Puis cliquez sur Terminer pour achever l’installation.

AVerTV CaptureHD
FRA-4
REMARQUE:
1. Si DirectX 9.0c ou supérieur n’est pas installé sur votre système, le cédérom l’installera
automatiquement pendant le processus d’installation. Assurez-vous que votre système possède
DirectX 9.0c ou supérieur installé pour que le logiciel utilitaire de télévision puisse fonctionner
correctement.
2. Si votre système n’est pas équipé d’Acrobat Reader, le wizard d’installation sera
automatiquement activé au cours de la procédure d’installation.
3. Le produit n’est pas fourni avec un décodeur DVD. Si l’utilisateur peut lire des DVD et des fichiers
vidéo MPEG-2 sur son ordinateur, il n’est pas nécessaire d’installer un décodeur DVD. Cependant,
si le message Erreur de décodage apparaît sur l’écran, veuillez installer le décodeur DVD
compatible par le site Windows
®
XP Media Center Edition Partners.
Activation de l’Application AVer MediaCenter
Pour lancer l’application depuis le menu Programmes, cliquez sur Start, pointez sur
Programmes, choisissez AVerMedia, AVer MediaCenter et cliquez ensuite sur
AVer MediaCenter.
Désinstallation de l’application et des pilotes
-- Windows XP / Windows XP Media Center Edition --
Pour désinstaller le logiciel TV de votre système, choisissez simplement Démarrer Æ
Programmes ÆAVerMedia Æ AVer MediaCenter Æ Désinstaller Æ Supprimer ToutÆ
SuivantÆ OK Æ Terminer.
--Windows Vista™ / Windows Vista™ Media Center Edition --
1. Pour désinstaller l’application TV installée de votre système, choisissez
simplement Démarrer Æ Tous les programmes Æ AVerMedia Æ AVer
MediaCenter Æ Désinstaller.
2. Lorsque la fenêtre “Paramètres du Compte Utilisateur” apparaît, choisissez
Autoriser.
3. Choisissez simplement Supprimer ToutÆ SuivantÆ OK Æ Terminer.
Télécommande
Après avoir installé les pilotes et les applications, vous pouvez utiliser la télécommande pour
activer/désactiver les programmes, sélectionner les chaînes, ajuster le volume, etc.
Fonction “Power On” télécommandée: Lorsque le PC est éteint, les utilisateurs
peuvent utiliser la télécommande pour allumer le PC à distance et lancer automatiquement
l’application TV. Pour l’utiliser, dirigez simplement la télécommande vers le récepteur
infrarouge et appuyez sur le bouton sur pour allumer le PC. Ensuite, appuyez sur le
bouton pour lancer l’application.
 Loading...