


AVerMedia HD HomeFree Duet
F200
English
Česky
Română
Hrvatski
Ελληνική
Quick Guide
European Community Compliance Statement
Class B
This product is herewith confirmed to comply with the requirements set out in the Council Directives on the Approximation of the laws of the Member States relating to Electromagnetic Compatibility Directive 2004/108/EC.
SafetyLow Voltage Directive 2006/95/EC ErP Directive2009/125/EC
Disclaimer
All the screen shots in this documentation are only example images. The images may vary depending on the product and software version. Information presented in this documentation has been carefully checked for reliability; however, no responsibility is assumed for inaccuracies. The information contained in this documentation is subject to change without notice.
Copyright
©2010 by AVerMedia Technologies, Inc. All rights reserved.
No part of this document may be reproduced or transmitted in any form, or by any means without the prior written permission of AVerMedia Technologies Inc. AVerMedia Technologies Inc. reserves the right to modify its models, including their characteristics, specifications, accessories and any other information stated herein without notice. The official printout of any information shall prevail should there be any discrepancy between the information contained herein and the information contained in that printout.
"AVerMedia" is a trademark (or registered trademark) of AVerMedia Technologies, Inc. Other trademarks used herein for description purpose only belong to each of their companies.
THE MARK OF CROSSED-OUT WHEELED BIN INDICATES THAT THIS PRODUCT MUST NOT BE DISPOSED OF WITH YOUR OTHER HOUSEHOLD WASTE. INSTEAD, YOU NEED TO DISPOSE OF THE WASTE EQUIPMENT BY HANDING IT OVER TO A DESIGNATED COLLECTION POINT FOR THE RECYCLING OF WASTE ELECTRICAL AND ELECTRONIC
EQUIPMENT. FOR MORE INFORMATION ABOUT WHERE TO DROP OFF YOUR WASTE EQUIPMENT FOR RECYCLING, PLEASE CONTACT YOUR HOUSEHOLD WASTE DISPOSAL SERVICE OR THE SHOP WHERE YOU PURCHASED THE PRODUCT.

Important Safety Instructions
1.) Read these instructions.
2.) Keep these instructions.
3.) Pay attention to all warnings.
4.) Follow all instructions.
5.) Do not use this apparatus near water.
6.) Clean only with dry cloth.
7.) Do not block any ventilation openings. Install in accordance with the manufacturer's instructions.
8.) Do not install near any heat sources such as radiators, heat registers, stoves, or other apparatus (including amplifiers) that produce heat.
9.) Do not defeat the safety purpose of the polarized or grounding-type plug. A polarized plug has two blades with one wider than the other. A grounding type plug has two blades and a third rounding prong. The wide blade or the third prong is provided for your safety. If the provided plug does not fit into your outlet, consult an electrician for replacement of the obsolete outlet.
10.) Protect the power cord from being walked on or pinched particularly at plugs, convenience receptacles, and the point where they exit from the apparatus.
11.) Only use the attachments/accessories specified by the manufacturer.
12.) Unplug this apparatus during lightning storms or when unused for long periods of time. 13.) Refer all servicing to qualified service personnel. Servicing is required when the apparatus
has been damaged in any way, such as power-supply cord or plug is damaged, liquid has been spilled or objects have fallen into the apparatus, the apparatus has been exposed to rain or moisture, does not operate normally, or has been dropped.
WARNING
To prevent fire or shock hazard do not expose the unit to rain or moisture. Dangerously high voltages are present inside the unit. Do not open the unit. Refer servicing to qualified personnel only.
Specification
|
Product name |
AVerMedia HD HomeFree Duet |
||||
|
Model name |
F200 |
||||
|
Power |
|
|
|
|
|
|
Power Rating |
5V |
|
, 2A |
||
|
|
|||||
|
Power consumption |
< 5W (USB device not included) |
||||
|
Off Mode |
< 0.5W |
||||
|
Adapter Power |
Input: 100-240V~, 50-60Hz, 0.3A Max. Output: 5V |
|
, 2A |
||
|
|
|||||

Quick Instillation Guide
1 |
Package Contents |
Quick Installation |
Installation CD |
High-Speed |
Power Adaptor |
|
Guide |
Ethernet Cable |
|||
|
|
2Hardware Installation
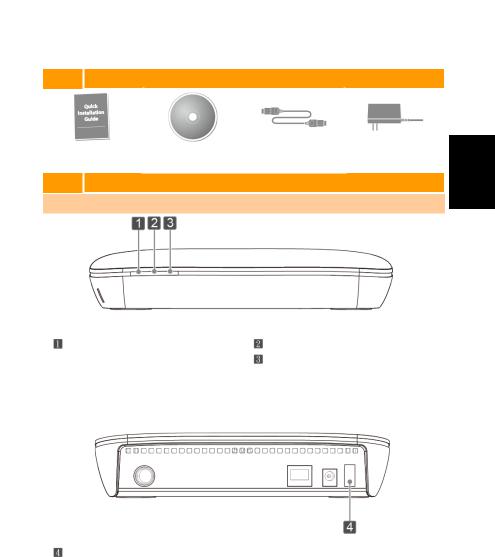
2.1Hardware Overview
Ethernet LED light |
Tuner 1 LED light |
OFF – Power off |
Tuner 2 LED light |
Blinking – Network checking / Network |
OFF – Tuner unused / error |
error / Network not working |
Blinking – Tuner scanning |
ON – Network working |
ON – Tuner streaming |
Power ON/OFF
български Česky Polski Hrvatski Magyar Slovenský English
English-1
Quick Instillation Guide
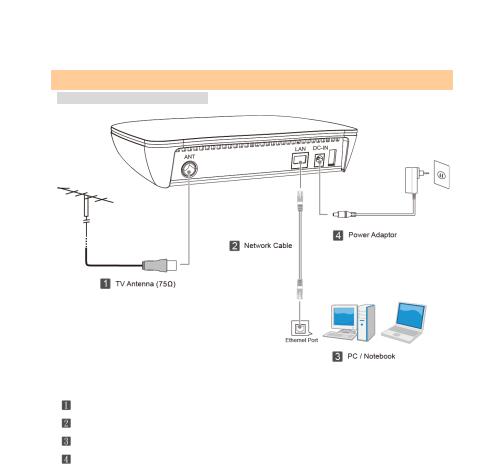
2.2 Making Connections
A. Directly connect to the computer (after well-connected, see 5.1 for IP setup instructions)
TV Antenna
High-Speed Ethernet Cable
PC / Notebook
Power Adaptor
English-2
Quick Instillation Guide
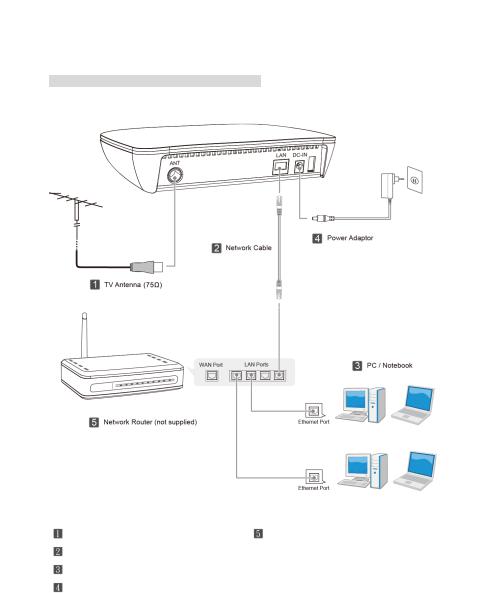
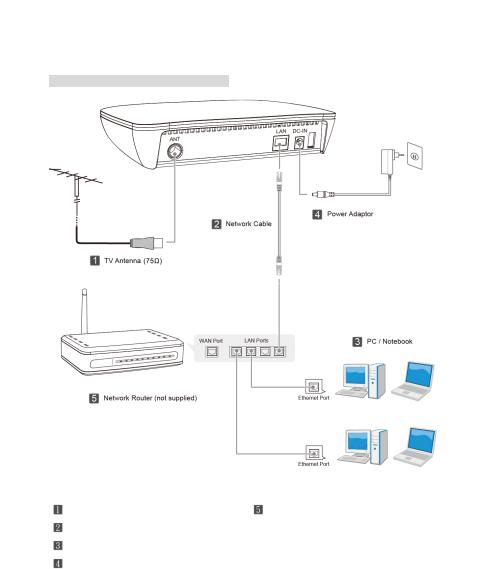
B. Connect to the computer via the network router (after well-connected, see 5.2 for DHCP setup
instructions)
TV Antenna |
Network Router (not supplied) |
High-Speed Ethernet Cable |
|
PC / Notebook |
|
Power Adaptor |
|
English-3
Quick Instillation Guide
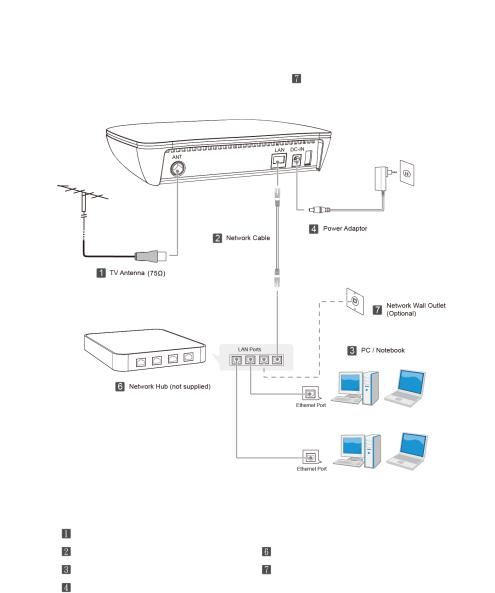
C. Connect to the computer via the network hub |
(If with |
connection, see 5.2 for DHCP setup |
instructions; otherwise, see 5.1 for IP setup instructions)
TV Antenna |
|
High-Speed Ethernet Cable |
Network Hub (not supplied) |
PC / Notebook |
Network Wall Outlet (Optional) |
Power Adaptor |
(for outside network connection) |
English-4

Quick Instillation Guide
3Software Installation
3.1Installing AVerTV 6 and HomeFree Manager
1.Plug in the device.
2.Place the Installation CD into the CD-ROM drive.
3.When the installation main screen appears, choose Install AVerTV.
4.If a windows pops up saying you need to install the required “WinPcap” or “Microsoft Visual C++ 2008 Redistributable –x86”, click OK and follow the instructions on screen to finish the installation.
5.Then click Next to begin the installation of AVerMedia HD HomeFree Duet.
6.Select “I accept the terms of the license agreement” if you agree. Then click Next.
7.Click Install.
8.Click Finish.
zIf DirectX 9.0c or above is not installed in your system, usually the installation CD will automatically install it during the process of installation. Make sure your system has DirectX 9.0c or above installed so that the TV software utility can function properly.
zIf your system is not equipped with Acrobat Reader, the installation wizard will automatically be called up during the process of installation.
zThe product does not come with a software DVD decoder. If users can playback DVD or MPEG-2
video files on the computer, there is no need to install a DVD decoder. However, if the Decoded Error message appears on the screen, please install the compatible DVD decoder via the Windows® XP Media Center Edition Partners site.
4 HomeFree Manager Overview
To open HomeFree Setup Tool, from the Start menu, choose All Programs Æ AVerMedia Æ HomeFree Æ HomeFree Manager. (After scanning, if the device is not found, please check if device is power-on and retry.)
zScan – Choose to rescan the device.
zLanguage – Select the UI language.
zHelp – Go to online help webpage.
zAbout – Check the tool version.
zDevice Info. – Show device information. Click  to see more details.
zFirmware Upgrade – Check the current version of your device firmware or upgrade it. (Please refer
to section 7. Firmware Upgrade problem and solution)
z Network Config. – Configure the Static IP or DHCP.
English-5
Quick Instillation Guide
5Network Setup Instructions
5.1IP Setup
If you connect the device to the computer via the High-Speed Ethernet Cable (Connection A in 2.2) or via the network hub but without outside network connection (Connection C in 2.2), please follow the steps below to finish the IP setup.
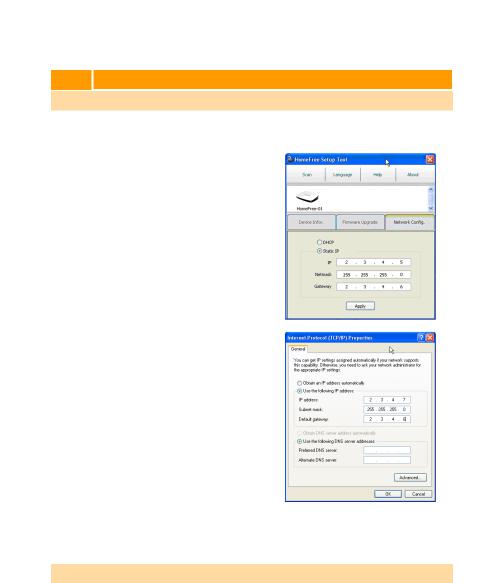
1.Open HomeFree Setup Tool and choose Network Config. tab.
2.Select Static IP option.
3.Enter the values below:*
IP : 2 · 3 · 4 · 5
Netmask : 255 · 255 · 255 · 0 Gateway : 2 · 3 · 4 · 6
*If you simultaneously use a second AVerMedia HD HomeFree Duet, enter the IP values of the second device as 2 · 3 · 4 · 8
4.Click Apply.
5.Then, click the Start button and choose
Control Panel.
6.Double-click on the Network Connections icon  .
.
7.Double-click on the Local Area Connection icon  (the main network connection you are using).
8.Choose Properties.
9.Double-click on the Internet Protocol (TCP/IP).
10.Select Use the following IP address and enter the values below*:
IP address : 2 · 3 · 4 · 7
Subnet mask : 255 · 255 · 255 · 0
Default gateway : 2 · 3 · 4 · 6
*If you simultaneously use a second PC/Notebook, enter the IP values of the second PC/Notebook as 2 · 3 · 4 · 9
11.Click OK.
5.2 DHCP Setup
If you connect the device to the computer via the network router (Connection B in 2.2) or via the network hub with outside network connection (Connection C in 2.2), please follow the steps below to finish the DHCP setup.
English-6
Quick Instillation Guide
1.Open HomeFree Setup Tool and choose Network Config. tab.
2.Select DHCP option.
3.Click Apply.
4.Then, click the Start button and choose
Control Panel.
5.Double-click on the Network Connections icon  .
.
6.Double-click on the Local Area Connection icon  (the main network connection you are using).
7.Choose Properties.
8.Double-click on the Internet Protocol (TCP/IP).
9.Select Obtain an IP address automatically.
10.Click OK.
6Using AVerTV 6
6.1Activating the AVerTV 6 Application
Choose Start ÆPrograms Æ AVerMedia Æ AVerTV 6 Æ AVerTV 6.
Note: For more AVerTV 6 instructions, please refer to the User’s Manual in the Installation CD.
6.2 Uninstalling AVerTV 6 and HomeFree Setup Tool
Choose Start Æ Programs Æ AVerMedia Æ AVerTV 6 Æ Uninstaller ÆYes.
7 Using TFTP for Firmware Upgrade Recovery
Firmware upgrade may fail if upgrade is interrupted for any reason, such as when a power blackout occurs during upgrading procedure. If so, you need the TFTP tool to restore the firmware, so AVerMedia HD HomeFree Duet can function normally. To use TFTP, please do the followings:
English-7
Quick Instillation Guide
1.Download the TFTP tool (tftpd32 standard edition (zip)) from the website: http://tftpd32.jounin.net/tftpd32_download.html
(AVerMedia is not responsible for any third-party software and will have no liability of any kind for your use of such third-party software and make no warranty of any kind with respect to such third-party software, whether included/downloaded in the Product or under AVerMedia’s suggestion.)
2.Download the firmware file “vmlinux.ub” from AVerMedia official website (www.avermedia.com/avertv).
3.Unzip the file to your hard drive.
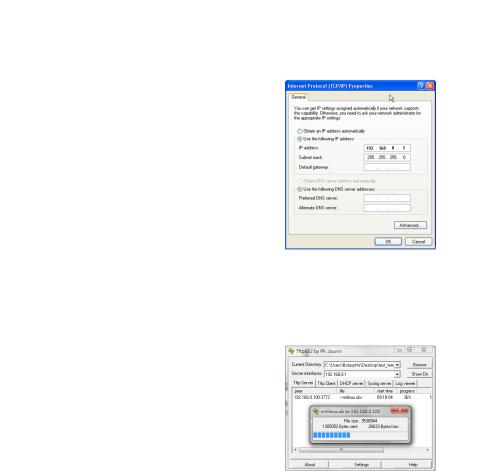
4.Set up your IP address: Start Æ Control Panel Æ Network Connections Æ Local Area Connection Æ PropertiesÆ Internet Protocol (TCP/IP).
5.Select Use the following IP address and enter the values below. Then click OK.
6.Double click on the tftpd32.exe icon  in the unzipped folder.
7.Check if Server interfaces is shown as 192.168.0.1. If not, repeat Step 3 to 5 and recheck.
8.Click Browse and choose the folder where “vmlinux.ub” is located.
9.You can click Show Dir to check if “vmlinux.ub” is in the directory.
10.Then connect AVerMedia HD HomeFree Duet to the computer via the High-Speed Ethernet Cable.
11.Duet will be reset. If you see the Ethernet LED light is solely on, it suggests AVerMedia HD HomeFree Duet is successfully recovered.
12.Turn on the AVerMedia HD HomeFree Duet and wait for a few seconds. The “vmlinux.ub” download from TFTP Server begins. (If the downloading window does not appear, please repeat this step and retry.)
13.AVerMedia HD HomeFree Duet will be reset. If you see the Ethernet LED light is solely on, it suggests AVerMedia HD HomeFree Duet is successfully recovered.
English-8
Stručný průvodce instalací
1 Obsah balení
Stručný průvodce |
Instalační CD disk |
Vysokorychlostní |
Síťový adaptér |
|
instalací |
Ethernet kabel |
|||
|
|
2Instalace Hardware
2.1Představení zařízení
Česky
Ethernet LED dioda
Nesvítí – Přístroj je vypnutý
Bliká – Ověrování sítě/ chyba sítě/ nefunkční síť
Svítí – funkční síť
Tlačítko Zapnout/Vypnout
LED dioda Tuneru 1 LED dioda Tuneru 2
Nesvítí – Tuner není využíván/ chyba Bliká – Tuner vyhledává
Svítí – Tuner streamuje
Česky -1
български Česky Polski

Stručný průvodce instalací
2.2 Propojení
A. Přímé zapojení do počítače (po úspěšném zapojení jděte na 5.1 Nastavení IP)
TV anténa
Vysokorychlostní Ethernet kabel
PC / Notebook
Síťový adaptér
Česky -2
Stručný průvodce instalací
B. Zapojení do počítače přes síťový router (po úspěšném zapojení jděte na 5.2 Nastavení DHCP)
TV anténa |
Síťový router (není součástí balení) |
Vysokorychlostní Ethernet kabel |
|
PC / Notebook |
|
Síťový adaptér |
|
Česky -3
 Loading...