


E9141
First Edition
April 2014
Copyright© 2014 ASUSTeK COMPUTER INC. All Rights Reserved.
No part of this manual, including the products and software described in it, may be reproduced, transmitted, transcribed, stored in a retrieval system, or translated into any language in any form or by any means, except documentation kept by the purchaser for backup purposes, without the express written permission of ASUSTeK COMPUTER INC. (“ASUS”).
Product warranty or service will not be extended if: (1) the product is repaired, modified or altered, unless such repair, modification of alteration is authorized in writing by ASUS; or (2) the serial number of the product is defaced or missing.
ASUS PROVIDES THIS MANUAL “AS IS” WITHOUT WARRANTY OF ANY KIND, EITHER EXPRESS OR IMPLIED, INCLUDING BUT NOT LIMITED TO THE IMPLIED WARRANTIES OR CONDITIONS OF MERCHANTABILITY OR FITNESS FOR A PARTICULAR PURPOSE. IN NO EVENT SHALL ASUS, ITS DIRECTORS, OFFICERS, EMPLOYEES OR AGENTS BE LIABLE FOR ANY INDIRECT, SPECIAL, INCIDENTAL, OR CONSEQUENTIAL DAMAGES (INCLUDING DAMAGES FOR LOSS OF PROFITS, LOSS OF BUSINESS, LOSS OF USE OR DATA, INTERRUPTION OF BUSINESS AND THE LIKE), EVEN IF ASUS HAS BEEN ADVISED OF THE POSSIBILITY OF SUCH DAMAGES ARISING FROM ANY DEFECT OR ERROR IN THIS MANUAL OR PRODUCT.
SPECIFICATIONS AND INFORMATION CONTAINED IN THIS MANUAL ARE FURNISHED FOR INFORMATIONAL USE ONLY, AND ARE SUBJECT TO CHANGE AT ANY TIME WITHOUT NOTICE, AND SHOULD NOT BE CONSTRUED AS A COMMITMENT BY ASUS. ASUS ASSUMES NO RESPONSIBILITY OR LIABILITY FOR ANY ERRORS OR INACCURACIES THAT MAY APPEAR IN THIS MANUAL, INCLUDING THE PRODUCTS AND SOFTWARE DESCRIBED IN IT.
Products and corporate names appearing in this manual may or may not be registered trademarks or copyrights of their respective companies, and are used only for identification or explanation and to the owners’ benefit, without intent to infringe.
Contents |
|
Dual Intelligent Processors 5...................................................................................... |
4 |
5-Way Optimization......................................................................................... |
4 |
TPU (Turbo Processing Unit)........................................................................... |
4 |
EPU (Energy Processing Unit)........................................................................ |
7 |
DIGI+ Power Control....................................................................................... |
8 |
Fan Xpert 3.................................................................................................... |
10 |
Turbo App...................................................................................................... |
12 |
Wi-Fi GO! Card........................................................................................................... |
13 |
ASUS Wi-Fi GO! card specifications............................................................. |
13 |
Installation...................................................................................................... |
14 |
Wi-Fi Engine............................................................................................................... |
15 |
Wi-Fi GO! and Remote GO!....................................................................................... |
17 |
System requirements..................................................................................... |
17 |
ASUS Account Login..................................................................................... |
17 |
Using Wi-Fi GO!............................................................................................. |
19 |
Cloud GO!...................................................................................................... |
22 |
Remote Desktop............................................................................................ |
23 |
File Transfer................................................................................................... |
25 |
Remote Keyboard & Mouse........................................................................... |
26 |
ASUS Media Streamer............................................................................................... |
26 |
System requirements..................................................................................... |
26 |
RF Equipment Notices............................................................................................... |
28 |

Conventions used in this guide
To ensure that you perform certain tasks properly, take note of the following symbols used throughout this manual.
DANGER/WARNING: Information to prevent injury to yourself when trying to complete a task.
CAUTION: Information to prevent damage to the components when trying to complete a task
IMPORTANT: Instructions that you MUST follow to complete a task.
NOTE: Tips and additional information to help you complete a task.

Dual Intelligent Processors 5
ASUS Dual Intelligent Processors 5 combines TPU, EPU, DIGI+ Power Control, Fan Xpert 3, and Turbo App functions to push the system’s performance to its optimal potential. It automatically balances the system’s performance, power saving, levels, and fan settings via the user-friendly AI Suite 3 utility.
5-Way Optimization
The 5-Way Optimization function dynamically optimizes your PC based on real-time usage to provide the best system status. It covers the essential areas such as CPU performance, energy saving, stable digital power, cool and quiet fan control, and includes tailored settings for your apps to ensure your PC is ready for gaming, entertainment, productivity, or just about anything.
5-Way Optimization screen
Click or tap this 5-Way Optimization button to auto-detect and tune the best settings for your system
DO NOT remove your fan during the tuning process.
TPU (Turbo Processing Unit)
TPU allows you to manually adjust the CPU frequency, core ratio, DRAM frequency, and related voltages for enhanced system stability and performance boost.
Refer to the CPU documentation before adjusting CPU voltage settings. Setting a high voltage may damage the CPU permanently and setting a low voltage may lead to an unstable system.
For system stability, the TPU settings are not saved in the BIOS and are not loaded during system bootup. Save your overclocking settings as a TPU profile and manually load this profile after system bootup.
4

Using TPU
CPU Frequency
Click or tap  or
or  to adjust the Base Clock Frequency, CPU Ratio, and CPU Cache Ratio
Click or tap or to select the |
Tick to enable |
|||||
number of cores to adjust |
Group Tuning |
|||||
|
|
|
|
|
|
|
|
|
|
|
|
|
|
|
|
|
|
|
|
|
|
|
|
|
|
|
|
Scroll down then adjust the CPU voltages and DRAM voltages
Click or tap to load the saved profile
|
|
|
|
|
Click or tap to save the |
Click to load the |
Click or tap to apply the |
||
adjustment into a profile |
default values |
adjustments |
||
|
Click or tap to |
undo the adjustments |
||
•Set the CPU Core Ratio item in BIOS to [Auto] before using the CPU Frequency in
TPU. Refer to section Ai Tweaker menu in the BIOS chapter of your motherboard user manual for details.
•The CPU Frequency bars show the status of the CPU cores, which vary with your CPU model.
Voltage
CPU Core Voltage adjustments |
CPU Cache Voltage adjustments |
|||
|
|
|
|
|
|
|
|
|
|
|
|
|
|
|
|
|
|
|
Click to load the |
Click |
to save the adjustment |
|
saved profile |
into a profile |
||
Drag the slider to adjust DRAM, CPU Analog I/O, PCH, and CPU Input voltages
Click to apply the adjustments
Click to undo the adjustments
Click to load the default values
Drag the slider to adjust CPU System Agent, CPU Digital I/O, VTTDDR, and PCHVLX voltages
5
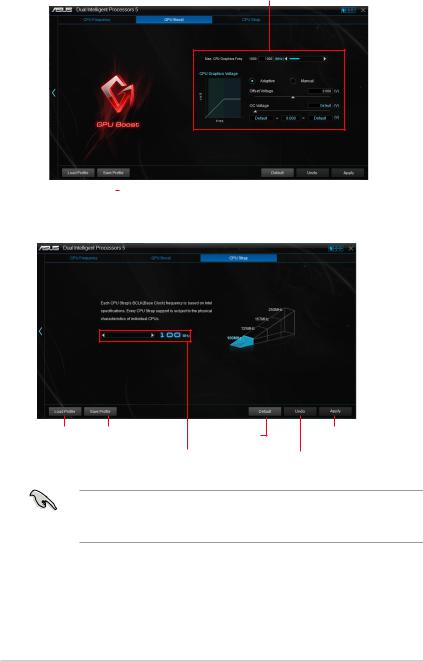
GPU Boost
CPU Graphics Voltage Adjustmets
|
|
|
|
|
|
|
|
|
Click to |
|
|
|
|
|
|
|
|
|
apply the |
|
|
|
|
|
|
|
|
|
adjustments |
|
|
|
|
|
|
|
|||
|
|
|
|
|
|
|
|
|
Click to |
|
|
|
|
|
|
|
|
|
|
Click to load the |
Click to save the |
Click to enable the |
|
|
|
|
|
undo the |
|
saved profile |
adjustment into a profile |
default settings |
|
|
adjustments |
||||
CPU Strap
Click to load the |
Click to save the |
Click to enable the |
saved profile |
adjustment into a profile |
default settings |
Click or tap  or
or  to adjust the
CPU Strap’s BCLK frequency
Click to apply the adjustments
Click to undo the adjustments
•The overclocking result varies with the CPU model and the system configuration.
•We recommend that you set up a better thermal environment to prevent overheating from damaging the motherboard.
6

EPU (Energy Processing Unit)
EPU is a real-time system power-saving chip that automatically detects the current system load and intelligently moderates power usage. It offers a total system-wide energy optimization, reduces fan noise, and extends the lifespan of your hardware components.
Using EPU
Click to configure the settings in Max Power Saving mode
Click to configure the |
Click to configure the settings |
||||
settings in Auto mode |
in High Performance mode |
||||
|
|
|
|
|
|
Click to configure the |
Click to configure the |
|||
settings in Away mode |
Global settings |
|||
|
|
|
|
|
|
|
|
|
|
Tick to select a setting for |
Click to enable the |
Voltage Decrement |
default settings |
Click  or
or  to adjust the configured Max CPU Power
Click  to select a fan profile
Tick to select a setting for Add-on USB ports power
Click to undo the |
Click to apply the |
adjustments |
adjustments |
•When you enable Configured Max CPU Power for advanced energy saving condition, the CPU frequency may display 800 MHz in the Windows® OS information of your computer. However, the true CPU frequency varies depending on the wattage that you manually set. You can adjust the CPU wattage from the lowest base on your preferred default value.
•Configured Max CPU Power may decrease the total power delivery to the CPU and affects the CPU performance under system heavy load. To restore your system to its default settings, reboot your computer.
7

DIGI+ Power Control
ASUS DIGI+ Power Control features the revolutionary and innovative digital VRM and DRAM Voltage controllers. These controllers offers ultra-precise memory and voltage tuning for optimal system efficiency, stability and performance.
The following screens are for reference only. Configuration options varies depending on the motherboard model.
Adjusting the CPU Power
Click or tap to switch between screens
Click or tap to undo |
Click |
|
or tap to |
|
|
||||
the changes |
|
apply the changes |
||
CPU Power Phase Control
Increase the phase number under a heavy system load to get more transient and better thermal performance. Reduce the phase number under a light system load to increase the VRM efficiency.
CPU VRM Switching Frequency
Enables spread spectrum to enhance system stability.
CPU Power Thermal Control
A higher temperature brings a wider CPU power thermal range and extends the overclocking tolerance to enlarge the overclocking potential.
CPU Current Capability
CPU Current Capability provides a wider total power range for overclocking. A higher value brings a wider total power range and extends the overclocking frequence range simultaneously.
CPU Load-line Calibration
It allows you to adjust the voltage range to control the CPU Load-line. Adjust to a high value for system performance or to a low value for power efficiezncy.
CPU Power Duty Control
CPU Power Duty Control adjusts the current of every VRM phase and the thermal conditions of every phase component.
Active Frequency Mode
Active Frequency Mode allows you to enhance the power saving condition of the CPU. Click ON to get a quicker transient response while saving the CPU power.
8
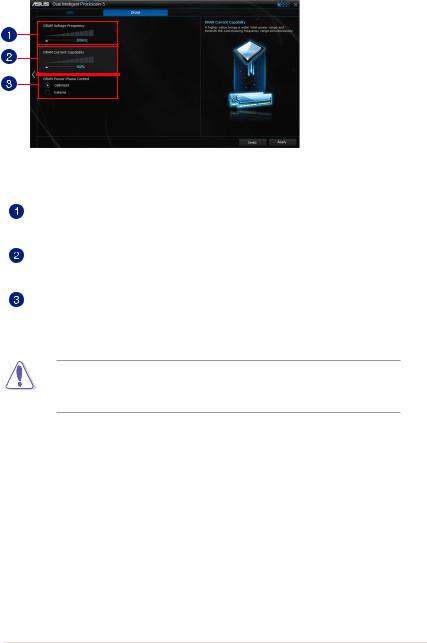
Adjusting the DRAM Power
Click or tap to undo |
|
|
Click or tap to |
|
the changes |
|
|
|
apply the changes |
DRAM Voltage Frequency
Allows you to adjust the DRAM switching frequency to stabilize the system or to increase the overclocking range.
DRAM Current Capability
A higher value brings a wider total power range and extends the overclocking frequency range simultaneously.
DRAM Power Phase Control
Select Extreme for full phase mode to increase system performance or select
Optimized for ASUS optimized phase tuning profile to increase the DRAM power efficiency.
• The actual performance boost may vary depending on your CPU specification.
•Ensure that the cooling modules are properly installed in your motherboard to monitor the thermal conditions.
9
 Loading...