


User Guide.
E12572
May 2017
First Edition
COPYRIGHT INFORMATION
No part of this manual, including the products and software described in it, may be reproduced, transmitted, transcribed, stored in a retrieval system, or translated into any language in any form or by any means, except documentation kept by the purchaser for backup purposes, without the express written permission of ASUSTeK COMPUTER INC. (“ASUS”).
ASUS PROVIDES THIS MANUAL “AS IS”WITHOUT WARRANTY OF ANY KIND, EITHER EXPRESS OR IMPLIED, INCLUDING BUT NOT LIMITED TO THE IMPLIED WARRANTIES OR CONDITIONS OF MERCHANTABILITY OR FITNESS FOR A PARTICULAR PURPOSE. IN NO EVENT SHALL ASUS, ITS DIRECTORS, OFFICERS, EMPLOYEES OR AGENTS BE LIABLE FOR ANY INDIRECT, SPECIAL, INCIDENTAL, OR CONSEQUENTIAL DAMAGES (INCLUDING DAMAGES FOR LOSS OF PROFITS, LOSS OF BUSINESS, LOSS OF USE OR DATA, INTERRUPTION OF BUSINESS AND THE LIKE), EVEN IF ASUS HAS BEEN ADVISED OF THE POSSIBILITY OF SUCH DAMAGES ARISING FROM ANY DEFECT OR ERROR IN THIS MANUAL OR PRODUCT.
Products and corporate names appearing in this manual may or may not be registered trademarks or copyrights of their respective companies, and are used only for identification or explanation and to the owners’ benefit, without intent to infringe.
SPECIFICATIONS AND INFORMATION CONTAINED IN THIS MANUAL ARE FURNISHED FOR INFORMATIONAL USE ONLY, AND ARE SUBJECT TO CHANGE AT ANY TIME WITHOUT NOTICE, AND SHOULD NOT BE CONSTRUED AS A COMMITMENT BY ASUS. ASUS ASSUMES NO RESPONSIBILITY OR LIABILITY FOR ANY ERRORS OR INACCURACIES THAT MAY APPEAR IN THIS MANUAL, INCLUDING THE PRODUCTS AND SOFTWARE DESCRIBED IN IT.
Copyright © 2017 ASUSTeK COMPUTER INC. All Rights Reserved.
LIMITATION OF LIABILITY
Circumstances may arise where because of a default on ASUS’ part or other liability, you are entitled to recover damages from ASUS. In each such instance, regardless of the basis on which you are entitled to claim damages from ASUS, ASUS is liable for no more than damages for bodily injury (including death) and damage to real property and tangible personal property; or any other actual and direct damages resulted from omission or failure of performing legal duties under this Warranty Statement, up to the listed contract price of each product.
ASUS will only be responsible for or indemnify you for loss, damages or claims based in contract, tort or infringement under this Warranty Statement.
This limit also applies to ASUS’ suppliers and its reseller. It is the maximum for which ASUS, its suppliers, and your reseller are collectively responsible.
UNDER NO CIRCUMSTANCES IS ASUS LIABLE FOR ANY OF THE FOLLOWING: (1) THIRD-PARTY CLAIMS AGAINST YOU FOR DAMAGES; (2) LOSS OF, OR DAMAGE TO, YOUR RECORDS OR DATA; OR (3) SPECIAL, INCIDENTAL, OR INDIRECT DAMAGES OR FOR ANY ECONOMIC CONSEQUENTIAL DAMAGES (INCLUDING LOST PROFITS OR SAVINGS), EVEN IF ASUS, ITS SUPPLIERS OR YOUR RESELLER IS INFORMED OF THEIR POSSIBILITY.
SERVICE AND SUPPORT
Visit our multi-language website at: https://www.asus.com/support/
Contents
|
Conventions used ................................................................................................................................. |
6 |
|
Care and safety........................................................................................................................................ |
6 |
1 |
Get your Zen ready! |
|
|
Parts and features.................................................................................................................................. |
8 |
|
Installing a memory card.................................................................................................................... |
9 |
|
Removing a memory card................................................................................................................ |
10 |
|
Installing a nano SIM card................................................................................................................. |
11 |
|
Removing a nano SIM card............................................................................................................... |
12 |
|
Charging your ASUS Phone.............................................................................................................. |
13 |
|
Turning your ASUS Phone on or off.............................................................................................. |
16 |
|
Starting for the first time................................................................................................................... |
17 |
|
Using the touchscreen....................................................................................................................... |
18 |
2 |
Secure and personalize |
|
|
Securing your ASUS Phone......................................................................................... |
20 |
|
Fingerprint ID sensor.......................................................................................................................... |
20 |
|
Lock Screen............................................................................................................................................ |
24 |
|
Zen Home features...................................................................................................... |
28 |
|
Home screen.......................................................................................................................................... |
28 |
|
Quick settings........................................................................................................................................ |
30 |
|
System notifications............................................................................................................................ |
31 |
|
Personalizing your Home screen................................................................................ |
32 |
|
Widgets.................................................................................................................................................... |
32 |
|
Wallpapers.............................................................................................................................................. |
33 |
|
Setting up the date and time........................................................................................................... |
34 |
|
Setting up your ringtone and alert sounds................................................................................ |
35 |
|
Clock......................................................................................................................................................... |
35 |
|
Weather................................................................................................................................................... |
38 |
|
Voice Search........................................................................................................................................... |
39 |
|
Power Saver............................................................................................................................................ |
40 |
|
Setting your ASUS Phone identity............................................................................. |
40 |
|
Keeping your device up-to-date................................................................................ |
41 |
3 |
Keeping in touch |
|
|
Managing contacts...................................................................................................... |
42 |
|
Launching the Contacts app............................................................................................................ |
42 |
|
Contacts Settings................................................................................................................................. |
42 |
|
Setting up your profile....................................................................................................................... |
42 |
|
Adding contacts................................................................................................................................... |
43 |
|
Marking your favorite contacts....................................................................................................... |
43 |
|
Setting up your VIPs............................................................................................................................ |
44 |
|
Importing contacts.............................................................................................................................. |
44 |
|
Exporting contacts.............................................................................................................................. |
44 |
4 |
Fun and entertainment |
|
|
Using a headset........................................................................................................... |
45 |
|
Connecting the audio jack................................................................................................................ |
45 |
|
Google Play Music....................................................................................................... |
46 |
|
Setting up your Google Play Music............................................................................................... |
46 |
5 |
Your precious moments |
|
|
Capture moments........................................................................................................ |
47 |
|
Launching the Camera app.............................................................................................................. |
47 |
|
Camera home screen.......................................................................................................................... |
48 |
|
Photo Locations.................................................................................................................................... |
48 |
|
Camera settings.................................................................................................................................... |
49 |
|
Video settings........................................................................................................................................ |
49 |
|
Others settings...................................................................................................................................... |
49 |
|
Advanced camera features............................................................................................................... |
50 |
|
Using the Photos app.................................................................................................. |
55 |
|
Viewing files from your social network or cloud storage...................................................... |
55 |
|
Viewing the photo location.............................................................................................................. |
55 |
|
Sharing files from the Photos.......................................................................................................... |
55 |
|
Deleting files from the Photos........................................................................................................ |
56 |
|
Editing images...................................................................................................................................... |
56 |
6 |
Work hard, play harder |
|
|
Browser........................................................................................................................ |
57 |
|
Launching the Chrome app............................................................................................................. |
57 |
|
Adding a new tab................................................................................................................................. |
57 |
|
Bookmarking pages............................................................................................................................ |
57 |
|
Clearing the browser cache.............................................................................................................. |
58 |
|
Email............................................................................................................................. |
58 |
|
Setting up email accounts................................................................................................................ |
58 |
|
Adding email accounts...................................................................................................................... |
59 |
|
Setting up a Gmail account.............................................................................................................. |
59 |
|
Do It Later..................................................................................................................... |
60 |
|
Adding to-do tasks.............................................................................................................................. |
60 |
|
Prioritizing to-do tasks....................................................................................................................... |
60 |
|
Deleting to-do tasks............................................................................................................................ |
60 |
|
File Manager................................................................................................................ |
61 |
|
Accessing the internal storage........................................................................................................ |
61 |
|
Accessing the external storage device......................................................................................... |
61 |
|
Accessing Cloud storage................................................................................................................... |
61 |
7 |
Staying connected |
|
|
Wi-Fi.............................................................................................................................. |
62 |
|
Enabling Wi-Fi........................................................................................................................................ |
62 |
|
Connecting to a Wi-Fi network........................................................................................................ |
62 |
|
Disabling Wi-Fi...................................................................................................................................... |
63 |
Bluetooth®................................................................................................................... |
63 |
Enabling Bluetooth®........................................................................................................................... |
63 |
Pairing your ASUS Phone to a Bluetooth device...................................................................... |
64 |
Unpairing your ASUS Phone from the Bluetooth device....................................................... |
64 |
Airplane mode............................................................................................................. |
65 |
Enabling Airplane mode.................................................................................................................... |
65 |
Disabling Airplane mode.................................................................................................................. |
65 |
Mobile Hotspot and Tethering................................................................................... |
66 |
USB Tethering........................................................................................................................................ |
66 |
Mobile Hotspot..................................................................................................................................... |
67 |
Bluetooth Tethering............................................................................................................................ |
68 |
Index
Conventions used
To highlight key information in this manual, some text are presented as follows:
IMPORTANT! This message contains vital information that must be followed to complete a task.
NOTE: This message contains additional information and tips that can help complete tasks.
CAUTION! This message contains important information that must be followed to keep you safe while performing tasks and prevent damage to your ASUS Phone data and components.
Care and safety
Guidelines
Road safety comes first. We strongly recommend not to use your device when driving or operating any type of vehicle.
This device should only be used in environments with ambient temperatures between 0°C (32°F) and 35°C (95°F).
Turn off your device in restricted areas where the use of mobile devices is prohibited. Always obey rules and regulations when in restricted areas, such as, in aircraft, movie theater, in hospitals or near medical equipment, near gas or fuel, construction sites, blasting sites and other areas.
Use only AC adapters and cables approved by ASUS for use with this device. Refer to the rating label on the bottom of your device and ensure that your power adapter complies with this rating.
Do not use damaged power cables, accessories, and other peripherals with your device.
Keep your device dry. Do not use or expose your device near liquids, rain, or moisture.
You can put your device through x-ray machines (such as those used in conveyor belts for airport security), but do not expose the device to magnetic detectors and wands.
The device screen is made of glass. If the glass gets broken, stop using the device and do not touch the broken glass parts. Immediately send device for repair to ASUS-qualified service personnel.
Do not listen at high volume levels for long periods to prevent possible hearing damage.
Disconnect the AC power before cleaning your device. Use only a clean cellulose sponge or chamois cloth when cleaning your device screen.
Send device for repair to ASUS-qualified service personnel only.

Proper disposal
Risk of explosion if battery is replaced by an incorrect type. Dispose of used batteries according to the instructions.
Do not throw your device in municipal waste. This product has been designed to enable proper reuse of parts and recycling. The symbol of the crossed out wheeled bin indicates that the product (electrical, electronic equipment and mercurycontaining button cell battery) should not be placed in municipal waste. Check local regulations for disposal of electronic products.
Do not throw the battery in municipal waste. The symbol of the crossed out wheeled bin indicates that the battery should not be placed in municipal waste.
DO NOT throw the device in fire. DO NOT short circuit the contacts. DO NOT disassemble the device.
NOTE: For FCC and IC e-labelling information, please go to Settings > About > Regulatory information.
Get your Zen ready!
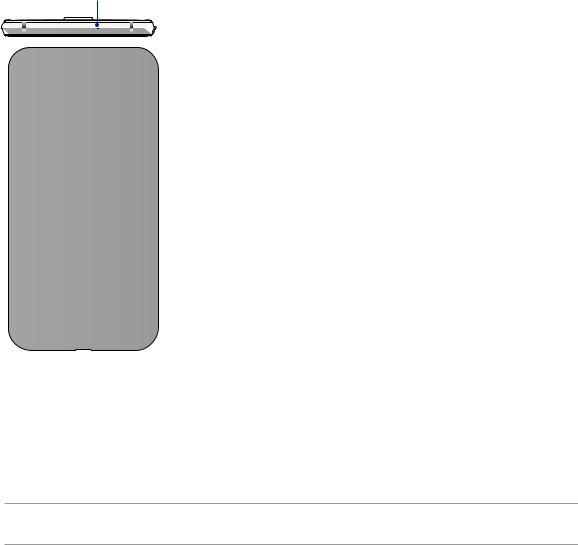
Parts and features
Take a hold of your device and have it up and running in a jiffy.
Microphone
Front camera
Earpiece LED indicator
Proximity
Sensor and light sensor
Nano SIM/ microSD card slot
Back button
Fingerprint sensor/ Home button

 Recent apps

 button
|
|
|
|
|
|
|
|
|
|
|
|
|
|
Headset |
|
|
|
|
Speaker |
|
jack |
|
|
USB / Charger port |
|||
|
||||||
|
|
|
|
Microphone |
||
|
|
|
|
|||
1
|
Flash |
|
|
|
||
Back camera |
|
Volume |
||||
|
||||||
|
|
|
|
|||
|
|
|
||||
|
|
|
|
|
|
|
|
|
|
|
|
|
|
|
|
|
|
|
|
|
|
|
|
|
|
|
|
|
|
|
|
|
|
|
|
|
|
|
|
|
|
Power / Lock button
IMPORTANT! Keep the device, particularly the touch screen, dry all the time. Water or other liquids can cause the touch screen to malfunction.
Chapter 1: Get your Zen ready! |
8 |

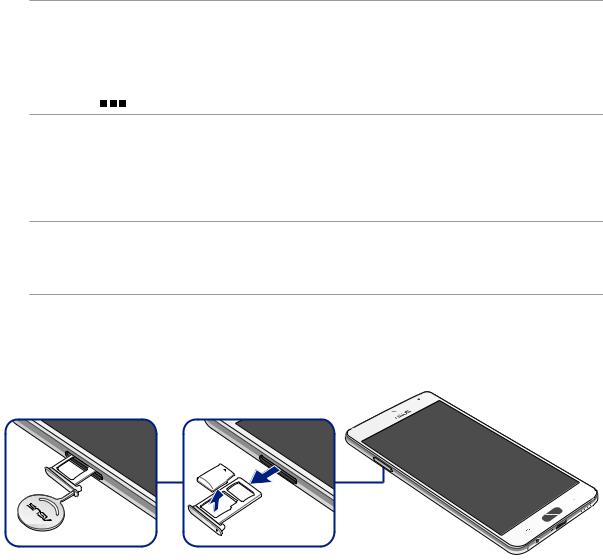
Installing a memory card
Your ASUS Phone supports a microSD™, microSDHC™, and microSDXC™ memory card with up to 128 GB of capacity.
NOTE:
•Some memory cards may not be compatible with your ASUS Phone. Ensure that you use only compatible memory cards to prevent loss of data, damage to your device, or memory card, or both.
•The microSD card is sold separately.
CAUTION! Be extra careful when handling a memory card. ASUS is not responsible for any data loss or damage incurred to your memory card.
To install a memory card:
1.With the phone facing up, insert the tool that came with your phone into the hole on the SIM/ microSD card tray and gently press to open the tray.
CAUTION!
•Be careful not to damage the card slot cover or injure your fingernails when you remove the cover.
•Do not forcibly remove, shear, or distort the card slot cover.
2.Place the microSD card into the tray with the gold contacts facing down (as shown).
3.Gently push the tray back in until it’s securely closed.
Chapter 1: Get your Zen ready! |
9 |
Removing a memory card
CAUTION!
•Be extra careful when handling a memory card. ASUS is not responsible for any data loss or damage incurred to your memory card.
•Eject the memory card properly to safely remove it from device.To eject the memory card, go to
Home > 

 > Settings > Storage >
  .
.
To remove a memory card:
1.With the phone facing up, insert the tool that came with your phone into the hole on the SIM/ microSD card tray and gently press to open the tray.
CAUTION!
•Be careful not to damage the card slot cover or injure your fingernails when you remove the cover.
•Do not forcibly remove, shear, or distort the card slot cover.
2.Remove the microSD card from the tray.
3.Gently push the tray back in until it’s securely closed.
Chapter 1: Get your Zen ready! |
10 |
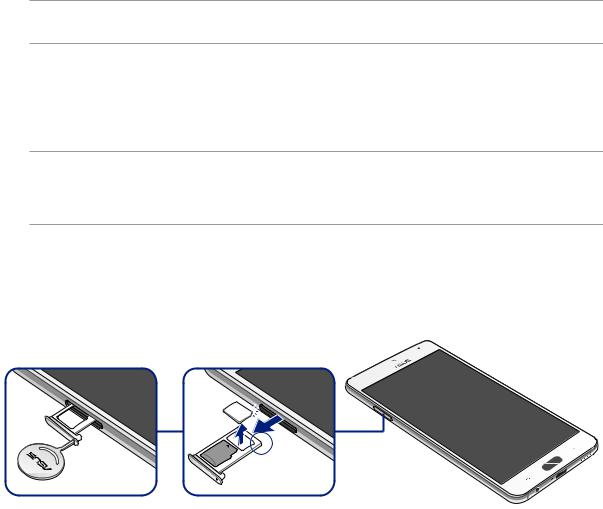
Installing a nano SIM card
Your phone already has a SIM card installed. Your nano SIM card slot supports LTE, WCDMA and EDGE/GSM bands.
NOTE: To prevent connector damage, ensure to use a standard nano SIM card without a SIM adapter or the use of a cutter.
CAUTION! Be extra careful when handling a nano SIM card. ASUS is not responsible for any data loss or damage incurred to your nano SIM card.
To install a nano SIM card:
1.With the phone facing up, insert the tool that came with your phone into the hole on the SIM/ microSD card tray and gently press to open the tray.
CAUTION!
•Be careful not to damage the card slot cover or injure your fingernails when you remove the cover.
•Do not forcibly remove, shear, or distort the card slot cover.
2.Place the nano SIM card into the slot (as shown) with the gold contacts facing down.
3.Gently push the tray back in until it’s securely closed.
Chapter 1: Get your Zen ready! |
11 |
Removing a nano SIM card
CAUTION! Be extra careful when handling a nano SIM card. ASUS is not responsible for any data loss or damage incurred to your nano SIM card.
To remove a nano SIM card:
1.With the phone facing up, insert the tool that came with your phone into the hole on the SIM/ microSD card tray and gently press to open the tray.
CAUTION!
•Be careful not to damage the back cover or injure your fingernails when you remove the cover.
•Do not forcibly remove, shear, or distort the back cover.
2.Remove the nano SIM card from the slot.
3.Gently push the tray back in until it’s securely closed.
Chapter 1: Get your Zen ready! |
12 |

Charging your ASUS Phone
Your ASUS Phone comes partially charged but you must charge it fully before using it for the first time. Read the following important notices and cautions before charging your device.
IMPORTANT!
•For safety purposes, use ONLY the bundled power adapter and cable to avoid damaging your device and prevent the risk of injury.
•Peel off the protective film on the AC power adapter and cable before using it with your device.
•Ensure to plug the AC power adapter to a compatible power outlet.You can plug the AC power adapter to any compatible 100~240 V outlet.
•The output voltage of the AC power adapter for this device is DC 5V, 3A or 9V, 2A.
•When using your ASUS Phone while plugged-in to a power outlet, the power outlet must be near your device and easily accessible.
•Do not use or expose your ASUS Phone near liquids, rain, or moisture.
•Do not use your ASUS Phone near heating equipment or in places where there is likelihood of high temperature.
•Keep your ASUS Phone away from sharp objects.
•Do not place objects on top of your ASUS Phone.
CAUTION!
•While charging, your ASUS Phone can become warm.This is normal, however, if your device becomes unusually hot, disconnect the cable from your device and send the device, including the AC power adapter and cable to an ASUS-qualified service personnel.
•To prevent any damage to your ASUS Phone, AC adapter, or cable. Ensure that the cable, AC adapter, and your device are connected properly before charging.
Chapter 1: Get your Zen ready! |
13 |
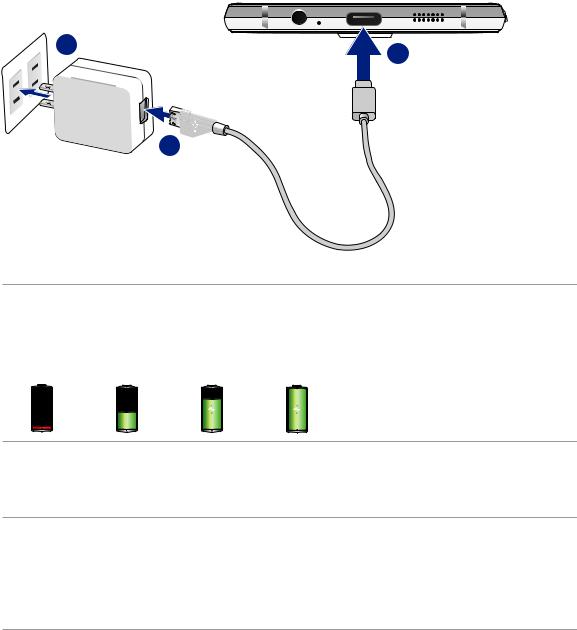
To charge your ASUS Phone:
1.Connect the USB Type-C cable to the power adapter.
2.Connect the USB Type-C cable to your ASUS Phone.
3.Plug the power adapter into a grounded power outlet.
3 |
2 |
|
1
IMPORTANT!
•Charge your ASUS Phone for eight (8) hours before using it in battery mode for the first time.
•The status of battery charge is indicated by the following icons:
Low |
Not Charging |
Charging |
Full |
4.When fully-charged, disconnect the USB cable from your ASUS Phone first before unplugging the AC power adapter from the power outlet.
NOTE:
•You can use your device while charging but it may take longer to fully charge the device.
•Charging your device via USB port of a computer may take longer to fully charge the device.
•If your computer does not provide enough power for charging via USB port, charge your ASUS
Phone using the AC power adapter plugged to a power outlet instead.
Chapter 1: Get your Zen ready! |
14 |
Battery power conservation tips
The battery charge is the lifeline of your ASUS Phone. Here are some battery power conservation tips that helps preserve the power of your ASUS Phone’s battery.
–Close all running apps that are not in use.
–When not in use, press the power button to put the device in sleep mode.
–Activate Power Saving in Power Management settings.
–Decrease brightness of display.
–Keep the speaker volume to a low level.
–Disable Wi-Fi feature.
–Disable Bluetooth feature.
–Disable PlayTo feature.
–Disable GPS.
–Disable the screen auto-rotate feature.
–Disable all auto-sync features on your device.
Chapter 1: Get your Zen ready! |
15 |
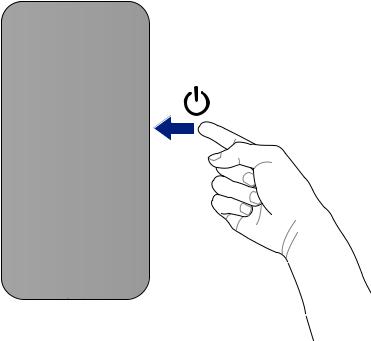
Turning your ASUS Phone on or off
Power on your device
To turn your phone on, press and hold the Power button.
Power off your device
To turn your phone off, press and hold the Power button. Then tap Power off > OK.
Suspend your device
To put your device in sleep mode:
a.Press the Power button to suspend your device.
b.You can also double-tap the blank screen from your device’s home page to suspend the device.
|
Chapter 1: Get your Zen ready! |
16 |
|
Starting for the first time
When you turn your ASUS Phone on for the first time, Setup Wizard will guide you through the setup process. Follow the onscreen instructions to select your language, select input methods, set up your mobile network, Wi-Fi, sync accounts, and configure your location services.
Your wireless device can determine its (and your) physical, geographical location (Location Information) and can associate Location Information with other data. Additionally, certain applications, services and programs are capable of accessing, collecting, storing and using Location Information and disclosing Location Information to others. You should use caution when determining whether or not Location Information should be made available to others and you should review any applicable third party privacy policies before providing access. To limit potential unauthorized access to your Location Information, Verizon Wireless phones are preset to E911 only, which will only allow emergency response personnel to locate you if you dial 9-1-1 from your phone. Other wireless devices (such as Broadband Data Cards or devices without a keypad or user interface) may or may not have such limitations and location settings available. By enabling location settings you are permitting third party access to Location Information through software, widgets or peripheral components you choose to download, add or attach to your wireless device or through web access, messaging capabilities or other means and you are authorizing Verizon Wireless to collect, use and disclose your Location Information as appropriate to provide you with any location services that you enabled.
Use your Google account to set up your device. If you do not have a Google account yet, go ahead and create one.
Google Account
Using a Google Account allows you to fully utilize these Android OS features:
•Organize and see all your information from anywhere.
•Automatically backup all your data.
•Leverage Google services conveniently from anywhere.
Chapter 1: Get your Zen ready! |
17 |

Using the touchscreen
Use these gestures on the touchscreen to launch apps, access some settings, and navigate your ASUS Phone.
Launching apps or selecting items
Do any of the following:
•To launch an app, simply tap on it.
•To select an item such as in File Manager app, simply tap on it.
Moving or deleting items
Do any of the following:
•To move an app or widget, tap and hold then drag it to the location where you want it to be.
•To delete an app or widget from the Home screen, tap and hold then drag it to  Remove.
Moving through pages or screens
Do any of the following:
•Swipe your finger to the left or to the right to switch between screens or to flip through a series of images.
•Scroll your finger up or down to go through web pages or list of items.
Chapter 1: Get your Zen ready! |
18 |

Zooming in
Spread apart your two fingers on the touch panel to zoom in an image in Photo or Maps, or zoom in a web page.
Zooming out
Bring together your two fingers on the touch panel to zoom out an image in Photo or Maps, or zoom out of a web page.
|
Chapter 1: Get your Zen ready! |
19 |
|

2 |
2 |
|
Secure and personalize |
||
|
Securing your ASUS Phone
Use the security features of your ASUS Phone to prevent unauthorized access of information.
Fingerprint ID sensor
Fingerprint ID sensor prevents others from using your ASUS phone without your permission. You can use your fingerprint to unlock your device, access your phone calls and data. When you set up your fingerprint ID, you also need to set up your screen lock method for device startup.
Starting your ASUS phone for the first time
To set up your fingerprint ID when using your ASUS Phone for the first time:
1.Ensure that the fingerprint identification module and your finger are clean and dry.
2.From the Welcome page, follow the on-screen instructions to the Protect your phone page and tick Set up fingerprint.
3.Click NEXT to the About Fingerprint Unlock page, and then click Add fingerprint to choose a screen lock method.
4.Place your finger on the home button of your device, adjust your finger and try to cover different areas of your finger repeatedly until your fingerprint is captured.
5.Click NEXT to complete the setup.
Chapter 2: Secure and personalize |
20 |
Setting up your fingerprint ID from Settings
To set up your fingerprint ID from Settings:
1.Ensure that the fingerprint scanner and your finger are clean and dry.
2.Launch the Settings screen by doing any of the following:
•• Launch Quick settings then tap  .
.
•• Tap 

 > Settings.
3.Select Lock screen.
4.In the next screen, tap Screen lock.
Chapter 2: Secure and personalize |
21 |
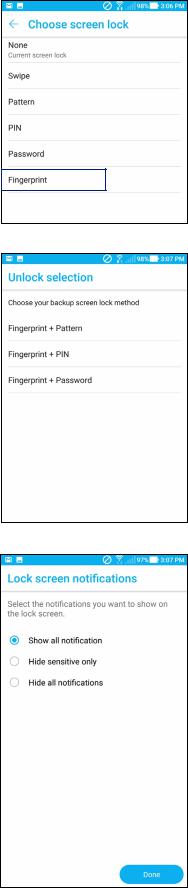
5.In the next screen, tap Fingerprint.
6.Follow the instructions to set up your backup screen lock method.
7.Select how you want to display your notifications on the lock screen, then tap Done.
Chapter 2: Secure and personalize |
22 |
 Loading...