


 Loading...
VA326 series
LCD Monitor
User’s Guide

Table of Contents
Safety Information....................................................................................... |
iii |
||
Maintenance and cleaning.......................................................................... |
iv |
||
1.1 |
Welcome........................................................................................ |
1-1 |
|
1.2 |
List of items................................................................................... |
1-1 |
|
1.3 |
Assemble the monitor.................................................................. |
1-2 |
|
1.4 |
Connect the cables....................................................................... |
1-3 |
|
|
1.4.1 |
Rear of the LCD monitor.................................................. |
1-3 |
1.5 Introduction to Monitor....................................................................... |
1-4 |
||
|
1.5.1 Using the control buttons....................................................... |
1-4 |
|
2.1 |
Adjusting the monitor.................................................................. |
2-2 |
|
3.1 |
OSD (On-screen Display) menu.................................................. |
3-1 |
|
|
3.1.1 |
How to reconfigure.......................................................... |
3-1 |
|
3.1.2 |
Description to the OSD functions.................................... |
3-2 |
3.2 |
Specifications............................................................................... |
3-9 |
|
3.3. |
Troubleshooting (FAQ).............................................................. |
3-10 |
|
3.4 |
List of supported timing sequences......................................... |
3-11 |
|
Copyright © 2016 ASUSTeK COMPUTER INC. All rights reserved.
Except the documents retained by purchasers for the backup purpose, without the explicit written permission of ASUSTeK COMPUTER INC. (hereinafter "ASUS"), no part of this manual may be copied, transmitted, duplicated in any form or by any means, including the products and software described herein, or may be stored in a retrieval system or translated into any language ("ASUS").
The following cases are not covered by the warranty or maintenance services: (1) Repair, modify or alter the product without written authorization of ASUS; (2) product serial number is damaged or missing.
ASUS provides this manual "as is" and provides no warranties, express or implied, including but not limited to the implied warranties or conditions for merchantability or fitness for a particular purpose. In any case, ASUS and its directors, senior officers, employees or agents do not assume any responsibility for any indirect, special, incidental, or consequential damages (including loss of revenue, loss of business, impossible use or loss of data, business interruption, etc.) because of any defects or errors in this manual or the product, even if ASUS has been advised of the possibility of such damages.
The specifications and information contained in this manual are for general reference only, and may be subject to change without notice, and therefore they should not constitute a commitment of ASUS. ASUS does not assume any responsibility for any errors that may exist in this manual (including the products and software described herein).
The product and company names that appear in this manual may respectively are or are not the registered trademarks or copyrights of the respective companies, and only used for marking or illustrative purposes only, and they do not intend to violate the rights of their respective owners.
ii

Safety Information
•Before setting up the monitor, please carefully read all the documentation that is included in the product packaging.
•To prevent fire or shock hazard, do not subject this monitor to rain or moisture.
•Do not open the monitor casing. The monitor has a dangerous high voltage that may result in serious personal injury.
•When a power failure occurs, do not try to repair it yourself. Please contact the technical service personnel or the dealer.
•Prior to use, ensure that all cables of this product are properly connected and the power cord is not damaged. If there is any damage, please contact your dealer immediately.
•The slots and openings in the back and on the top of the casing are for ventilation purposes. Do not block these openings. Unless there is proper ventilation, do not place this product on the top of or near the radiator or heat source.
•This monitor should only use the types of power supply indicated on the label. If you do not know the type of power supply in your home, please contact your dealer or local power company.
•Use a suitable power plug meeting your local power standards.
•Do not overload power strips or extension cords. Overload can cause fires or electric shocks.
•Avoid dust, humidity and temperature extremes. Do not place the monitor in any possibly damp area. Place the monitor on a stable surface.
•In case of thunderstorm or when not in use for a long time, the device's power cord should be unplugged. Doing so can prevent damage to the monitor due to voltage surge.
•Do not insert any foreign objects into or spray any liquid into the opening on the monitor casing.
•In order to ensure normal operation, the monitor should only be used together with the computers listed in UL, whose outlets are properly configured and marked with 100 ~ 240V AC.
•The outlet should be installed near the device and should be easy to use.
•If you encounter any technical problems when using this monitor, please contact the professional services.
•Before connecting the power plug to the power supply, a grounding connection must be provided. When disconnecting the grounding connection, please first make sure to remove the power plug from the power supply, and then disconnect the power.
iii

Maintenance and cleaning
•Before lifting or repositioning your monitor, it is best to unplug the cables and power cord. Use a correct lifting method to place the monitor. When lifting or carrying the monitor, grasp the edge of the monitor. Do not lift the monitor through the base or cable.
•Cleaning. Turn off the power of the monitor and unplug the power cable from it. Use a linen-free and non-abrasive cloth to clean the monitor surface. Wet the cloth with neutral detergent and wipe stains from the monitor.
•Do not use cleaning agents containing alcohol or acetone. Use a special cleaner for LCDs. Do not spray the cleaning agent directly on the screen, or the cleaning agent may get into the monitor and cause an electric shock.
The following phenomena are normal for the monitor:
•Due to the characteristics of fluorescent lamps, the screen may flash when used for the first time. Turn off the power switch, and then turn it on again, confirming that such flashing has disappeared.
•You may find a slightly uneven brightness on the screen, which is related to the desktop pattern you use.
•After the same image is displayed for a few hours, there may be a previous screen image left displayed when switching images. The screen will slowly restore, or you can turn off the power switch for several hours.
•When the screen goes black or flashes, or is unable to continue working, please contact your dealer or the Service Center for repair. Do not repair the screen yourself!
The conventions used in this guide
Warning: This information is intended to prevent injury while you are trying to complete a task.
Caution: This information is intended to prevent damage to the components when you are trying to complete a task.
Important: This information must be followed when you are completing a task.
Note: These tips and additional information are intended to help you complete a task.
iv

Further information
If you need more information or product and software updates, please use the following resources.
1.ASUS website
ASUS’ global site provides updated information on ASUS hardware and software products at http://www.ASUS.com
2.Optional documents
Your dealer may add optional documents for your product packaging. These documents are not a part of the standard package.
v

1.1Welcome
Thank you for purchasing ASUS® LCD monitor!
This is ASUS's latest widescreen LCD monitor. It not only provides a more gorgeous, wider, brighter display, but also enriches your viewing experience through a number of useful functions.
With these functions, this monitor can provide you with a pleasant visual experience!
1.2List of items
Check that the package contains the following items:
LCD Monitor
Quick Start Guide
Warranty card
1x Power cord
1x VGA video cable (optional)
1x DVI cable
1x Audio cable (optional)
1x HDMI cable (optional)
• If any of these items is damaged or missing, please contact your dealer immediately.
ASUS LCD Monitor VA326 Series |
1-1 |
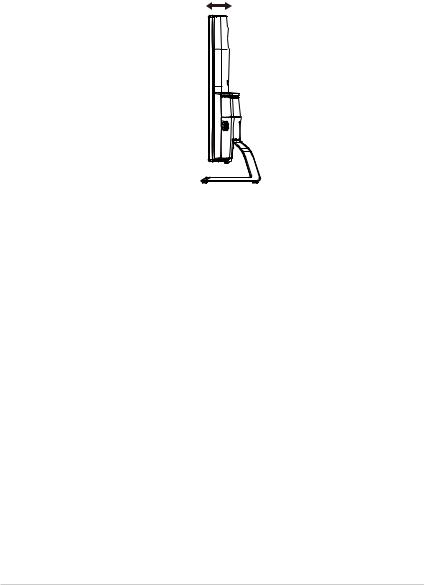
1.3Assemble the monitor
Assemble the monitor:
1.Unpack and remove the monitor, and place it flat on the table.
2.Adjust the monitor to the most suitable angle.
-3 ~ 10
~ 10
1-2 |
Chapter I: Product Introduction |
Loading...