


Index
1. |
English.................................................................................. |
1 |
2. |
Türkçe................................................................................. |
41 |
3. |
Български............................................................................. |
81 |
4. |
Česky................................................................................ |
121 |
5. |
Magyar.............................................................................. |
161 |
6. |
Bahasa Indonesia............................................................. |
201 |
7. |
Italiano.............................................................................. |
241 |
8. |
............................................................................... |
281 |
9. |
Polski................................................................................ |
321 |
10. |
Português......................................................................... |
361 |
11. |
Română............................................................................ |
401 |
12. |
Русский............................................................................... |
441 |
13. |
Srpski................................................................................ |
481 |
14. |
Español............................................................................. |
521 |
15. |
................................................................................... |
561 |
16. |
Tiếng Việt.......................................................................... |
601 |
17. |
.................................................................................641 |
|
18. |
.................................................................................681 |
|

Motherboard installation guide
Motherboard

E4204
First Edition V1
September 2008
Copyright © 2008 ASUSTeK COMPUTER INC. All Rights Reserved.
No part of this manual, including the products and software described in it, may be reproduced, transmitted, transcribed, stored in a retrieval system, or translated into any language in any form or by any means, except documentation kept by the purchaser for backup purposes, without the express written permission of ASUSTeK COMPUTER INC. (“ASUS”).
Product warranty or service will not be extended if: (1) the product is repaired, modified or altered, unless such repair, modification of alteration is authorized in writing by ASUS; or (2) the serial number of the product is defaced or missing.
ASUS PROVIDES THIS MANUAL “AS IS” WITHOUT WARRANTY OFANY KIND, EITHER EXPRESS OR IMPLIED, INCLUDING BUT NOT LIMITED TO THE IMPLIED WARRANTIES OR CONDITIONS OF MERCHANTABILITY OR FITNESS FORAPARTICULAR PURPOSE. IN NO EVENT SHALLASUS, ITS DIRECTORS, OFFICERS, EMPLOYEES ORAGENTS BE LIABLE FORANY INDIRECT, SPECIAL, INCIDENTAL, OR CONSEQUENTIAL DAMAGES (INCLUDING DAMAGES FOR LOSS OF PROFITS, LOSS OF BUSINESS, LOSS OF USE OR DATA, INTERRUPTION OF BUSINESSAND THE LIKE), EVEN IFASUS HAS BEENADVISED OF THE POSSIBILITY OF SUCH DAMAGESARISING FROM ANY DEFECT OR ERROR IN THIS MANUAL OR PRODUCT.
SPECIFICATIONS AND INFORMATION CONTAINED IN THIS MANUALARE FURNISHED FOR INFORMATIONAL USE ONLY,AND ARE SUBJECT TO CHANGE ATANY TIME WITHOUT NOTICE, AND SHOULD NOT BE CONSTRUED AS ACOMMITMENT BYASUS.ASUSASSUMES NO RESPONSIBILITY OR LIABILITY FORANY ERRORS OR INACCURACIES THAT MAYAPPEAR IN THIS MANUAL, INCLUDING THE PRODUCTSAND SOFTWARE DESCRIBED IN IT.
Products and corporate names appearing in this manual may or may not be registered trademarks or copyrights of their respective companies, and are used only for identification or explanation and to the owners’ benefit, without intent to infringe.
Safety information
Electrical safety
•To prevent electrical shock hazard, disconnect the power cable from the electrical outlet before relocating the system.
•When adding or removing devices to or from the system, ensure that the power cables for the devices are unplugged before the signal cables are connected. If possible, disconnect all power cables from the existing system before you add a device.
•Before connecting or removing signal cables from the motherboard, ensure that all power cables are unplugged.
•Seek professional assistance before using an adpater or extension cord. These devices could interrupt the grounding circuit.
•Make sure that your power supply is set to the correct voltage in your area. If you are not sure about the voltage of the electrical outlet you are using, contact your local power company.
•If the power supply is broken, do not try to fix it by yourself. Contact a qualified service technician or your retailer.
Operation safety
•Before installing the motherboard and adding devices on it, carefully read all the manuals that came with the package.
•Before using the product, make sure all cables are correctly connected and the power cables are not damaged. If you detect any damage, contact your dealer immediately.
•To avoid short circuits, keep paper clips, screws, and staples away from connectors, slots, sockets, and circuitry.
•Avoid dust, humidity, and temperature extremes. Do not place the product in any area where it may become wet.
•Place the product on a stable surface.
•If you encounter technical problems with the product, contact a qualified service technician or your retailer.
English
Chapter 1: Quick Start
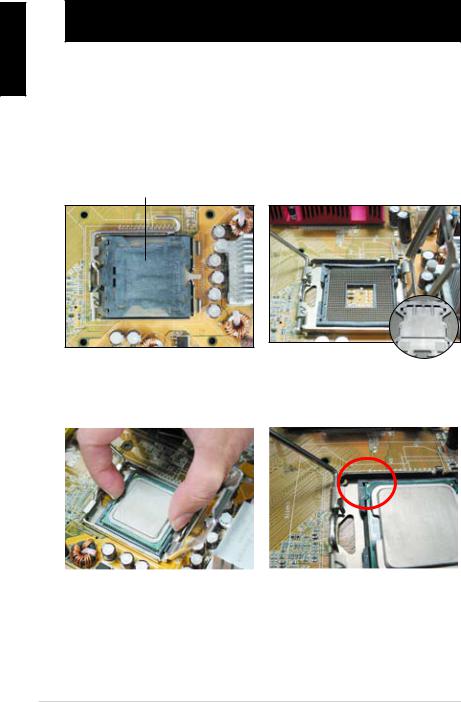
1.1Installing the CPU
1.1.1Intel LGA775 Socket
1.Locate the CPU socket on the motherboard.
Pick and Place Cap (PnP Cap)
2.Release the load lever from the retention tab and lift the load plate. Then push the PnP cap from the load plate window to remove
To prevent damage to the socket pins, do not remove the PnP cap unless you are installing a CPU.
3. |
Position the CPU over the socket. 4. |
Make sure that the gold triangle |
||
|
|
|
|
is on the bottom left corner of the |
|
|
|
|
socket. |
|
|
|
|
|
|
|
|
|
|
Chapter 1: Quick Start

5.Fit the socket alignment key into the CPU notch.
English
6.Close the load plate, then push the load lever until it snaps into the retention tab.
The CPU fits in only one correct orientation. DO NOT force the
CPU into the socket to prevent bending the connectors on the socket and damaging the CPU!
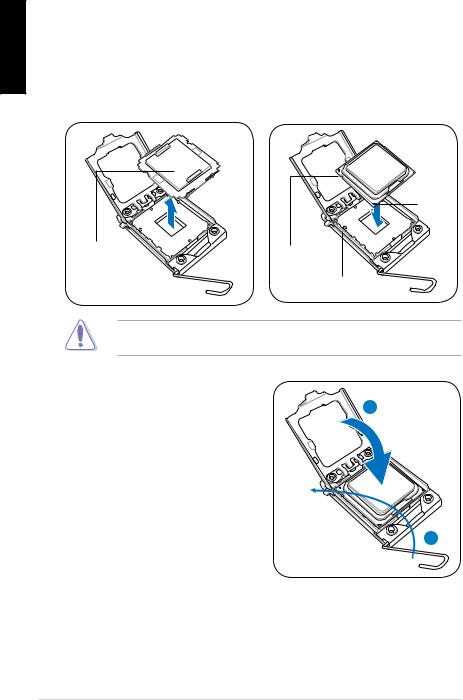
1.1.2Intel LGA1366 Socket
1.Locate the CPU socket on the motherboard.
2.Press the load lever with your thumb (A), then move it to the left
(B)until it is released from the retention tab.
To prevent damage to the socket pins, do not remove the PnP cap unless you are installing a CPU.
Retention tab
A
B
Load lever
3.Lift the load lever in the direction of the arrow to a 135º angle.
4.Lift the load plate with your thumb and forefinger to a 100º angle.
Load plate
4
3
ASUS Motherboard installation guide
English
5. Remove the PnP cap from the CPU 6. Position the CPU over the socket, socket. making sure that the gold triangle is on the bottom left corner of the
socket, and then fit the socket alignment key into the CPU notch.
|
Gold |
|
triangle |
|
mark |
PnP cap |
CPU notch |
|
Alignment key |
The CPU fits in only one correct orientation. DO NOT force the CPU into the socket to prevent bending the connectors on the socket and damaging the CPU!
8. Close the load plate (A), and then push the load lever (B) until it snaps
into the retention tab. |
A |
|
B
Chapter 1: Quick Start
1.1.3AMD AM2 Socket
1. |
Locate the CPU socket on the |
2. |
Press the lever sideways to unlock |
|||
|
motherboard. |
|
|
the socket, then lift it up to a 90º |
||
|
|
|
|
|
angle. |
|
|
|
|
|
|
|
|
|
|
|
|
|
|
|
|
|
|
|
|
|
|
|
|
|
|
|
|
|
English
Make sure that the socket lever is lifted up to 90º angle. Otherwise, the CPU will not fit in completely.
3. Position the CPU above the socket 4. |
When the CPU is in place, push |
|||||
such that the CPU corner with the |
down the socket lever to secure the |
|||||
gold triangle matches the socket |
CPU. The lever clicks on the side tab |
|||||
corner with a small triangle. |
to indicate that it is locked. |
|||||
Carefully insert the CPU into the |
|
|
|
|||
socket until it fits in place. |
|
|
|
|||
|
|
|
|
|
|
|
|
|
|
|
|
|
|
|
|
|
|
|
|
|
The CPU fits in only one correct orientation. DO NOT force the CPU into the socket to prevent bending the connectors on the socket and damaging the CPU!
ASUS Motherboard installation guide
English
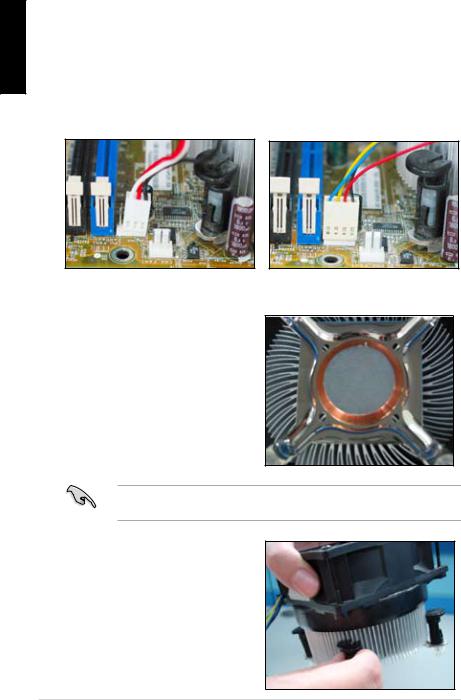
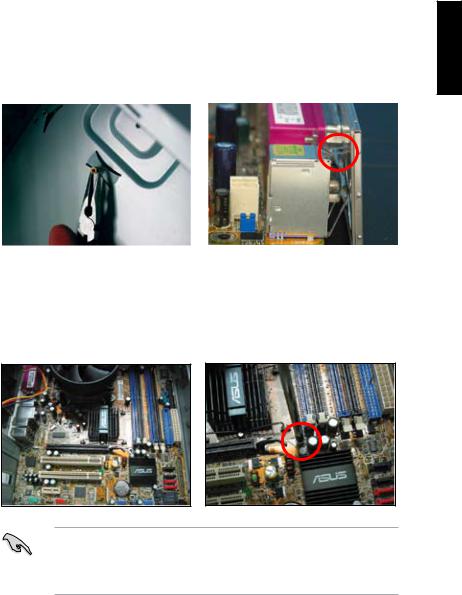
1.2Installing the heatsink and fan
To install the CPU heatsink and fan:
1.Select an Intel-certified or AMD-certified heatsink and fan assembly based on your motherboard. There are 3-pin (left) and 4-pin (right) fan connectors. Only CPU fans with 4-pin connectors supports the ASUS Q-Fan technology.
For Intel-certified heatsink:
2.Some heatsinks will come with pre-applied thermal paste. If so, do not scrape it off and remove the protective film only before installation. If not, before installing the heatsink, apply several drops of thermal paste to the exposed area of the CPU that the heatsink will be in contact with. Make sure that it is spread in an even thin layer.
To prevent contaminating the paste, DO NOT spread the paste with your finger directly.
3.Orient each fastener with the narrow end of the groove pointing outward.
Chapter 1: Quick Start

4. Push down two fasteners at a time 5. |
Connect the CPU fan cable to the |
||||
in a diagonal sequence to secure |
corresponding connector on the |
||||
the heatsink and fan assembly in |
motherboard. |
||||
place. |
|
|
|
|
|
|
|
|
|
|
|
|
|
B |
|
|
|
A |
A |
|
|
|
|
|
|
|
|
||
|
|
B |
|
|
|
|
|
|
|
|
|
|
|
|
|
|
|
English
DO NOT forget to connect the CPU fan connector! Hardware monitoring errors can occur if you fail to plug this connector and we suggest you use an omnidirectional heatsink to gain the maximum heat dissipation area.
For AMD-certified heatsink:
Follow the instructions below to install an AMD-certified heatsink.
1 |
2 |
3 |
4 |
ASUS Motherboard installation guide
English
1.3Installing a DIMM
Unplug the power supply before adding or removing DIMMs or other system components. Failure to do so can cause severe damage to both the motherboard and the components.
To install a DIMM: |
|
2 |
|
1. |
Press the retaining clips outward |
3 |
DDR2 DIMM notch |
|
|||
|
to unlock a DIMM socket by . |
|
|
2. |
Align a DIMM on the socket |
|
1 |
|
such that the notch on the DIMM |
|
|
|
matches the break on the socket. |
1 |
|
3. |
Firmly insert the DIMM into the |
|
|
|
socket until the retaining clips |
|
|
snap back in place and the DIMM is properly seated.
Unlocked retaining clip
•A DDR2 DIMM is keyed with a notch so that it fits in only one direction. DO NOT force a DIMM into a socket to avoid damaging the DIMM.
•To install two or more DIMMs, refer to the user guide bundled in the motherboard package.
•Refer to the user guide for qualified vendor lists of the memory modules.
1.4Installing the motherboard
1.I/O ports differ with motherboards. Use and install the rear I/O shield that comes with the motherboard package only.
Some sharp edges and points might cause physical injury. We recommend you put on cut or puncture resistant gloves before motherboard and I/O shield installation.
10 |
Chapter 1: Quick Start |
2. Install the standoffs to the matched 3. |
The I/O shield edge springs may |
||
screw holes on the metal plate. |
damage the I/O ports. Be cautious |
||
|
|
|
when installing the I/O shield. |
|
|
|
|
|
|
|
|
4.Position the I/O side of the motherboard toward the rear of the chassis and place the motherboard into the chassis.
5.Insert and loosely tighten each screw in a diagonal sequence first.
After all the screws have been inserted, drive the screws until they are finger-tight.
English
•You may remove the metal slot covers for the expansion cards at the back of the chassis before installing the motherboard. For some chassis models, it might be difficult to remove the expansion slot cover after the installation.
•DO NOT over-tighten the screws. Doing so may damage the motherboard.
ASUS Motherboard installation guide |
11 |
English
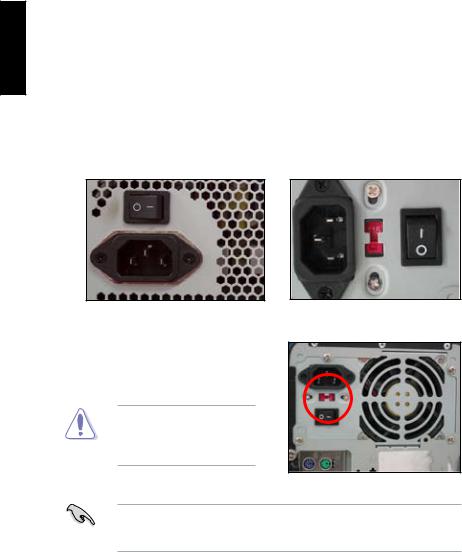
1.5Installing the power supply unit
There are two kinds of commonly-used power supply units. One is with Active
Power Factor Correction (PFC) and the other with passive PFC.
1. Select a power supply unit. |
|
Power supply with active PFC: |
Power supply with passive PFC: |
Active PFC automatically corrects the AC input voltage.
2.If you are using a power supply with passive PFC, adjust to the correctAC input voltage in your area.
Passive PFC requires user to manually adjust the AC input voltage.
Failure to adjust the power supply to the correct AC input voltage will seriously damage the system.
Use power supply units with safety certification only. Using unstable power supply units can damage your motherboard and other components. Refer to the user guide for power supply units that meet the motherboard requirements.
12 |
Chapter 1: Quick Start |

1.6Installing an expansion card
To install an expansion card:
1.Remove the metal slot cover opposite the expansion card slot where you wish to install an expansion card.
2.Install the expansion card and make sure that it is properly seated on the slot.
3.Screw to secure the card on the slot.
4.Repeat the previous steps to install another expansion card.
PCI card |
|
PCIE x16 card |
|
|
|
|
|
|
PCIE x1 card
English
•Refer to the card documentation for the card configuration details, and to the motherboard user guide in case you need to configure any jumpers after installing the expansion card.
•Refer to the motherboard user guide for the instructions of the expansion card signal cable connection.
ASUS Motherboard installation guide |
13 |

English
1.7Installing disk drives
1.7.1PATA optical disk drive
1. Remove the dummy cover and |
2. Align with the screw holes and |
|
slide the optical disk drive into the |
secure the disk drive with screws. |
|
bay. |
|
|
|
|
|
|
|
|
3.Orient and plug the IDE cable into the optical drive. The red stripe on the IDE cable is the pin1 end and should match the dimple marking Pin1 on the optical drive.
IDE cables are dummy-proof. Never force the IDE cable into the connector.
4. |
Connect the 4-pin power cable to |
5. |
Attach the audio cable to the |
|
|
the optical drive. |
|
|
connector on the optical drive. |
|
|
|
|
|
|
|
|
|
|
14 |
Chapter 1: Quick Start |
1.7.2SATA optical disk drive
1. Remove the dummy cover and |
2. Align with the screw holes and |
||
slide the optical disk drive into the |
secure the disk drive with screws. |
||
bay. |
|
|
|
|
|
|
|
|
|
|
|
3.Orient and plug the SATA cable into the optical drive. SATA cables are dummy-proof. Never force a SATA cable into the connector.
4. Connect the SATA power cable to |
5. |
Attach the audio cable to the |
|
the the optical drive. |
|
connector on the optical drive. |
|
|
|
|
|
|
|
|
|
English
ASUS Motherboard installation guide |
15 |
English
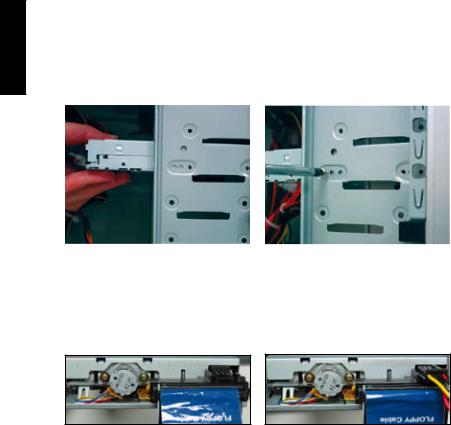
1.7.3 |
Floppy disk drive |
|
|
|
1. Remove the dummy cover and |
2. Align with the screw holes and |
|||
insert the floppy disk drive into the |
secure the disk drive with screws. |
|||
bay. |
|
|
|
|
|
|
|
|
|
|
|
|
|
|
3.Orient and plug the floppy interface cable into the floppy disk drive. The red stripe on the cable is the pin1 end and should match pin1 on the floppy disk drive.
4.Connect the floppy power cable to the connector at the back of the floppy disk drive.
16 |
Chapter 1: Quick Start |

1.7.4PATA hard disk drive
1.Insert the PATA hard disk drive into the bay.
3.Orient and connect the signal cable to the hard disk drive. The red stripe on the cable is the pin1 end. Match the dummy-proof notch and do not force the cable into the connector.
5.Attach the other end of the signal cable to the corresponding slot on the motherboard.
2.Align with the screw holes and secure the disk drive with screws.
4.Connect the 4-pin power cable to the connector at the back of the hard disk drive.
English
ASUS Motherboard installation guide |
17 |

English
Notes for installing PATA hard disk drive
•If your operating system is installed to the hard disk drive controlled by the RAID or other controllers, you have to install the controller driver to the hard disk first.
•The cables are designed with pull tabs. Just easily install the disk drives based on the cable labels. To prevent damaging the pins, pull the cable tabs to disconnect the cable.
•There are two cables forATA IDE disk drives, the newer 80-wire (right) and the older 40-wire (left) cables. For ATA66/100/133 disk drives, only the 80-wire cable can offer a better performance. The
40-wire cables are usually for the optical drives.
•The cable connector is colorcoded. The blue one is for the host connector, and the black/gray one is for the primary/secondary disk drive.
•When connecting two IDE devices, you have to set the jumpers to different position, one in master and one in slave. If you are using an 80-wire cable, you can use the cable select style.
18 |
Chapter 1: Quick Start |

1.7.5SATA hard disk drive
1. |
Insert the SATA hard disk drive into 2. |
Align with the screw holes and |
||
|
the bay. |
secure the disk drive with screws. |
||
|
|
|
|
|
|
|
|
|
|
3. Orient and connect the SATA cable |
4. |
Connect the SATA power cable to |
||
to the hard disk drive. The cable can |
the connector at the back of the |
|||
only fit in one direction. |
|
hard disk drive. |
||
|
|
|
|
|
|
|
|
|
|
|
|
|
|
|
English
Notes for installing SATA hard disk drive
• |
Serial ATA (SATA) interface |
• |
|
|
provides higher data transmission |
|
|
|
speed, and better voltage tolerance. |
|
|
|
The narrow design of the SATA |
|
|
|
cable also solves cabling issues |
|
|
|
and allows better airflow in the |
|
|
|
chassis. |
|
|
|
|
|
|
|
|
|
|
The SATA power cable connector is different from the traditional 4-pin power connector. ASUS
motherboard bundles power adapter cables for you in case your power supply unit does not include this new connector.
ASUS Motherboard installation guide |
19 |
English
1.8Front panel cables
To connect the front panel cables:
•RESET (Reset Switch)
•PLED (Power LED)
•PWRSW (Power Switch)
•IDE_LED (IDE Hard Disk Active LED)
•SPEAKER (Speaker Connector)
20-8 pin front panel connector |
|
|
|
|
|
|
PLED |
SPEAKER |
|||
P5B-E |
PIN1 |
PLED+ |
PLED- |
+5V |
Ground Ground Speaker |
|
|
|
|
|
|
|
PANEL |
|
|
|
|
|
PIN1 |
IDE LED+ |
IDE LED- |
PWR Ground |
Reset Ground |
|
|
||||
|
IDE_LED |
|
RESET |
||
|
|
|
|
PWRSW |
|
|
* Requires an ATX power supply. |
||||
10-1 pin front panel connector |
|
|
|
|
|
|
PWR LED PWR BTN |
||||
M2N-X |
|
PLED+ PLEDPWR GND |
|
|
|
|
|
|
|
|
|
|
F_PANEL |
|
|
|
|
|
|
IDELED+ IDELEDGround Reset |
|
|
|
|
HD LED RESET |
||||
•The front panel cables of your chassis may differ with models or designs.
Connect these connectors to the motherboard according to the label.
•If the LEDs do not light up and the pin location is correct, you might have mistaken the ground pins with the signal pins. Usually the white wire stands for the ground pins and the color-coded wire for the signal pins.
•The SPEAKER, RESET and PWRSW front panel cables have no specific orientation, while IDE_LED and PLED cables do. Connect the cable PIN1 to the connector PIN1 on the motherboard.
•The front panel connector varies with your motherboard model, refer to the user guide for more information.
20 |
Chapter 1: Quick Start |

ASUS Q-Connector
ASUS Q-Connector’s one step installation saves your time from struggling with the messy front panel cables. Refer to the user guide for details.
English
The Q-connector is available in selected models. Refer to the user guide for details.
1.9Connecting the ATX power
TheATX power connectors can fit in only one orientation. Use the side clip to hook the connectors to the motherboard. DO NOT force the male power connectors into the female counterparts on the motherboard. Usually there will be two connectors on the motherboard: 24-pin and 4-pin power connectors. Some older power supply units may only have 20-pin power connector which also fits the 24-pin power connector on the motherboard.
24-pin power connector |
|
20-pin power connector |
|
|
(on the 24-pin female counterpart) |
|
|
|
4-pin power connector
ASUS Motherboard installation guide |
21 |

English
•DO NOT attach the externalAC power when connecting the power connectors to the motherboard.
•Make sure the power connectors are firmly secured to the motherboard.
•If your power supply supports 20-pin+4-pin, you are able to combine these two connectors and install to the 24-pin connectors on the motherboard.
Power connectors
20+4 (24) pin ATX connector |
|
4-pin ATX connector |
|
|
|
|
|
|
peripheral power connector (left) floppy power connector (right)
22 |
Chapter 1: Quick Start |

1.10Peripheral devices and accessories
Refer to the figure for connecting the peripheral devices and accessories.
|
1. AC power plug |
8. PS/2 |
|
|
|
|
mouse port |
|
|
9. Parallel port |
|
2. PS/2 keyboard |
|||
|
port |
|
|
3. S/PDIF out port |
10. IEEE1394 port |
||
4. |
Serial port |
11. LAN (RJ45) port |
|
5. |
USB port |
12. Line in port |
|
6. Microphone port |
13. Video graphics |
||
|
|
|
adapter port |
7. |
Line out port |
14. DVI port |
|
1.AC Power plug + power extension cord
2.PS/2 keyboard port + keyboard
3.S/PDIF out port + digital 5.1 speaker system
4.Serial port + PDA dock
5.USB port + USB devices
6.Microphone port + microphone
7.Line out port + speaker
8.PS/2 mouse port + mouse
9.Parallel port + printer
10.IEEE1394 port + external hard disk drive
11.LAN (RJ45) port + modem
12.Line in port + recorder
13.VGA port + CRT monitor
14.DVI port + LCD monitor
English
The rear panel connectors vary with models. Refer to the user guide for details.
ASUS Motherboard installation guide |
23 |

English
1.11Starting up for the first time
The system then runs the power-on self tests or POST. While the tests are running, the BIOS beeps.
BIOS Beep |
Description |
One continuous beep followed by three |
No VGA detected |
short beeps |
|
One continuous beep followed by two |
No memory detected |
short beeps then a pause (repeated) |
|
One continuous beep followed by four |
Hardware component failure |
short beeps |
(AMI BIOS) |
Four short beeps |
Hardware component failure |
|
(AWARD BIOS) |
Troubleshooting
Trouble |
Action |
•Cannot turn on the computer Make sure the power cord is connected correctly.
•Power LED is not lit.
•Power supply fan is not working.
The computer is on but the |
|
• Make sure the monitor power is on and the VGA cable is |
monitor is black. |
|
connected correctly. |
|
|
• Adjust the monitor brightness and contrast. |
|
|
• Shut down the computer and remove the power cord. |
|
|
Check whether the VGAcard is installed firmly. |
No memory detected |
|
• Make sure the memory module is correct. |
|
|
• Make sure the DIMMS are firmly seated on the DIMM |
|
|
socket. |
|
|
• Make sure the memory module is from the qualified vedor |
|
|
list. Refer to the user guide for the QVL. |
Floppy Error |
|
• Check the BIOS configuration about floppy disk drive. |
(The indicator is always lit or |
|
• Make sure the cables for the floppy disk drive is plugged |
a warning message pops on |
|
correctly. |
the screen.) |
|
|
Hard/optical disk drive error |
|
• Make sure the jumper setting is correct. (Master/Slave) |
(not recognized or detected) |
|
• Check the BIOS configuration about hard/optical disk |
|
|
drive. |
|
|
• Make sure the device cables are firmly attached. |
|
|
• Make sure the device drivers are installed. |
24 |
Chapter 1: Quick Start |
Chapter 2: Manage/update BIOS
2.1AFUDOS utility
TheAFUDOS utility allows you to update the BIOS file in DOS environment using a bootable floppy disk with the updated BIOS file. This utility also allows you to copy the current BIOS file that you can use as backup when the BIOS fails or gets corrupted during the updating process.
Copying the current BIOS
To copy the current BIOS file using the AFUDOS utility:
•Make sure that the floppy disk is not write-protected and has at least 1024KB free space to save the file.
•The succeeding BIOS screens are for reference only. The actual BIOS screen displays may not be same as shown.
1.Copy the AFUDOS utility (afudos.exe) from the motherboard support CD/ DVD to the bootable floppy disk you created earlier.
2.Boot the system in DOS mode, then at the prompt type: afudos /o[filename]
where the [filename] is any user-assigned filename not more than eight alphanumeric characters for the main filename and three alphanumeric characters for the extension name.
A:\>afudos /oOLDBIOS1.rom
Main filename Extension name
3.Press <Enter>. The utility copies the current BIOS file to the floppy disk.
A:\>afudos /oOLDBIOS1.rom
AMI Firmware Update Utility - Version 1.19(ASUS V2.07(03.11.24BB))
Copyright (C) 2002 American Megatrends, Inc. All rights reserved.
Reading flash ..... done
Write to file...... ok
A:\>
The utility returns to the DOS prompt after copying the current BIOS file.
Updating the BIOS file
To update the BIOS file using the AFUDOS utility:
1.Visit the ASUS website (www.asus.com) and download the latest BIOS file for the motherboard. Save the BIOS file to a bootable floppy disk.
English
ASUS Motherboard installation guide |
25 |

English
Write the BIOS filename on a piece of paper. You need to type the exact BIOS filename at the DOS prompt.
2.Copy the AFUDOS utility (afudos.exe) from the motherboard support DVD to the bootable floppy disk you created earlier.
3.Boot the system in DOS mode, then at the prompt type: afudos /i[filename]
where [filename] is the latest or the original BIOS file on the bootable floppy disk.
A:\>afudos /iP5K3D.ROM
4.The utility verifies the file and starts updating the BIOS.
A:\>afudos /iP5K3D.ROM
AMI Firmware Update Utility - Version 1.19(ASUS V2.07(03.11.24BB))
Copyright (C) 2002 American Megatrends, Inc. All rights reserved.
WARNING!! Do not turn off power during flash BIOS
Reading file ....... |
done |
|
Reading flash ...... |
done |
|
Advance Check ...... |
|
|
Erasing |
flash ...... |
done |
Writing |
flash ...... |
0x0008CC00 (9%) |
DO NOT shut down or reset the system while updating the BIOS to prevent system boot failure!
5.The utility returns to the DOS prompt after the BIOS update process is completed. Reboot the system from the hard disk drive.
A:\>afudos /iP5K3D.ROM
AMI Firmware Update Utility - Version 1.19(ASUS V2.07(03.11.24BB))
Copyright (C) 2002 American Megatrends, Inc. All rights reserved.
WARNING!! Do not turn off power during flash BIOS
Reading file ....... |
done |
Reading flash ...... |
done |
Advance Check ...... |
|
Erasing flash ...... |
done |
Writing flash ...... |
done |
Verifying flash .... |
done |
Please restart your computer
A:\>
26 |
Chapter 2: Manage/update BIOS |
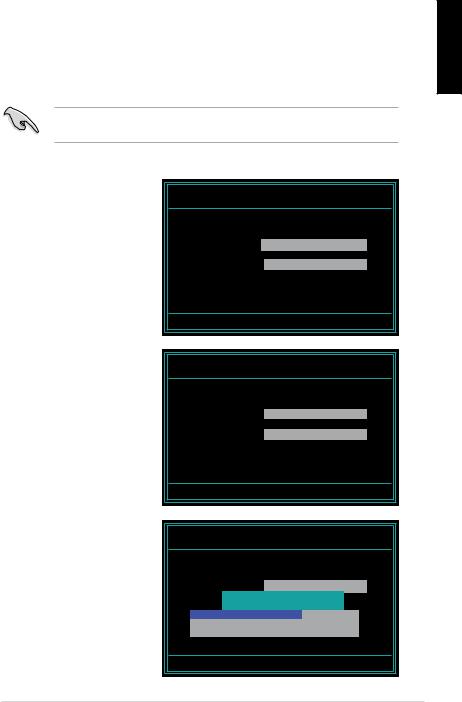
2.2Award BIOS Flash Utility
Updating the BIOS
The Basic Input/Output System (BIOS) can be updated using the AwardBIOS Flash Utility. Follow these instructions to update the BIOS using this utility.
1.Download the latest BIOS file from the ASUS web site. Rename the file to XXXXX.BIN (model name.BIN)and save it to a floppy disk, CD ROM or a USB flash disk in FAT 16/12 format.
Save only the updated BIOS file in the disk to avoid loading the wrong BIOS file.
2.Copy the AwardBIOS Flash Utility (awdflash.exe) from the Software folder of the support CD to the floppy disk, CD ROM or a USB flash disk with the latest BIOS file.
3.Boot the system in DOS mode using the bootable floppy disk, CD ROM or a USB flash disk you created earlier.
4. Under the DOS mode, |
|
|
|
|
AwardBIOS Flash Utility for ASUS V1.14 |
||||
use <X:> (X stands for |
(C) Phoenix Technologies Ltd. All Rights Reserved |
|||
the name of the disk |
For NF590-SLI-M2N32-SLI-DELUXE |
DATE:03/30/2006 |
||
assignment) to switch to |
Flash Type - PMC Pm49FL004T LPC/FWH |
|
|
|
the folder of floppy disk, |
|
|
|
|
File Name to Program: |
|
|
|
|
CD ROM or USB flash |
|
|
|
|
disk you saved the BIOS |
|
|
|
|
file and AwardBIOS Flash |
|
|
|
|
Utility. |
|
|
|
|
5. At the prompt, type |
|
|
|
|
Message: Please input File Name! |
|
|
||
awdflash then press |
|
|
|
|
|
|
|
|
|
<Enter>. The Award BIOS |
|
|
|
|
Flash Utility screen appears.
English
ASUS Motherboard installation guide |
27 |
English
6.Type the BIOS file name in the File Name to Program field, then press <Enter>.
AwardBIOS Flash Utility for ASUS V1.14
(C) Phoenix Technologies Ltd. All Rights Reserved
For NF590-SLI-M2N32-SLI-DELUXE |
DATE:03/30/2006 |
|||
Flash Type - |
PMC Pm49FL004T LPC/FWH |
|
|
|
File Name to |
Program: |
|
|
|
M2N32SLI.bin |
|
|
||
Message: Do You Want To Save Bios (Y/N)
7.Press <N> when the utility prompts you to save the current BIOS file. The following screen appears.
8.The utility verifies the BIOS file in the floppy disk, CD ROM or a USB flash disk and starts flashing the BIOS file.
AwardBIOS Flash Utility for ASUS V1.14
(C) Phoenix Technologies Ltd. All Rights Reserved
For NF590-SLI-M2N32-SLI-DELUXE |
DATE:03/30/2006 |
|||||||||||
Flash Type |
- PMC Pm49FL004T LPC/FWH |
|
|
|
|
|||||||
|
|
|
|
|
|
|
|
|
|
|||
File Name to Program: |
M2N32SLI.bin |
|
|
|
|
|||||||
Programming Flash Memory - OFE00 OK |
|
|
|
|
||||||||
|
|
|
|
|
|
|
|
|
|
|
||
|
|
|
|
|
|
|
|
|
|
|
|
|
|
|
|
|
|
|
|
|
|
|
|
|
|
|
|
|
|
|
|
|
|
|
|
|
|
|
|
|
|
Write |
OK |
|
No Update |
|
Write Fail |
||||
|
|
|
|
|||||||||
|
|
|
|
|
|
|
|
|
|
|
|
|
|
|
|
|
|
|
|
|
|
|
|
|
|
Warning: Don’t Turn Off Power Or Reset System!
DO NOT turn off or reset the system during the flashing process!
9.The utility displays a
Flashing Complete message indicating that you have successfully flashed the BIOS file.
Remove the disk then press <F1> to restart the system.
AwardBIOS Flash Utility for ASUS V1.14
(C) Phoenix Technologies Ltd. All Rights Reserved
For NF590-SLI-M2N32-SLI-DELUXE |
DATE:03/30/2006 |
|||||||||||||
Flash Type |
- PMC Pm49FL004T LPC/FWH |
|
|
|
|
|||||||||
|
|
|
|
|
|
|
|
|
|
|
|
|
|
|
File Name to Program: |
|
M2N32SLI.bin |
|
|
|
|
||||||||
|
|
|
|
|
|
Flashing |
Complete |
|
|
|
|
|||
|
|
|
|
|
|
Press <F1> to Continue |
|
|
|
|
||||
|
|
|
|
|
|
|
|
|
|
|
|
|
|
|
|
|
|
|
|
|
|
|
|
|
|
|
|
||
|
|
|
Write |
OK |
|
|
No Update |
|
Write Fail |
|||||
|
|
|
|
|
||||||||||
|
|
|
|
|
|
|
|
|
|
|
|
|
|
|
|
|
|
|
|
|
|
|
|
|
|
|
|
|
|
F1 |
|
|
|
|
|
|
|
|
|
|
|
|||
Reset |
|
|
|
|
|
|
|
|
|
|
||||
28 |
Chapter 2: Manage/update BIOS |
English
29
 Loading...