

Page 1

Getting Started with
Timbuktu Pro for Macintosh
®
version 8.6
Page 2

Copyright notice
Copyright © 1987-2006 Netopia, Inc. v.022006
All rights reserved. Printed in the U.S.A.
Netopia, the Netopia logo, and Timbuktu are registered trademarks belonging to Netopia, Inc., registered U.S. Patent and Trademark Office. Broadband Without Boundaries is a trademark belonging to
Netopia, Inc. This manual and any associated artwork, software, product designs or design concepts
are copyrighted with all rights reserved. Under the copyright laws this manual or designs may not be
copied, in whole or part, without the written consent of Netopia. Under the law, copying includes translation to another language or format.
Timbuktu Pro 8.6 works with Skype software. This product uses the Skype API but is not endorsed or
certified by Skype. Skype is a trademark of Skype Technologies S.A. in Luxembourg and other
countries.
Netopia, Inc.
6001 Shellmound Street, 4th Floor
Emeryville, CA 94608
USA
Part Number
This manual is Netopia part number 6120358-PF-06.
Page 3

Contents
Introducing Timbuktu Pro ..........................................................................................................6
Timbuktu Pro Services .......................................................................................................... 6
Connecting with Timbuktu Pro............................................................................................... 7
Timbuktu Pro Transports................................................................................................. 7
Who Can Connect to Your Timbuktu Pro Computer?......................................................... 8
What Timbuktu Pro Can Do for You ........................................................................................ 8
Timbuktu Pro Features .......................................................................................................... 9
New in Timbuktu Pro Version 8.6 .................................................................................... 9
New in Timbuktu Pro Version 8.5..................................................................................... 9
New in Timbuktu Pro Version 8 ...................................................................................... 11
Timbuktu Pro Services................................................................................................... 13
Other Timbuktu Pro Features ......................................................................................... 16
System Requirements for Timbuktu Pro ................................................................................ 21
Minimum Hardware Requirements................................................................................. 21
Minimum Software Requirements.................................................................................. 21
Installing Timbuktu Pro ............................................................................................................ 22
Installing and Upgrading Timbuktu Pro on Mac OS X ........................................................... 22
Performing a New Installation ....................................................................................... 22
Upgrading your Timbuktu Pro Installation to Timbuktu Pro version 8............................. 24
Push Installing Timbuktu Pro on a Remote Computer........................................................... 25
Uninstalling Timbuktu Pro ................................................................................................... 28
Setting Up Timbuktu Pro .......................................................................................................... 29
Starting Timbuktu Pro ......................................................................................................... 29
The Timbuktu Host ....................................................................................................... 29
Quitting Timbuktu Pro .................................................................................................. 30
| iii
Page 4

Getting Started with Timbuktu Pro for Macintosh | iv
Customizing Your Timbuktu Pro Preferences ......................................................................... 31
Setting General Preferences ......................................................................................... 32
Checking for Updates ................................................................................................... 33
Using the Features Manager ......................................................................................... 34
Setting Master Password Preferences ........................................................................... 36
Setting Password Rules ................................................................................................ 38
Using the Sound Manager ............................................................................................ 39
Setting Messages Received Options ............................................................................. 40
Setting Screen-Sharing Preferences............................................................................... 41
Setting IP Locator Preferences ...................................................................................... 42
Setting Proxy Server Preferences .................................................................................. 44
Setting the TCP Contact Port ......................................................................................... 44
Setting Connection-Security Options ............................................................................ 45
Setting Dial Direct Preferences ..................................................................................... 46
Preparing to Make Dial Direct Connections.......................................................................... 49
Configuring Timbuktu Pro for Your Modem.................................................................... 49
Setting Your Calling Location ........................................................................................ 49
Controlling Access to Your Computer ................................................................................... 50
Making a Timbuktu Pro Connection ...........................................................................................51
The New Connection Window............................................................................................... 51
Tabs in the New Connection Window ............................................................................ 52
The Button Bar.................................................................................................................... 54
Making a New Connection................................................................................................... 54
Using the TCP/IP Tab ..................................................................................................... 55
Using the Skype Tab to Find a Remote Computer........................................................... 58
Using the Bonjour Tab to Find a Remote Computer......................................................... 61
Using the TCP/IP Scanner to Find a Remote Computer................................................... 62
Re-Establishing a Previous Connection................................................................................ 63
Using the Address Books.............................................................................................. 64
Making a Dial Direct Connection ......................................................................................... 67
Timbuktu Pro Connection Documents.................................................................................. 69
Using Connection Documents to Save Custom Remote-Control Settings........................ 70
The Timbuktu Pro Services ........................................................................................................71
Send: Sending FlashNotes and Files to Remote Computers................................................... 71
The Send Status Dialog Box.......................................................................................... 73
Receiving FlashNotes..................................................................................................... 74
Page 5

Getting Started with Timbuktu Pro for Macintosh | v
Exchange: Copying and Moving Files Between Computers .................................................... 75
The Exchange Menu ...................................................................................................... 77
Remote Control: Controlling or Observing a Remote Computer .............................................. 77
Using Drag and Drop with Control ................................................................................. 79
Using The Control Menu ............................................................................................... 79
Notify: Requesting Notification When the Remote User is Active........................................... 81
Chat: Chatting with a Remote User ...................................................................................... 82
Intercom: Speaking to a Remote User.................................................................................. 84
Invite: Inviting a Remote User to Access your Computer ....................................................... 85
Profile: Generating a System Profile for the Remote Computer ............................................. 86
Skype: Using Skype with a Remote Computer...................................................................... 87
Install Timbuktu: Push Installation on a Remote Computer .................................................. 88
Security ...................................................................................................................................89
Setting User Access Privileges............................................................................................. 89
Assigning Privileges to Guest Users .............................................................................. 89
Allowing Remote Users to Ask for Permission................................................................ 92
Adding Registered Users .............................................................................................. 93
Assigning Services and Access Privileges...................................................................... 98
Opening Transports for Incoming Connections .................................................................. 100
Shutting Down Transports ........................................................................................... 101
Setting up Timbuktu Pro for Incoming Dial Direct Access .................................................... 102
Configuring Timbuktu Pro for Incoming Connections.................................................... 102
Setting Up Access Privileges for Remote Users............................................................. 104
Keeping Users Out ............................................................................................................ 106
Disconnecting Remote Users ...................................................................................... 106
Using a Master Password ................................................................................................... 107
Index ..................................................................................................................................... 109
Page 6

Chapter 1: Introducing Timbuktu Pro
Welcome to Timbuktu Pro!
Timbuktu Pro for Macintosh gives you total access to your network. Computers
across the country and around the world—Windows and Macintosh—are now as
accessible to you as the computer sitting on your desk! You can use Timbuktu Pro
to control and observe other computers, send instant messages, transfer files,
and text-chat or speak with remote users in real time. And when you’re not on a
network, Timbuktu Pro for Windows lets you make direct modem-to-modem connections between computers—with no network connection required.
Timbuktu Pro Services
The simple, powerful Timbuktu Pro application includes multiple services. Each
service provides you with a different way to access a remote computer, collaborate with its user, or provide access to your own Macintosh.
Timbuktu Pro’s services include
•Send. Send messages, files, and folders to a remote computer.
•Exchange. Access the hard drive of a remote Timbuktu Pro computer—even a
Windows PC. You can copy and move files and folders between computers
and delete files from either computer.
•Control. Control a remote computer from your own desktop.
•Observe. View a remote computer’s desktop without controlling it.
•Notify. Be alerted when a remote Timbuktu Pro computer becomes active.
•Chat. Carry on a keyboard conversation with a remote user.
•Intercom. Speak to a remote user through your computer’s audio hardware.
•Invite. Ask other users to visit your computer using a service you specify.
•Profile. Generate a full system profile for the remote computer and save it as
a text file on your Macintosh.
•Skype. Access the Skype internet-telephony application to speak or text-chat
with a remote user. The Skype service includes two subservices: Skype Call
and Skype Chat.
| 6
Page 7

Getting Started with Timbuktu Pro for Macintosh | 7
Connecting with Timbuktu Pro
When you’re at the office, Timbuktu Pro runs over your organization’s local network for easy conferencing and information sharing. When you’re home or traveling, you can log on to a remote access server and use Timbuktu Pro to take direct
control of your office computer. You can even use your modem to dial directly into
the modem of another computer, with no network connection required.
Once you connect to a remote computer with Timbuktu Pro, you can run software
at its normal speed, dramatically decreasing over-the-phone delay of applications
such as relational databases and electronic mail. Timbuktu Pro gives you full access to remote resources, but transfers only screen, keyboard, and mouse information—you don’t have to move large amounts of data over slow telephone links.
Timbuktu Pro Transports
Timbuktu Pro communicates with other Timbuktu Pro computers over TCP/IP networks (LAN, WAN, DSL, cable, and ISDN) and over direct modem-to-modem connections. If you are connected to the Internet or can make a modem connection,
you can use TCP/IP and Timbuktu Pro services to collaborate with other Timbuktu
Pro users around the world.
The TCP/IP Transport
Most of your Timbuktu Pro connections will use the TCP/IP transport, which uses
the same protocol as any basic Internet or intranet connection.
The Skype Transport
The Skype transport provides an additional connection pathway for Timbuktu Pro
services. Skype is an Internet-telephony application available for free download
at www.skype.com. Skype uses a proprietary connection protocol that can cross
many firewall and NAT-router configurations without requiring any special configuration. When integrated with the Skype application, Timbuktu Pro can “piggyback” on the Skype data stream to establish a Timbuktu Pro connection.
The Skype transport makes it possible to make Timbuktu Pro connections to computers behind NAT routers or firewalls, or otherwise inaccessible to previous versions of Timbuktu Pro without special configuration. You can open a Timbuktu Pro
connection to any computer to which you can open a Skype connection.
Page 8

Getting Started with Timbuktu Pro for Macintosh | 8
The Dial Direct Transport
Timbuktu Pro also includes a direct modem-to-modem protocol called Dial Direct.
You can use Dial Direct to connect directly to a remote Timbuktu Pro computer
with no other network connection required.
Who Can Connect to Your Timbuktu Pro Computer?
The first and most important answer is “No one—without your permission!” But
once you have set up your security options, anyone who meets your connection
criteria may connect.
Note: If your computer is connected to a company network that is protected by a
firewall, your Timbuktu Pro computer may only be accessible to users from your
local network. However, firewalls can be configured to admit Timbuktu Pro traffic.
What Timbuktu Pro Can Do for You
With Timbuktu Pro, you can
• Save technical support time and money by taking control of a remote user’s
computer and solving their problem without leaving your desk.
• Train employees and customers alike for a fraction of the usual time and cost.
Demonstrate the latest applications or products while a remote user watches.
Then observe and help as the user practices. Provide individual attention for
all remote trainees, and save the time and expense of travel.
• Work remotely from wherever you are. Harness the power of remote control to
share information, transfer files access databases, and send messages
across your network. You’ll discover many ways to work easier and smarter.
• Collaborate with remote colleagues in real time. Share screens, documents,
and information with both Macintosh and Windows computers. Work with
others anywhere, and confer with your colleagues using audio- or text-based
conferencing.
• Save time by scripting a variety of Timbuktu Pro tasks. Timbuktu Pro includes
AppleScripts that incorporate Timbuktu’s extensive scripting implementation. Or create your own scripts—you can even add them to the Script menu.
• Protect your network resources. You can open and close transports and grant
custom combinations of Timbuktu Pro services to individual Registered User
and Windows NT User accounts.
Page 9

Timbuktu Pro Features
Timbuktu Pro’s rich feature set enables you to use it more efficiently and securely
than ever before. From remote control services to multi-level security, Timbuktu
Pro is packed with features to make your network work for you. And it takes advantage of all the latest Mac OS X features, enhancing your Timbuktu experience!
New in Timbuktu Pro Version 8.6
Timbuktu Pro now features the Skype integration to provide new services and enhance your connection possibilities.
Skype Integration
The new Skype integration provides you with both the Skype transport and the
Skype service.
• The Skype transport provides a connection pathway for Timbuktu Pro services that can cross many firewall and NAT-router configurations without any
special configuration.
• The Skype service lets you access the Skype internet-telephony application
to speak or text-chat with a remote user. The Skype service includes two subservices: Skype Call and Skype Chat.
Getting Started with Timbuktu Pro for Macintosh | 9
Intel Processor Support
Timbuktu Pro version 8.6 is a Universal Application. It runs on both PowerPC and
Intel-based Macintosh computers.
New in Timbuktu Pro Version 8.5
Timbuktu Pro version 8.5 includes new features and preferences to enhance security and customize its functionality for the specific needs of your network.
Check for Update
The Check for Update feature allows Timbuktu Pro to check automatically for updated versions. By default, the check occurs silently once per week when you
Page 10

Getting Started with Timbuktu Pro for Macintosh | 10
launch Timbuktu Pro. When an update is found, Timbuktu Pro opens your Web
browser and loads the Web page for the updated version.
Enable and disable the Check for Update feature in the Preferences dialog box.
Full Exchange File Access
In Timbuktu Pro version 8, Exchange service permissions were improved to honor
file-system access permissions. However, in certain situations you may wish to allow some remote users unrestricted access to your file system. Now, when you
create or modify Timbuktu Pro user accounts, you can select the option to grant
full file-system access to the user accounts you specify.
Help Desk Mode
Timbuktu Pro now offers the Help Desk Mode feature, which “locks down” Timbuktu Pro and allows only incoming access. The local user will not be able to establish outgoing connections or change any Timbuktu Pro settings.
New Security Preferences
The Timbuktu Pro Preferences dialog box now includes a new tab, TCP Security,
with new connection-security options. You can specify whether Timbuktu Pro will
register your computer with Bonjour and respond to the TCP/IP Scanner, which allows other Timbuktu Pro users to find your computer with the TCP/IP Scanner and
Bonjour tabs in the New Connection window. And you can set Timbuktu Pro to allow incoming connections only when they are secured with SSH.
Secure Screen Blanking
Timbuktu Pro for Macintosh now supports secure screen blanking during Control
sessions. When a remote user controls your computer, the screen can automatically go blank. The mouse and keyboard may also be locked. When the Control
session is complete, your computer will display the screen-saver and remain
locked for your continued security.
For example, if you are accessing your own computer from a remote location, secure screen blanking will protect your data by preventing anyone near your workstation from watching the activity on your computer or interfering with your work.
Secure screen blanking is enabled on a user-by-user basis through the Define
User dialog box.
Page 11

Getting Started with Timbuktu Pro for Macintosh | 11
Share Entire Desktop
When you control or observe a remote computer with two monitors, the screensharing window now allows you to display both monitors together. Click the
Change Monitor button on the frame of the screen-sharing window to cycle
through the individual monitors.
Screen-Sharing Improvements
Timbuktu Pro version 8.5 features improved auto scrolling during Control sessions. When you control a computer with a larger monitor than your own computer, scrolling is now smoother. Enhanced auto scrolling may also make it easier
to activate a “hot” corner or open the dock on the remote computer.
In addition, screen-sharing performance has been improved for computers on fast
networks, particularly between two Timbuktu Pro version 8.5 computers.
New in Timbuktu Pro Version 8
Timbuktu Pro version 8 takes full advantage of the Internet as well as the most recent improvements and features available in Mac OS X Panther (version 10.3). The
new push installation process allows you to quickly and easily deploy Timbuktu
Pro across your network. Plus, Timbuktu Pro version 8 makes use of SSH to provide both enhanced security and improved performance.
Secure SSH Connections
Timbuktu Pro now supports secure connections between computers (and between Macintosh and Windows computers) running Timbuktu Pro version 8.
When you begin a connection to a remote Timbuktu Pro computer, the Remote
User dialog box will open to enable you to select a connection option and enter
your access credentials. To establish a secure connection, select the Registered
User (Secure) option.
In addition to connection security, connections over SSH tunnels provide the following functionality:
• Timbuktu Pro authentication is integrated with Mac OS X user accounts and
user authentication.
• The SSH tunnels provide a well-known and trusted security option for host
computers on the public Internet.
Page 12

Getting Started with Timbuktu Pro for Macintosh | 12
• Timbuktu Pro performance may be improved when data is passed through
SSH compression.
• Reverse (host to guest) connections are now supported, allowing you to use
the Control-session drag-and-drop feature and the Invite service, even when
the guest computer is behind a NAT router.
Push Installation
You may now “push” install Timbuktu Pro on the remote computers on your network which have enabled Remote Login. This process will also upgrade Timbuktu
Pro on computers that are running a Timbuktu Pro version older than the version
on your computer.
You may also use the push-install feature to distribute Zones files, Timbuktu Pro
preferences, site keys, and activation keys.
Bonjour Integration
Timbuktu Pro version 8 supports Apple’s Bonjour technology (formerly known as
Rendezvous). When you start Timbuktu Pro, it automatically registers the host
service with Bonjour. This allows the remote users on your network to find your
computer for Timbuktu Pro connections.
On your computer, the Bonjour tab will appear in the New Connection window.
Use the Bonjour tab to search for active Timbuktu Pro computers and connect
without needing to enter the IP address.
Plus, Bonjour can assist you with finding computers for push installation. The
Bonjour tab displays both Timbuktu Pro computers and Mac OS X computers with
Remote Login active. Select one or more computers to install Timbuktu Pro, then
open the Service menu and choose Install Timbuktu.
Finally, Timbuktu Pro’s Bonjour feature will take advantage of Bonjour enhancements in future versions of Mac OS X.
Ask for Permission Enhancements
You may now require Registered Users to ask for permission before each connection. You will be able to allow or deny the incoming connection before it occurs.
Page 13

Getting Started with Timbuktu Pro for Macintosh | 13
Exchange Permission Enhancements
Exchange service permissions have been improved. When remote users establish
secure SSH connections to your computer, they will be granted the same file-system access privileges that are assigned to their Mac OS X user profile. (Remote
users that connect as Timbuktu Users, Ask for Permission Users, or Guest Users
will have the access privileges assigned to the first administrator-level user created on your computer.)
To use Exchange to copy files from your computer, or to drag-and-drop files during
a Control session, the remote user must have access privileges for those files.
Timbuktu Pro Services
Each of Timbuktu Pro’s services allows you to interact with remote computers in a
different way; together, they help you make the most of your network. For details
about each Timbuktu Pro service, see Chapter 5, “The Timbuktu Pro Services.”
Every Timbuktu Pro service can work in both directions at once: another user can
send files to you while you are controlling or observing a third computer.
Control and Observe—Remote Control and Screen Sharing
Timbuktu Pro’s remote control feature allows you to control or observe the desktop of a remote computer anywhere on your network using Timbuktu Pro’s
IntelliScreen
erful tools for user support, training, and collaboration. The Control service lets
you use your keyboard and mouse to operate another computer for user support,
training, and collaboration. The Observe service lets you watch the activity on a
remote computer’s desktop without interfering with keyboard or mouse input.
Timbuktu Pro automatically adapts to any video mode. The auto scrolling feature
offers automatic panning as you move your pointer on the remote desktop. Thus,
you can always view the entire screen of the remote computer, even when monitor resolutions are different. You may also shrink the view of a remote desktop to
fit the size of your remote control window. This provides you greater flexibility in
displaying a remote computer’s desktop on your screen and allows you to create
convenient thumbnail images of several remote computers at once.
Timbuktu Pro allows you to hide your desktop pictures and patterns and limit the
number of colors sent when you share your screen with a remote user. These options may improve screen-sharing performance, particularly over slow
connections.
TM
technology. Timbuktu Pro’s Control and Observe services are pow-
Page 14

Getting Started with Timbuktu Pro for Macintosh | 14
Finally, the Control service fully supports Drag and Drop. For example, you can
drag a file out of the screen-sharing window and onto your own desktop.
Screen-Sharing Window
The screen-sharing window, in which you can Control and Observe remote computers, has been built to allow you the most flexibility and speed possible. The
screen-sharing window supports multiple grayscale and color-depth options, and
it provides scroll-wheel and multi-button mouse support.
The screen-sharing window includes a number of other features:
• During screen-sharing sessions, clicking the right mouse button (right-clicking) sends an old-style CTRL+click to host computers running older versions
of Timbuktu Pro.
• In the New Connection window, pressing CMD+ARROW switches connection
tabs only if the SHIFT or OPTION keys are not also pressed. When the guest
computer switches monitors during a screen-sharing session, the connection
tab is not accidentally changed on the host computer.
• When you press the TAB key on the guest computer, it is sent to the host computer even when Full Keyboard Access is turned on. System-menu keyboard
commands are also sent to the host computer.
• A 1.5-second delay occurs when you attempt to drag-and-drop from the
screen-sharing window onto your desktop. This prevents “accidental” dragand-drops. If you release the mouse button during the delay, drag-and-drop
will not occur.
QuickTime Support
You can record QuickTime movies of your screen-sharing sessions. Simply click
the QuickTime icon on the border of the screen-sharing window.
• You may record QuickTime movies using compressors other than the Animation codec from Apple.
• When recording a QuickTime movie, you may specify the name and location
of the saved file before you begin recording. This allows you to save the recording in a location with more disk space or onto a server.
• When you specify the save-file settings, you may also change the video and
sound recording settings. In addition, your changes are saved for future recording sessions.
• The cursor is recorded in QuickTime movies, as are the sounds played on the
guest computer during the screen-sharing session.
Page 15

Getting Started with Timbuktu Pro for Macintosh | 15
Send—Sending Messages
You can send FlashNotesTM—instant text messages that pop up on the recipient’s
desktop—and attach files and folders to your FlashNotes. To quickly send files,
you can drag files and folders to the Timbuktu Sender desktop icon. File transfer
is carried out in the background while you continue to work at your computer.
The Send service also supports file recovery. If your Send session is interrupted,
As long as Timbuktu Pro remains running, it can resume the transfer at the point
at which it was interrupted rather than having to start over from the beginning.
Exchange—File Transfer
Timbuktu Pro makes transferring files between computers easy. With the Exchange service, you can copy, move, and delete files across the network—even on
Windows computers—just as if they were on your own computer.
The Exchange menu appears whenever you connect to another computer with the
Exchange service. In addition to the Desktop, New Folder, Open, and Remove op-
tions, the Exchange menu also provides a number of options not listed in the Exchange window.
Notify, Chat, Intercom, and Invite
Communicating with other Timbuktu Pro users is more convenient than ever with
Timbuktu Pro’s Notify, Chat, Intercom, and Invite services. Notify alerts you when
a remote computer becomes active. Chat allows you to have a keyboard “conversation” with another user—even with multiple users simultaneously. Intercom
lets you have a voice conversation using your computer’s microphone and speakers—no telephone required. And Invite allows you to invite another user to access
your computer using the Timbuktu Pro service you specify.
Profile
The Profile service allows you to run the Apple System Profiler on a remote Macintosh computer and automatically save the output to a text file on your computer.
Skype
the Skype service accesses the Skype internet-telephony application to let you
speak or text-chat with a remote user. It includes two subservices: Skype Call and
Skype Chat.
Page 16

Getting Started with Timbuktu Pro for Macintosh | 16
Other Timbuktu Pro Features
In addition to the enhancements in Timbuktu Pro version 8, all your favorite tools
and features from previous versions are still available.
Timbuktu Host
Timbuktu Pro no longer uses the “Timbuktu Extension,” which ran in the background on Mac OS Classic computers. On Mac OS X, Timbuktu Pro uses the Timbuktu Host, a background application which monitors incoming Timbuktu Pro
connections. When a connection is received, the Timbuktu Host opens the full
Timbuktu Pro application (if it is not already running) and processes the connection normally.
Quitting the Timbuktu Host, or disabling it so it does not start automatically, prevents remote users from using Timbuktu Pro to connect to your computer. For details, see “The Timbuktu Host” on page 29.
In addition, when the Only Accept Incoming Connections When Application Is
Open option is selected on the General tab in the Preferences dialog box, Timbuktu Pro now runs as the logged-in user. It is no longer necessary to enter an administrator name and password when you start Timbuktu Pro. For information
about this option, see “Setting General Preferences” on page 32.
Comprehensive Multi-Level Security
Timbuktu Pro uses a flexible and comprehensive security scheme to allow only
the users you want to access your computer. You can restrict access to as few or
as many remote users as you wish. And you can provide individualized combinations of services and privileges to each different user.
Anyone can access the services you provide to Guest Users. You can define any
number of Registered Users, granting them password-protected access to the
specific combination of user access privileges you specify. Registered Users may
also connect securely with SSH, and they can be authenticated at the OS level.
Dial Direct access may also be provided on a user-by-user basis.
If you wish to grant one-time-only access to other Timbuktu Pro services, or allow
access only when you are at your computer, remote users can ask for permission
to use services you have not assigned to Guest Users or to a Registered User
account. The Ask for Permission dialog box opens on your screen, telling you who
Page 17

Getting Started with Timbuktu Pro for Macintosh | 17
wants to connect and the service they have requested. If you choose OK, they’re
connected. If you don’t, they aren’t.
For tightest security, you can even prevent remote users from connecting to your
computer entirely.
Connection Menu
The Connection menu is a shortcut that lets you quickly open Timbuktu Pro, turn
transports on and off, monitor incoming connections, and get information about
Timbuktu Pro.
Open the Connection menu by clicking on the Timbuktu Pro icon, which appears
on the right side of the menu bar anytime the Timbuktu Host is running.
Cross-Platform Connections
Timbuktu Pro offers remote control and file transfer between Macintosh and Windows computers. You can use your Macintosh to remotely control a computer of
either type, just as if you were seated in front of it. Timbuktu Pro also provides
cross-platform file transfer with a convenient, one-step procedure, whether you’re
using the Internet, a local network, or a Dial Direct connection.
Dial Direct Connections
Timbuktu Pro’s Dial Direct feature allows you to use your modem to connect directly to the modem of any other Timbuktu Pro computer. No Internet connection
is required. You can use any of the Timbuktu Pro services with Dial Direct, except
Skype.
Finding Remote Computers
Timbuktu Pro includes several different methods for finding remote Timbuktu Pro
computers on your network or on the Internet.
The Internet Locator Server
Timbuktu Pro’s Internet Locator allows you to connect to other Timbuktu Pro users
by specifying their email addresses instead of their IP addresses. When you enter an email address on the TCP/IP tab in the New Connection window, Timbuktu
Pro automatically queries Netopia’s Internet Locator server, resolves the correct
Page 18

Getting Started with Timbuktu Pro for Macintosh | 18
IP address, and connects to the remote computer. You can set up the Internet Locator on the IP Locator tab in the Preferences dialog box.
In addition, the IP Locator tab allows you to register your computer’s external IP
address—for example, the IP address of a NAT router—rather than the local or internal IP address, which may not be recognized outside your network.
TCP/IP Scanner
The TCP/IP Scanner tab in the New Connection window helps you find remote
computers, even when you don’t know their IP addresses, by browsing your local
network for active Timbuktu-compatible computers. Once the desired computer is
found, you may connect to it without leaving the TCP/IP Scanner tab.
Bonjour Integration
The Bonjour tab in the New Connection window helps you find remote computers,
even when you don’t know their IP addresses, by browsing your local network for
computers that have registered the Timbuktu Pro service with Bonjour. Once the
desired computer is found, you may connect to it without leaving the Bonjour tab.
Skype Contacts
The Skype tab lists the contacts from your Skype Contacts window. If a compatible
version of Timbuktu Pro is running on the contact’s computer, and the computer
is accepting Skype connections, you can use the Skype tab to establish a Timbuktu Pro connection without knowing the computer’s name or IP address.
Plus, the Skype transport provides flexibility beyond basic TCP/IP connections
and may allow you to connect to computers Timbuktu Pro couldn’t reach before
because of routers or firewalls.
TCP Contact Port Settings
The TCP Contact Port tab specifies the TCP port used for Timbuktu Pro traffic to
your computer. This allows you to use more than one Timbuktu Pro host computer
behind a NAT router, by directing traffic intended for a specific computer to a
unique port on that computer.
Timbuktu Sender
The Timbuktu Sender is a desktop icon that lets you quickly send files and folders
to other Timbuktu Pro computers. Simply drag the desired files onto the Sender
icon and a FlashNote window will open with the files already attached.
Page 19

Getting Started with Timbuktu Pro for Macintosh | 19
Timbuktu Pro Connection Documents
Timbuktu Pro connection documents are shortcuts that allow you to start a Timbuktu Pro connection to a specific remote computer, using a specific service, simply by double-clicking a desktop icon or opening the shortcut with the File menu.
Connection documents are created with the Save Connection command in the File
menu.
Drop Senders—Customizable Send Destinations
When you open a Send window, Timbuktu Pro adds the Save Drop Sender command to the File menu. When you choose this command, Timbuktu Pro creates a
Drop Sender desktop icon that records the destination and the files and folders
you selected. In the future, simply double-click the Drop Sender icon to send the
same files and folders to the same destination.
You can also drag other items onto the Drop Sender icon, and they will be immediately sent to the remembered destination.
Address Books
You can use Timbuktu Pro’s address books to help you organize the IP addresses
and phone numbers of the remote computers you connect to frequently. An address book is a collection of Timbuktu Pro addresses. They save you time because
you don’t have to enter an IP address or phone number every time you make a
connection—simply select a computer from the list.
Create address books by adding addresses from the New Connection window or
by importing an address list from a text file. You can drag an address directly from
a transport tab to an address book window or from one address book to another.
Activity Log
Timbuktu Pro keeps a list of all connections made to your computer. The activity
log shows each user’s Timbuktu Pro name and network address, records when
the user connected or attempted to connect, and specifies which services the
user accessed.
The Timbuktu Pro log file is stored in the default Mac OS X log-file folder, and you
may view it with the Console application.
Page 20

Getting Started with Timbuktu Pro for Macintosh | 20
Fast User Switching
Timbuktu Pro’s Panther support includes fast user switching. When you change
users or log in as an additional user on Panther computers, any open Timbuktu
Pro connections are closed. However, Timbuktu Pro is not shut down. You may immediately reconnect any Timbuktu Pro service.
Updated TCP/IP Zones File Name
The TCP/IP Zones file no longer requires the forward slash (/) in the file name.
TCPIP Zones is now an acceptable file name. Timbuktu Pro also recognizes an
alias to the actual TCP/IP Zones file, which you may now place anywhere on your
computer.
Common Terminology
To enhance your cross-platform Timbuktu Pro experience, Timbuktu Pro for Macintosh and Timbuktu Pro for Windows use the same terminology and service
names. The original Look service is called Observe; the original Knock service is
called Notify. In addition, Timbuktu Pro for Macintosh and Windows use the same
terms for remote users: the original Public Visitor is called the Guest User, and
Trusted Visitors are called Registered Users.
Timbuktu Pro Online Help
Timbuktu Pro’s comprehensive online Help provides a variety of ways to answer
your questions. It contains step-by-step instructions for common procedures, as
well as troubleshooting hints and keyboard shortcuts.
Use the Help menu to open Help from anywhere within Timbuktu Pro. Or click the
Help button in any dialog box or window to view context-sensitive Help for that dialog box.
Scripting
You can create AppleScript applications or run ready-made scripts that incorporate Timbuktu Pro features. Timbuktu Pro includes a Script menu with ready-to-
run scripts.
Page 21

Getting Started with Timbuktu Pro for Macintosh | 21
System Requirements for Timbuktu Pro
To run Timbuktu Pro for Macintosh, your computer must meet the following hardware and software requirements.
Minimum Hardware Requirements
Timbuktu Pro requires the same minimum hardware that is required by your Mac
OS. In addition, you’ll need
• 15 MB of available disk space
• 128 MB of physical RAM
• For TCP/IP and Skype connections, an Internet (TCP/IP) network connection
• For Dial Direct connections, a 56 Kbps or faster modem
• For the Intercom and Skype Call services, a microphone on each computer
Minimum Software Requirements
Timbuktu Pro requires the following software.
• Mac OS X version 10.3.9 or later
• One copy of Timbuktu Pro software on each computer that is to make or re-
ceive Timbuktu Pro connections
Compatibility
Timbuktu Pro version 8 for Mac OS is compatible with Timbuktu Pro for Macintosh
6.0 and later, and Timbuktu Pro for Windows 5.0 and later. Older versions of Tim-
buktu Pro are not officially supported with Timbuktu Pro version 8.
Skype Compatibility
The Timbuktu Pro Skype integration requires Skype 1.4 or greater (Skype 2.0 is
recommended). The first time you run Timbuktu Pro, Skype will notify you that another application is attempting to access it. You must allow this action to enable
the Timbuktu Pro Skype integration.
Page 22

Chapter 2: Installing Timbuktu Pro
This chapter will guide you as you install or un-install Timbuktu Pro.
Timbuktu Pro for Macintosh, version 8, requires an activation key. In most cases,
the first time you run Timbuktu Pro, the Activation Key dialog box is automatically
opened. However, the activation key for Timbuktu Pro Enterprise is included automatically—you are not required to enter it before using Timbuktu Pro. This allows
you to install Timbuktu Pro Enterprise on multiple computers without entering the
activation key each time.
Installing and Upgrading Timbuktu Pro on Mac OS X
If you have not yet installed Timbuktu Pro on your Mac OS X computer, see the following section, “Performing a New Installation.”
If you have already installed Timbuktu Pro 6.0 or later, see “Upgrading your Tim-
buktu Pro Installation to Timbuktu Pro version 8” on page 24.
Performing a New Installation
If you have not installed a previous version of Timbuktu Pro on your Mac OS X
computer, use the following procedure to install Timbuktu Pro.
To install Timbuktu Pro on Mac OS X
You must be logged in as an administrator to install Timbuktu Pro on Mac OS X.
1. If you downloaded Timbuktu Pro from the Web, double-click the Timbuktu
Pro.dmg file to mount the disk image. Drag the Timbuktu Pro folder to your
Mac OS X Applications folder.
If you received a Timbuktu Pro CD, open it and drag the Timbuktu Pro folder to
your Mac OS X Applications folder.
| 22
Page 23
Getting Started with Timbuktu Pro for Macintosh | 23
2. Open the Timbuktu Pro application folder (inside your Mac OS X Applications
folder). Double-click the Timbuktu Pro application icon to run Timbuktu Pro
for the first time.
3. When requested, enter your Mac OS X user name and password.
4. Accept the License Agreement.
5. In the Activation Key dialog box, enter your Timbuktu Pro version 8 Activation
Key. The Activation Key is included in the Welcome email you received from
Netopia, or in your CD case.
6. Click OK to close the Activation Key dialog box and start using Timbuktu Pro.
You do not need to restart your computer.
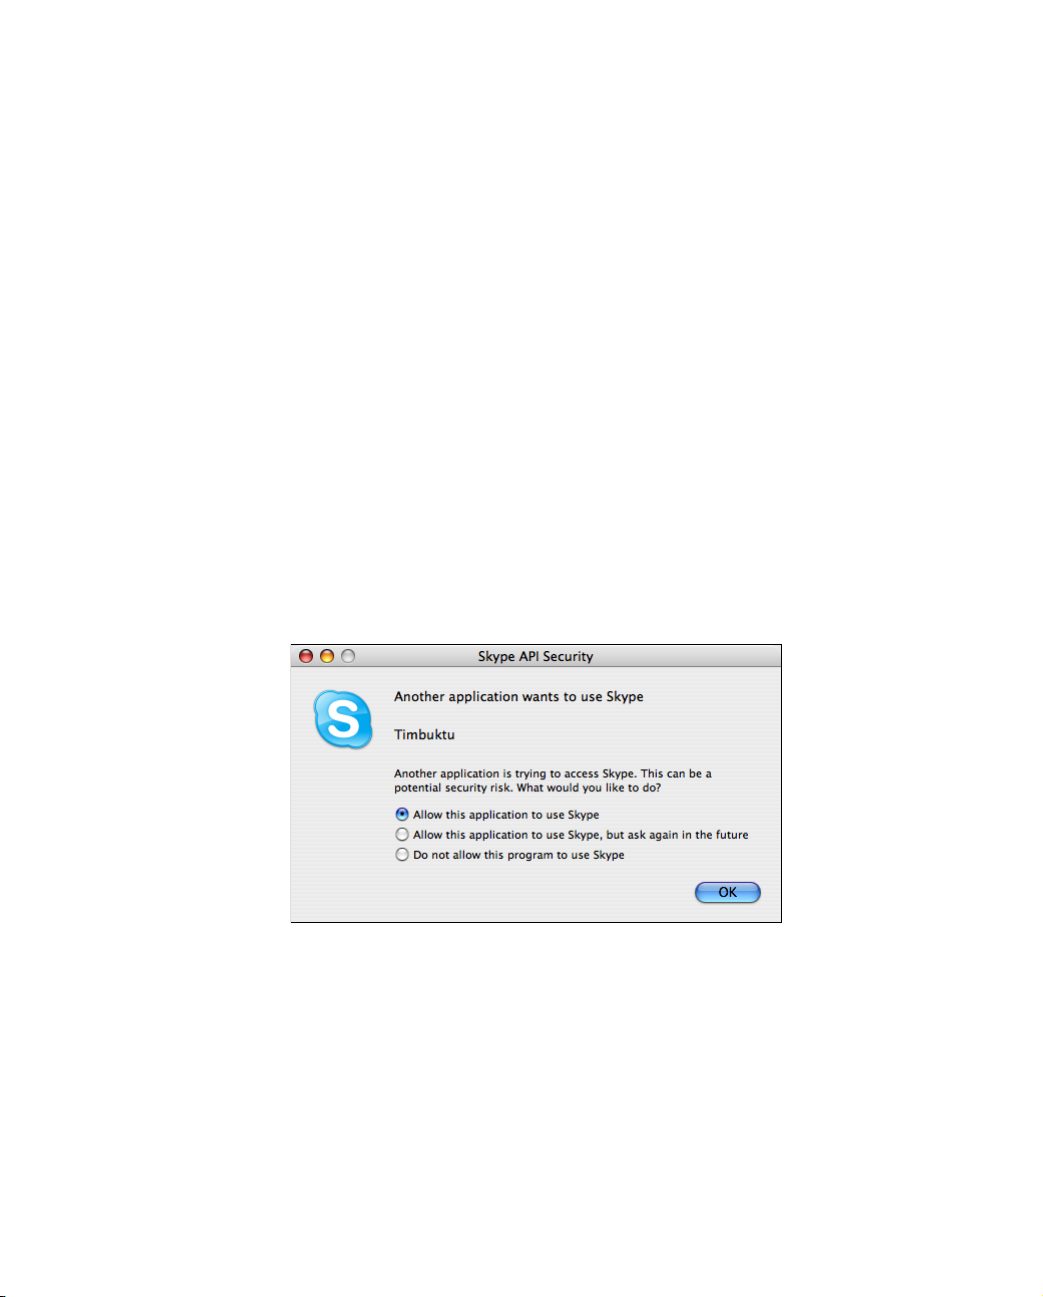
Allowing Skype Access
If the Skype application (version 1.4 or later) is installed and running on your computer, the Timbuktu Pro application will attempt to access it automatically when
you run it for the first time. Skype will present a warning dialog box.
Select the Allow this Program to Use Skype option and click OK.
Page 24

Getting Started with Timbuktu Pro for Macintosh | 24
Upgrading your Timbuktu Pro Installation to Timbuktu Pro version 8
If you have previously installed Timbuktu Pro version 6 or version 7, or a pre-release of Timbuktu Pro version 8, you may upgrade to Timbuktu Pro version 8 using
the following procedure. If you have Timbuktu Pro 5.x or earlier installed, Netopia
recommends that you uninstall it completely before installing Timbuktu Pro version 8.
Timbuktu Pro version 8 includes an “auto-update” feature that eliminates the
need for a restart when you upgrade from Timbuktu Pro version 6 or version 7.
To upgrade to Timbuktu Pro version 8
You must be logged in as an administrator to upgrade Timbuktu Pro on Mac OS X.
1. If you have modified your existing Timbuktu Scripts and Timbuktu Startup
Items folders, or any address book files in the Timbuktu Pro folder, and wish
to save them, drag them to your desktop.
2. If the Timbuktu Pro application is open, quit the Timbuktu Pro application by
choosing Quit from the Timbuktu menu. (The Timbuktu Host will still be running, but the application itself is shut down.)
3. Drag the Timbuktu Pro folder from the Mac OS X Applications folder to the
Trash. Do not empty the trash.
4. If you downloaded Timbuktu Pro from the Web, double-click the Timbuktu
Pro.dmg file to mount the disk image. Drag the Timbuktu Pro folder to your
Mac OS X Applications folder.
If you received a Timbuktu Pro CD, open it and drag the Timbuktu Pro folder to
your Mac OS X Applications folder.
If you dragged any existing folders to the desktop in Step 1, drag them to the
new Timbuktu Pro folder to restore them.
5. Open the new Timbuktu Pro folder and launch the Timbuktu Pro application.
Timbuktu will alert you that it has detected another version of Timbuktu Pro
running and will ask your permission to install the new version. Click Install.
6. When requested, enter your Mac OS X user name and password.
Note: If you are using a Timbuktu Pro connection to upgrade a remote Tim-
buktu Pro computer, your connection will be terminated at this time. Wait a
Page 25

Getting Started with Timbuktu Pro for Macintosh | 25
moment for Timbuktu Pro to restart on the remote computer, and then
reconnect.
7. Accept the License Agreement.
8. In the Activation Key dialog box, enter your Timbuktu Pro version 8 Activation
Key. The Activation Key is included in the Welcome email you received from
Netopia, or in your CD case.
9. Click OK to close the Activation Key dialog box and start using Timbuktu Pro.
You do not need to restart your computer.
Note: Before your computer can make or accept Skype connections, you must
allow the Skype integration as described in “Allowing Skype Access” on page 23.
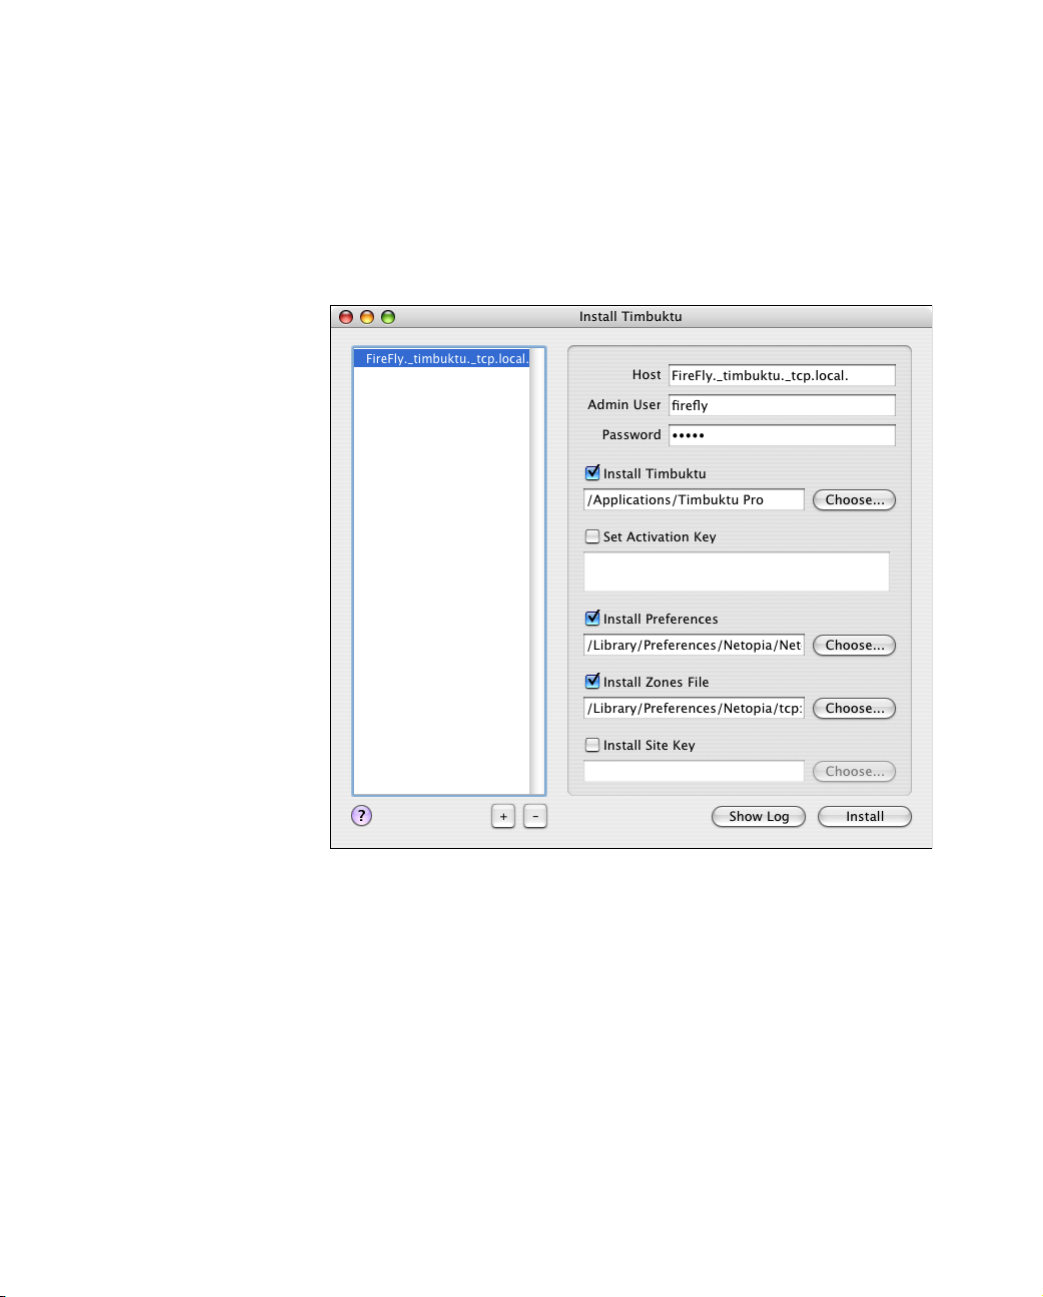
Push Installing Timbuktu Pro on a Remote Computer
With Timbuktu Pro version 8, you may now “push” install Timbuktu Pro on the remote computers on your network which have enabled Remote Login. This process
will also upgrade Timbuktu Pro on computers that are running a Timbuktu Pro version older than the version on your computer. You may upgrade Timbuktu Pro
even if it is currently running on the remote computer.
Before you can perform a push installation, you must perform the regular Timbuktu Pro version 8 installation process on at least one computer. This computer
can then perform the push installation on the other computers on your network.
You may push install Timbuktu Pro to computers running Timbuktu Pro version 6
or later. The installation is performed over a secure SSH connection.
Note: You must have a Mac OS X user name and password on the remote computer, and Remote Login must be enabled, to perform the push installation.
To push install Timbuktu Pro
1. In the New Connection window, select or specify the computer on which you
wish to install or upgrade Timbuktu Pro. You may also select multiple computers to perform the Timbuktu Pro push installation on several computers at
once.
You may select or specify the computer on any of the selection tabs. However, only the Bonjour tab displays computers that have Remote Login
enabled but do not yet have Timbuktu Pro installed.
Page 26
Getting Started with Timbuktu Pro for Macintosh | 26
2. From the Service menu, choose Install Timbuktu.
The Install Timbuktu window opens. The computer (or computers) you
selected are listed in the panel on the left side of the window.
Several options and settings will be preset to match the current Timbuktu Pro
installation on the local computer. If necessary, you may change any or all of
these settings. Your new settings will be saved for future installations.
If you selected more than one computer in the first step, you must change the
settings for each computer individually. (The settings for the last computer
will be saved for future installations.)
3. Confirm that the correct computer is specified in the Host text box.
4. Confirm that the user name in the Admin User text box is the Mac OS X user
with Admin privileges on the remote computer. In the Password text box,
enter the password associated with the user in the Admin User text box.
Page 27

Getting Started with Timbuktu Pro for Macintosh | 27
Note: You must enter the admin user’s Short Name. Do not enter the full user
name.
5. Confirm that the Install Timbuktu check box is selected. In the Install Tim-
buktu text box,
• To install or upgrade only the Timbuktu Pro application, make sure the
full path to the application is specified.
• To install or upgrade the entire Timbuktu Pro folder, specify only the path
to the Timbuktu Pro folder.
6. If you are installing Timbuktu Pro for the first time on the remote computer,
and you want it to be immediately available, you will need to set the activation key.
Select the Set Activation Key check box. Then enter an activation key for the
new Timbuktu Pro installation. If you do not enter an activation key for a new
installation, you will need to enter it on the remote computer later.
Note: If you are upgrading or reinstalling an existing Timbuktu Pro version 8
installation, you will not need to supply the activation key.
7. If desired, you may install Timbuktu Pro Preferences, a Zones file, and a Site
Key. Select or clear the options as desired.
Note: If you are installing Timbuktu Pro for the first time on the remote computer, and you want it to be immediately available for incoming connections,
you must install Preferences that allow incoming connections. By default,
Timbuktu Pro does not allow incoming connections.
8. If you selected more than one computer in the first step, choose the next
computer in the panel on the left side of the window. Then set its installation
parameters as desired. In particular, make sure to supply a unique activation
key.
9. If you wish to watch the progress of the installation as it occurs, click Show
Log to open the Console. The installation log will appear in the Console window as it progresses.
Installation information is also written to the system log on the remote
computer.
10. Click Install.
11. When installation is complete, you will be notified. Click OK to close the
Install Timbuktu window.
On the remote computer, Timbuktu Pro will be started.
Page 28

If the remote computer has the necessary Timbuktu Pro activation key and the appropriate Preferences, it will be ready to accept incoming Timbuktu Pro connections. If not, you will need to enter the activation key and set Preferences directly
on the remote computer.
In addition, before the remote computer can accept Skype connections, the user
of the remote computer must allow the Skype integration as described in “Allow-
ing Skype Access” on page 23.
Uninstalling Timbuktu Pro
If you wish to uninstall Timbuktu Pro from your computer, please use the following
procedure.
1. Log in to your Macintosh as an administrator.
2. Quit Timbuktu Pro by choosing Quit Timbuktu from the Timbuktu menu. (The
Timbuktu Host will still be running, but the application itself is shut down.)
3. Drag the Timbuktu Pro folder from the Applications folder to the trash. Do not
empty the trash.
4. Restart your computer.
Getting Started with Timbuktu Pro for Macintosh | 28
Page 29

Chapter 3: Setting Up Timbuktu Pro
Once you have installed Timbuktu Pro, you can review and change your configuration settings. This chapter describes how to start and exit Timbuktu Pro and how
to set Timbuktu Pro configuration preferences.
Starting Timbuktu Pro
When you install Timbuktu Pro on Mac OS X, the Timbuktu Pro application icon is
displayed on the right side of the menu bar. The icon is automatically positioned
in the available space on the menu bar.
Click the Timbuktu Pro icon to open the Connection menu, which lets you quickly
open Timbuktu Pro, turn transports on and off, monitor incoming connections,
and get information about Timbuktu Pro. The Connection menu appears on the
right side of the menu bar anytime the Timbuktu Host is running. (See the following section, “The Timbuktu Host.”)
To work with Timbuktu Pro or establish an outgoing connection, you must open
the Timbuktu Pro application. Click the Connection menu and choose Open Tim-
buktu Pro.
If the Connection menu does not appear on your screen, the Timbuktu Host has
been shut down. To restart Timbuktu Pro, open the Timbuktu Pro folder on your
computer and double-click the Timbuktu Pro icon.
The Timbuktu Host
Timbuktu Pro no longer uses the “Timbuktu Extension,” which ran in the background on Mac OS Classic computers. On Mac OS X, Timbuktu Pro uses the Timbuktu Host, a background application which monitors incoming Timbuktu Pro
connections. When a connection is received, the Timbuktu Host opens the full
Timbuktu Pro application (if it is not already running) and processes the connection normally.
| 29
Page 30

Getting Started with Timbuktu Pro for Macintosh | 30
By default, when you start your Macintosh, the Timbuktu Host is started automatically. Timbuktu Pro is available even before you log in, allowing incoming connections to occur anytime your Macintosh is turned on. Also by default, the
Timbuktu Host remains running when you quit Timbuktu Pro. The Timbuktu Pro
icon appears in the menu bar to remind you that the Timbuktu Host is running
and that remote users can still access your Macintosh.
You can disable the Timbuktu Host using the Only Accept Incoming Connections
When Application is Open option on the General tab in the Preferences dialog box
(see page 32). When this option is enabled, the Timbuktu Host does not start automatically when you start your computer; when you quit Timbuktu Pro, both the
application and the Timbuktu Host will shut down. This prevents remote users
from using Timbuktu Pro to connect to your computer.
To start Timbuktu Pro when the Only Accept Incoming Connections When Applica-
tion is Open option is enabled, open the Timbuktu Pro folder on your computer
and double-click the Timbuktu Pro icon.
Quitting Timbuktu Pro
Quitting Timbuktu Pro closes all Timbuktu Pro windows and dialog boxes and terminates all outgoing connections you have made. However, as long as the Timbuktu Host is running, incoming connections will not be affected. Remote users
will still be able to connect to your computer using Timbuktu Pro.
To shut down the Timbuktu Host when you quit Timbuktu Pro, open the Preferences dialog box and click the General tab. Select the Only Accept Incoming Con-
nections... option. When this option is selected, the Timbuktu Host is shut down
when you quit Timbuktu Pro. (For details, see the previous section, “The Timbuktu
Host.”)
To quit Timbuktu P ro
• From the Timbuktu menu, choose Quit.
Page 31

Getting Started with Timbuktu Pro for Macintosh | 31
Customizing Your Timbuktu Pro Preferences
To customize the behavior of your Timbuktu Pro installation, click the Setup menu
and choose Preferences. The Preferences dialog box lets you specify certain con-
figuration options for Timbuktu Pro. The tabs in the Preferences dialog box are as
follows:
•General—Controls Timbuktu Pro general and startup preferences. See “Set-
ting General Preferences” on page 32.
•Check for Update—Enables the Check for Update feature and allows you to
check for updates immediately. See “Checking for Updates” on page 33.
•Features—Enables and disables Timbuktu Pro transports and features. See
“Using the Features Manager” on page 34.
•Master Password—Sets an optional master password, which restricts access
to Timbuktu Pro’s configuration settings. See “Setting Master Password Pref-
erences” on page 36.
•Password Rules—Sets restrictions on the passwords used by your Registered
Users. See “Setting Password Rules” on page 38.
•Sound—Specifies the sounds that play when Timbuktu Pro performs certain
actions. See “Using the Sound Manager” on page 39.
• Messages Received—Specifies the location of the Messages Received folder.
See “Setting Messages Received Options” on page 40.
•Control/Observe—Sets screen-sharing window preferences. See “Setting
Screen-Sharing Preferences” on page 41.
•IP Locator—Specifies the email address Timbuktu Pro sends to the Internet
Locator server. See “Setting IP Locator Preferences” on page 42.
• Proxy Server—Specifies the proxy server used to make Timbuktu Pro connections to computers outside your local network. See “Setting Proxy Server Pref-
erences” on page 44.
•TCP Contact Port—Specifies the TCP port used for Timbuktu Pro traffic. See
“Setting the TCP Contact Port” on page 44.
•TCP Security—Sets connection-security options. “Setting Connection-Secu-
rity Options” on page 45.
•Dial Direct—Sets Dial Direct preferences. See “Setting Dial Direct Prefer-
ences” on page 46.
The following sections describe each of these tabs.
Page 32

Getting Started with Timbuktu Pro for Macintosh | 32
Setting General Preferences
The General tab in the Preferences dialog box lets you control the appearance of
the Timbuktu Pro Button Bar and some of Timbuktu Pro’s basic functionality. It
also lets you determine whether the Timbuktu Host will still run when you quit the
Timbuktu Pro application.
To change your General options
1. From the Setup menu, choose Preferences.
2. Click the General tab.
3. In the Button Bar area, choose options to control the appearance of the Button Bar. Choose Display Button Text to display the name of each Timbuktu Pro
service next to its icon.
4. Select or clear any of the following checkboxes.
• Show Splash Screen specifies whether or not to display the Timbuktu Pro
logo when you start the program. Timbuktu Pro starts more quickly when
the splash screen is turned off.
• Allow Only One User prevents more than one Guest User or Registered
User from connecting to your computer at a time. If, for example, multiple
users have access to an email-equipped computer, you may want to use
this option to make sure that each user can process his or her email in
private. (Note, however, that a second remote user may connect by asking for permission. This allows you to work on a remote computer
securely, but still collaborate with other users when needed.)
• Log Out this Computer causes Timbuktu Pro to log out all users when a
remote Timbuktu Pro session ends. Any unsaved changes are lost when
Page 33

Getting Started with Timbuktu Pro for Macintosh | 33
the computer is restarted. This option is available when you select the
Allow Only One User option; it allows each user to access the computer in
a “clean” state, and protects any cached passwords or open files left by
the previous user.
• Only Accept Incoming Connections... determines whether the Timbuktu
Host will remain running when you quit the main Timbuktu Pro application. If you select this option, the Timbuktu Host will be shut down when
you quit Timbuktu Pro. This prevents remote users from connecting to
your computer, but it also prevents Timbuktu Pro from starting automatically when you restart your computer. For more information about the
Timbuktu Host, see “The Timbuktu Host” on page 29.
5. Click Save to save your changes.
Checking for Updates
The Check for Update tab in the Preferences dialog box enables and disables the
Check for Update feature, which allows Timbuktu Pro to check automatically for
updated versions. By default, the check occurs silently once per week when you
launch Timbuktu Pro. When an update is found, Timbuktu Pro opens your Web
browser and loads the Web page for the updated version.
To disable the automatic check for updates, clear the Check Automatically check
box. To check for an update immediately, click Check Now.
Note: The top of the Check for Update tab displays the URL that will be checked for
the update. This URL will vary depending on your Mac OS X version and the current version of Timbuktu Pro running on your computer.
Page 34

Getting Started with Timbuktu Pro for Macintosh | 34
Using the Features Manager
The Features tab in the Preferences dialog box allows you to turn on and off Timbuktu Pro services, transports, and features.
Select or clear the check mark in front of a transport or feature to enable or disable the selected option.
Remember that when you disable a transport, you will not be able to make or receive Timbuktu Pro connections with that transport. The transport’s associated
tab will be removed from the New Connection window.
Address Book Required for user-created address books—lists of frequently
accessed computers; address book entries can be doubleclicked immediately with no need to browse the network.
Dial Direct Transport Required for outgoing and incoming Dial Direct connections.
A modem, ISDN, terminal adapter, or other serial device is
required for this service.
TCP/IP Transport Required when using a Timbuktu Pro service on any type of
TCP/IP network.
TCP/IP Browser Required for outgoing TCP/IP connections (over a local
TCP/IP network, SLIP, PPP, or the Internet).
TCP/IP Scanner Required to browse your TCP/IP network for active Timbuktu
Pro computers.
Page 35

Getting Started with Timbuktu Pro for Macintosh | 35
Control/Observe Host
Required for incoming Control or Observe connections.
Control/Observe Client
Required for outgoing Control or Observe connections.
Send and Receive Messages
Required for incoming and outgoing Send connections
(sending and receiving FlashNotes and files).
Exchange Files Host Required for incoming Exchange connections.
Exchange Files Client
Required for outgoing Exchange connections.
Chat Service Required for incoming and outgoing Chat connections.
Intercom Service Required for incoming and outgoing Intercom connections.
Notify Service Required for incoming and outgoing Notify connections.
Invite Service Required for incoming and outgoing Invite connections.
Profile Host Required for incoming Profile connections.
Profile Client Required for outgoing Profile connections.
Bonjour Required to use Bonjour to browse your network for active
Timbuktu Pro and Remote Login computers.
Push Install Required to push install Timbuktu Pro on other computers.
Help Desk Mode Enables Help Desk Mode on the computer.
WARNING: Enable this feature with caution! Once enabled,
it cannot be disabled. For more information about Help
Desk Mode, see the following section.
Skype Required for incoming and outgoing Skype connections.
Using Help Desk Mode
The Help Desk Mode feature “locks down” Timbuktu Pro and allows only incoming access. It allows remote users (such as the Help Desk) to access your
Page 36

Getting Started with Timbuktu Pro for Macintosh | 36
computer for maintenance and troubleshooting, but prevents you from establishing outgoing Timbuktu Pro connections or changing any Timbuktu Pro settings.
You will be able to receive and reply to messages with the Send service, but you
will not be able to forward messages or send new ones.
When you enable the Help Desk Mode feature, the following restrictions will be
imposed:
• Only the TCP/IP transport is available. (Skype and Dial Direct are disabled).
Incoming TCP/IP access is locked on, and cannot be disabled.
• The New Connection window is disabled and outgoing connections from
other windows, such as Chat, are prohibited.
• The Settings menu will be disabled; the Preferences and Define Users dialog
boxes will not be accessible.
• The Scripts menu will not appear.
• Certain menu options will change or disappear. For example, the Open Tim-
buktu option will change to Open Messages Received, and the Admit Tempo-
rary Guest option will not appear.
• Timbuktu Pro will not perform the automatic check for updates.
WARNING: Enable this feature with caution! Once enabled, it cannot be disabled.
Setting Master Password Preferences
When you create a master password, you can protect access to those parts of Timbuktu Pro that change Timbuktu Pro’s configuration and security settings—the
Preferences, Incoming Access, and Define Users dialog boxes. When you create a
master password, you can specify the areas of Timbuktu Pro that are passwordprotected. When you attempt to access the password-protected areas, you will
need to enter your master password before you can proceed.
If you protect your Timbuktu Pro settings with a master password, be sure you
choose a password you will remember. If you forget your master password, you
will need to uninstall and reinstall Timbuktu Pro to reset it, and all configuration
settings and custom access privileges will be lost.
To set or change your master password
1. From the Setup menu, choose Preferences.
2. If you have an existing master password, enter it when prompted.
3. Click the Master Password tab.
Page 37

Getting Started with Timbuktu Pro for Macintosh | 37
4. Enter the new password in the Password box. For your security, the characters
you enter are displayed as asterisks. Passwords are case-sensitive.
5. Re-type the master password in the Confirm box.
6. In the Require Master Password When area, select the actions that will
require a master password. For maximum security, select all options. Or
choose only the options that apply to your situation.
7. C li c k Save to save your changes.
Timbuktu Pro will not let you close the Preferences dialog box unless the Pass-
word and Confirm fields match exactly.
Removing Your Master Password
If you wish to unprotect your Timbuktu Pro settings, you may remove your master
password. Remember if you do so that anyone with access to your computer will
be able to change your Timbuktu Pro settings.
To remove your master password
1. From the Setup menu, choose Preferences.
2. Enter your existing master password.
3. Click the Master Password tab.
4. Delete the text from both the Password and Confirm boxes.
5. Click Save to save your changes.
Page 38

Getting Started with Timbuktu Pro for Macintosh | 38
Setting Password Rules
You can set password rules to increase the security of Registered User access to
your computer. Your password rules can define an expiration date on all passwords, set a minimum length for all passwords, and require new passwords created by users to be different from any of their three previous passwords.
Note that password rules apply only to Timbuktu Users, and not to Mac OS X Registered Users. Mac OS X User passwords are maintained by the operating system.
To set password rules, choose Preferences from the Setup menu, and click the
Password Rules tab.
Select or clear any or all of the following options.
Allow Users to Save Passwords in Connection Documents
Enables Registered Users to create Connection Documents that include the user
name and password they use to access your computer. Enabling this option
makes it easier for Registered Users to connect quickly, but it also enables anyone with access to their computers to connect to your computer.
New Passwords May Match User’s 3 Previous Passwords
Enables Registered Users to reuse recently-used passwords. If the password has
been compromised, this may reduce your security.
Page 39

Getting Started with Timbuktu Pro for Macintosh | 39
Allow Common Passwords
Enables Registered Users to use a password that may be easily guessed. This may
reduce your security.
Minimum Number of Characters in Passwords
Requires Registered Users to choose passwords of a minimum length, which may
make them more difficult to guess.
Number of Days Until Password Expires
Requires Registered Users to create new passwords on a regular basis.
Using the Sound Manager
The Sound tab in the Preferences dialog box allows you specify the sounds that
play when Timbuktu Pro performs certain actions. To specify a sound, select an
action in the window and choose a sound from the sound list. The sound is
played to confirm your selection.
The sound list is created from the system sounds inside your Macintosh’s system
folder. To add new sounds to the system folder, see your Mac OS documentation.
Click the Default Sounds button to return all sounds to their default settings.
Page 40

Getting Started with Timbuktu Pro for Macintosh | 40
Setting Messages Received Options
When you receive a FlashNote from another computer, the FlashNote and any attached files are stored in your messages received folder, which you specify in the
Preferences dialog box. You can also designate how much of your disk space
should be protected from temporary storage of FlashNotes and their enclosures
and specify how Timbuktu Pro notifies you of incoming FlashNotes.
To change your Messages Received options
1. From the Setup menu, choose Preferences.
2. Click the Messages Received tab.
3. In the Messages Received Folder area, specify the disk location where incoming FlashNotes and files will be stored.
To protect some disk space from being filled by received files, enter the
desired number of gigabytes in the Don’t Allow Messages to Fill field. This
prevents users from filling up your disk with FlashNotes and files.
If someone attempts to send files or folders that would require more disk
space on your computer than is available, Timbuktu Pro notifies them that
there isn’t enough disk space to carry out the file transfer.
This option does not restrict Exchange service file transfers.
4. In the When Messages Arrive area, select the alerts that are displayed when
you receive a FlashNote.
5. Click Save to save your changes.
Page 41

Getting Started with Timbuktu Pro for Macintosh | 41
Setting Screen-Sharing Preferences
Control and Observe sessions take place in a screen-sharing window, which displays the contents of the remote computer’s desktop. The Control/Observe tab in
the Preferences dialog box lets you specify how your computer will behave when
you control or observe another computer. You can also specify how your desktop
will appear when a remote user controls or observes your computer.
To change your Control and Observe options
1. From the Setup menu, choose Preferences.
2. Click the Control/Observe tab.
3. In the When Connecting to Other Computers area, specify whether you wish
to accept scaled fonts, which may improve performance.
4. In the When Other Users Connect area, specify the number of colors displayed when remote users connect to your computer. Grayscale and low numbers of colors will improve screen-sharing performance.
When you select the Scan Aggressively for Screen Changes option, screen
changes are detected as they have been in previous versions of Timbuktu
Pro. The CPU Meter is displayed at maximum usage when there is a screensharing guest connected to your computer. When this option is not selected,
CPU usage is greatly reduced. However, some images are not captured as
well during screen-sharing sessions. By default, this option is not selected.
Finally, select or clear the Lock Out This Computer’s Keyboard and Mouse
option. When this option is selected, and the computer is hosting an
Page 42

Getting Started with Timbuktu Pro for Macintosh | 42
incoming screen-sharing session, keyboard and mouse activity on the local
computer will have no effect.
5. Click Save to save your changes
The Control Menu
The Control menu includes a number of options that you may change before or
during a screen-sharing session. Some options are not available except during an
active screen-sharing session.
Most importantly, you may change the color depth for image data sent from a remote computer. Reducing the color depth may increase screen-sharing performance. You may change the color depth before or during a screen-sharing
session.
For information about the Control menu and its options, see “Using The Control
Menu” on page 79.
Setting IP Locator Preferences
When you set up Timbuktu Pro, you can enter your email address on the IP Locator
tab in the Preferences dialog box. When you specify an email address here, it is
registered with the Internet Locator server. Remote users can then connect to your
computer by entering your email address on the TCP/IP tab in the New Connection
Window. Users will not need to know your IP address to make the connection.
Page 43

Getting Started with Timbuktu Pro for Macintosh | 43
Select the Register Public Address check box to register your computer’s external
IP address—for example, the IP address of a NAT router—rather than the local or
internal IP address, which may not be recognized outside your network.
Note: If there are multiple host computers behind the NAT router, you may also
wish to set a unique TCP contact port for each computer. See “Setting the TCP
Contact Port” on page 44.
Advanced Settings
Click the Advanced button to override the default Internet Locator server or default IP address for your computer. Your network administrator will notify you if
you need to change these settings.
Override IP Locator Server
Some network administrators may wish to use an Internet Locator server other
than the default server. Enter the name or IP address provided by the administrator in the IP Locator Server box.
Unless your network administrator notifies you that another Internet Locator
server has been set up, leave this setting blank.
Override Registered IP Address
You may need to change the IP address that Timbuktu Pro sends to the Internet
Locator server if you are behind certain types of routers or firewalls. Enter the IP
address provided by the administrator in the Registered Address box.
Unless your network administrator notifies you that another IP address is required, leave this setting blank.
Page 44

Getting Started with Timbuktu Pro for Macintosh | 44
Setting Proxy Server Preferences
Timbuktu Pro allows connections over an HTTP proxy server. Depending on the
configuration of your firewall, you may need to use a proxy server when you’re
making Timbuktu Pro connections to computers outside your local network. Your
network administrator can tell you if you need to use this feature and help you
configure your Timbuktu Pro preferences.
Specify a proxy server on the Proxy Server tab in the Preferences dialog box.
Setting the TCP Contact Port
The TCP Contact Port tab in the Preferences dialog box allows you to specify the
TCP port used for Timbuktu Pro traffic. This allows you to use more than one Timbuktu Pro host computer behind a NAT router, by directing traffic intended for a
specific computer to a unique port on that computer.
Page 45

Getting Started with Timbuktu Pro for Macintosh | 45
Note: To ensure successful connections, you may also wish to register your computer’s external IP address, rather than the local or internal IP address, which may
not be recognized outside your network. See “Setting IP Locator Preferences” on
page 42.
Setting Connection-Security Options
The TCP Security tab in the Preferences dialog box allows you set several options
related to connection security.
Page 46

Getting Started with Timbuktu Pro for Macintosh | 46
• Select the Only Accept Secure (SSH) Incoming Connections check box to allow
incoming connections only when they are secured with SSH. Note that this
option will require the remote user to have a Mac OS X User account on your
computer, which will limit incoming access to other users of Timbuktu Pro
version 8.
• Select the Register with Bonjour check box to register Timbuktu Pro’s host
service with Bonjour whenever Timbuktu Pro starts up. This allows the remote
users on your network to find your computer for Timbuktu Pro connections. If
you disable this option, other Timbuktu Pro users will not be able to use the
Bonjour tab to connect to your computer.
• Select the Respond to TCP/IP Scanner check box to enable your computer to
respond when another Timbuktu Pro computer uses the TCP/IP Scanner to
search the network. If you disable this option, other Timbuktu Pro users will
not be able to use the TCP/IP Scanner tab to connect to your computer.
Setting Dial Direct Preferences
The Dial Direct tab in the Preferences dialog box lets you specify your modem’s
properties and control the way in which your modem responds to incoming calls.
In most cases, the default settings are suitable. Do not change the Modem Con-
nection or Modem Handling settings unless you are experienced with modem
configuration.
By default, Timbuktu Pro will not answer incoming Dial Direct calls. If you wish to
accept Dial Direct connections, you must set up Dial Direct privileges in the Define
Users dialog box. You may grant Dial Direct access to Guest Users (which allows
anyone to use Dial Direct to connect to your computer) or assign it only to specific
Registered Users. See “Setting up Timbuktu Pro for Incoming Dial Direct Access”
on page 102.
To change your Dial Direct options
1. From the Setup menu, choose Preferences.
2. Click the Dial Direct tab.
Page 47

Getting Started with Timbuktu Pro for Macintosh | 47
3. In the Modem Connection area, select the modem or port that you want to
use with Dial Direct. Make sure that the modem or port you select is not being
used by some other application.
4. Under Modem Handling, choose a radio button and provide the required
modem configuration information. You may determine the degree to which
you want to customize your modem settings.
• Choose Standard to let Timbuktu Pro determine your modem configura-
tion. The Standard setting is suitable for the majority of modems.
• Choose Special and click the Modem button to select a preset configura-
tion for your modem. (See the following section, “Modem Picker.”) You
can select your own modem-specific configuration without too much configuration detail. Choose a modem configuration from your computer’s
list of modem configuration (INF) files, stored in the Timbuktu Pro application bundle on Mac OS X and in the System Folder:Extensions:Modem
Descriptions folder on Mac OS 8 and 9.
• Choose Custom to use all of Timbuktu Pro’s tools to fine-tune your
modem settings. Custom enables all of the Modem Handling options:
Modem, Port Speed, Make Modem Ignore DTR, and Custom Init. Unless
you are experienced with modem configuration, custom modem configurations are not recommended. See your modem documentation for more
details.
5. In the When Answering Calls area, specify the number of times your modem
should ring before answering an incoming call. The default setting is 1.
Page 48

Getting Started with Timbuktu Pro for Macintosh | 48
Note that calls will not be answered if you have turned off the Dial Direct
transport in the Incoming Access dialog box.
You may also turn on your modem speaker if you wish to monitor the progress
of your outgoing connections.
6. Click Save to save your changes.
Modem Picker
The Modem Picker allows you to select the configuration data that applies to your
modem. When you specify the Special modem handling option on the Dial Direct
tab in the Preferences dialog box, you can use the Modem Picker to select a preset configuration for your modem.
The Modem Picker lists modem manufacturers and their modem types. The Modem Picker creates its list of modem configuration (INF) files from the INF files
stored in the Timbuktu Pro application bundle on Mac OS X.
Choose your modem manufacturer and model from the list and click OK.
If you don’t find a modem make and type for the modem that’s attached to your
computer, choose the Generic Modem option. If the Generic Modem selection
doesn’t work, see the following section, “Modem Information Files and Custom
Modem Configuration.”
Modem Information Files and Custom Modem Configuration
To identify and set up your modem, Timbuktu Pro uses a subset of the Microsoft
INF file format. This lets you use Microsoft INF modem files, which are created for
Windows, directly with Timbuktu Pro for Macintosh.
If you must specify your modem configuration manually, choose Standard or Cus-
tom in the Modem Handling area on the Dial Direct tab in the Preferences dialog
box. You can add a new modem information file or use a custom modem initialization string. Unless you are experienced with modem configuration, custom modem configurations are not recommended. See your modem documentation for
configuration information, or contact Netopia Technical Support.
Page 49

Getting Started with Timbuktu Pro for Macintosh | 49
Preparing to Make Dial Direct Connections
Before you can use Timbuktu Pro to make outgoing Dial Direct connections, you
must set up your modem and calling locations.
To set up Timbuktu Pro for incoming Dial Direct connections, see “Setting up Tim-
buktu Pro for Incoming Dial Direct Access” on page 102.
Configuring Timbuktu Pro for Your Modem
Configure your modem for the Dial Direct feature using the Dial Direct tab in the
Preferences dialog box. See “Setting Dial Direct Preferences” on page 46.
Setting Your Calling Location
Before you can use the Dial Direct service to make outgoing connections, you’ll
need to enter your calling location.
Your calling location tells Timbuktu Pro how to dial out of various telephone environments, such as different office, home, or hotel locations. After you’ve defined
your calling locations, you need only select the one that matches your current location before using the Dial Direct feature to place a call.
Your calling location is particularly important if you’re using callback. If you’re using callback, make sure that your calling location information is filled out accurately and that the appropriate calling location is selected. The computer that will
be calling you back reads your telephone number from the calling location you
specify. If the number is incorrect, the callback will fail. For more information
about callback, see “Choosing Callback Options” on page 104.
To enter a calling location
1. Make sure you have set your Dial Direct preferences. See “Setting Dial Direct
Preferences” on page 46.
2. From the Setup menu, choose Calling Locations.
3. In the Calling Locations dialog box, click New to create a new location.
4. In the New Location dialog box, enter the relevant information in each field.
Page 50

Getting Started with Timbuktu Pro for Macintosh | 50
• The Dialing Prefix field can be used to disable call waiting before making
a modem connection (contact your local telephone company to determine the correct prefix) or to reach an outside line if you’re dialing from
within a company telephone network.
• Use the credit-card information fields if you must pay for the call using a
credit card.
• The Country Code, Area Code, and Phone Number boxes should contain
the number you are calling from. This information is used for callback.
See “Choosing Callback Options” on page 104 for information about
each option.
5. Click Save to save your changes.
Controlling Access to Your Computer
There are several ways to maintain security and restrict access to your computer
by other Timbuktu Pro computers. You may use a master password to prevent anyone with direct access to your computer from changing your Timbuktu Pro preferences. See “Setting Master Password Preferences” on page 36.
Before your computer will accept any incoming connections, you must enable one
or more of the transports in the Incoming Access dialog box. You may also enable
and disable incoming access by selecting transports in the Connection menu. See
“Opening Transports for Incoming Connections” on page 100.
In addition, no remote user can connect to your computer without your prior authorization. There are several levels of remote access: you may assign privileges
to all Guest Users, allow remote users to ask for permission to use unassigned
services, and create Registered Users with specific privileges. The setup of various security measures is discussed in detail in “Security” on page 89.
Finally, to quickly prevent all user access to specific services or transports, you
may turn off the selected service on the Features tab in the Preferences dialog
box. See “Using the Features Manager” on page 34.
Page 51

Chapter 4: Making a Timbuktu Pro Connection
This chapter discusses how you can use the New Connection window to connect
to remote computers. The different tabs in the New Connection window give you
several different ways to find the remote computer you need, and the Button Bar
allows you to connect quickly to the computer you’ve selected.
As long as you have been granted access as a Guest User, Ask for Permission
User, or Registered User (either a Mac OS X User or a Timbuktu User), you can connect to any computer that is running Timbuktu Pro over a TCP/IP network. If you
have a 56 Kbps or faster modem, you may also make a direct modem-to-modem
connection, with no network required.
The New Connection Window
The New Connection window contains tabs that allow you to search for or specify
remote Timbuktu Pro computers. It also features a tab that allows you to organize
your Timbuktu Pro address books. Once you’ve specified the computer you want,
you can begin a Timbuktu Pro connection.
Each tab in the New Connection window is displayed only if the associated software has been installed and configured, and if the feature is enabled in the Features Manager in the Preferences dialog box. For example, the Dial Direct tab may
not appear if your computer does not have a modem, and the Skype tab may not
appear if you do not have Skype installed. The Skype or Bonjour tab may not ap-
pear if you disabled the Skype or Bonjour option in the Features Manager (see
“Using the Features Manager” on page 34).
You’ll use the New Connection window whenever you need to find or enter a Timbuktu Pro address for the first time. If all the addresses you need have been
saved in an address book, you can leave the New Connection window closed and
work directly from your address book.
To display the New Connection window, click the File menu and choose New
Connection.
| 51
Page 52

Getting Started with Timbuktu Pro for Macintosh | 52
You can establish a Timbuktu Pro connection by specifying a remote computer in
the New Connection window and then choosing a service from the Button Bar or
the Services menu.
Tabs in the New Connection Window
The New Connection window includes multiple tabs: Address Books, Bonjour,
Dial Direct, Skype, TCP/IP, and TCP/IP Scanner.
Note: Mac OS X does not support AppleTalk. Previous Timbuktu Pro users will
notice that the AppleTalk tab no longer appears in the New Connection window.
Address Books Tab
The Address Books tab in the New Connection window lists your Timbuktu Pro ad-
dress books. (They are also listed in the File menu.) You can use address books to
keep your favorite addresses organized. Use multiple address books to group addresses into convenient clusters: for example, business contacts, friends, and
family. See “Using the Address Books” on page 64.
Bonjour Tab
The Bonjour tab in the New Connection window allows you to search your local
network for active Timbuktu Pro computers and connect without needing to enter
the IP address. It also displays computers with Remote Login active, even if they
do not have Timbuktu Pro installed. You can use the Bonjour tab to launch a push
Page 53

Getting Started with Timbuktu Pro for Macintosh | 53
installation of Timbuktu Pro to another computer. See “Using the Bonjour Tab to
Find a Remote Computer” on page 61.
Dial Direct Tab
The Dial Direct tab in the New Connection window allows you to make a direct modem-to-modem connection to another Timbuktu Pro computer equipped with a
56 Kbps (or faster) modem and a version of Timbuktu Pro that supports Dial Direct
connections. No TCP/IP network connection is required. See “Making a Dial Direct
Connection” on page 67.
Skype Tab
The Skype tab in the New Connection window allows you to use the Skype transport to connect to remote computers. This may be particularly useful when you
wish to connect to a computer behind a firewall or NAT router. See “Using the
Skype Tab to Find a Remote Computer” on page 58.
TCP/IP Tab
The TCP/IP tab in the New Connection window lets you connect to a remote computer on a TCP/IP network using its IP address or DNS name. You may also use the
remote user’s email address to make a connection if that user is registered with
Netopia’s Internet Locator Server. See “Using the TCP/IP Tab” on page 55.
TCP/IP Scanner Tab
The TCP/IP Scanner tab in the New Connection window helps you find and connect to remote computers, even when you don’t know their IP addresses, by
browsing your local network for active Timbuktu Pro computers. Once the desired
computer is found, you may connect to it without leaving the TCP/IP Scanner tab.
See “Using the TCP/IP Scanner to Find a Remote Computer” on page 62.
Page 54

The Button Bar
Timbuktu Pro’s floating Button Bar includes a service button for each Timbuktu
Pro service, as well as and several function buttons.
• The Dial Direct button lets you make direct dial-up connections to modem-
• The Activate Modem button transfers control of your phone line from the tele-
• The Save Address button lets you save any selected address of a remote user
• The Install Timbuktu button enables you to push Timbuktu Pro to computers
The Button Bar allows you to access any of Timbuktu Pro’s services from almost
any Timbuktu Pro window. You can drag an address to any of the service buttons
to initiate a session using that service.
Getting Started with Timbuktu Pro for Macintosh | 54
equipped Timbuktu Pro computers. It appears on the Button Bar if you have
configured Timbuktu Pro properly on the Dial Direct tab in the Preferences di-
alog box.
phone (voice) to the modem (data). It eliminates the need to hang up and redial when you’re dealing with a remote Timbuktu Pro computer and speaking
to its user over a single phone connection.
in a Timbuktu Pro address book.
on your network that do not have it installed. You may also upgrade an existing Timbuktu Pro installation on the remote computer.
Note: The buttons are dimmed when no remote computer’s address is selected.
The Button Bar can be displayed in a vertical or horizontal configuration, with or
without labels. You can set these options on the General tab in the Preferences di-
alog box. (See “Setting General Preferences” on page 32.) When the Button Bar is
hidden, you can display it by choosing Show Button Bar from the Window menu.
Making a New Connection
You can establish a Timbuktu Pro connection to a computer you haven’t used before in several ways. You may enter its IP address, DNS address, or email address
in the TCP/IP tab in the New Connection window. You may use the Skype tab to locate a Skype user and connect to the computer on which the user is active. And
you may use the Bonjour tab or the TCP/IP Scanner tab to search your network for
the computer you want.
Page 55

Getting Started with Timbuktu Pro for Macintosh | 55
You may also establish a Dial Direct connection (see “Making a Dial Direct Con-
nection” on page 67) or reconnect to a computer you’ve connected to in the past
(see “Re-Establishing a Previous Connection” on page 63).
Using the TCP/IP Tab
The most common way to open a new Timbuktu Pro connection is through the
TCP/IP tab in the New Connection window.
To make a new connection
1. In the New Connection window, click the TCP/IP tab.
2. In the address box, enter the address of the remote computer.
You may enter the computer’s IP address or DNS name. If you don’t know the
IP address, and the Internet Locator service is enabled on the remote computer, you may enter the computer user’s email address. See “Setting IP
Locator Preferences” on page 42 for more information about the Internet
Locator.
If you need to specify the Timbuktu Pro port or the SSH port, enter the IP
address in the format
IP address:TB2 port:SSH port
Page 56

Getting Started with Timbuktu Pro for Macintosh | 56
You do not need to enter the port number if you are using the standard port.
For example, if you are using SSH port 36, but the Timbuktu Pro port is standard (port 407), enter
10.10.34.23::36
3. Choose any service from the Service menu or use the Button Bar to click on
the service button that you want to use. For detailed information about each
service, see “The Timbuktu Pro Services” on page 71.
4. To complete the connection to the remote computer, log in as a Registered
User or Guest User, or ask for permission. See the following section, “Logging
In to Complete the Connection.”
Once your connection has been established, you may wish to save it to a Connection Document to allow faster connection in the future. See “Timbuktu Pro Con-
nection Documents” on page 69.
Logging In to Complete the Connection
You can connect to a remote computer as a Guest User, an Ask for Permission
User, or a Registered User. When you begin a connection to a remote computer,
the Log In dialog box will appear on your screen.
Select a connection option and enter your access credentials.
• To connect as a System-Authenticated User, select the Registered User
(Secure) radio button. Enter your system-level user name and password for
the remote computer and click OK. For more information, see the following
section, “Connecting Securely as a System-Authenticated User.”
• To connect with a Timbuktu User account on the remote computer, select the
Registered User radio button. Enter your Timbuktu User credentials and click
Page 57

Getting Started with Timbuktu Pro for Macintosh | 57
OK. For more information, see “Connecting as a Registered User” on page 57.
(You may also change your password if desired or if prompted to do so.)
• If you do not have a Registered User account, you may ask for permission to
access the remote computer. Select the Ask for Permission radio button and
click OK. For more information, see “Connecting as a Guest User or Ask for
Permission User” on page 58. If the user of the remote computer grants your
request, you will be admitted.
• If the remote user has assigned the desired service to Guest Users, select the
Guest radio button and click OK. Your Timbuktu Pro session will begin immediately.
Connecting Securely as a System-Authenticated User
To establish a secure SSH connection, select the Registered User (Secure) option.
Then enter your system-authenticated user name and password for the remote
computer and click OK. Note that the user name and password combination that
you enter must be defined in the remote computer’s operating system.
• To connect securely to a Macintosh computer, enter your Mac OS X user name
and password and click OK. You may enter either your full user name or the
Short Name.
Before you can connect to a Macintosh computer as a System-Authenticated
User, the user of the remote computer must create a Mac OS X Registered
User account within Timbuktu Pro. This Mac OS X User account assigns
access privileges for your Mac OS X user name, the Mac OS X user group to
which you belong, or the wildcard Mac OS X user. (For details about Registered User accounts and how to create them, see “Setting User Access Privi-
leges” on page 89.)
In addition, Remote Login must be enabled with the System Preferences
Sharing panel on the remote computer.
Note: To connect with your Mac OS X credentials, you must use the secure
connection option. You cannot connect with the Registered User option.
• To connect securely to a Windows computer, you must have a Windows user
name and password. In addition, the Windows computer must be configured
to accept SSH connections with Timbuktu Pro.
Connecting as a Registered User
If you do not have system-authenticated access privileges on the remote computer, or if it is running a version of Timbuktu Pro that does not support secure
connections, select the Registered User option. Then enter your Registered User
Page 58

Getting Started with Timbuktu Pro for Macintosh | 58
access credentials for the remote computer and click OK. (If desired, you may select the Add to Keychain checkbox to add the user name and password to your
Keychain. You may also change your password if desired or if prompted to do so.
Note that passwords are case-sensitive.)
Note that, before you can connect as a Registered User, the user of the remote
computer must create your Registered User account and assign access privileges.
Mac OS X users will create a Timbuktu User account, which is a type of Registered
User; Windows users will create a Registered User account.
The remote user will provide you with your user name and password. For details
about Registered User accounts and how to create them, see “Setting User Access
Privileges” on page 89.
Connecting as a Guest User or Ask for Permission User
If you do not have a Registered User account, you will need to connect as a Guest
User or ask for permission to access the remote computer.
To establish a non-secure connection as a Guest User, select the Guest User op-
tion and click OK. If the service you wish to use has been assigned to Guest Users,
your connection will be established.
If you cannot connect as a Guest User, you can ask for permission. Select the Ask
for Permission radio button and click OK. If the user of the remote computer
grants your request, you will be admitted.
Note: The user of the remote computer may have disabled the Ask for Permission
option for the service you’ve requested. If the Ask for Permission radio button is
not available, you must use other means to contact the remote user to be granted
access.
Using the Skype Tab to Find a Remote Computer
The Skype tab in the New Connection window helps you find and connect to remote computers, even when you don’t know their IP addresses, by listing the users from your Skype contact list. You can select a Skype contact to connect to the
computer on which the contact is active.
When you use the Skype tab to connect to a remote computer, Timbuktu Pro uses
the Skype transport to pass connection data. This may allow you to connect to
Timbuktu Pro computers that are not accessible from the TCP/IP tab, such as computers behind NAT routers or firewalls.
Page 59

Getting Started with Timbuktu Pro for Macintosh | 59
To find a remote computer using the Skype tab
1. In the New Connection window, click the Skype tab.
The list of users from your Skype contact list is displayed.
The Skype icon in front of each contact’s name indicates their online status.
The word Yes in the Timbuktu? column indicates that the contact’s computer
is running a Skype-compatible version of Timbuktu Pro.
2. In the list of Skype contacts, select a contact.
You may make a Timbuktu Pro connection to any Skype contact who is online
(the contact must have allowed you to view their Skype status) and whose
Timbuktu? status is Yes.
If the Skype contact is online, but no Timbuktu? status is shown, you may still
use the Timbuktu Pro interface to establish a Skype Call or Skype Chat
connection.
If the Skype contact is offline, you cannot establish a connection from the
Skype tab. However, their computer may still be running Timbuktu Pro. You
may be able to make a connection with another connection tab.
3. Choose a service from the Service menu, or use the Button Bar to click the
service button that you want to use. For detailed information about each service, see “The Timbuktu Pro Services” on page 71.
Page 60

Getting Started with Timbuktu Pro for Macintosh | 60
4. To complete the connection to the remote computer, log in as a Registered
User or Guest User, or ask for permission. See “Logging In to Complete the
Connection” on page 56. (If you selected the Skype Call or Skype Chat service
in step 3, you will not be required to log in to complete the Skype
connection.)
You may want to save frequently-used Skype addresses in an address book for
more convenient access. See “Using the Address Books” on page 64.
Troubleshooting Skype Connections
If you are having trouble completing a connection from the Skype tab, review the
following tips for a solution to your problem.
• To complete a Skype connection, Skype must be running on both computers.
Be sure you are signed in to Skype before beginning a Skype connection. If an
attempted Skype connection fails, check the Skype tab in the New Connection window to be sure the Skype contact is online on the remote computer.
• Be sure that both computers have permission to access the Skype API (see
“Allowing Skype Access” on page 23) and that the host computer has Skype
access turned on in the Incoming Access dialog box (see “Opening Trans-
ports for Incoming Connections” on page 100).
• When you use the Skype transport to make a Timbuktu Pro connection, the
Skype application will attempt to establish a direct connection to the remote
computer. If this fails (which may occur due to a router or firewall configuration), Skype will open a relay connection, which passes through other com-
puters (the stream is encrypted to protect your data). The Skype application
limits relay connections to a maximum speed of 1 kB per second. Therefore, if
your connection is relayed, it may appear very slow.
You may confirm that the connection is relayed by using Skype to send a large
file. If the connection is relayed, Skype displays a yellow warning triangle in
the file transfer process dialog box. Place your mouse cursor over the warning
triangle to view a Skype tooltip.
If the Skype application relays your connection, you may wish to retry the
connection from a different network, if available. For example, if you are
using a wireless network, you may wish to try a wired network.
• In general, Timbuktu Pro connections using the Skype transport are slower
than connections using the regular Timbuktu Pro TCP/IP transport. This is due
to Skype’s requirements for the format of the data stream.
Page 61

Getting Started with Timbuktu Pro for Macintosh | 61
Using the Bonjour Tab to Find a Remote Computer
The Bonjour tab in the New Connection window helps you find and connect to remote computers, even when you don’t know their IP addresses, by browsing your
local network for active Timbuktu Pro computers. When you find the desired computer, you may connect to it without leaving the Bonjour tab.
The Bonjour tab also displays computers with Remote Login active, even if they
do not have Timbuktu Pro installed. When you find these computers, you can
launch a push installation of Timbuktu Pro. See “Push Installing Timbuktu Pro on
a Remote Computer” on page 25.
The Bonjour tab is continually updated as Timbuktu Pro computers become active
or are shut down.
Note: Bonjour will search only your local subnet. If you need to find computers on
other subnets, use the TCP/IP Scanner.
To find a remote computer using the Bonjour tab
1. In the New Connection window, click the Bonjour tab.
The scan is performed and a list of computers is generated.
You may limit your search to Timbuktu Pro or Remote Login computers by
choosing the appropriate option from the drop-down list at the bottom of the
window.
2. In the list of computers, select a remote computer.
Page 62

Getting Started with Timbuktu Pro for Macintosh | 62
3. Choose any service from the Service menu, or use the Button Bar to click the
service button that you want to use. For detailed information about each service, see “The Timbuktu Pro Services” on page 71.
4. To complete the connection to the remote computer, log in as a Registered
User or Guest User, or ask for permission. See “Logging In to Complete the
Connection” on page 56.
You may want to save frequently-used TCP/IP addresses in an address book for
more convenient access. See “Using the Address Books” on page 64.
Using the TCP/IP Scanner to Find a Remote Computer
The TCP/IP Scanner tab in the New Connection window helps you find and connect to remote computers, even when you don’t know their IP addresses, by
browsing your local network for active Timbuktu Pro computers. When you find
the desired computer, you may connect to it without leaving the TCP/IP Scanner
tab.
By default, the TCP/IP Scanner will search only your local subnet. Your system administrator can customize and extend the range of the TCP/IP Scanner search.
To find a remote user using the TCP/IP Scanner
1. In the New Connection window, click the TCP/IP Scanner tab.
The scan is performed and a list of computers is generated.
Page 63

Getting Started with Timbuktu Pro for Macintosh | 63
2. In the list of computers, select a remote computer.
If the computer you need doesn’t appear, and there is a lower panel listing
TCP/IP zones, select a different zone and click Scan. Timbuktu Pro searches
the selected zone and lists the Timbuktu Pro computers it finds.
3. Choose any service from the Service menu, or use the Button Bar to click the
service button that you want to use. For detailed information about each service, see “The Timbuktu Pro Services” on page 71.
4. To complete the connection to the remote computer, log in as a Registered
User or Guest User, or ask for permission. See “Logging In to Complete the
Connection” on page 56.
You may want to save frequently-used TCP/IP addresses in an address book for
more convenient access. See “Using the Address Books” on page 64.
Re-Establishing a Previous Connection
When you connect to a remote computer using the TCP/IP tab, the IP address is
saved in the IP Address drop-down list. You may save addresses to an address
book (on the Address Books tab) to make future connections easier.
You may also save your connection to a Timbuktu Pro Connection Document. (See
page 69.)
To re-connect to a remote computer
1. In the New Connection window, select the remote computer to which you
wish to connect. You can select a previously-accessed remote computer in
one of the following ways:
• If you have stored the address in an address book, select the appropriate
address book on the Address Books tab and click Open. Then select the
desired computer in the address book. (See “To save an address to an
address book” on page 66.)
• On the TCP/IP tab, the last 20 connections you made are saved to the
TCP/IP Address drop-down list. Select a TCP/IP address from the list and
choose a service.
2. Once you have selected an address, click a service button on the Button Bar
or choose a service from the Service menu. If you select multiple addresses,
the same service is invoked for each of the selected addresses.
Page 64

Getting Started with Timbuktu Pro for Macintosh | 64
Note: Double-clicking an entry in an address book launches the Control service. You can also select the computer and press Return.
3. To complete the connection to the remote computer, log in as a Registered
User or Guest User, or ask for permission. See “Logging In to Complete the
Connection” on page 56.
Using the Address Books
An address book is a collection of saved addresses to which you can quickly establish a Timbuktu Pro connection. Once you have added an address to your address book, you don't have to re-enter the address each time you connect to that
remote user.
You can add and delete addresses at any time, and you can have multiple address books to group addresses into convenient clusters: for example, business
contacts, friends, and family.
The Address Books tab in the New Connection window allows you to view the contents of your address books and connect to the computers you have saved.
Each address-book entry includes
• A name for the contact
• An indicator whether the remote computer’s contact information is saved
as a TCP/IP address or Skype name, or if it is a direct-dial connection
• The remote computer’s IP address, Skype name, or dialing information
• For TCP/IP and Skype contacts, the remote computer’s machine name
To open an address book, double-click it on the Address Books tab in the New
Connection window. Address books are also listed in the File menu. Choose the
name of the address book from the File menu to open it.
Page 65

Getting Started with Timbuktu Pro for Macintosh | 65
To connect to a saved address
1. In the New Connection window, click the Address Books tab.
2. Double-click the address book that contains the address you want.
3. In the address book, select the computer to which you wish to connect.
4. Click a service button on the Button Bar to connect using the chosen service,
or choose a service from the Service menu
Double-clicking an entry in an address book launches the Control service.
You can also select the computer and press Return.
If you select multiple addresses by holding down the Shift or Command key,
the same service is invoked for each of the selected addresses.
Note: When an address appears in an address book, it does not guarantee that
the computer at that address is currently running Timbuktu Pro. If Timbuktu Pro is
not running on the remote computer, or if the computer is shut down, you will not
be able to connect.
Saving and Editing Address-Book Contacts
You may save and edit address-book contacts at any time. Before you can save an
address to an address book, or edit a saved address, the target address book
must be open.
Note: In certain situations, TCP/IP addresses may change. For example, your organization may use dynamic TCP/IP addressing. In this situation, you may not want
Page 66

Getting Started with Timbuktu Pro for Macintosh | 66
to store IP addresses in Timbuktu Pro’s address books. Use the Internet Locator
email address or Skype address instead.
To open an address book
1. In the New Connection window, click the Address Books tab.
2. Double-click the address book that contains the address you want.
To save an address to an address book
1. Make sure the desired address book is open. (If it is not open, double-click it
on the Address Books tab in the New Connection window.)
2. In the New Connection window, select or specify the address to save in any of
the following ways.
• Select a computer on the Bonjour or TCP/IP Scanner tab.
• Select a Skype contact on the Skype tab.
• Enter an address on the TCP/IP tab.
• Enter a phone number on the Dial Direct tab.
3. From the Service menu, choose Save in Address Book. Or click the Save
Address button on the Button Bar.
If only one address book is open, the menu option will change to Save in
<address book name>. The address will be saved to this address book
automatically.
If multiple address books are open, the Select Address Book dialog box will
appear. Select the desired address book and click OK.
The address is saved to the selected address book.
To change the properties of a saved address
If a user’s TCP/IP address, Skype name, or telephone number changes, or you
wish to rename an address book entry, you may edit it.
1. Make sure the desired address book is open. (To open an address book,
select it on the Address Books tab in the New Connection window, or choose
the name of the address book from the File menu.)
2. In the address book window, select the address you wish to modify.
3. In the address properties panel, modify the address information.
The modified information is saved automatically.
Page 67

Getting Started with Timbuktu Pro for Macintosh | 67
Creating New Address Books
By default, Timbuktu Pro includes one address book, called Personal Address
Book. You may wish to create additional address books to organize addresses by
function or location.
To create a new address book
1. From the File menu, choose New Address Book.
2. In the Save dialog box, navigate to the folder where you want to create the
address book.
3. In the Save dialog box, enter a name for the new address book and click
Save.
4. The new address book is created and is opened on your desktop.
Making a Dial Direct Connection
The Dial Direct tab in the New Connection window allows you to make a direct modem-to-modem connection to another Timbuktu Pro computer equipped with a
modem and a version of Timbuktu Pro that supports Dial Direct connections. No
network connection is required.
Use the text boxes and drop-down lists to enter the complete phone number you
wish to dial, and click Dial.
After Timbuktu Pro has established a modem connection to the remote computer,
either you or the other user can initiate a service.
Page 68

Getting Started with Timbuktu Pro for Macintosh | 68
To establish a Dial Direct connection
1. In the New Connection window, click the Dial Direct tab.
2. If you are making an international call, enter a country code in the Country
Code box. If you do not enter a country code, Timbuktu Pro will not dial one.
(Note that you cannot enter a country code unless you choose International
from the Call Type drop-down list.)
3. Enter the area code in the Area Code box. If you do not enter an area code,
Timbuktu Pro assumes that you are making a local call and will not dial an
area code. (Note that you cannot enter an area code unless you choose Inter-
national or Long Distance from the Call Type drop-down list.)
4. Enter the phone number in the Phone Number box.
5. If desired, specify your current location in the Calling From drop-down list.
Calling locations allow you to save dialing information associated with the
various locations from which you may place calls. To set up calling locations,
see “Setting Your Calling Location” on page 49.
6. If necessary, select the Request Callback or Modem Speaker On checkbox.
If you’re using callback, make sure that your calling location information is
filled out accurately and that the appropriate calling location is selected. The
computer that will be calling you back reads your telephone number from the
calling location you specify. If the number is incorrect, the callback will fail.
See “Setting Your Calling Location” on page 49.
Page 69

Getting Started with Timbuktu Pro for Macintosh | 69
7. The complete phone number is displayed at the Number to Dial line exactly
as it will be dialed. If you have disabled call waiting in the Dialing Properties
dialog box, or if you have indicated a number (usually 9) you must dial to
reach an outside line, the appropriate dialing sequence will be displayed preceding the number.
8. Choose Dial to dial the number and begin a Dial Direct connection. The
Modem Status window will appear to help you monitor your connection.
Once the connection is established, you (or the user of the remote computer) may
launch any Timbuktu Pro service normally. All services work in the same way as
they do over a TCP/IP connection.
Timbuktu Pro Connection Documents
Timbuktu Pro connection documents are shortcuts that allow you to start a Timbuktu Pro connection to a specific remote computer by double-clicking a desktop
icon or opening the shortcut with the File menu. Connection documents are created with the Save Connection command in the File menu.
For example, if you have a file that you update and send to a number of other users on a weekly basis, you could put that file in a FlashNote, enter a message,
choose the destinations, and save a connection document. The next time you
need to distribute that file, simply update the file, open the connection document, and click Send.
To create a new Connection Document
1. Establish a connection to a remote computer using the service you wish to
save in the connection document. You may make the connection using any
available protocol. If necessary, log in to the remote computer as a Registered
User or Ask for Permission User.
2. With the connection and service active, open the File menu and choose Save
Connection.
3. Specify a name and location for the connection document.
4. If the Save Password on Keychain checkbox is available, you may select it.
This will streamline your next connection by sending your user name and
password automatically.
Page 70

Getting Started with Timbuktu Pro for Macintosh | 70
Note that your user name and password are stored on your the Mac OS X keychain, not within the connection document itself. Therefore, if you transfer
the connection document to a different computer, you will need to enter your
user name and password for the remote computer.
The Save Password on Keychain checkbox will not be available if you connect
as a Guest User or Ask for Permission user, if you are connecting to a Windows computer, or if the user of the host computer has not enabled the Allow
Users to Save Passwords in Connection Documents option on the Password
Rules tab in the Preferences dialog box.
5. Click Save to save your changes.
You may now close the connection.
To re-establish a connection using a connection document
• Double-click the connection document on the desktop or in the Finder, or
choose Open from the File menu and specify the connection document.
The connection will be reestablished. (You may need to log in as a Registered
User or ask for permission to complete the connection.)
Using Connection Documents to Save Custom Remote-Control Settings
Connection documents allow you to save custom Control and Observe settings for
each remote computer to which you connect. This allows you to establish different default settings for each computer you use.
To save custom remote-control settings
1. Begin a screen-sharing session with the remote computer.
2. Set up the session with your desired settings for color depth, window size,
and so on.
3. Save the connection document as described in the previous procedure.
4. Close your screen-sharing session.
When you use the saved connection document, the screen-sharing session will
begin with the saved settings active.
Page 71

Chapter 5: The Timbuktu Pro Services
This chapter introduces you to Timbuktu Pro’s user interface and terminology. It
also explains how to use each Timbuktu Pro service: Send, Exchange, Control, Observe, Notify, Chat, Intercom, Invite, Profile, and Skype. (The Control and Observe
services are collectively known as Remote Control.) Each Timbuktu Pro service allows you to interact with remote computers in a different way; together, they help
you make the most of your network.
This chapter also discusses the Install Timbuktu option, which allows you to perform a Timbuktu Pro installation on a remote computer.
Send: Sending FlashNotes and Files to Remote Computers
Timbuktu Pro’s Send service can send messages similar to electronic mail, called
FlashNotes, to another computer. You can also attach files and folders to the messages and send them to other computers. Timbuktu Pro temporarily stores the
files you send in a specific folder on the remote computer.
Likewise, remote users can send files only to your messages received folder,
which you specify on the Messages Received tab in the Preferences dialog box.
Send does not allow remote users to see the folders on your computer. Once you
receive the files, you can save them to any directory you wish. (See “Receiving
FlashNotes” on page 74.)
To send a FlashNote to a remote computer
1. Select the remote computer or establish a Dial Direct connection. (See Chap-
ter 4, “Making a Timbuktu Pro Connection.”)
2. From the Service menu, choose Send. Or click the Send service button.
3. In the Log In dialog box, log in as a Registered User or Guest User, or ask for
permission.
The Send window opens.
| 71
Page 72

Getting Started with Timbuktu Pro for Macintosh | 72
4. If desired, click the Add button next to the Destinations panel to add additional computers to the list of recipients.
5. To send a note, type a message in the Message panel.
6. To include files with your message, click the Add button next to the Enclo-
sures panel, make your selection in the Add Files or Folder dialog box, and
click Add.
Page 73

Getting Started with Timbuktu Pro for Macintosh | 73
Note: You may also drag and drop files and folders from the desktop into the
Enclosures area in the Send window.
7. If you established a Dial Direct connection to the remote computer, the Hang
Up... checkbox will be available. Select the checkbox to close your connection automatically once the FlashNote has been sent.
8. Click the Send button in the Send window to send the FlashNote and files.
The Send Status dialog box appears on your screen to help you monitor the
progress of the file transfer.
The Send Status Dialog Box
The Send Status dialog box appears when you’re transferring files using the Send
service.
To stop the file transfer before it is complete, click Stop. Timbuktu Pro stops the
file transfer, but the FlashNote is still sent to the remote computer. In addition,
stopping the file transfer does not affect files that have already been transferred.
If you established a Dial Direct connection to the remote computer, the Hang Up...
checkbox will be available. Select the checkbox to close your connection automatically once the FlashNote and its attachments have been sent.
The Show Message button reopens the Send window that you created to send the
files and message to the remote computer.
If a problem occurs during the file transfer, the Try Again button will become ac-
tive. Click to it attempt to send the FlashNote and files again.
Page 74

Getting Started with Timbuktu Pro for Macintosh | 74
Receiving FlashNotes
When you receive a FlashNote, it is automatically saved in your messages received folder. You may specify this folder on the Messages Received tab in the
Preferences dialog box. (See “Setting Messages Received Options” on page 40.)
The Messages Received tab also allows you to select the Open Timbuktu Pro and
Display the Message option. If this option is selected, incoming FlashNotes will
automatically open on your desktop. You may then reply to them, forward them,
or send them to the trash. If you wish to save enclosures to a different location
than the Messages Received folder, you may drag them from the FlashNote window to your desktop or to a Finder window.
The Messages Received Window
The Messages Received window lists all the FlashNotes you have received and
not moved or deleted. To open the Messages Received window, choose Show
Messages Received from the Window menu.
When you select a message in the Messages Received window, you can
• Click Open to display the message and a list of any attachments.
• Click Reply to send a message back to the original sender.
• Click Forward to send a copy of the message to another Timbuktu Pro user.
• Click Trash to move the message to the trash.
Page 75

Getting Started with Timbuktu Pro for Macintosh | 75
Exchange: Copying and Moving Files Between Computers
With Timbuktu Pro’s Exchange service, you can copy and move files and folders in
both directions between your computer and another Timbuktu Pro computer. Exchange provides more flexibility than Send.
To use Exchange to transfer files from the remote computer, you must have access
privileges for those files. The remote computer’s user may assign you unrestricted
access to the file system (see “Exchange Service Privileges” on page 99). Other-
wise, your access privileges will vary depending on the type of connection you
make:
• If you establish a secure SSH connection as a Mac OS X User, you will be
granted the same file-system access privileges that are assigned to your Mac
OS X user profile in the remote computer’s operating system.
• If you connect as a Timbuktu User, Ask for Permission User, or Guest User,
you will have the access privileges assigned to the first administrator-level
user created on the remote computer.
Regardless of the type of connection you make, the remote computer’s user may
specify whether or not you can copy, move, and delete files. (The unrestricted access option provides read-only access unless additional file-sharing privileges are
granted.)
To copy files and folders between computers
1. Select the remote computer or establish a Dial Direct connection. (See Chap-
ter 4, “Making a Timbuktu Pro Connection.”)
2. From the Service menu, choose Exchange. Or click the Exchange service
button.
3. In the Log In dialog box, log in as a Registered User or Guest User, or ask for
permission.
The Exchange window is displayed and the Exchange menu appears.
Page 76

Getting Started with Timbuktu Pro for Macintosh | 76
The left panel lists the drives, folders, and files on your computer. The right
panel lists the same information for the remote computer.
4. Locate and display the source and destination folders in the Drives dropdown lists.
You can use the New Folder button create a new folder on either computer.
5. Drag the desired files or folders from the source panel to the desired folder in
the destination panel.
6. Timbuktu Pro begins to transfer the files immediately. The Exchange Status
dialog box appears, indicating the progress of the file transfer.
While Timbuktu is transferring the files, you can
• Click outside the Exchange window, or minimize it, to work on other com-
puter tasks.
• Click Cancel to immediately cancel the transfer. The file being sent when
Cancel is clicked is not transferred, but any files that were previously
sent remain in the destination folder (unless you manually delete them).
• If you established a Dial Direct connection to the remote computer, the
Hang Up... checkbox will be available. Select the checkbox to close your
connection automatically once the files have been transferred.
7. When you have finished exchanging files, close the Exchange window.
You can also use the Exchange service while controlling or observing a Timbuktu
Pro computer.
Page 77

Getting Started with Timbuktu Pro for Macintosh | 77
The Exchange Menu
When you open an Exchange session with another computer, the Exchange menu
appears on the menu bar. The Exchange menu includes many of the options you
control by buttons in the Exchange window.
In addition, the Exchange menu includes the following options:
• Rename renames the selected file.
• Get Info displays basic information about the selected file, including file size
and location.
• Find Original resolves the selected alias and positions the file list on the orig-
inal file. If you select an alias and attempt to copy it, the alias will be copied
instead of the original file.
• Find opens the Find Files window to search for files on the local computer.
(See the online Help for information about the Find Files window.)
• Custom Icons turns custom icon display on and off.
The Exchange!Go To menu includes the Mac OS X Go menu shortcuts: Home,
Desktop, Favorites, and Applications.
Remote Control: Controlling or Observing a Remote Computer
You can use Timbuktu Pro to control or observe a remote computer. The desktop
of the remote computer is displayed in a window on your screen. The window is
updated as the other computer’s desktop changes.
While you are controlling another computer, you can perform any of the tasks that
you could perform locally, including opening applications and creating new files.
This means that a user with the Control privilege can remotely create, modify, or
delete files without restriction, and can erase data from the host computer. This
privilege, therefore, should be granted with caution.
While observing another computer, you can see the activity on its screen, but you
cannot control it. This privilege is useful for diagnosing problems on a remote
computer or giving a presentation.
Page 78

Getting Started with Timbuktu Pro for Macintosh | 78
To control or observe another computer
1. Select the remote computer or establish a Dial Direct connection. (See Chap-
ter 4, “Making a Timbuktu Pro Connection.”)
2. From the Service menu, choose Control or Observe. Or click the Control or
Observe service button.
3. In the Log In dialog box, log in as a Registered User or Guest User, or ask for
permission.
Timbuktu Pro displays the remote computer’s desktop in a screen-sharing
window.
If the remote computer has two monitors, the screen-sharing window displays both monitors together. To cycle through the monitors, click the Change
Monitor button on the frame of the screen-sharing window.
If the remote computer’s screen resolution is higher than yours and you maximize your Control or Observe window, the auto scrolling feature is enabled
so that you can view the entire remote desktop. To enable or disable auto
scrolling when the screen-sharing window is not maximized, open the Control
menu and select the Auto Scrolling option.
Note: When you control a remote computer, the mouse will continue to move
on the remote desktop even when the mouse pointer is in the border of the
screen-sharing window. Enhanced auto scrolling may also make it easier to
activate a “hot” corner or open the dock on the remote computer. This behavior is new in Timbuktu Pro version 8.5.
4. Click on the screen-sharing window to make it the active window. To return to
your own computer, click outside the screen-sharing window.
If you have chosen the Observe option, you will be able to observe the screen
only. If you have chosen the Control option, you can use your mouse and keyboard to operate the remote computer.
5. If desired, click the Control menu to display a number of settings that you can
change during your screen-sharing session, including the color depth sent
from the remote computer. (For details, see “Using The Control Menu” on
page 79.)
6. If desired, you can start another Timbuktu connection to the same computer
by selecting another service from the Button Bar or the Service menu.
Because you already have a connection open with the host, you will not need
to provide user-authentication information.
Page 79

Getting Started with Timbuktu Pro for Macintosh | 79
7. To stop controlling or observing, close the screen-sharing window. Timbuktu
Pro closes the window and ends the connection.
Note: Timbuktu Pro does not support full-screen DOS sessions on Windows computers. Press Option+Enter to switch the MS-DOS session from full-screen to windowed mode.
Using Drag and Drop with Control
When you control another computer, you can drag files from that computer directly across the border of the screen-sharing window to your own desktop.
Note: When you establish a secure SSH connection to a remote computer, you will
be granted the same file-system access privileges that are assigned to your Mac
OS X user profile. If you connect as a Timbuktu User, Ask for Permission User, or
Guest User, you will have the access privileges assigned to the first administratorlevel user created on the remote computer. To use Control to drag-and-drop files
from the remote computer, you must have access privileges for those files.
Using The Control Menu
The Control menu includes a number of options that you may change before or
during a screen-sharing session. Some options are not available except during an
active screen-sharing session.
Page 80

Getting Started with Timbuktu Pro for Macintosh | 80
Changing the Color Depth
During a screen-sharing session, you may use the Control menu to change the
color depth for the image data sent from the remote computer. (You may also
change this setting while no session is active.) Reducing the color depth may increase screen-sharing performance. Note that you cannot increase the color
depth beyond the setting specified by the host computer’s Preferences setting.
To change the color depth for the host computer during a screen-sharing session,
the screen-sharing window must be the active window in order for the change to
take effect immediately. If the screen-sharing window is not active when you
change the color depth, the default color depth for future sessions will be
changed, but the current session will not be affected.
You may also save different color-depth settings for different computers in connection documents, allowing you to reestablish screen-sharing sessions with
your preferred color depth and window size in place. See “Using Connection Doc-
uments to Save Custom Remote-Control Settings” on page 70.
Sending CTRL+ALT+DEL or Force Quit to a Remote Computer
If you’re connecting to a computer that is running Windows, and need to log in,
you’ll need to open the Logon Information dialog box. However, unlike with Windows computers, you cannot simply press Ctrl+Alt+Delete on your Macintosh.
To open the Logon Information dialog box on a Windows computer, click the Con-
trol menu and choose Send <Ctrl> <Alt> <Del>.
The Logon Information dialog box is displayed on the remote computer, allowing
you to enter your user name and password.
You don’t have to log in to Windows to use Timbuktu Pro with a remote Windows
computer. You can exchange files with and send files to a remote computer when
the Logon Information dialog box is displayed. However, FlashNotes are not displayed on the Windows system until after you have logged on.
If you do log in to Windows, make sure to log out before you end your Timbuktu
Pro session, or other users will not be able to log in.
If you are controlling a Mac OS X computer and need to force-quit an application,
click the Control menu and choose Send <Force-Quit>.
Page 81

Getting Started with Timbuktu Pro for Macintosh | 81
Notify: Requesting Notification When the Remote User is Active
Timbuktu Pro’s Notify service lets you leave a request to be notified when another
Timbuktu Pro computer becomes active. This is a useful way to find out when the
person you want to communicate with is available. You can then open another
Timbuktu Pro connection (for example, if you need to ask for permission) or contact the user of the remote computer.
To request notification of another user’s presence
1. Select the remote computer or establish a Dial Direct connection. (See Chap-
ter 4, “Making a Timbuktu Pro Connection.”)
2. From the Service menu, choose Notify. Or click the Notify service button.
3. In the Log In dialog box, log in as a Registered User or Guest User, or ask for
permission.
The Notify window is displayed.
“Waiting for activity” appears near the top of the window. Below it are the following fields:
• Last Active tells you the date and time the remote user last moved the
mouse or pressed a key. This field changes to Became Active the next
time the remote user moves the mouse or presses a key, and displays
the new date and time.
• Idle Time tells you how much time has passed since the remote user has
used that computer.
4. While you’re waiting, you can work on tasks in other windows. You can minimize the Notify window, but don’t close it.
Page 82

Getting Started with Timbuktu Pro for Macintosh | 82
5. When the remote computer becomes active, the message in your Notify window changes to
“Name has become active.”
If you have selected the Come to Front when Active checkbox in the Notify
window, it will appear on your desktop automatically.
6. You may now contact the user of the remote computer.
Once you have been notified of the remote user’s return, you can close the Notify
window and contact the other user.
If the Notify window is acknowledged while you are away from your computer, the
remote user may no longer be at their computer by the time you get back. You can
start the notification process again by clicking the Notify Again button.
Chat: Chatting with a Remote User
The Chat service lets Timbuktu Pro users post messages to one another interactively. For example, if you are in the midst of a file transfer session, a Chat session
lets you discuss the file transfer with the other user. You can even chat with multiple remote users in a single Chat window.
To chat with a remote user
1. Select the remote computer or establish a Dial Direct connection. (See Chap-
ter 4, “Making a Timbuktu Pro Connection.”)
To start a multiple-user Chat session, select each computer in an address
book or the TCP/IP Scanner.
2. From the Service menu, choose Chat. Or click the Chat service button.
Page 83

Getting Started with Timbuktu Pro for Macintosh | 83
3. In the Log In dialog box, log in as a Registered User or Guest User, or ask for
permission.
The Chat window is displayed.
4. Type your first message and press Return or click the Send button.
5. Your message is copied to the transcript panel in the upper part of the window and to the Chat window on the remote computer. Type more messages
immediately or wait for a reply from the other user.
6. The reply is displayed below your message in the transcript panel. You can
keep typing messages back and forth as long as you like.
7. To add other users to the Chat session, click the Add button and select
another computer. (To display the Add button, click the disclosure triangle
next to the host computer name.)
8. When you’ve finished chatting, click the click the red Close button. If the
other party disconnects first, the session is ended, but the Chat window
remains open.
9. After you have disconnected, you can save a transcript of the chat session to
a text file.
Click the File menu and choose Save Transcript . In the Save dialog box, spec-
ify the destination file name and folder.
10. Click the red Close button to close the chat window.
Page 84

Getting Started with Timbuktu Pro for Macintosh | 84
Intercom: Speaking to a Remote User
The Intercom service lets Timbuktu Pro users talk to each other through their computer’s audio hardware.
To speak to another Timbuk tu P ro user
1. Select the remote computer or establish a Dial Direct connection. (See Chap-
ter 4, “Making a Timbuktu Pro Connection.”)
2. From the Service menu, choose Intercom. Or click the Intercom service
button.
3. In the Log In dialog box, log in as a Registered User or Guest User, or ask for
permission.
The Intercom window is displayed.
Note: If the sound card on your computer or the remote computer is already
being used by another application—for example, recording or playback—you
won’t be able to begin your Intercom session until the other application has
been closed.
4. When the Intercom window is displayed, you can begin speaking with the
remote user.
Note: The Intercom window does not automatically stay on top of the screen
when other application windows are run in the foreground.
5. When you’ve finished talking, click the red Close button.
Page 85

Getting Started with Timbuktu Pro for Macintosh | 85
Invite: Inviting a Remote User to Access your Computer
The Invite service allows you to invite other users to visit your computer. Once you
have specified a user to receive your invitation, select the type of invitation you
want to extend and send it to the remote user. The recipient will be able to use the
service immediately or decline your invitation by closing the service window.
To invite a remote user to visit your computer
1. Select the remote computer or establish a Dial Direct connection. (See Chap-
ter 4, “Making a Timbuktu Pro Connection.”)
2. From the Service menu, choose Invite. Or click the Invite service button.
3. In the Log In dialog box, log in as a Registered User or Guest User, or ask for
permission.
The Invite window is displayed.
4. In the Invite window, specify the service you wish to invite the other user to
access. Then click Invite.
5. The Invite window appears on the remote computer, displaying the service
you invited the remote user to access. The invited user may begin using the
service or close the window to cancel it.
If the remote computer has enabled the Invite service, the Service menu’s Invite
command will allow you to ask another user to observe your screen, control your
computer, or use any of the other sharing or collaboration services.
If the remote user has granted Guest User access to his or her Invite service, the
service you selected from the Invite drop-down list will start immediately. If the remote user has not granted Guest User access to the Invite service, you will need
to either wait for permission from the remote user or log in to the remote user’s
computer as a Registered User.
The remote user has the option of accepting or turning down your invitation. If the
invitation is accepted, the Invite service you selected should be in session.
Page 86

Getting Started with Timbuktu Pro for Macintosh | 86
Profile: Generating a System Profile for the Remote Computer
The Profile service allows you to automatically run the Apple System Profiler on a
remote Macintosh computer and return the results to your computer as a text file.
To generate a system profile for a remote computer
1. Select the remote computer or establish a Dial Direct connection. (See Chap-
ter 4, “Making a Timbuktu Pro Connection.”)
2. From the Service menu, choose Profile. Or click the Profile service button.
3. In the Log In dialog box, log in as a Registered User or Guest User, or ask for
permission.
The Profile window is displayed, and a Save window opens.
4. In the Save window, specify a file name and location for the system profile to
be saved on your local computer. Then click Save.
5. The system profile is generated on the remote computer and saved as a text
file in the location you specified. When the process is complete, the Profile
window indicates that the profile has been saved and displays the file name.
Click the Open button to open the saved system profile in your default text
editor.
Page 87

Getting Started with Timbuktu Pro for Macintosh | 87
Skype: Using Skype with a Remote Computer
The Skype service integrates Timbuktu Pro with the Skype application from Skype
Technologies S.A. It includes two subservices, Skype Call and Skype Chat. You
can launch these Skype services from within the Timbuktu Pro interface.
To open a Skype connection to a remote computer
1. Select the remote computer. (See Chapter 4, “Making a Timbuktu Pro Con-
nection.”)
You can select the remote computer on any tab in the New Connection window except Direct Dial. Using the Skype tab is not required, which allows you
to connect with the Skype service even if you don’t know the remote user’s
Skype Name. However, the Skype services are supported only if both computers are running the Skype application and a Skype-compatible version of Timbuktu Pro.
2. From the Service menu, choose Skype Call or Skype Chat. Or click one of the
Skype service buttons.
3. In the Log In dialog box, log in as a Registered User or Guest User, or ask for
permission. (If you establish a Skype connection from the Skype tab, you will
not be required to log in.)
The Skype window is displayed.
• If you initiated a Skype Call session, the main Skype window opens, dis-
playing your contacts. The Skype call is initiated.
• If you initiated a Skype Chat session, the Chat window opens in the back-
ground. “Via Timbuktu” is displayed in the title bar and as the first comment from your computer. Proceed normally with your Skype Chat
session.
4. When you’ve finished talking or chatting, close the Skype window.
In addition to Skype Call and Skype Chat, the Skype transport allows you to connect to Timbuktu Pro computers that you may not have been able to reach before.
See “Using the Skype Tab to Find a Remote Computer” on page 58 for more infor-
mation.
Page 88

Getting Started with Timbuktu Pro for Macintosh | 88
Install Timbuktu: Push Installation on a Remote Computer
You may now “push” install Timbuktu Pro on the remote computers on your network which have enabled Remote Login. This process will also upgrade Timbuktu
Pro on computers that are running a Timbuktu Pro version older than the version
on your computer.
Select the target computer in the New Connection window, then open the Service
menu and choose Install Timbuktu.
Note: You must have a Mac OS X user name and password on the remote computer, and Remote Login must be enabled, to perform the push installation.
For details about the push installation process and options, see “Push Installing
Timbuktu Pro on a Remote Computer” on page 25.
Page 89

Chapter 6: Security
This chapter describes the essential steps to prepare your computer to receive incoming Timbuktu Pro connections. You must set up user access privileges and
turn on transports to enable them access. To allow remote users to dial directly
into your computer, you must also set up your computer for Dial Direct access.
To allow more complete control over incoming connections, you also have the
ability to disconnect remote users and keep them from connecting.
Finally, you can protect your own Timbuktu Pro settings using a Master Password.
Setting User Access Privileges
The Define Users dialog box lets you specify privileges for the three kinds of Timbuktu Pro users that may access your computer: Guest Users, Ask for Permission
users, and Registered Users.
• Guest Users can services on your computer without entering a user name and
password or asking for permission. Guest Users can use only the services you
specifically grant to them.
• Ask for Permission users can connect to your computer using services you
have not granted to Guest Users by requesting permission to connect. You
can choose whether or not to admit them.
• Registered Users can enter a user name and password to access your computer using any of the services you assigned to their Registered User account.
Assigning Privileges to Guest Users
When you grant a service to Guest Users, any Timbuktu Pro user may access that
service on your computer without entering a user name and password or asking
for permission. The remote user is allowed to use any of the services assigned to
Guest Users in the Define Users dialog box.
Guest Users may connect to your computer by beginning a Timbuktu Pro connection using the desired service. The Log In dialog box opens.
| 89
Page 90

Getting Started with Timbuktu Pro for Macintosh | 90
After the remote user selects Guest and clicks OK, the connection is completed.
To specify Guest User privileges
1. From the Setup menu, choose Define Users.
The Define Users dialog box appears.
In the Define Users dialog box, you can edit settings for Guest Users, Ask For
Permission Users, and Registered Users.
2. Select Guest and click Edit.
Page 91

Getting Started with Timbuktu Pro for Macintosh | 91
3. Assign the desired services to Guest Users by selecting or deselecting them
in the scrolling list. (See “Assigning Services and Access Privileges” on page
98 for information about the services and privileges you can assign.)
Remember: any Timbuktu Pro user can now—without entering a password or
asking for permission—connect to your computer using the services you have
selected. If you grant the Exchange or Control privilege to all remote users,
any remote user will be able to access all the files on your hard disk, as well
as files on any network drive that you are currently logged into. DO NOT grant
Exchange or Control privileges if your computer contains sensitive or confidential information.
Services you define for Guest Users are automatically granted to all Registered Users as well. For example, if you grant the Send service to Guest Users,
you cannot deny this service to Registered Users.
4. If you want to allow remote users to dial into your computer, select Let User
Dial into Your Computer. For more information, see “Setting up Timbuktu Pro
for Incoming Dial Direct Access” on page 102.
5. Click Save to confirm your newly defined Guest User services.
6. Click the close box to return to the Define Users dialog box.
Note that Guest Users cannot make secure connections, as they are not required
to enter a user name and password.
Page 92

Getting Started with Timbuktu Pro for Macintosh | 92
Allowing Remote Users to Ask for Permission
When a remote user wishes to connect to your computer using a service you have
not granted to Guest Users, the user may request permission to connect. Granting
services to Ask for Permission users makes it possible for remote users to request
that service on a one-time basis. When the user requests permission, you can
choose whether or not to admit them.
Remote users may ask for permission to connect to your computer by beginning a
Timbuktu Pro connection using the desired service. The Log In dialog box opens.
After the remote user selects Ask for Permission and clicks OK, an alert is displayed on your computer that identifies the user and the desired service.
Click OK if you want to allow the connection.
To allow users to ask for permission
1. From the Setup menu, choose Define Users. The Define Users dialog box
appears.
2. Select Ask for Permission and click Edit.
Page 93

Getting Started with Timbuktu Pro for Macintosh | 93
3. Assign the desired services to Ask for Permission users by selecting or deselecting them in the scrolling list. (See “Assigning Services and Access Privi-
leges” on page 98 for information about the services and privileges you can
assign.)
Services that are granted to Guest Users cannot be denied to Ask for Permis-
sion Users.
4. If you want to allow remote users to dial in to your computer on an ask-forpermission basis, select Let User Dial into Your Computer. See “Setting up
Timbuktu Pro for Incoming Dial Direct Access” on page 102.
5. Click Save to confirm your selections.
6. Click the close box to return to the Define Users dialog box.
Note that Ask for Permission Users cannot make secure connections, as they are
not required to enter a user name and password.
Adding Registered Users
When you create a Registered User account, you assign the Registered User an
identity and a set of access privileges. Once you have created the account, the
Page 94

Getting Started with Timbuktu Pro for Macintosh | 94
Registered User can enter their user name and password to access your computer
using any of the services you assigned to the Registered User account.
In Timbuktu Pro version 8, there are two types of Registered Users:
• Mac OS X Users (and members of Mac OS X user groups) can make secure
connections through SSH tunnels. They are known as System-Authenticated
Users because they are authenticated at the OS level, rather than by Timbuktu Pro—they are authenticated by Mac OS X when they connect (or by the
Windows operating system when connecting to a Windows computer). They
require Timbuktu Pro version 8, as well as a Mac OS X user name and password on your computer.
• Timbuktu Users use the same connection protocol used in previous versions
of Timbuktu Pro. These Registered Users are authenticated by Timbuktu Pro
when they connect. They may be using an older version of Timbuktu Pro, and
they do not require Mac OS X access credentials on your computer.
For both types of Registered Users, you can require the user to ask for permission
each time they begin a connection to your computer.
You can create as many Registered User accounts as you wish. Registered Users
can access the services you have assigned to their accounts anytime Timbuktu
Pro is running on your computer.
Adding a Mac OS X User or User Group
To allow secure incoming connections from System-Authenticated Users on other
Timbuktu Pro version 8 computers, you will create a Registered User account for a
Mac OS X user or user group.
As a type of Registered User, each Mac OS X User account includes one or more
services. Before you create the Registered User, make sure that the user has Mac
OS X access credentials on your computer.
To define a Mac OS X Registered User
1. From the Setup menu, choose Define Users.
2. In the Define Users dialog box, click New.
Timbuktu Pro opens a new dialog box in which you can define the settings for
the new Registered User.
Page 95

Getting Started with Timbuktu Pro for Macintosh | 95
3. From the Type drop-down list, select Mac OS X User or Mac OS X Group.
• If you create a Mac OS X User account, only the Mac OS X user whose
user name you enter will be able to use the Registered User account to
connect to your computer.
• If you create a Mac OS X Group account, all members of that user group
will be able to use the Registered User account to connect to your computer. All group members will be granted the same access privileges.
4. In the Name box, enter the user name or user group name exactly as it is
defined on your computer. You may enter either the full user name or the
Short Name.
5. To require the new Registered User to ask for permission each time they begin
a Timbuktu Pro session with your computer, select the Ask for Permission
Each Time check box. (For information about the Ask for Permission process,
see “Allowing Remote Users to Ask for Permission” on page 92.)
6. By default, most services and privileges are automatically preselected in the
privileges list. (Screen blanking, keyboard locking, and full file access for
exchange are not preselected.) Customize the services and privileges
assigned to the new Registered User by selecting or deselecting them in the
scrolling list.
Page 96

Getting Started with Timbuktu Pro for Macintosh | 96
See “Assigning Services and Access Privileges” on page 98 for information
about the services and privileges you can assign.
Note: Services granted to Guest Users are automatically granted to all Registered Users as well. For example, if you grant the Observe service to Guest
Users, you cannot deny this service to Registered Users. It will be dimmed in
the Let New User area in the New User dialog box.
7. If you wish to let the Registered User dial directly into your computer's
modem, select the Let User Dial Into Your Computer option and configure the
appropriate options. See “Setting up Timbuktu Pro for Incoming Dial Direct
Access” on page 102.
8. Click Save to confirm your selections, and click the close box to return to the
Define Users dialog box.
The Registered User will now be able to access your computer. When the user connects, they will enter one of the following:
• The Mac OS X user name for which you created the Registered User account,
and the password associated with that user name in Mac OS X.
• A Mac OS X user name that is a member of the Mac OS X user group for which
you created the Registered User account, and the password associated with
that user name in Mac OS X.
Mac OS X will authenticate the user and instruct Timbuktu Pro to allow or deny the
connection. Remember that Mac OS X users must have a user name and password for Mac OS X on your computer.
Defining the Wildcard User
To save time, you may wish to create the “Wildcard” Mac OS X User. When you
create this user and assign access privileges, anyone with a Mac OS X account on
your computer will be able to connect with those privileges—whether or not you
specifically created a Mac OS X User account for that user.
To define the Wildcard user, follow the procedure for creating a Mac OS X User
and enter * in the Name text box.
It is recommended that you assign the minimum number of privileges to the Wildcard user. If you need to assign greater privileges to a specific user, you may create a Mac OS X User account for that user. The user’s Mac OS X User privileges will
override the limitations of the Wildcard user.
Page 97

Getting Started with Timbuktu Pro for Macintosh | 97
Adding a Timbuktu User
To allow incoming connections by Registered Users without Mac OS X credentials
on your computer, or by users of older versions of Timbuktu Pro, you will create a
Timbuktu User.
To defin e a Tim buk tu User
1. From the Setup menu, choose Define Users.
2. In the Define Users dialog box, click New.
Timbuktu Pro opens a new dialog box in which you can define the settings for
the new Registered User.
3. From the Type drop-down list, select Timbuktu User.
4. In the Name box, enter the desired user name for the Registered User.
5. In the Password box, enter the Registered User’s password. (A password can
be up to 15 characters long.) Reenter the password in the Confirm box.
You cannot close the New Registered User dialog box until the Password and
Confirm boxes match exactly.
Page 98

Getting Started with Timbuktu Pro for Macintosh | 98
6. To require the new Registered User to ask for permission each time they begin
a Timbuktu Pro session with your computer, select the Ask for Permission
Each Time check box. (For information about the Ask for Permission process,
see “Allowing Remote Users to Ask for Permission” on page 92.)
7. By default, most services and privileges are automatically preselected in the
privileges list. (Screen blanking, keyboard locking, and full file access for
exchange are not preselected.) Customize the services and privileges
assigned to the new Registered User by selecting or deselecting them in the
scrolling list.
See “Assigning Services and Access Privileges” on page 98 for information
about the services and privileges you can assign.
Note: Services granted to Guest Users are automatically granted to all Registered Users as well. For example, if you grant the Observe service to Guest
Users, you cannot deny this service to Registered Users. It will be dimmed in
the Let New User area in the New User dialog box.
8. If you wish to let the Registered User dial directly into your computer's
modem, select the Let User Dial Into Your Computer option and configure the
appropriate options. See “Setting up Timbuktu Pro for Incoming Dial Direct
Access” on page 102.
9. Click Save to confirm your selections, and click the close box to return to the
Define Users dialog box.
The Registered User will now be able to access your computer. When the user connects, they will enter the user name you and password you assigned them. Timbuktu Pro will authenticate the user and allow or deny the connection.
Note that the Registered User is allowed to change the password you assign, subject to your password restrictions. (See “Setting Password Rules” on page 38 for
information about password restrictions.)
Assigning Services and Access Privileges
When you edit access privileges for Guest Users and Ask for Permission users,
and when you create accounts for Registered Users, you can assign a number of
different services and access privileges.
Most service options are self-explanatory. However, the Exchange and Control
services include other privileges that allow you to customize the amount of access you grant to remote users.
Page 99

Getting Started with Timbuktu Pro for Macintosh | 99
Exchange Service Privileges
Exchange service privileges are divided into several levels of file-system access.
However, unless you grant the Access All Files... privilege, remote users will be
able to access only the files for which they have file-system access privileges.
• Mac OS X Users are granted the same file-system access privileges that are
assigned to their Mac OS X user profile in your computer’s operating system.
• Timbuktu Users, Ask for Permission Users, and Guest Users have the access
privileges assigned to the first administrator-level user on your computer.
The Access All Files... privilege overrides Mac OS X file-system access privileges
and allows access to your entire file system.
Use Exchange to Copy Files to Your Computer
Allows the remote user to transfer files to your computer, but not to copy or delete
files from your computer.
Use Exchange to Copy Files from Your Computer
Allows the remote user to transfer files from your computer, but not to copy files
to your computer or delete files from your computer.
Use Exchange to Remove Files from Your Computer
Allows the remote user to delete files from your computer, but not to copy files to
or from your computer.
Use Exchange to Access All Files on Your Computer
Grants the remote user full access to the file system on your computer. Users with
this privilege are not limited to accessing only the files associated with their OSlevel user profile.
Note, however, that the Access All Files... option grants read-only access to your
file system. To allow the remote user to copy files to and from your computer and
delete files, you must assign additional Exchange privileges.
By default, this option is not selected.
Control Service Privileges
The Control service includes only one level of access privileges. However, you may
also assign the Lock Out... and Blank... privileges, which enable secure screen
Page 100

Getting Started with Timbuktu Pro for Macintosh | 100
blanking. This may enhance the security of the sensitive files on your computer
when the remote user views them.
For example, if you are accessing your own computer from a remote location, secure screen blanking will protect your data by preventing anyone near your workstation from seeing what is happening on your computer or interfering with your
work.
Note that the Lock Out... and Blank... privileges take effect only for remote users
whose computers are running Timbuktu Pro for Macintosh version 8.5.
Control Your Computer
Grants the Control service to the remote user.
Lock Out Your Computer’s Keyboard and Mouse
Disables your keyboard and mouse when the remote user controls your computer.
By default, this option is not selected.
Blank Your Computer’s Screen
Blanks your computer’s monitor when the remote user controls your computer.
When the Control session is complete, your computer will display the screensaver and remain locked for your continued security.
By default, this option is not selected.
Opening Transports for Incoming Connections
Remote users have access to your computer only after you’ve enabled one or
more of the transports in the Incoming Access dialog box. You may also enable
and disable incoming access by selecting transports in the Connection menu.
When a network or dial-in transport is switched off, no remote user can use that
transport to connect to your computer. Note that if you turn off a transport, you
can still use that transport to make outgoing connections. Turning off a transport
disables only incoming connections.
 Loading...