

Page 1
WARETON
Bl”!,
20 - 24 UK USER’S GUIDE
GENERAL
Installation of this appliance must be carried out by a
competent installer who will install it according to proper
norms and procedures.
The installation of this appliance must be in accordance
with a relevant requirements of the Gas Safety ( Installation
&
Use ) Regulations (
Regulations, the by-laws of the local water undertaking,
and in Scotland, in accordance with the Building
Standards
document
In order to take full advantage of the quality built into
your boiler, we suggest that you consult the manual
before use.
Keep this guide and the manual handy since you may
need in the future.
The boiler has been designed for supplying your central
heating and domestic hot water directly.
(
Scotland ) Regulation.
No.
635 “Electricity at work regs. 1989”.
1984 ),
the Local Building
Health
and safety
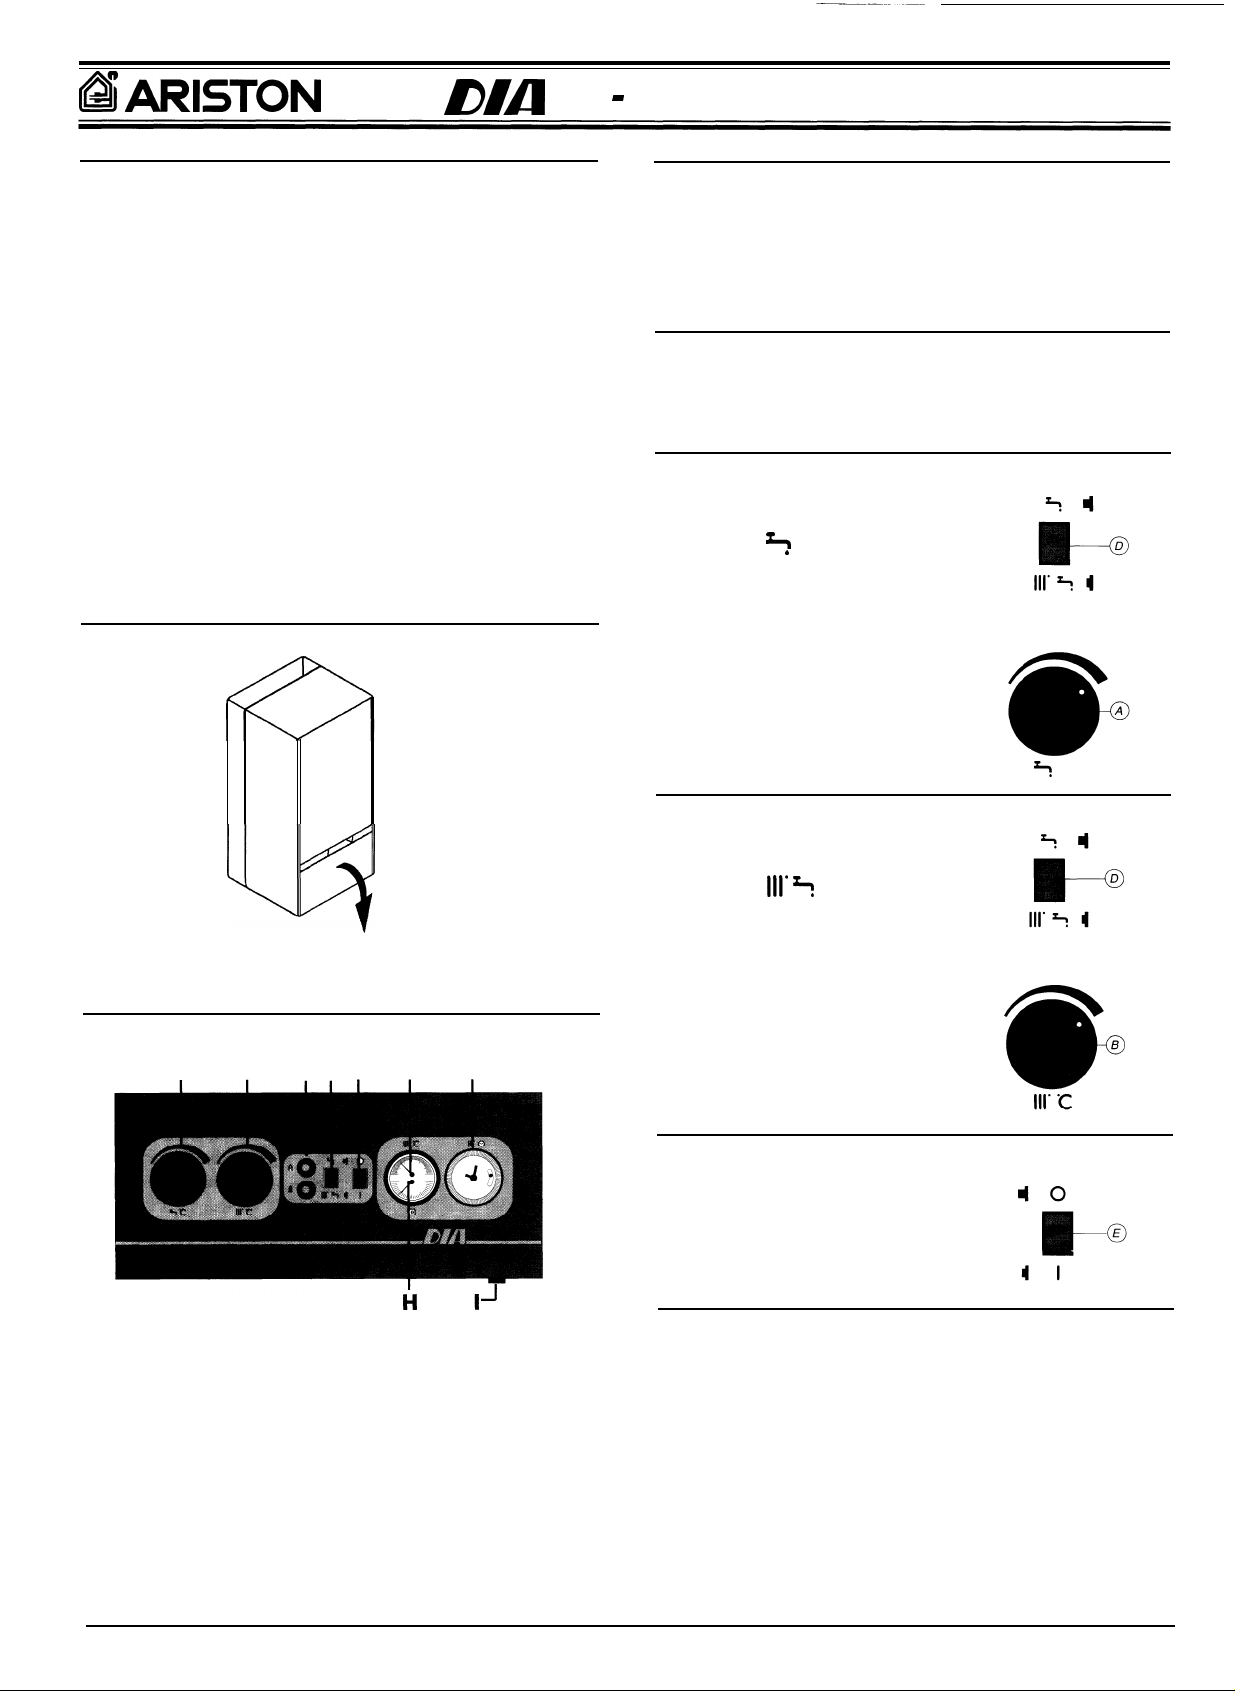
GAINING ACCESS TO THE CONTROL PANEL
TO OPERATE THE APPLIANCE
Before lighting the appliance, check central heating
system pressure.
It must be at least 1.5 bar gauge
If it is below this do not light the appliance but consult
your installer for checking and refilling the system.
.
LIGHTING THE APPLIANCE
Ensure that gas supply cock, c.h. cocks and d.h.w. cock
(
located on the bottom of the appliance) are open.
Switch on the mains electricity.
OPERATING DOMESTIC HOT WATER
Press the function switch
on position +
Adjust the temperature turning
the knob “A” clockwise to raise
or anticlockwise to lower.
.
6
“D”
/
/
To reach the control panel rotate
cated
in figure.
the small panel as
CONTROL PANEL
A
A
Domestic hot water temperature control
Central heating temperature control
B
Red warning light
C
Summer/Winter switch
D
On/Off switch with neon light
E
Central heating temperature gauge
F
Central heating time control clock
G
clock instruction refer to the following instruction
Water pressure gauge
H
Safety thermostat reset
I
B
CDEF G
(
for the time
indi-
)
i %
OPERATING HEATING + DOMESTIC HOT WATER
Press the function switch
on position
Adjust the temperature turning
the knob
or anticlockwise to lower.
111’ 5 .
“B”
clockwise to raise
“D”
TO SHUT DOWN THE APPLIANCE
Press the function switch
on position
“0”.
“E”
FLAME FAILURE RESET
If the flame does not ignite, the red warning light
come on.
To turn on again, press the red warning light
If the flame still does not ignite, remove the cap on safety
thermostat reset “I” and press the push button.
If, after several attemps, the flame still does not ignite,
call an Authorised Service Centre.
“C”.
“C”
will
Page 2

User’s guide
ELECTRICY SUPPLY
Warning - This appliance must be earthed
This appliance requires a 230 Vshould be protected by a 3A fuse.
To connect a plug
As the
colour
of the wire in the mains lead of the appliance
may not correspond with the coloured markings identifying
the terminals in your plug, proceed as follows:
-
the wire which is coloured green and yellow must be
connected to the terminal in the plug which is marked
which letter E or by the symbol
green and yellow;
-
the wire which is coloured blue must be connected to
the terminal which is marked with the letter N or
coloured black;
-
the wire which is coloured brown must be connected to
the terminal which is marked with the letter L or
coloured red.
CLEANING OUTER CASING
Use a damp cloth.
Do not use abrasive cleaners.
Control panel can be wiped with damp cloth and dried.
Spray polishes must not be used on control panel surface
or knobs.
Care must be taken in preventing any liquid entering the
appliance.
50Hz
supply and
@ or coloured green or
CARE OF APPLIANCE
It is good practice to clean and service the appliance and
central heating system every year.
Call an Authorised Service Centre.
IN THE EVENT OF OPERATING FAILURE
If there is a faulty with the appliance it must not be used
until the fault is rectfied by an Authorised Service Centre.
For more detailed instructions please consult the
manual supplied with your appliance.
Page 3

Time clock user’s guide
The timer fitted to your boiler allows you to control the
times of your central heating periods only.
Domestic hot water will always be available provided the
boiler is switched on.
The timer display (24 hr clock) provides a permanent
display of the time of day and day of the week.
If the boiler is switched off or its power supply interrupted, a built in battery will operate the display and protect
the programme of operating times etc.
TIMER CONTROL
DAY HR
Operating mode switch ( I AUTO 0 )
1
Set the switch to I and the timer is permanently on,
this provides a continous central heating “on” period,
,
overriding any other programme.
This setting is useful if you come in late in the evening
and the central heating is “off”.
Do not forget to reset the switch to AUTO when going
to bed or when the house was warmed up.
A
a
symbol appear in the display whenever the
operating mode switch is set to I to remind you that it
is “on”.
2 Set the switch to 0 and the timer is permantely “off”
no central heating.
3 Set the switch to AUTO and your central heating will
operate during your pre-set periods.
Timer setting switch
1
Set the switch to B and the time of day and day of the
week can be set using the HR, MIN and DAY buttons
as described below.
2 Set the switch to
central heating can be set as described below.
3 Set the switch to RUN and you pre-set programme will
start.
@
button - Use this button to select the switching modes
when setting your central heating periods. A a symbol
will appear at the right hand size of the display when a
switch “on” mode is selected, this will disappear when a
switch “off” mode is selected. A number (1 to 16) also
appears in the display next to the symbol, this indicates
the number of the switching mode.
Up to sixteen “on”,“off” switching modes can be selected.
DAY button - Use this button to select the day of the
week when setting the timer. You also use this button to
select “groups” of days when setting your central heating
periods.
( Cl
RUN
@
and the “on” and “off” times for the
MIN
@)
An arrow is
the day of the week.
When setting the operating times and chosing the “groups” of day, the arrows appear under each day in the
“group”, these revert back to the single arrow under the
day of the week after setting timer.
When using the day button, keep press/releasing it and
the arrow under the day of the week will advance through the days, after the single day of the week the “groups”
of days will appear.
Five days (Monday to Friday), then week-endes
(Saturday and Sunday).
Then six days (Monday to Saturday), then as seven
days. If the button is pressed again the arrow disappears, press it again and it will reappear under Sunday.
If the button is kept pressed in it will quickly advance
through the above sequence.
HR button
of day and the “on”, “off” times.
Keep the button pressed in to advance the time rapidity,
then press/release it for individual hrs.
MIN button
same manner as the HR button previously described.
it)
button - Use this button to select the “skip” function,
which will cause the timer to skip the next days programme commencing at midnight. I.e. The central heating will
be off for 24 hrs unless overridden by setting the operating mode to switch to I. It will revert back to normal operation the following midnight.
The
e
ted. During the 24 hrs that the skip function is operating
thew sign will disappear and the arrow indicating the
day will flash.
If required a second 24 hr skip period can be selected
during the skip day by pressing the
-
R button - Use this button to clear any previous programmes from the memory. Use the tip of a pencil to press
the button. The display will reset to 0.00 and Sunday will
be selected. The display will flash until the timer setting
switch is set to
continously visible on the display to indicate
-
Use this button to set the hours for the time
-
Use this button to set the minutes, in the
sign is displayed when the skip function is selec-
*
button again.
B
to set the timer.
TO SET THE TIMER
Press the R button to clear any previous programmes
from the memory. The display will reset and start to
flash.
Set the time of day and day of the week as follows:
a Set the timer setting switch to
will stop flashing.
b Press the HR and MIN buttons to set the actual
time of day (24 hr clock).
c Press the DAY button to set the actual day of the
week.
The current time of day and day of the week are now
set in the timers memory.
Set the switch “on” and switch “off” times for your
central heating periods and the group of days of the
week in which you wish them to operate as follows:
a Set the timer setting switch to
changes to 0.00 with the first switching mode ready
a
and the display
@ .
The display
Page 4

Time clock user’s guide
to be set, (the D symbol will appear in the display
to indicated that you are setting a switch on mode.
A number 1 will also appear to indicate that it is the
first switching mode).
Keep pressing the DAY button until the required
group of days is selected.
Press the HR and MIN buttons to set the actual
time for beginning of the first heating period.
Press the
switching mode (the a symbol will disappear from
the display to indicate that you are setting a switch
“off” mode. A number 2 will also appear to indicate
that it is the second switching mode).
Keep pressing the DAY button until the required
group of days is selected.
Press the HR and MIN buttons to set the actual
time for the end of the first heating period.
Operations 0 to 1 can be repeated to give you up to
eight heating periods in the selected group of days.
You do not need to use all of the switching modes.
With the timer setting switch still at
4
pressing the @ button to check your settings.
Ensure that you have set a switch off mode after each
switch on mode and that the times do not overlap.
Set the timer setting switch to RUN and the operating
mode switch to AUTO.
The timer will now automatically control the boiler to
,
provide central heating during the operating periods
you have just set.
The
Q
symbol will appear in the display whenever
the timer is operating during an “on” period.
@
button again to set the second
@ ,continue
USEFUL TIPS AND TYPICAL SETTINGS
When setting the times for the heating periods it is useful
to remember that it might take up to an hour for the
house to become warm, expecially in colder weather.
Also the effect of the central heating will remain for a
time when the central heating is turned off.
A typical timer setting for a working family could be as
follows:
A group of five days (Monday to Friday) set with the first
heating period set to come on at 6:00 and off at
then the second period set to come on at 16:00 and off
at 22:O0. A second group of two days (Saturday and
Sunday) set with the first heating period to come on at
8:00 and off at 1O:OO; then the second period set to
come on 16:00 and off at 23:O0.
Do not forget that if your require heating during a central
heating off period, symply set the operating mode switch
to I, remember this switch must be reset to AUTO at a
later date for the timer to return to its programmed settings.
8:00;
Manufacturer : Merloni TermoSanitari
MTS (GB) LIMITED
importer
:
MTS Building, Hughenden Avenue, High Wycombe
Bucks HP 13 5FT
Telephone (01494) 755600
-
Fax (01494) 459775
Page 5

Time clock
user’s
Operating the time switch
The step marked with the symbol
Preparing for Operation
b
Activate the
“Res”
switch (=RESET) to reset the time switch to its default setting (activate
using a pencil or similar pointed instrument). Do this:
-
every time you wish to “reset” the time switch
-
to erase all switching times and the current time of day.
After approximately two second the following display appears:
guide
“b ”
are necessary to carry out a switching program.
b
Enter current time and weekday
-
Keep the “0 " key pressed down
During the summer time period press the
+/-
1 h key once.
Enter the hour using the “h” key
Enter the minutes using the “m” key
Enter the day using the “Day” key
1 = “Monday”
-
Release the “ 0 ” key
. . . . . . . . . . . . . . 7
=
Sunday
Enter
switching
times
input
The colon now blinks once a second.
Notes:
If you
keep the “h” and “m” keys pressed down for more than 2 seconds, the display
will enter fast-forward scroll mode.
li-
Entering the switching times
You have 20 memory locations available. Each switching time takes up one memory location.
Keep pressing the “Prog” key until a free memory location is shown in the display
Programme ON or OFF with the “ 3 ” key:
‘I(-) “= OFF; “a “= ON
Enter the hour using “h”
Enter the minutes using “m”
If a switching command is to be carried out every day (1 2 3 4 5 6 7) then store using the
“0 ”
key, otherwise select the day(s) it is to be carried out by using the “Day” key.
Manual
swtch
Reset
time
Enter
weekday/s
“-
-:-
Summer and
winter
time
setting
-“_
Enter
the hours
Week
days
flash
Enter
minutes
When the day selection is left blank, the programmed switching instruction operates at the
same time every day
123456
12345
67
= Monday
= Monda y
= Saturda y
Selection of single days: 1
Save the switching time with the
-
Saturday
-
Friday
-
Sunday
= Mon. . . . . . . . . . . . . . . 2 =Tues.
0 ”
key.
The time switch enters the automatic operating mode and displays the current time of day.
Begin any further entry of a switching time with the “Prog” switch. If your entry is incomplete,
the segments not yet selected will blink in the display.
After programming is completed, and you return the timeswitch to the current time display
“0 ”
with the
key, the timeswitch will not activate any switching instruction required for the
current time. You may need to manually select the desired switching state with th e “ q
key. Thereafter, as the unit encounters further switching instructions in the memory in real
time, it will correctly activate all subsequent switching instructions.
”
Page 6

Time clock user’s guide
Automatic
Operation
8 0
= OFF
The switching
times correspond to the
program
entered.
8
-
Manual
Operation
3 @
~(-)=OFF
If the current
switching mode is
changed manually,
the next switching
time will be
carried out automatically again
according to the
entered switching
program.
= ON
%
It-
Continuous
Operation
[B] = Continuously
’
=
k-d
L .J
You can only
return to automatic
mode from the
continuously-ON
and
continuouslyOFF [o] switching
modes by
pressing the
key.
[
1
ON
Continuously OFF
[a]
” 3 *
Manual Override Switch “ ‘%
With the
“‘2) ”
you can change the
current switching setting at any time.
The
switching program already
ed is not altered.
Reading the programmed switching times
Pressing the “Prog” key displays the programmed switching times until the first free memory loca-
tion appears in the display
“-- : - -“.
If you now press the “Prog” key once again, the number of free memory locations will be displayed,
e.g. “FR 18” If all memory locations are occupied, the display
“FR00” appears.
”
ente-
Changing the programmed switching times
Press the “Prog” key repeatedly until the switching time you want to change is displayed. You can
now enter the new data. See
point
'Entering the switching times’
Notes on storing switching times:
If you end your entry of the switching times by pressing the “Prog” key, then the switching time you
have entered will be stored and the next memory location displayed. Entry of further switching
times is also carried out as described in point
‘Entering the switching times’
In addition, a complete switching command is stored automatically after around 90 seconds pro-
vided no other key is pressed. The time switch then enters the automatic operating mode and dis-
plays the current time again.
Deleting individual switching times
Press the “Prog” key repeatedly until the switching time you wish to delete is shown in the display.
Then set to
using the “h” or “m” key and keep the “0
”
key pressed down for around 3 sec-
“- -”
onds. The switching time is now erased and the current time is displayed.
AM / PM time display
If you press the “+/-1 h” and “h” keys at the same time, the time display switches into the AM/PM
mode (mostly used in English-speaking countries).
Technical data
Connection
Switching capacity
Ambient temperature
Running reserve
Memory locations
Shortest switching time
Programmable
every minute
see unit imprint
see unit imprint
-10°C to +55°C
5 h at + 20°C
20
1 min.
Manufacturer : Merloni
Importer.
MTS (GB) LIMITED
MTS Building, Hughenden Avenue,
Bucks HP 13
Telephone (01494) 755600 - Fax (01494) 459775
TermoSanitari
High Wycombe
5FT
 Loading...