


made for you.

IT |
ITALIANO |
3-10 |
GB |
ENGLISH |
11-18 |
DE |
DEUTSCH |
19-26 |
FR |
FRANÇAIS |
27-34 |
ES |
ESPAÑOL |
35-42 |
PT |
PORTUGUÊS |
43-50 |
SV |
SVENSKA |
51-58 |
PL |
POLSKI |
59-66 |
CZ |
âESKY |
67-74 |
SK |
SLOVENSKY |
75-82 |
HU |
MAGYAR |
83-90 |
LT |
LIETUVI·KA |
91-98 |
SR |
СРПСКИ |
99-106 |
UA |
УКРАЇНСЬКА |
107-114 |
RU |
РУССКИЙ |
115-122 |
ITALIANO |
3 |
Gentile Cliente,
La ringraziamo per aver scelto un nostro prodotto.
La preghiamo di leggere attentamente le istruzioni per l’uso prima dell’allacciamento e dell’utilizzo della macchina. La conoscenza dei principi di funzionamento garantirà un corretto e sicuro sfruttamento dell’apparecchio. Le istruzioni per l’uso contengono molte indicazioni utili circa il funzionamento, oltre ai particolari tecnici della lavatrice che La aiuteranno ad ottimizzare l’utilizzo di questa macchina.
In caso di vendita, oppure di cessione dell’asciugatore, bisogna ricordarsi di consegnare al nuovo utilizzatore anche il libretto delle istruzioni per l’uso.
|
|
INDICE |
|
NOTE E CONSIGLI PER L’UTILIZZATORE |
3-4 |
||
• |
Dati tecnici |
3 |
|
DESCRIZIONE DELLA MACCHINA |
5 |
||
INSTALLAZIONE DELLA MACCHINA |
5-7 |
||
• |
Installazione |
5-6 |
|
• Messa in piano del’asciugatore |
6 |
||
• Collegamento del tubo di evacuazione aria |
6 |
||
• |
Collegamento all’impianto elettrico |
7 |
|
UTILIZZO DELLA MACCHINA |
7-9 |
||
• |
Descrizione delle funzioni |
7-8 |
|
• |
Oblò |
|
8 |
• Per asciugare la biancheria correttamente |
8 |
||
• |
Precauzioni per tessuti |
9 |
|
• |
Tabella programmi |
9 |
|
• |
Pesi biancheria |
9 |
|
MANUTENZIONE |
10 |
||
• |
Pulizia del filtro |
10 |
|
• |
Individuazione guasti |
10 |
|
• |
Soluzione dei problemi |
10 |
|
• |
Accessori optional |
10 |
|
NOTE E CONSIGLI PER L’UTILIZZATORE |
|||
|
|
DATI TECNICI |
|
|
|
Larghezza: |
59.5 |
Dimensioni: |
Altezza: |
85.0 |
|
|
|
Profondità: |
57.0 |
|
|
Capacità Max |
vedi targhetta caratteristiche |
|
|
Potenza Nominale |
vedi targhetta caratteristiche |
|
|
Tensione |
vedi targhetta caratteristiche |
MODELLO: ..................................................................................................................................................................................................................... |
|
|
|
NUMERO DI FABBRICAZIONE: .................................................................................................................................................................. |
|
||
DATA D’ACQUISTO: ................................................................................................................................................................................................. |
|
||
|
|
|
IT |
SM1888

4 |
NOTE E CONSIGLI PER L’UTILIZZATORE |
▼L’uso di questo apparecchio dovrà essere quello di asciugatore per uso domestico ogni altro utilizzo è da considerarsi improprio e quindi pericoloso.
▼Conservare il presente manuale d’uso sempre vicino all’asciugatrice in modo da poterlo consultare rapidamente se necessario.
▼Qualsiasi modifica o tentativo di manomissione dell’apparecchio può essere pericolosa per l’utilizzatore e provocare danni al prodotto.
▼Alla consegna dell’elettrodomestico, verificare che risulti indenne da eventuali danneggiamenti dovuti al trasporto. Se si rilevassero danneggiamenti, rivolgersi immediatamente al rivenditore.
▼Durante il ciclo d’asciugatura, l’aria della stanza viene convogliata attraverso il lato posteriore dell’elettrodomestico.Non coprire l’asciugatrice con biancheria o altro.
▼Nel posizionare l’apparecchio assicurarsi che il cavo di alimentazione non subisca piegature ne compressioni e sia accessibile, per eventuali interventi.
▼Si ricordi che durante il ciclo d’asciugatura, il vetro dell’oblò e il tubo di scarico si scalderanno anche fino ad una temperatura di 60°. Non toccare queste parti prima della fine del ciclo di raffreddamento.
▼E’ vietato l’uso della macchina ai bambini, se non sorvegliati.
▼Non far mai asciugare capi che siano stati a contatto di agenti chimici come ad esempio fluidi di pulitura a secco.
Sono infatti di natura volatile e potrebbero causare esplosioni.
▼Non far asciugare capi con gomma espansa o parti in gomma, in quanto potrebbero sciogliersi e danneggiare altri capi di biancheria o addirittura l’elettrodomestico stesso.
▼Se l’elettrodomestico viene venduto o regalato, si ricordi di consegnare anche il presente manuale che consentirà al successivo proprietario di utilizzare l’asciugatrice in modo corretto e sicuro.
▼Non si può tentare di riparare da soli i guasti dell’apparecchio perché le riparazioni effettuate da non professionisti possono provocare seri danni e tolgono il diritto alle riparazioni di garanzia.
▼Le riparazioni dell’apparecchio possono essere effettuate esclusivamente da personale autorizzato dei centri di assistenza. Per le ripara-
IT
zioni devono essere usate solo parti di ricambio originali.
▼Centrifugare o strizzare bene la biancheria prima di caricarla nell’asciugatore.La biancheria ben centrifugata si asciugherà più in fretta.
▼Pulire bene il filtro ogni volta che si utilizza l’asciugatrice, in modo da garantire una perfetta circolazione dell’aria.
▼Non attaccare oppure staccare la spina dalla presa della corrente elettrica con le mani bagnate.
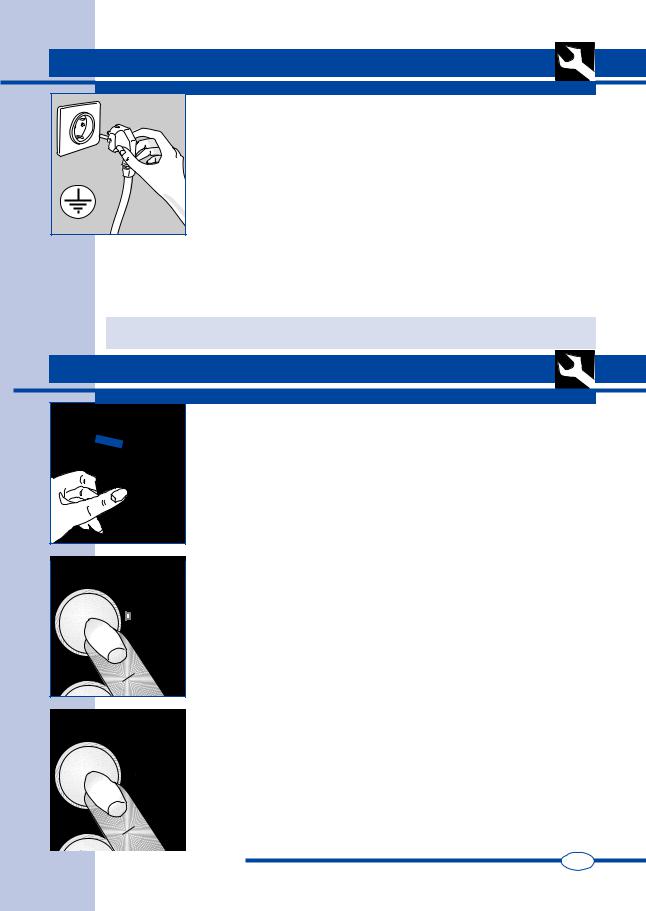
▼La macchina deve essere collegata ad una presa di corrente elettrica provvista di messa a terra e conforme alle esigenze di sicurezza.
▼E’ vietato collegare la macchina alla presa elettrica utilizzando prolunghe o spine multiple.
▼Non esporre l’apparecchio ad agenti atmosferici.
▼Eseguendo le revisioni o le pulizie ricordarsi di staccare l’apparecchio dalla presa della corrente elettrica.
Nel caso si voglia staccare la macchina dalla presa della corrente non tirare il cavo elettrico ma la spina.
▼Questo apparecchio è contrassegnato in conformità alla Direttiva Europea 2002/96/EC, Waste Electrical and Electronic Equipment (WEEE). Assicurandosi che questo prodotto sia smaltito in modo corretto, l’utente contribuisce a prevenire le potenziali conseguenze
negative per l’ambiente e la salute. Il simbolo
 sul prodotto o sulla documentazione di accompagnamento indica che questo prodotto non deve essere trattato come rifiuto domestico ma deve essere consegnato presso l’idoneo punto di raccolta per il riciclaggio di apparecchiature elettriche ed elettroniche. Disfarsene seguendo le normative locali per lo smaltimento dei rifiuti. Per ulteriori informazioni sul trattamento, recupero e riciclaggio di questo prodotto, contattare l’idoneo ufficio locale, il servizio di raccolta dei rifiuti domestici o il negozio presso il quale il prodotto è stato acquistato.
LA DITTA PRODUTTRICE DECLINA QUALSIASI RESPONSABILITÀ PER EVENTUALI INCIDENTI PROVOCATI DALLA NON OSSERVANZA DELLE NORME DI SICUREZZA NONCHÉ DELLE ISTRUZIONI D’USO
SM1888

DESCRIZIONE DELLA MACCHINA |
5 |
▼La macchina è un elettrodomestico che asciuga ogni tipo di tessuto quando
|
Lei vuole. |
12 |
▼ La struttura é stata realizzata in pannelli di lamiera trattati e verniciati in modo |
11 |
che le sue qualità estetiche possano rimanere inalterate nel tempo. |
|
▼Il motore e tutte le parti in movimento sono state studiate e realizzate in modo
da garantire il massimo della silenziosità.
|
|
▼ Il pannello comandi racchiude in se la possibilità di utilizzare facilmente tutte le |
||||
2 |
9 |
asciugature desiderate. |
|
|
|
|
10 |
|
|
|
|
||
|
|
▼ L’oblò molto ampio facilita il carico e scarico della biancheria. |
|
|||
|
|
1 |
2 |
3 |
4 |
5 |
Dry |
STOP
20'
40'
60'
1 |
- |
Pulsante ON/OFF |
|
|
2 |
- |
Pulsante asciugatura delicata o energica |
|
|
3 |
- |
Pulsante Start |
|
|
4 |
- |
Manopola regolazione tempi di asciugatura |
6 |
|
5 |
- |
Spia di controllo asciugatore acceso |
|
|
|
|
|||
6 |
- |
Oblò |
|
|
7 |
- |
Filtro |
7 |
|
8 |
- |
Piedini registrabili |
|
|
|
|
|||
9 |
- |
Sbocco di scarico |
|
|
10- |
Raccordo di accoppiamento |
|
|
|
11- |
Tubo di scarico |
|
|
|
12- |
Supporto tubo |
|
1 |
|
|
|
|
|
|
|
|
|
|
8 |
INSTALLAZIONE DELLA MACCHINA
INSTALLAZIONE
L’installazione deve essere effettuata da personale professionalmente qualificato, secondo le istruzioni del costruttore, perché una errata installazione può causare danni a persone e cose.
|
▼ |
Installare l’asciugatore vicino una finestra per facilitare l’evacuazione dell’aria |
|
|
umida. |
A |
▼ |
Utilizzare il tubo di evacuazione dell’aria per evitare la condensa e fissarlo nel |
3 |
|
foro A situato nella parte posteriore in basso della macchina (fig. 3). |
|
|
IT |
SM1888

6 |
INSTALLAZIONE DELLA MACCHINA |
|
INSTALLAZIONE |
▼Non coprire mai le prese dell’aria poste dietro il vostro apparecchio.
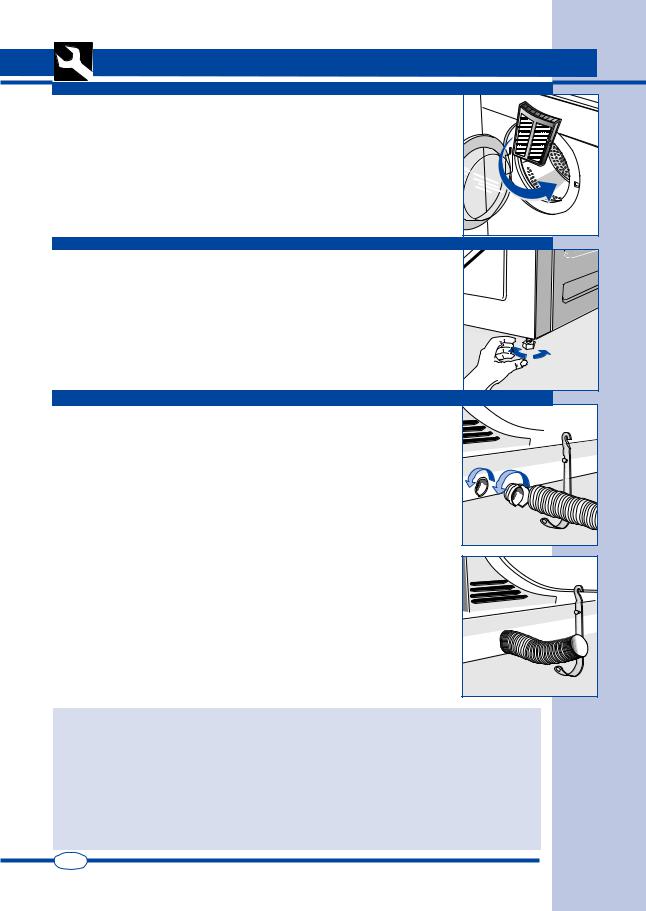
▼ Mettere il filtro nella posizione di utilizzo (fig. 4).
▼ Pulire l’interno del cestello di asciugatura con un panno umido per togliere l’eventuale polvere che vi si deposita.
MESSA IN PIANO DELL’ASCIUGATORE
Piedini regolabili. Mettere l’asciugatrice in posizione verticale in modo che appoggi saldamente su tutti e quattro i piedini. Livellare la macchina registrando i piedini come di seguito descritto
▼Sollevare leggermente la macchina.
▼Regolare i piedini all’altezza giusta (fig. 5).
▼Abbassare la macchina.
Una macchina mal livellata può danneggiare i cuscinetti ed usurarsi prematuramente. Questo asciugatore non necessita di fissaggio al suolo.
COLLEGAMENTO DEL TUBO DI EVACUAZIONE ARIA
Collegare il tubo di scarico aria allo sbocco di scarico sul retro dell’asciugatrice (fig.6).
▼ Collegare un’estremità del tubo al raccordo fornito.
▼ Girare il raccordo (insieme con il tubo) in senso antiorario nel foro di scarico sull’asciugatrice.
▼ Spingere il tubo fuori dal retro della macchina a sinistra o a destra attraverso la nicchia sul fondo del cassone della macchina.
▼Posizionare l’altra estremità del tubo in prossimità di una finestra o di uno sbocco di ventilazione verso l’esterno. Se ciò non fosse possibile, accertarsi che il
locale sia ben ventilato quando la macchina viene utilizzata. Servirsi del supporto fornito per fissare il tubo (fig. 7).
Importante: Il tubo di scarico aria deve essere collegato anche se l’aria non viene scaricata all’esterno perché altrimenti l’asciugatrice riassorbe l’aria umida scaricata e prolunga il ciclo d’asciugatura.
L’aria umida può inoltre danneggiare l’asciugatrice. Dal tubo di scarico aria viene scaricata solo aria calda e umida che di per sé non è pericolosa, ma che comunque non deve essere diretta verso persone, animali, piante.
Importante:L’aria in uscita non deve essere scaricata in un condotto che sia utilizzato per lo scarico dei fumi generati da apparecchi che bruciano gas o altri combustibili.
IT
4
5
6
7
SM1888
INSTALLAZIONE DELLA MACCHINA |
7 |
|
COLLEGAMENTO ALL’IMPIANTO ELETTRICO |
|
▼ Accertarsi che la tensione elettrica indicata nei dati tecnici della targhetta po- |
|
sta sul retro dell’apparecchio, corrisponda a quella della rete elettrica. |
|
▼ Salvavita, cavi elettrici e presa della rete devono avere parametri tali da per- |
|
mettere di sopportare il carico massimo indicato sulla targhetta stessa. |
|
▼ A seguito dell'installazione, l'accesso all'alimentazione di rete deve essere ga- |
|
rantito da un interruttore onnipolare. |
|
▼ La presa di corrente alla quale viene allacciata la macchina deve essere muni- |
8 |
ta di messa a terra. In caso contrario, il produttore declina qualsiasi responsa- |
bilità per eventuali incidenti (fig. 8). |
|
|
▼ Se il cavo d’alimentazione è danneggiato in qualche modo,contattare il centro |
|
di assistenza tecnica specializzato. |
|
▼ E’ vietato allacciare l’asciugatore alla rete attraverso elementi indiretti come |
|
prolunghe e prese multiple. |
|
▼ Posizionare l’apparecchio in modo che il cavo alimentazione sia facilmente |
|
accessibile in modo da poterlo di-sconnettere in caso di necessità. |
Importante: Alla fine del ciclo di asciugatura,scolle-gare l’asciugatrice dalla rete per impedire che un bambino possa eventualmente metterla in funzione.
UTILIZZO DELLA MACCHINA
9 |
10 |
DESCRIZIONE DELLE FUNZIONI
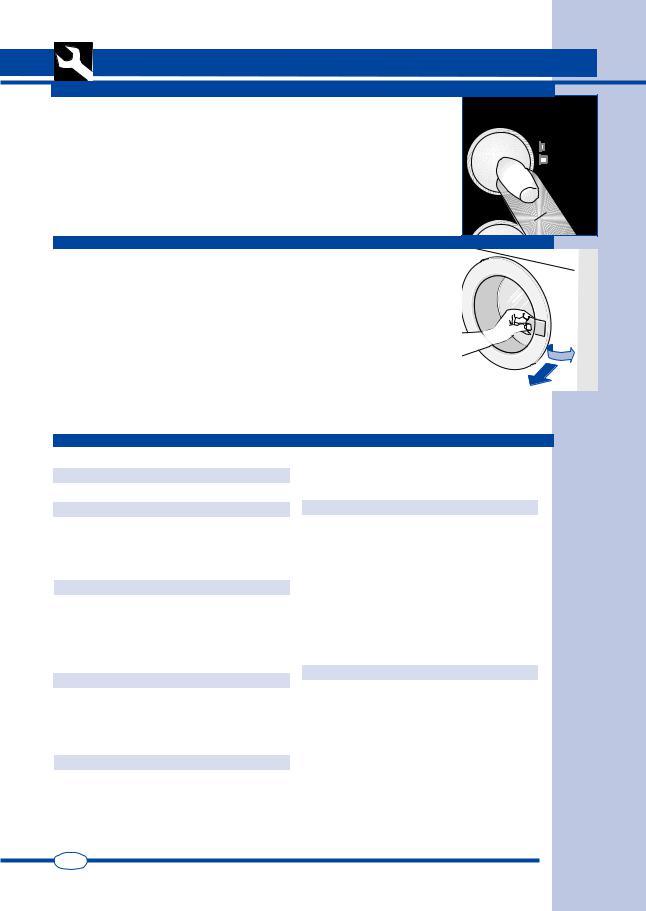
▼Manopola regolazione tempi di asciugatura: Ruotare la manopola per selezionare i tempi di asciugatura desiderati (fig. 9).
(vedere tabella programmi per la scelta del programma in base al tipo di tessuto)
▼Alla fine di ciascun ciclo, ci sarà un periodo di raffreddamento di 10-15 minuti durante il quale la macchina rimarrà accesa.
▼Pulsante Start: Premere questo pulsante per far partire il ciclo di asciugatura (la spia di controllo si accenderà)
11 |
▼ Pulsante asciugatura delicata o energica: premendo questo pulsante si può |
scegliere il tipo di asciugatura che verrà effettuata: Energica o delicata (fig.11). |

 Energico
 Delicato
IT
SM1888

8 |
UTILIZZO DELLA MACCHINA |
|
DESCRIZIONE DELLE FUNZIONI |
▼Pulsante On/Off: Premere questo pulsante per accendere la macchina.
12
OBLÒ
L’asciugatrice è del tipo a carico frontale.Tirare la maniglia in avanti senza forzare, qundi aprire delicatamente l’oblò. La macchina si arresta quando viene aperto l’oblò durante il ciclo d’asciugatura.
Importante:
▼ Durante il ciclo d’asciugatura, la biancheria sarà naturalmente calda.
La biancheria viene raffreddata durante il ciclo di raffreddamento.
▼ Non aprire mai l’oblò durante la fase di asciugatura per evitare bruciature a |
13 |
causa del vapore caldo o della biancheria stessa. |
PER ASCIUGARE LA BIANCHERIA CORRETTAMENTE
Seguire i seguenti punti:
A
▼Centrifugare la biancheria.
B
▼Dividere la biancheria per tipo o per fibre di tessuto.
▼Chiudere cerniere e allacciare bottoni, ricordandosi di vuotare le tasche dei capi d’abbigliamento.
▼Rivoltare i pullover.
C
▼Aprire l’oblò.
▼Caricare la biancheria nel cestello, ricordando di caricare le lenzuola da un angolo.
▼Si raccomanda di caricare capi piccoli e grandi insieme.
D
▼Chiudere l’oblò.
▼Asciugarsi le mani (non toccare mai apparecchiature elettriche con le mani bagnate).
▼Inserire la spina nella presa elettrica.
E
▼Premere il pulsante ON/OFF per accendere la macchina.
▼Aspettare il segnale sonoro e che la spia si sia spenta.
▼Scegliere il ciclo di asciugatura più indicato
IT
(vedere tabella programmi) oppure impostare il selettore timer sul tempo di asciugatura richiesto.
▼Aspettare che si accenda la spia e premere il pulsante start per avviare il ciclo di asciugatura.
F
▼Per arrestare la macchina durante il ciclo d’asciugatura basta aprire l’oblò (il cestello cesserà di girare)
▼Per continuare il ciclo d’asciugatura chiudere l’oblò e premere il pulsante start.
▼Per far asciugare perfettamente capi di grosse dimensioni, raccomandiamo di arrestare la macchina e togliere la biancheria più volte nel corso del ciclo d’ asciugatura.
G
▼Dopo aver tolto la biancheria asciutta, pulire il filtro nel modo seguente:
-sollevare il filtro;
-aprirlo e pulirlo con una spazzola morbida;
-chiuderlo e rimetterlo in sede;
-il filtro dovrà essere lavato periodicamente con acqua saponata per rimuovere anche le più piccole particelle.
▼Scollegare la spina dalla presa.
SM1888

UTILIZZO DELLA MACCHINA |
9 |
PRECAUZIONI PER TESSUTI |
|
In caso di dubbi sul tipo di tessuto, controllare l’etichetta sul capo stesso.Quasi tutti i capi che possono essere asciugati indicano specificamente che sono idonei per asciugatura a macchina.
Per evitare l’elettricità statica sui capi, durante i cicli di risciacquo della lavatrice usare un ammorbidente. Togliere subito dal cestello i capi sintetici per evitare che sgualciscano.
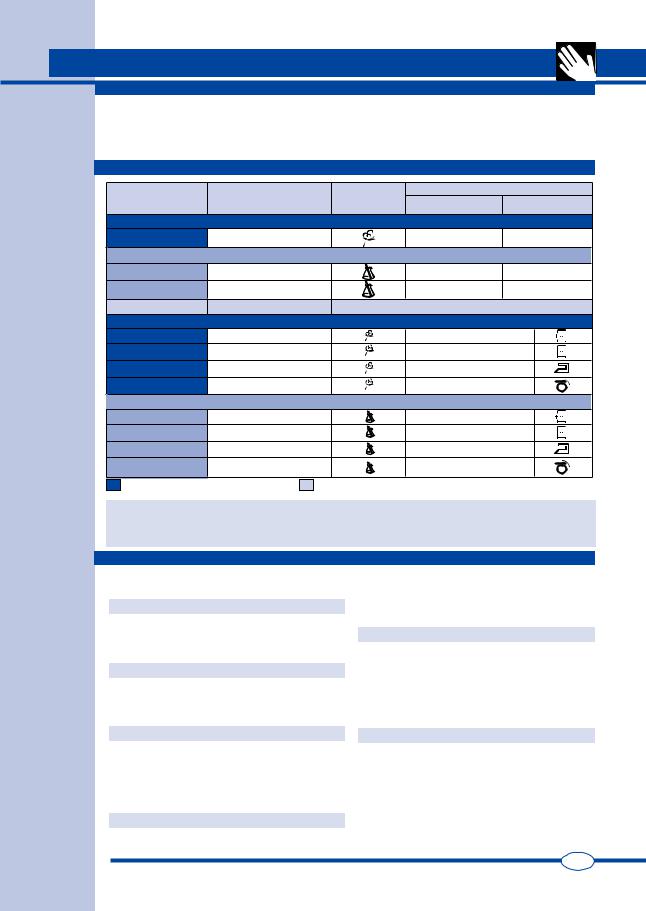
TABELLA PROGRAMMI
Tessuto |
Peso di biancheria |
|
Tipo di |
Tempi in minuti |
|
|
asciutta |
|
asciugatura da |
Asciugatura da armadio |
Asciugatura da ferro |
|
|
|
utilizzare |
|
|
|
PROGRAMMA A CONTROLLO TIMER |
|
|||
Cotone/Lino |
Mezzo Carico |
|
|
40-60 min. |
20-40 min. |
|
PROGRAMMA A CONTROLLO TIMER |
|
|||
Sintetici |
Mezzo Carico |
|
|
40-60 min. |
20-40 min. |
Sintetici delicati |
1,5 kg |
|
|
40-60 min. |
20-40 min. |
Tessuto |
Peso di biancheria asciutta |
Tipo di asciugatura da utilizzare |
|||
|
PROGRAMMA A CONTROLLO ELETTRONICO |
|
|||
Cotone/Lino |
Massimo Carico |
|
|
Extra secco |
|
Cotone/Lino |
Massimo Carico |
|
|
Da riporre in armadio |
|
Cotone/Lino |
Massimo Carico |
|
|
Umido da stiro |
|
Cotone/Lino |
Massimo Carico |
|
|
Molto umido |
|
|
PROGRAMMA A CONTROLLO ELETTRONICO |
|
|||
Sintetici delicati |
Mezzo Carico |
|
|
Extra secco |
|
Sintetici delicati |
Mezzo Carico |
|
|
Da riporre in armadio |
|
Sintetici delicati |
Mezzo Carico |
|
|
Umido da stiro |
|
Sintetici delicati |
Mezzo Carico |
|
|
Molto umido |
|
ASCIUGATURA ENERGICA |
ASCIUGATURA DELICATA |
|
|||
Importante: Il tempo di asciugatura dipende da diversi fattori: peso, dimensione dei capi, tipo di tessuto, umidità. I capi ben strizzati asciugano prima. Per evitare che i capi sgualciscano, non sovraccaricare l’asciugatrice.
PESI BIANCHERIA
I pesi indicati sono approssimativi e possono variare a seconda del processo di lavorazione, qualità e finitura.
Biancheria da letto |
|
Tovaglia grande |
1000 g |
|
Coperta imbottita |
700 g |
Tovaglioli |
80 g |
|
Lenzuola |
550 g |
Abbigliamento uomo |
|
|
Lenzuola di sopra |
600 g |
|
||
Camicia lava e indossa |
250 g |
|||
Federa cuscino |
180 g |
|||
Canottiera (senza maniche) |
120 g |
|||
Lino per la casa |
|
|||
|
Mutande |
80 g |
||
Asciugapiatti |
90 g |
Mutandoni |
250 g |
|
Asciugabicchieri |
70 g |
Pigiama |
480 g |
|
Asciugamano grezzo |
20 g |
Camicia da notte |
400 g |
|
Salvietta bagno |
200 g |
Fazzoletti |
25 g |
|
Altri capi di biancheria |
|
Abbigliamento donna |
|
|
Accappatoio |
1200 g |
Camicia |
100 g |
|
Salvietta bagno |
800 g |
Maglietta |
100 g |
|
Camicia donna |
300 g |
Mutandine |
80 g |
|
Camicia uomo |
600 g |
Sottoveste |
150 g |
|
Camicie donna/uomo |
|
Camicia da notte |
180 g |
|
in tessuto sintetico |
300 g |
Pigiama |
450 g |
|
Lino da tavola |
|
Fazzoletti |
15 g |
|
|
|
|
||
Tovaglia |
250 g |
|
IT |
|
|
|
|
SM1888

10 |
MANUTENZIONE |
|
PULIZIA DEL FILTRO |
|
Per garantire risultati ottimali di asciugatura in ogni circostanza, ricordare che il 14 |
|
filtro deve essere sempre pulito. Ricordare di controllare e pulire il filtro dopo ogni |
|
ciclo d’asciugatura. |
Importante:
Pulire il filtro solo a macchina fredda! Per la pulizia del filtro seguire questa procedura:
▼Aprire l’oblò.
▼Tenere il filtro con entrambe le mani e spingere verso l’alto per toglierlo.
▼Allargare leggermente il bordo superiore del filtro ed aprire il filtro.
▼Togliere la lanugine.
▼Chiudere il filtro accertandosi che la chiusura ritorni in posizione corretta.
▼Pulire le guide di scorrimento del filtro della macchina se necessario con un aspirapolvere.
▼Posizionare il filtro sulle sue guide di scorrimento (fig.14).
INDIVIDUAZIONE GUASTI
Tutte le apparecchiature elettriche sono soggette a guasti.Si ricordi che in questi casi si dovrà chiamare un elettricista qualificato. Potrete comunque risolvere voi stessi molti dei problemi che si verificano.
Importante: In caso di cattivo funzionamento, si ricordi di scollegare immediamente la macchina dalla rete d’alimentazione.
Prima di chiamare il nostro Centro Assistenza,verificare i punti di seguito indicati.
SOLUZIONE DEI PROBLEMI
Se la macchina non parte
•assicurarsi che:
1)Verificare di aver effettuato il collegamento all’alimentazione di rete.
2)Verificare che la presa sia efficiente:
2a) è saltato il fusibile? (Il controllo è facile, basta collegare un’altra apparecchiatura come una lampada da tavolo).
2b) Sono state seguite tutte le istruzioni del manuale d’istruzioni?
Se la macchina non parte
•assicurarsi che:
1)L’oblò è stato chiuso correttamente.
2)Sia stato premuto il tasto start.
La biancheria non si asciuga
•assicurarsi che:
1)E’ possibile che il tubo scarico aria sia piegato o ritorto.
2)E’possibile che il filtro sia intasato. (Si ricordi che quando si apre l’oblò, le parti interne dell’asciugatrice e la biancheria possono essere molto calde).
Se dopo l’esecuzione delle funzioni descritte, l’apparecchio continua a non funzionare correttamente segnalare il difetto al centro assistenza tecnica autorizzato più vicino. Si prega cortesemente di comunicare il modello, il numero di fabbricazione ed il tipo di guasto. Queste informazioni permettono all’operatore dell’assistenza tecnica di procurarsi le parti di ricambio necessarie e, quindi, garantiscono una veloce ed efficace esecuzione della riparazione.
ACCESSORI OPTIONAL
È disponibile presso il vostro venditore l’accessorio per completare la diversa installazione che vi permetterà di fissare la vostra asciugatrice sopra una lavabiancheria carica frontale per poter economizzare lo spazio. Il modello di macchina che vi permetterà di fare questo montaggio vi sarà consigliato dal vostro installatore
IT
SM1888
ENGLISH |
11 |
Dear Customer,
Thank you for having chosen our product. Please read these instructions carefully before connecting and using the appliance.
A knowledge of the operating principles will help guarantee correct and safe use of the appliance.
If the appliance is sold or handed over for use by others, remember to give the new user the instruction booklet.
CONTENTS |
|
NOTES AND ADVICE FOR THE USER |
11-12 |
• Technical information |
11 |
DESCRIPTION OF THE APPLIANCE |
113 |
INSTALLINGTHE APPLIANCE |
13-15 |
|
• |
Installation |
13-14 |
• |
Levelling the appliance |
14 |
• Connecting the air exhaust tube |
14 |
|
• Connecting to the mains supply |
15 |
|
USING THE APPLIANCE |
15-17 |
|
• Description of the functions |
15-16 |
|
• |
Door |
16 |
• Drying the washing correctly |
16 |
|
• Precautions for fabrics types |
17 |
|
• |
Program table |
17 |
• |
Weights of washing |
17 |
MAINTENANCE |
18 |
|
• |
Cleaning the filter |
18 |
• |
Fault finding |
18 |
• |
Resolving problems |
18 |
• |
Optional accessories |
18 |
|
NOTES AND ADVICE FOR THE USER |
|
|
TECHNICAL INFORMATION |
|
|
Width cm.: |
59.5 |
Dimensions: Height cm.: |
85.0 |
|
|
|
57.0 |
|
Depth cm.: |
|
|
Max. capacity |
see characteristics plate |
|
Power rating |
see characteristics plate |
|
Voltage |
see characteristics plate |
MODEL: |
.............................................................................................................................................................................................................................. |
|
SERIAL NUMBER: ..................................................................................................................................................................................................... |
|
|
DATE OF PURCHASE : .......................................................................................................................................................................................... |
|
|
GB
SM1888

12 |
NOTES AND ADVICE FOR THE USER |
▼This appliance has been designed for use as a domestic drier. Any other use is considered as improper and therefore dangerous.
▼Keep this instruction book near to the appliance always, in order that it can be easily consulted when necessary.
▼Any modifications or attempts to interfere with the appliance can be dangerous for the user and may damage the product.
▼On delivery of the appliance, check that it has not been damaged during transport. If any damage is discovered, report the matter to the retailer immediately.
▼During the drying cycle, the air in the room is ducted through the back of the appliance.Do not cover the drier with washing or any other items.
▼When positioning the appliance, ensure that the power supply cable is not kinked or squashed and is accessible.
▼Remember that the door glass and exhaust tube will heat up during a drying cycle and can reach temperatures of up to 60°. Do not touch these parts before the cooling cycle has been completed.
▼The appliance must not be used by children unless supervised.
▼Never dry washing that has been in contact with chemical agents such as dry-cleaning fluids
These products are volatile by nature and could cause an explosion.
▼Do not dry items with parts containing foam rubber or rubber in general, in that the material could melt and damage other items or even the appliance itself.
▼If the appliance is sold or given away, remember to hand over this instruction book with it. This will help the new owner use the drier both correctly and safely.
▼Do not attempt to repair any appliance faults alone, in that repairs carried out by a nonprofessional may cause serious damage and will nullify any rights to repairs under guarantee.
▼Repairs to the appliance can only be carried out by personnel authorised by the customer service centres. All repairs must make use of original spare parts only.
▼Spin dry or wring the washing well before loading it into the drier.Spun dry washing will dry quicker.
GB
▼Clean the filter thoroughly each time the drier is used in order to guarantee perfect air circulation.
▼Never insert or remove the plug from the mains socket with wet hands.
▼The machine must be connected to a mains socket fitted with an efficient earth complying with current safety standards.
▼Do not use extension leads or multiple plug adapters to connect the appliance to the mains supply.
▼Do not expose the appliance to atmospheric agents.
▼When servicing or cleaning the appliance, remember to disconnect it from the mains supply.
▼Do not pull the power supply cable to unplug the appliance from the mains supply.Pull the plug only.
▼This appliance is marked according to the European directive 2002/96/EC on Waste Electrical and Electronic Equipment (WEEE). By ensuring this product is disposed of correctly, you will help prevent potential negative consequences for the environment and human health, which could otherwise be
caused by inappropriate waste handling of this product. The symbol  on the product, or on the documents accompanying the product, indicates that this appliance may not be treated as household waste. Instead it shall be handed over to the applicable collection point for the recycling of electrical and electronic equipment. Disposal must be carried out in accordance with local environmental regulations for waste disposal. For more detailed information about treatment, recovery and recycling of this product, please contact your local city office, your household waste disposal service or the shop where you purchased the product.
THE MANUFACTURER WILL NOT BE HELD RESPONSIBLE FOR ANY INCIDENTS RESULTING FROM NON-COMPLI- ANCEWITH SAFETY STANDARDS ORTHE REQUIREMENTS OF THIS INSTRUCTION BOOK.
SM1888

DESCRIPTION OF THE APPLIANCE |
13 |
The drier is a domestic appliance capable of drying any type of fabric at any time.
|
|
▼ The machine has been constructed in steel panels which have been treated |
|
|
12 |
and painted to guarantees that its aesthetic qualities remain unaltered over |
|
11 |
time. |
||
|
|||
|
|
▼The motor and all moving parts have been designed and manufactured to guar-
antee the minimum possible noise levels
|
|
▼ The control panel has been designed to enable the user to run the desired |
||||
2 |
9 |
drying program without difficulty. |
|
|
||
10 |
|
|
|
|
||
|
|
▼ The wide door makes loading and unloading the washing much easier. |
||||
|
|
1 |
2 |
3 |
4 |
5 |
Dry |
STOP
20'
40'
60'
1 |
- |
ON/OFF button |
|
|
2 |
- |
Delicate or energetic drying button |
|
|
3 |
- |
Start button |
|
|
4 |
- |
Drying time control knob |
6 |
|
5 |
- |
Spin function active indicator light |
||
|
||||
6 |
- |
Door |
|
|
7 |
- |
Filter |
7 |
|
8 |
- |
Adjustable feet |
||
|
||||
9 |
- |
Exhaust outlet |
|
|
10- |
Outlet coupling |
|
||
11- |
Exhaust tube |
|
||
12- |
Tube support |
1 |
||
|
|
|
||
|
|
|
8 |
|
INSTALLING THE APPLIANCE
INSTALLATION
Installation must be carried out by qualified personnel in line with the instructions supplied by the manufacturer. Incorrect installation may result in damage and injury.
▼ IInstall the drier near to a window to facilitate the evacuation of the damp air from the drier.
3 |
A |
▼ The exhaust tube must be used to prevent condensation, and must be inserted |
|
||
|
in hole A at the bottom of the back panel of the appliance (fig. 3). |
GB
SM1888
14 |
INSTALLING THE APPLIANCE |
|
INSTALLATION |
▼Never cover the air intake at the back of the appliance.
▼ Place the filter in its normal position as shown (fig. 4).
▼ Clean the inside of the drying drum using a damp cloth to remove any dust deposits.
4
LEVELLING THE DRIER
Adjustable feet. Place the drier upright so that it rests firmly on all four feet. Level the drier by adjusting the feet as follows:
▼Lift the drier slightly.
▼Adjust the feet to the correct height (fig. 5).
(Do not unscrew the feet to much and do not use a screwdriver).
▼Lower the drier.
A badly levelled machine may cause damage to the bearings and lead to their premature wear. This drier does not need to be anchored to the floor.
CONNECTING THE AIR EXHAUST TUBE
Connect the exhaust tube to the outlet on the back of the drier (fig.6), as follows:
▼Connect one end of the tube to the connector piece supplied.
▼Rotate the connecting piece (together with the tube) anticlock-wise in the drier outlet hole.
▼Carry the tube away from the back of the drier to the left or right by means of the recess at the bottom of the drier body.
▼Position the other end of the tube near to a window or a ventilation outlet on an external wall. If this is not possible, ensure that the room is well ventilated when the drier is being used. Use the support supplied to anchor the tube (fig. 7).
5
 6
6
7
Important: The air exhaust tube must be connected even if the air is not discharged outdoors, otherwise the drier will re-absorb the discharged damp air and thus prolong the drying time.
Damp air can also damage the drier. Although the air discharged from the exhaust tube is only warm and damp and does not constitute a danger, it must never be directed towards people, animals or plants.
Important:The exhausted air must not be conveyed to a chimney discharging fumes generated by gas or other fuel burning appliances.
GB
SM1888

INSTALLING THE APPLIANCE |
15 |
|
ELECTRICAL CONNECTION |
|
▼ Make sure that the voltage indicated on the identification plate attached to the |
|
back of the appliance corresponds to that of the mains supply. |
|
▼ On completion of the installation, the appliance must be connected to the mains |
|
supply through a two-pole switch. |
|
▼ All cutouts, electric wiring and mains sockets must have a rating such that |
|
enables them to support the maximum load indicated on the identification plate. |
|
▼ The mains supply to which the appliance is connected must be fitted with an |
8 |
earthing system. If this is not the case, the manufacturer will not be held liable |
for any incidents that may occur (fig. 8). |
|
|
▼ If the power supply cable is damaged in any way, contact the appropriate spe- |
|
cialised customer technical service centre. |
|
▼ The drier must not be connected to the mains supply using indirect methods |
|
such as extension leads or multiple adapters. |
|
▼ Position the appliance so that the power supply cable is easily accessible for |
|
disconnection when the need arises. |
Important: On completion of the drying cycle, disconnect the appliance from the mains supply to prevent young children from operating the drier.
USING THE APPLIANCE
9 |
10 |
DESCRIPTION OF THE FUNCTIONS
▼Drying time control knob: Rotate the knob to select the required drying times (fig._9).
(Refer to the program table to select the program according to the type of fabric)
▼At the end of each drying cycle, the appliance effects a 10 - 15 minute cooling cycle, during which time the appliance is still switched on.
▼Start button: Press this button to start the drying cycle (the indicator will light up).
11 |
▼ Delicate or energetic drying button: This button is used to select the type of |
drying cycle to run: Energetic or delicate (fig.11). |

 Energetic
 Delicate
GB
SM1888
16 |
USING THE APPLIANCE |
|
DESCRIPTION OF THE FUNCTIONS |
▼ON/Off button: Press the button to switch on the appliance.
12
DOOR
The drier is the front-loading type. Pull the handle outwards, without forcing it, and gently open the door. The appliance will stop if the door is opened during a drying cycle.The drum will continue to rotate for a while, slowing down gradually to a stop.
Important:
▼ Obviously, during a drying cycle the washing in the drum will be hot.The washing is cooled during the cooling cycle.
▼ To avoid being scalded by steam or burned by the hot washing, do not open |
13 |
the door during the drying phase. |
DRYING THE WASHING CORRECTLY
Proceed as follows:
A
▼Spin the washing.
B
▼Separate the items into types or fabrics.
▼Close any zips and fasten buttons and remember to empty the pockets of any clothing.
▼Turn jumpers inside out.
C
▼Open the door
▼Load the washing in the drum and remember to load sheets from a corner first.
▼It is advisable to load small and large items together.
D
▼Close the door
▼Dry your hands (never touch electric appliances with wet hands).
▼Insert the plug in the mains socket.
E
▼Press the ON/OFF button to switch on the appliance.
▼Wait for the audible signal and the indicator light to switch off.
▼Select the drying cycle recommended for the load (see program table) or set the timer on
GB
the required during time.
▼To start the drying cycle, wait for the indicator light to light up and press the “Start” button.
F
▼To stop the machine during a drying cycle, simply open the door (the drum will slow down then stop).
▼To continue the drying cycle, close the door and press the start button.
▼In order to ensure that large items dry perfectly, stop the machine and remove the washing a number of times during the drying cycle.
G
▼After having removed the dry washing, clean the filter as follows:
-Lift the filter
-Open it and clean it using a soft brush
-Close it and replace it in its seating
-The filter must be washed periodically using soapy water in order to remove very small particles.
▼Unplug the appliance from the mains supply.
SM1888

USING THE APPLIANCE |
17 |
PRECAUTIONS FOR FABRIC TYPES |
|
In the case of doubt as to the type of fabric, read the label on the item itself. Almost all items that can be machine dried have this information specified on the label.To avoid static electricity being generated in the items, add a conditioner to the rinse cycle of the washing machine.
Remove synthetic materials from the drum immediately to prevent them from creasing.
PROGRAM TABLE
Fabric |
Weight of dry |
Type of drying |
Times in minutes |
|
|
washing |
to utilise |
Wardrobe dry |
Iron dry |
|
|
|||
|
TIMER CONTROLLED PROGRAM |
|
||
Cotton/Linen |
Half Load |
|
40-60 min. |
20-40 min. |
|
TIMER CONTROLLED PROGRAM |
|
||
Synthetics |
Half Load |
|
40-60 min. |
20-40 min. |
Delicate synthetics |
1,5 kg |
|
40-60 min. |
20-40 min. |
Fabric |
Weight of dry washing |
Type of drying to utilise |
|
|
|
ELECTRONICALLY CONTROLLED PROGRAM |
|
||
Cotton/Linen |
Maximum Load |
|
Extra dry |
|
Cotton/Linen |
Maximum Load |
|
Wardrobe dry |
|
Cotton/Linen |
Maximum Load |
|
Iron damp |
|
Cotton/Linen |
Maximum Load |
|
Very damp |
|
|
ELECTRONICALLY CONTROLLED PROGRAM |
|
||
Delicate synthetics |
Half Load |
|
Extra dry |
|
Delicate synthetics |
Half Load |
|
Wardrobe dry |
|
Delicate synthetics |
Half Load |
|
Iron damp |
|
Delicate synthetics |
Half Load |
|
Very damp |
|
ENERGETIC DRYING |
|
DELICATE DRYING |
|
|
Important: The drying time is dependent on a number of factors: weight, size of the items, type of fabric, degree of dampness. Well wrung/spun items dry quicker. To prevent items from creasing, do not overload the drier.
WASHING WEIGHTS
The indicated weights are approximate and may vary according to their manufacture, quality and
finish. |
|
Bedding |
|
Quilt |
700 g |
Bottom sheet |
550 g |
Top sheet |
600 g |
Pillowcase |
180 g |
Household linen |
|
Tea towel (dishes) |
90 g |
Tea towel (glasses) |
70 g |
Flannel |
20 g |
Hand towel |
200 g |
Other linen items |
|
Bath robe |
1200 g |
Bath towel |
800 g |
Lady’s blouse |
300 g |
Man’s shirt |
600 g |
Blouse/shirt in synthetic material300 g
Table linen |
|
Tablecloth |
250 g |
Large tablecloth |
1000 g |
Napkin |
80 g |
Men’s clothing |
|
Wash ‘n wear shirt |
250 g |
Vest (sleeveless) |
120 g |
Briefs |
80 g |
Long johns |
250 g |
Pyjamas |
480 g |
Nightshirt |
400 g |
Handkerchief |
25 g |
Ladies’ clothing |
|
Blouse |
100 g |
Jumper |
100 g |
Briefs |
80 g |
Slip |
150 g |
Nightdress |
180 g |
Pyjamas |
450 g |
Handkerchief |
15 g |
GB
SM1888
18 |
MAINTENANCE |
|
CLEANING THE FILTER |
|
In order to guarantee optimum drying results under all circumstances, remember 14 |
|
that the filter must be cleaned regularly. Remember to check and clean the filter |
|
after each drying cycle. |
Important:
The filter must only be cleaned when the appliance is cold! Clean the filter following the procedure described below:
▼Open the door.
▼Grasp the filter in both hands and push it upwards to remove it.
▼Carefully widen the top edge and open the filter.
▼Remove the woollen particles.
▼Close the filter, making sure that the catch closes at the correct position.
▼Clean the filter slide guides on the appliance, using a vacuum cleaner if necessary.
▼Reposition the filter in the slide guides (fig. 14).
FAULT FINDING
All electric appliance may breakdown at some time. Remember to call a qualified electrician in these cases. However, many problems can be resolved without the need for external intervention.
Important: If a fault occurs, disconnect the appliance from the mains supply immediately.
Before calling the customer service centre, check the points listed below.
RESOLVING PROBLEMS
If the drier doesn’t start
•Check that:
1)The appliance is plugged into the mains supply.
2)The mains socket is working correctly:
If the drier doesn’t start
•Check that:
1)The door is closed properly.
2)The "START" button has been pressed.
The washing does not dry
2a)The fuse has not blown. (Check by plug- |
• |
Check that: |
|
ging in another appliance such as a table |
|||
|
1) The air exhaust tube is not twisted or |
||
lamp). |
|
||
|
kinked. |
||
2b)All the instructions in the manual have |
|
||
|
2) The filter is not blocked. (Remember that |
||
been followed. |
|
||
|
when the door is opened, the internal parts |
||
|
|
||
|
|
of the drier and the washing may be very hot). |
If, after all these checks have been carried out, the appliance still does not work, inform the nearest customer service centre.
When contacting the service centre, inform them of the appliance model, serial number and type of fault.
This information will help the service centre operator in procuring the necessary spare parts, thus guaranteeing a speedy and efficient repair.
OPTIONAL ACCESSORIES
The retailer can provide an accessory to enable the drier to be mounted on top of a front-loading washing machine, thus saving space. The installer will inform you of the appliance model for which this option is possible.
GB
SM1888
DEUTSCH |
19 |
Werter Kunde,
wir danken Ihnen für die Wahl unseres Produktes. Bitte lesen Sie diese Gebrauchsanweisung aufmerksam durch, bevor Sie das Gerät anschließen und benutzen.
Die Kenntnis der Funktionsweise wird Ihnen bei der korrekten und sicheren Bedienung helfen.
Falls Sie den Trockner weiterverkaufen oder weitergeben denken Sie daran, dem neuen Besitzer auch diese Gebrauchsanweisung mitzugeben.
|
INHALTSVERZEICHNIS |
HINWEISE UND RATSCHLÄGE FÜR DEN BENUTZER |
19-20 |
• |
19 |
BESCHREIBUNG DES GERÄTES |
21 |
INSTALLATION DES GERÄTES |
21-23 |
• |
21-22 |
• |
22 |
• |
22 |
• |
23 |
GEBRAUCH DES GERÄTES |
23-25 |
• |
23-24 |
• |
24 |
• |
24 |
• Maßregel bei der Auswahl der Textilien |
25 |
• |
25 |
• |
25 |
WARTUNG |
26 |
• |
26 |
• |
26 |
• |
26 |
• |
26 |
HINWEISE UND RATSCHLÄGE FÜR DEN BENUTZER |
|
|
|
|
59.5 |
Abmessungen: Höhe cm.: |
85.0 |
|
57.0 |
|
siehe Typenschild |
|
siehe Typenschild |
|
siehe Typenschild |
MODELL: |
|
SERIENNUMMER: ......................................................................................................................................................................... |
|
KAUFDATUM: ................................................................................................................................................................................ |
|
|
DE |
SM1888

20 HINWEISE UND RATSCHLÄGE FÜR DEN BENUTZER
▼Das Gerät ist als Haushaltswäschetrockner einzusetzen, jede anderweitige Nutzung ist unsachgemäß und folglich gefährlich.
▼Vorliegendes Handbuch ist stets in der Nähe des Trockners aufzubewahren, damit es im Bedarfsfall rasch konsultiert werden kann.
▼JedeVeränderung oder sonstige Manipulierung des Gerätes kann den Benutzer gefährden und Schäden an der Maschine verursachen.
▼Bei der Übergabe des Hausgerätes kontrollieren, ob beim Transport eventuell Schäden entstanden sind. Ist dies der Fall, umgehend den Händler kontaktieren.
▼Beim Trocknen wird die Luft an der Rückseite des Gerätes aus dem Raum geleitet.DenTrockner keinesfalls mit Wäsche oder anderem abdecken.
▼Beim Aufstellen des Gerätes darauf achten, dass das Stromkabel nicht verdreht oder gequetscht wird und für eventuelle Eingriffe problemlos zugänglich ist.
▼Bitte beachten Sie, dass sich die Einfüllfensterscheibe und der Abluftschlauch während des Trocknens auf bis zu 60° C erhitzen. Diese Teile dürfen erst am Ende des Abkühlzyklus berührt werden.
▼Das Gerät darf nur von Erwachsenen benutzt werden.
▼Im Trockner dürfen auf keinen Fall Wäschestücke getrocknet werden, die mit chemischen Mitteln (z.B. Reinigungsflüssigkeiten für die Trockenreinigung) behandelt wurden, da diese flüchtiger Art sind und Explosionen verursachen können.
▼Auf keinen Fall Kleidungsstücke mit Schaumgummi oder Gummiteilen trocknen, da diese schmelzen und andere Wäschestücke oder sogar den Trockner beschädigen können.
▼Wird das Hausgerät verkauft oder verschenkt, muss dieses Handbuch gemeinsam mit dem Gerät ausgehändigt werden, damit dem neuen Besitzer eine korrekte und sichere Nutzung des Trockners ermöglicht wird.
▼Bei Betriebsstörungen auf keinen Fall versuchen, das Gerät selbst zu reparieren. Unsachgemäße Reparaturen können schwere Schäden verursachen und lassen außerdem den Gewährleistungsanspruch verfallen.
▼Das Gerät darf ausschließlich von dem autorisierten Personal der Kundendienststellen und unter Verwendung von Originalersatzteilen repariert werden.
▼Füllen Sie nur gründlich ausgewrungene oder geschleuderte Wäsche in den Trockner. Je tro-
DE
ckener dieWäsche, desto kürzer ist dieTrockenzeit.
▼Den Filter bei jedem Einsatz des Trockner stets gut reinigen, damit eine perfekte Luftzirkulation gewährleistet ist.
▼Den Stecker auf keinen Fall mit nassen Händen einoder ausstecken.
▼Das Gerät muss an eine vorschriftsmäßig geerdete Steckdose angeschlossen werden.
▼DieVerwendung vonVerlängerungskabeln oder Mehrfachsteckern zum Anschließen des Trockners ist verboten.
▼Das Gerät darf nichtWitterungseinflüssen ausgesetzt werden.
▼Vor der Reinigung des Gerätes den Stecker aus der Steckdose nehmen.
▼Beim Ausstecken des Kabels aus der Steckdose nicht am Kabel selbst, sondern am Stecker ziehen.
▼In Übereinstimmung mit den Anforderungen der Europäischen Richtlinie 2002/96/EG über Elektround Elektronik-Altgeräte (WEEE) ist vorliegendes Gerät mit einer Markierung. Sie leisten einen positiven Beitrag für den Schutz der Umwelt und die Gesundheit des Menschen, wenn Sie dieses Gerät einer gesonderten Abfallsammlung zuführen. Im unsortierten Siedlungsmüll könnte ein solches Gerät durch unsachgemä§e Entsorgung negative Konsequenzen nach sich ziehen. Auf dem Produkt oder der beiliegenden Produktdokumentation ist folgendes
Symbol  einer durchgestrichenen Abfalltonne abgebildet. Es weist darauf hin, dass eine Entsorgung im normalen Haushaltsabfall nicht zulässig ist Entsorgen Sie dieses Produkt im Recyclinghof mit einer getrennten Sammlung für Elektround Elektronikgeräte. Die Entsorgung muss gemä§ den örtlichen Bestimmungen zur Abfallbeseitigung erfolgen. Bitte wenden Sie sich an die zuständigen Behörden Ihrer Gemeindeverwaltung, an den lokalen Recyclinghof für Haushaltsmüll oder an den Händler, bei dem Sie dieses Gerät erworben haben, um weitere Informationen über Behandlung, Verwertung und Wiederverwendung dieses Produkts zu erhalten.
DER HERSTELLER HAFTET NICHT FÜR INFOLGE DER NICHTEINHALTUNG DER SICHERHEITSVORSCHRIFTEN UND DER GEBRAUCHSANWEISUNG ENTSTEHENDE SCHÄDEN.
SM1888
BESCHREIBUNG DES GERÄTES |
21 |
|
|
Der Trockner ist ein Elektro-Haushaltsgerät, das jede Art von Gewebe |
|
|
wunschgemäß trocknet. |
|
12 |
▼ Die Gerätestruktur besteht aus Blech, das so behandelt und lackiert ist, dass die |
|
11 |
ästhetischen Vorzüge über lange Zeit hin unverändert erhalten bleiben. |
|
|
|
|
▼Der Motor und alle Bewegungsteile wurden so realisiert, dass maximale Laufruhe
|
|
|
garantiert werden kann. |
|
|
|
||
|
|
▼ |
Am Bedienfeld befinden sich alle Bedienelemente zur einfachen Anwahl aller ge- |
|||||
2 |
9 |
10 |
wünschten Trockenprogramme. |
|
|
|
||
Das großzügige Einfüllfenster erleichtert das Einlegen und Entnehmen der Wäsche. |
||||||||
|
|
▼ |
||||||
|
|
|
1 |
2 |
3 |
4 |
5 |
|
Dry |
STOP
20'
40'
60'
1 |
- |
ON/OFF-Taste |
2 |
- |
Trockengrad-Wahltaste “Schon” oder “Ener- |
|
|
gisch” |
3 |
- |
Start-Taste |
4- Schalter zur Regelung der Trockendauer
5- Kontrolllampe “Trockner eingeschaltet”
6 |
- |
Einfüllfenster |
7 |
|
7 |
- |
Filter |
||
|
||||
8 |
- |
verstellbare Füße |
|
|
9 |
- |
Abluftöffnung |
|
|
10 - |
Verbindungsstück |
|
||
11 - |
Abluftschlauch |
|
||
12 - |
Schlauchhalterung |
|
||
8

INSTALLATION DES GERÄTES
6
1
INSTALLATION
Die Installation ist durch geschultes Fachpersonal entsprechend der vom Hersteller gegebenen Anweisungen auszuführen; eine unsachgemäße Installation kann Personenund Sachschäden verursachen.
|
▼ |
Den Trockner in Fensternähe aufstellen, um die Ableitung der feuchten Luft zu |
|
|
erleichtern. |
A |
▼ |
Den Abluftschlauch benutzen, um Kondensbildung zu vermeiden, und diesen |
3 |
|
an der Öffnung A an der unteren Rückseite des Geräts fixieren (Abb. 3). |
|
|
DE |
SM1888

22 |
INSTALLATION DES GERÄTES |
|
INSTALLATION |
▼ Die Belüftungsgitter an der Rückseite des Gerätes niemals abdecken.
▼ Den Filter für den Gebrauch positionieren (Abb. 4).
▼ DieTrommel mit einem feuchten Lappen reinigen, um eventuell angesammelten Staub zu entfernen.
4
AUSRICHTUNG DES TROCKNERS
Verstellbare Füße. Den Trockner vertikal so aufstellen, dass alle vier Füße fest am Boden stehen. Das Gerät wie nachstehend beschrieben ausrichten, indem die Füße eingestellt werden.
▼Das Gerät etwas heben.
▼Die Füße auf die korrekte Höhe einstellen (Abb. 5).
▼Das Gerät senken.
Ein nicht korrekt ausgerichtetes Gerät kann die Lager beschädigen und zu vorzeitigem Verschleiß führen. Dieser Trockner erfordert keine Befestigung am Fußboden.
ANSCHLUSS DES ABLUFTSCHLAUCHES
Den Abluftschlauch an der Abluftöffnung an der Rückseite des Trockners anschließen (Abb. 6).
▼Ein Schlauchende am mitgelieferten Verbindungsstück anschließen.
▼Das Verbindungsstück (gemeinsam mit dem Schlauch) gegen den Uhrzeigersinn in die Abluftöffnung des Trockners drehen.
▼Den Schlauch entlang der Vertiefung an der unteren Gerätestruktur links oder rechts nach außen führen.
▼Das andere Schlauchende in der Nähe eines Fensters oder einer Belüftungsöffnung, die ins Freie führt, positionieren. Ist dies nicht möglich, ist beim Betrieb des Trockners eine gute Belüftung des Raumes erforderlich. Für die Befestigung des Schlauches die mitgelieferte Halterung verwenden (Abb. 7).
5
 6
6
7
Wichtig:Der Abluftschlauch muss auch dann angeschlossen werden, wenn die Luft nicht ins Freie abgeleitet wird;ansonsten nimmt das Gerät erneut die abgeleitete feuchte Luft auf und derTrockenzyklus verlängert sich. Ferner kann die feuchte Luft das Gerät beschädigen.Vom Abluftschlauch tritt heiße und feuchte Luft aus, die an sich nicht gefährlich ist, aber nicht direkt auf Personen,Tiere und Pflanzen gerichtet sein sollte.
Wichtig: Die Abluft darf in keinen Kanal zur Ableitung von Rauch gelenkt werden, der von mit Gas oder anderen Brennstoffen betriebenen Geräten erzeugt wird.
DE
SM1888

INSTALLATION DES GERÄTES |
23 |
|
|
ELEKTROANSCHLUSS |
|
|
▼ Überprüfen Sie, ob die am Typenschild an der Rückseite des Gerätes angege- |
||
|
|
bene Spannung mit der Ihres Stromnetzes übereinstimmt. |
|
|
▼ Schütze, Stromkabel und Steckdose müssen für die maximale Leistung der |
||
|
|
Maschine ausgelegt sein, die am Typenschild angegeben ist. |
|
|
▼ A seguito dell'installazione, l'accesso all'alimentazione di rete deve essere |
||
|
|
garantito da un interruttore onnipolare. |
|
|
▼ |
Die für den Anschluss der Maschine bestimmte Steckdose muss vorschrifts- |
|
|
|
mäßig geerdet sein. Im gegenteiligen Fall haftet der Hersteller nicht für eventu- |
|
8 |
|
elle Unfälle (Abb. 8). |
|
▼ Falls das Speisekabel in irgendeiner Weise defekt ist, muss es von einem |
|||
|
|||
|
|
Kundendiensttechniker ausgewechselt werden. |
|
▼Der Anschluss des Trockners mittels Verlängerungskabeln oder Mehrfachsteckdosen ist verboten.
▼Das Gerät muss so positioniert werden, dass das Speisekabel leicht zugänglich ist, damit es im Bedarfsfall vom Stromnetz getrennt werden kann.
Wichtig: Am Ende des Trockenzyklus das Gerät vom Stromnetz trennen, damit es von Kindern nicht in Betrieb gesetzt werden kann.
GERBRAUCH DES GERÄTES
9 |
10 |
BESCHREIBUNG DER FUNKTIONEN
▼Schalter zur Regelung der Trockendauer: den Schalter drehen, um die gewünschte Trockendauer einzustellen (Abb. 9).
(für die Wahl des passenden Programms die Programmtabelle konsultieren)
▼Am Ende jedes Trockenzyklus erfolgt eine Abkühlphase von 10-15 Minuten, in der das Gerät eingeschaltet bleibt.
▼Start-Taste: Diese Taste drücken, um den Trockenzyklus zu starten (die Kontrolllampe leuchtet auf).
11 |
▼ Trockengrad-Wahltaste“Schon”oder“Energisch”: bei Drücken dieserTaste |
kann die Art der Trocknens gewählt werden:“Energisch” oder“Schon” (Abb.11). |
 Koch-/Buntwäsche
 Pflegeleicht
DE
SM1888

24 |
GEBRAUCH DES GERÄTES |
|
BESCHREIBUNG DER FUNKTIONEN |
▼On/Off-Taste: Diese Taste drücken, um das Gerät einzuschalten.
12
EINFÜLLFENSTER
Dieser Trockner ist ein Frontlader. Den Griff leicht ziehen und das Einfüllfenster vorsichtig öffnen. Wird das Einfüllfenster bei laufendem Trockenzyklus geöffnet, stoppt das Gerät.
Wichtig:
▼ Während des Trockenzyklus ist die Wäsche natürlich heiß.
Die Wäsche wird während eines Abkühlzyklus abgekühlt.
▼ Das Einfüllfenster niemals während des Trockenzyklus öffnen, um Verbren- |
13 |
nungen zu vermeiden, die durch den heißen Dampf und die Wäsche entstehen können.
ZUM KORREKTEN TROCKNEN DER WÄSCHE
Folgende Punkte beachten:
A
▼Die Wäsche schleudern.
B
▼Die Wäsche nach Typ und Gewebeart sortieren.
▼Reißverschlüsse und Knöpfe schließen; die Taschen der Kleidungsstücke leeren.
▼Pullover wenden.
C
▼Das Einfüllfenster öffnen.
▼Die Wäsche in die Trommel legen.
▼Wir empfehlen große und kleine Wäschestücke gemeinsam einzulegen.
D
▼Das Einfüllfenster schließen.
▼Die Hände trocknen (Elektrogeräte niemals mit nassen Händen berühren).
▼Den Stecker in die Steckdose geben.
E
▼Die EIN/AUS Taste drücken, um das Gerät einzuschalten.
▼Warten bis das akustische Signal ertönt und die Kontrollampe ausschaltet.
▼Den passenden Trockenzyklus wählen (siehe Programmtabelle) oder den Zeitschalter auf die erforderlicheTrockendauer einstellen.
DE
▼Warten bis die Kontrollampe aufleuchtet, dann die Start-Taste drücken um den Trockenzyklus zu starten.
F
▼Zum Stoppen des Gerätes während eines Trockenzyklus genügt es, das Einfüllfenster zu öffnen (die Trommeldrehung stoppt).
▼Zum Fortsetzen des Trockenzyklus das Einfüllfenster schließen und die Start-Taste drücken.
▼Damit große Wäschestücke einwandfrei trocknen, empfehlen wir das Gerät zu stoppen und die Wäsche während des Trockenzyklus mehrmals zu entnehmen.
G
▼Nach der Entnahme der trockenen Wäsche, den Flusenfilter folgendermaßen reinigen:
-den Filter herausziehen;
-den Filter öffnen und mit einer weichen Bürste reinigen;
-wieder schließen und einsetzen;
-der Filter muss periodisch mit Seifenwasser gewaschen werden, damit auch kleinste Gewebeteilchen entfernt werden.
▼Den Stecker aus der Steckdose ziehen.
SM1888
GEBRAUCH DES GERÄTES |
25 |
MASSREGELN BEI DER AUSWAHL DER TEXTILIEN
Vergewissern Sie sich anhand des Pflegekennzeichens in jedem Wäschestück, ob es für den Trockner geeignet ist. Fast alle Kleidungsstücke, die im Wäschetrockner getrocknet werden können, weisen das spezifische Symbol auf der Herstelleretikette auf. Um statische Elektrizität an den Kleidungsstücken zu vermeiden, soll für die Spülgänge Weichspüler verwendet werden. Synthetische Wäsche sofort aus der Trommel nehmen, um Liegefalten zu vermeiden.
PROGRAMMTABELLE
Gewebe |
Trockengewicht der |
Zu verwendende |
Dauer in Minuten |
||
|
Wäsche |
|
Trockenart |
Schranktrocken |
Bügeltrocken |
|
ZEITGESTEUERTES PROGRAMM |
|
|||
Baumwolle/Leinen |
HALBE LADUNG |
|
|
40-60 min. |
20-40 min. |
|
ZEITGESTEUERTES PROGRAMM |
|
|||
Synthetik |
HALBE LADUNG |
|
|
40-60 min. |
20-40 min. |
Empfindliche Synthetik |
1,5 kg |
|
|
40-60 min. |
20-40 min. |
Gewebe |
Trockengewicht der Wäsche |
Zu verwendende Trockenart |
|||
ELECTRONISCHES KONTROLLE PROGRAMM |
|
||||
Baumwolle/Leinen |
MAXIMALE LADUNG |
|
Extratrocken |
|
|
Baumwolle/Leinen |
MAXIMALE LADUNG |
|
Schranktrocken |
|
|
Baumwolle/Leinen |
MAXIMALE LADUNG |
|
Bügeltrocken |
|
|
Baumwolle/Leinen |
MAXIMALE LADUNG |
|
Mangeltrocken |
|
|
ELECTRONISCHES KONTROLLE PROGRAMM |
|
||||
Empfindliche Synthetik |
HALBE LADUNG |
|
|
Extratrocken |
|
Empfindliche Synthetik |
HALBE LADUNG |
|
|
Schranktrocken |
|
Empfindliche Synthetik |
HALBE LADUNG |
|
|
Bügeltrocken |
|
Empfindliche Synthetik |
HALBE LADUNG |
|
|
Mangeltrocken |
|
ENERGISCHES TROCKNEN |
SCHON-TROCKNEN |
|
|||
Wichtig: Die Trockendauer hängt von verschiedenen Faktoren ab: Gewicht, Größe der Wäschestücke, Gewebeart, Feuchtigkeitsgrad. Gut ausgewrungene Wäsche trocknet schneller. Den Trockner niemals überladen, da die Wäsche sonst zerknittert.
GEWICHT DER WÄSCHE
Die angegebenen Gewichte sind Richtwerte und hängen vom Bearbeitungsverfahren, der Qualität und der Ausführung der Wäsche ab.
Bettwäsche |
|
Großes Tischtuch |
1000 g |
|
Steppdecke |
700g |
Servietten |
80 g |
|
Betttuch |
550g |
Herrenbekleidung |
|
|
Oberes Betttuch |
600g |
|
||
Bügelfreies Hemd |
250g |
|||
Kopfkissenbezug |
180g |
|||
Unterhemd (ärmellos) |
120g |
|||
Wäsche für den Haushalt aus Leinen |
|
|||
|
Unterhosen |
80g |
||
Geschirrtuch |
90 g |
Lange Unterhosen |
250g |
|
Wischtuch für Gläser |
70g |
Pyjama |
480g |
|
Handtuch |
20 g |
Nachhemd |
400g |
|
Kleines Handtuch |
200g |
Taschentücher |
25g |
|
Andere Wäschestücke |
|
Damenbekleidung |
|
|
Bademantel |
1200 g |
Bluse |
100g |
|
Kleines Handtuch |
800 g |
Leibchen |
100g |
|
Bluse |
300 g |
Unterhosen |
80g |
|
Hemd |
600 g |
Unterkleid |
150g |
|
Bluse/Hemd |
|
Nachthemd |
180g |
|
aus synthetischem Gewebe |
300g |
Pyjama |
450g |
|
Tischwäsche aus Leinen |
|
Taschentücher |
15g |
|
Tischtuch |
250 g |
|
|
DE
SM1888

26 |
WARTUNG |
|
FILTEREINIGUNG |
|
Für optimaleTrockenergebnisse unter jeder Bedingung, muss der Flusenfilter stets 14 |
|
sauber sein.Denken Sie daran, den Filter nach jedem Trockenzyklus zu kontrollieren |
|
und zu reinigen. |
Wichtig:
Den Filter nur bei kaltem Gerät reinigen! Bei der Filterreinigung folgendermaßen vorgehen:
▼Das Einfüllfenster öffnen.
▼Den Filter mit beiden Händen ergreifen und für die Entnahme nach oben ziehen.
▼Die Oberkante leicht öffnen und den Filter aufklappen.
▼Die Flusen entfernen.
▼Den Filter schließen und kontrollieren, dass er korrekt geschlossen ist.
▼Die Filterführungen des Geräts reinigen, ggf. mit einem Staubsauger.
▼Den Filter in den Führungen positionieren (Abb. 13).
BESTIMMUNG VON BETRIEBSSTÖRUNGEN
Alle elektronischen Ausrüstungen sind fehleranfällig. Bitte beachten Sie, dass in einem solchen Fall ein Fachelektriker zugezogen werden muss. Zahlreiche Probleme können jedoch von Ihnen behoben werden.
Wichtig: Bei Betriebsstörungen muss das Gerät sofort vom Stromnetz getrennt werden. Bevor Sie sich an den Kundendienst wenden, sind folgende Kontrollen durchzuführen.
BEHEBEN VON STÖRUNGEN
Das Gerät funktioniert nicht
•Kontrollieren,:
1)dass der Stecker in die Steckdose eingesteckt ist;
2)dass die Steckdose funktionstüchtig ist; 2a) ob eine Sicherung durchgebrannt ist
(hierzu einfach ein anderes Gerät, z.B.
eine Tischlampe, anschließen.
2b) Wurden alle in der Gebrauchsanweisung enthaltenen Anleitungen befolgt?
Das Gerät startet nicht
•Kontrollieren, :
1)ob das Einfüllfenster richtig geschlossen
wurde.
Die Wäsche trocknet nicht
•Kontrollieren:
1)Ob der Abluftschlauch verdreht oder gequetscht wird.
2)Ob der Flusenfilter verstopft ist (Beachten Sie, dass die Innenteile des Trockner und die Wäsche beim Öffnen des Einfüllfensters sehr heiß sein können).
Falls Ihre Maschine trotz dieser Kontrollen weiterhin nicht funktionieren sollte, wenden Sie sich an das nächstgelegene Kundendienstzentrum.
Geben Sie dabei bitte das Modell, die Seriennummer und die Art der Störung an. Diese Angaben erlauben dem Kundendienstpersonal die erforderlichen Ersatzteile zu besorgen und die Reparatur schnell und effizient durchzuführen.
WAHLWEISE ZUBEHÖRTEILE
Bei Ihrem Händler finden Sie die Zubehörteile, die für eine platzsparende Installation Ihres Trockners auf einer Frontlader-Waschmaschine erforderlich sind. Ihr Installateur wird Ihnen das Gerätemodell empfehlen, das für eine solche Montage geeignet ist.
DE
SM1888

FRANÇOISE |
27 |
Cher Client,
Nous vous remercions d’avoir choisi l’un de nos produits. Nous vous prions de bien vouloir lire attentivement les instructions relatives à l’emploi avant d’effectuer la connexion et d’utiliser la machine.
La connaissance des principes de fonctionnement garantira une utilisation correcte et en toute sécurité de cet appareil.
En cas de vente ou de cession du sèche-linge, il ne faudra pas oublier de remettre également au nouvel utilisateur le manuel d’instructions pour l’emploi.
TABLE DES MATIÈRES |
|
REMARQUES ET CONSEILS POUR L’UTILISATEUR |
27-28 |
• Données techniques |
27 |
DESCRIPTION DE LA MACHINE |
29 |
INSTALLATION DE LA MACHINE |
29-31 |
|
• |
Installation |
29-30 |
• |
Nivellement du sèche - linge |
30 |
• Connexion du tuyau d’évacuation de l’air |
30 |
|
• Branchement à l’installation électrique |
31 |
|
EMPLOI DE LA MACHINE |
31-33 |
|
• |
Description des fonctions |
31-32 |
• |
Hublot |
32 |
• Pour effectuer correctement le séchage du linge |
32 |
|
• Précautions à adopter pour les tissus |
33 |
|
• |
Tableau des programmes |
33 |
• |
Poids du linge |
33 |
ENTRETIEN |
34 |
|
• |
Nettoyage du filtre |
34 |
• |
Localisation des pannes |
34 |
• |
Solution des problèmes |
34 |
• Accessoires fournis sur demande |
34 |
|
REMARQUES ET CONSEILS POUR L’UTILISATEUR |
||
|
DONNÉES TECHNIQUES |
|
|
Largeur cm.: |
59.5 |
Dimensions: Hauteur cm.: |
85.0 |
|
|
Profondeur cm.: |
57.0 |
|
Contenance Max. |
Voir plaquette des caractéristiques |
|
Puissance Nominale |
Voir plaquette des caractéristiques |
|
Tension |
Voir plaquette des caractéristiques |
MODÈLE: |
................................................................................................................................................................................................. |
|
NUMÉRO DE SÉRIE: ....................................................................................................................................................................... |
|
|
DATE D’ACHAT: ............................................................................................................................................................................... |
|
|
FR
SM1888

28 REMARQUES ET CONSEILS POUR L’UTILISATEUR
▼Cet appareil devra être utilisé en tant que sè- che-linge pour usage domestique; tout autre emploi doit être considéré impropre et, par conséquent, dangereux.
▼Conserver toujours le présent manuel d’emploi
àproximité du sèche-linge, de façon à pouvoir le consulter rapidement, si nécessaire.
▼Toute modification ou tentative d’altération de l’appareil peuvent être dangereuses pour l’utilisateur et risquent d’endommager le produit.
▼Au moment de la livraison de l’électroménager, vérifier qu’il ne soit pas endommagé suite au transport. Si l’on devait constater des dommages, il faudra s’adresser immédiatement au revendeur.
▼Pendant le cycle de séchage, l’air de la pièce est convoyé à travers le côté arrière de l’électroménager.Ne pas couvrir le sèche-linge avec du linge ou avec tout autre objet.
▼Lors du positionnement de l’appareil, s’assurer que le câble d’alimentation ne se plie pas, ne soit pas écrasé et soit accessible, pour toute intervention éventuelle.
▼Il ne faut pas oublier que, pendant le cycle de séchage, le verre du hublot et le tuyau d’évacuation se réchaufferont, jusqu’à atteindre une température de 60°. Ne pas toucher ces pièces avant la fin du cycle de refroidissement.
▼L’emploi de la machine est interdit aux enfants sans surveillance.
▼Ne jamais faire sécher des pièces de linge qui ont été en contact avec des agents chimiques tels que, par exemple, les fluides du nettoyage
àsec.
▼En effet, la nature de ces substances est volatile et elles pourraient provoquer des explosions.
▼Ne pas faire sécher des pièces de linge constituées par du caoutchouc expansé ou avec des parties en caoutchouc, étant donné qu’elles pourraient fondre et endommager les autres pièces de linge ou même l’électroménager utilisé.
▼Si l’électroménager est vendu ou cédé à des tiers, il ne faut pas oublier de remettre également le présent manuel, qui permettra au propriétaire suivant d’utiliser le sèche-linge de façon correcte et en toute sécurité.
▼Il ne faut pas tenter de réparer par soi-même les pannes de l’appareil, étant donné que les réparations effectuées par des non professionnels sont susceptibles de provoquer de graves dommages et annulent le droit aux réparations sous garantie.
▼Les réparations de cet appareil peuvent être effectuées exclusivement par le personnel autorisé des centres du service après-vente. Pour
FR
les réparations, il faut utiliser uniquement des pièces de rechange originales.
▼Il faut essorer ou tordre soigneusement le linge avant de l’introduire dans le sèche-linge. Le linge qui est essoré correctement séchera plus rapidement.
▼Nettoyer soigneusement le filtre chaque fois que l’on utilise le sèche-linge, afin de garantir une circulation de l’air optimale.
▼Ne pas introduire ou sortir la fiche de la prise de courant électrique avec les mains mouillées.
▼La machine doit être branchée à une prise de courant électrique équipée de mise à la terre et qui soit conforme aux exigences de sécurité.
▼lI est interdit de brancher la machine à la prise électrique en utilisant des rallonges ou des fiches multiples.
▼Ne pas exposer l’appareil aux agents atmosphériques.
▼Lorsque l’on effectue les révisions ou le nettoyage, il ne faut pas oublier de débrancher l’appareil de la prise de courant électrique.
▼Si l’on souhaite débrancher la machine de la prise de courant, il ne faut pas tirer le câble électrique mais la fiche.
Cet appareil porte le symbole du recyclage conformément à la Directive Européenne 2002/96/ CE concernant les Déchets d’Équipements Électriques et Électroniques (DEEE ouWEEE). En procédant correctement à la mise au rebut de cet appareil, vous contribuerez à empêcher toute
conséquence nuisible pour l’environnement et la santé de l’homme. Le symbole  présent sur l’appareil ou sur la documentation qui l’accompagne indique que ce produit ne peut en aucun cas être traité comme déchet ménager. Il doit par conséquent être remis à un centre de collecte des déchets chargé du recyclage des équipements électriques et électroniques.Pour la mise au rebut, respectez les normes relatives à l’élimination des déchets en vigueur dans le pays d’installation. Pour obtenir de plus amples détails au sujet du traitement, de la récupération et du recyclage de cet appareil, veuillez vous adresser au bureau compétent de votre commune, à la société de collecte des déchets ou directement à votre revendeur.
LA SOCIÉTÉ PRODUCTRICE DÉCLINE TOUTE RESPONSABILITÉ EN CAS D’ACCIDENTS PROVOQUÉS PAR LE NON RESPECT DES NORMES CONCERNANT LA SÉCURITÉ AINSI QUE DES INSTRUCTIONS POUR L’EMPLOI.
SM1888
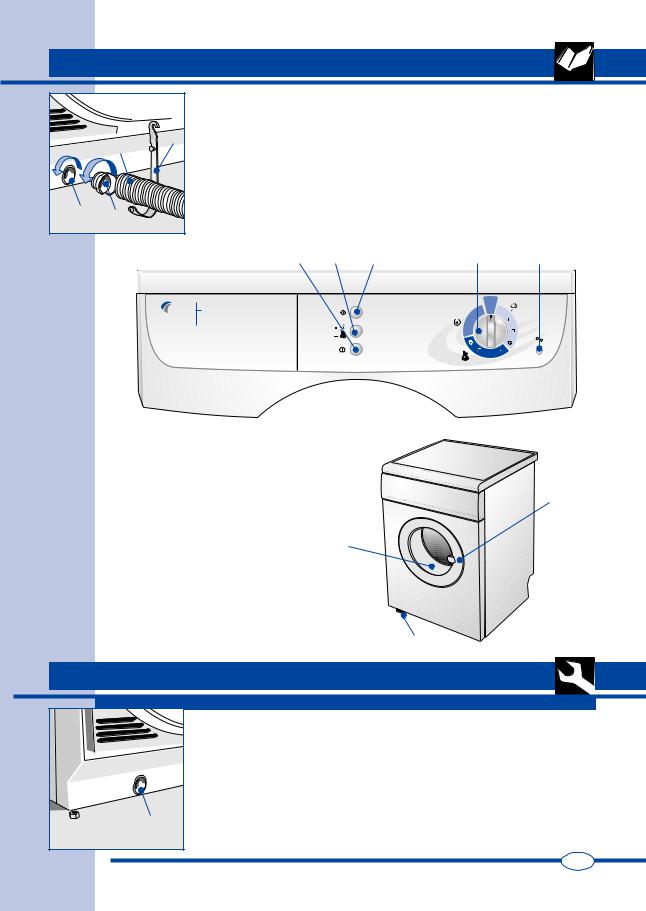
DESCRIPTION DE LA MACHINE |
29 |
||||
|
Cette machine est un électroménager qui sèche tout type de tissu lorsque vous le |
||||
|
souhaitez. |
|
|
|
|
12 |
▼ La structure a été réalisée en panneaux de tôle traités et vernis, de façon à ce |
||||
11 |
que ses caractéristiques esthétiques puissent rester inaltérées au cours du |
||||
temps. |
|
|
|
|
|
|
|
|
|
|
|
|
▼ Le moteur et toutes les parties en mouvement ont été conçus et réalisés de |
||||
|
façon à assurer le maximum de silence. |
|
|
||
|
▼ Le tableau des commandes offre la possibilité d’utiliser aisément tous les pro- |
||||
2 9 10 |
grammes de séchage que l’on souhaite exécuter. |
|
|
||
|
▼ Le hublot très ample facilite le chargement et le déchargement du linge. |
||||
|
1 |
2 |
3 |
4 |
5 |
Dry |
STOP
20'
40'
60'
1 - Touche Marche/Arrêt
2 - Touche séchage délicat ou énergique 3 - Touche Départ
4 - Manette de réglage des temps de séchage
6
5 - Voyant de contrôle sèche-linge allumé
6 - Hublot
7 - Filtre
7
8 - Pieds réglables
9 - Sortie de vidange
10- Raccord de couplage
11- Tuyau de vidange
12 - Support tuyau |
1 |
|
8

INSTALLATION DE LA MACHINE
|
INSTALLATION |
|
L’installation doit être effectuée par un personnel professionnellement qualifié, en |
|
respectant les instructions fournies par le constructeur, étant donné qu’une |
|
installation erronée pourrait provoquer des lésions aux personnes et endommager |
|
des objets. |
|
▼ Installer le sèche-linge à proximité d’une fenêtre, afin de faciliter l’éva- |
|
cuation de l’air humide. |
A |
▼ Utiliser le tuyau d’évacuation de l’air pour éviter la formation de condensat et le fixer |
3 |
dans le trou A qui se trouve dans la partie arrière en bas de la machine (fig. 3). |
|
|
|
FR |
SM1888
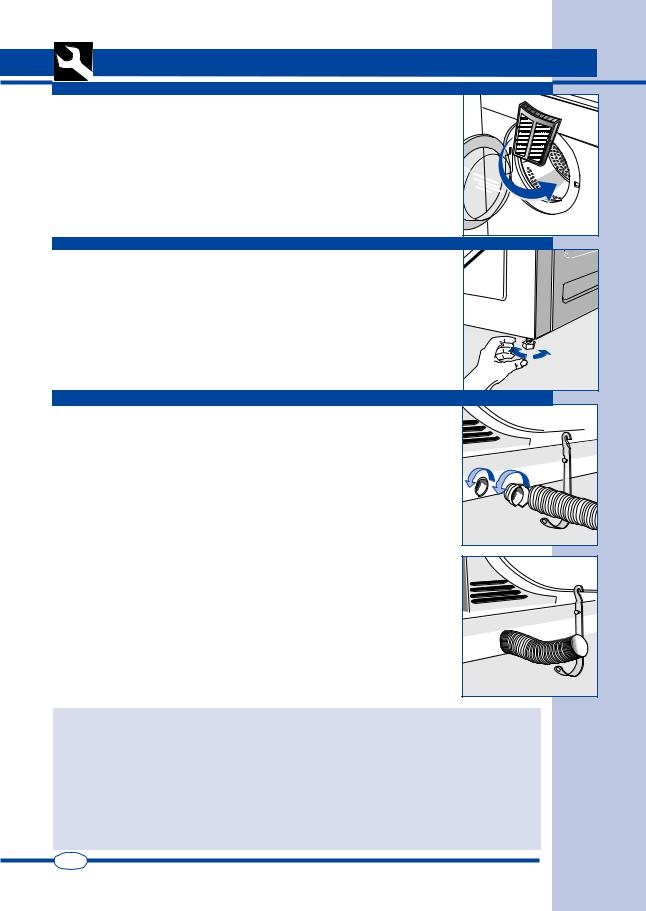
30 |
INSTALLATION DE LA MACHINE |
|
INSTALLATION |
▼Ne jamais couvrir le prises d’air qui se trouvent à l’arrière de l’appareil.
▼ Mettre le filtre dans la position d’emploi (fig. 4).
▼ Nettoyer l’intérieur du tambour de séchage au moyen d’un chiffon humide, pour éliminer la poussière qui pourrait éventuellement se déposer dans ce dernier.
NIVELLEMENT DU SÈCHE-LINGE
Pieds réglables. Mettre le sèche-linge en position verticale, de façon à ce qu’il soit solidement en appui sur les quatre pieds. Effectuer le nivellement de la machine en réglant le pieds, comme indiqué ci-après.
▼Soulever légèrement la machine.
▼Régler les pieds à la bonne hauteur (fig. 5).
▼Baisser la machine.
Une machine dont le nivellement n’est pas correct est susceptible d’endommager les roulements et de s’abîmer prématurément. Ce sèche-linge ne nécessite pas de fixation au sol.
CONNEXION DU TUYAU D’ÉVACUATION DE L’AIR
Connecter le tuyau d’évacuation de l’air à la sortie d’évacuation qui se trouve à l’arrière du sèche-linge (fig.6).
▼Connecter une extrémité du tuyau au raccord fourni avec l’appareil.
▼ Tourner le raccord (en même temps que le tuyau) dans le sens contraire à celui des aiguilles d’une montre, dans le trou de vidange sur le sèche-linge.
▼ Pousser le tuyau à l’extérieur depuis l’arrière de la machine à gauche ou à droite, à travers le logement sur le fond de la carcasse de la machine.
▼Positionner l’autre extrémité du tuyau à proximité d’une fenêtre ou d’une sortie de ventilation vers l’extérieur. Si cela ne devait pas être possible, il faudra s’assurer que la pièce soit correctement ventilée lorsque la machine est utilisée.
Se servir du support fourni avec l’appareil pour fixer le tuyau (fig. 7).
Important: le tuyau d’évacuation de l’air doit être connecté même si l’air n’est pas évacué à l’extérieur, autrement le sèche-linge absorberait à nouveau l’air humide évacué et prolongerait le cycle de séchage. L’air humide est en outre susceptible d’endommager le sèche-linge. Uniquement l’air chaud et humide est évacué par le tuyau d’évacuation de l’air;l’air évacué n’est pas dangereux mais, de tout manière,il ne doit pas être dirigé vers les personnes, les animaux ou les plantes.
Important: L’air à la sortie ne doit jamais être évacué dans une conduite utilisée pour l’évacuationdesfuméesgénéréespardesappareilsquibrûlentdesgazoutoutautretype de combustible.
FR
4
5
6
7
SM1888
 Loading...