Ardo C 6640 EE X Manual

Specification
Product name: |
cord& cordless rechargeable hair clipper |
Model No.: |
HC 800 |
Adapter: |
Input AC 230V 50Hz; Output DC 2.4V 800mA |
Rechargeable battery: |
1.2V 900mA - 2 pcs |
Battery Standard: |
Ni-Cd |
Charging time: |
around 6 hours |
Operating time: |
around 60 minutes |
WARNING: Do not use this product near water, in wet areas to avoid fire or injury of electric current. Always turn off the product when you don’t use it or before a revision. There aren’t any parts in this appliance which are reparable
by consumer. Always appeal to a qualified authorized service. The product is under a dangerous tention.
Liquidation of old electrical and electronic devices
This symbol appearing on the product, on the product accessories or on the product packing means that the product must not be disposed as household waste. Please transport the product to the respective collection point where the electric and electronic device will be recycled. Collection points for the used electric and electronic devices exist in the European Union and also in other European countries. By proper liquidation of the product you can prevent possible negative impacts on environment and human
health, which might otherwise occur as a consequence of improper manipulation with the product. Recycling of materials contributes to protection of natural resources. Therefore please do not throw the old electric and electronic devices in the household wastes. For more detailed information please contact your local authority, any service company liquidating household waste or the store where you have bought the product.
NÁVOD K POUŽITÍ
NÁVOD NA POUŽITIE
USERS MANUAL
Zastřihovač vlasů / Zastrihovač vlasov / Hair Clipper
HC 800
16

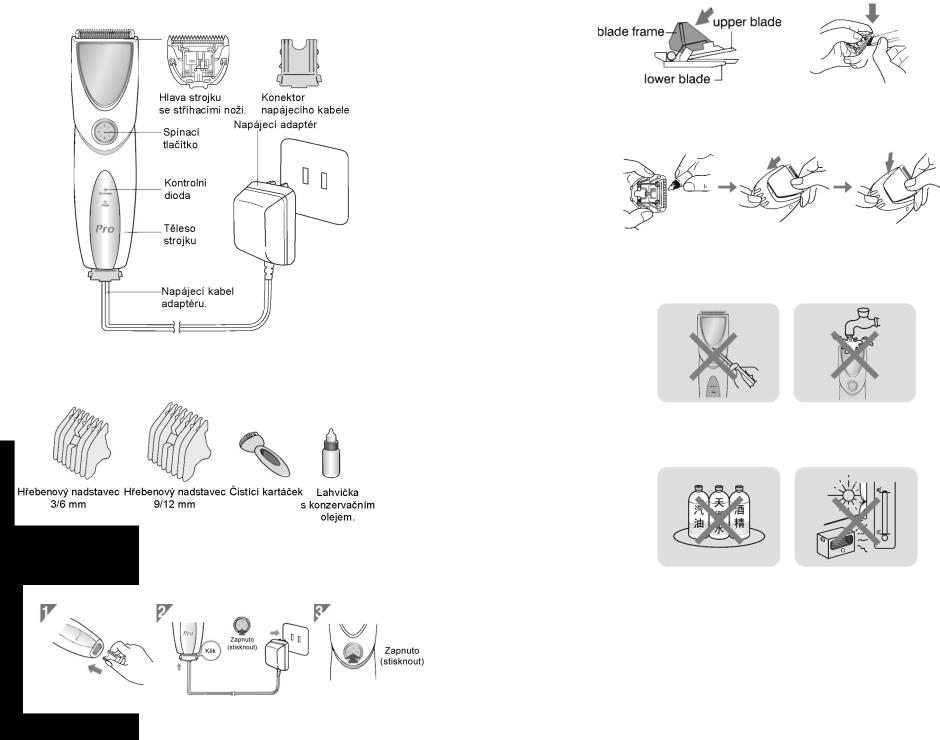
Popis částí zastřihovače |
CZ |
Popis a názvy příslušenství strojku
Zapojení a použití strojku
*Strojek může být použit ke stříhání vlasů a k zastřihávání fousů.
2
·As the upper illustrations showing, use the brush to clean the blade. Push the head of blade ame then clean the upper blade and lower blade.
(PLEASE NOTICE DO NOT DETACH THE BLADES AND SPRING FROM THE FRAME.)
·After finish the cleaning, drop 2-3 dripping lubricating oil between upper blade and lower blade., then fix the blade on the clipper.
(a “CARTA” voice can be heard when the blade is put into the suitable slot.)
Warning
1.DO NOT DETACH THE PRODUCT IF NOT FAMILIAR WITH IT.
2.DO NOT CLEAN IT WITH WATER DIRECTLY OR KEEP IT IN A MOISTURE CIRCUMSTANCE.
3.PLEASE USE WET CLOTH TO CLEAN THE PRODUCT.
4.DO NOT CHARGE IT IN A CIRCUMST ABOVE 40°C OR BELOW 0°C.
·IT IS NORMAL IF THE PRODUCT BE HEAT WHEN CHARGING.
·IT IS SUGGESTED TO TAKE THE NI-CD RECHAREABLE BATTERY OUT WHEN YOU WANT TO ABANDON THE PRODUCTS.
THE NI-CD BATTERY SHOULD BE DEALT IN SPECIALLY FOR PROTECTING OUR CIRCUMSTANCE.
15

Usage of fixing attachment comb
· Instruction of fixing the attachment comb As the left picture showing, make sure the fasteners in both sides is in proper site then push the comb on.
·Instruction of taking off the attachment comb Push off the fasteners in both sides then pull the comb out.
Cutting hair with attachment comb
1.If the user is not familiar with the product, please try to use 12mm comb. And do not cut too much hair in one time.
2.When cut the hair in calvaria, the bottom of attachment comb should be close head. Then cut the hair steadily.( refer illustration 1.)
3.When cut the hair near neck, please use the comb in 3mm or 6mm or 9mm. And the sequence of cutting is from middle to both sides.( refer illustration 2.)
4.When cut the hair near ears, please use the comb in 3mm or 6mm or 9mm. Cut the hair carefully.( refer illustration 3.)
Cutting hair with comb or finger
1.take the attachment comb off.
2.tease the hair up using comb or finger.( refer illustration 4.)
3.leave the hair which you want to cut upper the finger or comb.( refer illustration 5. or illustration 6.)
4.using the clipper cut off the hair again and again till as you wish.
5.Tease hair to clean the dropped hair.
Instruction of cleaning
·As the upper illustrations showing, push the blade off.
14
Použití s A/C adaptérem
1.Zasuňte konektor napájecího kabele do otvoru v dolní části strojku.
2.Ujistěte se, že je spínač strojku v poloze „off“ (vypnuto) a zasuňte napájecí adaptér do zásuvky ve zdi.
3.Stiskněte spínač na strojku a můžete začít se stříháním vlasů.
*Před vysunutím konektoru napájecího kabele ze strojku vypněte spínač.
Použití strojku
Použití strojku na vlasy
Postup při nabíjení akumulátoru
1.Nasuňte konektor napájecího kabele do otvoru ve spodní straně strojku.
2.Přesvědčete se, že je vypínač strojku v poloze „OFF” (vypnuto) a zasuňte adaptér do zásuvky ve zdi.
3.Po zasunutí napájecího adaptéru do zásuvky ve zdi se rozsvítí červená kontrolní dioda „charge“ (nabíjení).
4.Po úplném nabití akumulátoru se dioda rozsvítí zeleně „full charge“ (akumulátor nabit). Asi po 4 hodinách nabíjecího procesu, svítí kontrolní dioda nepřetržitě zelenou barvou a jas diody se postupně zvětšuje v závislosti na úrovni nabití akumulátoru. Po dalších 2 hodinách nabíjení, svítí dioda jasnou zelenou barvou.
5.Po ukončení nabíjecího procesu, vytáhněte adaptér ze zásuvky.
Upozornění
1.Akumulátor strojku nabíjejte při teplotách v rozmezí 5°C — 40°C. Docílíte tak nejlepších výsledků.
2.Akumulátor je plně dobit asi po 6 hodinách nabíjení. Po třetím nebo čtvrtém úplném nabití je akumulátor v optimálním provozním stavu.
3.Pokud po 6 hodinách neodpojíte adaptér ze zásuvky a pokračujete v nabíjení akumulátoru, přestože je akumulátor již plně nabitý, dochází k „přebíjení“ akumulátoru a ke snižování životnosti akumulátoru.
4.Akumulátor nabíjejte pouze pokud je zcela vybitý nebo pokud je to nezbytně nutné. Vyvarujete se tak „přebíjení“ a snižování životnosti akumulátoru.
·Před prvním použitím strojku na vlasy nejdříve zcela nabijte akumulátor
3
 Loading...