

Apple VoiceOver Quick Start Manual

VoiceOver
Getting Started
Includes instructions and complete
command lists for using VoiceOver with
Mac OS X version 10.4 Tiger.

Contents
1
Chapter 1 6 Introduction
6
About VoiceOver
7
What You Need to Get Started
7
Using This Document
8
Where to Find More Information
8
VoiceOver Quick Start
8
VoiceOver Help
8
VoiceOver Menu
8
Mac OS X Keyboard Shortcuts
9
Resources on the Internet
9
Teaching and Learning Tools
9
Darkening the Screen
9
VoiceOver Quick Start Application
9
VoiceOver Keyboard Commands Diagrams
10
About VoiceOver Accessibility
Chapter 2 11 Introduction to Mac OS X
11
The Desktop
12
The Finder
12
12
13
13
14
14
15
Chapter 3 16 Keyboard Basics
16
17
18
18
18
2
Toolbar Buttons
Sidebar and View Browser
The Dock
The Menu Bar
Files and Folders
System Preferences
Spotlight
Important Keys to Know
About Function Keys
Using Function Keys on Portable Computers
Using Home, End, Page Up, and Page Down on Portable Computers
Keyboard Accessibility

18
19
19
20
Sticky Keys
Slow Keys
Key Repeat Rate
Keyboard Settings in VoiceOver Utility
Chapter 4 22 VoiceOver Basics
22
Following Instructions
22
Turning On VoiceOver
23
Using VoiceOver in the Login Window
23
Pausing VoiceOver Speech
23
Controlling VoiceOver
24
Reading Window Contents
25
Reading Text
25
Changing Rate, Pitch, and Volume Temporarily
26
Interacting With Content Areas
27
Using Buttons and Controls
28
Learning More About an Item
28
Navigating Menus
29
29
29
30
30
31
32
32
32
32
33
33
Navigating Quickly in a Menu
Using Pop-up Menus
Using Contextual Menus
Understanding Duplicate Menu Items
Working With the VoiceOver Menu
Using the Commands Menu
Chapter 4 Exercises
Exercise 4.1: Moving the VoiceOver Cursor
Exercise 4.2: Interacting With a Content Area
Exercise 4.3: Navigating the Menu Bar
Exercise 4.4: Navigating in a Menu and Submenu
Exercise 4.5: Using the VoiceOver Menu
Chapter 5 34 Using VoiceOver With Mac OS X
34
Using the Dock
35
35
35
37
38
38
39
40
40
41
Setting Dock Preferences
Working With Contextual Menus for Dock Items
Switching Between Applications and Windows
Navigating Finder Windows
Using Icon View
Using List View
Using Column View
Accessing Finder Window Buttons
Selecting Files and Folders
Copying and Moving Files
Contents
3

42
43
43
43
44
44
45
46
46
46
47
47
The Item Chooser Menu
Interacting With Windows
Moving and Resizing Windows
Moving a Scroll Bar
Using Spotlight
Using the Spotlight Menu
Using the Spotlight Window
Changing the Sort Criteria
Chapter 5 Exercises
Exercise 5.1: Using the Dock
Exercise 5.2: Using the Item Chooser Menu
Exercise 5.3: Copying and Pasting a File
Chapter 6 50 VoiceOver Utility and Preferences
50
Saving VoiceOver Settings
51
Setting the Amount of Spoken Detail
51
52
52
53
53
54
54
55
55
56
57
57
57
58
58
59
59
59
60
61
62
62
Adjusting Punctuation Settings
Adjusting Text Attribute Settings
Setting Navigation Options
Setting Website Navigation Options
Setting VoiceOver Cursor Options
Customizing Voices
Using Different Voices
Changing Rate, Pitch, and Volume
Setting Visual Options
Magnifying the VoiceOver Cursor
Using the Caption Panel
Moving and Resizing the Caption Panel
Changing the Caption Panel Font Size
Tiling Visuals
Hiding Visuals
Setting Text Pronunciation
Chapter 6 Exercises
Exercise 6.1: Using VoiceOver to Change Voice Settings
Exercise 6.2: Using VoiceOver to Change Rate, Pitch, and Volume
Exercise 6.3: Adjusting the Caption Panel
Exercise 6.4: Magnifying the VoiceOver Cursor and Tiling VoiceOver Visuals
Exercise 6.5: Adding Pronunciation to the VoiceOver Dictionary
Chapter 7 64 Web Browsing and Email
64
Connecting to the Internet
66
Using Mac OS X Mail
66
4
The Mail Toolbar
Contents

66
67
68
68
68
69
70
70
70
71
Opening Collapsed Folders in the Mailboxes Outline
Reading Email
Addressing a Message
Using the Safari Web Browser
Navigating Websites With VoiceOver
Using the Link Chooser Menu
Navigating Website Images
Chapter 7 Exercises
Exercise 7.1: Opening and Reading an Email Message
Exercise 7.2: Using the Link Chooser Menu
Chapter 8 72 Reading and Editing Text
72
Reading a Document
73 Working With Text
73 Locating the Insertion Point
73 Navigating in a Document
74 Bookmarking a Document
74 Cursor Tracking in Text Areas
74 Selecting Text
75 Hearing Text Attributes
75 Using TextEdit With VoiceOver
75 Checking Spelling in TextEdit
76 Changing Tab Stops in TextEdit
77 Chapter 8 Exercises
77 Exercise 8.1: Following the Insertion Point
77 Exercise 8.2: Cutting and Pasting Text
78 Exercise 8.3: Saving a Document
Chapter 9 79 Advanced Navigation Skills
79 Full Keyboard Navigation and VoiceOver
79 Advanced Cursor Tracking
80 Using the Cursor Control Keys
81 Using the Mouse With VoiceOver
81 Mouse Settings in VoiceOver Utility
82 Making the Mouse Pointer More Visible
82 Using the Numeric Keypad to Control the Mouse
83 Quickly Navigating to Content Areas
83 Chapter 9 Exercises
83 Exercise 9.1: Using Command-Tab to Switch Applications
84 Exercise 9.2: Moving Cursors Independently
Appendix 85 VoiceOver Commands
Contents
5

1 Introduction
1
Welcome to VoiceOver Getting Started. This document
introduces you to VoiceOver and gets you started using your
Mac in a new way.
VoiceOver is an alternative way for users with visual or learning disabilities to use
Mac OS X. It provides magnification options, keyboard control, and spoken English
descriptions of what’s happening on the computer screen. VoiceOver reads aloud the
contents of documents (and webpages) and provides a comprehensive audible
description of the user’s workspace and activities taking place on the computer. It also
includes a rich set of keyboard commands for navigating the Mac OS X interface and
interacting with application and system controls.
6
About VoiceOver
VoiceOver is an integrated part of the Mac OS X operating system. If your computer has
Mac OS X version 10.4 or later installed, VoiceOver is already installed and ready to use.
Just turn on VoiceOver to begin using it.
VoiceOver works in conjunction with full keyboard access, the standard Mac OS X
keyboard navigation method. With full keyboard access, you can use the Tab key and
arrow keys to move to controls and text fields in windows, and the Space bar to select
or activate them. But when you use VoiceOver, you can do so much more.
VoiceOver uses keyboard commands to navigate your computer screen, windows,
documents, and websites. It reads aloud everything it encounters and lets you know
when events occur on your screen, such as when dialogs, alert messages, and progress
bars appear.

What You Need to Get Started
To use VoiceOver, you need:
 A Macintosh computer with Mac OS X version 10.4 or later installed
 An English language Apple keyboard
 Built-in or external speakers or headphones
A mouse and display are optional. If you don’t need a display or mouse, you can use
VoiceOver without them.
An Internet connection is highly recommended.
Using This Document
This document is a comprehensive guide to using VoiceOver. It is organized into 11
chapters with a VoiceOver commands appendix. You can read the chapters in any order
you choose, but if you are new to Mac OS X and to VoiceOver, you will find that reading
them in the order presented lets you build upon knowledge gained in previous
chapters.
 Chapter 1, “Introduction”: In this chapter, you learn what VoiceOver is, what you
need to get started using it, and where to find more information about VoiceOver.
 Chapter 2, “Introduction to Mac OS X”: In this chapter, you learn Mac OS X basics
that will help you use VoiceOver effectively. It includes a description of the screen
layout, windows, Finder, and System Preferences.
 Chapter 3, “Keyboard Basics”: In this chapter, you learn which keys control
VoiceOver. You also learn about keyboard practice and how to set preferences in
Mac OS X and VoiceOver if you have difficulty using a keyboard.
 Chapter 4, “VoiceOver Basics”: In this chapter, you learn the basics of controlling
VoiceOver. Users who have never used VoiceOver will find out how to navigate, read
text in windows and dialogs, and select controls and objects.
 Chapter 5, “Using VoiceOver With Mac OS X”: In this chapter, you learn how to use
VoiceOver to navigate windows and perform everyday tasks on your computer using
VoiceOver.
 Chapter 6, “VoiceOver Utility and Preferences”: In this chapter, you learn how to
use VoiceOver Utility to customize VoiceOver for your needs.
 Chapter 7, “Web Browsing and Email”: In this chapter, you learn how to set up your
Internet connection and use Mail and Safari to get email and browse the Internet.
 Chapter 8, “Reading and Editing Text”: In this chapter, you learn how to use
VoiceOver to read and edit text and check spelling.
Chapter 1 Introduction 7

 Chapter 9, “Advanced Navigation Skills”: In this chapter, you learn how to use the
keyboard, mouse, and VoiceOver cursor independently. You also learn how to use the
mouse with VoiceOver, and about alternate ways to control the mouse.
 Appendix , “VoiceOver Commands”: In this appendix, you learn all the commands
you can use to control VoiceOver.
Where to Find More Information
You can use the resources and VoiceOver features described below to learn more about
using VoiceOver.
VoiceOver Quick Start
When you turn on a new Macintosh computer for the first time, you hear music play as
Setup Assistant starts up. If you wait a moment, you hear a spoken invitation to learn
how to use VoiceOver to set up your computer. If you are new to VoiceOver, follow the
prompts to start the VoiceOver Quick Start. You will learn how to navigate with
VoiceOver and interact with buttons and controls.
VoiceOver Help
Your computer comes with a built-in help system for Mac OS X and all its applications.
You can access these in the Help menu in the menu bar. VoiceOver Help contains pages
to help you with specific tasks, complete lists of all the keyboard commands for
VoiceOver, and an orientation to VoiceOver. When you open VoiceOver Help, you can
look for pages by typing keywords or phrases in the text field or by looking in the
index of help topics.
You can open a complete list of all the VoiceOver commands from the VoiceOver Utility
Help menu.
VoiceOver Menu
The VoiceOver menu contains all the VoiceOver commands you can apply to the item
in the VoiceOver cursor. It acts as a quick reference guide as you work. When you use
the VoiceOver command Control-Option-F7, the VoiceOver menu appears in the middle
of the screen for sighted users. Non-sighted users can use VoiceOver navigation to read
the menu and make selections.
Mac OS X Keyboard Shortcuts
You can find lists of keyboard shortcuts for Mac OS X and most applications in the
built-in help system. Search for “shortcuts” or “keyboard shortcuts” or check the index if
there is one. You can change or create keyboard shortcuts in the Keyboard & Mouse
preference pane of System Preferences.
8 Chapter 1 Introduction

Resources on the Internet
The Apple website has several sections devoted to VoiceOver and accessibility. You can
find additional learning materials and support information at these addresses:
 www.apple.com/accessibility
 www.apple.com/accessibility/voiceover
 www.apple.com/support/tiger/voiceover
 www.apple.com/education/accessibility/technology/voiceover.html
In addition, you can find discussion groups on Apple’s website and other websites to
help you connect with other VoiceOver users.
Teaching and Learning Tools
If you are teaching or collaborating with a VoiceOver user, you can turn on a caption
panel that displays the text that VoiceOver is speaking. For more information about the
caption panel and how to customize it, see “Setting Visual Options” on page 55.
Darkening the Screen
If you are a sighted user, you can use the screen curtain to simulate a non-sighted user’s
experience. The screen curtain turns off all the visuals of the display, leaving a blank
screen. This is a great way to learn how to use VoiceOver.
To turn the screen curtain on and off:
m Press Control-Option-Shift-F11.
VoiceOver Quick Start Application
The VoiceOver Quick Start is available as a separate application that you can use any
time. Although it was designed to help users learn the basic commands necessary to
set up a computer using VoiceOver, the VoiceOver Quick Start can also be used as a
basic teaching tool. You can download the VoiceOver Quick Start from this Apple
accessibility website: www.apple.com/accessibility/voiceover.
VoiceOver Keyboard Commands Diagrams
You can download and print keyboard diagrams that show the VoiceOver commands
assigned to keys on a standard Apple English language keyboard. These diagrams are
intended for use by sighted users who want a more visual way to learn the VoiceOver
commands. You can download these diagrams from this Apple accessibility website:
www.apple.com/accessibility/voiceover.
Chapter 1 Introduction 9

About VoiceOver Accessibility
VoiceOver is a new technology in Mac OS X version 10.4 Tiger. You can use VoiceOver
with TextEdit, Mail, and Safari to do word processing, send and receive email, and
browse websites on the Internet. You can also use VoiceOver with some other
applications. As developers begin to support the underlying accessibility frameworks
provided in Mac OS X, more applications will become accessible with VoiceOver.
Contact the manufacturers of your favorite applications to inquire about the
accessibility of their products.
Visit the Apple website to learn about new developments and resources, and check the
Internet for discussion groups and user groups.
10 Chapter 1 Introduction

2 Introduction to Mac OS X
2
This chapter introduces you to basic information about
Mac OS X.
When you understand how your computer is organized and how to use the Finder and
application windows, learning to use VoiceOver is much easier. In Chapter 5, “Using
VoiceOver With Mac OS X,” you will learn how to use VoiceOver with Mac OS X to
complete everyday tasks on your computer.
You can find much more information about Mac OS X in Mac Help on your computer
and on the Apple website.
The Desktop
The desktop is the working area of your computer that contains folders, files, and other
items. When you connect to a server or connect an external hard disk or an iPod, an
icon that represents it appears on the desktop. When you insert a CD or DVD into your
computer’s optical drive, it also appears on the desktop.
You can store files and folders directly on your desktop for quick access.
11
The Finder
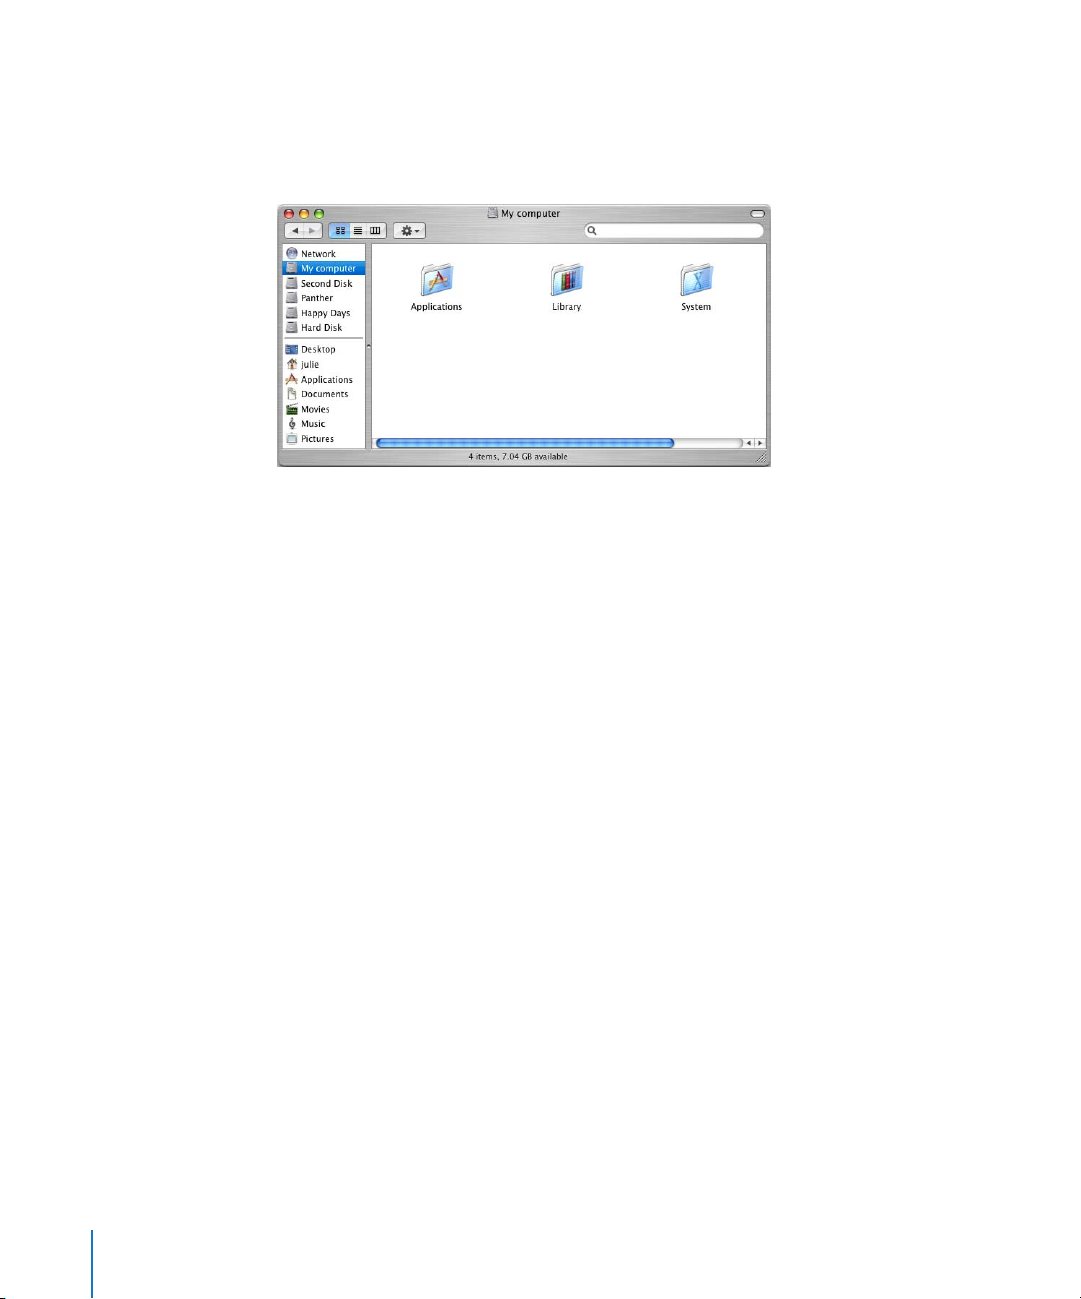
The Finder keeps track of files and folders and manages the desktop. When you open a
folder or other item on the desktop, a new Finder window like the one shown below
automatically opens.
Finder windows have a toolbar at the top and two sections below the toolbar called
the sidebar and the view browser. Three colored buttons above the toolbar are used to
close the window, send the window to the Dock, or change the window to its previous
size. See “Accessing Finder Window Buttons” on page 40 to learn the standard
Mac OS X keyboard shortcuts or menu commands to use these buttons.
Toolbar Buttons
You use the buttons in the toolbar to navigate, change the view, find items, and
perform some actions.
 Use the Back and Forward buttons on the left side of the toolbar to move back and
forth between locations on your computer, just as you would in a web browser.
 Use the three view buttons to choose the way you want to view the contents of your
hard disk and folders. You can choose icon, list, or column view.
 Use the Action pop-up menu to choose commands you can perform for the item
selected. For example, in the Finder window, some choices in the Action menu are
New Folder, Get Info, or Open. In other applications, you see different choices in the
Action menu.
 Use the search text field to type a word or phrase to locate an item. You can use the
buttons below the search text field to focus the search to a particular location. You
can choose Servers, Computer, Home, the current folder, or another location you
specify.
Sidebar and View Browser
Below the toolbar, the Finder window is split into two sections. The left side is called
the sidebar. At the top of the sidebar are icons that represent your hard disk, hard disk
partitions if you have them, any mounted servers or volumes, and the network.
12 Chapter 2 Introduction to Mac OS X

Below a separator are icons that represent often used folders on your hard disk.
Mac OS X has folders already set up for you to store your music, pictures, movies, and
documents. In the sidebar, you also see folders for the desktop contents, your home
folder, and applications.
When a folder is selected in the sidebar, its contents are displayed on the right side of
the Finder window in the view browser. Finder windows can display items in the view
browser in icon, list, or column view.
The Dock
The Dock is a customizable list of items that provides quick access to applications and
documents you use often. It appears as a row or column of icons on the screen. You
can position the Dock along the bottom, left, or right edge of the screen.
When an application is open, its icon appears temporarily in the Dock. When you
minimize a window, it disappears from the desktop and appears as an icon on the right
side of the Dock.
Each item in the Dock has a contextual menu that gives you quick access to commands
for that item. The contextual menu also contains the commands “Remove from Dock”
for icons that have been placed there permanently, and “Keep in Dock” for applications
that are open but whose icons are only there temporarily.
The Menu Bar
Mac OS X has a menu bar permanently located at the top of the screen. The menu bar
contains a collection of menus for the application that is currently active. When you
switch applications, the menus in the menu bar change to reflect the active
application. Most applications include File, Edit, Format, Window, and Help menus.
The Apple menu, located at the far left of the menu bar, is the same in every
application. It contains system commands and preferences.
The right side of the menu bar contains status menus. Status menus display information
and provide shortcuts to system and application settings that you may frequently
change. Common status menus include the volume slider, clock, and battery level
indicator. You can show or hide individual status menus in System Preferences and
other applications.
At the far right side of the menu bar is the Spotlight menu. You can use Spotlight, the
advanced search technology built in to Mac OS X, to search your entire system for
information contained in files, emails, contacts, images, calendars, and applications. For
more information about Spotlight, see “Spotlight” on page 15.
Chapter 2 Introduction to Mac OS X 13

Files and Folders
Most of the information in your computer is stored in files. Files include documents,
images, applications, and so on. Folders are simply a collection of files. Each file or
folder is represented by an icon with its name below or to the right of the icon. You can
select the text in the file’s name to change it, and you can copy, move, and delete files
on your computer.
Your computer comes with some folders already set up, but you can create and delete
your own folders to organize your information. Most folders and files you create are
stored in a home folder with your user account name. If you have multiple user
accounts on your computer, each user account has its own home folder.
You click once on a file or folder icon to select it and twice to open it. Clicking twice
quickly is called a “double-click.” If you double-click an application icon, you start the
application and a window for the application opens. If you double-click a file created
by an application, you automatically open the application (if it wasn’t open already)
and open the file. For example, if you double-click a TextEdit file on the desktop,
TextEdit starts up and its icon appears in the Dock. At the same time, the document
opens on the desktop.
If you can’t use a mouse to select and click, you can use VoiceOver commands instead.
System Preferences
System Preferences is a Mac OS X utility that you use to customize your computer and
choose essential settings such as your network configuration and Internet access.
System Preferences is located in the Apple menu and has an icon in the Dock.
You can find settings to improve accessibility in these preferences:
 Displays preferences
 Keyboard & Mouse preferences
 Speech preferences
 Universal Access preferences
The easiest way to learn about the many options in System Preferences is to explore
the different preference panes. Some preferences have multiple panes you access by
clicking the tab buttons. Network preferences even has an Assistant button to help you
troubleshoot connection problems.
14 Chapter 2 Introduction to Mac OS X
Spotlight
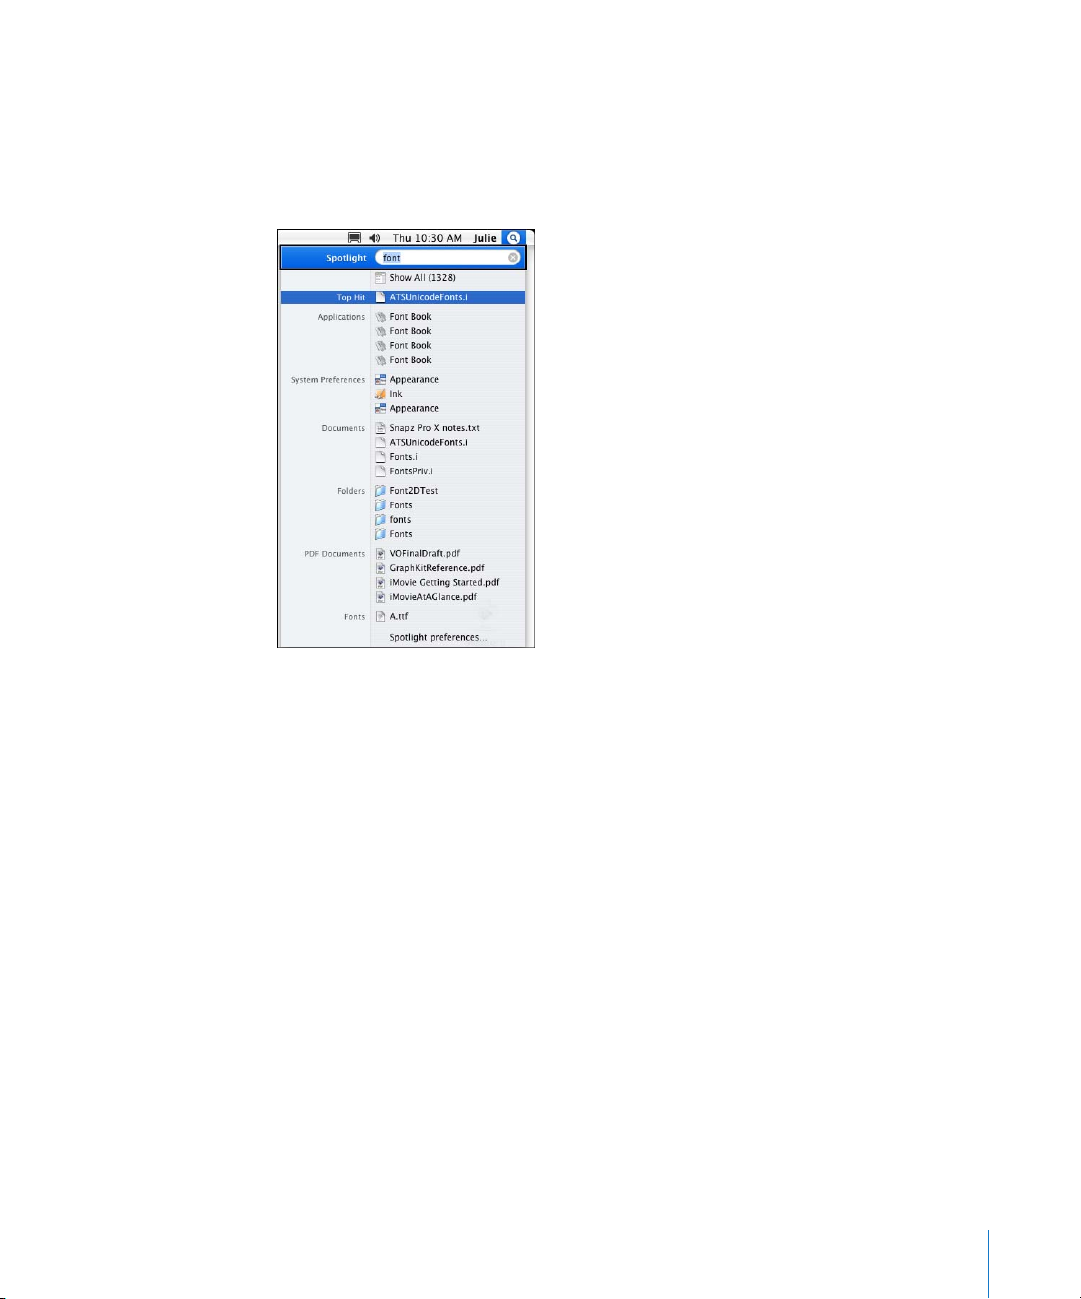
Spotlight is extraordinarily useful for VoiceOver users. In many cases, it may be easier to
use than the Finder for opening files, folders, and applications. When you type text in
the Spotlight search text field, search results appear immediately in a menu below the
search text field.
The more complete the word or phrase, the more refined your list of results will be.
Search results are grouped by category, such as Applications, System Preferences,
Documents, and Folders. You click an item in the list to open it.
If you don’t find the item you want, you can search again or click Show All at the top of
the results list. Clicking Show All displays a more complete list of results in a new
window called the Spotlight window.
Spotlight search results include all the metadata inside files, including the kind of
content, the author, edit history, format, size, and many more details. Depending on the
search word you type, you may find thousands of results. Spotlight narrows its results
to show you the best matches, but you can also browse the entire list if you want.
You can use Spotlight to find just about anything, anywhere, on your computer with
lightning speed. You don’t have to remember folder hierarchies or carefully store
project files in meaningful folders.
You can find more information about Spotlight in Mac Help on your computer or on
the Apple website at www.apple.com/macosx. See “Using Spotlight” on page 44 for
information about using Spotlight with VoiceOver.
Chapter 2 Introduction to Mac OS X 15

3 Keyboard Basics
3
This chapter provides basic information about using
VoiceOver with the Apple keyboard. You use your keyboard
to control VoiceOver, so you need to be very familiar with
your keyboard before you can use VoiceOver effectively.
If you are new to the Mac or have trouble using a keyboard, you’ll find important
information in this chapter. If you use a portable computer, make sure you review the
section in this chapter about function keys.
Important Keys to Know
You should be very familiar with the location of all the keys on your keyboard before
you begin using VoiceOver. In addition to the letters and punctuation characters, you
should know the location of these keys:
 Control
 Option
 Command
 Return
 Escape
 Home
 End
 Page Up
 Page Down
 Up, Down, Right, and Left arrows
 Function keys (F1 through F11)
16

If you’re not familiar with the layout of keys on your keyboard, you can use the
keyboard practice built in to VoiceOver to help you learn the name and location of the
keys. In the keyboard practice, you press keys to hear their names.
Using keyboard practice:
1 Press Command-F5 to turn on VoiceOver.
The Command keys are located directly to the left and right of the Space bar. You can
press either one.
The F5 key is in the top row of keys, sixth from the left.
2 Press Control-Option-K to begin keyboard practice
The Control and Option keys are the first two keys on the left of the bottom row. On a
portable keyboard, the Fn key comes first, then Control and Option.
3 Press keys to hear their names. Press the Shift key to hear the shifted characters on
punctuation keys.
4 Press the Escape key to end keyboard practice
The Escape key is on the top-left corner of the keyboard.
While you’re using keyboard practice, you can’t use your computer or keyboard for any
other tasks. You must press the Escape key to return your keyboard to its regular use.
About Function Keys
In VoiceOver, you use the function keys at the top of the keyboard to perform many
important actions. The function keys are labeled F1–F12 on some keyboards, and some
keyboards have function keys up to F16.
esc F1F2 F3F4F5F6F7F8F9F10F11F12F13
You also use the function keys to perform actions and commands in many other
software applications. To use a function key or other VoiceOver command keys for
another software application when VoiceOver is on, press Control-Option-Tab and then
press the function key. This command lets VoiceOver know that the next key
combination is for another application.
Chapter 3 Keyboard Basics 17

Using Function Keys on Portable Computers
On a portable computer, many of the function keys are programmed to perform
hardware-related functions such as adjusting brightness and volume. When you want
to perform an alternate action for the key, you press the Fn key and the function key
together. For example, in VoiceOver you press the following key combination to open
VoiceOver Utility:
Control-Option-F8
If you use a portable computer, you must press the function key with the command
Fn-Control-Option-F8
If you use VoiceOver all the time or very frequently, you can change the default
behavior of the function keys so that they perform software actions. Then the portable
keyboard behaves like a standard keyboard, and you press the Fn key only to change
the volume or change any of the other hardware settings.
To change the default behavior of the function keys:
1 Click the System Preferences icon in the Dock or choose Apple menu > System
Preferences to open System Preferences.
2 Click the Keyboard & Mouse button.
3 Click the Keyboard tab.
4 Select the checkbox labeled “Use the F1-F12 keys to control software features.”
When this checkbox is selected, you press the Fn key when you want to use the
hardware function of the key, such as adjusting volume. When you use the keys for
VoiceOver commands, you don’t need to press the Fn key with the VoiceOver
commands that use function keys.
Using Home, End, Page Up, and Page Down on Portable Computers
A standard keyboard has dedicated keys for Home, End, Page Up, and Page Down.
These are important VoiceOver navigation keys. On a portable computer, you use the
arrow keys with the Fn key for these functions.
Keyboard Accessibility
If you are able to use a keyboard but find it difficult, some other features included in
Mac OS X may help you use your keyboard more effectively with VoiceOver.
Sticky Keys
The Sticky Keys feature treats a series of modifier key presses as a single key
combination. For example, you can press Control, and then Option, and your keyboard
interprets that combination as Control-Option held down together.
18 Chapter 3 Keyboard Basics

To turn on Sticky Keys:
1 Click the System Preferences icon in the Dock or choose Apple menu > System
Preferences to open System Preferences.
2 Click the Universal Access button.
3 Click the Keyboard tab.
4 Select the On radio button for Sticky Keys.
When you turn on Sticky Keys, you can also set options to hear a sound when a
modifier key you press is accepted, and display an icon of the symbol for the modifier
keys you pressed. Checkboxes for these options are below the Sticky Keys On and Off
radio buttons.
Slow Keys
With the Slow Keys feature you can control the amount of time between when a key is
pressed and when it is accepted by the keyboard. If you frequently press keys
accidentally, you may want a longer delay.
To turn on Slow Keys:
1 Click the System Preferences icon in the Dock or choose Apple menu > System
Preferences to open System Preferences.
2 Click the Universal Access button.
3 Click the Keyboard tab.
4 Select the On radio button for Slow Keys.
5 Move the Acceptance Delay slider to the left for a longer delay and to the right for a
shorter delay.
You can also hear audible feedback when you press keys. You hear one sound when a
key is pressed and a different sound when the key is accepted. This is a very good way
to monitor what’s happening if you can’t see the screen. Select the checkbox labeled
“Use click key sounds” under the Slow Keys On and Off buttons to turn this on.
Key Repeat Rate
If you find that keys register more than once when you press them, you can adjust the
key repeat rate. The key repeat rate and key repeat delay let you control how fast keys
repeat and adjust how much time the keyboard will wait before it begins to repeat a
key press. If you have trouble releasing keys fast enough, you can set the delay very
long or turn off the repeat.
To adjust the key repeat rate:
1 Click the System Preferences icon in the Dock or choose Apple menu > System
Preferences to open System Preferences.
2 Click the Keyboard & Mouse button.
Chapter 3 Keyboard Basics 19

3 Click the Keyboard tab.
4 Move the Key Repeat Rate slider to the left if you want repeated keys to repeat slowly
(if you tend to make mistakes when pressing keys, moving this slider to a slow setting
will help minimize the number of repeated keystrokes). Move the slider to the right if
you want the keys to repeat at a faster pace.
5 Move the Delay Until Repeat slider to the left to cause a longer delay between when
you hold down the key and when the key begins to repeat.
You can move the Delay Until Repeat slider all the way to the left to turn off key
repeating completely.
Keyboard Settings in VoiceOver Utility
You use the VoiceOver Utility application to customize VoiceOver settings. The
Verbosity pane of VoiceOver Utility shown below includes some settings to help you
use your keyboard.
Typing Echo
As you type, VoiceOver can speak what you typed. If you are not a confident typist, or if
you just want to hear confirmation, you may want to use the typing echo. VoiceOver is
set to echo each character as you type it. You can change the setting in the “While
typing speak” pop-up menu to one of these:
 None: VoiceOver doesn’t speak what you type.
 Every Character: VoiceOver speaks each character as you type it. This is the default
setting for VoiceOver.
 Every Word: VoiceOver speaks the word you type as soon as you press the Space bar,
a punctuation key, or the Return key. This tells VoiceOver that the word is complete.
20 Chapter 3 Keyboard Basics

Key Press Notification
The “Announce when a modifier key is pressed” checkbox sets VoiceOver to say the
name of the modifier key when you press it. VoiceOver speaks these keys:
 Shift
 Control
 Option
 Command
 Fn
Turning on this option may help you become accustomed to the location of modifier
keys on your keyboard, and it may help prevent you from making mistakes.
Caps Lock Key Notification
If the Caps Lock key is pressed, you’ll be unable to use many VoiceOver commands.
Select the “Announce when the caps lock key is pressed” checkbox to hear VoiceOver
announce when this key is pressed.
To open VoiceOver Utility when VoiceOver is turned off:
1 Click the System Preferences icon in the Dock or choose Apple menu > System
Preferences to open System Preferences.
2 Click the Universal Access button.
3 Click the Seeing tab.
4 Click the Open VoiceOver Utility button.
When VoiceOver is turned on, you can open VoiceOver Utility with the VoiceOver
command Control-Option-F8. You will find more information about other VoiceOver
Utility settings in later chapters.
Chapter 3 Keyboard Basics 21

4 VoiceOver Basics
4
This chapter provides basic information about using
VoiceOver to navigate your computer, click buttons, make
selections in menus, and perform other basic tasks.
After reading this chapter, you will have enough information to begin using VoiceOver.
You will have practiced moving the VoiceOver cursor, interacting with scroll bars, and
navigating menus.
Following Instructions
When you use VoiceOver, you use the keyboard to activate controls. For example, when
you read “click,” use the VoiceOver command Control-Option-Space bar instead of the
mouse.
22
Menu commands are written using the greater than or right angle bracket symbol to
show a sequence of menu commands. For example:
Choose Finder > Services > Summarize.
In this example, Finder is the name of a menu in the menu bar. Services is a submenu in
the Finder menu, and Summarize is a command in the Services submenu. VoiceOver
speaks the sequence as “Choose Finder greater than Services greater than Summarize.”
Turning On VoiceOver
You can turn VoiceOver on and off at any time; you don’t have to restart your computer
or log in again. This makes it easier for users with different needs to share the same
computer.
You can turn on VoiceOver in System Preferences, and also with a quick VoiceOver
command.

To turn on VoiceOver in System Preferences:
1 Click the System Preferences icon in the Dock or choose Apple menu > System
Preferences to open System Preferences.
2 Click the Universal Access button.
3 Click the Seeing tab.
4 Select the On radio button for VoiceOver.
To turn VoiceOver on or off quickly:
m Press Command-F5. If you are using a portable computer, press Fn-Command-F5.
If VoiceOver is on, Command-F5 turns it off. If VoiceOver is off, the command turns it
on. The change takes effect immediately and remains in effect even after you log out of
your user account or restart your computer.
Using VoiceOver in the Login Window
If your computer requires you to log in and you want to use VoiceOver to navigate and
read the contents of the Mac OS X login window, you must first set a preference in
Accounts preferences.
To turn on VoiceOver for the login window:
1 Click the System Preferences icon in the Dock or choose Apple menu > System
Preferences to open System Preferences.
2 Click the Accounts button.
3 Click the Login Options button below the accounts list.
If the Login Options button is dimmed, click the lock icon at the bottom of the
Accounts window and type an administrator’s name and password to unlock the
window.
4 Select the checkbox labeled “Use VoiceOver at login window.”
Pausing VoiceOver Speech
When you’re using VoiceOver, you may want to silence the speech when you don’t
want to hear something. Just press and release the Control key to stop VoiceOver from
speaking. If VoiceOver is reading text and you don’t use any other commands after you
press the Control key, you can press and release Control again to hear VoiceOver
resume speaking where it left off.
Controlling VoiceOver
To control VoiceOver, you press and hold the Control and Option keys while you press
other keys to get information and perform actions.
Chapter 4 VoiceOver Basics 23

When VoiceOver is on, a box is drawn around an object on the screen to show where
VoiceOver is focused. This box is called the VoiceOver cursor. The visual representation of
the VoiceOver cursor helps sighted users track VoiceOver’s location. Objects in the
VoiceOver cursor can be buttons and other controls, text, images, files, documents, and
anything else that is displayed on your computer screen.
To move the VoiceOver cursor, you hold down the Control and Option keys as you
press the arrow keys. This moves the VoiceOver cursor vertically or horizontally. In
general, you should navigate windows horizontally, using the Left and Right arrow
keys. The VoiceOver cursor moves from left to right, wrapping to the next row as it
moves forward or back.
Use the Up and Down arrow keys to navigate vertically in lists and tables, or in
windows where you are familiar with the layout. The VoiceOver cursor moves up and
down, wrapping to the next column as it moves up or down.
For convenience, you can lock the Control and Option keys so that you don’t have to
press them while you are controlling VoiceOver. Locking the Control and Option keys is
useful if you are doing a lot of navigation and exploration with VoiceOver. It reduces
the number of keys you need to press to accomplish these goals. With Control and
Option locked, all you need to press are the remaining keys for the command, usually
one or two others.
To lock or unlock the Control and Option keys:
m Press Control-Option-semicolon (;).
You can practice navigating with the VoiceOver cursor using the exercises at the end of
this chapter.
Reading Window Contents
When you open a new window, the VoiceOver cursor goes to the first item in the
upper-left corner of the window and stops there. As you navigate the window, you
hear descriptions of the items in the VoiceOver cursor. If the VoiceOver cursor reaches
text, it reads the text that’s visible on the screen.
A good way to get a sense of how a window is laid out or to find out what information
the window contains is to have VoiceOver read all the contents of the window.
To read the window contents:
m Press Control-Option-Shift-W.
24 Chapter 4 VoiceOver Basics

When you use the Control-Option-Shift-W command to read the contents of the
window, VoiceOver reads only what’s visible. If there are more contents than can fit in
the window, scroll bars appear at the bottom or right side of the window so that you
can scroll to the rest of the content. For example, a large document may have many
pages, but only part of one page is visible on the screen. You use scroll bars to make
more of the document visible so that you can read it.
You can use other VoiceOver commands to read all the contents of scroll areas and
other content areas without having to scroll. The next section describes these
techniques.
Reading Text
Reading the contents of a window is very useful, but sometimes it isn’t enough. You’ll
need to be able to read individual words, sentences, and characters as well. You can use
the following VoiceOver commands for more control when you read text:
 Control-Option-C to read the last character in the VoiceOver cursor.
 Control-Option-W to read the last word in the VoiceOver cursor.
 Control-Option-S to read the sentence where the VoiceOver cursor is located.
 Control-Option-L to read the line where the VoiceOver cursor is located.
 Control-Option-P to read the paragraph where the VoiceOver cursor is located.
In addition, you can hear words or characters spelled phonetically to help you figure
out something that is difficult to hear. To do this, you use the same commands for
reading by character or reading by word, but you press the commands two or three
times to hear progressively more detail.
For example, if you hear the word “tab” but aren’t sure you heard it right, you can press
Control-Option-W to hear the word spoken. Press Control-Option-W again to hear the
word spelled. If you’re still not sure what was read, press Control-Option-W a third time
to hear each letter’s phonetic name (“tango alpha bravo”).
Changing Rate, Pitch, and Volume Temporarily
While you’re working, you may want to change the rate, pitch, or volume temporarily
without changing your permanent settings. You can use a VoiceOver command to do
this quickly.
To change settings temporarily:
1 Press Control-Option-Command-Right Arrow. Each time you press this command, you
hear VoiceOver cycle through rate, pitch, and volume. If you stopped at “rate” the last
time you used the command, the next time you press the command you hear “pitch.”
Chapter 4 VoiceOver Basics 25

2 After you hear the setting you want to change, press Control-Option-Command-Up
Arrow or Down Arrow. The Up Arrow increases the setting and the Down Arrow
decreases the setting.
3 Release the keys to return to navigation.
These settings remain in effect until you change them, log out of your user account,
turn off your computer, or turn off VoiceOver. To set your preferences for these, see
“Customizing Voices” on page 54.
Interacting With Content Areas
To be successful using VoiceOver, you must understand the VoiceOver concept of
interaction. When navigating the contents of windows, menus, and the desktop,
VoiceOver groups related items in order to present a cleaner overall picture of the
contents of the screen. So for example, moving once to the right will move the
VoiceOver cursor from one button to another, not just from one word or character to
the next. This allows you to quickly survey all that is available to you by navigating
through the major elements of a window or application. When you find an item of
interest, you then interact with it to read, add, control, or modify its contents.
Windows, documents, and webpages often have areas that contain text, files, or other
content. When the VoiceOver cursor reaches one of these areas, it identifies the content
area. Depending on the application or window, VoiceOver may identify these areas as:
 A scroll area
 HTML content
 A list
 A text area
 An outline
 A group
 A table
When you reach a content area, you can navigate past it to something else, or you can
interact with the content area to investigate, read, or modify something it contains. For
example, a Finder window has a sidebar that contains folders. You can skip over the
sidebar to the view browser, or interact with the sidebar to select one of its folders.
26 Chapter 4 VoiceOver Basics

First you use a command to let VoiceOver know that you want to interact with the
items it contains. Then you use the VoiceOver navigation commands to navigate within
the content area. The VoiceOver cursor stays within the boundaries of the object you're
interacting with, so when you navigate left, right, up, and down, you'll navigate only to
the objects within that area. If you find another object of interest, and it contains
objects, you can interact with it as well. Interaction allows you to navigate the larger
elements of an application quickly to locate what interests you, and also provides the
control you need to investigate the smallest details.
When you’re done, a VoiceOver command stops the interaction, returning the
VoiceOver cursor to the previous object or area. You can repeat the VoiceOver
command to interact or stop interacting as many times as necessary. When there's
nothing more to interact with, or stop interacting with, you'll hear a “beep” sound.
To interact with a content area:
 Press Control-Option-Shift-Down Arrow to begin interacting.
 Press Control-Option-Shift-Up Arrow to stop interacting with the content area.
To practice interacting with content areas, see the exercises at the end of this chapter.
You can use a VoiceOver command to read everything in the VoiceOver cursor,
including content not visible on the screen. This is a quick way to find out what’s in a
content area. When you use this command on an area that has scroll bars, the contents
become visible as VoiceOver reads them.
To read everything in the VoiceOver cursor:
m Press Control-Option-A when the VoiceOver cursor is on a content area.
If you want to navigate or interact with the items in a content area, you have to first let
VoiceOver know that you want to interact with the items it contains. Then you can use
all the regular VoiceOver commands inside the content area.
Using Buttons and Controls
You can use VoiceOver commands to press a button, select checkboxes, choose an item
in a list or menu, and move sliders.
For example, when instructions ask you to “click Save” or “click Cancel,” move the
VoiceOver cursor to the button and use a VoiceOver command to perform the button’s
action. You can use the same VoiceOver command to select a checkbox or radio
button.
To click a button or select a checkbox or radio button:
m Press Control-Option-Space bar.
You use this same powerful command to select just about anything on the screen,
from items in menus and lists to folders and files that you want to move or copy.
Chapter 4 VoiceOver Basics 27
 Loading...