

Page 1

Power Macintosh
User’s Guide
Includes setup, troubleshooting, and important health-related
information for Power Macintosh 9500 series computers
Page 2

K Apple Computer, Inc.
© 1996 Apple Computer, Inc. All rights reserved.
Under the copyright laws, this manual may not be copied, in whole or in part, without the
written consent of Apple. Your rights to the software are governed by the accompanying
software license agreement.
The Apple logo is a trademark of Apple Computer, Inc., registered in the U.S. and other
countries. Use of the “keyboard” Apple logo (Option-Shift-K) for commercial purposes without
the prior written consent of Apple may constitute trademark infringement and unfair
competition in violation of federal and state laws.
Every effort has been made to ensure that the information in this manual is accurate. Apple is
not responsible for printing or clerical errors.
Apple Computer, Inc.
1 Infinite Loop
Cupertino, CA 95014-2084
(408) 996-1010
Apple, the Apple logo, AppleScript, AppleShare, AppleTalk, GeoPort, ImageWriter, Inter•Poll,
LaserWriter, LocalTalk, Macintosh, MacTerminal, PlainTalk, Power Macintosh, PowerTalk,
and StyleWriter are trademarks of Apple Computer, Inc., registered in the U.S. and other
countries.
AppleCD, Apple Desktop Bus, At Ease, AudioVision, Balloon Help, Chicago, Disk First Aid,
eWorld, Finder, Macintosh PC Exchange, and QuickDraw are trademarks of Apple
Computer, Inc.
Adobe and PostScript are trademarks of Adobe Systems Incorporated or its subsidiaries and
may be registered in certain jurisdictions.
Helvetica and Times are registered trademarks of Linotype-Hell AG and/or its subsidiaries.
PowerPC and the PowerPC logo are trademarks of International Business Machines
Corporation, used under license therefrom.
Simultaneously published in the United States and Canada.
Mention of third-party products is for informational purposes only and constitutes neither an
endorsement nor a recommendation. Apple assumes no responsibility with regard to the
performance or use of these products.
Page 3

Con ten ts
Communications regulation information vi
Preface Welcome to Power Macintosh ix
Part I
1Getting Started 1
Plugging in the computer 3
Installing an expansion card 4
Connecting a monitor 4
Connecting the mouse and keyboard 8
Connecting other equipment 10
Tur ni ng the computer on 11
Problems turning your computer on? 13
What’s next? 13
Learning the basics 14
Revi ewing the basics 16
Tur ni ng the computer off 18
Where to find answers 19
iii
Page 4

2Getting Help 21
Getting answers to your questions 22
Identifying objects on the screen 30
Learning useful shortcuts 31
3Connecting Additional Equipment 33
Your computer at a glance 33
Connecting audio equipment 36
Connecting external SCSI devices 40
Expanding memory 44
Installing internal drives 44
Connecting network cables 45
4Installing and Using Application Programs 47
Installing application programs 48
Working with several programs at a time 49
Backing up your files 51
Usi ng Power Macintosh application programs 51
5Using the Optional CD-ROM Player 53
Inserting a CD-ROM disc 54
Ejecting a CD-ROM disc 55
Playing audio CDs 56
Working with Photo CDs 57
Sharing a CD-ROM disc over a network 58
iv
Contents
Page 5

Part II
6Troubleshooting 61
When you have questions 61
If you have trouble 61
Solutions to common problems 64
Solutions to CD-ROM problems 77
If your computer’s performance decreases 84
Solv ing printer problems 85
Obtaining updated Apple software 86
Initializing a hard disk 90
Repairing a damaged disk 93
Installing or reinstalling system software 97
Installing or reinstalling CD-ROM software 107
Part III
Appendi x A Health, Safety, and Maintenance Tips 111
Health-related information about computer use 111
Safety ins tructions 116
Handling your computer equipment 117
Cleaning your equipment 123
Locking and unlocking the mouse 126
Appendi x B Installing an Expansion Card 129
Expansion card power requirements 130
Installing an expansion card 130
Upgrading the processor 138
Appendi x C Special Keys on Your Keyboard 139
Typing sp ecia l characters and symbols 141
Special key combinations 143
Index 145
Contents
v
Page 6

Communications regulation information
FCC statement
This equipment has been tested and found to comply with the limits for a Class B digital device
in accordance with the specifications in Part 15 of FCC rules. See instructions if interference to
radio or television reception is suspected.
Radio and television interference
The equipment described in this manual generates, uses, and can radiate radio-frequency
energy. If it is not installed and used properly—that is, in strict accordance with Apple’s
instructions—it may cause interference with radio and television reception.
This equipment has been tested and found to comply with the limits for a Class B digital device
in accordance with the specifications in Part 15 of FCC rules. These specifications are designed
to provide reasonable protection against such interference in a residential installation. However,
there is no guarantee that interference will not occur in a particular installation.
Note: When the 10BASE-T Ethernet is connected, the system complies only with the FCC Part
15, Class A limits and the CISPR 22, Class A limits, and may not be used in a residential area.
You can determine whether your computer system is causing interference by turning it off. If
the interference stops, it was probably caused by the computer or one of the peripheral devices.
If your computer system does cause interference to radio or television reception, try to correct
the interference by using one or more of the following measures:
m Turn the television or radio antenna until the interference stops.
m Move the computer to one side or the other of the television or radio.
m Move the computer farther away from the television or radio.
m Plug the computer into an outlet that is on a different circuit from the television or radio.
(That is, make certain the computer and the television or radio are on circuits controlled by
different circuit breakers or fuses.)
If necessary, consult an Apple-authorized service provider or Apple. See the service and support
information that came with your Apple product. Or, consult an experienced radio/television
technician for additional suggestions. You may find the following booklet helpful: Interference
Handbook (stock number 004-000-00493-1). This booklet, prepared by the Federal
Communications Commission, is available from the U.S. Government Printing Office,
Washington, DC 20402.
IMPORTANT
could void the FCC Certification and negate your authority to operate the product.
This product was tested for FCC compliance under conditions that included the use of Apple
peripheral devices and Apple shielded cables and connectors between system components. It is
important that you use Apple peripheral devices and shielded cables and connectors between
system components to reduce the possibility of causing interference to radios, television sets,
and other electronic devices. You can obtain Apple peripheral devices and the proper shielded
cables and connectors through an Apple-authorized dealer. For non-Apple peripheral devices,
contact the manufacturer or dealer for assistance.
Changes or modifications to this product not authorized by Apple Computer, Inc.,
vi
Communications Regulation Information
Page 7

DOC statement
DOC Class B Compliance This digital apparatus does not exceed the Class B limits for radio
noise emissions from digital apparatus as set out in the interference-causing equipment standard
entitled “Digital Apparatus,” ICES-003 of the Department of Communications.
Observation des normes—Classe B Cet appareil numérique respecte les limites de bruits
radioélectriques applicables aux appareils numériques de Classe B prescrites dans la norme
sur le matériel brouilleur : “Appareils Numériques”, NMB-003 édictée par le ministre des
Communications.
VCCI statement
CD-ROM drive
WARNING
equipment’s manual may result in hazardous exposure.
WARNING
this product is harmful to the eyes. The use of optical instruments, such as magnifying lenses,
with this product increases the potential hazard to your eyes. For your safety, have this
equipment serviced only by an Apple-authorized service provider.
If you have an internal Apple CD-ROM drive in your computer, your computer is a Class 1
laser product. The Class 1 label, located in a user-accessible area, indicates that the drive meets
minimum safety requirements. A service warning label is located in a service-accessible area.
The labels on your product may differ slightly from the ones shown here.
Making adjustments or performing procedures other than those specified in your
Do not attempt to disassemble the cabinet containing the laser. The laser beam used in
Class 1 label Service warning label
Communications Regulation Information
vii
Page 8

Welcome to Power Macintosh
Congratulations on the purchase of your new Macintosh. Your computer is
designed to give you the highest performance combined with real ease of
use—it’s easy to set up, easy to use, and easy to expand. This book will guide
you through the setup procedure, tell you how to expand your Macintosh, and
provide many tips on using your new system.
Your Macintosh computer is powered by the new † microprocessor
(or “chip”). This microprocessor was designed by Apple Computer, Inc.,
Motorola, Inc., and IBM Corporation. The † microprocessor uses
Reduced Instruction Set Computing (RISC) technology to deliver very high
performance at the lowest possible cost. The † RISC mi c roprocessor
represents the state of the art i n microprocessor design.
Your new Macintosh will run almost all your existing Macintosh software, but
for best performance and greatest speed, look for the new software programs
designed especially for Power Macintosh computers. You’ll find Power
Macintosh programs at any software store that carries products for Macintosh.
ix
Page 9

Chapter 1 Get ting Star ted
Chapter 2 Get ting H elp
Chapter 3 Conn ecting Additional Equipment
Chapter 4 Installing and Using Ap plic ation Pro grams
Chapter 5 Using the Optional CD -ROM Player
part
I
Page 10

Page 11

Follow the instructions in this
chapter to set up your computer
and learn the basics.
1
Getting Started
The illustration on the next page shows all the equipment you will need to set
up your computer and begin using it. (Note that your monitor and keyboard
may look slightly different depending on what you purchased.)
Place your equipment on a sturdy, flat surface near a grounded wall outlet.
(Your computer was designed to be placed on the floor to conserve desk
space, but it can also be placed on any stable, flat surface.) Before following
the setup instructions in this chapter, you may want to read “Arranging Your
Office” in Appendix A (in the section on health-related information) for
tips on adjusting your work furniture so that you’re comfortable when using
the co mputer.
1
Page 12
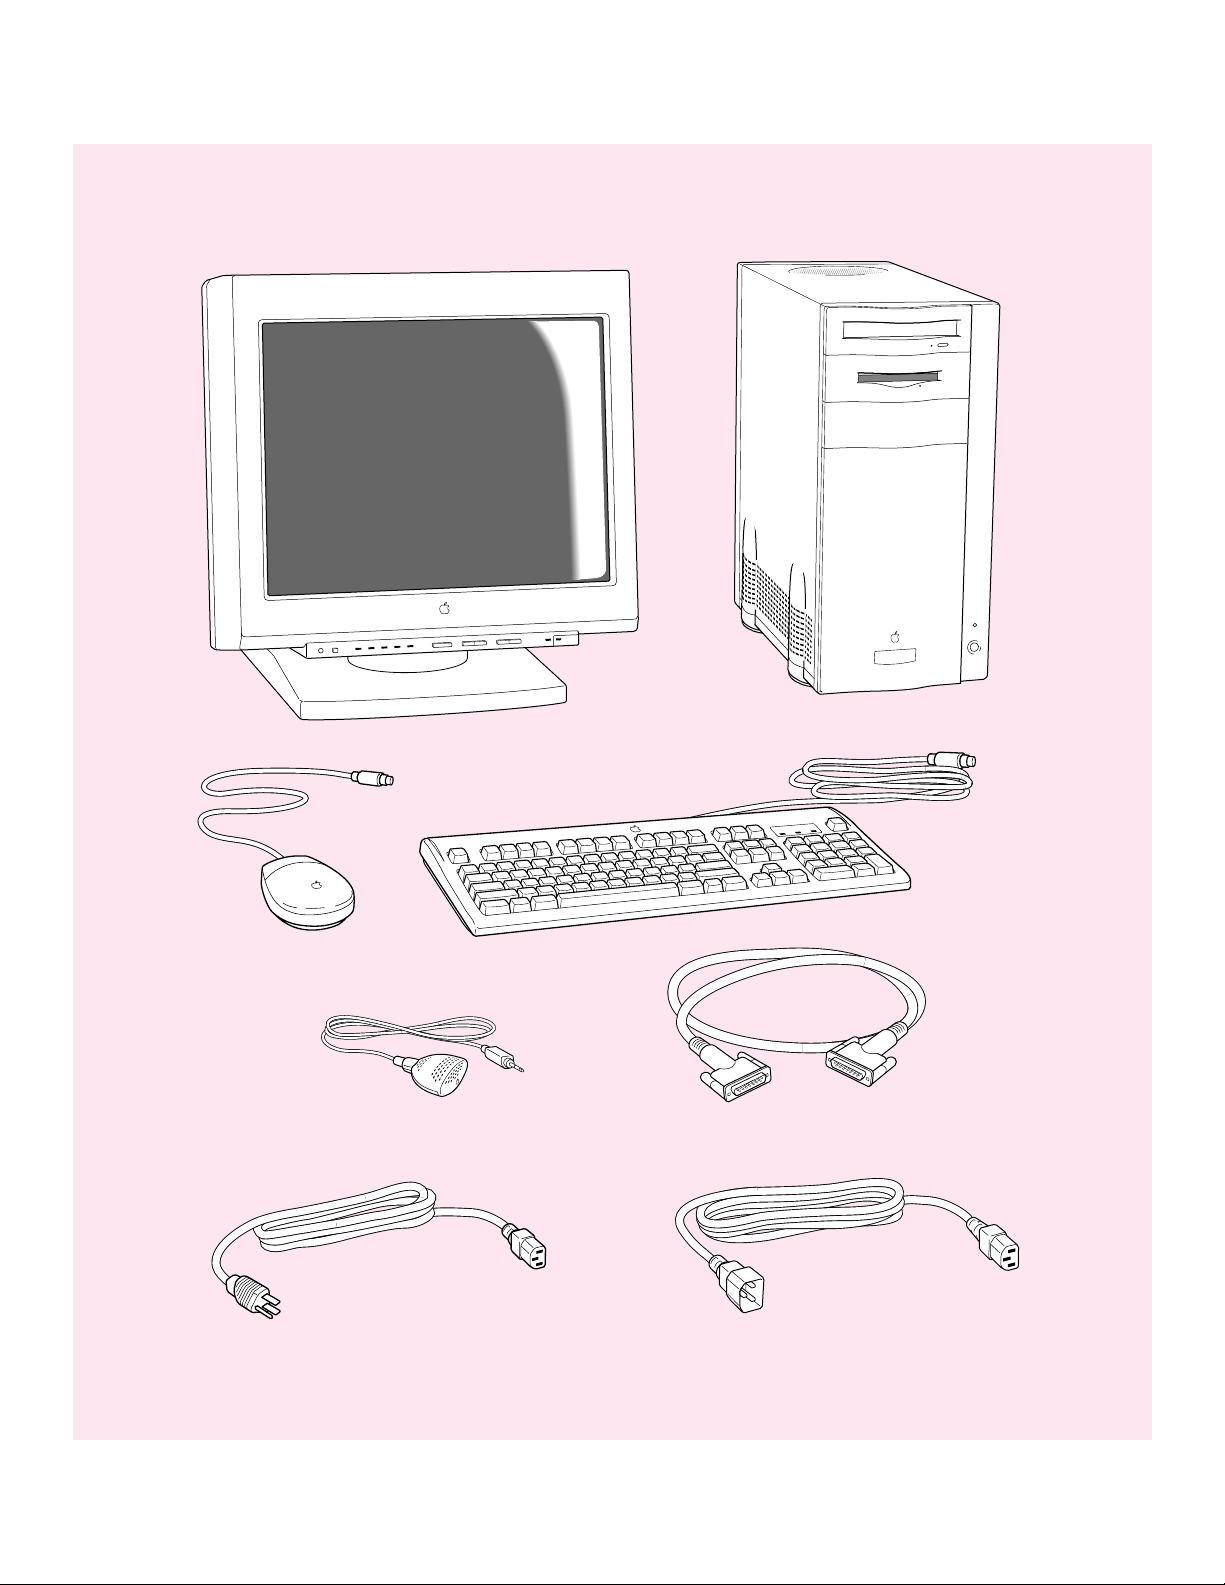
Monitor
Macintosh computer
Keyboard cable
(sometimes built
into the keyboard
as shown here)
Mouse
Apple PlainTalk Microphone (optional)
Computer power cord
Keyboard
Monitor cable
(sometimes built into the monitor)
Monitor power cord
(sometimes built into the monitor)
Page 13
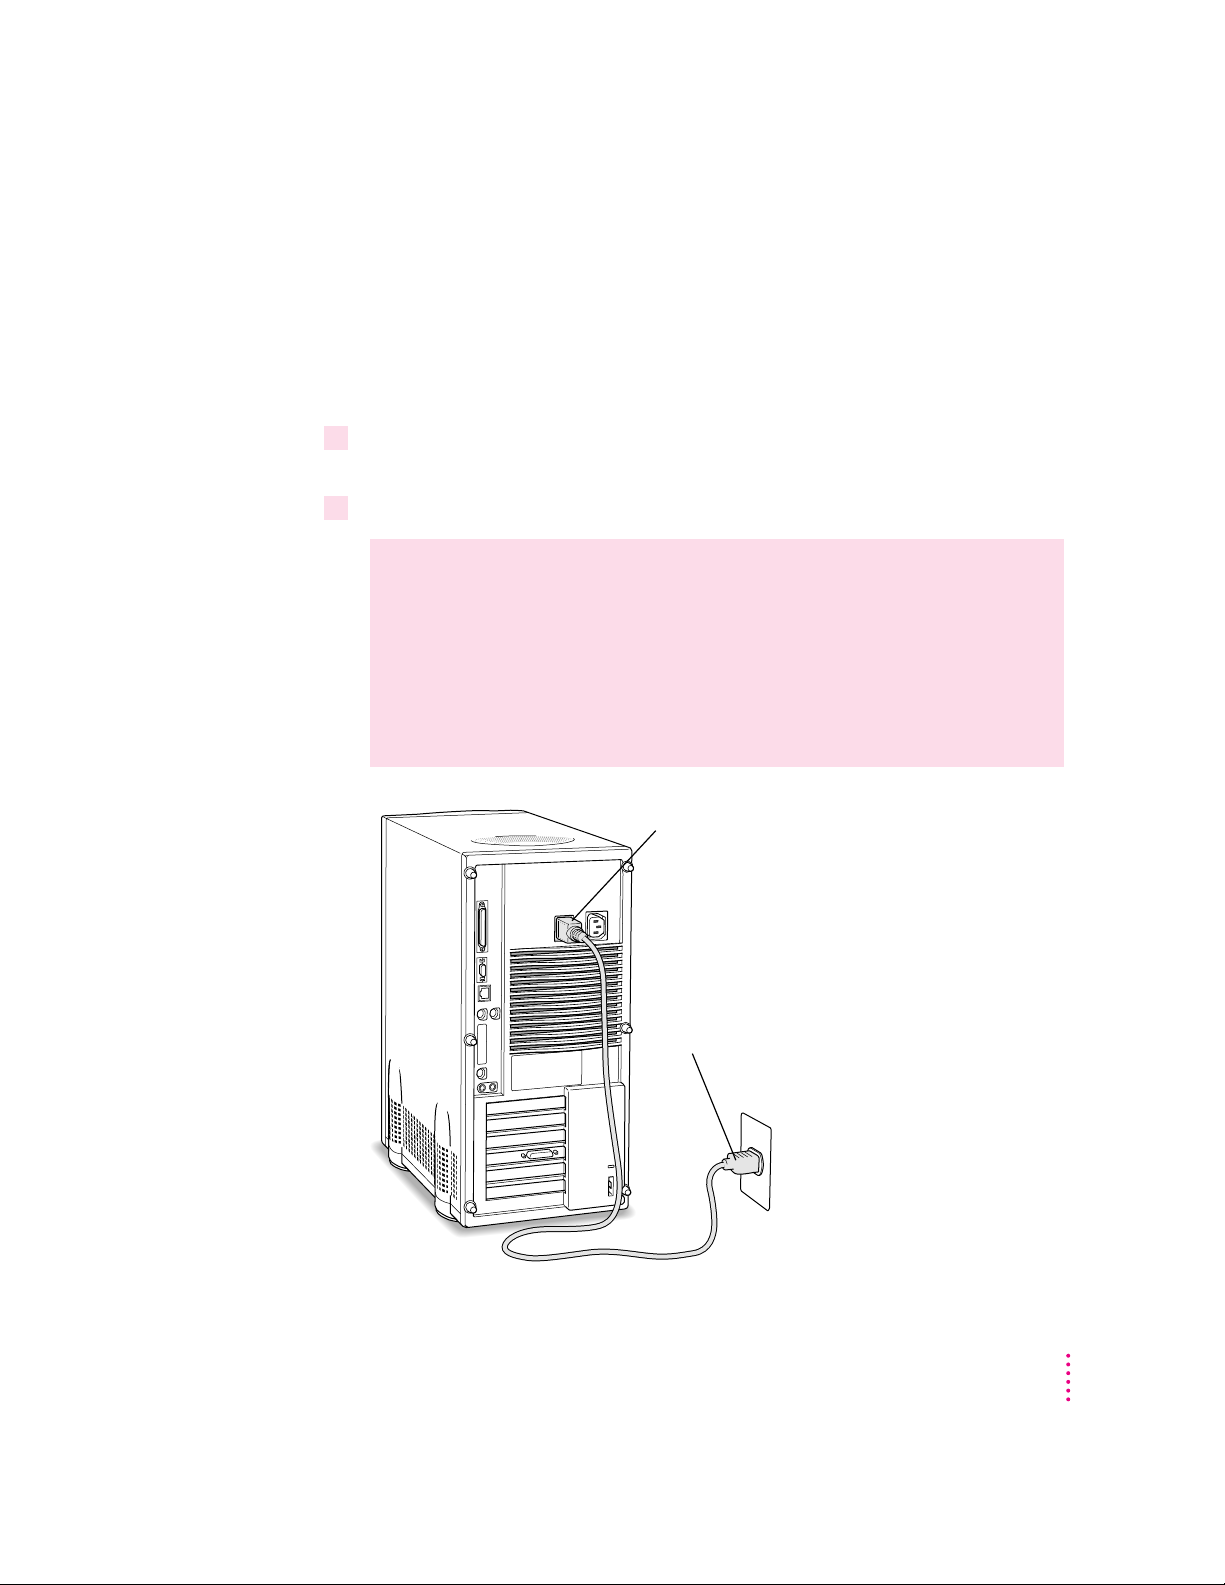
Pluggin g in the computer
Before you plug your Macintosh into a wall socket, carefully read all the
setup instructions in this chapter. T h en, before you connect anything to your
Macintosh, follow the instructions in this section to plug it in. The plug
grounds the computer and protects it from electrical damage while you are
setting up. When you are ready to begin, follow these steps:
1Plug the socket end of the computer’s power cord into the recessed power socket
(marked with the symbol ≤) on the back of the computer.
2Plug the other end of the power cord into a three-hole grounded outlet or power strip.
WARNING
This equipment is intended to be electrically grounded.
Your Macintosh is equipped with a three-wire grounding plug—a plug
that has a third (grounding) pin. This plug will fit only a grounded
AC outlet. This is a safety feature. If you are unable to insert the plug
into the outlet, contact a licensed electrician to replace the outlet
with a properly grounded outlet. Do not defeat the purpose of the
grounding plug!
Power cord socket
Power cord plug
Getting Started
3
Page 14

IMPORTANT
The only way to disconnect power completely is to unplug the
power cord. Make sure that at least one end of the power cord is within easy
reach so that you can unplug the computer when you need to.
Installing an ex pansion card
If you purchased a monitor (video) card or other expansion card for your
Macintosh, install it now. (See Appendix B, “Installing an Expansion Card,”
for instructions.)
Note: Some Power Macintosh 9500 models do not include a factory-installed
monitor card, so that you can install your own monitor card. If you have one
of these models, there is no monitor port on the back of the computer. You
need to install your monitor card now.
If you don’t have to install a monitor card or other expansion card, go on to
the next section, “Connecting a Monitor.”
Connectin g a monitor
You can connect many types of monitors to your Macintosh computer,
including most standard monitors. See the Tech n i cal In f o r m a t i o n booklet that
came with your computer for a complete list.
4
This section contains instr uctions on connecting most types of monitors.
Monitors from manufacturers other than Apple may require adapters for their
monitor cables and power cords. If you are connecting a non-Apple monitor,
also refer to the instructions that came with the monitor.
Chapter 1
Page 15

Connecting the monitor power cord
Monitors have two cords to connect: a power cord and a monitor cable. To
connect the monitor power cord, follow these steps:
1Place the monitor next to the computer.
Keep these considerations in mind:
m Allow a few inches for air circulation around the computer and monitor.
m Make sure that the top of the screen is slightly below eye level when you’re
sitting at the keyboard.
m Position the monitor to minimize glare and reflections on the screen from
overhead lights and windows.
For further suggestions about locating your computer equipment, consult
“Arranging Your Office” in Appendix A (in the section on health-related
information).
2Connect the monitor power cord to the monitor.
On some monitors, the cord is already attached.
Getting Started
5
Page 16
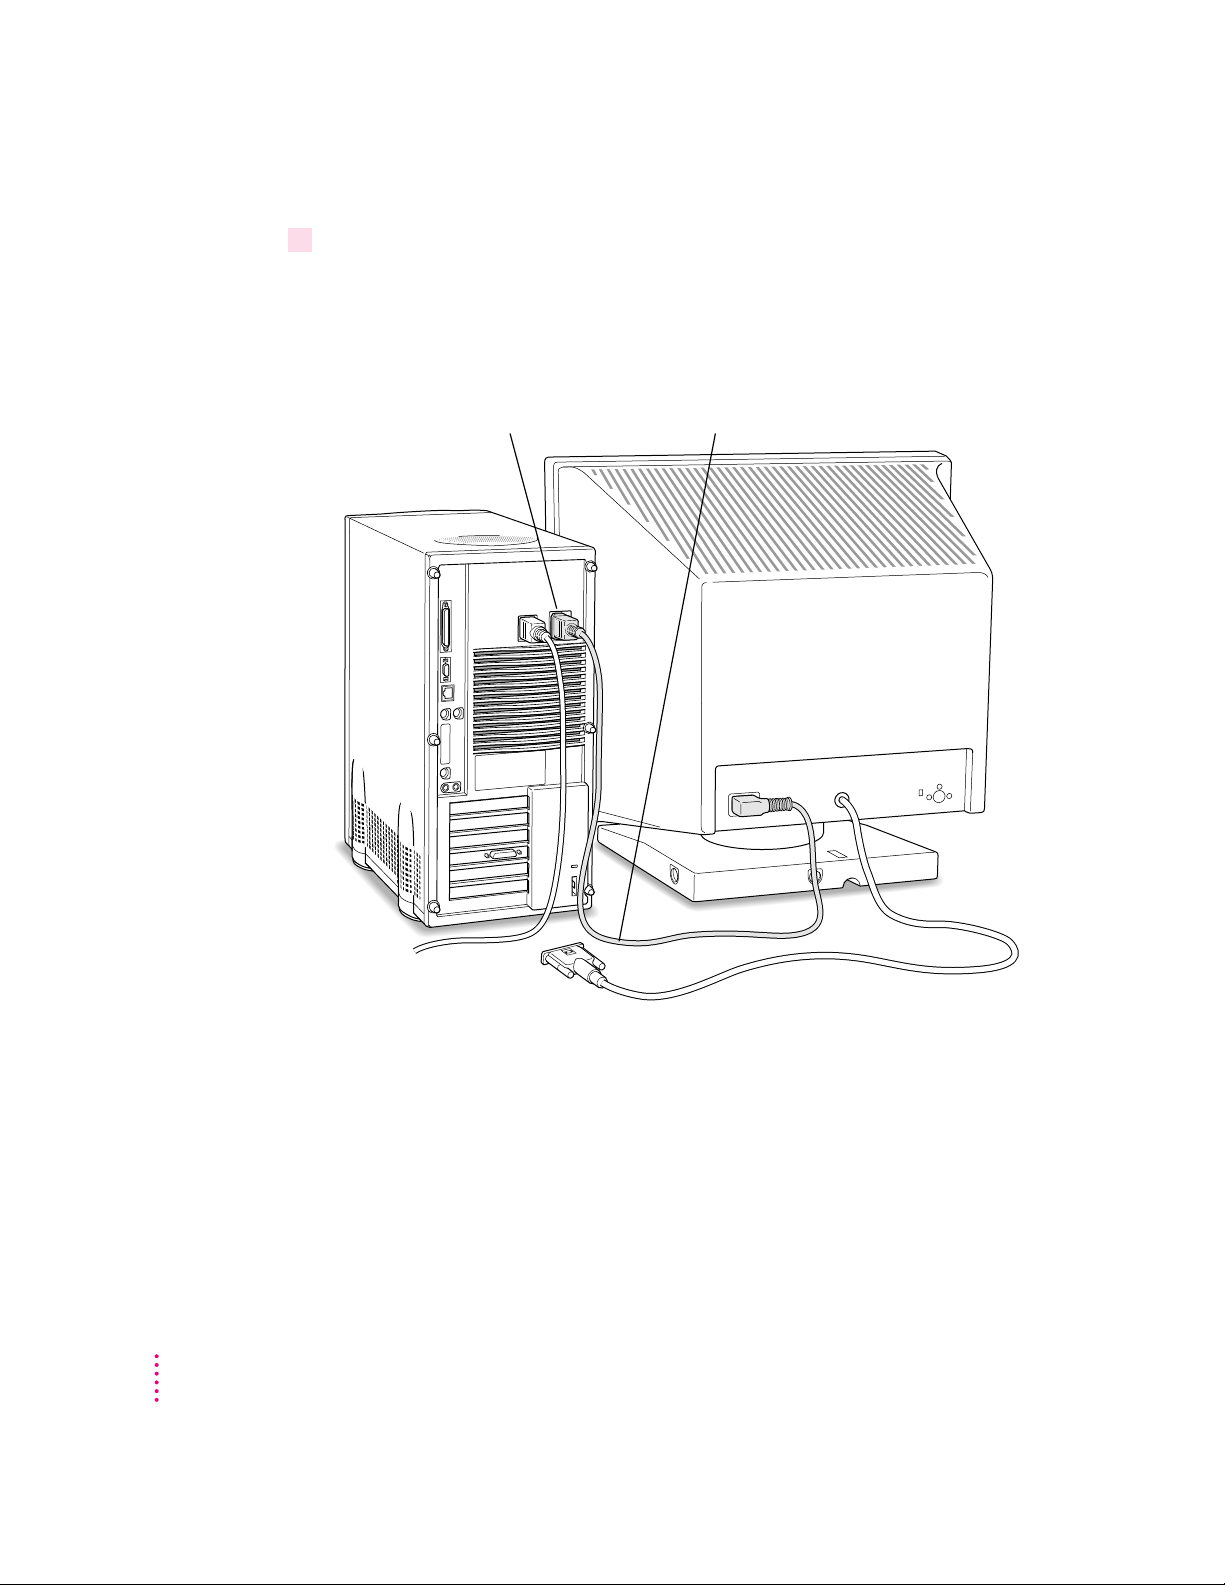
3Plug in the monitor power cord.
Some monitor power cords are designed to plug into the back of your
computer.
Some monitor power cords must be connected to a grounded electrical outlet,
not to the computer. Check the information that came with the monitor.
Monitor power cordMonitor power socket
6
Chapter 1
Page 17
Connecting the monitor cable
After you plug in the monitor power cord, you connect the monitor cable to
the co mputer’s monitor port.
To connect the monitor cable, follow these steps:
1Attach the monitor cable to the monitor.
On some monitors, the cable is already attached.
2Attach the monitor cable to the monitor port at the back of the computer.
Monitor cableVideo card
Getting Started
7
Page 18

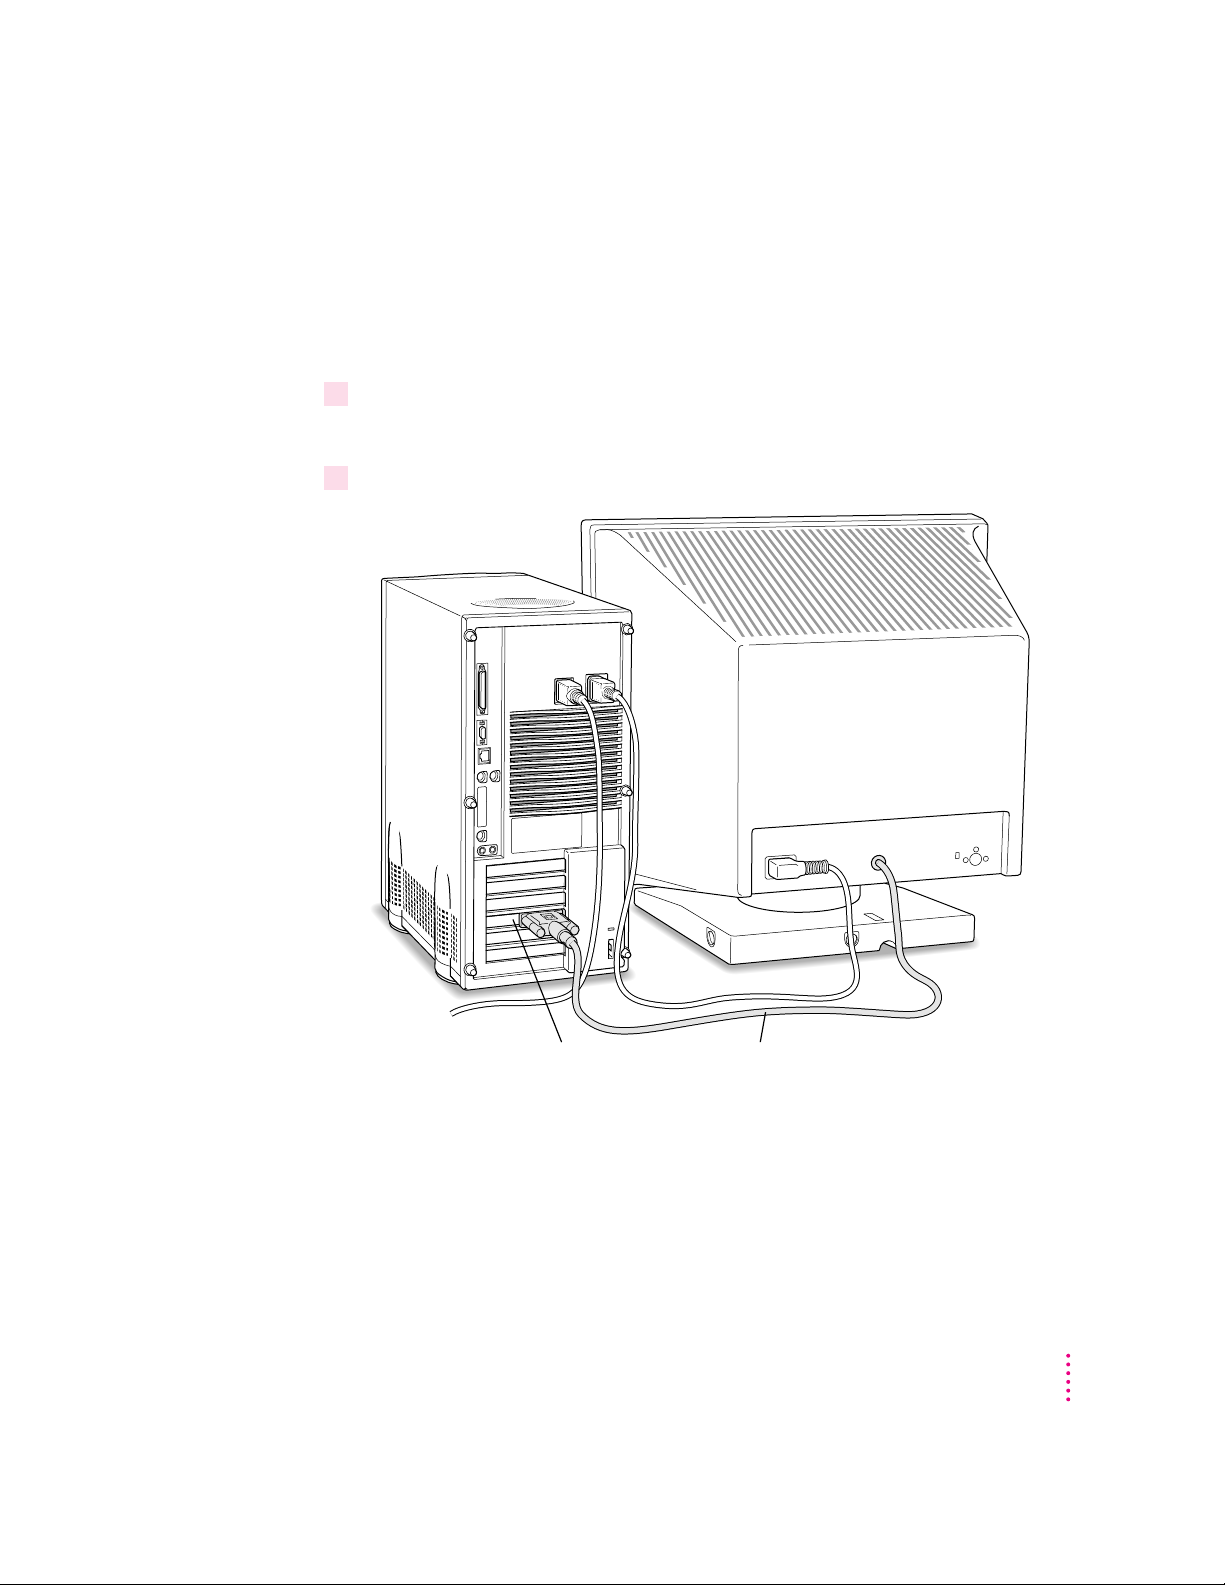
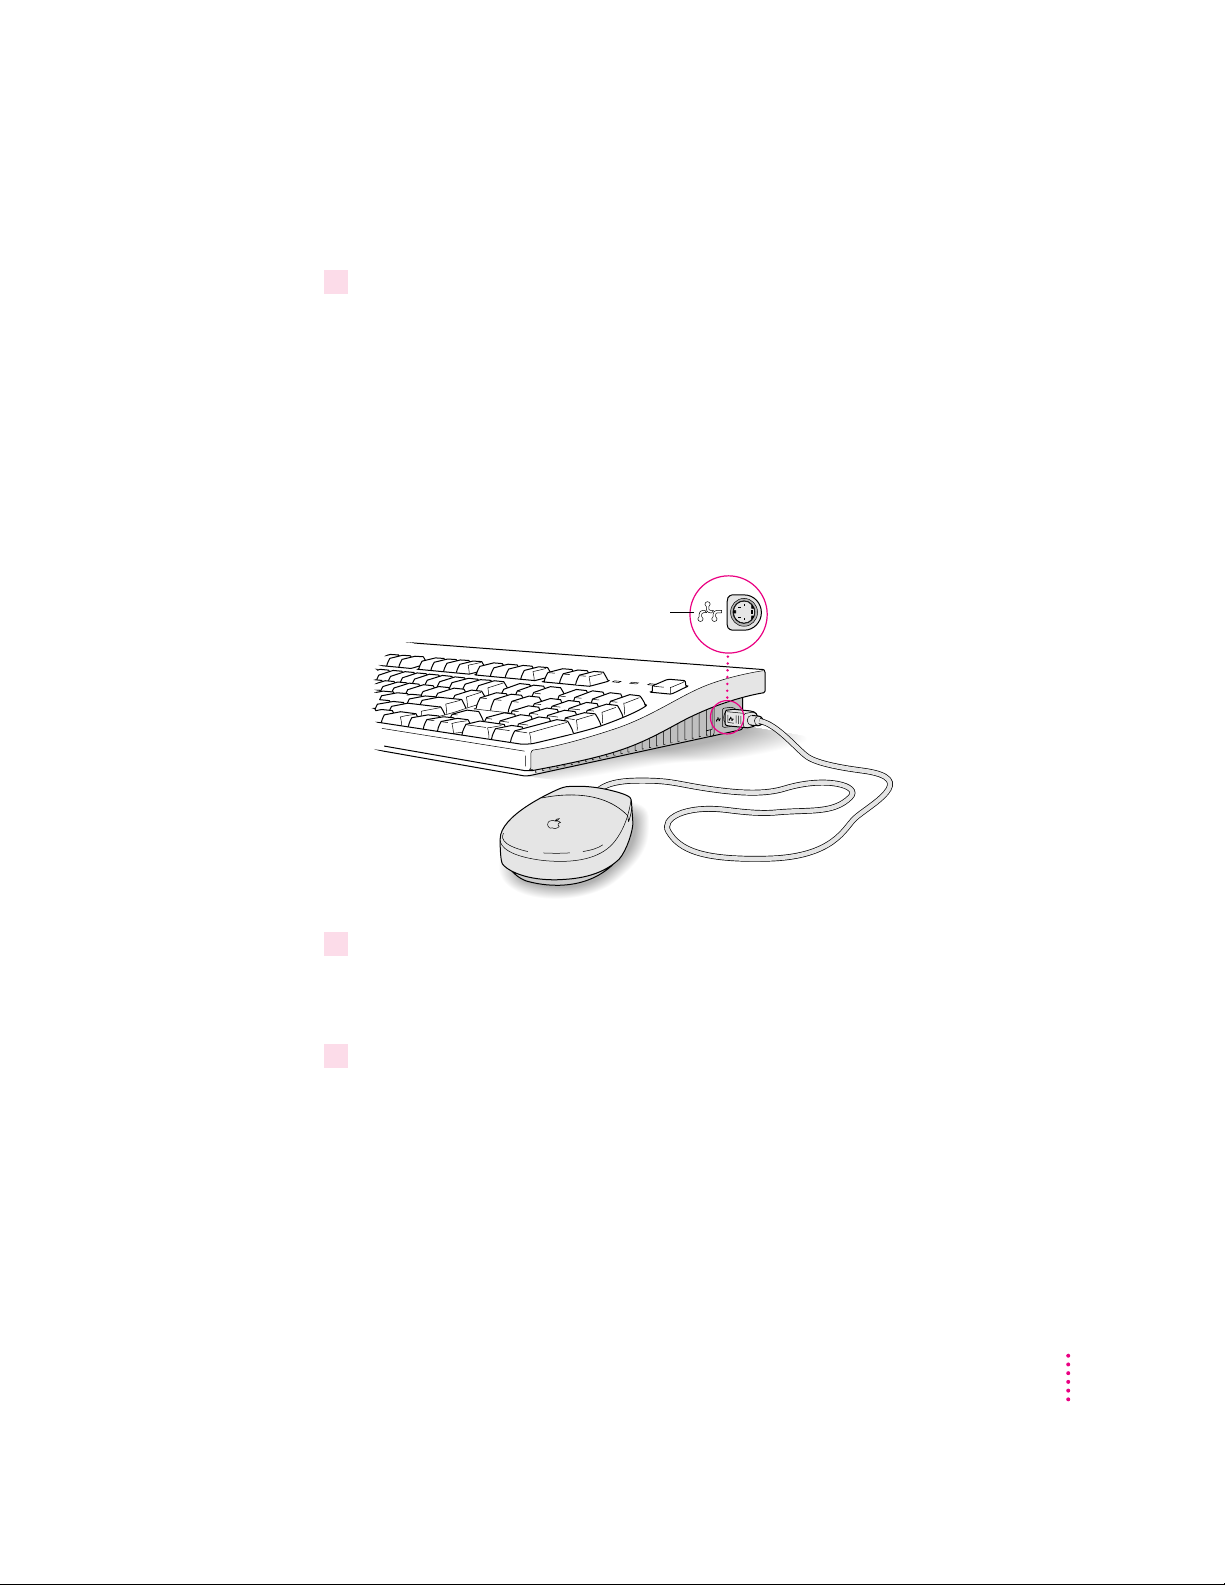
Connectin g the mouse and keyboard
You have a choice of several keyboards for your Macintosh. The way you
connect the mouse and keyboard depends on whether the keyboard has a
separate cable or a built-in cable.
Connecting a keyboard with a built-in cable
1Plug the mouse cable into the recessed port on the back of the keyboard.
The plug and the port are marked with the ◊ icon (symbol). The positions of
the port and icon on your keyboard may be different from those pictured.
By the way: A port marked with the ◊ icon is called an Apple Desktop Bus
(ADB) port.
Plug the mouse into the recessed port on
the keyboard. The flat part of the plug should
be pointing down, as shown here.
This cable plugs into the Apple Desktop Bus (ADB) port,
◊
marked with the
2Plug the keyboard cable into the port marked with the ◊icon on the back of
the computer.
icon, on the back of the computer.
Some monitors have aport to which you can connect the keyboard or mouse.
See the information that came with your monitor.
8
Chapter 1
Page 19
Connecting a keyboard with a separate cable
1Plug the mouse cable into the port on either side of the keyboard.
Most right-handed people prefer to use the mouse with their right hand; most
left-handed people prefer to use their left hand. Plug the mouse into the port
on the side you prefer.
The plug and the port are marked with the ◊ icon (symbol). Align the
symbols bef ore you inser t the plug. (The positions of the port and icon on
your keyboard may be different from those pictured here.)
By the way: A por t marked with the ◊ icon is called an Apple Desktop Bus
(ADB) port.
ADB icon
2Plug the keyboard cable (both ends are the same) into the other port on the keyboard.
If you plugged the mouse cable in on the right, for example, plug the keyboard
cable in on the left.
3Plug the keyboard cable into the port marked with the
the computer.
◊
icon on the back of
Some monitors have a port to which you can connect the keyboard or mouse.
See the information that came with your monitor.
Getting Started
9
Page 20

Connecting other equipment
If you are new to the Macintosh, it’s a good idea to get some experience using
your computer before you connect other equipment, such as a printer or
scanner. To learn basic Macintosh skills, continue with the instr uctions in
this cha p ter.
When you’re ready to connect other equipment to your Macintosh, see the
instructions in Chapter 3.
10
Chapter 1
Page 21
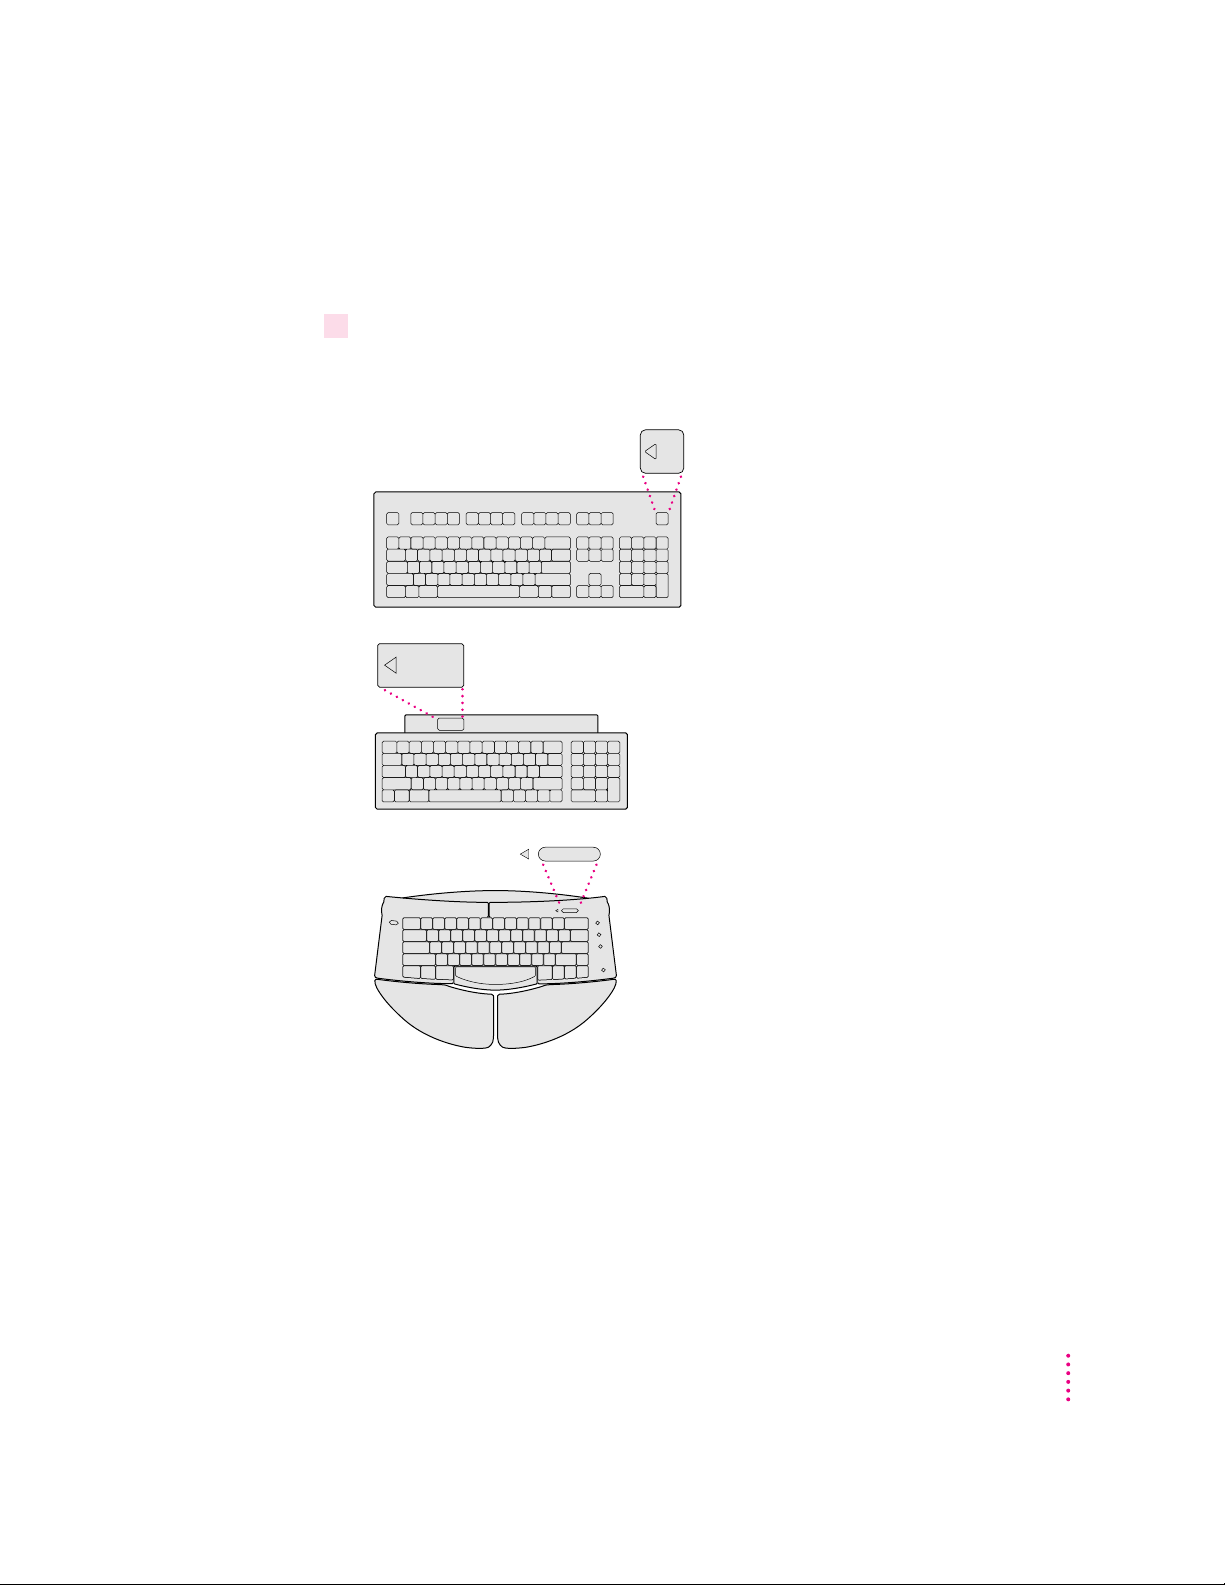
Turning the computer on
To t ur n on the computer for the first time, follow these steps:
1 Turn on your computer by pressing the Power key on the keyboard.
The Power key is marked with a triangle. Its location depends on which
keyboard you have.
You hear a tone from the computer as it starts up.
Getting Started
11
Page 22

2Turn on your monitor.
See the information that came with your monitor for the location of the power
switch. On Apple monitors, the power switch is located on the front of the
unit.
By the way: You only need to turn on the monitor once. From now on, the
monitor will turn off automatically when you shut down the computer, and it
will turn on automatically when you start up the computer. (If the monitor is
not plugged into the computer, it must be turned on separately each time you
turn on the computer.) If you have extra DRAM installed in your computer, it
can take several seconds for larger monitors to turn on. (The screen remains
black.)
3Check to see what’s on your screen.
m If you see a message about saving energy, read the information and click
Close M essage.”
“
m If you see the Macintosh desktop, shown here, your system software is
already set up correctly. Skip now to “
What’s Next?”
Hard disk icon
12
Macintosh desktop
m If you see a blinking question mark, see “Solutions to Common Problems”
in Chapter 6.
m If you see anything else on your screen, or if you see nothing at all, see the
next section, “Problems Turning Your Computer On?”
Chapter 1
Page 23

Prob lems turning your computer on?
If you don’t see anything on the screen, check these items to see if you can
identi fy the problem:
m Is the computer plugged into a power source? If it is plugged into a power
strip, is the power strip turned on?
m Is the computer turned on? The power-on light on the front pan el should
be on. If it isn’t on, press the power button (marked with the symbol I).
m Are the keyboard and mouse cables connected correctly? (Don’t connect or
disconnect the keyboard or mouse cable while the computer is on. You
could damage your equipment.)
m Is the monitor power cord plugged in?
m Is the monitor turned on? (Check the power-on light on the front of the
monitor.)
m Is the monitor cable attached firmly to both the monitor and computer?
m Is the brightness control on the monitor adjusted correctly? (On most
monitors, the brightness control is marked with the symbol ¤.)
What’s next?
Yo u’ve finished setting up your computer. Continue with one of the
following steps:
m If you are new to the Macintosh, turn to the next section, “Learning
the Basics.”
m If you are an experienced Macintosh user, turn to Chapter 2, “Getting
Help,” to learn about Macintosh Guide, your main source of information
when you’re working with the Macintosh.
m If you want to connect additional equipment, such as a microphone, to your
computer, see Chapter 3 of this book for instructions.
m If you want to install application software on your computer, see Chapter 4
of this book for information on setting up your programs and managing
memory. You’ll need this information to properly set up any software
programs specifically designed for Power Macintosh computers.
IMPORTANT
If you need to turn off your computer at any point, please see
“Turning the Computer Off” later in this chapter. It is very important to use
the correct procedure for shutting down your Macintosh before turning it off.
Getting Started
13
Page 24

Learning the basics
If you are new to the Macintosh, you should begin by looking at the easy-touse p r ogram called the Macintosh Tutorial. The tutorial teaches you the
basic skills you’ll need to use your computer. To start the tutorial, follow
these steps:
1Slide your mouse along your mouse pad or desk.
Hold the mouse as shown, with the cable pointing away from you. Rest the
heel of your palm on the desk and grasp the sides of the mouse between your
thumb and fingers. Use your wrist and fingers to slide the mouse around with
the index finger resting on the mouse button. Don’t press the mouse button
(under your index finger). Notice that the arrow (8) on the screen moves in
the same direction that you move the mouse.
Mouse button
14
If the arrow doesn’t move, make sure that the cables connecting the mouse
and keyboard are secure and that your mouse is positioned as shown in
the illustration.
Chapter 1
Page 25

2Move the tip of the arrow (8) to the question mark (h) in the upper-right portion of
the screen.
If you run out of room on your mouse pad or desk while moving the mouse,
pick up the mouse and place it where there’s more room. (The arrow on the
screen moves only when the mouse is in contact with the mouse pad or desk.)
3With the tip of the arrow on the question mark, press and hold down the mouse button.
A list of choices (called a menu) appears. This is the Guide (h) menu, which
is the place to go when you have a question about how to use your computer.
4While holding down the mouse button, move the arrow until the words “Macintosh
Tutorial” are highlighted, then release the mouse button.
A window appears welcoming you to the tutorial. You can set this book aside
for now and follow the instructions on the screen. When you have completed
the tutorial, return to this book.
Getting Started
15
Page 26
Reviewing the basics
You can use the following illustrations to review the elements you use on your
screen to do work with your computer.
Menu
Menus
Icons
Window
16
Chapter 1
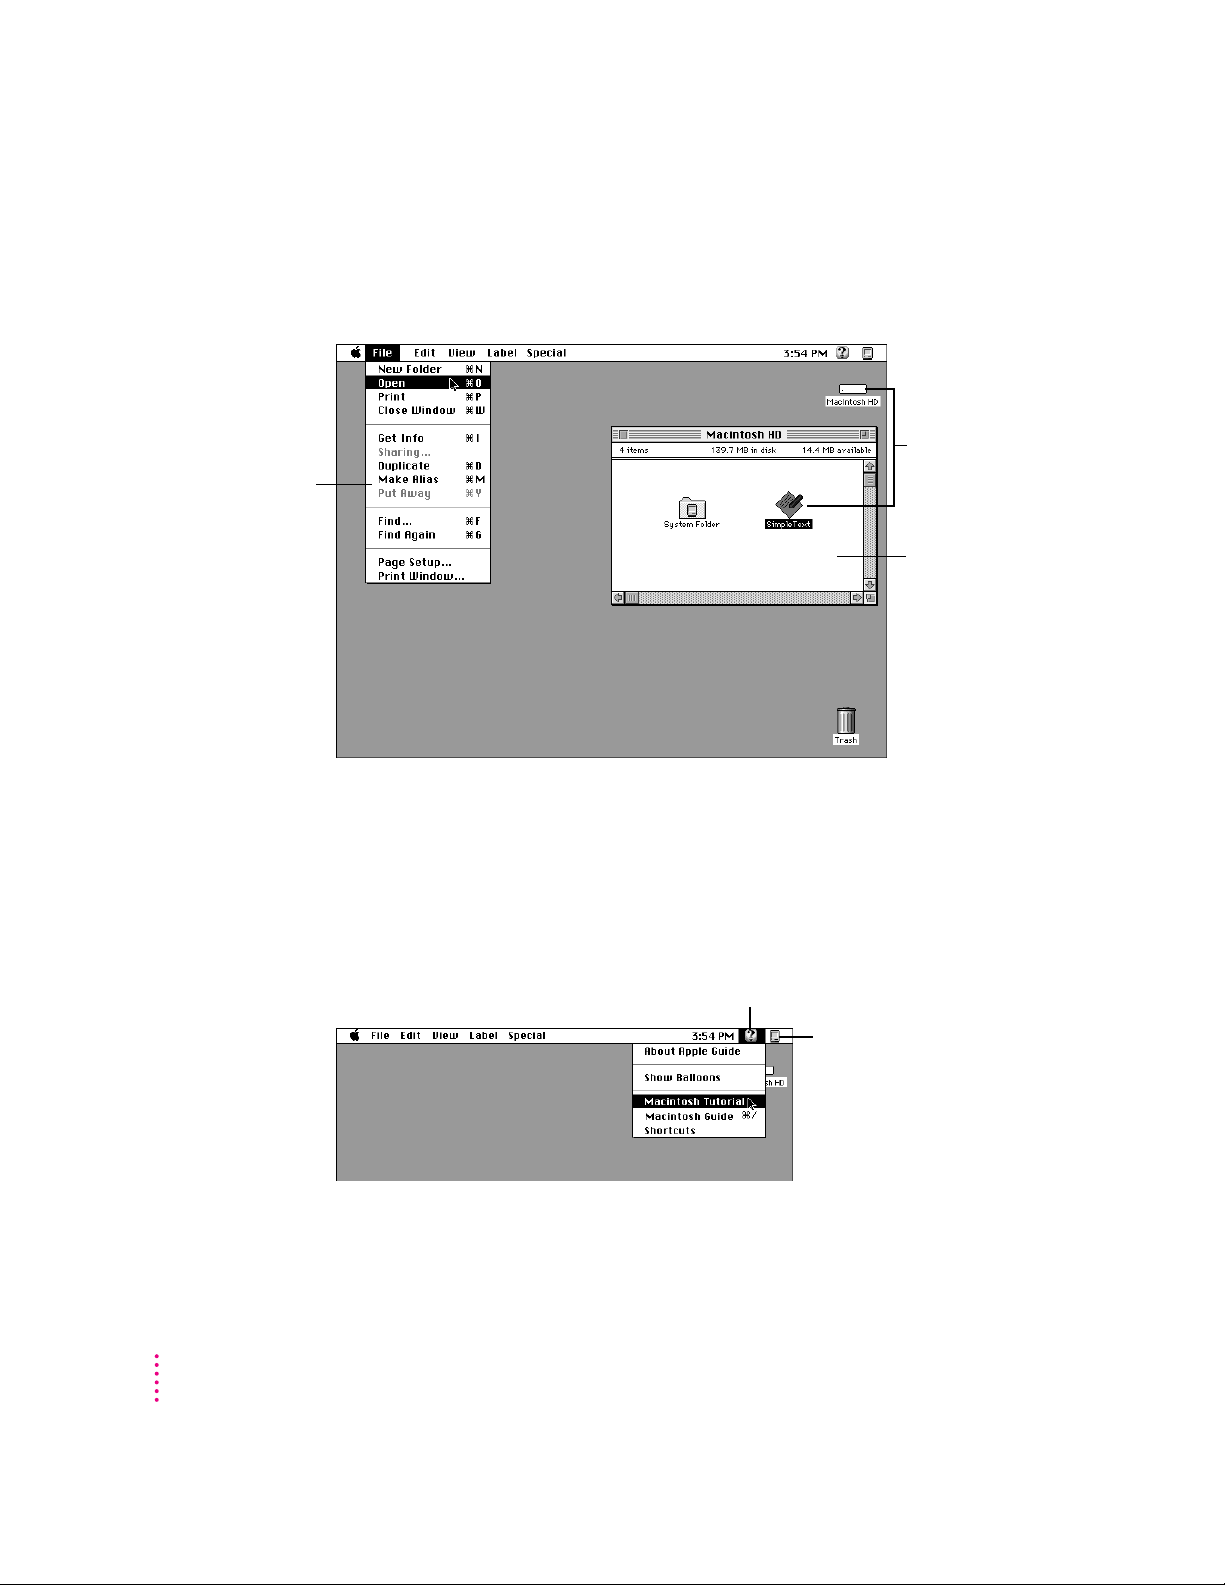
The strip across the top of the screen is called the menu bar. The symbols and
words in it represent menus of commands. To open a menu, place the pointer
on the symbol or word for the menu and press the mouse button.
Guide menu
To find an answer to a question,
h
look in the Guide (
) menu.
Application menu
You can have several
application programs open at
once. To see which program is
active or to switch from one
program to another, use this
menu (called the Application
menu).
Page 27
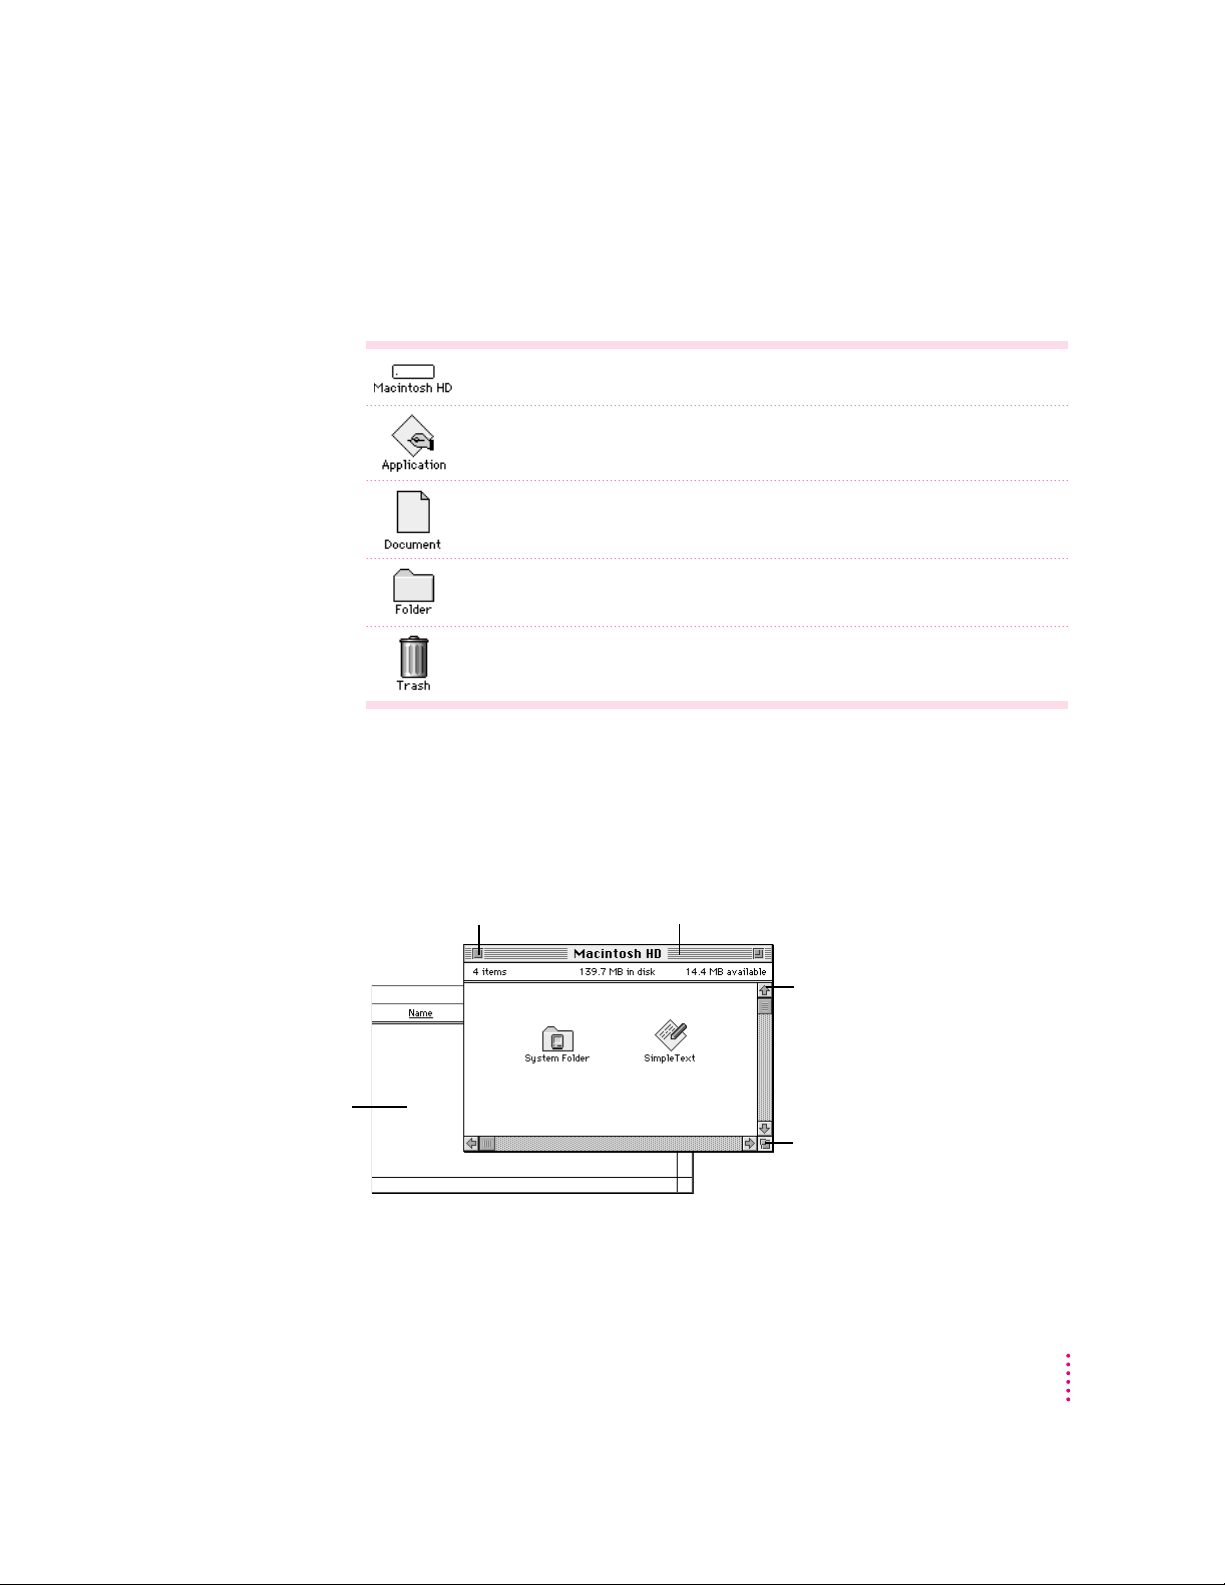
Icons
Icons are small pictures that represent disks, programs, documents, and
folders. You can double-click any icon to open it and see what it contains.
This icon represents your computer’s internal hard disk.
Icons like this one represent application programs, which you use to create
documents and do other work.
Icons like this one represent documents, which you can create and edit.
Icons like this represent folders. A folder contains other icons.
To throw away an item you no longer want, drag it to the Trash icon and choose
Empty Trash from the Special menu.
Windows
Windows are boxes that display text, graphics, or icons. To change the shape
or position of a window, or to close the window, use the elements shown here.
To bring a partially
covered window
to the front, click
anywhere in it.
Close box
To close a window,
click the close box.
Title bar
To move a window, drag it by the middle of the title
bar (anywhere in the bar except the small boxes).
Scroll arrow
To bring hidden portions
of a window’s contents into
view, click one of the four
scroll arrows.
Size box
To change the shape or size of
a window, drag the size box.
Getting Started
17
Page 28

Turning the computer off
To turn your computer off, you choose Shut Down from the Special menu.
Detailed instructions follow.
1Move the tip of the arrow (8) to the word “Special” at the top center of the screen.
If the word “Special” does not appear at the top of the screen, you’re working
in the wrong program. Pull down the Application menu (to the right of the
Guide [h] menu) and choose Finder. Then try step 1 again.
2With the tip of the arrow on the word “Special,” press and hold down the mouse button.
3While holding down the mouse button, move the arrow down until the words “Shut
Down” are highlighted, then release the mouse button.
18
Chapter 1
Choosing Shut Down readies the hard disk for a fast restart next time you turn
on the computer. It also prompts you to save any unsaved work on a disk
before turning the power off.
To t ur n th e co mputer on again, just press the Power key on the keyboard.
IMPORTANT
The power button on the front of the computer should not be
used to turn off your computer unless there is a problem that prevents it from
being turned off with the Shut Down command. (You could lose unsaved
work.) To make sure your work is saved, use the Shut Down command.
Page 29
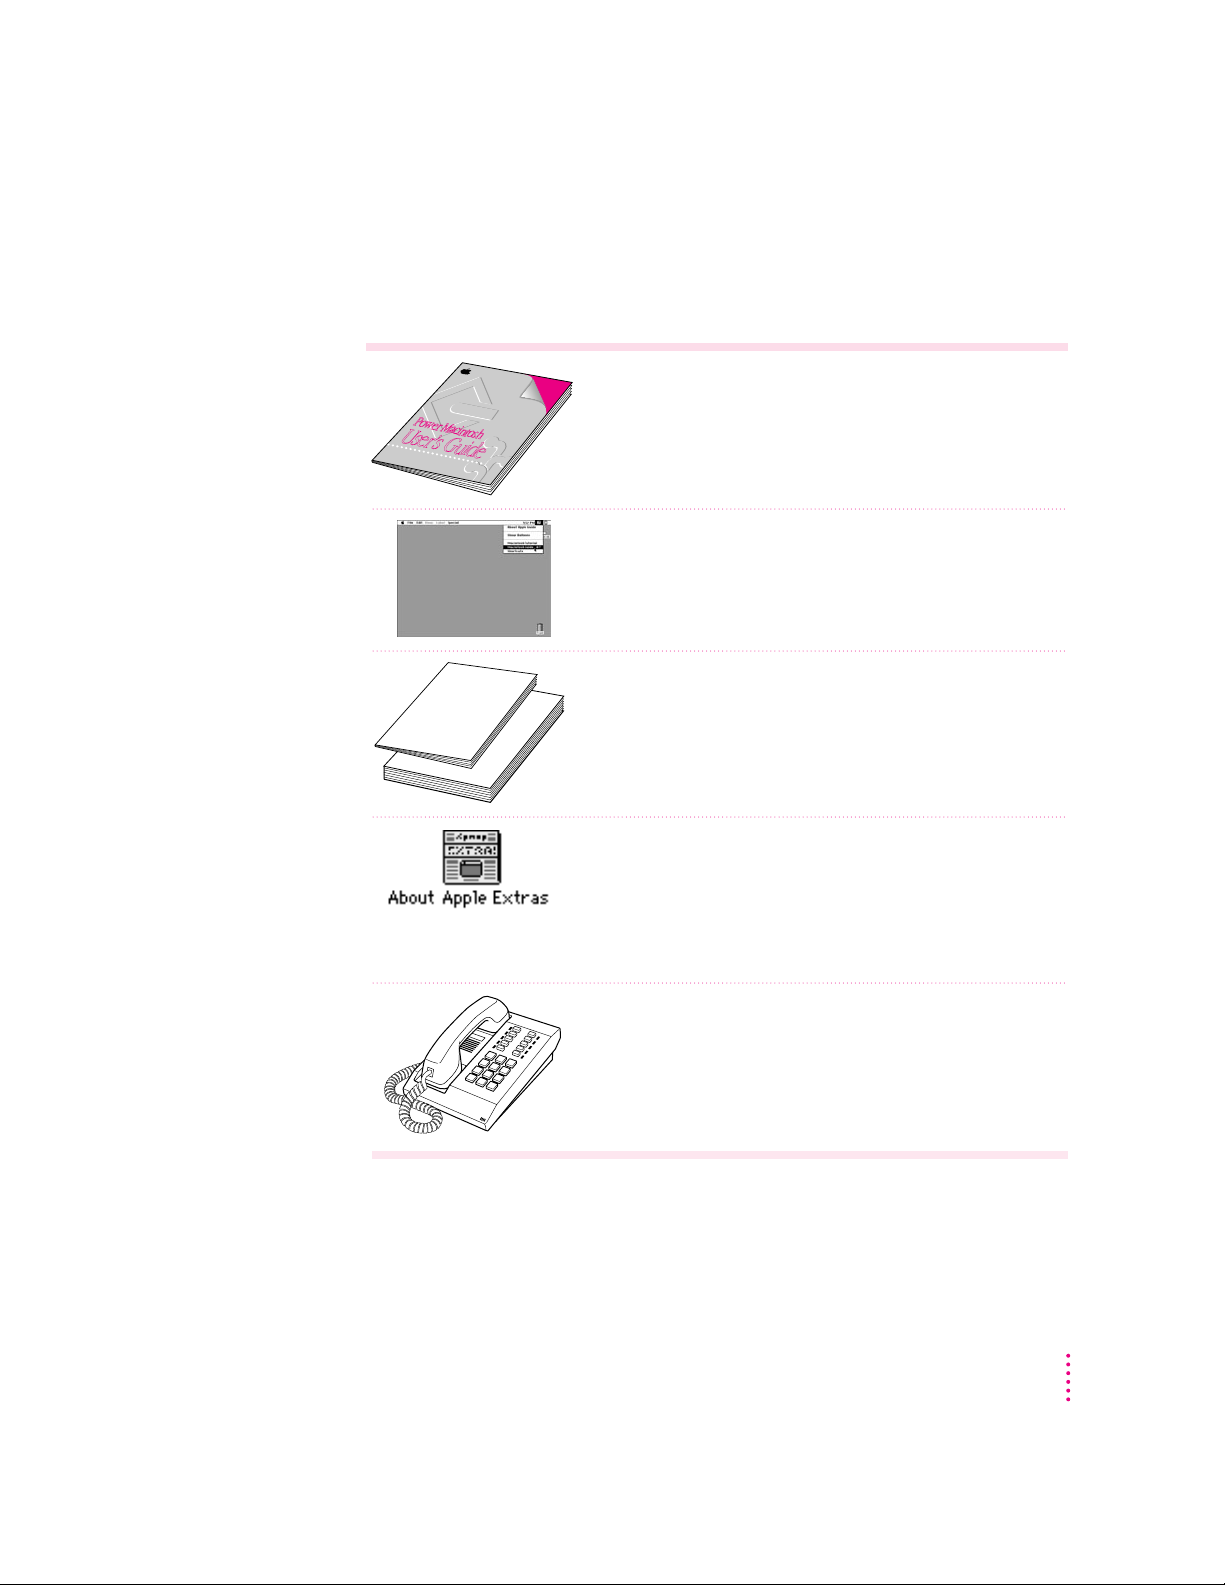
Where to find answers
When you have questions about using your Macintosh, there are several
places you can look for answers.
In this book
Power Macintosh
User’s Guide
Use this book to help you set up your computer and learn about it,
or to find solutions to problems with your equipment.
In the Guide menu
The Guide menu (marked with the hicon) is your main source
of information about the Macintosh. To learn how to get different
kinds of help from the Guide menu, see Chapter 2 in this book.
In other manuals
For answers to questions about other equipment or about
application programs you have purchased, see the manuals
that came with the equipment or programs.
In documents in the Apple Extras folder
The Apple Extras folder on your hard disk contains a SimpleText
document called About Apple Extras (often called a “Read Me” file)
with important information about some of the application programs
included with your computer. Read Me files can also be found
inside application folders.
From Apple’s customer support hotline
If you can’t find an answer in any of the materials provided, call the
customer support hotline. (The phone number for the hotline is in
the service and support information that came with your computer.)
If you have problems with a particular application program, contact the
manufacturer of the program.
Getting Started
19
Page 30

Page 31

Use the instructions in this
chapter to learn about the help
available to you in the Guide menu.
2
Getting Help
The Guide menu is your main source of information when you’re working
with your computer. The menu is identified by a question mark (h) in the
upper-right corner of the screen.
21
Page 32

Getting answers to your questions
When you have a question while working with your computer, you can get the
answer by choosing Macintosh Guide from the Guide menu.
1Pull down the Application menu (in the upper-right corner of the screen) and choose
Finder to make it the active application program.
A checkmark in the menu indicates that the Finder is the active program.
2Pull down the Guide menu (marked with the
h
icon) and choose Macintosh Guide.
The Macintosh Guide window appears.
Whenever you use Macintosh Guide, its window remains in front of other
windows. If the window gets in your way, you can move it by dragging its
title ba r (the gray bar across the top of the window).
22
Chapter 2
Page 33

3Notice the three buttons at the top of the window: Topics, Index, and Look For.
Macintosh Guide gives you three ways of finding information:
m
Topics
lets you choose from a list of general subjects; it is like the table of
contents in a book.
m
Index
lets you choose from an alphabetical list of more specific subjects; it
is like the index in a book.
m
Look For
lets you search for information related to a specific word or phrase
that you type.
In the following sections you will practice using each method.
If you have problems while using Macintosh Guide, see “Tips for Using
Macintosh Guide” at the end of this section.
Getting answers with the Topics button
1 In the Macintosh Guide window, click the Topics button.
A list of general topics appears on the left side of the Macintosh Guide
window. (Depending on the hardware and software you have, the list of topics
may look different.)
Getting Help
23
Page 34

2Click “Customizing Your Computer” or “Setting Options” (whichever is available) in the
list of topics.
When you click any topic area, a list of related questions appears on the right
side of the Macintosh Guide window.
To get instructions,
click a question…
…and then click OK.
3Click the question “How do I set the time and date?” and then click OK. Or double-click
the question.
A small window appears with instructions for you to follow.
24
If you want to
return to the main
Macintosh Guide
window, click this
Topics button. (On
some computers, it
says “Topics.”)
4 Read and follow the instructions in this window.
5When you have completed all the steps, click the Topics (or
Chapter 2
Click here to see the next
step (if there is one).
Macintosh Guide provides step-by-step instructions to answer the question
you selected. When you have completed each step, click the right arrow in the
lower-right corner to see the next step.
h
) button in the lower-left
corner to return to the main Macintosh Guide window.
Now continue with the next section.
Page 35

Getting answers with the Index button
1 In the Macintosh Guide window, click the Index button.
An alphabetical list of subjects appears on the left side of the window.
Slider
Scroll bar
2Scroll through the alphabetical list until the phrase “background pattern” is visible.
You can scroll through the list either by dragging the slider to the letter B or
by using the scroll bar at the right of the list.
3Click the phrase “background pattern” in the alphabetical list.
When you click any index entry, a list of related questions appears on the
right side of the Macintosh Guide window.
To get instructions,
click a question…
…and then click OK.
Getting Help
25
Page 36

4Click the question “How do I change the background pattern?” and then click OK. Or
If you want to
return to the main
Macintosh Guide
window, click this
Topics button. (On
some computers, it
says “Topics.”)
5 Read and follow the instructions in the window.
double-click the question.
A small window appears with instructions for you to follow.
Click here to see the next
step (if there is one).
Macintosh Guide provides step-by-step instructions to answer the question
you selected. When you have completed each step, click the right arrow in the
lower-right corner to see the next step.
6When you have completed all the steps, click the Topics (or
h
) button in the lower-left
corner to return to the main Macintosh Guide window.
Now continue with the next section.
26
Chapter 2
Page 37

Getting answers with the Look For button
1 In the Macintosh Guide window, click the Look For button.
A small box appears on the left side of the window, where you can type text.
To activate the text
box, click here.
Type a word or phrase
in the text box…
…and then click here.
2Click the arrow button to activate the text box.
3Type “trash” in the text box and then click Search.
When you click Search, a list of questions related to the word or phrase you
typed appears on the right side of the Macintosh Guide window.
To get instructions,
click a question…
…and then click OK.
Getting Help
27
Page 38

4Click the question “How do I turn off the Empty Trash warning?” and then click OK. Or
If you want to close
Macintosh Guide,
click here.
5 Read and follow the instructions in the window.
6When you have completed all the steps, click the close box in the upper-left corner to
double-click the question.
A small window appears with instructions for you to follow.
Click here to see the next
step (if there is one).
Macintosh Guide provides step-by-step instructions to answer the question
you selected. When you have completed each step, click the right arrow in the
lower-right corner to display the next step.
close Macintosh Guide.
28
Chapter 2
Page 39

Tips for using Macintosh Guide
Here are a few tips for using Macintosh Guide effectively:
m Macintosh Guide is available only when you are in the Finder—the
desktop area where you can see the icons of disks, folders, and files.
(Other programs may also have help available in the Guide menu,
however.) If you don’t see Macintosh Guide in the Guide menu, pull
down the Application menu (to the right of the Guide menu) and
choose Finder.
m Foll o w the steps when you’re instructed to; don’t skip ahead or read
ahead. That way the computer can check to make sure you’ve done a
step correctly.
m Unlike most windows, the Macintosh Guide window stays in front of
other windows on the screen so that your instructions are never
covered. If you need to move the Guide window out of the way, drag
it by the title bar at the top of the window.
You can also move the window out of the way by clicking the zoom
box. Click the box once to shrink the window; click it a second time
to expand the window to its original size.
m If you need more information about an instruction or a term, click the
button labeled “Huh?” to get further explanation. (The “Huh?” button
is dimmed when no additional information is available.)
m If you want to return to the main Macintosh Guide window, click the
Topics button in the lower-left corner of the Guide window.
m When you’re finished using Macintosh Guide, click the close box in
the upper-left corner of the window.
Close box
Topics button
Title bar
Zoom box
Right arrow
“Huh?” button
Getting Help
29
Page 40

Identifying objects on the screen
Sometimes you’ll see an unfamiliar item on the screen and ask yourself,
“What’s that?” You can get an answer by using a Macintosh feature known as
Balloon Help.
Balloon Help explains the function of icons, menus, commands, and other
items on the Macintosh screen in balloons like those you see in comic strips.
Follow these steps to use Balloon Help:
1Pull down the Guide menu (marked with the
2Point to any object on the screen that you want to identify.
h
icon) and choose Show Balloons.
A balloon appears next to the object. In the following illustration, for
example, pointing to the Trash displays a balloon that explains how to use the
Trash to throw items away.
Although balloons appear next to items when you point to them, the way
you work does not change; you can still select icons, choose commands, and
so on.
30
3When you’re finished using Balloon Help, choose Hide Balloons from the Guide menu.
Chapter 2
Page 41

Learning useful shortcuts
You can perform many tasks in the Finder more quickly if you use keyboard
or mouse shortcuts. For example, instead of clicking an icon and choosing
Open from the File menu, you can simply double-click the icon to open it.
Foll o w the se s teps to learn keyboard and mouse shortcuts:
1Pull down the Guide menu (marked with the
2Click one of the category buttons.
If you want to
close the window,
click here.
h
icon) and choose Shortcuts.
The main Macintosh Shortcuts window appears.
Another window appears, describing shortcuts for that category.
Click the Topics
button to return to the
main Macintosh
Shortcuts window for
more categories.
Click here to see the next
window (if there is one).
Getting Help
31
Page 42

3 Read about the shortcuts available for the category you selected.
Click the right arrow in the lower-right corner of the window to display the
next window (if there is one).
4When you finish reading about the shortcuts for your category, click the Topics button in
the lower-left corner to return to the main Macintosh Shortcuts window. Or click the
close box in the upper-left corner to close the window.
32
Chapter 2
Page 43

Read this chapter for information on
expanding your computer system
with additional hardware.
3
Con nect ing Additional Equipment
Your computer at a glance
The illustration on the next page shows a basic Power Macintosh 9500
system, ready to use. (Remember that your monitor and keyboard may appear
slightly different from the ones pictured here, depending on what you
purchased.)
You can also expand your computer system by connecting other equipment to
it. The illustration on the facing page shows where equipment should be
connected to your Macintosh.
For instructions on connecting audio equipment or SCSI devices, refer to the
next two sections of this chapter. For instructions on connecting other
equipment, such as a CD-ROM player (also called a CD-ROM drive), see the
manual that came with the equipment.
IMPORTANT
and does not exceed the maximum power allowance for that device. If it is a
SCSI or ADB device, make sure to turn off your computer before connecting
the device. For further information, consult your Apple-authorized dealer, the
manufacturer of the component you want to add, or the Tec h n i c a l In fo r m a t i o n
booklet that came with your computer.
Make sure each device you add is compatible with your computer
33
Page 44

CD-ROM drive
(optional)
CD-ROM drive
Open/Close button
Floppy disk drive
Hard disk drive
(internal)
Power-on light
A green light
indicates that the
computer is on.
Microphone
(optional)
Monitor
Power key
P
Use this key
to turn your
computer
on and off.
Power button
Keyboard Mouse
Your computer’s ports and connectors
g
SCSI port
Ethernet port (AAUI)
Ethernet port (10BASE-T)
Modem port (GeoPort)
Printer port (GeoPort)
Monitor port
Connects your Macintosh to SCSI equipment such as external
hard disk drives and scanners.
G
Connects your Macintosh to a high-speed Ethernet network
using an adapter.
G
Connects your Macintosh to a high-speed 10BASE-T Ethernet
network.
W
Connects an external modem or GeoPort Adapter to your
Macintosh.
[
Connects your Macintosh to a printer, LocalTalk network, or
GeoPort Adapter.
™
Connects a monitor to a monitor (video) card.
34
Chapter 3
Page 45

≤
Power socket
g
G
Ethernet port (AAUI)
G
Ethernet port (10BASE-T)
Modem port (GeoPort)
W
Printer port (GeoPort)
[
SCSI port
Monitor power socket
Apple Desktop Bus (ADB) port
V
Sound input port
≈
-
Sound output port
Access covers for
expansion slots (6)
Monitor port (optional)
™
Apple Desktop Bus
(ADB) port keyboard or a trackball.
Sound input port
Sound output port
Access covers for Your Macintosh supports up to six Peripheral Component
expansion slots (6) Interconnect (PCI) cards.
Security lock ports
V
Connects your Macintosh to an input device, such as a
≈
Connects your Macintosh to an Apple PlainTalk Microphone
or other audio input equipment.
-
Connects your Macintosh to headphones, externally
powered (amplified) speakers, or other audio output
equipment.
F
You can attach a security lock to your Macintosh. See your
computer products retailer for security lock devices that
work with your computer.
Security lock ports
F
Connecting Additional Equipment
35
Page 46

Connecting audio equipment
Your Macintosh can play and record stereo sound from a variety of sources.
You can listen to or reproduce stereo sound by connecting audio equipment to
the sound input and output ports on the computer. If you have an internal
CD-ROM player, you can also use your computer to play and record sound
from audio compact discs (CDs).
For information on using Macintosh system software to choose audio input
and output options, record an alert sound, or play audio CDs, see the “Sound”
topic of Macintosh Guide, available in the Guide (h) menu.
About your computer’s sound ports
The sound input port is marked with an icon of a microphone. The sound
output port is marked with an icon of a speaker.
Sound input port
36
Sound output port
Chapter 3
Page 47

The computer’s sound ports accept these 3.5 mm audio connectors:
Extended miniplugStereo miniplug
The stereo miniplug is found most often on stereo equipment (for example,
personal headphones). The extended miniplug is slightly longer and is
found on voice-quality microphones (for example, the Apple PlainTalk
Microphone). If your equipment has a different type of connector, you can
purchase an adapter at an electronics supply store.
Connecting audio equipme nt
To play or record sound with your Macintosh, you can attach a microphone,
amplifier, tape recorder, or a pair of speakers.
For specific instructions on connecting a microphone, skip to the next
section, “Connecting and Positioning a Microphone.” For specific instructions
on connecting speakers, see “Connecting External Stereo Speakers,” later in
this se ction.
Foll o w the se steps to connect audio equipment to the Macintosh:
1Make sure that the audio equipment has a cable with a stereo miniplug connector.
If it does not, attach an adapter that has a stereo miniplug.
2Place the audio equipment near the Macintosh.
3Shut down the Macintosh and turn off the audio equipment.
4Attach the cable to the audio equipment and to the appropriate sound port on the
Macintosh.
To record incoming sound on the computer, connect the audio equipment to
the sound input por t (X).
To record the sound produced by the computer or play that sound through
external speakers, connect the audio equipment to the sound output port (-).
5 Turn on the computer and the audio equipment.
Connecting Additional Equipment
37
Page 48

Yo u’re now ready to begin listening to and working with sound. For more
information on working with sound, see the “Sound” topic of Macintosh
Guide, available in the Guide (h)menu.
Connecting and p ositioning a microphone
With appropriate software, you can use the Apple PlainTalk Microphone that
comes with some Macintosh computers (or a compatible line-level
microphone) to record your voice or other sounds.
Apple PlainTalk Microphone
You can’t use the round, omnidirectional microphone supplied with some
other Macintosh models.
Follow these steps to connect and position the microphone:
1Shut down the Macintosh.
38
2Plug the microphone’s connector into the sound input port (X) on the back of the
computer.
3Place the microphone at the top center of the monitor, so that the microphone’s
Apple (K) icon is facing you.
Chapter 3
Page 49

If you can’t place the microphone on top of the monitor, position the
microphone according to these guidelines:
m The microphone should be between 1 and 3 feet away from you.
m The microphone should be directly in front of you to minimize the
effect of background noises.
4 Turn on the computer.
Yo u’re now ready to begin using your microphone.
Connecting external ster eo speakers
You can take advantage of your computer’s stereo sound output by attaching
externally powered (amplified) speakers.
1 Assemble the speakers and the cable you need.
You need a cable with a stereo miniplug at one end to connect one or both
speakers to the computer. (Some speakers require a dual-plug adapter.
Others, like those shown in the next illustration, accept a single stereo
miniplug a nd are join ed by standard speaker wires.) See the documentation
that came with your speakers for more information.
2 Turn off the Macintosh.
3Plug a stereo miniplug into the sound output port (-) on the Macintosh.
4Connect the speakers together with speaker wires, if necessary.
Your finished connections should look something like this:
-
Sound
output
port
Externally
powered
speakers
Audio In port
Connecting Additional Equipment
39
Page 50

5Turn on the computer.
Now you hear the computer’s sound through the external speakers.
Note: To control the volume of your external speakers, open the Sound
control panel and choose Volumes in the pop-up menu. Use the Built-in
Headphones slider to adjust the volume for your external speakers. If you are
playing an audio CD, you may also need to adjust the volume control in the
program you’re using to play CDs.
Connecting external SCSI devices
Your computer has a port for connecting devices that use the Small Computer
System Interface (SCSI, pronounced “skuh-zee”). The SCSI port permits
high-speed communication between the computer and the device. The SCSI
icon appears above the port on the computer’s back panel.
SCSI icon
SCSI port
40
You can connect SCSI devices to the SCSI port in a chain. The first device in
the chain plugs into the SCSI port; the second device plugs into the first
device, and so on. SCSI devices commonly used with the Macintosh include
hard disk drives, CD-ROM players, scanners, printers, and tape or cartridge
backup drives. You can attach up to seven SCSI devices to the external SCSI
port of your computer.
Note: In addition to the external SCSI port, your computer has a second,
internal SCSI interface. The internal hard disk drive that came with the
computer and the optional CD-ROM player are connected to this internal
SCSI interface. You can have an Apple-authorized dealer attach an additional
device to the internal SCSI interface. For more information about the SCSI
interfaces, see the Tec h n i c a l In fo r m a t i o n booklet that came with your
computer.
Chapter 3
Page 51

IMPORTANT
“Before You Connect a Device” and “Connecting a SCSI Device”
contain general instructions for attaching SCSI devices to your computer. Be
sure also to follow the specific instructions that came with your external hard
disk drive or other SCSI device when connecting the device to your
Macintosh.
Before you connect a device
Before you connect a SCSI device to your Macintosh, be sure to complete
these t asks:
m Install any necessary device drivers (software that makes a device work
with your computer). Drivers needed for a SCSI device usually come on a
floppy disk with the device. (If no drivers come with the device, then the
device doesn’t need drivers.) Be sure the drivers are designed for Power
Macintosh.
m Make sure each SCSI device connected to your Macintosh has its own,
unique ID number from 0 to 6 (or from 1 to 6 if you have a second internal
hard disk installed). See the instructions that came with each SCSI device
for information on checking and setting its SCSI ID number.
IMPORTANT
If you use two or more devices with the same ID number, your
equipment could malfunction and you could lose data as a result.
m Make sure you have the appropriate cable for attaching the SCSI device to
your Macintosh.
If the device is the first or only one you’re connecting, use a SCSI system
cable to connect it to the computer’s SCSI port.
Connecting Additional Equipment
41
Page 52

If the device is not the first one, use a SCSI peripheral interface cable to
connect it to the last device in the chain.
IMPORTANT
The total length of the cables in a SCSI chain should not exceed
6 meters (20 feet). SCSI cables must have a 110-ohm impedance. For best
results, use SCSI cables manufactured by Apple Computer.
m Make sure that the last (or only) device in the SCSI chain has a terminator.
Make sure that no other external SCSI device has a terminator.
To ensure accurate transmission of information, a terminator must be at
each end of a SCSI chain.
Some external SCSI devices from manufacturers other than Apple have
built-in terminators. (Check the information that came with the device.) If
the device at the end of the SCSI chain does not have a built-in termi nator,
you need to attach an external terminator.
SCSI terminator
If your SCSI device has a built-in terminator, you may choose to use it as
your first or last device in the chain, or you may have your Apple-authorized
service provider remove any extra built-in terminators. You can attach or
remove external terminators yourself.
42
Chapter 3
Page 53

Connecting a SCSI device
Use th e se general instructions in conjunction with the instructions that came
with your SCSI device:
1 Turn off your Macintosh.
2Make sure the SCSI device is switched off.
WARNING
Do not connect or disconnect any device while the device or
your Macintosh is turned on. Doing so could damage the device, your
computer, or both.
3 Use a SCSI cable to connect the device either to the computer’s SCSI port or to the last
SCSI device already in the chain.
4 Turn on the devices in your SCSI chain.
IMPORTANT
Always turn on any external SCSI devices connected to your
Macintosh before turning on the computer itself. Otherwise, your computer
won’t b e able to recognize that the SCSI devices are connected to it and your
computer may not be able to start.
Note: If you experience problems after connecting a SCSI device, see the
troubleshooting information in Chapter 6 for possible solutions.
Connecting Additional Equipment
43
Page 54

Expanding memory
The dynamic random-access memory (DRAM) in your computer can be
expanded. Installing additional DRAM adds more memory to your computer
and expands its capabilities. The Tec h n i c a l In for m at i o n booklet that came with
your computer describes how much additional memory can be installed in
your Power Macintosh.
Memory for your computer is provided in packages called DRAM Dual Inline
Memory Modules (DIMMs). The DIMMs must be the correct type for your
computer.
The memory used to display images on the screen (called video RAM, or
VRAM) can also be expanded.
WARNING
only an Apple-certified technician install additional DRAM. Consult the
service and support information that came with your computer for
instructions on how to contact an Apple-authorized service provider or
Apple for service. If you attempt to install additional DRAM yourself,
any damage you may cause to your equipment will not be covered by
the limited warranty on your computer. See an Apple-authorized dealer
or service provider for additional information about this or any other
warranty question.
It is very important that the DRAM DIMMs be correctly installed in your
Power Macintosh, because incorrect installation can result in errors,
unpredictable results, and damage to your equipment and data.
Installing internal drives
Your Macintosh can hold up to four internal storage devices. Possible
configurations could include a floppy disk drive, a CD-ROM player, and two
hard disk drives (several capacities are available) or a CD-ROM player, a
floppy disk drive, a removable hard drive, and a DAT drive. Depending on the
configuration you purchased, these storage devices may already be installed.
If you want to add an internal drive to your Macintosh, see your Appleauthorized dealer. Refer to the Tech n i cal In fo r m ation booklet that came with
your Macintosh for more information about internal drives.
To avoid damage to your computer, Apple recommends that
44
Chapter 3
Page 55

Connectin g network cables
Your Macintosh can be connected to a high-speed Ethern et n etwork via an
AAUI Ethernet connector or a high-speed 10BASE-T Ethernet connector. You
can also connect to a LocalTalk network.
It is possible to be physically connected to more than one kind of network at
the same time, but you can use only one of your connections at a time. If both
10BASE-T a nd AAUI networks are connected, your Macintosh automatically
uses the 10BASE-T connection. If 10BASE-T a nd LocalTalk are connected,
your Macintosh uses the 10BASE-T connection. If AAUI and LocalTalk are
connected, your Macintosh uses the AAUI connection.
About Macintosh networking
Your Power Macintosh can connect to a network that consists of as few as two
computers or as many as thousands or even millions of computers and other
devices. The network allows you and the other people connected to it to share
information, access remote services, and share computing resources such as
printers and modems.
A network extends the features of your Macintosh by extending your reach to
the services and resources provided on the network. For example, your
computer alone lets you store, retrieve, and modify information on floppy
disks, hard disks, and CD-ROM discs. On a network, however, you can also
store and retrieve information on the hard disks and CD-ROM discs of other
computers, access information that other people have stored for you, or use
mail or other network services.
Your computer comes equipped with two built-in network interfaces:
LocalTalk and Ethernet. You can also purchase additional Peripheral
Component Interconnect (PCI) cards for alternative networks such as
TokenRing, ISDN, or FDDI.
To connect your computer to a network you need to do two things: connect
your computer to the network using the appropriate cable, and set up your
network configuration in the AppleTalk control panel, the TCP/IP control
panel, or both.
Connecting Additional Equipment
45
Page 56

To set up your network configuration, open the AppleTal k control panel to
choose the physical network interface you are using. (The AppleTalk control
panel also contains zone information—a default zone is chosen for you.) If
you plan to use TCP/IP on your Power Macintosh, you also need to choose
settings in the TCP/IP control panel.You can set up your connection in two
ways: manually, by entering a static Internet address, or automatically by
using a network service to connect with a dynamic Internet address. Refer to
the “Networks” or “Networking & Communications” topic of Macintosh
Guide, available in the Guide (h) menu for more information on setting up
network configurations.
If you’re using a static Internet address, you’ll need the following information
before configuring your system (your network administrator or Internet
access provider can provide this information):
Internet (IP) address:
m
m
Domain name and domain name server address:
for example, 192.3.232.55
A domain connects an Inter net
address to a name for your site, for example, acme.com. Enter your Domain
name or type a period (.).
Gateway address:
m
This address provides the path the information will take
through the network at your site to reach the Internet.
m
Subnet mask:
A subnet mask further defines the location of your machine.
You don’t need to change the default unless instructed to do so by your
network administrator.
If you’re using a server on the network that will be issuing you an Intern et
address using a technique called bootstrapping, then you need to decide what
protocol you will use: BOOTP (BOOTstrap Protocol), or DHCP (Dynamic
Host Configuration Protocol). Your n etwork administrator will tell you which
to choose.
If you see an error message after configuring your AppleTalk and TCP/IP
control panels, such as, “Unable to locate host,” or “Could not create a
socke t,” this co u ld indicate a problem in the TCP/IP configuration. Contact
your network administrator for additional assistance.
46
Chapter 3
Page 57

Read this chapter for information on
installing and working with application
programs on your computer.
4
Installing and Using Application Programs
Your computer has several application programs already installed, as well as
some programs that need to be installed before you can use them. The
programs that come with your computer include
m AppleScript, which allows you to automate any actions you perform
repeatedly on your Macintosh
m Drive Setup, which enables you to initialize, test, and update hard disks and
other storage media. Drive Setup lets you partition very large disks (up to 2
terabytes)
m PowerTalk, which provides built-in mail and collaboration services
m QuickDraw GX, which gives your computer more powerful printing and
typographical capabilities
m Text-to-speech software that allows your Macintosh to speak typed text in
compatible applications such as SimpleText
Yo u’ ll find most of these plus other programs in the Apple Extras folder on
your hard disk. (Drive Setup is in the Utilities folder.) To find out if a program
needs to be installed, look inside the program’s folder for an icon labeled
Installer. If you find an Installer icon and want to use that program, doubleclick the I n staller and follow the instructions on the screen.
47
Page 58

IMPORTANT
If your computer did not come with a CD-ROM player and you
did not get the CD-ROM disc that contains system software, be sure to make a
backup copy of the programs in the Apple Extras folder. Backup copies allow
you to restore your software if anything should go wrong. It is always a good
idea to make backup copies of application programs and other software.
Installing application programs
Yo u’ ll probably want to buy and install additional programs. See the manuals
you receive with your programs for instructions on installing and using them.
In most cases, you’ll install an application program on your internal hard disk
from a CD-ROM disc that contains the program. The illustration shows how
to insert a CD-ROM disc into your computer’s disk drive, with the disc lying
flat, label side up.
48
For instructions on how to eject CD-ROM discs, see “Ejecting a CD-ROM
Disc” in Chapter 5. Some application programs come on floppy disks. See the
“Disks” topic of Macintosh Guide, available in the Guide (h) menu for
information on inserting and ejecting floppy disks.
Chapter 4
Page 59

To use your programs most effectively, follow these guidelines:
m To avoid installation problems, turn off virus protection programs and use
Apple Extensions Manager to turn off system extensions (except for
Macintosh Easy Open) before you install any software. To start Apple
Extensions Manager, restart your computer while holding down the space
bar. Use Apple Extensions Manager to turn off all system extensions except
Macintosh Easy Open (this extension is needed to rebuild the desktop
correctly). To turn extensions back on, use Apple Extensions Manager to
turn them on, then restart your computer.
m Put only one copy of each program on your hard disk. Having more than
one copy can cause errors.
m Whenever you copy a program disk to your hard disk, be careful not to
copy a System Folder. Always check to see what you’ve copied, and drag
any extra System Folders to the Trash.
m If a program malfunctions consistently, try installing a fresh copy. If that
doesn’t help, find out from the software ma nufacturer whether your version
of the program is compatible with the hardware and system software you’re
using.
Working with several programs at a time
You can open as many application programs and desk accessories as your
computer’s memory allows.
All open programs are listed in the Application menu at the right end of the
menu bar. The name of the active program (the one you’re using right now)
has a checkmark next to it, and its icon appears in the menu bar.
The Finder icon
Commands to hide or
display open windows
A checkmark
indicates the active
program.
Open programs
Installing and Using Application Programs
49
Page 60

Finding out which programs are open
If you have several programs and windows open, you can find out which
program is active and which other programs are open by pulling down the
Application menu.
Switching programs
You can switch to another open program or desk accessory by choosing its
name from the Application menu.
If a program’s icon is dimmed in the menu, that means its windows are
hidden. Choosing the program from the Application menu displays its
windows.
You can also switch to another program by clicking in a window that belongs
to an op en program, by double-clicking a program icon, or by double-clicking
the icon of a document that was created with the program.
Hiding and showing windows on the desktop
You can hide all windows except those of the active program by choosing
Hide Others from the Application menu.
50
The other programs remain open even though their windows are hidden.
When you switch to another program, its windows become visible again.
If you want to see all the open windows, choose Show All from the
Application menu.
Chapter 4
Page 61

Backing up your files
Making backup copies of important files is good protection against possible
damage to the originals.
m You can back up files stored on your hard disk by copying them to floppy
disks.
m You can back up an entire floppy disk by copying it to another floppy disk
of the same capacity or larger, or by copying it to a hard disk.
m You can use a commercial backup program to copy new and changed files
from a hard disk to another hard disk, to a tape drive, or to a series of
floppy disks.
m If your computer is on a network, you may be able to back up files by
copyi ng t hem to a shared disk on the network.
Using Power Macintosh application progr am s
Your Power Macintosh is compatible with most application programs
intended for use with Macintosh computers. But certain programs are
designed especially for Power Macintosh computers. (These are sometimes
called “native” applications.) You’ll find that these programs take best
advantage of your computer’s speed.
Special me mory requirements
Some Power Macintosh programs may be slightly larger than other programs
and may take up more memory. If you find that you are running out of
memory when you use your Power Macintosh programs, you can use space
on your computer’s hard disk as additional memory. For instructions on how
to use hard disk space as memory, see the “Memory” topic of Macintosh
Guide, available in the Guide (h) menu.
You can also have more memory added to your computer, as described in
“Expanding Memory” in Chapter 3.
Installing and Using Application Programs
51
Page 62

Shared libraries
Power Macintosh programs use special files called shared libraries. These files
help Power Macintosh programs to run more efficiently, and can be used by
more than one Power Macintosh program simultaneously. Any necessary
shared libraries are installed automatically in the System Folder when you
install Power Macintosh programs.
If a Power Macintosh program requires a shared library and there is not
enough memory available for the shared library, you’ll see a message that
the program could not be opened because of insufficient system memory. If
this happ ens, see the “Memory” topic of Macintosh Guide, available in the
Guide (h) menu, for instructions on turning on virtual memory.
If a required shared library is missing, you’ll see a message that the program
could not be opened because the shared library could not be found. If this
happens, follow the directions that came with your program to reinstall the
program. If the shared library is still missing, contact the program’s
manufacturer for assistance.
52
Chapter 4
Page 63

Read this chapter for information on
using the internal CD-ROM player,
if your computer has one.
5
Using the Optional CD-ROM Player
This chapter provides information on the optional CD-ROM player. Refer to
Appendix A, “Health, Safety, and Maintenance Tips” for information on the
proper handling of these discs.
Your internal CD-ROM (Compact Disc Read-Only Memory) player for
Macintosh computers works with CD-ROM discs, standard audio compact
discs (CDs), and single-session or multisession Photo CDs. Your CD-ROM
player provides access to large amounts of information. However, you cannot
save information on CD-ROM discs. ROM stands for read-only memory,
meaning that the player cannot “write” information onto CD-ROM discs.
A wide selection of CD-ROM discs is available for entertainment, education,
and business. A typical disc can hold over 650 megabytes (MB) of
information—the equivalent of 270,000 pages of text, up to 8 hours
of speech or music (depending on the sound quality), hundreds of highresolution images, or any combination of text, sound, and graphics.
53
Page 64

Inserting a CD-ROM disc
Follow these instructions to insert a CD-ROM disc into your CD-ROM
player. Then follow the instructions provided with your disc, as well as the
instructions in this manual.
1 Start up your Macintosh computer, if it’s not already on.
2Press the Open/Close button to open the tray of the CD-ROM player.
The tray opens.
3Place a CD-ROM disc in the tray, with the disc label facing up.
Make sure the disc is lying flat and centered in the tray. If you are using a
small (8 cm) disc, make sure it is centered within the inside ring on the tray.
Open/Close button
54
4Push the tray in, or press the Open/Close button, to close the tray.
In a few moments, an icon for the CD-ROM disc appears on your screen.
Chapter 5
Page 65

Ejecting a CD-ROM disc
Foll o w the se instructions to open the tray and eject a CD-ROM disc from
your computer.
IMPORTANT
You may not be able to eject a disc if it is being shared. To turn
off file sharing, use the Sharing Setup control panel.
1 Open the tray.
There are several ways to open the tray of your CD-ROM player.
If a CD-ROM disc icon appears on your screen:
m Select the disc icon on your screen and drag the icon to the Trash.
m Click the disc icon, then choose the Put Away command in the File menu.
m While the AppleCD Audio Player window is active, choose Eject CD from
the File menu, or simultaneously press the x and E keys. (AppleCD Audio
Player is a program that allows you to control your CD-ROM player and is
available i n the Apple [K] menu.)
If no CD-ROM disc icon appears on your screen:
m Press the Open/Close button for your CD-ROM player.
2Take the CD-ROM disc out of the tray.
Store your disc in a safe place, away from heat, dust, and moisture.
3Push the tray in, or press the Open/Close button, to close the tray.
To avoid possible damage to the tray or the CD-ROM player, keep the tray
closed when you are not using it.
Using the Optional CD-ROM Player
55
Page 66

Playing audio CDs
With your CD-ROM player and your computer’s built-i n speaker, you can play
audio compact discs (CDs) or audio tracks on CD-ROM discs. You can also
attach headphones or speakers to the computer to listen to audio CDs and
audio tracks. See Chapter 3, “Connecting Additional Equipment,” for
information on connecting sound equipment to your computer.
To s tar t, stop, and otherwise control audio discs, use the AppleCD Audio
Player program, available in the Apple (K) menu. Your audio CD software
will only play tracks that contain audio information. You can listen to an
audio CD or audio tracks in the background while you do other work on
your computer. For more information about playing audio CDs, see the
“CD-ROM Discs” topic of Macintosh Guide, available in the Guide (h)
menu.
56
Chapter 5
Page 67

Working with Photo CDs
You can use your CD-ROM player to open Photo CD images stored on Photo
CDs. A Photo CD image is a digitized version of a standard photograph that
you can open and view on your computer screen.
You can do many things with the images on your Photo CDs:
m Open and view the images individually on your computer screen.
m View the images on your computer screen in a series, as you would view
a slide presentation.
m Copy and save the images, print them, paste them into word-processing
documents or other documents that accept graphics, and edit them with
a graphics application program.
Photo CD images are an excellent source of graphics for desktop
publishing, multimedia presentations, business documents, and
professional-quality graphic design. For more information on working with
Photo CD images, see the “CD-ROM Discs” topic of Macintosh Guide,
available i n the Guide (h) menu.
Using the Optional CD-ROM Player
57
Page 68

Sharing a CD-ROM disc over a network
You can share a CD-ROM disc using your computer’s file-sharing feature. If
the disc has audio portions, you will be able to hear the audio yourself, but
other people on the network will not. Likewise, you cannot hear the audio
portions of discs you access over a network.
For further information about file sharing, see the “Networks and
Teleco mmunications” or “Sharing Files” topic of Macintosh Guide, available
in the Guide (h) menu.
58
Chapter 5
Page 69

Chapter 6 Troublesho oting
part
II
Page 70

Page 71

Consult this chapter if you experience
problems using your computer.
6
Troubleshooti ng
Whe n you have questions
If you want to know how to do a particular task with your computer, refer to
Macintosh Guide in the Guide (h) menu. For instructions on using
Macintosh Guide, see Chapter 2 of this manual.
If you have trouble
While you’re using your computer, you may occasionally see a bomb icon
or an error message, or the pointer (8) may “freeze” on the screen. If you have
trouble with your computer, take a few minutes to read the information in this
chapter. If your problem is related to a particular procedure, you should also
look for information on that procedure in Macintosh Guide, available in the
Guide (h) menu. For additional troubleshooting information and a list of
common questions relating to your system software, see the “Troubleshooting”
topic of Macintosh Guide.
If you are unable to access Macintosh Guide (for example, if your screen
is “frozen”), refer to this chapter to see if you can resolve the problem.
61
Page 72

Take your time
When you see an error message, you don’t have to take action immediately.
The message stays on the screen until you click the OK (or Restart) button or
turn off the Macintosh.
To h elp diagnose and correct the problem, gather as much information on the
situation as you can. Then follow the instructions in the next section, “Start
Over.”
m Make a note of exactly what you were doing when the problem occurred.
Write down the message on the screen and its ID number (if any). Also list
the programs you were using and the names of any items you know have
been added to the System Folder since the system software was installed.
This information will help a service person diagnose the problem. (It is
helpful to keep a printed copy of the items in your System Folder. For
instructions on printing the contents of a folder, see the “Printing” or
“Printing & Fonts” topic of Macintosh Guide, available in the Guide [h]
menu.)
m Check the screen for any clues. Is a menu selected? What programs and
document icons are open? Note anything else that seems relevant.
m If you were typing text and were not able to save it before the problem
occurred, you can write down the parts of the text still visible on the
screen so that some of your work will be easy to replace.
62
m Ask other Macintosh users about the problem you’re having; they may have
a solution for it.
If you need repair service, consult the service and support information that
came with your computer for instructions on how to contact an Appleauthorized service provider or Apple for assistance.
If you know that the problem is with a particular application program, contact
the manufacturer of that software for assistance.
Chapter 6
Page 73

Start over
Often you can eliminate a problem simply by clearing the computer’s memory
and starting over.
If you can, save any open documents before restarting the Macintosh. If your
system is frozen and do es not respond to anything you do, or if you have a
“bomb” message on the screen, saving may not be possible. You can try
pressing x-Option-Esc to quit the program in use when the problem
occurred; if this works, you can then save the documents open in other
programs before restarting. (Be sure to restart the computer immediately after
you save your documents; quitting a program using x-Option-Esc may leave
corrupt data in the computer’s memory. This corr upt data is erased when you
restart the computer.)
To restart your Macintosh, try the following solutions:
If you can, choose Restart from the Special menu or from the dialog box that’s on the
m
screen.
Dialog boxes contain messages from the computer. If something goes
wrong, a message may appear on the screen, asking you to restart the
computer.
If you can’t choose Restart, hold down the
m
Power key on the keyboard (marked with a triangle).
x
and Control keys while you press the
This key combination restarts the computer. (Use this key combination
only when you can’t choose Restart from the Special menu.)
m
Turn off your computer with the power button on the front panel of the computer, wait
at least 10 seconds, and then turn it on again.
If the computer does not turn off, try pressing and holding down the power
button for 3–4 seconds.
m
If the power button doesn’t turn off the computer, unplug your Macintosh.
m
If you suspect that the problem is with other equipment, such as a printer or an
external hard disk that’s attached to your computer, turn that equipment off for
10 seconds or longer, then turn it on again and restart the Macintosh.
Troubleshooting
63
Page 74

Rebuild your desktop regularly
A process known as “rebuilding the desktop” helps your Macintosh keep
track of data on your startup disks. Although you usually use the hard disk in
your computer as a startup disk, you can also start up from any other disk that
has system software installed. It’s a good idea to rebuild the desktop of your
startup disks regularly.
To rebuild the desktop of a startup disk, follow these steps:
1Hold down the Option and xkeys while you start up your computer.
Do not release the keys until you see a message asking whether you wa nt to
rebuild the desktop.
2Click OK.
Solutions to common problems
This section contains descriptions of problems you could experience with
your computer. Some problems may be caused by your CD-ROM player, so if
you don’t find your problem here, be sure to check the section, “Solutions to
CD-ROM Problems,” later in this chapter.
64
The computer is turned on but the screen is dark.
One of the following is probably the cause:
m You have a screen saver program that darkens the screen when the
computer has not been used for a certain period.
Press a key or move the mouse to turn off the screen saver.
m The computer is in sleep mode. Press a key on the keyboard and/or move
the mouse.
m The monitor’s brightness control (¤) is not adjusted properly.
Check the monitor’s brightness control and turn it up if necessary.
Chapter 6
Page 75

m The Macintosh or the monitor is not getting power.
If you have a separate monitor, check that the monitor is plugged in and
turned on, a nd that the monitor cable is firmly connected to both the
computer and the monitor.
Check that the computer’s power cord is firmly connected to the computer
and plugged into a grounded electrical outlet, and that the outlet has power.
If you have more than one monitor, a nd only one is dark, check that it is
set up correctly in the Monitors control panel. For information on using
more than one monitor, see the “Monitors” topic of Macintosh Guide,
available i n the Guide (h) menu.
m If none of these steps solves the problem, you may need to reset your
computer’s Parameter RAM (PRAM). Reset PRAM by turning off the
computer and disconnecting all external SCSI devices. Next, restart the
Macintosh while holding down the key combination x-Option-p-r. Wait for
the second startup chime, then release the keys. (Note that the “caps lock”
key must be in the up position. This procedure won’t work with the
uppercase “P” and “R” keys.)
If you are displaying video from your computer on a television screen, it is
normal for your computer monitor to be dark.
The computer’s clock keeps time inaccurately.
Your computer has a clock that runs continuously. When the computer is
turned off, a battery keeps the clock running. If your clock begins to keep
time inaccurately, have an Apple-authorized service provider replace the
battery. Consult the service and support information that came with your
computer for instructions on how to contact an Apple-authorized service
provider or Apple for assistance.
Troubleshooting
65
Page 76

When you start up, a disk icon with a blinking question mark appears in the middle of
the screen.
This icon indicates that your Macintosh cannot find the system software it
needs to start up. One of the following is probably the cause:
m Your computer may be having a problem recognizing external equipment
that uses the Small Computer System Interface (SCSI).
Shut down the computer, turn off all external SCSI equipment, and
disconnect the first SCSI device in the chain from your computer’s SCSI
port. Th en restart the computer. If the computer starts up after you
disconnect your SCSI equipment, refer to the manuals that came with the
equipment for information on the proper way to connect SCSI equipment
and assign SCSI ID numbers.
If you have a printer connected to your computer’s SCSI port, make sure
your printer is not supposed to be connected to the printer port instead.
Check the manuals that came with your printer for information on how to
properly connect it.
66
m System sof tware may not be installed on the startup hard disk, the system
software may be damaged, or the hard disk may not be working properly.
Star t up your computer using the Disk Tools floppy disk or (if you have a
built-in CD-ROM player) with the CD-ROM disc that contains system
software. (For instructions on how to start up your computer from the
CD-ROM disc, see “Starting Up From a CD-ROM Disc” in the section
“Initializing a Hard Disk” later in this chapter.) Then follow the
instructions in “Repairing a Damaged Disk” later in this chapter to test
your startup hard disk and repair any damage.
If repairing the disk doesn’t help, follow the instructions in “Installing or
Reinstalling System Software” later in this chapter to reinstall system
software on your startup hard disk.
Chapter 6
Page 77

When you try to start up from a floppy disk, a disk icon with an X appears in the middle
of the screen and the floppy disk is ejected.
This icon indicates that the floppy disk you tried to start up from is not a
startup disk.
Wait a few seconds. The computer should start up from its internal hard disk.
Make sure you insert floppy disks only after the computer has begun starting up.
A “sad Macintosh” icon appears and the computer won’t start up.
This icon indicates that your Macintosh cannot start up because of a problem
with the system software or the computer hardware.
Eject any floppy disks by turning off the computer and then holding down
the mouse button while you turn the computer on again. Try starting up with
the Disk Tools floppy disk or (if you have a built-in CD-ROM drive) with the
CD-ROM disc that contains system software. (For instructions on how to start
up your computer from the CD-ROM disc, see “Starting Up From a CD-ROM
Disc” in the section “Initializing a Hard Disk” later in this chapter.) If the “sad
Macintosh” icon appears again, consult the service and support information
that came with your computer for information on contacting an Appleauthorized service provider or Apple for assistance.
Troubleshooting
67
Page 78

The hard disk icon does not appear on the desktop.
If you don’t see a hard disk icon on the desktop, try the following:
m Use th e Drive Setup program to make the disk available. Drive Setup is
located in the Utilities folder on your hard disk. For instructions, start Drive
Setup, then choose Drive Setup Guide from the Guide (h) menu.
m If the hard disk is internal, shut down your computer, wait at least 10
seconds, and then turn it on again.
m If the hard disk is external, make sure that it is turned on and that its cable
is connected firmly; then restart the Macintosh.
m Check the ID numbers of all SCSI equipment connected to your computer.
No two SCSI devices on the same SCSI chain can have the same ID
number. In addition, there are special requirements for assigning SCSI ID
numbers that don’t conflict with your computer or its internal storage
devices. See Chapter 3 and the manuals that came with your SCSI
equipment for information on setting SCSI ID numbers.
m If the hard disk is your startup disk, start your computer using the Disk Tools
floppy disk or (if you have a built-in CD-ROM player) with the CD-ROM
disc that contains system software. (For instructions on how to start up your
computer from the CD-ROM disc, see “Starting Up From a CD-ROM Disc”
in the section “Initializing a Hard Disk” later in this chapter.) Then follow
the instructions in “Repairing a Damaged Disk” later in this chapter to test
your startup hard disk and repair any damage.
68
If repairing the disk doesn’t help, follow the instructions in “Installing or
Reinstalling System Software” later in this chapter to reinstall system
software on your startup hard disk.
Icons do not appear correctly on your screen.
You need to rebuild the desktop—a process that helps your Macintosh keep
track of files and folders on your hard disk. For instructions, see “Rebuild
Your Desktop Regularly” in the section “If You Have Trouble” earlier in this
chapter.
If icons do not appear correctly after you rebuild the desktop, restart your
computer while pressing the Shift key to temporarily turn off system
extensions. When you see the “Welcome to Macintosh—extensions off”
message, release the Shift key and press the Option and x keys simultaneously
until you see a message asking if you wa nt to rebuild the desktop.
Chapter 6
Page 79

Your Macintosh can’t read a floppy disk.
If you see a message that a floppy disk is unreadable, try one of the following:
m If the disk has never been used, you may simply need to initialize it. For
instructions, see the “Disks” topic of Macintosh Guide, available in the
Guide (h) menu.
m The disk may be damaged. See “Repairing a Damaged Disk” later in this
chapter for information on testing and repairing disks.
m If the disk is a high-density disk previously used on another computer, the
disk may have been formatted incorrectly as an 800K disk rather than as a
1440K (high-density) disk. If so, use the other computer to copy the disk’s
contents onto a properly formatted disk.
m The disk may have been formatted for use on another kind of computer.
You may be able to use a program that lets you work with such disks on
your Macintosh.
If you are trying unsuccessfully to use a DOS floppy disk, consider the
following:
m Make sure Macintosh PC Exchange is installed and turned on. Macintosh
PC Exchange is a control panel that allows your Macintosh to read files
from DOS computers.
m When formatting floppy disks on a DOS computer for use in a Macintosh,
you need to format standard double-sided disks as 720K disks and highdensity disks as 1440K disks. Double-sided disks formatted in 1440K
format and high-density disks formatted in 720K format may not work in a
Macintosh.
If you think your DOS floppy disk might have a format that doesn’t work
with a Macintosh, use a DOS computer to copy the contents of the disk
onto a properly formatted disk.
Troubleshooting
69
Page 80

You can’t eject a floppy disk
If you can’t eject a floppy disk in the usual way, try the following in order:
m Hold down the x and Shift keys and press the number 1 key on your
keyboard to eject a disk in the internal disk drive.
m Tur n off the computer. If the disk isn’t ejected, then hold down the button
on your mouse or other pointing device while you turn the computer on
again.
m Locate the small hole near the disk drive’s op ening, and carefully insert the
end of a large straightened paper clip into it. Push gently until the disk is
ejected. Do not use excessive force.
If none of these solutions work, take the computer or disk drive to your
Apple-authorized service provider to have the disk removed.
70
You installed a CD-ROM player after you bought your computer and your computer won’t
restart after you’ve copied software for your CD-ROM player to the System Folder.
m If you attempt to install software for your CD-ROM player without using
the Installer, you may not be able to restart your computer. Restart the
computer with the Shift key held down (to turn off system extensions), then
remove any CD-ROM software files you copied by dragging them to the
Trash. Reinstall the software according to the instructions that came with
the drive.
If this procedure doesn’t solve the problem, start your computer using the
Disk Tools floppy disk or the CD-ROM disc containing system software that
came with your computer. (For instructions on starting your computer
using a floppy disk, see “Starting Up From a Floppy Disk” in the section
“Initializing a Hard Disk,” later in this chapter.)
Chapter 6
Page 81

Your computer won’t restart and there is a CD-ROM disc inside the CD-ROM player.
m Your computer may be trying to start up from the CD-ROM disc. Press the
Open/Close button on the front of the computer to open the tray, and
remove the CD-ROM disc. Close the tray, then restart your computer.
Your computer starts up and you see large folder-shaped areas, containing labeled
pictorial buttons, instead of the usual Macintosh desktop.
m Your computer may have started up from a CD-ROM disc containing
At Ease, an alternative to the Macintosh desktop. You need to have the
Macintosh desktop on your screen before you can use the installation
instructions in this manual.
To return to the Macintosh desktop, choose Shut Down from the Special
menu. When your computer is off, press the Open/Close button of your
CD-ROM player to open the tray, then remove the CD. Close the tray. Then
start up your computer again.
To avoid having the computer start up from a CD-ROM disc, remember to
remove any disc in the drive before you shut down your computer.
You can’t start an application program or it quits unexpectedly. Or, when you try to open
a program, you see a message that not enough memory is available.
One of the following is probably the cause:
m The Macintosh ran out of memory.
Quit the programs that you have open and then open the program you want
to use, or restart your Macintosh.
Use the Memory control panel to turn on virtual memory. (This is
esp ecially i mportant if you have a Power Macintosh computer or Power
Macintosh upgrade card and are using programs designed specifically for
the Power Macintosh.) For more information on virtual memory, see the
“Memory” topic of Macintosh Guide, available in the Guide (h) menu.
m The program needs more memory.
Use th e program’s Info window to give it more memory. For more
information on increasing a program’s memory, see the “Memory” topic of
Macintosh Guide, available in the Guide (h) menu.
Troubleshooting
71
Page 82

m The program is a 68K application running in emulation mode that requires
a separate floating-point unit (FPU). It cannot use the built-in FPU on your
computer’s microprocessor.
Check the documentation that came with the program to find out if the
program requires the FPU found in the 68K chip. If it does, you may need
to upgrade to a Power Macintosh version of the program, or install
software that emulates the 68K FPU.
m Sometimes incompatible system extensions or control panels can cause
software problems. Restart while holding down the Shift key to temporarily
turn off all system extensions.
If your program works normally after you do this, use the Extensions
Manager control panel to turn off individual extensions and control panels.
For detailed instructions, see the “Customizing Your Computer” or
“Setting Options” topic of Macintosh Guide, available in the Guide (h)
menu.
If your program performs better when a particular extension or control
panel is turned off, contact the software’s ma nufacturer for information or
an upgrade.
A dialog box with a bomb appears.
72
Your system has a software problem.
m Write down what you were doing when the message appeared, and write
down the message.
m Restart your Macintosh. (See “Start Over” in the section “If You Have
Trouble,” earlier in this chapter, for instructions.) Most software problems
are temporary, and restarting usually corrects the problem.
m Check the startup disk and application program you were using when the
dialog box appeared. Make sure that all programs, desk accessories, and
system ex tensions you’re using are compatible with the system software.
Reinstalling the system software may correct the problem.
m If the bomb only occurs in one application program, try reinstalling the
program from the original disks. If reinstalling doesn’t solve the problem,
contact the manufacturer of the program.
Chapter 6
Page 83

m Sometimes incompatible system extensions or control panels can cause
system software problems. Restart while holding down the Shift key to
temporarily turn off all system extensions.
If your computer works normally after you do this, use the Extensions
Manager control panel to turn off individual extensions and control panels.
For detailed instructions, see the “Customizing Your Computer” or
“Setting Options” topic of Macintosh Guide, available in the Guide (h)
menu.
If your computer performs better when a particular extension or control
panel is turned off, contact the extension’s or control panel’s manufacturer
for information or an upgrade.
m If the problem recurs, you may need to reinstall system software. See
“Installing or Reinstalling System Software” later in this chapter for
instructions.
The pointer (8) doesn’t move when you move the mouse.
One of the following situations is probably the cause:
m Your system has a software problem.
Press x-Option-Esc to quit the application program in use when the
problem occurred. If this works, you can save the documents open in other
programs before restarting.
If that doesn’t solve the problem, follow the suggestions in the previous
section, “A Dialog Box With a Bomb Appears.”
m Your keyboard or mouse cable connection may have been loosened or
disconnected. Turn the computer off using the power button on the front of
the co mputer, check that the mouse and keyboard cables are connected
properly, and then restart the computer.
IMPORTANT
Do not connect or disconnect the mouse or keyboard while the
computer is turned on. You may damage your computer.
Troubleshooting
73
Page 84

m Signals from the mouse are not reaching the computer, either because the
mouse needs cleaning or because there is something wrong with the
mouse.
Clean the mouse according to the instructions in Appendix A of this book.
If you have another mouse or pointing device, try connecting and using it.
(Turn off the computer before connecting it.) If the new device works, there
is probably something wrong with the mouse you replaced.
If none of these procedures solves the problem, consult the service and
support information that came with your computer for instructions on how to
contact an Apple-authorized service provider or Apple for assistance.
Typing on the keyboard produces nothing on the screen.
One of the following is probably the cause:
m If the computer beeps every time you press a key, Easy Access is probably
turned on.
Open Easy Access from the control panels listed under the Apple ()
menu and turn it off.
m You haven’t selected any text or set the insertion point (i).
Make sure the program you want to type in is the active program. Then
place the pointer (8
) in the active window and click to set an inser tion
point (i) or drag to select text (if you want to replace the text with your
typing).
74
m The keyboard is not connected properly.
Tur n off the computer using the power button on the front of the computer,
then check that the keyboard cable is connected properly at both ends.
If you have a keyboard with an ADB port (marked with the ◊ icon) on
each end, turn off the Macintosh using the power button and plug the
keyboard cable into the other ADB port on the keyboard. (You may have to
unplug the mouse to do this.) T hen restart the computer.
m The keyboard is damaged.
If you have access to another keyboard, try using it instead. (Turn the
computer off before connecting it.) If the new keyboard works, there is
probably something wrong with the one you replaced.
Chapter 6
Page 85

m Your system has a software problem.
Restart your Macintosh. For instructions, see “Start Over” in the section
“If You Have Trouble” earlier in this chapter.
Check the startup disk and application program you were using when the
problem occurred. Make sure that all programs, desk accessories, and
system ex tensions you’re using are compatible with the system software.
If the problem recurs, try restarting the computer with system extensions
turned off. (To turn system extension off, hold down the Shift key while
restarting the computer.) If that doesn’t work, you may need to reinstall
system softwa re. See “Installing or Reinstalling System Software” later in
this cha p ter for instructions.
If none of these procedures solves the problem, consult the service and
support information that came with your computer for instructions on how
to contact an Apple-authorized service provider or Apple for assistance.
You can’t open a document, or you see a message that an application program can’t
be found.
m Some documents can be op ened by more than one application program.
Try starting a program that you think might be able to open the document,
then choose Open from the program’s File menu to try to open the
document.
m Purchase and install the correct software to use the document, or find out
if the creator of the document can convert it to a form that one of your
programs can use.
m Don’t try to open the files in your System Folder. Most of the files in your
System Folder are used by your computer for internal purposes and are not
intended to be opened.
m Rebuild your desktop by holding down the Shift key while starting up your
computer. Keep holding down the Shift key until you see a message that
extensions are turned off; then hold down the Option and x key s. Keep
holding down the Option and x key s until you see a message asking
whe t her you want to rebuild the desktop. Click OK.
m If the document is from a DOS computer, use the PC Exchange control
panel to specify which Macintosh program will open the document. For
information about working with DOS documents on your Macintosh,
see the information about DOS in Macintosh Guide, available in the
Guide (h) menu.
Troubleshooting
75
Page 86

You experience problems using a document from a DOS computer.
If you can’t open a DOS document using a Macintosh program, try the
following:
m Open the document from within the program by choosing Open in the
program’s File menu.
m Use th e PC Exchange control panel to specify which Macintosh program
will open the document.
If a DOS document is displayed incorrectly, or you see strange codes or
characters in the document, try one of the following:
m Your application program may have special procedures for opening and
saving documents with different file formats. See the information that
came with your program.
m Try opening the document in another program.
Note: So m e ch a racters that can be displayed on the Macintosh are not
accurately displayed on DOS computers, and vice versa.
For more information about working with DOS documents on your
Macintosh, see the information about DOS in Macintosh Guide, available in
the Guide (h) menu.
76
You see a message that your application program can’t be opened because a file can’t
be found.
Power Macintosh programs use special files called shared libraries. Any
necessary shared libraries should be installed automatically when you install
Power Macintosh programs.
Follow the directions that came with your program to reinstall the program. If
the shared library is still missing, contact the software program’s manufacturer
for assistance.
Chapter 6
Page 87

You experience problems using an older Macintosh program.
Some older Macintosh programs are not completely compatible with Power
Macintosh computers. Check with the program’s manufacturer for
compatibility and upgrade information.
Open the Memory control panel and turn off Modern Memory Manager. For
more detailed instructions, see the “Worki ng with Programs” topic of
Macintosh Guide, available in the Guide (h) menu.
Solutions to CD-ROM problems
Problems using the CD-ROM player
The CD-ROM player icon does not appear on screen.
m If you have other internal SCSI devices attached to your computer, make
sure that each device has a unique SCSI ID number. (If your CD-ROM
player was installed in your computer at the factory, it has SCSI ID 3.)
Refer to the documentation that came with your SCSI devices if you need
to reset SCSI ID numbers.
Note: Your computer also has an external SCSI connector. All devices on the
same SCSI chain must have unique ID numbers, but devices on different SCSI
chains may use the same SCSI ID number. (For example, you could have a
CD-ROM player with ID number 3 connected to the inter nal SCSI chain and
a tape drive with ID number 3 connected to the external SCSI chain.)
m If you installed a CD-ROM player after you bought your computer, make
sure the CD-ROM software that came with the drive is installed. See the
manual that came with the CD-ROM player for software installation
instructions.
m If you reinstall the CD-ROM software, make sure to restart your computer
after you reinstall the software.
Troubleshooting
77
Page 88

If you installed a CD-ROM player after you bought your computer and your computer
won’t restart after you’ve copied software for your CD-ROM player to the System Folder.
m If you attempt to install software for your CD-ROM player without using
the Installer, you may not be able to restart your computer. Restart the
computer while holding down the Shift key (to turn off system extensions),
and then remove any CD-ROM software files you copied by dragging them
to the Tras h . Reinstall the software according to the instructions that came
with the drive.
If this procedure doesn’t solve the problem, start your computer using the
Disk Tools floppy disk. (For instructions on starting your computer using a
floppy disk, see “Starting Up From a Floppy Disk,” later in this chapter.)
Your computer starts up and you see large folder-shaped areas, containing labeled
pictorial buttons, instead of the usual Macintosh desktop.
m Your computer may have started up from a CD-ROM disc containing At
Ease, an alternative to the Macintosh desktop. You need to have the
Macintosh desktop on your screen before you can use any of the
installation instructions in this manual.
To return to the Macintosh desktop, choose Shut Down from the Special
menu. When your computer is off, press the Open/Close button of your
CD-ROM player to open the tray, then remove the CD-ROM disc. Close the
tray. Then start up your computer again.
78
To avoid having the computer start up from a CD-ROM disc, remember to
remove any disc in the CD-ROM player before you shut down your computer.
Chapter 6
Page 89

The tray of your CD-ROM player won’t open.
If a CD-ROM disc icon appears on your screen:
m Drag the disc icon to the Trash, or select it and choose Put Away from the
File menu. If the AppleCD Audio Player program is active, choose Eject
CD from the File menu.
If you see a message that a disc can’t be put away because it is being
shared, turn off file sharing, then try again to put away the disc.
If no CD-ROM disc icon appears on your screen:
m Press the Open/Close button for your CD-ROM player.
m The signal to open the tray may not be reaching the computer. Tur n off
your computer and locate the small pinhole to the lower right of the
CD-ROM tray opening. Insert the end of a large, straightened paper clip
firmly and horizontally into the pinhole. Push gently until the tray is
released, then carefully pull the tray open. Do not force the tray open; wait
until the paper clip has dislodged it or you may break the front of the tray.
WARNING
Turn off your computer before you attempt to eject the tray
using a paper clip. If you don’t, you may damage the CD-ROM player.
If neither of these suggestions works, your CD-ROM player may be damaged.
Contact an Apple-authorized service provider or Apple for further assistance.
Your computer won’t restart, and a CD-ROM disc is in the CD-ROM player.
m Your computer may be trying to start up from the CD-ROM disc. Press the
Open/Close button of your CD-ROM player to open the tray, and remove
the CD-ROM disc. Close the tray, then restart your computer.
Troubleshooting
79
Page 90

Problems with CD-ROM discs
You insert a CD-ROM disc, but its icon doesn’t appear on the Macintosh desktop.
m Make sure that the disc label is facing up and the disc is centered in the
tray. If you’re using a small (8 cm) disc, make sure it is within the tray’s
inner ring.
m Make sure the tray is closed all the way.
m Try restar ting your computer.
m Try starting your computer from the CD-ROM disc that contains system
software while holding the “c” key down. If only the hard drive icon
appears on the desktop, then there may be a hardware problem with your
CD-ROM player. If the CD-ROM icon appears above the hard drive icon,
try reinstalling your CD-ROM software following the instructions in
“Installing or Reinstalling CD-ROM Software.”
m If you installed the CD-ROM player after you bought your computer, make
sure the CD-ROM software is installed. (Refer to the documentation that
came wi th the CD-ROM player.)
CD-ROM software is already installed on Macintosh computers that come
with CD-ROM players. You can reinstall it by following the procedure in
“Installing or Reinstalling CD-ROM Software” later in this chapter.
80
Your computer displays the message “This is not a Macintosh disk: Do you want to
initialize it?” when you insert a CD-ROM disc in the CD-ROM player.
m Make sure that the Foreign File Access and/or Audio CD Access CD-ROM
extensions are installed in your System Folder and are turn ed on. (If they
are not turned on, use the Extensions Manager control panel to turn them
on and then restart your computer.)
m Make sure the CD-ROM software is installed. (The CD-ROM software is
already installed on Macintosh computers that come with CD-ROM
players.) If you installed a CD-ROM player after buying your computer,
see the manual that came with your player.
m The disc may use a format that the Macintosh cannot recognize.
Chapter 6
Page 91

Your computer ejects a CD-ROM disc without giving you any error message.
m Make sure the disc is flat in the tray and the disc label is facing up. If
you’ re using a small (8 cm) disc, make sure it’s centered within the tray’s
inner ring.
m The disc may need to be cleaned. (See “Handling CD-ROM Discs” in the
section “Handling Your Equipment” in Appendix A.) If there are visible
scratches on the shiny side of the disc, you may be able to remove them
with a CD polishing kit (available from your audio CD dealer). If the
scratches can’t be removed, you’ll need to replace the disc.
m The disc may be damaged. Try another disc in the drive, and try the
original disc in another drive. If the original drive reads other discs or if
the original disc doesn’t work in another drive, the disc is probably
damaged. You’ll need to replace the disc.
You can’t open a document on a CD-ROM disc.
m Try opening the application program first; then open the do cument.
m Read the manual that came with your CD-ROM disc. Some discs come
with software that you need to install on your computer before using
the dis c.
You can’t save changes you make to information on a CD-ROM disc.
m CD-ROM is a read-only medium. This means that information can be read
(retrieved) from it, but not written (stored) on it. You can save the changed
information on a hard disk or floppy disk.
Prob lems using ISO 9660 or High Sierra discs
You cannot access files on a CD-ROM disc that uses the ISO 9660 or High Sierra format.
m Discs in the ISO 9660 and High Sierra disc formats have version numbers
attached to file names. Some application programs need these version
numbers in order to work with files. To make the version numbers
available to programs on your computer, follow these instructions:
Drag the CD icon to the Trash. When the tray opens, hold down the Option
key and push the tray back in, continuing to hold down the Option key
until the disc is fully in the drive. T h e program you are using should now
be able to locate file names on that CD-ROM disc.
Troubleshooting
81
Page 92

Problems playing audio CDs
You don’t hear any sound when you play an audio CD or an audio track on a CD-ROM
disc using the AppleCD Audio Player.
m If your CD-ROM player was installed after you bought your computer,
make sure the audio cable is properly connected. See the documentation
that came with the CD-ROM player for more information.
m If you have headphones or speakers connected to the computer, adjust the
connector to make sure they are firmly connected. Make sure the volume
control on your headphones or speakers is not turned down too low.
m If you do not have headphones or speakers connected to the computer,
make sure that nothing else is plugged into the sound output port on your
computer.
m Some programs change the sound options to suit their needs. You may need
to reset the sound options in a control panel. Refer to the “Sound” topic of
Macintosh Guide available in the Guide (h) menu.
m If you are using a CD-ROM disc over a network, you won’t be able to hear
the audio por tion.
m Make sure the volume is turned up in the AppleCD Audio Player. With the
Audio Player open, drag the volume control slider up or press the Up
Arrow key on your keyboard.
82
m The CD may have been paused. Click the Play/Pause button once or twice.
While playing an audio track on a CD-ROM disc that combines audio tracks and data,
you double-click the disc icon and the audio track stops playing.
m You can’t open data files on a CD-ROM disc and listen to audio tracks on
that disc at the same time.
You are unable to record sound from an audio CD.
m Check your computer’s sound input port to see if a microphone or other
device is connected.
m You may need to reset the sound options in a control panel. Refer to the
“Sound” topic of Macintosh Guide, available in the Guide (h) menu.
Chapter 6
Page 93

Problems using Photo CDs
Your CD-ROM player will not open Photo CDs.
m Reinstall the CD-ROM software (available through the “MultiMedia
Software” option in Custom Install when you reinstall system software).
Your computer does not display color icons for individual images on a Photo CD.
m Your system may be low on memory. To view color icons, restart your
computer and then reopen the Photos folder. See the “Memory” topic of
Macintosh Guide, available in the Guide (h) menu for more information
on managing memory.
After you open an image on a Photo CD, the image is scrambled, colors are displayed
incorrectly, or no image appears in the window.
m The program you are using may not be designed to work with large (high-
resolution) image files. You can open the image with another program or
you can assign more memory to the program. (For more information on
managing memory, see the “Memory” topic of Macintosh Guide, available
in the Guide (h) menu.)
After you open an image on a Photo CD, your system is “frozen” and does not respond
to any input, or you have a “bomb” message on your screen.
m Restart your Macintosh. The program you are using may not be designed
to work with large (high-resolution) image files. You can open the image
with another program or you can assign more memory to the program. (For
more information on managing memory, see the “Memory” topic of
Macintosh Guide available in the Guide (h) menu.)
Troubleshooting
83
Page 94

If your computer’s performance decreases
If you notice a decrease in your computer’s speed and general performance
after you add special software like a control panel, system extension, or
custom utility, it may be because this software does not work well with Power
Macintosh computers.
m To find out if a system extension is the problem, hold down the Shift key
while you restart the computer. This temporarily turns off system
extensions. If the computer performs better without this software, one of
the system extensions is likely to be the problem. (If you just added a new
system extension, it is the most probable cause of the problem.) Return the
system ex tensions to the System Folder one at a time, restarting and
checking your computer’s p erformance each time until you identify the
extension that is causing problems. Contact the software’s manufacturer for
information or an upgrade.
m To find out if a n ew control panel or custom utility you’ve added is the
problem, drag it out of the System Folder. (This software may be in the
Control Panels or elsewhere inside the System Folder.) Next, restart your
computer and check its performance. If there’s an improvement, the new
software was probably the cause of the problem. Contact the software’s
manufacturer for information or an upgrade.
84
If you don’t know which control panel or custom utility is causing the
problem, you can drag all of these items out of the System Folder and
restart the computer. If the computer performs better when the software is
removed, you need to find out which item is causing the problem. Return
the control panels and custom utilities to the System folder one at a time,
restarting and checking your computer’s performance each time until you
identi fy the one that is causing problems.
If you still do not notice an improvement, follow the instructions in
“Installing or Reinstalling System Software” later in this chapter to reinstall
system software on your startup hard disk.
Chapter 6
Page 95

Solving printer p roblems
m All printers: Check your printer settings in the Chooser, making sure you
have selected the correct printer. Next, turn off the computer and printer
and check the printer cable connections. If neither of these suggestions
solves the problem, reinstall your printer driver (this software probably
came with your printer on a floppy disk).
m Perso n al L as erWriter LS, LaserWriter Select 300, and Personal LaserWriter
300: The system software installed on your computer includes a new
version (version 1.2) of the Personal LaserWriter 300 printer driver. T his
driver works with all three of these printers. Do not install your older
Personal LaserWriter LS or LaserWriter Select 300 drivers; the older
printer drivers are not compatible with Power Macintosh computers.
m StyleWriter and StyleWriter II printers: The system software installed on
your computer includes a new version (version 2.0) of the StyleWriter I/II
printer driver. This driver works with both the StyleWriter II and the
StyleWriter pri nters. Do not install your older StyleWriter driver; the older
driver is not compatible with Power Macintosh computers.
If your printer is different from the ones just mentioned, its driver may not
be included on the Power Macintosh hard disk. You should install the driver
for your printer if you encounter printing problems. Install the driver from the
disks that came with the printer.
Troubleshooting
85
Page 96

Obtaining updated Apple software
Apple software updates include all of the latest versions of Apple software,
including most printer drivers, System Enablers, and updates to utilities,
networking, and communication software.
IMPORTANT
before installing any software.
Currently, Apple’s Customer Service Division (CSD) posts Apple software
updates to the following online services:
m AppleLink
m CompuServe
m Internet: Apple Computer Higher Education gopher server
m Internet: ftp.info.apple.com (formerly ftp.austin.apple.com)
m Internet: ftp.support.apple.com
Specific paths and details for each service follow.
Be sure to read the posted Apple Software License Agreement
AppleLink
Apple software updates are posted to the APPLE SW UPDATES board
located in the following path:
AppleLink Services (mai n window)
Software Sampler
Apple SW Updates
86
eWorld
Apple software updates are posted to the Apple Software Updates board
located in the following path:
Computer Center
Apple Customer Center
Apple Software Updates
Chapter 6
Page 97

CompuServe
Apple software updates are posted to two separate areas on CompuServe:
Apple Support Forum and Apple New Updates. All updates are posted
simultaneously to both areas. Updates are removed from the Apple New
Updates area after three weeks.
Apple Support Forum (GO APLSUP) contains all software and information
libraries. Software is organized by category into separate libraries, including
m System Software
m Apple II
m Newton
m System Enablers
m Printing
m Display & Peripheral Software
m Networking & Communications
m DOS & Windows
Apple New Updates (GO APLNEW) contains all recently published Apple
software updates, allowing you to download the latest and most popular
Apple Software Updates quickly and easily.
Troubleshooting
87
Page 98

Internet: Apple Computer Higher Education gopher server
Apple recommends using TurboGopher client software to access the Apple
Computer Higher Education gopher server. The “Apple Support Area” folder
is located in the following path:
Home Gopher Server
Computer Information
Apple Computer Higher Education gopher server
Apple Support Area
Apple SW Updates
TurboGoph er Client software is available via anonymous File Transfer
Protocol (ftp) to boombox.micro.umn.edu i n the /pub/gopher directory.
m Host name: info.h ed.apple.com
Internet: ftp.info.apple.com
This is a File Transfer Protocol (ftp) server with all of the latest Apple
software updates. (This ftp site was formerly called ftp.austin.apple.com)
m Host name: ftp.info.apple.com, IP numb er is: 204.96.16.4
m Path: ftp/Apple.Support.Area/Apple.SW.Updates
88
You can also download Apple software updates via Apple’s Worldwide Web
server, www.info.apple.com. The Apple web site allows you an easy way to
download Apple software updates from ftp.info.apple.com.
m URL for the Apple web site is: http://www.info.apple.com
m IP number for the Web site is: 204.96.16.2
Chapter 6
Page 99

Internet: ftp.support.apple.com
This is a File Transfer Protocol (ftp) server with all of the latest Apple
software updates.
m Host name: ftp.support.apple.com.
m IP number: 130.43.6.3
m Path: /pub/Apple SW Updates
America Online ftp (file transfer protocol) gateway
You can log onto our ftp.info.apple.com server via the America Online ftp
gateway. You need an America Online account. Once online, follow these
steps:
1 Use the keyword “ftp” to take you to the ftp area.
2Click the FTP button (icon of disk with sunglasses).
3 In the favorite sites list, double-click “ftp.info.apple.com”.
A dialog box will appear with the ftp.info.apple.com welcome screen.
4Click the OK button.
5Double-click the Apple.Support.Area folder to open it.
6Double-click the Apple.Software.Updates folder to open it.
Each time you open a folder, a new Macintosh window opens.
Troubleshooting
89
Page 100

Initializing a hard disk
Before you can use a new disk, the disk must be prepared so that the
computer knows where to store information on the disk. This preparation is
called initializing (or formatting) the disk.
When do you need to initialize a hard disk?
The hard disk inside your computer was initialized at the factory, so you
shouldn’t need to initialize it. You need to initialize a hard disk only if
m you purchase a hard disk that has not been initialized at the factory
m your hard disk is damaged
If a hard disk needs to be initialized, the disk’s icon does not appear on the
desktop when you start up the computer using another disk.
If the hard disk you want to initialize is not the startup disk, you can use the
Drive Setup program to initialize it. Drive Setup is located on the floppy disk
labeled Disk Tools that came with your computer. If your computer came with
a CD-ROM player and you didn’t receive floppy disks, you can find Drive
Setup on the CD-ROM disc that contains system software. For instructions,
start Drive Setup and choose Drive Setup Guide from the Guide (h) menu.
90
Chapter 6
If the hard disk you want to initialize is the startup disk, follow the
instructions in this chapter.
WARNING
Initializing a disk erases any information that may be on it.
Before you initialize a damaged disk, try to repair it as described in
“Repairing a Damaged Disk” later in this chapter.
 Loading...