

Page 1

Follow the instructions in this
chapter to set up your computer.
1
Setting Up Your Computer
The illustration on the next page shows all the equipment you will need to set
up your computer and begin using it. (Note that your monitor and keyboard
may look slightly different depending on what you purchased.)
Before following the setup instructions in this chapter, you may want to read
“Arranging Your Office” in Appendix A for tips on adjusting your work
furniture so that you’re comfortable when using the computer.
This chapter describes the basics of setting up your computer: plugging it in;
connecting a monitor, keyboard, and mouse; and turning it on for the first
time. For information on connecting and installing other equipment, such as
external hard disks, printers, audio equipment, memory, a nd expansion cards,
see Chapter 7, “Connecting Additional Equipment” and Chapter 8, “Installing
PCI Expansion Cards and Additional Memory,” after you have followed the
instructions in this chapter to set up your computer.
1
Page 2
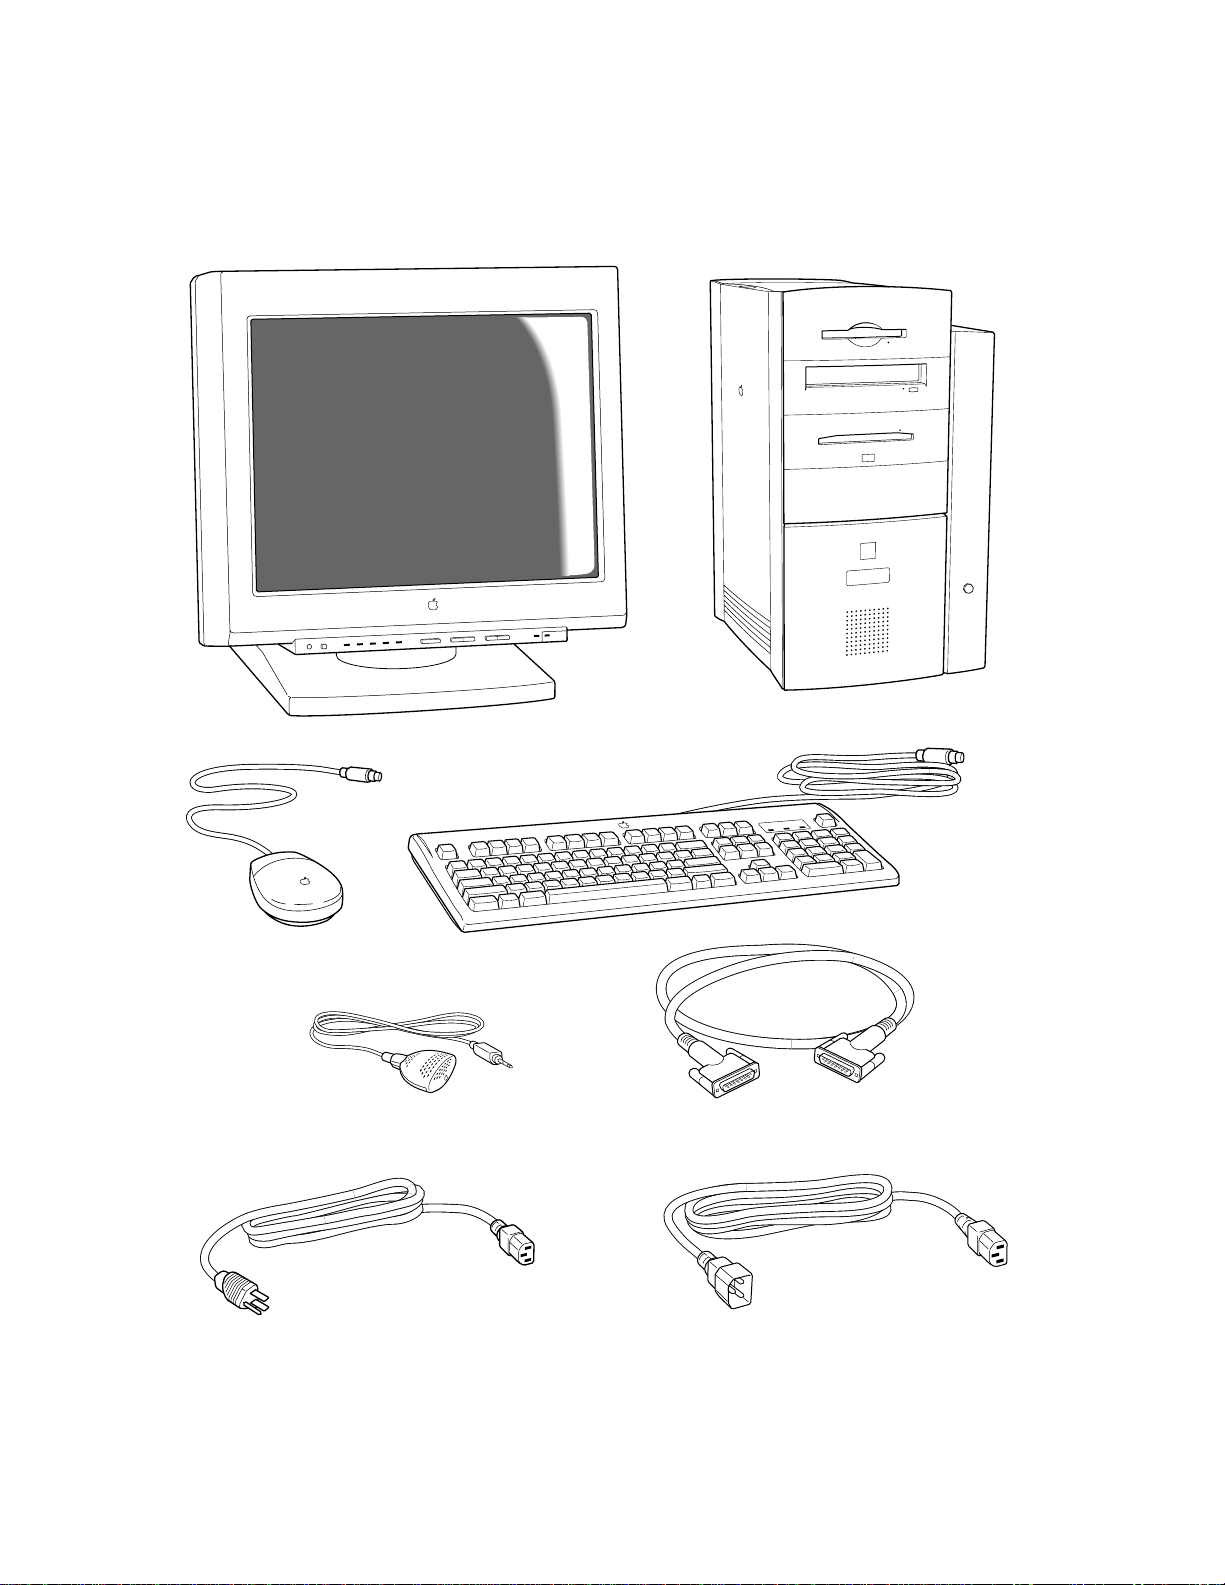
Monitor
Macintosh computer
Keyboard cable
(sometimes built
into the keyboard
as shown here)
Mouse
Apple PlainTalk Microphone (optional)
Computer power cord
Keyboard
Monitor cable
(sometimes built into the monitor)
Monitor power cord
(sometimes built into the monitor)
Page 3
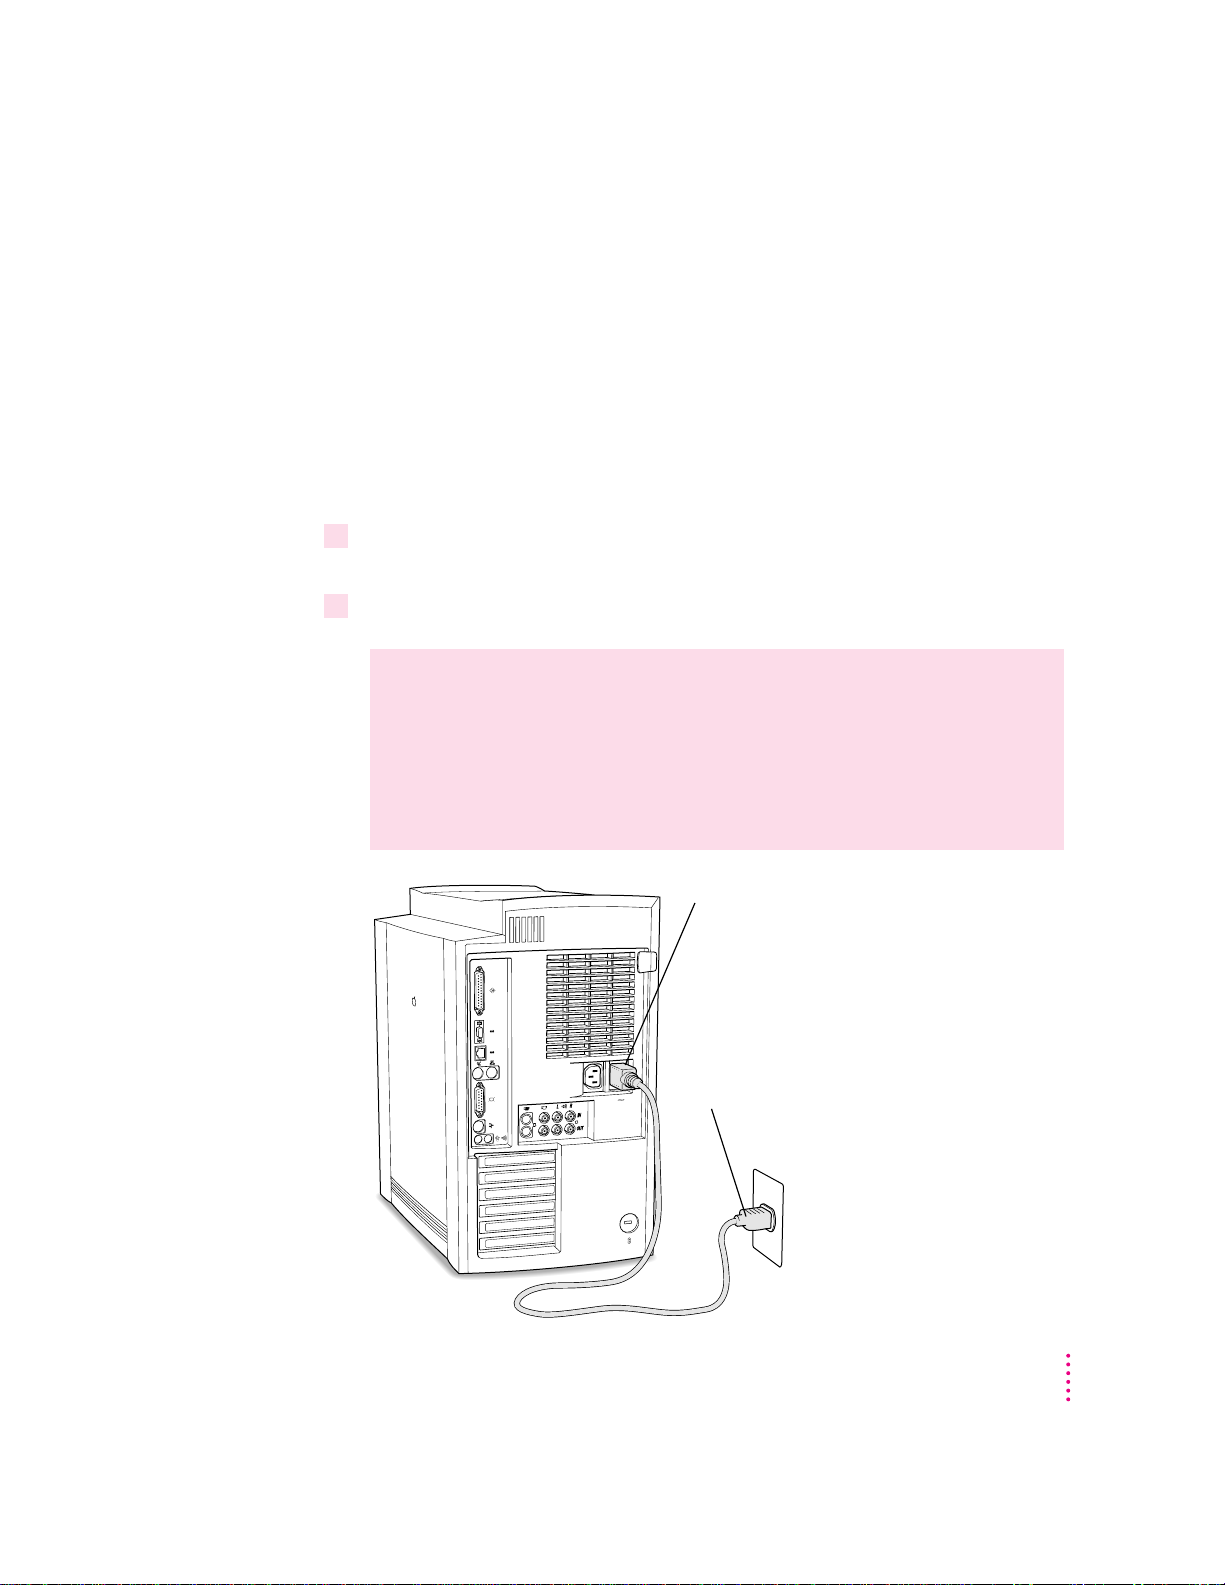
Posi tionin g a nd plugging in the computer
Place your equipment on a sturdy, flat surface near a grounded wall outlet.
(Your computer was designed to be placed on the floor to conserve desk
space, but it can also be placed on any stable, flat surface.)
Before you plug your Macintosh into a wall socket, carefully read all the
setup instructions in this chapter. Then, before you connect any other
equipment to your Macintosh, follow the instructions in this section to plug it
in. The plug grounds the computer and protects it from electrical damage
while you set up. When you are ready to begin, follow these steps:
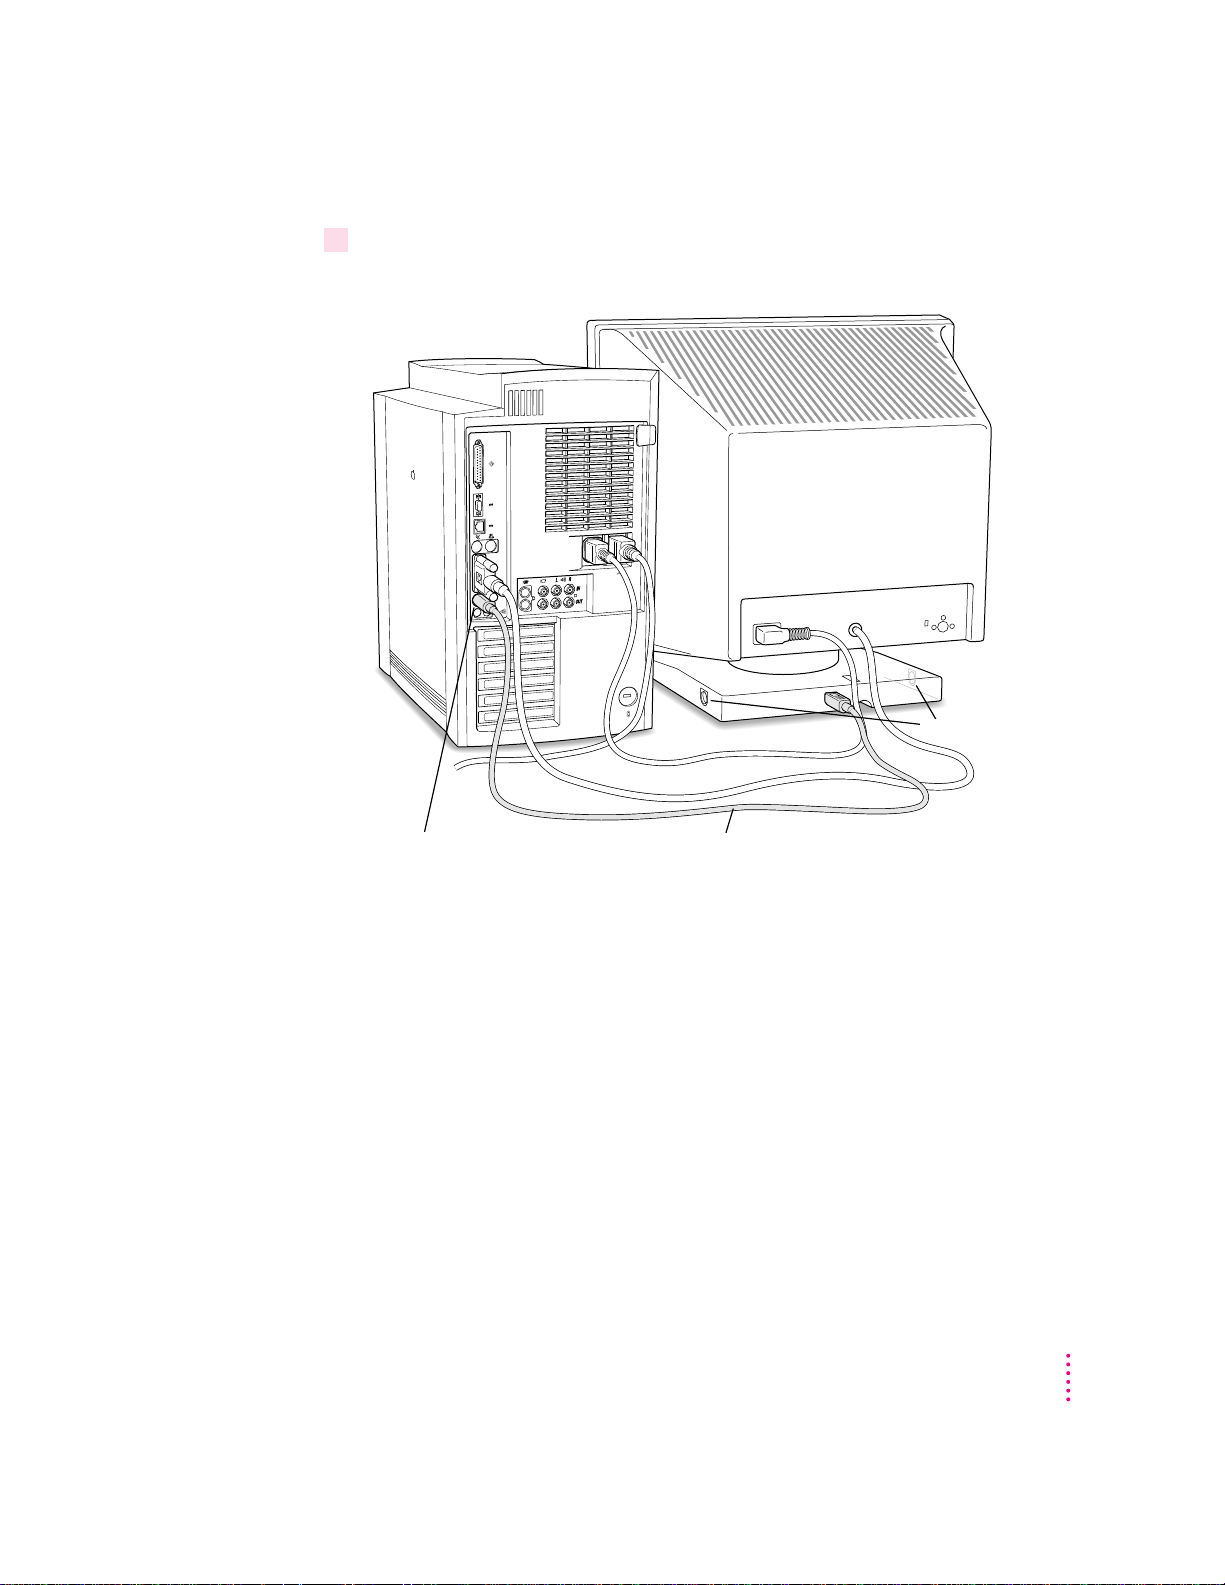
1Plug the socket end of the computer’s power cord into the recessed power socket
(marked with the symbol ≤) on the back of the computer.
2Plug the other end of the power cord into a three-hole grounded outlet or power strip.
WARNING
This equipment is intended to be electrically grounded. Your
Macintosh is equipped with a three-wire grounding plug—a plug that
has a third (grounding) pin. This plug will fit only a grounded AC outlet.
This is a safety feature. If you are unable to insert the plug into the
outlet, contact a licensed electrician to replace the outlet with a properly
grounded outlet. Do not defeat the purpose of the grounding plug!
Power cord socket
Power cord plug
Setting Up Your Computer
3
Page 4

IMPORTANT
power cord. Make sure that at least one end of the power cord is within easy
reach so that you can unplug the computer when you need to.
Connectin g a monitor
You can connect many types of monitors (often called displays) to your
Macintosh computer, including most standard monitors. See the Tech n i c al
Information booklet that came with your computer for a complete list.
This section contains instr uctions for connecting most types of monitors. You
should also refer to the instructions that came with the monitor for any
special instructions.
The only way to disconnect power completely is to unplug the
IMPORTANT
If you are connecting an Apple monitor that has built-in speakers
or a microphone, you may need to install monitor software after you have set
up and turn ed on your computer. Otherwise, you may not be able to use all
the monitor’s features. See the instructions that came with the monitor for
more information.
Connecting the monitor p o wer cord
At minimum, monitors have two cords to connect: a power cord and a
monitor cable. To connect the monitor power cord, follow these steps:
1Place the monitor near the computer.
Keep these considerations in mind:
m Allow at least three inches for air circulation around the computer and
monitor.
m Make sure that the top of the screen is slightly below eye level when you’re
sitting at the keyboard.
m Position the monitor to minimize glare and reflections on the screen from
overhead lights and windows.
For further suggestions about positioning your computer equipment, consult
“Arranging Your Office” in Appendix A (in the section on health-related
information).
4
Chapter 1
Page 5
2Connect the monitor power cord to the monitor.
On some monitors, the cord is already attached.
3Plug in the monitor power cord.
Some monitor power cords are designed to plug into the back of your
computer.
Some monitor power cords must be connected to a grounded electrical outlet,
not to the computer. Check the information that came with the monitor.
Monitor power cordMonitor power socket
Setting Up Your Computer
5
Page 6
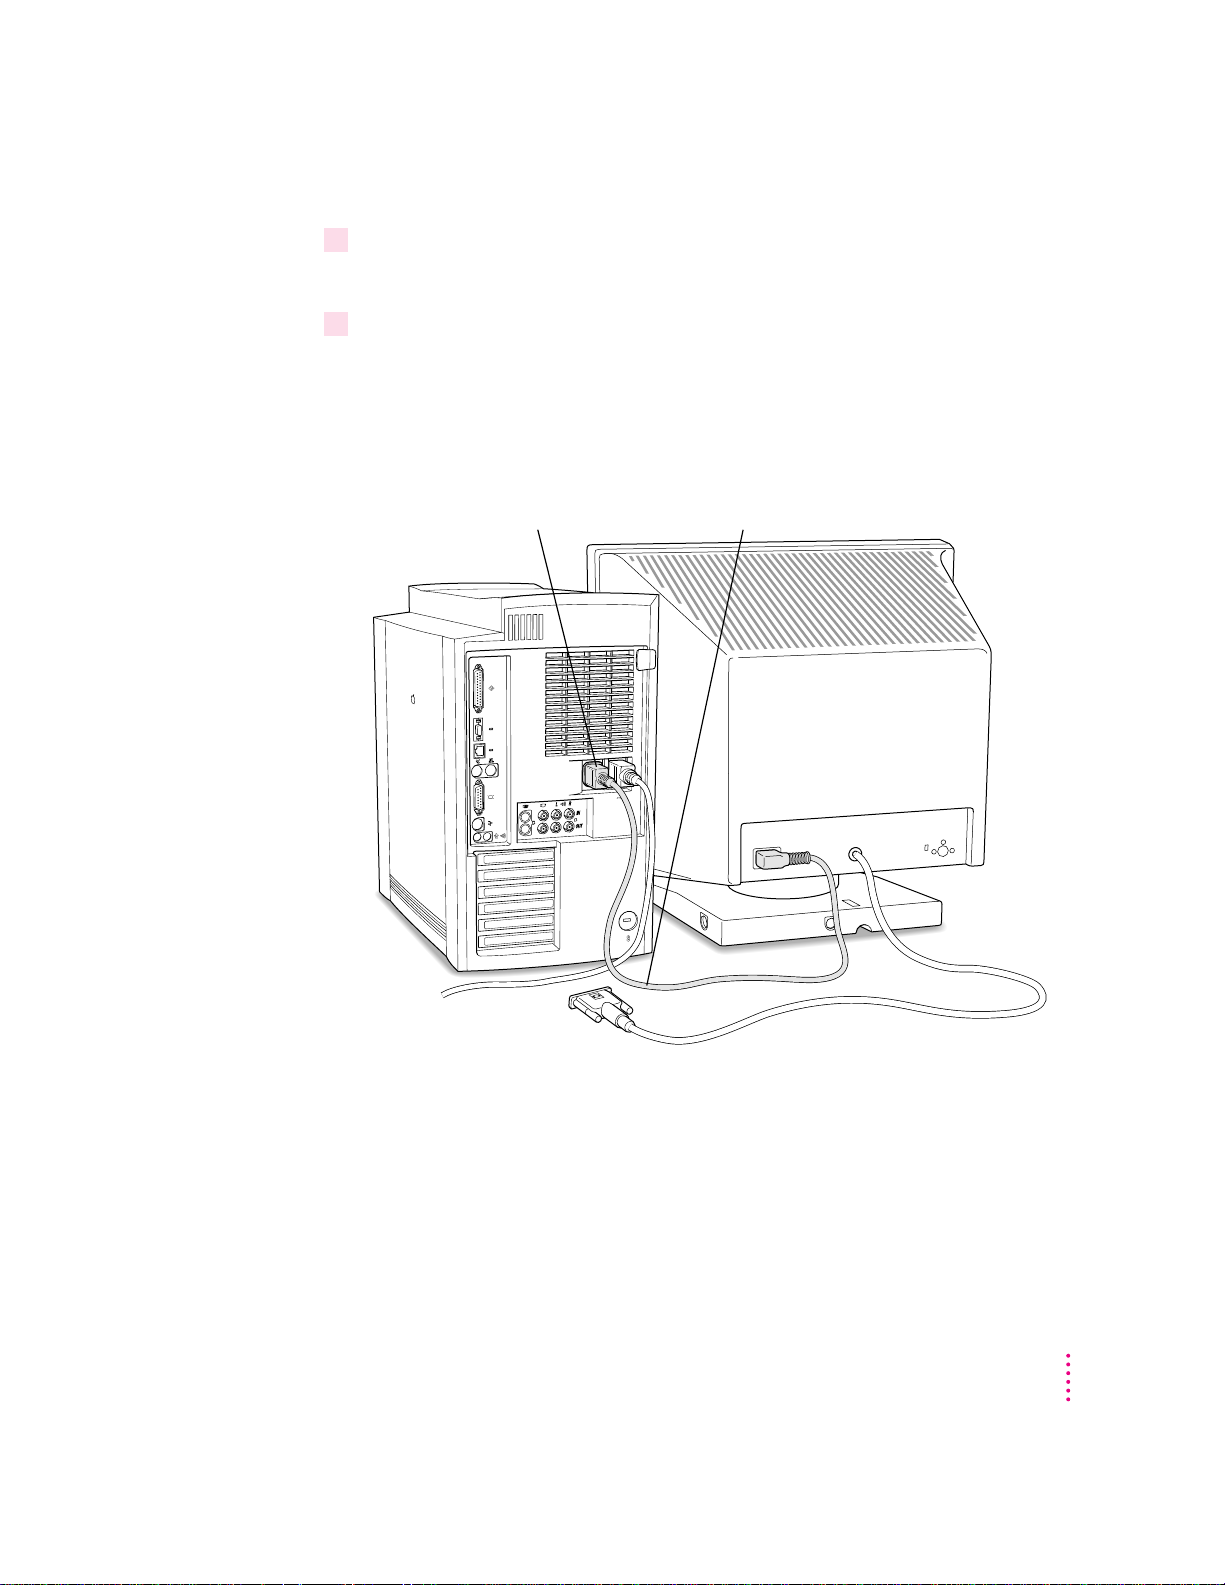
Connecting the monitor cable and ADB cable
After you plug in the monitor power cord, you connect the monitor cable to
the co mputer’s monitor port. Some monitors also include a cable called an
Appl e Desktop Bus (ADB) cable, which you connect between the ADB ports
(marked with the V icon) on the monitor and the computer.
To connect the monitor cable and the ADB cable, follow these steps:
1Attach the monitor cable to the monitor.
On some monitors, the cable is already attached.
2Attach the monitor cable to the monitor port on the back panel of the computer.
6
Chapter 1
™
Monitor port
Monitor cable
Page 7
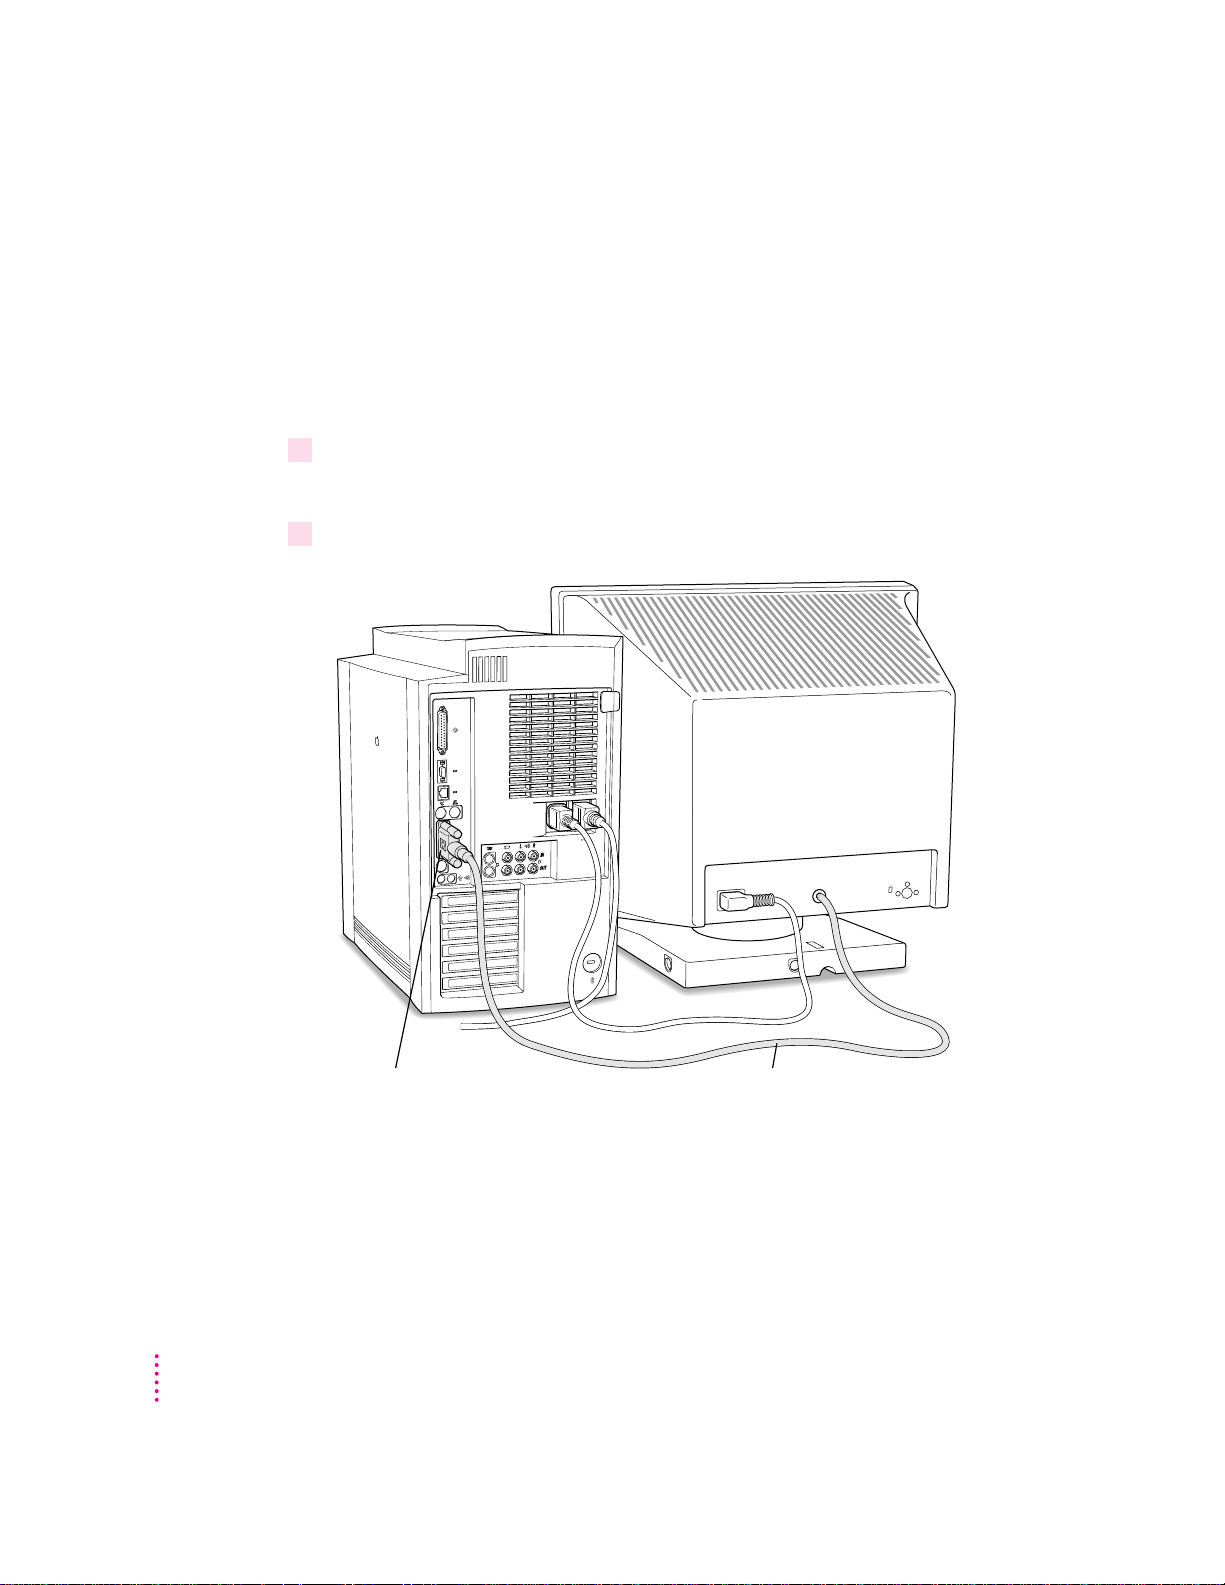
3If your monitor came with an ADB cable, connect it between the ports marked with the
V
icon on the back of the computer and on the back of the monitor.
Auxiliary ADB ports
Apple Desktop
V
Bus (ADB) port
Some monitors (such as this Apple Multiple Scan 20 Display) come with an
V
) cable that you can plug into the back of the monitor. The other end
ADB (
of this cable can be connected to your computer. This allows you to connect
either a keyboard, mouse, or other ADB device directly into your monitor’s
auxiliary ADB ports.
Setting Up Your Computer
7
Page 8

Connectin g the mouse and keyboard
The way you connect the mouse and keyboard depends on whether the
keyboard has a built-in cable or a separate cable.
Connecting a keyboard with a built-in cable
1Plug the mouse cable into the recessed port on the back of the keyboard.
The plug and the port are marked with the V icon (symbol). The positions of
the port and icon on your keyboard may be different from those pictured.
Plug the mouse into the recessed port on
the keyboard. The flat part of the plug should
be pointing down, as shown here.
This cable plugs into the Apple Desktop Bus (ADB) port,
V
marked with the
2If the front or side of your monitor has a port marked with the
cable into this port. Otherwise, plug the keyboard cable into the port marked with the
V
icon on the back of the computer.
8
Chapter 1
icon, on the back of the computer.
V
icon, plug the keyboard
Page 9
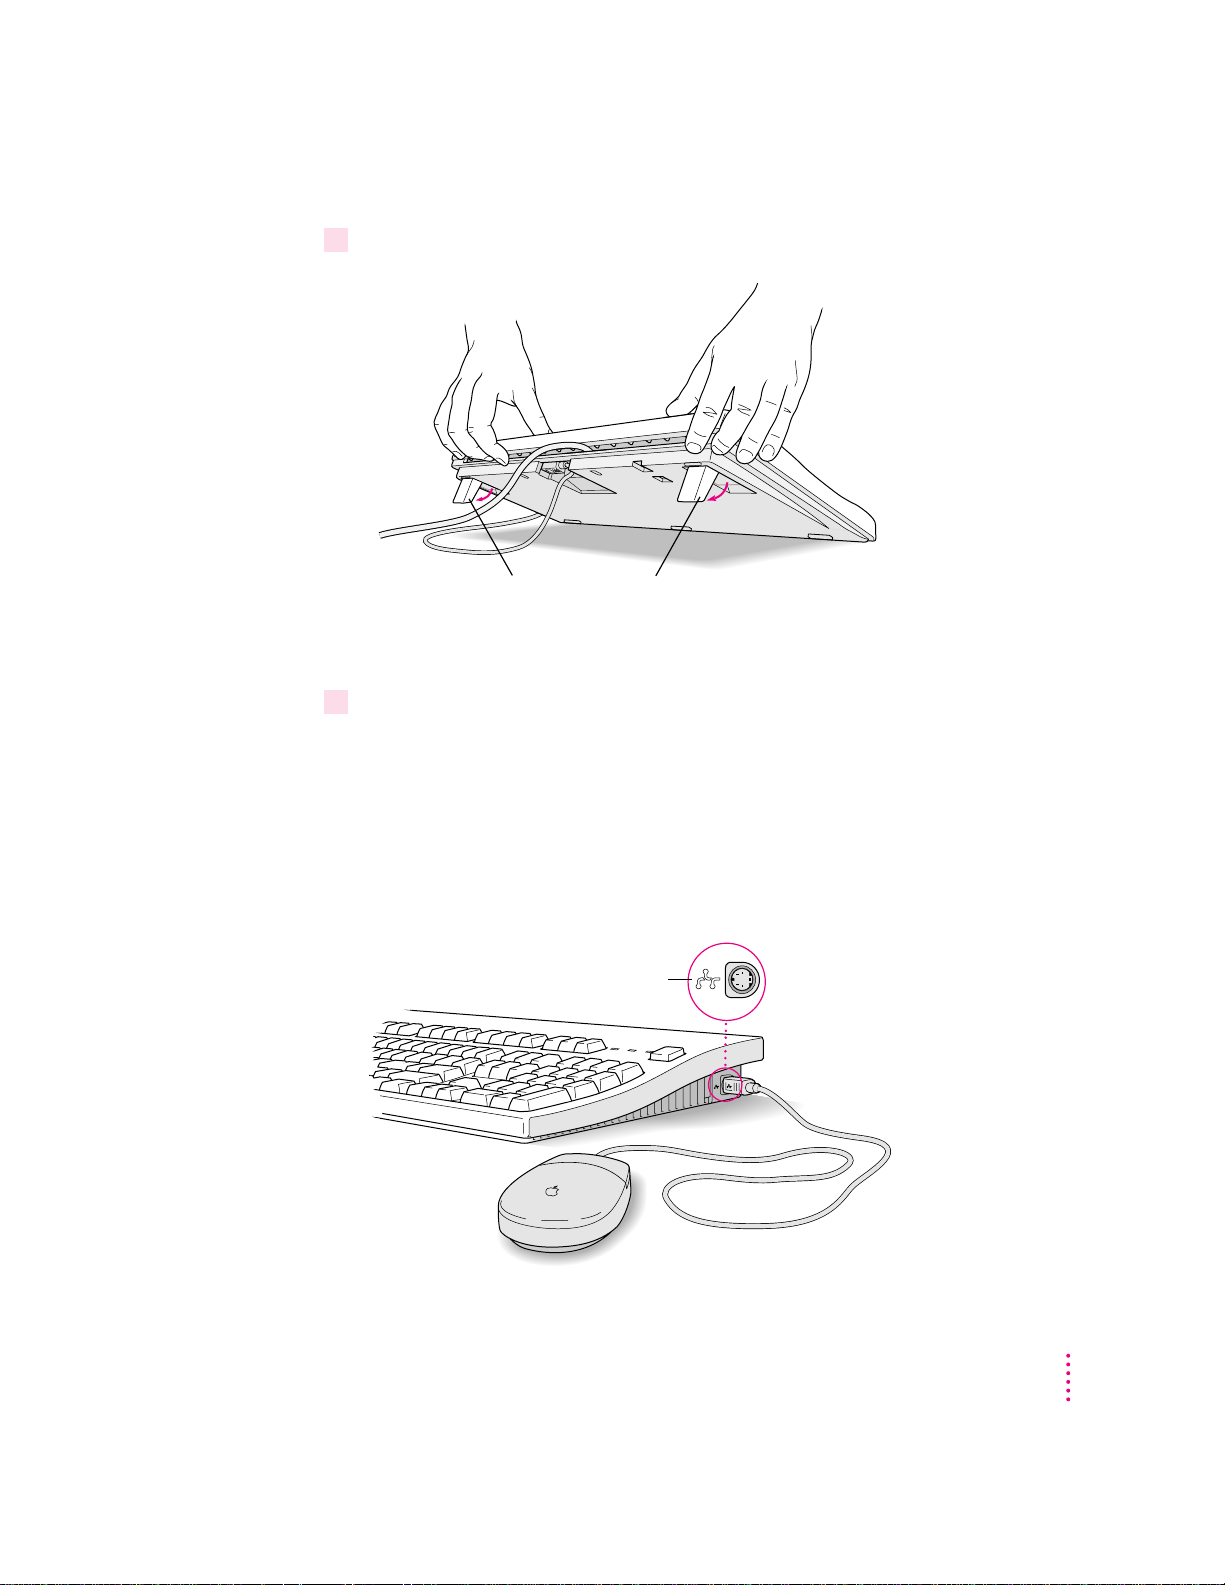
3If you want to adjust the angle of the keyboard, lower its feet.
To adjust the angle of the keyboard, lower the feet until they snap into position.
Connecting a keyboard with a separate cable
1Plug the mouse cable into the port on either side of the keyboard.
Most right-handed people prefer to use the mouse with their right hand; most
left-handed people prefer to use their left hand. Plug the mouse into the port
on the side you prefer.
The plug and the port are marked with the V icon (symbol). Align the
symbol s be f ore you inser t the plug. (The positions of the port and icon on
your keyboard may be different from those pictured here.)
ADB icon
Setting Up Your Computer
9
Page 10

2Plug the keyboard cable (both ends are the same) into the other ADB port on the
keyboard.
If you plugged the mouse cable in on the right, for example, plug the keyboard
cable in on the left.
3If the front or side of your monitor has a port marked with the
cable into this port. Otherwise, plug the keyboard cable into the port marked with the
V
icon on the back of the computer.
4If you want to adjust the angle of the keyboard, slide the tab in the back of the keyboard.
A bar extends as the
slide is moved, increasing
the keyboard angle.
V
icon, plug the keyboard
Turning the computer on
1Turn on your monitor.
10
Chapter 1
To tu r n on the computer for the first time, follow these steps:
See the information that came with your monitor for the location of the power
switch. On newer Apple monitors, the power switch is located on the front of
the unit.
Note: You may not see the monitor power come on until you turn on the
computer in the next step.
Page 11
By the way: Dep ending on the type of monitor you have, you may only need
to tur n it on once. Some monitors will turn off automatically when you shut
down the computer and turn on automatically when you start up the
computer. With other monitor types, you may have to turn the monitor on or
off se parately.
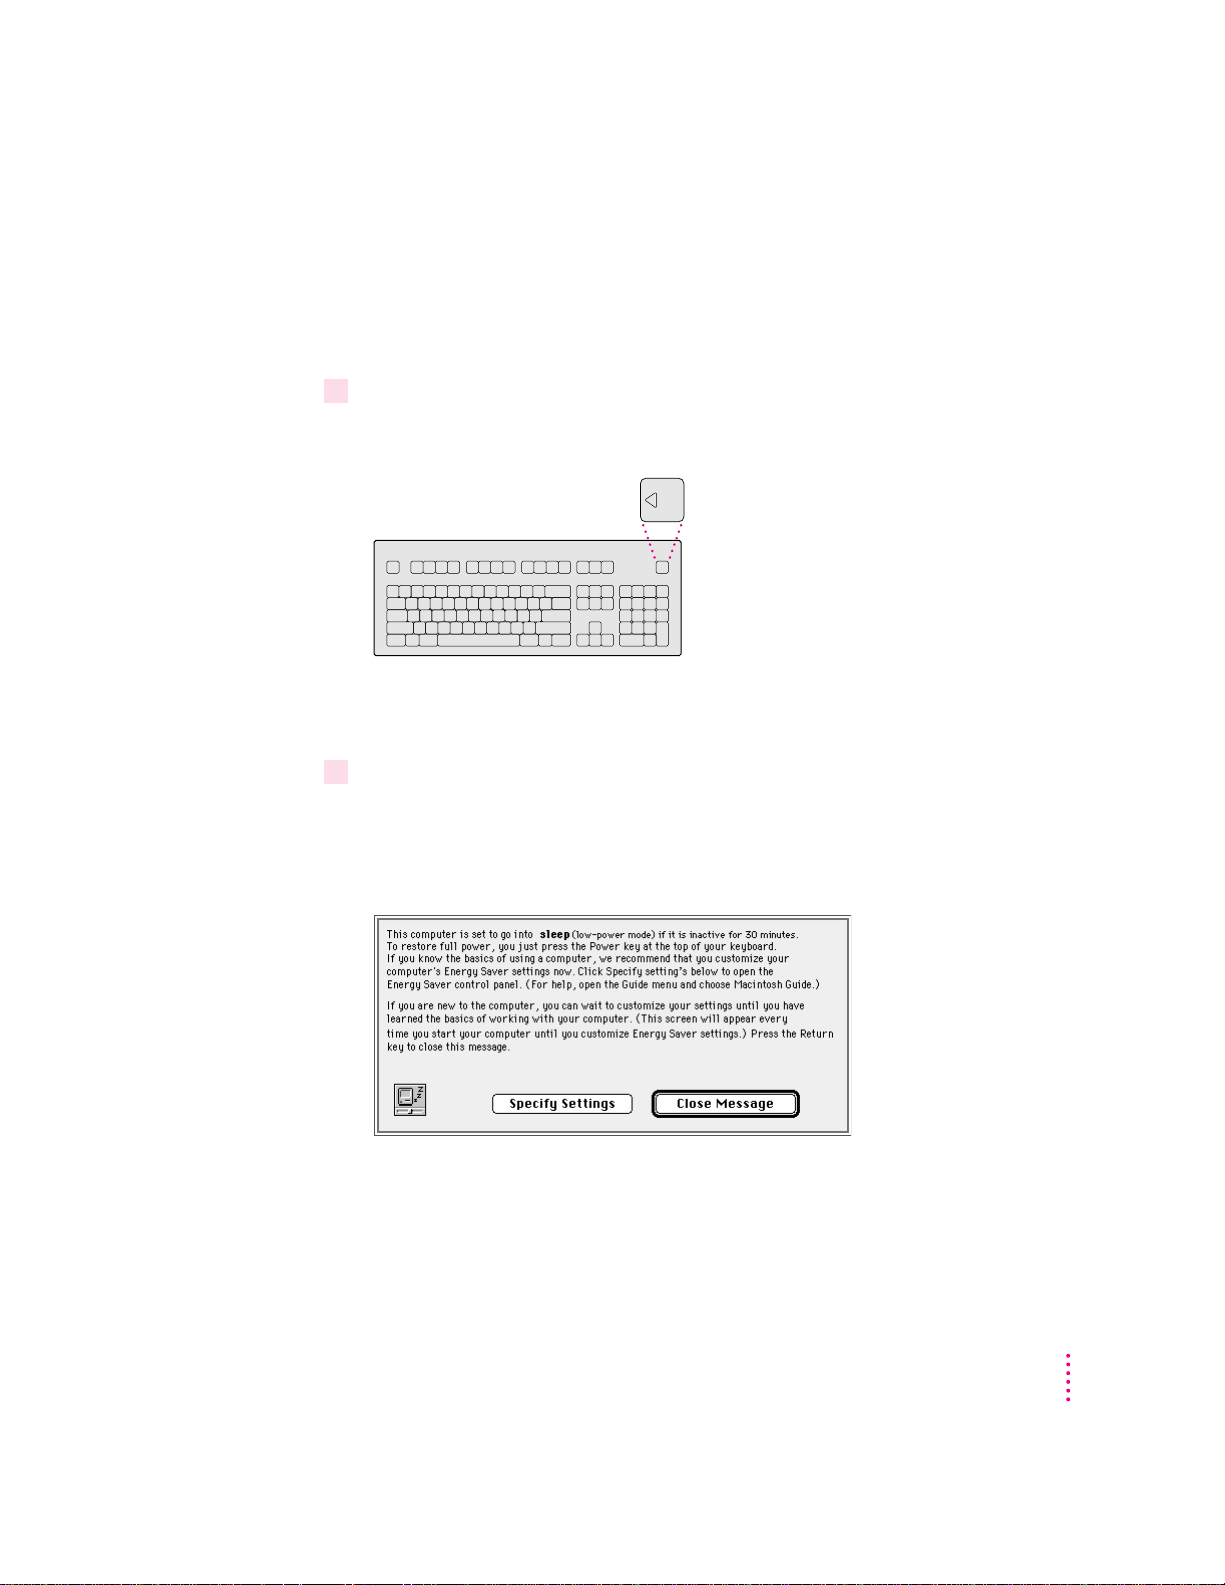
2 Turn on your computer by pressing the Power key.
The Power key is marked with a triangle on your keyboard.
You should hear a tone from the computer as it starts up. If you don’t, press
the Power key again, and hold down the key a little longer this time.
3Check to see what’s on your screen.
Yo u’ ll see a sequence of messages describing what is happening, followed by
the En ergy Saver dialog box. (If your computer does not start up properly, see
“Problems Turning Your Computer On,” next.)
Setting Up Your Computer
11
Page 12

4Do one of the following.
Close box
Click here for
more help.
m If you’re a beginning Macintosh user, press the Return key to close this
dialog box. You can set your Energy Saver options later.
m If you’re an experienced Macintosh user, you may want to set your energy-
saving options now. Click Specify Settings to open the Energy Saver
window. After you are done setting your energy-saving options, click the
close box to close the Energy Saver window.
12
Chapter 1
Page 13

5If you see the Macintosh “desktop” (shown here), skip now to “What’s Next?”
IMPORTANT
If you want to turn off your computer, be sure to follow the
proper shutdown procedure explained at the end of Chapter 2, “Learning to
Use Your Computer.”
Setting Up Your Computer
13
Page 14

Prob lems tu rning your computer on?
If you don’t see anything on your screen or you think your computer did not
start up properly, check these items to see if you can identify the problem:
m Is the computer plugged into a power source? If it is plugged into a power
strip, is the power strip t urned on?
m Is the computer turned on? The power button on the front pan el of the
computer should be illuminated. If it isn’t, press the power button.
m Are the keyboard and mouse cables connected correctly? (Don’t connect or
disconnect the keyboard or mouse cable while the computer is on. You
could damage your equipment. To tur n off your computer, press the power
button on its front panel.)
m If you connected an ADB cable between the monitor and the computer, is
it attached firmly to the ports marked with a V icon? (Don’t connect or
disconnect this cable while the computer is on. You could damage your
equipment. To turn off your computer, press the power button on its front
panel.)
m Is the monitor power cord plugged in?
m Is the monitor cable—the one connected to the monitor port (™) on your
computer—attached firmly to both the monitor and the computer?
14
m Is the monitor turned on? (Check the power-on light on the front of the
monitor.)
m Is the brightness control on the monitor adjusted correctly? (On most
monitors, the brightness control is marked with the symbol ¤.)
m Is the computer asleep? To wake the computer, press the Power key
(marked with a π) on the keyboard. It may take a moment or two for the
computer to wake up.
m If you see a blinking question mark, see Chapter 9, “Start Here If Trouble
Occurs.”
Chapter 1
Page 15

What’s next?
Congratulations—you’ve finished setting up your computer. If this is the first
time you’ve used a Macintosh computer, turn to Chapter 2, “Learning to Use
Your Computer.”
If you already know how to use a Macintosh computer, continue with the next
section, “Where to Find Answers.”
IMPORTANT
If you want to turn off your computer, be sure to follow the
proper shutdown procedure explained at the end of Chapter 2, “Learning to
Use Your Computer.”
Setting Up Your Computer
15
Page 16
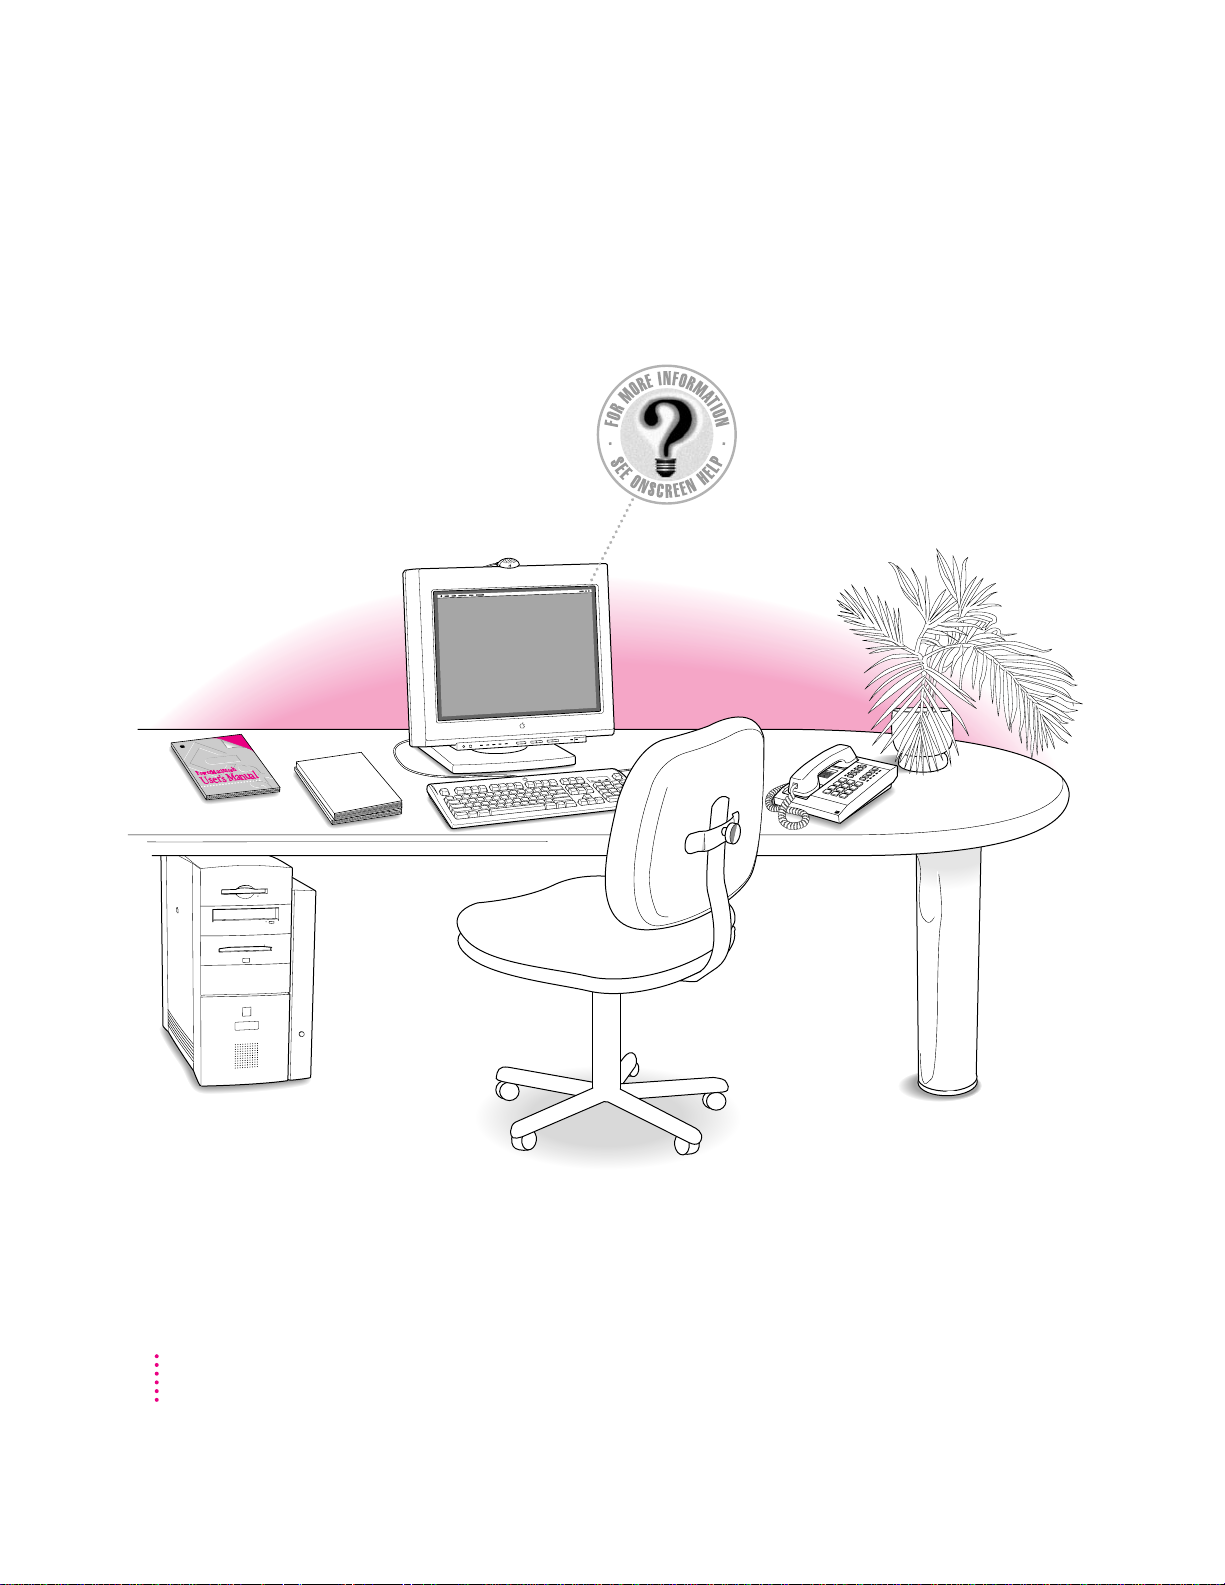
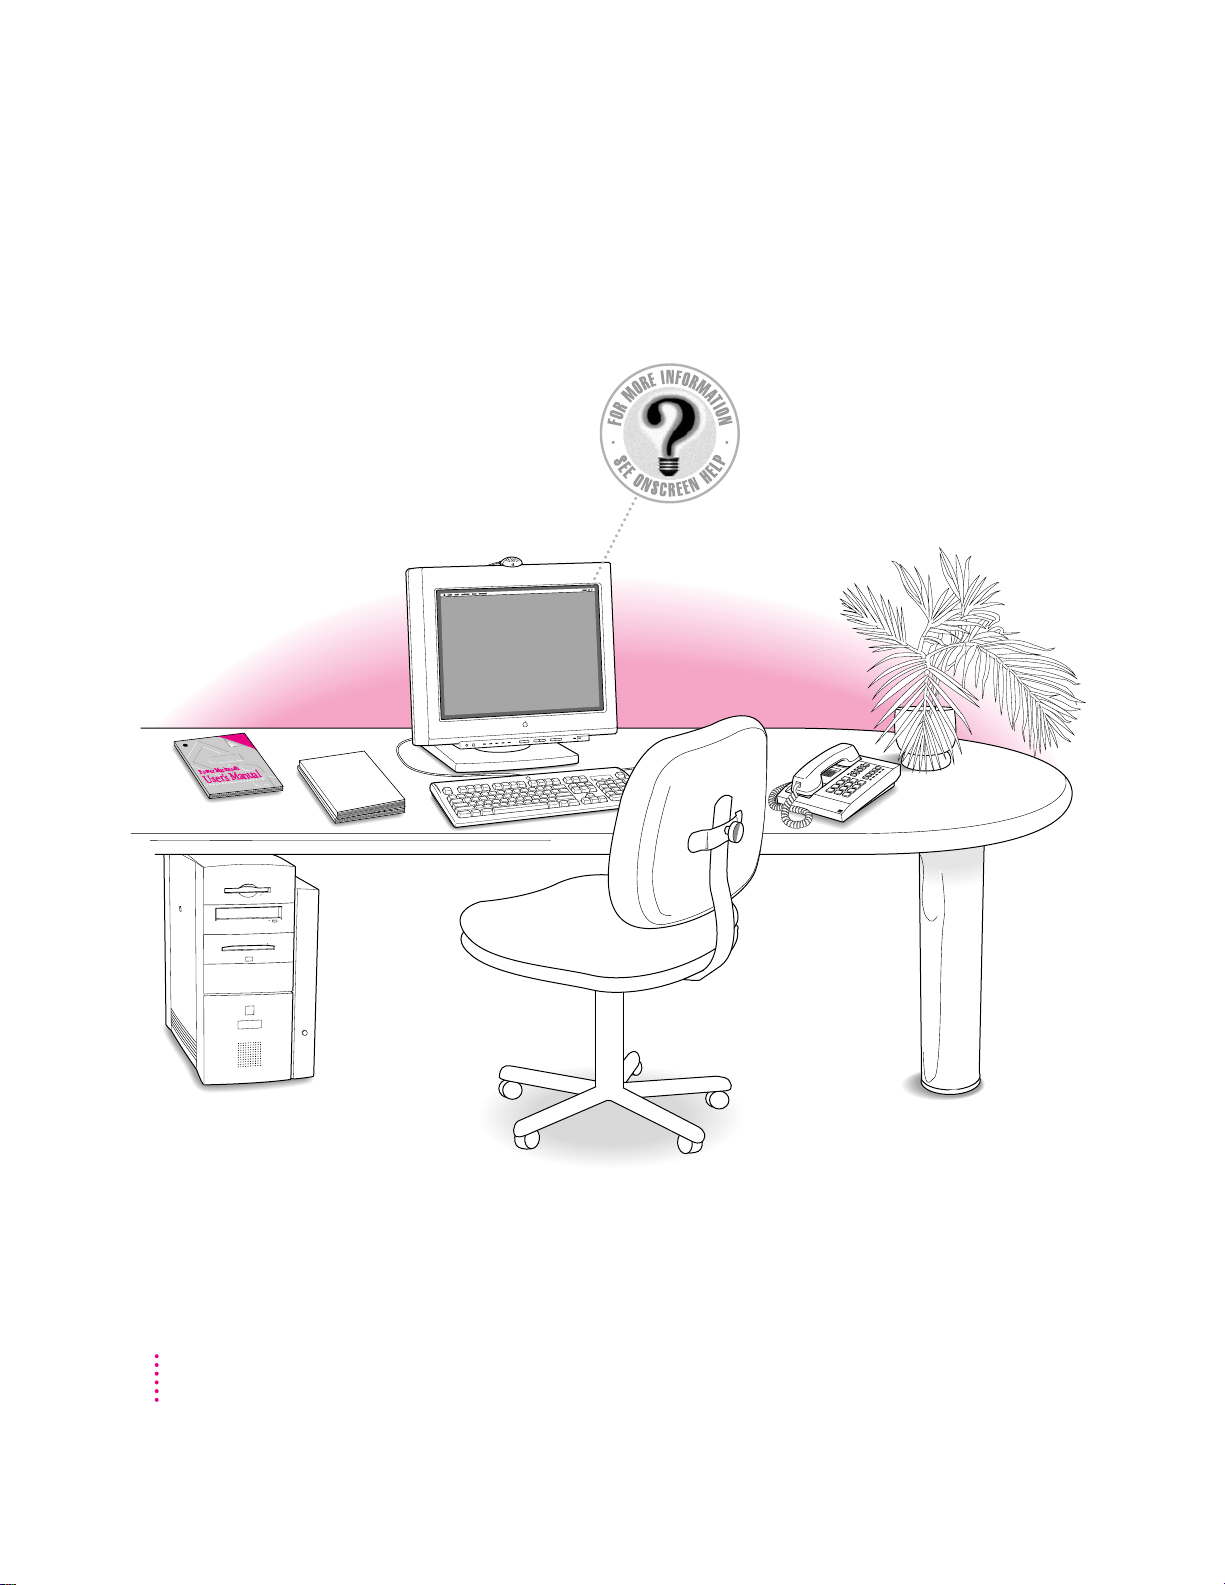
Where to find answers
When you have questions about using your Macintosh, there are several
places you can look for answers.
Macintosh User’s Manual
Use this book to help you
set up your computer and
learn about it, or to find
solutions to problems.
h
s
o
t
n
i
c
a
M
r
e
w
o
P
l
a
u
n
a
s M
’
r
e
Us
Apple Guide
If you need help or experience a
problem while using the computer,
h
open the Guide (
) menu and
choose Macintosh Guide (or Mac
OS Guide). The Guide menu is the
main source for information while
you are using the computer.
16
Chapter 1
Other manuals
For answers to
questions about
other equipment
or about application
programs you have
purchased, see the
manuals that came
with the equipment
or programs.
Apple’s customer
support hotline
If you can’t find an
answer in any of the
materials provided,
call the customer
support hotline.
(The phone number
for the hotline is in the
service and support
information that came
with your computer.)
Page 17

Four simple tips for using Macintosh Guide effectively
When you don’t see Macintosh Guide (or Mac OS Guide) in the Guide menu
Macintosh Guide (or Mac OS Guide) is only available while you’re in the
1
Finder, the system software program that creates and displays your Macintosh
desktop. To go to the Finder, do one of the following.
m Click the desktop (the colored or patterned background area of your
screen).
m Pull down the Application menu (to the right of the Guide menu) and
choose Finder.
When you can’t find the information you need
2
m In searching for help topics, use one of the three buttons at the top of the
Guide’s initial window by clicking them: Topics, Index, and Look For.
m If you’re in a series of steps and want to return to the list of help topics,
click th e Topics button.
When you can’t see what’s behind the Guide window
3
Guide windows stay in front of other windows on the screen so that your
instructions are never covered.
m Drag a Guide window by its title bar to move it out of the way.
m Click the zoom box once to shrink a Guide window. (To expand the
window, click the zoom box a second time.)
When you need more information about an instruction or term
4
m Click the “Huh” button if it is available.
Title bar
Zoom box
“Huh?” button
Navigation buttons
Setting Up Your Computer
17
Page 18
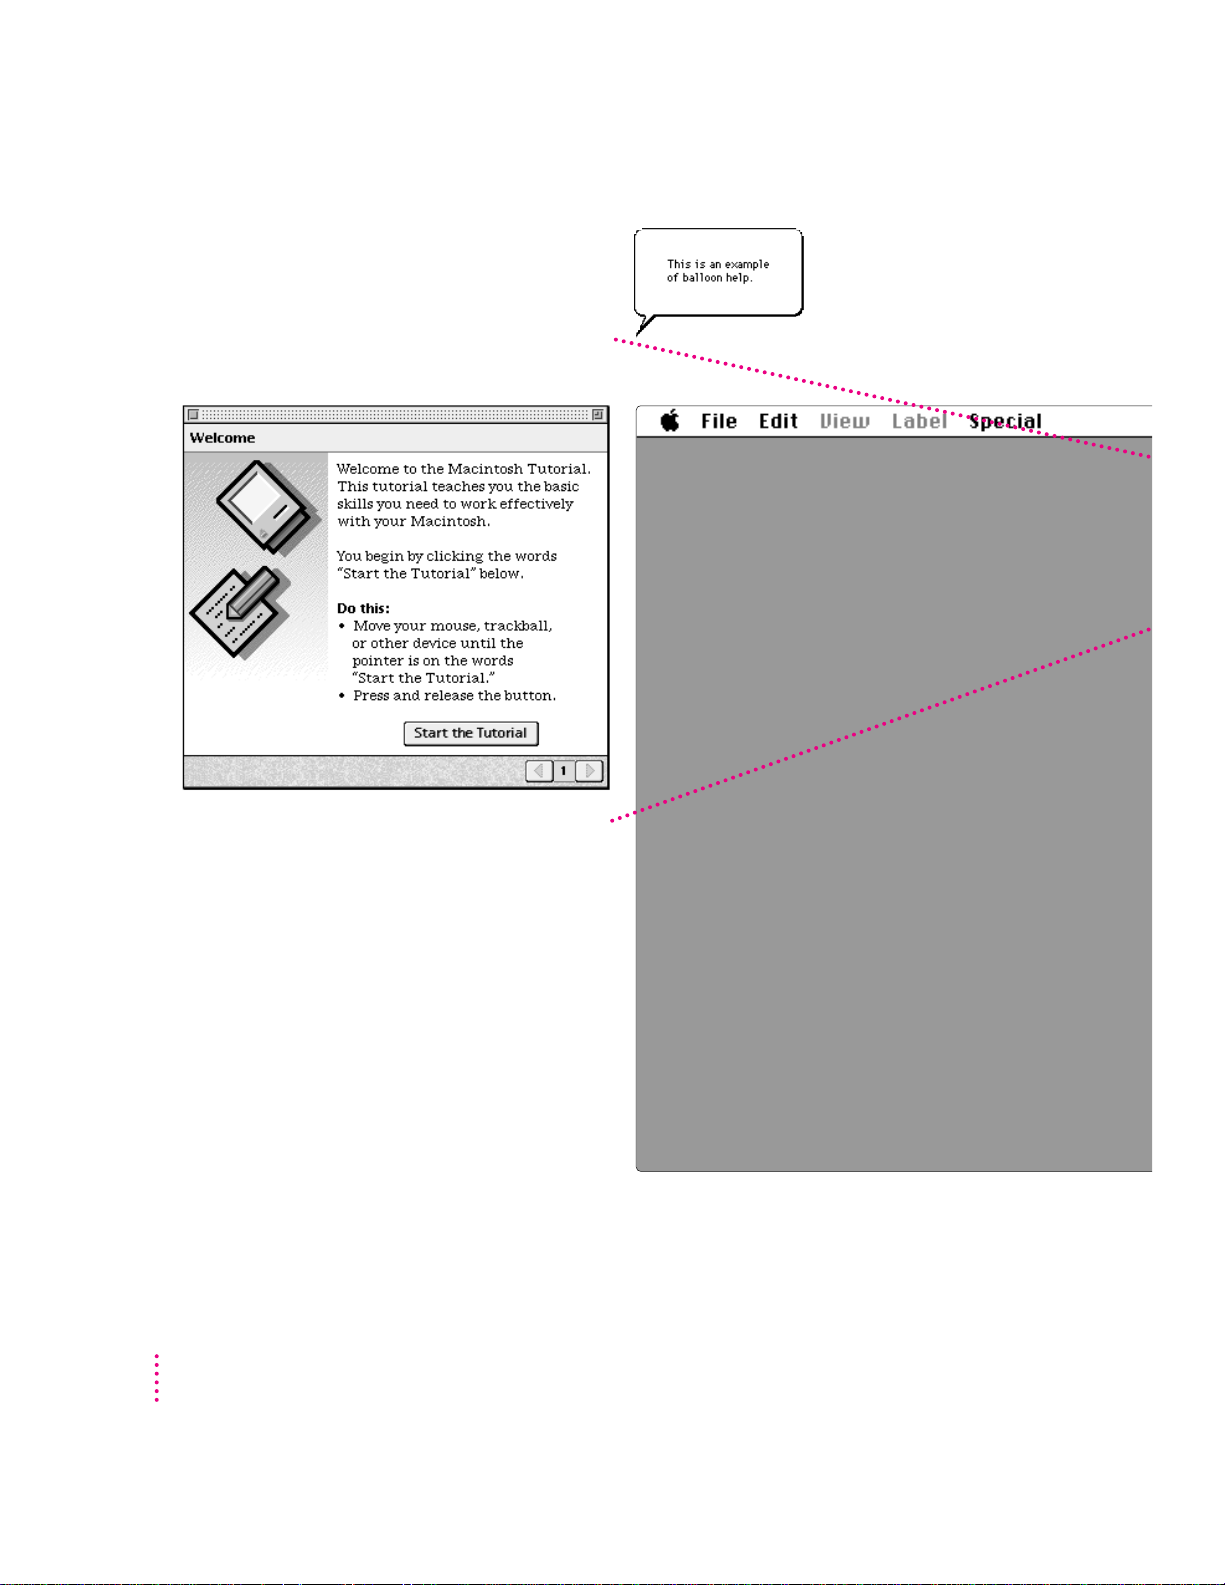
Identifying Objects
If you see something unfamiliar on the screen, open the
Guide menu and choose Show Balloons. Then point to
the object you want to identify. When you’re done,
choose Hide Balloons from the Guide menu.
18
Learni ng the Basics
To learn basic skills, open the Guide menu and
choose Macintosh Tutorial. Then follow the
instructions on the screen.
Getting Help via the Internet
If you have an Internet connection, you can get
information from the Apple World Wide Web site at
http://www.apple.com. (For more information
about the Internet, see Chapter 6.)
Chapter 1
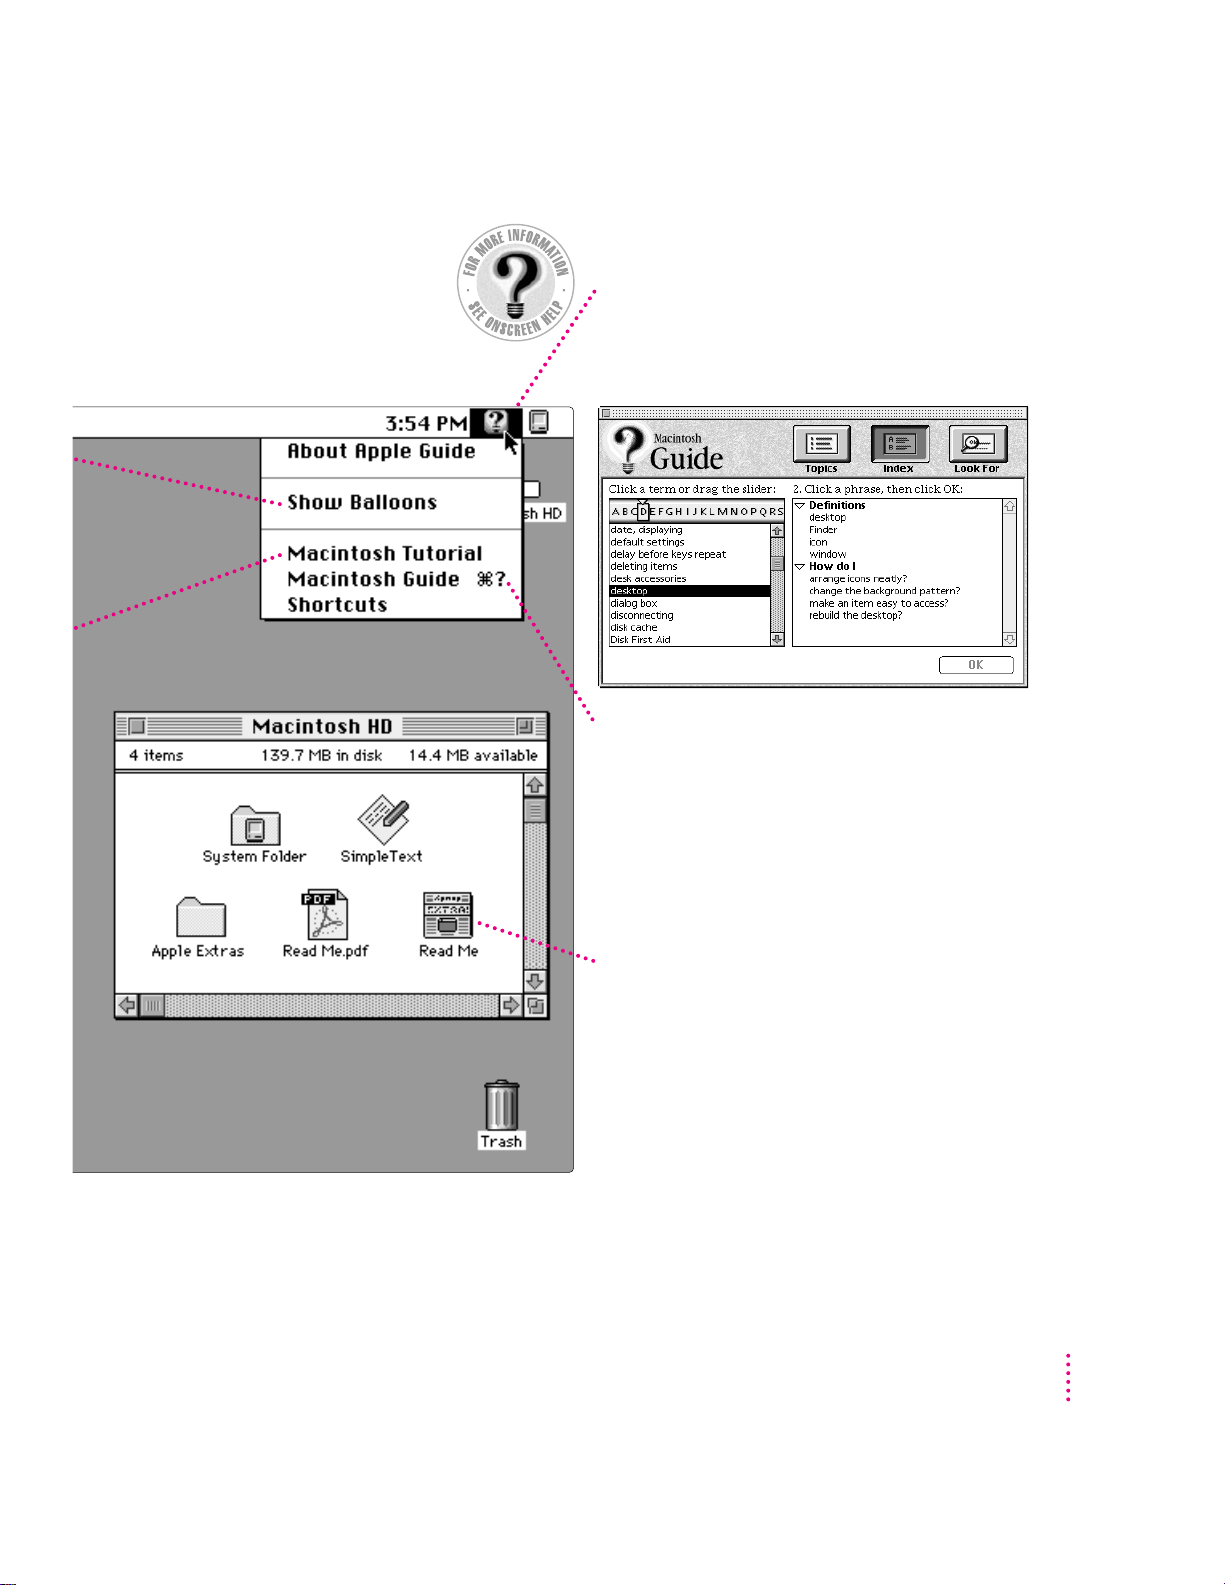
Page 19
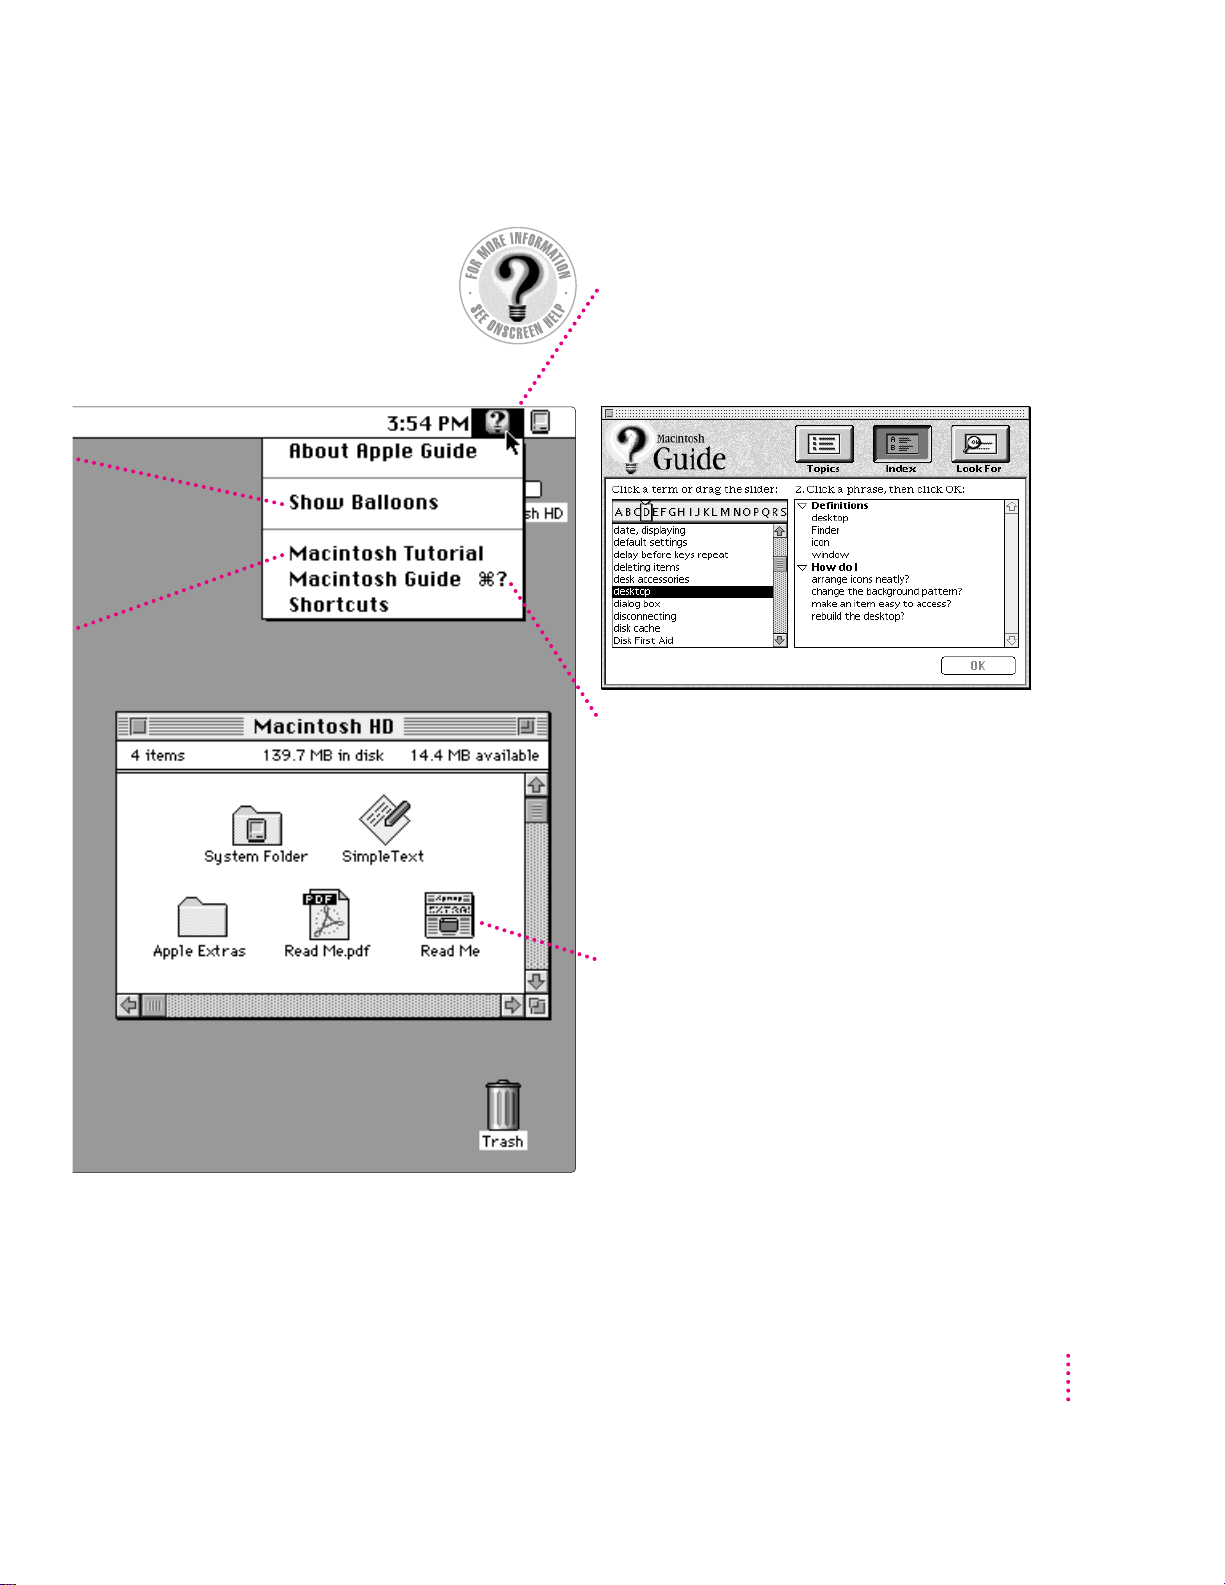
The Guide Menu
To find an answer to a question, look in the Guide (
menu—your main source of information about your computer.
h
)
Getting Answers to Your Questions
To get answers to questions you have while working with
your computer, open the Guide menu and choose Macintosh
Guide (or Mac OS Guide) or a Guide for the program you are
using. Then click one of the three buttons at the top of the
window: Topics, Index, or Look For, and follow the
instructions to choose a subject.
Getting the Latest News
Double-click the hard disk icon to see the “Read Me”
file pictured here, which contains last-minute tips and
news. Many other Read Me documents are in the
Apple Extras folder.
To open a Read Me document that has “pdf” in the
icon or in the file name, you first need to install the
Adobe Acrobat Reader program, which is available in
the Apple Extras folder.
Setting Up Your Computer
19
Page 20
Reviewing the basics
Use the following illustrations to review the onscreen elements you use to
work with your computer.
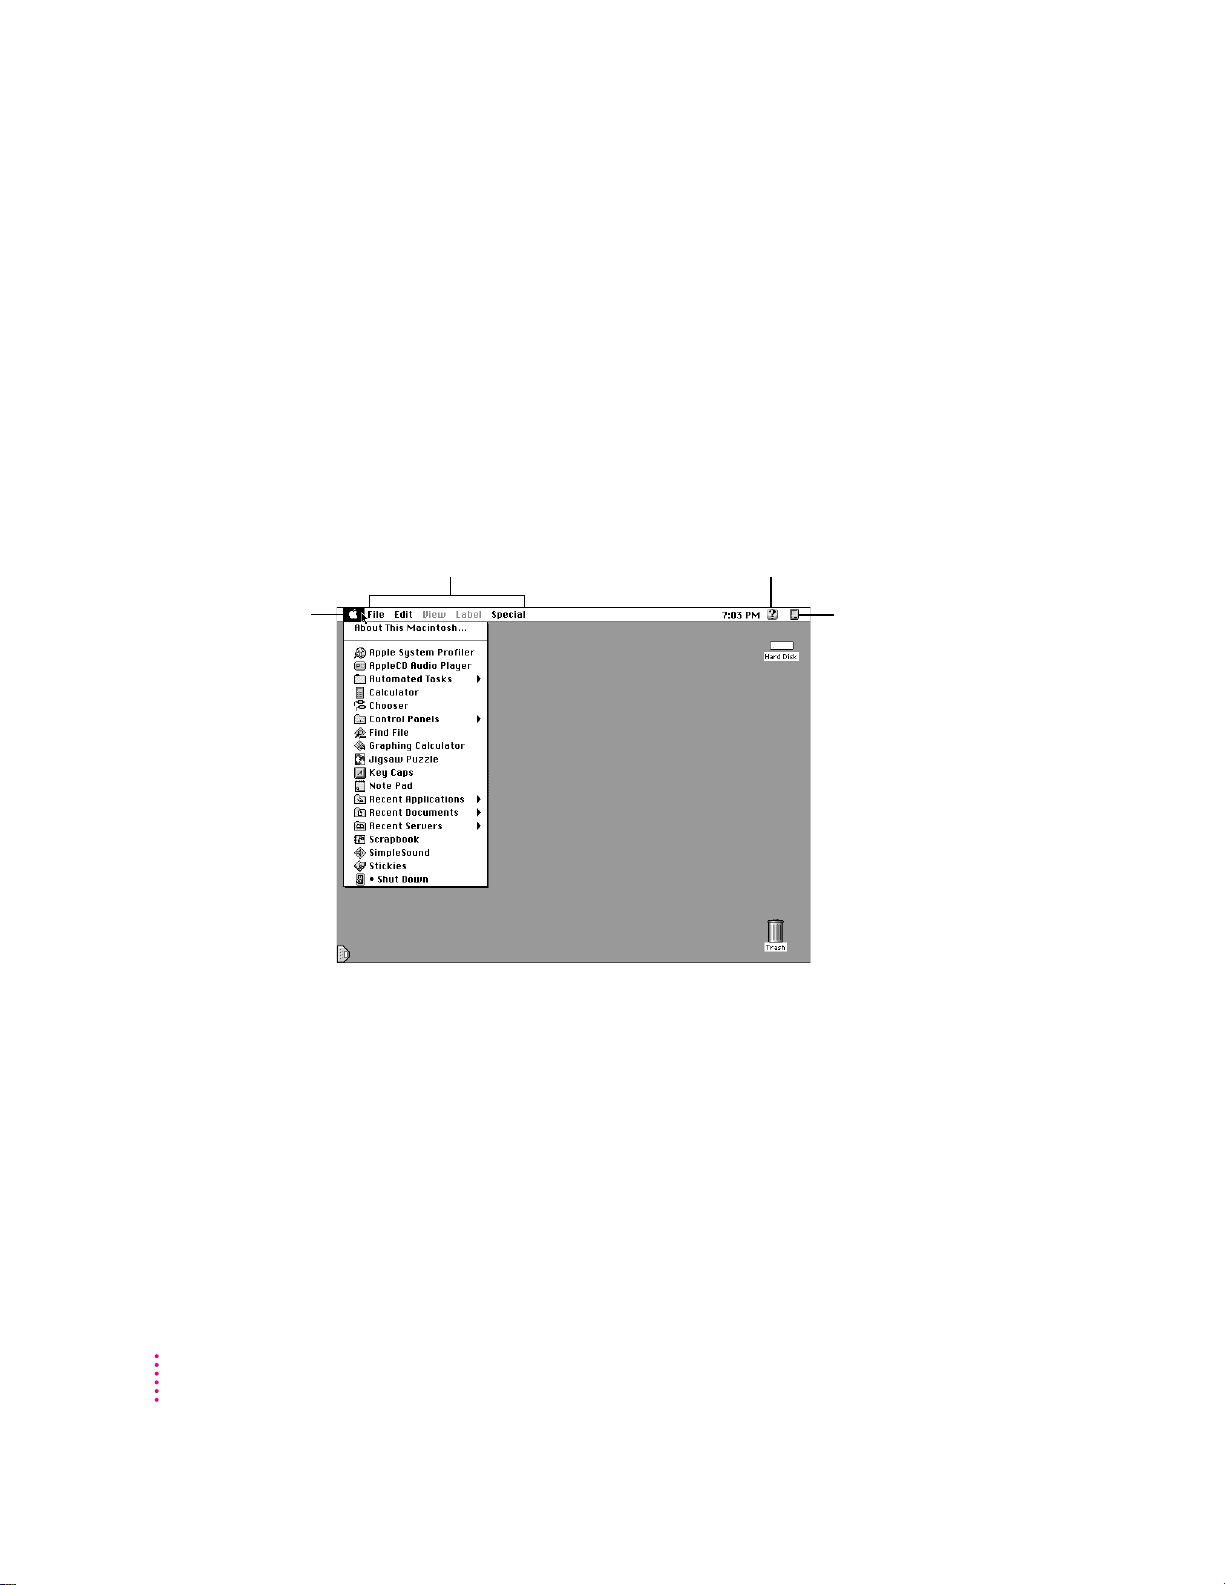
Menus
The strip across the top of the screen is called the menu bar. The symbols and
words in it contain menus of commands. To open a menu, place the pointer
on the symbol or word for the menu and press the mouse button.
File, Edit, View, Label, and Special
are also menus.
Guide menu
To find an answer to a question,
h
look in the Guide (
) menu.
Apple menu
To choose a control
panel, use this
menu. The Apple
menu also contains
several useful
programs and
folders.
Application menu
To see which program is
active or to switch to
another program, use this
menu.
20
Chapter 1
Page 21
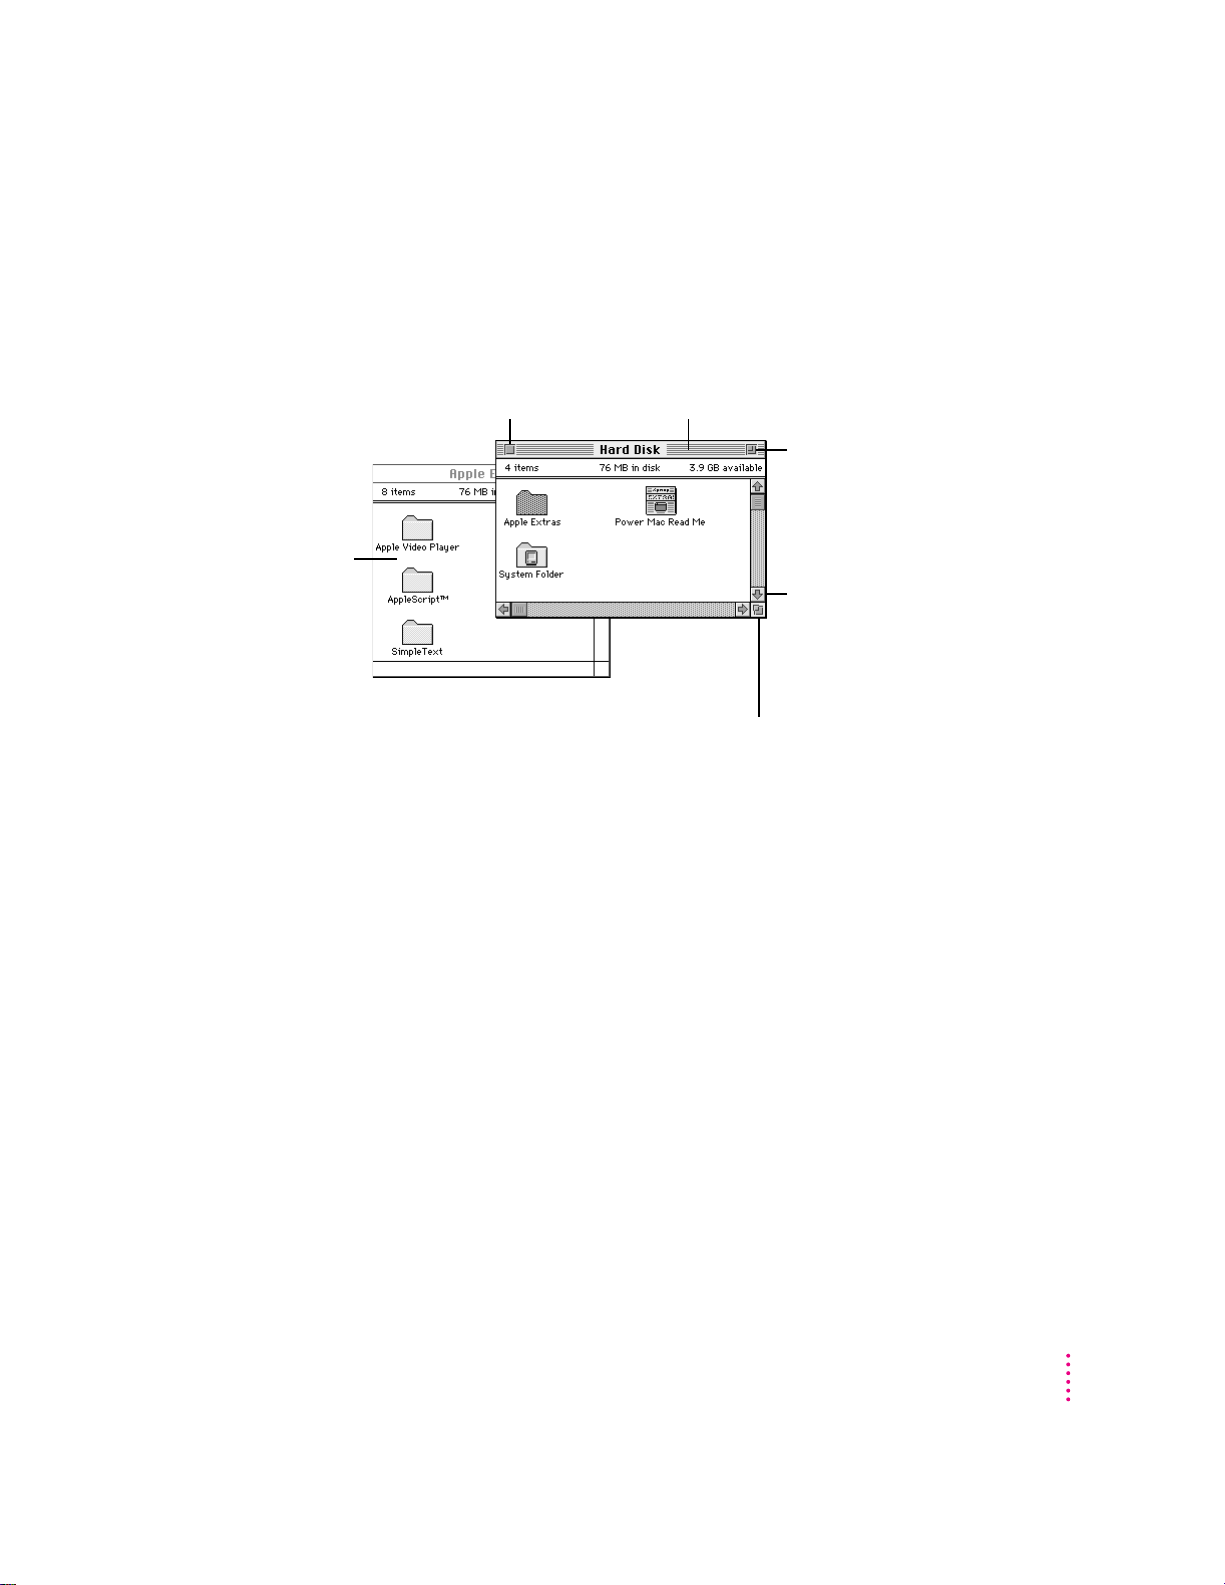
Windows
Windows are boxes that display text, graphics, or icons. To change the shape
or position of a window, or to close a window, use the elements shown here.
To bring a partially
covered window
to the front, click
anywhere in it.
Close box
To close a window,
click the close box.
To change the shape or size of
a window, drag the size box.
Title bar
To move a window, drag it by the middle of the title
bar (anywhere in the bar except the small boxes).
Size box
Zoom box
To size the window so that all of its
contents are visible, click the zoom
box. (Clicking it again returns the
window to its original size.)
Scroll arrow
To bring hidden portions of a window’s
contents into view, click one of the four
scroll arrows.
Setting Up Your Computer
21
Page 22
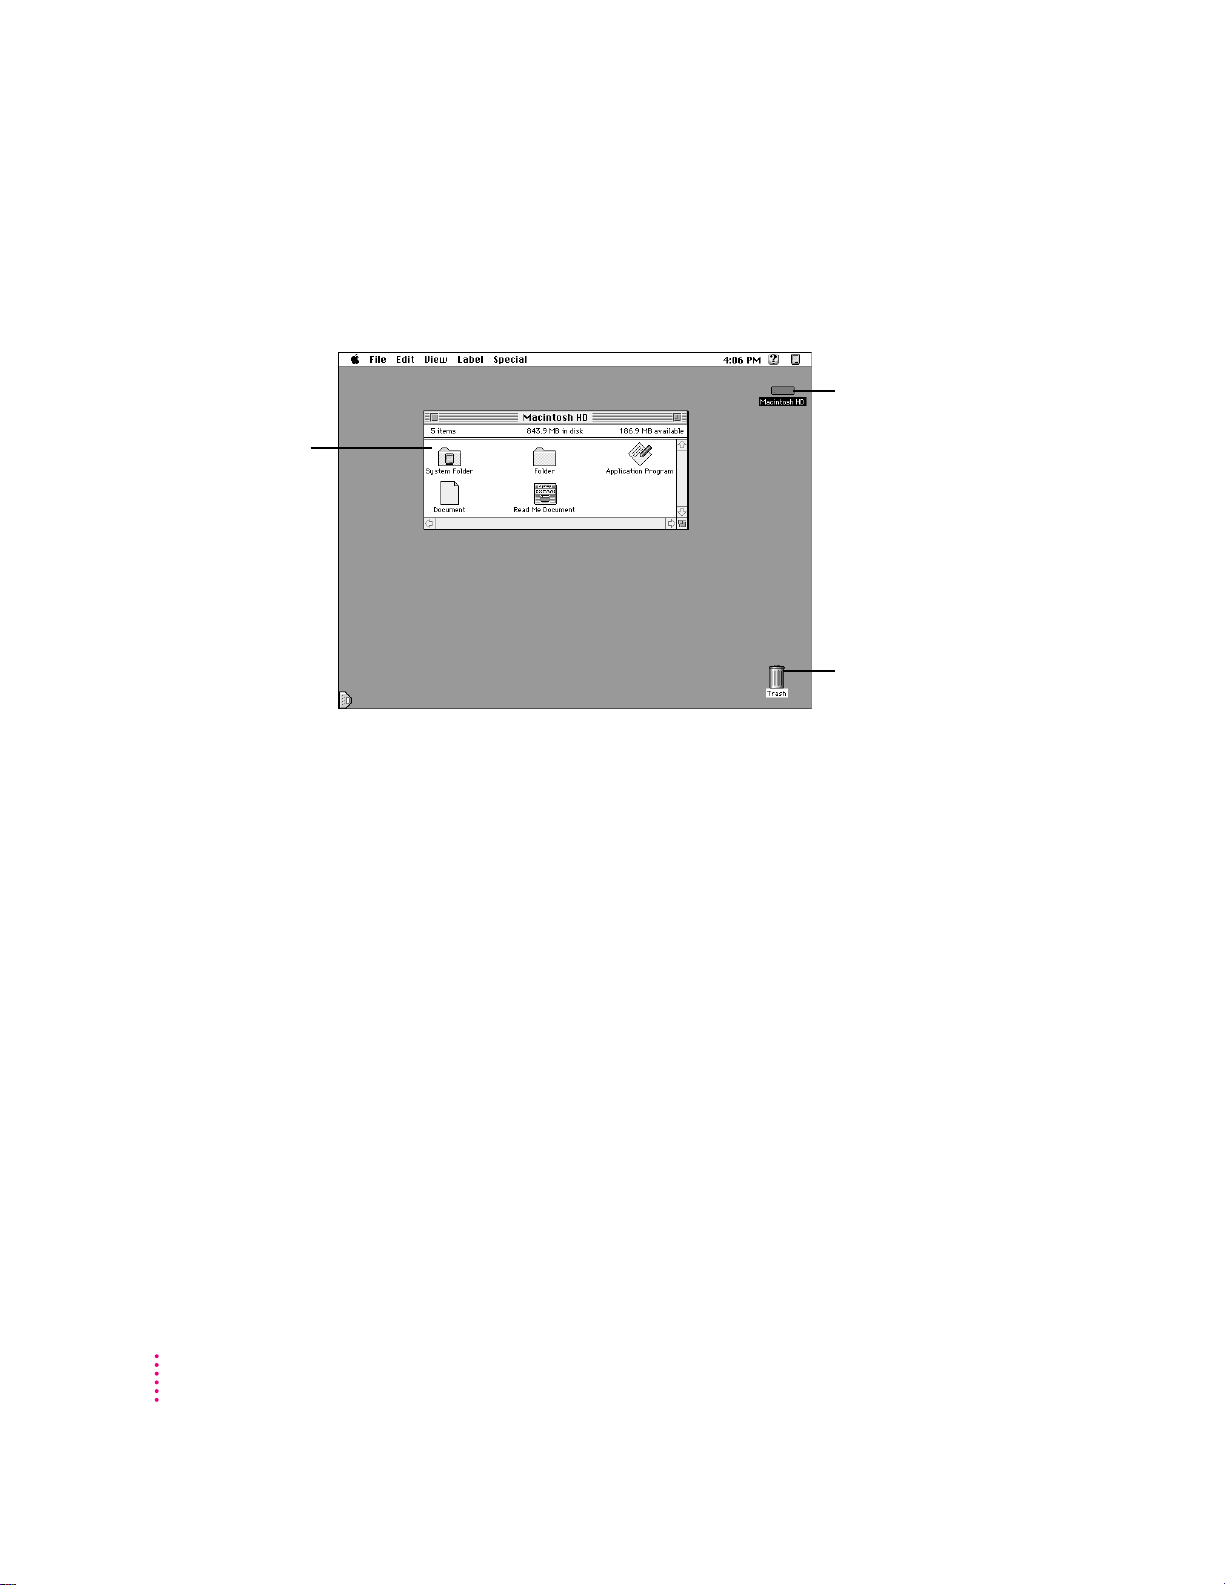
This window contains
several icons:
the System Folder,
which contains the
software that runs
the computer, and
icons for a folder,
application program,
document, and
Read Me document.
You will see many
icons similar to these
on your computer.
Icons
Icons are small pictures that represent disks, programs, documents, and
folders. You can double-click any icon to open it and see what it contains.
This icon represents your
computer’s internal hard
disk. Open this icon to see
documents and software
on your hard disk.
To throw away an item you
no longer want, drag it to
the Trash icon and choose
Empty Trash from the
Special menu.
22
Chapter 1
Page 23

This chapter explains how to get help
h
from the Guide (
the computer, and how to find a tutorial
that teaches you about your computer.
) menu while using
2
Learning to Use Your Computer
The Guide menu is your main source of information about your computer.
The menu is identified by a question mark (h) in the upper-right corner of
the screen.
Macintosh Tutorial
If you are new to the Macintosh, choose Macintosh Tutorial (sometimes
called the Mac OS Tutorial) first. Th e tutorial lets you learn by doing—
the fastest way to lear n about your computer.
Follow the steps in the next section to choose the tutorial from the
Guide men u.
23
Page 24

Learning the basics
To st art th e tutorial, follow these steps:
1Slide your mouse along your mouse pad or desk.
Hold the mouse as shown, with the cable pointing away from you. Rest the
heel of your palm on the desk and grasp the sides of the mouse as shown.
Slide the mouse around with the index finger resting on the mouse button.
Don’t press the mouse button (under your index finger). Notice that the arrow
(8) on the screen moves in the same direction that you move the mouse.
Mouse button
If the arrow doesn’t move, make sure that the cables connecting the mouse
and keyboard are secure and that your mouse is positioned as shown in the
illustration.
24
2Move the tip of the arrow (8) to the question mark (h) in the upper-right portion of
the screen.
If you run out of room on your mouse pad or desk while moving the mouse,
pick it up and place it where there’s more room. (The arrow on the screen
moves only when the mouse is in contact with the mouse pad or desk.)
Chapter 2
Page 25

3With the tip of the arrow on the question mark, press and hold down the mouse button.
A list of choices called a menu app ears. This is the Guide (h) menu, which is
the place to go when you have a question about how to use your computer.
4While holding down the mouse button, move the arrow until the words “Macintosh
Tutorial” are highlighted, then release the mouse button. (On some computers you’ll see
Mac OS Tutorial instead of Macintosh Tutorial.)
A window appears welcoming you to the tutorial. You can set this book aside
for now and follow the instructions on the screen. When you have completed
the tutorial, return to this book and read the next section, “After You Take
the Tutorial.”
IMPORTANT
you want to turn off your computer, however, be sure to follow the proper
shutdown procedure explained at the end of this chapter.
Af ter yo u take the tutorial
If you are comfortable with the basic skills taught in the tutorial, you are
ready to use your computer. However, you may have additional questions.
This book can answer some of them, but there are also many other convenient
sources of information. The next section explains how to find answers
you need.
You can stop the tutorial at any point and resume it later. If
Learning to Use Your Computer
25
Page 26
Where to find answers
When you have questions about using your Macintosh, there are several
places you can look for answers.
Macintosh User’s Manual
Use this book to help you
set up your computer and
learn about it, or to find
solutions to problems.
h
s
o
t
n
i
c
a
M
r
e
w
o
P
l
a
u
n
a
s M
’
r
e
Us
Apple Guide
If you need help or experience a
problem while using the computer,
h
open the Guide (
) menu and
choose Macintosh Guide (or Mac
OS Guide). The Guide menu is the
main source for information while
you are using the computer.
26
Chapter 2
Other manuals
For answers to
questions about
other equipment
or about application
programs you have
purchased, see the
manuals that came
with the equipment
or programs.
Apple’s customer
support hotline
If you can’t find an
answer in any of the
materials provided,
call the customer
support hotline.
(The phone number
for the hotline is in the
service and support
information that came
with your computer.)
Page 27

Four simple tips for using Macintosh Guide effectively
When you don’t see Macintosh Guide (or Mac OS Guide) in the Guide menu
1
Macintosh Guide (or Mac OS Guide) is only available while you’re in the
Finder, the system software program that creates and displays your Macintosh
desktop. To go to the Finder, do one of the following.
m Click the desktop (the colored or patterned background area of your
screen).
m Pull down the Application menu (to the right of the Guide menu) and
choose Finder.
When you can’t find the information you need
m In searching for help topics, use one of the three buttons at the top of the
2
Guide’s initial window by clicking them: Topics, Index, and Look For.
m If you’re in a series of steps and want to return to the list of help topics,
click th e Topics button.
When you can’t see what’s behind the Guide window
Guide windows stay in front of other windows on the screen so that your
3
instructions are never covered.
m Drag a Guide window by its title bar to move it out of the way.
m Click the zoom box once to shrink a Guide window. (To expand the
window, click the zoom box a second time.)
When you need more information about an instruction or term
4
m Click the “Huh” button if it is available.
Title bar
Zoom box
“Huh?” button
Navigation buttons
Learning to Use Your Computer
27
Page 28

Identifying Objects
If you see something unfamiliar on the screen, open the
Guide menu and choose Show Balloons. Then point to
the object you want to identify. When you’re done,
choose Hide Balloons from the Guide menu.
28
Learni ng the Basics
To learn basic skills, open the Guide menu and
choose Macintosh Tutorial. Then follow the
instructions on the screen.
Getting Help via the Internet
If you have an Internet connection, you can get
information from the Apple World Wide Web site at
http://www.apple.com. (For more information
about the Internet, see Chapter 6.)
Chapter 2
Page 29
The Guide Menu
To find an answer to a question, look in the Guide (
menu—your main source of information about your computer.
h
)
Getting Answers to Your Questions
To get answers to questions you have while working with
your computer, open the Guide menu and choose Macintosh
Guide (or Mac OS Guide) or a Guide for the program you are
using. Then click one of the three buttons at the top of the
window: Topics, Index, or Look For, and follow the
instructions to choose a subject.
Getting the Latest News
Double-click the hard disk icon to see the “Read Me”
file pictured here, which contains last-minute tips and
news. Many other Read Me documents are in the
Apple Extras folder.
To open a Read Me document that has “pdf” in the
icon or in the file name, you first need to install the
Adobe Acrobat Reader program, which is available in
the Apple Extras folder.
Learning to Use Your Computer
29
Page 30

Turning the computer off
To turn your computer off, follow these instructions:
1Press the Power key (π) on your keyboard.
The following dialog box appears on the screen:
2Press the Return key on the keyboard (or click the Shut Down button in the dialog box).
You will be prompted to save any unsaved work before the computer
shuts down.
To tu r n th e computer on again, just press the Power key on the keyboard.
Note: In the Finder, you can also turn your computer off by choosing
Shut Down from the Special menu.
30
Chapter 2
Page 31

Read this chapter for information
on installing and working with
software on your computer.
3
Installing and Using Software
Yo u’ll probably wa nt to purchase and install application program software to
do specific kinds of work on your computer. Application programs let you,
among other things, do word processing; create spreadsheets, databases, and
graphics; play games, alone or with others; and explore the Internet.
Your computer includes some basic application programs as well as other
software. Some are preinstalled and ready for use. Others are optional; if you
want to use them, you must install them first.
This chapter explains how to install and use application programs, and
describes the software that came with your computer.
31
Page 32
Installing application programs
Most application programs come with an installer that makes it easy to install
them on your hard disk. Follow the instructions in the manuals that came with
the specific programs to install them. Refer to the general instructions below
for additional help on how to use the programs with the Macintosh operating
system (Mac OS).
If you have a virus protection program installed, you should turn it off before
you install an application program. Also, use the Extensions Manager to turn
off system extensions. For more information about Extensions Manager, see
“Checking Your System Extensions” in Chapter 11, “Diagnostic Techniques.”
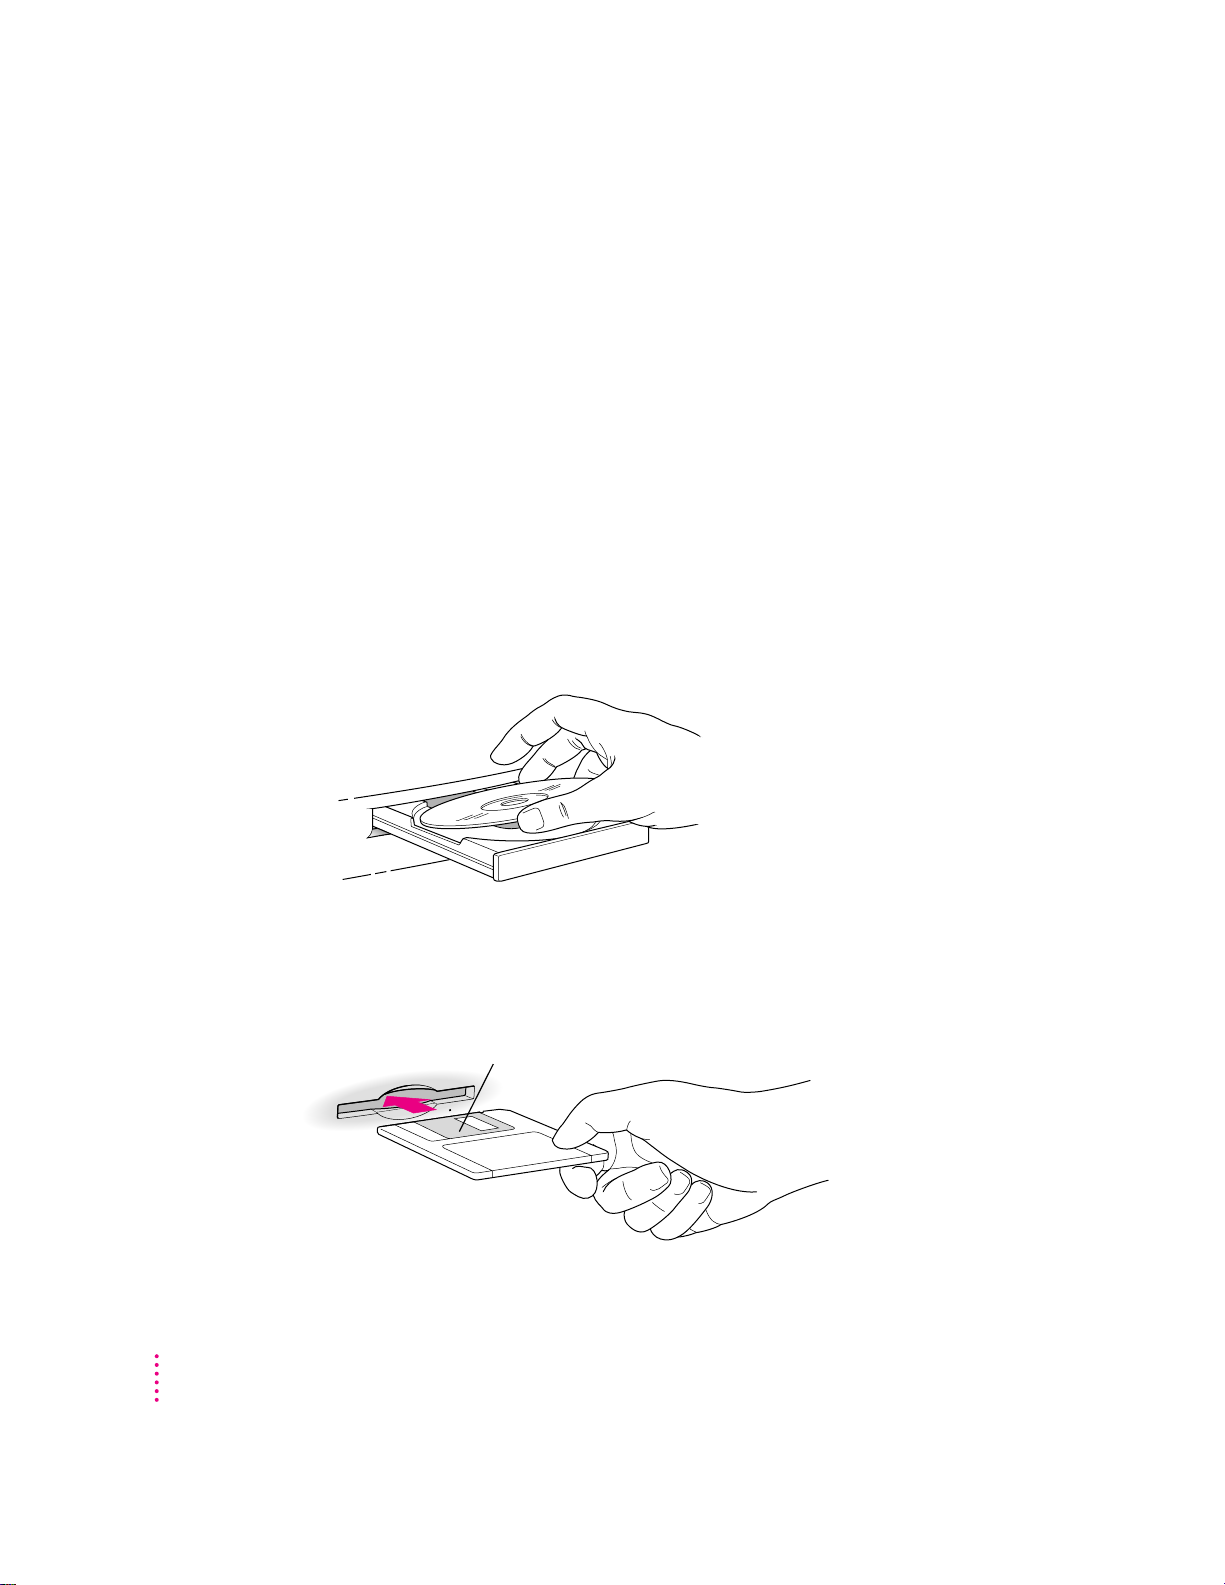
In most cases, you’ll install an application program on your internal hard disk
from a CD-ROM disc that contains the program. The illustration below
shows how to insert a CD-ROM disc into your computer’s CD-ROM drive,
the dis c lying flat with the label side up.
32
Some application programs come on floppy disks. The illustration below
shows how to insert a floppy disk.
Insert the floppy disk, metal
end first, into the floppy disk
drive of your computer.
Chapter 3
Page 33

After you insert the disk containing your application program, follow the
instructions that came with the program to install it.
To ej ect a floppy disk or CD-ROM disc after installation is complete, click the
disk icon to select it and choose Put Away from the File menu.
IMPORTANT
Never copy an entire CD-ROM disc to your hard disk. (Don’t drag
the disc’s icon to your hard disk.) Copying the CD-ROM disc itself can take up
a substantial amount of space on your hard disk. When you open programs on
some CD-ROM discs, you may get a message telling you to copy or install the
program onto your hard disk. If you get this message, refer to the installation
instructions that came with the CD-ROM disc, or double-click the CD-ROM
disc’s icon to open it, and then copy the CD-ROM disc’s program to your
hard disk.
Installing programs over a network
If your computer is connected to a network, there may be application
programs available on the network that you can install. Though you can run
installer programs over a network, it is usually faster to first copy the program
and its installer onto your computer, a nd then run the installer to complete
the installation. Carefully read any Read Me file or other instructions you
find with the program you want to install.
Installing and Using Software
33
Page 34

Opening an application pro gram
You open a program the same way you open other items—by double-clicking
the program’s icon.
When you open a document, the program that created it opens automatically.
Once you are working in a program, you can open other documents i n that
program by opening the File menu and choosing Open.
Working with several programs at a time
You can open as many application programs and desk accessories as your
computer’s random-access memory (RAM) allows.
The Application menu in the top-right corner of the screen lists the programs
you have open. The name of the active program (the one you’re using right
now) has a checkmark next to it, and its icon appears in the menu bar.
Application menu (The icon changes to show the active application.)
Commands to hide or
display open windows
A checkmark
indicates the
active program.
Open programs
34
Finding out which programs are open
If you have several programs and windows open, you can find out which
program is active and which other programs are open by opening the
Application menu.
Chapter 3
Page 35

Switching programs
You can switch to another open program by choosing its name from the
Application menu.
If a program’s icon is dimmed in the menu, that means its windows are
hidden. Choosing the program from the Application menu displays its
windows.
You can also switch to another program by clicking in a window that belongs
to an op en program or by double-clicking a program icon (or the icon of a
document that was created with the program).
Hiding an d showing w indo ws on the desktop
You can hide all windows except those of the active program by choosing
Hide Others from the Application menu. The other programs remain open
even though their windows are hidden. When you switch to another program,
its windows become visible again.
You can hide the active program by choosing the menu item that has “Hide”
next to the program’s name in the Application menu. For example, if the
Finder is active, you can hide it by choosing Hide Finder from the Application
menu.
If you want to see all the open windows, choose Show All from the
Application menu.
Installing and Using Software
35
Page 36

Five tips for using application programs effectively
Use “native” Power Macintosh programs.
m Your Power Macintosh is compatible with most application programs
1
intended for use with Macintosh computers. But it’s best to use Power
Macintosh programs—sometimes called “native” programs—that are
designed especially to take advantage of your computer’s PowerPC
microprocessor.
Put only one copy of each program on your hard disk.
m Having more than one copy can cause errors.
2
If you experience problems with a program, try reinstalling.
m If a program malfunctions consistently, try i nstalling a fresh copy. If that
3
doesn’t help, find out from the software manufacturer whether your version
of the program is compatible with the hardware and system software
you’ re using.
Don’t install additional System Folders.
m Whenever you copy a program disk to your hard disk, be careful not to
4
copy a nother System Folder. Your startup disk should only contain one
Syst em F ol der. Drag any extra System Folders to the Trash.
™
36
Chapter 3
Use virtual memory.
5
m If you run out of memory while using Power Macintosh programs, you can
use space on your computer’s hard disk as additional memory (called
“virtual memory”). For instructions, choose Macintosh Guide (or Mac OS
Guide) from the Guide (h) menu and read the information under
“memory” in the Guide’s index.
You can also add more memory to your computer, as described in
Chapter 8, “Installing PCI Expansion Cards and Additional Memory.”
Page 37

About the software included with your computer
Your computer includes a lot of software. Some of it is preinstalled and ready
for use, while other software must be installed before you can use it. The
types of software that come with your computer include
m Mac OS operating system software
m Optional system software additions
m Application programs
The following sections provide details about the included software.
Mac OS operating system software
The Mac OS is the basic software that runs the computer itself. It tells the
computer what to do when it starts up, keeps track of your documents, files,
and other software, and helps your computer find out what devices—such as
printers and network cables—are attached to it.
The Mac OS was installed on the internal hard disk at the factory, and starts
automatically when you turn on your computer. Here is some of the software
that com prises the Mac OS:
m The Finder, which displays the desktop and allows you to organize
documents, files, and application programs into folders
m PC Exchange, which lets you work with DOS and Windows disks as if they
were Mac OS disks
m QuickTime, which lets you play digital video on your computer
m AppleScript, which allows you to automate tasks in the Finder a nd other
scriptable applications (applications that support AppleScript). Instructions
for using AppleScript are in the Apple Extras folder on your hard disk.
m ColorSync, which helps make sure that the colors you see on your monitor
closely match the colors you get on printers, scanners, and other devices.
For more information about ColorSync, see Macintosh Guide (or Mac OS
Guide), available in the Guide (h) menu.
IMPORTANT
System software is preinstalled on your computer. Do not reinstall
system sof tware unless you are experiencing problems or you want to upgrade
to a more recent version. Consult Chapter 11, “Diagnostic Techniques,” b efore
attempting to reinstall system software.
Installing and Using Software
37
Page 38

Optional system software additions
Your computer includes optional software that adds other capabilities to the
Mac OS. This software was not installed at the factory, so you have to install it
if you want to use it.
Tip: Some of this software can decrease the amount of memory available for
use by programs. To conserve memory, only install the software you think
you’ll use.
These are some of the optional system software additions included with your
computer:
m OpenDoc, which extends the usefulness of your applications by adding
new functionality in the form of self-contained software components, or
“parts.” A variety of parts will be available from both Apple and thirdparty sources, including parts for placing Internet resources directly into
documents.
m QuickDraw GX, which gives your computer more powerful printing
capabilities
m QuickDraw 3D, which gives your computer the ability to display graphics
in three dimensions
m PlainTalk, which allows your computer to understand spoken commands in
English and Mexican Spanish
38
m Apple VideoPhone software, which allows you to set up video conferences
and collaborate over a network
To see what is included with your computer, look in the Apple Extras folder
on your hard disk and in the CD Extras folder on the CD-ROM disc that came
with your computer. There is usually a Read Me file that explains each system
software addition in more detail. To install on e of these items, look for an
Installer icon, similar to the one below, for the software. Double-click the
Installer and follow the instructions that appear.
Chapter 3
Page 39

Application programs
Your computer comes with application programs to play QuickTime videos, to
play audio CDs in your CD-ROM drive, and to open HyperCard stacks. It also
includes Internet access programs such as the Apple Internet Connection Kit.
To see what’s available, look on your hard disk and on the CD-ROM disc that
came with your computer. Some of the programs are preinstalled, while
others must be installed before you can use them. To install one of these
items, look for an Installer icon for the program. Double-click the Installer
and follow the instructions that appear.
If you have questions about using an application program, refer to the Read
Me file for the program, which is usually found inside the program’s folder.
Some programs also have online help that you can access after you have
installed the program. Look for online help in the Guide (h) menu after you
start the program.
For more information about the Apple Internet Connection Kit, see
Chapter 6, “Using an Online Service or the Internet.”
Backing up your files
Making backup copies of important files is good protection against possible
damage to the originals.
m You can back up files stored on your hard disk by copying them to
floppy disks.
m You can back up an entire floppy disk by copying it to another floppy disk
of the sa m e capacity or larger, or by copying it to a hard disk.
m You can use a commercial backup program to copy new and changed files
from a hard disk to another hard disk, a tape drive, a series of floppy disks,
or to another form of removable media.
m If your computer is on a network, you may be able to back up files by
copyi ng t hem to a shared disk on the network.
Installing and Using Software
39
Page 40

Page 41

Communicating With Other Computers
Chapter 4 Connecting Your C omputer to a Telephone Line
Chapter 5 Conn ecting Your Computer to a Network
Chapter 6 Using an Online Se rvice or the Intern et
part
II
Page 42

Page 43

Read this chapter for information
about the equipment you need
to get online, such as modems
and ISDN lines.
4
Con necti n g Your Computer to a Telephone Line
A world of information is now available online. By connecting your computer
to a telephone lin e, you can access the Intern et, send and receive electronic
mail (“e-mail”) and faxes, and connect to online services like America Online
and CompuServe. You can also use a telephone line to access another
Macintosh or an entire AppleTalk network from a remote Macintosh
computer. (For example, you can telecommute by accessing a company
computer network from a remote location, such as a home office.)
To get online, you need special equipment and software. This chapter provides
a brief introduction to the equipment you need. For information about the
software you need to perform online tasks, see Chapter 6, “Using an Online
Service or the Internet.”
43
Page 44

Types of equipment
There are three types of equipment you can use to get online: a modem,
an ISDN line, and shared telecommunications equipment on your
network.
Modem:
A modem may be the most common way to connect a computer to
a phone line, particularly if you are using your computer at home. A
modem works with standard analog telephone lines. For more information
about modems, see the next section, “Choosing and Connecting a
Modem.”
ISDN line:
An Integrated Services Digital Network (ISDN) line is a special
digital phone line that is about four times faster than the fastest modem
used over a standard analog telephone line. However, an ISDN line
typically costs more than regular phone service and may not be available
in your community. For more information about ISDN, see “Connecting
to an ISDN Line” later in this chapter.
Shared telecommunications equipment on your network:
One of the advantages
of n etworks is that you can share equipment, such as printers and file
servers. If your computer is one of many linked together in a network,
there may also be shared communications equipment connected to your
network that will allow you (or anyone else on your network) to get
online. Contact your computer network administrator for more
information. You can also find general information about networks in
Chapter 5, “Connecting Your Computer to a Network.”
44
Chapter 4
Page 45

Choosing and connecting a modem
A modem is a piece of equipment that turns the data from your computer into
information that can be transmitted over telephone lines. The modem enables
your computer to send and receive telephone calls, to connect to the Internet,
to access online services, and to communicate with other computer users.
Some modems also allow you to transmit documents on your computer to fax
machines as well as receive faxes as documents that you can view on screen
or print.
Keep in mind that when your phone and a modem share a single phone line,
you will not be able to use both at the same time, even if they are attached to
separate phone jacks. While you use a modem, outside callers get a busy
signal and you cannot call out. Conversely, when you use your phone, you
cannot use the modem. (If you miss phone calls because you often use your
modem, you may want to get a second phone line installed or get a phone
company message service which, unlike an answering machine, will record
messages even when your phone is off the hook or you are online.)
Also keep in mind that long-distance charges accrue when your modem dials
long-distance numbers. In most cases, an online service or an Internet service
provider will have a local access phone number so that long-distance charges
do not apply.
Connecting Your Computer to a Telephone Line
45
Page 46

Choosing a modem
When selecting a modem, look for one with fast data-transfer speed, a
compatible modem cable, and good bundled software.
Data-transfe r speed
The data-transfer speed determines how fast a modem can move data
between your computer and other computers. Purchase the fastest modem
that you can afford, particularly if you plan to connect to the World Wide Web.
Many Web pages contain graphics, video, and sound files that will take longer
to download (copy onto your computer) with a slower modem.
The data-transfer speed of a modem is specified in kilobits per second (kbps)
or bits per second (bps). Faster modems transfer data to and from your
computer more quickly than slower ones. The following table describes the
current modem speeds that are available.
Modem speed Usage
33,600 bps The fastest modem available (as of this writing) for use with standard
(33.6 kbps) analog telephone lines. Suitable for World Wide Web use.
28,800 bps Slightly slower than a 33.6 kbps modem, but still very suitable
(28.8 kbps) for World Wide Web use.
46
14,400 bps Only half as fast as a 28.8 kbps modem. May be acceptable for
(14.4 kbps) text-oriented applications such as e-mail or terminal emulation.
9600, 4800, Too slow for most purposes.
and 2400 bps
Modem cable
If you purchase a modem that is designed for use with a Macintosh, it will
probably include a Macintosh-compatible modem cable. If you have to
purchase a cable separately, make sure it supports hardware handshaking, a
protocol that controls the flow of data between computers. Also, check to
make sure the cable has a rounded connector that will fit the modem port on
the back of your computer (labeled with a W icon). A cable designed for use
with a Windows- or DOS-compatible computer won’t work with your
Macintosh.
Chapter 4
Page 47

Bundled software
Many modems include bundled software, such as fax software, a terminal
emulation program, and free trial membership software for online services. If
you can’t decide between two comparatively priced modems, pick the one that
comes with the best bundled software.
Connecting a modem
To connect a modem, follow the instructions in the manuals that came with
your modem.
Note: Some modem models have a single phone jack, while others have two.
If your modem has only one phone jack, consider purchasing a line splitter at
an electronics supply store. A li ne splitter enables you to plug your phone and
your internal modem into the same jack at the same time. (By the way, you
can keep your answering machine connected to your phone, even if your
phone and modem share the same telephone line.)
IMPORTANT
an analog phone line—the kind used typically in homes. Connecting to an
ISDN line could damage the modem.
IMPORTANT
storms. This will prevent a destructive voltage overload from damaging the
modem.
Connecting to an ISDN line
If you have a home office, telecommute frequently, or routinely need to send
and receive large files, then a 28.8- or 33.6-kbps modem may not be fast
enough for your needs. For faster performance, you may want to consider
connecting your computer to an Integrated Services Digital Network (ISDN)
digital telephone line, which can transfer data at 128 kbps, nearly 4.5 times
faster th an a 28.8-kbps modem.
ISDN lines are available to most but not all residential and business telephone
customers. Ch eck with your local phone company to see if ISDN service is
available at your location.
When connecting a modem, make sure you connect the modem to
Disconnect your modem from the phone jack during lightning
Connecting Your Computer to a Telephone Line
47
Page 48

There are fixed monthly charges and per-minute usage fees for ISDN, just like
regular phone service. Typically, ISDN costs more than regular phone service,
but it is still affordable for many business and residential purposes. Because
one ISDN line can support several devices simultaneously—such as a
computer, voice phone, and fax machine—you may be able to replace existing
extra phone lines with one ISDN line.
Note: Because an ISDN line requires a power source at your location, a
phone attached to an ISDN line will not work during a power outage. For
emergency use, you should strongly consider keeping your regular analog
phone line, which receives power from the phone company.
Setting up an ISDN line
If you’re interested in setting up an ISDN line, first contact your local phone
company to see if ISDN service is available at your location. Your phone
company can also provide sp ecific information about monthly charges and
usage fees. (Your phone company may also charge an installation fee, which
may be waived or refunded if you agree to keep the ISDN line for a specified
amount of time.)
In addition, you also need to purchase and configure an ISDN terminal
adapter, which connects to the external modem port on your Macintosh and
to the ISDN line. (ISDN terminal adapters are often called “ISDN modems”
because they are somewhat similar to modems.)
48
Some ISDN terminal adapter models may be difficult to configure with the
network configuration of your employer or Internet service provider (ISP).
Work closely with your computer network administrator or ISP to make sure
you purchase a compatible ISDN terminal adapter.
Chapter 4
Page 49

Read this chapter for information on
physically connecting and configuring
your computer to work on a network.
5
Connecting Your Computer to a Network
Your Macintosh has built-in networking ports so that you can connect it to a
network that consists of as few as two computers or as many as thousands or
even millions of computers and other devices. The network allows you and
the other people connected to it to share information, access remote services,
and share computing resources such as printers and modems.
A network extends the features of your Macintosh by extending your reach to
the services and resources provided on the network. For example, by itself,
your computer lets you store, retrieve, and modify information on hard disks
and floppy disks. On a network, however, you can also store and retrieve
information on servers, access information that other people have stored on
their computers, and use electronic mail and other network services.
You can connect your Macintosh to a LocalTalk network and to a high-speed
Ethernet network. You can also purchase peripheral component interconnect
(PCI) cards for alternative networks such as TokenRing, ISDN, and Fiber
Distributed Data Interface (FDDI).
49
Page 50

This chapter describes how to connect to and configure your computer on
LocalTalk and Ethernet networks. Refer to the appropriate information source
for other network-related information:
m If your computer is already connected to a network, refer to Macintosh
Guide (or Mac OS Guide), available in the Guide (h) menu, for
information about printing on a networked printer, accessing information
on file servers, and sharing files on your computer with other users. Also,
your network administrator can provide information about network
software that may be available, such as Intern et access and electronic mail.
m If your location does not currently have a network and you are interested
in setting one up, you should refer to a book on Macintosh networking that
will help you select and plan a network that is appropriate for your
organization. Many books are available, such as Planning and Managing
AppleTalk Networks, an Apple book published by Addison-Wesley that is
available at computer bookstores.
50
Chapter 5
Page 51

Connectin g to a Lo calTalk network
To connect your Macintosh to a LocalTalk network, you will need LocalTalk
cables and a LocalTalk adapter. In most cases, the Apple LocalTalk Locking
Connector Kit DIN-8, available from your Apple-authorized dealer, contains
the components you need to connect your Macintosh to an existing LocalTal k
network. If your network uses standard telephone cables for your network
wiring, obtain an Apple LocalTalk RJ-11 Connector instead.
Apple LocalTalk RJ-11 ConnectorApple LocalTalk Locking Connector Kit DIN-8
LocalTalk adapterLocalTalk adapter
LocalTalk cable
Standard telephone cable
Note: At your location, there may be a network administrator who is
responsible for network maintenance and upkeep. If so, ask your network
administrator to help connect your computer to the network.
To connect your Macintosh to a LocalTalk network, do the following:
1Shut down your Macintosh.
2Attach the LocalTalk adapter to the printer port on your computer.
Printer port icon
Printer port
Connecting Your Computer to a Network
51
Page 52

3Attach a network cable between the LocalTalk adapter connected to your computer and
the last LocalTalk adapter on your existing network.
Use the LocalTalk cable that comes with the Apple LocalTalk Locking
Connector Kit DIN-8. Use a standard telephone cable with RJ-11 connectors
if you are using the Apple LocalTalk RJ-11 Connector.
Printer port
LocalTalk adapter
52
LocalTalk cable
Next, see “Configuring Your Network Connection” later in this chapter for
information on configuring your LocalTalk connection.
Chapter 5
Page 53

Connecting to an Ethernet network
The built-in Ethern et capabilities of your Macintosh allow you to connect to
any standard Ethernet network using 10Base-T twisted-pair cables, thin or
thick coaxial cables, fiber-optic media, or other standard Ethernet cables.
You can connect dir e ct ly to an Ethernet network that uses 10Base-T twisted-
pair cable. To connect your Macintosh to an Ethernet n etwork that uses
coaxial cables, you need one of the following Ethernet media adapters:
m Apple Ethe rnet Thin Coax Tra nsceiver
m Apple Ethe rnet AU I Adapter
See your Apple-authorized dealer for more information on Apple Ethernet
media adapters. Refer also to the following instructions for information on
which items to purchase.
WARNING
Do not connect cables to the back of your computer when the
computer is on or you may damage your system.
You can connect an adapter and cable for an Ether net network directly to the
computer without installing an expansion card. You can find the Ethernet
ports on the back of your Macintosh by looking for the Ethernet icon:
Ethernet icon
AAUI Ethernet port
10Base-T Ethernet port
Although you can connect cables to both of these Ethern et ports at the same
time, only one of the ports will be active. For more information, see
“Connecting to Multiple Networks Simultaneously” later in this chapter.
Note: At your location, there may be a network administrator who is
responsible for network maintenance and upkeep. If so, ask your network
administrator to help connect your computer to the network.
Connecting Your Computer to a Network
53
Page 54

Connecting to a twisted-pair Ethernet network
Follow this procedure to connect your Macintosh to an Ethernet network that
uses twisted-pair cable. The hardware connection requires a twisted-pair
patch cord with an RJ-45 telephone-style connector. You plug the patch cord
into a wall plate that is connected to a centralized 10Base-T hub.
To connect your Macintosh to a twisted-pair Ether n et network:
1Shut down your Macintosh.
2Plug one end of the twisted-pair patch cord into the 10Base-T Ethernet port on
your Macintosh.
3Plug the other end of the twisted-pair patch cord into an RJ-45 wall outlet that is
connected to a twisted-pair Ethernet network.
Ethernet port
(10Base-T)
Wall plate 10Base-T hub
3-meter patch cord
Next, see “Configuring Your Network Connection” later in this chapter for
information on configuring your network connection.
Connecting to a thin coaxial Ethernet network
Follow this procedure to connect your Macintosh to an Ethernet network
that uses thin coaxial cabl e. The hardware connection requires an Apple (or
Apple-compatible) thin coaxial transceiver and a thin coaxial cable.
54
Chapter 5
Page 55

IMPORTANT
You can connect your Macintosh anywhere along a network;
however, to do so requires that you temporarily disconnect the network,
which could disrupt existing network services and other people using the
network. Consult your network administrator before connecting your
computer to the network.
To connect your Macintosh to a thin coaxial network:
1Shut down your Macintosh.
2Attach one end of a thin coaxial cable to the last thin coaxial transceiver on the network.
3Attach the other end of the thin coaxial cable to one of the connectors on the thin coaxial
transceiver.
4Plug the connector on the transceiver into the AAUI Ethernet port on your Macintosh.
A thin coaxial network must be terminated at the endpoints to function. An
Apple tra nsceiver is self-terminating. A non-Apple transceiver may require a
terminator; check the documentation that came with the transceiver.
Ethernet port (AAUI)
Ethernet thin coaxial transceiver
Thin coaxial cable
Next, see “Configuring Your Network Connection” later in this chapter for
information on configuring your network connection.
Connecting Your Computer to a Network
55
Page 56

Connecting to other types of Ethernet networks
The Apple Ethernet AUI Adapter is a universal adapter that lets you connect
your Macintosh to less-common types of industry-standard Ethernet media,
such as thick coaxial or fiber-optic cable. If you are using the Apple Ethernet
AUI Adapter, you also need an Ethern et transceiver for your specific media
type; the transceiver must have a standard AUI port on it.
To connect your Macintosh to an Ethernet transceiver for other types of
Ethernet media:
1Shut down your Macintosh.
2Connect the Ethernet transceiver to the network following the instructions that came
with the transceiver.
3Plug the transceiver cable from the Ethernet transceiver into the standard AUI port on
the Apple Ethernet AUI Adapter.
Electrical outlet
56
Apple Ethernet AUI Adapter
Ethernet port (AAUI)
Ethernet transceiver for other media
Chapter 5
Page 57

4Plug the adapter’s power cord into an electrical power outlet.
5Plug the connector on the Apple Ethernet AUI Adapter into the AAUI Ethernet port on
your Macintosh.
Next, see “Configuring Your Network Connection” later in this chapter for
information on configuring your network connection.
Connecting to multiple networks simultaneously
Because your Macintosh has three networking ports—LocalTalk, AAUI
Ethernet, and 10Base-T Ethern et—it is possible to be physically connected to
more than one kind of network at the same time. However, you can use only
one of your connections at one time.
If both 10Base-T and AAUI networks are connected, your Macintosh
automatically uses the 10Base-T connection. You cannot use the AAUI
connection unless you physically disconnect the 10Base-T connection.
If you are connected to both a LocalTalk and an Ethernet n etwork (either
10Base-T or AAUI), your computer uses the Ether n et connection unless you
specify LocalTalk in the AppleTalk control panel. “Configuring Your
AppleTalk Network Connection” in the section “Configuring Your Network
Connection” (next) explains how to specify the port you wa nt to use.
Connecting Your Computer to a Network
57
Page 58

Configuring your network connection
After you physically connect your computer to a LocalTalk or Ethernet
network, you need to configure your network connection in the AppleTalk
control panel, the TCP/IP control panel, or both.
You use the AppleTalk control panel to set up your connection to an
AppleTalk network (that is, a network using the AppleTalk protocol).
You use the TCP/IP control panel to set up your connection to the Internet
and to a TCP/IP network. TCP/IP stands for Transmission Control
Protocol/Intern et Protocol, a standard system for connections between
computers of different types.
You may need additional information about the network to which your
computer is connected, or about the service through which your computer is
connected to the Internet. To get this information, you may need to contact
your network administrator or your Internet service provider.
58
Chapter 5
Page 59

Configuring your AppleTalk network connection
To configure your AppleTalk network connection, you must specify the port
you use to connect your computer to the network.
Larger networks use zones to create logical groupings of computers, printers,
servers, and other network devices. For example, a network might have a zone
for each floor in a multistory office building. If your network has more than
one zone, you can choose the zone in which your computer is located. The
zone you choose is the zone that is automatically selected in the Chooser (for
example, when you select a network printer) and it is the zone in which other
network users can find your computer if you turn on file sharing.
To configure your AppleTalk network connection, follow these steps:
1Choose Control Panels from the Apple (
2Double-click the AppleTalk icon to open it.
K
) menu.
The AppleTal k control panel opens.
3 Use the “Connect via” pop-up menu (if available) to choose the port through which your
computer is connected to the network.
You can connect to an AppleTalk network through an Ethern et port, the
printer port, the modem port, or any additional ports available on expansion
cards installed in your computer. (Any additional ports appear automatically
in this pop-up menu.)
Note: If you don’t see a pop-up menu here, this setting has been locked.
Contact your network administrator for assistance. (If you don’t have a
network administrator, you can use the Administration user mode to unlock
this setting. For more information about user modes, click the h button in the
AppleTal k control panel.)
Connecting Your Computer to a Network
59
Page 60

4 Use the Current Zone pop-up menu (if available) to choose the zone you want.
If you don’t see a pop-up menu here, this setting has been locked or your
network is not set up to allow you to choose a zone. Zones are set up by the
network administrator.
5Click the close box to close the AppleTalk control panel.
If you have made configuration changes, an alert box asks if you wa nt to save
them. If you have changed the port, an alert box also tells you that the change
will interrupt any AppleTalk services that are established. This means that
your network services such as printers and e-mail may be temporarily
unavailable, and you may have to choose a printer and log on to your e-mail
again afte r saving changes.
6To save your changes, click the Save button.
Your changes take effect immediately; you do not have to restart your
computer.
Getting more information about the AppleTalk control panel
Macintosh Guide (or Mac OS Guide) contains information about additional
capabilities available in the AppleTal k control panel, such as:
60
m using configurations, a way to save different AppleTalk settings and switch
among them as desired—for example, if you use your computer with more
than one network
m using the User Mode command to change the availability of settings in the
AppleTal k control panel
m turning AppleTalk off in order to save RAM in your computer when you
are not using an AppleTal k n e twork
For more information about these capabilities, click the h button in the
AppleTal k control panel.
Chapter 5
Page 61

Configuring your TCP/IP network connection
You use the TCP/IP control panel when your computer is connected to a
network that uses TCP/IP standards, such as the Internet.
TCP/IP (Transmission Control Protocol/Internet Protocol) is a standard set of
rules (or protocols) for making connections among different types of
computers. TCP/IP protocols can be used with many different types of
network hardware, including LocalTal k, Eth ernet, and dialup Internet
connections. If you don’t know whether your network uses TCP/IP, contact
your network administrator.
To set up your TCP/IP network connection, you must specify the port you use
to connect your computer to the network. TCP/IP networks also require
information about your computer’s n etwork address. You must enter that
information in the control panel, or specify a server on which the information
can b e found.
Before you begin
To use a TCP/IP network, your computer must have an IP (Internet Protocol)
address, and it often must have a subnet mask number. Your network address
and subnet mask number identify your computer’s location on the network.
This information can be entered manually or obtained automatically from a
server. Before you set up your TCP/IP network connection, obtain your IP
address and subnet mask number from your Internet service provider or
network administrator. If these can be obtain ed automatically from a server,
find out whether the server is a “BootP,” “RARP,” “DHCP,” or “MacIP”
server.
“BootP” stands for Boot Protoc o l. A BootP server can automatically provide
all the TCP/IP setup information you need.
“RARP” stands for Reverse Address Resolution Protoc o l. A RARP server can
provide the I P address for your computer, but you must provide the rest of the
information manually.
“DHCP” stands for Dynamic Host Configuration Protocol. A DHCP server can
automatically provide all the TCP/IP setup information you need.
Connecting Your Computer to a Network
61
Page 62

“MacIP” stands for Macintosh Internet Protocol. MacIP is both a type of server
and a protocol for sending Internet-typ e packets of information over an
AppleTal k n etwork. A MacIP server can provide all the TCP/IP setup
information you need, but you need to know the zone where the MacIP
server is located.
Setting up
To set up your TCP/IP network connection, follow these steps:
1Choose Control Panels from the Apple (
K
) menu.
The Control Panels window opens.
2Double-click the TCP/IP icon to open it.
The TCP/IP control panel opens.
3 Use the “Connect via” pop-up menu to choose the port through which your computer is
connected to the network.
62
Note: If you don’t see the pop-up menu here or other settings described in
this section, they may have been locked. Contact your network administrator
for assistance. (If you don’t have a network administrator, you can use the
Administration user mode to unlock this setting. For more information about
user m odes, click the h button in the TCP/IP control panel.)
Chapter 5
Page 63

4 Use the Configure pop-up menu to choose a configuration method.
If you are connected using Ethernet, the pop-up menu looks like this:
If you are connected using AppleTalk (MacIP), the pop-up menu looks
like this:
What you do next depends on whether you are configuring your network
manually or automatically.
5If you are configuring your network connection manually, type the information provided
by your network administrator or Internet service provider into the appropriate boxes.
You must specify an IP address. You may also need to enter a subnet mask
number, router address, and other information.
6If you are configuring your network connection automatically, do one of the following:
m If you are using a BootP server or DHCP server, skip ahead to step 7. T h e
server usually provides all the configuration information needed by TCP/IP.
m If you are using a RARP server, you may need to type additional
information provided by your network administrator or Internet service
provider i nto the appropriate boxes. If so, enter the information now.
m If you are using a MacIP server, click Select Zone. In the dialog box that
appears, choose the zone that contains the MacIP server you want to use
and then click OK.
Connecting Your Computer to a Network
63
Page 64

7Click the close box to close the TCP/IP control panel.
If you have made configuration changes, an alert box asks if you wa nt to save
them. If you have changed the port, an alert box also tells you that the change
will interrupt any TCP/IP services that are established. For example, you may
have to quit and reopen a Web browser or e-mail software after saving changes.
8To save your changes, click the Save button.
Your changes take effect immediately; you do not have to restart your
computer.
Getting more information about the TCP/IP control panel
Macintosh Guide (or Mac OS Guide) contains information about additional
capabilities available in the TCP/IP control panel, such as:
m using configurations, a way to save different TCP/IP settings and switch
among them as desired
m using the User Mode command to change the availability of settings in the
AppleTal k control panel
m turning TCP/IP off to save RAM when you are not using a TCP/IP network
For more information about these capabilities, click the h button in the
TCP/IP control panel.
64
Chapter 5
Page 65

Read this chapter for information
about the Internet and online
services software that is included
with your computer.
6
Using an Online Service or the Internet
You can use your Macintosh to join the fastest growing organization on Earth:
the onlin e community. By connecting your computer to an online service or
the Internet, you can exchange electronic mail (“e-mail”) messages, gather
information on topics of interest, participate in discussion groups, download
software, and use many other services.
Your Macintosh computer includes software that you can use to connect to an
online service or the Internet. T his chapter describes the software a nd
provides a brief introduction to the information and services that are available
online.
In addition to the included software, you need special equipment, such as a
modem, to get online. For more information about the equipment you need,
see Chapter 4, “Connecting Your Computer to a Telephone Line.”
Connection software
Your Macintosh comes with two different application programs that you can
use to get onlin e: America Online and the Apple Internet Connection Kit.
Although both programs provide Internet access, they have different features;
you can use the one that best addresses your needs.
65
Page 66

America Online
America Online (AOL) is an online service; in addition to Internet access,
America Online provides many exclusive information services that may not
be available on the Inter net. AOL is also very easy to use, and may be the
best choice if you have never used an online ser vice or the Internet before.
For more information about AOL, see its folder on your hard disk or on the
CD that came with your computer.
Apple Inte rnet Conne c tion Kit
The Apple Internet Connection Kit is a collection of Apple and third-party
software that lets you connect to the Inter n et quickly and easily. The kit
includes the Netscape Navigator Web browser, Claris Emailer Lite e-mail
software, and several other Intern et applications and utilities. For more
information, see the Apple Internet Connection Kit: Getting Started manual that
came with your computer. If you decide to use the kit, your best source of
help is the Apple I ntern et Connection Kit Guide, available in the Guide (h)
menu when you’re using the kit’s software.
Note: To connect to the Internet by modem using the Apple Internet
Connection Kit, you need an Internet service provider (ISP). You pay the ISP
to use their access to the Internet, much as you pay the phone company for
access to the telephone network.
66
Chapter 6
Page 67

What you can do online
You can usually do the following through an online ser vice or the Internet.
Exchange electronic mail
You use e-mail to exchange messages. You can create, read, and respond to
e-mail. Unlike paper mail, you can conveniently send the same e-mail
message to a group of recipients. You can also subscribe to e-mail distribution
lists that provide information on topics of interest to you.
Access the World Wide Web
The World Wide Web is the fastest growing part of the Internet. Many
organizations post information on Web “pages” that you can view with
software called a Web browser. A por tion of the Apple Computer “home
page” is shown below.
A Web page usually contains words or pictures that serve as links to other
information; you click these links to display related information. There
are Web pages available on every imaginable subject, providing news,
information, and entertainment. You can search the Web to find information
on topics of interest.
Some onlin e ser vices and companies that provide Internet access will even
set aside some space for you to make your own Web page available.
Using an Online Service or the Internet
67
Page 68

Download files
You can retrieve pictures, sound files, movies, text documents, utilities, and
application software at a minimal cost (and often at no cost at all). Although
Apple Computer, Inc., does not provide technical assistance with non-Apple
software you download, the software’s creators may provide technical support.
Join a discussion group
Discussion groups are forums where people with common interests openly
exchange info rmation by writing messages. On the Intern et, these discussion
groups are called Usenet newsgroups. Like Web pages, Usenet newsgroups
address nearly every subject imaginable. Topics range from stamp collecting
to nuclear physics to cooking.
68
Chapter 6
Page 69

Expanding Your Computer’s Capabilities
Chapter 7 Conn ecting Additional Equipment
Chapter 8 Installing PCI Expansion Cards and Additional Memory
part
III
Page 70

Page 71

This chapter describes how to
connect additional equipment such
as a printer, second monitor, input
device, or audio or video device.
7
Con nect ing Additional Equipment
You can expand your computer system by connecting other equipment to it.
The illustrations on the next two pages show where equipment connects to
your Macintosh.
This chapter describes how to connect the following types of devices:
m audio equipment, such as a microphone, headphones, or speakers
m video equipment, such as a video camera or VCR
m external SCSI devices, such as a hard disk and a cartridge drive
m a printer
m a second monitor
m additional ADB input devices, such as a trackball or a graphics tablet
m security equipment to protect your Macintosh
For instructions on installing internal equipment, see Chapter 8, “Installing
PCI Expansion Cards and Additional Memory.” For instructions on connecting
to a network, see Chapter 5, “Connecting Your Computer to a Network.”
IMPORTANT
and must not exceed the maximum power allowance for that device. Turn off
the co mputer before connecting a SCSI or ADB device. For more
information, consult an Apple-authorized dealer, the manufacturer of the
equipment you add, or the Tech nical In form a t ion booklet that came with
your computer.
Each device you add should be compatible with your computer
71
Page 72

Your Computer’s Components and Front Panel Controls
Floppy disk drive
CD-ROM drive
C
CD-ROM drive
Open/Close button
Zip drive (optional)
Expansion bay
Speaker
Power button
Keyboard Mouse
Microphone
(optional)
Monitor
π
Power key
72
Chapter 7
Page 73

Floppy disk drive Works with high-density and double-sided 3.5"
(89 mm) floppy disks
C
CD-ROM drive Opens and closes the CD-ROM drive tray
Open/Close button
CD-ROM drive Works with CD-ROM discs and plays standard audio
and Photo CDs
Zip drive Works with Zip disks. For more information about
the Zip drive, see Appendix C, “Using the Internal
Zip Drive.”
Expansion bay Behind this front panel, there is an expansion bay for
an optional 3.5" or 5.25" storage device (up to 1.625"
[41.3 mm] high).
I
Power button A green light indicates that the computer is on.
Monitor Your monitor may look different. An Apple Multiple
Scan 20 Display is shown here.
π
Power key Use this key to turn your computer on and off.
Connecting Additional Equipment
73
Page 74
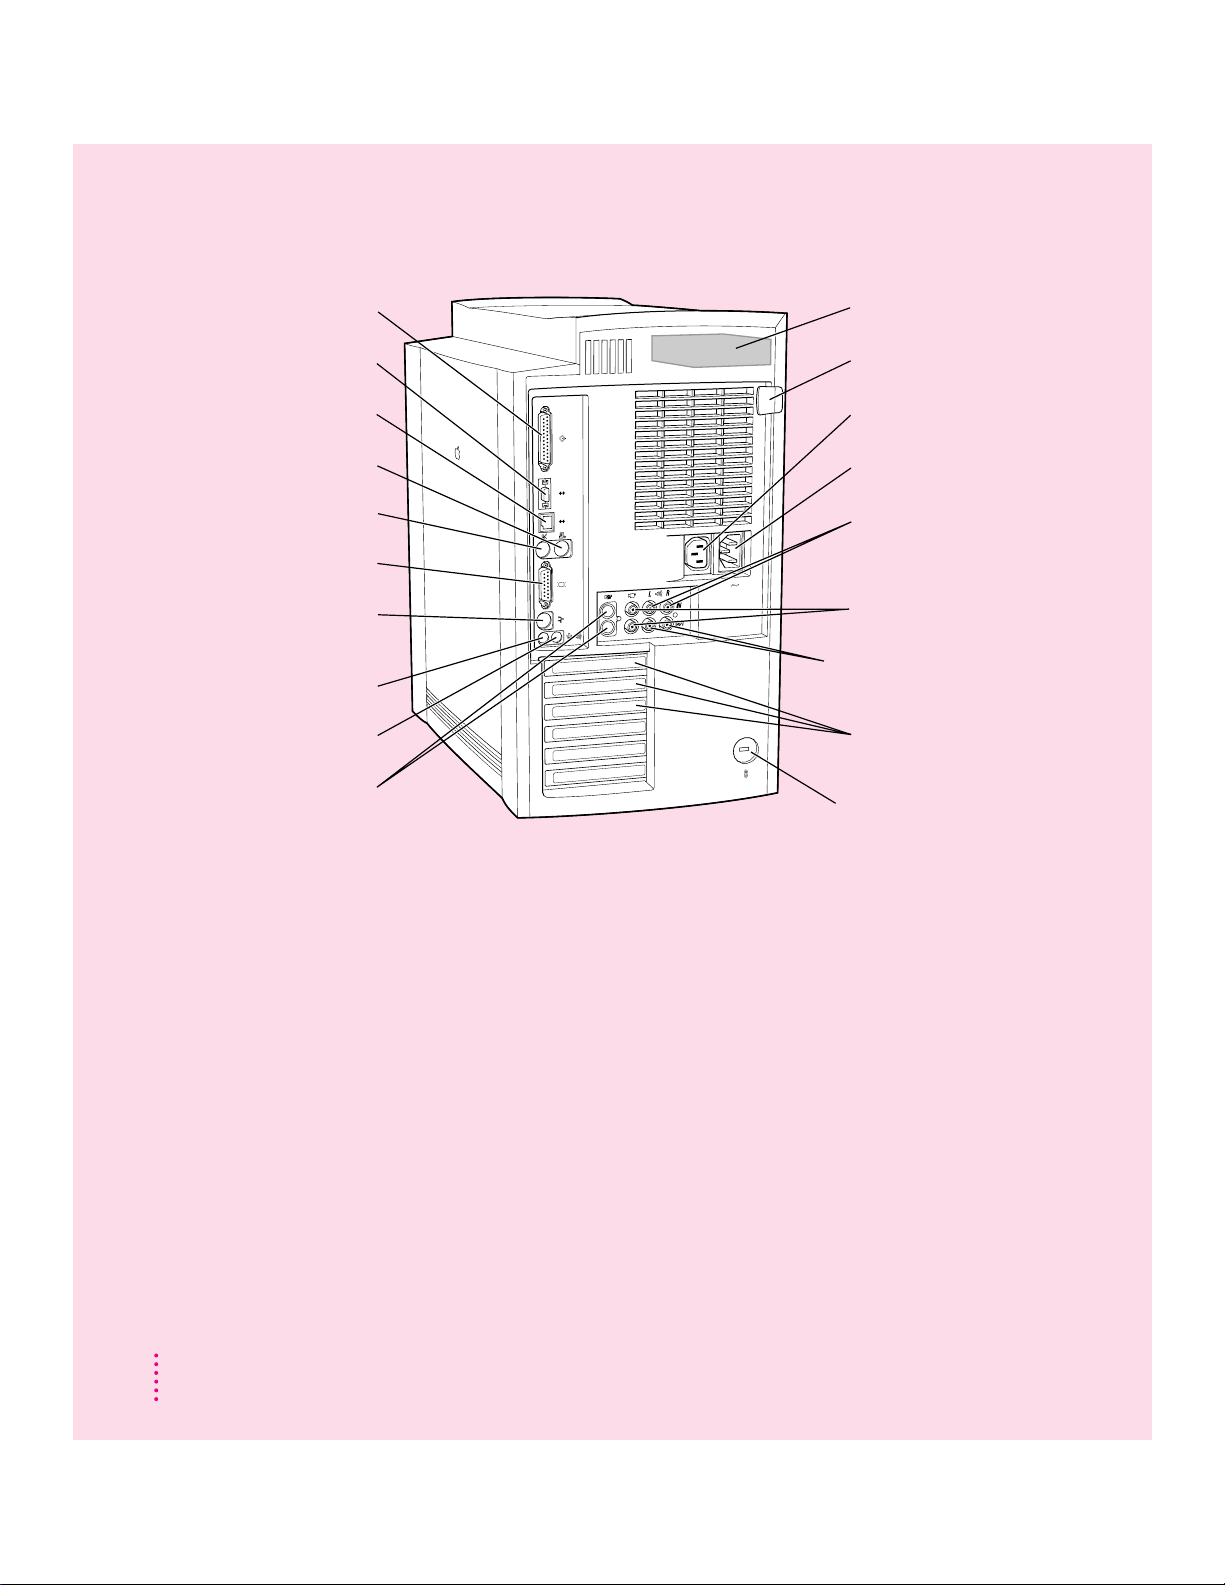
Your Computer’s Ports and Connectors
g
G
Ethernet port (AAUI)
G
Ethernet port (10Base-T)
Printer port (GeoPort)
[
Modem port (GeoPort)
W
Monitor port
™
Apple Desktop Bus
V
(ADB) port
Sound input port
≈
-
Sound output port
S-video ports
æÆ
(IN and OUT)
SCSI port
Internal hard disk drive
Lockable cover latch
Monitor power socket
≤
Power socket
-
Audio input ports
(left & right)
Composite video ports
˜Â
(IN and OUT)
Audio output ports
-
(left & right)
Access covers for
expansion slots (3)
Security lock port
F
74
Chapter 7
Page 75

g
SCSI port Connects your Macintosh to SCSI equipment such as
external hard disk drives and scanners
G
G
[
W
™
V
≈
-
æÆ
Ethernet port (AAUI) Connects your Macintosh to a high-speed Ethernet
network using an adapter
Ethernet port (10Base-T) Connects your Macintosh to a high-speed 10Base-T
Ethernet network
Printer port (GeoPort) Connects your Macintosh to a printer, LocalTalk
network, or GeoPort Telecom Adapter
Modem port (GeoPort) Connects your Macintosh to an external modem,
GeoPort Telecom Adapter, or LocalTalk cable
Monitor port Connects your Macintosh to a monitor
Apple Desktop Bus Connects your Macintosh to an input device, such
(ADB) port as a keyboard, a mouse, or a trackball
Sound input port Connects your Macintosh to an Apple PlainTalk
microphone or other audio input equipment
Sound output port Connects your Macintosh to headphones, externally
powered (amplified) speakers, or other audio output
equipment
S-video ports Connects your Macintosh to VCRs, laserdisc players,
(IN and OUT) video cameras, or other video equipment that uses an
S-video connector
Internal hard disk drive Large-capacity permanent device for storing software,
documents, and other files
-
˜Â
-
F
Audio input ports Connects your Macintosh to the RCA-type audio
(left & right) output ports of video or audio equipment, such as
VCRs and tape decks
Composite video ports Connects your Macintosh to most VCRs, laserdisc
(IN and OUT) players, video cameras, and other video equipment
Audio output ports Connects your Macintosh to the RCA-type audio input
(left & right) ports of video or audio equipment, such as VCRs and
tape decks
Access covers for Your Macintosh supports up to three peripheral
expansion slots (3) component interconnect (PCI) cards.
Security lock port and You can attach a security lock to your Macintosh and
lockable cover latch to its cover to secure the internal components. See
your computer products retailer for security lock
devices that work with your computer.
Connecting Additional Equipment
75
Page 76

Connecting audio equipment
Your computer has two sets of ports (also known as “jacks”) for handling
audio equipment: sound input and output ports like those found on most
models of Macintosh; and left and right RCA-type input and output por ts.
The sound input and output ports
Your Macintosh can handle stereo sound from a sound input device—also
called a sound source—such as a microphone, tape deck, or audio CD player.
(If you have an internal CD-ROM drive, it can also be used to play audio
CDs.) T he term “sound input device” is used because the signal goes into your
computer for you to record or process in various ways.
Sound input devices can be attached to the sound input port, which is marked
with an icon of a microphone (≈).
Your computer comes with a built-in speaker, but you can attach an
additional sound output device, such as amplified speakers or headphones.
Sound output devices can be attached to the sound output port, which is
marked with an icon of headphones (f) or a speaker (-).
≈
Sound input port
76
Chapter 7
-
Sound output port
Page 77
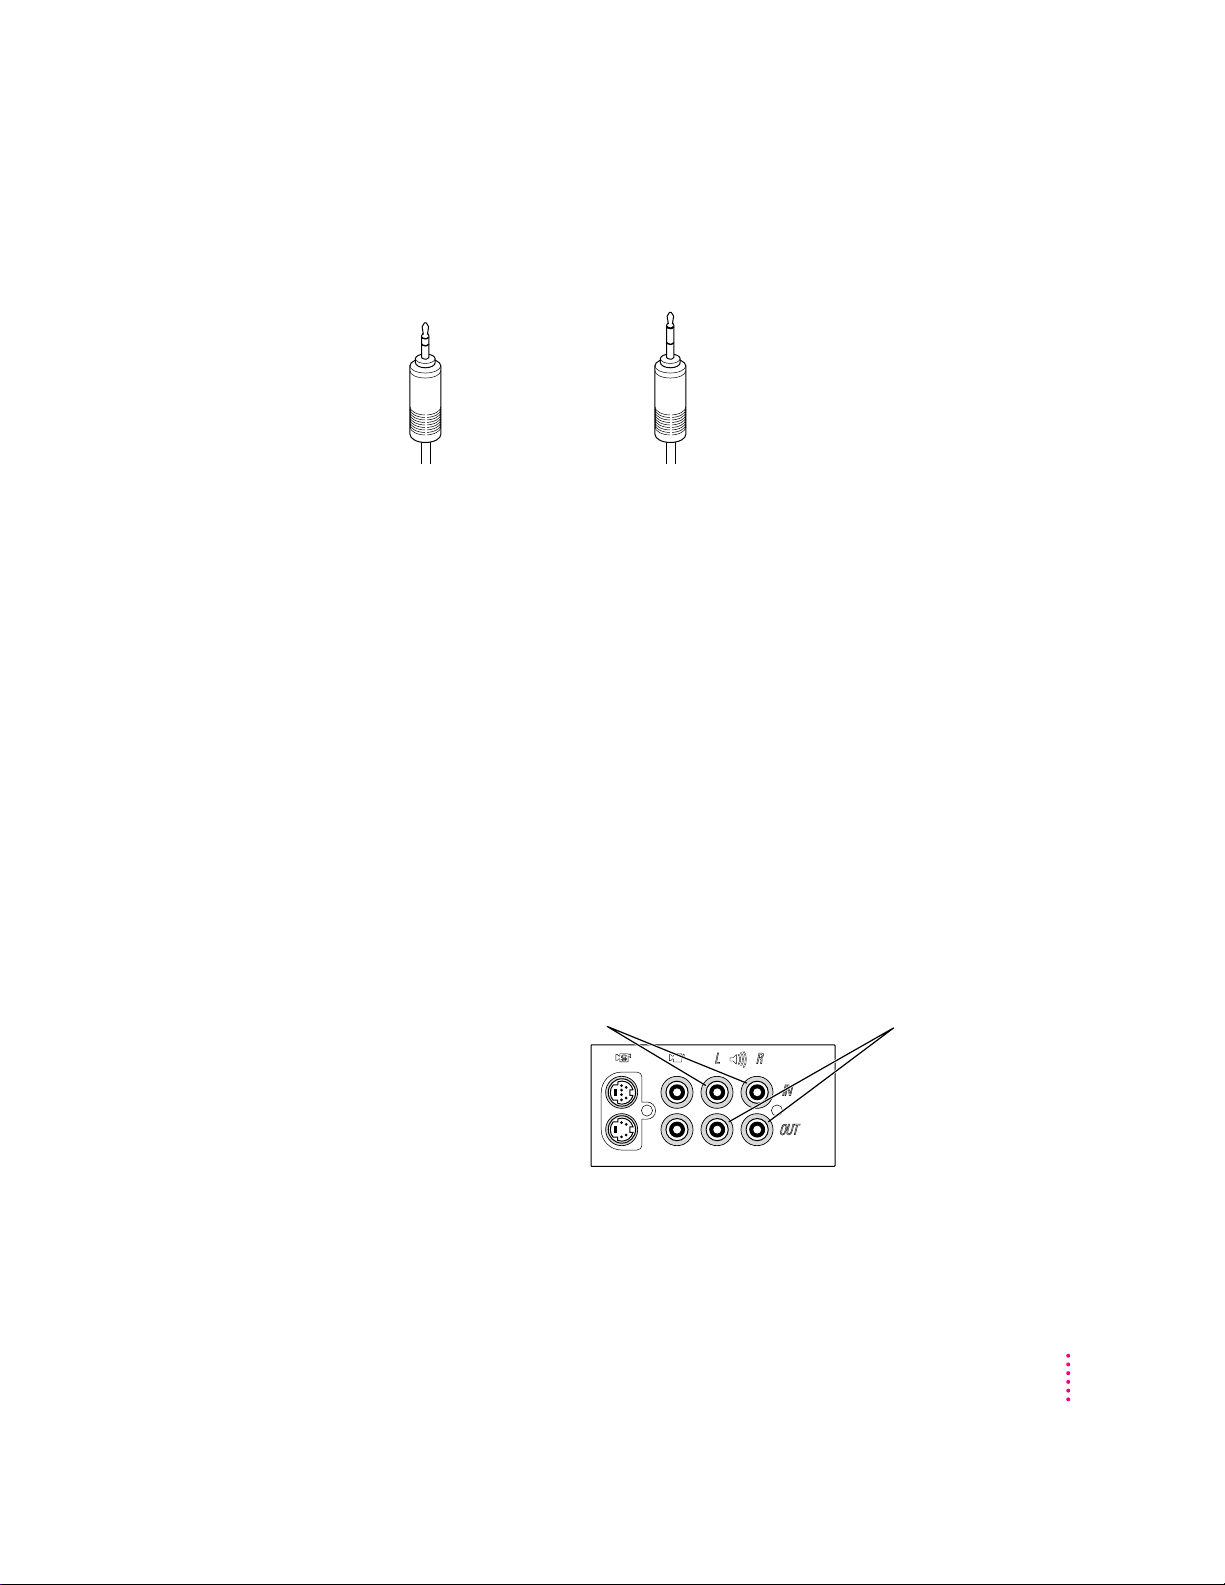
The computer’s sound input and output ports accept these 3.5-mm
connectors:
Extended miniplugStereo miniplug
The “stereo miniplug” is the smaller of the two and is found most often on
stereo equipment. The extended miniplug, which is slightly longer and is
found on voice quality microphones (such as the Apple PlainTalk
Microphone), works only in your computer’s sound in put port (≈). (Even
though it will fit into the sound output port, it won’t work there.) If your
equipment has a different type of connector from those shown here, you can
purchase an adapter at an electronics supply store.
The left and right RCA-t y pe audio ports
Your computer also has ports that accept left and right input and output
through RCA-type connectors. These connectors are found on devices like
videocassette recorders (VCRs) and tape decks. The RCA ports are colorcoded to help you properly attach your audio equipment.
-
Audio input ports (left & right)
Connect your Macintosh to the RCA-type
Audio Out ports of video or audio equipment
such as VCRs and tape decks
-
Audio output ports (left & right)
Connect your Macintosh to the RCA-type
Audio In ports of video or audio equipment
such as VCRs and tape decks
Connecting Additional Equipment
77
Page 78

The left and right RCA-type ports accept this type of connector:
RCA-type plug
If your equipment has a different type of connector, you can purchase an
adapter at an electronics supply store.
Connecting most audio equipment
To connect most audio equipment, follow the steps below. For specific
instructions on connecting a microphone, skip to the next section,
“Connecting and Positioning a Microphone.”
1Make sure that the audio equipment has a cable with a stereo miniplug connector or two
RCA-type connectors.
78
RCA
Stereo miniplug
RCA RCA
2Place the audio equipment near the computer.
3Shut down the computer and turn off the audio equipment.
4Attach cables to the audio equipment following the instructions that came with the
equipment.
Some equipment (such as most headphones) comes with cables already
attached.
Chapter 7
Page 79
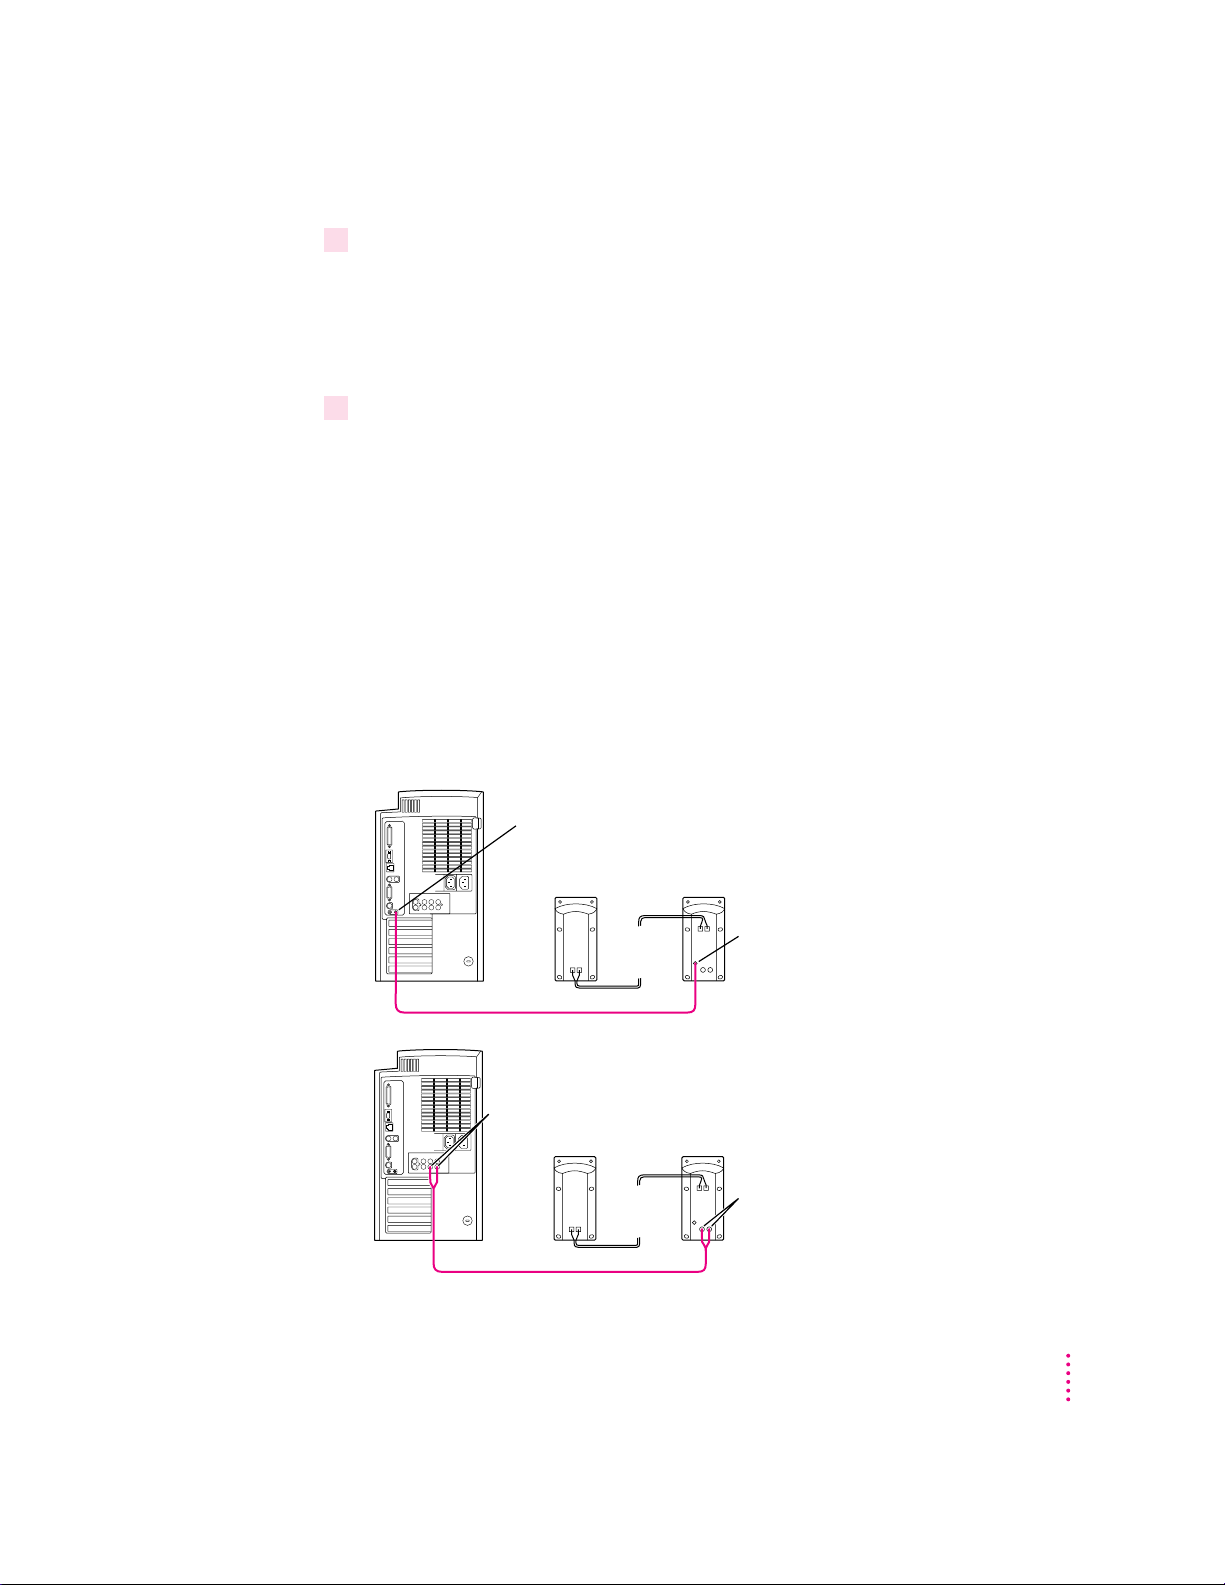
5If your audio equipment is a sound input device such as a tape deck, audio CD player, or
VCR, attach it to either the sound input port or the left and right RCA input ports.
Connect cables that have a stereo miniplug to the sound input port (≈). If
you’ re using a cable with two RCA-type connectors, connect to the right and
left RCA input ports (-).
6If your audio equipment is a sound output device such as headphones or amplified
speakers, attach it to either the sound output port or the left and right RCA audio
output ports.
Connect cables that have a stereo miniplug to the sound output port (-). If
you’ re using a cable with two RCA-type connectors, connect to the right and
left RCA audio output ports (-).
The illustrations below show two typical cabling arrangements for amplified
speakers. The first shows a cable with stereo miniplug connectors, and the
second shows a cable with RCA-type connectors. In both illustrations, the two
speakers are joined to each other by standard speaker wires. Some speaker
pairs have two cables (one per speaker) which must be joined by a dual-plug
adapter before they can be attached to the computer.
-
Sound
output
port
-
Audio
output ports
(left and right)
Externally
powered
speakers
Externally
powered
speakers
Audio In port
Audio In ports
(left and right)
Connecting Additional Equipment
79
Page 80

7Turn on the computer and the audio equipment.
You will probably need to adjust the settings (including volume) in the
control panel that handles sound on your computer. For instr uctions, choose
Macintosh Guide (or Mac OS Guide) from the Guide (h)menu; click the
Guide’s Index button, and choose “sound” from the index.
Connecting and p ositioning a microphone
You can use the Apple PlainTalk Microphone that comes with some
Macintosh computers (or a compatible line-level microphone) to give spoken
commands to your Macintosh and to record your voice or other sounds.
Apple PlainTalk Microphone
Note: Do not use the Apple Omni microphone (the round microphone
supplied with some other Macintosh models) or the attenuated RCA adapter
provided with some models of Macintosh.
80
If your monitor has a built-in microphone that you want to use, see the
information that came with the monitor to properly connect the microphone.
To connect and position an external microphone, follow these steps:
1Shut down the computer.
2Plug the microphone’s connector into the sound input port (≈) on the back of the
computer.
Chapter 7
Page 81

3Place the Apple PlainTalk Microphone at the top center of the monitor, so that the
microphone’s Apple (K) icon is facing you.
If you’re using a different microphone, position it according to these
guidelines:
m The microphone should be between 1 and 3 feet away from you.
m The microphone should be directly in front of you to minimize the
effect of background noises.
4 Turn on the computer.
Now that your computer is on, you need to activate the microphone by
selecting it as the sound input device.
5 Open the Apple (K) menu at the top left corner of your screen, and choose
Control Panels.
Connecting Additional Equipment
81
Page 82

6Double-click the Monitors & Sound control panel to open it.
Below is an example of the Monitors & Sound control panel. The control
panel may look slightly different on your computer.
7Click the Sound icon at the top of the Monitors & Sound control panel.
8Select “External Microphone” from the Sound Input pop-up menu.
Sound button
Sound Input
pop-up menu
82
9Click the close box to close the Monitors & Sound control panel window.
Now you’re ready to use your microphone.
For more instructions, click the Guide (h) button in the upper-right corner of
the control panel. For information about having the computer read text to you
or follow your spoken commands, choose “speech” from the Macintosh
Guide index.
Chapter 7
Page 83

Connecting video equipment
You can connect video equipment to your computer so that you can view TV
and other video images on your monitor, and store the images on your hard
disk. You can also view the Macintosh desktop on a television screen attached
to the computer, and record images from the desktop using a videocassette
recorder (VCR).
Your Macintosh can work with two major video formats:
m Composite video, which is used by most televisions, most VCRs, and
laserd isc players. Composite video devices plug into the computer’s
RCA -type video ports (˜ and Â)
m S-video, which is a high-quality video format used by many video cameras,
VCRs, and televisions. S-video devices plug into the computer’s S-video
ports (æ and Æ).
The video input and output ports and connectors
The illustration below shows the computer’s video input and output por ts.
Composite video input port
˜
Connects your Macintosh to the
RCA-type Video Out port of most
VCRs, laserdisc players, video cameras,
and other video input equipment
S-video input port
æ
Connects your Macintosh
to the S-video Out port
of VCRs, laserdisc players,
video cameras, or other
video input equipment that
uses an S-video connector
Composite video output port
Â
Connects your Macintosh to the
RCA-type Video In port of most
VCRs, or other video recording
or video display equipment
S-video output port
Æ
Connects your Macintosh
to the S-video In port of
VCRs, or other video
recording or video display
equipment that uses an
S-video connector
Connecting Additional Equipment
83
Page 84

The S-video input and output ports accept this type of connector:
S-video connector
Note: The S-video input port is compatible with both seven-pin and four-pin
S-video connectors.
IMPORTANT
The S-video connector is a round plug with several small metal
pins, which resembles other Macintosh connectors, such as those for a printer,
modem, mouse, or keyboard. Don’t confuse the connectors; they’re not
interchangeable.
The composite video input and output por ts accept this type of connector:
RCA-type plug
Connecting video equipment for input to the computer
When you connect video equipment to the video input port on your computer,
you can view video on your monitor, capture video images, and hear the
sound from the video equipment through the computer’s speaker. The
instructions that follow are for connecting a stereo VCR and video camera,
but you can use them as a model for connecting your computer to any video
equipment.
84
Chapter 7
Page 85

Connecting a VCR or video camera for input
1Make sure that the video equipment you want to connect has either an RCA-type video
port or an S-video port.
2Place the equipment near the Macintosh.
3Shut down the Macintosh and turn off the equipment.
4 Assemble the cables you need to connect the equipment to the Macintosh.
Depending on what kind of ports your VCR or camera has, you’ll need
different cables (available at an electronics supply store).
m If your equipment has an S-video Out port, you’ll need the following
cables:
Video cable with S-video connectors at each end.
S-video
S-video
Two audio cables with RCA-typ e connectors (plugs) at each end. The
cables can be separate, or joined like the one in the illustration.
RCA RCA
m If your equipment has an RCA Video Out port, you’ll need the following
cables:
One video and two audio cables with RCA-type connectors (plugs) at each
end. The cables can be separate, or joined like the one in the illustration.
RCA RCA
5Attach one end of the video cable to the Video Out port on the video equipment.
Foll o w the directions that came with the VCR or camera.
Connecting Additional Equipment
85
Page 86

6Plug the other end of the video cable into either the S-video input port (
RCA Video input port (˜) on the Macintosh.
æ
) or the yellow
If the S-video connector doesn’t slide easily into the port, check the pin
alignment and try again. Don’t use force, which could damage the computer
or cable.
7Plug the RCA-type connectors on the audio cables into the left and right RCA Audio Out
ports on the VCR or camera.
8Plug the RCA-type connectors on the audio cables into the left and right RCA input ports
(-) on the computer.
If the cable is color-coded, the red connector is for the right port, and the
black or white connector is for the left port.
The following illustrations show S-video connections and composite video
connections for both a VCR and a camera. Your finished connections should
look like one of the following:
S-video connection for input from a VCR
S-video
æ
input port
-
Audio
input ports
(left and right)
S-video Out
port
S-video cable
Dual RCA-plug cable
(available at most electronics supply stores)
Audio Out ports
(left and right)
VCR
86
Chapter 7
Page 87

Composite video connection for input from a VCR
Composite
˜
video
input port
Triple RCA-plug cable
(available at most electronics supply stores)
-
Audio
input ports
(left and right)
Video Out
S-video connection for input from a camera
-
Audio input ports (left and right)
S-video
æ
input port
S-video Out port
Audio Out ports
port
VCR
Audio Out ports
(left and right)
(left and right)
S-video cable
Dual RCA-plug cable
(available at most electronics supply stores)
Connecting Additional Equipment
87
Page 88

Composite video connection for input from a camera
Composite
˜
video
input port Video Out port Audio Out ports
Triple RCA-plug cable
(available at most electronics supply stores)
9Turn on the computer and the VCR or camera.
-
Audio
input ports
(left and right)
(left and right)
You can now begin working with the video equipment connected to your
computer.
You will probably need to adjust the video settings in the software that
handles sound on your computer. For instructions, choose Macintosh Guide
(or Mac OS Guide) from the Guide (h)menu; click the Guide’s Index button,
and choose “video” from the index.
88
Connecting video equipment for o utput from the computer
You can record and deliver a sophisticated presentation by combining the
video and sound capabilities of your Macintosh. The steps that follow explain
how to set up equipment for recording the computer’s output on videotape.
Before you start, do the following:
1Make sure that the VCR has either an RCA-type Video In port or an S-video In port.
2Place the VCR near the Macintosh.
3Shut down the Macintosh and turn off the VCR.
Chapter 7
Page 89

4 Assemble the cables you need.
Depending on what kind of ports your VCR has, you’ll need different cables
(available at an electronics supply store).
m If your VCR has an S-video In port, you’ll need the following cables:
Video cable with S-video connectors at each end.
S-video
S-video
Two audio cables with RCA-typ e connectors (plugs) at each end. The
cables can be separate, or joined like the one in the illustration.
RCA RCA
m If your VCR has an RCA Video In port, you’ll need the following cables:
One video and two audio cables with RCA-type connectors (plugs) at each
end. The cables can be separate, or joined like the one in the illustration.
RCA RCA
5Attach one end of the video cable to the Video In port on the VCR.
Foll o w the directions that came with the VCR.
6Plug the other end of the video cable into either the S-video output port (Æ) or the yellow
composite video output port (Â) on the Macintosh.
If the S-video connector doesn’t slide easily into the port, check the pin
alignment and try again. Don’t use force, which could damage the computer
or cable.
7Plug the RCA-type connectors on the audio cables into the left and right Audio In ports
on the VCR.
Connecting Additional Equipment
89
Page 90
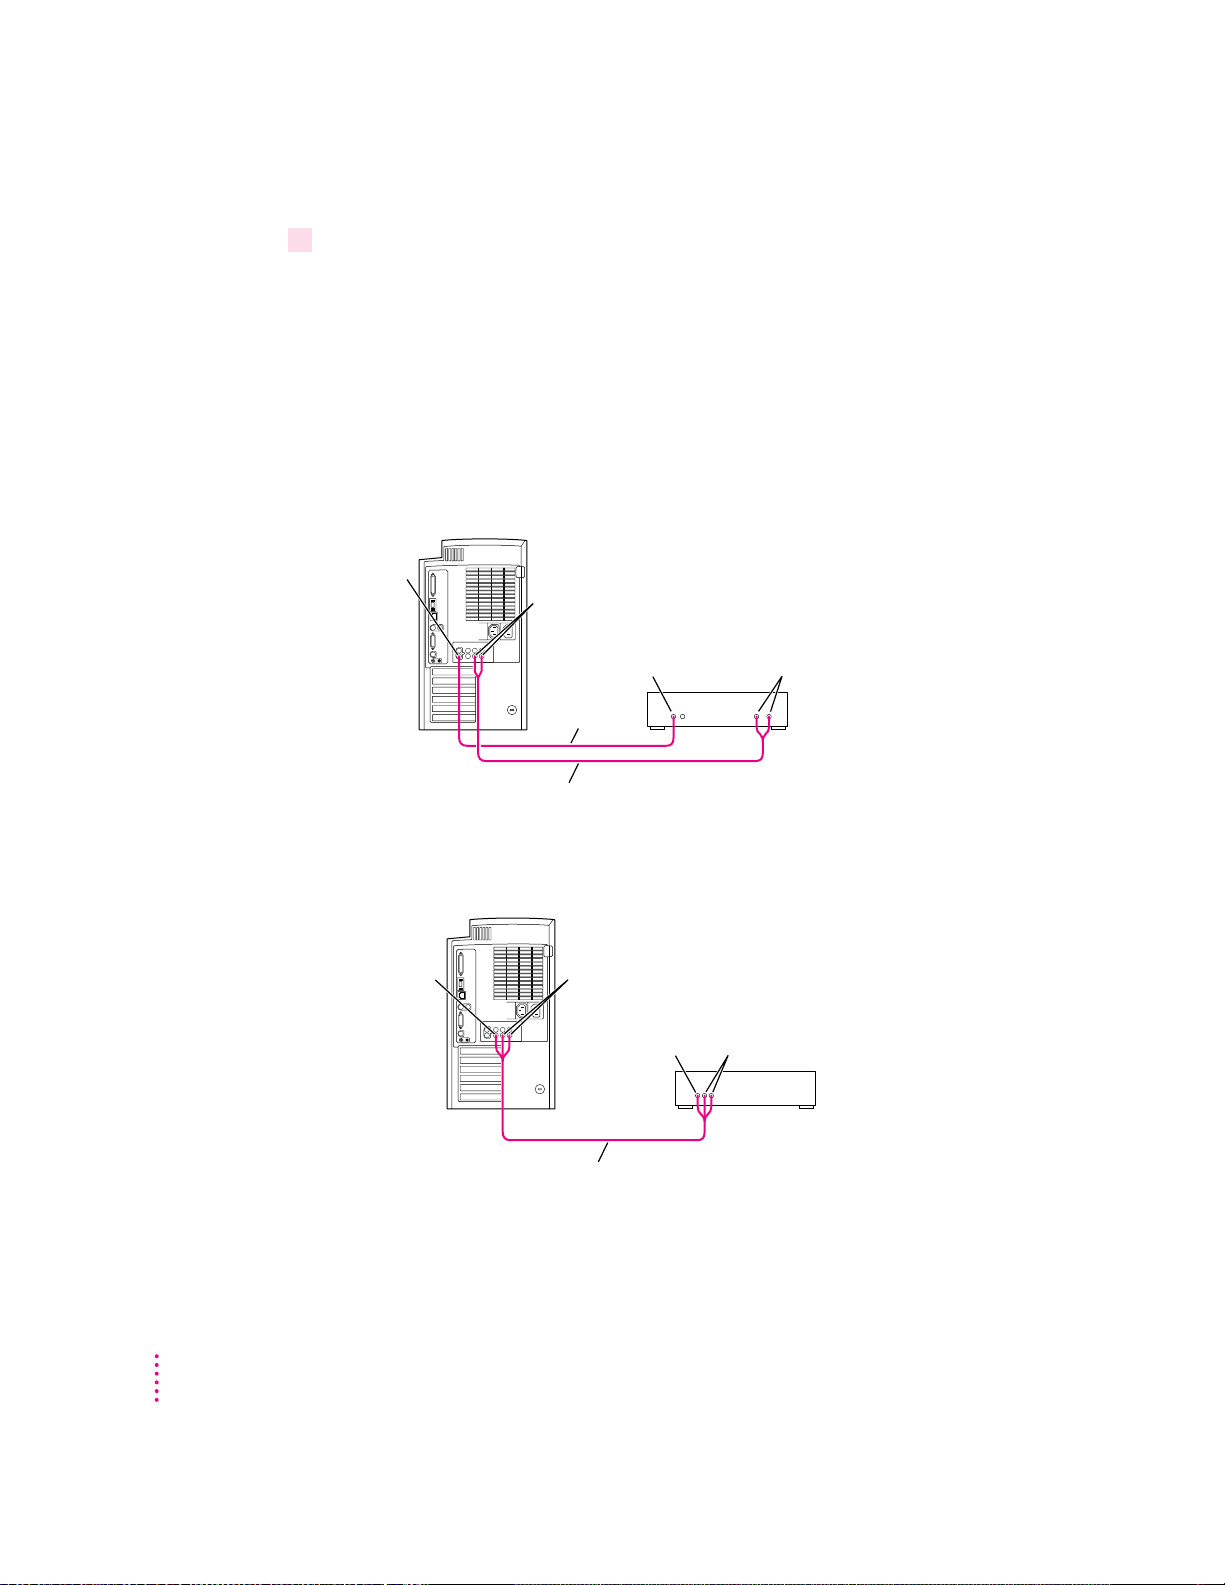
8Plug the RCA-type connectors on the audio cables into the left and right audio output
ports (-) on the Macintosh.
If the cable is color-coded, the red connector is for the right port, and the
black or white connector is for the left port.
Depending on whether your equipment has S-video or composite video
(RCA-type) ports, your finished connections should look like one of the
following:
S-video connection for output from the computer
S-video
Æ
output
port
Dual RCA-plug cable
(available at most electronics supply stores)
-
Audio
output ports
(left and right)
S-video In
S-video cable
port
Audio In ports
(left and right)
VCR
Composite video connection for output from the computer
Composite
Â
video
output port
-
Audio
output ports
(left and right)
Video In
port
Audio In ports
(left and right)
VCR
90
Triple RCA-plug cable
(available at most electronics supply stores)
Chapter 7
Page 91
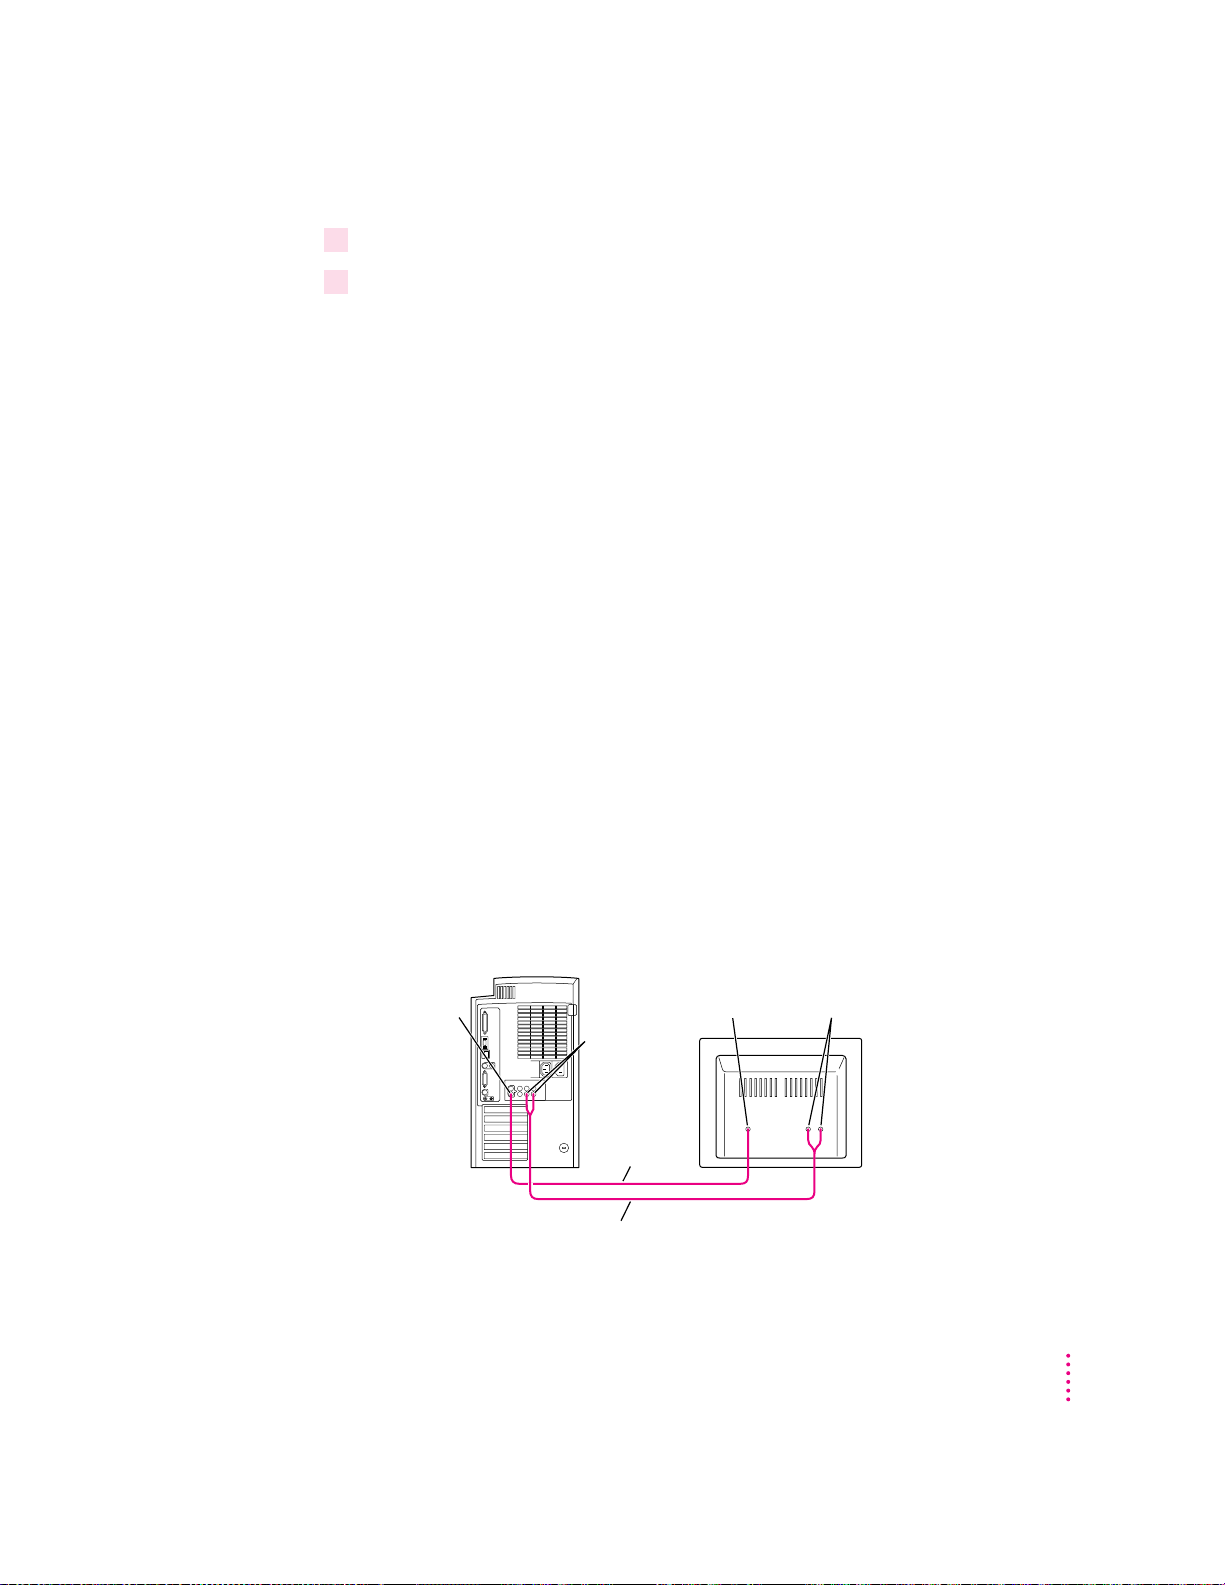
9 Turn on the computer and the VCR.
10 Select “line input” on your VCR.
See the manual that came with your VCR for instructions on how to select
the lin e input source.
For further instructions on how to record the computer’s output on videotape
and add voice annotation, choose Macintosh Guide (or Mac OS Guide) from
the Guide (h)menu; click the Guide’s Index button, and choose “video” from
the index.
Using a televisio n a s a monitor
You can connect a television to the computer and display the computer’s
images and sounds on the television. This capability is especially useful if
you’re using your Macintosh to give a presentation and you have access to a
large-screen television.
The television must have either an S-video or composite video input port, and
Audio In ports.
To connect a television, turn off your computer and connect the television
according to the instructions in the previous section, “Connecting Video
Equipment for Output From the Computer.” Depending on the type of
connectors your equipment has (S-video or composite video), your connection
should look similar to one of the following:
Television used as a monitor with an S-video connection
S-video
Æ
output port
-
Audio
output ports
(left and right)
S-video cable
Dual RCA-plug cable
(available at most electronics supply stores)
S-video In
port
TV
Audio In ports
(left and right)
Connecting Additional Equipment
91
Page 92

Television used as a monitor with a composite video connection
Composite
Â
video
output port
-
Audio output
ports
(left and right)
Triple RCA-plug cable
(available at most electronics supply stores)
Video In
port
TV
Audio In ports
(left and right)
Using a television and a monitor together
The amount of video random-access memory (VRAM) determines whether
you can view the desktop simultaneously on both a television and the
computer monitor.
If your computer is equipped with 4 megabytes (MB) of VRAM, you can
connect a television and a computer monitor simultaneously and view the
desktop on both the monitor and the television.
If your computer is equipped with 2 MB of VRAM, you can only view the
desktop on either the monitor or the television. When you start up your
computer with both a monitor and a television connected, the desktop will
appear on the monitor, and the television screen will be dimmed or black. To
use a television as the only monitor, shut down your computer and disconnect
the co mputer monitor. T hen turn on the television and then start up the
computer.
92
For further instructions on using a television as a monitor, choose Macintosh
Guide (or Mac OS Guide) from the Guide (h)menu; click the Guide’s Index
button, and choose “video” from the index.
For information on installing more VRAM, see Chapter 8, “Installing PCI
Expansion Cards and Additional Memory.”
Chapter 7
Page 93

Connecting external SCS I devices
Your computer has a port for connecting devices that use the Small Computer
System Interface (SCSI, pronounced “skuh-zee”). SCSI is a standard method
for connecting disk and cartridge drives, CD-ROM drives, scanners, and other
devices. The SCSI port permits high-speed communication between the
computer and the device.
The SCSI icon appears above the port on the computer’s back panel.
You can connect SCSI devices to the SCSI port in a chainlike fashion. The
first device in the chain plugs into the SCSI port; the second device plugs into
the first device, a nd so on.
You can attach up to seven SCSI devices in the chain. Each device on the
SCSI chain must have a unique ID number.
Note: In addition to the external SCSI port, your computer has a separate,
internal SCSI interface for the internal hard disk, CD-ROM drive, and Zip
drive. An authorized Apple dealer or service provider can install and attach
additional devices to the internal SCSI interface. For more information about
the internal SCSI interface, see the Tech nical In form a t ion booklet that came
with your computer.
SCSI icon
SCSI port
Connecting Additional Equipment
93
Page 94

Before you connect a SCSI device
Before you connect a SCSI device to your Macintosh, be sure to complete the
tasks explained in this section.
IMPORTANT
This section contains general instructions for attaching SCSI
devices to your computer. Be sure also to follow the specific instructions that
came with your external hard disk drive or other SCSI device when
connecting the device to your Macintosh. The specific instructions that came
with the device tell how to change a device’s ID number and attach a SCSI
cable or terminator to it.
Make sure each device has a unique ID number
Each external SCSI device connected to your computer must have its own,
unique ID number from 0 to 6. The SCSI ID number helps the computer keep
track of the devices and sort out conflicts when more than one device in the
SCSI chain is communicating with the computer simultaneously.
The SCSI devices can be in a ny physical order in the chain; it is not necessary
to arrange them in numerical order.
See the instructions that came with each SCSI device for information on
checking and setting its SCSI ID number.
IMPORTANT
If you use two or more devices attached to the same SCSI
interface with the same ID number, your computer will not start up properly,
your equipment could malfunction, and you could lose data as a result.
94
Chapter 7
Page 95

Make sure you use the right type and length of cable
To attach a SCSI device to your computer or to another device in the chain,
always use SCSI cables that are double-shielded, such as Apple SCSI cables.
Never use printer-type RS232 cables (commonly used with DOS and
Windows computers). Poor quality SCSI cables are often the cause of
SCSI problems.
Avoid mixing brands and types of SCSI cables.
If the device is the first or only one you’re connecting, use a SCSI system
cable to connect it to the computer’s SCSI port:
SCSI system cable
If the device is not the first one, use a SCSI peripheral interface cable to
connect it to the last device in the chain:
SCSI peripheral interface cable
IMPORTANT
The total length of the cables in a SCSI chain should not exceed
6 meters (about 20 feet). SCSI cables must have a 110-ohm impedance. For
best results, use SCSI cables manufactured by Apple Computer.
Keep the cables between SCSI devices as short as possible. Cables 18 to 24
inches long are best. PowerBooks and some SCSI devices (particularly
scanners) may not be able to handle cables longer than 24 inches.
Connecting Additional Equipment
95
Page 96

Term in ate the SCSI chain properly
To ensure accurate transmission of information, a terminator must be present
at each end of a SCSI chain. There is already a built-in terminator at the
beginning of the chain. Therefore, you only need to make sure that the last
device in the chain has a terminator.
IMPORTANT
In almost all cases, only the first and last devices in the SCSI
chain should be terminated with the exceptions noted below. Make sure that
no external SCSI device but the last one has a terminator.
To te r mina te the last device in the chain, do one of the following:
m Use a device that has a built-in terminator as the last device in the chain.
If you wish to attach two or more SCSI devices that have built-in
terminators, an Apple-authorized service provider can remove the extra
built-in terminators.
m If the device at the end of the SCSI chain does not have a built-in
terminator, attach an external terminator. You can attach or remove
external termi nators yourself. (Do not use a black terminator; the black
terminators are for Macintosh IIfx computers and certain LaserWriter
printers only.) Terminators are available at authorized Apple dealers.
96
External SCSI terminator
Exceptions to the “first and last” rule: If the SCSI chain is 18 inches or
shorter, the terminator on the last device is not needed. If the total cable
length in the chain is greater than 10 feet, the chain may need a third
terminator at the 10-foot point. Do not add the third terminator unless you are
experiencing a SCSI problem, and check all other possible causes of the
problem before adding the third terminator.
Chapter 7
Page 97

Connecting a SCSI device
After you read “Before You Connect a SCSI Device” earlier in this chapter,
follow th e inst ructions below. Use these general instructions in conjunction
with the more specific instructions that came with your SCSI device.
1Shut down your Macintosh.
2Make sure the SCSI device is switched off.
WARNING
Do not connect or disconnect any device while the device or
your Macintosh is turned on. Doing so could damage the device, your
computer, or both. Do not attach or remove a terminator while the
computer or any device is turned on.
3 Use a SCSI cable to connect the device either to the computer’s SCSI port or to the last
SCSI device already in the chain.
Use the thumbscrews and metal clips on the connectors to maintain a tight,
reliable connection. Do not overtighten the thumbscrews.
4 Turn on all devices in your SCSI chain.
IMPORTANT
Always turn on all external SCSI devices connected to your
Macintosh before turning on the computer itself. Otherwise, your computer
won’t be a ble to recognize that the SCSI devices are connected to it and your
computer may not be able to start up.
5 Install any necessary device drivers (software that makes a device work with your
computer).
Drivers needed for a SCSI device usually come on a floppy disk with the
device. (If no drivers come with the device, contact the device’s ma nufacturer.)
Note: If you experience problems after connecting a SCSI device, see the
troubleshooting information in Chapter 10, “Solutions to Common Problems.”
Connecting Additional Equipment
97
Page 98

Connectin g a printer
Your computer has a printer port, which you use to connect a printer.
The printer port accepts either a direct cable connection (to printers such as
the StyleWriter 2500) or a network cable connection (to printers such as most
LaserW riter models). A printer can also be connected to the modem port.
See the manual that came with your printer for more detailed information and
instructions on setting up and using the printer. Although your computer
comes with most Apple printer software (called “printer drivers”) already
installed, you may need to install software from disks that came with your
computer.
You use the Chooser to tell the computer which port you used to connect your
printer. For instructions on choosing a printer, open the Guide (h)menu a nd
choose Macintosh Guide (or Mac OS Guide), click the Guide’s Index button,
and choose “printing” from the index.
Printer port icon
Printer port
98
Chapter 7
Page 99

Connectin g a second monitor
You can install an expansion card that provides a second monitor port, if one
monitor doesn’t provide enough screen space.
To connect a second monitor, purchase a video card and install it in one of the
computer’s PCI expansion slots, or have an Apple dealer install it for you. (If
you are installing the expansion card yourself, follow the instructions that
came with the card and the instr uctions in Chapter 8 of this manual.) Then
plug the second monitor into the port provided by the card.
When you connect an additional monitor, make sure that the ventilation
openings on the computer and the monitors are clear and unobstructed.
If there is interference on your screens or on a television or radio near your
computer, separate or reposition the affected equipment. You may need to
increase the distance between two monitors so that they don’t interfere with
each other.
IMPORTANT
Though it is possible to install additional video cards that supply
more monitor ports, do not connect more than two monitors at a time to your
computer.
For additional instructions on using two monitors together, choose Macintosh
Guide (or Mac OS Guide) from the Guide (h)menu after you have connected
two monitors to your computer; click the Guide’s Index button, and choose
“monitors” from the index.
Connecting Additional Equipment
99
Page 100

Connecting an ADB input device
Your computer has an Apple Desktop Bus (ADB) port, which connects the
mouse and the keyboard to your computer. You can add other input devices,
such as a bar-code reader, graphics tablet, or joystick.
The ADB port is marked with the V icon.
ADB port icon
ADB port
You can connect up to three ADB devices in a chainli ke fashion to a single
ADB port. The exact number depends on how much power the devices
require.
Before you attach or remove an ADB device, turn off the computer. Attaching
or removing an ADB device while the computer is turned on could damage
the ADB device or your computer.
100
Chapter 7
IMPORTANT
The total power used by all ADB devices connected to your
computer must not exceed 500 milliamperes (mA). Before attaching another
ADB device, check the Tech nical In for m a t i o n booklet that came with your
computer and the information that came with the ADB device for power
requirements.
 Loading...