

Page 1

Installing and Configuring
ish
the Apple PCI Dual-Attached FDDI Card
Engl
A
A
A
Page 2

Page 3

Con t ents
Preface / A5
1Installing t he Ca rd and Connecting to the Network / A7
Opening the logic module of the Network Server / A8
Unpacking the card / A11
Installing the card / A12
Attaching the cables and connecting to the network / A16
2Installing and Con f i gur ing th e Device Driver Software / A19
Installing the Common FDDI Software / A20
Installing the FDDI AIX device driver / A22
Configuring the FDDI network interface / A24
3Troublesh ooting and Diagnostics / A2 7
Troubleshooting / A28
Using FDDI diagnostic routines / A29
Obtaining service and support / A29
Appendix Specifications / A31
Page 4

Page 5

Preface
The Apple Peripheral Connect Interface (PCI) Dual-Attached FDDI Card is a
100 megabit per second (Mbps) single-slot Fiber Distributed Data Interface
(FDDI) card for use with the Apple Network Server. The card and its
associated driver provide physical and data-link services under the TCP/IP
protocol as defined by the ANSI X3T9.5 specifications for FDDI.
IMPORTANT
FDDI Card. See Instructions to Update AIX for the Network Server to
Version 4.1.4.1.
The Apple PCI Dual-Attached FDDI Card has the following features:
m compliance with PCI Local Bus, version 2.1
m onboard integrated FDDI Station Management (SMT)
m 32-bit, zero wait state PCI Direct Memory Access (DMA) master
m up to 132 Mbps burst DMA rate
m PCI commands for efficient use of cache lines
m support of optical fiber media
m support of Dual Attachment for direct attachment to network ring
m 128K of local buffering
m Motorola MC68840 FDDI chipset
These capabilities are all available as soon as the card is installed in the
Network Server. No special configuring is required.
You must first install AIX 4.1.4.1 before you can use the
Page 6

About this manual
This manual is aimed at Network Server administrators. It assumes you have a
good understanding of the Network Server hardware, as described in
Up the Network Server (available in the Network Server accessory kit). You
should also have a working knowledge of the AIX operating system. Using
AIX®, AppleTalk Services, and Mac OS Utilities on the Network Server, also
available in your accessory kit, provides a basic introduction. Complete AIX
documentation is available online through the InfoExplorer application.
Chapter 5 of Using AIX, AppleTalk Services, and Mac OS Utilities on the
Network Server tells you how to access and use InfoExplorer.
For more information
Numerous books about FDDI and FDDI token-passing networks are available
at most technical bookstores. In addition, the FDDI Consortium at the
University of New Hampshire is an excellent resource for FDDI information
and training. The Consortium can be accessed on the Internet at
http://www.iol.unh.edu/consortiums/fddi/fddi_consortium.html
Setting
A6 Preface
Page 7

1 Installing the Card and
Connecting to the Network
This chapter provides complete instructions for installing the Apple PCI DualAttached FDDI Card in the Network Server. Before proceeding, you should
familiarize yourself with the section on installing PCI cards in
Network Server. Be sure to follow all recommendations for handling and
installing the card carefully and correctly, so as not to damage either the card
or the computer.
Setting Up the
Page 8
Opening the logic module of the Network Server
You do not need to remove the cover from the Network Server to install a card.
Instead you open the logic module, following the directions in this section.
1Shut down the Network Server.
See Using AIX, AppleTalk Services, and Mac OS Utilities on the Apple
Network Server if you need more information about safely shutting down the
Network Server.
2Attach a grounding strap to your body
A grounding strap is strongly recommended to avoid damage to the card or the
computer from electrostatic discharge.
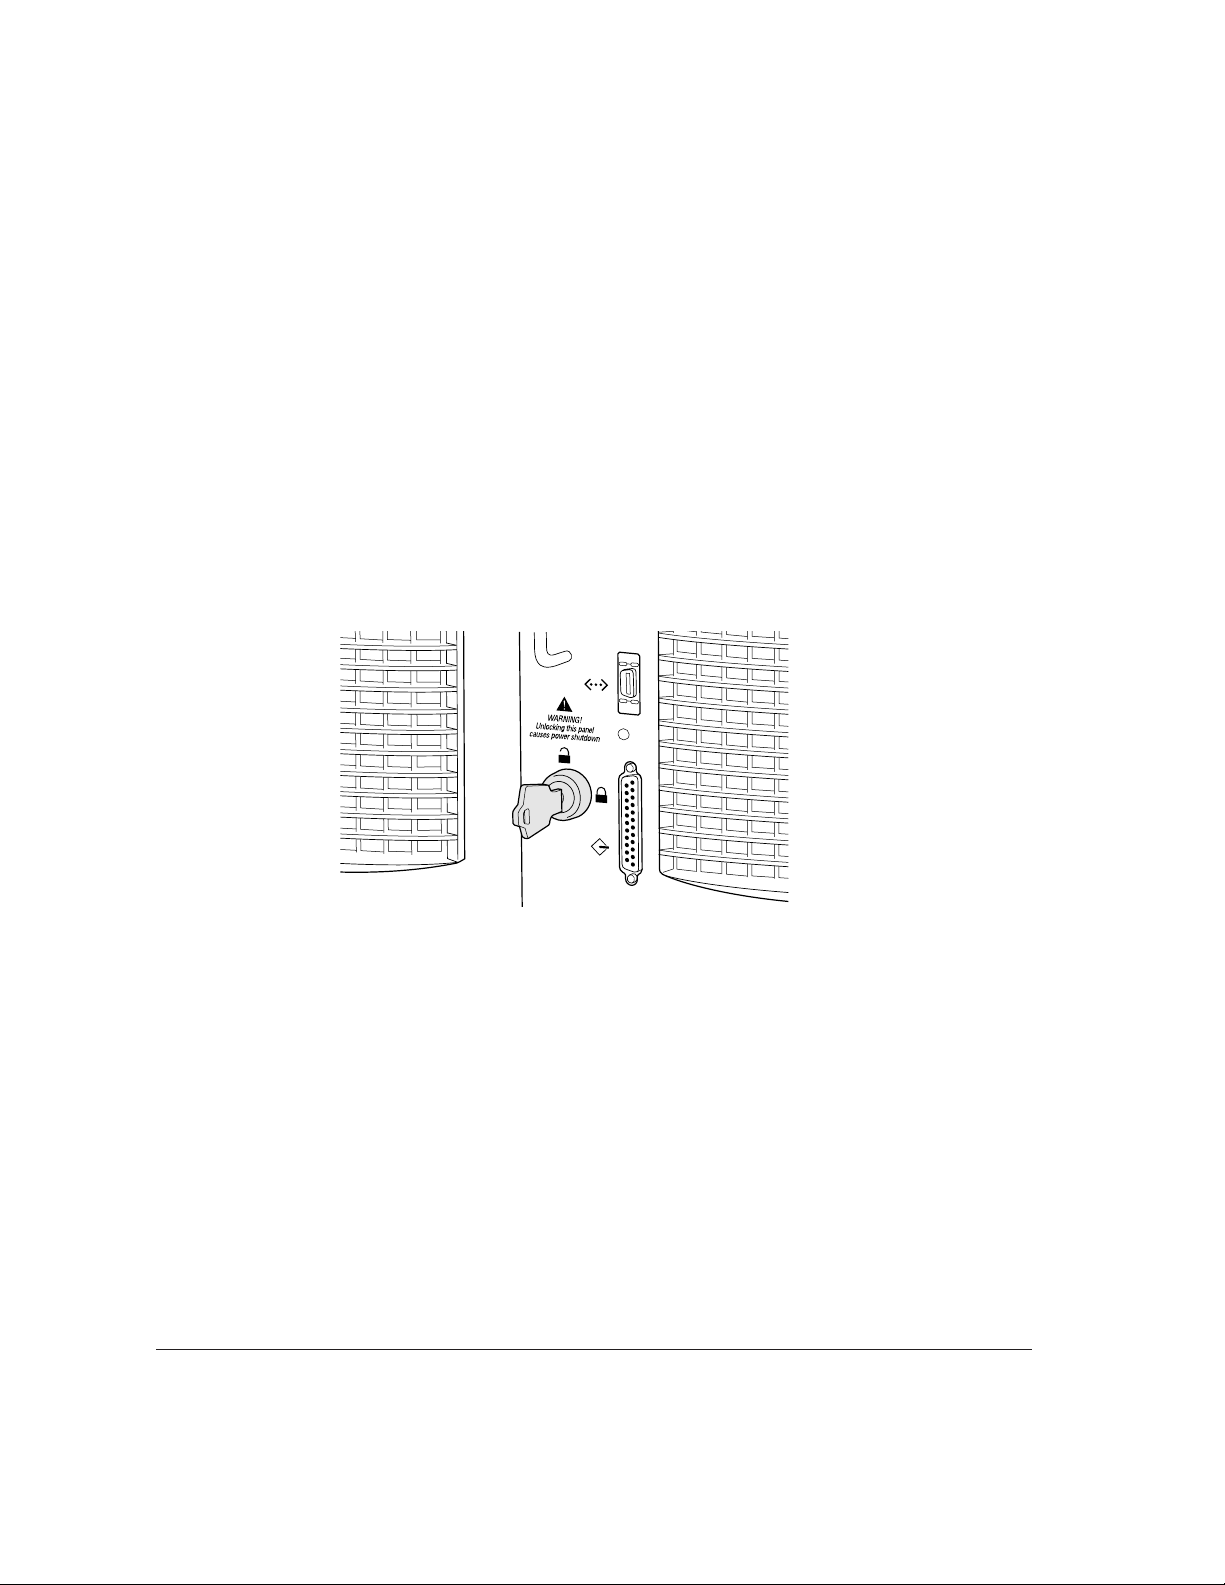
3 Turn the key at the rear of the server to the Unlock position.
A8 Chapter 1 / Installing the Card and Connecting to the Network
Page 9
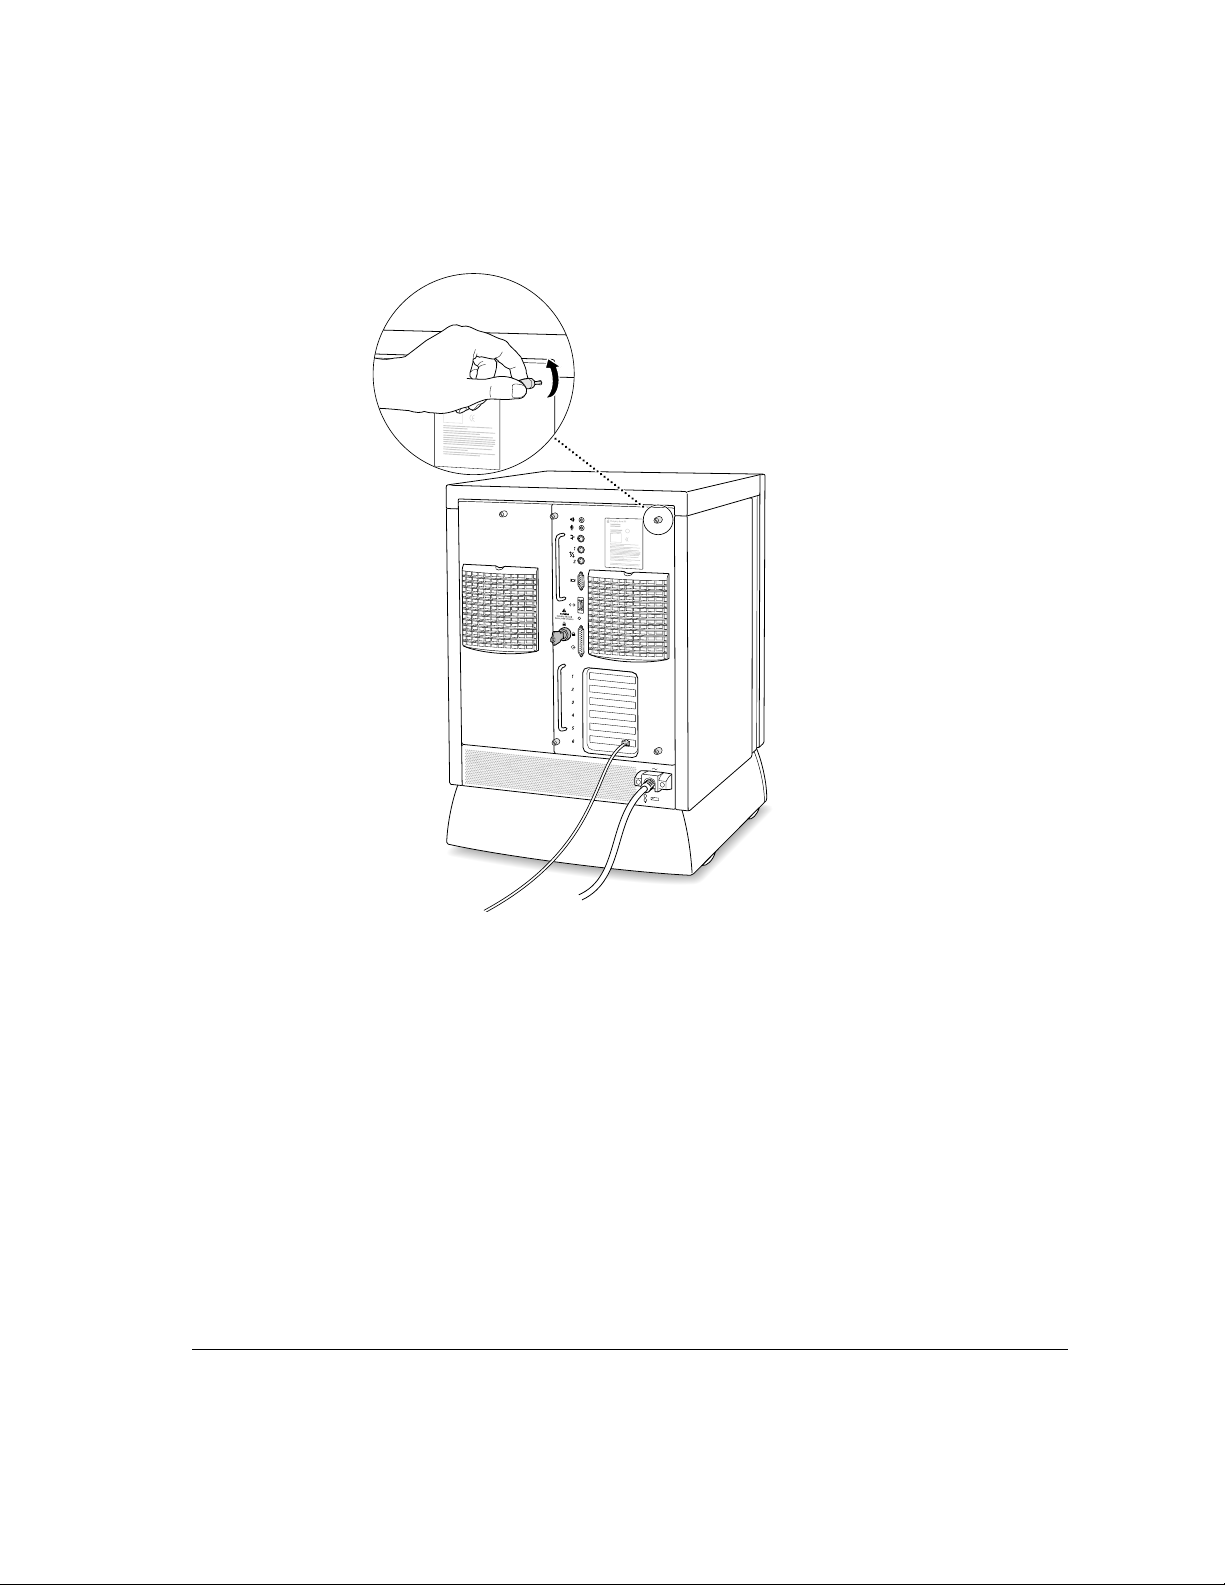
4 Loosen the thumb screws completely.
Opening the logic module of the Network Server A9
Page 10

5Grasping the logic module by its handles, pull the module out as far as it will go.
6 Remove the cover plate from the expansion slot you want to use.
Put the screw aside. You will reattach it later to hold the card in place. Put the
cover plate away for safekeeping in case you remove the card later.
A10 Chapter 1 / Installing the Card and Connecting to the Network
Page 11

Unpacking the card
The package for the Apple PCI Dual-Attached FDDI Card contains an
installation CD-ROM disc, the card itself, and this manual.
1 Remove the protective packing materials from around the card.
Save the packing materials and the package. You can use them should you
need to return the card for service.
2 Carefully remove the card from its antistatic bag.
Inspect for any visible damage that might have occurred during shipment. If
you find any damage, contact your Apple-authorized Network Server dealer or
service representative.
Unpacking the card A11
Page 12
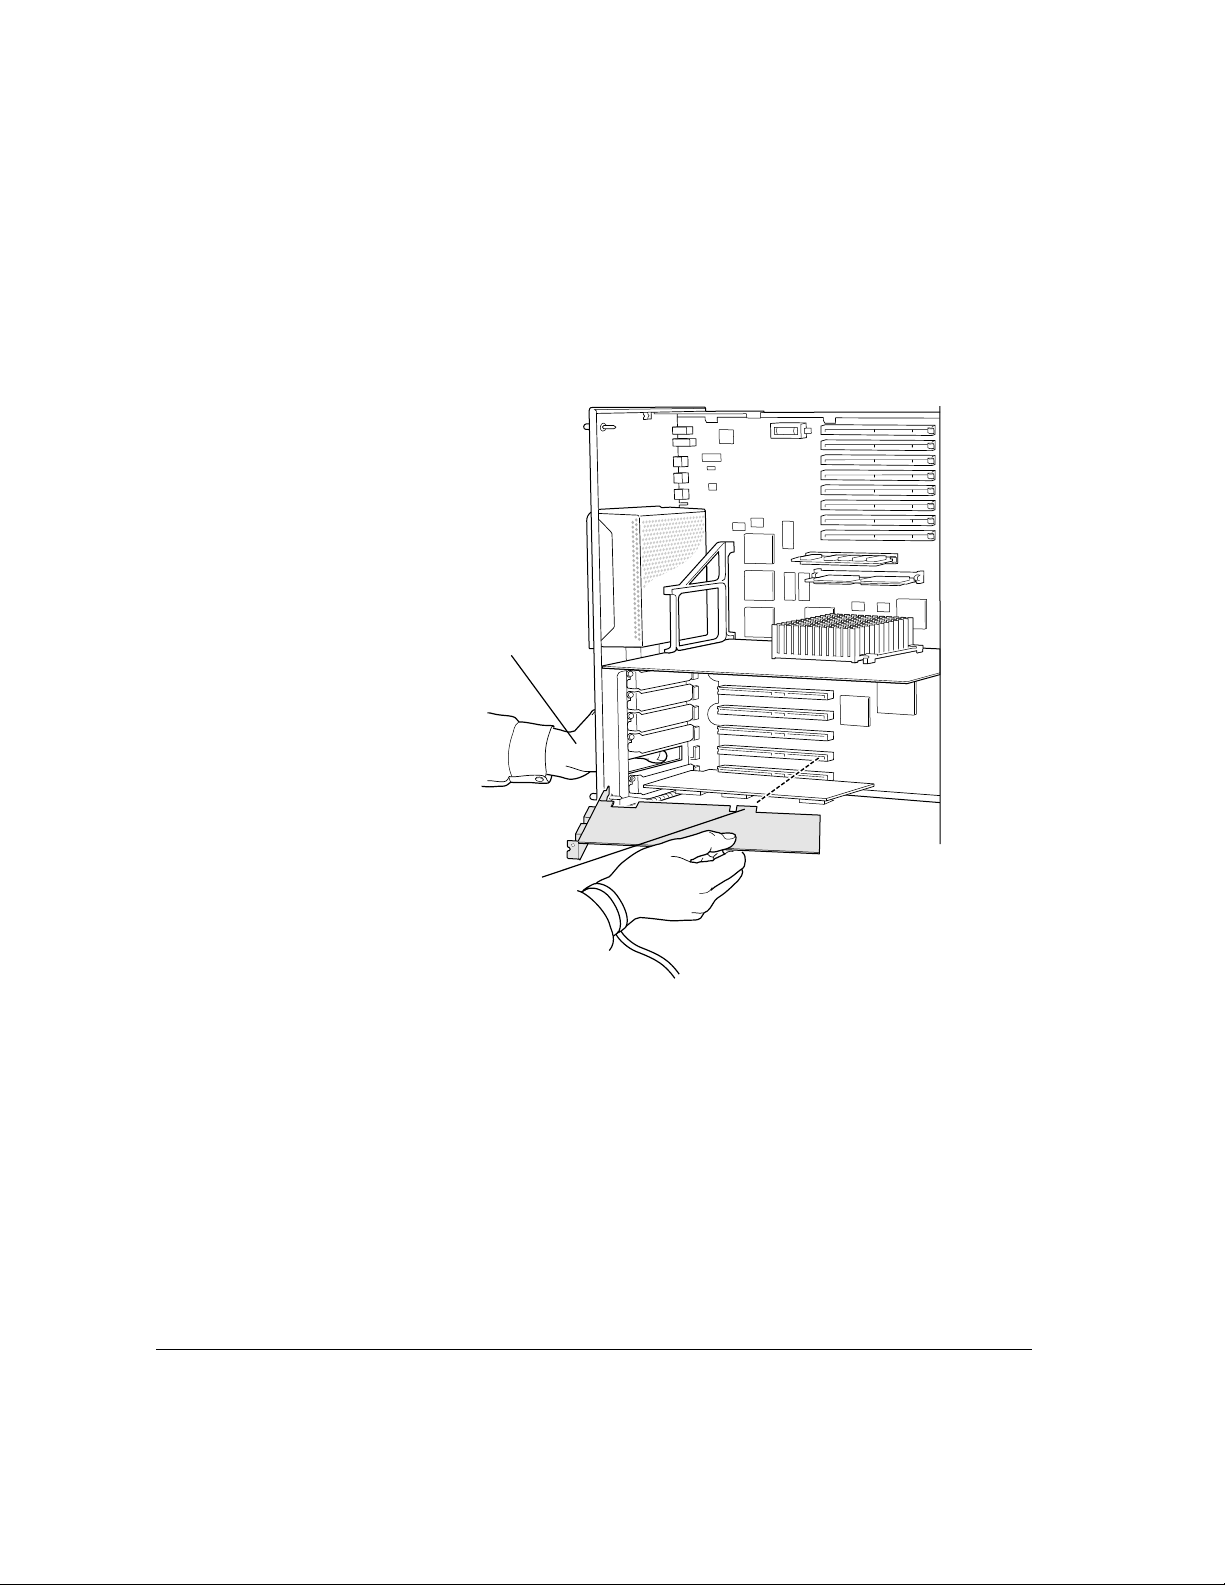
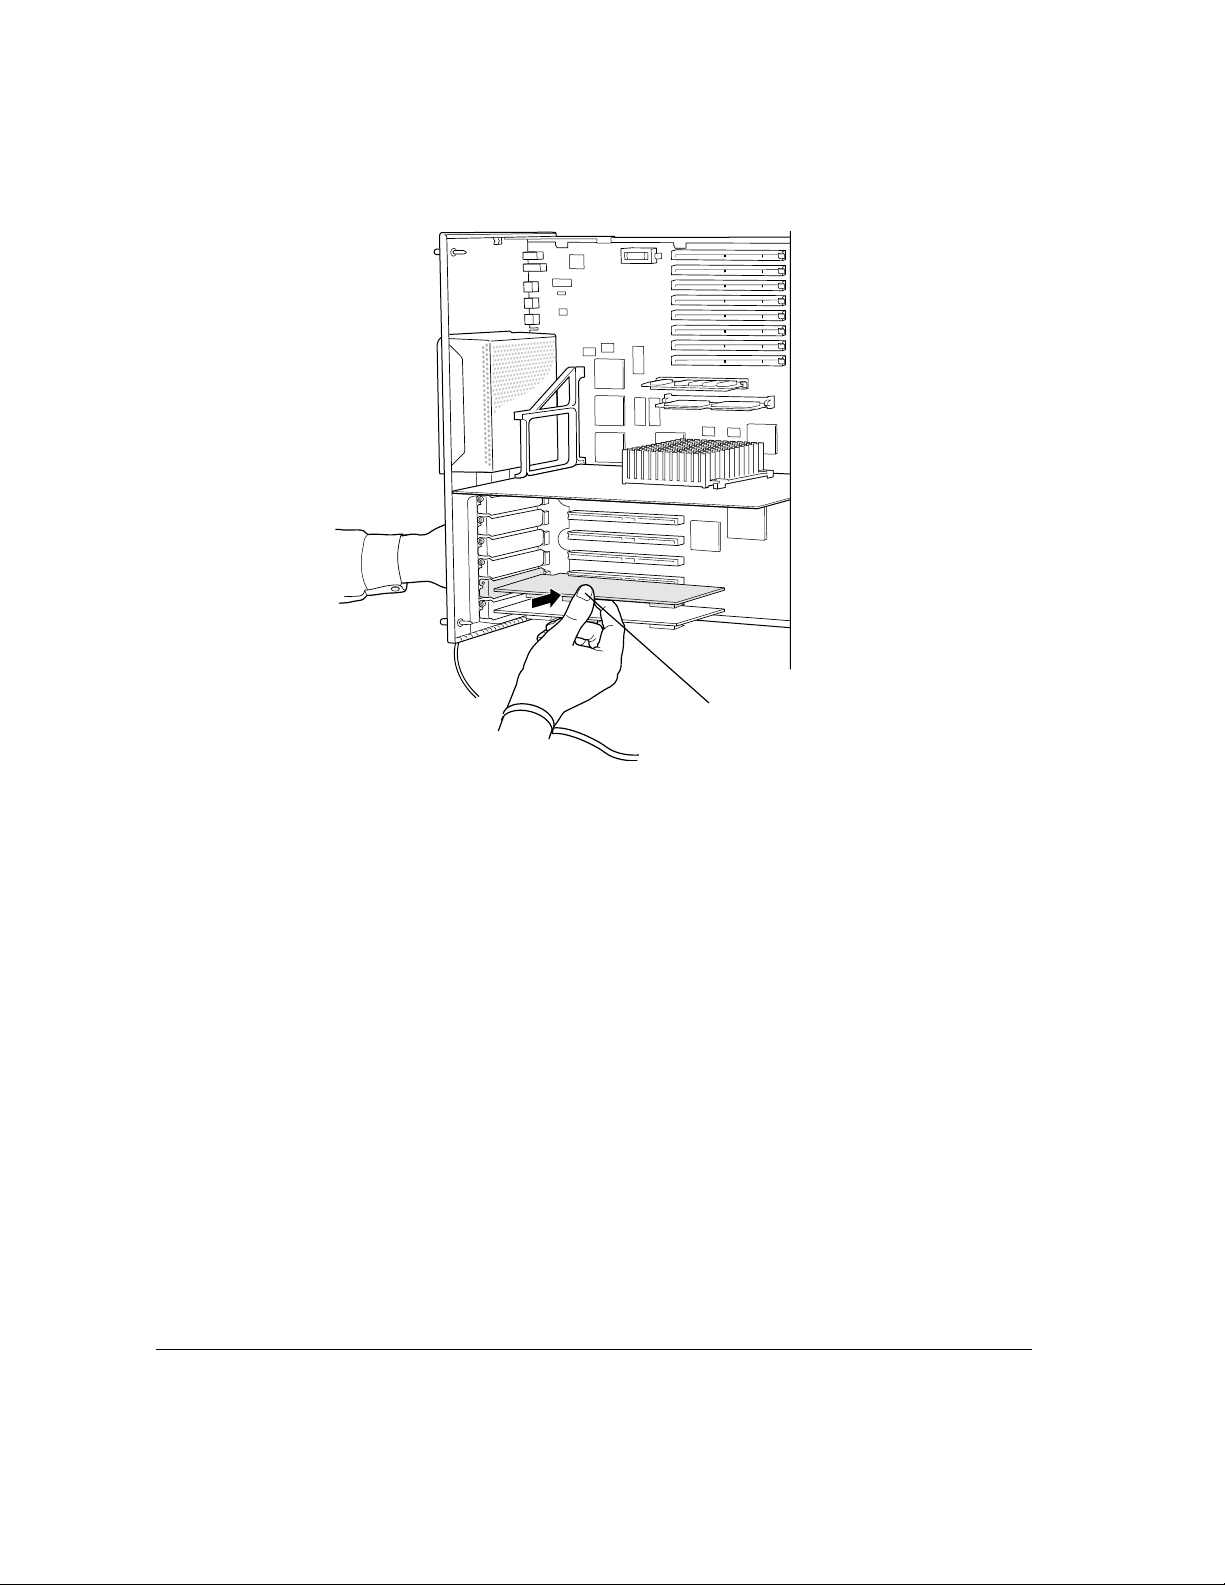
Installing the card
The cable ports on the Apple PC Dual-Attached FDDI card are somewhat
oversized for the Network Server, and require you to slightly modify the
procedure you’ve used to install other cards. Use the illustrations that follow to
install the FDDI card:
A12 Chapter 1 / Installing the Card and Connecting to the Network
Page 13
Installing the card A13
Page 14
A14 Chapter 1 / Installing the Card and Connecting to the Network
Page 15
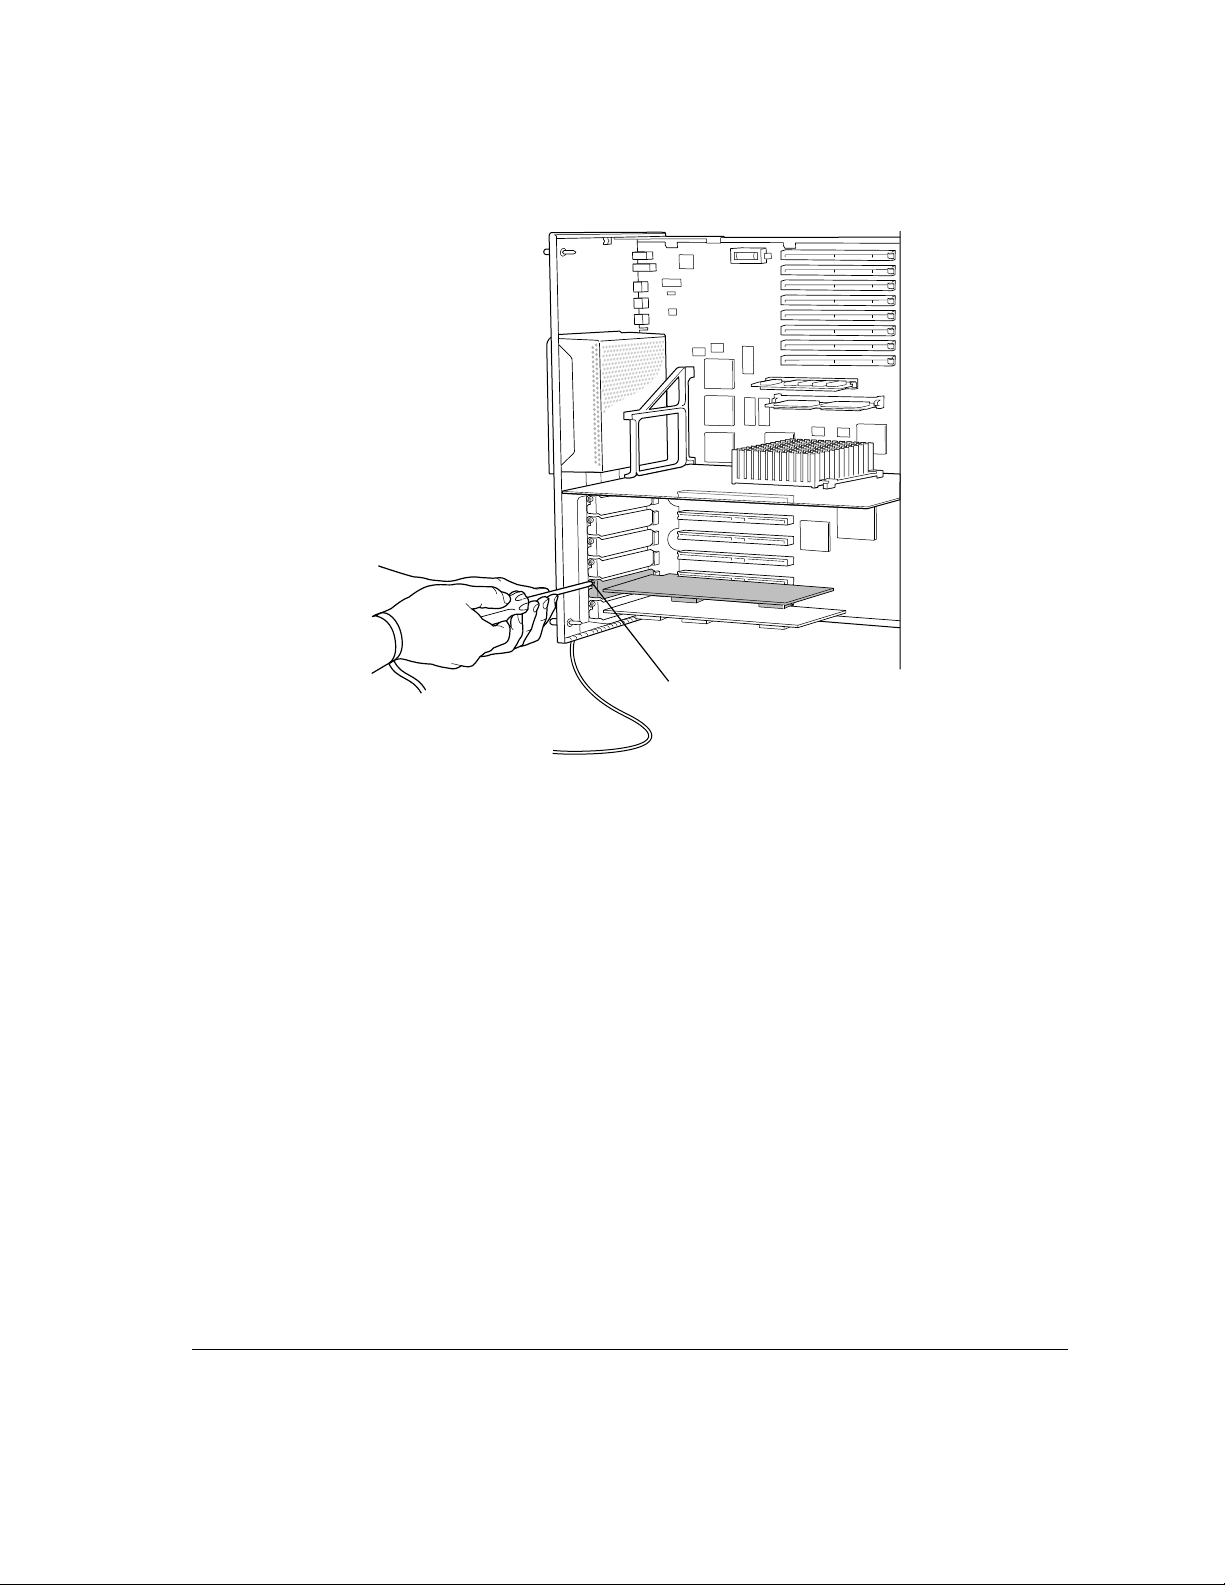
Once the card has been installed, push the logic module back in, tighten the
thumb screws, turn the key to Lock, and reattach all cables. Do not turn on the
computer until you have connected the card to the network.
Installing the card A15
Page 16

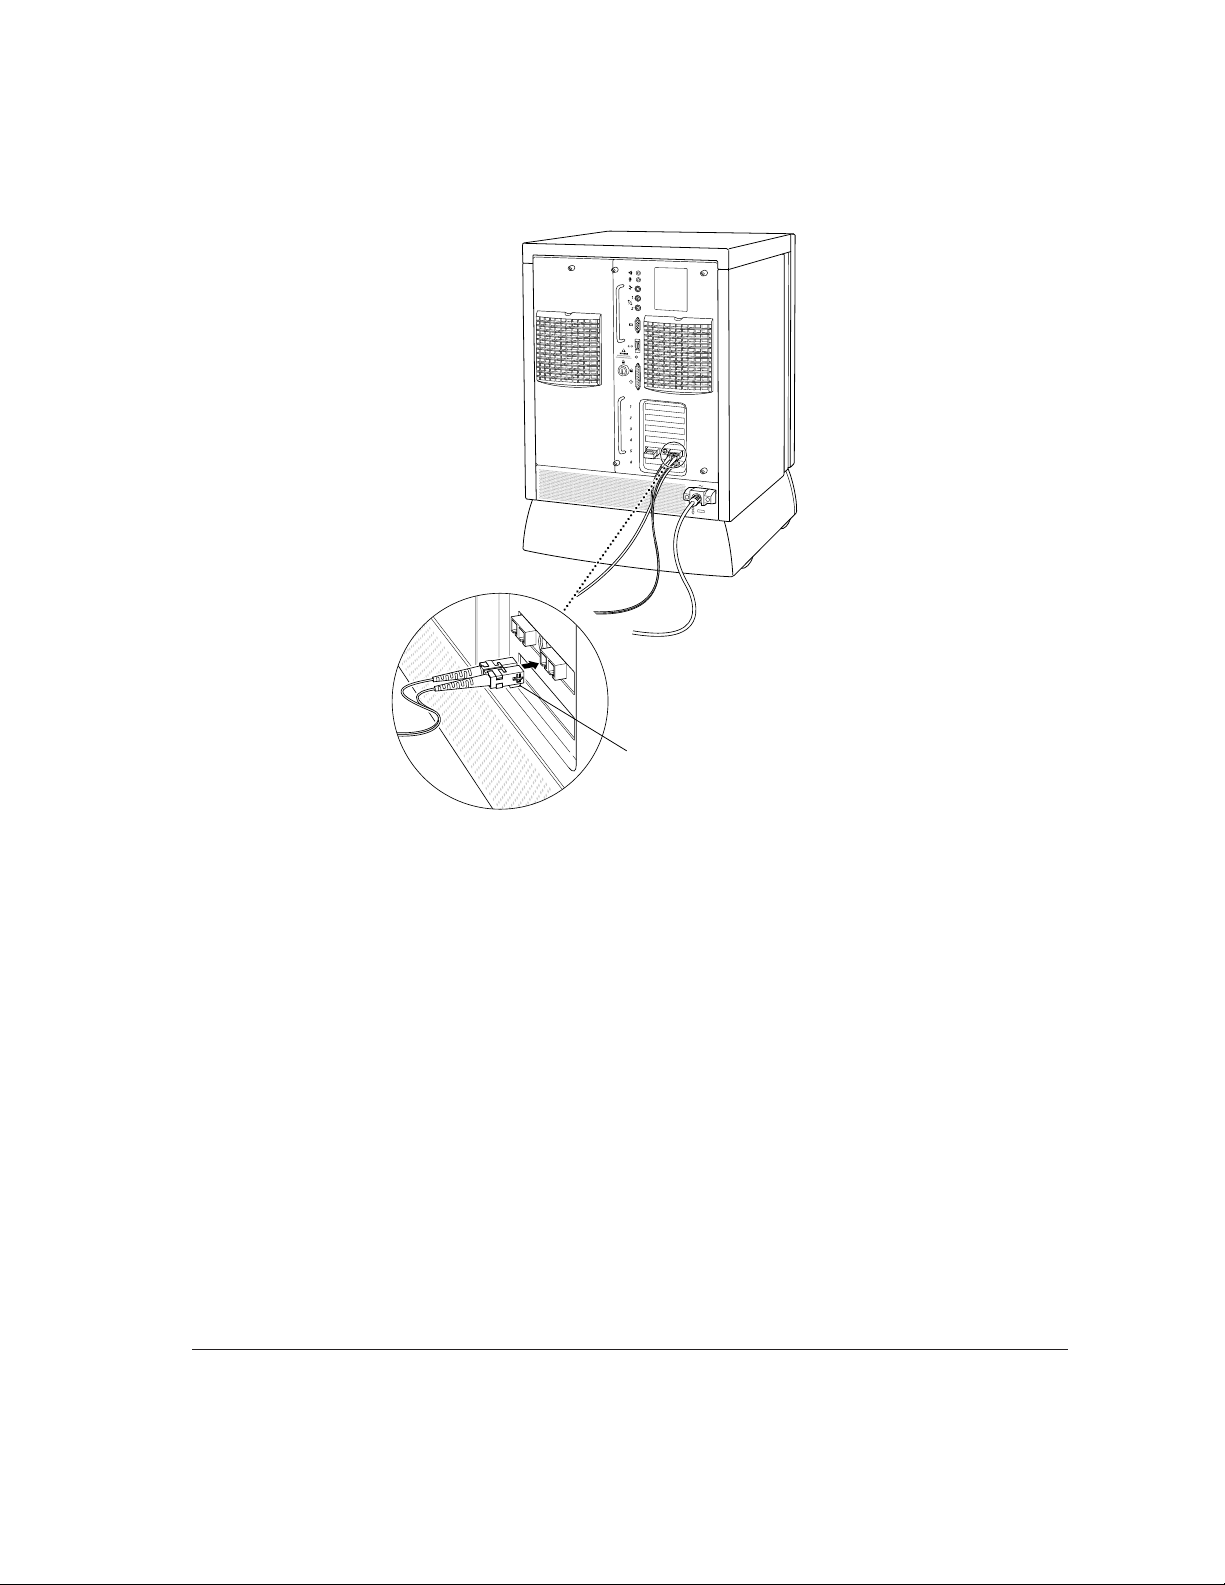
Attaching the cables and connecting to the network
The Apple PCI Dual-Attached FDDI card requires one SC Duplex fiber cable
for single attachment or two cables for dual attachment. Note that each cable
has two connectors, as shown in the illustration that follows.
These cables are not supplied with the card but may be ordered in a variety of
lengths from most large computer suppliers.
Attach each cable to Port A or Port B on the FDDI card, following the cable
manufacturer’ s instructions (if any). Looking at the computer from the back
(toward the logic module), as shown in the illustration that follows, Port A is
on the left.
A16 Chapter 1 / Installing the Card and Connecting to the Network
Page 17
IMPORTANT
Do not connect the Network Server to the next node on the
network without consulting with your network administrator. Where and how
you should connect, and how the rest of the network will be affected by adding
a node, depends on your particular network.
Attaching the cables and connecting to the network A17
Page 18

Page 19

2 Installing and Configuring
the Device Driver Software
Once you install the FDDI card, you must install a common FDDI software
package and the FDDI device driver software. You must also configure the
FDDI device driver so your Network Server can communicate on the FDDI
network. This chapter describes all of these steps.
IMPORTANT
FDDI Card. If your Network Server is not running AIX 4.1.4.l, you must first
upgrade your software before installing the FDDI software. See the
Instructions to Update AIX to Version 4.1.4.1 that came with your FDDI card.
You must be using Apple’s AIX version 4.1.4.1 or later to use the
Page 20

Installing the Common FDDI Software
After you have AIX Version 4.1.4.1 (or later) running on your Network Server,
you need to install a Common FDDI Software package before you install the
FDDI device driver. The steps you follow depend on whether you have the
Installation CD or the Software Update CD. Refer to the section below for the
CD you are using.
If you have the AIX Installation CD Version 4.1.4.1 (or later)
Follow these steps:
1Type
lslpp -l devices.mca.8ef4.com
In most cases a message appears telling you that the software is not installed.
Continue with step 2.
If a message appears telling you the software is present, then go to next
section, “Installing the FDDI AIX Driver.”
2Insert the AIX Installation CD in the CD drive.
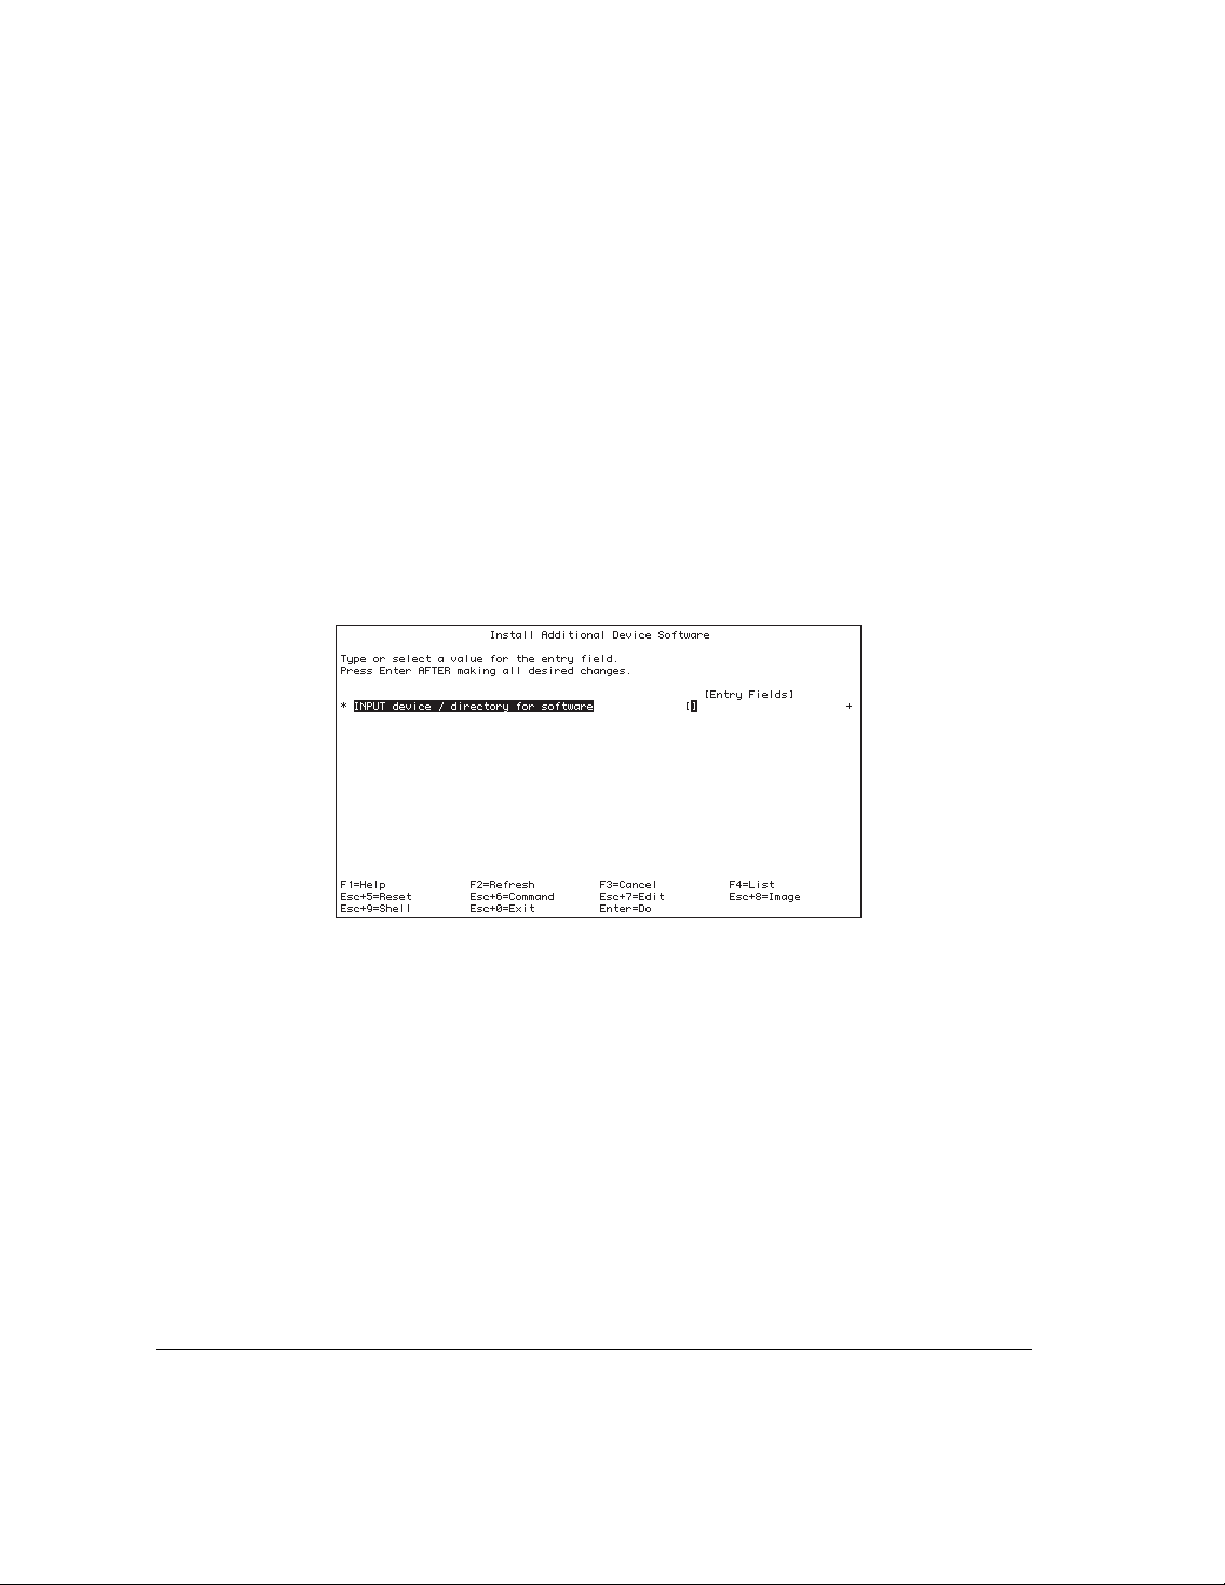
3At the AIX prompt, type the following command and press return:
smitty devinst
The menu for installing additional device software appears.
4Press F4 (or ESC-4).
A pop-up menu listing the device software that can be installed appears.
5Select the appropriate CD device from the list and press Return.
An expanded menu appears.
6Select “Software to install” from the menu and type:
devices.mca.8ef4.com
7Press Return.
A dialog box appears asking you to confirm the installation. Press Return to
begin the installation or press F3 (or ESC 3) to cancel the installation.
When the installation is finished, continue with the next section, “Installing the
FDDI AIX Driver.”
A20 Chapter 2 / Installing and Configuring the Device Driver Software
Page 21

If you have the Software Update CD
Follow these steps:
1Type
lslpp -l devices.mca.8ef4.com
In most cases a message appears telling you that the0 software is not installed.
Continue with step 2.
If a message appears telling you the software is present, then go to next
section, “Installing the FDDI AIX Driver.”
2 Insert the Network Server Software Update Kit CD in the CD drive.
3 To mount the CD, type the following command and press return:
mount -r -v cdrfs /dev/cd0 /mnt
4At the AIX prompt, type the following command and press return:
smitty devinst
The menu for installing additional device software appears.
5 In the “INPUT device/directory for software” field, type:
/mnt/new
6 In the “SOFTWARE to install” field, type:
devices.mca.8ef4.com
7Press Return.
A dialog box appears asking you to confirm the installation. Press Return to
begin the installation or press F3 (or ESC 3) to cancel the installation.
8 To unmount the CD, type:
umount /mnt
When the installation is finished, continue with the next section, “Installing the
FDDI AIX Driver.”
Installing the Common FDDI Software A21
Page 22
Installing the FDDI AIX device driver
The device driver software is included on the installation floppy disk. The
following instructions can be used to install the driver software using either
the X-windows version of the System Management Interface Tool (SMIT) or
the command line version (SMITTY). The example uses SMITTY, but all the
steps are the same.
Note: To perform the installation you must be logged in as root.
1Insert the installation floppy disk.
2At the AIX prompt, type the following command and press Return:
smitty devinst
The following menu appears:
3In the INPUT entry field, type:
/dev/fd0
A22 Chapter 2 / Installing and Configuring the Device Driver Software
Page 23
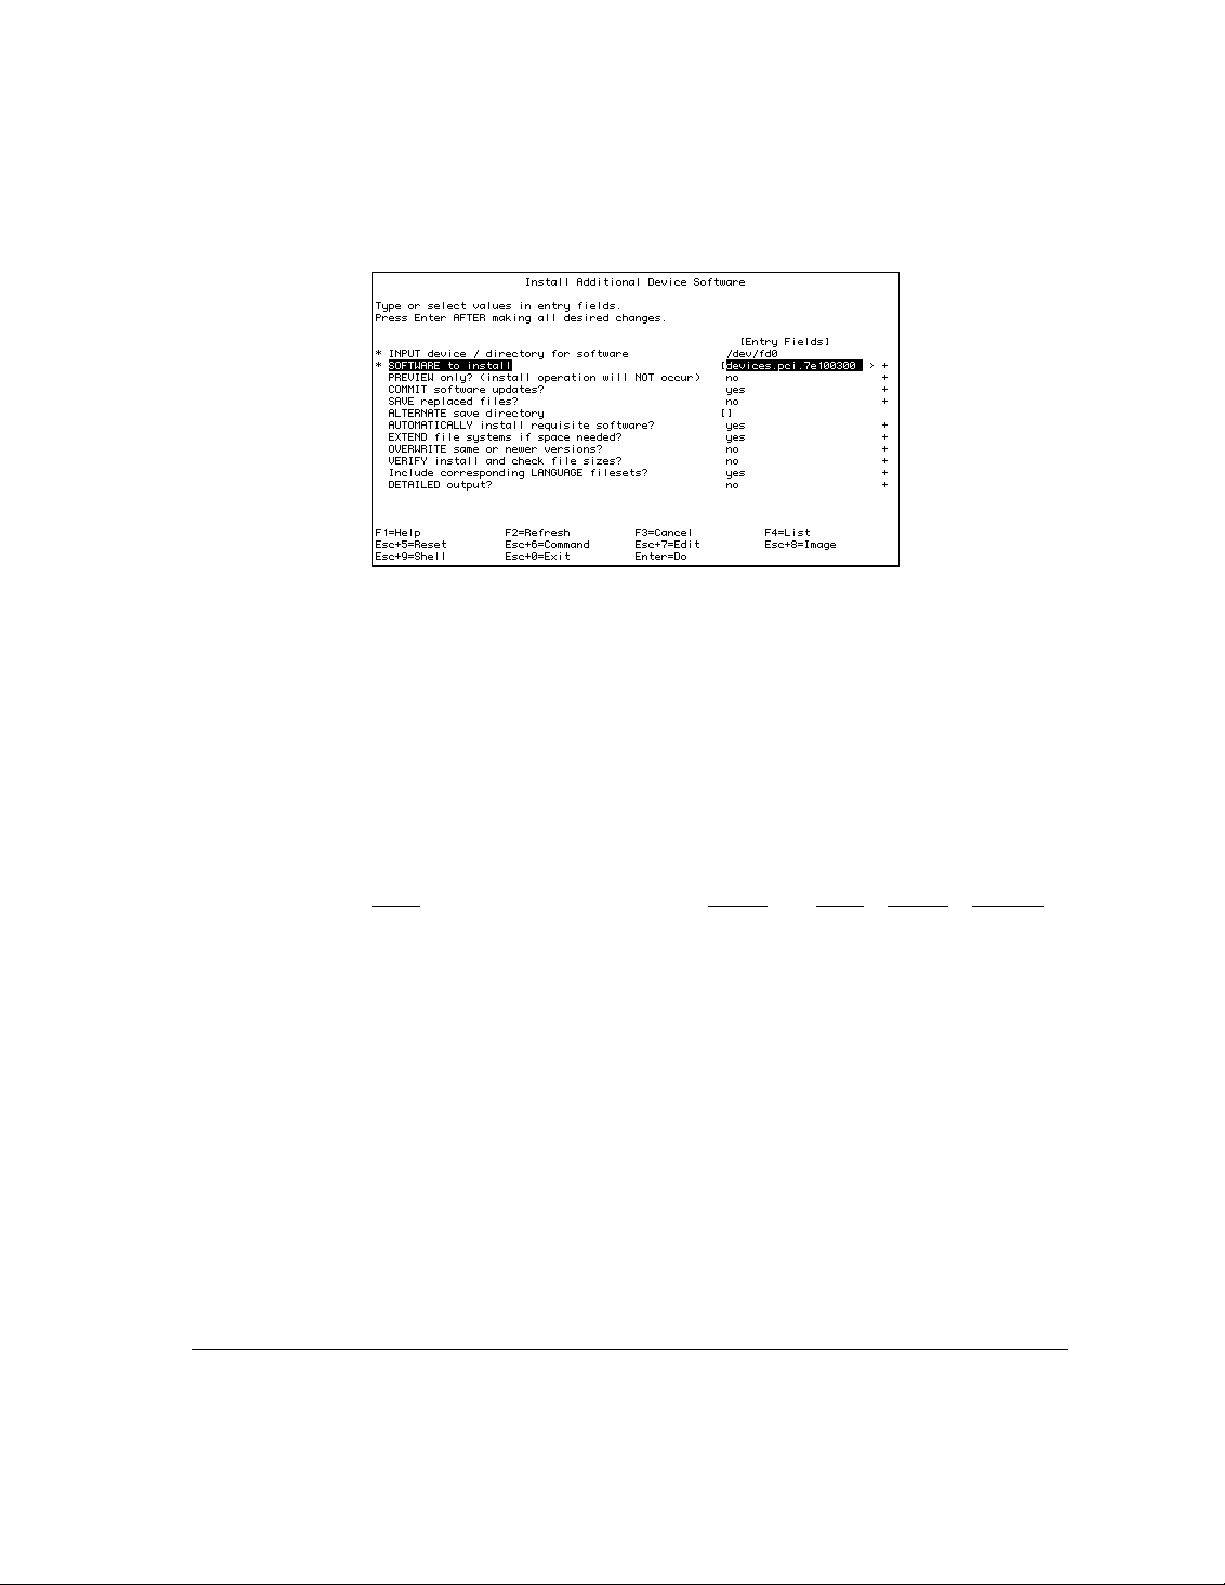
4Press Return to display the configuration options shown in the next screen:
5Type
devices.pci.7e100300
in the SOFTWARE to install field.
If a FDDI driver has already been installed and you want to continue with this
installation you need to type,
Yes in the overwrite field.
A dialog box appears asking you to confirm your selection.
6Press Return again to begin the installation.
Messages on the screen describe the installation process. When you see the
following message, installation is complete:
Installation Summary -------Name Level Part Event Result
devices.pci.7e100300.rte 2.1.0.0 USR APPLY SUCCESS
devices.pci.7e100300.diag 2.1.0.0 USR APPLY SUCCESS
7Press f10 to exit SMITTY, and then reboot the Network Server.
Configuring the FDDI AIX device driver A23
Page 24
Configuring the FDDI network interface
You’ll need to have the following information to configure the network
interface for the FDDI card:
m a name and IP address for each FDDI card installed on the Network Server
m the network mask
m the appropriate domain name server name and IP address
m the IP address of the router or gateway the Network Server uses for network
access.
If you don’t have this information, obtain it from your network administrator.
As when you install the device driver, you can configure the card with either
SMIT or SMITTY. The instructions that follow presume you are for using
SMITTY.
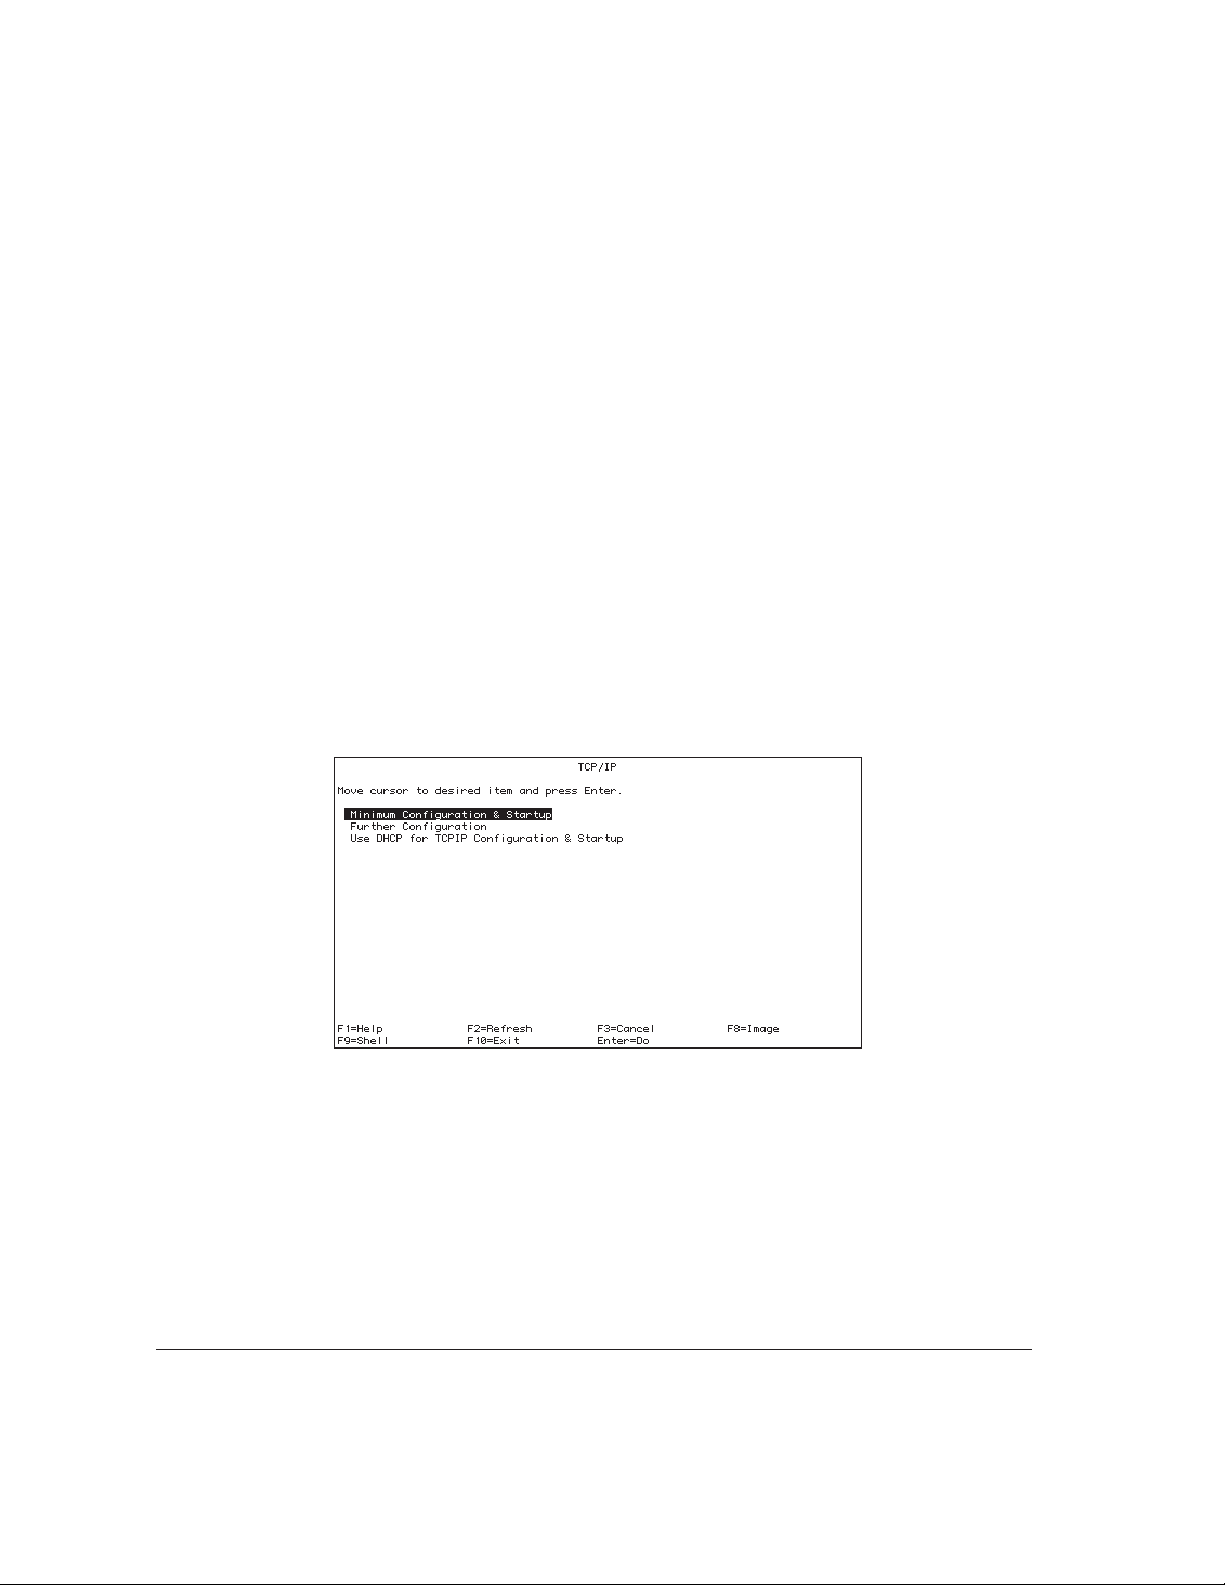
1At the AIX prompt, type the following command and press Return:
smitty tcpip
The TCP/IP configuration screen appears:
A24 Chapter 2 / Installing and Configuring the Device Driver Software
Page 25
2Select Minimum Configuration & Startup and then press Return.
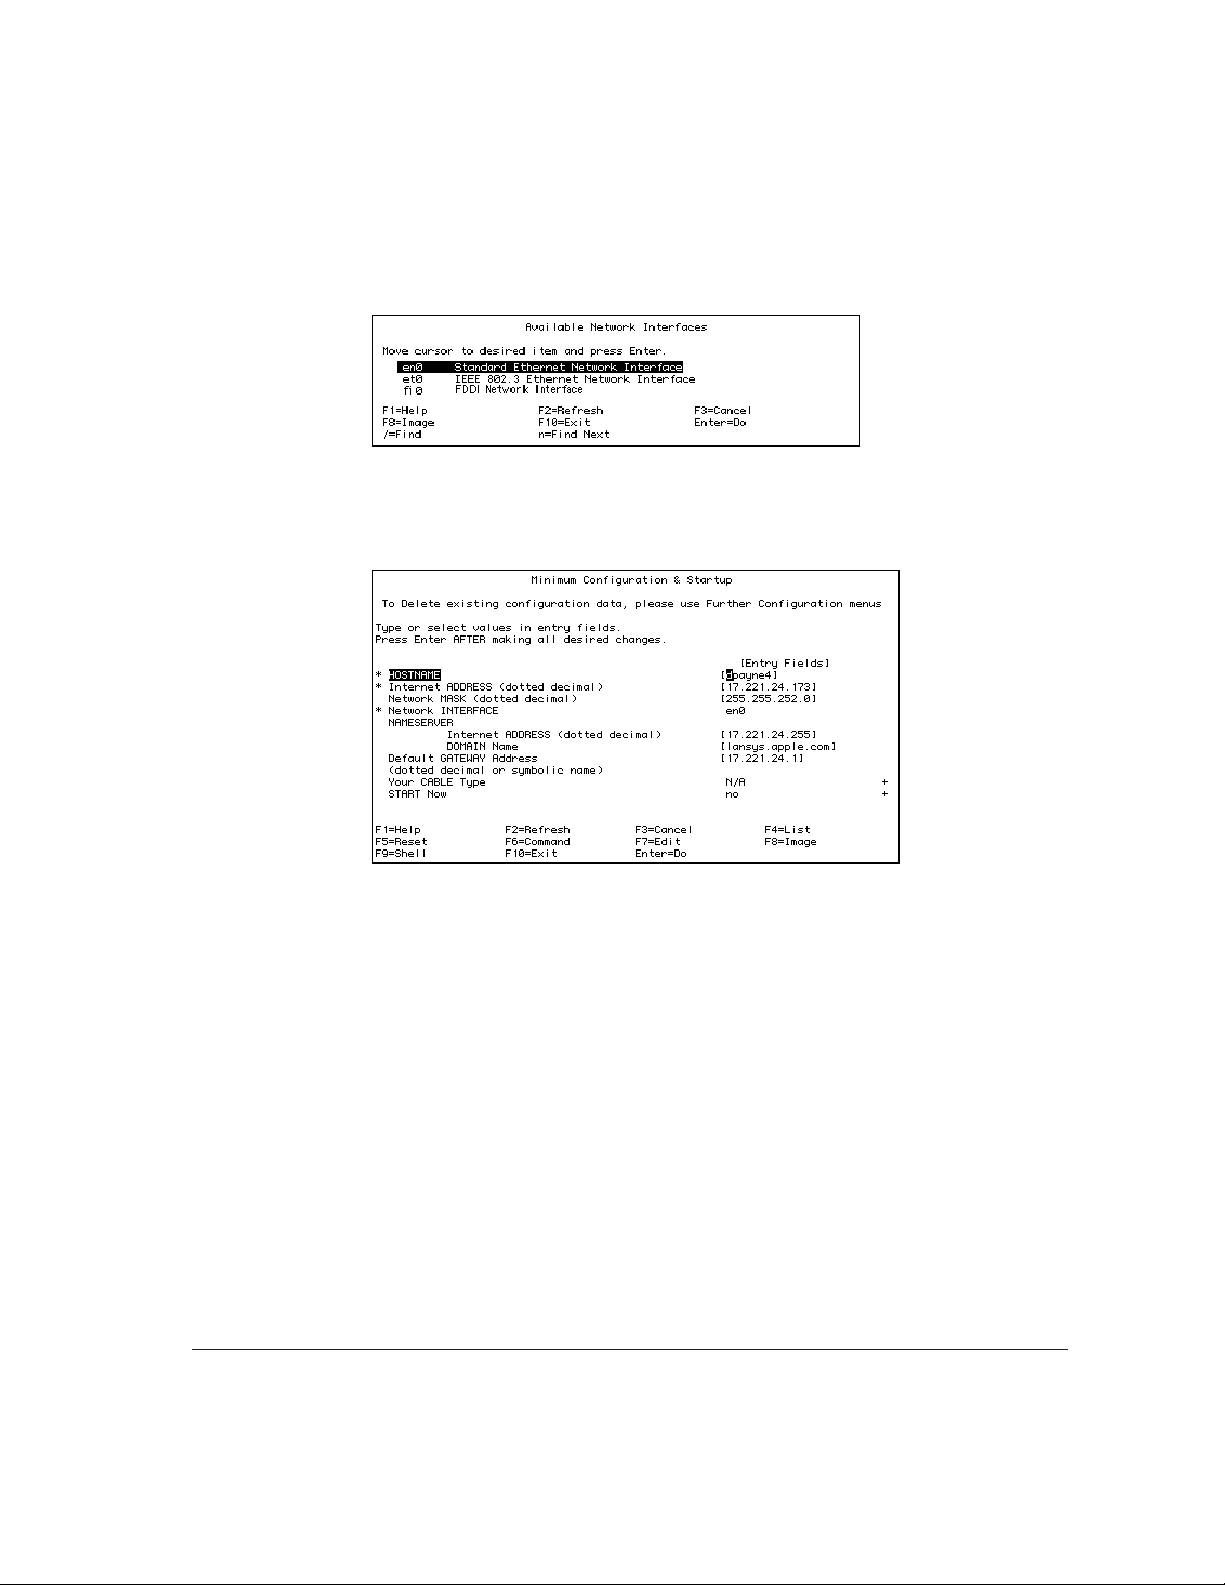
The Available Network Interfaces screen appears.
3Press fi0 and then press Return.
The Minimum Configuration & Startup screen appears.
4 Fill in or edit the entry fields in the Minimum Configuration & Startup screen.
Enter the name and IP address assigned to the FDDI card, the network mask,
the name and IP address of the appropriate domain name server, and the IP
address of the router or gateway the Network Server uses for network access.
If you are connecting more than one FDDI card to the server, each FDDI card
must have a unique IP address
5Press Return.
6Press f10 to exit SMITTY, and then reboot the Network Server.
Configuring the FDDI network interface A25
Page 26

Page 27

3 Troubleshooting and Diagnostics
This chapter suggests possible solutions to common problems that may come
up while you’re using the Network Server with an Apple PCI Dual-Attached
FDDI Card. Try the suggestions in the order they are listed, until you resolve
the problem.
The chapter gives you information about using FDDI diagnostic routines.
Finally, the chapter includes information on obtaining service and support if
you encounter problems you can’t solve.
Page 28

Troubleshooting
AIX won’t boot.
1. Check to see that the system is plugged in and turned on
2. Check to see that the card you just installed is properly seated in the slot.
3. Try installing the card in a different PCI slot.
4. Remove the card and see if the system boots up and works normally.
5. Try installing another card that you know is good. If the problem continues,
A network application no longer works.
If an application worked prior to the installation of the card, there is probably a
hardware conflict. See “Obtaining Service and Support,” later in this chapter.
The Network Server card cannot connect to the ring or communicate with other hosts on
the network.
1. Make sure the card is seated correctly in the bus expansion slot.
2. Verify that both cables are properly connected, and that Ports A and B are
3. Use a utility such as PING to test the Network Server’s ability to
see “Obtaining Service and Support,” later in this chapter.
connected to the correct ports on their adjacent nodes.
communicate on the network.
4. Install the card in another PCI slot and try again.
5. Try installing another card that you know is good. If the problem continues,
see “Obtaining Service and Support,” later in this chapter.
A28 Chapter 3 / Troubleshooting and Diagnostics
Page 29

Using FDDI diagnostic routines
A number of diagnostic routines were installed when you installed the FDDI
device driver software. To run these routines, use either SMIT or smitty to
open the AIX diagnostics utility. Complete information on AIX diagnostics
and on the AIX diagnostics utility is available through InfoExplorer. Chapter 5
Using AIX, AppleTalk Services, and Mac OS Utilities on the Apple Network
of
Server tells you how to access and use InfoExplorer.
Obtaining service and support
See the service and support information packaged with your Network Server
for phone numbers and other information that can help you solve problems
that may come up with your Apple PCI Dual-Attached FDDI Card.
Obtaining service and support A29
Page 30

Page 31

Appendix Specifications
Apple PCI Dual-Attached FDDI Card Specifications
Host Bus Interface PCI Revision 2.0
Network Interface ANSI X3T9.5 for FDDI @ 100 Mbps
Host Data Transfer 32-bit bus master DMA transfers to 132 Mbps
IEEE Compliance IEEE P1386 adapter card specification
Mechanical 5511 occupies a full-size, short card PCI slot
Operating Power +5 volts DC +/-5% @ 2.10 Amps (maximum)
Software Drivers AIX version 4.1.4.1
Operating
Environment Temperature: 0
Relative Humidity: 10–90%, non-condensing
Altitude: sea level to 15,000 feet
Storage: -20° to 70° C (-4° to 158° F)
° to 55° C (32° to 131° F)
Network
Connections Dual Mode Fiber (62.5/125): ST or SC Duplex
Page 32

Page 33

Installati on
ais
de la carte PCI FDDI Apple
et confi guration
Franç
B
B
B
Page 34

Page 35

Table des matières
Préface / B5
1 Installation de la carte et connexion au réseau / B7
Ouverture du module logique du Network Server / B8
Déballage de la carte / B11
Installation de la carte / B12
Branchement des câbles et connexion au réseau / B16
2 Installation et configuration du gestionnaire de périphérique / B19
Installation des ressources / B19
Installation du gestionnaire de périphérique FDDI AIX / B22
Configuration de l’interface réseau FDDI / B24
3 Dépannage et diagnostics / B27
Dépannage / B28
Utilisation des programmes de diagnostic FDDI / B29
Dépannage et assistance / B29
Annexe Spécifications techniques / B31
Page 36

Page 37

Préface
La carte PCI FDDI Apple se présente sous la forme d’une carte FDDI (Fiber
Distributed Data Interface) à connecteur unique, d’un débit de 100 mégabits
par seconde (Mbps). Elle s’utilise avec le Network Server d’Apple. La carte
fournit des services physiques et de liaison de données en utilisant le protocole
TCP/IP, comme mentionné dans les spécifications
ANSI X3T9.5 pour le FDDI.
IMPORTANT
installer la version 4.1.4.1 d’AIX. Reportez-vous aux instructions de mise à
jour d’AIX pour le Network Server.
La carte PCI FDDI Apple possède les caractéristiques suivantes :
m compatibilité avec Bus Local PCI, version 2.1
m FDDI Station Management (SMT) intégré à la carte
m DMA (Accès direct à la mémoire) PCI à état d’attente nul 32 bits
m taux de transmission de données en rafales jusqu’à 132 Mbps sur le bus PCI
m commandes PCI pour une utilisation efficace de la mémoire cache
m support pour dispositifs à fibre optique
m support pour un double branchement direct au réseau
m 128 Ko de cache locale
m jeu de composants Motorola MC68840 FDDI
Ces fonctionnalités sont toutes disponibles dès que la carte est installée dans le
Network Server. Aucune configuration particulière n’est nécessaire.
Avant de pouvoir utiliser la carte FDDI, vous devez d’abord
Page 38

À propos de ce manuel
Ce manuel est destiné aux administrateurs du Network Server. Il suppose une
bonne maîtrise matérielle de ce produit, que vous pouvez obtenir grâce au
manuel
Vous devez également avoir une bonne connaissance du système d’exploitation
AIX. Le manuel intitulé Utilisation d’AIX®, des services AppleTalk, et des
utilitaires Mac OS du Network Server, également fourni dans votre kit
d’accessoires, propose une introduction aux principes de base.
Une documentation détaillée sur AIX est disponible en ligne via l’application
InfoExplorer. Vous trouverez comment accéder à InfoExplorer et l’utiliser au
chapitre 5 du manuel Utilisation d’AIX, des services AppleTalk, et des
utilitaires Mac OS du Network Server.
Mise en œuvre du Network Server (fourni dans son kit d’accessoires).
Informations complémentaires
De nombreux ouvrages concernant FDDI et les réseaux FDDI à jeton sont
disponibles dans la plupart des librairies spécialisées. Le Consortium FDDI
de l’université du New Hampshire est également une excellente source
d’information et d’apprentissage concernant FDDI. Vous pouvez accéder au
Consortium par Internet à l’adresse suivante :
B6 Préface
http://www.iol.unh.edu/consortiums/fddi/fddi_consortium.html
Page 39

1 Installation de la carte et connexion au réseau
Ce chapitre donne toutes les instructions nécessaires à l’installation de la carte
PCI FDDI Apple dans le Network Server. Avant de procéder à cette
installation, prenez connaissance de la section traitant de l’installation des
cartes PCI du manuel
toutes les recommandations concernant la manipulation et l’installation de la
carte pour ne pas endommager celle-ci, ni l’ordinateur.
Mise en œuvre du Network Server. Suivez attentivement
Page 40

Ouverture du module logique du Network Server
Il n’est pas nécessaire d’ôter le capot du Network Server pour installer une carte.
Il suffit d’ouvrir le module logique en suivant les instructions ci-après.
1 Éteignez le Network Server.
Si vous avez besoin d’un complément d’informations pour éteindre le Network
Server sans risque, référez-vous à la section Utilisation d’AIX, des services
AppleTalk et des utilitaires Mac OS du Network Server.
2Mettez un bracelet de mise à la terre.
Un bracelet de mise à la terre est fortement recommandé pour éviter tout
endommagement de la carte ou de l’ordinateur dû à une décharge
d’électricité statique.
3 Déverrouillez le tiroir arrière en plaçant la clé en position verticale.
B8 Chapitre 1 / Installation de la carte et connexion au réseau
Page 41

4 Dévissez entièrement les vis à molette.
Ouverture du module logique du Network Server B9
Page 42

5 Tirez le module logique par ses poignées pour le faire coulisser vers l’extérieur.
6 Retirez le couvercle correspondant au connecteur d’extension que vous
souhaitez utiliser.
Conservez la vis. Elle servira plus tard pour maintenir la carte en place.
Placez le couvercle en lieu sûr au cas où vous retireriez cette carte ultérieurement.
B10 Chapitre 1 / Installation de la carte et connexion au réseau
Page 43

Déballage de la carte
La boîte contenant la carte PCI FDDI Apple comprend un CD-ROM
d’installation, la carte elle-même et ce manuel.
1 Dégagez la carte de tous ses éléments de protection.
Conservez-les soigneusement car ils seront utiles si vous devez retourner la
carte pour une réparation.
2 Retirez précautionneusement la carte de son étui antistatique.
Vérifiez que la carte n’a pas été endommagée durant son transport. Si vous
constatez un défaut, contactez votre distributeur Apple Network Server.
Déballage de la carte B11
Page 44

Installation de la carte
Les ports câble de la carte PCI FDDI Apple sont un peu trop grands pour le
Network Server. Vous devez donc modifier légèrement la procédure utilisée
pour installer d’autres cartes. Servez-vous des illustrations suivantes pour
installer la carte FDDI :
B12 Chapitre 1 / Installation de la carte et connexion au réseau
Page 45

Installation de la carte B13
Page 46

B14 Chapitre 1 / Installation de la carte et connexion au réseau
Page 47

Une fois la carte installée, replacez le module logique dans son compartiment,
serrez les vis à molette, placez la clé en position horizontale pour verrouiller le
tiroir arrière et reconnectez tous les câbles. N’allumez pas l’ordinateur avant
d’avoir connecté la carte au réseau.
Installation de la carte B15
Page 48

Branchement des câbles et connexion au réseau
La carte PCI FDDI Apple s’utilise avec un câble en fibres SC Duplex pour
un branchement simple ou deux câbles pour un branchement double. Chaque
câble possède deux connecteurs, comme illustré ci-dessous.
Ces câbles, disponibles en différentes longueurs, ne sont pas fournis avec la
carte, mais vous pouvez facilement vous les procurer chez la plupart des
revendeurs informatiques.
Connectez chaque câble au Port A ou au Port B sur la carte FDDI, en suivant
les instructions données par le fabricant du câble (si elles vous ont été fournies).
Si l’on regarde l’ordinateur de l’arrière (vers le module logique), le port A se
trouve à gauche comme illustré ci-après.
B16 Chapitre 1 / Installation de la carte et connexion au réseau
Page 49

IMPORTANT
Ne connectez pas le Network Server au nœud suivant sur le réseau
sans en informer votre administrateur réseau. Le point de connexion, les
modalités de connexion et les conséquences de l’ajout d’un nœud dépendent
de votre réseau.
Branchement des câbles et connexion au réseau B17
Page 50

Page 51

2 Installation et configuration du gestionnaire
de périphérique
Lorsque vous installez une carte FDDI, vous devez installer les ressources
FDDI ainsi que le gestionnaire de périphérique FDDI. Vous devez également
configurer le gestionnaire de périphérique FDDI pour que le Network Server
puisse communiquer sur le réseau FDDI. Ce chapitre vous explique comment
y parvenir.
IMPORTANT
version 4.1.4.1 d’Apple ou toute version ultérieure. Si AIX 4.1.4.l n’est pas
installé sur votre Network Server, vous devez mettre à jour ce logiciel avant
d’installer le logiciel FDDI. Consultez les instructions de mise à jour d’AIX en
version 4.1.4.1 livrées avec votre carte FDDI.
Pour pouvoir utiliser la carte FDDI, vous devez utiliser AIX
Installation des ressources FDDI
Une fois AIX version 4.1.4.1 (ou ultérieure) installé sur votre Network Server,
vous devez installer les ressources FDDI avant d’installer le gestionnaire de
périphérique FDDI. La procédure est différente selon que vous disposez du
CD d’installation complète ou du CD de mise à jour. Reportez-vous à la
section correspondant au CD dont vous disposez.
Page 52

Si vous disposez du CD d’installation d’AIX version 4.1.4.1 (ou
ultérieure)
Suivez les instructions ci-dessous :
1Entrez
lslpp -l devices.mca.8ef4.com
Le plus souvent, un message indiquant que le logiciel n’est pas installé
apparaît. Passez à l’étape 2.
Si un message indiquant que ce logiciel est installé apparaît, passez directement
à la section suivante “Installation du gestionnaire de périphérique FDDI AIX.”
2Insérez le CD d’installation d’AIX dans le lecteur.
3À l’invite d’AIX, entrez la commande suivante, puis appuyez sur la touche Retour :
smitty devinst
La fenêtre permettant d’installer des ressources supplémentaires apparaît.
4Appuyez sur la touche F4 (ou ESC-4).
Un menu déroulant indiquant les différents lecteurs pouvant être utilisés pour
installer de nouvelles ressources apparaît.
5Sélectionnez le lecteur approprié (dans ce cas, le lecteur de CD-ROM) et appuyez
sur Retour.
Un menu apparaît.
6Sélectionnez “Software to install” dans le menu puis entrez :
devices.mca.8ef4.com
7Appuyez sur Retour.
Une zone de dialogue demandant de confirmer l’installation apparaît. Appuyez
sur Retour pour lancer l’installation ou sur F3 (ou ESC 3) pour l’annuler.
Lorsque l’installation est terminée, passez à la section suivante, “Installation
du gestionnaire de périphérique FDDI AIX.”
B20 Chapitre 2 / Installation et configuration du gestionnaire de périphérique
Page 53

Si vous disposez du CD de mise à jour
Suivez les instructions ci-dessous :
1Entrez
lslpp -l devices.mca.8ef4.com
Le plus souvent, un message indiquant que le logiciel n’est pas installé
apparaît. Passez à l’étape 2.
Si un message indiquant que ce logiciel est installé apparaît, passez
directement à la section suivante “Installation du gestionnaire de périphérique
FDDI AIX”.
2 Insérez le CD de mise à jour du Network Server dans le lecteur.
3Pour monter le CD, entrez la commande suivante, puis appuyez sur la touche Retour :
mount -r -v cdrfs /dev/cd0 /mnt
4À l’invite d’AIX, entrez la commande suivante, puis appuyez sur la touche Retour :
smitty devinst
Un menu déroulant indiquant les différents lecteurs pouvant être utilisés pour
installer de nouvelles ressources apparaît.
5 Dans la zone “INPUT device/directory for software”, entrez :
/mnt/new
6 Dans la zone “SOFTWARE to install”, entrez :
devices.mca.8ef4.com
7Appuyez sur Retour.
Une zone de dialogue demandant de confirmer l’installation apparaît. Appuyez
sur Retour pour lancer l’installation ou sur F3 (ou ESC 3) pour l’annuler.
8Pour éjecter le CD, entrez :
umount /mnt
Lorsque l’installation est terminée, passez à la section suivante, “Installation
du gestionnaire de périphérique FDDI AIX”.
Installation des ressources FDDI B21
Page 54

Installation du gestionnaire de périphérique FDDI AIX
Le gestionnaire de périphérique se trouve sur la disquette d’installation.
Pour l’installer, vous pouvez utiliser soit la version X-windows du System
Management Interface Tool (SMIT) ou la version de ligne de commande
(SMITTY). L’exemple suivant utilise SMITTY, mais les étapes sont les mêmes.
Remarque: pour réaliser l’installation, vous de v ez être connecté en tant que root.
1Insérez la disquette d’installation.
2À l’invite d’AIX, entrez la commande suivante et appuyez sur la touche Retour :
smitty devinst
Le menu suivant s’affiche :
3Entrez la commande suivante dans le champ INPUT :
/dev/fd0
B22 Chapitre 2 / Installation et configuration du gestionnaire de périphérique
Page 55

4Appuyez sur Retour pour afficher les options de configuration présentées dans l’écran
ci-dessous :
5Entrez
devices.pci.7e100300
dans le champ SOFTWARE to install.
Si un gestionnaire FDDI a déjà été installé et si vous souhaitez continuer
l’installation en cours, il vous suffit d’entrer
Yes dans le champ overwrite.
Une zone de dialogue s’affiche vous invitant à confirmer votre sélection.
6Appuyez une nouvelle fois sur Retour pour commencer l’installation.
Une succession de messages à l’écran décrivent le processus d’installation.
L’installation est terminée lorsque le message suivant apparaît :
Installation Summary -------Name Level Part Event Result
devices.pci.7e100300.rte 2.1.0.0 USR APPLY SUCCESS
devices.pci.7e100300.diag 2.1.0.0 USR APPLY SUCCESS
7Appuyez sur f10 pour quitter SMITTY et redémarrez le Network Server.
Installation du gestionnaire des périphérique FDDI AIX B23
Page 56

Configuration de l’interface réseau FDDI
Les informations suivantes sont nécessaires pour configurer l’interface réseau
pour la carte FDDI :
m un nom et une adresse IP pour chaque carte FDDI installée sur le
Network Server
m le masque du réseau
m le nom du serveur de noms de domaines approprié et l’adresse IP
m l’addresse IP du routeur ou de la passerelle utilisés par le Network Server
pour accéder au réseau.
Si vous ne connaissez pas ces informations, contactez votre administrateur
système.
Lorsque vous installez le gestionnaire de périphérique, vous pouvez configurer
la carte soit avec SMIT soit avec SMITTY. Les instructions suivantes
supposent que vous utilisez SMITTY.
1À l’invite d’AIX, entrez la commande suivante et appuyez sur Retour :
smitty tcpip
L’écran de configuration TCP/IP apparaît :
B24 Chapitre 2 / Installation et configuration du gestionnaire de périphérique
Page 57

2Sélectionnez Minimum Configuration & Startup, puis appuyez sur Retour.
L’écran Available Network Interfaces s’affiche :
3Appuyez sur f10 puis sur Retour.
L’écran Minimum Configuration & Startup s’affiche :
4 Remplissez ou modifiez les champs de l’écran Minimum Configuration & Startup.
Entrez le nom et l’adresse IP donnés à la carte FDDI, le masque du réseau,
le nom et l’adresse IP du serveur de noms de domaines approprié, et l’adresse
IP du routeur ou de la passerelle utilisés par le Network Server pour accéder
au réseau.
Si vous connectez plusieurs cartes FDDI au serveur, chacune doit avoir sa
propre adresse IP.
5Appuyez sur Retour.
6Appuyez sur f10 pour quitter SMITTY, puis redémarrez le Network Server.
Configuration de l’interface réseau FDDI B25
Page 58

Page 59

3 Dépannage et diagnostics
Ce chapitre donne quelques solutions aux problèmes courants qui risquent de
survenir lorsque vous utilisez le Network Serv er a v ec une carte PCI FDDI Apple.
Essayez les suggestions dans l’ordre dans lequel elles sont présentées jusqu’à
ce que votre problème soit résolu.
Ce chapitre vous donne également des renseignements sur l’utilisation des
programmes de diagnostic FDDI. Il contient aussi les informations nécessaires
pour obtenir une aide ou une assistance si vous ne parvenez pas à résoudre
votre problème.
Page 60

Dépannage
AIX ne démarre pas.
1. Vérifiez que l’ordinateur est branché et allumé.
2. Vérifiez que la carte que vous venez d’installer est correctement positionnée
dans le connecteur.
3. Essayez d’installer la carte dans un connecteur PCI différent.
4. Retirez la carte et vérifiez si le système démarre et fonctionne normalement.
5. Essayez d’installer une autre carte, dont vous êtes sûr du bon état de marche.
Si le problème n’est pas résolu, reportez-vous au paragraphe “Dépannage et
assistance,” plus loin dans ce chapitre.
Une application du réseau ne fonctionne plus.
Si une application fonctionnait avant l’installation de la carte, il y a
probablement une incompatibilité matérielle. Reportez-vous au paragraphe
“Dépannage et assistance,” plus loin dans ce chapitre.
La carte du Network Server ne peut pas se connecter au réseau ni communiquer avec
d’autres ordinateurs hôtes sur le réseau.
1. Vérifiez que la carte est correctement positionnée dans le connecteur
d’extension de bus.
2. Vérifiez que les deux câbles sont bien connectés et que les ports A et B sont
connectés aux bons ports sur leurs nœuds adjacents.
3. Utilisez un utilitaire tel que PING pour tester les capacités de communication
du Network Server sur le réseau.
4. Installez la carte dans un autre connecteur PCI et essayez à nouveau.
5. Essayez d’installer une autre carte, dont vous êtes sûr du bon état de marche.
Si le problème n’est pas résolu, reportez-vous au paragraphe “Dépannage et
assistance,” plus loin dans ce chapitre.
B28 Chapitre 3 / Dépannage et diagnostics
Page 61

Utilisation des programmes de diagnostic FDDI
Un certain nombre de programmes de diagnostic ont été installés au moment
de l’installation du gestionnaire de périphérique FDDI. Pour exécuter ces
programmes, utilisez SMIT ou SMITTY pour lancer l’utilitaire de diagnostic
d’AIX. Des informations détaillées sur les diagnostics d’AIX et l’utilitaire de
diagnostics d’AIX sont disponibles via InfoExplorer. Le chapitre 5 du manuel
Utilisation d’AIX, des services AppleTalk et des utilitaires MAC OS du
Network Server contient des renseignements sur les procédures d’accès
et d’utilisation d’InfoExplorer.
Dépannage et assistance
Vous trouverez les numéros de téléphone et d’autres informations utiles à la
résolution de problèmes liés à votre carte PCI FDDI Apple dans la
documentation livrée avec votre Network Server.
Dépannage et assistance B29
Page 62

Page 63

Annexe Spécifications techniques
Spécifications techniques de la carte PCI FDDI Apple
Interface du bus hôte PCI Révision 2.0
Interface du réseau ANSI X3T9.5 pour FDDI à 100 Mbps
Transfert de
données hôte Transfert DMA bus maître 32 bits à 132 Mbps
Conformité IEEE Spécification carte adaptateur IEEE P1386
Physique 5511 occupe un connecteur carte PCI court complet
Consommation +5 volts DC +/-5% @ 2,10 Amps (maximum)
Gestionnaire AIX version 4.1.4.1
Environnement Température d’utilisation : de 0
Humidité relative : de 10 à 90%, sans condensation
Altitude : du niveau de la mer à 4500 mètres
Température de stockage : de -20° à 70° C
Connexions réseaux Fibre Dual Mode (62,5/125) : ST ou SC Duplex
° à 55° C
Page 64

Page 65

Installieren
sch
Apple PCI Dual-Attached FDDI Karte
und Konfigurieren der
Deut
C
C
C
Page 66

Page 67

Inhalt
Vorwort C5
1 Installieren der Karte und Anschuß an das Netzwerk C7
Öffnen des Komponenteneinschubs des Apple Network Server C8
Auspacken der Karte C11
Installieren der Karte C12
Herstellen der Netzwerkverbindung C16
2 Installieren und Konfigurieren der Treibersoftware C19
Installieren der FDDI Standard-Software C19
Installieren des FDDI AIX Gerätetreibers C22
Konfigurieren der FDDI Netzwerkschnittstelle C24
3Fehlerbeseitigung und Diagnosetechniken C27
Fehlerbeseitigung C28
Verwenden der FDDI Diagnoseroutinen C29
Hinweise zur technischen Unterstützung C29
Anhang Technische Daten C31
Page 68

Page 69

Vorwort
Die Apple PCI (Peripheral Connect Interface) Dual-Attached FDDI Karte
arbeitet mit dem FDDI Protokoll (Fiber Distributed Data Interface) der
„Single-Slot“-Methode. Sie belegt einen Steckplatz, arbeitet mit 100 Megabit
pro Sekunde (Mbps) und ist für den Einbau im Apple Network Server konzipiert. Die Karte und der zugehörige Treiber bieten Dienste der Schicht 0 und 1
des ISO/OSI Schichtenmodells. Sie werden unter dem TCP/IP Protokoll
gemäß den ANSI X3T9.5 Spezifikationen für FDDI arbeiten.
WICHTIG
wenden können. Bitte beachten Sie die Hinweise, die mit der Aktualisierung
von AIX für den Apple Network Server auf Version 4.1.4.1 geliefert werden.
Die Apple PCI Dual-Attached FDDI Karte zeichnet sich durch folgende
Funktionen aus:
m Kompatibilität mit dem PCI Local Bus, Version 2.1
m Auf der Karte integriertes FDDI Station Management (SMT)
m 32-Bit-PCI-DMA- (Direct Memory Access) Master ohne Wartezyklen
m Bis zu 132 Mbps Burst-DMA-Rate
m PCI-Befehle für die effiziente Verwendung von Cache-Speicher
m Unterstützung für optische Glasfasermedien
m Unterstützung der Dual-Attachment-Technologie für den direkten Anschluß
m 128 KB lokaler Pufferspeicher
m Motorola MC68840 FDDI Bausteine
Alle genannten Funktionen sind verfügbar, sobald die Karte im Apple
Network Server installiert ist. Weitere Schritte zur Konfiguration sind
nicht erforderlich.
Sie müssen AIX 4.1.4.1 installieren, damit Sie die FDDI Karte ver-
an Ringnetzwerke
Page 70

Über dieses Handbuch
Dieses Handbuch richtet sich an Apple Network Server Administratoren. Es
wird vorausgesetzt, daß Sie mit der Hardware des Apple Network Server
vertraut sind. (Die entsprechenden Informationen finden Sie im Handbuch
Installation des Apple Network Server, das sich in der Zubehörbox Ihres Apple
Network Server befindet.) Ferner sollten Sie die wichtigsten Funktionen des
AIX Betriebssystems kennen und verwenden können. Das Handbuch
Verwenden von AIX®, AppleTalk Diensten und Mac OS Dienstprogrammen
auf dem Apple Network Server, das ebenfalls mit Ihrem Server geliefert wird,
enthält eine Einführung und grundlegende Informationen hierzu. Die vollständige AIX Dokumentation ist über das Programm „InfoExplorer“ verfügbar. In Kapitel 5 des Handbuchs Verwenden von AIX, AppleTalk Diensten und
Mac OS Dienstprogrammen auf dem Apple Network Server finden Sie Anleitungen zum Verwenden von InfoExplorer.
Weitere Informationen
Über FDDI und FDDI Token-Passing-Verfahren sind zahlreiche Handbücher
im Fachhandel erhältlich. Darüber hinaus bietet das FDDI Consortium der
Universität von New Hampshire hervorragende Informations- und Trainingsmöglichkeiten an. Sie finden diese Informationen im Internet an der folgenden
Adresse:
C6 Vorwort
http://www.iol.unh.edu/consortiums/fddi/fddi_consortium.html
Page 71

1 Installieren der Karte und Anschluß an das
Netzwerk
Dieses Kapitel enthält ausführliche Anleitungen für die Installation der Apple
PCI Dual-Attached FDDI Karte in den Apple Network Server. Bitte lesen Sie
die Hinweise zum Einbau von PCI-Karten im Handbuch
Network Server, bevor Sie mit den folgenden Anleitungen fortfahren. Beachten Sie alle Empfehlungen und Anweisungen zur Handhabung und Installation
der Karte gewissenhaft, damit Karte und Computer während der Installation
nicht beschädigt werden.
Installation des Apple
Page 72

Öffnen des Komponenteneinschubs des Apple Network Server
Für die Installation der Karte öffnen Sie einfach den Komponenteneinschub,
indem Sie die hier beschriebenen Schritte ausführen:
1Schalten Sie den Apple Network Server aus und trennen Sie die Verbindung zum
Stromnetz sowie alle anderen Kabelverbindungen.
Beachten Sie die Hinweise im Handbuch Verwenden von AIX, AppleTalk
Diensten und Mac OS Dienstprogrammen auf dem Apple Network Server,
wenn Sie ausführliche Anweisungen zum korrekten Ausschalten des Apple
Network Server benötigen.
2Legen Sie ein Erdungsarmband an.
Das Verwenden eines Erdungsarmbands wird empfohlen, um eine
Beschädigung der Karte oder des Computers durch elektrostatische
Entladungen zu vermeiden.
3 Drehen Sie den Schlüssel an der Rückseite des Servers in die senkrechte Position
(aufgeschlossen).
C8 Kapitel 1: Installieren der Karte und Anschluß an das Netzwerk
Page 73

4 Lösen Sie die Sicherungsschrauben an der Rückwand des Komponenteneinschubs.
Öffnen des Komponenteneinschubs des Apple Network Server C9
Page 74

5 Ziehen Sie den Komponenteneinschub mit Hilfe der Griffe vollständig aus dem
Computergehäuse heraus.
6Entfernen Sie die Abdeckung des Erweiterungssteckplatzes, den Sie verwenden wollen.
Legen Sie die Schraube beiseite. Sie benötigen sie später, um die Karte festzuschrauben. Bewahren Sie die Abdeckung sorgfältig auf, damit sie zur Hand ist,
falls Sie die Karte zu einem späteren Zeitpunkt wieder ausbauen wollen.
C10 Kapitel 1: Installieren der Karte und Anschluß an das Netzwerk
Page 75

Auspacken der Karte
Mit Ihrer Apple PCI Dual-Attached FDDI Karte werden eine Diskette und das
vorliegende Handbuch geliefert.
1Entfernen Sie das Verpackungsmaterial der Karte.
Bewahren Sie das Verpackungsmaterial und den Karton auf, damit beides
zur Hand ist, falls Sie die Karte einmal ausbauen und aufbewahren oder zum
Kundendienst einschicken müssen.
2 Nehmen Sie die Karte vorsichtig aus der antistatischen Hülle.
Prüfen Sie, ob an der Karte während des Transports sichtbare Schäden entstanden sind. Sollte dies der Fall sein, wenden Sie sich bitte unverzüglich an Ihren
autorisierten Apple Händler.
Auspacken der Karte C11
Page 76

Installieren der Karte
Die Kabelanschlüsse der Apple PCI Dual-Attached FDDI Karte sind etwas
größer als die anderer PCI-Karten. Für die Installation der Karte im Apple
Network Server müssen Sie daher etwas anders vorgehen als im Handbuch
Installation des Apple Network Server beschrieben. Bitte installieren Sie die
FDDI Karte mit Hilfe der folgenden Anleitungen:
1. Stützen Sie den Komponenteneinschub mit einer Hand. Achten Sie
darauf, daß Sie die Kartenführung
beim Einsetzen der Karte nicht
versehentlich durch die Öffnung
des Steckplatzes schieben.
2. Setzen Sie zuerst den kleineren
Teil der Steckleiste ein und drehen
Sie die Karte dann leicht, um die
Anschlüsse durch die Öffnung zu
schieben und die Kartenführung
korrekt einzusetzen.
C12 Kapitel 1: Installieren der Karte und Anschluß an das Netzwerk
Page 77

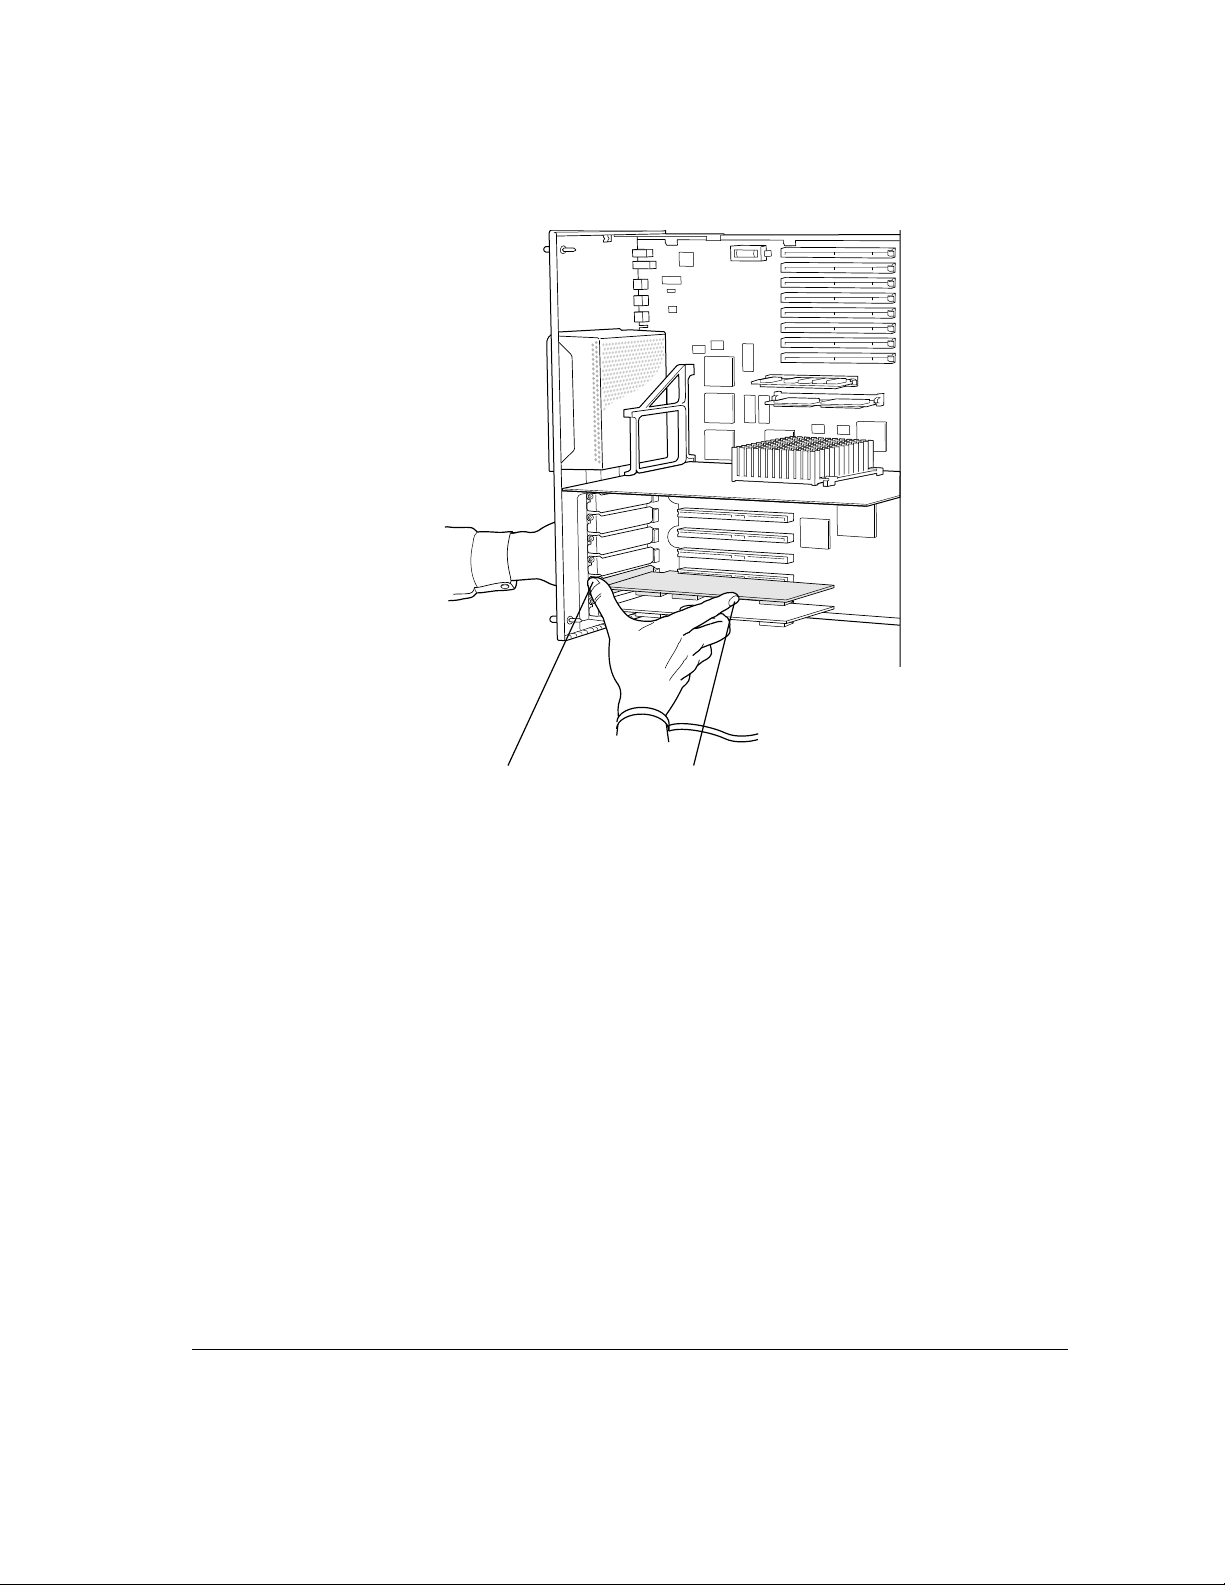
3. Setzen Sie die Karte ein, indem Sie wie hier gezeigt auf
die Kartenführung und den oberen Kartenrand drücken.
Installieren der Karte C13
Page 78

4. Drücken Sie nochmals kräftig auf den
Kartenrand, damit die Karte fest in die
Steckleiste sitzt und die Steckverbindung
korrekt hergestellt ist.
C14 Kapitel 1: Installieren der Karte und Anschluß an das Netzwerk
Page 79

5. Sichern Sie die Karte im Steckplatz, indem Sie
die zuvor herausgedrehte Schraube wieder
einsetzen und festdrehen.
Nachdem Sie die Karte installiert haben, schieben Sie den Komponenteneinschub in den Computer zurück und drehen Sie die Sicherungsschrauben
wieder fest. Drehen Sie den Schlüssel dann in die horizontale Position (abgeschlossen) und schließen Sie alle zuvor herausgezogenen Kabel erneut an.
Schalten Sie den Computer bitte noch nicht wieder ein; warten Sie damit, bis
Sie die Karte mit dem Netzwerk verbunden haben.
Installieren der Karte C15
Page 80

Herstellen der Netzwerkverbindung
Für einen einfachen Anschluß der Apple PCI Dual-Attached FDDI Karte
benötigen Sie ein SC Duplex Glasfaserkabel. Für einen doppelten Anschluß
benötigen Sie entsprechend zwei Kabel. Beachten Sie bitte, daß jedes Kabel
zwei Anschlußstecker besitzt (vgl. Abbildung).
Diese Kabel werden nicht mit der Karte geliefert, können jedoch in vielen
verschiedenen Längen im Computerfachhandel erworben werden.
Schließen Sie jedes Kabel an Anschluß A oder Anschluß B der FDDI Karte
an. Beachten Sie dabei bitte die Hinweise des Kabelherstellers (falls
vorhanden).
C16 Kapitel 1: Installieren der Karte und Anschluß an das Netzwerk
Page 81

Wenn Sie die Rückseite des Computers vor sich haben, befindet sich Anschluß A an der linken Seite. Bitte sehen Sie sich die folgende Abbildung an,
um die Kabel richtig anzuschließen.
Richten Sie diese Führungen mit den
Führungen des Kabelanschlusses aus.
WICHTIG
Schließen Sie den Apple Network Server nicht an den nächsten
Netzwerkknoten an, ohne zuvor Rücksprache mit Ihrem Netzwerkadministrator gehalten zu haben. An welcher Stelle im Netzwerk und auf welche
Weise Ihr Server in das Netzwerk integriert werden muß und welchen Einfluß
die Installation eines neuen Knotens auf das übrige Netzwerk hat, hängt von
Ihrem Netzwerk ab.
Herstellen der Netzwerkverbindung C17
Page 82

Page 83

2 Installieren und Konfigurieren der
Treibersoftware
Damit Sie mit dem FDDI Netzwerk kommunizieren können, müssen Sie die
FDDI Treibersoftware installieren und konfigurieren. In diesem Kapitel
erfahren Sie, wie Sie hierbei vorgehen müssen.
WICHTIG
um die FDDI-Karte verwenden zu können. Wenn Ihr Apple Network Server
nicht mit AIX 4.1.4.l arbeitet, müssen Sie Ihre Software aktualisieren, bevor
Sie die FDDI Software installieren. Bitte beachten Sie die mit Ihrer FDDI
Karte gelieferten Anweisungen, um AIX korrekt auf Version 4.1.4.1 zu
aktualisieren.
Sie benötigen AIX in der Version 4.1.4.1 oder einer neueren Version,
Installieren der FDDI Standard-Software
Nachdem Sie AIX in der Version 4.1.4.1 (oder einer neueren Version) auf
Ihrem Apple Network Server installiert haben, müssen Sie ein FDDI Standardsoftwarepaket installieren, bevor Sie den FDDI Gerätetreiber installieren.
Wie Sie hierbei vorgehen müssen, hängt davon ab, ob Sie die CD-ROM
Installation CD oder die CD-ROM Software Update vorliegen haben.
Page 84

CD-ROM
AIX Installation CD
Version 4.1.4.1 (oder neuer)
Bitte gehen Sie wie folgt vor, wenn Sie die Software mit der CD-ROM AIX
Installation CD installieren wollen:
1Geben Sie folgenden Befehl ein:
lslpp -l devices.mca.8ef4.com
In den meisten Fällen wird die Nachricht angezeigt, daß die Software noch
nicht installiert ist. Fahren Sie mit Schritt 2 fort.
Wird die Nachricht angezeigt, daß die Software bereits vorhanden ist, fahren
Sie mit dem Abschnitt „Installieren des FDDI AIX Gerätetreibers“ fort.
2Legen Sie die CD-ROM
3Geben Sie an der AIX Eingabeaufforderung den folgenden Befehl ein und drücken Sie
den Zeilenschalter:
smitty devinst
AIX Installation CD
in das CD-ROM-Laufwerk ein.
Das Menü für die Installation weiterer Treibersoftware wird angezeigt.
4 Drücken Sie die Taste „F4“.
Ein Einblendmenü wird angezeigt, in dem die Gerätetreiber von den Geräten
aufgelistet werden, von denen Sie installieren können.
5Wählen Sie das passenden CD-Gerät aus der Liste aus und drücken Sie den
Zeilenschalter.
Ein erweitertes Menü wird angezeigt.
6Wählen Sie die Option „Software to install“ aus und geben Sie folgenden Befehl ein:
devices.mca.8ef4.com
7 Drücken Sie den Zeilenschalter.
In einem Dialogfenster werden Sie aufgefordert, Ihre Auswahl zu bestätigen.
Drücken Sie den Zeilenschalter, um die Installation zu starten, oder drücken
Sie die Taste „F3“, um den Vorgang abzubrechen.
Fahren Sie mit dem Abschnitt „Installieren des FDDI AIX Gerätetreibers“
fort, wenn die Installation beendet ist.
C20 Kapitel 2: Installieren und Konfigurieren der Treibersoftware
Page 85

CD-ROM
Software Update CD
Bitte gehen Sie wie folgt vor, wenn Sie die Software mit der CD-ROM
Software Update CD installieren wollen:
1Geben Sie folgenden Befehl ein:
lslpp -l devices.mca.8ef4.com
In den meisten Fällen wird die Nachricht angezeigt, daß die Software noch
nicht installiert ist. Fahren Sie mit Schritt 2 fort.
Wird die Nachricht angezeigt, daß die Software bereits vorhanden ist, fahren
Sie mit dem Abschnitt „Installieren des FDDI AIX Gerätetreibers“ fort.
2Legen Sie die CD-ROM
3Geben Sie den folgenden Befehl ein und drücken Sie den Zeilenschalter, um die
CD zu aktivieren:
mount -r -v cdrfs /dev/cd0 /mnt
4Geben Sie an der AIX Eingabeaufforderung den folgenden Befehl ein und drücken Sie
den Zeilenschalter:
smitty devinst
Network Server Software Update Kit
in das CD-ROM-Laufwerk ein.
Das Menü für die Installation weiterer Treibersoftware wird angezeigt.
5Wählen Sie die Option „INPUT device/directory for software“ aus und geben Sie
folgenden Befehl ein:
/mnt/new
6Wählen Sie die Option „SOFTWARE to install“ aus und geben Sie folgenden Befehl ein:
devices.mca.8ef4.com
7 Drücken Sie den Zeilenschalter.
A dialog box appears asking you to confirm the installation. Press Return to
begin the installation or press F3 (or ESC 3) to cancel the installation.
8Geben Sie folgenden Befehl ein, um die CD zu deaktivieren:
umount /mnt
Fahren Sie mit dem Abschnitt „Installieren des FDDI AIX Gerätetreibers“
fort, wenn die Installation beendet ist.
Installieren der FDDI Standard-Software C21
Page 86

Installieren des FDDI AIX Gerätetreibers
Die Gerätetreibersoftware befindet sich auf der Installationsdiskette. Mit Hilfe
der folgenden Anleitungen können Sie die Treibersoftware entweder mit der
X-Window Version des Dienstprogramms „System Management Interface
Tool“ (SMIT) oder mit der Befehlszeilenversion des Programms (SMITTY)
installieren. In den hier gezeigten Beispielen wird die Programmversion
SMITTY verwendet. Die erforderlichen Schritte sind für beide Versionen
gleich.
Hinweis: Damit Sie die Installation ausführen können, müssen Sie sich mit
der Berechtigung „root“ angemeldet haben.
1Legen Sie die Installationsdiskette ein.
2Geben Sie an der AIX Eingabeaufforderung den folgenden Befehl ein und drücken Sie
anschließend den Zeilenschalter:
smitty devinst
Das folgende Menü wird angezeigt:
3Geben Sie im Feld „INPUT device“ folgenden Befehl ein:
/dev/fd0
C22 Kapitel 2: Installieren und Konfigurieren der Treibersoftware
Page 87

4 Drücken Sie den Zeilenschalter, um die im folgenden Bildschirm dargestellten
Konfigurationsoptionen anzuzeigen:
5Geben Sie
devices.pci.7e100300
in das Feld „SOFTWARE to install“ ein.
Falls bereits ein FDDI Treiber installiert ist und Sie mit dieser Installation
fortfahren wollen, müssen Sie
Yes in das Feld „OVERWRITE same or newer
versions“ eingeben.
In einem Dialogfenster werden Sie aufgefordert, Ihre Auswahl zu bestätigen.
6 Drücken Sie den Zeilenschalter erneut, um die Installation zu starten.
Verschiedene auf dem Bildschirm angezeigte Nachrichten beschreiben den
Installationsvorgang. Die Installation ist beendet, wenn Sie die folgende
Nachricht sehen:
Installation Summary -------Name Level Part Event Result
devices.pci.7e100300.rte 2.1.0.0 USR APPLY SUCCESS
devices.pci.7e100300.diag 2.1.0.0 USR APPLY SUCCESS
7 Drücken Sie die Taste „F10“, um das Programm SMITTY zu beenden, und starten Sie den
Apple Network Server anschließend neu.
Installieren des FDDI Gerätetreibers C23
Page 88

Konfigurieren der FDDI Netzwerkschnittstelle
Sie benötigen die folgenden Informationen, um die FDDI Karte für die
Netzwerkschnittstelle zu konfigurieren:
m einen Namen und eine IP-Adresse für jede im Apple Network Server
installierte FDDI Karte
m die Netzwerkmaske
m den geeigneten Domain Name Server Namen sowie dessen IP-Adresse
m die IP-Adresse des Routers oder Gateways, die der Apple Network Server
für den Netzwerkzugang verwendet.
Bitte wenden Sie sich an Ihren Netzwerkadministrator, wenn Sie diese
Informationen noch nicht verfügbar haben.
Ebenso wie bei der Installation des Gerätetreibers können Sie die Karte
entweder mit dem Programm SMIT oder mit SMITTY konfigurieren. Für die
folgenden Anleitungen wird das Programm SMITTY verwendet.
1Geben Sie an der AIX Eingabeaufforderung den folgenden Befehl ein und drücken Sie
anschließend den Zeilenschalter:
smitty tcpip
Der TCP/IP Konfigurationsbildschirm wird angezeigt:
C24 Kapitel 2: Installieren und Konfigurieren der Treibersoftware
Page 89

2 Aktivieren Sie die Option „Minimum Configuration & Startup“ und drücken Sie den
Zeilenschalter.
Der Bildschirm „Available Network Interfaces“ wird angezeigt.
3Wählen Sie „fi0“ aus und drücken Sie dann den Zeilenschalter.
Der Bildschirm „Minimum Configuration & Startup“ wird angezeigt.
4Tragen Sie die erforderlichen Werte in die Felder des Bildschirms „Minimum
Configuration & Startup“ ein bzw. ändern Sie sie wunschgemäß.
Geben Sie den Namen und die IP-Adresse, die der FDDI Karte zugewiesen
wurden, die Netzwerkmaske, die IP-Adresse und den Namen des geeigneten
Domain Name Servers und die IP-Adresse des Routers oder Gateways, die der
Apple Network Server für den Netzwerkzugang verwendet, ein.
Wenn Sie mehrere FDDI Karten in Ihren Server einbauen, benötigen Sie für
jede FDDI Karte eine einmalige, individuelle IP-Adresse und müssen die hier
beschriebenen Schritte ausführen.
5 Drücken Sie den Zeilenschalter.
6 Drücken Sie die Taste „F10“, um das Programm SMITTY zu beenden, und starten Sie den
Apple Network Server anschließend neu.
Konfigurieren der FDDI Netzwerkschnittstelle C25
Page 90

Page 91

3 Fehlerbeseitigung und Diagnosetechniken
In diesem Kapitel finden Sie Lösungsvorschläge für einige Probleme, die
auftreten können, wenn Sie den Apple Network Server mit einer Apple PCI
Dual-Attached FDDI Karte verwenden. Bitte führen Sie die Vorschläge in der
hier genannten Reihenfolge aus, um den Fehler zu beheben.
Sie finden in diesem Kapitel außerdem Hinweise zu den FDDI Diagnosetechniken und erfahren, wo Sie Hilfe bekommen, falls Sie ein Problem mit
Ihrem Apple Network Server oder der FDDI Karte nicht selbst lösen können.
Page 92

Fehlerbeseitigung
AIX startet nicht.
1. Stellen Sie fest, ob das System korrekt am Stromnetz angeschlossen und
eingeschaltet ist.
2. Überprüfen Sie, ob die gerade installierte Karte korrekt im Steckplatz sitzt.
3. Versuchen Sie das Problem zu lösen, indem Sie die Karte in einen anderen
PCI-Steckplatz einsetzen.
4. Nehmen Sie die Karte aus dem Server heraus und stellen Sie fest, ob das
System anschließend normal startet und funktioniert.
5. Versuchen Sie, eine andere Karte zu installieren, von der Sie genau wissen,
daß sie ordnungsgemäß funktioniert. Tritt der Fehler weiterhin auf, lesen
Sie bitte die Informationen im Abschnitt „Hinweise zur technischen
Unterstützung“ am Ende dieses Kapitels.
Ein Netzwerkprogramm arbeitet nicht mehr.
Wenn das Programm vor der Installation der Karte korrekt funktioniert hat,
liegt vermutlich ein Hardwarefehler vor. Bitte lesen Sie die Hinweise im
Abschnitt „Hinweise zur technischen Unterstützung“ am Ende dieses Kapitels.
Die Apple Network Server Karte kann nicht mit dem Ring verbunden werden oder nicht
mit anderen Host-Rechnern im Netzwerk kommunizieren.
1. Überprüfen Sie, ob die gerade installierte Karte korrekt im Steckplatz sitzt.
2. Stellen Sie sicher, daß beide Kabel ordnungsgemäß anschlossen sind
und daß die Anschlüsse A und B mit den korrekten Anschlüssen der
benachbarten Knoten verbunden sind.
3. Verwenden Sie ein Dienstprogramm wie PING, um festzustellen, ob der
Apple Network Server im Netzwerk kommunizieren kann.
4. Installieren Sie die Karte in einem anderen PCI-Steckplatz und versuchen
Sie es erneut.
5. Versuchen Sie, eine andere Karte zu installieren, von der Sie genau wissen,
daß sie ordnungsgemäß funktioniert. Tritt der Fehler weiterhin auf, lesen
Sie bitte die Informationen im Abschnitt „Hinweise zur technischen
Unterstützung“ am Ende dieses Kapitels.
C28 Kapitel 3: Fehlerbeseitigung und Diagnosetechniken
Page 93

Verwenden der FDDI Diagnoseroutinen
Bei der Installation der FDDI Gerätetreibersoftware wurden zahlreiche Diagnoseroutinen installiert. Um diese Routinen auszuführen, verwenden Sie
entweder das Programm SMIT oder SMITTY, um das AIX Diagnoseprogramm zu öffnen. Ausführliche Informationen zu den AIX Diagnosetechniken
und zum AIX Diagnoseprogramm stehen Ihnen über das Programm
„InfoExplorer“ zur Verfügung. In Kapitel 5 des Handbuchs
AIX, AppleTalk Diensten und Mac OS Dienstprogrammen auf dem Apple
Network Server erfahren Sie, wie Sie auf das Programm „InfoExplorer“
zugreifen und damit arbeiten können.
Hinweise zur technischen Unterstützung
Bitte beachten Sie die mit Ihrem Apple Network Server gelieferten Unterlagen
zum Kundendienst und zur technischen Unterstützung, wenn Sie Probleme bei
der Arbeit mit Ihrer Apple PCI Dual-Attached FDDI Karte nicht selbst lösen
können. Dort finden Sie Telefonnummern, unter denen Sie sofort Hilfe bekommen, sowie andere wichtige Informationen zur technischen Unterstützung.
Verwenden von
Hinweise zur technischen Unterstützung C29
Page 94

Page 95

Anhang Technische Daten
Spezifikationen der Apple PCI Dual-Attached FDDI Karte
Host-Bus-Schnittstelle PCI Revision 2.0
Netzwerkschnittelle ANSI X3T9.5 für FDDI @ 100 Mbps
Host-Datentransfer 32-Bit-Bus-Master DMA überträgt bis zu 132 Mbps
IEEE-Kompatibilität IEEE P1386 Adapterkartenspezifikation
Steckplatzmerkmale 5511, belegt einen vollwertigen PCI-Steckplatz für
kurze Karten
Leistungsaufnahme +5 V Gleichstrom +/-5% @ 2,10 A (maximal)
Softwaretreiber AIX Version 4.1.4.1
Betriebsumgebung
Temperatur: 0 °Cbis 55 °C
Relative
Luftfeuchtigkeit: 10 bis 90%, nicht kondensierend
Höhe über NN: 0 bis ca. 4600 m (ohne Druckausgleich)
Lagerung: -20 °C bis 70 °C
Netzwerkverbindungen Dual Mode Fiber (62.5/125): ST oder SC Duplex
Page 96

Page 97

Installation et configuration
de la carte PCI FDDI Apple
Installieren und Konfigurieren
der Apple PCI Dual-Attached FDDI Karte
Installing and Configuring
the Apple PCI Dual-Attached
FDDI Card
Page 98

K
Installing and Co nfigur ing
the Apple PCI Dual-Attached FDDI Card
Installation et c onfiguration
de la carte PCI FDDI Apple
Installieren und Konfigurieren
der Apple PCI Dual-Attached FDDI Karte
Page 99

K Apple Computer, Inc.
© 1997 Apple Computer, Inc. All rights reserved.
Under the copyright laws, this manual may not be copied,
in whole or in part, without the written consent of Apple.
Your rights to the software are governed by the
accompanying software license agreement.
The Apple logo is a trademark of Apple Computer, Inc.,
registered in the U.S. and other countries. Use of the
“keyboard” Apple logo (Option-Shift-K) for commercial
purposes without the prior written consent of Apple may
constitute trademark infringement and unfair competition
in violation of federal and state laws.
Every effort has been made to ensure that the information
in this manual is accurate. Apple is not responsible for
printing or clerical errors.
Apple Computer, Inc.
1 Infinite Loop
Cupertino, CA 95014-2084
408-996-1010
http://www.apple.com
Apple, the Apple logo, and Mac are trademarks of Apple
Computer, Inc., registered in the U.S. and other countries.
Adobe, Acrobat, Adobe Illustrator, Adobe Photoshop, and
PostScript are trademarks of Adobe Systems Incorporated
or its subsidiaries and may be registered in certain
jurisdictions.
AIX is a registered trademark of IBM Corp., registered in
the U.S. and other countries, and is being used under
license.
Helvetica and Times are registered trademarks of
Linotype-Hell AG and/or its subsidiaries.
Simultaneously published in the United States and Canada.
Mention of third-party products is for informational
purposes only and constitutes neither an endorsement nor
a recommendation. Apple assumes no responsibility with
regard to the performance or use of these products.
Page 100

General Contents
Installing and Configuring
the Apple PCI Dual-Attached FDDI Card / A1
Installation et c onfiguration
de la carte PCI FDDI Apple / B1
Installieren und Konfigurieren
der Apple PCI Dual-Attached FDDI Karte / C1
 Loading...