

Page 1

DVD Studio Pro 4
User Manual
Page 2

Copyright © 2009 Apple Inc. All rights reserved.
Your rights to the software are governed by the
accompanying software license agreement. The owner or
authorized user of a valid copy of Final Cut Studio software
may reproduce this publication for the purpose of learning
to use such software. No part of this publication may be
reproduced or transmitted for commercial purposes, such
as selling copies of this publication or for providing paid
for support services.
The Apple logo is a trademark of Apple Inc., registered in
the U.S. and other countries. Use of the “keyboard” Apple
logo (Shift-Option-K) for commercial purposes without
the prior written consent of Apple may constitute
trademark infringement and unfair competition in violation
of federal and state laws.
Every effort hasbeen made to ensure thatthe information
in this manual is accurate. Apple is not responsible for
printing or clerical errors.
Note: Because Apple frequently releases new versions
and updates to its system software, applications, and
Internet sites,images shownin this manualmay beslightly
different from what you see on your screen.
Apple
1 Infinite Loop
Cupertino, CA 95014
408-996-1010
www.apple.com
Apple, the Apple logo, Apple Cinema Display,
DVD Studio Pro, Exposé, Final Cut, Final Cut Pro,
Final Cut Studio, FireWire, GarageBand, iDVD, iMovie,
iPhoto, iTunes, Keynote, LiveType, Logic, Mac, Macintosh,
Mac OS, Panther, PowerBook, QuickTime, Soundtrack,
SuperDrive, and Tiger are trademarks of Apple Inc.,
registered in the U.S. and other countries.
DVD@CCESS and Finder are trademarks of Apple Inc.
AppleCare and iTunes Store are service marks of Apple Inc.,
registered in the U.S. and other countries.
Adobe and Photoshop are trademarks or registered
trademarks of Adobe Systems Incorporated in the U.S.
and/or other countries.
“Dolby,” “Pro Logic,” and the double-D symbol are
trademarks of Dolby Laboratories. Confidential
Unpublished Works,© 1992–1997 Dolby Laboratories, Inc.
All rights reserved.
Other company and product names mentioned herein
are trademarks of their respective companies. Mention of
third-party products is for informational purposes only
and constitutes neither an endorsement nor a
recommendation. Apple assumes no responsibility with
regard to the performance or use of these products.
Page 3

Contents
Welcome to DVD Studio Pro11Preface
About DVD Studio Pro11
About DVD Studio Pro Documentation11
Additional Resources11
Overview of Using DVD Studio Pro13Chapter 1
Moving from iDVD to DVD Studio Pro13
About Standard and High Definition DVDs14
About DVD Studio Pro and HD Resolution DVDs15
HD Video Assets17
Brief Overview of the DVD Creation Process19
What Makes a DVD Authoring System?25
Hard Disk Storage25
SCSI Devices25
DVD Burners26
DLT Drives29
External Video and Audio Monitoring29
Audio and Video Assets31
Planning Your Project33Chapter 2
Investigating Existing DVDs33
Determining Your Target Audience and Playback Device34
Deciding Which DVD Standard to Use34
Deciding Which Video Standard to Use35
Deciding What Content to Include35
Creating a Storyboard35
Designing the Menus and Buttons37
Making Sure Your Content Will Fit37
General DVD Limitations42
How Do You Do That?45Chapter 3
Creating a Simple DVD45
Creating a Play One or Play All Project47
Grabbing a Still Image from Your Movie50
3
Page 4

Adding Easter Eggs to Your Menus51
Preparing Video Assets53Chapter 4
Introduction to Preparing Video Sources53
NTSC or PAL?54
Using 24 fps Video55
Choosing an Aspect Ratio56
About MPEG Video60
Encoding Video Materials for DVD61
Using the Integrated MPEG Encoder68
Encoding Video for Multi-Angle Tracks74
Adding Markers to Your Video76
About H.264 Video80
About HDV Video81
DVD Video Source Settings Summary82
Preparing Audio Assets87Chapter 5
Introduction to Preparing Audio Sources87
Audio Formats Not Supported by the DVD Specification88
Audio Formats Supported by the DVD Specification and DVD Studio Pro88
Using Multiple Audio Formats in Your Project91
Required Audio Formats for SD Projects91
DVD Audio Source Settings Summary92
Preparing Menu Assets95Chapter 6
Introduction to Preparing Menu Sources95
What Is a Menu?96
Creating a Menu96
Creating Graphics to Use in Menus97
Creating Overlays101
Creating a Layered Menu106
Creating Video for Motion Menus106
Defining the Menu Loop Point107
Creating Shapes108
Creating Graphics for Drop Zones and Buttons112
Preparing Slideshow Assets113Chapter 7
Slideshow File Formats113
Aspect Ratio and Resolution114
Colors114
Audio114
Preparing Alpha Transitions115Chapter 8
Introduction to Preparing Alpha Transitions115
4 Contents
Page 5

Transition Asset Folder116
Asset Movie117
Asset Matte Movie118
Background Matte Movie119
About Alpha Transition Durations119
About NTSC and PAL Alpha Transitions120
Starting a Project121Chapter 9
Opening DVD Studio Pro121
Setting DVD Studio Pro Preferences124
Creating a New Project138
Opening an Existing Project143
Video Standards of the World145
Changing a Project’s Video Standard145
Changing a Project’s DVD Standard146
The DVD Studio Pro Interface149Chapter 10
Introduction to the DVD Studio Pro Interface150
Configuring the Interface152
Working with the Quadrants154
Working with the Tabs157
Overview of the Quadrant Tabs161
Inspector167
Palette168
Toolbar174
Drop Palette177
Comparing the Outline and Graphical Project Views177
Using the Outline Tab178
Using the Graphical Tab180
Managing Elements Using the Outline and Graphical Tabs190
Importing and Managing Assets195Chapter 11
How DVD Studio Pro Manages Assets195
About the Assets Tab201
Importing Assets207
Removing Selected Assets213
Renaming Assets213
Refreshing Still and QuickTime Assets214
Opening Assets in Their Editor216
Identifying an Asset216
Previewing Assets216
Asset Inspector218
5Contents
Page 6

Introduction to Creating Menus219Chapter 12
About Menus219
About the Menu Editor224
Starting and Working with a Menu231
Creating Menus Using the Standard Method241Chapter 13
About Standard Menus242
Choosing the Menu’s Background243
Choosing the Menu’s Overlay246
Understanding Color Mapping248
Configuring the Menu Inspector for Standard Menus256
Adding Buttons to Your Menu265
Configuring Button Navigation281
Adding Drop Zones to Your Menu285
Working with Assets in Buttons and Drop Zones288
Adding Text Objects to a Menu288
Adding Audio to a Menu291
Configuring the Menu’s Drop Shadow Settings292
Configuring Motion Menu Settings293
Options in the Drop Palette for Standard Menus296
Drop Palette for Standard Menus—Dragging Assets296
Drop Palette for Standard Menus—Dragging Project Elements304
Drop Palette for Standard Menus—Dragging Templates and Styles309
Using Templates, Styles, and Shapes to Create Your Menus313Chapter 14
Introduction to Templates, Styles, and Shapes313
What Are Templates and Styles?314
Templates and Styles in the Palette316
Applying a Template or Style321
Setting Default Styles323
Creating a Template or Style324
Importing Templates and Styles326
Deleting Templates and Styles327
Managing Shapes329
Creating Menus Using the Layered Method335Chapter 15
About Layered Menus335
Choosing the Menu’s Background336
Choosing the Menu’s Overlay338
About the Menu Inspector for Layered Menus338
Adding Buttons to Your Layered Menu343
About Layered Menu Button Properties344
6 Contents
Page 7

Options in the Drop Palette for Layered Menus348
Drop Palette for Layered Menus—Dragging Assets349
Drop Palette for Layered Menus—Dragging Project Elements353
Using Advanced Menu Features357Chapter 16
Adding Intro and Transition Clips to Menus357
Using Languages with Menus364
Creating and Editing Tracks369Chapter 17
About Track Limits in a DVD370
Working with a Track’s Assets370
How Many Tracks Should You Have?371
About Subtitle Streams371
DVD Studio Pro Tools for Working with Tracks371
Creating Tracks372
Opening Tracks373
Setting Track Properties373
About the Track Editor377
Configuring the Track Editor377
Understanding Time Information in the Track Editor380
Supported Asset Types384
Adding Video and Audio Assets386
Editing Video and Audio Clips390
Setting Stream Properties392
Exporting an MPEG Clip393
Working with Markers393
About Marker Placement394
Creating and Editing Markers395
Adding Markers to a Track Without a Video Clip Assigned397
Importing Markers from an Editor397
Importing Markers from a Text List399
About the Marker Types399
Setting Marker Properties401
Introduction to Stories403
Creating a Story for a Track404
Using the Story Editor404
Setting Story Properties405
Setting Story Entry Properties407
Simulating a Story407
Adding Alternate Video Streams408
Using Still Clip Transitions410
Viewing a Track413
7Contents
Page 8

Creating Slideshows417Chapter 18
Introduction to Slideshows417
Want Your Slideshows to Do More?418
File Formats for Slideshows418
Adding a Slideshow to Your Project419
Creating a Slideshow Using the Menu Editor420
Working with Slides in a Slideshow421
Adding Audio to Your Slideshow424
Working with Slideshows427
Setting Slideshow Properties437
Setting Slide Properties440
Previewing a Slideshow441
Simulating a Slideshow442
Creating Subtitles443Chapter 19
Introduction to Subtitles443
Importing Older DVD Studio Pro Subtitles445
Subtitles and Overlays445
About Subtitles and Closed Captions445
Subtitle Stream Basics446
Subtitle Inspector448
What Happens with Different Aspect Ratios?454
Viewing Subtitles455
Creating Subtitles with DVD Studio Pro457
Importing Graphics Files for Subtitles463
Creating and Importing Subtitle Files464
Importing a Subtitle File465
Creating an STL Format Subtitle File467
Creating Buttons over Video471
Configuring a Button over Video Subtitle Clip473
Creating Scripts477Chapter 20
Introduction to Scripts477
Pre-Scripts478
Scripting Overview479
The Scripting User Interface480
About the Script Tab481
About the Script Inspector484
About the Script Command Inspector485
Creating and Testing Scripts486
Script Command Details489
System Parameter Register Memories List499
8 Contents
Page 9

System Parameter Register Memories Details500
Using Bit-Wise Operations511
General Purpose Register Memories512
Scripting Examples517
Language Code Table525
Establishing Connections531Chapter 21
About Connections531
Connections Tab532
Connection Items533
Making Connections537
Connection Details540
Source Details540
Target Details547
Finishing a Project549Chapter 22
About the Final Steps of DVD Creation549
Should You Burn, Build, Format, or Build and Format?550
Options for Testing Your Project552
Simulating Your Project552
Setting Disc Properties559
Building Your Project566
Emulating Your Project Using DVD Player575
Setting Disc Format Properties577
About DVD-ROM Discs577
About Dual-Layer Discs580
About Two-Sided Discs584
Formatting Your Project584
Reading a DLT Drive590
Using Advanced Features591Chapter 23
VTS Editor591
DVD@CCESS598
User Operations602
Display Condition607
Remote Control Settings612
Line 21 Settings for Closed Captions614
Keyboard Shortcuts617Appendix A
General Interface and Application Controls618
General Project Controls619
Adding Project Elements620
Scrolling Through Lists621
9Contents
Page 10

Assets Tab622
Connections Tab622
Graphical Tab623
Log Tab624
Menu Tab (Menu Editor)624
Outline Tab626
Palette627
Script Tab (Script Editor)627
Simulator627
Slideshow Tab (Slideshow Editor)628
Story Tab (Story Editor)628
Subtitle Editor628
Track Tab ( Track Editor)629
Viewer Tab631
Importing Other Projects633Appendix B
Importing DVD Studio Pro 2 and DVD Studio Pro 3 Projects into DVD Studio Pro 4633
Calculating Disc Space Requirements635Appendix C
Calculating a Project’s Disc Space Requirements635
Using the Calculated Bit Rate640
Transition Parameters641Appendix D
Transition Duration641
Video Transition641
Alpha Transitions642
Standard Transitions642
647Glossary
10 Contents
Page 11

Welcome to DVD Studio Pro
DVD Studio Pro is software for authoring DVD-Video titles. It is both powerful and easy
to use.
This preface covers the following:
• About DVD Studio Pro (p. 11)
• About DVD Studio Pro Documentation (p. 11)
• Additional Resources (p. 11)
About DVD Studio Pro
DVD Studio Pro lets you work with audio, video, graphics, and text materials that you
have already created and edited and orchestrate them into a DVD that can be played on
a DVD player or a suitably equipped computer.
Preface
If you have used such production tools as Final Cut Pro, Adobe Photoshop, Media 100,
or Discreet cleaner, DVD Studio Pro will be easy for you to learn. You can use
DVD Studio Pro for everything from constructing sophisticated training materials, corporate
presentations, sales tools with web links, or high-quality event videos, to preparing a
motion picture for release on DVD.
About DVD Studio Pro Documentation
DVD Studio Pro comes with documentation that will help you get started as well as
provide detailed information about the application.
• DVD Studio Pro User Manual: This is a comprehensive document that describes the
DVD Studio Pro interface, commands, and menus, and gives step-by-step instructions
for creating DVD Studio Pro projects and for accomplishing specific tasks. It is written
for users of all levels of experience.
Additional Resources
Along with the documentation that comes with DVD Studio Pro, there are a variety of
other resources you can use to find out more about the application.
11
Page 12

DVD Studio Pro Website
For general information and updates, as well as the latest news on DVD Studio Pro, go
to:
• http://www.apple.com/finalcutstudio/dvdstudiopro
Apple Service and Support Websites
For software updates and answers to the most frequently asked questions for all Apple
products, go to the general Apple Support web page. You’ll also have access to product
specifications, reference documentation, and Apple and third-party product technical
articles.
• http://www.apple.com/support
For software updates, documentation, discussion forums, and answers to the most
frequently asked questions for DVD Studio Pro, go to:
• http://www.apple.com/support/dvdstudiopro
For discussions forums for all Apple products from around the world, where you can
search for an answer, post your question, or answer other users’ questions, go to:
• http://discussions.apple.com
12 Preface Welcome to DVD Studio Pro
Page 13

Overview of Using DVD Studio Pro
1
DVD Studio Pro plays a key part in delivering your video projects to your viewers. This
chapter covers many of the basics you need to know about to author and burn successful
DVDs.
This chapter covers the following:
• Moving from iDVD to DVD Studio Pro (p. 13)
• About Standard and High Definition DVDs (p. 14)
• About DVD Studio Pro and HD Resolution DVDs (p. 15)
• HD Video Assets (p. 17)
• Brief Overview of the DVD Creation Process (p. 19)
• What Makes a DVD Authoring System? (p. 25)
• Hard Disk Storage (p. 25)
• SCSI Devices (p. 25)
• DVD Burners (p. 26)
• DLT Drives (p. 29)
• External Video and Audio Monitoring (p. 29)
• Audio and Video Assets (p. 31)
Moving from iDVD to DVD Studio Pro
The Apple entry-level DVD authoring application is iDVD. It allows you to create simple
DVD-Video titles with some of the most popular features found in Hollywood-style releases,
without having to know any technical details about the process. The interface and feature
set are configured to make the process nearly foolproof.
Eventually, however, you will find yourself requiring features beyond those that iDVD
offers. DVD Studio Pro gives you access to a wide range of professional features outlined
in the DVD specification:
• Support for multiple video, audio, and subtitle streams, making it easy to create discs
that support multiple languages or add features such as a director’s commentary
13
Page 14

• Additional menu functionality. For example, you can create and add up to 36 buttons,
control the navigation between them, and have more flexibility when assigning their
functions.
• Alternate ways to play back movies. You can use the DVD Studio Pro story feature to
control how a movie plays.
• Support for web interactivity. You can embed links to websites or other documents
into your DVD title.
• Many advanced features supported by the DVD specification, such as dual-layer discs
and copy protection
DVD Studio Pro offers several workflows and work styles for creating DVD projects,
including templates and the drag-and-drop method used within iDVD. This makes
DVD Studio Pro easy to learn while still providing the advanced features you need.
About Standard and High Definition DVDs
Standard definition (SD) DVDs provided most viewers with their first digital video
experience. The great video quality, interactive menus, and surround sound audio found
on currentDVDs set a high standard for viewer expectations. Meanwhile,the establishment
of high definition (HD) video format standards and the increasing availability of HD
broadcasts have led to more and more viewers having HD video monitors, and even
higher expectations for DVDs.
These expectations, along with the development of improved compression technologies
and a blue laser technology that greatly increases a disc’s storage capacity, have led to
the ability of recording HD video onto a DVD.
14 Chapter 1 Overview of Using DVD Studio Pro
Page 15

But Aren’t DVDs Already High Definition?
In addition to traditional 4:3 aspect ratio video, traditional DVDs support widescreen
16:9 video, which is often mistaken for being high definition. The 16:9 video used on
current DVDs, however, is the same resolution as the 4:3 video, which is the same as
the standard NTSC and PAL broadcast resolutions. The 16:9 video must be anamorphic,
which makes it appear horizontally squashed when viewed on a 4:3 monitor.
This leads to a logical next question—what constitutes high definition video? While
most HD video formats use a 16:9 aspect ratio, what generally defines whether or not
they are HD is the resolution.
Video resolutions that result in more pixels per frame than are used in SD-based DVDs
are considered high definition. There are two common HD vertical resolutions: 720 lines
and 1080 lines (used for both NTSC and PAL). These compare to NTSC’s 480 lines and
PAL’s 576 lines for SD video.
As withSD-based DVDs, the scanning method used on HD-based DVDs can be interlaced,
with a video frame containing one field with the odd lines and another field with the
even lines, or progressive, where each frame is complete. Not all HD formats support
progressive scanning, however. See Supported Video Resolutionsfor details on supported
SD and HD video formats, including frame rates and scanning methods.
See About DVD Studio Pro and HD Resolution DVDs and HD Video Assets for more
information about creating HD projects in DVD Studio Pro.
About DVD Studio Pro and HD Resolution DVDs
In addition to supporting standard definition (SD) format video DVDs, DVD Studio Pro
supports creating high definition (HD) format video DVDs.
With the exception of support for HD video resolutions and the number of buttons on
menus and button over video subtitles, HD projects in DVD Studio Pro have the same
limits as SD projects.
There are two aspects to creating DVDs with HD content: what you can put into the DVD
video zone and the DVD disc media.
DVD Video Zone with HD Content
While the contents of the DVD video zone for an HD-based DVD (HVDVD_TS) are similar
to thoseof an SD-basedDVD video zone(VIDEO_TS), there are some important differences:
• HD-based DVDs support a broad range of video resolutions, including most of those
used in SD-based DVDs. See Supported Video Resolutions for a complete list of
supported resolutions.
15Chapter 1 Overview of Using DVD Studio Pro
Page 16

• In addition to supporting SD MPEG-2 video encodes, HD-based DVDs support HD
MPEG-2 and H.264 video encodes. These are discussed in HD Video Assets.
Blue Laser Disc Media
Due to the improved video resolution possible with HD video, the encoded video files
for HD resolution DVDs can be larger than those used with SD resolution DVDs. For that
reason, a media format based on a blue laser was designed specifically for DVD projects
containing HD video. See the following table for a comparison of SD and HD disc sizes.
Blue laser capacityRed laser capacityDisc
15 GB4.7 GBSingle-sided, single-layer
30 GB8.54 GBSingle-sided, dual-layer
In addition to blue laser based DVD media, an HD project’s DVD video zone can be written
to DVD media based on the red lasers used by traditional DVDs. (The obvious limitation
is that you will not be able to fit as much video data on the disc.)
Important: SD-based DVD players are not able to play DVD projects containing HD content,
whether they are on red or blue laser media. Additionally, only HD projects on special 3x
DVD-ROM red laser media are officially supported in the HD DVD specification. You can
burn HD projects to traditional red laser media on your system; however, the discs might
not play in all HD DVD players.
Supported Video Resolutions
All video resolutions supported by SD-based DVDs are also supported by HD-based DVDs.
This means that an HD-based DVD can use an HD video resolution for the main feature,
then use an SD video resolution for extras. The following list includes the SD and HD
video resolutions supported by DVD Studio Pro.
Note: MPEG-1 encoded video files are not supported in HD projects.
NTSC
Frame rates with an “i” indicate the interlaced scanning method; those with a “p” indicate
the progressive scanning method.
16 Chapter 1 Overview of Using DVD Studio Pro
NotesAspect ratioFrame rateResolution
Also known as SIF format4:329.97i352 x 240
Also known as 1/2 D14:329.97i352 x 480
Also known as Cropped D1; 16:9 is anamorphic4:3, 16:929.97i704 x 480
Also known as Full D1; 16:9 is anamorphic4:3, 16:929.97i720 x 480
HD only, also known as 480p; is anamorphic16:959.94p720 x 480
HD only, also known as 720p16:959.94p1280 x 720
HD only; 16:9 is anamorphic16:929.97i1440 x 1080
Page 17

NotesAspect ratioFrame rateResolution
HD only, also known as 1080i16:929.97i1920 x 1080
PAL
Frame rates with an “i” indicate the interlaced scanning method; those with a “p” indicate
the progressive scanning method.
NotesAspect ratioFrame rateResolution
Also known as SIF format4:325i352 x 288
Also known as 1/2 D14:325i352 x 576
Also known as Cropped D1; 16:9 is anamorphic4:3, 16:925i704 x 576
Also known as Full D1; 16:9 is anamorphic4:3, 16:925i720 x 576
HD only, also known as 576p; is anamorphic16:950p720 x 576
HD only, also known as 720p16:950p1280 x 720
HD only; 16:9 is anamorphic16:925i1440 x 1080
HD only, also known as 1080i16:925i1920 x 1080
Using 24P Video Formats
Both SD and HD projects can use assets encoded at 24 fps, as long as they are encoded
specifically with NTSC or PAL flags set.
Note: For NTSC, 24 fps is actually 23.976 fps, although it is most often referred to as
23.98 fps
Video at 24 fps has two main advantages: it matches the film frame rate, and, in the case
of NTSC, provides much smaller files due to having six fewer frames per second.
See Importing 24 fps Assets for more information.
HD Video Assets
There are a variety of sources for HD video assets to use in your HD projects, with the
most common being DVCPRO HD and HDV camcorders.
• With DVCPRO HD, once you have finished editing the video, the result will need to be
encoded to the HD MPEG-2 or H.264 video format.
• With HDV, which is already compliant MPEG-2 HD video, you can edit the video in
Final Cut Pro and import the result directly in your HD projects.
17Chapter 1 Overview of Using DVD Studio Pro
Page 18

DVD Studio Pro supports HD video encoded using the HD MPEG-2 codec and the H.264
codec. Both of these formats are playable with the Apple DVD Player. You can use
Compressor to encode video to either of these formats. When you import HD resolution
QuickTime video, such as DVCPRO HD video, into DVD Studio Pro, it is HD MPEG-2 encoded
using the integrated MPEG encoder.
Using HDV Assets
The HDV format uses MPEG-2 encoding to store HD video on a standard DV or Mini DV
tape. Two video resolutions supported by the HDV format:
• 1280 x 720 (720p) at 19 Mbps
• 1440 x 1080 (1080i or 1080p) at 25 Mbps (which is anamorphic 16:9)
Imported HDV assets have the video and audio separated into elementary streams (the
HDV format combines the video and audio into a single file), but are not otherwise
processed or converted.
Important: The HD DVD specification does not support all HDV frame rates. See About
HDV Video for more information.
Using H.264 Assets
You can use the H.264 for HD DVD presets included with Compressor to encode several
supported HD and SD video resolutions for use in your HD projects.
The H.264 encoder is twice as efficient as the standard MPEG-2 encoder. When compared
to encoding with MPEG-2, this means that with the H.264 encoder:
• You can use a lower bit rate to get the same quality, resulting in smaller files.
• You can use the same bit rate and get better quality with the same file size.
See About H.264 Video for more information.
Using DVCPRO HD and Uncompressed HD Assets
Another source of HD assets for your HD projects is video encoded with the DVCPRO HD
compression types or uncompressed video. DVCPRO HD video, like DVCPRO SD video,
and uncompressed video cannot be used directly in your DVD Studio Pro projects. You
can import them, however, and DVD Studio Pro will automatically encode them to
compatible HD MPEG-2 assets using the integrated MPEG encoder. You can also encode
them to HD MPEG-2 or H.264 using Compressor or QuickTime.
Note: Using the Animation codec with HD resolution video can significantly reduce your
computer’s performance and should be avoided if possible. An alternative is to use the
Apple Intermediate Codec.
18 Chapter 1 Overview of Using DVD Studio Pro
Page 19
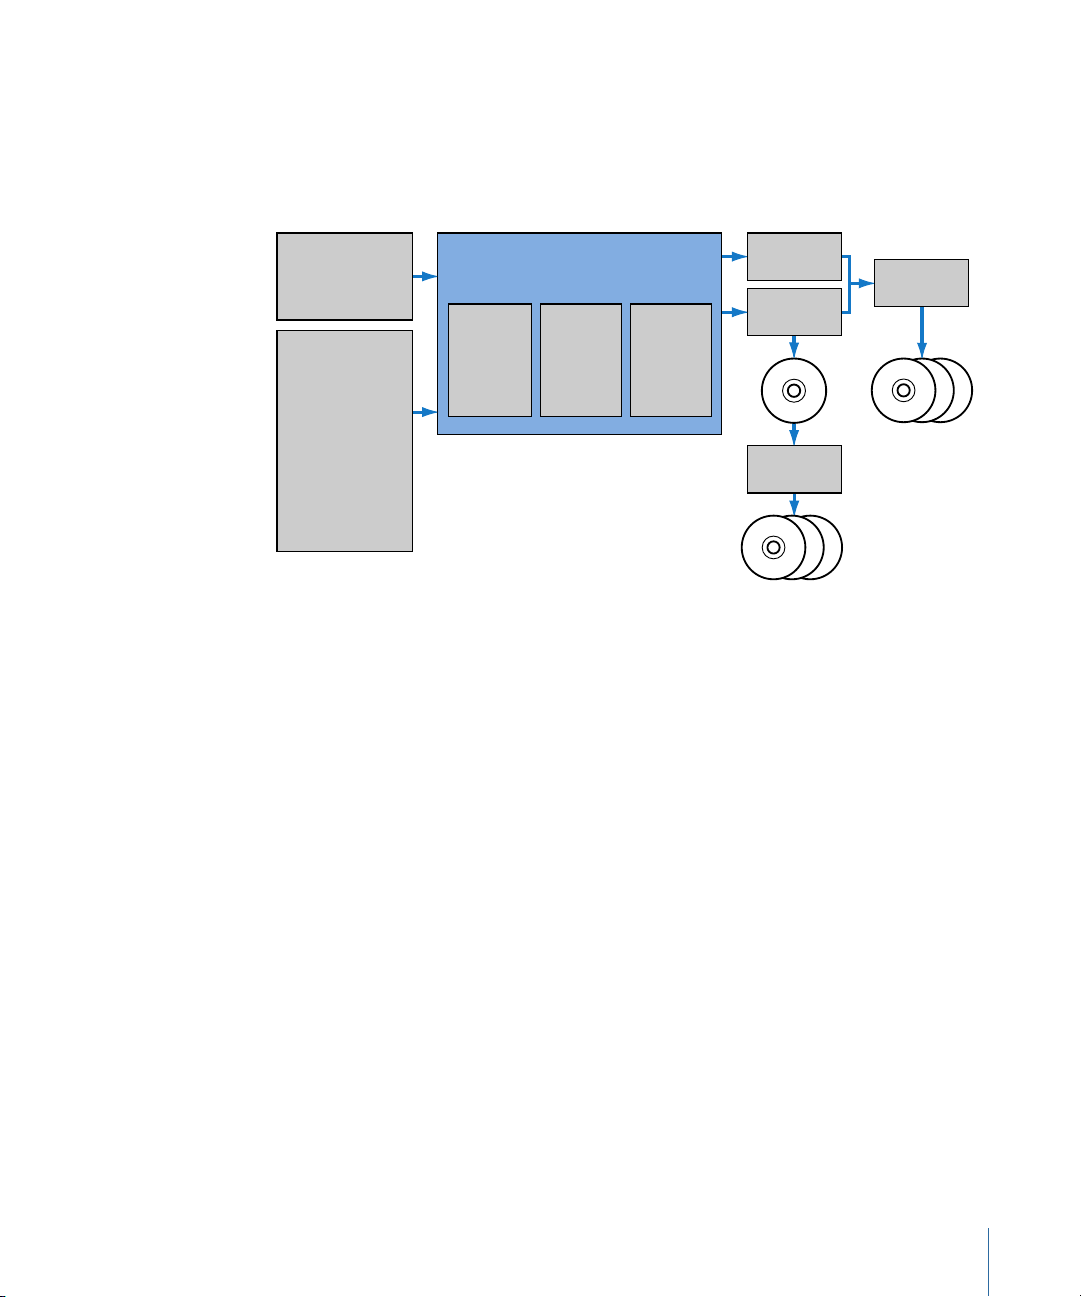
Brief Overview of the DVD Creation Process
Edit raw sources
• iMovie
• Final Cut Pro
• Final Cut Express
Author the DVD with
DVD Studio Pro
DVD burner
(SuperDrive)
DLT
drive
Replication
facility
Encode
assets.
Create
menus,
tracks,
slideshows.
Build and
format
the
project.
Duplication
facility
Other sources
• Compressor
• Motion
• Soundtrack Pro
• Color
• LiveType
• Logic Pro
• GarageBand
• iTunes
• iPhoto
• Keynote
You can create many different styles of DVDs with DVD Studio Pro, from corporate
presentations to training materials to event videos to feature films. While the content
and structure of each style may vary considerably, they all use the same basic DVD creation
process.
There are four stages to the DVD creation process:
Stage 1: Creating Your Source Material
The first part of the DVD creation process is to create or assemble your source material.
See Creating Source Material for more information.
Stage 2: Encoding Audio and Video to Compatible Formats
Once you have created your source materials, they must be encoded to comply with the
DVD specification. See Encoding Video and Audio for more information.
Stage 3: Authoring Your DVD Title
You use DVD Studio Pro to orchestrate your video, audio, and graphics material into an
interactive DVD-Video title, complete with menus, buttons, subtitles, and alternate
languages or soundtracks. See Authoring with DVD Studio Pro for more information.
Stage 4: Building the Project and Creating Your Disc
Creating adisc involves two steps: building the DVD-formatted video zone and formatting
it for how you intend to deliver it. See Creating a Disc for more information.
It’s important to understand the entire process, and how DVD Studio Pro is used in the
process, before you begin your DVD projects.
19Chapter 1 Overview of Using DVD Studio Pro
Page 20

Creating Source Material
The first part of the DVD creation process is to create or assemble your source material.
This might mean shooting video, recording voice or music tracks, designing graphics to
be included, and planning the general functionality of your project. If you are converting
an existing video program into a DVD, you may only need to gather your original video
and audio material and design graphics for the menus that will weave them together.
You can use whatever tools you prefer for creating your video and audio material, as long
as the resulting files are compatible with the MPEG or H.264 encoder that you plan to
use. In most cases, your video and audio assets will be created and saved as QuickTime
movie files or in standard sound file formats like AIFF, WAVE, or SoundDesigner II.
Your program material should be completely edited, including any special effects, audio
fades, and scene transitions, before you encode it.
Menu graphics can be still image files, multilayer Photoshop files, or full-motion video.
To create the menu graphics, you can use virtually any graphics program. DVD Studio Pro
includes extra support for Adobe Photoshop (PSD) files, taking advantage of Photoshop’s
“layers” feature to simplify the creation of backgrounds and overlays. Also included is
support for the menu loop point you can set in Motion.
If you plan to include alternate-language subtitles in your DVD project, you will want to
have your soundtrack transcribed and translated.
The most important thing you can do when preparing your assets is to use the
highest-quality settings available. Any flaws in your material will be revealed on DVD
much more quickly than in any other medium.
Once they are encoded into a DVD-compliant format, DVD Studio Pro does not improve
or degrade the quality of your source material in any way; if you use high-quality source
materials, you’ll get high-quality results.
Here are some guidelines to help you maintain high quality.
• Capture and edit your video material at the same resolution that you will use on the
DVD (typically 720 x 480 at 29.97 frames per second [fps] for NTSC or 720 x 576 at 25 fps
for PAL for SD-based DVDs).
• When recording and editing audio, use a 48 kilohertz (kHz) sample rate and no
compression. This assures the best quality whether you use the uncompressed audio
on the DVD or decide to use the Compressor AC-3 encoder to compress it.
Important: When creating DVDs, your audio must have either a 48 kHz or 96 kHz sample
rate. You cannot use the 44.1 kHz sample rate found on standard audio CDs. In most
cases, the DVD Studio Pro embedded AIFF encoder will convert your audio to the correct
sample rate if necessary.
20 Chapter 1 Overview of Using DVD Studio Pro
Page 21

• When saving video material to the QuickTime format, either specify no compression
(which requires a lot of disk space) or use a high-quality compression codec like DV or
Motion JPEG.
Encoding Video and Audio
Once you have created your source materials, they must be encoded to comply with the
DVD specification. DVD Studio Pro can use materials encoded using its integrated MPEG
and AIFF encoders, as well as materials encoded using the Apple Compressor application
and other methods.
What Is Needed for DVD?
Before video or audio material can be used on a DVD, it must be prepared in one of the
formats defined in the DVD specification. This usually means MPEG-2 format for video
and Dolby AC-3 format for audio files (although you can also use standard PCM audio
formats, such as AIFF files, DTS format files, and MPEG-1 Layer 2 formatted files).
SD projects also accept the older MPEG-1 video format, most commonly seen in web-based
applications. Because MPEG-1 is about one quarter the resolution of MPEG-2 (352 x 240
as opposed to 720 x 480 for NTSC or 352 x 288 versus 720 x 576 for PAL) and utilizes much
lower data rates, the quality is significantly lower. However, MPEG-1 is useful for very long
programs if the picture quality is not of primary importance. Using MPEG-1 encoding,
you can fit many hours of material on a single DVD.
Important: You cannot use MPEG-1 formatted video assets in HD projects.
MPEG encoding performs extremely complex calculations on your source material to
determine what can be safely “thrown away” with minimal impact on the visual quality.
As a result, MPEG encoding can produce files that are less than ten percent the size of
the source files, while still looking great.
Using the DVD Studio Pro Tools
DVD Studio Pro includes integrated MPEG and AIFF encoders. When you add a QuickTime
asset directly to your DVD Studio Pro project, it is automatically encoded to be
DVD-compliant. You can choose whether the asset is encoded in the background while
you continue authoring or whether the encode waits until you build your project.
Also included with Final Cut Studio is Compressor, an encoding tool that provides
additional MPEG encoding configurations and can process batches of video and audio
clips in one step.
21Chapter 1 Overview of Using DVD Studio Pro
Page 22

For many projects you will probably want to use a Dolby-certified AC-3 encoder (such as
the AC-3 encoder included with Compressor). An AC-3 encoder can be used to encode
multichannel surround soundtracks for inclusion on a DVD, as well as for stereo or mono
soundtracks. Using AC-3 encoded audio results in smaller files and a lower playback bit
rate. Uncompressed PCM audio formats (WAV or AIFF) have significantly larger file sizes
and generally do not support specialized soundtrack formats, such as surround channels.
Using Pre-Encoded Sources
Many other available tools, including software and hardware encoders, produce MPEG
streams. You can use any MPEG encoder you prefer, as long as it creates DVD-compliant
elementary streams. This means that the audio and video information is contained in
separate files (the streams).
Important: DVD Studio Pro cannot use MPEG multiplexed System, Program, or Transport
streams for DVD projects.
See About MPEG Video for more information on DVD-compliant requirements.
Authoring with DVD Studio Pro
You use DVD Studio Pro to orchestrate your video, audio, and graphics material into an
interactive DVD-Video title, complete with menus, buttons, subtitles, and alternate
languages or soundtracks.
DVD Studio Pro gives you complete control over every aspect of your DVD and lets you
view its elements and simulate your DVD in real time as you create it.
You can easily create menus, add buttons, and specify the actions that occur when the
buttons are activated. You can define powerful linking and scripting functionality with
just a few clicks. And the Inspector gives you a complete picture of all the characteristics
of any item in your project.
Authoring in DVD Studio Pro consists of these basic steps:
Stage 1: Setting the DVD and Video Standard
You can use DVD Studio Pro to author traditional SD-based DVDs or HD-based DVDs using
either NTSC or PAL frame rates. It is important to set this before importing your assets
because these settings control what happens when QuickTime assets are imported.
Stage 2: Importing Assets
Import your video, audio, graphics, and subtitle assets into DVD Studio Pro. If they are
not already DVD-compliant, the integrated MPEG encoder automatically encodes them.
Stage 3: Creating Menus
Create one or more menus to define the structure and navigation of your DVD. The menus
can rely completely on the supplied templates and styles or can use your own graphics.
22 Chapter 1 Overview of Using DVD Studio Pro
Page 23

Stage 4: Adding Buttons to the Menus
Add one or more buttons to your menus. The display mode (4:3, 16:9 Letterbox, and so
on) and DVD standard (SD DVD or HD DVD) determine the maximum number of buttons
each menu can have. Each button can initiate a wide variety of actions, themost common
being to open a different menu, play a track, or run a script. This hierarchy of menus and
buttons gives you tremendous flexibility in constructing an “interactive” program in which
the viewer has numerous options to choose from.
Stage 5: Creating Tracks and Slideshows
Create one or more tracks, each consisting of one or more video streams, audio streams,
subtitle streams, chapter markers, and stories. Create one or more slideshows, each
consisting ofstill images and, optionally, audio. Tracks and slideshows can also be created
by dragging assets to the Menu Editor and choosing options from the Drop Palette.
Stage 6: Linking the Project Elements
Set up the various actions and links that will make your project work as it should when
viewed. For example, you can set what happens when a DVD player first starts playing
the disc, what happens when a track finishes playing, and what happens if the player sits
idle at a menu for a specific amount of time.
Stage 7: Simulating Your Project
View your elements and test your project as you go using the real-time DVD Simulator
built in to DVD Studio Pro. This process allows you to verify the links between the project
elements.
Stage 8: Building and Burning Your Project
Build the completed project and either send it to a replication facility or burn a DVD on
your own system.
Creating a Disc
Creating a disc involves two steps: building the DVD-formatted video zone (VIDEO_TS
for SD-based DVDs and HVDVD_TS for HD-based DVDs) and formatting it for how you
intend to deliver it.
Building the Video Zone
When you build your SD-based DVD project, a set of files is created and stored on your
hard disk in a folder named “VIDEO_TS” (video title set). The contents and structure of
this folder are strictly defined by the DVD specification. HD projects store their files in a
folder named “HVDVD_TS.”
When you build your project within DVD Studio Pro, it combines all the material you’ve
included (video, audio, and subtitles for the menus and tracks) into a single stream and
writes it to this special folder. Using DVD Player, which is included with your operating
system, you can open and play the contents of this folder, just as if it were on a DVD disc.
23Chapter 1 Overview of Using DVD Studio Pro
Page 24

Formatting and Burning
Depending on the quantity of DVD discs you need, you can:
• Burn oneor moreDVDs onyour system(if properly equipped): This is a quick way to create
a test disc.
Note: You cannot add high-end features such as copy protection.
• Send a burned disc to a duplicator who can burn additional copies for you: This allows
you to create more discs than you would want to burn on your own system at a lower
cost than using a replicator. Because the copies are based on a disc you burn on your
system, the duplicated discs have the same restrictions as when you burn on your
system.
• Prepare suitablefiles to send toa DVD replicationfacility: Use a replicator to make copies
that are compatible with all DVD players, to create larger quantities of discs, and to
include specialized features not supported by your system’s DVD burner.
If you are using a DVD replication facility, you can deliver your project to the facility in
several ways:
• DLT: Digital Linear Tape (DLT) is the preferred method for sending an SD DVD project
to a DVD replication facility. DVD Studio Pro supports writing directly to a DLT drive.
DLT is well suited to transporting DVD projects because of its reliability and very high
capacity.
Important: You cannot write HD DVD projects to a DLT drive.
• Burned DVD: ManyDVD replicators accept DVD discs that you’ve burned on your system
for replication. There are special requirements if you want to include high-end features
such as dual-layer and copy protection. See DVD Burners for more informationon using
burned DVD discs for replication, including information about the Cutting Master
Format (CMF).
• Hard Disk: You can format your SD or HD project to an external hard disk and send the
hard disk to your replicator. By selecting a CMF or DDP format, you can also include
advanced features such as copy protection. This method works especially well for large
HD projects.
• Electronic Copy: Some replicators have provisionsthat allow you to transfer the project’s
build files directly to their server using the Internet.
See Output Devices for information on using these methods for delivering projects to
replicators.
24 Chapter 1 Overview of Using DVD Studio Pro
Page 25

What Makes a DVD Authoring System?
The DVD Studio Pro installation booklet lists the minimum hardware and software
requirements for using DVD Studio Pro to build DVD titles. However, you may find you
need additional items beyond the minimum requirements to make up your DVD authoring
system. Depending on the types of DVD titles you intend to create, your DVD authoring
system can be an off-the-shelf Mac Pro with a SuperDrive or a specialized system with
additional drives and hardware.
See the following for more information:
• Hard Disk Storage
• SCSI Devices
• DVD Burners
• DLT Drives
• External Video and Audio Monitoring
Hard Disk Storage
No matter what sort of titles you intend to create, you will be working with very large
files.
You should have at least twice as much hard disk storage space as the size of your project.
(For DVD-5, for example, which can hold about 4.4 GB, you need 4.4 GB for the MPEG-2
encoded asset files and another 4.4 GB to hold the built, or compiled, project. An HD
project can require about 60 GB to hold the asset and built project. Original asset files,
such as DV format video, require much more space than the MPEG-2 encoded versions
used in your DVD project.) For best build performance, dedicate two or three Ultra Wide
A/V or FireWire hard disks to your project. (Make sure they contain only your media and
no other programs that might fragment the disk and decrease performance.) If you have
three disks, use one for video assets, one for audio assets, and the third for the finished
files. If you have two disks, use one for source assets and one for final files.
SCSI Devices
Depending on your needs, you may need to add external devices—such as hard disks
and DLT drives—that require SCSI support.
To use SCSI devices, you must either have your Mac properly equipped when ordering
it or add a third-party SCSI PCI card to your existing desktop computer. Contact your
Apple Authorized Reseller or see the Support area of the Apple website for a list of
suggested SCSI cards and devices.
25Chapter 1 Overview of Using DVD Studio Pro
Page 26

DVD Burners
Being able to burn a DVD is useful for both proofing your titles on set-top DVD players
and burning the finished project (when only a small number of discs are required). You
can also burn a disc for a duplication or replication facility to use as a master when larger
quantities are needed.
You cannot burn discs that support Macrovision copy-protection or Content Scrambling
System (CSS) encryption. These must be created at a replication facility.
Note: For best results, it is recommended that you supply the replication facility with a
DLT tape or hard disk instead of a burned DVD disc. Be sure to confirm with the facility
what formats it supports.
Choosing a DVD Burner
When choosing a DVD burner for your system, you have the option of using an Apple
SuperDrive or other drives. Your choice depends in part on which media you want to
use: whether you intend to burn on red laser or blue laser media and, in the case of red
laser burners, whether to use general or authoring media.
Note: You cannot burn SD projects to blue laser media.
General Versus Authoring Media
The first drives created to write DVD-R discs used a special red laser and expensive media
and are known as authoring media drives. The most common DVD drives, however, use
a less expensive red laser and media. Such drives are known as general media drives.
Red laser DVD drives can write to either general or authoring media—not both. The
SuperDrive supplied with many Apple systems supports only general media. To use
authoring media, you need to connect a special DVD-R drive.
Important: Be sure you write only to media supported by your drive. If the media is not
labeled either general or authoring, it was likely manufactured before the existence of
general drives and can be assumed to be authoring-compatible.
The type of media you use only affects the writing of the disc. Both types of DVD drives
and most DVD-ROM drives and set-top DVD players can read and play both general and
authoring media.
For most projects, there is no significant difference between a DVD created using general
or authoring drives and discs. However, if you intend to use a replicator and require
high-end features such as Macrovision copy-protection and CSS data encryption, you
must use authoring media with an authoring drive.
26 Chapter 1 Overview of Using DVD Studio Pro
Page 27

Even with authoring media, you cannot burn a DVD that supports any of these high-end
features on your own system. However, authoring media supports the Cutting Master
Format (CMF), which can be used to add information required by the replicator to put
these features on your discs. General media does not support CMF.
See The Cutting Master Format for more information on the CMF standard.
An Alternative Way to Use General Media
While you cannot use the CMF format directly on general media discs, you can still use
general media discs to deliver DVD projects with high-end features to your replicator
by using them as data discs. In general, you format your project to your hard disk using
a CMF or DDP format. You can then copy the resultant Layer 0 and Layer 1 folders to
your DVD media (each layer to its own disc). While these discs are not DVD-Video discs
and cannot be played in a DVD player, they do contain all the information the replicator
needs to create the final discs. See Output Devices for more information about formatting
to your hard disk.
Important: Be sure to check with your replicator before making the discs.
About the Different Types of General DVD Media
There are several types of DVD media available that DVD Studio Pro can use. The type
you should use depends on your requirements. For example,
• If playback compatibility is a primary concern: Burning discs that can be played back on
most set-top DVD players is often a high priority. Several variables affect this, including
the media type, the brand of media, and the DVD player itself. In general, newer DVD
players can play a wider variety of media types; however, there are exceptions to this.
You should always test your burned DVDs on a variety of DVD players to verify
compatibility.
• If rewritable media is more efficient for you: Using rewritable DVD media can be very
useful when you want to burn a test disc of a project to verify various aspects of it. For
example, you might want to burn a disc just to verify that a menu or script works
correctly on a set-top DVD player or to see the video quality of a clip on a variety of
external monitors. Being able to make a change to the project and then reuse the disc
to burn it saves having to use a new disc each time.
• If you needto burn a dual-layer project: Being able to burn a dual-layer project to a DVD
disc can be very useful. You should be aware, though, that there are big differences
between DVD+R double-layer and DVD-R dual-layer media.
Following is some general information on the types of media you are able to choose
from.
DVD-R and DVD+R
These are “write-once” discs that tend to be the most widely compatible with DVD players.
27Chapter 1 Overview of Using DVD Studio Pro
Page 28

DVD-RW and DVD+RW
These rewritable discs can be erased and reused multiple times. While they cost a bit
more than “write-once” discs, the ability to use them multiple times to verify various
aspects of your project as you work on it can be very useful. However, rewritable discs
tend to not be as compatible with DVD players as “write-once” discs.
When you use DVD-RW and DVD+RW media, DVD Studio Pro first checks to see if the disc
contains any files. If it is empty, the format proceeds. If there are files on the disc, an alert
appears warning you that the disc will be erased if the format continues—you can then
continue or cancel the format process.
DVD+R Double-Layer
You can use DVD+R double-layer media, often referred to as DVD+R DL, for burning your
dual-layer projects. With DVD+R double-layer media, DVD Studio Pro places the layer
break point and sets the switch point to be nonseamless as specified in your project.
DVD+R double-layer discs require you to use the Opposite Track Path (OTP) direction
setting when burning the disc. This means that the first layer must be larger than the
second layer. See Setting the Dual-Layer Direction for more information.
While DVD+R double-layer discs allow you to burn your dual-layer projects, they tend to
have more compatibility issues than the other types of DVD media.
DVD-R Dual-Layer
If your system contains a DVD drive that can write to the new DVD-R dual-layer media,
you can burn your DVD project to it with DVD Studio Pro. However, there are several
issues:
• Because currently DVD Studio Pro has no way to identify DVD-R dual-layer media as
having two layers, burning a dual-layer project to it results in the appearance of an
alert message telling you that the DVD media may have insufficient room to hold the
project. This message is based on the assumption that the disc is single layer. Both
layers of the disc will be written to as needed, however, when you click Continue.
• If you are burning a dual-layer project, the break point you set will not affect where
the layer break actually occurs. Instead, the first layer is written to until filled, at which
point the drive switches to writing to the second layer.
• The switch between layers is a seamless layer change not supported by some DVD
players, which may stop playing the disc when the switch point is reached.
Important: Do not use DVD-R dual-layer media unless these issues do not impact your
project.
Determining Which Media Types Your DVD Drive Supports
Before using any of the media types described in About the Different Types of General
DVD Media, you should verify that your DVD drive supports that type.
28 Chapter 1 Overview of Using DVD Studio Pro
Page 29

To verify the media types supported by your DVD drive
1 Choose Apple menu > About This Mac.
2 Click the More Info button in the About This Mac window.
3 Click the disclosure triangle next to Hardware to show the list of hardware devices.
4 Select the Disc Burning item in the hardware list.
The DVD-Write line that appears in the information pane lists the supported media types.
DLT Drives
Digital Linear Tape (DLT) drives are the most reliable way to deliver SD DVD content to
a replicator. They are also a good way to back up completed projects so that you can
remove them from your hard disks and make room for your next project.
SD DVD data written to DLT drives with DVD Studio Pro can use Data Description Protocol
(DDP) version 2.0 or version 2.1. You can also write using CMF version 1.0.
Important: You cannot write HD DVD projects to a DLT drive.
External Video and Audio Monitoring
You can configure your system to support external video and audio monitors. This makes
it possible to more closely simulate a viewer’s environment before you build the project
and burn a test DVD.
When using external monitors, keep the following in mind:
• External video monitors are only used during simulation.
• External audio monitors are active during simulation and while playing fromthe Assets
tab or any of the editors (Track, Story, Slideshow, and Menu Editors).
• When youare using an external video monitor, the Simulator window on your computer
is inactive.
• You cannot use the pointer to click buttons on the external video monitor. You must
control the simulation by using the Simulator window’s controls.
• Depending on your system and the video being simulated, frames may be skipped
during playback to maintain synchronized playback with the audio.
The Simulator pane in DVD Studio Pro Preferences contains settings that control whether
the external video and audio monitors are used. Additionally, the Simulator contains
settings that allow you to change the display mode (4:3 Pan-Scan, 4:3 Letterbox, or 16:9)
and resolution (SD, HD 720, or HD 1080). See Simulator Preferences and Simulating with
an External Video and Audio Monitor for more information.
29Chapter 1 Overview of Using DVD Studio Pro
Page 30

Connecting an External Video Monitor
When simulating your project on your computer’s video monitor, you do not see video
exactly as a viewer would when playing the video using a set-top DVD player connected
to an NTSC or PAL monitor. There are two primary differences:
• Pixel aspect ratio: Computer monitors always use square pixels, while SD video uses
rectangular pixels. When viewed on the computer’s monitor, the Simulator scales the
pixels to make them fit the 4:3 or 16:9 aspect ratio, which can affect the video
appearance.
• Color space: Computer monitors generally use RGB color space for their displays while
most monitors used to view DVDs use the YUV color space.
The advantage of connecting an external video monitor is that, depending on the monitor
you connect and whether your project’s assets are already encoded for use on a DVD,
you are able to see the video as the viewer would see it.
The external video monitor uses the second monitor as configured in the Displays pane
of System Preferences. You must set the resolution and refresh rate to match the external
monitor. There are two common approaches to connecting an external video monitor:
• Connecting a video monitor to your computer’s S-Video output (if present)
• Connecting a second monitor to your system (if supported)
For example, you could connect an NTSC or PAL monitor to the S-Video output of a
PowerBook G4 system.
Note: When connected to an NTSC or PAL monitor, this video output provides only an
approximation of what the video will look like when burned to a disc and played on a
DVD player. Due to rendering, rescaling, and interlacing issues, you should not rely on
this output as a true representation of the video quality, especially with SD projects.
Connecting an External Audio Monitor
There are two primary issues with monitoring your project’s audio using the computer’s
built-in audio system:
• The built-in system cannot play surround sound audio. The audio is first downmixed
to stereo, then played.
• The built-in system cannot play DTS audio.
There are two common approaches to connecting an external audio monitor:
• Connecting a suitable AC-3 or DTS decoder to the computer’s optical digital audio
output (also known as an S/PDIF output)
• Connecting a suitable AC-3 or DTS decoder to the computer’s FireWire or USB port
30 Chapter 1 Overview of Using DVD Studio Pro
Page 31

Audio and Video Assets
Audio and video assets can come from a wide variety of analog and digital sources. You
must have an equally wide variety of ways to capture these sources on your authoring
system. When bringing your assets into DVD Studio Pro, you should keep in mind the
following issues.
Have the Assets Been Edited Yet?
DVD Studio Pro is not an editor. You can use it to link assets together on a timeline, as
with an editor, and even trim an asset’s start and end, but you cannot add effects, such
as dissolves and text credits, or perform any audio mixing. Your assets need to be already
edited using an application such as Final Cut Pro. If you are editing the assets on your
authoring computer, you need to capture them in a format required by your editing
software. Once edited, the assets can be imported into DVD Studio Pro (if they are in a
QuickTime-supported format) or encoded into DVD-compliant MPEG and audio formats,
using either Compressor or third-party applications.
Capturing from an Audio or Video Player
Often your assets will be edited at a post-production facility and you will capture them
directly from a video- or audiotape player. In this case, you must have a third-party capture
card that supports the video and audio formats used. This video must be captured using
Final Cut Pro (or a similar application) in a QuickTime format that the DVD Studio Pro
integrated MPEG encoder can convert to DVD-compliant formats, or captured directly as
DVD-compliant MPEG and audio sources.
31Chapter 1 Overview of Using DVD Studio Pro
Page 32

Page 33

Planning Your Project
2
Before you start authoring your DVD title, it is highly recommended that you set aside
time to plan your project. Spending time in the beginning to outline the various aspects
of the project will lead to a smoother production with minimal surprises.
This chapter covers the following:
• Investigating Existing DVDs (p. 33)
• Determining Your Target Audience and Playback Device (p. 34)
• Deciding Which DVD Standard to Use (p. 34)
• Deciding Which Video Standard to Use (p. 35)
• Deciding What Content to Include (p. 35)
• Creating a Storyboard (p. 35)
• Designing the Menus and Buttons (p. 37)
• Making Sure Your Content Will Fit (p. 37)
• General DVD Limitations (p. 42)
Investigating Existing DVDs
A very effective way to start planning your project is to spend some time viewing existing
DVDs. Thisprocess provides you with examplesof ways others approached various aspects
of their DVD projects, such as using slideshows or providing language selections. It can
also help you understand how frustrating the viewing experience can be when a disc has
poorly conceived menus or confusing interactivity.
Not all DVD titles are Hollywood releases—be sure to look at a variety of titles, especially
those that best match the goals of your project.
Keep in mind that, while DVD Studio Pro provides the tools needed to create highly
complex DVDs, most Hollywood-style titles have teams of specialists who work on each
project. Before you set out to create a complicated DVD, make sure you understand all
aspects of what is involved, and are prepared to deal with them.
33
Page 34

Determining Your Target Audience and Playback Device
As with any media project, you must have a clear idea of who the viewers are and what
their expectations will be. You may need to create a title that simply plays a movie as
soon as the DVD is loaded, with no viewer interaction at all. Or, you may need to create
a title with highly customizable languages or display types.
Another major consideration is whether your DVD will be played on a computer. When
a DVDis played on a set-topDVD player, thearrow buttons on the remote control provide
the primary navigation controls. However, when a DVD is played on a computer, viewers
typically use the pointer for navigation. This distinction affects menu designs because
you need to make it obvious where viewers should click to activate the buttons.
Additionally, if you need the title to play on older computers, you may need to set the
bit rate as low as possible, to increasethe chances thatthe title will play without stuttering.
Deciding Which DVD Standard to Use
DVD Studio Pro gives you the choice of authoring a traditional DVD using standard
definition (SD) assets or a DVD using high definition (HD) assets. There are several factors
to take into account when deciding which DVD format to use:
• While an HD-based DVD can provide an excellent HD video output, it can only be played
on devices designed specifically to support it, such as the Apple DVD Player. SD-based
DVDs can be played on all DVD players, including those that play HD-based DVDs.
• An HD project can be written on either a red laser disc (as is used by SD projects) or
on a blue laser disc. While SD-based DVD players can read red laser discs, they cannot
play HD content from them.
Important: Only HD projects on special 3x DVD-ROM red laser media are officially
supported in the HD DVD specification. You can burn HD projects to traditional red
laser media on your system; however, the discs might not play in all HD DVD players.
• Blue laser discs can hold about three times the data that a red laser disc can hold (a
single-layer red laser disc can hold 4.7 GB—a single-layer blue laser disc can hold 15 GB).
Because you can use SD video in your HD project, writing on a blue laser disc allows
you to get much more content on the disc.
• You may need to author both SD-based and HD-based DVD versions of your project.
The easiest way to do this is to first author the SD-based DVD version of the project.
You can then set the DVD standard to HD DVD—DVD Studio Pro automatically converts
the project—and you can then choose which QuickTime assets to encode to the HD
format. Alternatively, you can swap SD assets with HD assets as needed.
34 Chapter 2 Planning Your Project
Page 35

Deciding Which Video Standard to Use
In addition to choosing the DVD standard you want to use, you must also choose the
video standard to use. You can choose between NTSC and PAL. This choice affects the
video resolutions and frame rates that are supported.
Important: You cannot use both NTSC and PAL assets in the same project.
Also, be careful not to confuse the video standard setting with the region code setting.
The region code setting allows you to specify the regions that can play your
DVD—choosing a region that primarily contains PAL countries does not force you to use
the PAL video standard, though in most cases you would want to.
See Video Standards of the World for information on which countries support each video
standard. It is also useful to keep in mind that DVD players that can play both NTSC and
PAL are becoming more common and are most common in PAL countries. However, in
most cases, while the DVD player can output either video standard, it assumes the video
monitor it is connected to can display either standard (which is less likely to be true).
Deciding What Content to Include
The audio, video, and still-image files used by DVD Studio Pro in authoring DVD projects
are known as assets. Often you’ll have a good idea of what primary assets you want to
include when you start your project, but you may think of additional items once it is too
late to create them. For example, providing a second language may greatly increase the
value of a corporate title but may require you to create new menus to support it.
Additionally, including nontraditional items on a DVD, such as PDF files and web links,
can add a great deal of value to titles that will be viewed on computers.
You may also have the opposite problem—you may have too much content for a DVD
title. Be sure you know which content is required and which is optional. Explore the
feasibility of creating a dual-layer DVD ordouble-sided DVD. Some content may be suitable
for encoding at lower bit rates or as MPEG-1 streams. Perhaps instead of using
uncompressed AIFF audio, you can use Dolby Digital AC-3 to save space. See Making Sure
Your Content Will Fit for more information.
Creating a Storyboard
Even simple DVD titles with only a few menus can benefit from the time you spend in
the planningstages.Storyboarding includes planning the interaction between the menus,
tracks, slideshows, and stories. It helps you visualize what the viewing experience will be
and ensures that there are minimal surprises during the authoring process.
35Chapter 2 Planning Your Project
Page 36

You’ll find that storyboarding can give you the overarching view of your project needed
Product
Slideshow 1
Track 1
Customer
Interview
Track 3
Company
Background
Track 4
Main
Presentation
Track 2
End
Jump
Menu
(disable)
Stills
Main Menu
Menu 1
Extras Menu
Menu 2
First Play
Track 1
Extras
Play
Button press
Press Menu on remote
End jump
Interviews
Background
Main
to plan fairly complex interactivity.
Storyboarding helps you to sort out a variety of navigational issues:
• What should play first: By default the first play is set to the first menu, but for many
projects you may want something else to be the first thing viewers see when they start
playing the DVD.
• What should be each element’s end jump setting: You may know that you want the DVD
to go back to the main menu once a track plays, but have you thought about which
button on that menu to highlight?
36 Chapter 2 Planning Your Project
Page 37

• What should the remote control’s Menu button do: It’s worth planning what should
happen withall of the remote control buttons, but especially the Menu button because
its action can vary from element to element.
These and many other decisions need to be made. Drawing them out as a storyboard
before starting the project can help eliminate errors or delayswhile waiting for a decision
to be made.
Designing the Menus and Buttons
DVD Studio Pro provides tools that make it easy to create menus without relying heavily
on outside graphics applications. For simple titles whose main focus is to provide
information, you may be able to rely on the basic button-and-text capability of
DVD Studio Pro to create your menus.
For custom titles, you’ll need to create your own graphics. Creating graphics for use with
video is a bit different from creating graphics for print. Be sure to see Creating Graphics
to Use in Menus for information on creating graphics for your title.
In either case, because menus and the buttons on them are the viewers’ primary way of
interacting with your title, it is important to spend time making sure that they are
straightforward, with logical button navigation and clear highlights that let viewers know
where they are in the menu.
Making Sure Your Content Will Fit
Be sure to allow time in the planning process to determine whether all of your assets will
fit on the type of DVD you are using. You don’t want to be surprised when you are finished
authoring the title—that is a bad time to find out that the assets won’t fit.
What Do You Mean a 4.7 GB DVD Won’t Hold 4.7 Gigabytes?
With computers, memory and disk size arecommonly expressed in terms such as kilobyte,
megabyte, and gigabyte. Technically, a kilobyte should represent 1000 bytes, but due to
the binary numbering system computers use, a kilobyte actually represents 1024 bytes.
Similarly, a megabyte represents 1,048,576 bytes (and not 1,000,000 bytes) and a gigabyte
represents 1,073,741,824 bytes (and not 1,000,000,000 bytes).
Unfortunately, with DVD discs the terms megabyte and gigabyte do not use the same
binary-based standard; they literally refer to the technically accurate 1,000,000 bytes for
a megabyte and 1,000,000,000 bytes for a gigabyte. This means that a 4.7 GB DVD disc
will actually hold only 4.37 binary-based gigabytes. While the difference is not large
(relatively speaking), it must be accounted for if you intend to come close to filling the
disc.
37Chapter 2 Planning Your Project
Page 38

Important: When displaying estimated sizes, DVD Studio Pro uses the “1000 bytes equals
a kilobyte” system. This means that the estimated sizes refer to the amount of space they
will require on the DVD and will be a bit larger than the file sizes shown in the Finder.
While the Finder shows binary-based file sizes, you can use its File > Get Info command
to see both the binary-based file size and, in parentheses, the “1000 bytes equals a kilobyte”
size.
Disc Options
You have a variety of DVD discs to choose from. The one you choose depends on your
content, your budget, and whether you intend to use a DVD replication facility. DVD sizes
are typically referred to with names such as DVD-5 and DVD-9. While the number in the
name is intended to provide general guidance as to the capacity of the disc, it should
not be relied on too strictly. (Note that a DVD-4 disc has a higher capacity than a DVD-5
disc.) The following tables list the common sizes used.
Red Laser Discs
The following table lists the names for discs based on red lasers.
CapacityTypeDisc sizeDVD name
8 cmDVD-1
8 cmDVD-3
8 cmDVD-4
12 cmDVD-5
12 cmDVD-10
12 cmDVD-14
12 cmDVD-18
Single-sided,
single-layer
Single-sided, dual-layer8 cmDVD-2
Dual-sided, both sides
single-layer
Dual-sided, both sides
dual-layer
Single-sided,
single-layer
Single-sided, dual-layer12 cmDVD-9
Dual-sided, both sides
single-layer
Dual-sided, one side
dual-layer
Dual-sided, both sides
dual-layer
1.46 GB (1.36 binary
gigabytes)
2.66 GB (2.47 binary
gigabytes)
2.92 GB (2.72 binary
gigabytes)
5.32 GB (4.95 binary
gigabytes)
4.7 GB (4.38 binary
gigabytes)
8.54 GB (7.95 binary
gigabytes)
9.4 GB (8.75 binary
gigabytes)
13.24 GB (12.32 binary
gigabytes)
17.08 GB (15.9 binary
gigabytes)
If you intend to burn your own discs using your system’s DVD burner, you can only use
DVD-5 and DVD-9 discs. To use any of the other sizes, you must use a DVD replication
facility.
Blue Laser Discs
The following table lists the names for discs based on blue lasers.
38 Chapter 2 Planning Your Project
Page 39

CapacityTypeDisc sizeDVD name
8 cmHD DVD-4
12 cmHD DVD-15
Single-sided,
single-layer
Single-sided, dual-layer8 cmHD DVD-9
Single-sided,
single-layer
Single-sided, dual-layer12 cmHD DVD-30
4.5 GB (4.19 binary
gigabytes)
9.0 GB (8.38 binary
gigabytes)
15.0 GB (13.97 binary
gigabytes)
30.0 GB (27.94 binary
gigabytes)
Estimating Whether Your Content Will Fit
While you will often hear that a DVD-5 (or a 4.7 GB disc) can hold two hours of video
content, this is really only a rough guideline. The actual amount of video a DVD-5 disc
can hold depends on the bit rate the video is encoded at. Often overlooked is the size of
audio files—if you plan to use uncompressed AIFF (PCM) audio, you must also take the
additional space requirements into account when calculating whether all your content
will fit.
If your project needs to fit on a DVD-5 disc that you can burn on your SuperDrive, you
need to choose an appropriate bit rate. There is a simple formula you can use. See Fitting
Your Project on a DVD-5 Disc for more information.
If you are flexible as to the DVD disc type you can use, you can experiment with different
bit rates and determine the disc space required by each. This process is more detailed
and includes more variables, such as taking into account additional audio streams and
DVD-ROM content. See Calculating Disc Space Requirements for details on precisely
determining your disc space requirements.
Fitting Your Project on a DVD-5 Disc
You can use this simple formula to estimate the bit rate you should use to fit your video
on a DVD-5 disc:
560/x = bit rate
The “x” represents the length of the video (in minutes) and the resulting bit rate is in
megabits per second (Mbps). This formula assumes you are using compressed audio,
such as AC-3. If you are using uncompressed audio, you need to subtract 1.5 Mbps
(assuming you are using 16-bit stereo at a 48 kHz sample rate) from the bit rate value.
For example, if you have 120 minutes of video, you get a suggested bit rate of 4.67 Mbps
(560/120 = 4.67). If you are using uncompressed audio (such as the AIFF format the
embedded AIFF encoder supplies), you need to reduce the bit rate to 3.17 Mbps to ensure
the video and audio will fit on the disc.
39Chapter 2 Planning Your Project
Page 40

Beware of Setting Your Bit Rate Too High
You will find that with some DVD projects, the content easily fits on the disc, and you
may be temptedto use the highest video bit rate available.While higher bit rates produce
better quality, you must take into account other factors before deciding to use the
maximum allowable value.
The maximum video bit rate allowed on SD-based DVDs is 9.8 Mbps, but rarely is that
practical to use because DVD players support combined video, audio, and subtitle bit
rates of up to 10.08 Mbps. For HD-based DVDs, the maximum video bit rate is 29.4 Mbps
for HD assets and 15.0 Mbps for any SD assets used in an HD project, with an overall
maximum bit rate of 30.24 Mbps.
In practice, you should be conservative when determining how high of a bit rate to allow
for. Trying to squeeze out the highest possible bit rate for your project can lead to player
compatibility and disc space issues.A general recommendation is to not exceed 9.2 Mbps
for the combined video and audio bit rates when authoring SD projects or 29 Mbps when
authoring HD projects.
Important: If you are building your project and DVD Studio Pro detects that the bit rate
of the multiplexed stream is too high, the build stops and an error message appears.
Using PCM or AC-3 Audio
A single PCM audio stream using typical settings (as produced with the embedded AIFF
encoder) requires 1.536 Mbps, which leaves an absolute maximum bit rate for the video
in an SD project of around 8.54 Mbps. If there are two PCM audio streams, 3.07 Mbps
must be allowed for the audio, leaving just 7.01 Mbps for the video.
Note: Even though you can only play one audio stream at a time, the bit rates of all audio
streams must be added together when determining the overall bit rate for a track. Similarly,
all subtitle streams must be added together and added to the overall bit rate.
Using AC-3 audio in place of the PCM audio leaves far more room for the video bit rate.
Stereo AC-3 audio using typical settings requires only about 224 kbps—using two stereo
AC-3 streams in place of the PCM audio leaves about 9.6 Mbps for the video.
See Calculating a Project’sDisc Space Requirements formore information about allowances
for other audio formats.
Subtitle Allowances
Subtitles generally use a very small bit rate—about 10 kbps per stream. Larger subtitles
that change frequently or use graphics can have a significant impact though and can
affect the maximum bit rate you can use for the video.
40 Chapter 2 Planning Your Project
Page 41

Multiple Video Angles
Using multiple video angles in a track also affects the maximum allowable video bit rate
you can use. Due to the way the DVD specification requires video streams to be
multiplexed together, the number of video streams determines the maximum video bit
rate you can use in SD projects. The maximum combined bit rates (highest bit rate video
stream + all audio streams + all subtitle streams) you can use for each multi- and
mixed-angle track in an SD project is from 8.0 Mbps with two streams to 7.0 Mbps with
nine streams. See Encoding Video for Multi-Angle Tracks for more information.
HD projects using multiple video angles in a track are limited to 24.0 Mbps for the
maximum combined bit rates, regardless of the number of video angles.
Transitions
When you add a transition to a menu, to a still clip in a track, or to slides in a slideshow,
you need to account for the additional video it creates.
• In the case of menus, the transitions become short rendered video clips stored in the
same video object (VOB) file as the menus. This means that, in addition to the overall
amount of disc space menu transitions require, you must also consider their impact on
the 1 GB menu VOB file size limit. See Standard SD DVD Video Zone Files for more
information. You must also take into account that a transition video clip is rendered
for eachmenu button that has transitions enabled—a menu with 18 buttons can require
18 transition video clips.
• In the case of still clips in a track and slides in a slideshow, adding transitions increases
the amount of disc space each requires even if the transition does not increase the
length of the track or slideshow. This is because stills and slides use much less disc
space than the motion video created by the transitions, even if the transition is from
one slide to another.
The amount of disc space required by each transition varies depending on their length
and type. In general, for SD projects, which use a bit rate of 6 Mbps for transitions, you
should allow 750 KB of disc space for every second of transition time in the project. For
HD projects, which use a bit rate of 20 Mbps for transitions, you should allow 2.5 MB of
disc space per second.
Using the Video Bit Rate
The video bit rates you calculate can be used as the bit rate entry of your encoder,
regardless of the encoding method you intend to use (one pass, one-pass variable bit
rate [VBR], or two-pass VBR).
When using one of the VBR encoding methods in the integrated MPEG encoder, the “Bit
rate” setting affects the amount of disc space that the MPEG video file requires, while the
“Max bit rate” setting sets the highest video bit rate that is allowed in the file (but does
not affect the file size). See MPEG Encoding Methods for more information.
41Chapter 2 Planning Your Project
Page 42

General DVD Limitations
Following are some general limitations you may run into while authoring your DVD project
with DVD Studio Pro. Most of these limitations are due to DVD-Video specification
requirements.
Note: With the exception of the number of buttons on a menu, the same limits apply to
both SD and HD projects.
Project
Following are the limitations within a DVD Studio Pro project.
• Maximum number of tracks, stories, and slideshows in a project: 99
• Minimum number of menus in a project: 0
• Minimum number of tracks or slideshows in a project: 1
Menus
Following are the menu-related limitations.
• Maximum number of menus in a project: 10,000
• Menu aspect ratio support: 4:3 and 16:9 menus can be used in the same project.
• Maximum number of buttons on an SD-based DVD 4:3 menu: 36
• Maximum number of buttons on an SD-based DVD 16:9 menu: 18, unless Pan Scan &
Letterbox is selected, which then sets the maximum to 12
• Maximum number of buttons on an HD-based DVD 4:3 menu: 48
• Maximum number of buttons on an HD-based DVD 16:9 menu: 24, unless Pan Scan &
Letterbox is selected, which then sets the maximum to 16
Tracks
Following are the track-related limitations.
• Maximum number of video streams in a track: 9
• Minimum number of video streams in a track: 1
• Maximum number of audio streams in a track: 8
• Maximum number of subtitle streams in a track: 32
• Maximum number of cell markers in a track: 255
• Maximum number of chapter markers in a track: 99 (Each chapter marker is also a cell
marker.)
• Maximum combined number of chapter markers and individual chapter end jumpsettings
in a track: 106 (See Setting Chapter Marker End Jumps for more information.)
• Maximum number of buttons on an SD-based DVD 4:3 track’s buttonhighlight marker: 36
42 Chapter 2 Planning Your Project
Page 43

• Maximum numberof buttons on an SD-based DVD 16:9 track’s buttonhighlight marker: 18,
unless Pan Scan & Letterbox is selected, which then sets the maximum to 12
• Maximum number of buttons on anHD-based DVD 4:3track’s button highlight marker: 48
• Maximum numberof buttonson an HD-basedDVD 16:9 track’s buttonhighlight marker: 24,
unless Pan Scan & Letterbox is selected, which then sets the maximum to 16
Stories
Following is the story-related limitation.
• Maximum number of segments: 98 (must all be from the same track)
Slideshows
Following are the slideshow-related limitations.
• Maximum number of slides in a slideshow: 99
• Minimum number of slides in a slideshow: 1
Scripts
Following are the script-related limitations.
• Maximum number of scripts in a project: 10,000
• Maximum number of command lines in a script: 124
• Minimum number of command lines in a script: 1
43Chapter 2 Planning Your Project
Page 44

Page 45

How Do You Do That?
3
While investigating other DVDs, you may decide to include similar specialized features
in yours.
This chapter covers the following:
• Creating a Simple DVD (p. 45)
• Creating a Play One or Play All Project (p. 47)
• Grabbing a Still Image from Your Movie (p. 50)
• Adding Easter Eggs to Your Menus (p. 51)
Creating a Simple DVD
While DVD Studio Pro is capable of creating complex projects, you may find yourself
needing to create a very simple project that does nothing more than start playing when
you insert the DVD into a DVD player—with no menus and no viewer interaction at all.
This could be a disc that plays in a standalone kiosk or a DVD daily whose only purpose
is to distribute a video track for approval.
To create a simple DVD
1 Choose File > New (or press Command-N) to create a new project.
By default a new project contains Menu 1 and Track 1.
2 Select the Menu 1 tile in the Graphics tab and press Delete.
3 Control-click the Track 1 tile, then choose First Play from the shortcut menu.
This sets the project to automatically start playing this track once the DVD is inserted into
a DVD player. (By default, DVD Studio Pro sets Menu 1 as the First Play element.)
4 Drag the movie from the Library or a Finder window to the Track 1 tile in the Graphics
tab.
This not only imports the movie but assigns it to Track 1.
5 Select the Track 1 tile in the Graphics tab so that the Track Inspector appears.
45
Page 46

6 Do one of the following to control what happens when the movie finishes playing:
• To have nothing happen when the movie finishes playing, leave End Jump (in the top
section of the Track Inspector) set to Not Set. Once the movie finishes playing, the DVD
player will stop. The viewer can press Play to play it again.
• To have the track play again in an infinite loop, choose the track from the End Jump
pop-up menu.
And that’s it. You might want to consider adding a few additional elements to the project
that would improve the viewer’s experience.
Adding Chapter Markers
Depending on the length of the movie, it can be very helpful for the viewer to be able
to use the DVD player’s Previous and Next buttons to quickly skip through the movie to
points you define with chapter markers.
If the movie was edited in Final Cut Pro, you can add the chapter markers at each scene
change or at other significant points in the movie. These chapter markers will automatically
import into DVD Studio Pro. See Adding and Configuring Markers in Final Cut Pro and
Final Cut Express for more information.
You can also manually add the markers in the DVD Studio Pro Track Editor. Even just
placing markers every five or ten minutes can help the viewer locate specific parts of the
movie. See Working with Markers for more information.
Adding a Menu
This goes a bit against the general idea of a simple DVD project, but it might be worth
adding a simple menu so that the viewing experience once the movie finishes playing is
a bit better. For example, you could leave the track set as the First Play element but have
the track jump to a menu once it finishes playing. The menu could have a single button
that says “Play Again?” Or the menu could have a credit list.
If You’re Using Multiple Movies
You may have a situation where you have more than one movie to put on the DVD. You
can handle that in a couple of ways:
• You can put each movie in its own track: If you do not want to have a menu, you can
have the End Jump of the first track set to the next track, linking the tracks together.
This assures that the viewer will watch the movies in the order you specify.
• You can concatentate the movies in a single track: This is a bit easier than placing each
movie in its own track because you do not have to set the End Jumps for each, and it
also ensures that the movies will be watched in a specific order. This does require that
each movie uses the same video and audio formats.
46 Chapter 3 How Do You Do That?
Page 47

In most cases with multiple movies, you will want to create a menu where the viewer
can choose which movie to watch. You may even want to have a menu where the viewer
can choose to play a specific movie or to play all of them. See Creating a Play One or Play
All Project for information on setting up this situation.
Creating a Play One or Play All Project
You may have a project with a track that contains several sections that a viewer either
might want to watch individually or all at once, one after the other, from the start to the
end.
It’s actually fairly easy to set this up using stories. Once it is set up, you can optionally
add additional functionality to polish the project.
Stories in a Nutshell
Stories allow you to configure alternative ways to play the movie in a track. Stories use
chapter markers to divide the movie into sections (cells) that you can then configure to
play, skip, or even play more than once. You can also choose to play these sections in a
different order than they appear in the track.
Stories are elements you can add to your project that are tied to a specific track—a story
can only contain content from a single track. However, a track can have multiple stories.
An advantage of stories is that because they only redefine how to play an existing track’s
movie, they do not require any additional disc space on the DVD. They do count against
the 99 track and slideshow limit that DVD Studio Pro projects have.
See Introduction to Stories for more information about stories.
Creating the Basic Project
You follow three primary steps to create this project:
Stage 1: Creating the Track and Adding Chapter Markers to It
The chapter markers define the sections that you can use for your stories. You can manually
add the markers in DVD Studio Pro, import the chapter markers you added in Final Cut Pro
or Final Cut Express, or import chapter markers from a text file.
Stage 2: Creating and Configuring the Stories
For this project, you create a story for each individually playable section of the movie.
Each story contains one chapter marker to define the section of the movie to play. Each
story also has an End Jump setting that takes the viewer back to the menu.
Stage 3: Creating and Configuring the Menus
Once you have the stories defined, you can create the one or more menus needed to
access them.
47Chapter 3 How Do You Do That?
Page 48

Creating the Track and Adding Chapter Markers to It
How you create the track depends on your movies:
• If you have a single movie that contains all of the sectionsedited together: This is the ideal
situation because, assuming you edited them together in Final Cut Pro, you could also
have added the chapter markers needed to set up the stories. You can manually add
the chapter markers in DVD Studio Pro; however, most often you will not be able to
place them on the exact frame you would like to use because the markers must be on
an I-frame or a key frame.
• If you have multiple movies, with each containing one or more sections: In this situation,
you place all of the movies in the same track (in the order they should play for the “play
all” button). This situation also requires you to manually add the chapter markers.
Note: Having multiple movies makes it tempting to skip using stories and just create
a separate track for each section. You could then create buttons to play each of the
tracks. The difficulty in this is creating the “play all” button, because each track’s End
Jump would need to be set to go back to the menu. Even if you managed to use scripts
to get each track to jump tothe next track, you would almost always have a short pause
during the jump while the DVD player located the next track. Using stories makes it
possible tohave seamless playback between the sections for the “play all” button while
retaining the ability to play each section individually—all without using scripts.
To create and configure the track
1 Click the Add Track tool in the DVD Studio Pro toolbar to add a new track.
You can also use the track that is automatically added to new projects.
2 Import the movie or movies into the project.
3 Do one of the following:
• If you have a single movie, drag it to the track in the Track Editor.
• If you have multiple movies, drag each to the Track Editor, in the order that you want
them to play.
4 Add the chapter markers to the track by positioning the Track Editor’s playhead on the
first frame of each section and pressing M.
The markers are placed on the nearest I-frame or key frame. You can move the marker
forward or backward to try to locate a better frame if needed.
Note: If you used a single movie that had the chapter markers added in Final Cut Pro, the
chapter markers should already be present and you can skip this step.
You can also name the chapter markers to help identify them later when creating your
stories. See Importing Assets and Working with Markers for additional information.
48 Chapter 3 How Do You Do That?
Page 49

Creating and Configuring the Stories
The entry list. Drag
markers to this list
to create your story.
The source list. Drag
markers from this side
to the other side
to create your story.
Choose a story from
the current track to edit.
Once you have the track configured with chapter markers to identify each section, you
are ready to create the stories. For this project, you need a story for each section of the
movie that you want the viewer to be able to play individually. Once you create the story,
you need to choose the chapter marker that defines the section of the track that that
story should play.
To create and configure the stories
1 Click the Add Story tool in the Toolbar.
This adds a new story, related to the currently selected track, to your project.
2 Double-click the new story’s icon in the Graphical tab to open it in the Story Editor.
The left side of the Story Editor lists the chapter markers in the track. The right side lists
the markers that have been assigned to this story (which is empty at the moment).
3 Locate the chapter marker on the left side that you want this story to play and drag it to
the right side.
Note: If there are additional chapter markers in the section of the movie you want this
story to play, you need to drag them to the right side as well, in the order that they are
placed in the track.
4 Repeat the above steps for each section of the movie.
As mentioned previously, naming the chapter markers makes this process much easier.
Naming the stories, especially if there are a lot of them, can also help the process.
49Chapter 3 How Do You Do That?
Page 50

Creating and Configuring the Menus
Once you have created your stories, you are ready to create the menu (or menus,
depending on how many stories you created and how many buttons you want to have
on each menu).
The basic concept for the menu is to have a Play All button that plays the entire track
and separate buttons that play each of the stories. You can use any of the normal menu
creation methods. See Introduction to Creating Menus for information on the types of
menus you can create.
Grabbing a Still Image from Your Movie
DVD Studio Pro includes a feature that allows you to export a still image from a movie in
a track. The still image is saved as a TIFF file that you can use as a menu background or
open in a graphics program. The file matches the movie’s resolution. Anamorphic 16:9
video results in an anamorphic still image using a 4:3 aspect ratio (which works fine as a
16:9 menu background). This feature works with SD as well as HD projects.
The one issue is that the still image must be from an I-frame (MPEG-1 or MPEG-2 video)
or a key frame (H.264 video). This means you may not be able to get a still from the exact
frame you would like.
To create a still image from a movie
1 In the Track Editor, move the playhead to the frame you would like to have a still image
made from.
2 Press M.
This adds a marker to the timeline. The exact position of the marker depends on how
close you are to an I-frame or key frame as well as the Snap To setting in the Track pane
of the DVD Studio Pro Preferences window. You can drag the marker left and right to see
if either of those positions would produce a better still image. (This is easier to do if you
zoom into the timeline.)
3 Click Save Still in the Marker Inspector.
A dialog appears for saving the file.
4 Enter a name for the file (the default name is the marker’s name) and choose the location
to save it to (the default location is in the same folder as the video file).
5 Click Save.
You can import the still image file into this project or open it in a graphics application to
add effects or text.
50 Chapter 3 How Do You Do That?
Page 51

Adding Easter Eggs to Your Menus
It is becoming increasingly popular to add hidden items to DVD projects. For example,
you may include a track or menu that you only want people to find if they know the right
buttons to push.
Most often, invisible buttons on less-used menus are used to access these items.
Depending on how elaborate you want to be, you can configure the button navigation
so that the viewer can only get to the invisible button by pressing non-obvious arrow
buttons on the remote control.
For example, if you have a menu with a column of six buttons, you could set the button
navigation so that the invisible button is reached only by pressing the left arrow button
when on the fourth button in the column. (Most viewers would not think to press the
left arrow button if the menu’s buttons are arranged in an obvious up/down fashion.)
You can make it even harder to find by using multiple invisible buttons, with each requiring
the correct arrow button presses to get to the next, with incorrect presses jumping back
to the visible buttons.
About Invisible Buttons
You can set an overlay button to be invisible by selecting Invisible in the Advanced tab
of the Button Inspector. In this case, making a button invisible means that the highlight
colors do not appear when the button is selected and activated. This can be confusing
when combined with visible buttons on a menu because it can lead to a condition
where nothing appears to be selected.
Instead of using a true invisible button, you may want to use a button whose normal
state is invisible, but which acts as a visible button when selected and activated. To do
this, you only have to make sure the button has no normal state graphics on the menu’s
background (making the button invisible when not selected), butdoes havesupporting
graphics, such as a star or happy face, in the overlay file that will show the selected and
activated highlight colors. Note that if you do this, a viewer playing the DVD on a
computer may be able to find the button just by waving the pointer over the menu.
See Advanced Tab in the Button Inspector for information on invisible buttons.
Important: While using invisible buttons can make it difficult for viewers to accidentally
find hidden features, you should not assume this is entirely secure. Determined viewers
can use a variety of methods to find hidden content on a DVD disc.
51Chapter 3 How Do You Do That?
Page 52

Page 53

Preparing Video Assets
4
Before you can begin building a DVD project, you must have correctly prepared video
source material.
This chapter covers the following:
• Introduction to Preparing Video Sources (p. 53)
• NTSC or PAL? (p. 54)
• Using 24 fps Video (p. 55)
• Choosing an Aspect Ratio (p. 56)
• About MPEG Video (p. 60)
• Encoding Video Materials for DVD (p. 61)
• Using the Integrated MPEG Encoder (p. 68)
• Encoding Video for Multi-Angle Tracks (p. 74)
• Adding Markers to Your Video (p. 76)
• About H.264 Video (p. 80)
• About HDV Video (p. 81)
• DVD Video Source Settings Summary (p. 82)
Introduction to Preparing Video Sources
After you have captured and edited your source material, you need to encode it to make
it DVD-compliant. Compressor is a full-featured video and audio compression application
included with Final Cut Studio that you can use to create DVD-compliant assets for use
in DVD Studio Pro. DVD Studio Pro is integrated with Compressor to provide easy access
to the commonly used MPEG, AIFF, and Dolby Digital AC-3 encoding functions for
converting QuickTime video to DVD-compliant assets.
The DVD Studio Pro integration with Compressor allows you to directly import QuickTime
sources into a project—the encoders work with the sources while you continue authoring
the project.
53
Page 54

You can also use Compressor as a standalone application to get more options and control
over the encoding process. Compressor also integrates well with Final Cut Pro, providing
exceptionally high-quality MPEG-2 streams directly from Final Cut Pro sequences.
This chapter describes how to prepare video source material for use in DVD Studio Pro
and how to use the integrated MPEG encoder. For more information on DVD-compliant
material, see About MPEG Video.
There are three areas in a DVD project that can use video sources:
• Tracks: This is the primary area that uses video sources.
• Menus: This area uses video sources when you are creating motion menus. Menus can
also assign video sources to buttons and drop zones. For the most part, video sources
used for motion menus must follow the same rules as video sources used for tracks.
See Preparing Menu Assets for more information.
• Alpha Transitions: You can use specialized video sources as alpha transitions in your
menus, tracks, and slideshows. See Preparing Alpha Transitions for more information.
The DVD-Video specification has strict requirements for several aspects of the sources
used. For best results, you should create and capture your video and audio using the
settings required for DVD.
See DVD Video Source Settings Summary for a complete list of settings required for a
source to be DVD-compliant.
NTSC or PAL?
A DVD-Video title must contain either all NTSC or all PAL sources. If you intend to create
a title that can be played on either NTSC or PAL DVD players, you must create two titles
and two versions of the sources (including all graphics and video, which will require
significant effort), one for each standard.
About the Terms “NTSC” and “PAL”
The terms “NTSC” and “PAL” are technically incorrect when used with respect to DVDs.
These terms specify a variety of things with respect to an SD composite video signal.
When you refer to a video asset as NTSC or PAL with respect to SD-based DVDs, you
are defining the asset’s frame rate and resolution. With most HD assets, the terms NTSC
and PAL refer only to the frame rate, because the resolution is far different than an SD
video asset.
54 Chapter 4 Preparing Video Assets
Page 55

Many DVD players in PAL countries can also play NTSC DVD-Video titles. It’s important
to understand that these players often do not convert NTSC video to PAL—they simply
output the NTSC sources. You must connect an NTSC or dual-standard video monitor to
view the output. Additionally, be aware that all DVD players have a region code that
prevents them from playing DVD-Video titles not intended for the player’s region.
Using 24 fps Video
Often the video content for a DVD project originates from film shot at 24 frames per
second (for NTSC this is actually 23.976 fps, which is more commonly referred to as
23.98 fps). The DVD specification allows you to include 24 fps MPEG-2 assets as long as
they are properly flagged so the DVD player can decode them by either using a 3:2
pulldown (for NTSC DVD players) or playing them 4% faster (for PAL DVD players). The
video resolution also must match those allowed for the intended video standard. See
Choosing a Video Resolution for details on supported video resolutions.
This means that there are NTSC and PAL versions of 24 fps MPEG-2 assets, and you can
only use NTSC 24 fps assets in NTSC projects and PAL 24 fps assets in PAL projects.
Encoding video that originates with a 24 fps rate as a 24 fps MPEG asset has two primary
advantages:
• Less time is spent on the encoding process.
• Smaller files are produced.
These advantages are due to fewer frames being encoded, especially when compared
to NTSC frame rates.
Important: MPEG-2 assets that include 23.98 frames to play at 29.97 fps show as 29.97 fps
assets in QuickTime, Compressor, and DVD Studio Pro.
Importing 24 fps Assets
How DVD Studio Pro handles your 24 fps assets depends on whether or not they are
already MPEG-2 encoded:
• If you import 24 fps MPEG-2 assets: They are handled correctly and remain 24 fps when
you build the project.
Note: 24 fps assets show as their display rate setting when viewed in the Track Editor.
This makes them appear as if they were at the NTSC or PAL frame rate. You can confirm
they are actually 24 fps by selecting them in the Assets tab and verifying the frame rate
in the Asset Inspector.
• If you import 24 fps QuickTime assets: They are encoded as either 29.97 fps or 25 fps
MPEG-2 files, based on your project’s video standard, and are no longer 24 fps when
you build the project.
55Chapter 4 Preparing Video Assets
Page 56

To create a 24 fps MPEG-2 asset, you need to use Compressor (included with
DVD Studio Pro) or a third-party encoder that supports encoding 24 fps MPEG-2 assets.
Using 24 fps Video in Tracks
You can use 24 fps video assets in tracks just like you would use regular 29.97 fps or 25 fps
video assets, as long as they match the project’s video standard (NTSC or PAL). You can
also combine 24 fps assets with regular video assets within a track, as long as they use
the same resolution.
Using 24 fps Video in Menus
You can use 24 fps assets in menus as backgrounds or assets for buttons and drop zones.
You can also combine 24 fps assets with regular video assets within a menu.
If the menu must be rendered because it contains shapes, drop zones, or text objects, it
is rendered at the project’s frame rate, even if the menu’s background is 24 fps.
Choosing an Aspect Ratio
The aspect ratio is the ratio of the width of the visible area of the video frame to the height
of the visible area. Standard NTSC and PAL monitors have a picture aspect ratio of 4:3 (or
1.33, which is the width divided by the height). Some High Definition Television (HDTV)
formats have a picture aspect ratio of 16:9, or 1.78.
The DVD specification supports both 4:3 and 16:9 sources, but it does not support HD
video. Most HD video formats use a combination of features to create the high definition
image, including a much larger frame size than DVD-Video supports.
HD-based DVDs also support both 4:3 and 16:9 sources, as well SD and HD video formats.
Using 16:9 sources in your project raises a number of issues that you need to be aware
of. Your main goal is to ensure that 16:9 assets play back correctly on 16:9 monitors and
as expected on 4:3 monitors (and that 4:3 assets play correctly on both monitor types as
well). Incorrect settings can lead to distorted video. For example, the video may appear
horizontally compressed (objects look “skinny”) or expanded (objects look “fat”).
56 Chapter 4 Preparing Video Assets
Page 57

This illustration shows the viewing options for a 16:9 asset.
16:9 monitor
16:9 aspect ratio
16:9 anamorphic
(The dashed line shows
the circle’s original size.)
16:9 letterbox
16:9 pan-scan
16:9 video on 4:3 monitors
4:3 monitor
4:3 aspect ratio
4:3 stretched
(The dashed line shows
the circle’s original size.)
4:3 video on 16:9 monitors
4:3 pillar box
This illustration shows the viewing options for a 4:3 asset.
Read the following sections to find out more about using 16:9 assets in your projects.
What Exactly Is a 16:9 Asset?
When you decide to use 16:9 assets in a DVD Studio Pro project, it is crucial that you
understand exactly what attributes your 16:9 media should have.
57Chapter 4 Preparing Video Assets
Page 58

16:9 and SD Projects
The DVD specification and DVD Studio Pro require 16:9 video to be anamorphic. An
anamorphic 16:9 video frame has the same number of pixels as a 4:3 video frame. When
displayed on a 16:9 monitor, the frame is horizontally stretched to fit the screen, and the
content appears normal. When viewed on a 4:3 monitor, however, the video content
appears horizontally compressed (see the illustrations in Choosing an Aspect Ratio).
The most common error is to letterbox your 16:9 video assets before bringing them into
DVD Studio Pro. Once a 16:9 asset has been letterboxed, it becomes a 4:3 asset with black
bars along the top and bottom of the video image. If you flag letterboxed source video
as 16:9 video when encoding it, you will have problems when you play it back later.
16:9 and HD Projects
HD projects can use a wide variety of video resolutions. Several of these are true 16:9
(1280 x 720p and 1920 x 1080i) while several others use the same anamorphic method
used in SD projects (720 x 480p, 720 x 576p, and 1440 x 1080i).
Using Pan-Scan to Display 16:9 Video
The pan-scan method of displaying 16:9 video on a 4:3 monitor was developed as a
compromise between letterbox, which displays all the video content but with black areas
at the top and bottom, and the only other alternative: filling the entire 4:3 screen, but
cropping some of the content. With pan-scan, you can choose which bits of the 16:9
content to crop, ensuring the action is not lost by displaying the center of the screen
only. The pan-scan method can result in sudden jumps from one side of the screen to
the other (for example, to follow a conversation’s dialogue), which may make your video
look as if edits have been made.
To make pan-scan work, you must have a pan-scan vector, a frame-based value that
controls which part of the content to use. Someone watching the video creates the vector,
deciding which parts should be seen. This vector must be available when the video is
MPEG-encoded. The MPEG encoder included with DVD Studio Pro does not support
pan-scan vector information. However, if the information is already part of an
MPEG-encoded video stream, created with an encoder that supports the vector
information, DVD Studio Pro passes this information along.
Virtually all movies shown on TV have been through the pan-scan process; however,
pan-scan vectors are rarely used for movies released on DVD. Instead, a version of the
movie is made using the 4:3 pan-scanned source and is not intended to be played as a
16:9 video on 16:9 monitors. The other side of the disc often contains the true 16:9 version,
set to display as letterboxed video on 4:3 monitors.
Important: Do not use pan-scan if your video does not actually support it. If you do, only
the center part of the frame will appear.
58 Chapter 4 Preparing Video Assets
Page 59

MPEG Encoding and 16:9 Video
It’s important to correctly identify your source video as either 4:3 or 16:9 before encoding
it. At this point, you are only identifying it—you are not defining how it should be handled
when played back. When using the integrated MPEG encoder, you can select the video’s
aspect ratio in the Encoding pane of DVD Studio Pro Preferences.
Using 16:9 Assets in Tracks
Each track within a DVD Studio Pro project has an aspect ratio setting. This setting lets
the DVD player know how to display the video when playing back the title.
With a 16:9 track, you specify how it will play back on a 4:3 monitor: Pan-Scan, Letterbox,
or Pan Scan & Letterbox (allowing the viewer to choose). As mentioned previously,
pan-scan is rarely used and should never be selected unless the encoded video contains
pan-scan vector information.
Mixing 16:9 and 4:3 Assets in a Track
Keep in mind that a track’s aspect ratio setting applies to the entire track. If you mix 16:9
assets with 4:3 assets in a track, you will have problems when playing it back. For example,
if you set the aspect ratio to 16:9 Letterbox, the 4:3 video will also be letterboxed and
end up looking vertically compressed.
To be safe, do not mix 16:9 and 4:3 assets in the same track. Instead, create separate tracks
for each. You can use the Connections tab in DVD Studio Pro to control the playback
order of the tracks.
Some Players Cheat!
Unfortunately, not all players handle 16:9 video correctly. The aspect ratio setting foreach
track is stored in the track’s video title set file (vts_01_1.vob, for example). Most DVD
players read the setting and process it correctly, but some DVD players ignore this setting
and instead look at the aspect ratio setting of the video itself.For the most part, this works
out, but it can result in inconsistencies when playing the title on different DVD players,
particularly if you are not careful while encoding and authoring.
Buttons over 16:9 Video Tracks
To place a button over a video track, you add a menu overlay to a subtitle stream in the
track. These overlays are not processed in the same way as the video, so you must create
a separate overlay for each display mode (16:9, 4:3 letterbox, and 4:3 pan-scan). You then
need to create a script that selects the correct subtitle stream to display based on the
DVD player’s settings.
See What Happens with Different Aspect Ratios? for information on using subtitle streams
to place buttons over a video track, and see Creating Scripts for information on creating
scripts.
59Chapter 4 Preparing Video Assets
Page 60

Using 16:9 Assets in Menus
2.40:1 (Widescreen)
1.85:1 (Normal film)
1.78:1 (16:9)
1.33:1 (4:3)
Typically you’ll want to use 16:9 menus with 16:9 tracks. Most of the same concerns with
video apply to menus as well—specifically how the 16:9 menu is displayed on a 4:3
monitor.
With a 16:9 menu, you specify how it will play back on a 4:3 monitor: Pan-Scan, Letterbox,
or Pan Scan & Letterbox (allowing the viewer to choose). As mentioned previously,
pan-scan is rarely used, and should never be selected unless the encoded video contains
pan-scan vector information.
See Understanding Pixel Differences in Graphics and Video for information on the image
size settings you should use when creating 16:9 menus.
Issues with Film Aspect Ratios
While 16:9 is a fairly wide aspect ratio, it is not wide enough to contain an entire frame
from a typical Hollywood movie. Two film aspect ratios are widely used now: Normal is
1.85:1 and Widescreen is 2.40:1 (for comparison, 16:9 is 1.78:1). For normal titles (those
that use the 1.85:1 aspect ratio), a small amount of letterboxing or pan-scan cropping is
required to transfer the title to DVD, but for Panavision titles significant letterboxing or
pan-scan cropping is necessary. This processing must be done before the video is
MPEG-encoded. The DVD specification supports only 4:3 and 16:9 aspect ratios.
You should not be surprised to see some letterboxing when playing a Panavision movie
on a 16:9 monitor.
About MPEG Video
MPEG (Moving Picture Experts Group) is a family of video and audio compression formats
that make high-quality titles possible on DVD. There are a broad range of MPEG types
and settings; use care to select those that are DVD-compliant with the DVD standard (SD
or HD) you are using. DVD Studio Pro imports MPEG assets created with a wide variety
of third-party products. The following section, Encoding Video Materials for DVD, provides
60 Chapter 4 Preparing Video Assets
a general overview of MPEG, as well as details that relate specifically to DVD Studio Pro
and its integrated MPEG encoder.
Page 61

Encoding Video Materials for DVD
The DVD specification requires video movies to be in a DVD-compliant MPEG format.
There are a number of methods for converting video from its current format to MPEG.
DVD Studio Pro includes an integrated MPEG encoder, which can quickly encode your
QuickTime movies into DVD-compliant MPEG-2 files. See Using the Integrated MPEG
Encoder for more information.
For analog sources, you need a hardware video capture card to digitize your video.
Depending on the card’s output format, you may then need a transcoder to convert it
to MPEG.
Elementary and Multiplexed MPEG Files
There are two common types of MPEG file structures: elementary and multiplexed.
Elementary files contain onlyone stream of data, either the video or the audio. Multiplexed
MPEG files, also known as system, transport, or program files, have the video and audio
combined into a single file.
MPEG files that are imported directly into DVD Studio Pro must be elementary MPEG files.
You can use an MPEG utility to convert multiplexed MPEG files into elementary streams.
The integrated MPEG encoder converts QuickTime files into elementary MPEG streams.
When creating an HD project, you can import HDV and H.264 streams, both of which are
multiplexed QuickTime streams.
Choosing Between MPEG-1 and MPEG-2
The DVD specification allows for the use of either MPEG-1 or MPEG-2 encoded video. In
general, MPEG-1 provides for smaller file sizes but reduced picture quality (by scaling a
half-screen image to full screen), while MPEG-2 provides for better quality with larger file
sizes.
• MPEG-1 is generally used for titles for which file size is critical and that will be played
back on a computer (not a set-top DVD player).
• MPEG-2 is usually used for DVD titles on DVD media. The integrated MPEG encoder
encodes video into MPEG-2.
DVD Studio Pro works with both MPEG-1 and MPEG-2 video assets in your SD project
tracks, as long as they are DVD-compliant. MPEG-1 video used as menu backgrounds is
rendered to full D1 MPEG-2 when the project is built.
Important: HD projects cannot use MPEG-1 video.
61Chapter 4 Preparing Video Assets
Page 62

Choosing a Bit Rate for SD Projects
Bit rate directly determines file size, and thus how many minutes of material you can fit
onto a DVD disc. SD-based DVD players support combined bit rates of up to 10.08 megabits
per second (Mbps), but this must include the audio and subtitles as well. The maximum
video bit rate is 9.8 Mbps.
Note: Some DVD players have trouble playing video that uses sustained high bit rates.
On such players, you may see dropped frames during playback.
Typical maximum bit rates used for video are around 8 Mbps. The maximum MPEG-1 bit
rate is 1.856 Mbps, while 1.15 Mbps is most typical.
The actual video content determines how low a bit rate you can use and still get acceptable
quality. Video with little movement works well at lower bit rates, while higher bit rates
are best at handling video with a lot of movement (a quick camera pan, for example).
For more information on choosing a bit rate that ensures all the content in your project
will fit on a DVD, see Making Sure Your Content Will Fit.
Choosing a Bit Rate for HD Projects
Choosing a bit rate for use in HD projects is similar to doing so for SD projects, but there
are some differences.
The maximum overall bit rate for HD projects is 30.24 Mbps. While an HD project can use
both SD and HD video assets, the maximum bit rate you can use is different for each:
• HD assets: 29.4 Mbps
Note: HD assets include the 480p and 576p resolutions.
• SD assets: 15.0 Mbps
MPEG Encoding Methods
There are three common methods of encoding video: CBR (constant bit rate, also known
as one-pass), one-pass VBR (variable bit rate), and two-pass VBR.
• CBR (one-pass) method: You choose a bit rate and it is used for the entire video,
regardless of its content. The advantage of this method is that you can reliably predict
the final encoded file size. By adjusting the bit rate, you can ensure the video will fit
on the DVD. The disadvantage is that the same bit rate gets applied to all of the video,
regardless of the motion content. You must choose a high enough bit rate to provide
acceptable results for the scenes with motion, even if they are only a small part of the
movie.
62 Chapter 4 Preparing Video Assets
Page 63

• One-pass VBRmethod: Youchoose a basic bitrate and a maximum bit rate. Theencoder
detects the amount of motion present in the video as it encodes and adjusts the bit
rate appropriately—scenes with motion use higher bit rates (up to the maximumsetting
you choose) and scenes with little motion use the lower,basic bit rate. The disadvantage
of this method is that the quality will not be as good as with the two-pass VBR method.
• Two-pass VBR method: You choose a basic bit rate and a maximum bit rate, just as with
the one-pass VBR method. The difference is that the encoder makes two passes through
the video to encode it. The first pass examines the video to learn about its motion
content. The second pass performs the encode, varying the bit rate to provide better
results in scenes with motion (as compared to the one-pass VBR method). The
disadvantage of this method is that it takes twice as long as the one-pass VBR method.
Important: With the VBR methods, the basic bit rate setting determines the encoded file
size. The maximum bit rate setting does not affect the file size. Additionally, the VBR
methods are most effective when the maximum bit rate is about double the basic bit
rate, or at least 1 to 3 Mbps higher than the basic bit rate.
The integrated MPEG encoder allows you to select which of these methods you want to
use.
Choosing a Video Resolution
The resolution determines the number of pixels processed within a frame. The more pixels
used, the sharper the details in the image. Note that regardless of the resolution you
choose, most DVD players play back at full screen. The following is a list of common
resolutions used with MPEG-1 and MPEG-2 video with DVD Studio Pro.
Note: Menus must use full D1 resolution MPEG-2 video. If you assign any other resolution
or an MPEG-1 asset, the video will be transcoded to full D1 MPEG-2 when you build the
project.
SD Projects
SD projects can use the resolutions shown in the following tables.
NTSC
All frame rates use the interlaced scanning method (as indicated with an “i”). With the
exception of 352 x 240, all resolutions are MPEG-2 only.
NotesAspect ratioFrame rateResolution
Also known as SIF format; MPEG-1 or MPEG-24:329.97i352 x 240
Also known as 1/2 D14:329.97i352 x 480
Also known as Cropped D1; 16:9 is anamorphic4:3, 16:929.97i704 x 480
Also known as Full D1; 16:9 is anamorphic4:3, 16:929.97i720 x 480
63Chapter 4 Preparing Video Assets
Page 64

PAL
All frame rates use the interlaced scanning method (as indicated with an “i”). With the
exception of 352 x 288, all resolutions are MPEG-2 only.
NotesAspect ratioFrame rateResolution
Also known as SIF format; MPEG-1 or MPEG-24:325i352 x 288
Also known as 1/2 D14:325i352 x 576
Also known as Cropped D1; 16:9 is anamorphic4:3, 16:925i704 x 576
Also known as Full D1; 16:9 is anamorphic4:3, 16:925i720 x 576
HD Projects
HD projects can use the resolutions shown in the following tables.
Note: MPEG-1 video is not supported.
NTSC
Frame rates with an “i” indicate the interlaced scanning method; those with a “p” indicate
the progressive scanning method.
NotesAspect ratioFrame rateResolution
Also known as SIF format4:329.97i352 x 240
Also known as 1/2 D14:329.97i352 x 480
Also known as Cropped D1; 16:9 is anamorphic4:3, 16:929.97i704 x 480
Also known as Full D1; 16:9 is anamorphic4:3, 16:929.97i720 x 480
HD only, also known as 480p; is anamorphic16:959.94p720 x 480
HD only, also known as 720p16:959.94p1280 x 720
HD only; 16:9 is anamorphic16:929.97i1440 x 1080
HD only, also known as 1080i16:929.97i1920 x 1080
PAL
Frame rates with an “i” indicate the interlaced scanning method; those with a “p” indicate
the progressive scanning method.
64 Chapter 4 Preparing Video Assets
NotesAspect ratioFrame rateResolution
Also known as SIF format4:325i352 x 288
Also known as 1/2 D14:325i352 x 576
Also known as Cropped D1; 16:9 is anamorphic4:3, 16:925i704 x 576
Also known as Full D1; 16:9 is anamorphic4:3, 16:925i720 x 576
HD only, also known as 576p; is anamorphic16:950p720 x 576
HD only, also known as 720p16:950p1280 x 720
HD only; 16:9 is anamorphic16:925i1440 x 1080
Page 65

NotesAspect ratioFrame rateResolution
HD only, also known as 1080i16:925i1920 x 1080
Picture Frame Rate
DVD Studio Pro NTSC projects support the NTSC frame rate (29.97 fps) and 23.976 fps
assets that use NTSC video resolutions. PAL projects support the PAL frame rate (25 fps)
and 23.976 fps assets that use PAL video resolutions. You can set a project’s video standard
in the General tab in the Disc Inspector or in the Project pane of DVD Studio Pro
Preferences.
Warning: You cannot mix NTSC and PAL MPEG assets in a project.
Working with GOP Settings
A major function of MPEG encoding is to identify redundancy not only within a frame,
but also among a group of frames. A scene with no movement except a car driving by
has a lot of redundancy over time. In this case, a single complete frame could provide
the majority of the video; subsequent frames only need to provide for the areas that
change. Each MPEG stream contains three types of frames that define the video. A Group
of Pictures (GOP) setting defines the pattern of the three frame types used: Intra (I) frames,
Bi-directional (B) frames, and Predicted (P) frames.
• I-frames: Also known as reference or key frames, I-frames contain the complete image
of the current frame, without reference to frames that precede or follow it. The I-frame
is the only type of MPEG frame that can stand by itself, without requiring information
from other frames in the GOP. Every GOP contains one I-frame, although it does not
have to be the first frame of the GOP. I-frames are the least efficient MPEG frame type,
requiring the most disc space. Markers on a DVD track can be placed only at I-frames.
• P-frames: P-frames are encoded from a “predicted” picture based on the closest
preceding I- or P-frame. P-frames are also known as reference frames, because
neighboring B- and P-frames can reference them. P-frames typically require much less
disc space than I-frames.
• B-frames: B-frames are encoded based on an interpolation from I- and P-frames that
come before and after them. B-frames are the most efficientMPEG frame type,requiring
the least amount of disc space. While a GOP can begin with a B-frame, it cannot end
with one.
The goal of encoding video to MPEG is to reduce the video file size as much as possible
while maintaining good quality. The B- and P-frames are what make MPEG so good at
compressing video into such small files. Because they only contain information about
what has changed in the images, they use much less disc space than I-frames.
65Chapter 4 Preparing Video Assets
Page 66

There are three aspects to choosing a GOP setting: the GOP pattern, the GOP length, and
:09
:06 :07 :08 :10 :11 :12 :13 :14 :15 :16 :17 :18:04 :05
Closed GOP
(IBBP, 15 Frames)
P B B P B P B P B PI B BBB
whether the GOP is “open” or “closed.”
GOP Pattern
The GOP pattern determines the ratio of P- to B-frames within a GOP. The most common
patterns used for DVD are IBP and IBBP. All three frame types do not have to be used in
a pattern; an IP pattern is also used in special circumstances.
IBP and IBBP GOP patterns, in conjunction with longer GOP lengths, produce the most
efficient encodes. Smaller GOP patterns with shorter GOP lengths work better with video
that has quick movements.
Some encoders can force I-frames to be added sporadically throughout a stream’s GOPs.
These I-frames can be placed manually by someone watching for sudden video changes
or automatically by an encoder detecting scene changes. You can place markers in
Final Cut Pro to identify specific frames to have an I-frame, either for use as a chapter
marker or to manually identify high motion areas. See Adding Markers to Your Video for
more information.
The integrated MPEG encoder uses a GOP pattern of IBBP.
GOP Length
Longer GOP lengths produce more efficient encodes by reducing the number of I-frames
but are less desirable during short-duration effects such as quick fades and quick camera
pans.
• SD-Based DVDs: The maximum GOP length for SD projects is 18 frames for NTSC or
15 frames for PAL. The minimum GOP length depends on the GOP pattern. For example,
an IP pattern can have a length as short as two frames.
The integrated MPEG encoder uses a GOP length of 15 frames for NTSC and 12 frames
for PAL SD assets.
• HD-Based DVDs: Because HD projects can use both interlaced and progressive video
assets, they have different GOP length maximums.
• NTSC interlaced assets: 18 frames per GOP
• NTSC progressive assets: 36 frames per GOP
• PAL interlaced assets: 15 frames per GOP
• PAL progressive assets: 30 frames per GOP
66 Chapter 4 Preparing Video Assets
Page 67

Note: 24p assets have their GOP structure based on their display rate, not the encoded
rate. A 24p asset encoded to play in an NTSC project has a display rate of 29.97 interlaced
frames (with an 18 frames per GOP maximum) or 59.94 progressive frames (with a
36 frames per GOP maximum).
The integrated MPEG encoder uses a GOP length of 15 frames for NTSC and 12 frames
for PAL HD assets.
Open or Closed GOPs
An open GOP allows the B-frames from one GOP to look at an I- or P-frame from an
adjacent GOP. Open GOPs are more efficient, but cannot be used with multi-angle or
mixed-angle titles. A closed GOP keeps all references within itself, standing alone with
respect to other GOPs. DVD Studio Pro works with either type in single-angle titles and
requires closed GOPs with multi-angle and mixed-angle titles.
It is important to know that the same pattern can provide different results when used
with an open or closed GOP. For example, the integrated MPEG encoder uses a closed
GOP type, and it starts its IBBP pattern with an I-frame. Other encoders using an open
GOP may start with a B-frame. In this case, starting with a B-frame is a little more efficient;
if you start with an I-frame, an extra P-frame must be added to the end (a GOP cannot
end with a B-frame).
General Quality Issues
The quality of the MPEG encoding determines the quality of the title. It is well worth
putting some effort into getting the best possible MPEG encoding environment. For
example, start with the best quality source material you can. An uncompressed digital
source is the best, followed by a DV source, and then an analog Component source. Of
the other analog formats, S-Video (Y/C) is much preferable to Composite.
Noisy Video
Because a large portion of MPEG’s compression power depends on its ability to locate
areas of the image that do not change between successive frames, “noisy” video can
reduce theefficiency of MPEG encoding. While the actual video may be identical between
two frames, if there are noise artifact differences between the two frames, they are
detected as a change in video and require more bits to encode. A lot of noise causes poor
encodes, because the encoding resources are tied up trying to faithfully reproduce the
noise.
Transcoding Artifacts
Every time video is transcoded from one format to another—for example, from analog
to digital, or DV to MPEG-2—artifacts are introduced into it. The visibility of these artifacts
depends on the quality of the transcoding device and the content. While transcoding
cannot be avoided, its effects can be minimized. Use the highest quality equipment and
software you can, and choose products that work well together and support each other’s
formats.
67Chapter 4 Preparing Video Assets
Page 68

Using the Integrated MPEG Encoder
When QuickTime assets that are not DVD-compliant are imported into a DVD Studio Pro
project, they must be made DVD-compliant. DVD Studio Pro uses its integration with
Compressor to encode these assets.
This integration with Compressor provides simplified encoding functionality, with the
more advanced attributes automatically set.
Note: If you would like to encode the assets using more advanced Compressor
functionality or to take advantage of distributed encoding, you can encode the assets
directly in Compressor.
For video assets, the integrated MPEG encoder outputs an MPEG-2 video stream with a
closed GOP pattern and a fixed GOP size (15 frames for NTSC and 12 frames for PAL). The
exported MPEG video stream can be used for multi-angle tracks. The file type is “.m2v.”
See Settings in the MPEG-2 SD and MPEG-2 HD Tabs for information on configuring other
aspects of the integrated encoder.
If the file to be encoded has audio multiplexed together with the video, the audio is
encoded as a PCM audio file and given the same name as the video file, but with an “.aiff”
extension.
See Preparing Audio Assets for more information on audio formats.
Transcoding with the Integrated MPEG Encoder
If you import a QuickTime asset whose video standard is different from the project’s
current setting, the integrated MPEG encoder automatically transcodes the asset to the
project’s video standard while encoding it. For example, if you are working on a PAL
project and accidentally import an NTSC QuickTime file, the NTSC file is encoded as a
PAL asset and is imported into the project. Similarly, if you import an HD asset into an
SD project, the HD asset is automatically transcoded to SD.
You should be aware, though, that the integrated encoder uses the default Compressor
Frame Controls settings (which control the quality of frame size and rate conversions),
and the results you get may not be suitable for use in a project. Using Compressor
directly or any of a variety of third-party products can provide good transcoding results.
You may also choose to have a facility that specializes in video standards conversion
transcode the video.
Configuring the Integrated MPEG Encoder
DVD Studio Pro Preferences contain the settings that determine how DVD Studio Pro uses
the integrated MPEG encoder.
68 Chapter 4 Preparing Video Assets
Page 69

To configure the integrated MPEG encoder
1 Choose DVD Studio Pro > Preferences.
2 Click Encoding to open the Encoding pane.
3 Configure the settings in the Encoding pane. See Encoding Preferences for information
about the options in this pane.
4 Click Apply to enable the settings, then click OK to close the Preferences window.
Encoding Preferences
The Encoding pane of DVD Studio Pro Preferences contains two tabs: MPEG-2 SD and
MPEG-2 HD. Each tab has the same settings, with the exception of the higher bit rate
settings allowed in the MPEG-2 HD tab.
The settings in the MPEG-2SD tab are automatically applied to all QuickTime video assets
added to an SD project (including those with an HD video resolution) and assets with an
SD video resolution added to an HD project. The MPEG-2 HD tab’s settings are applied
to QuickTime video assets with an HD video resolution added to an HD project. (An
exception are H.264 and HDV QuickTime assets, which are already properly encoded.)
Settings in the MPEG-2 SD and MPEG-2 HD Tabs
• Aspect Ratio: Select the aspect ratio to use.
• 4:3: This aspect ratio is only available for SD video assets.
• 16:9: This aspect ratio is supported by both SD and HD video assets. Note that
selecting 16:9 does not convert the video to the 16:9 aspect ratio. The file to be
encoded must already be in a 16:9 anamorphic format. See What Exactly Is a 16:9
Asset? for more information.
69Chapter 4 Preparing Video Assets
Page 70

• Start: Sets the starting timecode of the encoded MPEG stream. This is most often set
to match the timecode of the original video, ensuring that any timecode-based lists
you have, such as a chapter list, marker positioning file, or subtitle file, match the
encoded video.
• Drop Frame: Select this checkbox touse drop frame timecode for assets using the NTSC
frame rate.
• Field Order: Choose the field order (Top or Bottom) that matches the video being
encoded. This is also known as the field dominance setting in other products. Each
interlaced NTSC and PAL video frame is comprised of two fields, each containing every
other video line. The top field is also known as field two, the upper field, or the odd field.
The bottom field is also known as field one, the lower field, or the even field.
If the field order is set incorrectly, any motion in the video will appear very jagged when
played back. Most professional and DV sources are field one dominant, and should use
the Bottom setting. If you are unsure of the field order of your source video, choose
Auto to let the encoder attempt to determine the field order.
Note: The Field Order setting does not apply to progressive scan video.
• Mode: You can choose from three encoding modes, each with its own advantages and
disadvantages.
See MPEG Encoding Methods for more information on the encoding methods.
• One Pass: With this option chosen, the encoder uses a one-pass encoding method
with a constant bit rate (CBR). Note that the integrated MPEG encoder One Pass
mode actually varies the bit rate a small amount.
• One Pass VBR: With this option chosen, the encoder uses the one-pass variable bit
rate (VBR) encoding method.
• TwoPass VBR: With this option chosen, the encoder uses the two-pass VBR encoding
method (one pass to create a motion profile of the video and a second pass to perform
the encode).
• Bit Rate: Set the bit rate for the One Pass encoding method and the basic bit rate for
the One Pass VBR and Two Pass VBR encoding methods. When using one of the VBR
encoding methods, you cannot set Bit Rate any higher than 85% of the Max Bit Rate
setting. See Choosing a Bit Rate for SD Projects for more information.
• Max Bit Rate: Set the maximum bit rate that can be used during a One Pass VBR or Two
Pass VBR encode. You cannot set the Max Bit Rate setting lower than the Bit Rate setting
or 5 Mbps (whichever is higher). Because the VBR methods are most effective when
the maximum bit rate is about double the basic bit rate, or at least 1 to 3 Mbps higher
than the basic bit rate, the Max Bit Rate setting is forced to be higher than the Bit Rate
setting.
Note: The Max Bit Rate setting does not affect the size of the encoded file—it only sets
the upper limit that can be used during the encode.
70 Chapter 4 Preparing Video Assets
Page 71

• Motion Estimation: Choose a Motion Estimation setting that provides a balance between
quality and speed ofencoding. This setting controls howmuch time is spent determining
the motion between video frames.
• Good: The fastestMotion Estimation setting. This mode does well even with significant
amounts of motion between frames, if the motion has minimal interfield motion
within frames. For example, footage that has been exposed to frame-rate conversion
or other effects processes tends to have little interfield motion. In general, use Good
with the One Pass encoding mode.
• Better: A good general purpose Motion Estimation setting. The Better mode provides
good results even with complex interlaced motion. Better works well for almost all
types of interlaced video sources, even shaky footage from hand-held consumer
camcorders. In general, use Better with One Pass VBR and Two Pass VBR.
• Best: This is the highest quality Motion Estimation setting and should be used for
the most demanding and complex motion for interlaced sources. It is slower than
the Better mode. In general, use the Best mode to maximize quality when using One
Pass VBR or Two Pass VBR.
• Reset to Factory Defaults: Click this to restore the current tab’s settings to the default
settings.
Settings Outside of the Tabs
• Method: Select when you want the asset to be encoded.
Note: An advantage of selecting “Background encoding” is that, once the assets are
encoded, the encoded versions of them appear in the Simulator and the Viewer when
playing a track. This makes it possible to see the video as it will appear on the DVD,
and not the QuickTime version. See Is That the QuickTime or MPEG Encoded Version?
for more information.
• Background encoding: The encoding begins as soon as you import the asset. The
encoding takes place in the background, allowing you to continue working on your
project. A progress bar appears in the Status column of the Assets tab. Once the
encoding process finishes, the Status column displays Done. See Default Columns
in the Assets Tab for more information.
• Encode on build: The encoding does not start until you complete your project and
build the VIDEO_TS or HVDVD_TS files.
Using the Integrated MPEG Encoder
Depending on the Method setting in Encoding Preferences, video assets can either begin
encoding as soon as you add them to your project, or they can wait until you perform a
build of the project.
71Chapter 4 Preparing Video Assets
Page 72

Is That the QuickTime or MPEG Encoded Version?
When you import QuickTime assets and assign them to elements in your project, it can
be important to know whether you are seeing the original QuickTime version of the
asset or the MPEG encodedversion in the Viewer or Simulator. Seeing the MPEG encoded
version has the advantage of allowing you to see the video as it will appear when the
DVD is played. The disadvantage of seeing the MPEG encoded version is that the video
must be encoded first.
The Method setting in the Encoding pane of DVD Studio Pro Preferences controls whether
the encoded versions of the assets can be available while you are authoring the project.
With “Background encoding” selected, you will be able to see the encoded versions of
the assets as soon as they are encoded. With “Encode on build” selected, you will not
be able to see the encoded versions until you build the project.
There are some guidelines DVD Studio Pro uses to determine whether to show the
original QuickTime version of the asset or the MPEG encoded version:
• When you view an asset from the Assets tab in the Viewer, you will see the QuickTime
version, whether the encoded version is available or not.
• When you view an asset from the Track Editor, you will see the encoded version (if
available). This is also true when you view the track in the Simulator.
• When you view an asset in the Menu Editor, you will see the QuickTime version,
whether or not the encoded version is available. This is also true when you view the
menu in the Simulator.
When you import a QuickTime video asset into DVD Studio Pro, the current Encoding
Preferences settings are assigned to it. If you change the Encoding Preferences settings
after you have imported a QuickTime video asset, those changes are applied only to new
assets you import—they are not applied to existing assets.
Verifying and Changing Encoding Settings
If your project contains a mixture of 4:3 and 16:9 assets or has some assets you want to
encode differently than others, you must be sure to set the Encoding Preferences settings
before you import the assets. You can use the Encoder Settings dialog to verify and
change the encoding settings on assets that have been imported.
To change the encoding settings after importing an asset
Do one of the following:
Select the asset and choose File > Encoder Settings (or press Command-E).
µ
Control-click the asset in the Assets tab, then choose Encoder Settings from the shortcut
µ
menu.
72 Chapter 4 Preparing Video Assets
Page 73

The Encoder Settings dialog appears with the same settings found in the Encoding
Preferences pane, with HD projects getting an added Resolution setting.
When you have the “Background encoding” method selected and you make any changes
in the Encoder Settings dialog, one of two things happens:
• If you change the bit rate setting: The current file, whether a complete or partially
complete file, is left as is and the encoder starts encoding a new file. This allows you
to compare the quality of the two bit rates. If you decide to continue the encoding of
the partially completed file, you can set the bit rate (and all other settings, if you have
made changes) to the value it used, and the encoder will continue encoding it.
Note: If the encoded files are being written to the project bundle, they are deleted
regardless of whether or not you change the bit rate setting.
• If youdo not change the bitrate setting: The original asset is deleted, whether a complete
or partially complete file, and a new encoded file is created. For example, if you want
to see the difference between one-pass VBR and two-pass VBR encoding and want to
keep the files from both encoding sessions, you need to rename ormove the completed
one-pass VBR encoded file before re-encoding with the two-pass VBR setting.
If you have the “Encode on build” method selected, these changes will apply once you
build your project.
Encoding Settings in HD Projects
Because an HD project can use assets with a wide variety of video resolutions, the Encoder
Settings dialog contains a Resolution pop-up menu that shows the asset’s resolution.
You are also able to change an asset’s video resolution by choosing a setting from the
Resolution pop-up menu.
SD resolution assets (720 x 480i and 720 x 576i) in HD projects can use a bit rate up to
15 Mbps. The Bit Rate setting in the Encoder Settings dialog will not go beyond 15 Mbps
when an SD resolution is chosen.
Important: Encoding an asset at a resolution other than its native resolution may result
in unacceptable artifacts appearing in the video.
How the Encoded Files Are Named
When you import QuickTime video assets into DVD Studio Pro, the integrated MPEG
encoder names the encoded files as follows:
• The first half is the complete original filename, including its extension.
• The second half has three parts—the video standard (NTSC or PAL), the encoding bit
rate (shown as a four-digit number), and the “.m2v” extension.
For example, if you import an asset named “Main Program.mov,” use the NTSC standard
and a bit rate of 5.5 Mbps, the MPEG-encoded filename will be “Main
Program.mov_NTSC_5500.m2v.”
73Chapter 4 Preparing Video Assets
Page 74

Audio files created by the embedded AIFF encoder use the original filename with an
Angle
1
2
3
4
Mixed-angle track with stream 3 playing
added “.aiff” extension.
Encoding Video for Multi-Angle Tracks
DVD Studio Pro supports multi-angle and mixed-angle video. With multi-angle video, a
track can contain up to eight alternate video streams that last the entire length of the
main stream (for a total of nine video streams per track). With mixed-angle video, the
alternate streams do not last the entire length of the main stream, so you can have
alternate streams in only those locations where they are needed, saving disc space. In
either case, the viewer can switch among angles using the Angle button on the remote
control.
Because different MPEG encoders can produce slightly different GOP structures, you
should use the same encoder for all streams.
Note: Switching angles while playing a DVD affects only the video playback. The audio
remains on the currently selected stream.
Considerations for Mixed-Angle Tracks
Mixed-angle tracks provide the possibility of interesting playback scenarios. The illustration
below shows a track that has two sections with three alternate angles, with playback set
to angle 3.
There are some additional considerations when creating a mixed-angle track:
• Within atrack, you can use markers to define multiplesections to use additionalangles,
but each section must have the same number of streams. For example, you cannot
have one section early in the track with two alternate streams and a section later in
the track with three alternate streams—both sections must have either two or three
streams.
• Each alternate angle section can be a different length, but all streams within a section
must be the same length. For example, you can have one mixed-angle section early in
the track that is 10 seconds long and a second mixed-angle section that is 20 seconds
long. All alternate streams in the first mixed-angle section must be 10 seconds long;
all alternate streams in the second mixed-angle section must be 20 seconds long.
74 Chapter 4 Preparing Video Assets
Page 75

• You cannot use still images in the V2 through V9 streams. You can use still images in
the V1 stream as long as they are outside of the mixed-angle areas (places where video
is present in the V2 through V9 streams).
Requirements for MPEG Streams in Multi- and Mixed-Angle Video
The integrated MPEG encoder produces streams that meet the criteria for multi- and
mixed-angle use:
• With multi-angle tracks, all streams must be the same length. With mixed-angle tracks,
all alternate streams in each mixed-angle section must be the same length.
• All streams must have the same resolution and frame rate.
• The length and pattern of GOPs (Group of Pictures) must be the same for all streams
(angles). If you are not using the integrated MPEG encoder, use an encoder that allows
you to turn scene detection off.
• All GOPs should be closed. You will not be able to cleanly switch between the streams
if you use open GOPs.
Using Final Cut Pro and Compressor
In addition to the chapter and compression markers you can manually add to a video
clip in Final Cut Pro and Final Cut Express, compression markers are automatically added
at each edit point.
The manually added chapter and compression markers (also known as named markers)
are processed by the integrated MPEG encoder and by Compressor when used directly.
Be sure to add identically placed chapter and compression markers to each video clip
you intend to use in a mixed- or multi-angle track.
The integrated MPEG encoder ignores the automatic compression markers, because they
can alterthe GOP structure and make the clip unusable for mixed- and multi-angle tracks.
You can either set Compressor to process the automatic compression markers or ignore
them. The Extras pane of the Compressor MPEG-2 presets includes an “Include chapter
markers only” checkbox. Select thecheckbox to force Compressorto ignore the automatic
compression markers if you are encoding clips for use in a mixed- or multi-angle track.
See Using Compression Markers to Improve the MPEG Encode for more information about
compression markers.
Maximum Bit Rates for Multi- and Mixed-Angle Tracks
The maximum bit rate for a multi- or mixed-angle track is different from other tracks. Due
to the way the DVD specification requires video streams to be multiplexed together, the
number of video streams determines the maximum video bit rate you can use. Following
is a list of maximum combined bit rates (highest bit rate video stream + all audio streams
+ all subtitle streams) you can use for each multi- and mixed-angle track.
75Chapter 4 Preparing Video Assets
Page 76

Important: When calculating the combined bit rate for a track, you only need to add in
the bit rate of one video stream, but it needs to be the stream with the highest bit rate.
SD Projects
• 5 angles or fewer: 8 Mbps maximum for the track’s combined bit rate
• 6–8 angles: 7.5 Mbps maximum for the track’s combined bit rate
• 9 angles: 7 Mbps maximum for the track’s combined bit rate
HD Projects
• 2 to 9 angles: 24 Mbps maximum for the track’s combined bit rate
Note: 1080i HDV video uses a bit rate of 25 Mbps, which is higher than the maximum
allowable multi-angle bit rate. 720p HDV video uses a bit rate of 19 Mbps, which,
depending on the number and type of audio and subtitle streams, can be used in a
multi-angle project.
Adding Markers to Your Video
You can add markers to your tracks in the DVD Studio Pro Track Editor. You can use these
markers in a variety of ways—the most common usage is to provide a place in a track to
which a button on a chapter index menu can connect.
Apple video editing applications—Final Cut Pro and Final Cut Express—let you add
markers while you edit the video. You can also add markers with Compressor. There are
two types of markers that are important to DVD Studio Pro:
• Chapter markers: DVD Studio Pro can import these markers and display them in the
Track Editor.
• Compression markers: The integrated MPEG encoder usesthese markers toplace custom
I-frames in the MPEG-encoded file.
Because DVD Studio Pro can import chapter markers added within Final Cut Pro,
Final Cut Express, and Compressor, you can choose to create the markers in the editing,
compressing, or DVD authoring process. When you import video with chapter markers
into DVD Studio Pro, you see the marker position and marker name you set appear in the
Track Editor. The markers can then be edited within DVD Studio Pro exactly as if you had
manually created them there.
Note: The markers embedded in MPEG files encoded with the DVD Studio Pro 4 version
of the integrated MPEG encoder are not compatible with 1.X versions of DVD Studio Pro.
Placing Chapter Markers Exactly Where You Want Them
Adding markers in Final Cut Pro, Final Cut Express, or Compressor offers the potentially
large advantage of allowing you to position them on the exact frame where you want
them to appear.
76 Chapter 4 Preparing Video Assets
Page 77

When adding markers to a track in DVD Studio Pro, you can only place them at GOP
boundaries. This means that you will often not be able to place them exactly where you
want them. When you place the markers with a video editor, the integrated MPEG encoder
automatically forces an I-frame at that position, placing a GOP boundary exactly at every
marker and providing perfect marker placement. Markers placed in Compressor before
it is used to encode the video are also perfectly placed.
Using Compression Markers to Improve the MPEG Encode
MPEG encoding is based on the placement of I-frames, P-frames, and B-frames within a
GOP (see Working with GOP Settings). The I-frames encode a complete frame, while the
P-frames and B-frames only encode the parts of the video that change between the
I-frames. When there is a sudden change in the video content on a P-frame or B-frame,
such as a cut to a new scene,the output of the MPEG encoder can have significant artifacts
until it reaches the next I-frame.
The integrated MPEG encoder uses compression markers to force an I-frame into the
encode at a specific frame, modifying the surrounding GOP structure to keep the encode
DVD-compliant.
Adding compression markers at places in the video where sudden transitions occur can
produce better MPEG encodes when you use the integrated MPEG encoder. You can
manually place compression markers in Final Cut Pro and Final Cut Express. As with chapter
markers, an I-frame is forced at their position. The difference is that compression markers
do not import into DVD Studio Pro as chapter markers and do not count against the 99
chapter marker limit for a track.
Note: Final Cut Pro automatically adds compression markers at each edit point. These
are not processed when encoding the video with the integrated MPEG encoder. Only
compression markers you manually add in Final Cut Pro are processed. See Using
Final Cut Pro and Compressor for information on these markers and Compressor.
About the Markers You Add in an External Editor
There are several issues to be aware of when adding chapter and compression markers
in an external video editor:
• DVD tracks can support a maximum of 99 chapter markers. Because compression
markers are only used in the MPEG encoding process, they do not count as chapter
markers and do not count against the 99-marker limit. Because you can add several
video assets to a single track in DVD Studio Pro, you must keep in mind that the
99-marker limit applies to the total markers of all assets on the track.
• You cannot place markers closer than one second to each other or within one second
of the clip’s start or end in the editor. This gives the encoder the flexibility to modify
the GOP structures in that area to accommodate the added I-frame.
77Chapter 4 Preparing Video Assets
Page 78

• If you are going to use a video asset to create a mixed-angle or multi-angle track, all
video streams must have identical MPEG structures. If you add chapter or compression
markers to one stream, you must add them at the exact same place in the other streams.
Adding and Configuring Markers in Final Cut Pro and Final Cut Express
Using Final Cut Pro or Final Cut Express, you can add markers to a clip or to a sequence.
If you intend to export the markers for use with DVD Studio Pro, it is important that you
place the markers correctly.
• If you export a clip by selecting it in the Browser: The chapter and compression markers
can be exported.
• If you export a sequence by selecting it in either the Browser or the Timeline: Only markers
in the sequence are exported—markers in any clips in the sequence are ignored.
For details on adding markers to clips and sequences, see the Final Cut Pro User Manual.
The following instructions assume you are familiar with Final Cut Pro and Final Cut Express.
Note: The following instructions are for Final Cut Pro 4 through Final Cut Pro 5, and all
versions of Final Cut Express. If you are using a different version of Final Cut Pro, you may
have different choices.
To configure a marker in Final Cut Pro
1 Select the marker and open the Edit Marker dialog.
2 Enter a name for the marker.
This is the name that appears in the Track Editor in DVD Studio Pro and can be used as
button text.
3 Click either Add Chapter Marker or Add Compression Marker.
Text is added to the Comment area.
Only chapter markers appear in DVD Studio Pro. Because each chapter marker forces an
I-frame at that location, it is unnecessary for you to add both marker types.
78 Chapter 4 Preparing Video Assets
Page 79

To export a Final Cut Pro or Final Cut Express movie with markers
1 Do one of the following:
• If exporting a clip with markers: Select the clip in the Browser.
• If exporting a sequence with markers: Select the sequence in either the Browser or the
Timeline.
2 Choose File > Export > QuickTime Movie.
The Save dialog appears.
3 Choose the type of markers to export from the Markers pop-up menu.
Choose DVD Studio Pro Markers to export both compression and chapter markers, or
choose the type (compression or chapter) you want to export.
4 Ensure all other settings are correct, then click Save.
79Chapter 4 Preparing Video Assets
Page 80

About H.264 Video
You can use the H.264 video format, also known as MPEG-4 part 10 and the Advanced
Video Codec (AVC), in your HD projects. The H.264 encoder is twice as efficient as the
standard MPEG-2 encoder. When compared to encoding with MPEG-2, this means that
with the H.264 encoder:
• You can use a lower bit rate to get the same quality, resulting in smaller files.
• You can use the same bit rate and get better quality with the same file size.
While DVD Studio Pro does not include an embedded H.264 encoder, Compressor includes
presets specifically for use in HD projects. You are able to modify these presets to suit
your specific needs.
Important: You must use H.264 for HD DVD presets in Compressor to encode H.264 video
assets for native use in DVD Studio Pro HD projects.
Natively Supported H.264 Formats
DVD Studio Pro natively supports the following H.264 formats. Native support means that
the files are not reencoded when they are imported into the appropriate NTSC or PAL
HD project. In some cases, however, frames may be set to repeat during playback to
create the HD DVD specification’s required frame rate.
NTSC HD projects natively support the following formats:
• 720p24
• 720p30
• 720p60
• 1080p24
• 1080p30
PAL HD projects natively support the following formats:
• 720p25
• 720p50
• 1080p25
H.264 Bit Rates
The process of choosing a bit rate for H.264 video is similar to choosing a bit rate for
MPEG-2 video—the higher the bit rate the better the quality, but the more disc space
that is required. In general, you are able to use lower bit rates than you would use with
an MPEG-2 encoder.
While the maximum bit rates you can use are identical to MPEG-2 video, the minimum
bit rates are lower.
80 Chapter 4 Preparing Video Assets
Page 81

H.264 rangeMPEG-2 rangeVideo format
0.5 Mbps to 15 Mbps2.0 Mbps to 15.0 MbpsStandard definition
1.5 Mbps to 29.4 Mbps2.0 Mbps to 29.4 MbpsHigh definition
Important: It is strongly suggested that you use H.264 bit rates of 18 Mbps or less to
ensure DVD compatibility.
H.264 Frame Sync Setting
The H.264 encoder in Compressor contains a Frame Sync setting. This setting defines
how often the encoder places a key frame, similar to an MPEG-2 I-frame, in the stream.
The value is in seconds, with one half second increments. The range is from 0.5 seconds
to 5.0 seconds.
The smaller the Frame Sync value is, the more key frames are placed in the stream, which
results in better quality but with a larger file size. Higher values result in a smaller file but
with reduced quality.
The Frame Sync setting does not affect where you can place markers in the Track Editor.
Due to the structure of the H.264 stream, you are able to place a marker about every half
second.
About HDV Video
DVD Studio Pro natively supports many of the HDV video formats currently in use. Native
support means that the files are not reencoded when they are imported into the
appropriate NTSC or PAL HD project. In some cases, however, frames may be set to repeat
during playback to create the HD DVD specification’s required frame rate.
You can edit the following HDV video formats directly in Final Cut Pro and use them
directly in your HD DVD Studio Pro projects without the need to transcode them.
Note: None of these formats are supported in SD DVD projects. For the best results, use
Compressor to convert any unsupported HDV formats to supported HDV, MPEG-2, or
H.264 formats. You can use Compressor to convert these formats (and any other HD-format
video) to an SD format that you can use in your SD projects.
NTSC HD projects natively support the following formats:
• 720p24
• 720p30
• 720p60
• 1080p24
• 1080p30
• 1080i60
81Chapter 4 Preparing Video Assets
Page 82

PAL HD projects natively support the following formats:
• 720p25
• 720p50
• 1080p25
• 1080i50
Note: You can import 24 fps and 23.98 fps HDV-format video into PAL projects, but they
are not treated natively and are reencoded to a supported MPEG-2 format.
Using HDV Video from the Final Cut Pro Capture Scratch Folder
The HDV video clips that Final Cut Pro captures from some HDV sources cannot be
imported directly into DVD Studio Pro. Only HDV video clips exported from Final Cut Pro
are formatted correctly for use in an HD DVD project. When the clips are captured, they
may not have legal opening and closing GOP structures. When HDV clips are exported
from Final Cut Pro, the opening and closing GOP structures are made legal.
DVD Video Source Settings Summary
The following sections, DVD Video Settings for SD Projects and DVD Video Settings for
HD Projects, summarize the required settings for MPEG and other sources that can be
used with DVD Studio Pro.
Note: All assets within a project must use the same video standard (all NTSC or all PAL).
For the other settings, such as encoding format, resolution, and bit rates, you can mix
assets with different settings.
DVD Video Settings for SD Projects
The following settings work with SD projects. With the exception of MPEG-1 video, these
same settings can also be used in HD projects.
MPEG Type
Both MPEG-1 and MPEG-2 are supported, at the video resolutions listed below.
MPEG Structure
Only elementary streams are supported.
MPEG Bit Rates
Multi-angle and mixed-angle tracks have stricter requirements. See Encoding Video for
Multi-Angle Tracks for details.
• MPEG-1 Video: Up to 1.856 Mbps (1.15 Mbps is typical.)
• MPEG-2 Video: Up to 9.8 Mbps (The typical maximum used is 8 Mbps.)
82 Chapter 4 Preparing Video Assets
Page 83

Video Resolution
DVD Studio Pro supports a variety of resolutions. See Choosing a Video Resolution for
more information.
• MPEG-1: The following resolution is supported:
• SIF (Standard Interface Format): 352 x 240 NTSC; 352 x 288 PAL
• MPEG-2: The following resolutions are supported:
• SIF: 352 x 240 NTSC; 352 x 288 PAL
• 1/2 D1: 352 x 480 NTSC; 352 x 576 PAL
• Cropped D1: 704 x 480 NTSC; 704 x 576 PAL (matches analog blanking)
• Full D1: 720 x 480 NTSC; 720 x 576 PAL
Frame Rate
There are three supported frame rates:
• NTSC with 525 lines (29.97 fps)
• PAL with 625 lines (25 fps)
• Versions of 23.976 fps video using either the NTSC or PAL video resolutions
Aspect Ratio
4:3 and anamorphic 16:9 are supported. (See What Exactly Is a 16:9 Asset?)
Chroma Format
The DVD specification requires a 4:2:0 chroma format.
GOP Size (Maximum)
18 frames NTSC; 15 frames PAL
GOP Size (Typical)
15 frames NTSC; 12 frames PAL
DVD Video Settings for HD Projects
The following settings work with HD projects.
MPEG Type
MPEG-2, HDV, and H.264 are supported, at the video resolutions listed below.
MPEG Structure
Only elementary streams are supported.
MPEG Bit Rates
Multi-angle and mixed-angle tracks have stricter requirements. See Encoding Video for
Multi-Angle Tracks for details.
• SD MPEG-2 Video: From 2.0 Mbps to 15.00 Mbps
83Chapter 4 Preparing Video Assets
Page 84

• HD MPEG-2Video: From 2.0 Mbps to 29.40 Mbps (The typical maximum used is 27 Mbps.)
Note: HD assets include the 480p and 576p resolutions.
• HDV Video: HDV video is MPEG-2 encoded. The bit rate depends on the video resolution:
• 1280 x 720p: 19 Mbps
• 1920 x 1080i: 25 Mbps
H.264 Bit Rates
Multi-angle and mixed-angle tracks have stricter requirements. See Encoding Video for
Multi-Angle Tracks for details.
• SD H.264 Video: From 0.5 Mbps to 15.00 Mbps
• HD H.264 Video: From 1.5 Mbps to 29.40 Mbps (The typical maximum used is 27 Mbps.)
Note: HD assets include the 480p and 576p resolutions.
Video Resolution
DVD Studio Pro supports a variety of resolutions. See Choosing a Video Resolution for
more information.
• SIF: 352 x 240 NTSC; 352 x 288 PAL
• 1/2 D1: 352 x 480 NTSC; 352 x 576 PAL
• Cropped D1: 704 x 480 NTSC; 704 x 576 PAL (matches analog blanking, only the interlaced
version is supported)
• Full D1: 720 x 480 NTSC; 720 x 576 PAL (both interlaced and progressive versions)
• 720p: 1280 x 720 (NTSC and PAL, progressive)
• Anamorphic 1080i: 1440 x 1080 (NTSC and PAL, interlaced, anamorphic 16:9)
• 1080i: 1920 x 1080 (NTSC and PAL, interlaced)
Frame Rate
There are three supported frame rates:
• NTSC with 525 lines (29.97 fps)
• PAL with 625 lines (25 fps)
• Versions of 23.976 fps video using either the NTSC or PAL video resolutions
Aspect Ratio
4:3, anamorphic 16:9, and true 16:9 are supported.
Chroma Format
The DVD specification requires a 4:2:0 chroma format.
84 Chapter 4 Preparing Video Assets
Page 85

GOP Size (Maximum)
18 interlaced frames or 36 progressive frames NTSC; 15 interlaced frames or 30 progressive
frames PAL
GOP Size (Typical)
15 frames NTSC; 12 frames PAL
85Chapter 4 Preparing Video Assets
Page 86

Page 87

Preparing Audio Assets
5
Before you can begin building a DVD project, you must have correctly prepared audio
source material.
This chapter covers the following:
• Introduction to Preparing Audio Sources (p. 87)
• Audio Formats Not Supported by the DVD Specification (p. 88)
• Audio Formats Supported by the DVD Specification and DVD Studio Pro (p. 88)
• Using Multiple Audio Formats in Your Project (p. 91)
• Required Audio Formats for SD Projects (p. 91)
• DVD Audio Source Settings Summary (p. 92)
Introduction to Preparing Audio Sources
The DVD specification restricts the types of audio formats that you can include on a DVD.
There arealso restrictions on mixing audio of different types within a track or set of menus.
There are also required audio formats to make a DVD-compliant disc.
Three areas in a DVD project can use audio sources:
• Tracks: This is the primary area that uses audio sources.
• Slideshows: This areacan use a single audio source for the entire slideshow or individual
audio sources for each slide. See Preparing Slideshow Assets for more information.
• Menus: This area uses audio sources when you are creating motion menus. For the
most part, audio sources used for motion menus must follow the same rules as audio
sources used for tracks. See Preparing Menu Assets for more information.
See DVD Audio Source Settings Summary for a complete list of settings required for an
audio source to be DVD-compliant.
87
Page 88

Audio Formats Not Supported by the DVD Specification
If you import an audio format that is not supported by the DVD specification,
DVD Studio Pro automatically uses the embedded AIFF encoder to transcode the audio
file into an uncompressed AIFF format file. For example, if you import an MP-3 file (a file
format that is not supported by the DVD specification), DVD Studio Pro creates an AIFF
file from the MP-3 file and that is what is used by your project.
Note: Because an AIFF file is not compressed, its file size will be substantially larger than
the original MP-3 file. If disc space is an issue, you can use the AC-3 encoder in the
Compressor application to transcode the AIFF file to the Dolby Digital AC-3 format. See
Dolby Digital AC-3 Audio for more information.
Using AAC Audio Files from the iTunes Store
DVD Studio Pro is able to import and use AAC format audio files purchased from the
iTunes Store as long as the computer you are using them on is authorized to use them.
If you import iTunes Store files that the computer is not authorized to use, DVD Studio Pro
plays silence when it encounters those files. Additionally, if you select and try to play
an iTunes Store file that the computer is not authorized to play in the Audio tab in the
Palette, DVD Studio Pro plays silence. As with MP-3 files, AAC files are converted to AIFF
files.
Audio Formats Supported by the DVD Specification and DVD Studio Pro
The following audio formats are supported by the DVD specification and can be imported
into DVD Studio Pro without using the embedded AIFF encoder.
• MPEG-1 Layer 2 audio
• Dolby Digital (AC-3) audio (mono up to six channels)
• DTS multichannel audio (preview not supported)
• PCM audio (pulse code modulation audio; used by the AIFF and WAVE formats)
Note: When importing DVD-compliant audio files, DVD Studio Pro imports only elementary
files (not multiplexed). See Elementary and Multiplexed MPEG Files for more information.
Uncompressed PCM Audio
Uncompressed audio is typically referred to as PCM, although the files usually have a
“.wav” or “.aif” extension. The DVD specification supports uncompressed PCM audio at
sample sizes of 16 bits and 24 bits and sample rates of 48 kHz or 96 kHz. Audio in this
format is completely compatible with DVD players worldwide and is of higher fidelity
than data-compressed audio. The disadvantage of PCM audio is the relatively large file
sizes, compared to compressed audio formats.
88 Chapter 5 Preparing Audio Assets
Page 89

There are two common PCM audio formats:
• AIFF audio(Audio Interchange File Format-uncompressed PCM audio; themost common
Macintosh audio format)
• WAVE audio (Windows uncompressed PCM audio; the most common Windows audio
format, also referred to as WAV)
The DVD Studio Pro integrated MPEG encoder creates AIFF format files. In most cases,
DVD Studio Pro converts WAVE files into AIFF files.
Compressed Audio Formats
The DVD medium uses data-compressed (as opposed to sonically compressed) audio for
two purposes:
• To deliver discrete surround audio (5.1)
• To conserve bandwidth and disc space, allowing more room for video. This is especially
applicable in long-form material such as feature films, notably when the smaller DVD-5
medium is the target.
Data-compressed audio for DVD comes in a few forms, described next.
MPEG-1 Layer 2 Audio
For DVD products in PAL, MPEG-1 Layer 2 audio is compatible with all players. For NTSC
markets (North America, Japan), most (but not all) DVD players support playback of
MPEG-1 Layer 2 audio. If you create NTSC titles using MPEG audio, be aware that there
may be problems in playback on some players.
If you want to ensure that your data-compressed audio is compatible with all players for
NTSC, using the AC-3 format is recommended. See the next section for information on
encoding and authoring with AC-3 format audio.
Dolby Digital AC-3 Audio
There are two good reasons to use AC-3 format audio in your DVD production:
• To take advantage of 5.1 surround audio (five main speakers and a subwoofer—six
channels of audio total), which is supported by AC-3 but not by MPEG-1 Layer 2
• To produce stereo data-compressed audio that is fully compatible with every DVD
player in the NTSC markets of North America and Japan. You may run into some
compatibility issues with older DVD players in PAL countries.
You can use the AC-3 encoder in Compressor to encode everything from stereo to 5.1
surround audio. See Previewing AC-3 and DTS Audio for information on listening to
surround audio.
89Chapter 5 Preparing Audio Assets
Page 90

DTS Audio
DTS (Digital Theatre Systems) is an alternative format for surround audio. DVD Studio Pro
can import and use DTS audio files.
DVD Studio Pro supports DTS ES audio that can have up to 6.1 channels as well as audio
that uses either a 48 kHz or a 96 kHz sample rate and a 24-bit sample size.
Important: All DTS audio imported into DVD Studio Pro must use the compacted file
format, with a “.cpt” file extension. Additionally, DTS audio using a 44.1 kHz sample rate
will produce unusable results.
See Previewing AC-3 and DTS Audio for information on listening to surround audio.
Previewing AC-3 and DTS Audio
In most cases, the best way to verify AC-3 and DTS audio is to burn a disc that you can
play on a DVD player with suitable audio support. If you play the audio on your computer
using its built-in audio support, the following happens:
• When you play AC-3 audio from the Assets tab, one of the editors (Track, Story,
Slideshow, or Menu Editor), or the Simulator, the audio is automatically converted to
two-channel stereo for playback through your computer.
• Because there is no DTS decoder on your computer, you cannot hear DTS audio when
played from the Assets tab, one of the editors (Track, Story, Slideshow, or Menu Editor),
or the Simulator.
You are able to add an external AC-3 or DTS decoder to your computer to listen to your
surround sound audio from the Assets tab, one of the editors (Track, Story, Slideshow, or
Menu Editor), or the Simulator.
To configure DVD Studio Pro to use an external audio monitor
1 Choose DVD Studio Pro > Preferences.
2 Click the Simulator icon to show the Simulator preferences.
3 Choose your external audio monitor device from the Playback Output section’s Audio
pop-up menu.
Common choices include Built-in Audio, for normal system audio, and Built-in Audio
(S/PDIF), which uses your system’s optical digital audio output (if available) to output the
audio to an external AC-3 or DTS decoder.
4 Click Apply.
See External Video and Audio Monitoring for more information.
Another option is to build your project and use the Apple DVD Player. Similar to
DVD Studio Pro, you can configure DVD Player to use an external audio monitor.
90 Chapter 5 Preparing Audio Assets
Page 91

To configure DVD Player for external audio decoder support
1 Open DVD Player.
2 Choose DVD Player > Preferences.
3 Click the Disc Setup icon to show the Disc Setup pane.
4 Choose the external audio device to use from the Audio Output pop-up menu.
5 Click OK.
Using Multiple Audio Formats in Your Project
A project can contain audio in a variety of formats; however, there are some restrictions
regarding mixing formats within an element or group of elements, such as menus.
When you are required to have the same audio format within an element or group of
elements, all settings must be the same:
• Audio type: AIFF, WAVE, PCM, AC-3, or MPEG-1 Layer 2
• Number of channels: This is especially true with the AC-3 audio format, because it
commonly supports a variety of channel configurations.
• Sample size: 16 bits or 24 bits
• Sample rate: 48 kHz or 96 kHz
• Bit rate: 64 kbps to 4608 kbps, depending on the audio type
Tracks
Each audio stream within a track can be in a different format. Within an audio stream,
however, the audio format must be the same for all clips.
Menus
All menus within a video title set (VTS) must use the same audio format. DVD Studio Pro
automatically creates additional VTS blocks as needed to support menus with different
audio formats. See VTS Editor for additional information.
Slideshows
When adding individual audio clips to each slide or when using multiple audio clips for
overall audio, all clips must use the same audio format.
Required Audio Formats for SD Projects
To ensure that a DVD will play on all SD-based DVD players, there is a DVD specification
requirement that at least one stream of audio for each element be in a specific format.
• For NTSC DVDs: At least one of the audio streams must be either PCM or AC-3.
• For PAL DVDs: At least one of the audio streams must be either PCM or MPEG
compressed audio.
91Chapter 5 Preparing Audio Assets
Page 92

Note: HD projects can use any supported audio format and do not require specific ones
to be present.
DVD Studio Pro verifies your project during the build process to ensure it is DVD-compliant.
The build log shows any issues that are found; however, the build will continue and you
can write your project to disc.
DVD Audio Source Settings Summary
Following is a summary of the required settings for MPEG and other audio sources that
can be used with DVD Studio Pro.
Note: All assets within a project must use the same video standard (all NTSC or all PAL).
For the other settings, such as encoding format, resolution, and bit rates, you can mix
assets with different settings.
DVD Audio Settings for SD Projects
The following settings work with SD projects. These same settings can also be used in
HD projects.
Bit Rates
The audio bit rate depends on the format and quality level you need (higher bit rates
provide better quality, but reduce the bit rate you can use with the video).
• MPEG-1 Layer 2 Audio: 64 to 384 kbps (192 kbps and 224 kbps are typical.)
• Dolby DigitalAC-3: 64 to 448 kbps (192 kbps, 224 kbps, and 448 kbps [for 5.1] are typical.)
• DTS ES: 754.5 kbps or 1509.75 kbps
• Stereo PCM @ 16 Bits/48 kHz: 1536 kbps
• Stereo PCM @ 24 Bits/96 kHz: 4608 kbps
Audio Sample Rate
There are two supported audio sample rates:
• 16 bits or 24 bits
• 48 kHz or 96 kHz
DVD Audio Settings for HD Projects
The following settings work with HD projects.
Bit Rates
The audio bit rate depends on the format and quality level you need (higher bit rates
provide better quality, but reduce the bit rate you can use with the video).
• MPEG-1 Layer 2 Audio: 64 to 384 kbps (192 kbps and 224 kbps are typical.)
• Dolby DigitalAC-3: 64 to 448 kbps (192 kbps, 224 kbps, and 448 kbps [for 5.1] are typical.)
92 Chapter 5 Preparing Audio Assets
Page 93

• DTS ES: 754.5 kbps or 1509.75 kbps
• Stereo PCM @ 16 Bits/48 kHz: 1536 kbps
• Stereo PCM @ 24 Bits/96 kHz: 4608 kbps
Audio Sample Rate
There are two supported audio sample rates:
• 16 bits or 24 bits
• 48 kHz or 96 kHz
93Chapter 5 Preparing Audio Assets
Page 94

Page 95

Preparing Menu Assets
6
Before you can begin building a DVD project, you must have correctly prepared menu
source material.
This chapter covers the following:
• Introduction to Preparing Menu Sources (p. 95)
• What Is a Menu? (p. 96)
• Creating a Menu (p. 96)
• Creating Graphics to Use in Menus (p. 97)
• Creating Overlays (p. 101)
• Creating a Layered Menu (p. 106)
• Creating Video for Motion Menus (p. 106)
• Defining the Menu Loop Point (p. 107)
• Creating Shapes (p. 108)
• Creating Graphics for Drop Zones and Buttons (p. 112)
Introduction to Preparing Menu Sources
This chapter describes the various components, such as backgrounds, overlays, buttons,
and drop zones, and strategies you can use to create menus in DVD Studio Pro.
The types of menu sources you need for your DVD project depend on the types of menus
you want to use:
• Will the backgrounds be still images or contain full-motion videos?
• Will you use the provided shapes for your buttons or create your own?
• Will you use the standard method of creating menus or the layered method?
Before you can know how to prepare your menu sources, you need to understand how
DVD Studio Pro uses them. Following is an overview of what makes up a menu and how
menus are used.
95
Page 96

What Is a Menu?
Most DVD-Videos have at least one menu. The menu allows the viewer to choose what
to see. If no choices need to be made, such as with a looping movie at a sales kiosk, the
disc can be configured to immediately begin playing the movie, and no menu is required.
For DVDs that have a number of viewing options—such as multiple movies, chapter
selections, and bonus items—menus that are clear and logical can greatly enhance the
viewing experience. Menus that are cluttered, clumsy, and confusing may cause viewers
to become frustrated and give up trying to watch the title.
A menu consists of a background and one or more buttons. The background can be a
simple still image or a full-motion video (a motion menu). The background may or may
not contain content that relates to the buttons; it may be a scenic mountain view or a
multilayered graphic including images for each button. Some menusmay also have audio.
Creating a Menu
Creating a menu involves two basic steps: selecting the background graphic or video,
and setting up the buttons. Selecting the background graphic or video is fairly simple;
the only challenge is when you use multilayer Photoshop files. Setting up the buttons
involves identifying wherethey are located by drawing boxes over them, and then setting
up their actions (what happens when they are activated) and the colors to display for
their different states.
DVD Studio Pro gives you two ways to create menus: the standard method, which uses
overlays and allows you to use shapes, templates, and add text; and the layered method.
• The standard method: The standard method is usually preferred. It is the most flexible,
allowing you to mix overlays with shapes, to use either stills or videos as the menu
background, and to include audio. You can also use the templates and styles included
with DVD Studio Pro for quick and consistent menu creation.
• For more information on overlays, see Creating Overlays.
• For a description of shapes, see Creating Shapes.
• For information on the templates and styles feature, see Using Templates, Styles, and
Shapes to Create Your Menus.
• For information on motion menus and setting the loop point, see Creating Video for
Motion Menus.
• The layered method: The layered methoduses layers in a Photoshop (PSD) file to describe
each button’s possible states. Layered menus can also use overlays in addition to the
Photoshop layers. This method cannot be usedwith motion menus and cannot include
audio.
• For more information on overlays, see Creating Overlays.
96 Chapter 6 Preparing Menu Assets
Page 97

• For a description of creating layered menus, see Creating a Layered Menu.
An easy source for menu backgrounds are frames grabbed from a track’s video. By setting
a marker on the frame you want, you can choose to save that frame as a TIFF file that can
then be imported and used as a menu background. You can also open the file in a graphics
program andadd effects andtext before using it as your menu’s background. See Grabbing
a Still Image from Your Movie for more information.
Creating Graphics to Use in Menus
When creating graphics for menus, you need to be aware of several considerations. Some
of these apply to all menu types, and some are specific to certain menu types, such as
layered menus, menus with a still background, or menus using an overlay.
Using Your Graphics Program
DVD Studio Pro is designed to import a wide variety of graphics formats, allowing you to
use almost any graphics program to create the menus and overlays.
Supported formats include:
• Adobe Photoshop PSD files
• PICT format files
• BMP format files
• JPEG format files
• QuickTime image files
• Targa (TGA) format files
• TIFF (TIF) format files
Additional support is also included for files that conform to the Adobe Photoshop (PSD)
format. DVD Studio Pro can recognize individual layers and allows you to assign them to
separate functions in a menu. You can even use the same file for several menus by
selecting the appropriate layers to use for each menu.
• Layers forstandard overlay menus: When creating graphics for standard overlay menus,
you can select the layer (or layers, as is often the case) to use as the background and
the overlay. In this way, a single file can be used in several menus, even sharing elements
(such as a background image). To avoid confusion, assign clear names to each of the
layers.
• Layers for layered menus: When creating graphics for use as layered menus, in addition
to the layer (or layers) that makeup the background, you must create at least twolayers
for each button, one showing the selected state and the other showing the activated
state. To show the normal state of each button, you can either build it into the
background layer or create a third layer.
97Chapter 6 Preparing Menu Assets
Page 98

Tips for Creating Menu Graphics
Most of the following tips apply to all graphics programs. Several apply specifically to
Adobe Photoshop, although similar issues may exist in other graphics programs.
• Make horizontal lines a minimum of three pixels thick so they won’t flicker on TV screens.
For the same reason, avoid using typefaces with narrow lines. Serif fonts tend to be
more prone to flicker than sans serif fonts.
• Be sure to use a filter that constricts the colors in the graphic to NTSC or PAL color
space. To support broadcast bandwidths, NTSC and PAL video must use colors that are
substantially limited compared to those your graphics program can create. Highly
saturated colors create the biggest problemsand produce the biggest disappointments
when viewed on a video monitor.
• Photoshop’s effects layers, transfer modes, and layer styles do not work with
DVD Studio Pro. Be sure to flatten any of these before using them in DVD Studio Pro.
Flattening a Photoshop Layer
When creating graphics within Adobe Photoshop, you may want to add effects such as
bevels, glows, and shadows to a layer, use the transfer modes, or configure layer styles.
These Photoshop effects and modes are not supported by DVD Studio Pro. However, you
can “flatten” them in Photoshop so that they appear in DVD Studio Pro.
Note: Flattening effects is not the same as using the Flatten Image command, which
combines all contents of all layers of a Photoshop file (including effects) into a single
layer.
It’s a good idea to use this procedure on a copy of the original file, just in case something
goes wrong.
To flatten a layer of a Photoshop file
1 Add a new empty layer immediately below the layer with the effects you want to flatten.
2 Either merge or stamp the layer with the effects into the empty layer. Merging deletes
the effects layer, and stamping leaves the effects layer in place (which can be a good idea
if you need to make changes to the layer later on).
• To merge the layer: Select it and choose Layers > Merge Layers (or press Command-E).
• To stamp the layer: Select it and press Command-Option-E.
A bitmap image of the effects layer is placed in the new layer.
98 Chapter 6 Preparing Menu Assets
Page 99

Understanding Pixel Differences in Graphics and Video
The term square pixel actually refers to the horizontal and vertical distance from a pixel
to its neighbors. With a square pixel, the distance is the same in both directions. This
distance is a function of the sampling rates, both horizontal and vertical, and the aspect
ratio the graphic will be displayed in. Given the right aspect ratio, virtually any combination
of horizontal and vertical sampling rates could produce square pixels.
Computer graphics programs are optimized to work with square pixels: When you draw
a square, it has the same number of pixels in all four of its sides and looks like a square
on the display.
Unfortunately, SD video is different.
Video Pixels
Standard definition video uses a 4:3 aspect ratio. No matter what the size of the display,
the height is always 75 percent of the width. This is true for both NTSC, which has 525
lines in each frame (480 of these active with DVDs), and PAL, which has 625 lines per
frame (576 active). Both standards also have 720 pixels per line when converted to MPEG.
Tofit the 4:3 aspect ratio perfectly using squarepixels and 720 pixels per line, there would
have to be 540 lines in each frame. So for NTSC, which has 480 lines, the lines must be
spaced slightly apart to fill the same area, resulting in rectangular pixels. For PAL, with
576 lines, they must be squeezed together slightly to fit.
The Settings pop-up menu in the DVD Studio Pro Menu Editor has a square/rectangular
pixel selection that allows you to choose whether to view menu graphics as rectangular
pixels (forcing a 4:3 aspect ratio) or as square pixels while creating menus. The Viewer
tab also has the same settings. The Simulator always shows rectangular pixels, simulating
what the viewer will see.
The real problem arises when you create your menu graphics.
Square Pixels in Graphics
Graphics programs use square pixels. If you set the dimensions of a graphic to 720 x 480
pixels (the NTSC frame size), you will notice that the drawing area of the graphic in the
graphics program is not a 4:3 aspect ratio (it is a bit short). If you set a graphic to PAL
dimensions (720 x 576 pixels), the drawing area you see in your graphics program is taller
than 4:3.
Anything you put in the graphic will be distorted (either vertically stretched or compressed,
depending on your video standard) when viewed on a video monitor. If you draw a
square, it will look like a rectangle. In some cases, the distortion is not great enough to
worry about, but in most cases you should build your graphics with the distortion in
mind.
99Chapter 6 Preparing Menu Assets
Page 100

To compensate for pixel differences between graphics and video, you need to build the
graphics at one size andthen rescale them to the appropriatevideo dimensions, as shown
in the following table.
Rescale dimensionStarting dimensionAspect ratio
720 x 480 pixels720 x 534 pixelsNTSC 4:3
720 x 480 pixels864 x 480 pixelsNTSC 16:9
720 x 576 pixels768 x 576 pixelsPAL 4:3
720 x 576 pixels1024 x 576 pixelsPAL 16:9
Important: While DVD Studio Pro automatically rescales graphics that use the starting
dimensions above, it is strongly recommended that you rescale the graphics in your
graphics program. (Graphics that already use the rescale dimensions are imported without
any rescaling.) If you rescale the graphics in your graphics program, they will appear
distorted in the graphics program but will be correct when viewed in DVD Studio Pro as
rectangular pixels.
Using Later Versions of Adobe Photoshop
Later versions of Adobe Photoshop, including the CS versions, have presets that
automatically set Photoshop to display the graphic with 4:3 or 16:9 aspect ratios using
nonsquare pixels. Even better, these presets include title and action safe guides. For SD
assets, these presets include:
• NTSC DV 720 x 480 (with guides)
• NTSC DV Widescreen 720 x 480 (with guides)
• PAL D1/DV 720 x 576 (with guides)
• PAL D1/DV Widescreen 720 x 576 (with guides)
You can turn this feature off by choosing View > Pixel Aspect Ratio Correction (a
checkmark next to this indicates when the feature is active).
Note: See Shape Aspect Ratios for information on how DVD Studio Pro works with graphics
used in shapes, buttons, and drop zones.
HD Video Pixels
There are a variety of video resolutions supported by HD projects:
100 Chapter 6 Preparing Menu Assets
Rescale dimensionStarting dimensionSquare pixelsResolution
720 x 480 pixels864 x 480 pixelsNo (anamorphic)480p (NTSC; 16:9)
720 x 576 pixels1024 x 576 pixelsNo (anamorphic)576p (PAL; 16:9)
1280 x 720 pixels1280 x 720 pixelsYes720p (NTSC, PAL; 16:9)
1440 x 1080 pixels1920 x 1080 pixelsYes (anamorphic)1080i (NTSC, PAL; 16:9)
 Loading...