

Page 1

Mac OS X Server
Mail Service Administration
Version 10.6 Snow Leopard
Page 2

Apple Inc. K
© 2009 Apple Inc. All rights reserved.
Under the copyright laws, this manual may not be
copied, in whole or in part, without the written consent
of Apple.
The Apple logo is a trademark of Apple Inc., registered
in the U.S. and other countries. Use of the “keyboard”
Apple logo (Option-Shift-K) for commercial purposes
without the prior written consent of Apple may
constitute trademark infringement and unfair
competition in violation of federal and state laws.
Every eort has been made to ensure that the
information in this manual is accurate. Apple is not
responsible for printing or clerical errors.
Apple
1 Innite Loop
Cupertino, CA 95014-2084
408-996-1010
www.apple.com
Apple, the Apple logo, AppleScript, FireWire, Keychain,
Leopard, Mac, Mac OS, Quartz, Safari, Snow Leopard,
Xcode, Xgrid, Xsan, and Xserve are trademarks of Apple
Inc., registered in the U.S. and other countries.
Apple Remote Desktop and Finder are trademarks of
Apple Inc.
AIX is a trademark of IBM Corp., registered in the U.S.
and other countries, and is being used under license.
The Bluetooth® word mark and logos are registered
trademarks owned by Bluetooth SIG, Inc. and any use of
such marks by Apple is under license.
This product includes software developed by the
University of California, Berkeley, FreeBSD, Inc.,
The NetBSD Foundation, Inc., and their respective
contributors.
Java™ and all Java-based trademarks and logos
are trademarks or registered trademarks of Sun
Microsystems, Inc. in the U.S. and other countries.
PowerPC™ and the PowerPC logo™ are trademarks
of International Business Machines Corporation, used
under license therefrom.
UNIX® is a registered trademark of The Open Group.
Other company and product names mentioned herein
are trademarks of their respective companies. Mention
of third-party products is for informational purposes
only and constitutes neither an endorsement nor a
recommendation. Apple assumes no responsibility with
regard to the performance or use of these products.
The product described in this manual incorporates
copyright protection technology that is protected
by method claims of certain U.S. patents and other
intellectual property rights owned by Macrovision
Corporation and other rights owners. Use of this
copyright protection technology must be authorized
by Macrovision Corporation and is intended for home
and other limited viewing uses only unless otherwise
authorized by Macrovision Corporation. Reverse
engineering or disassembly is prohibited.
Apparatus Claims of U.S. Patent Nos. 4,631,603, 4,577,216,
4,819,098 and 4,907,093 licensed for limited viewing
uses only.
Simultaneously published in the United States and
Canada.
019-1412/2009-08-01
Page 3

Contents
7 Preface: About This Guide
7 What’s in This Guide
8 Using Onscreen Help
9 Document Road Map
10 Viewing PDF Guides Onscreen
10 Printing PDF Guides
11 Getting Documentation Updates
11 Getting Additional Information
12 Chapter 1: Understanding Mail Service
12 Mail Service Architecture
13 Mail Transfer Agent
14 Mail Screening
15 Where Mail Is Stored
16 Local Delivery Agent
17 User Interaction with Mail Service
18 Using Mailing Lists with Mail Service
18 Mailman-Based Mailing Lists
18 Wiki-Based Mailing Lists
19 Using Network Services with Mail Service
20 Chapter 2: Mail Service Setup
20 Managing Mail Service
20 Before You Begin
21 Using Mail Service Tools
21 Conguring DNS for Mail Service
22 How User Account Settings Aect Mail Service
22 Setup Overview
25 Administering Mail Service
25 Changing Mail Service Settings
26 Viewing Mail Service Settings from the Command Line
26 General Setup
26 Conguring Outgoing Mail Service
3
Page 4

29 Conguring Incoming Mail Service
31 Restricting SMTP Relay
32 Restricted SMTP Relay and SMTP Authentication Interaction
32 Rejecting SMTP Connections from Specic Servers
33 Rejecting Mail from Blacklisted Senders
33 Filtering SMTP Connections
34 Limiting Junk Mail and Viruses
34 Connection Control
35 Mail Service Filtering
40 Managing Mail Quotas
40 Limiting Incoming Message Size
40 Enabling Mail Quotas for Users
41 Viewing a User’s Quota Usage
41 Conguring Quota Warnings
41 Congure Quota Violation Responses
42 Mailing Lists
42 Setting Up a Wiki-Based Mailing List
43 About Mailman
44 Setting Up a Mailman Mailing List
50 Administering Mailing Lists
53 Working with Mailing List Subscribers
55 List Subscriber Options
58 Where to Find More Information
59 Setting Mail Service Logging Options
59 Setting the Mail Service Log Detail
59 Archiving Mail Service Logs by Schedule
60 Client-Specic Conguration for Mail Service
60 Conguring Mail Client Applications
61 Using Webmail
61 Vacation Notices
62 Chapter 3: Mail Service Advanced Conguration
62 Securing User Access to Mail Service
62 Designating Authorized Mail Service Users
63 Using Workgroup Manager for Mail Service Access
63 Using Access Control Lists for Mail Service Access
64 Choosing Authentication for Mail Service
64 SMTP Authentication
65 IMAP and POP Authentication
67 Securing Mail Service with SSL
68 Conguring SSL Transport for SMTP Connections
68 Conguring SSL Transport for IMAP and POP Connections
69 Using an SSL Certicate from an External Certicate Authority
4 Contents
Page 5

71 Accessing Server Certicates from the Command Line
72 Creating a Password File from the Command Line
73 A Mail Service Virtual Host
73 Enabling Virtual Hosting
74 Adding or Removing Virtual Hosts
74 Associating Users to the Virtual Host
77 Creating Additional Mail Addresses for Users
78 Setting Up Forwarding Mail Addresses for a User
79 Working with Mail Service Data Storage
79 Viewing the Location of the Mail Store
79 Specifying the Location of the Mail Store
80 Creating Additional Mail Store Locations
81 Maximum Number of Mail Messages Per Volume
81 Backing Up and Restoring Mail Messages
82 Setting Up Mail Server Clustering with Xsan
82 Conguring Additional Mail Service Support for 8-Bit MIME
83 Chapter 4: Monitoring and Maintaining Mail Service
83 Starting or Stopping Mail Service
84 Reloading Mail Service
84 Holding Outbound Mail
85 Blocking Inbound Mail Connections
85 Allowing Administrator Access to Mail Folders
85 Creating an Administration Account
86 Monitoring Mail Service Activity
86 Viewing an Overview of Mail Service Activity
86 Viewing Mail Service Logs
87 Viewing the Mail Connections List
88 Viewing Mail Accounts
88 Monitoring the Outgoing Mail Queue
89 Viewing Mail Service Statistics
91 Chapter 5: Troubleshooting Mail Service
91 Improving Performance
92 When a Disk Is Full
92 When Mail Is Undeliverable
92 Forwarding Undeliverable Incoming Mail
92 Where to Find More Information
93 Books
93 Internet
Contents 5
Page 6

94 Appendix A: Command-Line Parameters for the serveradmin Tool and
Default Mail Service Settings
128 Appendix B: Sample Sieve Scripts
131 Index
6 Contents
Page 7

About This Guide
This guide provides a starting point for administering Mail
Service using its advanced administration tools. It contains
information about conguring Mail Service using Server
Admin.
Mail Service Administration might not be the only guide you need when administering
Mail Service, but it gives you the basics beyond initial Mac OS X Server conguration.
What’s in This Guide
This guide includes the following sections:
Chapter  1, “ Understanding Mail Service,” gives an overview of the components of
the Mac OS X Server Mail service.
Chapter  2, “ Mail Service Setup,” includes everything you need to set up and
congure Mail service and to support and congure mail users.
Chapter  3, “ Mail Service Advanced Conguration,” builds on the basic setup
instructions to help you ne tune your mail server, especially concerning security
settings and data storage.
Chapter  4, “ Monitoring and Maintaining Mail Service,” includes information for
ongoing mail server maintenance and administration.
Chapter  5, “ Troubleshooting Mail Service,” helps you to resolve some of the most
common issues that may arise with Mail service.
Appendix  A, “ Command-Line Parameters for the serveradmin Tool and Default Mail
Service Settings,” shows the default state of the settings you can congure from the
command line.
Appendix  B, “ Sample Sieve Scripts,” provides examples of sieve scripts.
Preface
Note: Because Apple periodically releases new versions and updates to its software,
images shown in this book may be dierent from what you see on your screen.
7
Page 8

Using Onscreen Help
You can get task instructions onscreen in Help Viewer while you’re managing
Mac OS X Server v10.6. You can view help on a server or an administrator computer.
(An administrator computer is a Mac OS X computer with Mac OS X Server v10.6
administration software installed on it.)
To get the most recent onscreen help for Mac OS X Server:
Open Server Admin or Workgroup Manager and then: m
Use the Help menu to search for a task you want to perform. Â
Choose Help > Server Admin Help or Help > Workgroup Manager Help to browse Â
and search the help topics.
The onscreen help contains instructions taken from Server Administration and other
advanced administration guides described “Document Road Map”in next.
To see the most recent server help topics:
Make sure the server or administrator computer is connected to the Internet while m
you’re getting help.
Help Viewer automatically retrieves and caches the most recent server help topics
from the Internet. When not connected to the Internet, Help Viewer displays cached
help topics.
8 Preface About This Guide
Page 9

Document Road Map
Network Services
Administration
Explains how to
set up DNS, VPN,
and firewall for use
with mail service.
Advanced Server
Administration
Describes using Server Admin
to install, configure, and
administer server software
and services. Includes best
practices and advice for system
planning, security, backing up,
and monitoring.
Information
Technologies
Dictionary
Provides onscreen
definitions of server
and mail service
terminology.
Introduction to
Command-Line
Administration
Explains how to use
UNIX shell commands to
configure and manage
servers and services.
Getting Started
Covers basic
installation, setup,
and management of
mail service using
Server Preferences.
Mail Server
Administration
Describes advanced
options for setting
up, configuring,
and managing
mail service.
User Management
Explains how to
give each user a
mail service account
and add users to
directory services.
Open Directory
Administration
Explains how to set up
Open Directory to
authenticate users
of mail service.
Mac OS X Server v10.6 has a suite of guides which can cover management of
individual services. Each service may be dependent on other services for maximum
utility. The road map below shows some related documentation that you may need to
fully congure your desired service to your specications. You can get these guides in
PDF format from the Mac OS X Server documentation website:
www.apple.com/server/documentation
Preface About This Guide 9
Page 10

Viewing PDF Guides Onscreen
While reading the PDF version of a guide onscreen:
Show bookmarks to see the guide’s outline, and click a bookmark to jump to the Â
corresponding section.
Search for a word or phrase to see a list of places where it appears in the document. Â
Click a listed place to see the page where it occurs.
Click a cross-reference to jump to the referenced section. Click a web link to visit the Â
website in your browser.
Printing PDF Guides
If you want to print a guide, you can take these steps to save paper and ink:
Save ink or toner by not printing the cover page. Â
Save color ink on a color printer by looking in the panes of the Print dialog for an Â
option to print in grays or black and white.
Reduce the bulk of the printed document and save paper by printing more than Â
one page per sheet of paper. In the Print dialog, change Scale to 115% (155%
for Getting Started). Then choose Layout from the untitled pop-up menu. If your
printer supports two-sided (duplex) printing, select one of the Two-Sided options.
Otherwise, choose 2 from the Pages per Sheet pop-up menu, and optionally choose
Single Hairline from the Border menu. (If you’re using Mac OS X v10.4 or earlier,
the Scale setting is in the Page Setup dialog and the Layout settings are in the
Print dialog.)
You may want to enlarge the printed pages even if you don’t print double sided,
because the PDF page size is smaller than standard printer paper. In the Print dialog
or Page Setup dialog, try changing Scale to 115% (155% for Getting Started, which has
CD-size pages).
10 Preface About This Guide
Page 11

Getting Documentation Updates
Periodically, Apple posts revised help pages and new editions of guides. Some revised
help pages update the latest editions of the guides.
To view new onscreen help topics for a server application, make sure your server or Â
administrator computer is connected to the Internet and click “Latest help topics” or
“Staying current” in the main help page for the application.
To download the latest guides in PDF format, go to the Mac OS X Server Â
documentation website:
www.apple.com/server/documentation
An RSS feed listing the latest updates to Mac OS X Server documentation and Â
onscreen help is available. To view the feed use an RSS reader application, such as
Safari or Mail:
feed://helposx.apple.com/rss/snowleopard/serverdocupdates.xml
Getting Additional Information
For more information, consult these resources:
 Read Me documents—important updates and special information. Look for them on
the server discs.
 Mac OS X Server website (www.apple.com/server/macosx)—gateway to extensive
product and technology information.
 Mac OS X Server Support website (www.apple.com/support/macosxserver)—access to
hundreds of articles from Apple’s support organization.
 Apple Discussions website (discussions.apple.com)—a way to share questions,
knowledge, and advice with other administrators.
 Apple Mailing Lists website (www.lists.apple.com)—subscribe to mailing lists so you
can communicate with other administrators using email.
Preface About This Guide 11
Page 12

Understanding Mail Service
1
Mail service in Mac OS X Server is comprised of many
dierent components that work together to provide
incoming and outgoing Mail service, mail ltering, and
mailing lists.
This chapter begins with a look at the standard protocols used for sending
and receiving mail. Then it explains how Mail service works, discusses mailing
lists, and concludes with information on how Mail service integrates with other
network services.
Mail Service Architecture
Mail service in Mac OS X Server allows network users to send and receive mail over
your network or across the Internet.
Mail service sends and receives mail using the following standard Internet mail protocols:
Simple Mail Transfer Protocol (SMTP) Â
Internet Message Access Protocol (IMAP) Â
Post Oce Protocol (POP) Â
A standard mail client setup uses SMTP to send outgoing mail and POP and IMAP to
receive incoming mail. Mac OS X Server includes an SMTP service and a combined POP
and IMAP service.
Mail service also uses a Domain Name System (DNS) service to determine the
destination IP address of outgoing mail.
12
Page 13
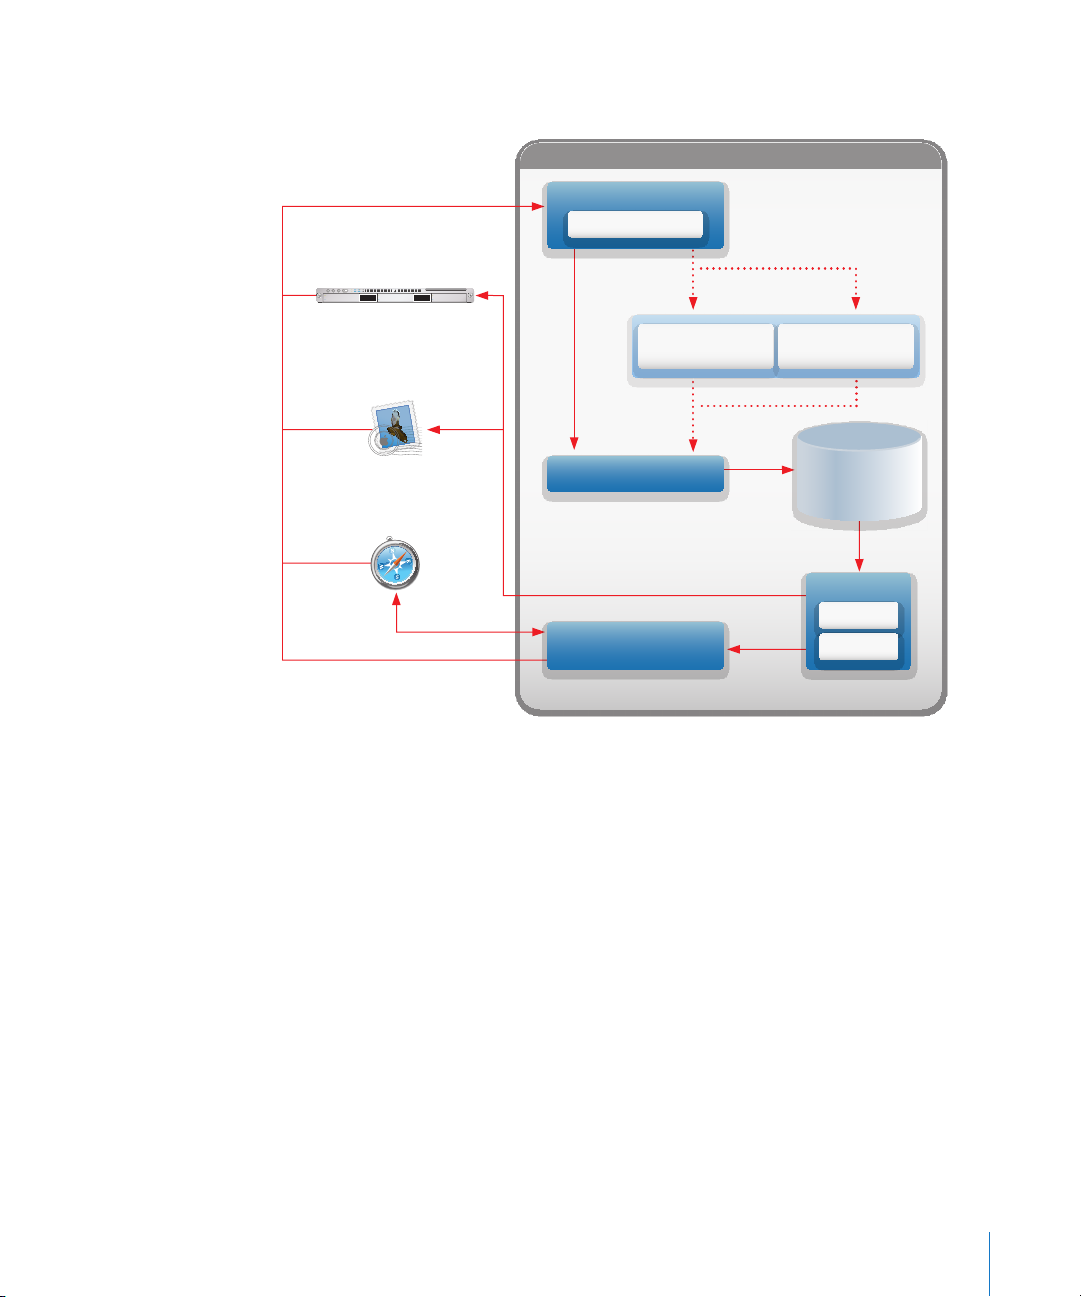
The following image gives an overview of how the components of Mac OS X Server
Mac OS X Server
External Mail
Transfer Agent (MTA)
Native Mail
User Agent (MUA)
Web Browser
Optional
Mail Delivery Agent
Mail Delivery Agent
(Squirrel Mail)
Mail Transfer Agent (MTA)
SMTP Server (Postfix)
Dovecot
POP Server
IMAP Server
Virus Scanner
(ClamAV)
Spam Filter
(Spam Assassin)
Message storage
on disk in
Maildir format
Mail service interact:
Mail Transfer Agent
Simple Mail Transfer Protocol (SMTP) is a protocol used to send and transfer mail. SMTP
queues outgoing mail messages from the user. These messages are transferred over
the Internet to their destinations, to be picked up by incoming mail protocols.
Mac OS X Server uses Postx as its mail transfer agent (MTA). Postx fully supports
SMTP. Your mail users will set their mail application’s outgoing mail server to your
Mac OS X Server running Postx.
Postx is easy to administer. Its basic conguration can be managed through Server
Admin and therefore it does not rely on editing the conguration le.
Postx uses multiple layers of defense to protect the server computer from intruders:
There is no direct path from the network to the security-sensitive local delivery tools. Â
Postx does not trust the contents of its queue les or the contents of its IPC messages. Â
Postx lters sender-provided information before exporting it via environment Â
variables.
Chapter 1 Understanding Mail Service 13
Page 14

Nearly every Postx application can run with xed low privileges and no ability to Â
change ID, run with root privileges, or run as any other user.
Postx uses the conguration les main.cf and master.cf in /etc/postx/. When Server
Admin modies Postx settings, it overwrites the main.cf le.
If you make a manual change to the conguration le of Postx, Server Admin overwrites
your changes the next time you use it to modify the Mail service conguration.
The spool les for Postx are located in /var/spool/postx/ and the log le is /var/log/
mail.log. For more information about Postx, see www.postx.org.
If you use another MTA (such as Sendmail), you can’t congure Mail service with Mac
OS X Server administration tools.
To use Sendmail instead of Postx, disable the current SMTP service through
Postx, then install and congure Sendmail. For more information about Sendmail,
see www.sendmail.org.
Mail Screening
After a mail delivery connection is made and the message is accepted for local
delivery (relayed mail is not screened), the mail server can screen it before delivery.
Mac OS X Server uses SpamAssassin (from spamassassin.apache.org) to analyze the
text of a message, and gives it a probability rating for being junk mail.
No junk mail lter is 100% accurate in identifying unwanted mail. For this reason the
junk mail lter in Mac OS X Server doesn’t delete or remove junk mail from being
delivered. Instead, it marks the mail as potential junk mail.
The user can then decide if it’s really unsolicited commercial mail and deal with it
accordingly. Many mail clients use the ratings that SpamAssassin adds as a guide in
classifying mail for the user.
Mac OS X Server uses ClamAV (from www.clamav.net) to scan mail messages for
viruses. If a suspected virus is found, you can deal with it in several ways, as described
below. The virus denitions are kept up to date (if enabled) via the Internet using a
process called freshclam.
14 Chapter 1 Understanding Mail Service
Page 15

Where Mail Is Stored
Mail is stored in an outgoing queue awaiting transfer to a remote server or in a local
mail store accessible by local mail users.
Outgoing Mail Location
By default, outgoing mail messages are stored in the following spool directory on the
startup disk in /var/spool/postx/.
This location is temporary, and the mail is stored until it’s transferred to the Internet.
These locations can be moved to any accessible volume if you create a symlink link to
the new location.
Incoming Mail Location
Mail service stores each message as a separate le in a mail folder for each user.
Incoming mail is stored on the startup disk in /var/spool/imap/dovecot/mail/GUID.
You can change the location of mail folders and indexes to another folder, disk, or disk
partition. You can even specify a shared volume on another server as the location of
the mail folder, although using a shared volume negatively aects performance.
For remotely mounted le systems, NFS isn’t recommended. The incoming mail
remains on the server until deleted by a Mail User Agent (MUA).
Mail storage can also be split across multiple partitions or stored on an Xsan
cluster. This can be done to scale Mail service or to facilitate data backup. For more
information see “Setting Up Mail Server Clustering with Xsan” on page 82.
You can change where mail is stored. For more information, see “Working with Mail
Service Data Storage” on page 79.
Chapter 1 Understanding Mail Service 15
Page 16

Local Delivery Agent
Mail is transferred from incoming mail storage to the mail recipient’s inbox by a local
delivery agent (LDA). The LDA handles local delivery, making mail accessible by the
user’s mail application. Two protocols are available from the Mac OS X Server LDA:
POP and IMAP.
Mac OS X Server uses Dovecot to provide POP and IMAP service. Your mail users will set
their mail application’s incoming mail server to your Mac OS X Server running Dovecot.
More information about Dovecot can be found at: http://www.dovecot.org/.
Dovecot
Dovecot is an open-source enterprise mail system for use in small to large enterprise
environments. Dovecot developers have focused on security, scalability, and ease
of administration.
Each message is stored as a separate le in a mail folder for each user. This design
gives the server advantages in eciency, scalability, and administration. User access to
mail is primarily through software using IMAP or POP3.
Dovecot uses the conguration le /etc/dovecot/dovecot.conf. Server Admin uses
the defaults le /etc/dovecot/dovecot.conf.default. Dovecot logs its events in
/var/log/mailaccess.log. The Dovecot mail store is located in /var/imap/ and user
folders are located in /var/spool/imap/.
The Dovecot delivery application receives mail from the Postx delivery agent and
stores the mail in user spool les in /var/spool/imap/dovecot/mail/GUID, where GUID is
the Globally Unique ID (GUID) of the mail user. The user can then use IMAP or POP to
retrieve messages.
After receiving mail from external MTAs, you can apply virus ltering or junk mail
ltering to the messages. Mac OS X Server uses ClamAV and Spam Assassin for these
tasks. For more information on enabling these, see “Limiting Junk Mail and Viruses”
on page 34.
For more information about Dovecot, see http://www.dovecot.org/.
Internet Message Access Protocol (IMAP)
IMAP is the solution for people who use more than one computer to receive mail.
IMAP is a client-server mail protocol that allows users to access mail from anywhere on
the Internet.
With IMAP, a user’s mail is delivered to the server and stored in a remote mailbox on
the server. To users, mail appears as if it were on the local computer.
A key dierence between IMAP and POP is that with IMAP the mail isn’t removed from
the server until the user deletes it.
16 Chapter 1 Understanding Mail Service
Page 17

The IMAP user’s computer can ask the server for message headers, ask for the bodies
of specied messages, or search for messages that meet certain criteria. These
messages are downloaded as the user opens them.
IMAP connections are persistent and remain open, maintaining load on the server and
possibly the network as well.
Post Oce Protocol (POP)
POP is used only for receiving mail, not for sending mail.
The POP service is like a post oce, storing mail and delivering it to a specic
address. Mail service stores incoming POP mail until users connect to Mail service and
download their waiting mail.
After a user’s computer downloads POP mail, the mail is stored only on the user’s
computer. The user’s computer disconnects from Mail service, and the user can read,
organize, and reply to the received POP mail.
An advantage of using POP is that your server doesn’t need to store mail that users
have downloaded. Therefore, your server doesn’t need as much storage space as it
would using IMAP.
However, because the mail is removed from the server, if the user’s computer sustains
hard disk damage and loses mail les, there’s no way to recover these les without
using data backups.
Another advantage of POP is that POP connections are transitory. After mail is transferred,
the connection is dropped and the load on the network and mail server is removed.
POP isn’t the best choice for users who access mail from more than one computer,
such as a home computer, an oce computer, and a laptop while on the road. When
a user retrieves mail via POP, the mail is downloaded to the user’s computer and is
usually removed from the server. If the user logs in later from a dierent computer, the
user can’t see previously downloaded mail.
User Interaction with Mail Service
Mail is delivered to its nal recipient using a mail user agent (MUA). MUAs are usually
referred to as mail clients or mail applications. These mail clients often run on the
user’s local computer.
Each user’s mail application must be congured to send messages to the outgoing
server and receive messages from the incoming server. These congurations can aect
your server’s processing load and available storage space. For more information, see
“Conguring Mail Client Applications” on page 60.
Users can also access mail through Webmail. For more information, see “Mail Service
Filtering” on page 35.
Chapter 1 Understanding Mail Service 17
Page 18

Using Mailing Lists with Mail Service
Mac OS X Server provides two types of mailing lists:
A Mailman-based list where a single mail message is distributed to recipients who Â
have subscribed to the list
A wiki-based list that allows you to send a single message that is copied to each Â
member of a Mac OS X Server wiki group
Mailman-Based Mailing Lists
Mac OS X Server uses Mailman for its traditional mailing list service.
Mailman is a mailing list service with support for built-in archiving, automatic bounce
processing, content ltering, digest delivery, spam lters, and other features. Mailman
provides a customizable web page for each mailing list.
Users can subscribe and unsubscribe themselves, as well as change list preferences.
List and site administrators can use the web interface for common tasks such as
account management, approvals, moderation, and list conguration. The web interface
requires that you have the Apache web server running.
You can access Mailman at www.yourdomain.com/mailman/listinfo.
Mailman receives mail from the local postx process by conguring alias maps.
Messages destined for a mail list are piped by the local process to Mailman processes.
The mapping is provided in /var/mailman/data/aliases.
You can nd more information about conguring and administering mail lists using
Mailman at www.list.org and at /Library/Documentation/Services/mailman.
Mailing lists dier from workgroups in a few fundamental ways:
Mailing lists aren’t linked to le or directory permissions. Â
Mailing lists can be administered by someone other than the workgroup or Â
server administrator.
Mailing list subscribers do not need an account (mail or le access) on the list’s Â
server. Any mail address can be added to the list.
Mailing list subscribers can often remove themselves from and add themselves to lists. Â
Wiki-Based Mailing Lists
A wiki-based mailing list is based on a Mac OS X wiki group. It diers from a Mailman-
based mailing list in the following ways:
Group members receive all messages sent to the group’s address. No subscription Â
is required.
The recipients list is up-to-date with the wiki group, so only members of the group Â
receive mail messages.
The group administrator controls the membership of the group. Â
18 Chapter 1 Understanding Mail Service
Page 19

Using Network Services with Mail Service
Mail service makes use of network services to ensure delivery of mail. Before sending
mail, your Mail service will probably have a DNS service determine the Internet
Protocol (IP) address of the destination.
The DNS service is necessary because people typically address their outgoing mail
by using a domain name, such as example.com, rather than an IP address, such as
198.162.12.12. To send an outgoing message, Mail service must know the IP address
of the destination.
Mail service relies on a DNS service to look up domain names and determine the
corresponding IP addresses. The DNS service can be provided by your Internet Service
Provider (ISP) or by Mac OS X Server, as explained in Network Services Administration.
Additionally, a mail exchange (MX) record can provide redundancy by listing an
alternate mail host for a domain. If the primary mail host isn’t available, the mail can
be sent to the alternate mail host. An MX record can list several mail hosts, each with
a priority number. If the lowest priority host is busy, mail can be sent to the host with
the next lowest priority, and so on.
Without a properly congured MX record in DNS, mail might not reach your intended
server.
Mail service uses DNS like this:
1 The sending server reads the mail recipient’s domain name (what comes after the @ in
the To address).
2 The sending server looks up the MX record for that domain name to nd the
receiving server.
3 If the MX record is found, the message is sent to the receiving server.
4 If the lookup fails to nd an MX record for the domain name, the sending server
assumes that the receiving server has the same name as the domain name, so the
sending server does an Address (A) lookup on that domain name and attempts to
send the le there.
To congure DNS, see “Conguring DNS for Mail Service” on page 21.
Chapter 1 Understanding Mail Service 19
Page 20

Mail Service Setup
2
This chapter explains the basic conguration of Mail service.
You learn about tools used to manage Mail service and conguration steps to manually
congure Mail service or make changes after using the Server Setup Assistant.
Managing Mail Service
This sections provides basic steps to set up Mail service on Mac OS X Server and
explains the tools you use to manage Mail service.
Before You Begin
Before setting up Mail service for the rst time:
If you are upgrading from a previous version of Mac OS X Server, you might need Â
to take special steps to upgrade Mail service. See “Viewing Mailing List Archives”
on page 53.
Decide whether to use POP, IMAP, or both for accessing mail. Â
If your server will provide Mail service over the Internet, obtain a registered Â
domain name.
Determine whether your ISP will create your MX records or whether you’ll create Â
them using your own DNS service. See “Conguring DNS for Mail Service” on page 21.
Identify the people who will use Mail service but who don’t have user accounts Â
in a directory domain accessible to Mail service. Then create user accounts for these
mail users.
Determine your authentication and transport security needs. See “ Â Understanding
SMTP Authentication” on page 26.
20
Page 21

Using Mail Service Tools
Mac OS X Server provides two primary applications and one primary command-line
tool to help you set up and manage Mail service:
 Server Admin: Use to start, stop, congure, maintain, and monitor Mail service when
you install Mac OS X Server.
 Workgroup Manager: Use to create user accounts for mail users and congure each
user’s mail options.
 serveradmin: Use to manage Mail service from the command-line remotely via ssh
or locally through the Terminal application. See “Viewing Mail Service Settings from
the Command Line” on page 26 and Introduction to Command-Line Administration.
Conguring DNS for Mail Service
Conguring DNS for Mail service entails enabling MX records with your DNS server.
If you have an ISP that provides DNS service, contact the ISP so they can enable your
MX records.
To enable MX records:
Follow these steps if you provide your own DNS service using Mac OS X Server.
1 In Server Admin, choose a server, then select DNS.
2 Click the Zones button in the toolbar.
3 Select the zone that the MX record will be added to.
If there are no zones, create one. If the mail server does not have a machine record (A),
add one. For more information, see Network Services Administration.
4 Click the + button in the Mail Exchangers list.
5 Enter the mail server’s hostname.
6 Set a mail server precedence number.
Mail servers try to deliver mail at lower numbered mail servers rst.
7 Click OK to Save.
To set up multiple servers for redundancy, add MX records with dierent precedence
numbers.
Chapter 2 Mail Service Setup 21
Page 22

How User Account Settings Aect Mail Service
In addition to setting up Mail service as described in this chapter, you can also
congure individual mail settings for anyone who has a user account on your server.
For each user, you need to:
Enable mail usage. Â
Enter the DNS name or IP address of your mail server. Â
Select the protocols for retrieving incoming mail (POP, IMAP, or both). Â
Set a quota on disk space available for storing a user’s mail. Â
Congure any alternate mail storage location. Â
You congure these settings with the Workgroup Manager application. For more
information, see User Management.
Setup Overview
You can have Mail service set up and start as part of the Mac OS X Server installation
process. An option for setting up Mail service appears in the Setup Assistant
application, which runs at the conclusion of the installation process. If you select this
option, Mail service is set up as follows:
SMTP, POP, and IMAP are active and use standard ports. Â
Junk mail lter is on. Â
Virus ltering is on. Â
Quotas are not enforced. Â
Incoming messages larger than 10 MB are refused. Â
Mailing lists are inactive. Â
Standard authentication methods are used (not Kerberos), with POP and IMAP Â
set for clear-text passwords (APOP and CRAM MD-5 turned o) and SMTP
authentication turned o.
If your server is an Open Directory master, Kerberos, CRAM-MD5, and APOP are used.
Mail is delivered only locally. (No mail is sent over the Internet.) Â
Mail relay is unrestricted. Â
You can also use the conguration assistant to set up Mail service. This interactive
assistant helps you select options and settings. If you use the conguration assistant,
you should already have MX records set properly. After using the assistant, you can
use Server Admin, Workgroup Manager, and the serveradmin command-line tool to
customize your conguration.
22 Chapter 2 Mail Service Setup
Page 23

To start the mail conguration assistant:
1 In Server Admin, select a computer in the Servers list, then select Mail.
If Mail is not listed beneath the server you selected, you must start Mail service.
Click the + button at the bottom of the Servers lists, then select Add Service from
the pop-up list.
2 Click the Congure Mail Service button to start the assistant.
3 Follow the onscreen instructions.
To congure Mail service manually:
To change Mail service manually, complete the following:
1 Make a plan.
For a list of items to think about before you start full-scale Mail service, see “Before You
Begin” on page 20.
2 Set up MX records.
For users to send and receive mail over the Internet, make sure DNS service is set up
with the relevant MX records for Mail service:
If an ISP provides DNS service to your network, contact the ISP and have them set Â
up MX records for you. Your ISP needs your mail server’s DNS name (such as mail.
example.com) and your server’s IP address.
If you use Mac OS X Server to provide DNS service, create MX records as described Â
in “Conguring DNS for Mail Service” on page 21.
If you do not set up an MX record for your mail server, your server might still be Â
able to exchange mail with other mail servers. Some mail servers will nd your mail
server by looking in DNS for your server’s A record. (You probably have an A record
if you have a web server set up.)
Note: Your mail users can send mail to each other even if you do not set up MX
records. Local Mail service doesn’t require MX records.
3 Congure incoming Mail service.
Mail service has many settings that determine how it handles incoming mail.
For instructions, see “Conguring Incoming Mail Service” on page 29.
4 Congure outgoing Mail service.
Mail service has many settings that determine how it handles outgoing mail.
For instructions, see “Conguring Outgoing Mail Service” on page 26.
5 Secure your server.
If your server exchanges mail over the Internet, make sure you’re not operating an
open relay. An open relay is a security risk and enables junk mail senders to use your
computer resources for sending unsolicited commercial mail. For instructions see
“Restricting SMTP Relay” on page 31.
Chapter 2 Mail Service Setup 23
Page 24

6 Congure additional settings for Mail service.
Additional settings that you can change aect how Mail service stores mail, limits junk
mail, and handles undeliverable mail. See the following sections for instructions:
“ Â Working with Mail Service Data Storage” on page 79
“ Â Limiting Junk Mail and Viruses” on page 34
“ Â When Mail Is Undeliverable” on page 92
7 Set up accounts for mail users.
Each person who wants Mail service must have a user account in a directory domain
accessible by your Mail service. The short name of the user account is the mail account
name and is used to form the user’s mail address.
In addition, each user account has settings that determine how Mail service handles
mail for the user account. You can congure a user’s mail settings when you create
the user’s account, and you can change an existing user’s mail settings at any time.
For instructions, see “How User Account Settings Aect Mail Service” on page 22 and
“To create a list description:” on page 46.
8 Create a postmaster alias (optional, but recommended).
You should create an administrative alias named postmaster. Mail service or the mail
administrators send reports to the postmaster account. An alias allows mail sent to
postmaster@yourdomain.com to be forwarded to an account of your choice.
Set up forwarding of the postmaster’s mail to a mail account that you check regularly.
Other common postmaster accounts are named abuse (used to report abuses of your
Mail service) and spam (used to report unsolicited commercial mail abuses by users).
To learn about creating an alias to an existing mail users, see “Creating Additional Mail
Addresses for Users” on page 77.
9 Start Mail service.
Before starting Mail service, make sure the server computer shows the correct day,
time, time zone, and daylight-saving settings in the Date & Time pane of System
Preferences. Mail service uses this information to timestamp each message. An
incorrect timestamp can cause other mail servers to handle a message incorrectly.
Also, make sure you’ve enabled Mail service protocols (SMTP, POP, or IMAP) in the
Settings pane.
After you verify this information, you can start Mail service. If you selected the Server
Assistant option to have Mail service start automatically, stop Mail service now, then
start it again for your changes to take eect. For detailed instructions, see “Setting Up a
Wiki-Based Mailing List” on page 42.
10 Set up each user’s mail client software.
After you set up Mail service on your server, mail users must congure their mail client
software. For details, see “Mail Screening” on page 14 .
24 Chapter 2 Mail Service Setup
Page 25

Administering Mail Service
You must turn on Mail service administration before you can use Server Admin to
congure or enable it. This allows Server Admin to start, stop, and change settings
for Mail service.
To enable Mail Service for administration:
1 Open Server Admin.
2 Select a server, click the Settings button in the toolbar, and then click the Services tab.
3 Select the checkbox for Mail service.
You can now congure and control Mail service using Server Admin.
You can also congure and control Mail service from the command line using the
serveradmin command-line tool. For more information, see the serveradmin man page
and Introduction to Command-Line Administration.
For advanced command-line conguration and maintenance, you may need to
enable a specic mail administration account. For more information, see “Creating an
Administration Account” on page 85.
Changing Mail Service Settings
Most settings are exposed in Server Admin and Workgroup Manager and can be
changed in those applications. If you make a change, you may need to stop and restart
the Mail service.
Many settings can also be accessed through the serveradmin command-line tool.
To change Mail service settings from the command line:
Find the name of the specic setting you need to change and then submit your
setting as an argument to serveradmin. For example, to disable POP email service:
$ sudo serveradmin settings mail:imap:enable_pop = no
$ sudo serveradmin stop mail
$ sudo serveradmin start mail
To see all possible commands, see Appendix A, “ Command-Line Parameters for the
serveradmin Tool and Default Mail Service Settings,” on page 94.
For more specic conguration of Postx and Dovecot you might want to congure
them directly. For information about conguring these tools, see the following:
For Postx, see  www.postx.org.
For Dovecot IMAP/POP, see  www.dovecot.org.
Chapter 2 Mail Service Setup 25
Page 26

Viewing Mail Service Settings from the Command Line
To view Mail service conguration settings:
$ sudo serveradmin settings mail
To view a specic setting:
$ sudo serveradmin settings mail:setting
To view a group of settings:
You can view a group of settings that have part of their names in common by entering
as much of the name as you want, stopping at a colon (:), and entering an asterisk (*)
as a wildcard for the remaining parts of the name. For example:
$ sudo serveradmin settings mail:imap:*
General Setup
This section discusses basic conguration settings you make to use Mail service.
Conguring Outgoing Mail Service
Mail service includes an SMTP service for sending mail. Subject to restrictions that you
control, the SMTP service also transfers mail to and from Mail service on other servers.
If your mail users send messages to another Internet domain, your SMTP service
delivers the outgoing messages to the other domain’s Mail service. Other Mail services
deliver messages for your mail users to your SMTP service, which then transfers the
messages to your POP service and IMAP service.
Understanding SMTP Authentication
If you don’t choose a method of SMTP authentication or authorized specic SMTP
servers to relay for, the SMTP server allow anonymous SMTP mail relay and is
considered an open relay. Open relays are bad because junk mail senders can exploit
the relay to hide their identities and send illegal junk mail without penalty.
There is a dierence between relaying mail and accepting delivery of mail. Relaying mail
means passing mail from one (possibly external) mail server or a local user’s mail client
to another (third) mail server. Accepting delivery means receiving mail from a (possibly
external) mail server to be delivered to the server’s mail users. Mail addressed to local
recipients is still accepted and delivered.
Enabling authentication for SMTP requires authentication from any selected
authentication method prior to relaying mail.
SMTP Authentication is used with restricted SMTP mail transfer to limit junk mail
propagation. For more information about these settings, see “Understanding SMTP
Authentication” on page 26.
26 Chapter 2 Mail Service Setup
Page 27

Enabling SMTP Access
SMTP is used for transferring mail between Mail service and sending mail from users’
mail clients. The SMTP Mail service stores outgoing mail in a queue until it has found
the mail exchange server at the mail’s destination. Then it transfers the mail to the
destination server for handling and eventual delivery.
SMTP service is required for outgoing Mail service and for accepting delivery of mail
from mail servers outside your organization.
To enable SMTP access:
1 In Server Admin, select a computer in the Servers list, then select Mail.
2 Click Settings.
3 Select the General tab.
4 Click Enable SMTP.
5 Select “Allow incoming mail,” if wanted.
6 If you allow incoming mail, enter the domain name to accept mail for and the mail
server’s host name.
7 Click Save.
By default SMTP is enabled on port 25. If port 25 is blocked in your environment,
you need to change the port SMTP uses.
Requiring SMTP Authentication
If your Mail service requires SMTP authentication, your server cannot be used as an
open relay by anonymous users. Someone who wants to use your server as a relay
point must rst provide the name and password of a user account on your server.
Although SMTP authentication applies primarily to mail relay, your local mail users
must also authenticate before sending mail. This means your mail users must have
mail client software that supports SMTP authentication or they can’t send mail to
remote servers. Mail sent from external mail servers and addressed to local recipients
is still accepted and delivered.
To require SMTP authentication, see “Requiring SMTP Authentication” on page 27.
Chapter 2 Mail Service Setup 27
Page 28

Relaying SMTP Mail Through Another Server
Rather than delivering outgoing mail to its destinations, your SMTP Mail service can
relay outgoing mail to another server.
Normally, when an SMTP server receives a message addressed to a remote recipient,
it attempts to send that message to that server or the server specied in the MX
record, if it exists. Depending on your network setup, this method of mail transport
might not be wanted or even possible. You might then need to relay outbound
messages through a specic server.
You might need to use this method to deliver outgoing mail through the rewall set
up by your organization. In this case, your organization will designate a server for
relaying mail through the rewall.
This method can be useful if your server has slow or intermittent connections to
the Internet.
Do not attempt to relay mail through a mail server outside your organization’s control
without the relay administrator’s permission. Trying to do so will label you as a Mail
service abuser.
To relay SMTP mail through another server:
1 In Server Admin, select a computer in the Servers list, then select Mail.
2 Click Settings.
3 Click the General tab.
4 Click “Relay outgoing mail through host” and enter the DNS name or IP address of the
server that provides SMTP relay.
5 Click Save.
Copying Undeliverable Incoming Mail
You can have Mail service copy messages that arrive for unknown local users to
another person or a group in your organization, usually the postmaster. You can
use this setting to track mail delivery failures such as SMTP connection rejections or
misaddressed mail, or to determine the source of junk mail.
To keep a copy of undeliverable incoming mail:
1 In Server Admin, select a computer in the Servers list, then select Mail.
2 Click Settings.
3 Select the General tab.
4 Select “Copy undeliverable mail to” and enter a user, group name, or alias.
5 Click Save.
28 Chapter 2 Mail Service Setup
Page 29

Saving Mail Messages for Monitoring and Archival Purposes
You can congure Mail service to send a blind carbon copy (Bcc) of each incoming
or outgoing message to a user or group. You might want to do this to monitor or
archive messages. Senders and receivers of mail don’t know that copies of their mail
are being archived.
You can set up the user or group to receive Bccs using POP, then set up a client mail
application to log in periodically and clean out the account by retrieving all new
messages. Otherwise, you might want to periodically copy and archive the messages
from the destination directory using automated shell commands.
You can set up lters in the mail client to highlight types of messages. Additionally, you
can archive all messages for legal reasons.
To save all messages:
1 In Server Admin, select a computer in the Servers list, then select Mail.
2 Click Settings.
3 Select the General tab.
4 Click the “Copy all mail to” checkbox and enter a user or group name.
5 Click Save.
Conguring Incoming Mail Service
When conguring incoming Mail service, you congure mail to be retrieved by users
and mail client applications. It involves these basic steps:
Choose and enable the type of access (POP, IMAP, or both). Â
Choose a method for authentication of the mail client. Â
Choose a policy for secure transport of mail data over SSL. Â
The following sections explain how to enable IMAP and POP access. For information
on authentication and SSL, see “Securing User Access to Mail Service” on page 62.
Enabling IMAP Access
IMAP is a client-server mail protocol that allows users to access mail from the Internet.
With IMAP, mail is delivered to the server and stored in a remote mailbox on the server.
To users, mail appears as if it were on the local computer.
A key dierence between IMAP and POP is that with IMAP the mail isn’t removed from
the server until the user deletes it. IMAP connections are persistent and remain open,
maintaining load on the server and possibly the network as well.
Chapter 2 Mail Service Setup 29
Page 30

To enable IMAP access:
1 In Server Admin, select a computer in the Servers list, then select Mail.
2 Click Settings.
3 Select the General tab.
4 Click Enable IMAP.
5 Enter the number of concurrent connections you want to allow, then click Save.
6 Click Save.
7 Continue and congure security for IMAP authentication and transport.
See the following to continue conguration:
“ Â IMAP and POP Authentication” on page 65
“ Â Securing Mail Service with SSL” on page 67
Enabling POP Access
POP is used for receiving mail. The POP Mail service stores incoming POP mail until users
have their computers connect to Mail service and download their waiting mail. After a
user’s computer downloads POP mail, the mail is stored only on the user’s computer.
An advantage of using POP is that your server doesn’t need to store mail that users
have downloaded.
POP isn’t the best choice for users who access mail from more than one computer,
such as a home computer, an oce computer, and a laptop while on the road because
after messages are accessed by one computer, they are deleted from the server.
To enable POP access:
1 In Server Admin, select a computer in the Servers list, then select Mail.
2 Click Settings.
3 Select the General tab.
4 Click Enable POP.
5 Click Save.
6 Continue and congure security for POP authentication and transport.
See the following to continue conguration:
“ Â IMAP and POP Authentication” on page 65
“ Â Securing Mail Service with SSL” on page 67
Choosing No Incoming Mail Retrieval
You can choose to enable SMTP Mail service but not supply POP or IMAP service for
incoming mail retrieval. If neither POP nor IMAP is enabled, incoming mail from other
mail servers is still delivered to users but they can’t access their mail with their mail
client applications.
30 Chapter 2 Mail Service Setup
Page 31

Mail accepted for local delivery is queued until POP or IMAP services are enabled,
delivery to /var/mail/ is enabled, or the message expires and a Non Delivery Receipt
(NDR) is sent to the sender (after 72 hours by default).
If delivery to /var/mail/ is enabled, users can still access mail using UNIX mail tools
such as PINE or ELM. Messages delivered to /var/mail/ are not available for delivery to
users with Dovecot if POP or IMAP are enabled again.
If POP and IMAP are disabled, you can change where incoming mail is stored from its
default location at /var/spool/imap/dovecot/mail/GUIDto /var/mail/GUID.
To change the local delivery directory:
1 In Server Admin, select a computer in the Servers list, then select Mail.
2 Click Settings.
3 Select the General tab.
4 Click the “Deliver to /var/mail/” checkbox.
5 Click Save.
Restricting SMTP Relay
Your Mail service can restrict SMTP relay by allowing only approved hosts to relay mail.
You create the list of approved servers.
Approved hosts can relay through Mail service without authenticating. Servers not on
the list cannot relay mail through Mail service unless they authenticate rst. All hosts,
approved or not, can deliver mail to your local mail users without authenticating.
Mail service can log connection attempts made by hosts not on your approved list.
To restrict SMTP relay:
1 In Server Admin, select a computer in the Servers list, then select Mail.
2 Click Settings.
3 Select the Relay tab.
4 Click the “Accept SMTP relays only from these hosts and networks” checkbox.
5 Edit the list of hosts by choosing one of the following:
Click the Add (+) button to add a host to the list. Â
Click the Remove (-) button to delete the selected host from the list. Â
Click the Edit (/) button to change the selected host from the list. Â
When adding to the list, Server Admin accepts a variety of notations. You can:
Enter a single IP address or the network/netmask pattern, such as 192.168.40.0/21. Â
Enter a host name, such as mail.example.com. Â
Enter an Internet domain name, such as example.com. Â
Chapter 2 Mail Service Setup 31
Page 32

Restricted SMTP Relay and SMTP Authentication Interaction
The following table describes the results of using restricted SMTP relay and SMTP
authentication (see “SMTP Authentication” on page 64) in various combinations.
SMTP requires authentication Restricted SMTP relay Result
On O All mail servers must
authenticate before Mail
service accepts mail for relay.
Your local mail users must also
authenticate to send mail out.
On On Approved mail servers can
relay without authentication.
Servers you haven’t approved
can relay after authenticating
with Mail service.
O On Mail service can’t be used for
open relay. Approved mail
servers can relay (without
authenticating).
Servers that you haven’t
approved can’t relay unless
they authenticate, but they can
deliver to your local mail users.
Your local mail users don’t need
to authenticate to send mail.
This is the most common
conguration.
Rejecting SMTP Connections from Specic Servers
Mail service can reject unauthorized SMTP connections from hosts on a disapprovedhosts list that you create. Mail trac from hosts on this list is denied and the SMTP
connections are closed after posting a 554 SMTP connection refused error.
To reject unauthorized SMTP connections from specic servers:
1 In Server Admin, select a computer in the Servers list, then select Mail.
2 Click Settings.
3 Select the Relay tab.
4 Click the “Refuse all messages from these hosts and networks” checkbox.
5 Edit the list of servers by choosing one of the following:
Click the Add (+) button to add a host to the list. Â
Click the Remove (-) button to delete the selected host from the list. Â
Click the Edit (/) button to change the selected host from the list. Â
32 Chapter 2 Mail Service Setup
Page 33

When adding to the list, Server Admin accepts a variety of notations. You can:
Enter a single IP address or the network/netmask pattern, such as 192.168.40.0/21. Â
Enter a host name, such as mail.example.com. Â
Enter an Internet domain name, such as example.com. Â
Rejecting Mail from Blacklisted Senders
Mail service can reject mail from SMTP servers that are blacklisted as open relays by a
Real-time Blacklist (RBL) Server. Mail service uses an RBL server that you specify. RBLs
are sometimes called black-hole servers.
Blocking unsolicited mail from blacklisted senders might not be completely accurate.
Sometimes it prevents valid mail from being received.
To reject mail from blacklisted senders:
1 In Server Admin, select Mail in the Computers & Services pane.
2 Click Settings.
3 Select the Relay tab.
4 Click the “Use these junk mail rejection servers” checkbox.
5 Edit the list of servers by adding the DNS name of an RBL server:
Click the Add (+) button to add a server to the list, then enter the domain name of a Â
RBL server, such as rbl.example.com.
Click the Remove (-) button to delete the selected server from the list. Â
Click the Edit (/) button to change the selected server. Â
Filtering SMTP Connections
You can use Mac OS X Server Firewall service to allow or deny access to your SMTP
Mail service from specic IP addresses. Filtering disallows communication between
an originating host and your mail server. Mail service doesn’t receive the incoming
connection and no SMTP error is generated or sent back to the client.
To lter SMTP connections:
1 In Server Admin, select Firewall in the Computers & Services pane.
2 Create a rewall IP lter using the instructions in Network Services Administration,
using the following settings:
Access: denied Â
Port number: 25 (or your incoming SMTP port, if you use a nonstandard port) Â
Protocol: TCP Â
Source: the IP address or address range you want to block Â
Destination: your mail server’s IP address Â
Chapter 2 Mail Service Setup 33
Page 34

3 If you want, log the packets to monitor the SMTP abuse.
4 Add more lters for the SMTP port to allow or deny access from other IP addresses
or address ranges.
For additional information about Firewall service, see Network Services Administration.
Limiting Junk Mail and Viruses
You can congure Mail service to decrease the volume of unsolicited commercial mail,
also known as junk mail (or spam), and mail containing viruses. You can take steps to
block junk mail or viruses that are sent to mail users. Additionally, you can secure your
server against use by Mail service abusers who try to use your resources to send junk
mail to others.
You can also take steps to prevent senders of junk mail from using your server as
a relay point. A relay point or open relay is a server that unselectively receives and
forwards mail addressed to other servers. An open relay sends mail from any domain
to any domain.
Junk mail senders exploit open relay servers to avoid having their SMTP servers
blacklisted as sources of junk mail. You don’t want your server blacklisted as an open
relay because other servers might reject mail from your users.
There are two main methods of preventing viruses and junk mail passing through or
into your mail system. Using both methods helps mail system integrity. The two points
of control are explained in the following sections:
“ Â Connection Control” on page 34
“ Â Mail Service Filtering” on page 35
Connection Control
This method of prevention controls which servers can connect to your mail system
and what those servers must do to send mail through your mail system. Your Mail
service can do any of the following to exercise connection control:
Require SMTP authentication. See “ Â Requiring SMTP Authentication” on page 27.
Restrict SMTP relay, allowing relay only by approved servers. See “ Â Restricting SMTP
Relay” on page 31.
Reject all SMTP connections from disapproved servers. See “ Â Rejecting SMTP
Connections from Specic Servers” on page 32.
Reject mail from blacklisted servers. See “ Â Rejecting Mail from Blacklisted Senders”
on page 33.
Filter SMTP connections. See “ Â Filtering SMTP Connections” on page 33.
34 Chapter 2 Mail Service Setup
Page 35

Mail Service Filtering
Mail service uses SpamAssassin (spamassassin.apache.org) to lter spam, or junk mail,
from incoming mail messages. Mail service uses ClamAV (www.clamav.net) to detect
viruses in mail messages. Both tools are managed within the Filters pane of Mail
Settings in Server Admin. Additional information on conguring the junk mail and
spam lters follows in these sections:
“ Â Enabling Junk Mail Screening (Bayesian Filters)” on page 35
“ Â Training the Junk Mail Filter” on page 36
“ Â Filtering Mail by Language and Locale” on page 37
“ Â Enabling Virus Screening” on page 38
Enabling Junk Mail Screening (Bayesian Filters)
Before you can benet from mail screening, it must be enabled. While enabling
screening, you congure screening parameters.
Bayesian mail ltering is the classication of mail messages based on statistics. Each
message is analyzed and word frequency statistics are saved. Mail messages that have
more of the same words as those in junk mail receive a higher marking of probability
that they are also junk mail. When the message is screened, the server adds a header
(”X-Spam-Level”) with the junk mail probability score.
For example, let’s say you have 400 mail messages where 200 of them are junk mail
and 200 are good mail. When a message arrives, its text is compared to the 200
junk mail and the 200 good messages. The lter assigns the incoming message a
probability of being junk or good, depending on what group it most resembles.
Bayesian ltering has shown itself to be a very eective method of nding junk mail if
the lter has enough data to compare. One strength of this method is the more mail
you get and classify (a process called training), the more accurate the next round of
classication is. Even if junk mail senders alter their mailings, the lter takes that into
account the next time around.
To enable junk mail screening:
1 In Server Admin, select a computer in the Servers list, then select Mail.
2 Click Settings.
3 Select the Filters tab.
4 Select Scan Mail for Junk Mail.
5 Set the level of permissiveness (Cautious, Moderate, Aggressive).
The permissiveness meter sets how many junk mail ags can be applied to a message
before it is processed as junk mail. If you set it to “Least permissive,” mildly suspicious
mail is tagged and processed as junk mail. If you set it to “Most permissive,” it takes a
high score (in other words, many junk mail characteristics) to mark it as junk.
Chapter 2 Mail Service Setup 35
Page 36

6 Choose from the following to deal with junk mail messages.
 Bounced: Sends the message back to the sender. You can optionally send a mail
notication of the bounce to a mail account, probably the postmaster.
 Deleted: Deletes the message without delivery. You can optionally send a mail
notication of the bounce to a mail account, probably the postmaster.
 Delivered: Delivers the message even though it’s probably junk mail. You can
optionally add text to the subject line, indicating that the message is probably junk
mail, or encapsulate the junk mail as a MIME attachment.
 Redirected: Delivers the message to someone other than the intended recipient.
7 Choose how often to update the junk mail database updated, if desired.
8 Click Save.
For an explanation of other options, see “Filtering Mail by Language and Locale” on
page 37.
Training the Junk Mail Filter
The junk mail lter must be told what is and isn’t junk mail. Mac OS X Server provides a
method of training the lter with the help of mail users. The server runs an automated
command at 2:15 am (a cron job) that scans two specially named mail users’ inboxes.
It runs SpamAssassin’s sa-learn tool on the contents of the inboxes and uses the results
for its adaptive junk mail lter.
Training the junk mail lter with users’ help:
1 Enable junk mail ltering.
See “Enabling Junk Mail Screening (Bayesian Filters)” on page 35.
2 Create two local accounts: junkmail and notjunkmail.
3 Use Workgroup Manager to enable them to receive mail.
4 Instruct mail users to redirect junk mail messages that have not previously been
tagged as junk mail to junkmail@<yourdomain>.
5 Instruct mail users to redirect real mail messages that were wrongly tagged as junk
mail to notjunkmail@<yourdomain>.
Each day at 2:15 am, the junk mail lter will learn what is junk and what was mistaken
for junk.
6 Delete the messages in the junkmail and notjunkmail accounts daily.
36 Chapter 2 Mail Service Setup
Page 37

Training the junk mail lter without user interaction:
You can also train the junk mail lter by giving it known junk and good mail messages.
Accurate training requires a large sample, so a minimum of 200 messages of each type
is advised.
1 Choose a mailbox of 200 messages made of only junk mail.
2 Use Terminal and the lter’s command-line training tool to analyze and remember junk
mail using the following command:
sa-learn --showdots --spam sample junk mail directory/*
3 Choose a mailbox of 200 messages made of only good mail.
4 Use Terminal and the lter’s command-line training tool to analyze and remember
good mail using the following command:
sa-learn --showdots --ham sample good mail directory/*
If the junk mail lter fails to identify a junk mail message, train it again so it can do
better next time. Use sa-learn again with the --spam argument on the mislabeled
message. Likewise, if you get a false positive (a good message marked as junk mail),
use sa-learn again with the --ham argument to further train the lter.
Filtering Mail by Language and Locale
You can lter incoming mail based on locales or languages. Mail messages composed
in foreign text encodings are often erroneously marked as junk mail. You can congure
your mail server to not mark messages from designated originating countries or
languages as junk mail.
To allow mail by language and locale:
1 In Server Admin, select a computer in the Servers list, then select Mail.
2 Click Settings.
3 Select the Filters tab.
4 Select Scan Email for Junk Mail.
5 Click the Edit (/) button next to Accepted Languages to change the list, select the
language encodings to allow as non-junk mail, and click OK.
6 Click the Edit (/) button next to Accepted Locales to change the list, select the country
codes to allow as non-junk mail, and click OK.
7 Click Save.
Chapter 2 Mail Service Setup 37
Page 38

Enabling Virus Screening
Before you can benet from mail screening, it must be enabled. While enabling
screening, you congure screening parameters.
Mac OS X Server uses ClamAV (from www.clamav.net) to scan mail messages for
viruses. If a suspected virus is found, you can deal with it several ways, described
below. The virus denitions are kept up to date (if enabled) via the Internet using
a process called freshclam.
To enable virus screening:
1 In Server Admin, select a computer in the Servers list, then select Mail.
2 Click Settings.
3 Select the Filters tab.
4 Select Scan Email for Viruses.
5 Choose from the following to deal with junk mail messages.
 Bounced: Sends the message back to the sender. You can optionally send a mail
notication of the bounce to a mail account (probably the domain’s postmaster)
and notify the intended recipient.
 Deleted: Deletes the message without delivery. You can optionally send a mail
notication to a mail account, probably the postmaster, as well as the intended
recipient.
 Redirected: Delivers the message to a designated address for further analysis.
6 Choose if you want to notify the intended recipient if the message was ltered.
7 Choose how often to update the virus database.
A minimum of twice a day is suggested. Some administrators choose eight times a day.
8 Click Save.
38 Chapter 2 Mail Service Setup
Page 39

Server-Side Mail Rules
Mac OS X Server supports Sieve scripts to process server-side mail rules. Sieve is an
Internet standard mail ltering language for server-side ltering. Sieve scripts interact
with incoming mail before nal delivery.
Sieve acts much like rules in mail programs to sort or process mail based on user-
dened criteria. Sieve can provide such functions as vacation notications, message
sorting, and mail forwarding.
Sieve scripts are kept for each user on the mail server at /var/spool/imap/dovecot/
sieve-scripts/GUID. The directory is owned by Mail service, so users normally don’t have
access to it and can’t put their scripts there for mail processing. For security purposes,
users and administrators upload their scripts to a Sieve process, managesieve, which
transports the scripts to the mail process for use.
To enable Sieve support:
For Sieve to function, you must enable its communications port.
By default, Sieve has the vacation extension.
Place scripts in the central script repository at /usr/sieve/.
Do not use Sieve scripts to process mail for mail aliases set up in Workgroup Manager.
You must use Postx-style aliases. See “Creating Additional Mail Addresses for Users”
on page 77.
1 In Server Admin, select a computer in the Servers list, then select Mail.
2 Click Settings.
3 Select the Filters tab.
4 Select Enable server side mail rules.
From the command line:
Add the following entry in /etc/services/:
...
sieve 2003/udp # Sieve mail filtering
Sieve 2003/tcp # Sieve mail filtering
...
Sieve’s complete syntax, commands, and arguments are found in IETF RFC 3028 at
www.ietf.org/rfc/rfc3028.txt?number=3028.
Other information about Sieve and a sample script archive can be found in
Appendix B, “ Sample Sieve Scripts” and atwww.cyrusoft.com/sieve.
For more information about managesieve, see http://wiki.dovecot.org/ManageSieve.
Chapter 2 Mail Service Setup 39
Page 40

Managing Mail Quotas
Mail quotas dene how much disk space a user’s mail can use on the mail server.
Quotas are set on a per-user basis in the user’s record in Workgroup Manager.
Although you don’t set a mail user’s quota in Server Admin, you do manage quota
enforcement and your server’s response to quota violation.
Mail quotas are especially important if the mail server hosts many IMAP accounts.
IMAP doesn’t require mail to be removed from the server when read, so IMAP users
who get large attachments can ll their quotas quickly.
Limiting Incoming Message Size
You can set a maximum size for incoming messages. The default is 10 MB. You might
not want to allow large attachments that add to the message size.
To set a maximum incoming message size:
1 In Server Admin, select a computer in the Servers list, then select Mail.
2 Click Settings.
3 Click the Quotas tab.
4 Click the “Refuse messages larger than” checkbox and enter the number of megabytes
you want to set as the limit.
5 Click Save.
Enabling Mail Quotas for Users
You can enable limits to mail storage on server. This is especially important if you use
IMAP for incoming messages because mail messages aren’t necessarily deleted when
downloaded to the user.
You use Workgroup Manager to enable a user’s mail quota.
To enable a user’s mail quota:
1 In Workgroup Manager, open the user account you want to work with, if it isn’t open.
To open the account, click the Accounts button, click the globe icon below the tool bar
menu, and open the directory domain where the account resides. Click the lock to be
authenticated. Select the user in the user list.
2 Click the Mail tab.
If the user doesn’t have mail enabled, enable it now.
3 Enter the number of MB for the user’s mail storage in the Mail Quota box.
4 Click Save.
40 Chapter 2 Mail Service Setup
Page 41

Viewing a User’s Quota Usage
When a mail user is over quota, Server Admin (in the Mail> Maintenance > Accounts
pane) reports a percent free which is negative. This percent is proportional to the
amount the user is over quota.
For example, suppose a user has a 2 MB quota and has received 5 MB of mail. This is 3 MB
over quota, which is 150% over quota. Server Admin reports this as “-150% of quota.”
Conguring Quota Warnings
When a user’s mailbox approaches its storage quota, you can warn users of an
impending quota violation. You choose whether to warn the mail user, how often to
warn him or her, and at what point to send the warning.
To congure quota warnings:
1 In Server Admin, select a computer in the Servers list, then select Mail.
2 Click Settings.
3 Select the Quotas tab.
4 Click Enable quota warnings.
5 Enter the maximum percentage of storage usage before a warning is sent.
6 Enter the frequency of the warning notice, in number of days.
7 If you want to customize the quota warning notication, click Edit Quota Warning
Message and customize the message.
8 Click Save.
Congure Quota Violation Responses
When a mail user has more mail in storage than is allowed for his or her quota, the
mail server recognizes a quota violation. There are typically two responses to quota
violation: a violation notice, and suspension of Mail service.
To congure quota violation responses:
1 In Server Admin, select a computer in the Servers list, then select Mail.
2 Click Settings.
3 Select the Quotas tab.
4 Click Enable Quota Warnings.
5 To customize the quota violation notication, click Edit Quota Warning Message,
then customize the message.
6 To suspend Mail service for users who exceed their quotas, select “Disable a user’s
incoming mail when they exceed 100% of quota.”
7 To customize the over-quota message, click Edit Over Quota Error Message and then
customize the message.
8 Click Save.
Chapter 2 Mail Service Setup 41
Page 42

Mailing Lists
Use this section to determine how to congure and manage mailing lists with built-in
mailing list functionality of Mac OS X Server.
Setting Up a Wiki-Based Mailing List
To send mail messages to all members of a wiki group, you can enable server group
mailing lists. Each member of the wiki group receives a copy of messages sent to the
group address.
To enable wiki-based mailing lists:
1 In Server Admin, select a computer in the Servers list, then select Mail.
2 Click Settings.
3 Select the Mailing Lists tab.
4 Click Enable Server Group Mailing Lists.
5 Enter an interval for how frequently the recipients list is updated.
The mail server rescans the group membership periodically. Members added to the
group between updates of the recipients list won’t receive messages until the mail
server reads the group membership record.
6 In Workgroup Manager, enable the Mailing List service for each group you want to
have a mailing list address.
The setting is located in the Basic group options in Workgroup Manager.
For information about using Workgroup Manager, see Open Directory Administration.
Note: The address for a group-based list is group_shortname@ServerDNSname.
42 Chapter 2 Mail Service Setup
Page 43

About Mailman
Some of Mailman’s main features include the following (from www.list.org/features.html):
Web-based list administration for nearly all tasks, including list conguration, Â
moderation (post approvals), and management of user accounts.
Web-based subscribing and unsubscribing, and user conguration management. Â
Users can temporarily disable their accounts, select digest modes, hide their mail
addresses from other members, and so on.
A customizable home page for each mailing list. Â
Per-list privacy features, such as closed subscriptions, private archives, private Â
membership rosters, and sender-based posting rules.
Congurable (per-list and per-user) delivery mode. Â
Integrated bounce detection within an extensible framework. Â
Automatic disposition of bouncing addresses (disable, unsubscribe). Â
Integrated spam lters. Â
Built-in web-based archiving, with hooks for external archivers. Â
Integrated Usenet gatewaying. Â
Integrated autoreplies. Â
Majordomo-style mail-based commands. Â
Multiple list owners and moderators. Â
Support for virtual domains. Â
Compatibility with most web servers and browsers, and most SMTP servers. Â
Requires Python 2.1.3 or later.
An extensible mail delivery pipeline. Â
High-performance mail delivery, with a scalable architecture. Â
For more information about Mailman, see: www.list.org.
Chapter 2 Mail Service Setup 43
Page 44

Setting Up a Mailman Mailing List
This section describes the process of setting up a Mailman mailing list. To do this,
you enable the service, dene a list name, and add subscribers to the list.
When you create a mailing list, you must specify a master password that gives you
control over all lists. Do not use an administrator’s or user’s login password. You must
also specify the mail addresses of other administrators who need the master password.
The following topics explain how to set up a mailing list.
Enabling Mailing Lists
Before you can dene mailing lists and subscribers, you must enable the list service
and create the administrator’s default mailing list. When you enable mailing lists,
you also create a password that allows administration of all lists on the server
and automatically create a special list for mailing list administrators. Mailing list
administrators get a copy of the master list password and error notications.
Note: This list (called Mailman) must exist for mailing lists to function. Do not remove
the master list.
To enable mailing lists:
1 In Server Admin, select a computer in the Servers list, then select Mail.
2 Click Settings.
3 Select the Mailing Lists tab.
4 Click Enable Mailman Mailing Lists.
5 Enter the master list password.
6 Enter the mail addresses of the list administrators, then click OK.
You must enter at least one administrator who will receive notications about the
mailing list service.
7 Click Save.
The Mailman list is created and the master password is sent to the indicated administrators.
44 Chapter 2 Mail Service Setup
Page 45

Creating a Mailing List
Mailing lists distribute a single mail message to multiple recipients. After you create a
mailing list, mail sent to the list’s address is sent to all subscribers. Mailing lists have list
administrators who can change list membership and list features.
Lists can be self-subscribing, so list administrators don’t need to add and remove
subscribers. The subscribers can do so themselves.
Note: Mailing lists cannot be renamed or corrected after creation. This is a limitation of
Mailman, the list software used by Mac OS X Server. Although you can change the case
of a list name using Mailman’s web interface, Server Admin doesn’t allow changing the
list name in any way.
To rename or correct a list name, you must create a list and add existing users to the
new list. This results in a Welcome message being sent to all listed users.
To create a list:
1 In Server Admin, select a computer in the Servers list, then select Mail.
2 Click Settings.
3 Select the Mailing Lists tab.
4 Click the Add (+) button under the Lists pane.
5 Enter the list’s name.
The list name is the mail account name that mailing list users will send their mail to.
The name isn’t case sensitive, and cannot contain spaces.
6 Enter the list administrator’s mail address, then click Edit.
If you only enter a name, it must be a username on the server. If you enter
username@domain, the administrator doesn’t need to be a local user.
7 Click Users May Self Subscribe, if desired.
8 Choose the default language for the list.
You can choose English, French, German, Japanese, Korean, Russian, or Spanish.
This setting encodes the text generated by the list for the default language.
9 Choose additional languages you want to be supported by the list.
This setting also encodes the text generated by the list for the default language.
10 Click OK.
11 Click Save.
You can now add subscribers to the list. See “Maximum Number of Mail Messages Per
Volume” on page 81.
If you allow users to self-subscribe, they can subscribe using mail or the web
administration page.
Chapter 2 Mail Service Setup 45
Page 46

Setting a List’s Maximum Message Length
You can set the maximum size message that the list accepts. You can disallow large
attachments by setting a small maximum size, or you can allow le collaboration by
setting an unlimited message size.
You use Server Admin to set the maximum message length.
To set a list’s maximum message length:
1 In Server Admin, select a computer in the Servers list, then select Mail.
2 Click Settings.
3 Select the Mailing Lists tab.
4 Select the list whose message length you want to set.
5 Click the Edit (/) button under the Lists pane.
6 Enter the maximum message length (in KB).
If you enter 0, the maximum length is unlimited.
7 Click OK.
Creating a Mailing List Description
Sometimes it’s dicult to know the scope and subject matter of a mailing list from the
short list name. The list information page contains a description of the list, the subject
matter it covers, and (optionally) who is permitted to subscribe. These details are
especially good for self-subscription lists. A potential subscriber can decide whether to
subscribe from the list’s description.
You use the web interface to set the mailing list description. Web services must be
enabled to access the web-based interface.
To create a list description:
1 In a web browser, enter the URL of the list administration page.
This is usually server.domain.tld/mailman/admin/listname.
2 Enter the master list password and click “Let me in.”
This is not the user’s login password. The master list password was set when mailing lists
were enabled on the server. It was mailed to list administrators designated at that time.
3 Make sure that General Options is selected from the Conguration Categories link section.
4 Enter a short phrase in the description text box.
5 In the info text box, enter information about the list, its rules, and its content
expectations.
6 Click Submit Your Changes.
46 Chapter 2 Mail Service Setup
Page 47

Customizing the Mailing List Welcome Message
When subscribers join a mailing list, by assignment or self-subscription, they receive
an automated welcome message. The message explains where to nd the list archives
and how to unsubscribe. You can customize it by adding text, describing the list
culture and rules, or including any other information you want subscribers to have.
You use the web interface to set the mailing list welcome message. Web services must
be enabled to access the web interface.
To customize a welcome message:
1 In a web browser, enter the URL of the list administration page.
This is usually server.domain.tld/mailman/admin/listname.
2 Enter the master list password.
This is not the user’s login password. The master list password was set when mailing lists
were enabled on the server. It was mailed to list administrators designated at that time.
3 Make sure that General Options is selected from the Conguration Categories link section.
4 Enable “Send welcome message to newly subscribed members.”
5 Enter the text you want to include in the “List-specic text prepended” text box.
6 Click Submit Your Changes.
Customizing the Mailing List Unsubscribe Message
When a user is unsubscribed from a mailing list, by the list administrator or by
unsubscribing, the user receives an automated unsubscribe message. The message
conrms the unsubscribing. You can customize it by adding information you want
users to have upon leaving the list.
You use the web interface to set the mailing list welcome message. Web services must
be enabled to access the web interface.
To customize the subscriber welcome message:
1 In a web browser, enter the URL of the list administration page.
This is usually server.domain.tld/mailman/admin/listname.
2 Enter the master list password.
This is not the user’s login password. The master list password was set when mailing lists
were enabled on the server. It was mailed to list administrators designated at that time.
3 Make sure that General Options is selected from the Conguration Categories link section.
4 Enable “Send goodbye message to members.”
5 Enter the text you want to include in the “Text sent to people leaving the list” text box.
6 Click Submit Your Changes.
Chapter 2 Mail Service Setup 47
Page 48

Enabling a Mailing List Moderator
You can create a moderated list where the posts must be approved by a list
administrator before the post is sent. You designate list moderators, who have limited
administrative privileges. They can’t change list options but they can approve or reject
subscription requests and postings.
When moderators enter their password in the list administration page, they get a page
with their own moderating tasks available.
You use the web interface to set mailing list moderation. Web services must be
enabled to access the web interface.
To enable list moderation:
1 In a web browser, enter the URL of the list administration page.
This is usually server.domain.tld/mailman/admin/listname.
2 Enter the master list password.
This is not the user’s login password. The master list password was set when mailing
lists were enabled on the server and was mailed to list administrators designated at
that time.
3 Make sure that General Options is selected from the Conguration Categories link section.
4 Enter the list moderator addresses you want to include in the “The list moderator mail
addresses” text box.
5 Click Submit Your Changes.
6 Select the Password Options in the Conguration Categories link section.
7 Enter a password in the moderator password eld and conrm it.
8 Click Submit Your Changes.
Setting Mailing List Message Bounce Options
When a list message bounces and returns to the list server, you can choose how the
list server handles the resulting bounce message.
You use the web interface to set the mailing list bounce options. Web services must be
enabled to access the web interface.
To set bounce options:
1 In a web browser, enter the URL of the list administration page.
This is usually server.domain.tld/mailman/admin/listname.
2 Enter the master list password.
This is not the user’s login password. The master list password was set when mailing
lists were enabled on the server and was mailed to list administrators designated at
that time.
48 Chapter 2 Mail Service Setup
Page 49

3 Select Bounce Processing in the Conguration Categories link section.
4 Select the bounce processing options you want.
Each option section has a link to a help page that explains the option setting.
5 Click Submit Your Changes.
Designating a Mailing List as Private
You might not want to show some lists on the web list access page. To designate a list
as “private” so it isn’t shown, see server.domain.tld/mailman/listinfo.
You use the web-based interface to set a list’s privacy options. Web services must be
enabled to access the web-based interface.
To set privacy options:
1 In a web browser, enter the URL of the list administration page.
This is usually server.domain.tld/mailman/admin/listname
2 Enter the master list password.
This is not the user’s login password. The master list password was set when mailing lists
were enabled on the server. It was mailed to list administrators designated at that time.
3 In the Conguration Categories link section, select Privacy Options and then
Subscription Rules.
4 Deselect “Advertise this list” in the privacy list.
5 Click Submit Your Changes.
Adding Subscribers
Use Server Admin to add mailing list subscribers to a list. Mailing list subscribers do
not need an account (mail or le access) on the list’s server. Any mail address can be
added to the list. You must have an existing list to add a subscriber.
If the subscriber is a user on the mail server, you can use the Users and Groups button
to add a local subscriber to the list.
To add subscribers:
1 In Server Admin, select Mail in the Computer & Services list.
2 Click Settings.
3 Select the Mailing Lists tab.
4 Select the list you want to add a subscriber to.
5 Click the Add (+) button under the Members pane.
6 Enter the recipient’s mail address.
If you’re entering multiple subscribers, enter the recipient mail addresses or drop a text
list into the User Identiers box.
Chapter 2 Mail Service Setup 49
Page 50

If the subscribers are users on the mail server, you can use the Users and Groups
button to add a local groups to the list.
7 Choose from the following subscriber privileges:
 Users subscribed to list: This means the user will receive mail sent to the list address.
 Users may post to list: This means the list will accept mail from the user.
 Users can administer list: This means the user has administrative privileges for the list.
8 Click OK.
Administering Mailing Lists
Mailing lists can be administered by designated list members, called list administrators
or list managers. List administrators can add or remove subscribers and can designate
other list administrators. List administrators can also designate list moderators, who
have limited administrative privileges. They can’t change list options, but they can
approve or reject subscription requests and postings.
Mailman uses a web interface and mail-based administration. Web services must be
enabled to access the web interface. Dozens of conguration options are available for
Mailman mailing lists that are not accessible using Server Admin.
The Web-based administration interface is found at server.domain.tld/mailman/listinfo.
Information and access to a specic list is found at server.domain.tld/mailman/listinfo/
listname.
For documentation of these functions for users, list administrators, and server
administrators, see www.list.org/docs.html.
Viewing a Server’s Mailing Lists
You can view public (not private) lists that are being run on a server through the
server’s web information portal. Web services must be enabled to access the portal.
To see the lists:
Open a web browser, and enter the list’s URL: m
server.domain.tld/mailman/listinfo
Viewing a Mailing List’s Information Page
Each list has an information page on the server that shows basic information about
the list, how to post to it, how to subscribe to it, and how to access subscription
preferences. You access the list information page with a web browser.
Web services must be enabled to access the web interface.
To see the list’s information page:
Open a web browser, and enter the list’s URL: m
server.domain.tld/mailman/listinfo/listname
50 Chapter 2 Mail Service Setup
Page 51

Designating a List Administrator
When you set up a mailing list, you designate at least one user to administer it.
This administrator has access to the other list settings pages for all lists on the server.
You can designate more than one list administrator and change any subscriber to or
from being a list administrator. You can add, remove, or change the list administrator
using these instructions.
List administrators do not need to be users (neither administrator nor regular) on
the server. They are listed as mail addresses. Giving list administrator privileges to a
subscriber does not give them privileges on the mailing list server other than making
and removing lists and editing list preferences.
To designate a list administrator:
1 In Server Admin, select a computer in the Servers list, then select Mail.
2 Click Settings.
3 Select the Mailing Lists tab.
4 Select the list that has the subscriber to be given list administrator privileges.
If the user isn’t subscribed to the list, you must add him or her rst. For more
information, see “Maximum Number of Mail Messages Per Volume” on page 81.
5 Select the subscriber.
6 Click the Admin checkbox in the subscriber list, if wanted.
7 Click OK.
Accessing Web-Based Administrator Options
List administrators set preferences for mailing list behavior. They also view pending
moderation requests for mailing lists that are being run on a server. These and other
tasks are accomplished through the server’s web-administration portal. Web services
must be enabled to access the web portal.
Server Admin does not give access to the wide range of preferences available for a
mailing list. List administrators are encouraged to use the web interface for all but the
most basic setup tasks.
Information about what options are available via the web interface can be found at
www.list.org/docs.html.
To access a list’s web-based options:
1 In a web browser, enter the URL of the list administration page.
This is usually server.domain.tld/mailman/admin/listname.
2 Enter the master list password.
Chapter 2 Mail Service Setup 51
Page 52

This is not the user’s login password. The master list password was set when mailing lists
were enabled on the server. It was mailed to list administrators designated at that time.
3 Change list settings as desired.
Designating a List Moderator
When you set up a list, you can designate another user to moderate the list.
To designate a list moderator:
1 In Server Admin, select a computer in the Servers list, then select Mail.
2 Click Settings.
3 Select the Mailing Lists tab.
4 Select the list that has the subscriber.
5 Click the Edit (/) button under the Lists pane.
Hold down the Shift or Command key to select multiple subscribers.
6 Select or deselect “User can administer the list” as necessary.
7 Click OK.
Archiving a List’s Mail
Messages sent to a mailing list can be archived and viewed at a later time. The messages
are grouped into archival volumes by time and date. You can choose whether a list’s
archive is accessible by nonsubscribers, and how often the archives are updated.
By default, the archives are found at server.domain.tld/pipermail/listname.
You use the web interface to set mailing list archive preferences. Web services must be
enabled to access the web interface.
To archive a list’s mail:
1 In a web browser, enter the URL of the list administration page.
This is usually server.domain.tld/mailman/admin/listname.
2 Enter the master list password.
This is not the user’s login password. The master list password was set when mailing lists
were enabled on the server. It was mailed to list administrators designated at that time.
3 Select “Archiving Options” from the Conguration Categories section.
4 Select Yes next to “Archive messages?”
5 Select whether the archive will be public or private.
6 Select how often to start a new archive volume.
7 Click Submit Your Changes.
52 Chapter 2 Mail Service Setup
Page 53

Viewing Mailing List Archives
If the list administrator has enabled message archiving, you can access and search
the archived messages.
To view a list’s archives:
1 In a web browser, enter the URL of the list information page.
This is usually server.domain.tld/mailman/archives/listname.
2 Select the year and month of the archive you’d like to browse.
Working with Mailing List Subscribers
After a mailing list is created, you can add or remove people from it. You might want to
give list administration privileges to a user or change a user’s ability to receive or post
to the list.
Adding a Subscriber to a List
This is the same procedure as adding a user to a new list.
To add a subscriber to a list:
1 In Server Admin, select a computer in the Servers list, then select Mail.
2 Click Settings.
3 Select the Mailing Lists tab.
4 Select the List to add a subscriber to.
5 Click the Add (+) button under the Members pane.
6 Enter the recipient’s mail address.
The mail address must match the return address of the recipient to post messages
without administrator approval.
If a user was added via the Users and Groups button, the mail address in the list is
in the form of user@server.domain.com. If necessary, change the mail address in the
mailing lists panel of Server Admin to match the return address used by the client.
7 Assign the subscriber privileges.
8 Click OK.
Removing a List Subscriber
You can remove a subscriber from a mailing list forcibly or by request.
To remove a list subscriber:
1 In Server Admin, select a computer in the Servers list, then select Mail.
2 Click Settings.
3 Select the Mailing Lists tab.
Chapter 2 Mail Service Setup 53
Page 54

4 Select the list to remove the subscriber from.
5 Select the subscriber from the User pane.
To select multiple subscribers, hold down the Shift or Command key.
6 Click the Remove (-) button under the Email Address pane.
Changing Subscriber Posting Privileges
Sometimes you might want an announce-only list, where recipients can’t post
messages. You can limit the subscriber’s ability to post and create announce-only lists.
To add or remove a subscriber’s posting privileges:
1 In Server Admin, select a computer in the Servers list, then select Mail.
2 Click Settings.
3 Select the Mailing Lists tab.
4 Select the list that has the subscriber.
5 Click the Edit (/) button under the Mailing Lists pane.
To select multiple subscribers, hold down the Shift or Command key.
6 Select or deselect the Post checkbox as necessary.
This setting determines whether the user can send messages to the list.
7 Click OK.
Suspending a Subscriber
You can keep a user on a mail list and still allow him or her to post to a list without
receiving list messages. In this case, you temporarily suspend a user’s subscription to a list.
To suspend a user’s subscription to a list:
1 In Server Admin, select a computer in the Servers list, then select Mail.
2 Click Settings.
3 Select the Mailing Lists tab.
4 Select the List that has the subscriber.
5 Click the Edit (/) button under the Mailing Lists pane.
Hold down the Shift or Command key to select multiple subscribers.
6 Deselect or select “Subscribe” as necessary.
7 Click OK.
54 Chapter 2 Mail Service Setup
Page 55

List Subscriber Options
A subscriber can customize their mailing list subscriptions. Without being designated
a list administrator or having user privileges on the server, the user has control of a
number of aspects of his or her subscriptions.
The following section gives instructions on common settings your users can customize.
A full list of possible congurable options, and instructions for use, can be found on
Mailman’s documentation page at www.list.org/docs.html.
Subscribing to a Mailing List Via Mail
You can subscribe to lists using mail. You do so by sending a message to the list
subscription address. Depending on the list’s settings, you might need to conrm your
subscription or wait for moderator approval.
You do not need to subscribe using both mail and the web.
If the list allows self-subscription, you can subscribe yourself.
To subscribe via mail:
1 Open your mail program that sends from the address you want to subscribe.
2 Send a message to the list subscription address, which is usually listname-join@domain.
The subject and body of the message are ignored. Replace listname with the name of
the list and the domain where the list is hosted.
Subscribing to a Mailing List Via Web
You can subscribe to lists using the web interface. You go to the information page
for the list and provide your mail address and a password for your list preferences.
Depending on the list’s settings, you might need to conrm your subscription or wait
for moderator approval. You do not need to subscribe using both the web and mail.
You can subscribe only yourself, if the list allows self-subscription.
To subscribe via web:
1 In a web browser, enter the URL of the list information page.
This is usually server.domain.tld/mailman/listinfo/listname.
2 In the Subscriber section of the web page, enter your mail address and name (optional).
3 Specify a password for use with the list and enter it twice to conrm it.
The password should not be one that you use for other purposes because it is sent in
plain text as a reminder periodically from the lists you are subscribed to.
4 Select your digest message mode preference.
If you receive a daily digest, instead of getting each list posting separately, you will
get one daily post.
5 Click Subscribe.
Chapter 2 Mail Service Setup 55
Page 56

Unsubscribing from a Mailing List Via Mail
Unsubscribing from a mailing list via mail is similar to subscribing to a mailing list via
mail. Depending on the list’s settings, you might need to conrm your subscription
removal or wait for moderator response.
To unsubscribe via mail:
1 Open the mail program that sends from the address that receives mailing list posts.
2 Send a mail message to the list subscription address, which is usually listname-leave@
domain.
Replace listname with the name of the mailing list.
The subject and body of the message are ignored.
3 Follow the directions in the conrmation mail.
Unsubscribing from a Mailing List Via Web
Unsubscribing from a mailing list via the web is similar to subscribing to a mailing
list via the web. Depending on the list’s settings, you might need to conrm your
subscription removal or wait for moderator response.
To unsubscribe via web:
1 In a web browser, enter the URL of the list information page.
This is usually server.domain.tld/mailman/listinfo/listname.
2 In the Subscriber section of the web page, enter your mail address and click
Unsubscribe Or Edit Options.
3 Click Unsubscribe.
Setting and Changing Your Mailing List Password
You use your mailing list password to alter preferences for a list. The password should
not be one that you use for other purposes because it is sent in plain text as a
reminder periodically from the lists you are subscribed to.
To set or change your password:
1 In a web browser, enter the URL of the list information page.
This is usually server.domain.tld/mailman/listinfo/listname.
2 In the Subscriber section of the web page, enter your mail address and click
Unsubscribe Or Edit Options.
3 Enter your password, and click Log In.
This is not your user password. If you subscribed using the web interface, you chose
a list password. If you subscribed via mail or were subscribed via Server Admin, your
password is blank.
4 Find the password section of the subscription page.
56 Chapter 2 Mail Service Setup
Page 57

5 Enter a new password in the indicated eld, and enter it again to conrm it.
To change your password for all lists that you belong to on this server, select Change
Globally.
6 Click Change My Password.
Disabling List Mail Delivery
You can temporarily disable delivery of mailing list messages (for example, to stop mail
while on vacation).
To disable list delivery:
1 In a web browser, enter the URL of the list information page.
This is usually server.domain.tld/mailman/listinfo/listname.
2 In the Subscriber section of the web page, enter your mail address and click Unsubscribe
Or Edit Options.
3 Enter your password, and click Log In.
This is not your user password. If you subscribed using the web interface, you chose
a list password. If you subscribed via mail or were subscribed via Server Admin, your
password is blank.
4 In the Mail Delivery section, select Disabled.
To disable delivery for all lists you belong to on this server, select Change Globally.
5 Click Submit My Changes.
Changing Digest Mode
Digest mode sends only one message per day regardless of list mail volume. You can
switch between getting each message or a single digest message.
If your digest mode is On you receive a single digest message per day.
To toggle digest mode:
1 In a web browser, enter the URL of the list information page.
This is usually server.domain.tld/mailman/listinfo/listname.
2 In the Subscriber section of the web page, enter your mail address and click
Unsubscribe Or Edit Options.
3 Enter your password and click Log In.
This is not your user password. If you subscribed using the web interface, you chose
a list password. If you subscribed via mail or were subscribed via Server Admin, your
password is blank.
4 In the Set Digest Mode section, select whether you want a daily digest by clicking
On or O.
5 Click Submit My Changes.
Chapter 2 Mail Service Setup 57
Page 58

Choosing MIME or Plain Text Digests
If you subscribe to a mailing list and receive digests (a single mail with all of a day’s
postings in it), you can choose whether to receive them as a MIME digest (a collection
of individual posts) or as a plain text digest (one message with the text of all posts).
To change message types:
1 In a web browser, enter the URL of the list information page.
This is usually server.domain.tld/mailman/listinfo/listname.
2 In the Subscriber section of the web page, enter your mail address and click
Unsubscribe Or Edit Options.
3 Enter your password and click Log In.
This is not your user password. If you subscribed using the web interface, you chose
a list password. If you subscribed via mail or were subscribed via Server Admin,
your password is blank.
4 In the Get MIME Or Plain Text Digests section, select a digest type.
To set the digest type for all your lists on this server, select Change Globally.
5 Click Submit My Changes.
Setting Additional Subscriber Options
Subscribers can change other list membership options, including these:
Mail address Â
Name on the list Â
Posting acknowledgments Â
Message copy handling Â
These options are available on your subscription options page.
To access additional options:
1 In a web browser, enter the URL of the list information page.
This is usually server.domain.tld/mailman/listinfo/listname.
2 In the Subscriber section of the web page, enter your mail address and click
Unsubscribe Or Edit Options.
3 Find the option you want to change and follow the instructions on screen.
Where to Find More Information
Mailman’s features and its capabilities, can be found at www.list.org.
You will also nd the following information at www.list.org/docs.html:
Web-based administration and subscriber commands Â
Mail-based administration and subscriber commands Â
Frequently Asked Questions (FAQ) lists Â
58 Chapter 2 Mail Service Setup
Page 59

Setting Mail Service Logging Options
Mail service logs can show the following levels of reported detail:
 Debug: All debugging information
 Information: Connection transactions, delivery attempts, authentication attempts
 Notice: Authentication failures
 Critical: Errors that require prompt administration attention
 Warning: All warnings and errors
 Errors: All errors
 Critical: Errors that require prompt administration attention
Setting the Mail Service Log Detail
You can choose log detail for each service category (outgoing, incoming, or junk
mail lter).
To set the Mail service log detail:
1 In Server Admin, select a computer in the Servers list, then select Mail.
2 Click Settings.
3 Select the Logging tab.
4 Select the service whose log detail you want to set:
SMTP for outgoing mail and connections from external mail servers Â
POP/IMAP for incoming mail retrieval for users Â
Junk Mail/Virus for the junk Mail service Â
5 Choose a detail level from the Log Detail Level pop-up menu.
6 Click Save.
Archiving Mail Service Logs by Schedule
Mac OS X Server archives Mail service logs after a specied time. Each archive log is
compressed and uses less disk space than the original log le. You can customize the
schedule to archive the logs after a set period of time, measured in days.
To archive logs by schedule:
1 In Server Admin, select Mail in the Computer & Services list.
2 Click Settings.
3 Select the Logging tab.
4 Click “Archive Logs Every ____ Days.”
5 Enter the number of days.
6 Click Save.
For information about viewing Mail service logs, see “Viewing Mail Service Logs”
on page 86.
Chapter 2 Mail Service Setup 59
Page 60

Client-Specic Conguration for Mail Service
Client Access to your Mail service requires:
Enabling users to access your Mail service. See “ Â Designating Authorized Mail Service
Users” on page 62.
Conguring and managing the tools they use to access Mail service. Some of these Â
topics are discussed below.
Conguring Mail Client Applications
Users must congure their mail client software to connect to Mail service. The
following table details the information most mail clients need and the source of the
information in Mac OS X Server.
Mail client software Mac OS X Server Example
User name Full name of the user Steve Macintosh
Account name or Account ID Short name of user account steve
Password Password of user account
Host name
Mail server
Mail host
Mail address User’s short name, followed by
SMTP host
SMTP server
POP host
POP server
IMAP host
IMAP server
SMTP user Short name of user account steve
SMTP password Password of user account
Mail server’s full DNS name or IP
address, as used when you log
in to the server in Server Admin
the @ symbol, followed by one
of the following:
 Server’s Internet domain (if
the mail server has an MX
record in DNS)
 Mail server’s full DNS name
 Server’s IP address in brackets
Same as host name mail.example.com
Same as host name mail.example.com
Same as host name mail.example.com
mail.example.com
192.168.50.1
steve@example.com
steve@mail.example.com
steve@[192.168.50.1]
192.168.50.1
192.168.50.1
192.168.50.1
60 Chapter 2 Mail Service Setup
Page 61

Using Webmail
WebMail is a web-based mail user agent (MUA). It allows a web browser such as
Apple’s Safari to compose, read, and forward mail like any other mail client. Mac OS X
Server’s WebMail functionality is provided by a software package called SquirrelMail
at www.squirrelmail.org.
WebMail relies on your mail server to provide the Mail service. WebMail cannot provide
Mail service independent of the mail server. WebMail uses the Mail service of your
Mac OS X Server computer.
WebMail uses standard mail protocols and requires your mail server to support them.
These protocols are:
IMAP, for retrieving incoming mail Â
SMTP, for exchanging mail with other mail servers (sending outgoing mail and Â
receiving incoming mail)
WebMail doesn’t support retrieving incoming mail via POP. Even if your mail server has
POP enabled, WebMail doesn’t use it.
To use WebMail:
1 Enable and congure your mail server.
2 After the mail server is congured, enable the WebMail software.
For instructions on setting up WebMail, see Web Technologies Administration, available
at www.apple.com/server/documentation.
Vacation Notices
If you enable server-side mail rules and the Wiki Server, mail users can add vacation
notices through a web interface.
How a user modies their vacation notices:
1 Log into any wiki page they have access to.
2 Select My Page.
3 Select “settings.”
4 Select Vacation Notice.
5 To enable vacation notices, for Enabled, select On; to disable vacation notices, select O.
6 Click the date next to Vacation Begins and then select the date when notications will
start being sent.
7 Click the date next to Returning On and then select the date when notications will
stop being sent.
8 In the Email Subject eld, enter the subject line of the mail that will be sent.
9 In the Vacation Message area, enter the body of the mail that will be sent.
10 Click Save.
Chapter 2 Mail Service Setup 61
Page 62

Mail Service Advanced
Conguration
3
Use this chapter to tune Mail service beyond a basic setup.
This chapter discusses topics beyond the basic conguration to get Mail service
running. It includes information about using Mail service virtual hosting environments,
more specic security tuning, information about managing the data store, and
information about using the Xsan cluster le system with Mail service.
Securing User Access to Mail Service
You secure user access to your Mail service by:
Authorizing only specied users to access your Mail service Â
Authenticating those users with the highest level of authentication that your Â
environment aords
Encrypting communications between the Mail service and clients with Secure Â
Sockets Layer
62
These sections describe these procedures in more detail:
“ Â Designating Authorized Mail Service Users” on page 62
“ Â Choosing Authentication for Mail Service” on page 64
“ Â Securing Mail Service with SSL” on page 67
Designating Authorized Mail Service Users
Mac OS X Server allows you to enable mail access for users using:
Workgroup Manager. See “ Â Using Workgroup Manager for Mail Service Access”
on page 63.
The Access tab in a server’s Server Admin listing (using Access Control Lists). Â
See “Using Access Control Lists for Mail Service Access” on page 63.
If you enabled user access via Server Admin and traditional mail access using
Workgroup Manager, the settings interact in the following manner:
Page 63

Access via ACL Access via Workgroup
Manager
O On User has mail access granted
O O User has no mail access.
On On User has mail access granted
On O User has mail access granted
Result
according to his or her user
record settings in Workgroup
Manager. This is the default.
according to the IMAP or POP
settings in the General Settings
Mail panel in Server Admin.
according to the IMAP or POP
settings in the General Settings
Mail panel in Server Admin.
Using Workgroup Manager for Mail Service Access
By default, you use Workgroup Manager to designate which users can use Mail service.
You can do this on an individual basis as discussed below, or you can use templates
that have mail access enabled when you set up the users.
To enable a user’s mail access using Workgroup Manager:
1 In Workgroup Manager, open the user account you want to work with, if it isn’t open.
To open the account, click the Accounts button, click the globe icon below the tool bar
menu, and open the directory domain where the account resides. Click the lock to be
authenticated. Select the user in the user list.
2 Click the Mail tab.
3 If the user doesn’t have mail enabled, enable it now.
4 Click Save.
Using Access Control Lists for Mail Service Access
Access Control Lists (ACLs) are a method of designating service access to users or
groups on an individual basis. For example, you can use an ACL to allow only one user
access to a le server or shell login, without allowing any other user on the server
to access it.
Mail service is dierent from other services that traditionally use ACLs for determining
service access. Mail service is already specied on a per-user basis. Either you have a
mail account on a server or you don’t. Being a user on a server doesn’t automatically
confer access to mail storage and retrieval.
Chapter 3 Mail Service Advanced Conguration 63
Page 64

Some administrators nd it easier to designate mail access using ACLs if they do
all their other conguration using ACLs. They also might have mixed network
environments that necessitate using ACLs to assign mail access.
To enable mail access using ACLs:
1 In Server Admin, select the server that has Mail service running.
2 Select Access, then click Services.
3 Select Mail from the Services list.
4 Select “For selected services below.”
5 Select “Allow only users and group below.”
6 Click the Add (+) button to reveal a Users and Groups list.
7 Drag the user or group to the access list.
8 Click Save.
Choosing Authentication for Mail Service
SMTP Authentication
You can protect your server from being an open relay (which indiscriminately relays
mail to other mail servers) by requiring SMTP authentication. Requiring authentication
ensures that only known users—people with user accounts on your server—can send
mail from your mail servers.
You can congure Mail service to require secure authentication using CRAM-MD5 or
Kerberos or less secure authentication methods using plain text or login.
Plain authentication sends mail passwords as plain text over the network. Login
authentication sends a minimally secure crypt hash of the password over the network.
You might allow these less secure authentication methods, which don’t encrypt
passwords, if some users have mail client software that doesn’t support the secure
methods.
If you congure Mail service to require CRAM-MD5, mail users’ accounts must be set to
use a password server that has CRAM-MD5 enabled.
Before enabling Kerberos authentication for incoming Mail service, you must integrate
Mac OS X with a Kerberos server. If you’re using Mac OS X Server for Kerberos
authentication, this is already done for you.
Enabling SMTP Authentication will:
Make your users authenticate with their mail client before accepting mail to send. Â
Frustrate mail server abusers who are trying to send mail through your system Â
without your consent.
64 Chapter 3 Mail Service Advanced Conguration
Page 65

Enabling multiple methods allows a client to use any of the enabled methods. If you
want to require any of these authentication methods, enable only one method.
To allow secure SMTP authentication:
1 In Server Admin, select a computer in the Servers list, then select Mail.
2 Click Settings.
3 Select the Advanced tab.
4 Select Security.
5 Click the CRAM-MD5 or Kerberos checkbox in the SMTP section.
6 Click Save.
To allow less secure authentication:
1 In Server Admin, select a computer in the Servers list, then select Mail.
2 Click Settings.
3 Select the Advanced tab.
4 Select Security.
5 In the SMTP section, click the Plain or Login checkbox.
6 Click Save.
If you use the Server Setup Assistant and make your server and Open Directory Master,
Kerberos and CRAM-MD5 are enabled automatically. If you want to force only one of
these methods to be used for authentication, deselect the one you do not want used.
IMAP and POP Authentication
Your IMAP/POP Mail service (Dovecot) can protect user passwords by requiring that
connections use a require secure authentication using Kerberos, CRAM-MD5 (for
IMAP), or APOP (for POP) or less secure authentication methods using plain text or
login. When a user connects with secure authentication, the user’s mail client software
encrypts the user’s password before sending it to your IMAP service.
Plain authentication sends mail passwords as plain text over the network. Login
authentication sends a minimally secure crypt hash of the password over the network.
You might allow these less secure authentication methods, which don’t encrypt
passwords, if some users have mail client software that doesn’t support the secure
methods.
Make sure your users’ mail applications and user accounts support the method of
authentication you choose. If you congure Mail service to require CRAM-MD5, you must
set mail accounts to use a Mac OS X Server Password Server that has CRAM-MD5 enabled.
Chapter 3 Mail Service Advanced Conguration 65
Page 66

Before enabling Kerberos authentication for incoming Mail service, you must integrate
Mac OS X with a Kerberos server. If you’re using Mac OS X Server for Kerberos
authentication, this is already done for you.
Enabling multiple methods allows a client to use any of the enabled methods. If you
want to require any of these authentication methods, enable only one method.
To set secure IMAP and POP authentication:
1 In Server Admin, select a computer in the Servers list, then select Mail.
2 Click Settings.
3 Select the Advanced tab.
4 Select Security.
5 Select CRAM MD-5 or Kerberos (as needed) in the IMAP section.
6 Click Save.
To set less secure IMAP and POP authentication:
1 In Server Admin, select a computer in the Servers list, then select Mail.
2 Click Settings.
3 Select the Advanced tab.
4 Select Security.
5 Click the Login, PLAIN, or Clear checkbox in the IMAP list.
6 Click Save.
If you use the Server Setup Assistant and make your server and Open Directory Master,
Kerberos, CRAM-MD5 (for IMAP), and APOP (for POP) are enabled automatically. If you
want to force only one method to be used for authentication, deselect the one you do
not want used.
66 Chapter 3 Mail Service Advanced Conguration
Page 67

Securing Mail Service with SSL
Secure Sockets Layer (SSL) connections ensure that the data sent between your mail
server and your users’ mail clients is encrypted. This allows secure and condential
transport of mail messages across a local network.
SSL transport doesn’t provide secure authentication. It only provides secure transfer
from your mail server to your clients. For secure authentication information, see
“Choosing Authentication for Mail Service” on page 64.
For incoming mail, Mail service supports secure mail connections with mail client
software that requests them. If a mail client requests an SSL connection, Mail service
can comply if that option is enabled.
Mail service still provides non-SSL (unencrypted) connections to clients that don’t
request SSL. The conguration of each mail client determines whether it connects with
SSL or not.
For outgoing mail, Mail service supports secure mail connections between SMTP
servers. If an SMTP server requests an SSL connection, Mail service can comply if that
option is enabled. Mail service can still allow non-SSL (unencrypted) connections to
mail servers that don’t request SSL.
Conguring SSL for mail transport
Mail service requires some conguration to provide SSL connections automatically.
The basic steps are as follows:
1 Obtain a security certicate.
This can be done in the following ways:
Get a certicate from an external Certicate Authority. See “ Â Using an SSL Certicate
from an External Certicate Authority” on page 69.
Create a self-signed certicate in Server Admin’s Certicate Manager. Â
Locate an existing certicate from a previous installation of Mac OS X Server v10.3 Â
or later.
2 Import the certicate into Server Admin’s Certicate Manager.
You can use Certicate Manager to drag and drop certicate information or you can
provide Certicate Manager with the path to an existing installed certicate. You
can also import certicates from the command line as outlined in “Accessing Server
Certicates from the Command Line” on page 71.
3 Congure the service to use the certicate.
For instructions for allowing or requiring SSL transport, see the following sections:
“ Â Conguring SSL Transport for SMTP Connections” on page 68
“ Â Conguring SSL Transport for IMAP and POP Connections” on page 68
Chapter 3 Mail Service Advanced Conguration 67
Page 68

Conguring SSL Transport for SMTP Connections
SSL transport enables mail transmitted over the network to be securely encrypted.
You can choose Require, Use, or Don’t Use SSL for IMAP connections. Before using SSL
connections, you must have a security certicate for mail use.
For more information about certicates, see Certicates in Server Admin.
To congure SSL transport for SMTP connections:
1 In Server Admin, select a computer in the Servers list, then select Mail.
2 Click Settings.
3 Select the Advanced tab.
4 Select Security.
5 In the SMTP SSL section, click Require or Use to enable (or Don’t Use to disable).
6 If you are using or requiring SSL, select the certicate you want to use from the
corresponding pop-up menu.
7 Click Save.
Conguring SSL Transport for IMAP and POP Connections
SSL transport enables mail transmitted over the network to be securely encrypted.
You can choose Require, Use, or Don’t Use SSL for IMAP connections. Before using
SSL connections, you must have a security certicate for mail use.
For more information about certicates, see Certicate Manager in Server Admin.
Setting SSL transport for IMAP also sets it for POP.
To congure SSL transport for IMAP and POP connections:
1 In Server Admin, select a computer in the Servers list, then select Mail.
2 Click Settings.
3 Select the Advanced tab.
4 Select Security.
5 From the pop-up menus in the IMAP and POP SSL section, click Require or Use to
enable (or Don’t Use to disable).
6 If you are using or requiring SSL, select the Certicate you want to use from the
corresponding pop-up menu.
7 Click Save.
68 Chapter 3 Mail Service Advanced Conguration
Page 69

Using an SSL Certicate from an External Certicate Authority
If you do not have a valid certicate, you can acquire one from a certicate authority
and add it to the System keychain:
Generate a Certicate Signing Request (CSR)
A CSR is a le that provides information needed to issue an SSL certicate.
1 Log in to the server as root locally through Terminal or remotely via ssh.
2 Enter the following commands:
$ cd /private/var/root/Library/Keychains/
$ /usr/bin/certtool r csr.txt k=certkc c
This use of the certtool tool begins an interactive process that generates a CSR in
the le csr.txt and creates a keychain named certkc.
3 In the New Keychain Passphrase dialog that appears, enter a password for the keychain
you’re creating, enter the password a second time to verify it, and click OK.
Remember this password, because later you must supply it again.
4 When “Enter key and certicate label” appears in the Terminal window, enter a one-
word key, a blank space, and a one-word certicate label, and then press Return.
For example, you could enter your organization’s name as the key and mailservice as
the certicate label.
The following output appears.
Please specify parameters for the key pair you will generate.
r RSA
d DSA
f FEE
Select key algorithm by letter:
5 Enter r, and then press Return.
The following output appears.
Valid key sizes for RSA are 512..2048; default is 512
Enter key size in bits or CR for default:
6 Enter a key size, and then press Return.
Larger key sizes are more secure, but they require more processing time on your server.
Key sizes smaller than 1024 aren’t accepted by some certicate-issuing authorities.
The following output appears.
You have selected algorithm RSA, key size (size entered above) bits.
OK (y/anything)?
7 Enter y, and then press Return.
The following output appears.
Enter cert/key usage (s=signing, b=signing AND encrypting):
Chapter 3 Mail Service Advanced Conguration 69
Page 70

8 Enter b, and then press Return.
The following output appears.
...Generating key pair...
Please specify the algorithm with which your certificate will be signed.
5 RSA with MD5
s RSA with SHA1
Select signature algorithm by letter:
9 Enter s, and then press Return.
The following output appears.
You have selected algorithm RSA with SHA1.
OK (y/anything)?
10 Enter y, and then press Return.
The following output appears.
...creating CSR...
Enter challenge string:
11 Enter a phrase or random text, and then press Return.
The following output appears.
For Common Name, enter the server's DNS name, such as server.example.com.
For Country, enter the country in which your organization is located.
For Organization, enter the organization to which your domain name is
registered.
For Organizational Unit, enter something similar to a department name.
For State/Province, enter the full name of your state or province.
12 Enter the correct information for each prompt, which requests the components of the
certicate’s Relative Distinguished Name (RDN), and press Return after each entry.
The following output appears.
Is this OK (y/anything)?
13 Enter y, and then press Return.
The following output appears.
Wrote (n) bytes of CSR to csr.txt
When you see a message about writing to csr.txt, you have generated a CSR and
created the keychain that Mail service needs for SSL connections.
14 Log out from the server.
Note: You can use the security command to administer keychains and manipulate keys
and certicates. For more information about this command, see the security man page.
70 Chapter 3 Mail Service Advanced Conguration
Page 71

Importing an SSL Certicate into the Keychain from the Command Line
You can import your SSL certicate into the Keychain using Keychain Access or from
the command line with certtool. To import an SSL certicate using certtool:
1 Log in to the server as root.
2 Open the Terminal application.
3 Go to the folder where the saved certicate le is located.
For example, if the certicate le is saved on the desktop of the root user, enter
cd /private/var/root/Desktop and press Return.
4 Enter the following command, and then press Return:
$ certtool i sslcert.txt k=certkc
Using certtool this way imports a certicate from the le named sslcert.txt into
the keychain named certkc.
A message conrms that the certicate was imported.
...certificate successfully imported.
5 Log out from the server.
After generating a CSR and a keychain, you continue conguring Mail service for
automatic SSL connections by purchasing an SSL certicate from a certicate authority
such as Verisign or Thawte. You can do this by completing a form on the certicate
authority’s website.
When prompted for your CSR, open the csr.txt le using a text editor, such as TextEdit.
Then, copy and paste the contents of the le into the appropriate eld on the
certicate authority’s website. The websites for these certicate authorities are at:
 www.verisign.com
 www.thawte.com
When you receive your certicate, save it in a text le named sslcert.txt. You can save
this le with the TextEdit application. Make sure that the le is plain text, not rich text,
and that it contains only the certicate text.
Accessing Server Certicates from the Command Line
Server Admin keeps a centralized store of your server’s certicates for ease of use
and management. Use certadmin to access this information from the command line.
certadmin directly manipulates the list of certicates stored in the System keychain.
To view the certicates in the System keychain: Â
$ sudo certadmin list
By default, certadmin prints the Common Name eld of each certicate separated
by newlines. Adding the option -x or --xml prints the certicate list to screen as an
XML property list (plist).
Chapter 3 Mail Service Advanced Conguration 71
Page 72

To export a certicate to OpenSSL: Â
$ sudo certadmin export
For more information, see the certadmin man page. You can also access the System
keychain locally from Keychain Access.
Creating a Password File from the Command Line
The password le contains the password you specied when you created the keychain.
Mail service uses the password le to unlock the keychain that contains the SSL certicate.
Creating the Password File in the Keychain
1 Log in to the server as root.
2 In TextEdit, create a le and enter the password as you entered it when you created
the keychain.
Don’t press Return after entering the password.
3 Make the le plain text by choosing Make Plain Text from the Format menu.
4 Save the le, naming it cerkc.pass.
5 Move the le to the root keychain folder.
The path is /private/var/root/Library/Keychains/.
To see the root keychain folder in the Finder, choose Go to Folder from the Go menu,
enter /private/var/root/Library/Keychains/, and then click Go.
6 In the Terminal application, change the access privileges to the password le so only
root can read and write to this le.
Do this by entering the following commands, pressing Return after each one:
cd /private/var/root/Library/Keychains/
chmod 600 certkc.pass
Mail service can now use SSL for secure IMAP connections.
7 Log out from the server.
Note: If Mail service is running, stop it and start it again so it recognizes the new
certicate keychain.
Mail service is now congured for automatic SSL connections.
72 Chapter 3 Mail Service Advanced Conguration
Page 73

A Mail Service Virtual Host
Virtual hosting is a method you can use to host more than one domain name on the
same computer and IP address, with overlapping mail user names.
For example, a mail server can receive mail transfer requests for two domains, mail.
example1.com and mail.example2.com, both of which resolve to the same IP address.
For mail.example1.com, the server delivers mail to “bob@example1.com” to a user
mailbox for “bob,” while it also delivers mail to “bob@example2.com” to a dierent user
mailbox. Virtual hosts are essentially the converse of local host aliases.
Enabling Virtual Hosting
Before you can enable virtual hosting, you must add a list of locally hosted virtual
domains to your mail server.
If you enable virtual domains, mail aliases (described in “Creating Additional Mail
Addresses for Users” on page 77) as well as mail addresses associated with the virtual
name (described in “Associating Users to the Virtual Host” on page 74) must be fully
qualied. This means that additional mail user names entered into the Short Names
eld of a user’s Workgroup Manager record must contain the user name as well as the
“@domainname” portion.
If you enable hosted virtual domains, you must include (in Workgroup Manager’s Short
Name eld for a user) the user’s full mail address for all mail hosts you expect the user
to receive mail, for all aliases, and for virtual host addresses.
To enable virtual hosting:
1 In Server Admin, select a computer in the Servers list, then select Mail.
2 Click Settings.
3 Select the Advanced tab.
4 Select Hosting.
5 Add at least one virtual host.
For more information, see “Adding or Removing Virtual Hosts” on page 74 .
6 Select Enable Virtual Hosting.
You can now add or remove virtual hosts using the Add (+) or Remove (-) button.
7 Click Save.
Chapter 3 Mail Service Advanced Conguration 73
Page 74

Adding or Removing Virtual Hosts
Before you can enable virtual hosting, you must add a list of locally hosted virtual
domains to your mail server. Virtual hosting must be enabled to add or remove virtual
hosts. If virtual hosting is not enabled, see “Enabling Virtual Hosting” on page 73.
If you enable virtual host domains, all mail aliases, addresses for local host aliases, and
mail addresses associated with the virtual name must be fully qualied. This means that
additional mail user names entered into the Short Names eld of a user’s Workgroup
Manager must contain the user name as well as the @domainname portion.
If you enable virtual domains, you must include the full mail address for user aliases
and virtual users.
To add or remove virtual hosts:
1 In Server Admin, select a computer in the Servers list, then select Mail.
2 Click Settings.
3 Select the Advanced tab.
4 Select Hosting.
5 Click the Add (+) button next to the Locally Hosted Virtual Domain box and enter the
domain name of a virtual host you want your server to be responsible for.
To change a virtual domain, select it and click the Edit (/) button.
To remove an item from the list, select it and click the Remove (-) button.
6 Click Save.
Note: Set up MX records for each virtual domain. If a domain name in this list doesn’t
have an MX record, only your Mail service recognizes it. External mail sent to this
domain name is returned.
Associating Users to the Virtual Host
Associating users to a virtual host requires creating an alias in their user records that
contain the entire mail address (such as bob@example.com, where example.com isn’t
the domain name of the mail server, but a virtual host).
There are two types of creating aliases for virtual host users: Mac OS X Server-style, and
Postx-style. Each has its advantages and disadvantages:
Mac OS X Server–style aliases are easy to make, and are listed with a user’s login Â
name. You can easily see the alias that refers to each user. The downside is that Mail
service’s Sieve functionality doesn’t understand Mac OS X Server-style aliases and
will not lter mail based on the Mac OS X Server-style alias.
Postx-style aliases require command-line administration and are less obvious to Â
audit. However, Postx-style aliases are compatible with Sieve scripting. Only aliases
generated by the Postx-style method can be acted upon by Sieve scripts.
74 Chapter 3 Mail Service Advanced Conguration
Page 75

To associate a user to a virtual host using Mac OS X Server–style aliases:
1 Add a Virtual Host Name using the directions in “Adding or Removing Virtual Hosts”
on page 74.
2 In Workgroup Manager, open the user account you want to work with, if it isn’t open.
To open the account, click the Accounts button, click the globe icon below the toolbar
menu, and open the directory domain where the account resides. Click the lock to be
authenticated. Select the user in the user list.
3 Click Basic, then double-click under the last entry in the Short Names eld.
4 Enter the user name and the fully qualied mail address at the virtual host (name@
virtualhostdomain).
For example, if your domain is example.com, the virtual host domain is server.com, and
you want mail addressed to postmaster@server.com to be delivered to user bob, open
bob’s user record in Workgroup Manager, and enter:
postmaster@server.com
Note: You must use the entire mail address for this to work for a virtual mail host. If
you only enter the new user name without the remainder of the address, you might
create an alias for the user on the default domain, rather than on the virtually hosted
domain.
5 Click Save.
To associate a user to a virtual host using Postx-style aliases:
1 Add a Virtual Host Name using the directions in “Adding or Removing Virtual Hosts”
on page 74.
2 Log in to Terminal as the root user.
3 Save the original virtual user le to be used as a future template by entering:
cp /etc/postfix/virtual /etc/postfix/virtual.original
4 Using a text editor as the root user, open and edit the le /etc/postx/virtual by adding
the following line at the beginning of each section (one section for each virtual host):
virtual_host_domain virtual
Fill in the virtual host domain name. For example, if your virtual host domain is server.
com, substitute that domain name for virtual_host_domain above. This distinguishes
the section as belonging to a specic virtual domain.
This is necessary if you only have one virtual domain, or if you enabled Mailing Lists for
your virtual domains.
5 For each virtual user, add a line in the le with the following format:
name@virtual_host_domain local_user_name
Chapter 3 Mail Service Advanced Conguration 75
Page 76

For example, if your domain is example.com, you are running a virtual host for
“server.com,” and you want to have user bob get mail sent to “postmaster@server.com,”
you should enter:
postmaster@server.com bob
This causes mail sent to your mail server for postmaster@server.com to be sent to
user “bob.” Mail sent to postmaster@example.com is sent to some other designated
recipient.
You can make a catch-all address to get all mail not sent to an existing user by using
the following format:
@virtual_host_domain local_user_name
This is not recommended because it can increase the amount of junk mail you receive.
6 Save your le changes.
7 Using a text editor as the root user, add a conguration line to /etc/postx/main.cf so
Postx knows where to look for the virtual user le, if the line doesn’t exist:
virtual_alias_maps = hash:/etc/postfix/virtual
8 At the prompt, enter the following command:
postmap /etc/postfix/virtual
The virtual user le is processed for access by Postx.
9 At the prompt, reload mail server settings by entering the following command:
postfix reload
This causes mail sent to your mail server for postmaster@server.com to be sent to the
real mail account for user bob. Meanwhile, mail to postmaster@example.com goes to
another designated mail account.
76 Chapter 3 Mail Service Advanced Conguration
Page 77

Creating Additional Mail Addresses for Users
Mail service allows each user to have more than one mail address. These additional
addresses are called aliases. Every user has one mail address that’s formed from the
short name of the user account.
In addition, you can dene more names for any user account by creating an alias le.
Each additional name is an alternate mail address for the user at the same domain.
These additional mail addresses aren’t additional accounts and don’t require separate
quotas or passwords.
Most often, alias les are used to map postmaster users to a real account and give
a “rstname.lastname@example.com” mail address to a user with a short login
account name.
There are two types of mail aliases: Mac OS X Server-style, and Postx-style. Each has
its advantages and disadvantages.
Mac OS X Server–style aliases are easy to make and are listed with a user’s login Â
name. You can easily see the alias that refers to each user. The disadvantage of this
is that Mail service’s Sieve functionality doesn’t understand Mac OS X Server-style
aliases and can’t lter mail based on the Mac OS X Server-style alias.
Postx-style aliases require command-line administration and are less obvious to audit. Â
However, the major benet to using Postx-style aliases is their compatibility with Sieve
scripting. Only aliases generated Postx-style can be acted upon by Sieve scripts.
If you are using this feature with virtual mail hosting and are using Mac OS X v10.4.3
or later, you must enter a fully-qualied mail address (i.e. username@domain_name)
in the location indicated in Workgroup Manager.
To create a Mac OS X Server–style alias:
1 In Workgroup Manager, open the user account you want to work with, if it isn’t open.
To open the account, click the Accounts button, click the globe icon below the toolbar
menu and open the directory domain where the account resides. Click the lock to be
authenticated. Select the user in the user list.
2 Click the Basic tab.
3 Double-click under the last entry in the Short Names eld.
4 Enter the alias.
For example, if your domain is example.com and you want to give user name bob an
alias of robert.fakeuser you should enter:
robert.fakeuser
If virtual hosting is enabled, enter the fully qualied mail address:
robert.fakeuser@example.com
5 Click Save.
Chapter 3 Mail Service Advanced Conguration 77
Page 78

To create a Postx-style alias:
1 Create the le /etc/postx/aliases, if none exists.
2 For each alias, make a line in the le with the following format:
alias:localaddress1,localaddress2,...
For example, for your domain example.com, if you want to give user name bob”an alias
of robert.fakeuser you enter:
robert.fakeuser: bob
This takes mail sent to your mail server for robert.fakeuser@example.com and sends it
to the real mail account, bob@example.com.
3 Save your le changes.
4 In the Terminal application, enter the following command:
postalias /etc/postfix/aliases
The text le is processed into a database for faster access.
5 At the prompt, enter the following command:
newaliases
The alias database will reload.
As a result, mail to robert.fakeuser@example.com is sent to user bob, giving Bob two
eective mail addresses, bob@example.com and robert.fakeuser@example.com.
For further information about creating and maintaining mail aliases, see /etc/postx/
aliases.
Setting Up Forwarding Mail Addresses for a User
You can use forwarding to provide a mail redirection service for users. Any mail sent to
a user’s mail account is forwarded to the specied account.
There is an additional method of mail forwarding using Sieve scripting. To learn more
about that method, see “Server-Side Mail Rules” on page 39.
To forward a user’s mail:
1 In Workgroup Manager, open the user account you want to work with, if it isn’t open.
To open the account, click the Accounts button, click the globe icon below the toolbar
menu and open the directory domain where the account resides. Click the lock to be
authenticated. Select the user in the user list.
2 Click the Mail tab.
3 Select Forward.
4 Enter the forwarding mail address in the Forward To eld.
You can enter multiple addresses but they must be separated by a comma.
78 Chapter 3 Mail Service Advanced Conguration
Page 79

Working with Mail Service Data Storage
Mail service stores each message as a separate le in a mail folder for each user.
This is the user’s mailbox.
Incoming mail is stored on the startup disk in the /var/spool/imap/dovecot/mail/
folder. Dovecot mail storage can also be split across multiple partitions. This can be
done to scale Mail service, or to facilitate data backup.
You can do the following with the mail les:
View and specify where the mail les are stored. Â
Backup and restore the mail store. Â
Convert mail les from a previous version of Mac OS X Server. Â
Create additional mail stores. Â
These tasks are described in this section.
Viewing the Location of the Mail Store
You can view the location of the mail store as well as the size of the mail store. You
might need to track the current size of the mail store to plan mail server resources.
To change the location of the mail store, see “Specifying the Location of the Mail
Store” on page 79.
To view the location of the mail store:
1 In Server Admin, select Mail in the Computers & Services pane.
2 Click Advanced.
3 Select the Data Store tab.
Specifying the Location of the Mail Store
If you’re starting Mail service for the rst time and you have no mail store, you can
specify where the mail message les will be stored. By default, the mail store location
is /var/spool/imap/dovecot/mail.
Note: Changing the mail store location of an existing mail system doesn’t move the
mail from the old location to the new one.
If this server is part of a mail server cluster, the mail store is kept on the Xsan cluster
and their locations cannot be changed.
To specify where mail is stored on the server:
1 If Mail service is running, stop Mail service.
See “Managing Mail Service” on page 20.
Chapter 3 Mail Service Advanced Conguration 79
Page 80

When Mail service starts for the rst time, it creates an empty mail store at the default
location. You can ignore this or delete it after you specify an alternate mail storage
location and restart Mail service.
2 In Server Admin, select a computer in the Servers list, then select Mail.
3 Click Settings.
4 Click the Advanced tab.
5 Click Data Store.
You’ll see the current location of the mail store.
6 In the Mail store location eld, enter the path of the location where you want mail
les to be stored.
You can browse for a location by clicking Choose next to the Location eld.
Creating Additional Mail Store Locations
Mail service can scale well as your storage needs change. You can spread the mail store
across several disks or le systems. You can add partitions to the mail store without
requiring downtime, or even users’ knowledge.
To use new mail store locations, you designate the partition where the mail store
resides. Enter the mail store path in the user’s mail settings using Workgroup Manager.
For more instructions, see User Management.
The mail store partitions can be additional hard disk partitions or remotely mounted
le systems. For remotely mounted le systems, NFS isn’t recommended.
Note: Creating locations doesn’t put mail in those locations. Edit the user records
in Workgroup Manager to start delivering mail to the partitions. Deleting a location
doesn’t delete the mail at that location, but makes those mail folders inaccessible.
To split the mail store:
1 In Server Admin, select a computer in the Servers list, then select Mail.
2 Click Settings.
3 Click the Advanced tab.
4 Click Data Store.
You’ll see the current location of the mail store.
5 To add a location, click the Add (+) button below the Additional Mail Store Locations
box and complete the following:
a Enter a name for the mail store location (for example, “Marketing” or “Executive”).
b Enter the path to the new location (such as /Volumes/mailstore2).
c Click OK.
80 Chapter 3 Mail Service Advanced Conguration
Page 81

6 To change a location, click the Edit (/) button below the Additional Mail Store
Locations box, edit the path to the new location, and click OK.
7 To remove a location, select the location to be deleted and click the Remove (-) button
next to the Additional Mail Store Locations box.
8 Click Save.
Maximum Number of Mail Messages Per Volume
Because Mail service stores each mail message in a separate le, the number of
messages that can be stored on a volume is determined by the total number of les
that can be stored on the volume.
The total number of les that can be stored on a volume that uses Mac OS Extended
format (sometimes referred to as HFS Plus format) depends on the following factors:
The size of the volume Â
The sizes of the les Â
The minimum size of a le, which by default is one 4 KB block Â
For example, a 4 GB HFS Plus volume with the default block size of 4 KB has one
million available blocks. This volume can hold up to a million 4 KB les, which means
it can hold a million mail messages that are 4 KB or less each. If some mail messages
are larger than 4 KB, this volume holds fewer of them. A larger volume with the same
default block size can hold proportionately more les.
Backing Up and Restoring Mail Messages
You can back up Mail service data by making a copy of the Mail service folder. If you need
to restore Mail service data, you can replace the Mail service folder with a backup copy.
You can back up individual mail storage folders or the entire mail store as needed.
One command line tool you can use to back up your mail messages is ditto.
See ditto’s man page for information.
Important: Before backing up or restoring the Mail service folder, stop Mail service.
If you back up the Mail service folder while Mail service is active, the backup mail store
might go out of sync with the backup folder. If you restore the folder while Mail service
is active, the active mail store might go out of sync with the active folder.
An incremental backup of the Mail service folder can be fast and ecient. If you back
up mail data incrementally, the only les copied are the message les that are new or
changed since the last backup.
After restoring the Mail service folder, notify users that messages stored on the server
have been restored from a backup copy.
Chapter 3 Mail Service Advanced Conguration 81
Page 82

Setting Up Mail Server Clustering with Xsan
With Xsan, you can cluster multple mail servers that share the mail store. This provides
mission-critical redundancy and high performance and allows you to easily maintain
the pooled storage using Xsan tools and software.
Each server also has a primary SMTP spool le. If a server goes oine, another node
in the cluster takes over processing of the failed sever’s spool le. This happens
automatically, but you will see it noted in log les.
You can congure your mail server to join an existing mail cluster as a new member
of the cluster, or you can migrate a mail server’s mail store to another server that is a
member of the cluster.
If Xsan software is installed, you can also create a cluster, with the current server
becoming the cluster’s rst member.
Conguring Mail Clustering
1 In Server Admin, select a computer in the Servers list, then select Mail.
2 Click Advanced.
3 Click Clustering.
4 Click the Change button, then follow the onscreen instructions that appear.
Note: After a server has joined a cluster, changes to mail server settings, such as SMTP,
POP, IMAP, and logging, will aect all servers in the cluster.
When you remove the last member of a cluster, you must designate a server to take
over as a standard mail server.
Conguring Additional Mail Service Support for 8-Bit MIME
By default, many mail systems that use 8-bit character encoding for text (like Asian
language mail systems) convert from 8-bit MIME to 7-bit characters. This has the
unfortunate eect of garbling the mail.
To receive 8-bit character-encoded mail messages, disable the default conversion that
Postx performs. Use the postconf command-line tool to disable the setting.
To disable the default conversion:
1 Log in to your server as the administrator.
2 In Terminal, enter the following command:
sudo postconf -e disable_mime_output_conversion=yes
This disables the special processing of Content-Type headers while delivering mail.
82 Chapter 3 Mail Service Advanced Conguration
Page 83

Monitoring and Maintaining
Mail Service
4
Use this chapter to monitor and maintain Mail service.
This chapter discusses how to watch over Mail Service and the mail store, including
archiving, logging, and handling undeliverable mail.
Starting or Stopping Mail Service
Normally, Mail service starts after you nish using the Server Assistant, but you can use
Server Admin to start and stop Mail service.
In some situations, you might not want to stop Mail service entirely, but instead hold
outbound mail or block incoming mail connections. If you want to only partially
disable Mail service, see the following:
“ Â Holding Outbound Mail” on page 84
“ Â Blocking Inbound Mail Connections” on page 85
You don’t need to stop and start Mail service to load settings into the mail software.
If you want only new settings to take eect, see the following:
“ Â Setting Up a Mailman Mailing List” on page 44
To start or stop the service:
1 Open Server Admin.
2 Select a server, then click the service disclosure triangle to show the services
for administration.
These instructions assume Mail service has been enabled in the service administration
list of Server Admin. If not, see “To enable Mail Service for administration:” on page 25.
3 In the service list beneath the server, select Mail service.
4 Click Settings.
5 Select the General tab.
6 Make sure at least one protocol (SMTP, POP, or IMAP) is enabled.
7 Click Start Mail, the service start button below the server list.
83
Page 84

If the service is running, click Stop Mail.
From the command line:
Start and stop the Mail service using the serveradmin command.
To start the Mail service: m
sudo serveradmin start mail
To stop the Mail service: m
sudo serveradmin stop mail
If you plan to turn o Mail service for an extended period of time, notify users before
you stop the service.
You can determine whether your Mail service is running via ssh or using Terminal by
typing sudo serveradmin status mail.
Reloading Mail Service
Sometimes it’s necessary to reload the mail server for Mail service setting changes
to take eect (for example, after restoring from backup, or altering the alias le).
Reloading Mail service can be done without interrupting current Mail service.
To reload Mail service from the command line:
$ sudo postfix reload
Holding Outbound Mail
You can prevent Mail service from sending outgoing mail. You might do this to isolate
a problem or to prevent conicts with another Mail service running on your network.
You might also do this to stop virus propagation or a spam relay originating with
your server.
Holding mail isn’t the same as disabling SMTP service. Disabling prevents user
connections from sending outgoing mail, but holding queues the mail for later
sending. Mail is held in the outbound mail queue for inspection or deletion until
you stop the hold.
To hold outbound mail:
1 In Server Admin, select a computer in the Servers list, then select Mail.
2 Click Settings.
3 Select the General tab.
4 Click Hold Outbound Mail.
5 Click Save.
84 Chapter 4 Monitoring and Maintaining Mail Service
Page 85

Blocking Inbound Mail Connections
You can prevent Mail service from receiving inbound mail from external servers.
You might do this to isolate a problem or to prevent conicts with another Mail service
running on your network. You might also do this to stop virus propagation or a spam
relay originating from external servers.
Blocking inbound mail isn’t the same thing as disabling SMTP service. Disabling
prevents queued mail from being sent out, but blocking inbound mail stops accepting
connections to add mail to the queue. Attempted mail deliveries are bounced and
returned to the sender.
To block inbound connections:
1 In Server Admin, select a computer in the Servers list, then select Mail.
2 Click Settings.
3 Select the General tab.
4 Deselect Allow Incoming Mail.
5 Click Save.
Allowing Administrator Access to Mail Folders
You can congure IMAP to allow the server administrator to view the Mail service
hierarchy. Administrators cannot view mail itself; they can only view user folder locations.
When you connect as the IMAP administrator, you see user mail folders stored on the
server. Each user’s mailbox appears as a separate folder in your mail client. You can
remove inactive mailbox folders that belong to deleted user accounts.
For more information, see the man page for imapd.conf.
Creating an Administration Account
You might want to create a separate mail administrator account to maintain and
watch mail folders, remove defunct user accounts, and archive mail. This administrator
account doesn’t need to be a server administrator. Also, this administrator account
shouldn’t receive mail. It isn’t a normal mail account.
To create a mail administrator account:
1 Designate a user to be mail administrator.
You can create a new user in System Preferences > Accounts if you don’t want to use
an existing user.
2 Open /etc/imapd.conf in a text editor.
If you aren’t comfortable using a Terminal-based text editor like emacs or vi, you can
use TextEdit.
Chapter 4 Monitoring and Maintaining Mail Service 85
Page 86

3 Find the line that reads “admins:”
4 Edit the line to add the short name of the administrator account after the colon.
5 Save your changes.
For more information see the man page for imapd.conf.
Monitoring Mail Service Activity
This section describes how to use Server Admin and the command line to monitor Mail
server activity, logs, and connected mail users, active accounts, and the mail queue.
Viewing an Overview of Mail Service Activity
You can obtain an overview of Mail service that reports whether the service is running,
when Mail service started, and incoming and outgoing connections by protocol.
To see an overview of Mail service activity:
1 In Server Admin, select Mail in the Computer & Services list.
2 Click the Overview button.
From the Command Line
To see a summary status of Mail service: m
$ sudo serveradmin status mail
To see a detailed status of Mail service: m
$ sudo serveradmin fullstatus mail
Viewing Mail Service Logs
This section also describes how Mac OS X Server reclaims disk space used by logs and
how to reclaim space manually.
Mail service maintains the following logs:
 Mail Access: General Mail service information is stored in this log.
 IMAP log: IMAP activity is stored in this log.
 POP log: POP activity is stored in this log.
 SMTP log: SMTP activity is stored in this log.
 Mailing List logs: These record the Mailmain activity, including service, error,
delivery, delivery failures, postings, and subscriptions.
 Junk Mail and Virus logs: These record activity for mail ltering, including virus
denition updates (freshclam log), virus scanning (clamav log), and mail ltering
(amavis log).
To search for specic entries, use the text lter box in the window.
86 Chapter 4 Monitoring and Maintaining Mail Service
Page 87

To view a Mail service log:
1 In Server Admin, select a computer in the Servers list, then select Mail.
2 Click the Logs button.
3 From the View pop-up menu, choose a log type.
4 Click Save.
From the command line:
You can use tail or another le-listing tool to view the contents of Mail service logs.
1 Use the serveradmin getLogPaths command to see where Mail service logs are located.
$ sudo serveradmin command mail:command = getLogPaths
2 View the latest entries in your selected log with the tail command.
To view the last 10 entries in the Junk Mail/Virus Scanning log:
$ tail /var/log/amavis.log
To view any number of entries:
$ tail -n lines /var/log/amavis.log
Replace lines with the number of lines you want to view.
To watch new additions to the log le:
$ tail -f /var/log/amavis.log
Control-C stops the tail command from watching the log le and returns your
command prompt.
For more information on the tail command, see its man page.
Reclaiming Disk Space Used by Mail Service Log Archives
Mac OS X Server reclaims disk space used by Mail service logs when they reach
a specied size or age. You can use the command-line tool diskspacemonitor to
monitor disk space when you want, and delete or move the log archives. For additional
information, see the diskspacemonitor man page.
Viewing the Mail Connections List
Server Admin can list the users who are connected to Mail service. For each user, you
see the user name, IP address of the client computer, type of mail account (IMAP or
POP), number of connections, and connection length.
To view a list of connected mail users:
1 In Server Admin, select Mail in the Computer & Services list.
2 Click the Connections button.
Chapter 4 Monitoring and Maintaining Mail Service 87
Page 88

Viewing Mail Accounts
You can use Server Admin to see a list of users who have used their mail accounts at
least once. For each account, you see the user name, disk space quota, disk space used,
and percentage of space available to the user.
Mail accounts that have never been used aren’t listed.
To view a list of mail accounts:
1 In Server Admin, select a computer in the Servers list, then select Mail.
2 Click Maintenance.
3 Click the Accounts button.
Monitoring the Outgoing Mail Queue
You might need to check mail that is waiting to be sent. If you have a message
backlog, or if you have interrupted outbound mail, you might have a number of items
in the queue. Additionally, you might want to monitor mail delivery to ensure that mail
is being delivered to local and remote hosts.
Checking the Outgoing Mail Queue
When checking the queue, you see the message ID number, sender, recipients, date, and
message size. You can select a message in the queue and inspect the message headers.
To check the outgoing mail queue:
1 In Server Admin, select a computer in the Servers list, then select Mail.
2 Click Maintenance.
3 Click the Mail Queue tab.
4 To inspect amessage, select it.
Clearing Messages from the Outgoing Mail Queue
Your outgoing mail queue might have a backlog of messages. These are messages that
can’t be sent for any number of reasons: the message might be improperly addressed,
the destination server might be unresponsive, or the destination account might be over
quota. In such circumstances, you might want to clear messages from the queue backlog.
To clear a message from the outgoing queue:
1 In Server Admin, select a computer in the Servers list, then select Mail.
2 Click Maintenance.
3 Click the Mail Queue tab.
4 Select the message to be deleted.
5 Click Delete.
88 Chapter 4 Monitoring and Maintaining Mail Service
Page 89

Retrying Undelivered Outgoing Messages
Sometimes the outgoing mail queue has undelivered messages that are properly
addressed, but for some reason the messages aren’t sent (for example, if the
destination server is down, or if the rewall is blocking the outgoing port for SMTP).
You can attempt to send the messages again. Normally, the mail server attempts to
resend, but you can activate it manually instead of waiting.
To try to resend an outgoing message:
1 In Server Admin, select a computer in the Servers list, then select Mail.
2 Click Maintenance.
3 Click the Mail Queue tab.
4 Select the message to retry sending.
To select more than one message, hold down the Shift key or the Command key.
5 Click Retry.
While doing this you can monitor the logs to see what is might be causing the
problem. See “Viewing Mail Service Logs” on page 86.
Viewing Mail Service Statistics
You can use the serveradmin getHistory command to display a log of periodic
samples of the number of user connections and the data throughput. Samples are
taken once each minute.
To view samples:
$ sudo serveradmin command
mail:command = getHistory
mail:variant = statistic
mail:timeScale = scale
Control-D
Parameter Description
statistic
scale
Chapter 4 Monitoring and Maintaining Mail Service 89
The value you want to display.
Valid values:
v1—Number of connected users (average during
sampling period)
v2—Data throughput (bytes/sec)
The length of time in seconds, ending with the
current time you want to see samples for. For
example, to see 24 hours of data, you would
specify
mail:timeScale = 86400.
Page 90

The computer responds with the following output:
mail:nbSamples = <samples>
mail:v2Legend = "throughput"
mail:samplesArray:_array_index:0:vn = <sample>
mail:samplesArray:_array_index:0:t = <time>
mail:samplesArray:_array_index:1:vn = <sample>
mail:samplesArray:_array_index:1:t = <time>
[...]
mail:samplesArray:_array_index:i:vn = <sample>
mail:samplesArray:_array_index:i:t = <time>
mail:v1Legend = "connections"
afp:currentServerTime = <servertime>
Value displayed by getHistory Description
<samples>
<sample>
<time>
The total number of samples listed.
The numerical value of the sample.
For connections (
number of users.
For throughput, (
second.
The time when the sample was measured.
A standard UNIX time (number of seconds since
September 1, 1970). Samples are taken every 60
seconds.
v1), this is integer average
v2), this is integer bytes per
90 Chapter 4 Monitoring and Maintaining Mail Service
Page 91

Troubleshooting Mail Service
5
Use this chapter to nd information about how to work with
Mail service when it is not performing as expected.
This chapter discusses situations where Mail service is not performing optimally.
It also includes links to other resources for more information and advanced
conguration techniques for the technologies and protocols underlying Mail service
in Mac OS X Server.
Improving Performance
Mail service must act very fast for a short period of time. It sits idle until a user reads or
sends a message, then it transfers the message immediately. Therefore, it puts intense
but brief demands on the server.
As long as other services do not place heavy continuous demands on a server (for
example, as a QuickTime streaming server would), the mail server can typically handle
several hundred connected users.
As the number of connected mail users increases, the demand of Mail service on the
server increases. If Mail service performance needs improvement, try the following:
Move the mail storage location to its own hard disk or hard disk partition. Â
For instructions, see “Setting Mailing List Message Bounce Options” on page 48.
Run other services on a dierent server, especially services that place frequent heavy Â
demands on the server. (Each server requires a separate Mac OS X Server license.)
91
Page 92

When a Disk Is Full
Mail service becomes erratic if the disk storing your mail reaches maximum capacity.
When your disk reaches full capacity, you’ll experience the following:
 Postx: If the operating system can still spawn the smtpd process, Postx tries to
function and attempts to accept the message. The message is then rejected with a
“disk full” error. Otherwise, its behavior is unpredictable.
 Dovecot: If the operating system can still spawn an imapd or pop3d process, the
server attempts to open the user’s mail account. Upon success, the user can access
mail as normal.
When Mail Is Undeliverable
Mail messages might be undeliverable for several reasons. Incoming mail might be
undeliverable because it has a misspelled address or is addressed to a deleted user
account. Outgoing mail might be undeliverable because it’s misaddressed or the
destination mail server isn’t working.
You can congure Mail service to:
Forward undeliverable incoming mail Â
Limit the number of attempts to deliver problematic outgoing mail Â
Report failed delivery attempts Â
Use a dierent timeout value to increase the chance of connection success Â
Forwarding Undeliverable Incoming Mail
Mail service can forward messages that arrive for unknown local users to another real
local person or a group in your organization. Whoever receives forwarded mail that’s
incorrectly addressed (with a typo in the address, for example) can forward it to the
correct recipient.
If forwarding of these undeliverable messages isn’t explicitly enabled, the messages
are returned to sender.
To forward undeliverable mail, see “Unsubscribing from a Mailing List Via Web” on
page 56.
Where to Find More Information
You can nd more information about Mail service in books and on the Internet.
92 Chapter 5 Troubleshooting Mail Service
Page 93

Books
For general information about mail protocols and other technologies, see these books:
A good introduction to internet Mail service can be found in  Internet Messaging, by
David Strom and Marshall T. Rose (Prentice Hall, 1998).
For more information about MX records, see “DNS and Electronic Mail” in  DNS and
BIND, third edition, by Paul Albitz, Cricket Liu, and Mike Loukides (O’Reilly and
Associates, 1998).
Also of interest is  Removing the Spam: Email Processing and Filtering, by Geo
Mulligan (Addison-Wesley Networking Basics Series, 1999).
To learn about mail standards, see  Essential email Standards: RFCs and Protocols Made
Practical, by Pete Loshin (John Wiley & Sons, 1999).
To learn more about Postx, see  Postx, by Richard Blum (Sams; 1st edition, 2001)
To learn more about Dovecot, see  Pro Open Source Mail: Building an Enterprise Mail
Solution, by Curtis Smith (Apress, 2006).
Internet
There is an abundance of information about mail protocols, DNS, and other related
topics on the Internet.
Request for Comments (RFC) documents provide an overview of a protocol or service
and details about how the protocol should behave.
If you’re a novice server administrator, you might nd RFC background information
helpful. If you’re an experienced server administrator, you’ll nd all the technical details
about a protocol in its RFC document.
You can search for RFC documents by number at www.faqs.org/rfcs.
For technical details about how mail protocols work, see these RFC documents:
 POP: RFC 1725
 IMAP: RFC 2060
 SMTP: RFC 821 and RFC 822
 Sieve: RFC 3028
For more information about Postx, go to www.postx.org.
For more information about Dovect, go to www.dovecot.org
For more information about Sendmail, go to www.sendmail.org.
For more information about SquirrelMail, go to www.squirrelmail.org.
For more information about Sieve, go to http://wiki.dovecot.org/LDA/Sieve.
Chapter 5 Troubleshooting Mail Service 93
Page 94

Command-Line Parameters for the
serveradmin Tool and Default Mail
A
Service Settings
The following table provides the parameters for use with the serveradmin tool to
change settings for Mail service from the command line.
It also gives the default values after conguration with the Server Setup Assistant on a
server that is an Open Directory Master.
Parameter Default Value
mail:mailman:default_email_host "example.com"
mail:mailman:default_language "en"
mail:mailman:lists:_array_
id:mailman:members:_array_
id:ladmin@example.com:owner
mail:mailman:lists:_array_
id:mailman:members:_array_
id:ladmin@example.com:post
mail:mailman:lists:_array_
id:mailman:members:_array_
id:ladmin@example.com:group
mail:mailman:lists:_array_
id:mailman:members:_array_
id:ladmin@example.com:subscribe
mail:mailman:lists:_array_
id:mailman:list_admin
mail:mailman:lists:_array_
id:mailman:preferred_language
mail:mailman:lists:_array_
id:mailman:available_languages
mail:mailman:lists:_array_
id:mailman:list_name
mail:mailman:lists:_array_
id:mailman:subscribe_policy
mail:mailman:lists:_array_
id:mailman:max_message_size
yes
yes
no
yes
"ladmin@example.com"
"en"
"['en']"
"Mailman"
"confirm+approve"
40
Appendix
94
Page 95

Parameter Default Value
mail:mailman:enable_mailman yes
mail:imap:lmtp_over_quota_perm_
failure
mail:imap:srvtab "/etc/srvtab"
mail:imap:imap_auth_cram_md5 yes
mail:imap:imap_auth_clear no
mail:imap:loginuseacl no
mail:imap:popexpiretime 0
mail:imap:notifysocket "/var/imap/socket/notify"
mail:imap:timeout 30
mail:imap:max_imap_connections 1000
mail:imap:sieve_maxscripts 5
mail:imap:logtimestamps no
mail:imap:quota_enforce_
restrictions
mail:imap:tls_imap_key_file ""
mail:imap:mupdate_authname ""
mail:imap:newsprefix ""
mail:imap:proxyservers _empty_array
mail:imap:singleinstancestore yes
mail:imap:mupdate_password ""
mail:imap:tls_cert_file "/etc/certificates/example.com.057
mail:imap:lmtp_admins _empty_array
mail:imap:poptimeout 10
mail:imap:postuser ""
mail:imap:imap_auth_plain no
mail:imap:imap_admins _empty_array
mail:imap:quota_custom_
error:subject
mail:imap:quota_custom_error:body ""
mail:imap:quota_custom_error:from ""
mail:imap:tls_imap_cert_file ""
no
no
1FAFAA0BFDC76BADA66D200C44FD4FBEBC
D87.cert.pem"
""
Appendix A Command-Line Parameters for the serveradmin Tool and Default Mail Service Settings 95
Page 96

Parameter Default Value
mail:imap:sieve_proxyservers _empty_array
mail:imap:lmtp_luser_relay_enabled no
mail:imap:unixhierarchysep no
mail:imap:partition-default "/var/spool/imap/dovecot/mail"
mail:imap:imap_auth_gssapi yes
mail:imap:allowanonymouslogin no
mail:imap:quota_custom_warning_
message_path
mail:imap:quota_custom_error_
message_path
mail:imap:imapidlepoll 60
mail:imap:enable_pop no
mail:imap:enable_quota_warnings no
mail:imap:tls_session_timeout 1440
mail:imap:mupdate_server ""
mail:imap:mupdate_realm ""
mail:imap:idlesocket "/var/imap/socket/idle"
mail:imap:enable_sieve yes
mail:imap:lmtpsocket "/var/imap/socket/lmtp"
mail:imap:deleteright "c"
mail:imap:mupdate_port ""
mail:imap:postmaster "postmaster"
mail:imap:pop_auth_gssapi yes
mail:imap:pop_auth_apop yes
mail:imap:proxyd_allow_status_
referral
mail:imap:sharedprefix "Shared Folders"
mail:imap:sasl_auto_transition no
mail:imap:tls_ca_file ""
mail:imap:sasl_minimum_layer 0
mail:imap:sievedir ""
mail:imap:debug_command ""
mail:imap:duplicatesuppression yes
""
""
no
96 Appendix A Command-Line Parameters for the serveradmin Tool and Default Mail Service Settings
Page 97

Parameter Default Value
mail:imap:tls_lmtp_key_file ""
mail:imap:servername "example.com"
mail:imap:partitions _empty_array
mail:imap:tls_imap_require_cert no
mail:imap:sieve_admins _empty_array
mail:imap:mupdate_retry_delay 20
mail:imap:quota_custom_
warning:subject
mail:imap:quota_custom_warning:body ""
mail:imap:quota_custom_warning:from ""
mail:imap:enable_imap yes
mail:imap:popminpoll 0
mail:imap:tls_pop3_key_file ""
mail:imap:sendmail "/usr/lib/sendmail"
mail:imap:tls_lmtp_cert_file ""
mail:imap:tls_require_cert no
mail:imap:tls_sieve_require_cert no
mail:imap:defaultpartition "default"
mail:imap:allowallsubscribe no
mail:imap:pop_auth_clear no
mail:imap:sasl_pwcheck_method "auxprop"
mail:imap:sieve_maxscriptsize 32
mail:imap:tls_sieve_key_file ""
mail:imap:tls_ca_path ""
mail:imap:defaultacl "anyone lrs"
mail:imap:reject8bit no
mail:imap:tls_key_file "/etc/certificates/example.com.057
mail:imap:tls_pop3_require_cert no
mail:imap:sasl_maximum_layer 256
mail:imap:autocreatequota 0
""
1FAFAA0BFDC76BADA66D200C44FD4FBEBC
D87.key.pem"
Appendix A Command-Line Parameters for the serveradmin Tool and Default Mail Service Settings 97
Page 98

Parameter Default Value
mail:imap:tls_sieve_cert_file ""
mail:imap:userprefix "Other Users"
mail:imap:mupdate_admins _empty_array
mail:imap:mupdate_username ""
mail:imap:quota_warn_frequency_days 0
mail:imap:tls_pop3_cert_file ""
mail:imap:quotawarn 80
mail:imap:plaintextloginpause 0
mail:imap:lmtp_overquota_perm_
failure
mail:imap:tls_server_options "use"
mail:imap:allowplaintext yes
mail:imap:loginrealms _empty_array
mail:imap:lmtp_luser_relay ""
mail:imap:imapidresponse yes
mail:imap:tls_cipher_list:_array_
index:0
mail:imap:imap_auth_login no
mail:imap:admins _empty_array
mail:imap:altnamespace no
mail:imap:sieveusehomedir no
mail:imap:tls_lmtp_require_cert no
mail:imap:log_level "crit"
mail:imap:umask "077"
mail:imap:hashimapspool no
mail:imap:imap_proxyservers _empty_array
mail:cluster:hostname "example.com"
mail:cluster:cluster_info _empty_array
mail:postfix:nested_header_checks "$header_checks"
mail:postfix:smtp_connection_cache_
time_limit
mail:postfix:required_hits 6
mail:postfix:lmtp_rcpt_timeout "300s"
no
"DEFAULT"
"2s"
98 Appendix A Command-Line Parameters for the serveradmin Tool and Default Mail Service Settings
Page 99

Parameter Default Value
mail:postfix:strict_rfc821_
envelopes
mail:postfix:tls_export_cipherlist "ALL:+RC4:@STRENGTH"
mail:postfix:smtp_sasl_auth_cache_
name
mail:postfix:check_for_od_forward "yes"
mail:postfix:default_verp_
delimiters
mail:postfix:spam_ok_locales "en"
mail:postfix:mydestination:_array_
index:0
mail:postfix:mydestination:_array_
index:1
mail:postfix:showq_service_name "showq"
mail:postfix:smtpd_delay_reject yes
mail:postfix:smtp_enforce_tls "no"
mail:postfix:milter_macro_daemon_
name
mail:postfix:smtpd_tls_security_
level
mail:postfix:ignore_mx_lookup_error no
mail:postfix:command_expansion_
filter
mail:postfix:smtpd_tls_mandatory_
exclude_ciphers
mail:postfix:milter_connect_timeout "30s"
mail:postfix:local_destination_
concurrency_negative_feedback
mail:postfix:default_delivery_slot_
loan
mail:postfix:smtp_destination_
recipient_limit
mail:postfix:default_transport "smtp"
mail:postfix:lmtp_defer_if_no_mx_
address_found
no
""
"+="
"localhost"
"example"
"$myhostname"
""
"1234567890!@%-_=+:,./abcdefghijklm
nopqrstuvwxyzABCDEFGHIJKLMNOPQRSTUV
WXYZ"
""
"$default_destination_concurrency_
negative_feedback"
3
"$default_destination_recipient_
limit"
"no"
Appendix A Command-Line Parameters for the serveradmin Tool and Default Mail Service Settings 99
Page 100

Parameter Default Value
mail:postfix:lmtp_pix_workaround_
maps
mail:postfix:local_recipient_maps "proxy:unix:passwd.byname $alias_
mail:postfix:lmtp_tls_enforce_
peername
mail:postfix:lmtp_tls_fingerprint_
digest
mail:postfix:flush_service_name "flush"
mail:postfix:non_fqdn_reject_code 504
mail:postfix:smtpd_tls_req_ccert "no"
mail:postfix:lmtp_destination_
concurrency_negative_feedback
mail:postfix:ipc_idle "5s"
mail:postfix:smtp_discard_ehlo_
keyword_address_maps
mail:postfix:proxy_read_maps "$local_recipient_maps
mail:postfix:spam_log_level "crit"
mail:postfix:address_verify_map ""
mail:postfix:lmtp_tls_key_file "$lmtp_tls_cert_file"
mail:postfix:smtpd_enforce_tls "no"
mail:postfix:smtpd_sasl_auth_enable yes
mail:postfix:connection_cache_
status_update_time
mail:postfix:always_bcc_enabled no
mail:postfix:smtpd_starttls_timeout "300s"
""
maps"
"yes"
"md5"
"$default_destination_concurrency_
negative_feedback"
""
$mydestination $virtual_alias_maps
$virtual_alias_domains $virtual_
mailbox_maps $virtual_mailbox_
domains $relay_recipient_maps
$relay_domains $canonical_maps
$sender_canonical_maps $recipient_
canonical_maps $relocated_maps
$transport_maps $mynetworks
$sender_bcc_maps $recipient_bcc_
maps $smtp_generic_maps $lmtp_
generic_maps"
"600s"
10 0 Appendix A Command-Line Parameters for the serveradmin Tool and Default Mail Service Settings
 Loading...