

Page 1
Solid-State Drive
Replacement Instructions
Mac Pro
First Steps
1 Shut down computer.
2 Wait 10 minutes.
Warning: Parts inside
computer can be very
hot. Allow computer
to cool down before
continuing.
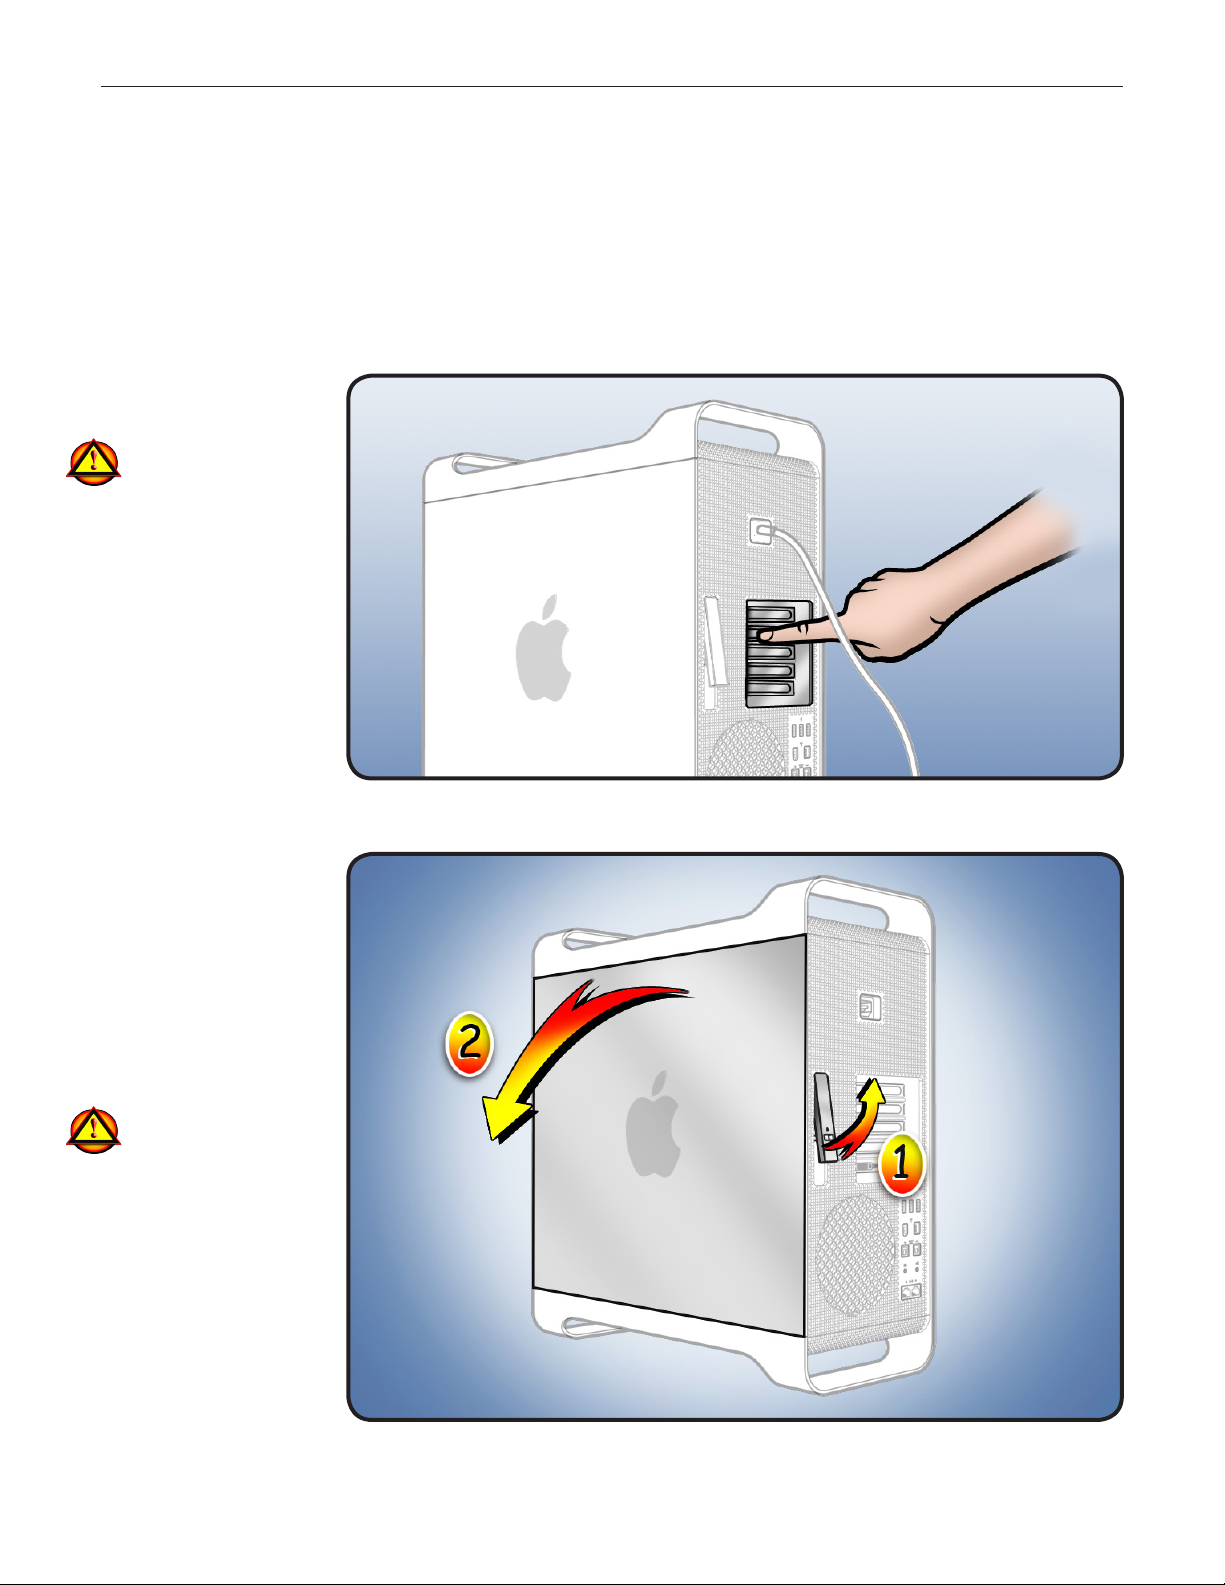
3 Unplug all external
cables except power
cord.
4 Touch metal PCI cover
on back of computer.
5 Unplug power cord.
Note: Follow these instructions carefully. Failure to do so could damage your equipment and
void its warranty.
Opening the
Computer
1 Hold side access
panel and lift latch on
back of computer.
Warning: Edges of
access panel and
enclosure can be
sharp. Be careful
when handling.
2 Remove access panel
and place it on at
surface covered by
soft, clean cloth.
© 2010 Apple Inc. All rights reserved.
073-1349 Rev. A 1
Page 2
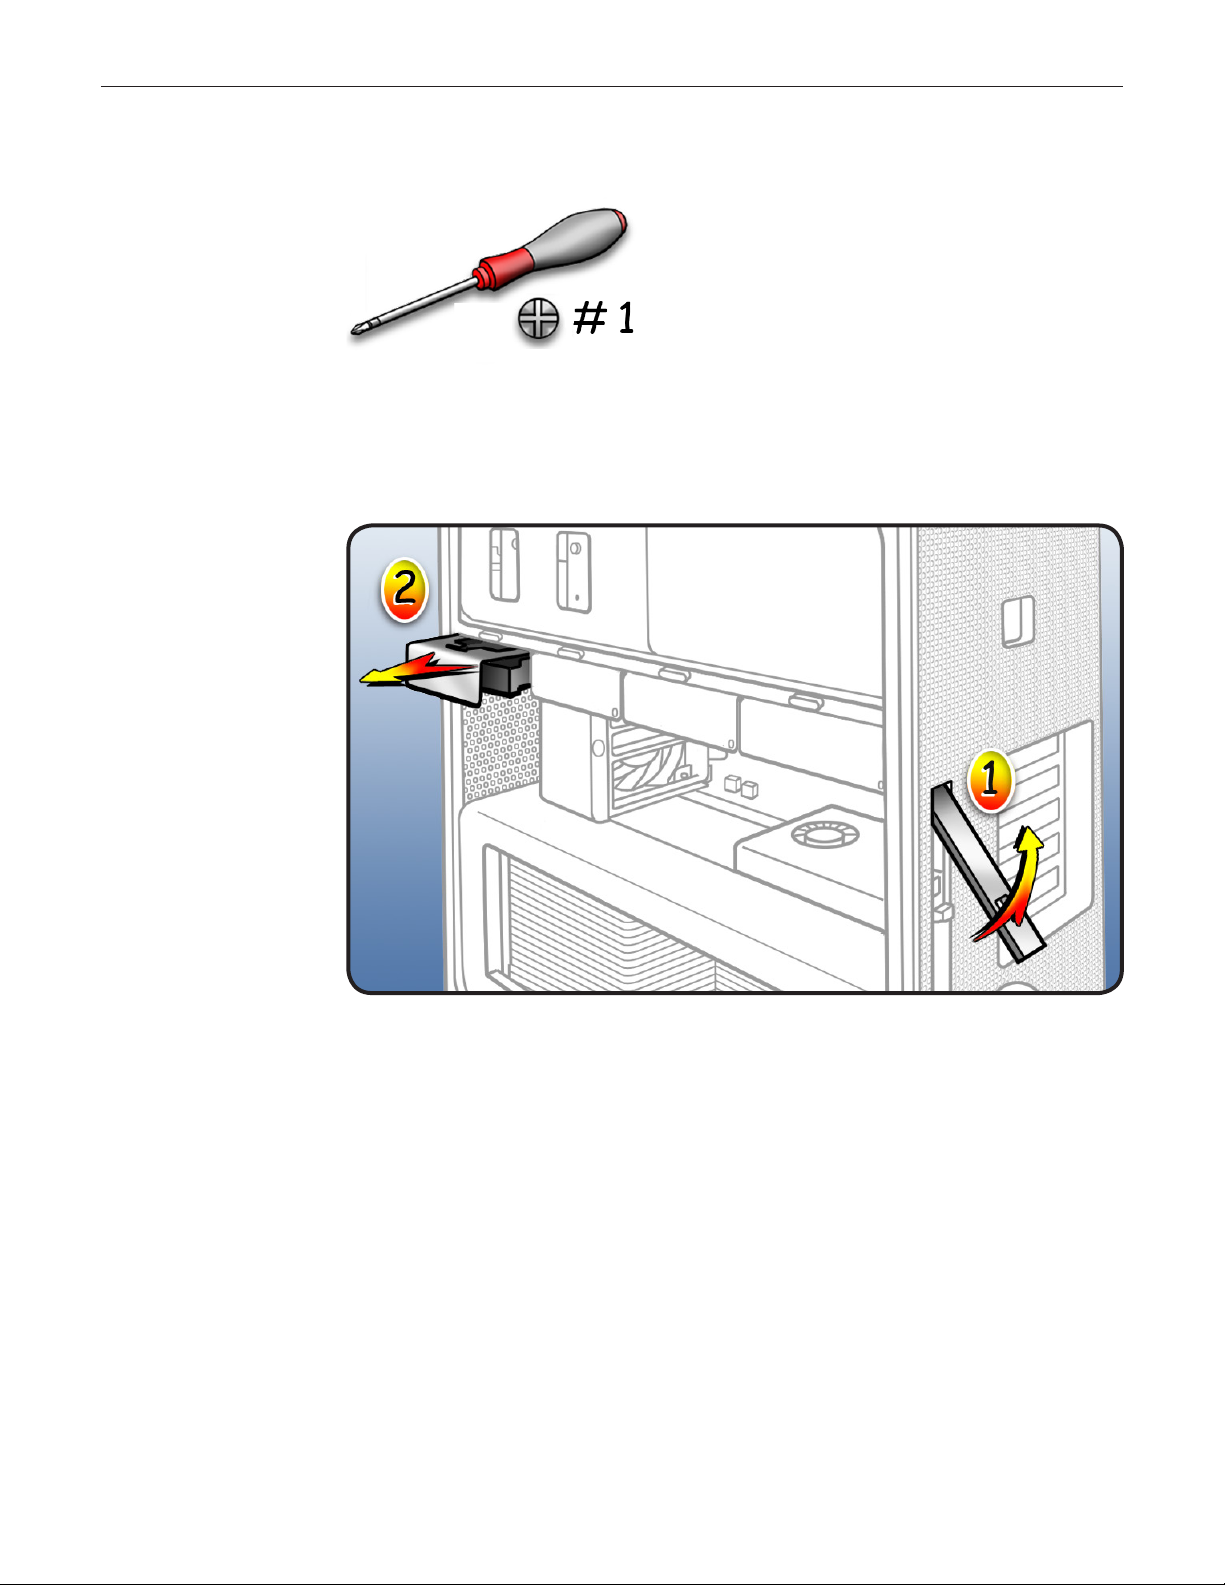
Required Tool
Phillips #1 screwdriver
Removing the
Installed Drive
1 Make sure latch on
back panel is up, so
that drives and
carriers are unlocked.
2 Pull drive carrier (with
drive) out of drive bay.
© 2010 Apple Inc. All rights reserved.
073-1349 Rev. A 2
Page 3
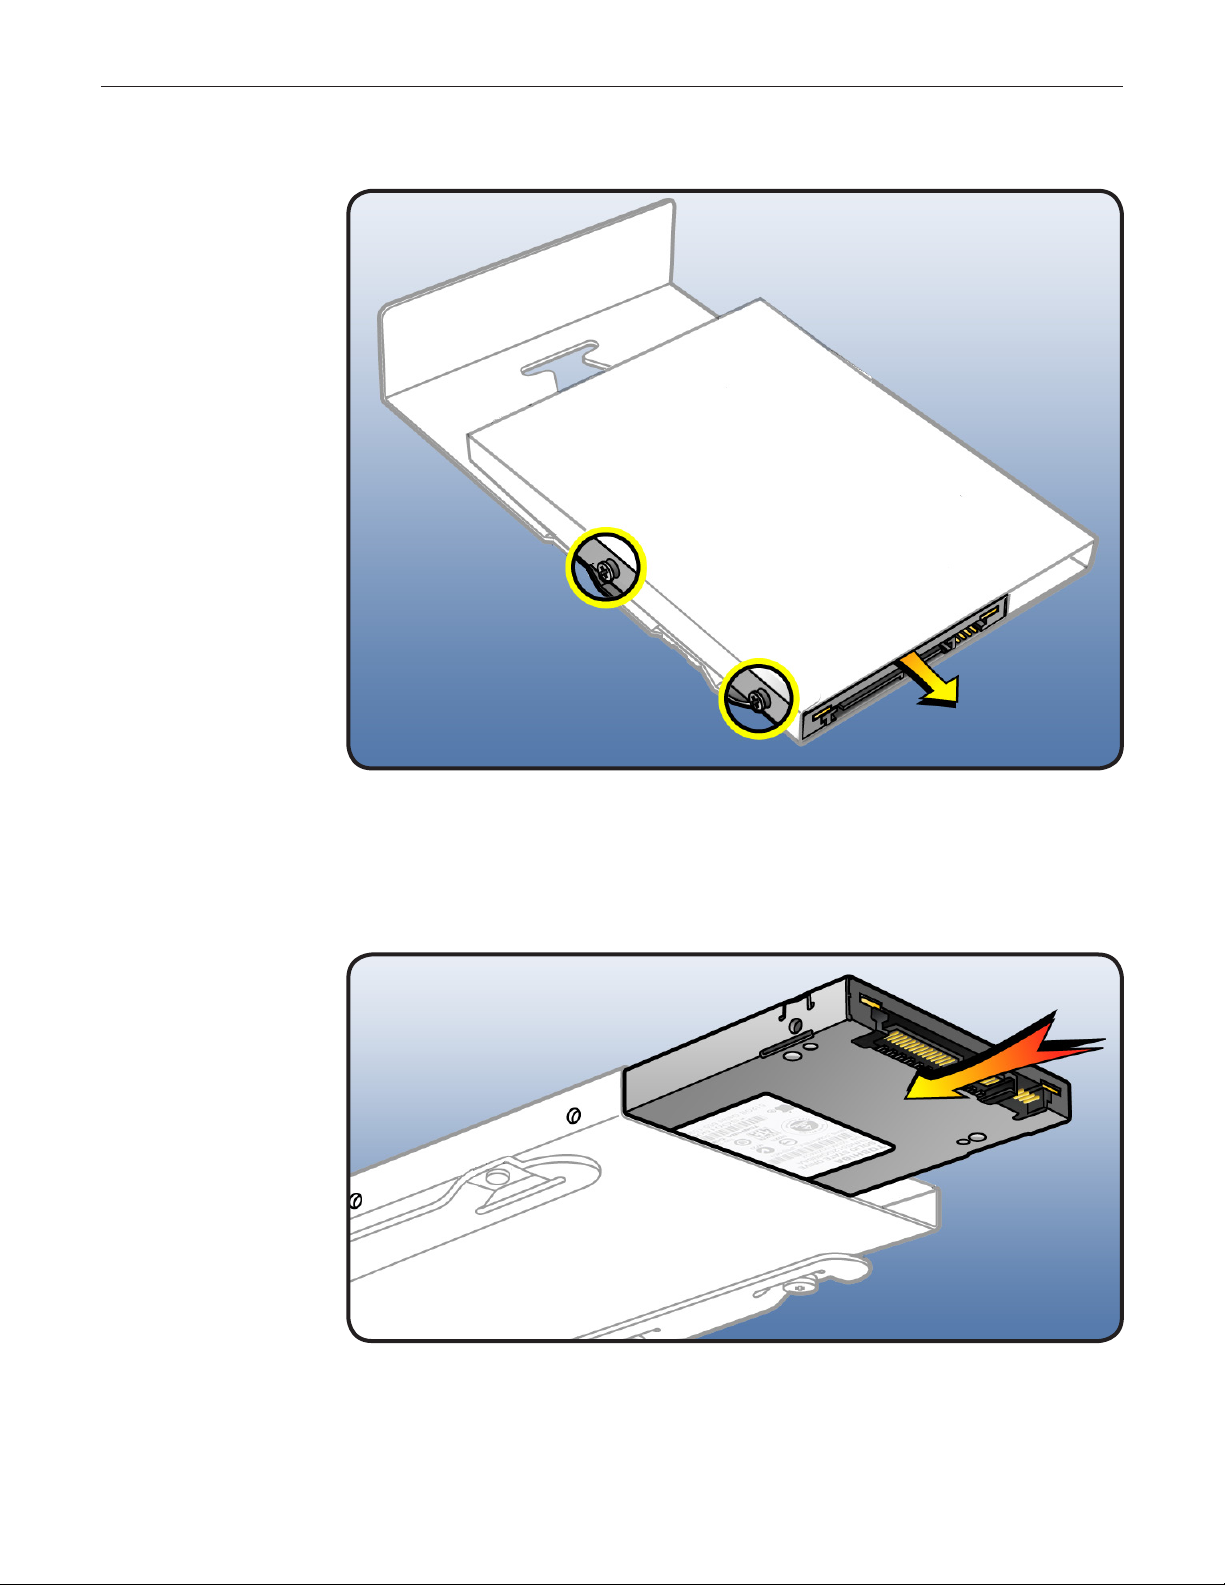
3 Remove 2 screws on
side of carrier adapter.
4 Slide solid-state drive
out of adapter.
Installing the
Replacement
Drive
1 Slide replacement
drive into adapter as
shown, label side
down and connector
facing out.
2 Replace mounting
screws.
3 Slide carrier over
guides and into drive
bay until drive snaps
into place.
© 2010 Apple Inc. All rights reserved.
073-1349 Rev. A 3
Page 4

Closing the
Computer
1 Replace access panel.
Note: Make sure
latch is up before you
replace panel. If latch
is down, panel will
not seat correctly.
2 Push latch down
to close and secure
access panel.
Warning: Never turn
on computer unless
all its internal/external
parts are in and it is
closed. Operating unit
when open or missing
parts can cause
damage or injury.
Formatting a New Drive
After installing a new (replacement) drive, format it using these steps:
1. Open Disk Utility and select the drive in list to the left.
2. Click on Partition tab.
3. Click on “Options” and verify GUID is selected if this is a bootable drive.
4. Apply change by clicking on “Partition” button.
© 2010 Apple Inc. All rights reserved.
Note: If you are formatting the primary drive, use Disk Utility program on Install Disk.
073-1349 Rev. A 4
Page 5

Reinstalling Software that Came with the Computer
Use the software install discs that came with the computer to reinstall Mac OS X and any
applications that came with the computer.
Important: Apple recommends backing up data on the hard disk before restoring software.
Back up essential les before installing Mac OS X and other applications. Apple is not
responsible for any lost data.
For more details, refer to http://support.apple.com/kb/HT3910.
This procedure has four parts:
• Erasing the hard drive/formatting the hard drive
• Installing the Mac OS X operating system using the Mac OS X Install DVD.
• Completing the Mac OS X Setup Assistant.
• Restoring the bundled applications using the Applications Install Disc.
Important: This procedure will completely erase your hard drive. If you have installed Microsoft
Windows using Boot Camp, or have multiple partitions, this procedure will erase the partition
you select.
Part One: Erasing the hard drive/formatting the hard drive
1. Turn on the computer.
2. Insert the Mac OS X Install DVD into the optical drive.
3. Press and hold the “C” key while the computer starts up. The computer will start up using
the Mac OS X Install DVD.
4. If your are using a wireless mouse, a mouse icon should appear asking you to turn the
mouse on so that the computer can discover it.
5. Select a language, then press the right arrow key.
6. Click the Utilities menu, the choose Disk Utility.
7. Select a volume to erase (usually called Macintosh HD).
8. Click the Erase tab.
9. Click Erase... Important: This step will completely erase your hard drive. If you have installed
Microsoft Windows using Boot Camp, or have multiple partitions, this procedure will erase
the partition you select.
10. A dialog box appears asking if you want to erase the partition: click Erase.
11. After the partition is erased, choose Quit Disk Utility from the Disk Utility menu.
Part Two: Installing the operating system
1. When the Mac OS X Installer screen appears, click Continue.
2. When the license agreement appears, click Agree.
© 2010 Apple Inc. All rights reserved.
073-1349 Rev. A 5
Page 6

3. Select the disk you erased. It should now be highlighted with a green arrow.
4. Click Install. A status bar appears on the bottom of the screen while Mac OS X installs.
5. An Additional Information screen appears, advising you that you operating system has
been installed. Click Continue.
6. An Install Succeeded screen appears. Click Restart.
Part Three: Completing the Mac OS X Setup Assistant
1. When the restart has completed, a welcome video plays, then country/region selection
screen appears.
2. Select your country or region and click Continue.
3. Select a keyboard layout and click Continue.
• A migration screen appears. If you wish to migrate your data from another Macintosh,
see Migration tips and tricks http://support.apple.com/kb/HT1291. If you do not wish
to migrate, or want to migrate later, select “Do not transfer my information now” and click
Continue.
4. A Wireless Service screen appears if you have wireless services available within range of
your computer. Select “On” and click Continue.
5. If the network is password protected, you be asked for a password when you select it. Type
the password and click Continue.
6. An Apple ID screen appears. This is used to purchase content from the iTunes store. You
can use MobileMe or .Mac usernames here as well. When complete, click Continue.
7. If you do not have an Apple ID or MobileMe account, click Continue to move to the next
screen.
8. A Registration Information screen appears. You are not required to ll this out, but it is
helpful if you do. When complete, click Continue and your product registration will be sent
immediately.
9. If Mac OS X servers are available on your network, you’ll be asked if you’d like to log on to
them. If not, click Continue.
10. A Create Your Account screen appears. This will be used to create a User Account with
Login ID and Password for you computer. You should remember this password. You’ll be
asked for it when you install new software or perform other administrative tasks on your
computer. When complete, click Continue and your account will be created immediately.
11. A screen to select your user picture appears. Take a snapshot with the built-in camera or
select a picture from your Library. When complete, click Continue.
12. A MobileMe screen appears. Select an option and click Continue.
13. A Thank You screen appears. Click Go to complete the Mac OS X Setup Assistant.
14. Eject the Mac OS X Install DVD by dragging its icon to the Trash.
© 2010 Apple Inc. All rights reserved.
073-1349 Rev. A 6
Page 7

Part Four: Restoring the bundled applications
1. To install the bundled applications, locate the Applications Install Disc that came with your
computer.
Note: You may see a Software Update icon bouncing up and down in your dock. You can
quit this for now.
2. Insert the Applications Install Disc into the optical drive.
3. The disc will mount and an Applications Install Disk dialog appears. Double-click on Install
Bundled Software to install your iLife applications.
4. A dialog appears asking if you want to run the package. Click Continue.
5. The Bundled Software Applications Installer screen appears. Click Continue.
6. A software license screen appears. Click Continue, then click Agree to accept the terms.
7. A select destination dialog appears. Make sure the partition with the green arrow is the
correct destination, then click Continue.
8. To install all the bundled applications, click Install.
9. To select individual applications, click Customize. Click the disclosure triangle next to
Bundled Applications to select individual applications, then click Install. Clicking Standard
Install on the Customize screen installs all the applications.
10. Type the password you created in Part Three, step 11 to start the installation.
11. A restart dialog appears. Click Continue Installation.
12. An Install was Successful screen appears. Click Restart.
The restore process is now complete.
It is a good idea to make sure you’ve updated all the software after performing this procedure.
From the Apple () menu, choose Software Update to nd the updates currently available for
your computer.
Apple Inc.
© 2010 Apple Inc. All rights reserved.
This document is protected under U.S. Copyright Law and International Treaties, and no part of this
document may be reproduced in any form without written permission from Apple. Apple is not
responsible for typographical, printing, or inadvertent errors.
Apple Inc.
1 Innite Loop
Cupertino, CA 95014-2084 USA
+ 1 408 996 1010
www.apple.com
Apple, the Apple logo, and Mac are trademarks of Apple Inc., registered in the U.S. and other countries.
© 2010 Apple Inc. All rights reserved.
073-1349 Rev. A 7
 Loading...