

Page 1
MacBook (13-inch, Late 2009)/(13-inch, Mid 2010)
Hard Drive
Replacement Instructions
Follow the instructions in this document carefully. Failure to follow these instructions could
damage your equipment and void its warranty.
Online instructions are available at http://www.apple.com/support/diy/.
Note: This procedure is for MacBook (13-inch, Late 2009) and MacBook (13-inch, Mid 2010)
models. Although your model may look slightly dierent from the one shown in the illustrations,
the steps are the same.
Important: Make sure data is backed up before removing the hard drive and restoring software.
Apple is not responsible for any lost data.
Tools Required
• Clean, soft, lint-free cloth
• ESD wrist strap, if available
• Magnetized Phillips #00 screwdriver
© 2010 Apple Inc. All rights reserved.
073-1316 Rev. B 1
Page 2
Removal
Important: Make sure data is backed up before removing the hard drive. Apple is not responsible
for any lost data.
1 Shut down computer.
2 Unplug all cables.
3 Put on ESD strap or touch metal to discharge electricity.
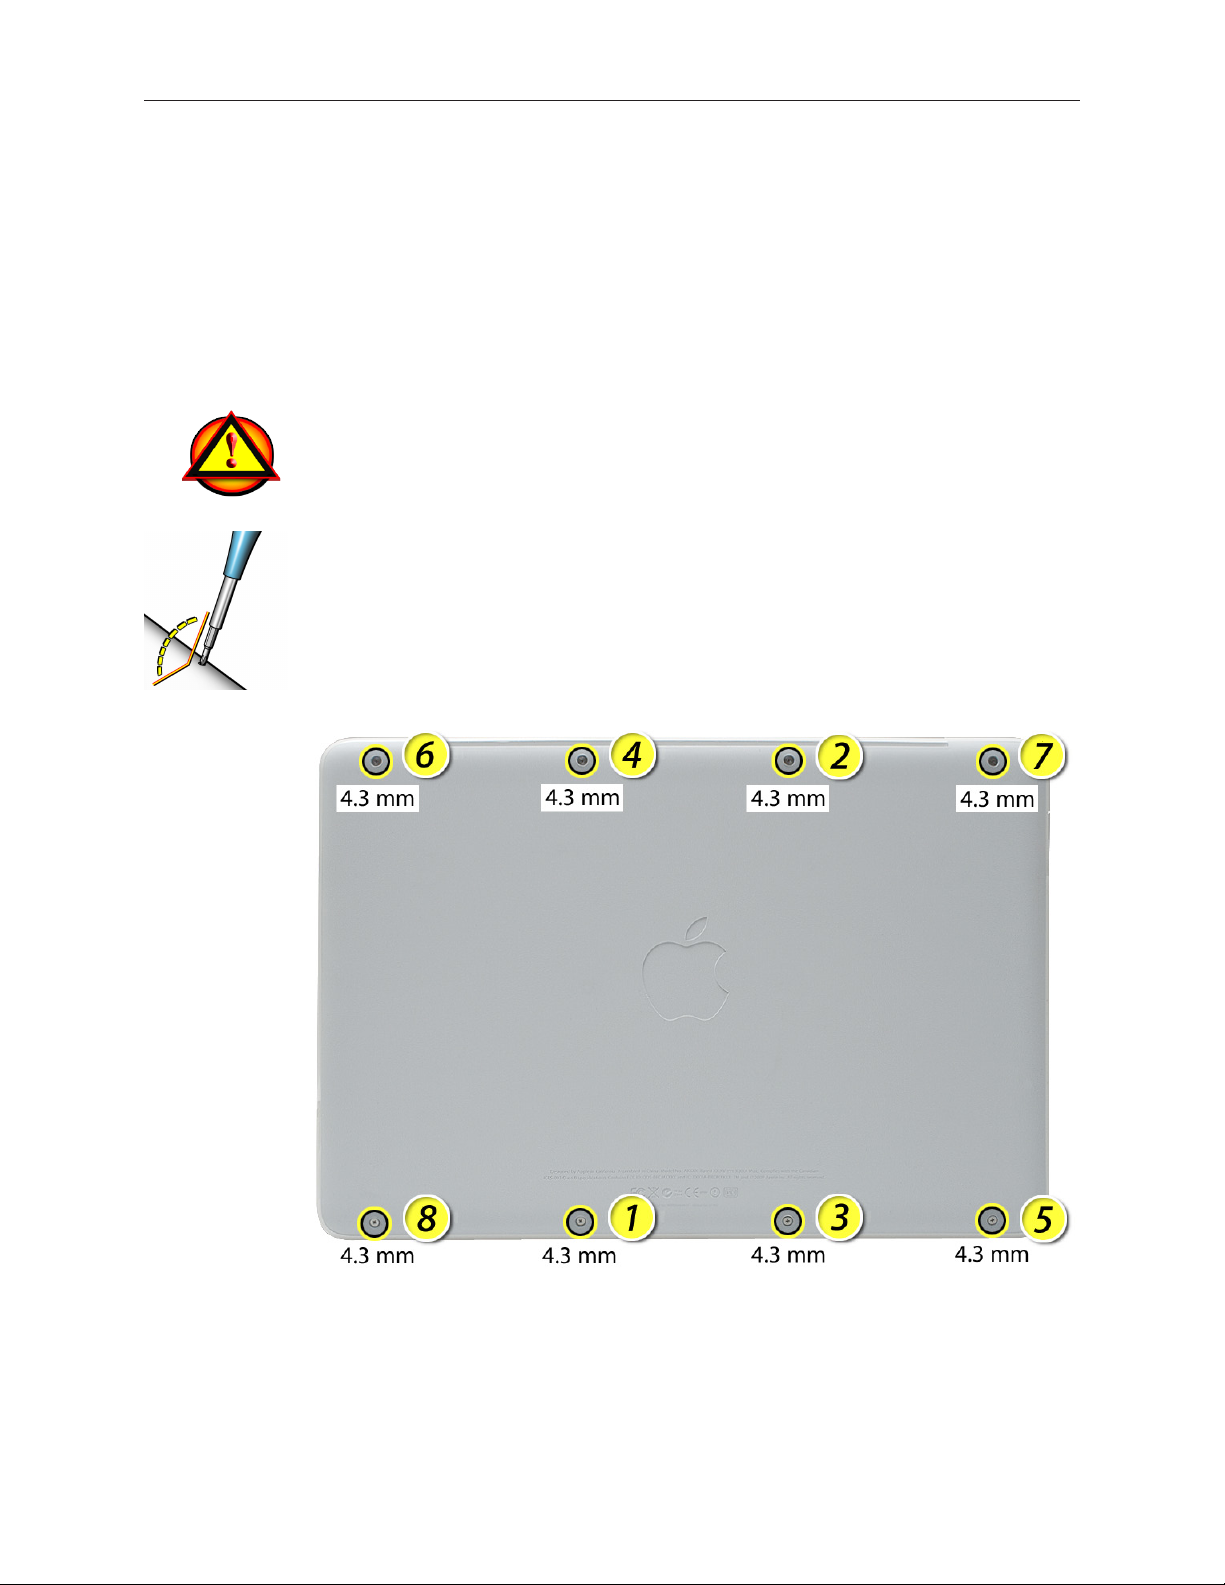
Caution: To prevent scratches to the case, use a protective cloth when working with metal tools.
Important: The screws at the sides and front of the computer must be removed and installed at
an angle.
4 Remove 8 (4.3-mm) screws.
Replacement Note: Install screws in the order shown.
© 2010 Apple Inc. All rights reserved.
073-1316 Rev. B 2
Page 3
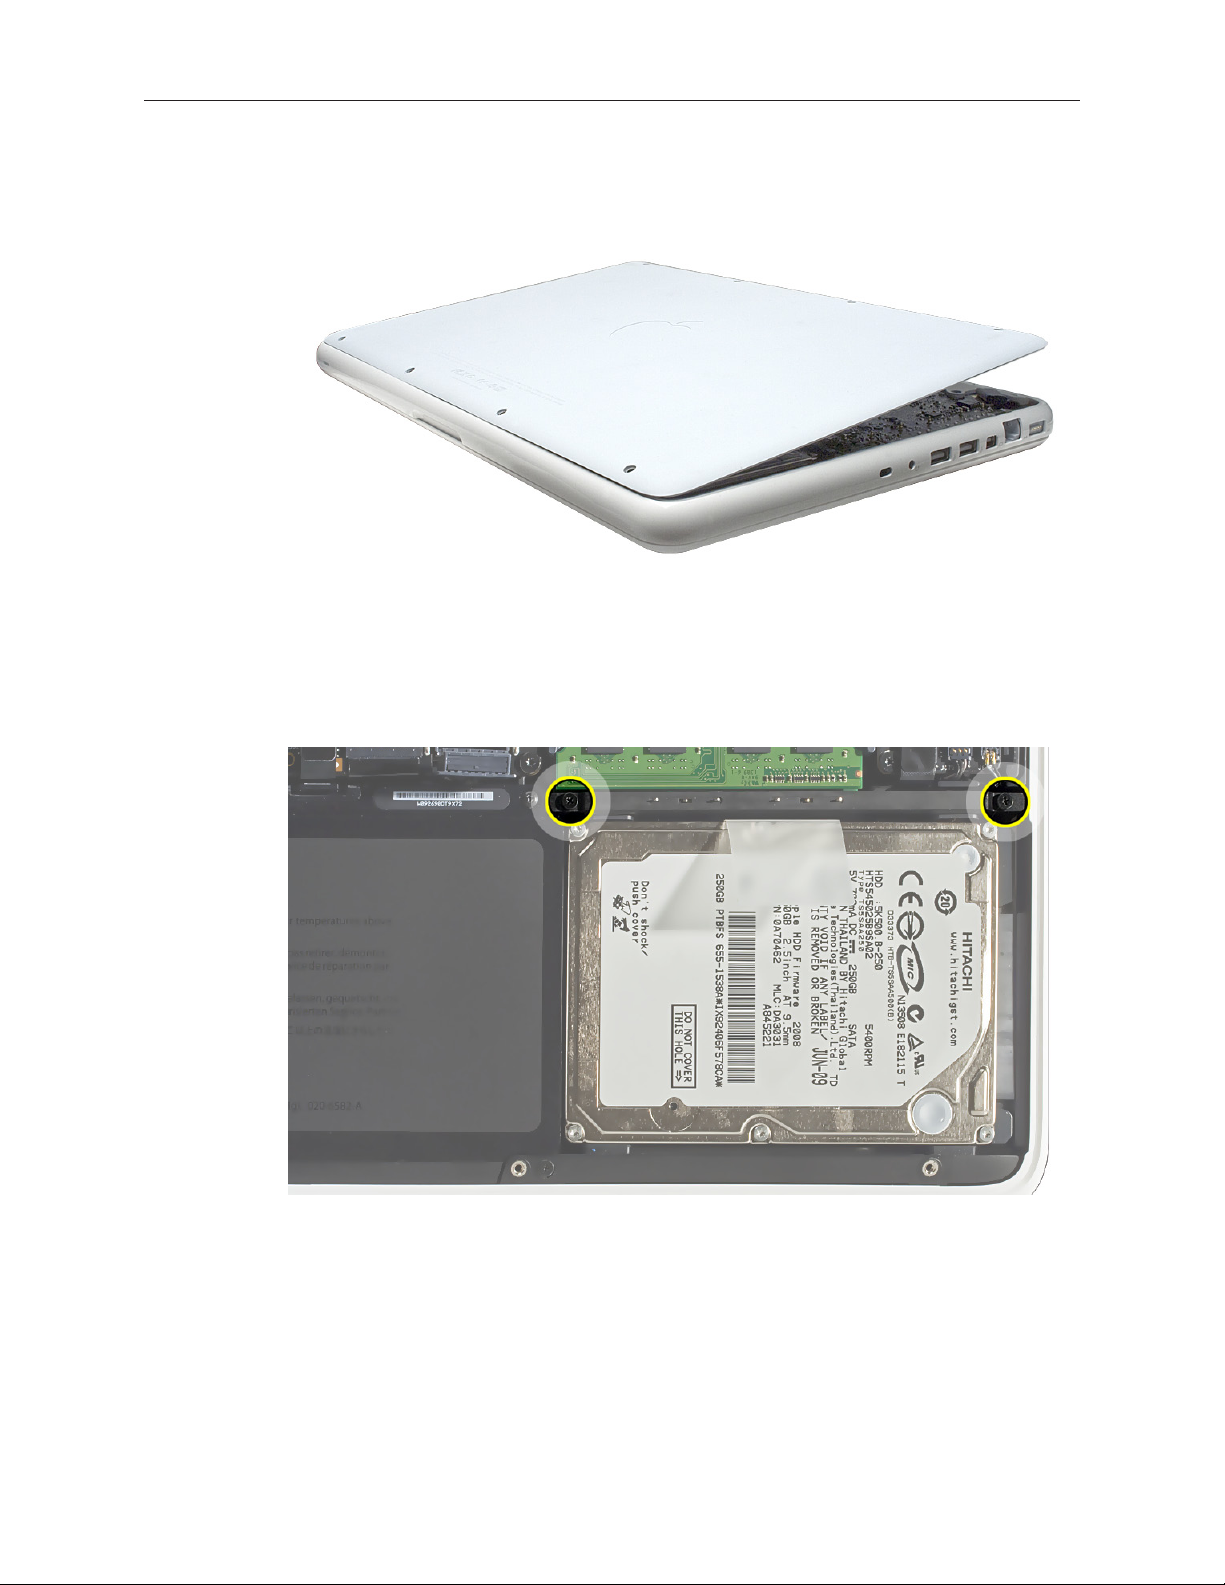
5 Tilt up and remove bottom case.
Note: In the center and at each side are 3 clips that attach to snaps on the top case.
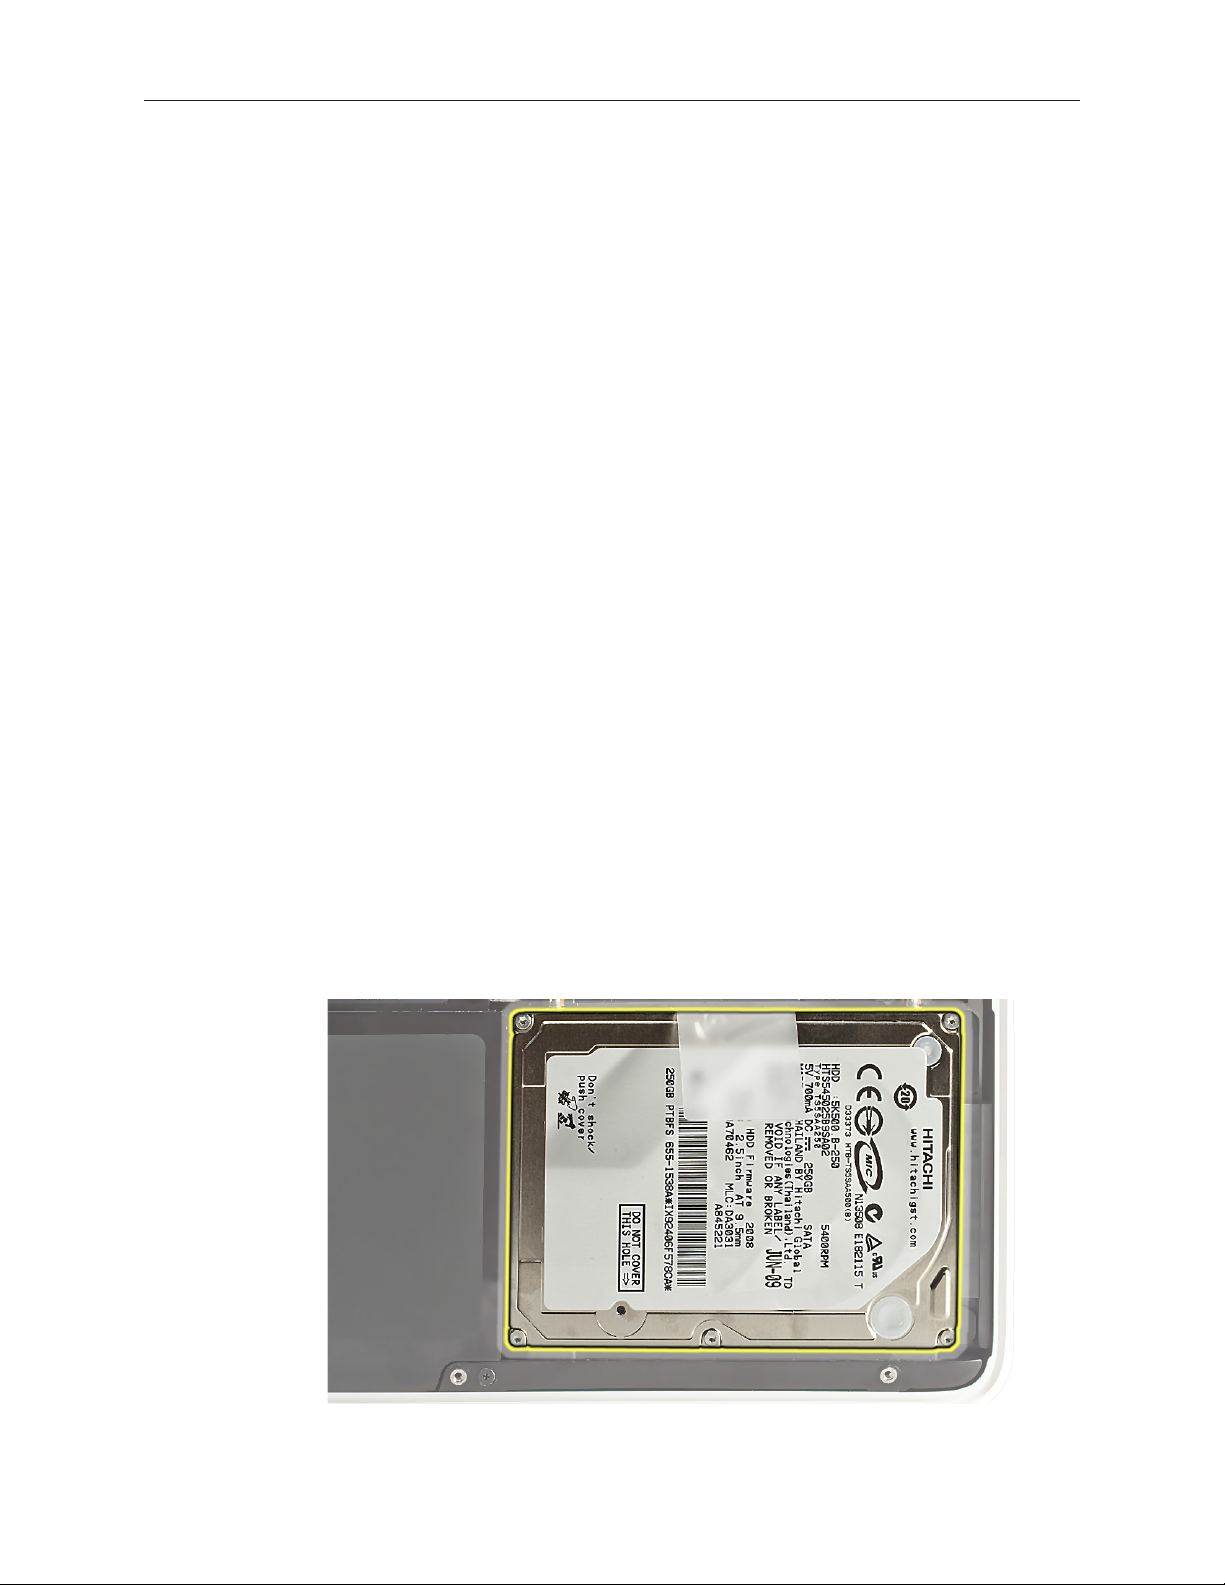
6 Loosen, but do not remove, 2 screws from the hard drive bracket. Remove hard drive bracket
and put it aside.
Note: The top of the hard drive bracket has a long EMI gasket, not shown. Do not remove it.
© 2010 Apple Inc. All rights reserved.
073-1316 Rev. B 3
Page 4

7 To prevent strain on hard drive cable, disconnect cable from logic board and remove 3-mm
long screw.
8 Use pull tab to tilt hard drive out.
© 2010 Apple Inc. All rights reserved.
073-1316 Rev. B 4
Page 5

9 Disconnect hard drive connector cable.
10 Follow safe handling:
• Do not press drive between your ngers
• Handle drive by the sides only
• Do not touch connector
• Do not touch circuitry on underside of drive
© 2010 Apple Inc. All rights reserved.
073-1316 Rev. B 5
Page 6

Replacement
1 Touch a metal surface inside computer to discharge static electricity.
2 Make sure 4 rubber grommets are seated in top case before installing the hard drive.
3 Attach hard drive connector cable to drive, and tilt hard drive into computer.
4 Connect hard drive connector cable to logic board and install screw.
5 Install hard drive bracket.
© 2010 Apple Inc. All rights reserved.
073-1316 Rev. B 6
Page 7

6 Install bottom case by securing 3 clips to the matching snaps on the top case. This helps
align the 8 screw holes.
Reinstalling Software that Came with the Computer
Use the software install discs that came with the computer to reinstall Mac OS X and any
applications that came with the computer.
Important: Apple recommends backing up data on the hard disk before restoring software. Back
up essential les before installing Mac OS X and other applications. Apple is not responsible for
any lost data.
For more details, refer to http://support.apple.com/kb/HT3910.
This procedure has four parts:
• Erasing the hard drive/formatting the hard drive
• Installing the Mac OS X operating system using the Mac OS X Install DVD.
• Completing the Mac OS X Setup Assistant.
• Restoring the bundled applications using the Applications Install Disc.
Important: This procedure will completely erase your hard drive. If you have installed Microsoft
Windows using Boot Camp, or have multiple partitions, this procedure will erase the partition you
select.
© 2010 Apple Inc. All rights reserved.
073-1316 Rev. B 7
Page 8

Part One: Erasing the hard drive/formatting the hard drive
1. Turn on the computer.
2. Insert the Mac OS X Install DVD into the optical drive.
3. Press and hold the “C” key while the computer starts up. The computer will start up using the
Mac OS X Install DVD.
4. If your are using a wireless mouse, a mouse icon should appear asking you to turn the
mouse on so that the computer can discover it.
5. Select a language, then press the right arrow key.
6. Click the Utilities menu, the choose Disk Utility.
7. Select a volume to erase (usually called Macintosh HD).
8. Click the Erase tab.
9. Click Erase... Important: This step will completely erase your hard drive. If you have installed
Microsoft Windows using Boot Camp, or have multiple partitions, this procedure will erase
the partition you select.
10. A dialog box appears asking if you want to erase the partition: click Erase.
11. After the partition is erased, choose Quit Disk Utility from the Disk Utility menu.
Part Two: Installing the operating system
1. When the Mac OS X Installer screen appears, click Continue.
2. When the license agreement appears, click Agree.
3. Select the disk you erased. It should now be highlighted with a green arrow.
4. Click Install. A status bar appears on the bottom of the screen while Mac OS X installs.
5. An Additional Information screen appears, advising you that you operating system has been
installed. Click Continue.
6. An Install Succeeded screen appears. Click Restart.
Part Three: Completing the Mac OS X Setup Assistant
1. When the restart has completed, a welcome video plays, then country/region selection
screen appears.
2. Select your country or region and click Continue.
3. Select a keyboard layout and click Continue.
4. A migration screen appears. If you wish to migrate your data from another Macintosh,
see Migration tips and tricks http://support.apple.com/kb/HT1291. If you do not wish
to migrate, or want to migrate later, select “Do not transfer my information now” and click
Continue.
5. A Wireless Service screen appears if you have wireless services available within range of your
© 2010 Apple Inc. All rights reserved.
073-1316 Rev. B 8
Page 9

computer. Select “On” and click Continue.
6. If the network is password protected, you be asked for a password when you select it. Type
the password and click Continue.
7. An Apple ID screen appears. This is used to purchase content from the iTunes store. You can
use MobileMe or .Mac usernames here as well. When complete, click Continue.
8. If you do not have an Apple ID or MobileMe account, click Continue to move to the next
screen.
9. A Registration Information screen appears. You are not required to ll this out, but it is
helpful if you do. When complete, click Continue and your product registration will be sent
immediately.
10. If Mac OS X servers are available on your network, you’ll be asked if you’d like to log on to
them. If not, click Continue.
11. A Create Your Account screen appears. This will be used to create a User Account with Login
ID and Password for you computer. You should remember this password. You’ll be asked for
it when you install new software or perform other administrative tasks on your computer.
When complete, click Continue and your account will be created immediately.
12. A screen to select your user picture appears. Take a snapshot with the built-in camera or
select a picture from your Library. When complete, click Continue.
13. A MobileMe screen appears. Select an option and click Continue.
14. A Thank You screen appears. Click Go to complete the Mac OS X Setup Assistant.
15. Eject the Mac OS X Install DVD by dragging its icon to the Trash.
Part Four: Restoring the bundled applications
1. To install the bundled applications, locate the Applications Install Disc that came with your
computer.
Note: You may see a Software Update icon bouncing up and down in your dock. You can
quit this for now.
2. Insert the Applications Install Disc into the optical drive.
3. The disc will mount and an Applications Install Disk dialog appears. Double-click on Install
Bundled Software to install your iLife applications.
4. A dialog appears asking if you want to run the package. Click Continue.
5. The Bundled Software Applications Installer screen appears. Click Continue.
6. A software license screen appears. Click Continue, then click Agree to accept the terms.
7. A select destination dialog appears. Make sure the partition with the green arrow is the
correct destination, then click Continue.
8. To install all the bundled applications, click Install.
9. To select individual applications, click Customize. Click the disclosure triangle next to
© 2010 Apple Inc. All rights reserved.
073-1316 Rev. B 9
Page 10

Bundled Applications to select individual applications, then click Install. Clicking Standard
Install on the Customize screen installs all the applications.
10. Type the password you created in Part Three, step 11 to start the installation.
11. A restart dialog appears. Click Continue Installation.
12. An Install was Successful screen appears. Click Restart.
The restore process is now complete.
It is a good idea to make sure you’ve updated all the software after performing this procedure.
From the Apple () menu, choose Software Update to nd the updates currently available for
your computer.
Apple Inc.
© 2010 Apple Inc. All rights reserved.
Under the copyright laws, this document may not be copied, in whole or in part, without the
written consent of Apple.
Every eort has been made to ensure that the information in this document is accurate. Apple is
not responsible for printing or clerical errors.
Apple
1 Innite Loop
Cupertino, CA 95014-2084
USA
+ 1 408 996 1010
http://www.apple.com
Apple, the Apple logo, Mac, Macintosh, and MacBook are trademarks of Apple Inc., registered in
the U.S. and other countries.
© 2010 Apple Inc. All rights reserved.
073-1316 Rev. B 10
 Loading...