


Uber FX
User Guide
English ( 3 – 10 )
Guía del usuario
Español ( 11 – 18 )
Guide d’utilisation
Français ( 19 – 26 )
Guida per l’uso
Italiano ( 27 – 34 )
Benutzerhandbuch
Deutsch ( 35 – 43 )
Appendix
English ( 44 – 45 )

2
User Guide (English)
Introduction
Thank you for purchasing the Uber FX. At Alto Professional, performance and reliability mean as much to us as they do to you. That’s why we design our equipment with only one thing in mind—to make your performance the best it can be.
Note: Before you first use the product, please fully charge the battery. Your unit was purposely shipped with a reduced battery charge to ensure safe transit.
Use the included power cable to connect the unit to a power outlet and let it charge for up to 12 hours. This helps ensure the longest life for your battery.
Box Contents
Uber FX
Power Cable
User Guide
Safety & Warranty Manual
Support
For the latest information about this product (system requirements, compatibility information, etc.) and product registration, visit altoproaudio.com.
For additional product support, visit altoproaudio.com/support.
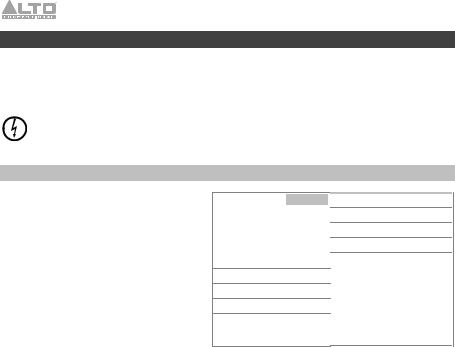
Rechargeable Batteries
Rechargeable lead-acid batteries are the same type used in automobiles. As with your car battery, how you use this battery has a significant impact on its lifespan. With proper use and treatment, a lead-acid battery can last for years. Here are some recommendations for getting the longest life from the internal battery.
General |
Fully charge the battery before using the speaker. |
Usage |
Charge the battery completely after each use. |
|
|
Storage |
For best product longevity, do not store at exceedingly hot (greater than |
|
90 °F / 32 °C) or exceedingly cold (less than 32 °F / 0 °C) temperatures. |
|
It is acceptable to leave your speaker plugged in. This will not overcharge the |
|
battery. |
|
If you leave the battery level low and do not charge it for 6 months, it may |
|
permanently lose capacity. |
Repair |
If the battery fails to charge, contact Alto Professional at altoproaudio.com. |
Disposal |
Bring the unit to a recycling center or dispose of in accordance with local |
|
ordinances. |
|
3 |
Important Safety Precautions
Please note: Alto Professional and inMusic are not responsible for the use of its products or the misuse of this information for any purpose. Alto Professional and inMusic are not responsible for the misuse of its products caused by avoiding compliance with inspection and maintenance procedures. Please also refer to the included safety and warranty manual for more information.
Caution: To reduce the risk of electric shock, do not connect Uber FX to a power outlet while the grille is removed.
Sound Level
Permanent hearing loss may be caused by exposure to extremely high noise levels. The U.S. Occupational Safety and Health Administration (OSHA) has specified permissible exposures to certain noise levels. According to OSHA, exposure to high sound pressure levels (SPL) in excess of these limits may result in hearing loss. When using equipment capable of generating high SPL, use hearing protection while such equipment is under operation.
Hours per day |
SPL (dB) |
Example |
|
8 |
90 |
|
Small gig |
|
|
|
|
6 |
92 |
|
Train |
|
|
|
|
4 |
95 |
|
Subway train |
|
|
|
|
3 |
97 |
|
High-level desktop monitors |
2100 Classical music concert
1.5102 Riveting machine
1105 Machine factory
0.5 |
110 |
Airport |
0.25 or less |
115 |
Rock concert |
4
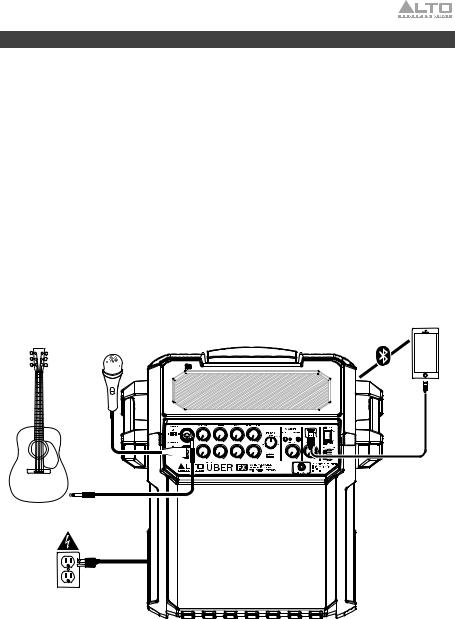
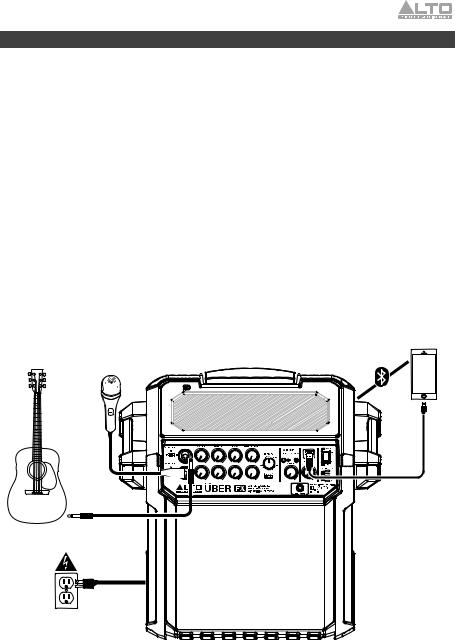
Setup
1.Make sure all items listed in the Box Contents are included in the box.
2.Read the Safety & Warranty Manual before using the product.
3.Make sure that you have completely charged the battery prior to first use for maximum battery life.
4.Turn down the Master Volume on Uber FX.
5.Power on Uber FX.
6.Connect your devices.
7.Switch everything on in the following order:
•audio input sources (i.e. microphones, instruments, CD/MP3 Players)
•Uber FX
8.Raise the volume to a comfortable level.
9.Return the Master Volume to zero and turn off Uber FX when you are finished.
Example
Bluetooth
Device
Guitar
Microphone
Power
Items not listed under Introduction > Box Contents are sold separately.
5

Features
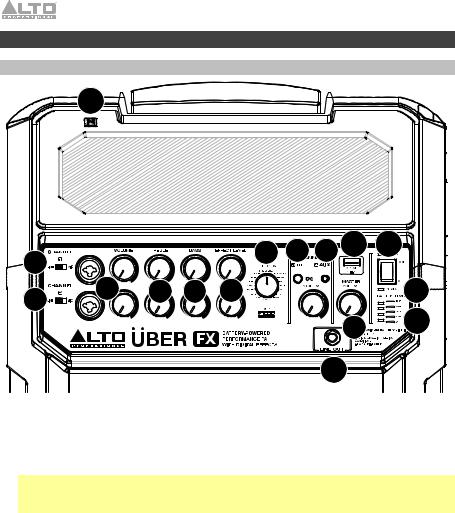
Front Panel
15
2 |
|
|
|
8 |
3 |
4 |
11 |
12 |
|
|
|
|
|
|
|
|
|
2 |
1 |
5 |
6 |
7 |
|
|
|
13 |
|
|
|
|
|
|
|
14 |
|
|
|
|
|
|
|
|
9 |
|
|
|
|
|
|
|
|
|
|
|
|
|
|
|
|
10 |
|
|
1.Combo Inputs with Volume Control: Use a standard 1/4" (6.35 mm) TRS or XLR cable (not included) to connect your sound source to each input. Use the Volume knob to adjust the level of each one.
2.Line/Mic Switch: Use this switch to set the Input to accept either a Line-level or Mic-level sound source.
Note: When using an instrument with passive pickups, set the switch to the Mic setting. When using an instrument with active pickups, set the switch to the Line setting.
3.Bluetooth: The Bluetooth LED will be lit when a device is paired to Uber FX. This LED will not be lit when Uber FX is first powered on (unless it was previously paired with a device). Press the Bluetooth button to disconnect a paired Bluetooth device.
4.Auxiliary Input with Volume Control: This stereo 1/8” (3.5 mm) input can be used to connect a CD player, MP3 player, or other audio source. The Volume control adjusts auxiliary input and Bluetooth volume.
5.Hi EQ (Treble): Adjusts the high (treble) frequencies of the channel.
6.Lo EQ (Bass): Adjusts the low (bass) frequencies of the channel.
7.Effect Level: Adjusts how much of the internal effect will be applied to the channel.
8.Effects Selector: Selects the effect that Uber FX’s internal effects processor (powered by Effects by Alesis) will apply to the various channels. Each channel can send different levels of audio to the processor by adjusting their Effect Level knob. See Operation > Effects for an explanation of the available effects.
6
9.Master Volume Control: This adjusts the loudspeaker's main mix volume, which includes Instrument/Microphone Inputs, Auxiliary Input, and the audio of a paired Bluetooth device.
10.Line Out: This 1/4" (6.35 mm) TRS output can be connected to a stereo auxiliary input or to a mixer using a TRS-to-dual-TS splitter cable (not included). The Line Out is postMaster Volume Control.
11.USB Charging Port: Connect your device’s charge cable here to charge it. USB charging only functions when the unit’s power is turned on.
Note: To charge smartphones and tablets faster, put the device’s screen to sleep.
12.Power Switch: Use this switch to power the loudspeaker on or off. Make sure all Volume knobs are set to "zero" before powering it on. When the loudspeaker is powered on, the Power LED above it will be lit.
13.Charge Indicator: This LED will illuminate when Uber FX is connected to AC power to indicate it is charging. Once charging is complete, the LED will go off.
14.Battery Level Indicator: While the unit is powered on, these four lights indicate the power left in the battery. Battery life varies based on volume and usage.
15.NFC (Near-Field Communication): Touch and briefly hold your supported and enabled device to the NFC logo to pair the device. See Pairing a Bluetooth Device Using NFC for more information.
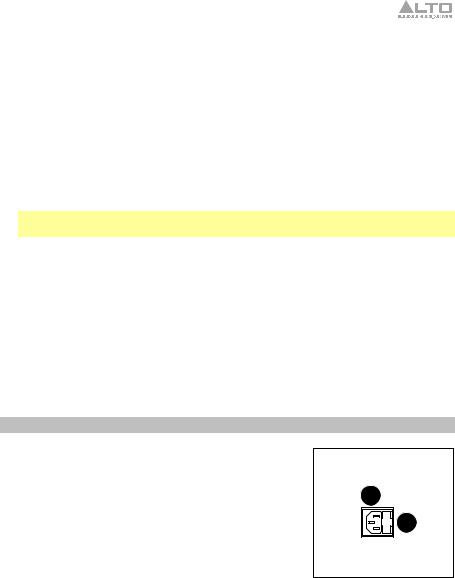
Rear Panel
1. Power |
Cable Input: Insert the included power cable here |
to |
charge |
the unit. Please note that when the power cable is |
|
connected, the battery will still charge while the unit is in use. |
16 |
|
|
|
|
2. Fuse: If the unit's fuse needs replacing, lift this tab to access |
17 |
the fuse. Replace it with a fuse with an appropriate rating |
|
(printed under the unit's power cable input). Using a fuse with |
|
an incorrect rating can damage the unit and/or fuse. |
|
Operation
Pairing a Bluetooth Device
1.Turn on your Bluetooth device.
2.Turn on Uber FX using the power switch. If you have previously connected to another Bluetooth device, Uber FX will reconnect.
3.Navigate to your Bluetooth device’s setup screen, find Uber FX and connect.
Note: If your device requires a passcode or PIN, enter 0000.
4.The Bluetooth LED will light up solid when it is "paired."
If your Bluetooth device is not able to connect to Uber FX, press the Bluetooth button on Uber FX to break previous Bluetooth connections and reset the Bluetooth module.
5.Start playback from your Bluetooth device.
6.To disconnect a connected Bluetooth device and connect to another Bluetooth device, press the Bluetooth button. Repeat Step 3.
Note: If you experience trouble connecting or playing music, update your device's OS.
7

Pairing a Bluetooth Device Using NFC
NFC (near-field communication) allows data exchange from devices, such as pairing, by gently bumping them together. Check in your device’s manual to see if this feature is supported.
To use NFC to pair with Uber FX:
1.In order to use NFC, your device must be turned on and unlocked.
2.Enter your device’s Settings menu and check that NFC is turned On (one-time step).
3.Power on Uber FX.
4.Touch and briefly hold your device to the NFC logo located on Uber FX’s top panel.
5.Follow the pairing instructions that appear on your phone. If a passcode is required, enter “0000”.
6.To unpair, gently bump your device against the NFC logo.
Using the Aux Input
Connect your smartphone, MP3 player, or similar device to the Aux Input. Adjust the output volume on your source device and then adjust the overall volume using the Aux Input Volume Control on Uber FX.
8

Effects
To hear the effects on a channel: Turn up the Effects Level for the channel. Use the Effects Selector knob to choose one of the effects below:
Reverb Effects
•HALL 1: A large, bright concert hall reverberation effect suitable for vocals and instruments.
•HALL 2: A large, warm concert hall reverberation effect suitable for drums, piano and other instruments.
•ROOM 1: A medium-sized, moderately bright reflective room reverberation effect suitable for vocals, lead guitars and other instruments.
•ROOM 2: A small, very reflective bright room reverberation effect suitable for drums and percussion as well as electric guitars and other instruments.
•ROOM 3: A large, warm room reverberation effect suitable for acoustic instruments.
•PLATE 1: A lush, smooth vocal plate reverb with a long decay time and warm tonality.
•PLATE 2: An emulation of vintage plate reverb with bright, slightly tinny tonality and a medium-length decay.
•PLATE 3: A short, bright plate reverb effective for creating subtle spaces.
Modulation Effects
•CHORUS: A complex, 6-voice chorus ensemble effect with short delays often referred to as a "Chorus / Doubler". Discrete stereo signal path. Slow and watery.
•FLANGE: Classic stereo flange: a slow, slightly metallic sweep with a discrete stereo signal path.
•ROTARY: Fast rotary speaker simulator creates the classic, lush Doppler effect of an organ’s spinning horn. Effective on guitars, vocals, keyboards and other instruments.
Delay Effects
•DELAY 1: A simple slap-back echo with no feedback particularly effective on vocals and rhythm guitars.
•DELAY 2: Medium-length poly-rhythmic delay with crossover feedback. 3 to 4 ratio between L and R delay times (291 to 388ms) for 3/4 vs. 4/4 feel. Useful for solo instruments where a long, trailing echo effect is desired.
Multi Effects
•CHORUS – ROOM 1: Room reverb into a slow flanging modulation creates a spacey effect.
•CHORUS – ROOM 2: Fast modulation provides a dramatic chorus effect in a small room for a very lush chorus + reverb sound with a discrete stereo signal path.
BYPASS: Bypasses the effects processor – no effects will be heard.
9

Troubleshooting
If the unit is not charging: Make sure the power cable is properly connected to the power input and the power outlet.
If the sound is distorted: Try lowering the volume control of your sound source, musical instrument, or microphone. Also, try to reduce the overall volume of Uber FX using the Master Volume knob.
If there is too much bass: Try adjusting the tone or EQ control on your sound source to lower the bass level. This will allow you to play the music louder before clipping (distortion) occurs.
If there is a high-pitched whistling noise when using microphones: This is probably feedback. Point the microphone away from the speaker.
If you can’t hear the microphone over the music volume: Turn down the music volume from your source.
If you can't hear your instrument: Check the setting of the Line/Mic switch. If you are using an instrument with passive pickups, set the switch to the Mic setting.
If you can’t play music from a flash drive: The USB port is only for charging USB devices.
If you cannot connect your audio device to Uber FX via Bluetooth:
•Have your audio device (e.g., smartphone or tablet) and Uber FX as close together as possible while trying to connect. Make sure both the audio device and Uber FX are unobstructed by walls, furniture, etc.
•Reset the Bluetooth connection on Uber FX to disconnect Uber FX from any other audio device and restart the search process. If this does not work right away, power off Uber FX and then power it back on. See Pairing a Bluetooth Device Using NFC for more information.
•Reset the Bluetooth connection on your audio device by turning Bluetooth off and back on. You can find this under the Bluetooth menu in the Settings for your phone or other audio device.
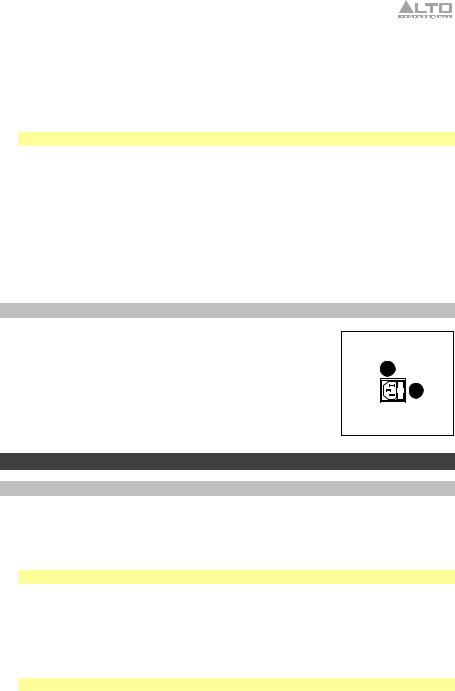
If this does not work, and you have connected to Uber FX before, find Uber FX in the list of available or previously connected devices in your audio device's Bluetooth menu, tap the "gear" or “i” icon located next to it and then select Unpair or Forget. Turn Uber FX off and back on and try pairing again once it reappears in your available devices list.
Note: If Uber FX has been paired to another audio device recently that is still within range, you may need to repeat this process with that audio device to fully disconnect.
10
Guía del usuario (Español)
Introducción
Gracias por comprar el Uber FX. En Alto Professional, el rendimiento y la confiabilidad significan tanto para nosotros como para usted. Por eso es que diseñamos nuestros equipos con una sola cosa en mente—hacer que pueda tocar su mejor interpretación.
Nota: Antes de utilizar por primera vez el producto, cargue completamente la batería. Su unidad se despachó intencionalmente con una carga reducida de la batería por razones de seguridad en el tránsito.
Utilice el cable del suministro eléctrico incluido para conectar la unidad a una toma de corriente y permita que la unidad se cargue durante hasta 12 horas. Esto contribuye a asegurar la vida útil más larga de su batería.
Contenido de la caja
Uber FX
Cable de alimentación
Guía del usuario
Manual sobre la seguridad y garantía
Soporte
Para obtener la información más completa acerca de este product (los requisitos del sistema, compatibilidad, etc) y registro del producto, visite altoproaudio.com.
Para soporte adicional del producto, visite altoproaudio.com/support.
Baterías recargables
Las baterías de plomo-ácido recargables son del mismo tipo que se usa en los automóviles. Al igual que con la batería del vehículo, la forma en que se usa tiene una influencia significativa en la duración de su vida útil. Con un uso y tratamiento correctos, una batería de plomo-ácido puede durar varios años. He aquí algunas recomendaciones para prolongar la vida útil de la batería interna.
Uso general |
Cargue completamente la batería antes de utilizando el altavoz. |
|
Cargue la batería completamente después de cada uso. |
Almacenamiento |
Para lograr la mayor longevidad del producto, no lo almacene a |
|
temperaturas muy altas (superiores 32 °C / 90 °F) o muy frías (inferiores |
|
a 0 °C / 32 °F). |
|
Es aceptable dejar su sistema de sonido enchufado. No sobrecargará |
|
la batería. |
|
Si deja que el nivel de la batería baje y no la carga durante 6 meses, |
|
puede perder permanentemente su capacidad. |
Reparación |
Si la batería no se carga, póngase en contacto con Alto Professional en |
|
altoproaudio.com. |
Disposición final |
Lleve la unidad a un centro de reciclaje o deséchela de acuerdo a las |
|
ordenanzas locales. |
|
11 |

Precauciones importantes para la seguridad
Para tener en cuenta: Alto Professional e inMusic no son responsables del uso de sus productos o el mal uso de esta información para cualquier propósito. Alto Professional e inMusic no son responsables del mal uso de sus productos causados por la omisión del cumplimiento de los procedimientos de inspección y mantenimiento. Para más información, consulte también el manual de seguridad y garantía incluido.
Precaución: Para reducir el riesgo de shock eléctrico, no conecte el Uber FX a una toma de corriente cuando la rejilla está desmontada.
Nivel de sonido
La exposición a niveles muy altos de ruido puede causar pérdidas auditivas permanentes. La Administración de Seguridad y Salud Ocupacional de EE.UU. (OSHA) ha especificado los niveles de exposición permisibles a ciertos niveles de ruido. Según la OSHA, la exposición a niveles de presión sonora (SPL) elevados que excedan estos límites puede causar pérdidas auditivas. Cuando utilice equipos capaces de generar SPL elevados, use protecciones auditivas mientras dichos equipos están en funcionamiento.
Horas diarias |
SPL (dB) |
Ejemplo |
8 |
90 |
Música de bajo volumen |
|
|
|
6 |
92 |
Tren |
|
|
|
4 |
95 |
Tren subterráneo |
|
|
|
3 |
97 |
Monitores de escritorio de |
|
|
alto nivel |
|
|
|
2 |
100 |
Concierto de música clásica |
|
|
|
1,5 |
102 |
Remachadora |
|
|
|
1 |
105 |
Máquina fabril |
|
|
|
0,5 |
110 |
Aeropuerto |
|
|
|
0,25 o menos |
115 |
Concierto de rock |
|
|
|
12
Instalación
1.Asegúrese de que todos los artículos indicados en Contenido de la caja estén incluidos en ella.
2.Lea el manual sobre la seguridad y la garantía antes de utilizar el producto.
3.Para asegurar una máxima vida útil de la batería, asegúrese de que esté completamente cargada antes de utilizarla por primera vez.
4.Asegúrese de que el volumen maestro del Uber FX esté en cero.
5.Encienda el Uber FX.
6.Conecte sus dispositivos.
7.Encienda todo en el siguiente orden:
•fuentes de entrada de audio (por ejemplo, micrófonos, instrumentos, reproductores de CD/MP3)
•Uber FX
8.Suba el volumen hasta un nivel confortable.
9.Regrese el volumen maestro a cero y apague el Uber FX cuando no lo use.
Ejemplo |
Dispositivo |
|
Bluetooth |
||
|
||
Micrófono |
|
|
Guitarra |
|
|
Suministro |
|
|
eléctrico |
|
Los elementos que no se enumeran en Introducción > Contenido de la caja se venden por separado.
13
Características
Panel frontal
15
2 |
|
|
|
8 |
3 |
4 |
11 |
12 |
|
|
|
|
|
|
|
|
|
2 |
1 |
5 |
6 |
7 |
|
|
|
13 |
|
|
|
|
|
|
|
14 |
|
|
|
|
|
|
|
|
9 |
|
|
|
|
|
|
|
|
|
|
|
|
|
|
|
|
10 |
|
|
1.Entradas combinadas con control de volumen: Use un cable de XLR o TRS de 6,35 mm (1/4 pulg.) estándar (no incluido) para conectar su fuente de sonido a estas entradas. Accione la perilla volumen para ajustar el volumen de cada entrada.
2.Interruptor Line/Mic: Utilice este interruptor para configurar la entrada de manera que acepte una fuente de sonido de nivel de línea o de nivel de micrófono.
Nota: Cuando utilice un instrumento con captadores pasivos, coloque el interruptor en la posición Mic. Cuando utilice un instrumento con captadores activos, coloque el interruptor en la posición Line.
3.Bluetooth: El LED Bluetooth se enciende cuando se aparea un dispositivo al Uber FX. Este LED no se enciende cuando el Uber FX se enciende por primera vez (a menos que hubiera sido apareado previamente con un dispositivo). Pulse el botón Bluetooth para desconectar un dispositivo Bluetooth apareado.
4.Entrada auxiliar con control de volumen: questo ingresso stereo da 3,5 mm (1/8 pulg.) può essere utilizzato per collegare un lettore CD, un lettore MP3 o altre sorgenti audio. Il comando di regolazione del volume regola il volume dell'ingresso ausiliario e Bluetooth.
5.Ecualizador de altos (Agudos): Ajusta las frecuencias altas (agudos) del canal.
6.Ecualizador de bajos (Graves): Ajusta las frecuencias bajas (graves) del canal.
7.Nivel de efectos: Ajusta la cantidad de efecto interno que se aplicará al canal.
14
8.Selector de efectos: Selecciona el efecto que el procesador de efectos (potenciado por los efectos de Alesis) interno Uber FX aplica a los diversos canales. Cada canal puede enviar al procesador niveles diferentes de audio ajustando sus perillas de Nivel de Efectos. Consulte en la sección Funcionamiento > Efectos una explicación de los efectos disponibles.
9.Control de volumen maestro: Este control ajusta el volumen de la mezcla principal del altavoz, que incluye las entradas de micrófono/instrumento, la entrada auxiliar, y el audio de un dispositivo Bluetooth apareado.
10.Salida de línea: Esta salida TRS de 6,35 mm (1/4 pulg.) puede conectar a una salida auxiliar estéreo o a un mezclador usando un cable divisor de TRS-a-doble-TS (no includio). La salida de línea es post control de volumen maestro.
11.USB estación: Conecte aquí el cable de carga de su dispositivo para cargarlo. La carga por USB funciona solamente cuando la unidad está encendida.
Nota: Para cargar sus teléfonos inteligentes (smartphones) y tabletas más rápido, ponga la pantalla de su dispositivo en estado de reposo.
12.Interruptor de encendido: Enciende y apaga el altavoz. Asegúrese de que la perilla de volumen esté ajustada a “cero” antes de encenderlo. Cuando el altavoz esté encendido, se encenderá el LED Power ubicado encima de él.
13.Indicador Charge: Este LED se encenderá cuando el Uber FX esté conectado a una fuente de CA para indicar que se está cargando. Una vez completada la carga, el LED se apagará.
14.Indicador de nivel de batería: Mientras la unidad está alimentada, estas cuatro luces indican la energía remanente en la batería. La vida útil de la batería varía en función del volumen y el consumo.
15.NFC (comunicación de campo cercano): Toque y acerque brevemente su dispositivo habilitado y soportado al logo de NFC para aparearlo. Consulte la sección Cómo aparear un dispositivo Bluetooth usando NFC para más información.
Panel trasero
1.Entrada del cable de alimentación: Inserte aquí el cable de alimentación incluido para cargar la unidad. Tenga en cuenta que cuando el cable de alimentación se encuentra conectado, la batería seguirá cargándose mientras la unidad esté en uso.
2.Fusible: Si el fusible de la unidad debe reemplazarse, levante esta lengüeta para acceder al fusible. Reemplácelo por un fusible con especificación apropiada (impresa debajo de la entrada del cable de alimentación de la unidad). Si utiliza un fusible de especificación incorrecta, puede dañarse la unidad y/o el fusible.
16
17 |
15
 Loading...