


QUICKSTART GUIDE
ENGLISH
GUÍA DE INICIO RÁPIDO
ESPAÑOL
GUIDE D'UTILISATION RAPIDE
FRANÇAIS
GUIDA RAPIDA
ITALIANO
SCHNELLSTART-ANLEITUNG
DEUTSCH
SNELSTARTGIDS
NEDERLANDS
BOX CONTENTS
•TRUESONIC speaker
•Power cable
•Quickstart Guide
•Safety Instructions & Warranty Information Booklet
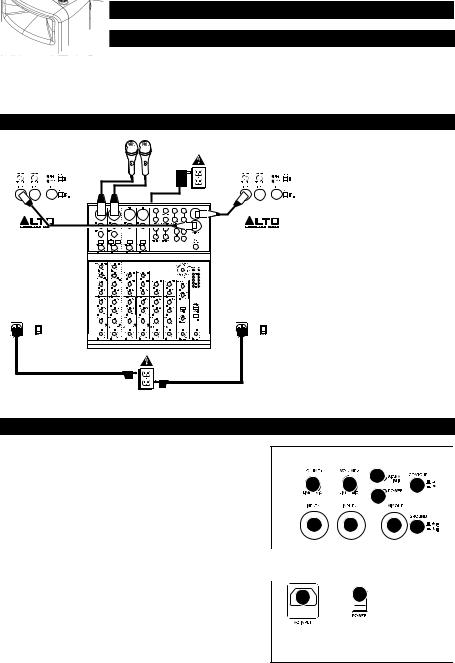
CONNECTION DIAGRAM / INSTALLATION
Microphones* |
Power |
Speaker |
Speaker |
Mixer*
Power
*Note: Microphones, mixer, and cables are not included.
INSTALLATION:
This speaker should be installed on a stand on the floor, according to its maximum weight, or suspended from its suspension points (M10 x 1.5PH, 30mm length) (see example image). We do NOT recommend suspending multiple speakers in a vertical array.
Example:
Eyebolt
Dust cover
Suspension point
REAR PANEL OVERVIEW
1.POWER INPUT – Connect the included power cable to this input and connect the other end of the cable to a power source. Make sure the speaker's POWER SWITCH is set to "off" when plugging and unplugging the cable.
2.POWER SWITCH – Turns the speaker on/off. Make sure the VOLUME knob is set to "zero" before turning it on.
3.POWER LED – Illuminates when the speaker is on.
4.VOLUME – Turn this knob to adjust the speaker's volume.
5.INPUT – Use a standard 1/4" TRS or XLR cable (not included) to connect your sound source to this input.
6.MIX OUT – Use a standard XLR cable (not included) to connect this jack to the input of another speaker (i.e., another TRUESONIC speaker).
7.SIGNAL LIMIT LED – Illuminates when the audio signal being sent to the speaker is "clipping" or distorting. If this light illuminates frequently or steadily, reduce the volume of your sound source.
4 |
4 |
7 |
|
|
8 |
||
|
|
3 |
|
5 |
5 |
6 |
9 |

 1
1


 2
2 


8.CONTOUR – Engage (depress) this switch to
emphasize low and high frequencies by +3 dB. Disengage the switch for flatter response for live performance or for maximum output.
9.GROUND SWITCH – Press this switch to reduce hum or noise.
2

CONTENIDO DE LA CAJA
•Altavoz TRUESONIC
•Cable de alimentación
•Guía de inicio rápido
•Folleto de instrucciones de seguridad e información sobre la garantía
DIAGRAMA DE CONEXIÓN / INSTALACIÓN
Micrófonos * |
Potencia |
Altavoz |
Altavoz |
Mezclador *
Potencia
* Nota: No se incluyen micrófonos, mezclador y cable.
INSTALACIÓN:
Este altavoz debe instalarse sobre un soporte colocado en el suelo, de acuerdo a su peso máximo, o suspendido de sus puntos de suspensión (M10 x 1.5PH, 30 mm de longitud) (vea la imagen de ejemplo). NO recomendamos suspender varios altavoces en un arreglo vertical.
Ejemplo:
Perno de ojal
Cubierta antipolvo
Punto de suspensión
VISTA DEL PANEL TRASERO
1.ENTRADA DE ALIMENTACIÓN – Conecte a esta
entrada el cable de alimentación incluido y luego |
|
|
|
|
conecte el otro extremo del cable al suministro |
|
|
7 |
|
eléctrico. Asegúrese de que el INTERRUPTOR DE |
4 |
4 |
||
8 |
||||
ENCENDIDO esté en "off" (apagado) cuando enchufe |
||||
|
|
3 |
||
y desenchufe el cable. |
|
|
||
|
|
|
2.INTERRUPTOR DE ENCENDIDO – Enciende y apaga
|
el altavoz. Asegúrese de que la perilla de VOLUMEN |
5 |
5 |
6 9 |
|
|
|||
|
|
|
|||||||
|
esté ajustada a "cero" antes de encenderlo. |
|
|
|
|
|
|
|
|
3. |
LED DE ENCENDIDO – Se ilumina cuando el altavoz |
|
|
|
|
|
|
|
|
|
está encendido. |
|
|
|
|
|
|
|
|
4. |
VOLUMEN – Gire esta perilla para ajustar el volumen |
|
|
|
|
|
|
|
|
|
del altavoz. |
|
|
|
|
|
|
|
|
|
|
|
|
|
|
|
|
|
|
5. |
ENTRADA – Use un cable de 1/4" TRS o XLR |
|
|
|
|
|
|
|
|
|
|
|
|
|
|
|
|||
|
estándar (no incluido) para conectar su fuente de |
1 |
|
|
2 |
|
|
|
|
|
|
|
|
|
|
|
|||
|
sonido a esta entrada. |
|
|
|
|
|
|
|
|
|
|
|
|
|
|
|
|
||
|
|
|
|
|
|
|
|
||
6. |
SALIDA DE MEZCLA – Use un cable XLR estándar |
|
|
|
|
|
|
|
|
|
(no incluido) para conectar este conector a la entrada |
|
|
|
|
|
|
|
|
|
de otro altavoz (por ej. otro altavoz TRUESONIC). |
|
|
|
|
|
|
|
|
7.LED DE LÍMITE DE SEÑAL – Se enciende cuando la señal de audio que se envía al altavoz se "recorta" o
distorsiona. Si esta luz se enciende con frecuencia o en forma permanente, reduzca el volumen de su fuente de sonido.
8.CONTORNO – Accione (presione) este interruptor para enfatizar las frecuencias bajas y altas en +3 dB. Libere este interruptor para lograr una respuesta más plana en interpretaciones en vivo o para máxima salida.
9.INTERRUPTOR DE TIERRA – Pulse este interruptor para reducir el zumbido o ruido.
3
 Loading...