


User Guide
English ( 2 – 7 )
Guía del usuario
Español ( 8 – 13 )
Guide d’utilisation
Français ( 14 – 19 )
Guida per l’uso
Italiano ( 20 – 25 )
Benutzerhandbuch
Deutsch ( 26 – 31 )
Gebruikershandleiding
Nederlands ( 32 – 37 )
Appendix
English ( 38 – 39 )
User Guide (English)
Introduction
Box Contents
TS2W Series Loudspeaker
Power Cable
User Guide
Safety & Warranty Manual
Support
For the latest information about this product (system requirements, compatibility information, etc.) and product registration, visit altoprofessional.com.
Quick Start
Items not listed under Introduction > Box Contents are sold separately.
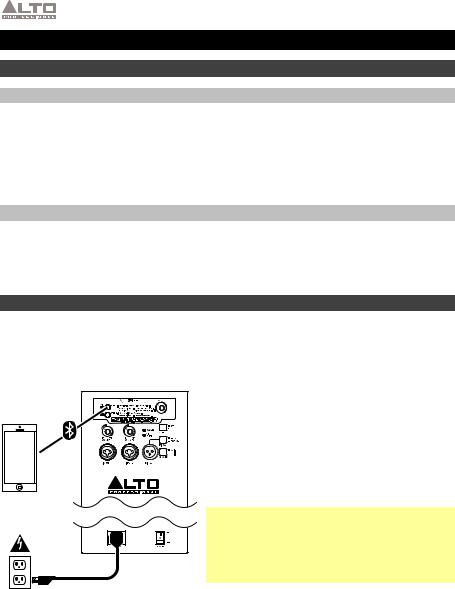
Example 1
Smartphone, tablet, etc.
Power
Press and release the TS2W Series loudspeaker's Pair button. Its LED will flash, and you will hear a tone sequence from the loudspeaker. From your Bluetooth device's settings page, enable Bluetooth and select Alto Pro Wireless as the device. When paired successfully, you will hear a final "confirmation tone" from the loudspeaker and the Pair LED will light continuously. (The first time you do this, the process may take up to 60 seconds.)
Note: When using two TS2W Series loudspeakers, you will need to link them wirelessly. The stereo signal will be split between them. Check with your device’s manufacturer to see how to set your audio output to mono for a dual mono configuration. Please see Bluetooth > Linking to learn more.
2

Example 2
Microphone |
Guitar |
|
|
|
with |
|
active |
|
pickup |
Power
Connect a dynamic microphone to the Input 1 using an XLR or 1/4” (6.35 mm) TRS cable. Connect a guitar with an active pickup to the Input 2 using a 1/4” (6.35 mm) TS or TRS cable (see your guitar’s documentation for cable requirements).
Note: When using the TS2W Series loudspeaker with a guitar, we recommend using one with active pickups rather than passive pickups. If you use a guitar with passive pickups, connect it to an external preamp or direct input (DI) box, and connect the line-level output to the loudspeaker.
Also, use dynamic microphones with the TS2W Series loudspeaker rather than condenser microphones. If you use a microphone that requires +48 V of phantom power, connect it to an external phantom power supply before connecting it to the loudspeaker.
Example 3
Connect the left and right output of your DJ mixer, controller, etc. to Input 1 of each loudspeaker using XLR or 1/4” (6.35 mm) TRS cables.
DJ controller,
Mixer, etc.
Power
Tip: To send the same mix to both TS2W Series loudspeakers, connect both channels of your DJ mixer, controller, etc. to the Input 1 and Input 2 of one loudspeaker, and then connect that loudspeaker’s Mix Out to the Input 1 of the other loudspeaker. Both TS2W Series loudspeakers will then play identical summed mono mixes.
3
Important Safety Precautions
Please note: Alto Professional and inMusic are not responsible for the use of its products or the misuse of this information for any purpose. Alto Professional and inMusic are not responsible for the misuse of its products caused by avoiding compliance with inspection and maintenance procedures. Please also refer to the included safety and warranty manual for more information.
Caution: To reduce the risk of electric shock, do not connect a TS2W Series loudspeaker to a power outlet while the grille is removed.
Stand-Mounting
•Always install loudspeakers in accordance with applicable electrical and building codes.
•Install the loudspeaker according to its maximum weight. Check the specifications of your stand or pole to ensure it can support the loudspeaker’s weight. Also, observe all safety precautions specified by the manufacturer.
•Do not mount multiple loudspeakers on the same stand or pole.
•Always verify that the stand or pole is on a flat, level, and stable surface. Also, fully extend the legs of tripod-style stands, and ensure its legs do not present a trip hazard.
•Inspect the stand (or pole and associated hardware) before each use and do not use equipment with worn, damaged, or missing parts.
•Always be cautious in windy, outdoor conditions. You may need to place additional weight (e.g., sandbags) on stand’s base to improve stability. Do not attach banners or similar items to any part of a loudspeaker system. Such attachments could act as a sail and topple the system.
•Unless you are confident that you can handle the loudspeaker’s weight, ask another person to help you lift it onto the stand or pole.
•Make sure your cables are out of the way of performers, production crew, and audience so they will not trip over them, pulling the loudspeaker off the stand or pole.
Sound Level
Permanent hearing loss may be caused by exposure to extremely high noise levels. The U.S. Occupational Safety and Health Administration (OSHA) has specified permissible exposures to certain noise levels. According to OSHA, exposure to high sound pressure levels (SPL) in excess of these limits may result in hearing loss. When using equipment capable of generating high SPL, use hearing protection while such equipment is under operation.
Hours per day |
SPL (dB) |
Example |
8 |
90 |
Small gig |
|
|
|
6 |
92 |
Train |
|
|
|
4 |
95 |
Subway train |
|
|
|
3 |
97 |
High level desktop monitors |
|
|
|
2 |
100 |
Classical music concert |
|
|
|
1.5 |
102 |
Riveting machine |
|
|
|
1 |
105 |
Machine factory |
|
|
|
0.50 |
110 |
Airport |
|
|
|
0.25 or less |
115 |
Rock concert |
4

Features
Rear Panel
1.Power Input: Use the included power cable to connect this input to a power outlet. Make sure the speaker’s Power Switch is set to “off” when connecting or disconnecting the cable.
2.Power Switch: Use this switch to power the loudspeaker on/off. Make sure all Volume knobs are set to “zero” before powering it on.
3.Power LED: This light illuminates when the loudspeaker is powered on.
4.Input: Use a standard 1/4” (6.35 mm) TRS or XLR cable (not included) to connect your sound source to each input. Use the Input Volume knob to adjust the level of each one.
5.Input Volume: Turn this knob to adjust the volume of each Input.
6.Mix Out: Use a standard XLR cable (not included) to connect this output to the input of another loudspeaker. The signal sent from this output is a summed mono signal of the two Inputs.
14 |
12 |
3 |
|
11 |
13 |
|
|||
|
|
|||
5 |
5 |
|
|
8 |
|
|
10 |
||
4 |
4 |
|
6 |
|
|
|
|||
|
|
7 |
|
9 |
1 |
2 |
7.Signal Limit LED: This light illuminates when a high audio signal level activates the internal protection circuit. The protection circuit dynamically reduces the signal level to avoid audible distortion and to protect the woofer and high-frequency driver from overexcursion or mechanical damage. If this light is lit constantly, or the sound is distorted, reduce the signal level of your sound source, or lower the volume with the Volume knob.
8.Contour: Engage (depress) this switch to emphasize low and high frequencies by +3 dB. Disengage (raise) the switch for a “flatter” response for live performance or for maximum output.
9.Ground Switch: Engage (depress) this switch to reduce hum or noise.
10.Mix Out Selector: When disengaged (Pre Vol), the Mix Out level will be unaffected by the Input Volume controls. When engaged (Post Vol), the Mix Out level can be adjusted by the Input Volume controls.
Note: The Bluetooth Volume control always affects the Mix Out.
11.Bluetooth volume: Turn this knob to adjust the volume of your paired Bluetooth device.
12.Pair: Press and release this button to pair the loudspeaker system to your Bluetooth device. See the Bluetooth > Pairing section for pairing instructions.
13.Stereo Link: When using a pair of TS2W Series loudspeakers press and release this button on each loudspeaker to "link" them for wireless stereo audio. See the Bluetooth > Linking section for more information.
14.Pairing/Linking Tone Volume: Use this recessed knob to increase or decrease the level of the pairing and linking tones. Insert a small, flathead screwdriver and turn right to increase the volume by up to 10 dB, or turn left to decrease volume all the way down to silent.
5

Bluetooth
Important:
•These steps are for wireless audio streaming only.
•When pairing or linking, do only one process at a time. Starting one process before the other is finished will cancel the first.
•The tone sequences for pairing and linking are different, so you can easily distinguish between the two.
About Range
TS2W Series loudspeakers use an advanced, extended-range Bluetooth antenna design, allowing for ranges far greater than traditional Bluetooth devices. The typical range is 60-80 feet (18-24 meters) with a clear line of sight. However, the range may vary depending on your source device and the environment.
To maximize the range:
•Set your source device on a flat surface and make sure there are no obstacles between the loudspeaker and your device (e.g., walls, furniture, etc.).
•Turn off your source device's Wi-Fi.
•Turn off any unneeded 2.4 GHz devices in the nearby vicinity (e.g., other Bluetooth devices, baby monitors, Wi-Fi access points, microwave ovens, etc.).
•Try using a different Bluetooth source device. Bluetooth signal strength varies between different devices.
Pairing
To pair TS2W Series loudspeaker to your Bluetooth device:
1.Do this on one loudspeaker only: With the loudspeaker powered on, press and release its Pair button. Its LED will flash, and you will hear a tone sequence from the loudspeaker. (If you are using two TS2W Series loudspeakers, this one will be the "master." Also see the Linking section below.)
2.From your Bluetooth device's settings page, enable Bluetooth and select Alto Pro Wireless as the device. When paired successfully, you will hear a final "confirmation tone" from the loudspeaker and the Pair LED will light continuously. (This process may take up to 60 seconds.)
Note: If your device prompts you to enter a PIN code to pair it to the speaker, enter 0000 (four zeros). If your device prompts you to select the connection type, select stereo speakers, advanced audio, or a similar option.
3.Turn the loudspeaker's Bluetooth Volume knob to its lowest setting.
4.On your Bluetooth device, play music. We recommend setting the playback volume at its maximum setting.
Note: When connected to a single loudspeaker, the Bluetooth signal from your device will only play half the stereo image, either Left or Right. Check with your device’s manufacturer to see how to set your audio output to mono.
5.Once your device is paired to the loudspeaker, the loudspeaker will remember the device even after power-cycling it. To reconnect it, go to your device's Bluetooth settings page and select Connect to re-establish the connection.
6

Linking
Note: The loudspeaker that is connected to your source device is the "master"; the linked loudspeaker is the "slave." The source device sends its signal to the master, and the master relays the signal to the slave.
If you are using two TS2W Series loudspeakers:
1.Make sure no audio is playing from your Bluetooth device. If it is, pause/stop playback and wait 5 seconds.
2.Press and release the Stereo Link button on each loudspeaker.
3.Both loudspeakers' LEDs will flash while "searching" for each other and you will hear a tone sequence from both loudspeakers. (This process may take up to 60 seconds. However, the very first time you link the loudspeakers, the process may take up to 3 minutes.)
4.When they are successfully linked, you will hear a final "confirmation tone" from both loudspeakers and the Stereo Link LEDs on both loudspeakers will light continuously.
Note: The stereo signal will be split between the two loudspeakers: the master loudspeaker will play the left channel; the slave loudspeaker will play the right channel.
To use two loudspeakers in a dual mono configuration, follow the pairing and linking process, then check with your device’s manufacturer to see how to set your audio output to mono.
Tip: When using two loudspeakers, we recommend labeling the master loudspeaker so you can distinguish between the two in future setups.
Additional Information
TS2W Series loudspeakers will remember their pairing and linking settings even after they are powered off. When you turn the loudspeakers back on, they will automatically reconnect to each other. When the connections are re-established between the loudspeakers, the LEDs next to the Stereo Link buttons will light continuously.
Tip: Once your device is paired to the loudspeaker, the loudspeaker will remember the device even after power-cycling it. To reconnect, go to your device's Bluetooth settings page and select Connect to re-establish the connection.
If the connection is lost between the loudspeakers, or between the loudspeaker and the source device, and if they do not reconnect automatically, power-cycle both loudspeakers and allow them to reconnect.
When the two loudspeakers are linked, you can only pair your source device to the master loudspeaker. The slave loudspeaker's Pair button will be disabled; if you press it, you will hear 3 rapid "beeps" to indicate that the button is "locked out."
To erase all previous pairing and linking settings, press and hold either the Pair button or the Stereo Link button for 3 seconds. You will hear a long tone to confirm its pairing and linking settings have been erased. The LEDs will also turn off. Do this on both the master and the slave loudspeakers. Now, you can pair to a new source device or link the loudspeakers again.
Note: The volume of the pairing and linking tones are pre-set to an optimal level. To increase or decrease this level, insert a small, flathead screwdriver into the Pairing/Linking Tone Volume and turn right to increase tones by up to 10 dB, or turn left to decrease tones all the way down to silent.
7
Guía del usuario (Español)
Introducción
Contenido de la caja
Altavoz de la Serie TS2W
Cable de alimentación
Guía del usuario
Manual sobre la seguridad y garantía
Soporte
Para obtener la información más completa acerca de este product (los requisitos del sistema, compatibilidad, etc) y registro del producto, visite altoprofessional.com.
Inicio rapido
Los elementos que no se enumeran en Introducción > Contenido de la caja se venden por separado.
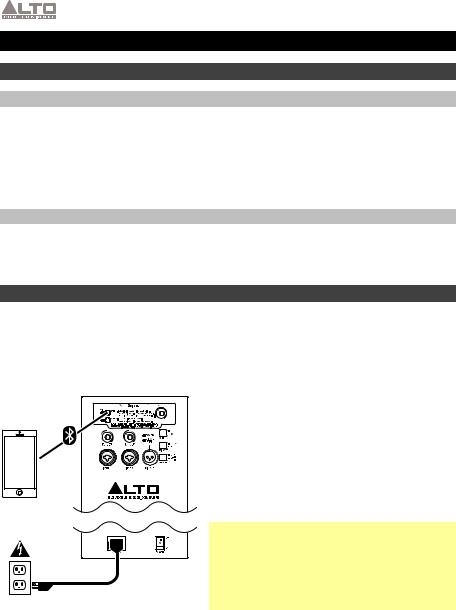
Ejemplo 1
Teléfono
inteligente, tableta, etc.
Alimentación
Pulse y suelte el botón Pair (Apareamiento) del altavoz TS2W. Destellará el LED y oirá una secuencia de tonos procedente del altavoz. Desde la página de configuración de su dispositivo Bluetooth, habilite Bluetooth y seleccione Alto Pro Wireless como el dispositivo. Cuando el apareamiento sea exitoso, oirá un "tono de confirmación" procedente del altavoz y el LED Pair (Apareamiento) se encenderá continuamente. (La primera vez que realice esto, puede demorar hasta 60 segundos).
Nota: Al utilizar dos altavoces TS2W, deberá enlazarlos de forma inalámbrica. La señal estéreo se divide entre los dos altavoces. Consulte con el fabricante de su dispositivo cómo ajustar su salida de audio a mono para obtener una configuración monoaural doble. Consulte Bluetooth > Cómo realizar el enlace para aprender más.
8
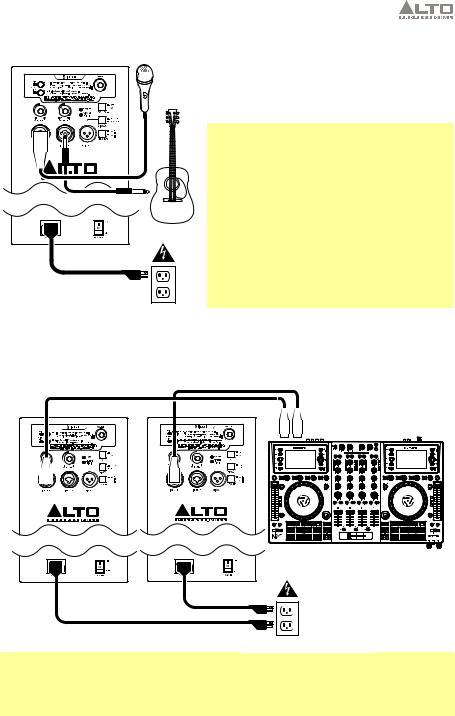
Ejemplo 2
Micrófono |
Guitarra |
|
con |
|
captador |
|
activo |
Alimentación
Conecte un micrófono dinámico a la entrada 1 mediante un cable XLR o TRS de 6,35 mm (1/4 pulg.). Conecte una guitarra con captador activo a la entrada 2 mediante un cable TS o TRS de 6,35 mm (1/4 pulg.).
Nota: Al utilizar el altavoz de la Serie TS2W con una guitarra, recomendamos utilizar una con captador activo en lugar de una con captador pasivo. Si utiliza una guitarra con captador pasivo, conéctela a un preamplificador externo o caja de entrada directa (DI), y conecte la salida de nivel de línea al altavoz.
También recomendamos utilizar micrófonos dinámicos con el altavoz de la Serie TS2W en lugar de micrófonos condensadores. Si utiliza micrófonos que requieren +48 V de potencia fantasma, recomendamos conectarlos a una fuente de potencia fantasma externa antes de conectarlos al altavoz.
Ejemplo 3
Conecte la salida izquierda y derecha de su mezclador de DJ, controlador, etc., a la entrada 1 de cada altavoz mediante cables XLR o TRS de 6,35 mm (1/4 pulg.).
Controlador de DJ, mezclador, etc.
Alimentación
Consejo: Para enviar la misma mezcla a ambos altavoces de la Serie TS2W, conecte ambos canales de su mezclador de DJ, controlador, etc. a las entradas 1 y 2 de un altavoz, y a continuación conecte la salida Mix (mezcla) de ese altavoz a la entrada 1 del otro altavoz. Ambos altavoces de la Serie TS2W reproducirán entonces mezclas mono sumadas idénticamente.
9

Precauciones importantes para la seguridad
Para tener en cuenta: Alto Professional e inMusic no son responsables del uso de sus productos o el mal uso de esta información para cualquier propósito. Alto Professional e inMusic no son responsables del mal uso de sus productos causados por la omisión del cumplimiento de los procedimientos de inspección y mantenimiento. Para más información, consulte también el manual de seguridad y garantía incluido.
Precaución: Para reducir el riesgo de shock eléctrico, no conecte el altavoz de la Serie TS2W a una toma de corriente cuando la rejilla está desmontada.
Montaje en soporte
•Instale siempre los altavoces de acuerdo con los códigos de electricidad y construcción aplicables.
•Instale el altavoz de acuerdo a su peso máximo. Compruebe las especificaciones de su soporte o columna para asegurarse de que pueda soportar el peso del altavoz. Asimismo, observe todas las precauciones para la seguridad especificadas por el fabricante.
•No monte varios altavoces en el mismo soporte o columna.
•Verifique siempre que el soporte o columna esté sobre una superficie plana, nivelada y estable. Asimismo, extienda totalmente las patas de los soportes tipo trípode y asegúrese de que las patas no representen un riesgo de tropiezo.
•Inspeccione el soporte (o columna y elementos de fijación asociados) antes de cada uso y no utilice equipos con piezas desgastadas, dañadas o faltantes.
•Tenga siempre cuidado en condiciones de viento a la intemperie. Es posible que deba colocar peso adicional (como bolsas de arena) en la base del soporte para mejorar la estabilidad. No fije pancartas o elementos similares a ninguna parte del sistema de altavoces. Tales agregados pueden funcionar como velas y hacer volcar el sistema.
•Salvo que tenga confianza de que puede manejar el peso del altavoz, solicite a otra persona que le ayude a levantarlo para colocarlo en el soporte o columna.
•Asegúrese de que los cables estén fuera del camino de los intérpretes, personal de producción y audiencia, de modo que no tropiecen con ellos y hagan caer el altavoz del soporte o columna.
Nivel de sonido
La exposición a niveles muy altos de ruido puede causar pérdidas auditivas permanentes. La Administración de Seguridad y Salud Ocupacional de EE.UU. (OSHA) ha especificado los niveles de exposición permisibles a ciertos niveles de ruido. Según la OSHA, la exposición a niveles de presión sonora (SPL) elevados que excedan estos límites puede causar pérdidas auditivas. Cuando utilice equipos capaces de generar SPL elevados, use protecciones auditivas mientras dichos equipos están en funcionamiento.
Horas diarias |
SPL (dB) |
Ejemplo |
8 |
90 |
Música de bajo volumen |
|
|
|
6 |
92 |
Tren |
|
|
|
4 |
95 |
Tren subterráneo |
|
|
|
3 |
97 |
Monitores de escritorio de alto nivel |
|
|
|
2 |
100 |
Concierto de música clásica |
|
|
|
1,5 |
102 |
Remachadora |
|
|
|
1 |
105 |
Máquina fabril |
|
|
|
0,50 |
110 |
Aeropuerto |
|
|
|
0,25 o menos |
115 |
Concierto de rock |
|
|
|
10
Características
Panel trasero
1.Entrada de corriente: Utilice el cable de corriente incluido para conectar esta entrada a una toma de corriente. Asegúrese de que el interruptor de encendido (Power) esté en la posición apagado (Off) cuando conecte o desconecte el cable.
2.Interruptor de encendido: Enciende y apaga el altavoz. Asegúrese de que la perilla de volumen esté ajustada a “cero” antes de encenderlo.
3.LED de encendido: Se ilumina cuando el altavoz está encendido.
4.Entrada: Use un cable de 6,35 mm (1/4” TRS) o XLR estándar (no incluido) para conectar su fuente de sonido a esta entrada. Accione la perilla volumen para ajustar el volumen de cada entrada.
5.Volumen: Accione esta perilla para ajustar el volumen de cada entrada.
6.Salida de mezcla: Use un cable XLR estándar (no incluido) para conectar este conector a la entrada de otro altavoz (por ej. otro altavoz TS2W).
14 |
12 |
3 |
|
11 |
13 |
|
|||
|
|
|||
5 |
5 |
|
|
8 |
|
|
10 |
||
4 |
4 |
|
6 |
|
|
|
|||
|
|
7 |
|
9 |
1 |
2 |
7.LED de límite de señal: Se enciende cuando el circuito de protección se activa debido a un nivel de señal elevado. El circuito de protección reduce dinámicamente el nivel de señal para evitar la distorsión audible y proteger al woofer y al excitador de alta frecuencia contra el exceso de excursión o daños mecánicos. Si el LED está constantemente encendido o el sonido está distorsionado, reduzca el nivel de señal de su fuente de sonido o baje el control de volumen del panel trasero.
8.Contorno: Accione (presione) este interruptor para enfatizar las frecuencias bajas y altas en +3 dB. Libere este interruptor para lograr una respuesta más plana en interpretaciones en vivo o para máxima salida.
9.Interruptor de tierra: Pulse este interruptor para reducir el zumbido o ruido.
10.Selector de salida de mezcla: Cuando está sin pulsar (Pre Vol), el nivel de salida de mezcla
(Mix Out) no es afectado por los controles volumen de las entradas. Cuando está pulsado (Post Vol), el nivel de salida de mezcla se puede ajustar con los controles volumen de las entradas.
Nota: El control volumen del Bluetooth siempre afecta a la salida salida de mezcla.
11.Volumen del Bluetooth: Gire esta perilla para ajustar el volumen de entrada de su dispositivo apareado.
12.Apareamiento (Pairing): Pulse y suelte este botón para aparear el altavoz con su dispositivo Bluetooth. Para conocer las instrucciones de apareamiento, consulte la sección Bluetooth > Cómo realizar el apareamiento.
13.Enlace estéreo (Stereo Link): Cuando utilice un par de altavoces TS2W, pulse y suelte este botón en cada altavoz a fin de "enlazarlos" para el audio estéreo inalámbrico. Para más información, consulte la sección Bluetooth > Cómo realizar el enlace.
14.Volumen de tono de apareamiento/enlace: Utilice esta perilla embutida para el cargo disminuir el nivel de los tonos de apareamiento y enlace. Inserte un destornillador plano pequeño y gírelo hacia la derecha para aumentar el volumen en hasta 10 dB o gírelo la izquierda para disminuir el volumen hasta silenciarlo totalmente.
11

Bluetooth
Importante:
•Estos pasos son para la transmisión inalámbrica de audio únicamente.
•Cuando realice el apareamiento o enlace, haga sólo un proceso por vez. Si se inicia un proceso antes de terminar el otro, el primero se cancela.
•Las secuencias de tonos para el apareamiento y el enlace son diferentes, de modo que es posible distinguir fácilmente entre los dos.
Acerca del alcance
Los altavoces TS2W utilizan un diseño de antena Bluetooth avanzado, de alcance extendido, que permite lograr alcances mayores que los de los dispositivos Bluetooth tradicionales. El alcance típico es de 18 a 24 metros (60 a 80 pies) con línea de visión despejada. No obstante, el alcance puede variar dependiendo de su dispositivo fuente y el ambiente.
Para maximizar el alcance:
•Coloque su dispositivo fuente en una superficie plana y asegúrese de que no haya obstáculos entre el altavoz y su dispositivo (como paredes, muebles, etc.).
•Apague el Wi-Fi de su dispositivo fuente.
•Apague todos los dispositivos de 2.4 GHz innecesarios que haya en las cercanías (como otros dispositivos Bluetooth, monitores de bebés, puntos de acceso al Wi-Fi, hornos de microondas, etc.).
•Pruebe usando un dispositivo fuente Bluetooth diferente. La intensidad de la señal del Bluetooth varía entre los distintos dispositivos.
Cómo realizar el apareamiento
Para aparear el altavoz con su dispositivo Bluetooth:
1.Haga esto sólo en un altavoz: Con el altavoz encendido, pulse y suelte el botón Pair (Aparear fuente). Destellará el LED y oirá una secuencia de tonos procedente del altavoz. (Si usa dos altavoces TS2W, éste será el "maestro". Consulte también la sección Cómo realizar el enlace más abajo.)
2.En la página "settings" (configuración) de su dispositivo Bluetooth, habilite Bluetooth y seleccione Alto Pro Wireless como dispositivo. Cuando el apareamiento sea exitoso, oirá un "tono de confirmación" procedente del altavoz y el LED Pair se encenderá continuamente. (Este proceso puede demorar hasta 60 segundos.)
Nota: Si su dispositivo le solicita que ingrese un código PIN para aparearlo con el altavoz, ingrese 0000 (cuatro ceros).Si su dispositivo le solicita seleccionar el tipo de conexión, seleccione altavoces estéreo, audio avanzado o una opción similar.
3.Gire la perilla volumen del Bluetooth del altavoz a su ajuste más bajo.
4.Reproduzca música en su dispositivo Bluetooth. Recomendamos ajustar el volumen de reproducción al valor máximo.
Nota: Cuando se conecta a un único altavoz, la señal Bluetooth proveniente de su dispositivo sólo reproducirá la mitad de la imagen estéreo, la izquierda o la derecha. Consulte con el fabricante de su dispositivo cómo ajustar su salida de audio a mono.
5.Una vez que su dispositivo está apareado al altavoz, éste recuerda el dispositivo aunque se apague y vuelva a encender. Para reconectarlo, vaya a la página de configuración de su dispositivo Bluetooth y seleccione Connect (Conectar) a fin de restablecer la conexión.
12
 Loading...