

Page 1

5
User Guide
English ( 3 – 5 )
Guía del usuario
Español ( 6 – 8 )
Guide d'utilisation
Français ( 9 – 11 )
Guida per l'uso
Italiano ( 12 – 14 )
Benutzerhandbuch
Deutsch ( 15 – 17 )
Appendix
English ( 18 )
Page 2

Page 3
User Guide (English)
1. Make sure all items listed in the Box Contents are included.
2. READ SAFETY INSTRUCTION BOOKLET BEFORE USING THE
PRODUCT.
3. Place the product in an appropriate location for operation.
4. Ensure high quality, shielded audio cables are used away from sources
of electromagnetic interference.
Support
For the latest information about this product and product registration, visit alesis.com/elevate-5.
For additional product support, visit alesis.com/support.
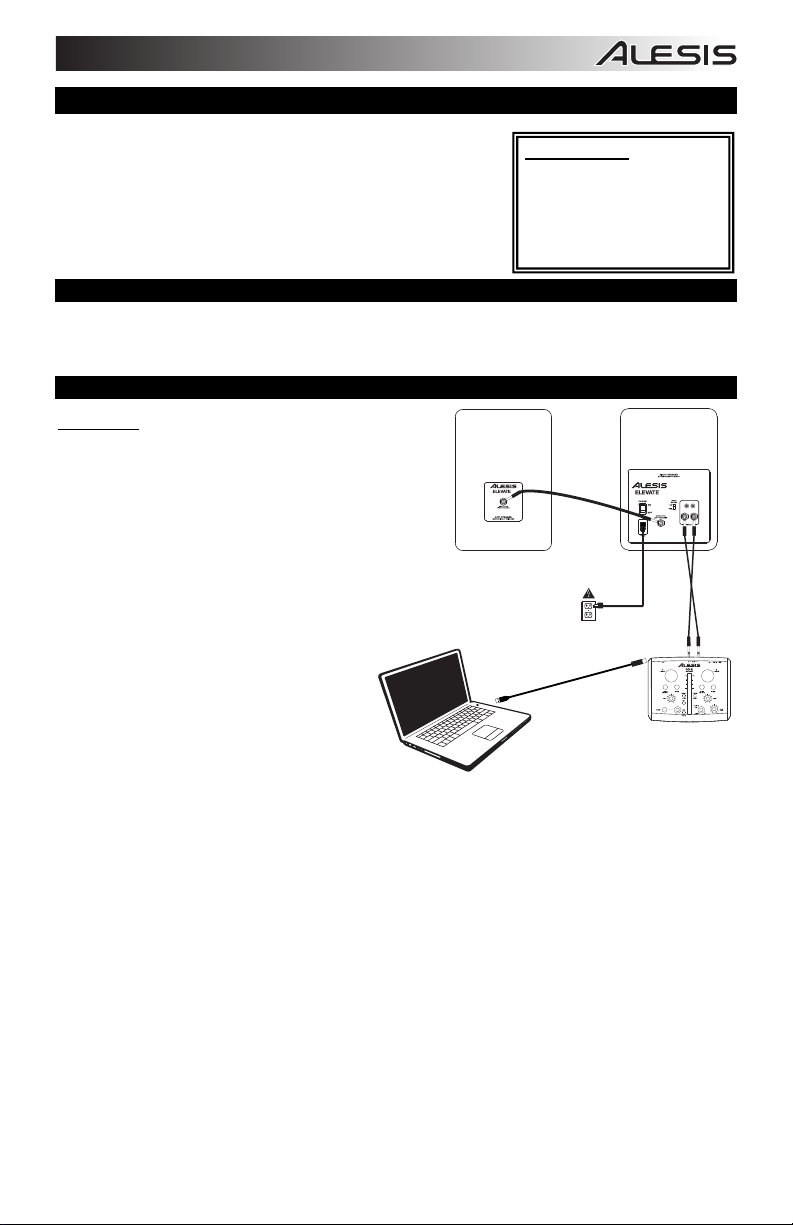
Connection Diagram
Quick Setup
Before turning on the right speaker of Elevate 5's
power, do the following:
1. Ensure the volume control on Elevate 5’s right
speaker is turned down.
2. Connect Elevate 5's left and right speakers
with the included 1/4" interconnection cable.
3. Connect any audio sources (such as an audio
interface, mixer, etc.) to the inputs on Elevate
5's right speaker. Power on the audio
sources.
4. Connect the included power cable to the
power input on Elevate 5's right speaker, and
then plug the other end of the power cable
into an outlet.
5. Flip the power switch on Elevate 5's right
speaker to the "on" position.
6. Adjust the volume control on the front panel of
Elevate 5's right speaker.
BOX CONTENTS
• Elevate 5
• 1/4” Interconnection Cable
• Audio Cable
• Power Cable
• User Guide
• Safety & Warranty Manual
5
POWER
COMPUTER*
*SOLD SEPARATELY
5
AUDIO
INTERFACE*
3
Page 4
3
1
2
4
5
6
7
3
1
2
4
5
6
7
3
5 5
1
2
1
5
5
4
2
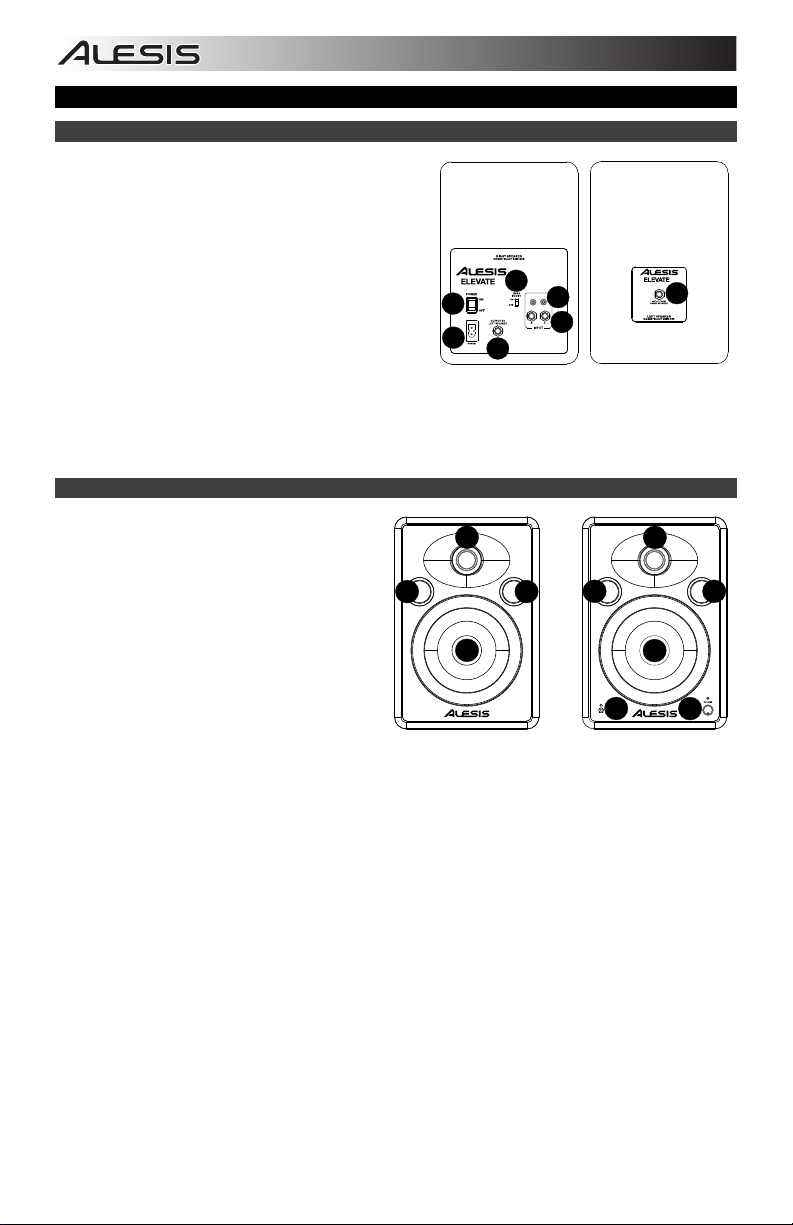
Features
Rear Panel
1. RCA INPUTS – Use RCA cables (sold separately)
to connect an external sound source to these
inputs.
2. 1/4” INPUTS – Use 1/4” cables (sold separately) to
connect an external sound source to these inputs.
3. BASS BOOST – This 2-position switch allows you
to boost the speakers’ bass frequencies.
4. OUTPUT TO LEFT SPEAKER – This is the audio
connection to the left speaker. Use the included
1/4” interconnection cable to connect the right
speaker to the left speaker.
5. INPUT FROM THE RIGHT SPEAKER – This is the
audio connection to the right speaker. Use the
included 1/4" interconnection cable to connect the
left speaker to the right speaker.
6. POWER ON/OFF SWITCH – Turns Elevate 5 on or off. To save energy, Elevate 5 will automatically
power off after 30 minutes of not receiving an audio signal from its inputs. Once Elevate 5 detects an
audio signal from its inputs, it will automatically power on again.
7. POWER CONNECTOR – Plug the included power cable here.
Front Panel
1. TWEETER – This outputs the high
frequencies.
2. WOOFER – This outputs the low
frequencies.
3. HEADPHONES – Connect your 1/8”
headphones to this output to hear the mix
through your headphones. Note that while
headphones are connected to Elevate 5,
you will not be able to hear sound out of
your speakers until the headphones are
disconnected.
4. VOLUME – This knob is used to adjust the
volume of the speakers.
5. BASS PORT – The bass port augments
the bass generated by the woofer to increase the low-frequency SPL over that of non-ported speakers.
Make sure this hole is not obstructed since this will adversely affect bass response.
4
5
5
Page 5
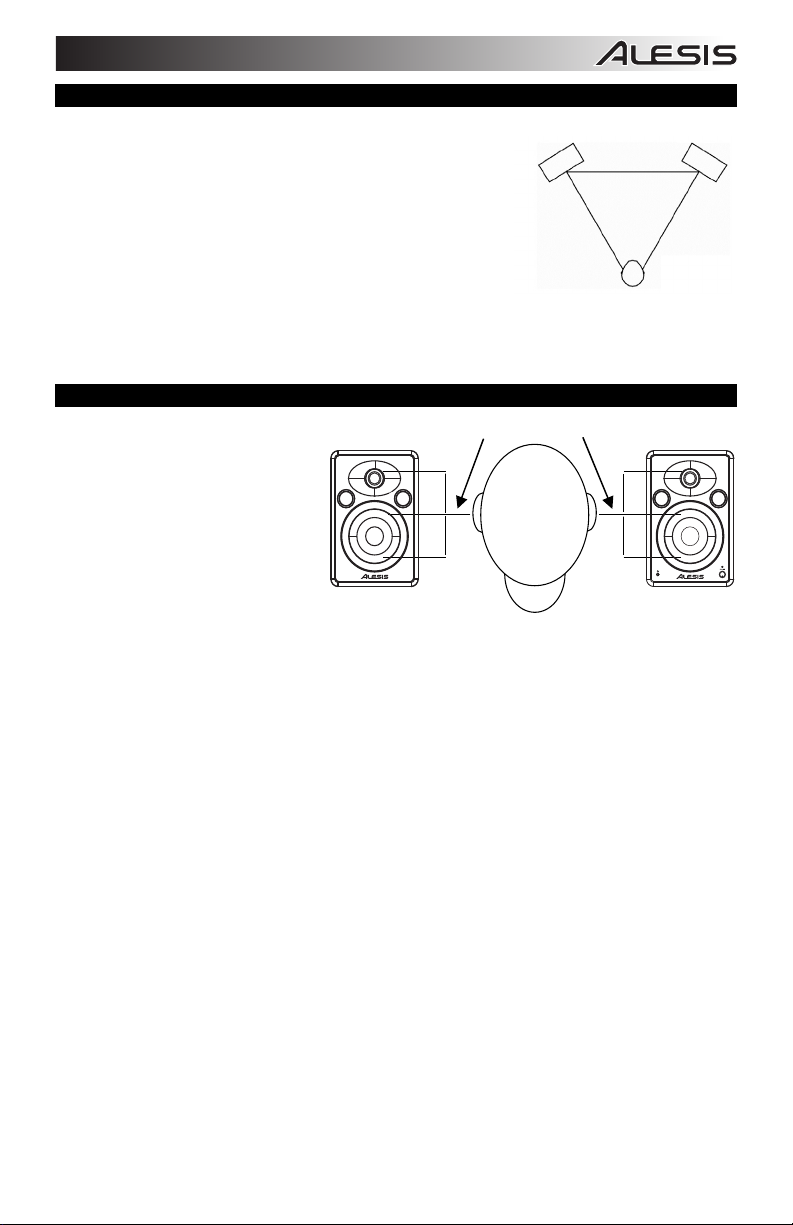
Speaker Placement
The placement of your speakers has a huge impact on how well they will
perform in your studio. Although nearfield studio monitors are designed to
be more forgiving when it comes to placement, you should do your best to
make sure they form an equilateral triangle relative to your head. In other
words, make sure that each speaker is equally distant from both your head
as well as the other speaker. Once each speaker has been placed, rotate
the speakers slightly so that the drivers are pointing toward the listener.
Take a look at the diagram on the right. Notice that the distance from the
listener’s head to each speaker is the same as the distance between the left
and right speakers. Also note that the speakers are turned slightly so that
the drivers are facing the listener. This is an ideal setup but if it is not
practical (or possible) to do this, try to match this setup as closely as
possible.
Speaker Height
The ideal height for Elevate 5 is so that the
speaker is parallel to the ground and that
the midpoint of the woofer and tweeter is at
ear-height.
The diagram to the right demonstrates the
ideal placement height of the speakers
relative to the listener. Notice that the
listener’s ears are directly between the
woofer and tweeter.
tweeter/woofer midpoint
Left Speaker
Right Speaker
Listener
The speakers and listener should
be at the three corners of a triangle
having equal length sides.
5
Page 6

Guía del Usuario (Español)
1. Asegúrese de que estén presentes todos los elementos
enumerados en Contenido de la caja.
2. LEA EL FOLLETO DE INSTRUCCIONES DE SEGURIDAD ANTES
DE UTILIZAR EL PRODUCTO.
3. Coloque el producto en un lugar adecuado para su funcionamiento.
4. Asegúrese de usar cables de audio blindados de alta calidad y
alejados de las fuentes de interferencia electromagnética.
Soporte
Para obtener la información más reciente acerca de este product y el registro del producto, visite
alesis.com/elevate-5.
Para soporte adicional del producto, visite alesis.com/support.
Diagrama de Conexión
Conexión Rápida
Antes de encender el altavoz derecho del Elevate 5,
haga lo siguiente:
1. Asegúrese de que el control de volumen del
altavoz derecho del Elevate 5 esté ajustado al
mínimo.
2. Conecte los altavoces izquierdo y derecho del
Elevate 5 con el cable de interconexión de 1/4
pulg. incluido.
3. Conecte las fuentes de audio (tales como una
interfaz de audio, un mezclador, etc.) a las
entradas del altavoz derecho del Elevate 5.
Encienda las fuentes de audio.
4. Conecte el cable de alimentación incluido a la
entrada de alimentación del altavoz derecho
del Elevate 5 y luego enchufe el otro extremo
del cable de alimentación a un tomacorriente.
5. Coloque el interruptor de encendido del
altavoz derecho del Elevate 5 en la posición
de encendido.
6. Ajuste el control de volumen del panel frontal
del altavoz derecho del Elevate 5.
CONTENIDO DE LA CAJA
• Elevate 5
• 1/4” Cable de interconexión
• Cable de audio
• Cable de alimentación
• Guía de inicio rápido
• Manual sobre la seguridad y
garantía
5
SUMINISTRO
ELÉCTRICO
COMPUTADORA*
5
INTERFAZ DE
AUDIO*
6
*SE VENDE POR
SEPARADO
Page 7

3
1
2
4
5
6
7
3
1
2
4
5
6
7
3
5 5
1
2
1
5
5
4
2
Funciones
Panel Trasero
1. ENTRADAS RCA – Use cables RCA (que se venden
por separado) para conectar una fuente de sonido
externa a estas entradas.
2. ENTRADAS DE 1/4 PULG. – Use cables de 1/4 pulg.
(que se venden por separado) para conectar una
fuente de sonido externa a estas entradas.
3. REFUERZO DE GRAVES – Este conmutador de 2
posiciones permite reforzar las frecuencias bajas de
los altavoces.
4. SALIDA PARA EL ALTAVOZ IZQUIERDO –
Conexión de audio al altavoz izquierdo. Use el 1/4”
interconexión cable de incluido para conectar al
altavoz derecho al izquierdo.
5. ENTRADA DESDE EL ALTAVOZ DERECHO – Ésta es la conexión de audio al altavoz derecho. Use
el cable de interconexión de ¼” pulg incluido para conectar al altavoz izquierdo al derecho.
6. INTERRUPTOR DE ENCENDIDO – Se utiliza para encender y apagar el Elevate 5. Para ahorrar
energía, el Elevate 5 se apaga automáticamente después de 30 minutos de no recibir una señal de
audio desde sus entradas. Una vez que el Elevate 5 detecta una señal de audio en sus entradas, se
vuelve a encender automáticamente.
7. CONECTOR DE ALIMENTACIÓN – Enchufe aquí el cable de incluido.
Panel Frontal
1. TWEETER – Emite las frecuencias altas.
2. WOOFER – Emite las frecuencias bajas.
3. AURICULARES – Conecte a esta salida sus
auriculares de 1/8” para oír la mezcla con los
mismos. Tenga en cuenta que mientras estén
conectados los auriculares al Elevate 5, no
podrá oír el sonido por los altavoces hasta que
se desconecten los auriculares.
4. VOLUMEN – Esta perilla se usa para ajustar el
volumen de los altavoces.
5. PUERTO LOS GRAVES – Este puerto de
subfrecuencias aumenta los graves generados
por el woofer para incrementar el SPL de bajafrecuencia con respecto al de los altavoces sin Puerto los graves. Asegúrese de que el orificio no
quede obstruido, puesto que se afectará perjudicialmente a la respuesta en graves.
5
5
7
Page 8

Ubicación de los Altavoces
La ubicación de los altavoces tiene un gran impacto sobre la
bondad de la reproducción en el estudio. Si bien los monitores
para estudio de campo cercano están diseñados para ser más
flexibles en lo referente a la ubicación, debe hacer lo posible para
asegurar que formen un triángulo equilátero en relación con su
cabeza. En otras palabras, asegúrese de que cada altavoz esté
equidistante tanto con respecto a su cabeza como al otro altavoz.
Una vez colocado cada altavoz, gírelos ligeramente de modo que
los drivers apunten al oyente.
Eche un vistazo al diagrama de la derecha. Note que la distancia
desde la cabeza del oyente hasta cada altavoz es igual a la
distancia entre los altavoces derecho e izquierdo. Observe
también que los altavoces están ligeramente girados de modo
que los drivers queden mirando hacia el oyente. Esta es una
configuración ideal, pero si no es práctico (o posible) hacerla,
trate de acercarse a la misma lo más posible.
Altura del Altavoz
La altura ideal del Elevate 5 es tal que el
altavoz quede paralelo al piso y que el
punto medio entre el woofer y el tweeter
esté a la altura del oído.
El diagrama de abajo muestra la altura de
ubicación ideal de los altavoces en relación
al oyente. Observe que los oídos del oyente
están directamente entre el woofer y el
tweeter.
Altavoz izquierdo
Oyente
Los altavoces y el oyente deben estar en
las tres esquinas de un triángulo
equilátero.
punto medio entre tweeter/woofer
Altavoz derecho
8
Page 9

A
Guide d’utilisation (Français)
1. Assurez-vous que tous les articles énumérés dans le contenu de la
boîte de ce guide sont inclus dans la boîte.
2. VEUILLEZ LIRE LE LIVRET DES CONSIGNES DE SÉCURITÉ
AVANT D'UTILISER LE PRODUIT.
3. Placez le produit dans un endroit approprié à son utilisation.
4. Veuillez vous assurer que les câbles audio blindés de qualité
supérieure sont utilisés loin des sources d’interférences
électromagnétiques.
Assistance
Pour l'enregistrement du produit et les dernières informations concernant ce produit, visitez alesis.com/elevate-5.
Pour de plus amples informations, visitez alesis.com/support.
Schéma de Connexion
Démarrage Rapide
Avant de mettre le haut-parleur droit du Elevate
5 sous tension, procédez comme suit :
1. Veuillez vous assurer que la commande
de volume sur le haut-parleur droit du
Elevate 5 est au minimum.
2. Branchez les haut-parleurs gauche et
droit du Elevate 5 à l’aide du câble
d’interconnexion 6,35 mm (¼ po) fourni.
3. Branchez les sources audio (par
exemple, une interface audio, une
console de mixage, etc.) aux entrées du
haut-parleur droit du Elevate 5. Mettez
les sources audio sous tension.
4. Branchez le câble d'alimentation fourni à
l'entrée d'alimentation sur le haut-parleur
droit du Elevate 5, puis branchez l'autre
extrémité du câble d'alimentation à une
prise de courant.
5. Mettez l'interrupteur d'alimentation sur le
haut-parleur droit du Elevate 5 à la
position « on ».
6. Réglez le volume sur le panneau avant
du haut-parleur droit du Elevate 5.
CONTENU DE LA BOITE
• Elevate 5
• 1/4" Câble d’interconnexion
• Câble audio
• Câble d'alimentation
• Guide d’utilisation simplifié
• Consignes de sécurité et
informations concernant la
garantie
5
LIMENTATION
INTERFACE
ORDINATEUR*
5
AUDIO*
*VENDU SÉPARÉMENT
9
Page 10

3
1
2
4
5
6
7
3
1
2
4
5
6
7
3
5 5
1
2
1
5
5
4
2
Fonctions
Panneau Arrière
1. ENTRÉES RCA – Utilisez des câbles RCA (vendus
séparément) pour brancher des sources audio
externes à ces entrées.
2. ENTRÉES 6,35 mm (¼ po) – Utilisez des câbles
6,35 mm (¼ po) (vendus séparément) pour brancher
des sources audio externes à ces entrées.
3. BASS BOOST – Ce sélecteur à 2 positions permet
d'augmenter les basses fréquences des hautparleurs.
4. SORTIE HAUT-PARLEUR GAUCHE – Cette entrée
permet de brancher le haut-parleur gauche. Utilisez
le 1/4” d’interconnexion câble po inclus pour
brancher le haut-parleur gauche à celui de droite.
5. ENTRÉE DU HAUT-PARLEUR DROIT – C'est la
connexion audio vers le haut-parleur droit. Utilisez le câble d’interconnexion 6,35 mm (¼ po) fourni
pour brancher le haut-parleur gauche à celui de droite.
6. INTERRUPTEUR D'ALIMENTATION – Cet interrupteur met le Elevate 5 sous et hors tension. Pour
économiser de l'énergie, le Elevate 5 s'éteint automatiquement après 30 minutes lorsqu'aucun signal
n’est transmis par ses entrées. Une fois qu'un signal audio est détecté par le Elevate 5, il se remettra
automatiquement sous tension.
7. ENTRÉE D’ALIMENTATION – Ce connecteur permet de brancher le câble d’alimentation inclus.
Panneau Avant
1. HAUT-PARLEUR D'AIGUS – Ce haut-parleur
permet d’assurer la réponse en hautes
fréquences.
2. HAUT-PARLEUR D'EXTRÊMES GRAVES – Ce
haut-parleur permet d’assurer la réponse en
basses fréquences.
3. ASQUE – Un casque d'écoute de 1/4 po (6,35
mm) peut être branché à cette sortie afin
d’entendre votre mix via casque. Il est à noter
que lorsqu’un casque est branché au Elevate 5,
vous ne pouvez pas entendre le son via les
haut-parleurs jusqu'à ce que le casque soit
débranché.
4. VOLUME – Ce bouton permet d’ajuster le volume des haut-parleurs.
5. ÉVENT DES GRAVES – L'évent des graves permet un renforcement des graves créé par le haut-
parleur des graves afin d’augmenter le niveau de pression-acoustique (SPL). Assurez vous que cet
orifice n'est pas obstrué afind’éviter une perte de réponse des graves.
5
5
10
Page 11

Placement des Haut-Parleurs
Le placement de vos haut-parleurs aura un impact énorme sur leur
performance dans votre studio. Bien que les haut-parleurs de proximité
sont conçus pour être plus compatissants lorsqu’il s'agit de placement, il
est tout de même préférable de vous assurer qu'ils forment un triangle
équilatéral par rapport à votre tête. En d'autres termes, assurez-vous
que les haut-parleurs sont à la même distance de votre tête ainsi que de
l’un et l’autre. Une fois que chaque haut-parleur a été positionné,
pivotez-les légèrement afin que les transducteurs des haut-parleurs
soient pointés vers l'auditeur.
Regardez le diagramme de droite. Veuillez remarquer que la distance
entre la tête de l'auditeur et chaque haut-parleur est la même que la
distance entre les haut-parleurs gauche et droit. Remarquez également
que les haut-parleurs sont tournés légèrement afin que les
transducteurs fassent face à l'auditeur. Il s'agit d'une installation idéale,
mais s’il n'est pas pratique (ou possible) de le faire, essayez de vous
rapprocher de cette configuration le plus possible.
Hauteur des Haut-Parleurs
Pour être à la hauteur idéale, le Elevate 5
doit être parallèle au sol et le milieu entre le
haut-parleur d’extrêmes graves et le hautparleur des aigus doit être à la hauteur des
oreilles.
Le diagramme à droite montre la hauteur
de placement idéale des haut-parleurs par
rapport à l'auditeur. Veuillez remarquer que
les oreilles de l'auditeur sont directement
entre le haut-parleur d’extrêmes graves et
le haut-parleur des aigus.
Plein centre entre le haut-parleur d’extrêmes graves et le haut-parleur
Haut-parleur
gauche
Auditeur
Les haut-parleurs et l'auditeur
doivent former un triangle ayant
des côtés de mêmes longueurs.
des aigus
Haut-parleur
droit
11
Page 12

A
Guida per l'uso (Italiano)
1. Assicurarsi che tutti gli elementi elencati nella parte “Contenuti della
confezione” siano inclusi.
2. LEGGERE ATTENTAMENTE IL LIBRETTO DELLE ISTRUZIONI
DI SICUREZZA PRIMA DI UTILIZZARE IL PRODOTTO.
3. Collocare il prodotto in una posizione adeguata all’uso.
4. Assicurarsi di utilizzare cavi audio di alta qualità schermati lontano
da fonti di interferenze elettromagnetiche.
Assistenza
Per ottenere le iltime informazioni su questo prodotto e registrazione del prodotto, recarsi alla pagina
alesis.com/elevate-5.
Per ulteriore assistenza, recarsi alla pagina alesis.com/support.
Schema dei Collegamenti
Guida rapida
Prima di accendere l'altoparlante destro
dell'Elevate 5, procedere come segue:
1. Assicurarsi che il comando del volume
dell'altoparlante destro dell'Elevate 5 sia
al minimo.
2. Collegare gli altoparlanti sinistro e destro
dell'Elevate 5 con il cavo di collegamento
da 1/4" in dotazione.
3. Collegare font audio (quali un'interfaccia
audio, un mixer, ecc.) agli ingressi a
livello dell'altoparlante destro dell'Elevate
5. Accendere le sorgenti audio.
4. Collegare il cavo di alimentazione in
dotazione all'ingresso di alimentazione
dell'altoparlante destro dell'Elevate 5,
quindi collegare l'altro capo del cavo di
alimentazione a una presa elettrica.
5. Impostare l'interruttore di alimentazione
dell'Elevate 5 su "on".
6. Regolare il comando di alimentazione a
livello del pannello anteriore
dell'altoparlante destro dell'Elevate 5.
CONTENUTI DELLA
CONFEZIONE
• Elevate 5
• 1/4" Cavo di collegamento
• Cavo audio
• Cavo di alimentazione
• Guida rapida
• Istruzioni di sicurezza e
garanzia
5
LIMENTAZIONE
COMPUTER*
5
INTERFACCIA
AUDIO*
*VENDUTI
SEPARATAMENTE
12
Page 13

3
1
2
4
5
6
7
3
1
2
4
5
6
7
3
5 5
1
2
1
5
5
4
2
Funzioni
Pannello Posteriore
1. INGRESSI RCA – Servirsi di cavi stereo RCA (venduti
separatamente) per collegare sorgenti sonore esterne
a questi ingressi.
2. INGRESSI DA 1/4" – Servirsi di cavi da 1/4” (venduti
separatamente) per collegare una sorgente sonora
esterna a questi ingressi.
3. BASS BOOST – Questo interruttore a 2 posizioni
permette di incrementare le frequenze dei bassi delle
casse.
4. USCITA ALL’ALTOPARLANTE DI SINISTRA –
Questo è il collegamento audio alla cassa sinistra.
Servirsi del 1/4” collegamento cavo da in dotazione per
collegare la cassa destra a quella sinistra.
5. INGRESSO DELL'ALTOPARLANTE DESTRO – Questo è il collegamento audio all'altoparlante
destro. Servirsi del cavo da 1/4” in dotazione per collegare l'altoparlante sinistro a quello destro.
6. POWER ON/OFF SWITCH (interruttore di accensione / spegnimento) – Accende e spegne l'Elevate
5. Per risparmiare energia, l'Elevate 5 si spegnerà automaticamente dopo 30 minuti senza ricevere
segnali audio dai suoi ingressi. Appena l'Elevate 5 individua un segnale audio proveniente dai suoi
ingressi, si riaccende automaticamente.
7. CONNETTORE DI ALIMENTAZIONE – Inserire a questo livello cavo in dotazione.
Pannello Anteriore
1. TWEETER – Serve per l'uscita delle frequenze
alte.
2. WOOFER – Serve per l'uscita delle frequenze
basse.
3. CUFFIE – Collegare cuffie da 1/8” a questa uscita
per ascoltare il mix attraverso di esse. Va notato
che quando le cuffie sono collegate all'Elevate 5
non si udrà alcun suono provenire dalle casse fino
a quando le cuffie non vengano scollegate.
4. VOLUME – Questa manopola serve a regolare il
volume degli altoparlanti.
5. BASS PORT –
generati dal woofer per aumentare la bassa
frequenza SPL al di sopra di quella di altoparlanti
non dotati di porta. Assicurarsi di non ostruire il foro,
in quanto la risposta dei bassi ne risentirebbe.
La porta bassi aumenta i bassi
5
5
13
Page 14

Disposizione delle Casse
La disposizione delle casse ha un notevole impatto sulle loro prestazioni
nel vostro studio. Nonostante le casse nearfield (a campo vicino) siano
progettate per essere piuttosto adattabili in fatto di posizionamento,
bisogna fare il possibile affinché formino un triangolo equilatero con la
testa. In altre parole, assicuratevi che ogni cassa sia equidistante dalla
vostra testa e dall’altra cassa. Una volta posizionate, ruotare leggermente
le casse in modo che i driver siano puntati verso l'ascoltatore.
Osservate lo schema a destra. La distanza della testa dell'ascoltatore da
ciascuna cassa equivale alla distanza che intercorre tra la cassa destra e
quella sinistra. Si nota inoltre che le casse sono leggermente girate, in
modo da trovarsi di fronte all'ascoltatore. Questa è la disposizione ideale,
ma se non risulta pratica (o possibile), si suggerisce di rispettarla il più
possibile.
Altezza Casse
L’altezza ideale delle casse dell'Elevate 5 è
tale per cui la cassa è parallela al terreno e
il punto centrale tra woofer e tweeter si
trova all’altezza dell’orecchio.
Lo schema a destra mostra il
posizionamento ideale in altezza delle
casse rispetto all'ascoltatore. Va notato che
le orecchie dell'ascoltatore si trovano
direttamente tra il woofer e il tweeter.
Punto centrale tweeter/woofer
Cassa sinistra Cassa destra
Ascoltatore
Le casse e l'ascoltatore dovrebbero
trovarsi ai tre angoli di un triangolo
avente lati di lunghezza equivalente.
14
Page 15

Benutzerhandbuch (Deutsch)
1. Stellen Sie sicher, dass alle im Lieferumfang aufgelisteten Teile in der
Verpackung enthalten sind.
2. LESEN SIE DIE SICHERHEITSHINWEISE, BEVOR SIE DAS
PRODUKT VERWENDEN.
3. Stellen Sie das Gerät an einen für den Betrieb geeigneten Standort.
4. Stellen Sie sicher, dass die Audiokabel nicht in der Nähe von Quellen
verwendet werden, die elektromagnetische Interferenzen verursachen.
Kundendienst
Um aktuelle Informationen von Ihr Produkt und Produktregistrierung zu erhalten, besuchen Sie alesis.com/elevate-5.
Für zusätzlichen Produkt-Support besuchen Sie alesis.com/support.
Anschlussübersicht
Schnelle Aufstellung
Bevor Sie den rechten Lautsprecher von Elevate 5
einschalten, gehen Sie folgendermaßen vor:
1. Sorgen Sie dafür, dass der Lautstärkeregler
am rechten Lautsprecher des Elevate 5 auf
Null steht.
2. Verbinden Sie den linken und rechten
Lautsprecher des Elevate 5 mit dem
mitgelieferten 1/4"-Verbindungskabel.
3. Schließen Sie alle Audio-Quellen (wie z.B.
Soundkarte oder Mischpult etc.) an die
Eingänge am rechten Lautsprecher des
Elevate 5 an. Schalten Sie die AudioQuellen ein.
4. Verbinden Sie das mitgelieferte Netzkabel
mit dem Netzeingang am rechten
Lautsprecher des Elevate 5 und stecken Sie
anschließend das andere Ende des
Stromkabels in eine Steckdose.
5. Stellen Sie den Netzschalter am rechten
Lautsprecher des Elevate 5 auf die Position
"Ein".
6. Stellen Sie den Lautstärkeregler auf der
Vorderseite des rechten Lautsprechers nach
Wunsch ein.
LIEFERUMFANG
• Elevate 5
• 1/4"- Verbindungskabel
• Audio-Kabel
• Strom-Kabel
• Kurzanleitung
• Sicherheitshinweise und
Garantieinformationen
5
STROOM
COMPUTER*
5
INTERFACE*
AUDIO-
15
*SEPARAT ERHÄLTLICH
Page 16

3
1
2
4
5
6
7
3
1
2
4
5
6
7
3
5 5
1
2
1
5
5
4
2
Funktionen
Rückseite
1. CINCH-EINGÄNGE - Verwenden Sie Cinch-Kabel
(separat erhältlich), um externe Tonquellen an diese
Eingänge anzuschließen.
2. 1/4"-EINGÄNGE - Verwenden Sie 1/4"-Kabel
(separat erhältlich), um eine externe Audioquelle an
diese Eingänge anzuschließen.
3. BASS BOOST - Mit diesem Schalter können Sie die
Bassfrequenzen Ihres Lautsprechers verstärken.
4. AUSGANG LAUTSPRECHER LINKS - Dies ist der
Audioanschluss für den linken Lautsprecher.
Verwenden Sie das mitgelieferte 1/4"-Links Kabel, um
den rechten Lautsprecher mit dem linken
Lautsprecher zu verbinden.
5. EINGANG VOM RECHTEN LAUTSPRECHER - Dies
ist der Audio-Anschluss für den rechten Lautsprecher.
Verwenden Sie das mitgelieferte 1/4"-Verbindungskabel, um den linken Lautsprecher mit dem rechten
Lautsprecher zu verbinden.
6. EIN-/AUSSCHALTER - Schaltet Elevate 5 ein und aus. Wenn Elevate 5 mehr als 30 Minuten kein Audiosignal
über die Eingänge empfängt, schaltet sich das Gerät automatisch ab, um Strom zu sparen. Sobald Elevate 5
ein Audiosignal über seine Eingänge empfängt, schaltet es sich automatisch wieder ein.
7. STROMANSCHLUSS - Stecken Sie das mitgelieferte Netz-kabel hier ein.
Vorderseite
1. HOCHTÖNER - Gibt die hohen Frequenzen
wieder.
2. WOOFER - Gibt tiefe Frequenzen wieder.
3. KOPFHÖRER - Verbinden Sie Ihre 1/8"Kopfhörer mit diesem Ausgang, um die
Musik über Ihre Kopfhörer zu hören.
Beachten Sie, dass Sie keinen Ton von den
Lautsprechern hören können solange Sie
Kopfhörer an die Elevate 5 angeschlossen
haben.
4. LAUTSTÄRKE - Dieser Regler wird
verwendet, um die Lautstärke der
Lautsprecher einzustellen.
5. BASSREFLEX ÖFFNUNG - Der hintere
Bassreflexausgang betont den vom Woofer
generierten Bass, um den Schallpegel tiefer
Frequenzen zu erhöhen. Passen Sie auf,
dass dieser Ausgang nicht verdeckt wird,
da er entscheidend für Die Basswiedergabe
ist.
5
5
16
Page 17

Positionierung der Lautsprecher
Die Positionierung der Lautsprecher hat einen großen
Einfluss darauf, wie gut sie im Studio klingen. Obwohl
Nahfeld-Studiomonitore ohnehin eher darauf ausgelegt
sind, eine schlechte Positionierung auszugleichen, sollten
Sie möglichst darauf achten, dass die Lautsprecher und
Ihr Kopf ein gleichseitiges Dreieck bilden. Mit anderen
Worten: Sorgen Sie dafür, dass jeder Lautsprecher
jeweils den gleichen Abstand zum anderen Lautsprecher
und Ihrem Kopf hat. Sind die Lautsprecher platziert,
drehen Sie jeden Lautsprecher leicht, so dass sie zum
Hörer zeigen.
Sehen Sie sich das Diagramm auf der rechten Seite an.
Beachten Sie, dass der Abstand vom Kopf des Hörers
zu jedem Lautsprecher so groß wie der Abstand
zwischen dem linken und dem rechten Lautsprecher
sein soll. Denken Sie auch daran die Lautsprecher leicht
zu drehen, so dass sie zum Hörer zeigen. Das wäre die
ideale Aufstellung - falls dies praktisch nicht
durchführbar ist, versuchen Sie dieser Aufstellung so
nahe wie möglich zukommen.
Höhe der Lautsprecher
Die Elevate 5 befinden sich in idealer Höhe,
wenn die Lautsprecher parallel zum Boden
stehen und der Mittelpunkt zwischen
Woofer und Hochtöner auf Ohrhöhe ist.
Das Diagramm rechts zeigt die ideale
Lautsprecherhöhe in Relation zum Hörer.
Beachten Sie, dass die Ohren des Hörers
unmittelbar zwischen Woofer und
Hochtöner sind.
Linker Lautsprecher
Rechter Lautsprecher
Hörer
Die Lautsprecher und Hörer sollten sich
jeweils in den drei Ecken eines gleichseitigen
Dreiecks befinden.
Mittelpunkt zwischen Hochtöner/Woofer
17
Page 18

Appendix (English)
Technical Specifications
Power: 100-240V, 50/60Hz; universal switching power supply
Output Power: 40 watts
Front Baffle Thickness: 15mm
LF Driver: 5” (127mm) woofer
HF Driver: 1” (25mm) silk dome tweeter
Audio Inputs: RCA and 1/4” (6.35mm)
Headphone Output: 1/8" (3.5mm) stereo
Interconnection Cable: 1/4" (6.35mm)
Input Impedance: 10kΩ
Frequency Response: 55Hz–20,000Hz
Dimensions: (L x W x H): 8.7” x 7.25” x 10.6” (221mm x 184mm x 269mm)
Weight: 12.5 lbs. (5.7 kg)
Specifications are subject to change without notice.
18
Page 19

Page 20

alesis.com
Manual Version 1.0
 Loading...