

Alesis Elevate 3 Quick Start Guide [ml]

Elevate 3
QUICKSTART GUIDE
ENGLISH ( 3 - 4 )
MANUAL DE INICIO RÁPIDO
ESPAÑOL ( 5 - 6 )
GUIDE D'UTILISATION RAPIDE
FRANÇAIS ( 7 - 8 )
GUIDA RAPIDA
ITALIANO ( 9 - 10 )
KURZANLEITUNG
DEUTSCH ( 11 - 12 )

1
3
4
5
6
2
5
2
QUICKSTART GUIDE (ENGLISH)
1. Make sure all items listed in the Box Contents
are included.
2. READ SAFETY INSTRUCTION BOOKLET
BEFORE USING THE PRODUCT.
3. Place the product in an appropriate location for
operation.
4. Ensure high quality, shielded audio cables are
used away from sources of electromagnetic
interference.
BOX CONTENTS
y Elevate 3
y Interconnection cable
y Audio cable
y Power cable
y Quickstart Guide
y Safety Instructions & Warranty Information booklet
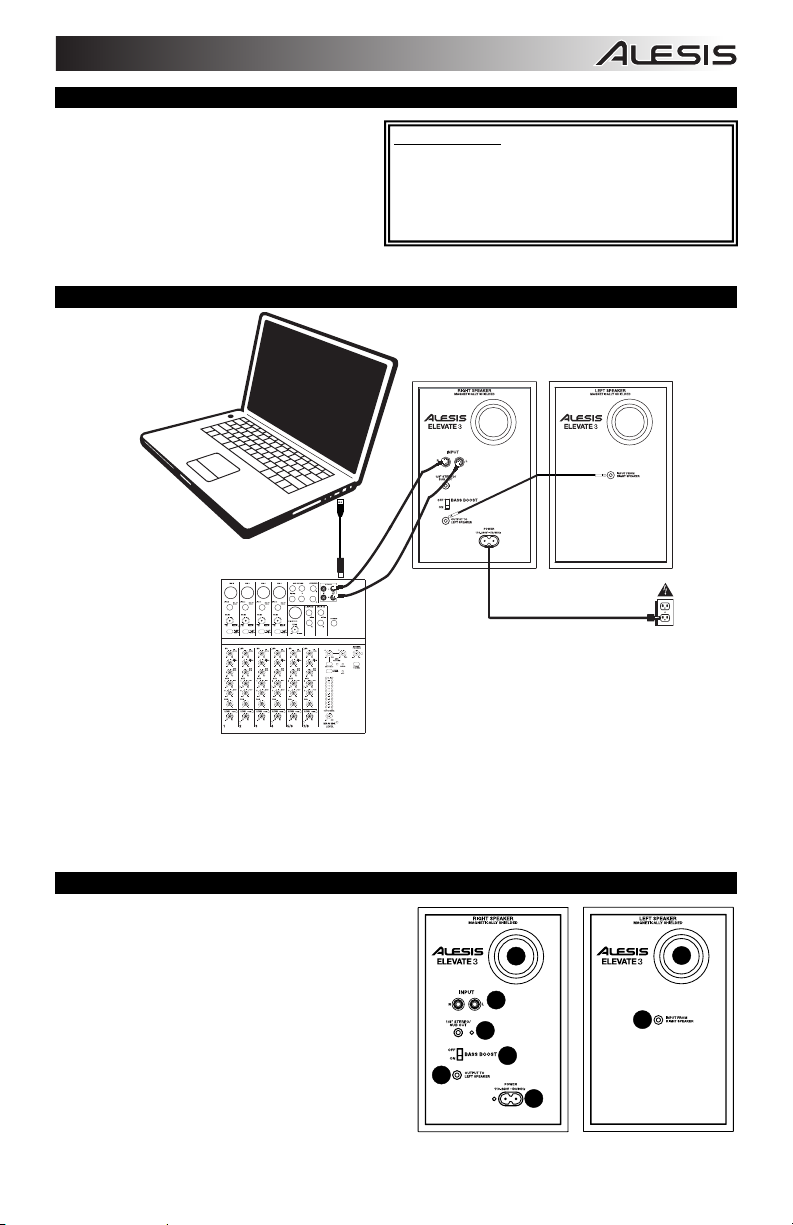
CONNECTION DIAGRAM
COMPUTER*
Before turning on the Elevate 3’s power, do the following:
1. Ensure all cable connections have been made correctly.
2. Ensure the volume controls for the speakers are turned down.
3. Connect any other peripheral devices to Elevate 3 and power on those devices (such as a mic, mixer, etc.)
4. Insert the Power jack into the [POWER] input on the rear panel of Elevate 3 and plug the power adapter into an
AC outlet.
5. Then power-up Elevate 3.
6. Adjust the volume control on Elevate 3.
MIXER*
POWER
*SOLD SEPARATELY
REAR PANEL
1. RCA INPUTS – Use RCA cables (sold separately) to
connect external sound sources to these inputs.
2. REAR PORT – The rear port enhances the bass
generated by the woofer, increasing the low
frequencies. Make sure these ports are not
obstructed since this will adversely affect bass
response.
3. STEREO/SUB OUT – This is a full range audio
output which can be connected to a mixer, powered
speakers, or an external recording device.
4. BASS BOOST – This 2-position switch allows you to
boost the speakers’ bass frequencies.
5. OUTPUT TO LEFT SPEAKER – This is the audio
connection to the left speaker. Use the included 1/8”
cable to connect the right speaker to the left speaker.
6. POWER CONNECTOR – Plug the included AC adapter here.
3
1
3
4
5
6
2
5
2
2
1
3
4
1
2
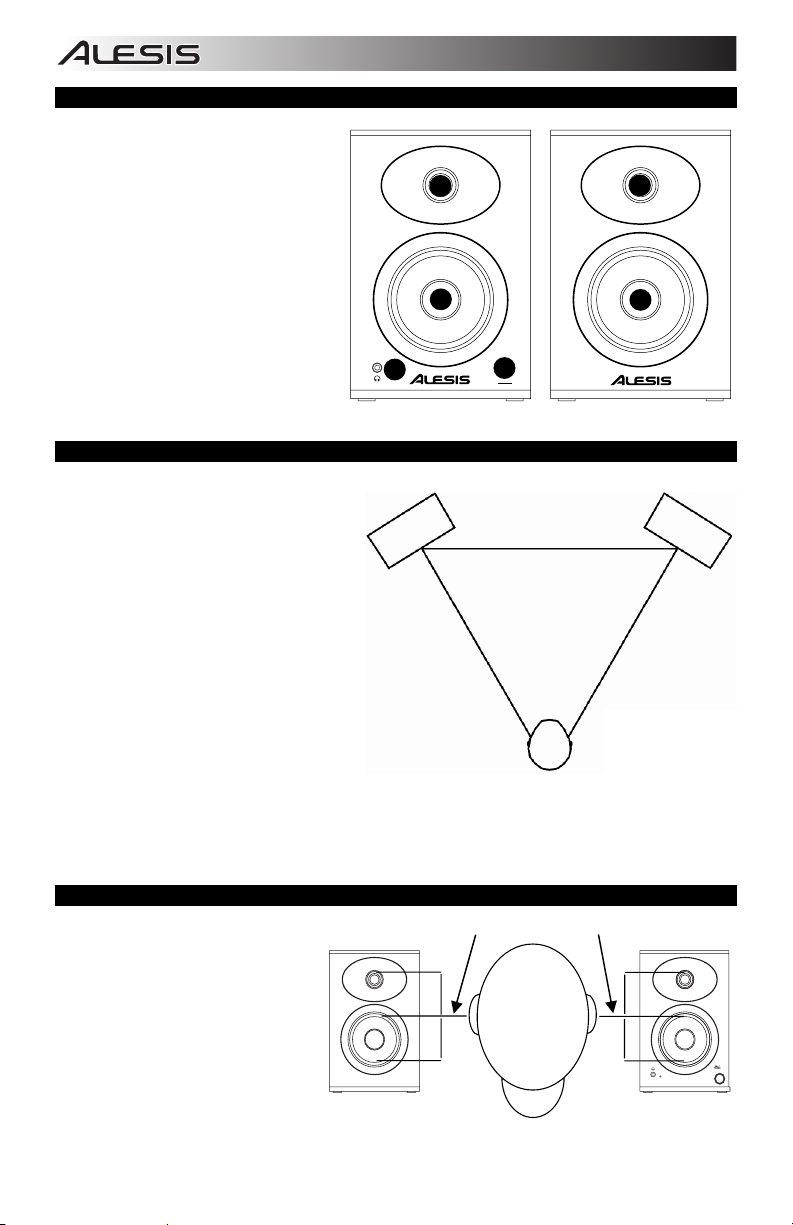
FRONT PANEL
1. TWEETER – This outputs the high
frequencies.
2. WOOFER – This outputs the low
frequencies.
3. HEADPHONES – Connect your 1/8”
headphones to this output to hear the
mix through your headphones. Note that
while headphones are connected to
Elevate 3, you will not be able to hear
sound out of your speakers until the
headphones are disconnected.
4. VOL/POWER – This knob is used to turn
the speakers on and adjust their volume.
To turn on, simply turn up the knob. You
will feel a click when the speakers turn
on. A LED on the left side of the speaker
will illuminate. To turn off, simply turn the
volume all the way down; the LED will
turn off to let you know that the speakers
are off.
SPEAKER PLACEMENT
The placement of your speakers has a huge
impact on how well they will perform in your
studio. Although nearfield studio monitors are
designed to be more forgiving when it comes to
placement, you should do your best to make
sure they form an equilateral triangle relative to
your head. In other words, make sure that each
speaker is equally distant from both your head as
well as the other speaker. Once each speaker
has been placed, rotate the speakers slightly so
that the drivers are pointing toward the listener.
Take a look at the diagram on the right. Notice
that the distance from the listener’s head to each
speaker is the same as the distance between the
left and right speakers. Also note that the
speakers are turned slightly so that the drivers
are facing the listener. This is an ideal setup but
if it is not practical (or possible) to do this, try to
match this setup as closely as possible.
SPEAKER HEIGHT
The ideal height for Elevate 3 is so that the
speaker is parallel to the ground and that
the midpoint of the woofer and tweeter is at
ear-height.
The diagram to the right demonstrates the
ideal placement height of the speakers
relative to the listener. Notice that the
listener’s ears are directly between the
woofer and tweeter.
VOLUME
POWER
Left Speaker Right Speaker
Listener
The speakers and
listener should be at
the three corners of a
triangle having equal
length sides.
tweeter/woofer midpoint
1
4
1
3
4
5
6
2
5
2
GUÍA DE INICIO RÁPIDO (ESPAÑOL)
1. Asegúrese de que estén presentes todos los
elementos enumerados en Contenido de la
caja.
2. LEA EL FOLLETO DE INSTRUCCIONES DE
SEGURIDAD ANTES DE UTILIZAR EL
PRODUCTO.
3. Coloque el producto en un lugar adecuado
para su funcionamiento.
4. Asegúrese de usar cables de audio blindados
de alta calidad y alejados de las fuentes de
interferencia electromagnética.
CONTENIDO DE LA CAJA
y Elevate 3
y Cable de interconexión
y Cable de audio
y Cable de alimentación
y Guía de inicio rápido
y Folleto de instrucciones de seguridad e información
sobre la garantía
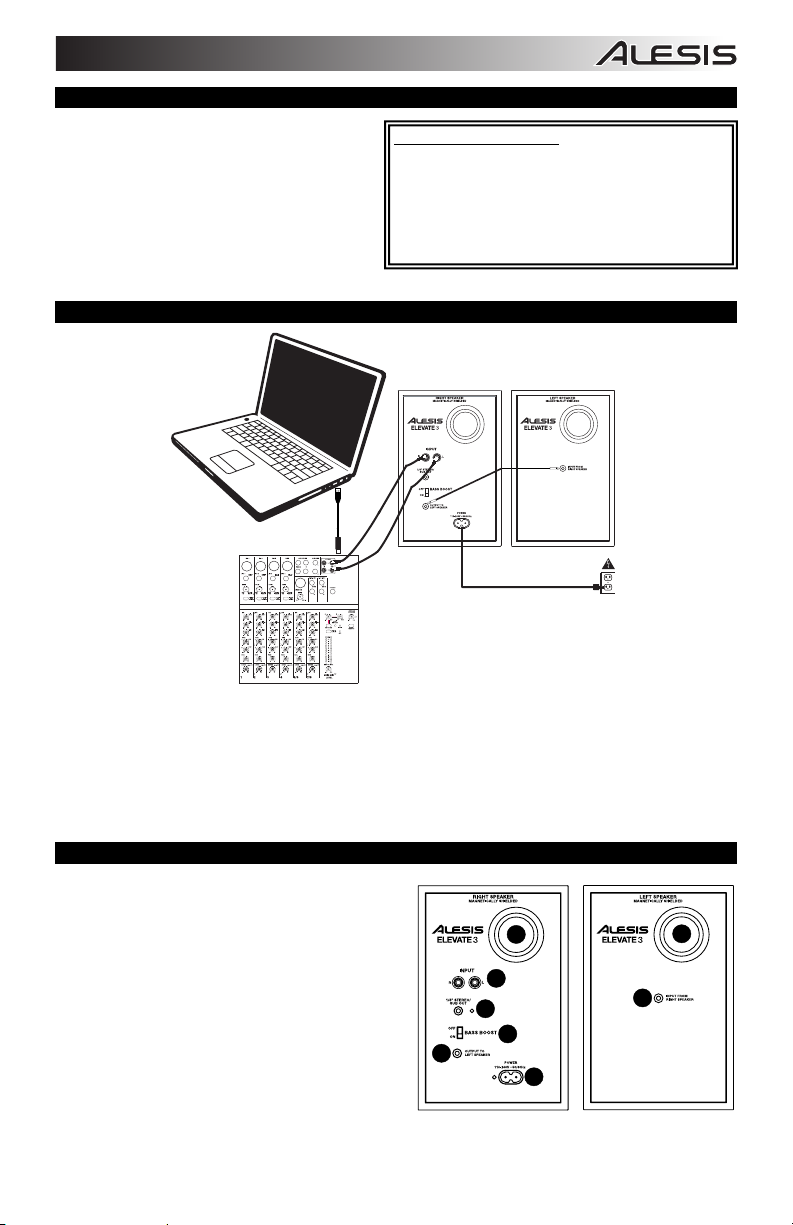
DIAGRAMA DE CONEXIÓN
COMPUTADORA*
Antes de encender el Elevate 3, haga lo siguiente:
1. Gúrese de que todas las conexiones de cables hayan sido realizadas correctamente.
2. Gúrese de que los controles de volumen de los altavoces se ajustaron al mínimo.
3. Conecte todos los demás dispositivos periféricos al Elevate 3 y enciéndalos (por ej. micrófono, mezclador, etc.)
4. Inserte el conector de alimentación en la entrada [POWER] del panel trasero del Elevate 3 y enchufe el
5. A continuación, encienda el Elevate 3.
6. Ajuste el control de volumen del Elevate 3.
MEZCLADOR*
adaptador de alimentación a un tomacorriente de CA.
*SE VENDE POR
SEPARADO
SUMINISTRO
ELÉCTRICO
PANEL TRASERO
1. ENTRADAS RCA – Use cables RCA (se venden por
separado) para conectar fuentes de sonido externas
a estas entradas.
2. ORIFICIO TRASERO – El orificio trasero potencia
los graves generados por el woofer, reforzando las
frecuencias bajas. Asegúrese de que el orificio no
quede obstruido, puesto que se afectará
perjudicialmente a la respuesta en graves.
3. SALIDA ESTÉREO/SUB – Es una salida de audio
de gama completa que se puede conectar a un
mezclador, altavoces alimentados o un sistema de
grabación interno.
4. REFUERZO DE GRAVES – Este conmutador de 2
posiciones permite reforzar las frecuencias bajas de
los altavoces.
5. SALIDA PARA EL ALTAVOZ IZQUIERDO –
Conexión de audio al altavoz izquierdo. Use el cable de 1/8” incluido para conectar al altavoz derecho al
izquierdo.
6. CONECTOR DE ALIMENTACIÓN
– Enchufe aquí el adaptador de CA incluido.
5
 Loading...