


User Guide
English ( 3 – 9 )
Guía del usuario
Español ( 10 – 16 )
Guide d'utilisation
Français ( 17 – 23 )
Guida per l'uso
Italiano ( 24 – 30 )
Benutzerhandbuch
Deutsch ( 31 – 37 )
Appendix
English ( 38 )
User Guide (English)
Introduction
Box Contents
AFX
USB Cable
Software Download Card
User Guide
Safety & Warranty Manual
Important: AFX is an Official Serato Accessory and requires a supported Serato DJ interface, controller, or mixer to control Serato DJ.
Support
For the latest information about this product (system requirements, compatibility information, etc.) and product registration, visit akaipro.com/afx.
For additional product support, visit akaipro.com/support.
Quick Start
1.Make sure you have already installed the latest version of Serato DJ (sold separately).
2.Download and install the Serato Flip Expansion Pack from serato.com.
3.Make sure all devices are off and all faders and gain knobs are set to "zero."
4.Make all necessary connections in your DJ setup (e.g., controller to computer, turntables to mixer, etc.).
5.Connect AFX to your computer with a standard USB cable (included).
6.Open Serato DJ and go!
Read the rest of this User Guide to get the most out of AFX's features.
3

Features
10 |
2 |
1 |
|
10 |
|
|
|
||
|
|
11 |
|
|
|
12 |
13 |
14 |
|
15 |
|
|
|
15 |
6 |
7 |
|
7 |
6 |
6 |
7 |
4 |
7 |
6 |
|
||||
6 |
7 |
5 |
7 |
6 |
|
||||
8 |
9 |
17 |
9 |
8 |
|
||||
3 |
18 |
16 |
19 |
3 |
|
||||
21 |
22 |
23 |
24 |
25 |
|
|
20 |
|
|
Connections
1.USB Port: Use a standard USB cable to connect this USB port to your computer. The computer's USB port provides ample power to AFX. This connection is also used to send and receive MIDI data to and from your computer.
2.Kensington® Lock: You may use this Kensington lock slot to secure AFX to a table or other surface.
Global Controls
Important: These controls affect all decks in the software.
3.Shift: Press and hold this button to access the secondary functions (in red lettering) of other controls on AFX.
4.Touch: Press this button to activate the functions of AFX's touch-capacitive knobs: the FX 1 Knob, FX 2 Knob, FX 3 Knob, Beat Knobs, and Parameter Knob. When the Touch button is activated, touch any of these knobs to activate or deactivate their corresponding functions momentarily.
5.Quantize: Press this button to activate or deactivate Quantize, which "snaps" your cue points and loops to your Beatgrids.
6.FX1 Button, FX2 Button, FX3 Button:
These buttons have different functions on each Deck depending on the current FX Mode: Single-FX Mode or Multi-FX Mode.
7.FX1 Knob, FX2 Knob, FX3 Knob: These knobs have different functions on each Deck depending on the current FX Mode: Single-FX Mode or Multi-FX Mode.
8.Tap / FX Mode: Tap this button repeatedly at the desired tempo to set the rate of the effects' low-frequency oscillators (LFOs). Press and hold this button to reset Beat Multiplier to the Deck's BPM. Press and hold Shift and then press this button to switch between Single-FX Mode and Multi-FX Mode.
9.Beat Knob: Turn this knob to set the Time Division for the selected effects.
4

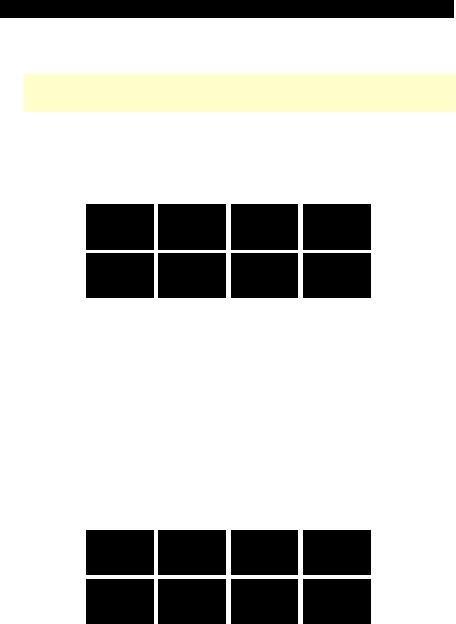
Deck Controls
Important: These controls affect only their corresponding deck (1/3 or 2/4) in the software.
10.Deck: Selects which Layer in the software is controlled by that hardware Deck. Deck A can control Layer 1 or 3; Deck B can control Layer 2 or 4.
11.Endless Controller: The length of this strip represents the length of the entire track. Place your finger on a point along this sensor to jump to that point in the track. (If you want to scroll through a track, we recommend using your computer rather than running your finger along the strip.) Use the three buttons below this strip to access its additional functions (described below).
12.Search / ABS: Press this button to activate Search Mode for the Endless Controller. In Search Mode, the strip's length represents the length of the entire track. Place your finger on a point along this sensor to jump to that point in the track.
Press and hold Shift and press this button to select Absolute Mode (ABS) in the software. You must be using the Serato DVS Expansion Pack (sold separately) or a supported Serato DJ interface, controller, or mixer (sold separately) in order to use this function.
13.Pitch / REL: Press this button to activate Pitch Mode for the Endless Controller. In Pitch Mode, the strip's length represents a temporary pitch fader. Touch the strip and slide your finger to the left or right to bend the pitch down or up temporarily. Lift your finger from the strip to return to the normal pitch. The center where the pitch change is 0% is indicated by an LED above the strip.
Press and hold Shift and press this button to select Relative Mode (REL) in the software. You must be using the Serato DVS Expansion Pack (sold separately) or a supported Serato DJ interface, controller, or mixer (sold separately) in order to use this function.
14.S-FX / INT: Press this button to activate Strip FX Mode for the Endless Controller. In Strip FX Mode, the strip's length represents the range of values for all active effects. Touch the strip and slide your finger to the left or right to increase or decrease the effects' values temporarily. Lift your finger from the strip to return to your previous effects settings.
Press and hold Shift and press this button to select Internal Mode (INT) in the software. You must be using the Serato DVS Expansion Pack (sold separately) or a supported Serato DJ interface, controller, or mixer (sold separately) in order to use this function.
15.FXA Assign / FXB Assign: Press these buttons to activate or deactivate Effect A and/or B on Decks 1 or 2.
Press and hold Shift and press these buttons to activate or deactivate them on Decks 3 or 4. Each effect can be applied to any or all of the four decks and/or the Program Mix.
16.Parameter Knob: Use this knob for various functions in each Pad Mode. Press and hold Shift and use this knob to access secondary parameters in certain Pad Modes.
17.LCD: This display shows the current parameter value. A dot next to the number indicates that the number is actually the denominator of a note value (e.g., 16• indicates a length of 1/16 of a bar). Use the Parameter Knob to set the value.
18.Record / Loop: Press this button to record-arm the deck to record a Flip. The Flip will begin recording once you press a pad.
Press and hold Shift and press this button to activate or deactivate looping for the Flip.
19.Start / On: Press this button to start playing the currently selected Flip. The Flip will start playing immediately.
Press and hold Shift and press this button to activate or deactivate Flip in Serato DJ.
5
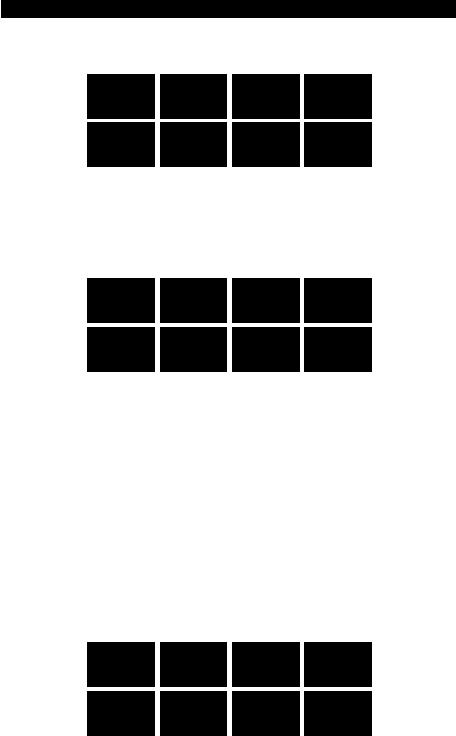
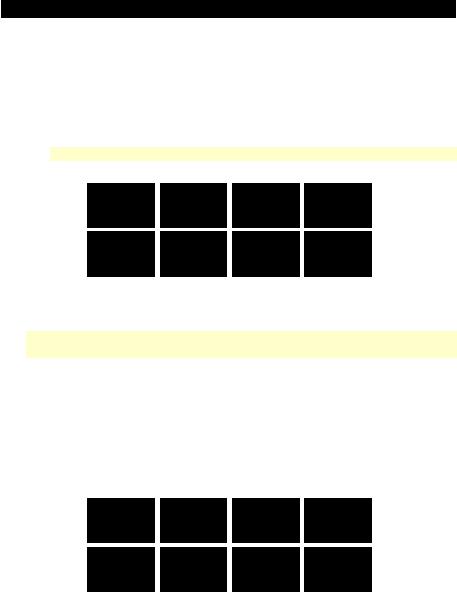
20.Pads: These pads have different functions on each Deck depending on the current Pad Mode (described below). These pads are similar to the pads used with Akai Professional MPCs, so they are velocity-sensitive (in certain modes only), durable, and easy to play.
Pad 1 |
Pad 2 |
Pad 3 |
Pad 4 |
Pad 5 |
Pad 6 |
Pad 7 |
Pad 8 |
21.Cues / Transport: This Pad Mode button switches the pads between Hot Cue Mode and Transport Mode. When the button is unlit, the first press will always select Hot Cue Mode.
•Hot Cue Mode: Each pad assigns a Hot Cue Point or returns the track to that Hot Cue Point. When a Hot Cue Button is unlit, you can assign a Hot Cue Point by pressing it at the desired point in your track. Once it is assigned, the Hot Cue Button will light. Press and hold Shift and then press a pad to delete its assigned Hot Cue Point.
Hot Cue 1 |
Hot Cue 2 |
Hot Cue 3 |
Hot Cue 4 |
Hot Cue 5 |
Hot Cue 6 |
Hot Cue 7 |
Hot Cue 8 |
•Transport: The bottom row of pads acts as a set of transport controls for the deck, according to the labels below them: Play, Cue, Sync, and Stutter.
o Play / Pause: This button pauses or resumes playback.
oCue: When the Deck is paused, you can set a Temporary Cue Point by moving the Platter to place the Audio Pointer at the desired location and then pressing the Cue Button. During playback, you can press the Cue Button to return the track to this Temporary Cue Point. (If you did not set a Temporary Cue Point, then it will return to the beginning of the track.)
If the Deck is paused, you can press and hold the Cue Button to play the track from the Temporary Cue Point. Releasing the Cue Button will return the track to the Temporary Cue Point and pause it. To continue playback without returning to the Temporary Cue Point, press and hold the Cue Button, then press and hold the Play Button, and then release both buttons. Press and hold Shift and then press this button to return to the beginning of the track.
oSync: Press this button to automatically match the corresponding Deck's tempo with the opposite Deck's tempo and phase. Press and hold Shift and press this button to deactivate Sync.
o Stutter: Press this button to "stutter-play" the track from the last set Cue Point.
No function No function No function No function
Play / Pause Cue Sync Stutter
6
22.Auto / Roll: This Pad Mode button switches the pads between Auto-Loop Mode and Loop Roll Mode. When the button is unlit, the first press will always select Auto-Loop Mode.
Note: The pad layouts here match the software's default Auto-Loop time division layout. If you shift the range of time divisions displayed in the software, the pad layout will change to match it.
•Auto-Loop Mode: Each pad triggers or releases an Auto-Loop of a different length. Turn the Parameter Knob to halve or double the loop's length. Press and hold Shift and then turn the Parameter Knob to shift the loop backward or forward.
•Loop Roll Mode: Each pad triggers a momentary Loop Roll. Turn the Parameter Knob to halve or double the loop's length. Press and hold Shift and then turn the Parameter Knob to shift the loop backward or forward.
1/8-beat |
1/4-beat |
1/2-beat |
1-beat |
2-beat |
4-beat |
8-beat |
16-beat |
23.Manual: This Pad Mode button switches the pads between Manual Loop Mode and Flip Mode. When the button is unlit, the first press will always select Manual Loop Mode.
•Manual Loop Mode: Pads 1-4 (the top row) return the track to one of your saved Manual Loops. You set and assign a Manual Loop using Pads 5-8 (the bottom row).
To set a Manual Loop, press any one of Pads 1-4 (the top row) that does not have a Manual Loop assigned to it. Press Pad 5 to set the Loop In Point, and then press Pad 6 to set the Loop Out Point and trigger the loop.
To trigger an assigned Manual Loop, press any one of Pads 1-4 (the top row) that has a Manual Loop assigned to it. You can use Pad 7 to activate or deactivate the loop. Press Pad 8 to return the track to the last triggered Manual Loop and activate it ("reloop").
To delete a Manual Loop, press and hold Shift and then press the corresponding pad (of Pads 1-4).
Turn the Parameter Knob to halve or double the loop's length. Press and hold Shift and then turn the Parameter Knob to shift the loop backward or forward.
Loop 1 |
Loop 2 |
Loop 3 |
Loop 4 |
Set Loop In |
Set Loop Out |
Loop On/Off |
Reloop |
7
•Flip Mode: Pads 1, 2, 3, 5, 6, and 7 each trigger a Flip, which you can assign in the software. Unlit pads have no Flip assigned to them. Solidly lit pads have a Flip assigned but are not triggered. Flashing pads have a Flip assigned and are currently playing.
To immediately stop playback of a Flip, press and hold Shift and then press the corresponding pad.
To automatically "snap" the length of a Flip so it aligns with the Beatgrid, press and hold Pad 4 and then press a pad with a Flip assigned to it.
Important: Your track must have a set Beatgrid for the Loop Snap function to work. To assign a Flip to a pad, press and hold Pad 8 and then press Pad 1, 2, 3, 5, 6 or 7.
Flip 1 |
Flip 2 |
Flip 3 |
Loop Snap |
Flip 4 |
Flip 5 |
Flip 6 |
Assign Flip |
24.Slicer / Slicer Loop: This Pad Mode button switches the pads between Slicer Mode and Slicer Loop Mode. When the button is unlit, the first press will always select Slicer Mode.
Important: Your track must have a set Beatgrid for Slicer Mode or Slicer Loop Mode to work.
•Slicer Mode: The eight pads represent eight sequential beats—"Slices"—in the Beatgrid. The currently playing Slice is represented by the currently lit pad; the light will "move through the pads" as it progresses through each eight-Slice phrase. Press a pad to play that Slice—hold it down if you want to keep looping it. When you release the pad, the track will resume normal playback from where it would have been if you had never pressed it (i.e., as if the track had been playing forward the whole time).
Turn the Parameter Knob to decrease or increase the Slice quantization. Press and hold Shift and then turn the Parameter Knob to decrease or increase the Slice Domain size.
Slice 1 |
Slice 2 |
Slice 3 |
Slice 4 |
Slice 5 |
Slice 6 |
Slice 7 |
Slice 8 |
•Slicer Loop Mode: The pads behave identically to the pads in Slicer Mode, except the eight-Slice phrase will loop rather than moving forward continuously through the track.
8

25.Sampler / Velocity: This Pad Mode button switches the pads between Sample Player Mode and Sample Velocity Trigger Mode. When the button is unlit, the first press will always select Sample Player Mode.
•Sample Player Mode: Pads 1, 2, 3, 5, 6, and 7 each trigger a sample, which you can assign in the software (the volume level is also set in the software). Unlit pads have no sample assigned to them. Solidly lit pads have a sample assigned but are not triggered. Flashing pads have a sample assigned and are currently playing.
To immediately stop playback of a sample:
oTrigger Mode or On/Off Mode: Press and hold Shift and then press the corresponding pad.
o Hold Mode: Release the corresponding pad.
To cycle through the available Sample Play Modes, press Pad 4.
To activate or deactivate Sample Player Repeat, press Pad 8.
Sample 1 |
Sample 2 |
Sample 3 |
Play Mode |
|
Sample 4 |
Sample 5 |
Sample 6 |
Player |
|
Repeat |
||||
|
|
|
•Sample Velocity Trigger Mode: The pads behave identically to the pads in Sample Player Mode, except they are velocity-sensitive, so triggered samples will play back at a volume level proportional to how heavily you pressed the pads. This mode can give your performance more of a "human feel."
9
Guía del usuario (Español)
Introducción
Contenido de la caja
AFX
Cable USB
Tarjeta de descarga de software
Guía del usuario
Manual sobre la seguridad y garantía
Importante: El AFX es un accesorio oficial de Serato y requiere una interfaz, controlador o mezclador de Serato DJ soportado para controlar el Serato DJ.
Soporte
Para obtener la información más reciente acerca de este producto (requisitos de sistema, información de compatibilidad, etc.) y registrarlo, visite akaipro.com/afx.
Para obtener soporte adicional del producto, visite akaipro.com/support.
Inicio rápido
1.Asegúrese de tener instalada la última versión de Serato DJ (que se vende por separado).
2.Descargue e instale el Serato Flip Expansion Pack desde serato.com.
3.Asegúrese que todos los dispositivos estén apagados y que todos los atenuadores (faders) y perillas de ganancia estén en posición “cero".
4.Realice todas las conexiones necesarias en su instalación para DJ (por ej., del controlador al ordenador, de los giradiscos al mezclador, etc.).
5.Conecte el AFX a su ordenador con un cable USB estándar (incluido).
6.¡Abra Serato DJ y listo!
Lea el resto de esta Guía del usuario para aprovechar al máximo las características del AFX.
10
Características
10 |
2 |
1 |
|
10 |
|
|
|
||
|
|
11 |
|
|
|
12 |
13 |
14 |
|
15 |
|
|
|
15 |
6 |
7 |
|
7 |
6 |
6 |
7 |
4 |
7 |
6 |
|
||||
6 |
7 |
5 |
7 |
6 |
|
||||
8 |
9 |
17 |
9 |
8 |
|
||||
3 |
18 |
16 |
19 |
3 |
|
||||
21 |
22 |
23 |
24 |
25 |
|
|
20 |
|
|
Conexiones
1.Puerto USB: Utilice un cable USB estándar para conectar este puerto USB a su ordenador. El puerto USB del ordenador suministra suficiente corriente al AFX. Esta conexión también se utiliza para enviar y recibir datos MIDI desde y hacia su ordenador.
2.Ranura de bloqueo Kensington®: Puede utilizar esta ranura de bloqueo Kensington a fin de sujetar el AFX a una mesa u otra superficie.
Controles globales
Importante: Estos controles afectan todas las bandejas del software.
3.Función secundaria: Mantenga pulsado este botón para acceder a las funciones secundarias (en letra roja) de los demás controles del AFX.
4.Función táctil: Pulse este botón para activar las funciones capacitivas táctiles de las perillas del AFX: las perillas FX 1, FX 2, FX 3, las perillas de beat, y la perilla de parámetros. Cuando se activa el botón Touch (Función táctil) toque cualquiera de estas perillas para activar o desactivar sus correspondientes funciones momentáneamente.
5.Cuantización: Pulse este botón para activar o desactivar la cuantización, la cual hace "saltar" sus puntos de cue y loops (bucles) para que coincidan con su grilla de beats.
6.Botones FX1, FX2 y FX3: Estos botones tienen distintas funciones en cada bandeja en función del modo de efectos activado: Modo de efecto único o modo multiefectos.
7.Perillas FX1, FX2 y FX3: Estas perillas tienen distintas funciones en cada bandeja en función del modo de efectos activado: Modo de efecto único o modo multiefectos.
8.Modo de tap-efecto: Toque este botón repetidamente al tempo deseado para ajustar la frecuencia de los osciladores de baja frecuencia (LFO) del efecto. Mantenga pulsado este botón para reiniciar el multiplicador de beats a las BPM de la bandeja. Mantenga pulsado Shift (Función secundaria) y pulse este botón para cambiar entre el modo de efecto único y el modo multiefectos.
9.Perilla de beats: Gire esta perilla para ajustar la división de tiempo de los efectos seleccionados.
11

Controles de la bandeja
Importante: Estos controles afectan solo a su bandeja correspondiente (1/3 o 2/4) en el software.
10.Bandeja: Selecciona qué bandeja virtual del software es controlada por esa bandeja del hardware. La bandeja A puede controlar las bandejas virtuales 1 o 3. La bandeja B puede controlar las bandejas virtuales 2 o 4.
11.Endless Controller: La longitud de esta tira representa la longitud de la pista completa. Coloque su dedo en un punto de este sensor para saltar a ese punto en la pista. (Si desea desplazarse a lo largo de una pista, recomendamos que use la computadora en vez de pasar el dedo a lo largo de la tira.) Utilice los tres botones debajo de la tira para acceder a sus funciones tradicionales (descritas a continuación).
12.Búsqueda / ABS: Pulse este botón para activar el modo Búsqueda para el Endless Controller. En el modo Búsqueda, la longitud de esta tira representa la longitud de la pista completa. Coloque su dedo en un punto de este sensor para saltar a ese punto en la pista.
Mantenga pulsado Shift y pulse este botón para seleccionar el modo Absoluto (ABS) en el software. Debe utilizar el Serato DVS Expansion Pack (que se vende por separado) o una interfaz, controlador o mezclador (que se venden por separado) de Serato DJ a fin de poder utilizar esta función.
13.Pitch / REL: Pulse este botón para activar el modo Búsqueda para el Endless Controller. En modo Pitch, la longitud de la tira representa un fader temporario de pitch. Toque la tira y deslice su dedo hacia la izquierda o derecha para flexionar el pitch temporalmente hacia arriba o abajo. Levante su dedo de la tira para regresar el pitch normal. El centro, en donde el cambio de pitch es del 0%, se indica mediante un LED encima de la tira.
Mantenga pulsado Shift y pulse este botón para seleccionar el modo Relativo (REL) en el software. Debe utilizar el Serato DVS Expansion Pack (que se vende por separado) o una interfaz, controlador o mezclador (que se venden por separado) de Serato DJ a fin de poder utilizar esta función.
14.S-FX / INT: Pulse este botón para activar el modo Efectos de tira para el Endless Controller. En el modo Efectos de tira, la longitud de la tira representa el rango de valores para todos los efectos activos. Toque la tira y deslice su dedo hacia la izquierda o derecha para aumentar o reducir temporalmente los valores del efecto. Levante su dedo de la tira para regresar a sus ajustes previos de los efectos.
Mantenga pulsado Shift y pulse este botón para seleccionar el modo Interno (ABS) en el software. Debe utilizar el Serato DVS Expansion Pack (que se vende por separado) o una interfaz, controlador o mezclador (que se venden por separado) de Serato DJ a fin de poder utilizar esta función.
15.Asignar FXA / FXB: Pulse estos botones para activar o desactivar el efecto A y/o B en las bandejas 1 o 2.
Mantenga pulsado Shift y pulse estos botones para activar o desactivarlos en las bandejas 3 o 4. Cada efecto puede aplicarse en una o en todas las cuatro bandejas y/o la mezcla del programa.
16.Perilla de parámetros: Utilice esta perilla para diversas funciones en cada modo Pad. Mantenga pulsado Shift y utilice esta perilla para acceder a parámetros secundarios en ciertos modos Pad.
17.LCD: Esta pantalla muestra el valor actual del parámetro. Un punto junto al número indica que el número es en realidad el denominador de un valor de nota (por ej., 16• indica una longitud de 1/16 de una barra). Utilice la perilla de parámetros para ajustar el valor.
18.Grabar / Loop: Pulse este botón para armar la bandeja para grabar un Flip. El Flip comenzará a grabar una vez que pulse un pad.
Mantenga pulsado Shift y pulse este botón para activar o desactivar el loop del Flip.
19.Inicio / Encendido: Pulse este botón para comenzar a reproducir el Flip actualmente seleccionado. El Flip comenzará a reproducirse inmediatamente.
Mantenga pulsado Shift y pulse este botón para activar o desactivar el Flip en Serato DJ.
12
 Loading...