


Operator’s manual
Set of 2 Portable LCD-displays
7” with 1 built-in DVD-player
ACVDS720T
|
|
|
|
|
|
|
|
Operator’s manual |
GB 1 ~ 23 |
||
|
|
|
|
SAFETY PRECAUTIONS
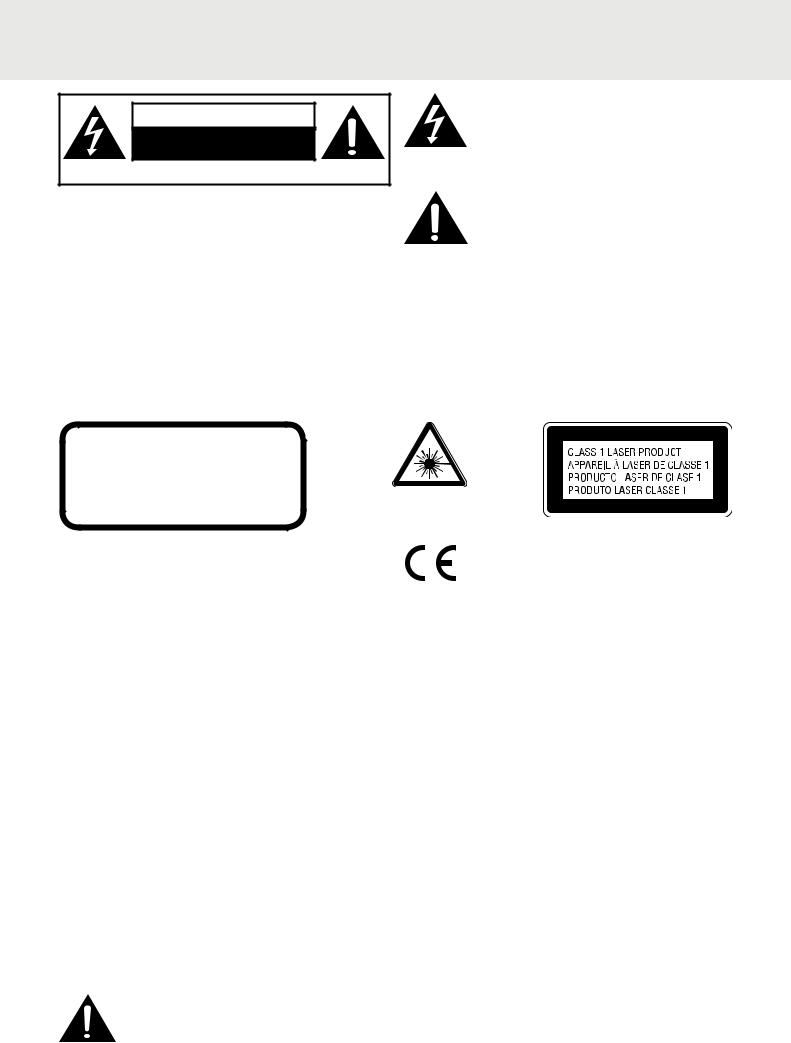
CAUTION |
RISK OF ELECTRIC SHOCK |
DO NOT OPEN |
DO NOT EXPOSE THIS UNIT TO RAIN OR MOISTURE |
The lightning flash with an arrowhead symbol, within the equilateral triangle, is intended to alert the user to the presence of uninsulated "dangerous voltage" within the product's enclosure that may be of sufficient magnitude to cause an electric shock.
WARNING: TO REDUCE THE RISK OF ELECTRIC SHOCK, DO NOT REMOVE COVER (OR BACK). NO USER-SERVICEABLE PARTS INSIDE. REFER SERVICING TO QUALIFIED SERVICE PERSONNEL.
WARNING: THE APPARATUS SHALL NOT BE EXPOSED TO DRIPPING OR SPLASHING AND THAT NO OBJECTS FILLED WITH LIQUIDS, SUCH AS VASES, SHALL BE PLACED ON APPARATUS
* SEE BACK OF UNIT FOR GRAPHIC
SYMBOLS *
The exclamation point within the equilateral triangle is intended to alert the user to the presence of important operating and maintenance (servicing) instructions in this owner manual.
WARNING: TO PREVENT FIRE OR SHOCK HAZARD, DO NOT EXPOSE THIS APPLIANCE TO RAIN OR MOISTURE.
CAUTION: DANGER OF EXPLOSION IF BATTERY IS INCORRECTLY REPLACED. REPLACE ONLY WITH THE SAME OR EQUIVALENT TYPE.
CAUTION
INVISIBLE LASER RADIATION WHEN OPEN AND INTERLOCKS DEFEATED.
AVOID EXPOSURE TO BEAM.
On Placement
This product contains a low power laser device.
This symbol means that the unit complies with European safely and electrical interference directives.
• Do not use the unit in places which are extremely hot, cold, dusty, or humid.
On Safety
•When connecting or disconnecting the AC adaptor, grip the plug and not the cord itself. Pulling the cord may damage it and create a hazard.
•When you are not going to use the unit for a long period of time, disconnect the AC adaptor.
•Leave a minimum of 5 cm around the apparatus for sufficient ventilations.
•The ventilation openings should not be impeded by covering with items such as newspaper, table-cloths, curtains, etc.
•No naked flame sources such as lighted candles should be placed on the apparatus.
•Attention should be drawn to the environmental aspects of battery disposal.
•The use of apparatus in moderate climates.
On Condensation
•When left in a heated room where it is warm and damp, water droplets or condensation may form inside the unit. When there is condensation inside the unit, the unit may not function normally. Let the unit stand for 1 to 2 hours before turning the unit on, or gradually heat the room up and allow the unit to dry before use.
Rating Plate Location
• The rating plate is located at the back of the unit.
WARNING:
Should any trouble occur, disconnect the AC power cord and refer servicing to a quali!ed technician.
GB - 1

SAFETY PRECAUTIONS
Notes on Copyright
It is forbidden by law to copy, broadcast, show, broadcast on cable, play in public, or rent copyrighted material without permission.
Apparatus Claims of U.S. Patent Nos. 6,836,549; 6,381,747; 7,050,698; 6,516,132; and 5,583,936 licensed for limited viewing uses only.
This product incorporates copyright protection technology that is protected by U.S. patents and other intellectual property rights. Use of this copyright protection technology must be authorized by Macrovision, and is intended for home and other limited viewing uses only unless otherwise authorized by Macrovision. Reverse engineering or disassembly is prohibited.
IMPORTANT SAFETY INSTRUCTIONS
SAFE USE OF YOUR EQUIPMENT
Here are a few tips to help you do this:
READ this instruction manual before you attempt to use the equipment.
NEVER fit make shift stands or legs with woodscrews. Use only approved supports and fasteners specially designed for the equipment.
NEVER let anyone, especially children, push objects into holes, ventilation slots or any other opening; this could result in fatal electric shock!
ENSURE that all electrical connections (including the mains plug, extension leads and interconnections between pieces of equipment) are properly made in accordance with the instructions given. Switch off the main supply when making or changing connections.
CONSULT your dealer if you are ever in doubt about the installation, operation or safety of your equipment.
DON'T continue to operate the equipment if it is damaged in any way or if it does not function normally.
DON'T leave equipment switched on when it is unattended unless it is part of it's normal function to operate in your absence, for example a video cassette recorder with timed recording facility.
LISTEN to headphones at moderate volume levels; high volume levels can permanently damage your hearing.
WARNING:
•The AC/DC Adaptor is used as the disconnect device, it shall remain readily operable and should not be obstructed during intended use. To be completely disconnected the apparatus from supply mains, the AC/DC Adaptor of the apparatus shall be disconnected from the mains socket outlet completely.
•When the signal lamp LED is off, it indicates that the apparatus is completely disconnected from the mains.
TO AVOID DAMAGE TO THE PLASTIC CABINETS,
IF THE UNIT IS NOT IN USE,
CONSUMER SHOULD PLACE THE UNIT AWAY
FROM DIRECT SUNLIGHT FOR STORAGE.
GB - 2

TABLE OF CONTENTS
Safety Precautions ........................... |
1 |
Important Safety Instructions............. |
2 |
Table of Contents .............................. |
3 |
Disc Formats ..................................... |
4 |
Accessories ...................................... |
5 |
Remote Control ................................ |
5 |
Control Reference Guide |
|
Remote Control ........................................... |
6 |
DVD Player.................................................. |
7 |
Monitor ........................................................ |
7 |
Power Supply |
|
Using the Car Power Adaptor...................... |
8 |
Connections |
|
Watching a DVD on the Main Unit and the |
|
Monitor ........................................................ |
9 |
Connecting a TV.......................................... |
9 |
Connecting a Stereo Receiver or Amplifier |
|
(Main unit only).......................................... |
10 |
Connecting Game Pad/Video Equipments |
|
(monitor only) ............................................ |
10 |
Using the Monitor with Other Equipment |
|
while Playing DVD on the Main Unit.......... |
11 |
Using Headphones/Earphones ................. |
11 |
Mounting in the Vehicle |
|
Installation guide ....................................... |
12 |
Using the Stand for Desktop Use .... |
13 |
Sound System ................................. |
13 |
Unit Operation ................................ |
13 |
CD / DVD OPERATION |
|
Playing a Disc............................................ |
14 |
Pausing Playback (Still Mode)................... |
14 |
Stopping Playback..................................... |
14 |
Skipping to a different track....................... |
14 |
Fast Forward / Fast Reverse..................... |
14 |
Audio Selection ........................................ |
15 |
Subtitle Selection....................................... |
15 |
Angle Selection ......................................... |
15 |
SPECIAL FUNCTION |
|
Display Function........................................ |
16 |
Locating a Specific Title ............................ |
16 |
Locating a Specific Chapter ...................... |
16 |
Locating a Specific Time ........................... |
16 |
DVD Programmable Playback......... |
17 |
Repeat Playback ............................. |
18 |
Playing MP3 and Picture Files......... |
19 |
Customizing the Function Settings |
|
Language Setup........................................ |
20 |
Video Setup............................................... |
20 |
System Setup ....................................... |
20-21 |
Maintenance |
|
Troubleshooting Guide .................... |
22 |
Specifications .................................. |
23 |
GB - 3
DISC FORMATS
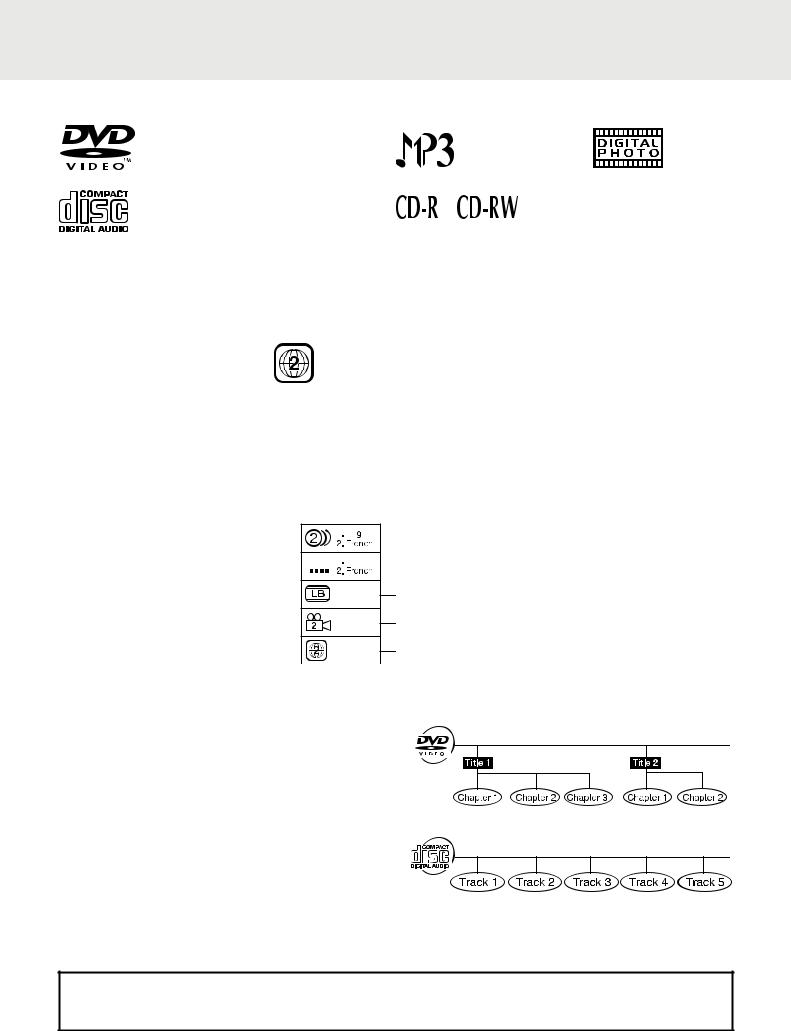
This DVD player can playback discs bearing any of the following marks:
DVDs [8cm(3")/12cm(5") disc]
Audio CDs
[8cm(3")12cm(5") disc]
Compatible
Region Management Information
Region Management Information: This unit is designed and manufactured to respond to the Region Management Information that is encoded on DVDs. If the region number printed on the DVD does not correspond to the region number of this unit, this unit cannot play that disc.
The region number of this unit is 2.
Disc Function or Operation that is Not Available
When the  symbol appears on the TV screen, it indicates that the function or operation attempted is not available at that time. This occurs because the DVD manufacturer determines the specific functions. Certain functions may not be available on some discs. Be sure to read the documentation provided with the disc.
Icons Used on DVDs


 Language selections for audio
Sample lcons


 Language selections for subtitles
Screen aspect ratio
Multiple camera angles
Region code indicator
Note:
•When playing back a CD-G (Graphics) or CD EXTRA disc, the audio portion will be played, but the graphic images will not be shown.
Titles, Chapters and Tracks
• DVDs are divided into “titles” and “chapters”. If the disc has more than one movie on it, each movie would be a separate “title”. “Chapters” are sections of titles.
• Audio CDs are divided into “tracks”. A “track” is usually one song on an Audio CD.
Note:
•Numbers identify each title, chapter, and track on a disc. Most discs have these numbers recorded on them, but some do not.
Notes on Unauthorized Discs
You may not be able to play back some DVDs on this unit if they were purchased from outside your geographic area or made for business purposes.
GB - 4

ACCESSORIES |
|
|
|
Please check and identify the supplied accessories. |
|
Remote Control (with battery)................................................................................................................... |
x 1 |
Car Power Adaptor................................................................................................................................... |
x 1 |
DC-AV Cable............................................................................................................................................ |
x 1 |
Mounting Strap ......................................................................................................................................... |
x 2 |
Game pad................................................................................................................................................. |
x 1 |
Carrying case ........................................................................................................................................... |
x 1 |
REMOTE CONTROL
Using the Remote Control
•Point the remote control at the REMOTE SENSOR located on the unit.
•When there is a strong ambient light source, the performance of the infrared REMOTE SENSOR may be degraded, causing unreliable operation.
•The recommended effective distance for remote operation is about 16 feet (5 meters).
Take out the plastic sheet before operating the Remote Control.
To Change Remote Battery
1. Open the battery door.
2. Insert one CR2025 (3V) size battery.
BATTERY REPLACEMENT
When battery becomes weak, the operating distance of the Remote Control will greatly reduced and you will need to replace the battery.
Note:
•If the Remote Control is not to be used for a long time, remove the battery to avoid damage caused by battery leakage corrosion.
•Corrosion, oxidation, battery-leakage and any other gradually acidic defect of this nature will invalidate the guarantee.
WARNING:
•DO NOT DISPOSE OF BATTERY IN FIRE; BATTERY MAY EXPLODE OR LEAK.
•Batteries should not be exposed to excessive heat such as sunshine, fire or the like.
GB - 5
CONTROL REFERENCE GUIDE
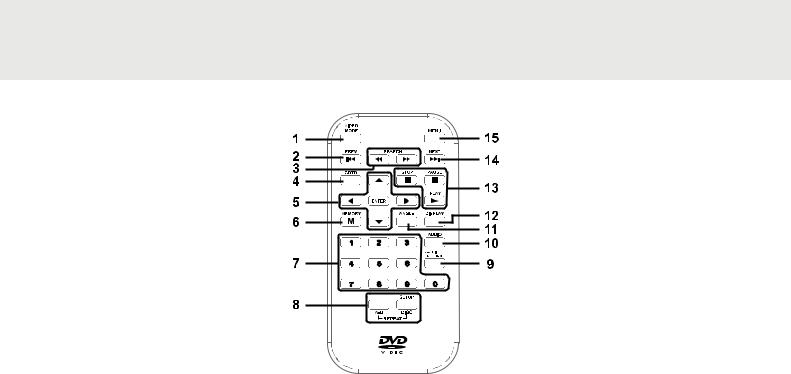
Remote Control
1)VIDEO MODE Button
Adjusts Brightness, Contrast or Color of the LCD screen.
2) PREV Button
Moves back through titles, chapters or tracks on a disc.
3) /
/  SEARCH Buttons
 SEARCH: Fast reverse playback.
 SEARCH: Fast forward playback.
4)GOTO Button
Skips directly to a location on a DVD.
5)Cursor ( ,
,  ,
,  ,
,  ) Buttons
Moves between selections on a menu screen and adjusts certain settings.
ENTER Button
Confirms selections on a menu screen.
6)MEMORY Button
In STOP mode, sets titles/chapters in a favorite order.
7)Number (0 - 9) Buttons
Use when creating programs, entering parental control password or locating a title/chapter/track or specific time.
8)REPEAT A-B Button
Performs point-to-point repeat playback on a DVD or CD.
REPEAT DISC Button
Repeats a DVD chapter or title. Repeats a CD track or the entire disc.
SETUP Button
In stop mode, it brings up the unit’s SETUP menu.
9)SUBTITLE Button
Selects one of the subtitle languages programmed on a DVD (if available).
RETURN Button
Returns to normal operation after using the SETUP menu of a DVD.
10)AUDIO Button
Selects one of the audio sound tracks on a DVD (if more than one is available) or select the audio output mode on a CD.
11)ANGLE Button
Switches between multiple camera angles when the DVD you are playing has been programmed with multiple camera angles.
12)DISPLAY Button
Shows status information on the screen.
13) STOP Button
Stops playing a disc.
 PLAY Button
Starts or resumes playback of a disc.
 PAUSE Button
Pauses playback and frame advance.
14) NEXT Button
Moves forward through titles, chapters or tracks on a disc.
15)MENU Button
Enters and exits the main DVD menu.
GB - 6

CONTROL REFERENCE GUIDE
DVD Player
1)Remote Sensor
Receives the remote control signal.
2) OPEN Button
Press the  OPEN button and hold the front panel to open the disc door.
3) SEARCH Button
Performs fast reverse playback.
 SEARCH Button
Performs fast forward playback.
 PREV Button
Goes backwards to previous chapters/ tracks/titles.
 NEXT Button
Advances chapters/tracks/titles.
 STOP Button
Stops playing a disc.
 PAUSE Button
Pauses playback and frame advance.
 PLAY Button
Starts or resumes playback of a disc.
4)STANDBY(power off) / ON Switch
5)LCD Screen
6)Headphone Jack
7)VOLUME Control
Adjusts the volume.
Monitor |
2 |
3 |
|
1) DC OUT 9-12V Jack |
|||
|
|
2)VOLUME Control
Adjusts the volume.
3)Headphone Jack
4)AUDIO / VIDEO IN Jacks
5)LCD Screen
6)BRIGHTNESS Control
Adjusts the relative lightness or darkness
|
of the screen. |
|
7) |
COLOUR Control |
|
|
Adjusts the colour intensity. |
|
8) |
Screen Switch |
|
|
WIDE: Wide Screen |
1 |
|
NORMAL: Pan Screen |
|
|
|
9)ON / OFF Switch
10)DC IN 9-12V Jack
11)POWER ON Indicator
When the ON / OFF switch is in the ON position, the light will illuminate.
12)Stand
1 |
2 |
3 |
4 |
5 |
6 |
|||
|
|
|
|
|
|
|
|
|
|
|
|
|
|
|
|
|
|
|
|
|
|
|
|
|
|
|
|
|
|
|
|
|
|
|
|
|
|
|
|
|
|
|
|
|
7
8
9
10
11
8)AUDIO / VIDEO OUT Jacks
9)DC IN 9V-12V Jack
10)POWER ON Indicator
When the STANDBY / ON switch is in the ON position, the light will illuminate.
11)Stand
4 |
5 |
6 |
7 |
8
9
10
11
12
GB - 7
 Loading...