


|
................................................ ............................................. |
||
SG2570N |
EN FREEZER |
USER MANUAL |
2 |
|
FR CONGÉLATEUR |
NOTICE D'UTILISATION |
19 |
|
DE GEFRIERGERÄT |
BENUTZERINFORMATION |
38 |
|
IT CONGELATORE |
ISTRUZIONI PER L’USO |
57 |

2 www.electrolux.com |
|
|
CONTENTS |
|
|
1. |
SAFETY INSTRUCTIONS . . . . . . . . . . . . . . . . . . . . . . . . . . . . . . . . . . . . . . . . . . . . . . . . . . |
3 |
2. |
CONTROL PANEL . . . . . . . . . . . . . . . . . . . . . . . . . . . . . . . . . . . . . . . . . . . . . . . . . . . . . . . |
5 |
3. |
DAILY USE . . . . . . . . . . . . . . . . . . . . . . . . . . . . . . . . . . . . . . . . . . . . . . . . . . . . . . . . . . . . . |
7 |
4. |
HELPFUL HINTS AND TIPS . . . . . . . . . . . . . . . . . . . . . . . . . . . . . . . . . . . . . . . . . . . . . . . . |
9 |
5. |
CARE AND CLEANING . . . . . . . . . . . . . . . . . . . . . . . . . . . . . . . . . . . . . . . . . . . . . . . . . . . . |
9 |
6. |
WHAT TO DO IF… . . . . . . . . . . . . . . . . . . . . . . . . . . . . . . . . . . . . . . . . . . . . . . . . . . . . . . |
10 |
7. |
INSTALLATION . . . . . . . . . . . . . . . . . . . . . . . . . . . . . . . . . . . . . . . . . . . . . . . . . . . . . . . . . |
13 |
8. |
NOISES . . . . . . . . . . . . . . . . . . . . . . . . . . . . . . . . . . . . . . . . . . . . . . . . . . . . . . . . . . . . . . |
16 |
9. |
TECHNICAL DATA . . . . . . . . . . . . . . . . . . . . . . . . . . . . . . . . . . . . . . . . . . . . . . . . . . . . . . |
18 |
10. |
ENVIRONMENT CONCERNS . . . . . . . . . . . . . . . . . . . . . . . . . . . . . . . . . . . . . . . . . . . . . . |
18 |
WE’RE THINKING OF YOU
Thank you for purchasing an Electrolux appliance. You’ve chosen a product that brings with it decades of professional experience and innovation. Ingenious and stylish, it has been designed with you in mind. So whenever you use it, you can be safe in the knowledge that you’ll get great results every time.
Welcome to Electrolux.
Visit our website for:
Get usage advice, brochures, trouble shooter, service information:
www.electrolux.com
Register your product for better service:
www.electrolux.com/productregistration
Buy Accessories, Consumables and Original spare parts for your appliance: www.electrolux.com/shop
CUSTOMER CARE AND SERVICE
We recommend the use of original spare parts.
When contacting Service, ensure that you have the following data available. The information can be found on the rating plate. Model, PNC, Serial Number.
Warning / Caution-Safety information
General information and tips
Environmental information
Subject to change without notice.
1.  SAFETY INSTRUCTIONS
In the interest of your safety and to ensure the correct use, before installing and first using the appliance, read this user manual carefully, including its hints and warnings. To avoid unnecessary mistakes and accidents, it is important to ensure that all people using the appliance are thoroughly familiar with its operation and safety features. Save these instructions and make sure that they remain with the appliance if it is moved or sold, so that everyone using it through its life will be properly informed on appliance use and safety.
For the safety of life and property keep the precautions of these user's instructions as the manufacturer is not responsible for damages caused by omission.
1.1 Children and vulnerable people safety
•This appliance is not intended for use by persons (including children) with reduced physical, sensory or mental capabilities, or lack of experience and knowledge, unless they have been given supervision or instruction concerning use of the appliance by a person responsible for their safety.
Children should be supervised to ensure that they do not play with the appliance.
•Keep all packaging well away from children. There is risk of suffocation.
•If you are discarding the appliance pull the plug out of the socket, cut the connection cable (as close to the appliance as you can) and remove the door to prevent playing children to suffer electric shock or to close themselves into it.
•If this appliance featuring magnetic door seals is to replace an older appliance having a spring lock (latch) on the door or lid, be sure to make that spring lock unusable before you discard the old appliance. This will prevent it from becoming a death trap for a child.
1.2 General safety
WARNING!
ENGLISH 3
Keep ventilation openings, in the appliance enclosure or in the built-in structure, clear of obstruction.
•The appliance is intended for keeping foodstuff and/or beverages in a normal household as explained in this instruction booklet.
•Do not use a mechanical device or any artificial means to speed up the thawing process.
•Do not use other electrical appliances (such as ice cream makers) inside of refrigerating appliances, unless they are approved for this purpose by the manufacturer.
•Do not damage the refrigerant circuit.
•The refrigerant isobutane (R600a) is contained within the refrigerant circuit of the appliance, a natural gas with a high level of environmental compatibility, which is nevertheless flammable.
During transportation and installation of the appliance, be certain that none of the components of the refrigerant circuit become damaged.
If the refrigerant circuit should become damaged:
–avoid open flames and sources of ignition
–thoroughly ventilate the room in which the appliance is situated
•It is dangerous to alter the specifications or modify this product in any way. Any damage to the cord may cause a short-circuit, fire and/or electric shock.
WARNING!
Any electrical component (power cord, plug, compressor) must be replaced by a certified service agent or qualified service personnel to avoid hazard.
1.Power cord must not be lengthened.
2.Make sure that the power plug is not squashed or damaged by the back of the appliance. A squashed or damaged power plug may overheat and cause a fire.
3.Make sure that you can come to the mains plug of the appliance.

4www.electrolux.com
4.Do not pull the mains cable.
5.If the power plug socket is loose, do not insert the power plug. There is a risk of electric shock or fire.
6.You must not operate the appliance without the lamp cover (if foreseen) of interior lighting.
•This appliance is heavy. Care should be taken when moving it.
•Do not remove nor touch items from the freezer compartment if your hands are damp/wet, as this could cause skin abrasions or frost/freezer burns.
•Avoid prolonged exposure of the appliance to direct sunlight.
•Bulb lamps (if foreseen) used in this appliance are special purpose lamps selected for household appliances use only. They are not suitable for household room illumination.
1.3 Daily Use
•Do not put hot pot on the plastic parts in the appliance.
•Do not store flammable gas and liquid in the appliance, because they may explode.
•Do not place food products directly against the air outlet on the rear wall. (If the appliance is Frost Free)
•Frozen food must not be re-frozen once it has been thawed out.
•Store pre-packed frozen food in accordance with the frozen food manufacturer's instructions.
•Appliance's manufacturers storage recommendations should be strictly adhered to. Refer to relevant instructions.
•Do not place carbonated or fizzy drinks in the freezer compartment as it creates pressure on the container, which may cause it to explode, resulting in damage to the appliance.
•Ice lollies can cause frost burns if consumed straight from the appliance.
1.4 Care and cleaning
•Before maintenance, switch off the appliance and disconnect the mains plug from the mains socket.
•Do not clean the appliance with metal objects.
•Do not use sharp objects to remove frost from the appliance. Use a plastic scraper.
•Never use a hair drier or other heating appliances to speed up defrosting. Excessive heat may damage the plastic interior, and humidity could enter the electric system making it live.
1.5 Installation
For electrical connection carefully follow the instructions given in specific paragraphs.
•Unpack the appliance and check if there are damages on it. Do not connect the appliance if it is damaged. Report possible damages immediately to the place you bought it. In that case retain packing.
•It is advisable to wait at least four hours before connecting the appliance to allow the oil to flow back in the compressor.
•Adequate air circulation should be around the appliance, lacking this leads to overheating. To achieve sufficient ventilation follow the instructions relevant to installation.
•Wherever possible the back of the product should be against a wall to avoid touching or catching warm parts (compressor, condenser) to prevent possible burn.
•The appliance must not be located close to radiators or cookers.
•Make sure that the mains plug is accessible after the installation of the appliance.
•Connect to potable water supply only (If a water connection is foreseen).
1.6 Service
•Any electrical work required to do the servicing of the appliance should be carried out by a qualified electrician or competent person.
•This product must be serviced by an authorized Service Centre, and only genuine spare parts must be used.

1.7 Environment Protection
This appliance does not contain gasses which could damage the ozone layer, in either its refrigerant circuit or insulation materials. The appliance shall not be discarded together with the urban refuse and rubbish. The insulation foam con-
ENGLISH 5
tains flammable gases: the appliance shall be disposed according to the applicable regulations to obtain from your local authorities. Avoid damaging the cooling unit, especially at the rear near the heat exchanger. The materials used on this appliance marked by the symbol  are recyclable.
2. CONTROL PANEL
6 5
1Display
2Temperature warmer button
3Temperature colder button
4OK button
5Mode button
6ON/OFF button
It is possible to change predefined sound of buttons to a loudly one by pressing together Mode button and Temperature colder button for some seconds. Change is reversible.
2.1 Display/Indicator
|
|
|
|
|
|
|
|
|
|
|
|
|
|
|
|
|
|
|
|
|
|
|
|
|
|
|
|
|
|
|
|
|
|
|
|
|
|
|
|
|
|
|
|
|
|
|
|
|
|
|
|
|
|
|
|
|
|
|
|
|
|
|
|
|
|
|
|
|
|
|
|
|
|
|
|
|
|
|
|
|
|
|
|
|
|
|
|
|
|
|
|
|
|
|
|
|
|
|
|
|
|
|
|
|
|
|
|
|
|
|
|
|
|
|
1 |
|
|
|
|
3 |
|
4 |
|
|
|
6 |
|
|||||
1Timer indicator
2FROSTMATIC function
3Minute Minder function
4Child Lock function
5Alarm indicator
6Temperature indicator
1
4 3 2
2.2 Switching on
To switch on the appliance do these steps:
1.Connect the mains plug to the power socket.
2.Press the ON/OFF button if the display is off.
3.The alarm buzzer could operate after few seconds.
To reset the alarm refer to “High temperature alarm”.
4.If "dEMo" appears on the display, the appliance is in demonstration mode. Refer to "What to do if..." paragraph.
5.The temperature indicators show the set default temperature.
To select a different set temperature refer to "Temperature regulation".
If the door remains open for some minutes, the light will turn off automatically. The light is reset by closing and opening the door itself.
2.3 Switching off
To switch off the appliance do these steps:
1.Press the ON/OFF button for few seconds.

6www.electrolux.com
2.The display switches off.
3.To disconnect the appliance from the power disconnect the mains plug from the power socket.
2.4 Temperature regulation
The set temperature of the freezer may be adjusted by pressing the temperature button.
Set default temperature:
• -18°C for the freezer
The temperature indicator shows the set temperature.
The set temperature will be reached within 24 hours.
After a power failure the set temperature remains stored.
2.5 FROSTMATIC function
To switch on the function:
1.Press the Mode button until the corresponding icon appears.
The FROSTMATIC indicator flashes.
2.Press the OK button to confirm.
The FROSTMATIC indicator is shown. This function stops automatically after 52 hours.
To switch off the function before its automatic end:
1.Press the Mode button until the FROSTMATIC indicator flashes.
2.Press the OK button to confirm.
3.The FROSTMATIC indicator goes off.
The function switches off by selecting a different freezer set temperature.
2.6 Minute Minder function
The Minute Minder function is to be used to set an acoustic alarm at the preferred time, useful for example when a recipe requires to cool down a mixture for a certain length of time, or when a reminder is needed in order not to forget the bottles placed in the freezer for fast cooling.
To switch on the function:
1.Press the Mode button until the corresponding icon appears.
The Minute Minder indicator flashes.
The Timer shows the set value (30 minutes) for a few seconds.
2.Press the Temperature colder button or the Temperature warmer button to change the Timer set value from 1 to 90 minutes.
3.Press the OK button to confirm.
The Minute Minder indicator is shown.
The Timer start to flash (min).
At the end of the countdown the Minute Minder indicator flashes and an audible alarm sounds:
1.Remove any drinks contained in the freezer compartment.
2.Press OK button to switch off the
sound and terminate the function.
It is possible to deactivate the function at any time during the countdown:
1.Press the Mode button until the Minute Minder indicator flashes.
2.Press the OK button to confirm.
3.The Minute Minder indicator goes off. It is possible to change the time during the countdown and at the end by pressing the Temperature colder button and the Temperature warmer button.
2.7 Child Lock function
To lock the buttons from unintentional operation select the Child Lock function.
To switch on the function:
1.Press the Mode button until the corresponding icon appears.
2.The Child Lock indicator flashes.
3.Press the OK button to confirm.
The Child Lock indicator is shown. To switch off the function:
1.Press the Mode button until the Child Lock indicator flashes.
2.Press the OK button to confirm.
3.The Child Lock indicator goes off.
2.8 High temperature alarm
Temperature increase in the freezer compartment (for example due to an earlier power failure or door is open) is indicated by:
•flashing the alarm and freezer temperature indicators
•sounding of buzzer.
To reset the alarm:

1.Press any button.
2.The buzzer switches off.
3.The freezer temperature indicator shows the highest temperature reached for a few seconds. Then show again the set temperature.
4.The alarm indicator continue to flash until the normal conditions are restored.
2.9 Door open alarm
An acoustic alarm will sound if the door is left open for a few minutes. The door open alarm conditions are indicated by:
ENGLISH 7
•flashing alarm indicator
•acoustic buzzer.
When normal conditions are restored (door closed), the alarm will stop. During the alarm phase, the buzzer can be switched off by pressing any button.
3.DAILY USE
3.1Freezing fresh food
The freezer compartment is suitable for freezing fresh food and storing frozen and deep-frozen food for a long time.
To freeze small amount of fresh foods it is not necessary to change the present setting.
To freeze fresh food activate the Action Freeze function 24 hours before placing the food to be frozen in the freezer compartment.
It is possible to place the fresh food to be frozen in all compartments except the lowest.
The maximum amount of food that can be frozen in 24 hours is specified on the rating plate, a label located on the inside of the appliance.
The freezing process lasts 24 hours: during this period do not add other food to be frozen.
3.2 Storage of frozen food
When first starting-up or after a period out of use, before putting the products in the compartment let the appliance run at least 2 hours.
The freezer baskets ensure that it is quick and easy to find the food package you want. If large quantities of food are to be stored, remove all drawers except for the
bottom basket which needs to be in place to provide good air circulation. On all shelves except for the top shelf it is possible to place food that protrude 15 mm from the door.
In the event of accidental defrosting, for example due to a power failure, if the power has been off for longer that the value shown in the technical characteristics chart under "rising time", the defrosted food must be consumed quickly or cooked immediately and then re-frozen (after cooling).
3.3 Thawing
Deep-frozen or frozen food, prior to being used, can be thawed in the refrigerator compartment or at room temperature, depending on the time available for this operation.
Small pieces may even be cooked still frozen, directly from the freezer: in this case, cooking will take longer.
3.4 Cold accumulators
One or more cold accumulators are supplied in the freezer; these increase the length of time for which food will keep in the event of a power failure or breakdown.

8www.electrolux.com
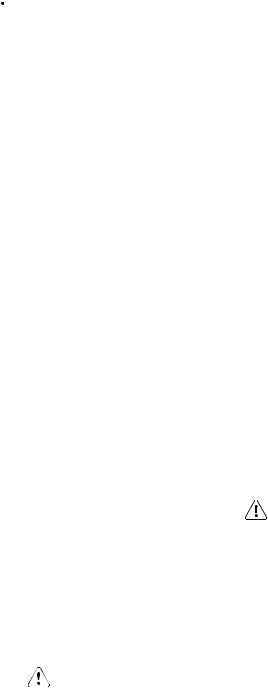
3.5Removal of freezing baskets and wire shelves from the freezer
|
|
Some of the freezing baskets have a limit |
|
|
|
stop to prevent their accidental removal or |
|
|
|
falling out. At the time of its removal from |
|
|
|
the freezer, pull the basket towards your- |
|
|
2 |
self and, upon reaching the end point, re- |
|
|
move the basket by tilting its front up- |
||
|
|
||
1 |
|
wards |
|
|
|
At the time of putting it back, slightly lift |
|
|
|
the front of the basket to insert it into the |
|
|
|
freezer. |
|
|
|
Once you are over the end points, push |
|
|
|
the basket back in their position. |
|
|
|
The wire shelves equipped with expander |
|
|
|
rollers are secured with locking pins. |
|
|
|
To remove them proceed as follow: |
|
|
|
• Loosen the locking pin on each side on |
|
|
|
|
the expander roller. If necessary, use a |
|
|
|
screwdriver. |
1 |
|
• |
Then pull out both locking pin (1). |
|
|
• |
Then pull the wire shelf outwards (2). |
2  1
1
1
3.6 Cleaning the interior
Before using the appliance for the first time, wash the interior and all internal accessories with lukewarm water and some neutral soap so as to remove the typical smell of a brand-new product, then dry thoroughly.
Do not use detergents or abrasive powders, as these will damage the finish.
Check that the drain hose at the rear of the cabinet discharges into the drip tray

4. HELPFUL HINTS AND TIPS
4.1 Hints for freezing
To help you make the most of the freezing process, here are some important hints:
•the maximum quantity of food which can be frozen in 24 hrs. is shown on the rating plate;
•the freezing process takes 24 hours. No further food to be frozen should be added during this period;
•only freeze top quality, fresh and thoroughly cleaned, foodstuffs;
•prepare food in small portions to enable it to be rapidly and completely frozen and to make it possible subsequently to thaw only the quantity required;
•wrap up the food in aluminium foil or polythene and make sure that the packages are airtight;
•do not allow fresh, unfrozen food to touch food which is already frozen, thus avoiding a rise in temperature of the latter;
•lean foods store better and longer than fatty ones; salt reduces the storage life of food;
5.CARE AND CLEANING
CAUTION!
Unplug the appliance before carrying out any maintenance operation.
This appliance contains hydrocarbons in its cooling unit; maintenance and recharging must therefore only be carried out by authorized technicians.
5.1 Periodic cleaning
The equipment has to be cleaned regularly:
•clean the inside and accessories with lukewarm water and some neutral soap.
•regularly check the door seals and wipe clean to ensure they are clean and free from debris.
ENGLISH 9
•water ices, if consumed immediately after removal from the freezer compartment, can possibly cause the skin to be freeze burnt;
•it is advisable to show the freezing in date on each individual pack to enable you to keep tab of the storage time.
4.2 Hints for storage of frozen food
To obtain the best performance from this appliance, you should:
•make sure that the commercially frozen foodstuffs were adequately stored by the retailer;
•be sure that frozen foodstuffs are transferred from the foodstore to the freezer in the shortest possible time;
•not open the door frequently or leave it open longer than absolutely necessary;
•once defrosted, food deteriorates rapidly and cannot be refrozen;
•do not exceed the storage period indicated by the food manufacturer.
• rinse and dry thoroughly.
Do not pull, move or damage any pipes and/or cables inside the cabinet.
Never use detergents, abrasive powders, highly perfumed cleaning products or wax polishes to clean the interior as this will damage the surface and leave a strong odor.
Clean the condenser (black grill) and the compressor at the back of the appliance with a brush. This operation will improve the performance of the appliance and save energy consumption.
Take care of not to damage the cooling system.
10 www.electrolux.com
When moving the cabinet, lift it by the front edge to avoid scratching the floor.
Many proprietary kitchen surface cleaners contain chemicals that can attack/damage the plastics used in this appliance. For this reason use a soft cloth rinsed in warm water and neutral soap emulsion for cleaning external surfaces.
Do not use detergents or abrasive paste as these will damage the paint, or stainless steel anti finger print coating.
After cleaning, reconnect the equipment to the mains supply.
5.2 Defrosting of the freezer
The freezer compartment of this model, on the other hand, is a "no frost" type. This means that there is no buildup of frost when it is in operation, neither on the internal walls nor on the foods.
The absence of frost is due to the continuous circulation of cold air inside the compartment, driven by an automatically controlled fan.
5.3 Periods of non-operation
When the appliance is not in use for long periods, take the following precautions:
1.disconnect the appliance from electricity supply
2.remove all food
3.clean the appliance and all accessories
4.leave the door/doors open to prevent unpleasant smells.
If the cabinet will be kept on, ask somebody to check it once in a while to prevent the food inside from spoiling in case of a power failure.
5.4 Cleaning the ventilation grille
The ventilation grille can be removed for washing.
Make sure the door is open and then:
• Loosen the upper edge of the grille by pulling outward/downward.
• Pull the grille straight out to completely remove it.
• Vacuum clean under the cabinet.
6. WHAT TO DO IF…
During operation of the appliance some smaller but annoying trouble can often occur, which does not require calling a technician out. In the following chart information is given about them to avoid unnecessary charges on service.
The operation of the appliance goes with certain sounds (compressor and circulating sound). This not means a trouble, but a normal operation.
The appliance operates discontinuously, so the stopping of compressor does not mean being no current. That is why you must not touch the electrical parts of the appliance before breaking the circuit.
|
|
ENGLISH 11 |
|
|
|
Problem |
Possible cause |
Solution |
The appliance is |
The appliance is not sup- |
Check if the appliance |
noisy. |
ported properly. |
stands stable (all feet and |
|
|
wheels should be on the |
|
|
floor). Refer to "Levelling". |
The buzzer sounds. |
The temperature in the |
Refer to "High Temperature |
The Alarm icon |
freezer is too high. |
Alarm". |
flashing. |
|
|
|
|
|
The door is not closed correctly.
Refer to "Door open alarm".
Upper or lower |
An error has occurred in |
Call your service represen- |
square is shown in |
measuring the tempera- |
tative (the cooling system |
the temperature dis- |
ture. |
will continue to keep food |
play |
|
products cold, but temper- |
|
|
ature adjustment will not be |
|
|
possible). |
The compressor |
The Temperature regulator |
Set a warmer temperature. |
runs continuously. |
may be set incorrectly. |
|
|
The door is not closed |
Refer to "Closing the door". |
|
correctly. |
|
|
The door has been |
Do not keep the door open |
|
opened too frequently. |
longer than necessary. |
|
The food temperature is |
Let the food temperature |
|
too high. |
decrease to room tempera- |
|
|
ture before storage. |
|
The room temperature is |
Decrease the room temper- |
|
too high. |
ature. |
There is too much |
The door is not closed |
Refer to "Closing the door". |
frost and ice. |
correctly. |
|
|
The door gasket is de- |
Refer to "Closing the door". |
|
formed or dirty. |
|
The temperature in |
The Temperature regulator |
Set a warmer temperature. |
the appliance is too |
may be set incorrectly. |
|
cold. |
|
|
The temperature in |
The Temperature regulator |
Set a colder temperature. |
the appliance is too |
may be set incorrectly. |
|
warm. |
|
|
|
|
|
The door is not closed correctly.
Refer to "Closing the door".
|
The food temperature is |
Let the food temperature |
|
too high. |
decrease to room tempera- |
|
|
ture before storage. |
The temperature in |
Food is too near to each |
Store food so that there is |
the freezer is too |
other. |
cold air circulation. |
warm. |
|
|
|
|
|

12 www.electrolux.com
Problem |
Possible cause |
Solution |
|
Large quantities of food to |
Insert smaller quantities of |
|
be frozen were put in at |
food to be frozen at the |
|
the same time. |
same time. |
The appliance does |
The appliance is switched |
Switch on the appliance. |
not operate. |
off. |
|
|
The mains plug is not con- |
Connect the mains plug to |
|
nected to the mains sock- |
the mains socket correctly. |
|
et correctly. |
|
|
The appliance has no |
Connect another electrical |
|
power. There is no voltage |
appliance to the mains |
|
in the mains socket. |
socket. Check fuse. Con- |
|
|
tact a qualified electrician. |
The lamp does not |
The lamp is defective. |
Refer to "Replacing the |
work. |
|
lamp". |
|
The door has been open |
Close the door. |
|
to long. |
|
Door interferes with |
The appliance is not level- |
Refer to "Levelling". |
ventilation grill. |
led. |
|
Misaligned door. |
The appliance is not level- |
Refer to "Levelling". |
|
led. |
|
|
|
|
DEMO appears on |
The appliance is in dem- |
the Display |
onstration mode (DEMO). |
Keep pressed approximately 10 sec the Mode button since a long sound of buzzer is heard and the Display shut off for a short while: appliance start works regularly.
As much as the advice does not lead to result, call the nearest brand-mark service.
6.1 Replacing the lamp
The appliance is equipped with a longlife LED interior light.
Only service is allowed to replace the lighting device. Contact your Service Center .
2.If necessary, adjust the door. Refer to "Installation".
3.If necessary, replace the defective door gaskets. Contact the Service Center.
6.2 Closing the door
1.Clean the door gaskets.

7. INSTALLATION
WARNING!
Read the "Safety Information" carefully for your safety and correct operation of the appliance before installing the appliance.
7.1 Positioning
Install this appliance at a location where the ambient temperature corresponds to the climate class indicated on the rating plate of the appliance:
|
ENGLISH 13 |
|
|
Cli- |
Ambient temperature |
mate |
|
class |
|
SN |
+10°C to + 32°C |
N |
+16°C to + 32°C |
ST |
+16°C to + 38°C |
T |
+16°C to + 43°C |
|
|
7.2 Location
50 mm |
To ensure best performance, if the appliance is positioned below an overhanging wall unit, the minimum distance between the top of the cabinet and the wall unit must be at least 40 mm. Ideally, however, the appliance should not be positioned below overhanging wall units.
The ventilation space can be:
•directly above the appliance
•behind and above the top cupboard.
In this case, the space behind the top cupboard must be at least 50 mm deep.
7.3 Electrical connection
Before plugging in, ensure that the voltage and frequency shown on the rating plate correspond to your domestic power supply.
The appliance must be earthed. The power supply cable plug is provided with a contact for this purpose. If the domestic
power supply socket is not earthed, connect the appliance to a separate earth in compliance with current regulations, consulting a qualified electrician.
The manufacturer declines all responsibility if the above safety precautions are not observed.
This appliance complies with the E.E.C. Directives.
14www.electrolux.com
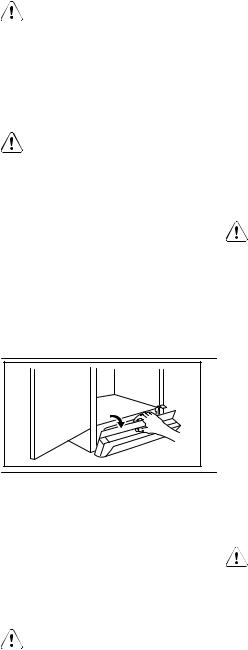
7.4Removing the transport support
3 |
2 |
Your appliance is equipped with transport support to secure the door during transportation.
To remove them do these steps:
•Open the door.
•Remove the transport support from the door sides.
•Remove the transport support from the lower hinge (some models).
Some models are fitted with a silencing pad under the cabinet. Do not remove this pad.
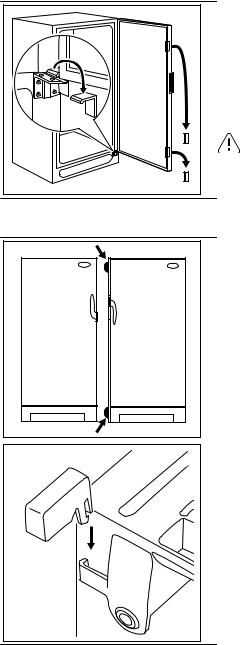
7.5 Spacers
Install the spacers provided within the accessory bag as shown in the figures. When two appliances are placed beside each other, attach the adhesive spacers between the appliances.
Install the spacers on the back side of the panel.
ENGLISH 15
7.6 Levelling
When placing the appliance ensure that it stands level. If necessary adjust the feet using the adjustment spanner supplied.
7.7 Door reversibility
2 |
1 |
4 |
3 |
1 |
2 |
3 |
To change the opening direction of the door, do these steps:
•Remove the plug from the power.
•Remove the ventilation grille. Remove the filling and install it on the opposite side of the grille.
•Lay down the appliance back side down on a wooden support.
•Unscrew the lower hinge.
•Remove the door closure device from the hinge and move the pin to the other side. Re-screw the door closure device provided within the accessory bag on the opposite side.
•Remove the door closure device on the door.
•Re-screw the door closure device provided within the accessory bag on the opposite side.

16 www.electrolux.com
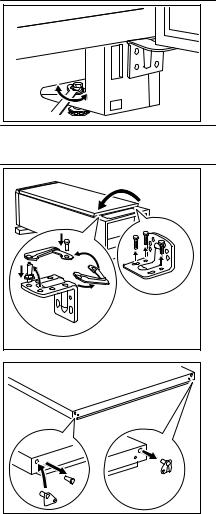
2 |
1 |
180° |
•Remove the door.
•Unscrew and move the pin to the opposite side.
•Re-insert the door.
•Re-screw the lower hinge.
•Raise the appliance and install the ventilation grille.
•Unscrew the handle. On the opposite side remove the hole covers by driving a 3-4 mm drift or drill into them.
•Install the handle. Fit the handle on to the opposite side by turning it on half circle.
•Install the hole covers provided within the accessory bag.
•Put the cabinet in position.
WARNING!
Reposition, level the appliance, wait for at least four hours and then connect it to the power socket.
Do a final check to make sure that:
•All screws are tightened.
•The edges of the doors run parallel to the side edge of the appliance.
•The magnetic seal adheres to the cabinet.
•The door opens and closes correctly.
WARNING!
If the ambient temperature is cold (i.e. in Winter), the gasket may not fit perfectly to the cabinet. In that case, wait for the natural fitting of the gasket.
8. NOISES
There are some sounds during normal running (compressor, refrigerant circulation).

OK 
SSSRRR!
HISSS! BLUBB!
ENGLISH 17
CLICK! BRRR!
CRACK!
SSSRRR! SSSRRR!
CLICK! |
CLICK! |
HISSS! HISSS!
BRRR! |
BRRR! |
BLUBB! BLUBB! CRACK! CRACK!

18 www.electrolux.com
9. TECHNICAL DATA
Dimension
Height |
1650 mm |
Width |
660 mm |
Depth |
680 mm |
Rising Time |
16 h |
Voltage |
230 V |
Frequency |
50 Hz |
|
|
The technical information are situated in the rating plate on the internal left side of the appliance and in the energy label.
10. ENVIRONMENT CONCERNS
Recycle the materials with the symbol 
. Put the packaging in applicable containers to recycle it.
Help protect the environment and human health and to recycle waste of electrical
and electronic appliances. Do not dispose appliances marked with the symbol 
with the household waste. Return the product to your local recycling facility or contact your municipal office.

|
FRANÇAIS |
19 |
SOMMAIRE |
|
|
1. |
INSTRUCTIONS DE SÉCURITÉ . . . . . . . . . . . . . . . . . . . . . . . . . . . . . . . . . . . . . . . . . . . . |
20 |
2. |
BANDEAU DE COMMANDE . . . . . . . . . . . . . . . . . . . . . . . . . . . . . . . . . . . . . . . . . . . . . . . |
22 |
3. |
UTILISATION QUOTIDIENNE . . . . . . . . . . . . . . . . . . . . . . . . . . . . . . . . . . . . . . . . . . . . . . |
24 |
4. |
CONSEILS . . . . . . . . . . . . . . . . . . . . . . . . . . . . . . . . . . . . . . . . . . . . . . . . . . . . . . . . . . . . |
27 |
5. |
ENTRETIEN ET NETTOYAGE . . . . . . . . . . . . . . . . . . . . . . . . . . . . . . . . . . . . . . . . . . . . . . |
27 |
6. |
EN CAS D'ANOMALIE DE FONCTIONNEMENT . . . . . . . . . . . . . . . . . . . . . . . . . . . . . . . . |
29 |
7. |
INSTALLATION . . . . . . . . . . . . . . . . . . . . . . . . . . . . . . . . . . . . . . . . . . . . . . . . . . . . . . . . . |
31 |
8. |
BRUITS . . . . . . . . . . . . . . . . . . . . . . . . . . . . . . . . . . . . . . . . . . . . . . . . . . . . . . . . . . . . . . . |
35 |
9. |
CARACTÉRISTIQUES TECHNIQUES . . . . . . . . . . . . . . . . . . . . . . . . . . . . . . . . . . . . . . . . |
37 |
10. |
EN MATIÈRE DE PROTECTION DE L'ENVIRONNEMENT . . . . . . . . . . . . . . . . . . . . . . . . . |
37 |
NOUS PENSONS À VOUS
Merci d'avoir choisi ce produit Electrolux. Avec ce produit, vous bénéficiez de dizaines d'années d'expérience professionnelle et d'innovation. Ingénieux et élégant, il a été conçu sur mesure pour vous. Grâce à cet appareil, vous savez que chaque utilisation vous apportera satisfaction.
Bienvenue chez Electrolux.
Visitez notre site Internet pour :
Obtenir des conseils d'utilisation, des brochures, de l'aide, des informations : www.electrolux.com
Enregistrer votre produit pour obtenir un meilleur service :
www.electrolux.com/productregistration
Acheter des accessoires, consommables et pièces de rechange d'origine pour votre appareil :
www.electrolux.com/shop
SERVICE APRÈS-VENTE
N'utilisez que des pièces de rechange d'origine.
Avant de contacter le service, assurez-vous de disposer des informations suivantes :
Vous trouverez ces informations sur la plaque signalétique. Modèle, PNC, numéro de série.
Avertissement/Attention : consignes de sécurité.
Informations générales et conseils
Informations écologiques
Sous réserve de modifications.

20 www.electrolux.com
1.  INSTRUCTIONS DE SÉCURITÉ
Pour votre sécurité et garantir une utilisation correcte de l'appareil, lisez attentivement cette notice, y compris les conseils et avertissements, avant d'installer et d'utiliser l'appareil pour la première fois. Pour éviter toute erreur ou accident, veillez à ce que toute personne qui utilise l'appareil connaisse bien son fonctionnement et ses fonctions de sécurité. Conservez cette notice avec l'appareil. Si l'appareil doit être vendu ou cédé à une autre personne, veillez à remettre cette notice au nouveau propriétaire, afin qu'il puisse se familiariser avec son fonctionnement et sa sécurité.
Pour la sécurité des personnes et des biens, conservez et respectez les consignes de sécurité figurant dans cette notice. Le fabricant décline toute responsabilité en cas de dommages dus au non-res- pect de ces instructions.
1.1 Sécurité des enfants et des personnes vulnérables
•Cet appareil n'est pas destiné à être utilisé par des enfants ou des personnes dont les capacités physiques, sensorielles ou mentales, ou le manque d'expérience et de connaissance les empêchent d'utiliser l'appareil sans risque lorsqu'ils sont sans surveillance ou en l'absence d'instruction d'une personne responsable qui puisse leur assurer une utilisation de l'appareil sans danger.
Empêchez les enfants de jouer avec l'appareil.
•Ne laissez pas les différents emballages à portée des enfants. Ils pourraient s'asphyxier.
•Si l'appareil doit être mis au rebut, veillez à couper le câble d'alimentation électrique au ras de l'appareil pour éviter les risques d'électrocution. Démontez la porte pour éviter que des enfants ne restent enfermés à l'intérieur.
•Cet appareil est muni de fermetures magnétiques. S'il remplace un appareil équipé d'une fermeture à ressort, nous vous conseillons de rendre celle-ci inutilisable avant de vous en débarrasser. Ceci afin d'éviter aux enfants de s'en-
fermer dans l'appareil et de mettre ainsi leur vie en danger.
1.2 Consignes générales de sécurité
AVERTISSEMENT
Veillez à ce que les orifices de ventilation, situés dans l'enceinte de l'appareil ou la structure intégrée, ne soient pas obstrués.
•Les appareils sont destinés uniquement à la conservation des aliments et/ou des boissons dans le cadre d’un usage domestique normal, tel que celui décrit dans la présente notice.
•N'utilisez pas d'appareils électriques, d'agents chimiques ou tout autre système artificiel pour accélérer le processus de dégivrage.
•Ne faites pas fonctionner d'appareils électriques (comme des sorbetières électriques, ...) à l'intérieur des appareils de réfrigération à moins que cette utilisation n'ait reçu l'agrément du fabricant.
•N'endommagez pas le circuit frigorifique.
•Le circuit frigorifique de l’appareil contient de l’isobutane (R600a), un gaz naturel offrant un haut niveau de compatibilité avec l’environnement mais qui est néanmoins inflammable.
Pendant le transport et l'installation de votre appareil, assurez-vous qu'aucune partie du circuit frigorifique n'est endommagée.
Si le circuit frigorifique est endommagé :
– évitez les flammes vives et toute autre source d'allumage
– aérez soigneusement la pièce où se trouve l'appareil
•Ne modifiez pas les spécifications de l'appareil. Si le câble d'alimentation est endommagé, il peut causer un court circuit, un incendie et/ou une électrocution.
AVERTISSEMENT
Les éventuelles réparations ou interventions sur votre appareil, ainsi que le remplacement du câble d'alimentation, ne doivent être effectuées que par un professionnel qualifié.
1.Ne branchez pas le cordon d'alimentation à une rallonge.
2.Assurez-vous que la prise n'est pas écrasée ou endommagée par l'arrière de l'appareil. Une prise de courant écrasée ou endommagée peut s'échauffer et causer un incendie.
3.Vérifiez que la prise murale de l'appareil est accessible.
4.Ne débranchez pas l'appareil en tirant sur le câble.
5.Si la prise murale n'est pas bien fixée, n'introduisez pas de prise dedans. Risque d'électrocution ou d'incendie.
6.N'utilisez pas l'appareil sans le diffuseur de l'ampoule (si présent) de l'éclairage intérieur.
•Cet appareil est lourd. Faite attention lors de son déplacement.
•Ne touchez pas avec les mains humides les surfaces givrées et les produits congelés (risque de brûlure et d'arrachement de la peau).
•Évitez une exposition prolongée de l'appareil aux rayons solaires.
•Les ampoules (si présentes) utilisées dans cet appareil sont des ampoules spécifiques uniquement destinées à être utilisées sur des appareils ménagers. Elles ne sont pas du tout adaptées à un éclairage quelconque d'une habitation.
1.3 Utilisation quotidienne
•Ne posez pas d'éléments chauds sur les parties en plastique de l'appareil.
•Ne stockez pas de gaz ou de liquides inflammables dans l'appareil (risque d'explosion).
•Ne placez pas d'aliments directement contre la sortie d'air sur la paroi arrière de l'appareil. (Si l'appareil est sans givre.)
FRANÇAIS 21
•Un produit décongelé ne doit jamais être recongelé.
•Conservez les aliments emballés conformément aux instructions de leur fabricant.
•Respectez scrupuleusement les conseils de conservation donnés par le fabricant de l'appareil. Consultez les instructions respectives.
•Ne mettez pas de bouteilles ni de boîtes de boissons gazeuses dans le compartiment congélateur, car la pression se formant à l'intérieur du contenant pourrait le faire éclater et endommager ainsi l'appareil.
•Ne consommez pas certains produits tels que les bâtonnets glacés dès leur sortie de l'appareil, car ils peuvent provoquer des brûlures.
1.4 Entretien et nettoyage
•Avant toute opération d'entretien, mettez l'appareil à l'arrêt et débranchez-le.
•N'utilisez pas d'objets métalliques pour nettoyer l'appareil.
•N'utilisez pas d'objet tranchant pour gratter la couche de givre. Utilisez une spatule en plastique.
•N'utilisez pas d'appareils électriques ou agents chimiques pour dégivrer l'appareil. La chaleur excessive pourrait endommager le revêtement plastique interne et l'humidité pourrait s'introduire dans le système électrique.
1.5 Installation
Avant de procéder au branchement électrique, respectez scrupuleusement les instructions fournies dans cette notice.
•Déballez l'appareil et vérifiez qu'il n'est pas endommagé. Ne branchez pas l'appareil s'il est endommagé. Signalez immédiatement au revendeur de l'appareil les dommages constatés. Dans ce cas, gardez l'emballage.
•Il est conseillé d'attendre au moins quatre heures avant de brancher l'appareil pour que le circuit frigorifique soit stabilisé.
•Veillez à ce que l'air circule librement autour de l'appareil pour éviter qu'il ne

22 www.electrolux.com
surchauffe. Pour assurer une ventilation suffisante, respectez les instructions de la notice (chapitre Installation).
•Placez l'appareil dos au mur pour éviter tout contact avec le compresseur et le condenseur (risque de brûlure).
•Placez de préférence votre appareil loin d'une source de chaleur (chauffage, cuisson ou rayons solaires trop intenses).
•Assurez-vous que la prise murale reste accessible après l'installation de l'appareil.
•Branchez à l'alimentation en eau potable uniquement. (Si un branchement sur le réseau d'eau est prévu.)
1.6 Maintenance
•Les branchements électriques nécessaires à l'entretien de l'appareil doivent être réalisés par un électricien qualifié ou une personne compétente.
•Cet appareil ne doit être entretenu et réparé que par un Service après-vente
autorisé, exclusivement avec des pièces d'origine.
1.7 Protection de l'environnement
Le système frigorifique et l'isolation de votre appareil ne contiennent pas de C.F.C. contribuant ainsi à préserver l'environnement. L'appareil ne doit pas être mis au rebut avec les ordures ménagères et les déchets urbains. La mousse d'isolation contient des gaz inflammables : l'appareil sera mis au rebut conformément aux règlements applicables disponibles auprès des autorités locales. Veillez à ne pas détériorer les circuits frigorifiques, notamment au niveau du condenseur. Les matériaux utilisés dans cet appareil identifiés par le symbole  sont recyclables.
2. BANDEAU DE COMMANDE
1Affichage
2Touche d'augmentation de la température
3Touche de diminution de la température
4Touche OK
5Touche Mode
6Touche ON/OFF
Pour augmenter le volume défini lors de l'activation ou désactivation des touches, appuyez simultanément sur la toucheMode et la touche de réglage de température (plus de froid) pendant plusieurs secondes. Ce changement est réversible.
2.1 Affichage/voyant
|
|
|
|
|
|
|
|
|
|
|
|
|
|
|
|
|
|
|
|
|
|
|
|
|
|
|
|
|
|
|
|
|
|
|
|
|
|
|
|
|
|
|
|
|
|
|
|
|
|
|
|
|
|
|
|
|
|
|
|
|
|
|
|
|
|
|
|
|
|
|
|
|
|
|
|
|
|
|
|
|
|
|
|
|
|
|
|
|
|
|
|
|
|
|
|
|
|
|
|
|
|
|
|
|
|
|
|
|
|
|
|
|
|
|
1 |
|
2 |
|
3 |
|
4 |
|
|
|
6 |
|
||||||
1Affichage de la minuterie
2Fonction FROSTMATIC
3Fonction Minute Minder
4Fonction Sécurité enfants
5Voyant d'alarme
6Indicateur de température
2.2 Mise en marche
Pour mettre l'appareil marche, procédez comme suit :
1.Branchez la fiche électrique de l'appareil à la prise de courant.
2.Appuyez sur la touche ON/OFF si l'affichage est éteint.
3.L'alarme sonore peut se déclencher au bout de quelques secondes.
Pour réinitialiser l'alarme, reportezvous au paragraphe « Alarme haute température ».
4.Si « dEMo » s'affiche sur l'écran, l'appareil est en mode démonstration. Reportez-vous au paragraphe « En cas d'anomalie de fonctionnement ».
5.Les indicateurs de température indiquent la température programmée
par défaut.
Pour sélectionner une température programmée différente, reportez-vous au paragraphe « Réglage de la température ».
Si la porte reste ouverte pendant quelques minutes, l'éclairage s'éteint automatiquement. Pour le rallumer, fermez et ouvrez de nouveau la porte.
2.3 Position Arrêt
Pour mettre à l'arrêt l'appareil, procédez comme suit :
1.Appuyez sur la touche ON/OFF pendant quelques secondes.
2.L'écran est désactivé.
3.Pour mettre l'appareil hors tension, débranchez-le électriquement.
2.4 Réglage de la température
La température de consigne du congélateur peut être réglée en appuyant sur la touche de température.
Réglage de la température par défaut :
•-18 °C dans le compartiment congélateur
L'indicateur de température indique la température programmée.
La température programmée sera atteinte en 24 heures.
Après une coupure de courant, la température programmée reste activée.
FRANÇAIS 23
2.5 Fonction FROSTMATIC
Pour activer la fonction :
1.Appuyez sur le bouton Mode jusqu'à ce que le voyant correspondant apparaisse.
L'indicateur FROSTMATIC clignote.
2.Appuyez sur la touche OK pour confirmer.
L'indicateur FROSTMATIC s'affiche. Cette fonction s'arrête automatiquement au bout de 52 heures.
Pour désactiver la fonction avant sa désactivation automatique :
1.Appuyez sur le bouton Mode jusqu'à ce que l'indicateur FROSTMATIC clignote.
2.Appuyez sur la touche OK pour confirmer.
3.L'indicateur FROSTMATIC s'éteint.
La fonction se désactive en sélectionnant une température de consigne différente.
2.6 Fonction Minute Minder
La fonction Minute Minder est à utiliser pour le réglage d'une alarme sonore à une heure souhaitée, ce qui est utile, par exemple, lorsque l'on souhaite refroidir une préparation pendant un certain temps dans le cadre d'une recette de cuisine ou lorsque l'on refroidit des bouteilles rapidement dans le congélateur.
Pour activer cette fonction :
1.Appuyez sur la touche Mode jusqu'à ce que le symbole correspondant s'affiche.
L'indicateur Minute Minder clignote.
Le minuteur indique pendant quelques secondes la valeur programmée (30 minutes).
2.Appuyez sur la touche de diminution de la température ou sur la touche d'augmentation de la température pour faire varier la valeur programmée du minuteur de 1 à 90 minutes.
3.Appuyez sur la touche OK pour confirmer.
L'indicateur Minute Minder s'affiche. Le minuteur se met à clignoter (min).
 Loading...