


ESF452
152982 81/2
PL
HU
GB
DD ii ss hh ww aa ss hh ee rr
ZZ mm yy ww aa rr kk aa
MM oo ss oo gg aa tt óó gg éé pp
IINNSSTTRRUUCCTTIIOONN BBOOOOKK
IINNSSTTRRUUKKCCJJAA UUØØYYTTKKOOWWAANNIIAA
HHAASSZZNN¡¡LLAATTII UUTTAASSÕÕTT¡¡SS
Model ESF 452

2
For the user
Important safety information 3
Description of the appliance 4
The control panel 4
Before use 5
Setting the water softener 5
Rinse aid 7
Using your appliance 8
Loading your appliance 8
Adjusting the height of the upper basket 9
Use of detergent 10
Hints and tips 11
Washing programmes 12
Operating sequence 13
Maintenance and cleaning 14
Internal cleaning 14
Cleaning the filters 14
External cleaning 15
Prolonged periods of non-operation 15
Frost precautions 15
Moving the machine 15
Something not working 16
Service and spare parts 17
Protection against flooding 17
Hints for test centres 18
Technical specifications 18
For the installer
Installation instructions 19
Water supply connections 19
Water outlet hose connection 20
Electrical connection 20
Adjusting the worktop 21
Fitting under a counter 21
Levelling 21
Contents
Guide to use the instruction book
The following symbols will be found in the text to guide you throughout the instructions:
Safety instructions
1. 2. 3. Step by step
Hints and tips
Environmental information

3
Installation
● This appliance is heavy. Care should be taken when
moving it.
● It is dangerous to alter the specifications or attempt
to modify this product in any way.
● Care must be taken to ensure that the appliance
does not stand on the electrical supply cable.
● Any electrical work required to install this appliance
should be carried out by a qualified electrician or
competent person.
● Any plumbing work required to install this appliance
should be carried out by a qualified plumber or
competent person.
Child Safety
● This appliance is designed to be operated by
adults.
Children should not be allowed to tamper with the
controls or play with the product.
● Keep all packaging well away from children.
● Keep all detergents in a safe place out of children's
reach.
During Use
● Items that are contaminated by petrol, paint, steel
or iron debris, corrosive, acidic or alkaline
chemicals must not be washed in this dishwasher.
● Under no circumstances should you open the door
whilst the appliance is in operation. Always turn off
the appliance before opening the door.
● Only use detergent specifically designed for use in
dishwashers.
● Long bladed knives stored in an upright position are
a potential hazard.
● Long and/or sharp items of cutlery such as carving
knives must be positioned horizontally in the upper
basket.
● When finishing loading or unloading close the
door, as an open door can be a hazard.
● Do not sit or stand on the open door.
● Isolate the appliance from the power supply and
turn off the water supply after use.
● Care should be taken when cleaning the bottom
door seal and hinge area as any exposed metal
edges may cut if care is not taken.
● This product should be serviced by an
authorised Service engineer, and only genuine
spare parts should be used.
● Under no circumstances should you attempt to
repair the machine yourself. Repairs carried out
by inexperienced persons may cause injury or
serious malfunctioning. Contact your local
Service Force Centre. Always insist on genuine
spare parts.
Conservation
In the interest of the environment:
● Materials marked with the symbol are
recyclable.
● Check with your local Council or Environmental
Health Office to see if there are facilities in your
area for re-cycling this appliance.
● When the appliance is to be scrapped, cut off
the power supply cable and make the door
closing device unusable to prevent young
children from being trapped inside.
● Help to keep your country tidy - use authorised
disposal sites for your old appliance.
Important safety information
It is most important that this instruction book should be retained with the appliance for future
reference. Should the appliance be sold or transferred to another owner, or should you move house
and leave the appliance, always ensure that the book is left with the appliance in order that the new
owner can get to know the functioning of the appliance and the relevant safety information.
This information has been provided in the interest of your safety. You MUST read it carefully before
installing or using the appliance.
4
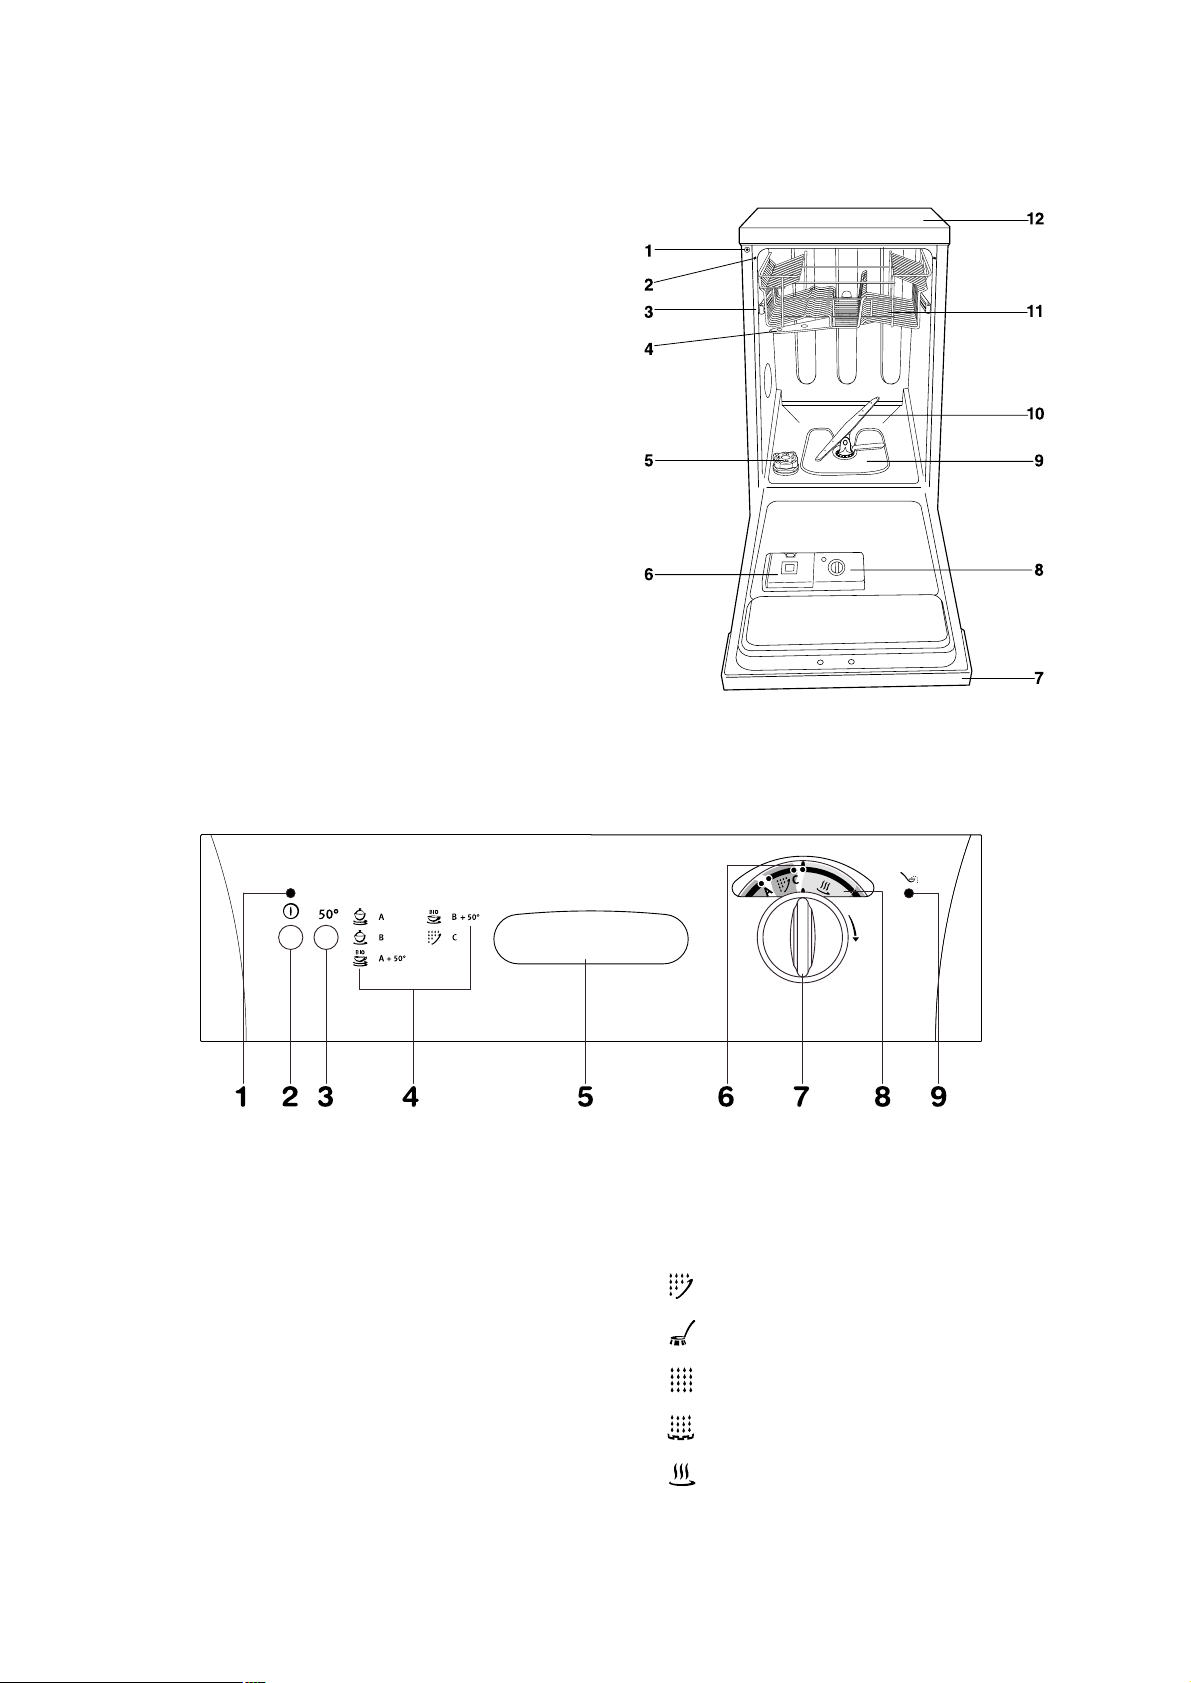
Description of the appliance
The control panel
1. Water hardness adjustment
2. Levelling spacers
3. Upper basket stop
4. Upper spray arm
5. Salt container
6. Detergent dispenser
7. Control panel
8. Rinse aid dispenser
9. Filters
10. Lower spray arm
11. Upper basket
12. Worktop
1. On/Off indicator light
2. On/Off push button
3. "50°" push button
4. Programme guide
5. Door handle
6. Programme marker
7. Programme selector dial
8. Programme sequence indicator
As the programme progresses, the programme
selector dial turns, to show the phase in the
wash programme the appliance has reached.
Prewash/Rinse and hold
Wash
Cold rinse
Hot rinse
Drying
9. Salt refill indicator light
IN115
5
Before using your dishwasher for the first time:
1. Ensure that the electrical and water connections
comply with the installation instructions
2. Remove all packaging from inside the appliance
3. Set the water softener
4. Pour one litre of water inside the salt container
and then fill with salt
5. Fill the rinse aid dispenser.
Setting the water softener
The dishwasher is equipped with a water softener
designed to remove minerals and salts from the
water supply, which would have a detrimental or
adverse effect on the operation of the appliance.
The higher the content of these salts, the harder
your water is.
Water hardness is measured in equivalent scales,
German and French degrees.
The softener should be adjusted according to the
hardness of the water in your area. Your local Water
Authority can advise you on the hardness of the
water in your area.
The dishwasher is factory set at level 2.
If this level is not suitable for your area the softener
should be adjusted.
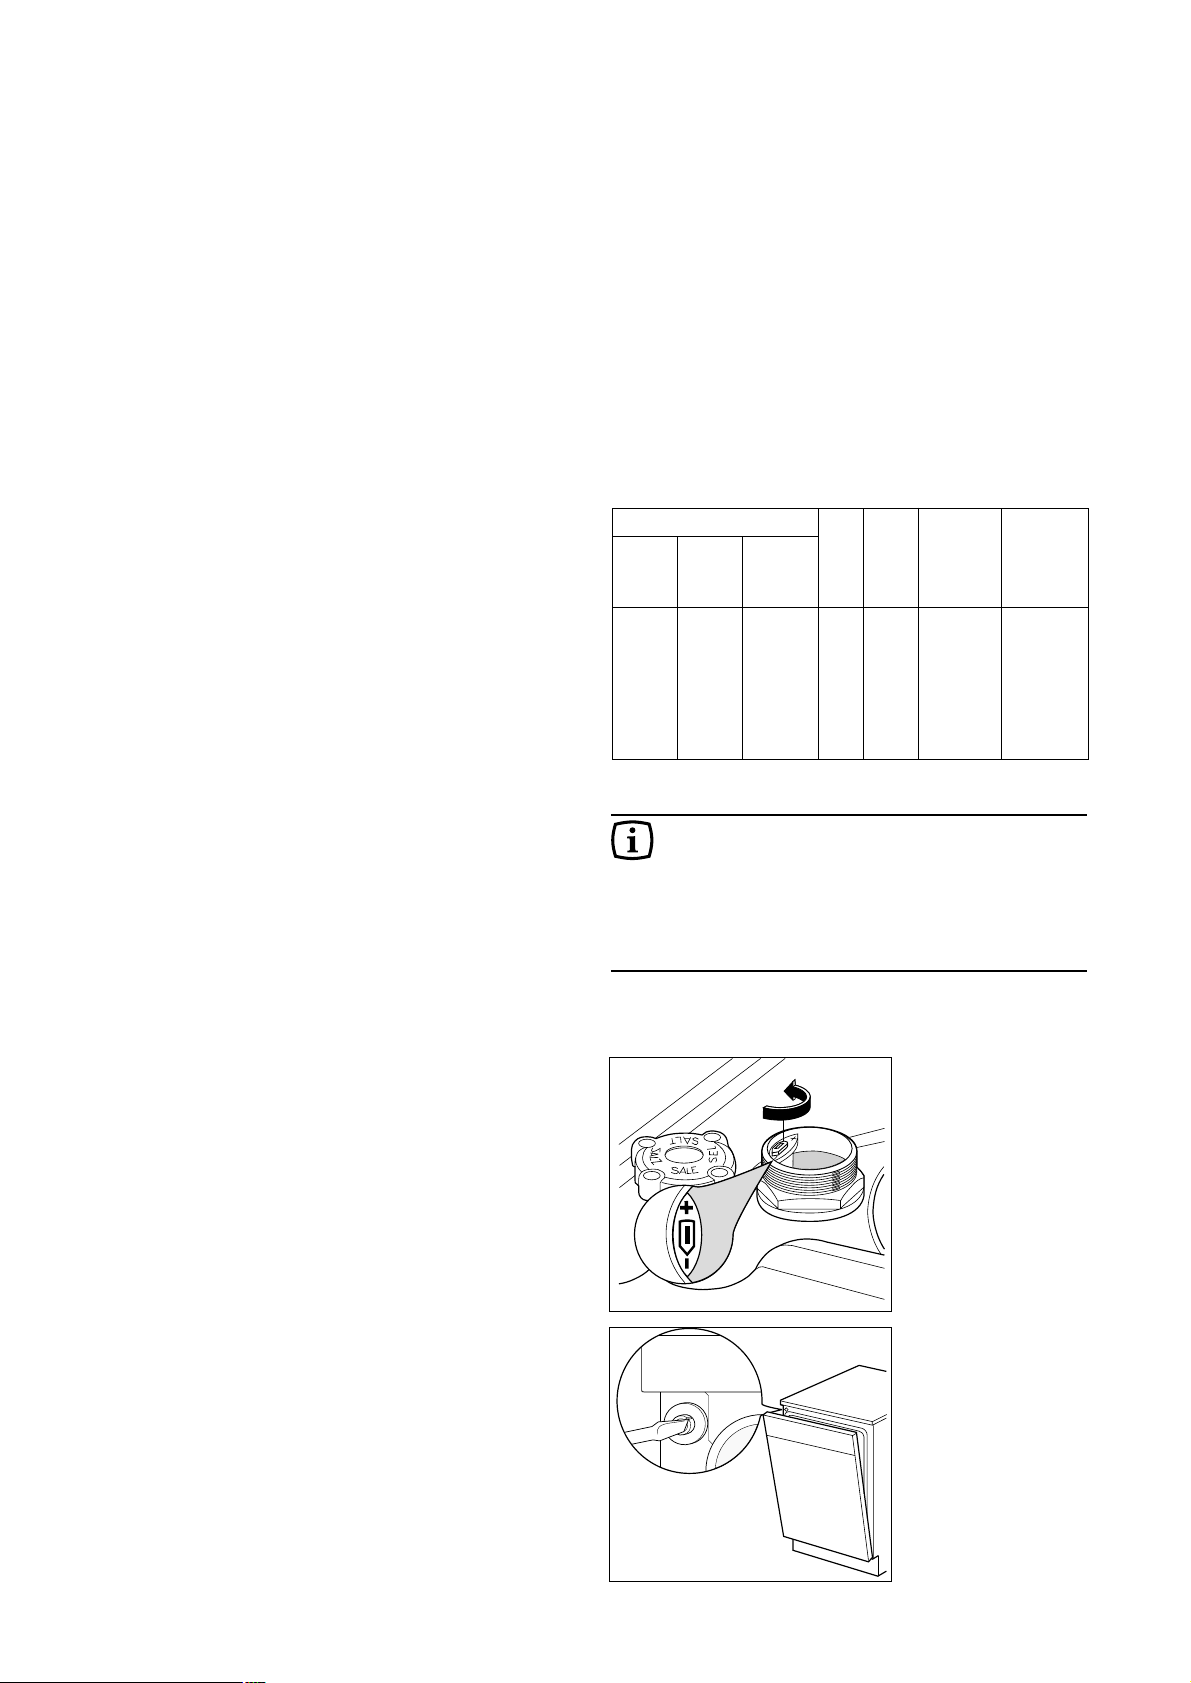
To adjust the water softener
Levels 3 and 5 (water softener adjustment)
If your water is level 3 or 5, proceed as follows:
- slide out the lower basket and unscrew the cap of
the salt container;
- turn the two-position selector anticlockwise from
position - to position + with the aid of a blunt knife
or screwdriver.
Levels 4 and 5 (adjustment on the machine)
If your water is level 4 or 5, open the door and turn
the selector on the upper left-hand corner of the
machine from position 1 to position 2.
With a water hardness of level 5 both
adjustments must be made.
Before use
Level
Adjustment
on the
machin
e
Water
softener
adjustment
Use of
salt
French
degrees
(°TH)
PPM
(parts per
million)
German
degrees
(°dH)
1
2
3
4
5
1
1
1
2
2
-
-
+
-
+
NO
YES
YES
YES
YES
0 - 4
5 - 11
12 - 22
23 - 39
40 - 50
0 - 8
9 - 20
21 - 40
41 - 70
71 - 90
0 - 80
81 - 200
201 - 400
401 - 700
701 - 900
Water hardness
AA01
1
2
AA03
If your water is "level 1" it is already soft
and therefore there is no need to use salt.
In this case the salt refill indicator light on
the control panel will always remain
illuminated when the machine is switched
on.
6
Filling with salt
Only use salt specifically designed for use
in dishwashers.
All other types of salt not specifically
designed for use in a dishwasher, especially
table salt, will damage the water softener.
Only fill with salt just before starting one of
the complete washing programmes (not the
Rinse and Hold programme). This will
prevent any grains of salt or salty water,
which may have been spilled, remaining on
the bottom of the machine for any period of
time, which may cause corrosion.
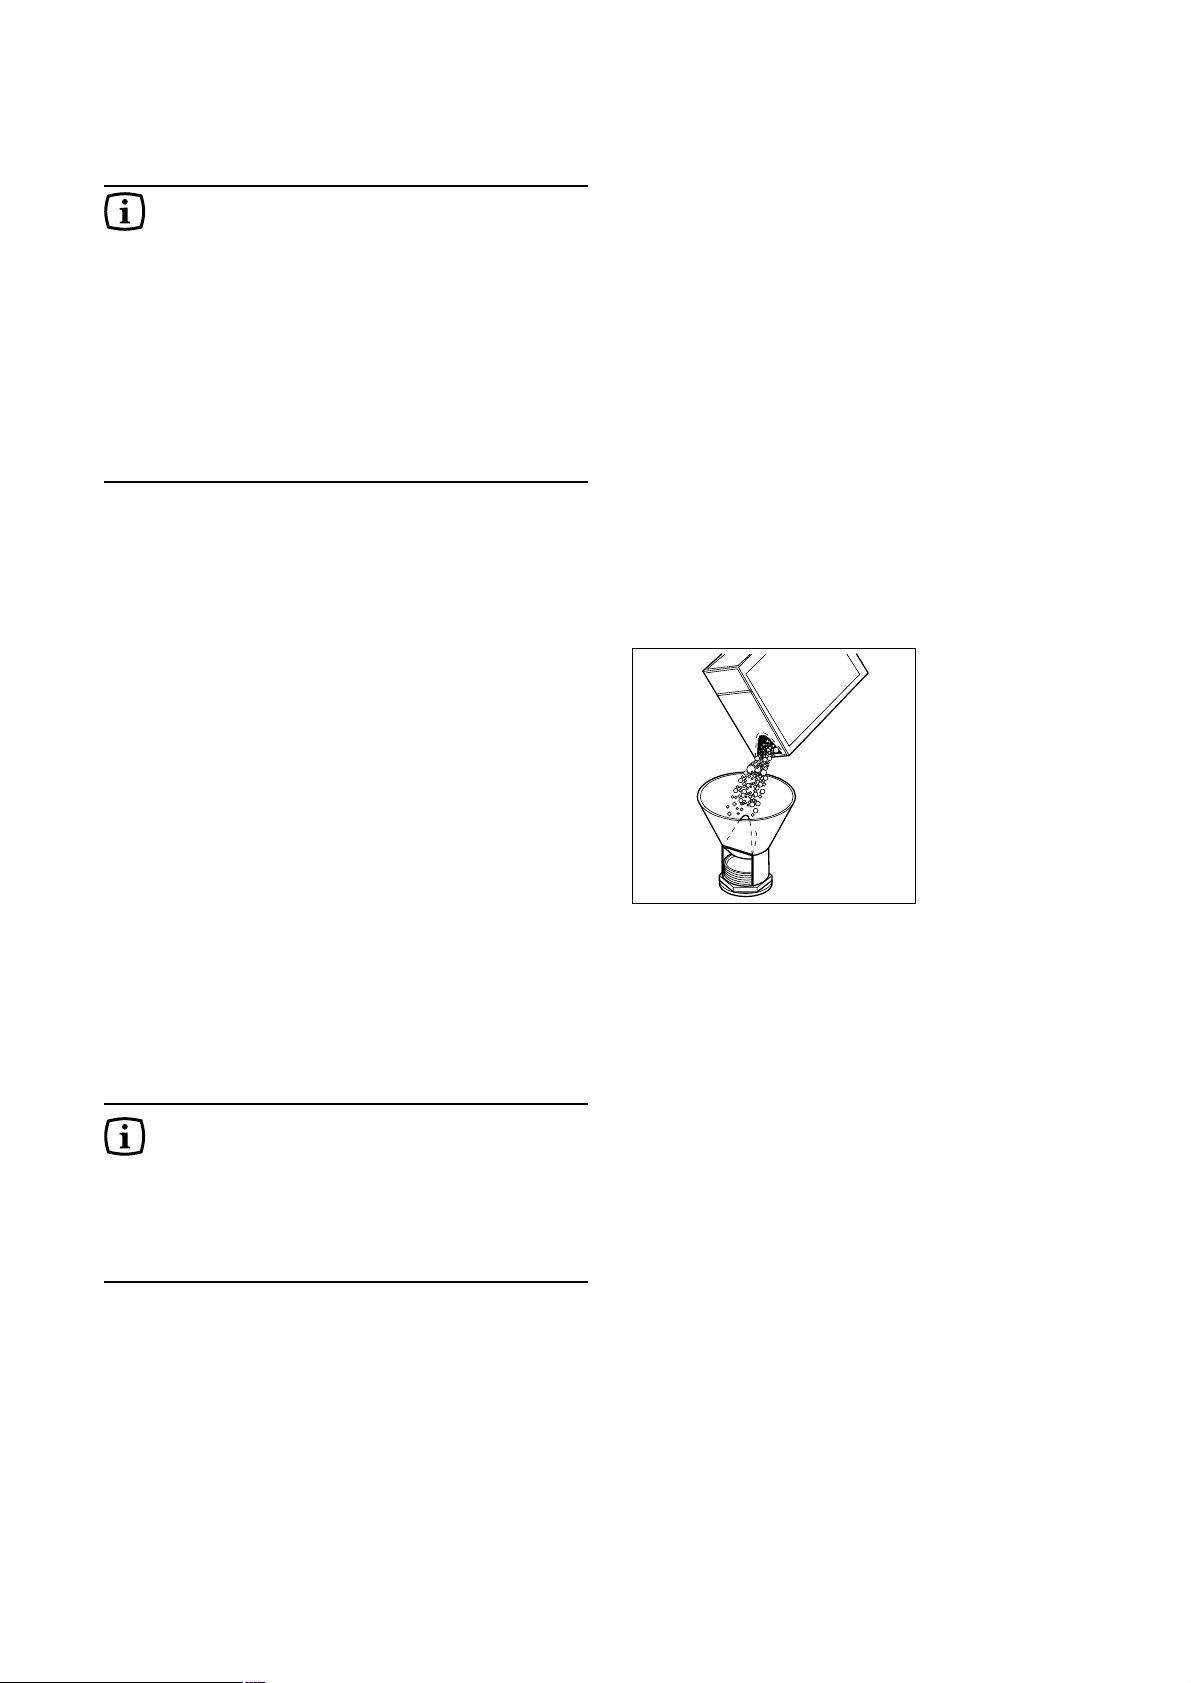
To fill:
1. To fill with salt, unscrew the cap of the salt
container.
2. Pour one litre of water inside the container
(this is necessary only before filling with salt for
the first time).
3. Using the funnel provided, pour in the salt until the
container is full.
Do not worry if water over flows from the unit when
filling with salt, this is quite normal.
4. Replace the cap making sure that there is no trace
of salt on the screw thread or on the gasket.
5. Screw on the cap tightly.
The salt container will require topping up periodically.
You are reminded of this by the salt indicator light on
the control panel which comes on when the salt has
finished.
The salt indicator light on the control panel
can remain illuminated for 2-6 hours after
the salt has been replenished, assuming the
dishwasher remains switched on. If you are
using salts that take longer to dissolve then
this can take longer. The function of the
machine is not affected.
SALE
SALT
SALZ
SEL
SR14

7
Rinse aid
Rinse aid is automatically added during the last rinse,
ensuring thorough rinsing, and spot and streak free
drying. The dispenser, which is positioned inside the
door, holds about 110 ml of rinse aid, which is
sufficient for 16 - 40 dishwashing programmes,
depending upon the dosage setting.
Filling with rinse aid
1. Open the container by turning the lid (A)
anticlockwise.
2. Add the rinse aid until the container is completely
full. The indicator (B) will be completely dark.
3. Top up the rinse aid when the indicator (B)
becomes clear.
Ensure that the lid is closed after every refill.
Do not put liquid detergent in the rinse aid
compartment. Clean up any rinse aid spilt during filling
with an absorbent cloth to avoid excess foaming
during the next wash.
Adjusting the dose
According to the finish and drying results obtained,
adjust the dose of rinse aid by means of the 6 position
selector (C) (position 1 minimum dosage, position 6
maximum dosage).
Increase the dose if there are drops of water or lime
spots on the dishes after washing. Reduce it if there
are sticky whitish streaks on the dishes.
BR01
A
m
a
x
6
5
4
3
2
1
B
BR03
BR02
C
m
a
x
6
5
4
3
2
1
 Loading...