


600MM WIDE INTEGRATED FREESTANDING COOKERS

600MM WIDE FREESTANDING INTEGRATED COOKER
Read the following carefully to avoid an electric shock or fire
General warnings
•This appliance is not suitable for use by young children or infirm persons, without supervision.
•Young children must be supervised to ensure they do not play with this appliance.
•During use, this appliance becomes hot. Care should be taken to avoid touching hot surfaces, eg oven door, heating elements.
•This appliance must not be used as a space heater.
•Keep vents clear of obstructions.
•In order to avoid a fire, the appliance must be kept clean and vents kept unobstructed.
•Do not spray aerosols in the vicinity of the appliance when it is in operation.
•Do not store flammable materials in or under the appliance, eg aerosols.
•Accessible parts will become hot when in use. To avoid burns and scalds children should be kept away.
Grill
•Always turn the grill off immediately after use as fat left there may catch fire.
•Do not cover the insert with foil, as fat left there may catch fire.
•Always keep the grill dish clean as any fat left there may catch fire.
•Do not leave the grill on unattended.
•To avoid a fire, ensure that grill trays and fittings are always inserted into the appliance in accordance with the instructions.
•Do not place thick portions of food under the grill. Foods may curl, catch and ignite.
•Do not store flammable materials in the grill.
Oven
•Switch the appliance off before removing the oven light glass for globe replacement.
•To avoid an accident, ensure that oven shelves and fittings are always inserted into the appliance in accordance with the instructions.
•Do not use the door as a shelf.
•Do not push down on the open oven door.
•Do not cover the base of the electric oven with foil or place cookware there.
Hotplates (generally)
•Do not allow pots to boil dry, as damage to both pan and hotplate may result.
•Do not operate the hotplates for an extended period of time without a utensil on the hotplate.
•Do not allow large cookware to overhang the hob onto the adjacent benchtop. This will cause scorching to the benchtop surface.
•Do not allow cooking utensils to intrude into the area which is close to the controls.
Ceramic glass
•If the ceramic glass is accidentally cracked, switch off the appliance to avoid the possibility of electric shock.
•Do not place heat resistant mats, wire mats or aluminium foil under pots or pans.
•Do not cook food directly on the ceramic glass surface.
•Do not use round bottom woks or similar utensils which could lead to overheating of hotplates and possible damage to the cooking surface.
Installation, cleaning and servicing
•An authorised person must install this appliance. (Certificate of Compliance to be retained.)
•Before using the appliance, ensure that all packing materials are removed from the appliance.
•In order to avoid any potential hazard, the installation instructions must be followed.
•Ensure that all specified vents, openings and airspaces are not blocked.
•Where the appliance is built into a cabinet, the cabinet material must be capable of withstanding 85°C.
•Only authorised personnel should carry out servicing. (Certificate of Compliance to be retained.)
•Always ensure the appliance is switched off before cleaning or replacing parts.
•Do not use steam cleaners, as this may cause moisture build up.
•Always clean the appliance immediately after any food spillage.
•To maintain safe operation, it is recommended that the product be inspected every five years by an authorised service person.
•This appliance must be earthed.
•If supply cord is damaged it must be replaced by the manufacturer or its service agent or similarly qualified person in order to avoid a hazard.

C O N T E N T S
1
2
3
4
5
6
7
8
9
Introduction
General Information |
• General safety warnings |
4 |
||
about your cooker |
• Preparing your appliance for the first time |
4 |
||
|
• The controls |
4 |
||
Using the hotplate |
• Hotplate Dos and Don’ts |
6 |
||
|
• Ceramic hotplates |
6 |
||
|
• Gas hotplates |
7 |
||
Using the oven |
• The cooling fan |
8 |
||
|
• 5 button programmable timer |
8 |
||
|
• Rapid heat |
10 |
||
|
• Fan forced |
10 |
||
|
• Bake |
10 |
||
|
• Base heat |
10 |
||
|
• Defrost |
10 |
||
|
• |
Turbo grill |
11 |
|
|
• |
Grill |
11 |
|
|
• Maxi Grill |
11 |
||
|
• Loading the shelves |
12 |
||
|
• Hints for better baking |
12 |
||
|
• Condensation |
12 |
||
|
• Electric oven cooking guide |
13 |
||
|
• Grilling Guide |
14 |
||
|
• Dealing with cooking problems |
15 |
||
Cleaning the |
• Ceramic hotplates |
16 |
||
hotplates |
• Gas hotplates |
16 |
||
|
|
– |
Removing trivets |
16 |
|
|
– |
Removing burners |
16 |
|
|
– |
Refitting burner crowns and caps |
16 |
Cleaning the oven |
• Safety warnings for cleaning |
17 |
||
|
• Cleaning products |
17 |
||
|
• Cleaning enamel |
17 |
||
|
• |
Cleaning stainless steel |
17 |
|
|
• Removing the oven door |
17 |
||
|
• Replacing the oven door |
17 |
||
|
• Cleaning the shelves |
18 |
||
|
• Removing the shelf supports |
18 |
||
|
• Removing the fan cover and oven light glass |
18 |
||
|
• Releasing the element |
18 |
||
|
• |
Catalytic self-clean panels |
19 |
|
Solving problems |
|
|
20 |
|
Service & Spare Parts |
|
21 |
|
Installing the |
• Cabinet |
|
|
appliance |
|
requirements |
22 |
|
• |
Installation |
|
|
|
sequence |
22 |
|
• |
Electrical and |
|
|
|
gas services |
|
|
|
requirements |
24 |
Commissioning |
|
|
25 |
Warranties
|
|
|
|
You |
|
|
|
|
|
|
|
|
|
|
||
|
|
|
|
|
|
awise |
the |
|
|
|
||||||
|
|
|
|
made |
|
|
|
|
|
|
|
|
||||
|
|
have |
|
|
arenow |
|
|
|
|
|||||||
|
|
|
|
You |
|
|
ofAustralia’swill |
|||||||||
|
|
|
. |
|
|
|
|
|||||||||
decision |
ofone |
.This |
book |
|
||||||||||||
proud |
owner |
|
|
|
|
|
|
from |
||||||||
|
|
appliances |
|
|
results |
to |
||||||||||
domestic |
|
bestpossible sometime |
|
|||||||||||||
finest |
|
|
getthe |
|
|
|
|
take |
|
|
an |
|
||||
helpyou |
oven–please |
|
saveyou |
|
|
|||||||||||
your |
new |
.This |
could |
|
|
|
. |
|
|
|||||||
|
|
|
|
service |
call |
|
|
|||||||||
|
readit |
|
|
|
|
|
these |
|||||||||
|
|
|
|
|
|
|
|
|
|
|
|
keep |
|
|
||
|
|
|
unnecessary you |
a |
|
|
|
|||||||||
|
|
|
|
|
recommend |
|
|
|
|
|
||||||
|
|
We |
|
in |
|
|
|
|||||||||
|
|
|
instructions . |
|
|
|
||||||||||
|
|
|
|
|
|
|
|
|
|
place |
|
|
|
|||
|
|
|
|
|
|
|
|
safe |
|
|
|
|
|
|
||
1 |
GENERAL INFORMATION ABOUT YOUR COOKER |
|
General safety warnings
•Do not let children play with the oven.
•Do not let children or infirm people use the oven, if you are not with them.
•Do not use the oven as a heater.
•Do not spray aerosols near the oven, when it is turned on.
•Do not keep flammable materials in or near the oven eg chemicals, aerosols etc.
•Do not block oven air vents, because this can cause a fire.
•Keep oven clean. A dirty oven can cause a fire.
•Be careful not to touch hot surfaces, eg oven door.
Preparing your appliance for the first time
Please remove all stickers and leaflets from the floor of the oven before operation.
Please wipe out the oven interior prior to operation with warm soapy water and polish dry with a soft clean cloth. Do not close the oven door until the oven is completely dry.
New appliances have a smell during first use. It is recommended to operate the oven empty at a temperature of 180°C for approximately 4 - 8 hours to eliminate the smell of the adhesive used in the insulation. Please ensure the room is well ventilated during this process.
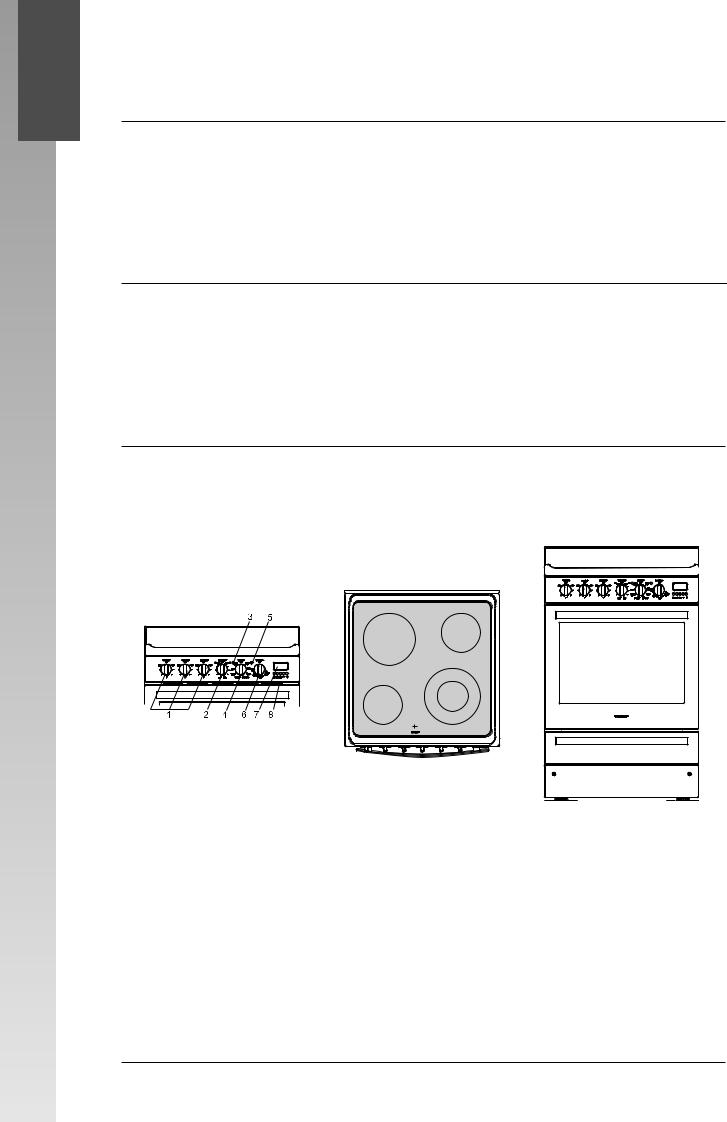
The controls
Before using your cooker, compare the controls in this diagram with the control panel of your cooker. Check your model number on the control panel.
Multi-function electric oven with ceramic hotplate and programmable clock
Model No 6633
1Hotplate control knob
•Adjusts temperature of hotplate.
•Can be rotated in either direction.
2Dual ring hotplate control knob
•Adjusts temperature of hotplate.
•When rotated anticlockwise it uses the inner ring only.
•When rotated clockwise both rings are used.
3Function indicator lamp
•Comes on when you select a function.
4Function knob
•Turns oven light and cooling fan on.
•Sets the function you want.
•Note: you must use the oven temperature control knob as well to use cooking functions.
5Oven indicator lamp
•Comes on when oven temperature knob is turned on.
•Turns off when oven reaches set temperature.
•Cycles on and off automatically when you are baking.
6Oven temperature control knob
•Sets temperature for rapid heat, fan forced, bake, base heat, defrost, turbo grill, grill and maxi grill.
•Note: You must select the function you want before you set the temperature.
7Electronic clock
•Shows time of day.
•Sets automatic cooking duration and end time.
•Sets minute minder.
8Cooling Fan Vents
4

GENERAL INFORMATION ABOUT YOUR COOKER
Multi-function electric oven with flame-safeguard hotplate and programmable clock
Model No 6653
1Hotplate burner control knob
•Ignites the hotplate burner.
•Adjusts temperature of hotplate.
•To operate, push knob
in and turn anti-clockwise to the ‘Max’ mark. Release knob once the burner has ignited.
2Function indicator lamp
•Comes on when you select a function.
3Function knob
•Turns oven light on.
•Sets the function you want.
•Note: You must use the oven temperature control knob as well to use cooking functions.
4Oven indicator lamp
•Comes on when oven temperature knob is turned on.
•Turns off when oven reaches set temperature.
•Cycles on and off automatically when you are baking.
5Oven temperature control knob
•Sets temperature for rapid heat, fan forced, bake, base heat, defrost, turbo grill, grill and maxi grill.
•Note: You must select the function you want before you set the temperature.
6Electronic clock
•Shows time of day.
•Sets automatic cooking duration and end time.
•Sets minute minder.
7Cooling Fan Vents
1
R E K O O C R U O Y T U O B A N O I T A M R O F N I L A R E N E G
5
2 |
USING THE HOTPLATE |
|
Hotplate Dos and Don’ts
•Do not place heat resistant mats, wire mats or aluminium foil under pots and pans.
•Do not allow pots and pans to boil dry, as damage to both pan and hotplate may result.
•Do not use the cooktop as extra bench space or as a cutting board.
•Do not allow children on or near the cooktop at any time.
•Do not allow large cookware to overhang the cooktop onto the adjacent benchtop. This will cause scorching to the benchtop surface.
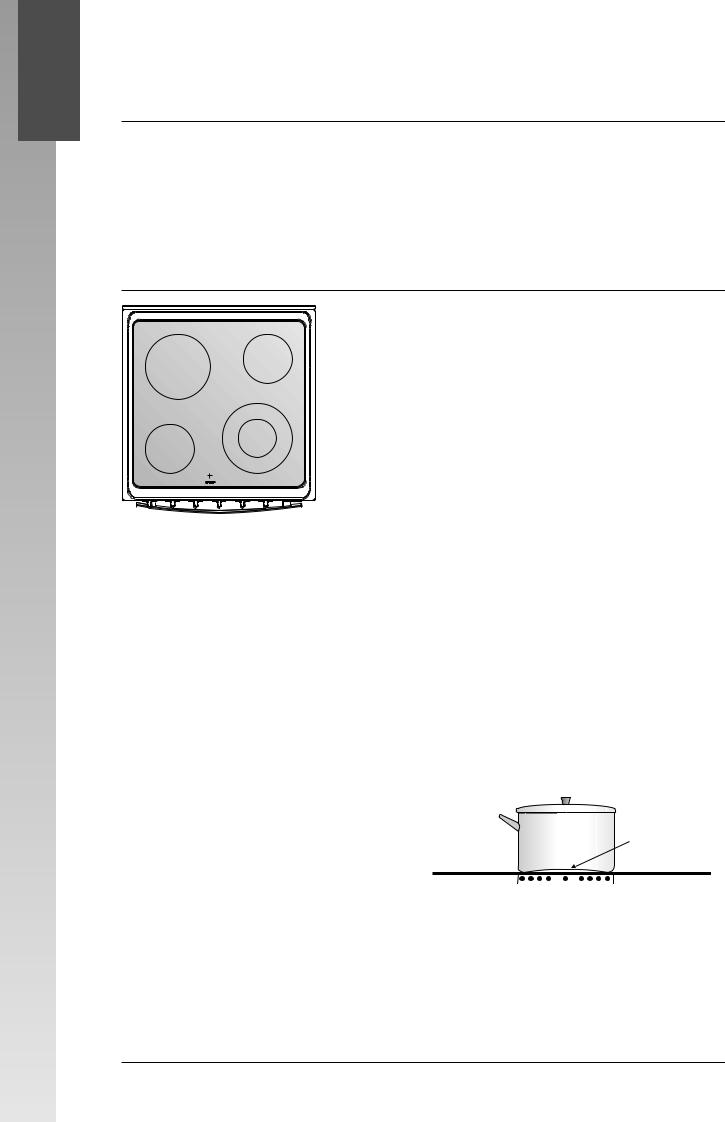
Ceramic hotplates
The cooktop is made from ceramic glass, a tough, durable material that withstands heating and cooling without breaking. It is strong enough to hold the heaviest utensils. However, it must be remembered that as it is GLASS, it may break. Treat it accordingly! Should you have any questions about the glass in your new appliance, please contact the service centre by dialling 13 13 49.
The heating elements are concealed under the smooth glass surface which has a pattern to show the location of the elements. When cooking, turn the control to the
required setting. The hot surface warning light will illuminate to indicate the switch is on.
The ceramic cooktop glass will retain heat for a period of time after the control is turned off. This will be indicated by the hot surface warning light which will continue to glow until the temperature drops below 60°C.
Note: If the ceramic glass is cracked switch off the appliance to avoid the possibility of electric shock.
•Use pans with smooth, clean and dry bottoms to avoid scratching or burning residue into the glass.
•Ensure the pan bottom is the same size as the working element.
•We do not recommend ceramic glass pans because they do not conduct heat well.
•Stainless steel or enamelled saucepans are best.
•Do not use pans with copper or aluminium bottoms because they can leave traces which are difficult to remove from the glass.
•If buying new utensils select enamelled steel with 2–3mm thick bottoms or stainless steel with sandwich bottoms 4–6mm thick. The bottom should be flat, or preferably, slightly concave at room temperature so that it lies flat on the glass surface when hot.
 A flat or slightly concave pan is preferable for ceramic hotplates.
•Do not use aluminium foil on the ceramic hotplates.
•Do not use round bottom woks or similar utensils which could lead to overheating of the hotplates and possible damage to the cooking surface.
•Use the stored heat in the hotplate by turning the control to off before the final few minutes of cooking.
6

USING THE HOTPLATE |
|
2 |
|
|
|
|
|
|
|
|
|
Gas hotplates
Operation
•The Gas Hotplate has “Flame Safe Guard” which will cut the gas supply if the flame is extinguished.
•To ignite, push knob in and turn anti-clockwise to the
“HIGH” mark, sparks are sent to all burners. The knob must be held in for approximately 5 seconds.
•If the flame goes out when the knob is released simply depress the knob again and hold it down for the required length of time. The height of the flame can be varied by turning the control knob toward the “LOW” position.
•In the absence of electrical power, carry out the ignition directly to the burner with a hand held ignition source.
1Low heat burner (5.1 Mj/h)
Used for simmering and for use with small cookware items.
2High heat burner (12.4 Mj/h)
Used for fast heating with large size cookware items.
3Intense heat wok burner (15.0 Mj/h)
Used for very fast heating with woks and other large size cookware items. Use wok support provided when cooking with a wok.
4Medium heat burner (9.0 Mj/h)
Used for normal cooking and simmering with mid size cookware items.
To conserve gas, place the pan centrally over the burner and adjust the flame so that it does not go past the edge of the cookware.
E T A L P T O H E H T G N I S U
7
3 |
USING THE OVEN |
|
The cooling fan
•The cooling fan comes on whenever the oven is on.
•It blows hot air out through the vents above the oven door.
•It continues to operate after the appliance has been turned off to cool the appliance.
Please read before operating your oven for the first time
1Each electric oven has a concealed lower element. To avoid damage to the enamel do not place anything on the bottom of the oven – use the shelves provided.
2It may take several hours to totally eliminate the smell of the adhesive used in the insulation. It is best to initially operate the appliance with windows and doors open for 4–8 hours.
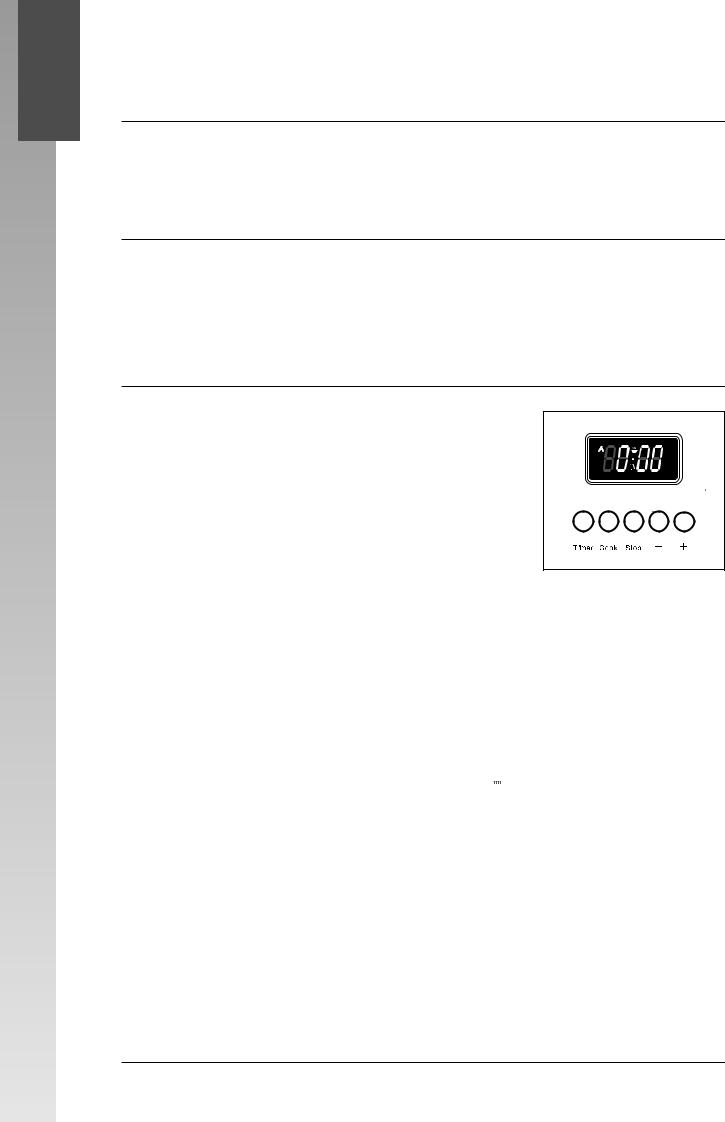
5 button programmable timer
GENERAL FEATURES
Your 5 button programmable timer has the following features:
• Minute minder – your 5 button programmable timer allows you to set a countdown time that will beep when the set time has elapsed.
•Cooking time – you can set a cooking time. A timer will count down the preset cooking time, beep when the time has elapsed and turn the appliance off.
•Stop cooking time – you can set a cooking finish time. A timer will count down the preset cooking time, beep when the finish time has been reached and turn the appliance off.
•Delayed start cooking time – you can combine the cooking time and stop cooking time to switch the oven on and off at a specific time during the day.
NOTE: Your 5 button programmable timer only operates with your main oven.
Setting the time of day
You must set the time of day before you can operate your appliance. When power is supplied to your oven “0.00” and “A” will alternately flash on the clock display.
1.Press buttons “COOK” and “STOP” together and hold down.
2.Whilst holding these buttons press the “-” or “+” buttons to set the time of day. When the time of day has been entered the manual cook symbol  will appear in the display and the clock will advance minute by minute.
NOTE: The clock has a 24-hour display.
Setting the minute minder
1.Press the “TIMER” button briefly.
2.Set the countdown time you want by using the “-” or “+” buttons. You will see the time of day and the timer symbol  on the clock display.
3.Press the “TIMER” button briefly to check for time remaining. You will see the set time for 4 seconds before the time of day is displayed again.
4.To stop the beeper, press the “TIMER” button.
8

USING THE OVEN
Setting the cooking time
1.Check the clock displays the correct time of day.
2.Select the desired oven function and temperature. The oven indicator light will glow and the heating source will come on.
3.Press “COOK” button, then set the required cooking duration by using the “-” and “+” buttons. After 4 seconds the time of day and “A” will display with the cook symbol  . NOTE: Do not forget to add preheating time if necessary.
Setting the cooking stop time
1.Check the clock displays the correct time of day.
2.Select the desired oven function and temperatures. The oven indicator light will glow and the heating source will come on.
3.Press the “STOP” button, then use the “-” and “+” buttons to enter the time of day you want to finish cooking. After 4 seconds the time of day and “A” will display with the cook symbol  . NOTE: Do not forget to add preheating time if necessary.
Setting the delayed start cooking time
1.Program the “cooking time” and “cooking stop time” as described in the relevant sections. After 4 seconds the time of day and “A” will display, but the cook symbol  will not display until the oven automatically turns on.
On completion of cooking
The heat source will turn off, the timer will beep, the cooking symbol  will disappear, and the “A” symbol will flash.
1.Turn the function and temperature controls to the off position.
2.Press the “TIMER” or “STOP” buttons to stop the timer from beeping.
3.To return the appliance to manual operation press the “COOK” and “STOP” buttons together.
To check your cooking settings
1.Press “COOK” button. The cooking duration will show on the timer display.
2.Press “STOP” button. The finish time will be display on the timer.
To cancel your cooking settings
1.Press the “COOK” and “STOP” buttons together to revert back to manual operation.
2.Then turn both the function and temperature selectors back to the off position.
NOTE: The pitch of the beeper can also be adjusted by holding the “-” button for a few seconds until the desired tone is heard.
3
N E V O E H T G N I S U
9
 Loading...