


 Loading...
AEG-Electrolux ERL6298XX10, ERL6298XX0, S75628SK11, S75628SK10, S75628SK13 User Manual
...Use & Care Guide
S i d e - B y - S i d e R e f r i g e r a t o r
241737900 (Aug 2006)
2 Finding Information
PLEASE READ AND SAVE THIS GUIDE
Attach your sales receipt to this page for future reference.
Thank you for choosing Electrolux. This Use & Care Guide is part of our commitment to customer satisfaction and product quality throughout the service life of your new refrigerator.
We view your purchase as the beginning of a relationship. To ensure our ability to continue serving you, please use this page to record key product information.
MAKE A RECORD FOR QUICK REFERENCE
________________________________________________
Purchase Date
________________________________________________
Electrolux Model Number
________________________________________________
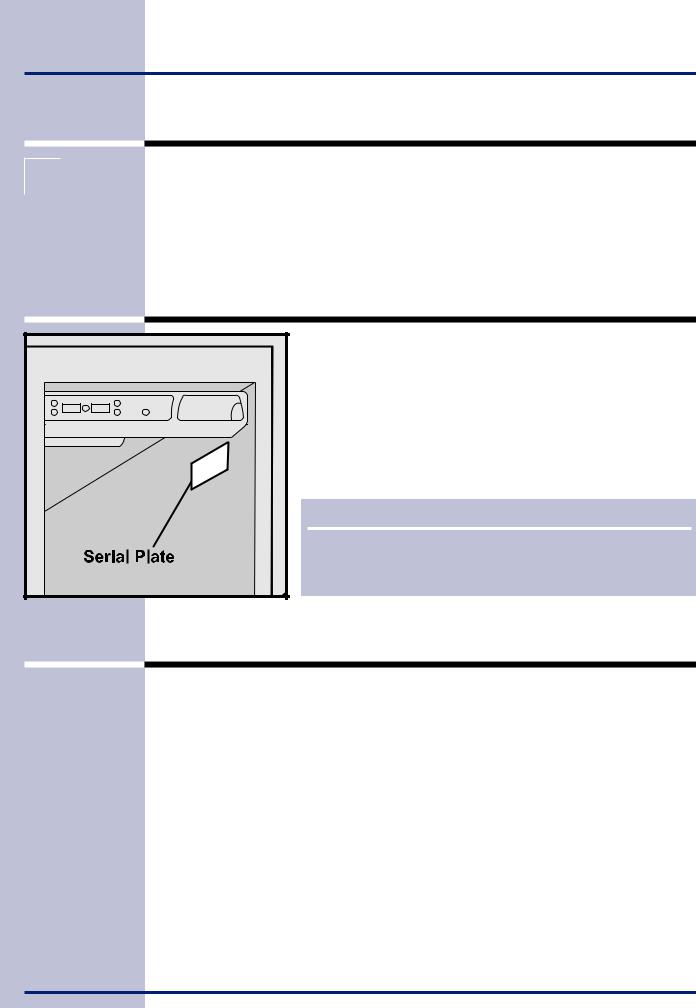
Electrolux Serial Number (see picture for location)
NOTE
Registering your product with Electrolux enhances our ability to serve you. You can register by dropping your Product Registration Card in the mail.
TABLE OF CONTENTS |
|
Finding Information ............................................ |
2 |
Safety ................................................................... |
3 |
Installation ........................................................... |
5 |
Removing The Doors .......................................... |
6 |
Connecting The Water Supply ........................... |
8 |
Feature Overview ................................................ |
9 |
Controls & Settings .......................................... |
10 |
Storage Features ............................................... |
14 |
Automatic Ice & Water Dispenser ................... |
18 |
Changing The Filters ........................................ |
23 |
Storing Food & Saving Energy ........................ |
25 |
Normal Operating Sounds & Sights ............... |
27 |
Care & Cleaning ................................................ |
28 |
Solutions To Common Problems .................... |
31 |
©2006 Electrolux Home Products, Inc. All rights reserved. Printed in the USA
Safety 3
IMPORTANT SAFETY INSTRUCTIONS
! WARNING
Please read all safety instructions before using your new Electrolux refrigerator.
General Safety
•Do not store or use gasoline, or other flammable liquids, near this or any other appliance. Read product labels for warnings regarding flammability and other hazards.
•Do not operate the refrigerator in the presence of explosive fumes.
•Avoid contact with any moving parts of the automatic ice maker.
•Remove all staples from the carton to avoid cut injuries. Staples can also damage finishes if they come in contact with other appliances or furniture.
Child Safety
Packing Materials:
•Packing cartons covered with rugs, bedspreads, plastic sheets or stretch wrap may become airtight chambers and can quickly cause suffocation.
•Destroy or recycle the product’s carton, plastic bags, and any other exterior wrapping material immediately after the refrigerator is unpacked. Children should never play with these items.
Child Entrapment And Suffocation:
•These problems are not limited to the past. Whether junked, abandoned or temporarily stored (even for a few hours), unattended refrigerators and freezers are dangerous.
ELECTRICAL INFORMATION
! WARNING
You must follow these guidelines to ensure that your refrigerator’s safety mechanisms are operating correctly.
•If the power cord is damaged, it should be replaced by the manufacturer, service technician or a qualified person to prevent any risk.
•Never unplug the refrigerator by pulling on the power cord. Always grip the plug firmly, and pull straight out from the receptacle to prevent damaging the power cord.
•Unplug the refrigerator before cleaning and before replacing a light bulb to avoid electrical shock.
4Safety
•Performance may be affected if the voltage varies by 10% or more. Operating the refrigerator with insufficient power can damage the compressor. Such damage is not covered under your warranty.
•Do not plug the unit into an outlet controlled by a wall switch or pull cord to prevent the refrigerator from being turned off accidentally.
IMPORTANT
To turn off power to your refrigerator, unplug the power cord from the wall outlet.
Installation
LOCATION
•Choose a place that is near a grounded electrical outlet. Do Not use an extension cord or an adapter plug.
•If possible, place the refrigerator out of direct sunlight and away from the range, dishwasher or other heat sources.
•The refrigerator must be installed on a floor that is level and strong enough to support a fully loaded refrigerator.
•Consider water supply availability for models equipped with an automatic ice maker.
INSTALLATION
Installation Clearances
! CAUTION
Do Not install the refrigerator where the temperature will drop below 13°C (55°F) or rise above 43°C (110°F). The compressor will not be able to maintain proper temperatures inside the refrigerator. Do Not block the toe grille on the lower front of your refrigerator. Sufficient air circulation is essential for the proper operation of your refrigerator.
Allow the following clearances for ease of installation and plumbing and electrical connections:
Sides & Top |
10 mm (3/8 inch) |
Back |
25 mm (1 inch) |
Installation 5
Door Opening
Your refrigerator should be positioned to allow easy access to a counter when removing food. For best use of drawers and freezer baskets, the refrigerator should be in a position where both the refrigerator and freezer doors can be fully opened.
NOTE
If your refrigerator is placed with the door hinge side against a wall, you may have to allow additional space so the door can be opened wider.
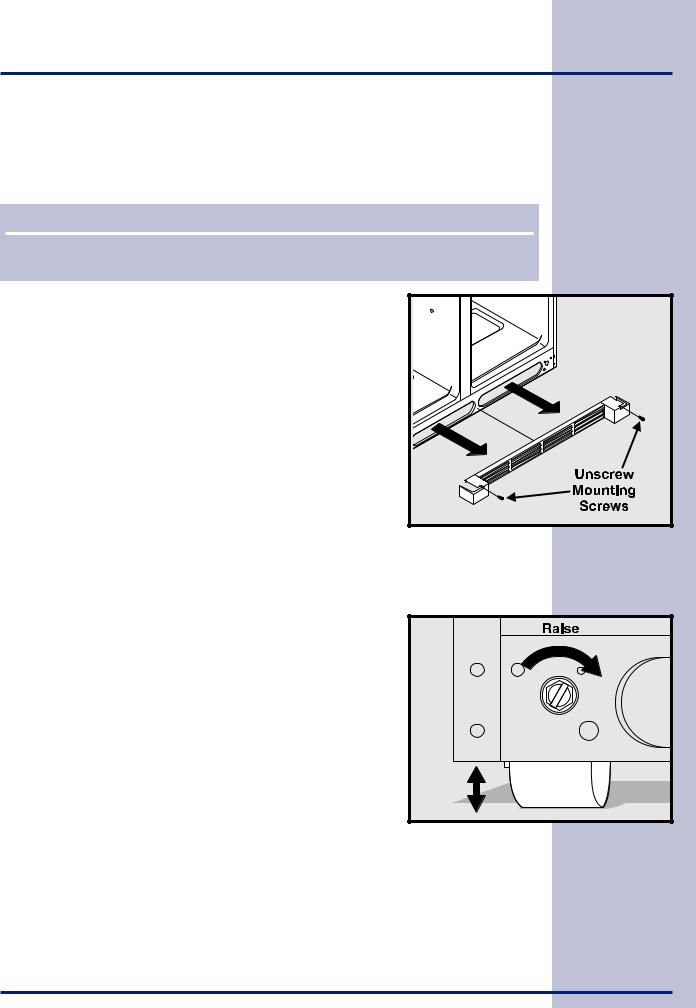
Removing And Replacing The Toe Grille
To remove the toe grille:
1Open freezer and refrigerator compartment doors.
2Remove the screw from each side of the toe grille.
3 Pull the toe grille forward and lift it off. Reverse these instructions to install the toe grille.
Leveling
All four corners of your refrigerator must rest firmly on a solid floor. Your refrigerator is equipped with adjustable front rollers to help level your unit. To ensure proper door seal and assist door closing, the refrigerator should be tilted 6 mm (1/4 inch), front to back.
To level your refrigerator:
1 Remove toe grille (see above) to access the front rollers.
2Adjust the rollers by turning each roller adjustment bolt with a wrench until the refrigerator is level and stable.
3 Check both doors to be sure seals touch cabinet on all four sides.
4 Replace the toe grille.
Tips:
•If the freezer door is higher than the refrigerator door, raise the right corner and/or lower the left corner until the doors align across the top of the cabinet.
•If the refrigerator door is higher than the freezer door, raise the left corner and/or lower the right corner until doors align across the top of the cabinet.
6 Removing The Doors
GETTING THROUGH NARROW SPACES
If your refrigerator will not fit through an entrance area, you can reduce its size by removing the doors. Check first by measuring the entrance.
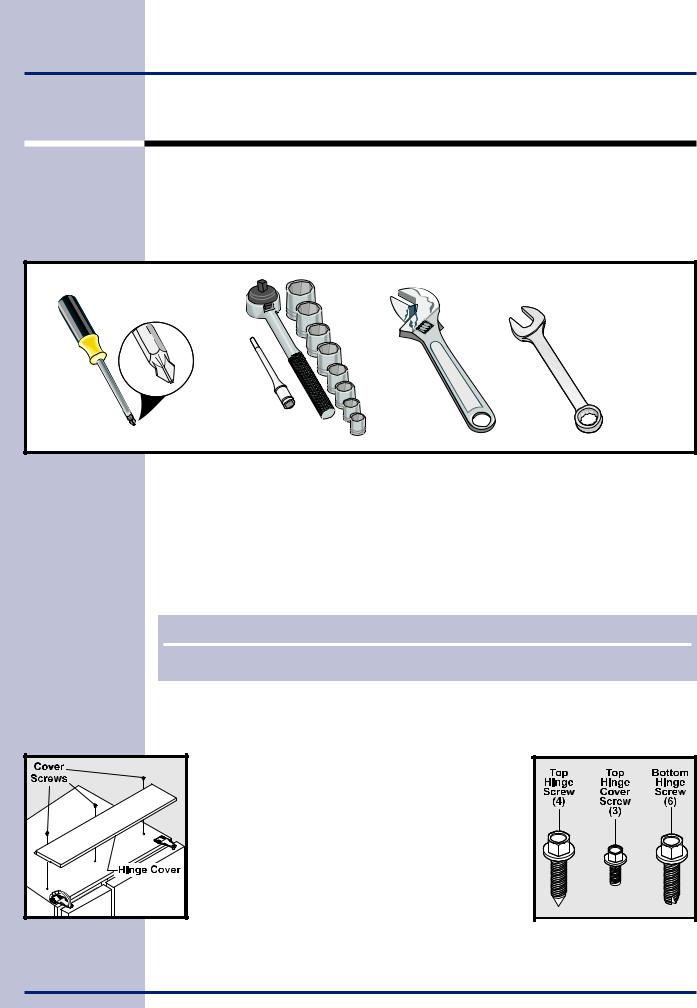
Required Tools
You will need the following tools:
Tools Necessary:
AND |
OR |
OR |
|
|
Socket |
Adjustable |
3/8” Fixed |
Phillips™ Head |
Wrench Set |
Wrench |
Wrench |
To prepare for removing the doors:
1Make sure the electrical power cord is unplugged from the wall outlet.
2Open both doors and remove the toe grille.
3Remove any food from the door shelves.
4Close the doors.
NOTE
For more information on removing the toe grille, please refer to the Installation section.
To remove the top hinge cover:
1 Remove the three screws from the cover over the top door hinges.
2 Pull the cover forward about a half-inch and lift it off.

Removing The Doors 7
To remove the refrigerator door:
1Trace lightly around the door’s top hinge with a pencil. This makes reinstallation easier.
2Remove the two screws from the top hinge. Lift the door off of the
bottom hinge and and set it aside.
3 Remove the three bottom hinge screws and hinge if necessary.
To reinstall the refrigerator door, reverse the above steps. Once both doors are in place, also replace the
top hinge cover.
! CAUTION
Be sure doors are set aside in a secure position where they cannot fall and cause personal injury.
To remove the freezer door:
1 Detach the multi-wire cable connector located above the top hinge. Grasp both sides of the connector firmly and pull apart.
2 Trace lightly around the hinge with a pencil.
This makes reinstallation easier.
3 Detach the water tube from the connector located below the freezer door. The connector releases when you press its outer sleeve inward.
4 Remove the screws from the top hinge.
Leave the multi-wire cable inside the hinge.
Do not unscrew the ground wire that attaches the cable to the hinge. Lift the
door off of the bottom hinge.
5 Remove the three bottom hinge screws and
hinge if necessary.
6 Lay the door on its side to avoid damage to 
 the water tube extending from the bottom hinge.
To reinstall the freezer door, reverse the above steps. Once both doors are in place, also replace the top hinge cover.
8 Connecting The Water Supply
ABOUT YOUR REFRIGERATOR’S WATER SUPPLY
The automatic ice & water dispenser on your refrigerator requires a permanent water supply to function correctly. During installation, you (or a service professional) establish this water supply by connecting a copper tube from your household water system to a valve at the rear of the refrigerator.
! CAUTION
To avoid property damage:
•Use copper tubing for the water supply line (plastic tubing is more likely to leak). Manufacturer is not responsible for any damage if plastic tubing is used for supply line.
•Ensure water supply complies with local plumbing codes.
•For proper dispenser operation, recommended water supply pressure should fall between 1.4 and 6.9 bars. Excessive pressure may cause water filter to malfunction.
What you will need:
•Access to a cold water line with pressure of 1.4-6.9 bars.
•The water connector kit that comes with your refrigerator, which provides all materials for a water supply installation, including 7.6 m (25 feet) of copper tubing.
To connect the water supply to the rear of your refrigerator:
1 Ensure that the refrigerator is not plugged in.
2 Flush the supply line until water is clear by placing the end of the copper tube in a sink or bucket and opening the shut-off valve.
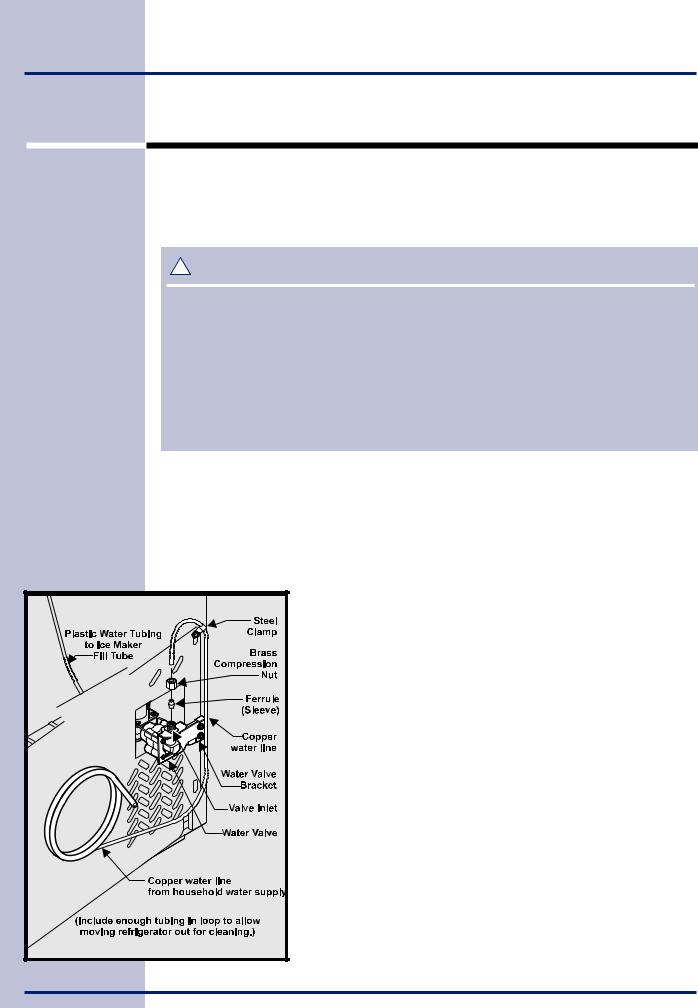
3 Unscrew the plastic cap from the water valve inlet at the rear of your refrigerator. Discard the cap.
4 Slide the brass compression nut, then the ferrule (sleeve) onto copper tube.
5 Push the copper tube into water valve inlet as far as it will go (6.5mm).
6 Slide the ferrule (sleeve) into valve and finger-tighten the compression nut onto valve. Tighten another half turn with a wrench. Do not over-tighten.
7 Secure the copper tube to your refrigerator’s rear panel with a steel clamp and screw (see illustration).

Connecting The Water Supply 9
8Coil the excess copper tubing (about 2½ turns) behind your refrigerator as shown. Arrange coiled tubing to avoid vibration or wear against other surfaces.
9Open water supply shut-off valve and tighten any connections that leak.
NOTE
After connecting the water supply, see information in this guide about priming an empty water supply system. Also read all topics in the “Automatic Ice & Water Dispenser” section to learn about normal operating procedures.
Feature Overview
Freezer and Refrigerator
Controls
Ice Cream Shelf
Ice Maker
Fixed
Door Bin
Ice Container
Shelf
Shelf
Tilt Out
Door Bin
Small Basket
Large
Glide Out
Basket
Tilt Out
Door Bin
Large Basket
Tilt Out
Door Bin
NOTE
SpillProof |
TM |
CAUTION: |
|
|
Do Not Remove |
||
Aspect Shelf |
|||
Magnet Behind |
|||
|
|
||
Water Filter |
Dairy |
||
Compartment |
|||
|
|
||
|
|
Dairy |
|
|
|
Compartment |
|
|
|
Door Bin |
|
|
|
SpillProofTM |
|
|
|
Sliding Shelf |
|
|
|
Door Bin |
|
|
|
Tall Bottle |
|
|
|
Retainer |
|
|
|
Door Bin |
|
|
|
Special Item |
|
|
|
Rack |
|
|
|
Meat Keeper |
|
|
|
and Cover |
|
|
|
Can Rack |
|
|
|
Crisper Pan |
|
|
|
and Cover |
|
|
|
Fixed |
|
|
|
Door Bin |
|
Toe Grille |
|
||
Features may vary according to model.
10 Controls & Settings
ALLOWING COOLING TIME BEFORE USE
To ensure reliable food storage, allow your refrigerator and freezer to operate with the doors closed for 8 to 12 hours before placing food inside. During this cooling period, you do not need to adjust the controls, which are preset at the factory.
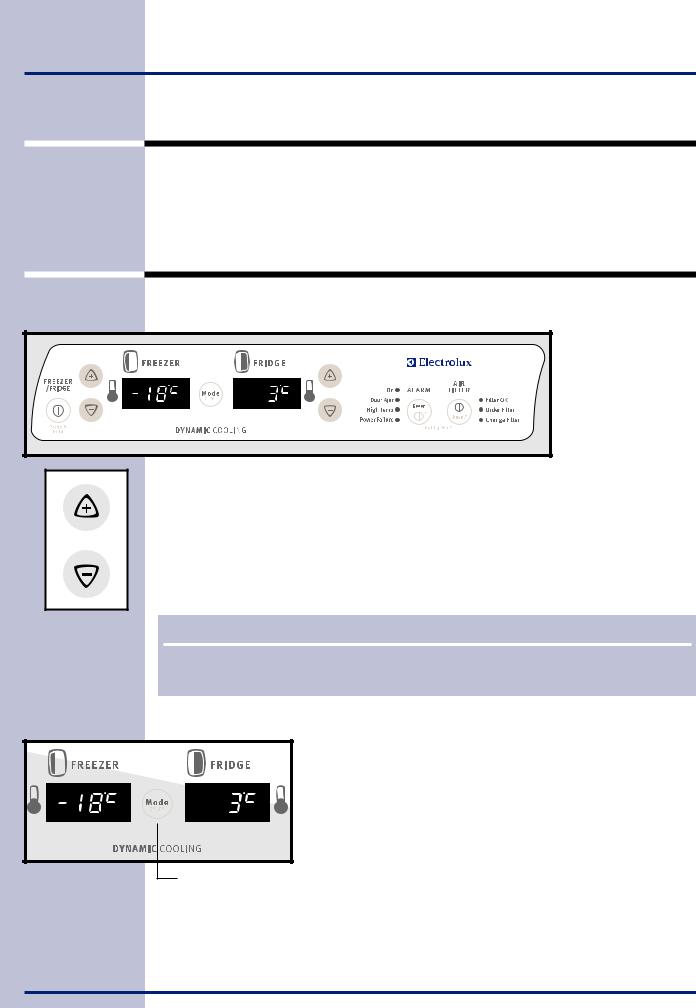
SETTING COOLING TEMPERATURES
Your refrigerator comes with a state-of-the-art electronic digital control system. The system’s control panel is located at the top of the the fresh food compartment. The
two digital displays on the left half of the
control panel
indicate the current
temperatures of
your freezer and fresh food compartments.
To adjust the temperature to a higher or lower setting, press the Up or Down Arrow button closest to the display. The first time you press the button, the display shows the last setting you entered. Each press of the button after that increments the setting by one degree.
The display shows your new setting momentarily, then changes back to the current temperature. (Refer to following pages for more about temperature settings.)
NOTE
The advanced electronic control system in your refrigerator includes additional display modes that service professionals can use to rapidly diagnose performance issues.
Choosing Centigrade or Fahrenheit
Depending on which temperature standard you prefer to use, you can set your control panel to display in centigrade or fahrenheit. To change between fahrenheit and centigrade, press the Mode button (located between the two digital temperature displays).
Press to alternate between
Centigrade and Fahrenheit
Controls & Settings 11
Making Temperature Adjustments
After running your refrigerator for 24 hours, you can adjust temperatures as needed. Make your adjustments small and gradual, allowing time for temperatures to change and stabilize. Refer to the following guidelines for temperature settings.
Temperature Control Range |
Freezer |
|
Fresh Food |
|
|||||
|
|
|
|
|
|
||||
|
|
|
|
Fahrenheit |
Centigrade |
|
Fahrenheit |
Centigrade |
|
|
|
|
|
|
|
|
|
|
|
|
|
Warmest |
|
6° |
-14° |
|
47° |
8° |
|
Warmer |
|
|
|
|
|
|
|
|
|
|
|
|
|
|
|
|
|
|
|
Factory Setting |
|
Midpoint |
|
0° |
-18° |
37° |
3° |
|
|
Colder |
|
|
|
|
|
|
|
|
|
Coldest |
|
-10° |
-23° |
|
33° |
1° |
|
||
|
|
|
|
|
|||||
|
|
|
|
|
|
|
|
|
|
Temperature Adjustment Guide
If Fresh Food compartment is too warm
If Fresh Food compartment is too cold
If Freezer compartment is too warm
If Freezer compartment is too cold
Adjust Fresh Food control one degree colder by pressing Down Arrow button.
Adjust Fresh Food control one degree warmer by pressing the Up Arrow button.
Adjust Freezer control one degree colder by pressing Down Arrow button.
Adjust Freezer control one degree warmer by pressing the Up Arrow button.
What To Do If The Temperature Displays Flash
If ever you you see both temperature displays continuously flashing, it may indicate that the control system has detected a performance problem. Call your Electrolux service representative, who can interpret the flashing message.
SYSTEM-MONITORING ALARMS
The electronic control system continuously monitors your refrigerator/freezer for temperature consistency, doors left ajar, and power failures. Variances from normal operating conditions are communicated by audible tones and a set of four status indicator lights.
NOTE
Each time you make settings on the control panel, a single audible tone acknowledges your input.
Indicator Lights
Alarm Reset Button
Loading...