


S93000KZM0 |
ENUser manual |
2 |
|
IT Istruzioni per l’uso |
20 |
|
DEBenutzerinformation |
38 |
|
RUИнструкция по эксплуатации |
57 |

2www.aeg.com
CONTENTS
1. |
SAFETY INSTRUCTIONS . . . . . . . . . . . . . . . . . . . . . . . . . . . . . . . . . . . . . . . . . . . . . . . . . . . . . |
. 3 |
2. |
CONTROL PANEL . . . . . . . . . . . . . . . . . . . . . . . . . . . . . . . . . . . . . . . . . . . . . . . . . . . . . . . . . . . |
5 |
3. |
DAILY USE . . . . . . . . . . . . . . . . . . . . . . . . . . . . . . . . . . . . . . . . . . . . . . . . . . . . . . . . . . . . . . . . . |
7 |
4. |
HELPFUL HINTS AND TIPS . . . . . . . . . . . . . . . . . . . . . . . . . . . . . . . . . . . . . . . . . . . . . . . . . . . |
12 |
5. |
CARE AND CLEANING . . . . . . . . . . . . . . . . . . . . . . . . . . . . . . . . . . . . . . . . . . . . . . . . . . . . . . |
12 |
6. |
WHAT TO DO IF… . . . . . . . . . . . . . . . . . . . . . . . . . . . . . . . . . . . . . . . . . . . . . . . . . . . . . . . . . |
13 |
7. |
INSTALLATION . . . . . . . . . . . . . . . . . . . . . . . . . . . . . . . . . . . . . . . . . . . . . . . . . . . . . . . . . . . . |
15 |
8. |
NOISES . . . . . . . . . . . . . . . . . . . . . . . . . . . . . . . . . . . . . . . . . . . . . . . . . . . . . . . . . . . . . . . . . . . |
17 |
9. |
TECHNICAL DATA . . . . . . . . . . . . . . . . . . . . . . . . . . . . . . . . . . . . . . . . . . . . . . . . . . . . . . . . . . |
19 |
10. |
ENVIRONMENT CONCERNS . . . . . . . . . . . . . . . . . . . . . . . . . . . . . . . . . . . . . . . . . . . . . . . . . |
19 |
FOR PERFECT RESULTS
Thank you for choosing this AEG product. We have created it to give you impeccable performance for many years, with innovative technologies that help make life simpler – features you might not find on ordinary appliances. Please spend a few minutes reading to get the very best from it.
Visit our website for:
Get usage advice, brochures, trouble shooter, service information:
www.aeg.com
Register your product for better service:
www.aeg.com/productregistration
Buy Accessories, Consumables and Original spare parts for your appliance: www.aeg.com/shop
CUSTOMER CARE AND SERVICE
We recommend the use of original spare parts.
When contacting Service, ensure that you have the following data available. The information can be found on the rating plate. Model, PNC, Serial Number.
Warning / Caution-Safety information
General information and tips
Environmental information
Subject to change without notice.

1.  SAFETY INSTRUCTIONS
In the interest of your safety and to ensure the correct use, before installing and first using the appliance, read this user manual carefully, including its hints and warnings. To avoid unnecessary mistakes and accidents, it is important to ensure that all people using the appliance are thoroughly familiar with its operation and safety features. Save these instructions and make sure that they remain with the appliance if it is moved or sold, so that everyone using it through its life will be properly informed on appliance use and safety.
For the safety of life and property keep the precautions of these user's instructions as the manufacturer is not responsible for damages caused by omission.
1.1 Children and vulnerable people safety
•This appliance is not intended for use by persons (including children) with reduced physical, sensory or mental capabilities, or lack of experience and knowledge, unless they have been given supervision or instruction concerning use of the appliance by a person responsible for their safety.
Children should be supervised to ensure that they do not play with the appliance.
•Keep all packaging well away from children. There is risk of suffocation.
•If you are discarding the appliance pull the plug out of the socket, cut the connection cable (as close to the appliance as you can) and remove the door to prevent playing children to suffer electric shock or to close themselves into it.
•If this appliance featuring magnetic door seals is to replace an older appliance having a spring lock (latch) on the door or lid, be sure to make that spring lock unusable before you discard the old appliance. This will prevent it from becoming a death trap for a child.
ENGLISH 3
1.2 General safety
WARNING!
Keep ventilation openings, in the appliance enclosure or in the built-in structure, clear of obstruction.
•The appliance is intended for keeping foodstuff and/or beverages in a normal household as explained in this instruction booklet.
•Do not use a mechanical device or any artificial means to speed up the thawing process.
•Do not use other electrical appliances (such as ice cream makers) inside of refrigerating appliances, unless they are approved for this purpose by the manufacturer.
•Do not damage the refrigerant circuit.
•The refrigerant isobutane (R600a) is contained within the refrigerant circuit of the appliance, a natural gas with a high level of environmental compatibility, which is nevertheless flammable.
During transportation and installation of the appliance, be certain that none of the components of the refrigerant circuit become damaged.
If the refrigerant circuit should become damaged:
–avoid open flames and sources of ignition
–thoroughly ventilate the room in which the appliance is situated
•It is dangerous to alter the specifications or modify this product in any way. Any damage to the cord may cause a short-circuit, fire and/or electric shock.
WARNING!
Any electrical component (power cord, plug, compressor) must be replaced by a certified service agent or qualified service personnel to avoid hazard.
1.Power cord must not be lengthened.

4www.aeg.com
2.Make sure that the power plug is not squashed or damaged by the back of the appliance. A squashed or damaged power plug may overheat and cause a fire.
3.Make sure that you can come to the mains plug of the appliance.
4.Do not pull the mains cable.
5.If the power plug socket is loose, do not insert the power plug. There is a risk of electric shock or fire.
6.You must not operate the appliance without the lamp cover (if foreseen) of interior lighting.
•This appliance is heavy. Care should be taken when moving it.
•Do not remove nor touch items from the freezer compartment if your hands are damp/wet, as this could cause skin abrasions or frost/freezer burns.
•Avoid prolonged exposure of the appliance to direct sunlight.
•Bulb lamps (if foreseen) used in this appliance are special purpose lamps selected for household appliances use only. They are not suitable for household room illumination.
1.3 Daily Use
•Do not put hot pot on the plastic parts in the appliance.
•Do not store flammable gas and liquid in the appliance, because they may explode.
•Do not place food products directly against the air outlet on the rear wall. (If the appliance is Frost Free)
•Frozen food must not be re-frozen once it has been thawed out.
•Store pre-packed frozen food in accordance with the frozen food manufacturer's instructions.
•Appliance's manufacturers storage recommendations should be strictly adhered to. Refer to relevant instructions.
•Do not place carbonated or fizzy drinks in the freezer compartment as it creates pressure on the container, which may cause it to explode, resulting in damage to the appliance.
•Ice lollies can cause frost burns if consumed straight from the appliance.
1.4 Care and cleaning
•Before maintenance, switch off the appliance and disconnect the mains plug from the mains socket.
•Do not clean the appliance with metal objects.
•Do not use sharp objects to remove frost from the appliance. Use a plastic scraper.
•Regularly examine the drain in the refrigerator for defrosted water. If necessary, clean the drain. If the drain is blocked, water will collect in the bottom of the appliance.
1.5 Installation
For electrical connection carefully follow the instructions given in specific paragraphs.
•Unpack the appliance and check if there are damages on it. Do not connect the appliance if it is damaged. Report possible damages immediately to the place you bought it. In that case retain packing.
•It is advisable to wait at least four hours before connecting the appliance to allow the oil to flow back in the compressor.
•Adequate air circulation should be around the appliance, lacking this leads to overheating. To achieve sufficient ventilation follow the instructions relevant to installation.
•Wherever possible the back of the product should be against a wall to avoid touching or catching warm parts (compressor, condenser) to prevent possible burn.
•The appliance must not be located close to radiators or cookers.
•Make sure that the mains plug is accessible after the installation of the appliance.
•Connect to potable water supply only (If a water connection is foreseen).
1.6 Service
•Any electrical work required to do the servicing of the appliance should be carried out by a qualified electrician or competent person.
•This product must be serviced by an authorized Service Centre, and only genuine spare parts must be used.
1.7 Environment Protection
This appliance does not contain gasses which could damage the ozone layer, in either its refriger-
ENGLISH 5
ant circuit or insulation materials. The appliance shall not be discarded together with the urban refuse and rubbish. The insulation foam contains flammable gases: the appliance shall be disposed according to the applicable regulations to obtain from your local authorities. Avoid damaging the cooling unit, especially at the rear near the heat exchanger. The materials used on this appliance marked by the
symbol  are recyclable.
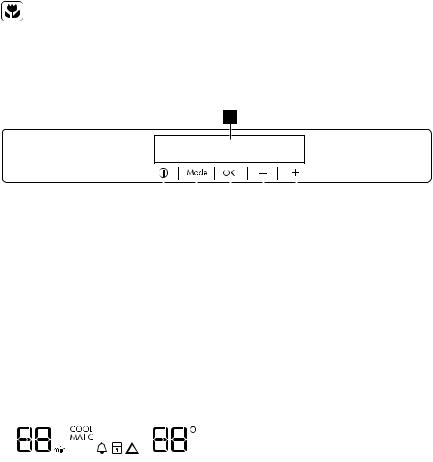
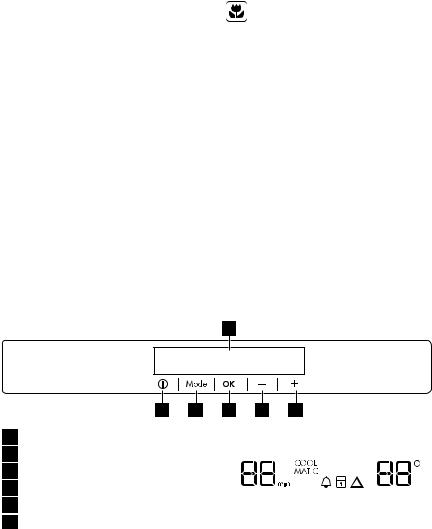
2. CONTROL PANEL
1
|
|
|
|
|
|
|
|
|
|
|
|
|
|
|
|
|
|
|
|
|
|
|
|
|
|
|
|
|
|
|
|
|
|
|
|
|
|
|
|
|
|
|
|
|
|
|
|
|
|
|
|
|
|
|
|
|
|
|
|
|
|
6 |
|
|
|
5 |
|
4 |
|
|
3 |
|
2 |
|
|||||
|
|
Display |
|
|
|
|
|
|
|
|
|
|
|
|
|
|
|
|
|
|
|
Temperature indicator |
|||||||||||||||||
|
1 |
|
|
|
|
|
|
|
|
|
|
|
|
|
|
|
|
|
|
6 |
|||||||||||||||||||
|
|
Temperature warmer button |
|
|
|
|
|
|
|
|
|
|
|
|
|
|
|
|
|
||||||||||||||||||||
|
2 |
|
|
|
|
|
|
2.2 Switching on |
|||||||||||||||||||||||||||||||
|
|
Temperature colder button |
|
|
|
|
|
|
|||||||||||||||||||||||||||||||
|
3 |
|
|
|
|
|
|
||||||||||||||||||||||||||||||||
|
|
OK button |
|
|
|
|
|
|
|
|
|
|
|
|
|
|
|
|
|
|
To switch on the appliance do these |
||||||||||||||||||
|
4 |
|
|
|
|
|
|
|
|
|
|
|
|
|
|
|
|
|
|
||||||||||||||||||||
|
|
Mode button |
|
|
|
|
|
|
|
|
|
|
|
|
|
|
|
|
|
|
steps: |
|
|
|
|
||||||||||||||
|
5 |
|
|
|
|
|
|
|
|
|
|
|
|
|
|
|
|
|
|
|
|
|
|
||||||||||||||||
|
|
|
ON/OFF button |
|
|
|
|
|
1. |
|
Connect the mains plug to the pow- |
||||||||||||||||||||||||||||
|
6 |
|
|
|
|
|
|
||||||||||||||||||||||||||||||||
|
|
|
|
|
|
|
|
|
|
|
er socket. |
||||||||||||||||||||||||||||
It is possible to change predefined |
2. |
|
|||||||||||||||||||||||||||||||||||||
|
Press the ON/OFF button if the dis- |
||||||||||||||||||||||||||||||||||||||
sound of buttons to a loudly one by |
|
||||||||||||||||||||||||||||||||||||||
pressing together Mode button and |
|
|
|
|
|
play is off. |
|||||||||||||||||||||||||||||||||
Temperature colder button for some |
3. |
|
The alarm buzzer could operate af- |
||||||||||||||||||||||||||||||||||||
seconds. Change is reversible. |
|
|
|
|
|
|
|
|
|
|
ter few seconds. |
||||||||||||||||||||||||||||
2.1 Display |
|
|
|
|
|
|
|
|
|
|
|
|
|
|
|
|
|
|
|
|
|
|
To reset the alarm refer to "High |
||||||||||||||||
|
|
|
|
|
|
|
|
|
|
|
|
|
|
|
|
|
|
|
|
|
|
temperature alarm". |
|||||||||||||||||
|
|
|
|
|
|
|
|
|
|
|
|
|
|
|
|
|
|
|
|
|
|
|
|
|
|
|
|
4. |
|
If "dEMo" appears on the display, |
|||||||||
|
|
|
|
|
|
|
|
|
|
|
|
|
|
|
|
|
|
|
|
|
|
|
|
|
|
|
|
|
|
|
|
|
the appliance is in demonstration |
||||||
|
|
|
|
|
|
|
|
|
|
|
|
|
|
|
|
|
|
|
|
|
|
|
|
|
|
|
|
|
|
|
|
|
mode. Refer to "What to do if..." |
||||||
|
|
|
|
|
|
|
|
|
|
|
|
|
|
|
|
|
|
|
|
|
|
|
|
|
|
|
|
|
|
|
|
|
|||||||
|
|
|
|
|
|
|
|
|
|
|
|
|
|
|
|
|
|
|
|
|
|
|
|
|
|
|
|
|
|
|
|
|
paragraph. |
||||||
|
|
|
|
|
|
|
|
|
|
|
|
|
|
|
|
|
|
|
|
|
|
|
|
|
|
|
|
|
|
|
|
|
|||||||
|
|
|
|
1 |
|
|
|
|
3 |
|
4 |
|
|
|
|
|
6 |
|
|
|
5. |
|
The temperature indicators show the |
||||||||||||||||
|
|
|
Timer function |
|
|
|
|
|
|
|
|
|
|
|
|
|
|
|
|
|
|
|
|
|
|
set default temperature. |
|||||||||||||
|
1 |
|
|
|
|
|
|
|
|
|
|
|
|
|
|
|
|
|
|
|
|
|
|
||||||||||||||||
|
|
|
|
|
|
|
|
|
|
|
|
|
|
|
|
|
|
|
To select a different set temperature re- |
||||||||||||||||||||
|
|
|
COOLMATIC function |
|
|
|
|
|
|
||||||||||||||||||||||||||||||
|
2 |
|
|
|
|
|
|
fer to "Temperature regulation". |
|||||||||||||||||||||||||||||||
|
Minute Minder function |
|
|
|
|
|
|
|
|
|
|
|
|
|
|
|
|
|
|||||||||||||||||||||
|
3 |
|
|
|
|
|
|
|
|
|
|
|
|
|
|
|
|
|
|||||||||||||||||||||
|
Child Lock function |
|
|
|
|
|
|
|
|
|
|
|
|
|
|
|
|
|
|||||||||||||||||||||
|
4 |
|
|
|
|
|
|
|
|
|
|
|
|
|
|
|
|
|
|||||||||||||||||||||
|
Alarm indicator |
|
|
|
|
|
|
|
|
|
|
|
|
|
|
|
|
|
|||||||||||||||||||||
|
5 |
|
|
|
|
|
|
|
|
|
|
|
|
|
|
|
|
|
|||||||||||||||||||||

6www.aeg.com
2.3Switching off
To switch off the appliance do these steps:
1.Press the ON/OFF button for 5 seconds.
2.The display switches off.
3.To disconnect the appliance from the power disconnect the mains plug from the power socket.
2.4 Temperature regulation
The set temperature of the fridge may be adjusted by pressing the temperature button.
Set default temperature: +5°C for the fridge.
The temperature indicator shows the set temperature.
The set temperature will be reached within 24 hours.
After a power failure the set temperature remains stored.
2.5 Minute Minder function
The Minute Minder function is to be used to set an acoustic alarm at the preferred time, useful for example when a recipe requires to cool down a mixture for a certain length of time.
To switch on the function:
1.Press the Mode button until the corresponding icon appears.
The Minute Minder indicator flashes.
The Timer shows the set value (30 minutes) for a few seconds.
2.Press the Timer regulator button to change the Timer set value from 1 to 90 minutes.
3.Press the OK button to confirm.
The Minute Minder indicator is shown.
The Timer start to flash (min).
At the end of the countdown the Minute Minder indicator flashes and an audible alarm sounds:
1.press OK button to switch off the sound and terminate the function.
It is possible to deactivate the function at any time during the countdown:
1.Press the Mode button until the Minute Minder indicator flashes.
2.Press the OK button to confirm.
3.The Minute Minder indicator goes off.
It is possible to change the time at any time during the countdown and at the end by pressing the Temperature colder button and the Temperature warmer button.
2.6 Child Lock function
To lock the buttons from unintentional operation select the Child Lock function. To switch on the function:
1.Press the Mode button until the corresponding icon appears.
2.The Child Lock indicator flashes.
3.Press the OK button to confirm.
The Child Lock indicator is shown. To switch off the function:
1.Press the Mode button until the Child Lock indicator flashes.
2.Press the OK button to confirm.
3.The Child Lock indicator goes off.
2.7 COOLMATIC function
If you need to insert a large amount of warm food, for example after doing the grocery shopping, we suggest activating the COOLMATIC function to chill the products more rapidly and to avoid warming the other food which is already in the refrigerator.
To switch on the function:
1.Press the Mode button until the corresponding icon appears.
The COOLMATIC indicator flashes.
2.Press the OK button to confirm.
The COOLMATIC indicator is shown.
The COOLMATIC function shuts off automatically after approximately 6 hours. To switch off the function before its automatic end:
1.Press the Mode button until the COOLMATIC indicator flashes.
2.Press the OK button to confirm.
3.The COOLMATIC indicator goes off.
The function switches off by selecting a different fridge set temperature.
2.8 Door open alarm
An acoustic alarm will sound if the door is left open for a few minutes. The door open alarm conditions are indicated by:
• flashing Alarm indicator
ENGLISH |
7 |
• acoustic buzzer
When normal conditions are restored (door closed), the alarm will stop. During the alarm, the buzzer can be switched off by pressing any button.
3. DAILY USE
3.1 Cleaning the interior
Before using the appliance for the first time, wash the interior and all internal accessories with lukewarm water and some neutral soap so as to remove the typical smell of a brand-new product, then dry thoroughly.
Do not use detergents or abrasive powders, as these will damage the finish.
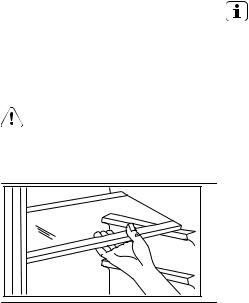
3.2 Movable shelves
If “dEMo” appears on the Display, the appliance is in demonstration mode: refer to “WHAT TO DO IF...” paragraph.
The walls of the refrigerator are equipped with a series of runners so that the shelves can be positioned as desired.
For better use of space, the front halfshelves can lie over the rear ones.
3.3 Positioning the door shelves
To permit storage of food packages of various sizes, the door shelves can be placed at different heights.
8www.aeg.com
3.4Positioning the sliding box
The sliding box can be placed at different heights.
Do make these adjustments proceed as follow:
1. lift the shelf with the sliding box upwards and out of the holders in the door
2. remove the retaining bracket out of the guide under the shelf
3. Reverse the above operation to insert the sliding box at a different height.
3.5 Carbon Air Filter
|
|
|
Your appliance is equipped with a car- |
|
|
||
|
|
|
bon filter CLEANAIR CONTROL behind |
|
|
|
a flap in the rear wall of the fridge com- |
|
|
|
partment. |
C L E A N A I R C O N T R O L |
|
|
The filter purifies the air from unwanted |
|
|
|
|
|
|
|
odours in the fridge and LONGFRESH |
|
|
|
compartment meaning that the storage |
|
|
|
quality will be further improved. |
|
|
|
During the operation, always |
|
|
keep the air ventilation flap |
|
|
closed. |
|
|
|
|
3.6 LONGFRESH |
ment, where it will last up to 3 times lon- |
|
Compartment |
ger with better quality compared to nor- |
|
mal refrigerator compartments. This al- |
||
|
||
In the LONGFRESH 0°C compartment |
lows you to stock more fresh food. Taste, |
|
the temperature is controlled automati- |
degree of freshness, quality and nutri- |
|
cally. It stays constantly at about 0°C, no |
tional values (vitamins and minerals) are |
|
adjustment is necessary. |
well preserved. Loss of weight in vegeta- |
|
The constant storage temperature of |
bles and fruit diminishes. Food yields a |
|
about 0°C and the relative humidity of |
higher degree of nutritional value. |
|
between 45 and 90 % provide optimal |
|
|
conditions for the various kinds of food. |
|
|
|
The LONGFRESH 0°C compartment is |
|
|
also suitable for defrosting food. |
|
You can therefore store a variety of fresh |
In this case the thawed food can be stor- |
|
food in the LONGFRESH 0°C compart- |
ed up to two days . |
ENGLISH 9
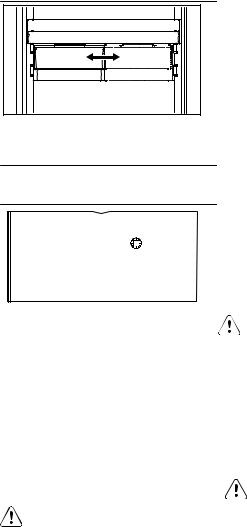
3.7 Humidity control
Both drawers can be used according to the desired storage conditions independently of each other with lower or higher humidity.
Regulation for each drawer is separate and is controlled using the slide valve at the front of the drawer.
• „Dry“: low air humidity - up to 50 % relative humidity
This humidity level is reached when
both sliders are set into this position  and the ventilation openings are wide open.
• Humid“: high relative humidity - up to 90%
This humidity level is reached when both sliders are set in this position
 and the ventilation openings are closed. Humidity is kept and can not escape.
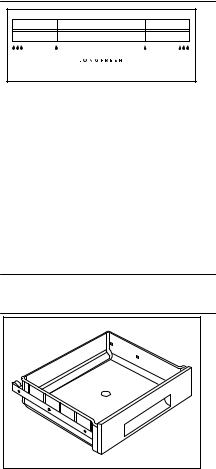
3.8 Longfresh drawers
The humidity is not adjustable.
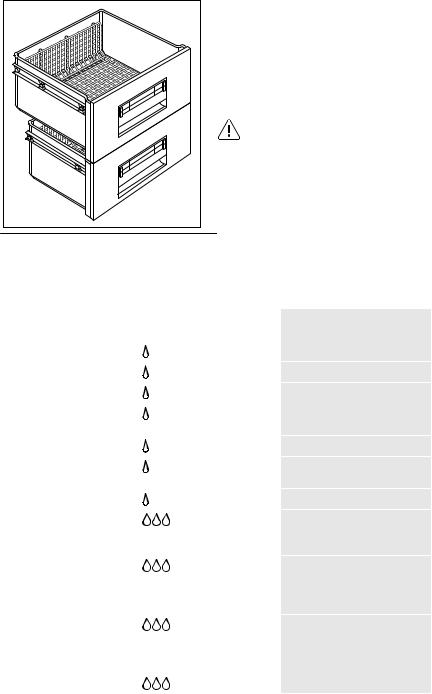
10 www.aeg.com
The wire shelves inside the drawers permit that air can circulate freely and consequently a better conservation of foods. The compartment has stops to prevent the drawers from falling out when fully extended.
To remove the drawers (e.g. for cleaning purposes), pull them out as far as the stops, lift and remove.
Remove all drawers to store large quantities of foods.
3.9 Storage time in the Longfresh 0°C compartment for fresh food
Type of food |
Air humidity adjust- |
Storage time |
|
ment |
|
Onion |
"dry” |
up to 5 months |
Butter |
“dry” |
up to 1 month |
Large pork cuts |
“dry” |
up to 10 days |
Beef, venison, small |
“dry” |
up to 7 days |
pork cuts, poultry |
|
|
Tomato sauce |
“dry” |
up to 4 days |
Fish, shellfish, cooked |
“dry” |
up to 3 days |
meat products |
|
|
Cooked seafood |
“dry” |
up to 2 days |
Salad, vegetables Car- |
“humid” |
up to 1 month |
rots, herbs, Brussels |
|
|
sprouts, celery |
|
|
Artichokes, cauliflower, |
“humid” |
up to 21 days |
chicory, iceberg lettuce, |
|
|
endive, lamb’s lettuce, |
|
|
lettuce, leeks, radicchio |
|
|
Broccoli, Chinese |
“humid” |
up to 14 days |
leaves, kale, cabbage, |
|
|
radishes, Savoy cab- |
|
|
bage |
|
|
Peas, kohlrabi |
“humid” |
up to 10 days |
|
|
|
ENGLISH 11
Type of food |
Air humidity adjust- |
Storage time |
|
ment |
|
Spring onions, radishes, |
“humid” |
up to 7 days |
asparagus, spinach |
|
|
Fruit (The riper the fruit, |
“humid” |
up to 1 month |
the shorter the storage |
|
|
time) |
|
|
Pears, dates (fresh), |
|
|
strawberries, peaches |
|
|
Plums (The riper the |
“humid” |
up to 21 days |
fruit, the shorter the |
|
|
storage time) |
|
|
rhubarb, gooseberries |
|
|
Apples (not sensitive to |
“humid” |
up to 20 days |
cold), quinces |
|
|
Apricots, cherries |
“humid” |
up to 14 days |
Damsons, grapes |
“humid” |
up to 10 days |
Blackberries, currants |
“humid” |
up to 8 days |
Figs (fresh) |
“humid” |
up to 7 days |
Blueberries, raspberries |
“humid” |
up to 5 days |
|
|
|
Cakes containing cream and other kinds of pastry products can be stored in the Longfresh 0°C compartment for 2 or 3 days.
Not to be placed in the Longfresh 0°C compartment:
•cold sensitive fruit which have to be stored at cellar or room temperature like pineapple, bananas, grapefruit, melons, mango, papaya, oranges, lemons, kiwi fruit.
•The types of food not mentioned above should be stored in the refrigerator compartment (e.g. all sorts of cheese, cold cuts, etc.)
The level of air humidity in the drawers depends on the content of humidity in the stored food, vegetable and fruit and on the frequency of door opening
The Longfresh 0°C compartment is also suitable for slow thawing of food. In this case the thawed food can be stored in the Longfresh 0°C compartment for up to two days.
Tips:
•Pay attention to the freshness of the food, especially on the expiry date. Quality and freshness influence the storage time.
•The whole storage cycle time will depend on the preservation conditions made prior to the final storage in the fridge.
•Food, fruit or vegetables should always be packed or wrapped up before storage.
•Animal food always store packed and dry.
•Food rich in proteins will go bad quicker. This means seafood will spoil before fish which in turn will spoil before meat. While storing food in a 0°C compartment storage time for that kind of food can be increased by up to three times as well without loss on quality.
•All food stored in a 0°C compartment should be taken out of the drawers roughly 15-30 min before consumption, particularly fruit and vegetables to be consumed without any additional cooking process. Allowing fruit and vegetables to return to room tempera-
12 www.aeg.com
ture will improve the texture and flavour.
4. HELPFUL HINTS AND TIPS
4.1 Hints for energy saving
•Do not open the door frequently or leave it open longer than absolutely necessary.
•If the ambient temperature is high and the Temperature Regulator is set to low temperature and the appliance is fully loaded, the compressor may run continuously, causing frost or ice on the evaporator. If this happens, set the Temperature Regulator toward warmer settings to allow automatic defrosting and so a saving in electricity consumption.
4.2 Hints for fresh food refrigeration
To obtain the best performance:
•do not store warm food or evaporating liquids in the refrigerator
•do cover or wrap the food, particularly if it has a strong flavour
•position food so that air can circulate freely around it
5.CARE AND CLEANING
CAUTION!
Unplug the appliance before carrying out any maintenance operation.
This appliance contains hydrocarbons in its cooling unit; maintenance and recharging must therefore only be carried out by authorized technicians.
5.1 Periodic cleaning
The equipment has to be cleaned regularly:
4.3 Hints for refrigeration
Useful hints:
Meat (all types) : wrap in polythene bags and place on the glass shelf above the vegetable drawer.
For safety, store in this way only one or two days at the most.
Cooked foods, cold dishes, etc..: these should be covered and may be placed on any shelf.
Fruit and vegetables: these should be thoroughly cleaned and placed in the special drawer(s) provided.
Butter and cheese: these should be placed in special airtight containers or wrapped in aluminium foil or polythene bags to exclude as much air as possible. Milk bottles: these should have a cap and should be stored in the bottle rack on the door.
Bananas, potatoes, onions and garlic, if not packed, must not be kept in the refrigerator.
•clean the inside and accessories with lukewarm water and some neutral soap.
•regularly check the door seals and wipe clean to ensure they are clean and free from debris.
•rinse and dry thoroughly.
Do not pull, move or damage any pipes and/or cables inside the cabinet.
Never use detergents, abrasive powders, highly perfumed cleaning products or wax polishes to clean the interior as this will damage the surface and leave a strong odour.

Clean the condenser (black grill) and the compressor at the back of the appliance with a brush. This operation will improve the performance of the appliance and save electricity consumption.
The lowest shelf, dividing the cooler compartment from the LONGFRESH 0°C compartment can be removed only for cleaning. To remove pull out the shelf straight.
The cover plates above the drawers in the compartment can be taken out for cleaning.
To make sure fully functionality of the LONGFRESH 0°C compartment the lowest shelf and cover plates must be put back in their original position after cleaning.
Take care of not to damage the cooling system.
Many proprietary kitchen surface cleaners contain chemicals that can attack/ damage the plastics used in this appliance. For this reason it is recommended that the outer casing of this appliance is only cleaned with warm water with a little washing-up liquid added.
After cleaning, reconnect the equipment to the mains supply.
5.2 Replacing the carbon filter
To get best performance the carbon air filter should be changed once every year.
ENGLISH 13
New active air filters can be purchased from your local dealer.
Refer to “Installation of the carbon air filter” for the instructions.
The air filter is a consumable accessory and as such is not covered by the guarantee.
5.3 Defrosting of the refrigerator
Defrosting of the fridge compartment is automatic.
The water that forms flows into a recipient on the compressor and evaporates. This recipient cannot be removed.
5.4 Periods of non-operation
When the appliance is not in use for long periods, take the following precautions:
•disconnect the appliance from electricity supply
•remove all food
•defrost (if foreseen) and clean the appliance and all accessories
•leave the door/doors ajar to prevent unpleasant smells.
If the cabinet will be kept on, ask somebody to check it once in a while to prevent the food inside from spoiling in case of a power failure.
6. WHAT TO DO IF…
WARNING!
Before troubleshooting, disconnect the mains plug from the mains socket.
Only a qualified electrician or competent person must do the troubleshooting that is not in this manual.
14 www.aeg.com
Problem |
Possible cause |
Solution |
The appliance is |
The appliance is not sup- |
Check if the appliance |
noisy |
ported properly |
stands stable (all the four |
|
|
feet should be on the |
|
|
floor) |
The appliance does |
The appliance is switched |
Switch on the appliance. |
not operate. The |
off. |
|
lamp does not oper- |
|
|
ate. |
|
|
|
The mains plug is not |
Connect the mains plug to |
|
connected to the mains |
the mains socket correctly. |
|
socket correctly. |
|
|
The appliance has no |
Connect a different electri- |
|
power. There is no volt- |
cal appliance to the mains |
|
age in the mains socket. |
socket. |
|
|
Contact a qualified electri- |
|
|
cian. |
The lamp does not |
The lamp is in stand-by. |
Close and open the door. |
work. |
|
|
|
The lamp is defective. |
Refer to "Replacing the |
|
|
lamp". |
The compressor op- |
The temperature is not |
Set a higher temperature. |
erates continually. |
set correctly. |
|
|
The door is not closed |
Refer to "Closing the |
|
correctly. |
door". |
|
The door has been |
Do not keep the door |
|
opened too frequently. |
open longer than necessa- |
|
|
ry. |
|
The product temperature |
Let the product tempera- |
|
is too high. |
ture decrease to room |
|
|
temperature before stor- |
|
|
age. |
|
The room temperature is |
Decrease the room tem- |
|
too high. |
perature. |
The compressor |
This is normal, no error |
The compressor starts af- |
does not start imme- |
has occurred. |
ter a period of time. |
diately after press- |
|
|
ing the COOLMATIC |
|
|
switch, or after |
|
|
changing the tem- |
|
|
perature. |
|
|
Water flows on the |
During the automatic de- |
This is correct. |
rear plate of the re- |
frosting process, frost de- |
|
frigerator. |
frosts on the rear plate. |
|
The temperature in |
The temperature regula- |
Set a higher/lower temper- |
the appliance is too |
tor is not set correctly. |
ature. |
low/high. |
|
|
|
|
|
|
|
ENGLISH 15 |
|
|
|
Problem |
Possible cause |
Solution |
|
The door is not closed |
Refer to "Closing the |
|
correctly. |
door". |
|
The product temperature |
Let the product tempera- |
|
is too high. |
ture decrease to room |
|
|
temperature before stor- |
|
|
age. |
|
Many products are stored |
Store less products at the |
|
at the same time. |
same time. |
The temperature in |
There is no cold air circu- |
Make sure that there is |
the refrigerator is |
lation in the appliance. |
cold air circulation in the |
too high. |
|
appliance. |
Upper or lower |
An error has occurred in |
Call your service represen- |
square is shown in |
measuring the tempera- |
tative (the cooling system |
the temperature Dis- |
ture |
will continue to keep food |
play. |
|
products cold, but temper- |
|
|
ature adjustment will not |
|
|
be possible). |
|
|
|
dEMo appears on The appliance is in demthe Display. onstration mode (dEMo).
Keep pressed approximately 10 sec. the OK button since a long sound of buzzer is heard and the Display shut off for a short while: appliance start works regularly
6.1 Replacing the lamp
The appliance is equipped with a longlife LED interior light.
Only service is allowed to replace the lighting device. Contact your Service Center.
2.If necessary, adjust the door. Refer to "Installation".
3.If necessary, replace the defective door gaskets. Contact the Service Center.
6.2 Closing the door
1.Clean the door gaskets.
7.INSTALLATION
WARNING!
Read the "Safety Information" carefully for your safety and correct operation of the appliance before installing the appliance.
7.1 Positioning
WARNING!
If you are discarding an old appliance that has a lock or catch on the door, you must ensure that it is made unusable to prevent young children being trapped inside.
16 www.aeg.com
The appliance shall have the plug accessible after installation.
Install this appliance at a location where the ambient temperature corresponds to the climate class indicated on the rating plate of the appliance:
Cli- |
Ambient temperature |
mate |
|
class |
|
SN |
+10°C to + 32°C |
N |
+16°C to + 32°C |
ST |
+16°C to + 38°C |
T |
+16°C to + 43°C |
|
|
plate correspond to your domestic power supply.
The appliance must be earthed. The power supply cable plug is provided with a contact for this purpose. If the domestic power supply socket is not earthed, connect the appliance to a separate earth in compliance with current regulations, consulting a qualified electrician. The manufacturer declines all responsibility if the above safety precautions are not observed.
This appliance complies with the E.E.C. Directives.
7.2 Electrical connection
Before plugging in, ensure that the voltage and frequency shown on the rating
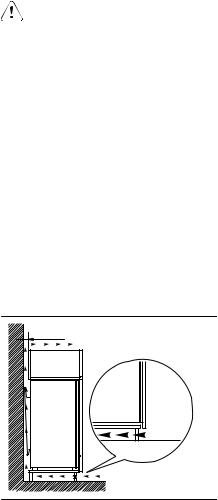
7.3 Ventilation requirements
5 cm |
min. |
|
200 cm2 |
|
min. |
|
200 cm2 |
The airflow behind the appliance must be sufficient.

ENGLISH 17
7.4 Installation of the carbon air filter
1
2
The carbon air filter is an active carbon filter which absorbs bad odors and permits to maintain the best flavour and aroma for all foodstuffs without risk of odor cross contamination.
On delivery the carbon filter is in a plastic bag to maintain it’s duration and characteristics. The filter should be placed behind the flap before the appliance is turned on.
1.Open the flap cover (1).
2.Remove the filter from the plastic bag.
3.Insert the filter in the slot found in the back of the flap cover (2).
4.Close the flap cover.
During operation, always keep the air ventilation flap closed. Handle carefully the filter so fragments do not loosen from the surface.
8. NOISES
There are some sounds during normal running (compressor, refrigerant circulation).
OK 
SSSRRR!
HISSS! BLUBB!
CLICK! BRRR!
CRACK!

18 www.aeg.com
SSSRRR! SSSRRR!
CLICK! |
CLICK! |
HISSS! HISSS!
BRRR! |
BRRR! |
BLUBB! BLUBB! CRACK! CRACK!

ENGLISH 19
9. TECHNICAL DATA
Dimension of the recess
Height |
1855 mm |
Width |
545 mm |
Depth |
575 mm |
Voltage |
230-240 V |
Frequency |
50 Hz |
|
|
The technical information are situated in the rating plate on the internal left side of the appliance and in the energy label.
10. ENVIRONMENT CONCERNS
Recycle the materials with the symbol  . Put the packaging in applicable containers to recycle it. Help protect the environment and human health and to recycle waste of electrical and electronic
appliances. Do not dispose appliances marked with the symbol  with the household waste. Return the product to your local recycling facility or contact your municipal office.

20 www.aeg.com
INDICE
1. ISTRUZIONI DI SICUREZZA . . . . . . . . . . . . . . . . . . . . . . . . . . . . . . . . . . . . . . . . . . . . . . . . . . . 21 2. PANNELLO DEI COMANDI . . . . . . . . . . . . . . . . . . . . . . . . . . . . . . . . . . . . . . . . . . . . . . . . . . 23 3. UTILIZZO QUOTIDIANO . . . . . . . . . . . . . . . . . . . . . . . . . . . . . . . . . . . . . . . . . . . . . . . . . . . . . 25 4. CONSIGLI E SUGGERIMENTI UTILI . . . . . . . . . . . . . . . . . . . . . . . . . . . . . . . . . . . . . . . . . . . . 30 5. PULIZIA E CURA . . . . . . . . . . . . . . . . . . . . . . . . . . . . . . . . . . . . . . . . . . . . . . . . . . . . . . . . . . . . 30 6. COSA FARE SE… . . . . . . . . . . . . . . . . . . . . . . . . . . . . . . . . . . . . . . . . . . . . . . . . . . . . . . . . . . . 32 7. INSTALLAZIONE . . . . . . . . . . . . . . . . . . . . . . . . . . . . . . . . . . . . . . . . . . . . . . . . . . . . . . . . . . . 34 8. RUMORI . . . . . . . . . . . . . . . . . . . . . . . . . . . . . . . . . . . . . . . . . . . . . . . . . . . . . . . . . . . . . . . . . . 35 9. DATI TECNICI . . . . . . . . . . . . . . . . . . . . . . . . . . . . . . . . . . . . . . . . . . . . . . . . . . . . . . . . . . . . . 37
10. CONSIDERAZIONI AMBIENTALI . . . . . . . . . . . . . . . . . . . . . . . . . . . . . . . . . . . . . . . . . . . . . . 37
PER RISULTATI PERFETTI
Grazie per aver scelto di acquistare questo prodotto AEG. Lo abbiamo creato per fornirvi prestazioni impeccabili per molti anni, grazie a tecnologie innovative che vi semplificheranno la vita - funzioni che non troverete sui normali elettrodomestici. Vi invitiamo di dedicare qualche minuto alla lettura per sapere come trarre il massimo dal vostro elettrodomestico.
Visitate il nostro sito web per:
ricevere consigli, scaricare i nostri opuscoli, eliminare eventuali anomalie, ottenere informazioni sull'assistenza.
www.aeg.com
registrare il vostro prodotto e ricevere un servizio migliore: www.aeg.com/productregistration
acquistare accessori, materiali di consumo e ricambi originali per la vostra apparecchiatura:
www.aeg.com/shop
SERVIZIO CLIENTI E MANUTENZIONE
Consigliamo sempre l’impiego di ricambi originali.
Quando si contatta l'Assistenza, accertarsi di disporre dei seguenti dati.
Le informazioni si trovano sulla targhetta di identificazione. Modello, numero dell'apparecchio (PNC), numero di serie.
Avvertenza / Attenzione - Importanti Informazioni di Sicurezza
Informazioni e consigli generali
Informazioni in materia di sicurezza ambientale
Con riserva di modifiche.
ITALIANO 21
1.  ISTRUZIONI DI SICUREZZA
Per garantire un impiego corretto e sicuro dell'apparecchio, prima dell'installazione e del primo utilizzo leggere con attenzione il libretto istruzioni, inclusi i suggerimenti e le avvertenze. Per evitare errori e incidenti, è importante garantire che tutte le persone che utilizzano l'apparecchio ne conoscano il funzionamento e le caratteristiche di sicurezza. Conservare queste istruzioni e accertarsi che rimangano unite all'apparecchio in caso di vendita o trasloco, in modo che chiunque lo utilizzi sia correttamente informato sull'uso e sulle norme di sicurezza. Per la sicurezza delle persone e delle cose osservare le precauzioni indicate nelle presenti istruzioni per l'utente, il produttore non è responsabile dei danni provocati da eventuali omissioni.
1.1 Sicurezza dei bambini e delle persone fragili
•Questo apparecchio non deve essere usato da persone, bambini inclusi, con ridotte capacità fisiche, sensoriali o psichiche, oppure prive di conoscenza e esperienza, a meno che non siano state istruite all'uso dell'apparecchio da parte dei responsabili della loro sicurezza, oppure sotto vigilanza di questi.
I bambini devono essere sorvegliati per assicurarsi che non giochino con l'apparecchio.
•Tenere i materiali di imballaggio al di fuori della portata dei bambini. Alcuni materiali possono creare rischi di soffocamento.
•Qualora l'apparecchio venga demolito, estrarre la spina dalla presa, tagliare il cavo di collegamento (il più vicino possibile all'apparecchio) e smontare lo sportello per evitare che i bambini giocando possano subire scosse elettriche o chiudersi dentro l'apparecchio.
•Se questo nuovo apparecchio, che è dotato di guarnizioni magnetiche nello sportello, va a sostituirne uno più vecchio avente sportello o coperchio con chiusure a molla, si deve rendere inutilizzabili tali chiusure prima di eli-
minare l'apparecchio sostituito, per evitare che diventi una trappola mortale per i bambini.
1.2 Norme di sicurezza generali
AVVERTENZA!
Verificare che le aperture di ventilazione, sia sull'apparecchiatura che nella struttura da incasso, siano libere da ostruzioni.
•L'apparecchiatura è progettata per la conservazione domestica di alimenti e/o bevande nelle modalità descritte nelle presenti istruzioni.
•Non usare dispositivi elettrici o altri mezzi artificiali non raccomandati dal produttore allo scopo di accelerare il processo di sbrinamento.
•Non utilizzare altre apparecchiature elettriche (per esempio gelatiere) al- l'interno del frigorifero, salvo quelle approvate per tale scopo dal produttore.
•Non danneggiare il circuito refrigerante.
•Il circuito refrigerante dell'apparecchiatura contiene isobutano (R600a), un gas naturale con un elevato livello di compatibilità ambientale che, tuttavia, è infiammabile.
Durante il trasporto e l'installazione dell'apparecchiatura, assicurarsi che nessuno dei componenti del circuito refrigerante venga danneggiato.
In caso di danneggiamento del circuito refrigerante:
–evitare fiamme libere e scintille
–aerare bene il locale in cui si trova l'apparecchiatura
•È pericoloso cambiare le specifiche o modificare il prodotto in qualunque modo. Un danneggiamento del cavo potrebbe provocare cortocircuiti, incendi e/o scosse elettriche.

22 www.aeg.com
AVVERTENZA!
Tutti i componenti elettrici (cavo di alimentazione, spina, compressore) devono essere sostituiti da un tecnico certificato o da personale d'assistenza qualificato al fine di evitare di correre rischi.
1.Non collegare prolunghe al cavo di alimentazione.
2.Evitare che il lato posteriore del- l'apparecchiatura possa schiacciare o danneggiare la spina, causandone il surriscaldamento con un conseguente rischio di incendio.
3.La spina dell'apparecchiatura deve trovarsi in una posizione accessibile.
4.Evitare di tirare il cavo di alimentazione.
5.Se la presa elettrica non è perfettamente stabile, non inserire la spina. Il collegamento potrebbe provocare scosse elettriche o creare un rischio di incendio.
6.L'apparecchiatura non deve essere messa in funzione senza il coprilampada interno (se previsto).
•Questa apparecchiatura è pesante. Procedere con cautela durante gli spostamenti.
•Evitare di estrarre o di toccare gli alimenti riposti nel vano congelatore con le mani bagnate o umide; il contatto potrebbe provocare abrasioni o ustioni da freddo.
•Evitare un'esposizione prolungata del- l'apparecchiatura alla luce solare diretta.
•Le lampadine utilizzate in questa apparecchiatura (se previste) sono lampade speciali selezionate esclusivamente per elettrodomestici. Non sono adatte per l'illuminazione degli ambienti.
1.3 Uso quotidiano
•Non collocare pentole calde sulle parti in plastica dell'apparecchio.
•Non collocare gas e liquidi infiammabili nell'apparecchio, perché potrebbero esplodere.
•Evitare di appoggiare gli alimenti contro la presa d'aria situata nella parete
posteriore (per le apparecchiature di tipo no-frost)
•Gli alimenti congelati non devono essere ricongelati una volta scongelati.
•Riporre gli alimenti surgelati preconfezionati secondo le istruzioni del produttore dell'alimento surgelato.
•Osservare rigorosamente i consigli per la conservazione degli alimenti del produttore dell'apparecchio. Vedere le relative istruzioni.
•Non collocare bevande gassate o frizzanti nello scomparto congelatore perché creano pressione sul recipiente che può esplodere danneggiando l'apparecchio.
•I ghiaccioli possono provocare bruciature da gelo se consumati immediatamente dopo averli tolti dall'apparecchio.
1.4 Pulizia e cura
•Prima della manutenzione, spegnere l'apparecchio e staccare la spina dalla presa.
•Non pulire l'apparecchio con oggetti metallici.
•Non usare oggetti appuntiti per rimuovere la brina dall'apparecchio. Usare un raschietto di plastica.
•Esaminare regolarmente il foro di scarico dell'acqua di sbrinamento nel frigorifero. Se necessario, pulirlo. Se il foro è otturato, l'acqua si raccoglie sul fondo dell'apparecchio.
1.5 Installazione
Per il collegamento elettrico, seguire attentamente le istruzioni dei paragrafi corrispondenti.
•Disimballare l'apparecchio e assicurarsi che non presenti danni. Non collegare l'apparecchio se è danneggiato. Segnalare immediatamente gli eventuali danni al negozio in cui è stato acquistato. In questo caso conservare l'imballaggio.
•Si consiglia di attendere almeno due ore prima di collegare l'apparecchio per consentire all'olio di arrivare nel compressore.
•Attorno all'apparecchio vi deve essere un'adeguata circolazione dell'aria, altrimenti si può surriscaldare. Per ottenere una ventilazione sufficiente seguire le istruzioni di installazione.
•Se possibile il retro dell'apparecchio dovrebbe essere posizionato contro una parete per evitare di toccare le parti calde o di rimanervi impigliati (compressore, condensatore), evitando così possibili scottature.
•L'apparecchio non deve essere posto vicino a radiatori o piani di cottura a gas.
•Installare l'apparecchio in modo che la presa rimanga accessibile.
•Collegare solo a sorgenti d'acqua potabile (se è previsto un collegamento alla rete idrica).
1.6 Assistenza tecnica
•Gli interventi elettrici sull'apparecchiatura devono essere eseguiti esclusivamente da elettricisti qualificati o da personale competente.
ITALIANO 23
•Gli interventi di assistenza devono essere eseguiti esclusivamente da tecnici autorizzati e utilizzando solo ricambi originali.
1.7 Tutela ambientale
Questo apparecchio non contiene gas che potrebbero danneggiare lo strato di ozono nel circuito refrigerante o nei materiali isolanti. L'apparecchio non deve essere smaltito assieme ai rifiuti urbani e alla spazzatura. La schiuma dell'isolamento contiene gas infiammabili: lo smaltimento del- l'apparecchio va eseguito secondo le prescrizioni vigenti da richiedere alle autorità locali. Evitare di danneggiare il gruppo refrigerante, specialmente nella parte posteriore vicino allo scambiatore di calore. I materiali usati su questo apparecchio contras-
segnati dal simbolo  sono riciclabili.
2. PANNELLO DEI COMANDI
1
6 5
1 Display
2 Tasto Temperatura più calda
3 Tasto Temperatura più fresca
4 Tasto OK
5 Tasto Mode
6Tasto ON/OFF
Èpossibile modificare le impostazioni audio predefinite dei tasti e impostarle con un volume più alto premendo contemporaneamente il tasto Mode ed il tasto Temperatura più fredda per alcuni secondi. La modifica è reversibile.
4 3 2
2.1 Display
|
|
|
|
|
|
|
|
|
|
|
|
|
|
|
|
|
|
|
|
|
|
|
|
|
|
|
|
|
|
|
|
|
|
|
|
|
|
|
|
|
|
|
|
|
|
|
|
|
|
|
|
|
|
|
|
|
|
|
|
|
|
|
|
|
|
|
|
|
|
|
|
|
|
|
|
|
|
|
|
|
|
|
|
|
|
|
|
|
|
|
|
|
|
|
|
|
|
|
|
|
|
|
|
|
|
|
|
|
|
|
|
|
|
|
|
|
|
|
|
|
|
|
|
|
|
|
|
1 |
|
2 |
|
3 |
|
4 |
|
|
|
|
6 |
|
|||||||||
|
|
Funzione timer |
|
|
|
|
|
|
|
|
|
|
|
|
|
|
|
|||||||
1 |
|
|
|
|
|
|
|
|
|
|
|
|
|
|
|
|||||||||
|
|
Funzione COOLMATIC |
|
|
|
|
||||||||||||||||||
2 |
|
|
|
|
||||||||||||||||||||
|
|
Funzione Minute Minder |
|
|
|
|
||||||||||||||||||
3 |
|
|
|
|
||||||||||||||||||||
|
|
Funzione Sicurezza bambini |
|
|
|
|
||||||||||||||||||
4 |
|
|
|
|
||||||||||||||||||||
|
|
Spia allarme |
|
|
|
|
|
|
|
|
|
|
|
|
|
|
|
|||||||
5 |
|
|
|
|
|
|
|
|
|
|
|
|
|
|
|
|||||||||
|
|
Indicatore della temperatura |
|
|
|
|
||||||||||||||||||
6 |
|
|
|
|
||||||||||||||||||||

24www.aeg.com
2.2Accensione
Per accendere l'apparecchiatura procedere come segue:
1.Inserire la spina nella presa di alimentazione.
2.Premere il tasto ON/OFF se il display è spento.
3.Il segnale acustico d'allarme potrebbe attivarsi dopo alcuni secondi.
Per resettare l'allarme, consultare la sezione "Allarme di alta temperatura".
4.Se "dEMo" appare sul display, l'apparecchiatura si trova in modalità dimostrazione. Fare riferimento al paragrafo "Cosa fare se...".
5.Gli indicatori di temperatura visualizzano la temperatura impostata predefinita.
Per selezionare una temperatura diversa, consultare la sezione "Regolazione della temperatura".
2.3 Spegnimento
Per spegnere l'apparecchiatura, procedere come segue:
1.Premere il tasto ON/OFF per 5 secondi.
2.Il display si spegne.
3.Per scollegare l’apparecchiatura dalla corrente elettrica, staccare la spina dalla presa di alimentazione.
2.4 Regolazione della temperatura
È possibile regolare la temperatura impostata del frigorifero, premendo il tasto temperatura.
Impostare la temperatura predefinita: +5°C per il frigorifero.
Gli indicatori della temperatura visualizzano la temperatura impostata.
La temperatura impostata verrà raggiunta entro 24 ore.
Dopo un'interruzione di corrente la temperatura impostata rimane in memoria.
2.5 Funzione Minute Minder
La funzione Minute Minder serve per impostare un segnale acustico in un preciso momento, utile per esempio quando una pietanza richiede il raffreddamento di alimenti misti per un certo periodo di tempo.
Per attivare la funzione:
1.Premere il tasto Mode finché non appare l'icona corrispondente.
L'indicatore Minute Minder lampeggia.
Il timer visualizza il valore impostato (30 minuti) per alcuni secondi.
2.Premere il tasto Regolatore timer per modificare il valore impostato da 1 a 90 minuti.
3.Premere il tasto OK per confermare.
La spia Minute Minder viene visualizzata.
Il Timer inizia a lampeggiare (min). Al termine del conto alla rovescia la spia Minute Minder lampeggia e viene emesso un segnale acustico:
1.premere il tasto OK per spegnere il segnale acustico e porre fine alla funzione.
È possibile disattivare la funzione in qualsiasi momento durante il conto alla rovescia:
1.Premere il tasto Mode fino a quando la spia Minute Minder lampeggia.
2.Premere il tasto OK per confermare.
3.La spia Minute Minder si spegne.
È possibile modificare l'ora in qualsiasi momento durante il conto alla rovescia e alla fine premendo il tasto Temperatura più fredda ed il Tasto temperatura più calda.
2.6 Funzione Sicurezza
Bambini
Per evitare che i tasti vengano premuti accidentalmente, selezionare la funzione Sicurezza Bambini.
Per attivare la funzione:
1.Premere il tasto Mode fino a quando non appare l'icona corrispondente.
2.L'indicatore Sicurezza Bambini lampeggia.
3.Premere il tasto OK per confermare.
 Loading...