

Page 1

Using
ADOBE® INDESIGN® CS5 & CS5.5
Page 2

Legal notices
Legal notices
For legal notices, see http://help.adobe.com/en_US/legalnotices/index.html.
Last updated 11/16/2011
Page 3

Contents
Chapter 1: What’s new
What’s new (CS5.5) . . . . . . . . . . . . . . . . . . . . . . . . . . . . . . . . . . . . . . . . . . . . . . . . . . . . . . . . . . . . . . . . . . . . . . . . . . . . . . . . . . . . . . . . . . . . . . . . . . . . 1
What’s new (CS5) . . . . . . . . . . . . . . . . . . . . . . . . . . . . . . . . . . . . . . . . . . . . . . . . . . . . . . . . . . . . . . . . . . . . . . . . . . . . . . . . . . . . . . . . . . . . . . . . . . . . . . 7
Chapter 2: Workspace
Workspace basics . . . . . . . . . . . . . . . . . . . . . . . . . . . . . . . . . . . . . . . . . . . . . . . . . . . . . . . . . . . . . . . . . . . . . . . . . . . . . . . . . . . . . . . . . . . . . . . . . . . . 16
Customize menus and keyboard shortcuts . . . . . . . . . . . . . . . . . . . . . . . . . . . . . . . . . . . . . . . . . . . . . . . . . . . . . . . . . . . . . . . . . . . . . . . . . . . . 27
Toolbox . . . . . . . . . . . . . . . . . . . . . . . . . . . . . . . . . . . . . . . . . . . . . . . . . . . . . . . . . . . . . . . . . . . . . . . . . . . . . . . . . . . . . . . . . . . . . . . . . . . . . . . . . . . . . . 30
Viewing the workspace . . . . . . . . . . . . . . . . . . . . . . . . . . . . . . . . . . . . . . . . . . . . . . . . . . . . . . . . . . . . . . . . . . . . . . . . . . . . . . . . . . . . . . . . . . . . . . . 35
Working with ConnectNow . . . . . . . . . . . . . . . . . . . . . . . . . . . . . . . . . . . . . . . . . . . . . . . . . . . . . . . . . . . . . . . . . . . . . . . . . . . . . . . . . . . . . . . . . . . 39
Setting preferences . . . . . . . . . . . . . . . . . . . . . . . . . . . . . . . . . . . . . . . . . . . . . . . . . . . . . . . . . . . . . . . . . . . . . . . . . . . . . . . . . . . . . . . . . . . . . . . . . . 40
Recovery and undo . . . . . . . . . . . . . . . . . . . . . . . . . . . . . . . . . . . . . . . . . . . . . . . . . . . . . . . . . . . . . . . . . . . . . . . . . . . . . . . . . . . . . . . . . . . . . . . . . . . 42
Chapter 3: Layout
Creating documents . . . . . . . . . . . . . . . . . . . . . . . . . . . . . . . . . . . . . . . . . . . . . . . . . . . . . . . . . . . . . . . . . . . . . . . . . . . . . . . . . . . . . . . . . . . . . . . . . . 44
Rulers and measurement units . . . . . . . . . . . . . . . . . . . . . . . . . . . . . . . . . . . . . . . . . . . . . . . . . . . . . . . . . . . . . . . . . . . . . . . . . . . . . . . . . . . . . . . . 49
Grids . . . . . . . . . . . . . . . . . . . . . . . . . . . . . . . . . . . . . . . . . . . . . . . . . . . . . . . . . . . . . . . . . . . . . . . . . . . . . . . . . . . . . . . . . . . . . . . . . . . . . . . . . . . . . . . . . 54
Ruler guides . . . . . . . . . . . . . . . . . . . . . . . . . . . . . . . . . . . . . . . . . . . . . . . . . . . . . . . . . . . . . . . . . . . . . . . . . . . . . . . . . . . . . . . . . . . . . . . . . . . . . . . . . . 56
Pages and spreads . . . . . . . . . . . . . . . . . . . . . . . . . . . . . . . . . . . . . . . . . . . . . . . . . . . . . . . . . . . . . . . . . . . . . . . . . . . . . . . . . . . . . . . . . . . . . . . . . . . 62
Master pages . . . . . . . . . . . . . . . . . . . . . . . . . . . . . . . . . . . . . . . . . . . . . . . . . . . . . . . . . . . . . . . . . . . . . . . . . . . . . . . . . . . . . . . . . . . . . . . . . . . . . . . . . 70
Layers . . . . . . . . . . . . . . . . . . . . . . . . . . . . . . . . . . . . . . . . . . . . . . . . . . . . . . . . . . . . . . . . . . . . . . . . . . . . . . . . . . . . . . . . . . . . . . . . . . . . . . . . . . . . . . . . 78
Laying out frames and pages . . . . . . . . . . . . . . . . . . . . . . . . . . . . . . . . . . . . . . . . . . . . . . . . . . . . . . . . . . . . . . . . . . . . . . . . . . . . . . . . . . . . . . . . . 84
Numbering pages, chapters, and sections . . . . . . . . . . . . . . . . . . . . . . . . . . . . . . . . . . . . . . . . . . . . . . . . . . . . . . . . . . . . . . . . . . . . . . . . . . . . . 88
Text variables . . . . . . . . . . . . . . . . . . . . . . . . . . . . . . . . . . . . . . . . . . . . . . . . . . . . . . . . . . . . . . . . . . . . . . . . . . . . . . . . . . . . . . . . . . . . . . . . . . . . . . . . 95
iii
Chapter 4: Working with documents
Working with files and templates . . . . . . . . . . . . . . . . . . . . . . . . . . . . . . . . . . . . . . . . . . . . . . . . . . . . . . . . . . . . . . . . . . . . . . . . . . . . . . . . . . . . 100
Saving documents . . . . . . . . . . . . . . . . . . . . . . . . . . . . . . . . . . . . . . . . . . . . . . . . . . . . . . . . . . . . . . . . . . . . . . . . . . . . . . . . . . . . . . . . . . . . . . . . . . 105
Converting QuarkXPress and PageMaker documents . . . . . . . . . . . . . . . . . . . . . . . . . . . . . . . . . . . . . . . . . . . . . . . . . . . . . . . . . . . . . . . . . 110
Exporting . . . . . . . . . . . . . . . . . . . . . . . . . . . . . . . . . . . . . . . . . . . . . . . . . . . . . . . . . . . . . . . . . . . . . . . . . . . . . . . . . . . . . . . . . . . . . . . . . . . . . . . . . . . 114
Chapter 5: Text
Creating text and text frames . . . . . . . . . . . . . . . . . . . . . . . . . . . . . . . . . . . . . . . . . . . . . . . . . . . . . . . . . . . . . . . . . . . . . . . . . . . . . . . . . . . . . . . . 128
Adding text to frames . . . . . . . . . . . . . . . . . . . . . . . . . . . . . . . . . . . . . . . . . . . . . . . . . . . . . . . . . . . . . . . . . . . . . . . . . . . . . . . . . . . . . . . . . . . . . . . 134
Threading text . . . . . . . . . . . . . . . . . . . . . . . . . . . . . . . . . . . . . . . . . . . . . . . . . . . . . . . . . . . . . . . . . . . . . . . . . . . . . . . . . . . . . . . . . . . . . . . . . . . . . . 142
Articles (CS5.5) . . . . . . . . . . . . . . . . . . . . . . . . . . . . . . . . . . . . . . . . . . . . . . . . . . . . . . . . . . . . . . . . . . . . . . . . . . . . . . . . . . . . . . . . . . . . . . . . . . . . . . 147
Linked stories (CS5.5) . . . . . . . . . . . . . . . . . . . . . . . . . . . . . . . . . . . . . . . . . . . . . . . . . . . . . . . . . . . . . . . . . . . . . . . . . . . . . . . . . . . . . . . . . . . . . . . . 148
Editing text . . . . . . . . . . . . . . . . . . . . . . . . . . . . . . . . . . . . . . . . . . . . . . . . . . . . . . . . . . . . . . . . . . . . . . . . . . . . . . . . . . . . . . . . . . . . . . . . . . . . . . . . . 150
Find/Change . . . . . . . . . . . . . . . . . . . . . . . . . . . . . . . . . . . . . . . . . . . . . . . . . . . . . . . . . . . . . . . . . . . . . . . . . . . . . . . . . . . . . . . . . . . . . . . . . . . . . . . . 161
Glyphs and special characters . . . . . . . . . . . . . . . . . . . . . . . . . . . . . . . . . . . . . . . . . . . . . . . . . . . . . . . . . . . . . . . . . . . . . . . . . . . . . . . . . . . . . . . . 176
Spell-checking and language dictionaries . . . . . . . . . . . . . . . . . . . . . . . . . . . . . . . . . . . . . . . . . . . . . . . . . . . . . . . . . . . . . . . . . . . . . . . . . . . . 183
Footnotes . . . . . . . . . . . . . . . . . . . . . . . . . . . . . . . . . . . . . . . . . . . . . . . . . . . . . . . . . . . . . . . . . . . . . . . . . . . . . . . . . . . . . . . . . . . . . . . . . . . . . . . . . . . 189
Tracking and reviewing changes . . . . . . . . . . . . . . . . . . . . . . . . . . . . . . . . . . . . . . . . . . . . . . . . . . . . . . . . . . . . . . . . . . . . . . . . . . . . . . . . . . . . . 193
Adding editorial notes in InDesign . . . . . . . . . . . . . . . . . . . . . . . . . . . . . . . . . . . . . . . . . . . . . . . . . . . . . . . . . . . . . . . . . . . . . . . . . . . . . . . . . . . 196
Last updated 11/16/2011
Page 4

USING INDESIGN
Contents
Chapter 6: Styles
Paragraph and character styles . . . . . . . . . . . . . . . . . . . . . . . . . . . . . . . . . . . . . . . . . . . . . . . . . . . . . . . . . . . . . . . . . . . . . . . . . . . . . . . . . . . . . . 198
Drop caps and nested styles . . . . . . . . . . . . . . . . . . . . . . . . . . . . . . . . . . . . . . . . . . . . . . . . . . . . . . . . . . . . . . . . . . . . . . . . . . . . . . . . . . . . . . . . . 206
Object styles . . . . . . . . . . . . . . . . . . . . . . . . . . . . . . . . . . . . . . . . . . . . . . . . . . . . . . . . . . . . . . . . . . . . . . . . . . . . . . . . . . . . . . . . . . . . . . . . . . . . . . . . 213
Working with styles . . . . . . . . . . . . . . . . . . . . . . . . . . . . . . . . . . . . . . . . . . . . . . . . . . . . . . . . . . . . . . . . . . . . . . . . . . . . . . . . . . . . . . . . . . . . . . . . . 218
Chapter 7: Combining text and objects
Anchored objects . . . . . . . . . . . . . . . . . . . . . . . . . . . . . . . . . . . . . . . . . . . . . . . . . . . . . . . . . . . . . . . . . . . . . . . . . . . . . . . . . . . . . . . . . . . . . . . . . . . 220
Wrapping text around objects . . . . . . . . . . . . . . . . . . . . . . . . . . . . . . . . . . . . . . . . . . . . . . . . . . . . . . . . . . . . . . . . . . . . . . . . . . . . . . . . . . . . . . . 228
Creating type on a path . . . . . . . . . . . . . . . . . . . . . . . . . . . . . . . . . . . . . . . . . . . . . . . . . . . . . . . . . . . . . . . . . . . . . . . . . . . . . . . . . . . . . . . . . . . . . . 234
Captions . . . . . . . . . . . . . . . . . . . . . . . . . . . . . . . . . . . . . . . . . . . . . . . . . . . . . . . . . . . . . . . . . . . . . . . . . . . . . . . . . . . . . . . . . . . . . . . . . . . . . . . . . . . . 238
Chapter 8: Typography
Formatting text . . . . . . . . . . . . . . . . . . . . . . . . . . . . . . . . . . . . . . . . . . . . . . . . . . . . . . . . . . . . . . . . . . . . . . . . . . . . . . . . . . . . . . . . . . . . . . . . . . . . . 241
Using fonts . . . . . . . . . . . . . . . . . . . . . . . . . . . . . . . . . . . . . . . . . . . . . . . . . . . . . . . . . . . . . . . . . . . . . . . . . . . . . . . . . . . . . . . . . . . . . . . . . . . . . . . . . . 244
Leading . . . . . . . . . . . . . . . . . . . . . . . . . . . . . . . . . . . . . . . . . . . . . . . . . . . . . . . . . . . . . . . . . . . . . . . . . . . . . . . . . . . . . . . . . . . . . . . . . . . . . . . . . . . . . 249
Kerning and tracking . . . . . . . . . . . . . . . . . . . . . . . . . . . . . . . . . . . . . . . . . . . . . . . . . . . . . . . . . . . . . . . . . . . . . . . . . . . . . . . . . . . . . . . . . . . . . . . . 251
Formatting characters . . . . . . . . . . . . . . . . . . . . . . . . . . . . . . . . . . . . . . . . . . . . . . . . . . . . . . . . . . . . . . . . . . . . . . . . . . . . . . . . . . . . . . . . . . . . . . . 253
Formatting paragraphs . . . . . . . . . . . . . . . . . . . . . . . . . . . . . . . . . . . . . . . . . . . . . . . . . . . . . . . . . . . . . . . . . . . . . . . . . . . . . . . . . . . . . . . . . . . . . . 260
Aligning text . . . . . . . . . . . . . . . . . . . . . . . . . . . . . . . . . . . . . . . . . . . . . . . . . . . . . . . . . . . . . . . . . . . . . . . . . . . . . . . . . . . . . . . . . . . . . . . . . . . . . . . . 265
Tabs and indents . . . . . . . . . . . . . . . . . . . . . . . . . . . . . . . . . . . . . . . . . . . . . . . . . . . . . . . . . . . . . . . . . . . . . . . . . . . . . . . . . . . . . . . . . . . . . . . . . . . . 269
Bullets and numbering . . . . . . . . . . . . . . . . . . . . . . . . . . . . . . . . . . . . . . . . . . . . . . . . . . . . . . . . . . . . . . . . . . . . . . . . . . . . . . . . . . . . . . . . . . . . . . 275
Text composition . . . . . . . . . . . . . . . . . . . . . . . . . . . . . . . . . . . . . . . . . . . . . . . . . . . . . . . . . . . . . . . . . . . . . . . . . . . . . . . . . . . . . . . . . . . . . . . . . . . . 285
iv
Chapter 9: Tables
Creating tables . . . . . . . . . . . . . . . . . . . . . . . . . . . . . . . . . . . . . . . . . . . . . . . . . . . . . . . . . . . . . . . . . . . . . . . . . . . . . . . . . . . . . . . . . . . . . . . . . . . . . . 290
Selecting and editing tables . . . . . . . . . . . . . . . . . . . . . . . . . . . . . . . . . . . . . . . . . . . . . . . . . . . . . . . . . . . . . . . . . . . . . . . . . . . . . . . . . . . . . . . . . 294
Formatting tables . . . . . . . . . . . . . . . . . . . . . . . . . . . . . . . . . . . . . . . . . . . . . . . . . . . . . . . . . . . . . . . . . . . . . . . . . . . . . . . . . . . . . . . . . . . . . . . . . . . 299
Table strokes and fills . . . . . . . . . . . . . . . . . . . . . . . . . . . . . . . . . . . . . . . . . . . . . . . . . . . . . . . . . . . . . . . . . . . . . . . . . . . . . . . . . . . . . . . . . . . . . . . . 304
Table and cell styles . . . . . . . . . . . . . . . . . . . . . . . . . . . . . . . . . . . . . . . . . . . . . . . . . . . . . . . . . . . . . . . . . . . . . . . . . . . . . . . . . . . . . . . . . . . . . . . . . 307
Chapter 10: Long document features
Creating book files . . . . . . . . . . . . . . . . . . . . . . . . . . . . . . . . . . . . . . . . . . . . . . . . . . . . . . . . . . . . . . . . . . . . . . . . . . . . . . . . . . . . . . . . . . . . . . . . . . 313
Creating a table of contents . . . . . . . . . . . . . . . . . . . . . . . . . . . . . . . . . . . . . . . . . . . . . . . . . . . . . . . . . . . . . . . . . . . . . . . . . . . . . . . . . . . . . . . . . 319
Creating an index . . . . . . . . . . . . . . . . . . . . . . . . . . . . . . . . . . . . . . . . . . . . . . . . . . . . . . . . . . . . . . . . . . . . . . . . . . . . . . . . . . . . . . . . . . . . . . . . . . . 325
Working with markers . . . . . . . . . . . . . . . . . . . . . . . . . . . . . . . . . . . . . . . . . . . . . . . . . . . . . . . . . . . . . . . . . . . . . . . . . . . . . . . . . . . . . . . . . . . . . . . 338
Chapter 11: Drawing
Understanding paths and shapes . . . . . . . . . . . . . . . . . . . . . . . . . . . . . . . . . . . . . . . . . . . . . . . . . . . . . . . . . . . . . . . . . . . . . . . . . . . . . . . . . . . . 340
Drawing with the line or shape tools . . . . . . . . . . . . . . . . . . . . . . . . . . . . . . . . . . . . . . . . . . . . . . . . . . . . . . . . . . . . . . . . . . . . . . . . . . . . . . . . . 343
Drawing with the Pencil tool . . . . . . . . . . . . . . . . . . . . . . . . . . . . . . . . . . . . . . . . . . . . . . . . . . . . . . . . . . . . . . . . . . . . . . . . . . . . . . . . . . . . . . . . . 344
Drawing with the Pen tool . . . . . . . . . . . . . . . . . . . . . . . . . . . . . . . . . . . . . . . . . . . . . . . . . . . . . . . . . . . . . . . . . . . . . . . . . . . . . . . . . . . . . . . . . . . 347
Editing paths . . . . . . . . . . . . . . . . . . . . . . . . . . . . . . . . . . . . . . . . . . . . . . . . . . . . . . . . . . . . . . . . . . . . . . . . . . . . . . . . . . . . . . . . . . . . . . . . . . . . . . . . 351
Applying line (stroke) settings . . . . . . . . . . . . . . . . . . . . . . . . . . . . . . . . . . . . . . . . . . . . . . . . . . . . . . . . . . . . . . . . . . . . . . . . . . . . . . . . . . . . . . . 358
Change corner appearance . . . . . . . . . . . . . . . . . . . . . . . . . . . . . . . . . . . . . . . . . . . . . . . . . . . . . . . . . . . . . . . . . . . . . . . . . . . . . . . . . . . . . . . . . . 362
Compound paths and shapes . . . . . . . . . . . . . . . . . . . . . . . . . . . . . . . . . . . . . . . . . . . . . . . . . . . . . . . . . . . . . . . . . . . . . . . . . . . . . . . . . . . . . . . . 363
Last updated 11/16/2011
Page 5

USING INDESIGN
Contents
Chapter 12: Graphics
Understanding graphics formats . . . . . . . . . . . . . . . . . . . . . . . . . . . . . . . . . . . . . . . . . . . . . . . . . . . . . . . . . . . . . . . . . . . . . . . . . . . . . . . . . . . . . 369
Importing files from other applications . . . . . . . . . . . . . . . . . . . . . . . . . . . . . . . . . . . . . . . . . . . . . . . . . . . . . . . . . . . . . . . . . . . . . . . . . . . . . . . 371
Placing graphics . . . . . . . . . . . . . . . . . . . . . . . . . . . . . . . . . . . . . . . . . . . . . . . . . . . . . . . . . . . . . . . . . . . . . . . . . . . . . . . . . . . . . . . . . . . . . . . . . . . . . 378
Managing graphics links . . . . . . . . . . . . . . . . . . . . . . . . . . . . . . . . . . . . . . . . . . . . . . . . . . . . . . . . . . . . . . . . . . . . . . . . . . . . . . . . . . . . . . . . . . . . . 389
Reusing graphics and text . . . . . . . . . . . . . . . . . . . . . . . . . . . . . . . . . . . . . . . . . . . . . . . . . . . . . . . . . . . . . . . . . . . . . . . . . . . . . . . . . . . . . . . . . . . 396
Chapter 13: Frames and objects
Selecting objects . . . . . . . . . . . . . . . . . . . . . . . . . . . . . . . . . . . . . . . . . . . . . . . . . . . . . . . . . . . . . . . . . . . . . . . . . . . . . . . . . . . . . . . . . . . . . . . . . . . . 402
Transforming objects . . . . . . . . . . . . . . . . . . . . . . . . . . . . . . . . . . . . . . . . . . . . . . . . . . . . . . . . . . . . . . . . . . . . . . . . . . . . . . . . . . . . . . . . . . . . . . . . 408
Aligning and distributing objects . . . . . . . . . . . . . . . . . . . . . . . . . . . . . . . . . . . . . . . . . . . . . . . . . . . . . . . . . . . . . . . . . . . . . . . . . . . . . . . . . . . . 424
Grouping, locking, and duplicating objects . . . . . . . . . . . . . . . . . . . . . . . . . . . . . . . . . . . . . . . . . . . . . . . . . . . . . . . . . . . . . . . . . . . . . . . . . . . 428
Working with frames and objects . . . . . . . . . . . . . . . . . . . . . . . . . . . . . . . . . . . . . . . . . . . . . . . . . . . . . . . . . . . . . . . . . . . . . . . . . . . . . . . . . . . . 431
Clipping paths . . . . . . . . . . . . . . . . . . . . . . . . . . . . . . . . . . . . . . . . . . . . . . . . . . . . . . . . . . . . . . . . . . . . . . . . . . . . . . . . . . . . . . . . . . . . . . . . . . . . . . 438
Chapter 14: Transparency effects
Adding transparency effects . . . . . . . . . . . . . . . . . . . . . . . . . . . . . . . . . . . . . . . . . . . . . . . . . . . . . . . . . . . . . . . . . . . . . . . . . . . . . . . . . . . . . . . . . 442
Blending colors . . . . . . . . . . . . . . . . . . . . . . . . . . . . . . . . . . . . . . . . . . . . . . . . . . . . . . . . . . . . . . . . . . . . . . . . . . . . . . . . . . . . . . . . . . . . . . . . . . . . . . 451
Flattening transparent artwork . . . . . . . . . . . . . . . . . . . . . . . . . . . . . . . . . . . . . . . . . . . . . . . . . . . . . . . . . . . . . . . . . . . . . . . . . . . . . . . . . . . . . . 454
v
Chapter 15: Color
Understanding spot and process colors . . . . . . . . . . . . . . . . . . . . . . . . . . . . . . . . . . . . . . . . . . . . . . . . . . . . . . . . . . . . . . . . . . . . . . . . . . . . . . 463
Applying color . . . . . . . . . . . . . . . . . . . . . . . . . . . . . . . . . . . . . . . . . . . . . . . . . . . . . . . . . . . . . . . . . . . . . . . . . . . . . . . . . . . . . . . . . . . . . . . . . . . . . . 465
Working with swatches . . . . . . . . . . . . . . . . . . . . . . . . . . . . . . . . . . . . . . . . . . . . . . . . . . . . . . . . . . . . . . . . . . . . . . . . . . . . . . . . . . . . . . . . . . . . . . 469
Tints . . . . . . . . . . . . . . . . . . . . . . . . . . . . . . . . . . . . . . . . . . . . . . . . . . . . . . . . . . . . . . . . . . . . . . . . . . . . . . . . . . . . . . . . . . . . . . . . . . . . . . . . . . . . . . . . 479
Gradients . . . . . . . . . . . . . . . . . . . . . . . . . . . . . . . . . . . . . . . . . . . . . . . . . . . . . . . . . . . . . . . . . . . . . . . . . . . . . . . . . . . . . . . . . . . . . . . . . . . . . . . . . . . 480
Mixing inks . . . . . . . . . . . . . . . . . . . . . . . . . . . . . . . . . . . . . . . . . . . . . . . . . . . . . . . . . . . . . . . . . . . . . . . . . . . . . . . . . . . . . . . . . . . . . . . . . . . . . . . . . . 485
Using colors from imported graphics . . . . . . . . . . . . . . . . . . . . . . . . . . . . . . . . . . . . . . . . . . . . . . . . . . . . . . . . . . . . . . . . . . . . . . . . . . . . . . . . . 487
Chapter 16: Trapping color
Trapping documents and books . . . . . . . . . . . . . . . . . . . . . . . . . . . . . . . . . . . . . . . . . . . . . . . . . . . . . . . . . . . . . . . . . . . . . . . . . . . . . . . . . . . . . 489
Trap presets . . . . . . . . . . . . . . . . . . . . . . . . . . . . . . . . . . . . . . . . . . . . . . . . . . . . . . . . . . . . . . . . . . . . . . . . . . . . . . . . . . . . . . . . . . . . . . . . . . . . . . . . . 493
Adjusting ink options for trapping . . . . . . . . . . . . . . . . . . . . . . . . . . . . . . . . . . . . . . . . . . . . . . . . . . . . . . . . . . . . . . . . . . . . . . . . . . . . . . . . . . . 499
Chapter 17: PDF
Exporting to Adobe PDF . . . . . . . . . . . . . . . . . . . . . . . . . . . . . . . . . . . . . . . . . . . . . . . . . . . . . . . . . . . . . . . . . . . . . . . . . . . . . . . . . . . . . . . . . . . . . 501
Adobe PDF options . . . . . . . . . . . . . . . . . . . . . . . . . . . . . . . . . . . . . . . . . . . . . . . . . . . . . . . . . . . . . . . . . . . . . . . . . . . . . . . . . . . . . . . . . . . . . . . . . . 506
Preparing PDFs for service providers . . . . . . . . . . . . . . . . . . . . . . . . . . . . . . . . . . . . . . . . . . . . . . . . . . . . . . . . . . . . . . . . . . . . . . . . . . . . . . . . . 515
Structuring PDFs . . . . . . . . . . . . . . . . . . . . . . . . . . . . . . . . . . . . . . . . . . . . . . . . . . . . . . . . . . . . . . . . . . . . . . . . . . . . . . . . . . . . . . . . . . . . . . . . . . . . 517
Chapter 18: Interactive documents
Interactive web documents for Flash . . . . . . . . . . . . . . . . . . . . . . . . . . . . . . . . . . . . . . . . . . . . . . . . . . . . . . . . . . . . . . . . . . . . . . . . . . . . . . . . . 523
Dynamic PDF documents . . . . . . . . . . . . . . . . . . . . . . . . . . . . . . . . . . . . . . . . . . . . . . . . . . . . . . . . . . . . . . . . . . . . . . . . . . . . . . . . . . . . . . . . . . . . 530
Bookmarks . . . . . . . . . . . . . . . . . . . . . . . . . . . . . . . . . . . . . . . . . . . . . . . . . . . . . . . . . . . . . . . . . . . . . . . . . . . . . . . . . . . . . . . . . . . . . . . . . . . . . . . . . . 533
Hyperlinks . . . . . . . . . . . . . . . . . . . . . . . . . . . . . . . . . . . . . . . . . . . . . . . . . . . . . . . . . . . . . . . . . . . . . . . . . . . . . . . . . . . . . . . . . . . . . . . . . . . . . . . . . . 535
Cross-references . . . . . . . . . . . . . . . . . . . . . . . . . . . . . . . . . . . . . . . . . . . . . . . . . . . . . . . . . . . . . . . . . . . . . . . . . . . . . . . . . . . . . . . . . . . . . . . . . . . . 541
Movies and sounds . . . . . . . . . . . . . . . . . . . . . . . . . . . . . . . . . . . . . . . . . . . . . . . . . . . . . . . . . . . . . . . . . . . . . . . . . . . . . . . . . . . . . . . . . . . . . . . . . . 548
Animation . . . . . . . . . . . . . . . . . . . . . . . . . . . . . . . . . . . . . . . . . . . . . . . . . . . . . . . . . . . . . . . . . . . . . . . . . . . . . . . . . . . . . . . . . . . . . . . . . . . . . . . . . . 551
Last updated 11/16/2011
Page 6

USING INDESIGN
Contents
Page transitions . . . . . . . . . . . . . . . . . . . . . . . . . . . . . . . . . . . . . . . . . . . . . . . . . . . . . . . . . . . . . . . . . . . . . . . . . . . . . . . . . . . . . . . . . . . . . . . . . . . . . 556
Buttons . . . . . . . . . . . . . . . . . . . . . . . . . . . . . . . . . . . . . . . . . . . . . . . . . . . . . . . . . . . . . . . . . . . . . . . . . . . . . . . . . . . . . . . . . . . . . . . . . . . . . . . . . . . . . 558
Digital Publishing Suite overview . . . . . . . . . . . . . . . . . . . . . . . . . . . . . . . . . . . . . . . . . . . . . . . . . . . . . . . . . . . . . . . . . . . . . . . . . . . . . . . . . . . . 566
Chapter 19: XML
Working with XML . . . . . . . . . . . . . . . . . . . . . . . . . . . . . . . . . . . . . . . . . . . . . . . . . . . . . . . . . . . . . . . . . . . . . . . . . . . . . . . . . . . . . . . . . . . . . . . . . . . 567
Importing XML . . . . . . . . . . . . . . . . . . . . . . . . . . . . . . . . . . . . . . . . . . . . . . . . . . . . . . . . . . . . . . . . . . . . . . . . . . . . . . . . . . . . . . . . . . . . . . . . . . . . . . 570
Tagging content for XML . . . . . . . . . . . . . . . . . . . . . . . . . . . . . . . . . . . . . . . . . . . . . . . . . . . . . . . . . . . . . . . . . . . . . . . . . . . . . . . . . . . . . . . . . . . . 581
Structuring documents for XML . . . . . . . . . . . . . . . . . . . . . . . . . . . . . . . . . . . . . . . . . . . . . . . . . . . . . . . . . . . . . . . . . . . . . . . . . . . . . . . . . . . . . . 586
Exporting XML . . . . . . . . . . . . . . . . . . . . . . . . . . . . . . . . . . . . . . . . . . . . . . . . . . . . . . . . . . . . . . . . . . . . . . . . . . . . . . . . . . . . . . . . . . . . . . . . . . . . . . 594
Chapter 20: Printing
Printing documents . . . . . . . . . . . . . . . . . . . . . . . . . . . . . . . . . . . . . . . . . . . . . . . . . . . . . . . . . . . . . . . . . . . . . . . . . . . . . . . . . . . . . . . . . . . . . . . . . 597
Printer’s marks and bleeds . . . . . . . . . . . . . . . . . . . . . . . . . . . . . . . . . . . . . . . . . . . . . . . . . . . . . . . . . . . . . . . . . . . . . . . . . . . . . . . . . . . . . . . . . . . 607
Printing thumbnails and oversized documents . . . . . . . . . . . . . . . . . . . . . . . . . . . . . . . . . . . . . . . . . . . . . . . . . . . . . . . . . . . . . . . . . . . . . . . 609
Printing graphics and fonts . . . . . . . . . . . . . . . . . . . . . . . . . . . . . . . . . . . . . . . . . . . . . . . . . . . . . . . . . . . . . . . . . . . . . . . . . . . . . . . . . . . . . . . . . . 611
Managing color . . . . . . . . . . . . . . . . . . . . . . . . . . . . . . . . . . . . . . . . . . . . . . . . . . . . . . . . . . . . . . . . . . . . . . . . . . . . . . . . . . . . . . . . . . . . . . . . . . . . . 613
Preflighting files before handoff . . . . . . . . . . . . . . . . . . . . . . . . . . . . . . . . . . . . . . . . . . . . . . . . . . . . . . . . . . . . . . . . . . . . . . . . . . . . . . . . . . . . . 617
Creating PostScript and EPS files . . . . . . . . . . . . . . . . . . . . . . . . . . . . . . . . . . . . . . . . . . . . . . . . . . . . . . . . . . . . . . . . . . . . . . . . . . . . . . . . . . . . . 623
Printing booklets . . . . . . . . . . . . . . . . . . . . . . . . . . . . . . . . . . . . . . . . . . . . . . . . . . . . . . . . . . . . . . . . . . . . . . . . . . . . . . . . . . . . . . . . . . . . . . . . . . . . 628
vi
Chapter 21: Color separations
Preparing to print separations . . . . . . . . . . . . . . . . . . . . . . . . . . . . . . . . . . . . . . . . . . . . . . . . . . . . . . . . . . . . . . . . . . . . . . . . . . . . . . . . . . . . . . . 634
Overprinting . . . . . . . . . . . . . . . . . . . . . . . . . . . . . . . . . . . . . . . . . . . . . . . . . . . . . . . . . . . . . . . . . . . . . . . . . . . . . . . . . . . . . . . . . . . . . . . . . . . . . . . . 639
Inks, separations, and screen frequency . . . . . . . . . . . . . . . . . . . . . . . . . . . . . . . . . . . . . . . . . . . . . . . . . . . . . . . . . . . . . . . . . . . . . . . . . . . . . . 642
Chapter 22: Automation
Scripting . . . . . . . . . . . . . . . . . . . . . . . . . . . . . . . . . . . . . . . . . . . . . . . . . . . . . . . . . . . . . . . . . . . . . . . . . . . . . . . . . . . . . . . . . . . . . . . . . . . . . . . . . . . . 649
Plug-ins . . . . . . . . . . . . . . . . . . . . . . . . . . . . . . . . . . . . . . . . . . . . . . . . . . . . . . . . . . . . . . . . . . . . . . . . . . . . . . . . . . . . . . . . . . . . . . . . . . . . . . . . . . . . . 651
Data merge . . . . . . . . . . . . . . . . . . . . . . . . . . . . . . . . . . . . . . . . . . . . . . . . . . . . . . . . . . . . . . . . . . . . . . . . . . . . . . . . . . . . . . . . . . . . . . . . . . . . . . . . . 651
Chapter 23: Sharing content between InCopy and InDesign
Understanding a basic managed-file workflow . . . . . . . . . . . . . . . . . . . . . . . . . . . . . . . . . . . . . . . . . . . . . . . . . . . . . . . . . . . . . . . . . . . . . . . 661
Sharing content . . . . . . . . . . . . . . . . . . . . . . . . . . . . . . . . . . . . . . . . . . . . . . . . . . . . . . . . . . . . . . . . . . . . . . . . . . . . . . . . . . . . . . . . . . . . . . . . . . . . . 668
Assignment packages . . . . . . . . . . . . . . . . . . . . . . . . . . . . . . . . . . . . . . . . . . . . . . . . . . . . . . . . . . . . . . . . . . . . . . . . . . . . . . . . . . . . . . . . . . . . . . . 673
Working with managed files . . . . . . . . . . . . . . . . . . . . . . . . . . . . . . . . . . . . . . . . . . . . . . . . . . . . . . . . . . . . . . . . . . . . . . . . . . . . . . . . . . . . . . . . . 676
Adjusting your workflow . . . . . . . . . . . . . . . . . . . . . . . . . . . . . . . . . . . . . . . . . . . . . . . . . . . . . . . . . . . . . . . . . . . . . . . . . . . . . . . . . . . . . . . . . . . . 681
Chapter 24: Comparison of PageMaker and InDesign menus
PageMaker menu commands . . . . . . . . . . . . . . . . . . . . . . . . . . . . . . . . . . . . . . . . . . . . . . . . . . . . . . . . . . . . . . . . . . . . . . . . . . . . . . . . . . . . . . . . 685
Chapter 25: Keyboard shortcuts
Default keyboard shortcuts . . . . . . . . . . . . . . . . . . . . . . . . . . . . . . . . . . . . . . . . . . . . . . . . . . . . . . . . . . . . . . . . . . . . . . . . . . . . . . . . . . . . . . . . . . 692
Last updated 11/16/2011
Page 7
Chapter 1: What’s new
Important: This page provides a list of features in InDesign CS5.5 and InDesign CS5. This page does NOT tell you how
to use these features. For more information about any of the new features, click the corresponding links provided.
What’s new (CS5.5)
The CS5.5 Design Standard Feature Tour on Adobe TV contains several videos to show you the new features.
EPUBS
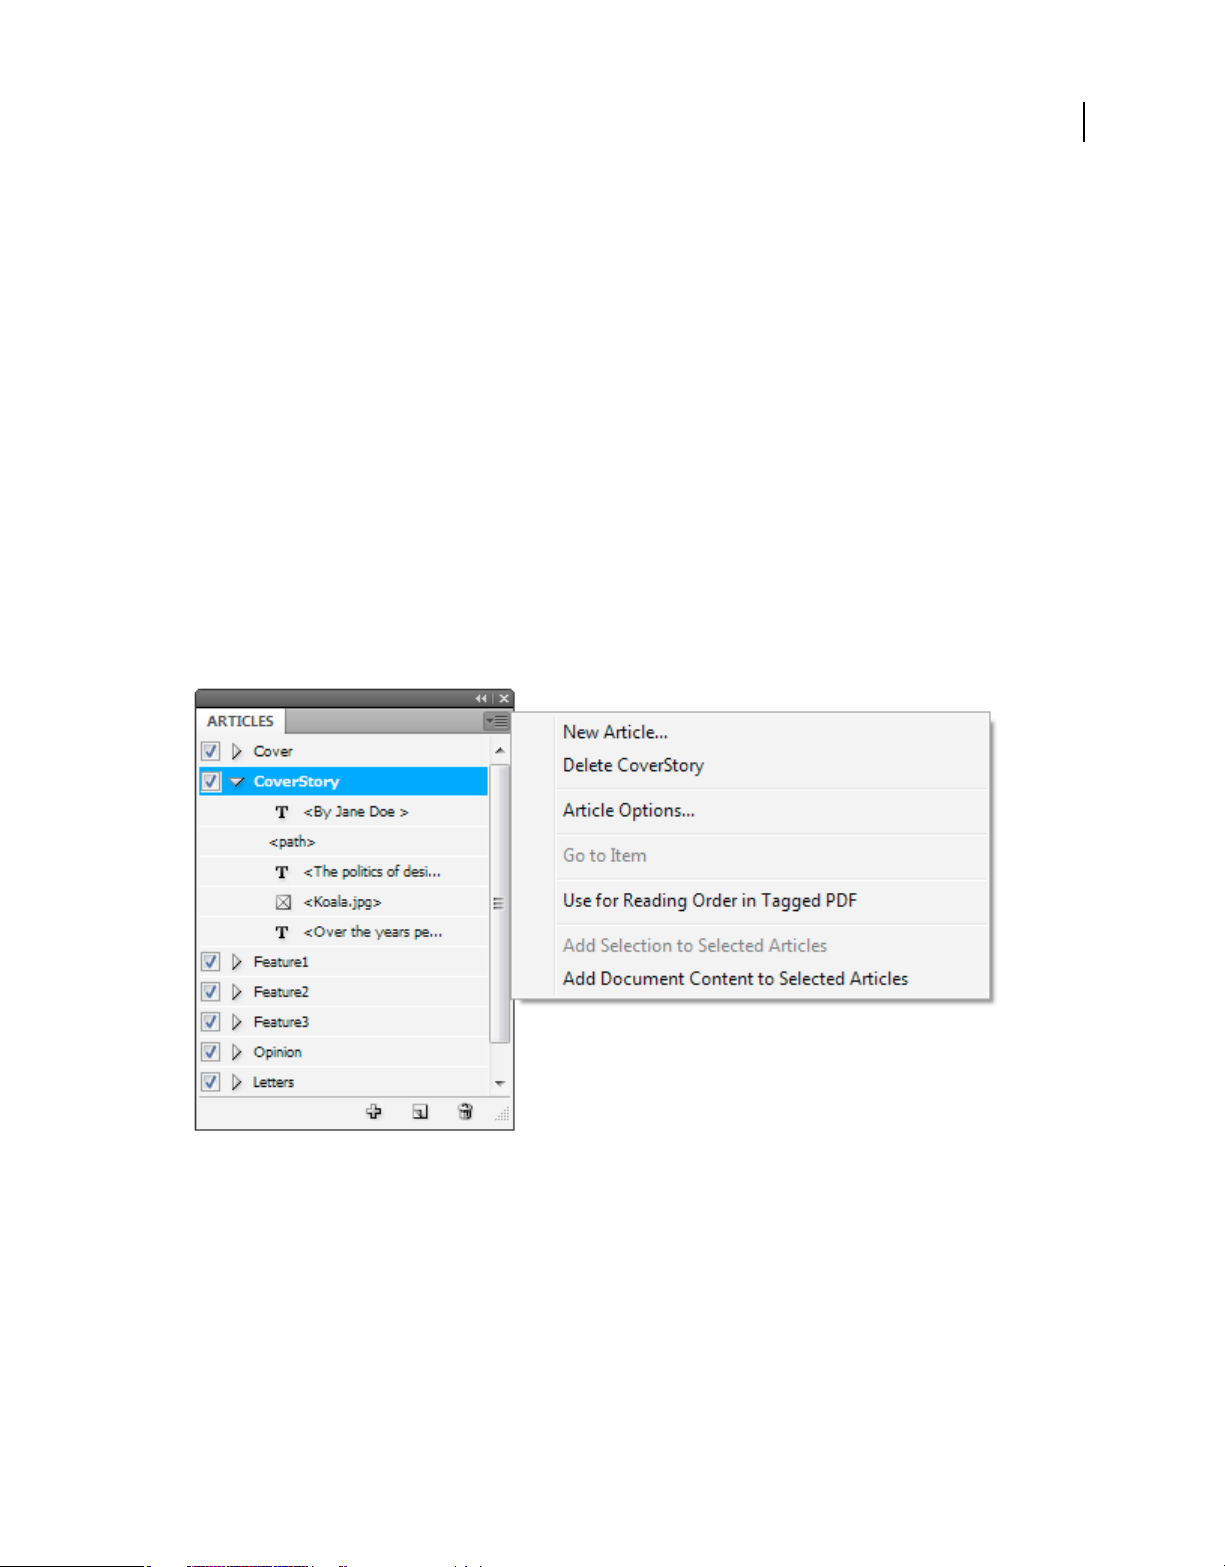
Articles
Articles provide an easy way to create relationships among page items. These relationships are used to define the
content to export to EPUB, HTML, or Accessible PDFs; and to define the order of the content.
1
Articles panel with the options pullout menu
For more details, see “Articles (CS5.5)” on page 147
Linked stories
Adobe InDesign CS5.5 linked stories makes it easier to manage multiple versions of the same story or text content in
the same document.
For more details, see “Linked stories (CS5.5)” on page 148
Last updated 11/16/2011
Page 8
USING INDESIGN
What’s new
Object Export options
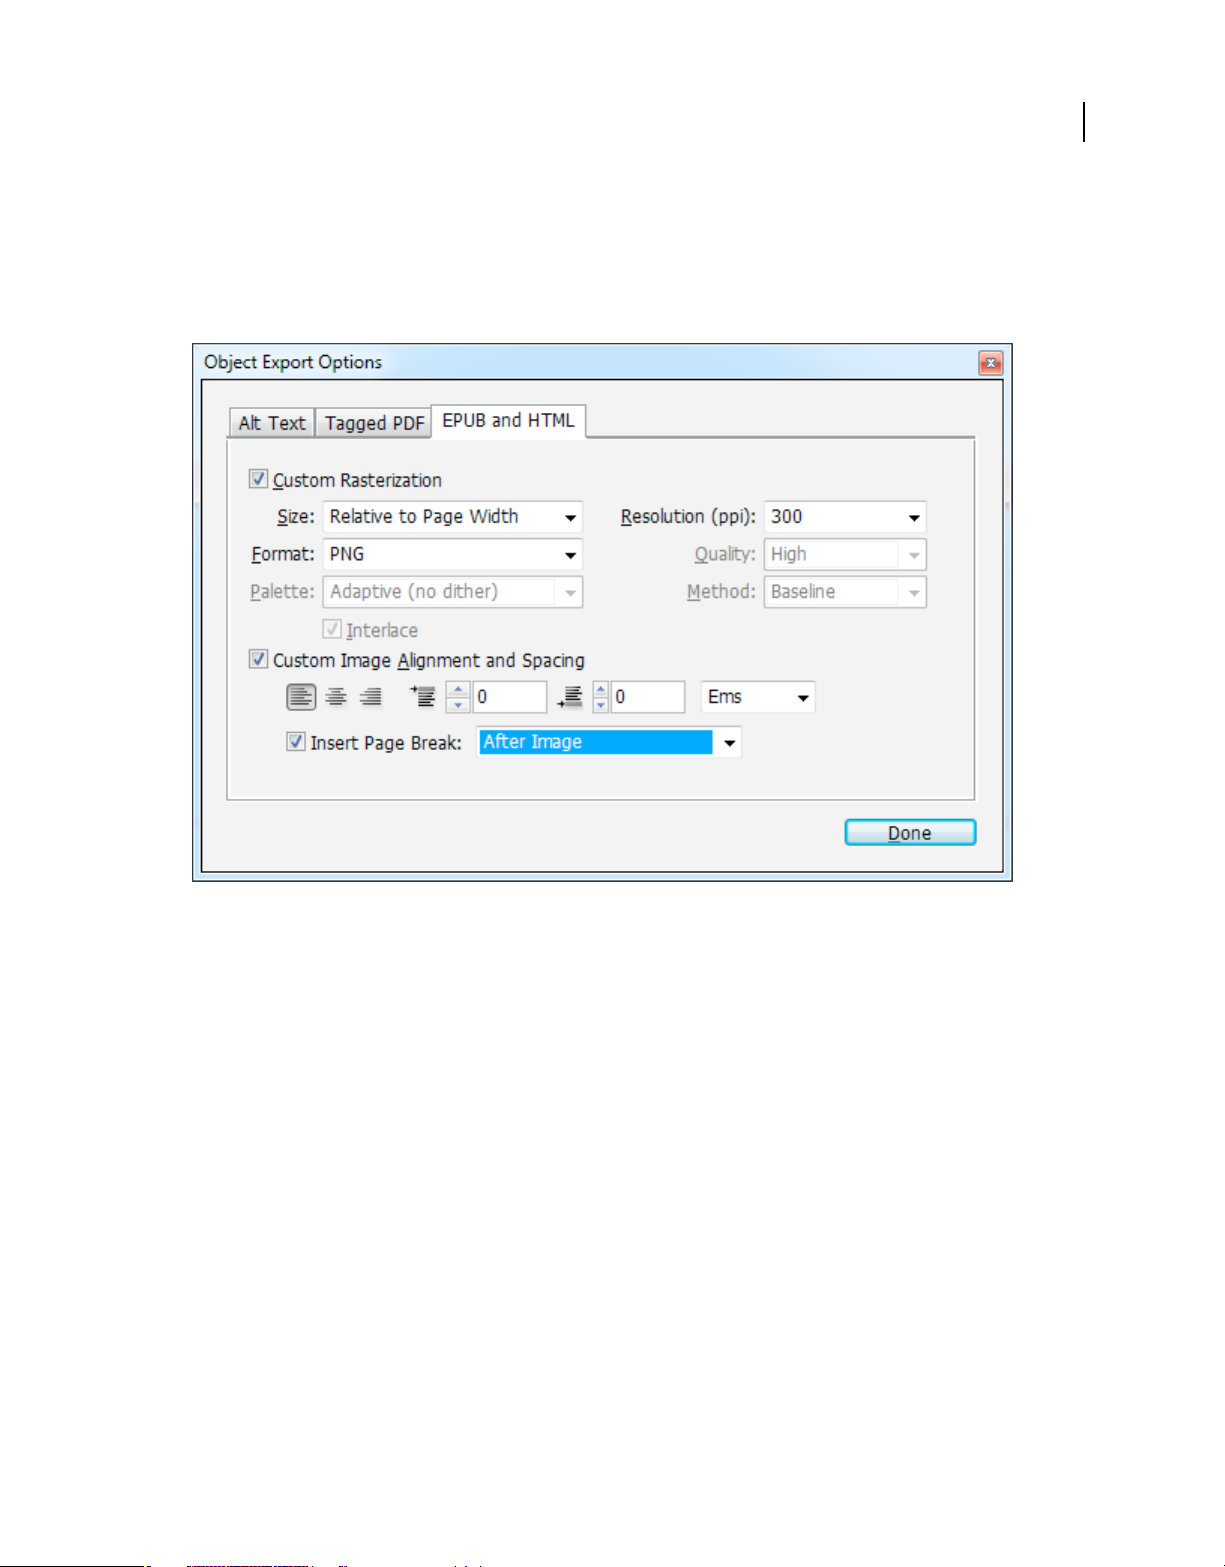
Object export options are used to specify export parameters required when you export to different formats such as
EPUB, HTML, or accessible PDFs. Object export options are applied to both text frames and graphic frames, as well
as groups. Object export options are specified to individual objects or groups and can override the global export
settings. Choose Object > Object Export Options.
2
Object export options dialog box
For more details, see “Object export options (CS5.5)” on page 436
Map styles to export tags
The Paragraph and Character styles have a new subfeature—Export Tagging. Export Tagging lets you define how text
with InDesign styles should be marked up in HTML/EPUB or in the tagged PDF output.
Last updated 11/16/2011
Page 9

USING INDESIGN
What’s new
3
Paragraph Style dialog box with Export Tagging options
See “Map styles to export tags (CS5.5)” on page 201
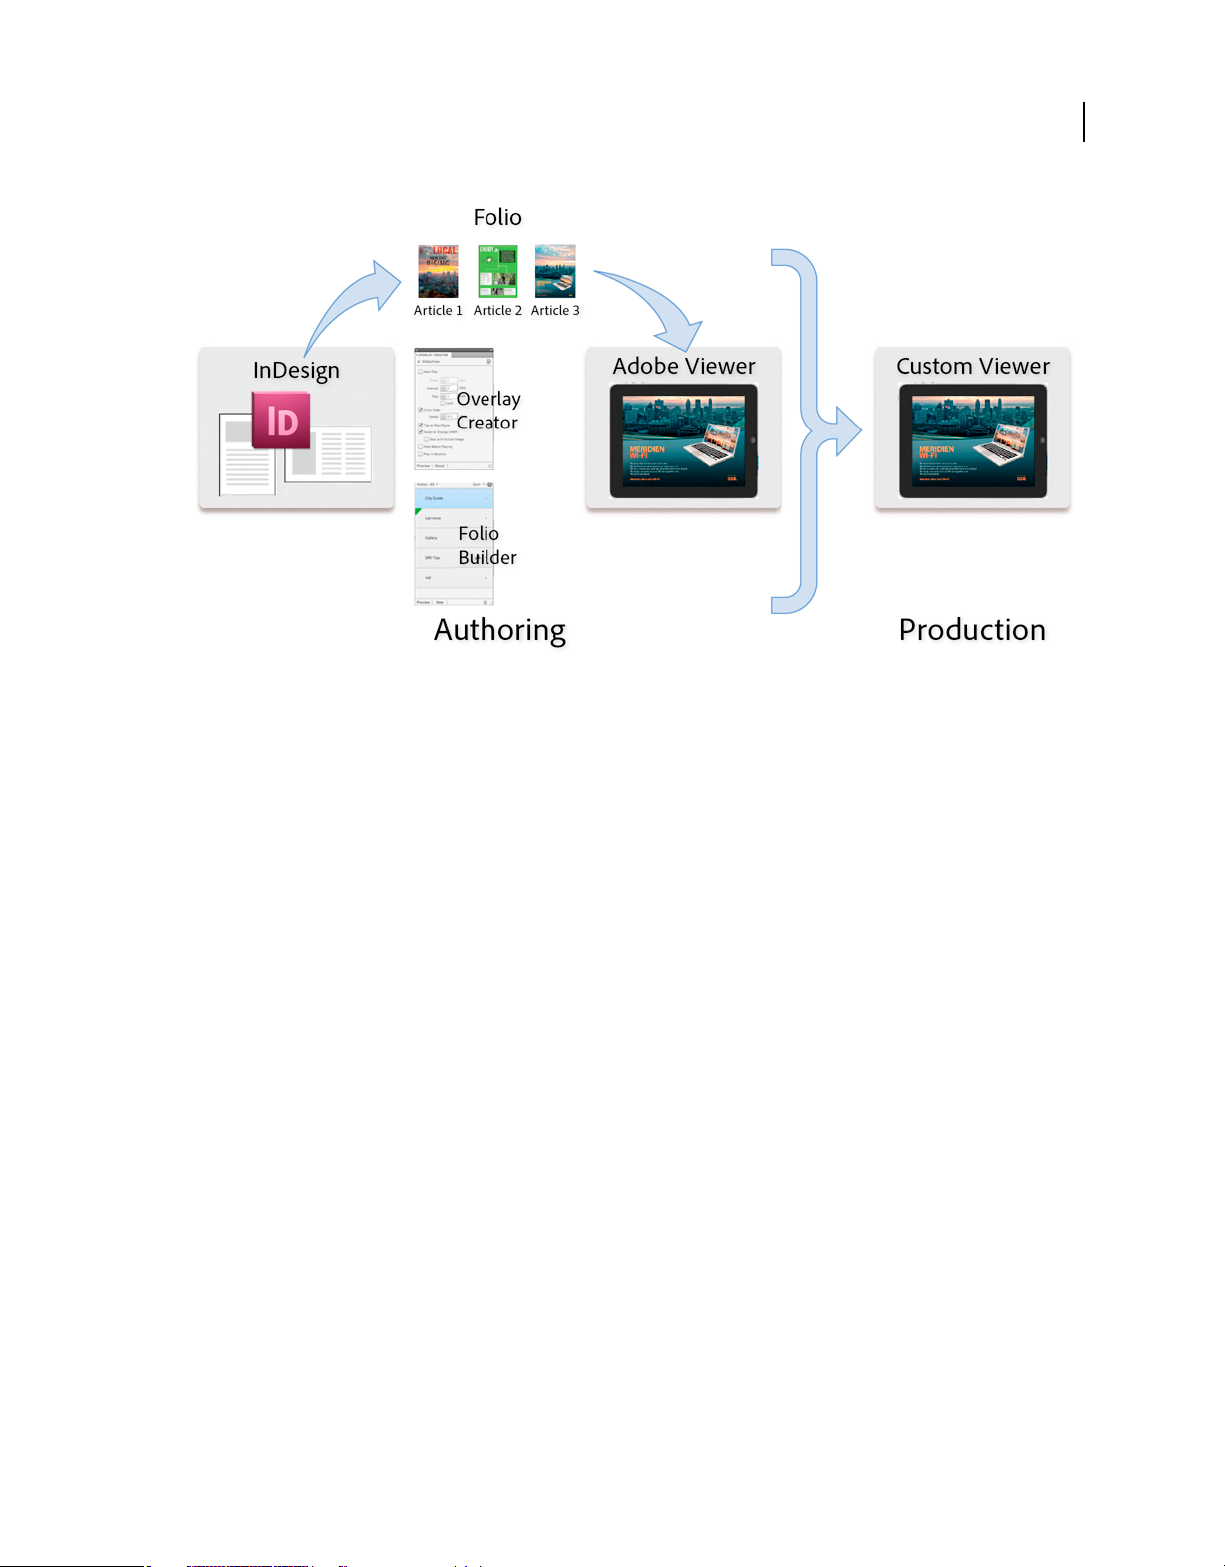
Integration with Adobe Digital Publishing Suite
To create richly designed, interactive publications for tablet devices, InDesign includes Folio Builder and Overlay
Creator panels. You can use these panels to create digital publications called folios.
Last updated 11/16/2011
Page 10
USING INDESIGN
What’s new
InDesign and Digital Publishing Suite workflow
4
See “Digital Publishing Suite overview” on page 566 for a bird’s eye view of the solution. For information on creating
digital publications for mobile devices, see www.adobe.com/go/learn_dps_help_en
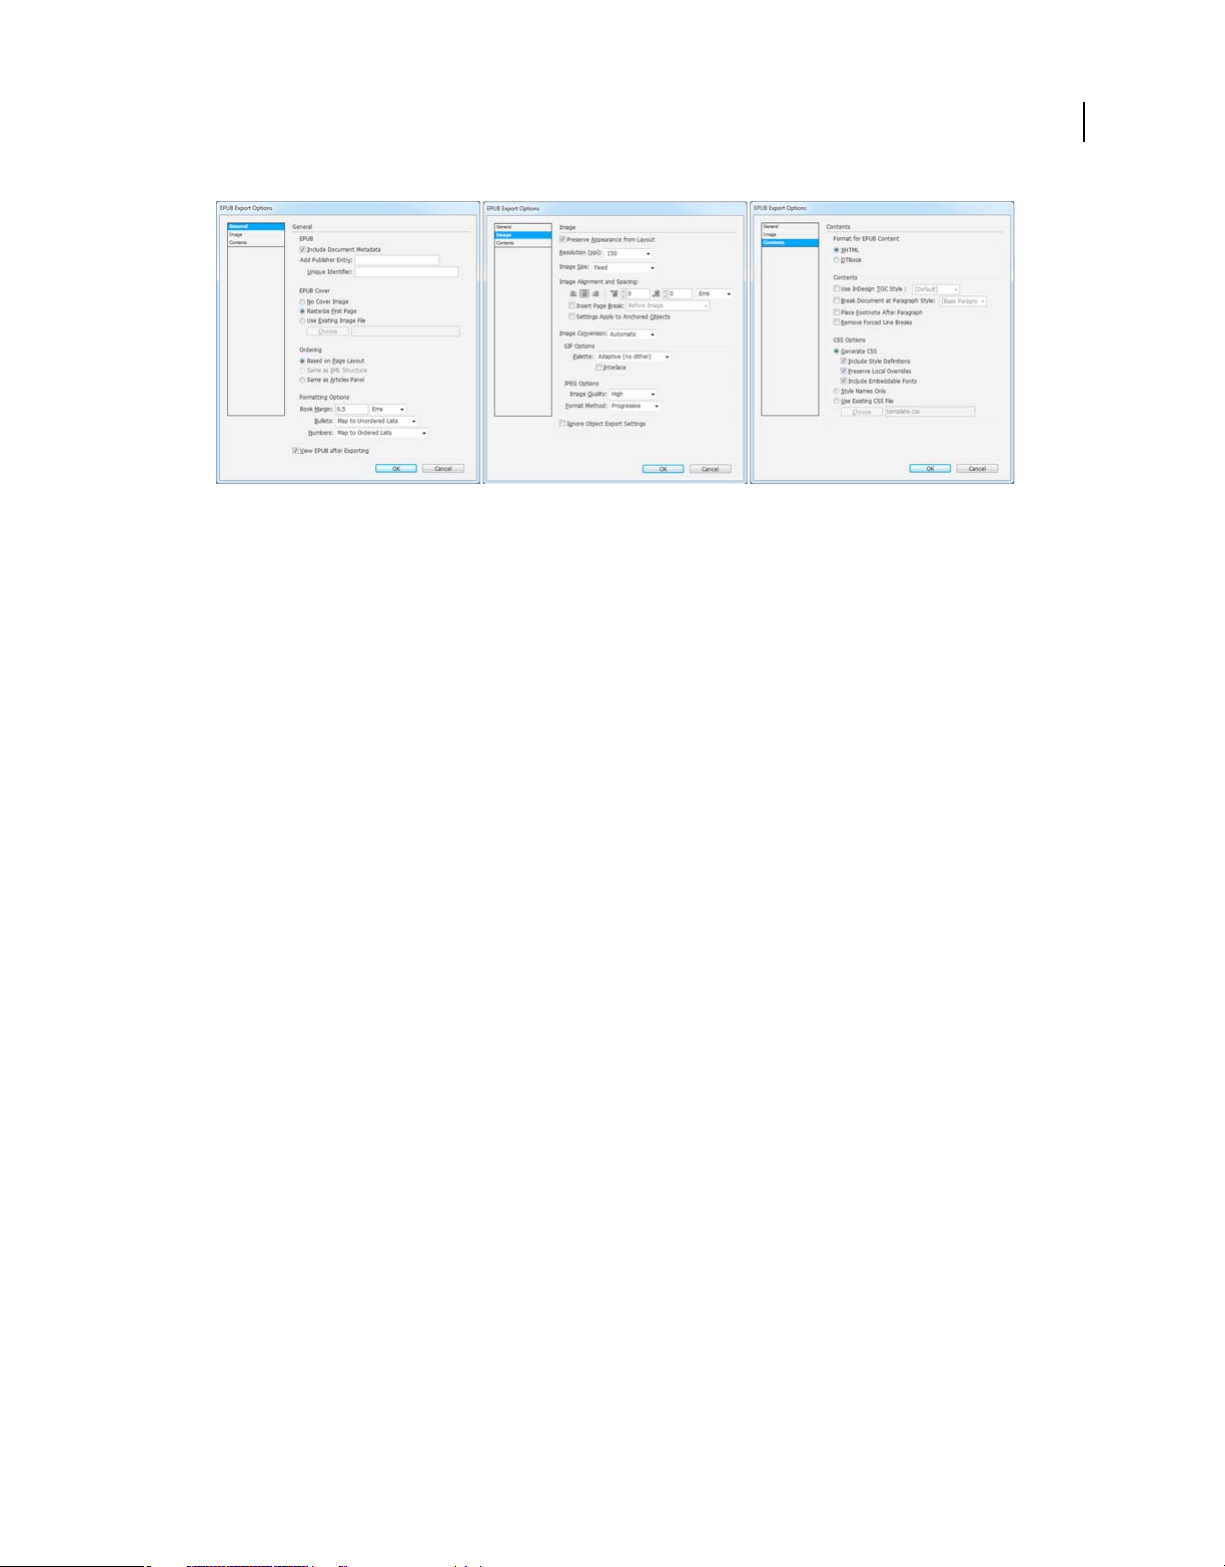
Improved EPUB and HTML export
InDesign CS5.5 contains a re-engineered EPUB and HTML export solution that offers several improvements to the
EPUB export workflow.
See “Export content for EPUB (CS5.5)” on page 124 and “Export content to HTML (CS5.5)” on page 119
Some of the features are listed below:
• General export options: Define book margins, use article order to specify reading order. See “EPUB General export
options” on page 124.
• Image export options: Define image resolution PPI settings, size, and added support for PNG images. You can also
specify image alignment settings, space before and after images, and insert page breaks. See
on page 125.
• Content export options: Break document by paragraph styles, enhancements to footnotes, remove soft returns. See
“EPUB Contents options” on page 126.
“EPUB Images options”
Last updated 11/16/2011
Page 11
USING INDESIGN
What’s new
EPUB Export options
• Audio and video tags in HTML: Placed audio and h.264 video files are enclosed in HTML5 <audio> and <video>
tags. An increasing numbers of hardware and software vendors now support HTML5 audio and video tags.
• J-language features: Support for vertical text and Ruby characters.
• Added support for sublists: Sublists formatted using the InDesign auto-bullet and auto-number features are
represented as nested ordered and unordered lists.
• Table headers and footers: Table headers and footers are exported to EPUB and HTML.
• Table of contents: InDesign table of content is now included in the EPUB export instead of the NCX manifest.
• Publish date: Publish date metadata value is automatically inserted. Other data such as author and keywords, that
you provide using the File > File Info are also exported to the EPUB file.
5
Usability and productivity
PDF Enhancements
Support for PDF/X-4:2010 has been added. PDF/X-4:2010 is identical to the earlier PDF/X-4:2008, except that it
relaxes certain restrictions on how layers can be specified in the PDF. This change allows InDesign CS5.5 to allow
creating layers in the exported PDF, and provides PDF 1.6 compatibility. Apart from layers support, PDF 1.6 also
allows JPEG2000 compression as an option for the color and grayscale images.
If you earlier used PDF/X-4:2008 to certify files that you sent to printers, don’t expect any changes in your workflow.
Note: The default [PDF/X-4:2008] Adobe PDF preset has been retained, but updated to use the PDF/X-4:2010
specification, so that your existing workflows do not break.
Dictionary enhancements
InDesign supports the open-source HunSpell dictionaries for most languages to verify spelling and to hyphenate
words, in addition to the existing Proximity and WinSoft dictionaries.
Proximity Portuguese orthogonal agreement dictionary has been added.
For information on working with dictionaries, see “Hyphenation and spelling dictionaries” on page 185.
Drag and drop anchored objects
You can now drag an existing object into a text frame to anchor it. Drag the blue square near the top right corner to
the location you want to anchor it to.
Last updated 11/16/2011
Page 12
USING INDESIGN
What’s new
Drag the blue square to anchor the object
See “Working with anchored objects using drag-and-drop (CS5.5)” on page 227
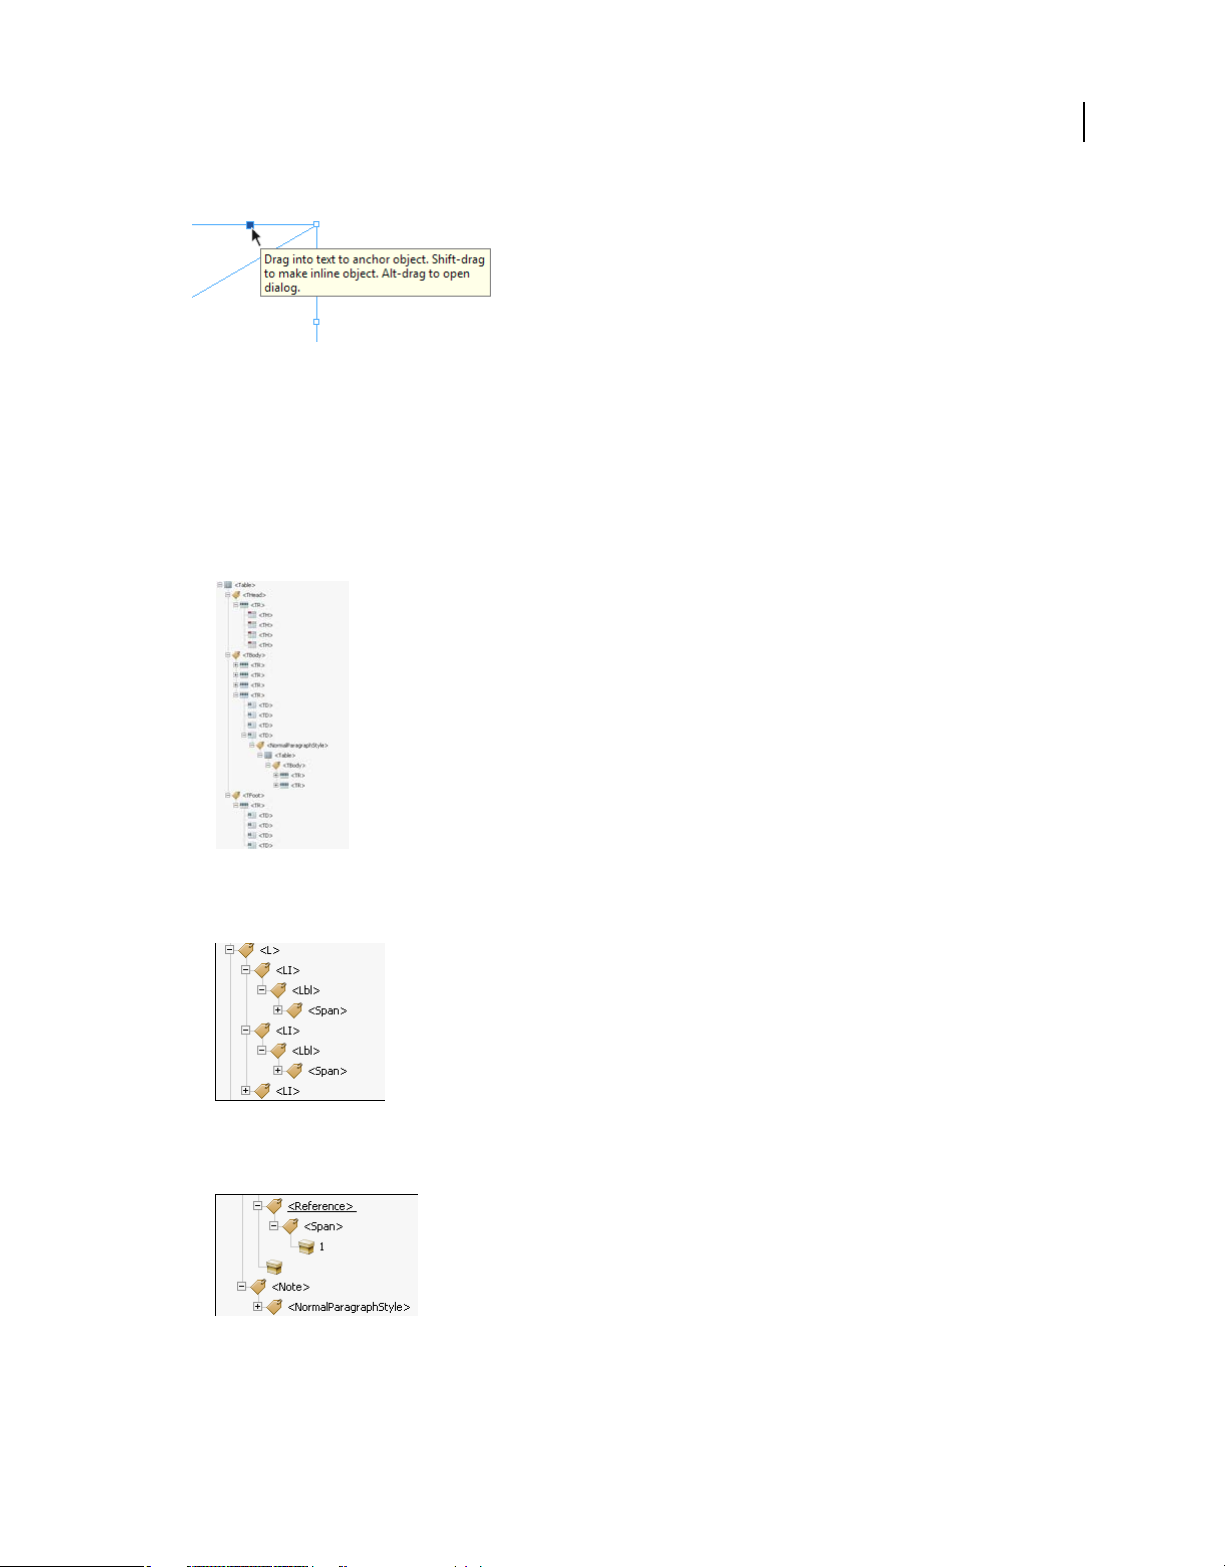
Better PDF tag support
Create accessible PDFs for Adobe Acrobat, Adobe Reader, or other software such as screen readers. InDesign
automatically adds tags for the following:
• Tables and nested tables
6
Table tags in exported PDF
• Lists and nested lists
List tags in exported PDF
• Footnotes
Footnote tags in exported PDF
• Hyperlinks
Last updated 11/16/2011
Page 13

USING INDESIGN
What’s new
Hyperlink tags in exported PDF
Note: The THead, TBody, and TFoot tags are honored only if you export to PDF version 1.5 or higher
For information exporting as PDF, see “Export to PDF for printing” on page 501 and “Create interactive documents
for PDF” on page 530.
PDF enhancements
Support for PDF/X-4:2010 has been added. PDF/X-4:2010 is identical to the earlier PDF/X-4:2008, except that it
relaxes certain restrictions on how layers can be specified in the PDF. This change allows InDesign CS5.5 to allow
creating layers in the exported PDF, and provides PDF 1.6 compatibility. Apart from layers support, PDF 1.6 also
allows JPEG2000 compression as an option for the color and grayscale images.
If you earlier used PDF/X-4:2008 to certify files that you sent to printers, don’t expect any changes in your workflow.
Note: The default [PDF/X-4:2008] Adobe PDF preset has been retained, but updated to use the PDF/X-4:2010
specification, so that your existing workflows do not break.
7
What’s new (CS5)
The InDesign CS5 Feature Tour contains video overviews for most of the new features on Adobe TV.
Design and layout
Multiple page sizes
You can define different page sizes for pages within a single document. This feature is especially useful when you want
to manage related designs in one file. For example, you can include business card, postcard, letterhead, and envelope
pages in the same document.
To create multiple page sizes, use the Page tool to select a page, and then change the settings in the Control panel. See
“Use multiple page sizes” on page 69.
New Layers panel
The new InDesign Layers panel is now more similar to the Illustrator Layers panel. Each layer has a disclosure triangle
that can be expanded to reveal the objects and their stacking order on that given layer for the active spread.
By default, new page items are given generic names such as <rectangle> and <path>. You can give any page item a
custom name by click-pause-clicking the item name in the Layers panel.
You can change the stacking order of objects by dragging items in the list. The Layers panel also lets you show or hide
and lock or unlock individual page items.
See “Layers” on page 78.
Last updated 11/16/2011
Page 14

USING INDESIGN
What’s new
Custom page sizes
Instead of editing a text file to create custom page sizes, you can use the Custom Page Size dialog box to make custom
page sizes available when you create documents. See
“Create custom page sizes” on page 46.
Simplified transformations
InDesign includes several new selection and transformation features that simplify manipulating objects.
Content grabber The content grabber appears as a circle when you hover over an image using the Selection tool. Use
the content grabber to select and move the content of a frame with the Selection tool still selected. This behavior
effectively replaces that of the Position tool, which is removed from InDesign CS5. If you rotate the content with the
frame, a horizontal line appears in the center of the content grabber. This line mirrors the rotation angle of the content.
The content grabber draws over each frame that is part of a group. Use the Selection tool to reposition content within
a frame that is part of the group.
If you don’t want the content grabber to appear when you hover over an image, choose View > Extras > Hide Content
Grabber.
See “Select objects” on page 402.
Double-click behavior Double-clicking graphics with the Selection tool no longer switches to the Direct Selection tool.
Instead, double-clicking a graphic frame now selects the content in the frame. If the content is selected, double-clicking
the content selects the content’s frame. (When the content is selected, you can also click the edge of its containing
frame to select the frame.)
8
In a group, double-clicking an item in the group selects the item you double-clicked. To reselect the group, doubleclick the edge of the selected item or group. In all cases, the Selection tool remains the active tool. This approach gives
you a quick and consistent way to select graphic frames and groups.
Frame edge highlighting InDesign now temporarily draws the frame edges as you use the Selection tool to hover over
items on a page. This method makes it easier to find the item you want before you select it. The color of the frame edge
drawn matches the color of the layer the object is on. Groups are drawn with a dashed line. This feedback is especially
helpful when working in Preview Mode or with Hide Frame Edges selected.
Path and point highlighting When you hover over a page item with the Direct Selection tool, InDesign displays the
path and display the path points. This feedback makes it easier to view the path point you want to manipulate. You no
longer have to select the object with the Direct Selection tool and then select the path point. You can simply drag the
point you want.
Rotate As in Illustrator, you don’t have to switch to the Rotate tool to rotate a selected page item. With the Selection
tool, you can simply position the pointer just outside a corner handle, and drag to rotate the item. When you stop
dragging, the Selection tool remains the active tool. See
Transform multiple selected items You no longer have to group multiple items before you can resize, scale, or rotate
“Rotate an object using the Selection tool” on page 415.
them with the Selection tool. Simply select the items you want to transform, and you see a transformation bounding
box around the selected items. Dragging a handle resizes the selected elements; holding down Shift resizes them
proportionally. Holding down Ctrl (Windows) or Command (Mac OS) scales them. Holding down Ctrl+Shift
(Windows) or Command+Shift (Mac OS) scales them proportionally. Including Alt (Windows) or Option (Mac OS)
performs the transformations from the center of the selected objects. See
Live Screen Drawing In InDesign CS5, you see the content draw as you drag it. In previous InDesign versions, you
“Transform objects” on page 412.
pause before dragging to see the content draw. You can change the Live Screen Drawing setting in Interface
preferences to use the previous behavior. See
“Change Interface preferences” on page 26.
Last updated 11/16/2011
Page 15

USING INDESIGN
What’s new
Favor the selected object If you select one of several overlapping page items and begin dragging, the selected object
remains selected. To select a different item, simply click a portion of that different item that is not overlapping or
intersecting the currently selected item.
Live Distribute When transforming multiple selected objects, InDesign CS5 lets you proportionally resize the space
between the selected items instead of resizing the actual items. See
“Distribute objects using Live Distribute” on
page 428.
Reordering of the Transformation Tools The Rotate, Scale, and Shear tools appear under the Free Transform tool in
the Tools panel. You can rotate, resize, and scale objects without having to switch from the Selection tool.
Gap tool
The Gap tool provides a quick way to adjust the size of a gap between two or more items. The Gap tool is a one-step
way to adjust your layout by directly manipulating the whitespace. See
“Align objects using the Gap tool” on page 427.
Paragraphs that span or split columns
In InDesign CS5, you can make a paragraph span multiple columns without creating separate text frames. You can
also split a paragraph into multiple columns within the same text frame. See
“Create paragraphs that span or split
columns” on page 267.
Keep with previous
The Keep Options dialog box now has a Keep With Previous option that keeps the first line of the current paragraph
with the last line of the previous paragraph. See
“Control paragraph breaks using Keep Options” on page 263.
9
Balanced columns
The Balance Columns setting in the Text Frame Options dialog box lets you automatically balance text across columns
in a multiple column text frame. See
“Add columns to a text frame” on page 131.
Vertical justification in non-rectangular frames
In previous versions of InDesign, applying a non-rectangular text frame causes vertical justification settings to be
ignored. In InDesign CS5, you can apply both vertical justification and corner effects and other irregular-shaped
frames. See
“Align or justify text vertically within a text frame” on page 267.
Live corner effects
Click the yellow square that appears near the upper right corner of a selected frame to apply corner effects to
rectangular frames. In addition, you can now apply a different corner effect and a different corner radius to each
corner. See
“Use Live Corners” on page 363.
Swatches in Control panel
You can apply swatches to objects directly in the Control panel. Select an object and choose the swatch from the Fill
or Stroke menu in the Control panel. You can also drag the current color swatch displayed in the Control panel and
apply it to other objects. See
“Apply color” on page 465.
Grid place enhancements
When placing multiple files, simply start dragging, and then use the arrow keys to change the number of columns and
rows of the placed images. While dragging, hold down Ctrl (Windows) or Command (Mac OS) and press arrow keys
to change the gutter space. See
“Place multiple graphics” on page 383 and “Create contact sheets” on page 388.
Last updated 11/16/2011
Page 16

USING INDESIGN
What’s new
Auto-Fit
Select the Auto-Fit option so that the image is resized automatically whenever you resize the frame. See “Using Auto
Fit” on page 433.
Drawing multiple frames in a grid
When using frame creation tools such as the Rectangle or Type tool, you can press arrow keys to create equally spaced
frames. See
“Draw multiple objects as a grid” on page 343.
Duplicating objects into a grid
You can create a grid of objects while dragging a copy of a selected object. See “Duplicate objects into a grid” on
page 430.
Live captions from metadata
In InDesign CS5, you can generate captions based on image metadata using a number of methods.
• You can generate captions while you place images by turning on the Create Static Captions checkbox in the Place
dialog box.
• You can generate captions from placed images. First, use the Caption Setup dialog box to identify which metadata
is included in the image. Then choose an option from the Object > Captions menu to generate either a live or static
caption.
• You can add a text variable to a text frame that display the metadata of the image that touches or is grouped with
the text frame.
See “Captions” on page 238.
10
Mini Bridge
Mini Bridge is a subset of Adobe Bridge that is available as a panel within InDesign. Mini Bridge lets you navigate your
file system and preview files as visual thumbnails without having to leave InDesign. You can drag-and-drop files from
Mini Bridge to InDesign as an alternative way to place files into a document. Doing so loads the dragged images into
the place cursor, just like dragging from Bridge. You can also drag selected items into Mini Bridge to create snippets.
For a video on using Mini Bridge with InDesign, see www.adobe.com/go/lrvid5051_br_en.
Improved Adobe Bridge integration
InDesign CS5 and Adobe Bridge CS5 are more integrated in two ways.
Page Thumbnails A new File Handling preference option lets you generate page thumbnails for more than the first
page of InDesign files. The default number of pages to generate thumbnails for is set to 2, but you can change it to 1,
2, 5, 10, or All. You can now see previews of the pages within an INDD file in the Preview pane of Bridge. Choosing
more thumbnail pages may cause your InDesign document to take longer to save. See
“Include previews in saved
documents” on page 106.
View Links in an InDesign File while in Bridge You can view the links inside an InDesign document while in Adobe
Bridge, without having to open the document in InDesign. For example, suppose that you don’t remember the location
of an image, but you remember placing it in an InDesign document. In Adobe Bridge, navigate to the InDesign file,
and then display thumbnails of all the placed files contained within the selected InDesign file.
See “Using Adobe Bridge with InDesign” on page 103.
Last updated 11/16/2011
Page 17

USING INDESIGN
What’s new
Cross media design
Interactive documents and presentations
FLV and MP3 import You can import video files in Flash Video format (.FLV and .F4V), H.264-encoded files (such as
MP4), and SWF files. You can import audio files in MP3 format. Legacy media file types like QuickTime (.MOV),
.AVI, and .WMV are still supported. However, use FLV, F4V, MP4, and MP3 formats to take full advantage of the rich
media support offered in the most recent versions of Acrobat, Adobe Reader, and Adobe Flash Player.
Use Adobe Media Encoder to convert older media file types to .FLV. See “Relink legacy media files” on page 551.
Media panel The Media panel lets you preview SWF, FLV, F4V, MP4, and MP3 files directly in InDesign. For FLV,
F4V, and MP4 files, you can choose any frame in the video as the placeholder poster image. You can choose which
video playback controls you want the viewer of your interactive document to have. The Media panel lets you create
navigation points, which are time-code markers that you can target with button actions. See
files to documents” on page 548.
Motion presets The Animation panel lets you assign a motion preset to any page item as a way to quickly create an
animation. These motion presets are the same motion presets found in Adobe Flash CS5 Professional. Furthermore,
InDesign can import any custom motion preset created in Flash, enabling InDesign and Flash users to collaborate to
create animation effects. See
Animation panel Use the Animation panel to create or edit animation effects. You can edit supported animation
“Animate a document with motion presets” on page 552.
attributes such as Position, Scale, Rotate, and Opacity. Save any custom animation created in InDesign as a custom
motion preset that can be shared with others.
“Add movies and sound
11
Use the Animation panel to specify when an animated object is played, such as when the page is loaded or clicked. See
“Animation” on page 551.
Timing panel Use the Timing panel to change the order of when animated objects play. See “Use the Timing panel to
change the animation order” on page 555.
Object States panel Use the Object States panel to create multiple versions of an object. For example, you can create a
single page object with 20 different states, and each state contains a different photo. Anyone who opens the PDF or
SWF file can click forward and back buttons to browse the photo gallery. See
“Create a multi-state object slide show”
on page 564.
Preview panel In InDesign, you can preview interactivity and animation of the current selection, the current spread,
or the entire document using the Preview panel. You can also test interactive elements in a web browser. See
“Preview
interactive documents” on page 532.
Pixels as unit of measurement You can now specify Pixels for your unit of measure in Preferences > Units &
Increments. You can override the current unit of measure by adding “px” to your values in edit fields in the Control
panel, dialog boxes, and other panels. When using pixels, objects and X/Y coordinates snap to whole pixel values, and
the line weights listed in the Stroke panel also change to pixels. See
Convert URLs to hyperlinks Use the Convert URLs To Hyperlinks command to search the current selection, story, or
“Change rulers and measurement units” on page 49.
document for URL strings and convert them to hyperlinks. You can also assign a character style to the found URLs.
“Convert URLs to hyperlinks” on page 539.
See
Improved export to Flash Player
SWF file export can now include animation, video, audio, and remote rollovers. In addition, several new options let
you control the final SWF file output. See
“Create interactive SWF (Flash) files for the web” on page 523.
Last updated 11/16/2011
Page 18

USING INDESIGN
What’s new
Improved export to Flash Professional
InDesign CS5 exports to FLA format rather than XFL format for editing the file in Flash Professional. FLA export
options support rich media content and offer more ways to handle text. See
“Create FLA files for the web” on page 526.
Improved export to Interactive PDF
InDesign CS5 includes separate commands for exporting print and interactive PDF files.
InDesign CS5 exports all rich media content to the Rich Media Annotation Layer when exporting to Interactive PDF,
resulting in more reliable playback in Adobe Reader. For best results, video files must be in FLV or F4V format and
audio files must be in MP3 format.
A few new options are available when exporting to interactive PDF, including initial view options, presentation
settings, and page transitions. See
“Create interactive documents for PDF” on page 530.
Improved XHTML export
Exporting to XHTML is a way to extract your content out of an InDesign document and hand it over to a web
developer who can repurpose it using a web application such as Dreamweaver. InDesign CS5 enhancements include
the ability to match the attributes of InDesign text formatting, preserve local formatting, and control the order of
content. InDesign Tables are now assigned unique IDs, allowing them to be referenced as Spry data sets in
Dreamweaver. See
“Export content to Dreamweaver (CS5)” on page 116.
12
Improved JPEG export
The Export JPEG dialog box includes several new options, including the ability to specify the color space, use
document bleed settings, and simulate overprinting. See
“Export to JPEG format” on page 115.
Collaboration
Integrated comment and review
CS Review is an online service that provides a simple way to share designs on the web so others can provide feedback.
Use the CS Review panel in InDesign to upload snapshots of the current document to an Acrobat.com workspace,
where others can add comments. See
Track text changes
When the Track Text Changes feature is turned on, changes made to the text are tracked on a per user basis. You can
view changes in Story Editor (but not in Layout view). Text changes that are supported include deleting text, moving
text, and inserting text. Use the Track Changes panel to accept and reject changes in the document. See
reviewing changes” on page 193.
Document installed fonts
Any fonts in a Document Fonts folder that’s in the same location as an InDesign document are available when the
document is opened. Fonts installed by one document are not available to other documents. The Package command
can generate a Document Fonts folder when you want to share your document or move it to a different computer. See
“Document installed fonts” on page 249.
“Reviewing InDesign documents” on page 104.
“Tracking and
Buzzword integration
Buzzword is a web-based text editor that lets users create and store text files on a web server. In InDesign CS5, you can
import and export text from Buzzword documents. See
“Import Buzzword documents” on page 141 and “Export
content to Buzzword” on page 127.
Last updated 11/16/2011
Page 19

USING INDESIGN
What’s new
Presentation Mode
InDesign CS5 has a new screen mode called Presentation Mode. In Presentation Mode, the application menu and all
panels are hidden. Keystrokes and clicks let you move forward or backward through the document one spread at a
time. See
“Use Presentation Mode” on page 532.
Color labels for page thumbnails
You can now assign colored labels to the page thumbnails in the Pages panel. See “Create color labels for page
thumbnails” on page 64.
Usability and productivity
Background tasks
When you save large documents or export them to PDF or IDML files, you can continue working on your document.
You can also queue up multiple PDF exports in the background. Use the Background Tasks panel (Window > Utilities
> Background Tasks) to view the progress of the export processes. See
Spring-loaded tools shortcut
You can temporarily switch from the current tool to any other tool by holding down the appropriate letter key. As you
hold down the key, your current tool changes the new tool, and when you release it, you return to the previous tool.
For example, press the U key to use the Gap tool, and then release it to return to the Selection tool. See
temporarily” on page 32.
“Background Tasks panel” on page 506.
“Select tools
13
Tool Hints panel
The Tool Hints panel (Window > Utilities > Tool Hints) lists all the hidden modifier key behaviors available for the
currently selected tool. See
“View tool hints” on page 32.
Community Help
Adobe Community Help offers access to complete Adobe product documentation as well as to community-created
learning content and other learning content on Adobe.com. Adobe Community Help includes an AIR-based viewer
that displays the latest online Help or defaults to a local version of Help when a web connection is unavailable.
Community Help also includes expert-moderated comments and user ratings on Adobe documentation, knowledge
base articles, tutorials, and other content.
Specify starting page number
When you create a document in InDesign CS5, you can make the first page start on a specified page number. If you
specify an even number with facing pages turned on, the document begins with a two-page spread. You can also change
the starting page number in the Document Setup dialog box after you’ve created a document. See
“Create new
documents” on page 44.
Edit Original for multiple selected items
You can choose the Edit Original command to open multiple images in their respective editing applications. See “Edit
original artwork” on page 395.
New options for locking objects
To lock and unlock objects, you can now choose Object > Lock or Object > Unlock All On Spread. Clicking the lock
icon also unlocks a locked object.
Last updated 11/16/2011
Page 20

USING INDESIGN
What’s new
The new Prevent Selection Of Locked Objects option in General preferences lets you determine whether you can select
locked objects.
Relink file extensions
Relink files based on file extension. For example, you can replace a set of JPEG files with TIFF files. See “Relink files
with different file extensions” on page 395.
Hide objects
You can now choose Object > Hide to hide objects on the page. Hidden objects are not printed or exported, and they
cannot be selected. Choose Object > Show All On Spread to view all hidden objects.
Sticky Preview check boxes
InDesign now remembers whether the Preview checkbox is selected in a dialog box after you exit and restart.
Place cursor when dragging from Adobe Bridge
In previous versions, dragging an image from Adobe Bridge or the desktop inserted the image on to the page, creating
a frame the size of the image. In InDesign CS5, this action loads the place cursor, letting you drag a proportionally sized
frame for your image.
14
Open book files in Explorer or Finder
A command appears on the books panel menu that lets you view a document in an Explorer or Finder window.
Miscellaneous enhancements
Round CMYK values to whole numbers The Colors panel round the values for the CMYK sliders to the nearest whole
value.
Delete all guides A new Delete All Guides On Spread command appears in the View > Grids & Guides menu.
Zoom from dialog boxes You can now use the keyboard shortcuts to zoom in and out of your document when you
have a modal dialog box open. Press Ctrl+- or Ctrl+= (Windows) or Command+- or Command +=.
New default font The default font is changed from Times (Mac) and Times New Roman (Windows) to the cross-
platform OpenType version of Minion Pro Regular.
Collapse multiple links to same source In InDesign, links to images placed multiple times in a document are collapsed
into a single row in the Links panel. You can now turn off this collapsing behavior with a new option in the Panel
Options dialog box.
Remember Story Editor window location When you close and reopen a Story Editor window, InDesign reopens the
window to its previous width, height, and location on the screen.
Fold marks If you select Crop Marks while printing spreads, fold marks are printed as solid lines.
Menu commands changed or moved The following menu commands have new names or new locations.
Choose Window > Workspace > [New in CS5] to highlight menu commands of new and enhanced features.
InDesign CS4 command InDesign CS5 new location
File > Export For Digital Editions File > Export For > EPUB
File > Export For Dreamweaver File > Export for > Dreamweaver
Object > Lock Position Object > Lock
Last updated 11/16/2011
Page 21

USING INDESIGN
What’s new
InDesign CS4 command InDesign CS5 new location
Object > Unlock Position Object > Unlock All On Spread
Object > Interactive > Movie Options / Sound Options Media panel
15
Object > Paths > Convert Point > Line End / Corner / Smooth / Smooth
Symmetrical
View > Show/Hide Hyperlinks, Show/Hide Text Threads, Show/Hide
Frame Edges, Show/Hide Assigned Frames, and Show/Hide Notes
Window > Assignments Window > Editorial > Assignments
Window > Attributes Window > Output > Attributes
Window > Automation > Data Merge / Script Label / Scripts Window > Utilities > Data Merge / Script Label / Scripts
Window > Color Window > Color > Color
Window > Gradient Window > Color > Gradient
Window > Object Styles Window > Styles > Objects Styles
Window > Swatches Window > Color > Swatches
Window > Tags Window > Utilities > Tags
Window > Type & Tables > Notes Window > Editorial > Notes
Window > Type & Tables > Cell Styles / Character Styles / Paragraph
Styles > Table Styles
Help/InDesign > Configure Plug-ins Help/InDesign > Manage Extensions
Object > Convert Point > Plain / Corner / Smooth / Symmetrical
View > Extras > Show/Hide Hyperlinks, Show/Hide Text Threads,
Show/Hide Frame Edges, Show/Hide Assigned Frames, and
Show/Hide Notes
Window > Styles > Cell Styles / Character Styles / Paragraph Styles >
Table Styles
Last updated 11/16/2011
Page 22

Chapter 2: Workspace
The Adobe® InDesign® workspace is arranged to help you focus on designing and producing pages efficiently. When
you first start InDesign, you see the default workspace, which you can customize to suit your needs.
Click the following links for details and procedures.
Workspace basics
Click the following links for more information.
Workspace overview
You create and manipulate your documents and files using various elements, such as panels, bars, and windows. Any
arrangement of these elements is called a workspace. The workspaces of the different applications in Adobe® Creative
Suite® 5 share the same appearance so that you can move between the applications easily. You can also adapt each
application to the way you work by selecting from several preset workspaces or by creating one of your own.
16
Although the default workspace layout varies in different products, you manipulate the elements much the same way
in all of them.
Last updated 11/16/2011
Page 23
USING INDESIGN
Workspace
17
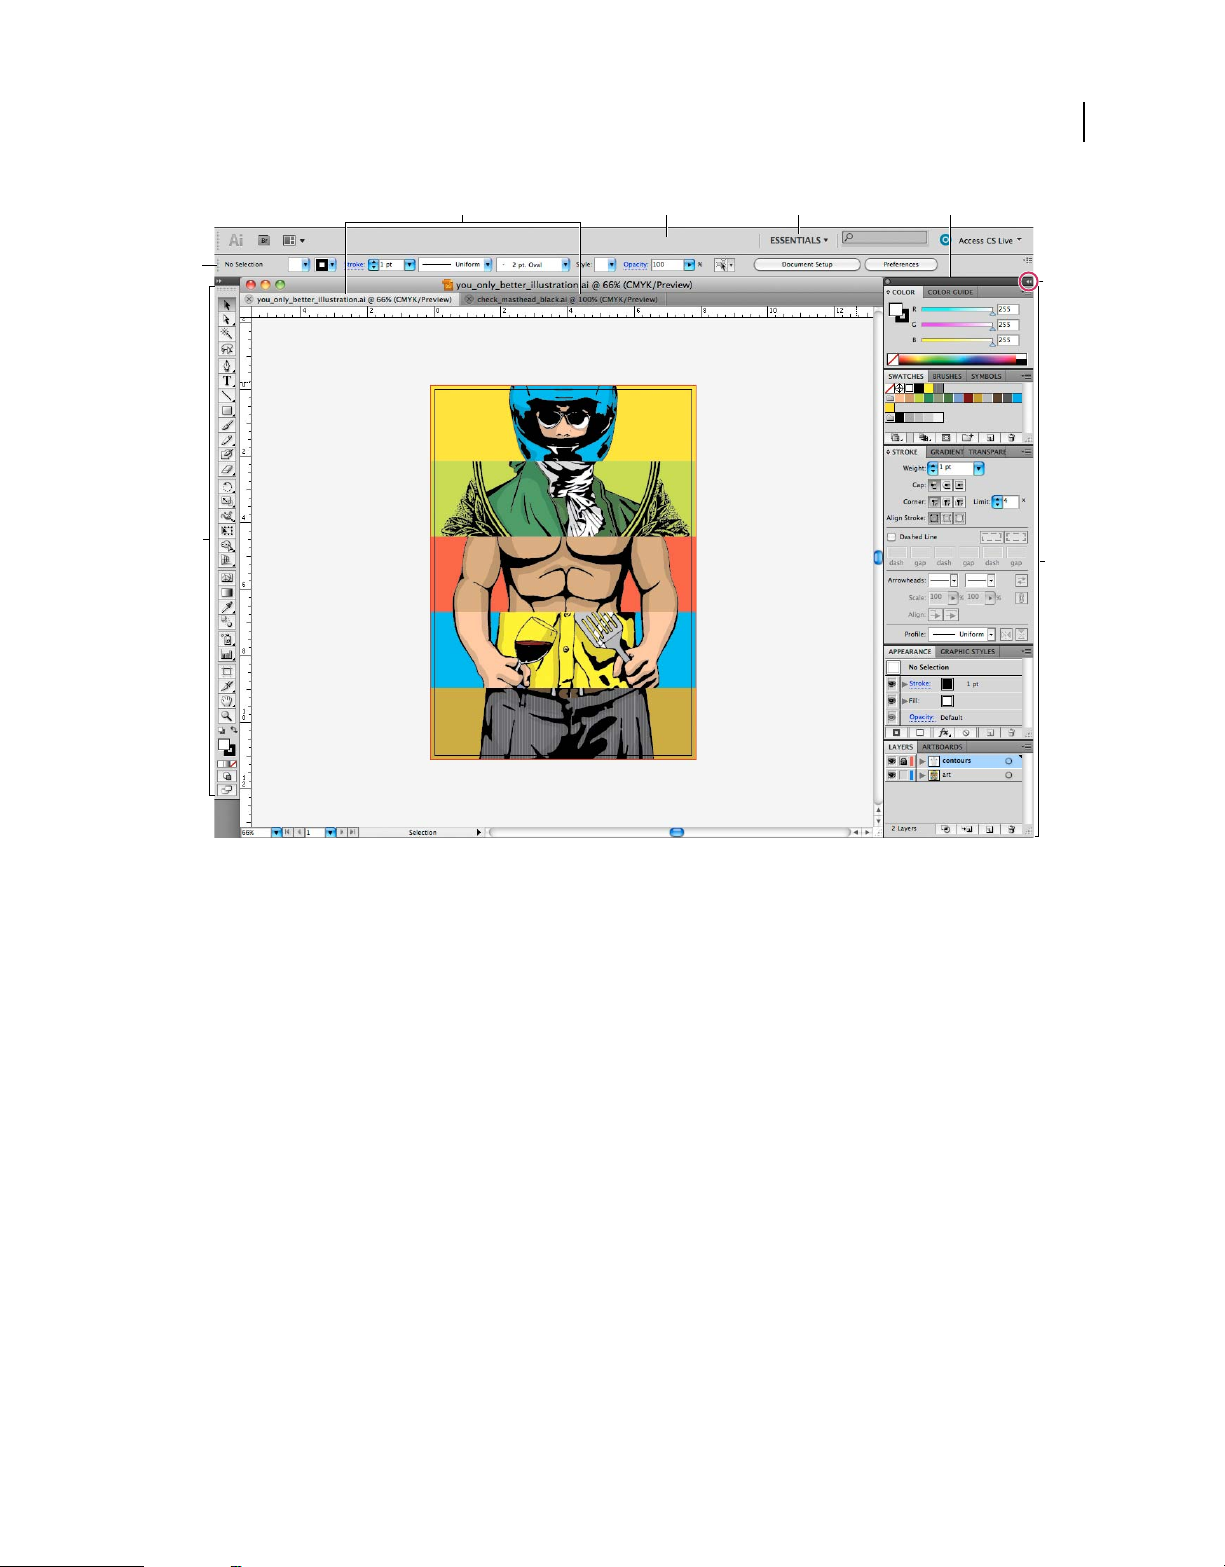
A
E
F
B DC
G
H
Default Illustrator workspace
A. Tabbed Document windows B. Application bar C. Workspace switcher D. Panel title bar E. Control panel F. Tools panel G. Collapse To
Icons button H. Four panel groups in vertical dock
• The Application bar across the top contains a workspace switcher, menus (Windows only), and other application
controls. On the Mac for certain products, you can show or hide it using the Window menu.
• The Tools panel contains tools for creating and editing images, artwork, page elements, and so on. Related tools are
grouped.
• The Control panel displays options for the currently selected tool. In Illustrator, the Control panel displays options
for the currently selected object. (In Adobe Photoshop® this is known as the Options bar. In Adobe Flash®, Adobe
Dreamweaver®, and Adobe Fireworks® this is known as the Property Inspector and includes properties of the
currently selected element.)
• The Document window displays the file you’re working on. Document windows can be tabbed and, in certain cases,
grouped and docked.
• Panels help you monitor and modify your work. Examples include the Timeline in Flash, the Brush panel in
Illustrator, the Layers panel in Adobe Photoshop®, and the CSS Styles panel in Dreamweaver. Panels can be
grouped, stacked, or docked.
• The Application frame groups all the workspace elements in a single, integrated window that lets you treat the
application as a single unit. When you move or resize the Application frame or any of its elements, all the elements
within it respond to each other so none overlap. Panels don’t disappear when you switch applications or when you
accidentally click out of the application. If you work with two or more applications, you can position each
application side by side on the screen or on multiple monitors.
Last updated 11/16/2011
Page 24

USING INDESIGN
Workspace
If you are using a Mac and prefer the traditional, free-form user interface, you can turn off the Application frame.
In Adobe Illustrator®, for example, select Window > Application Frame to toggle it on or off. (In Flash, the
Application frame is on permanently for Mac, and Dreamweaver for Mac does not use an Application frame.)
Hide or show all panels
• (Illustrator, Adobe InCopy®, Adobe InDesign®, Photoshop, Fireworks)To hide or show all panels, including the
Tools panel and Control panel, press
Tab.
• (Illustrator, InCopy, InDesign, Photoshop) To hide or show all panels except the Tools panel and Control panel,
press Shift+Tab.
You can temporarily display hidden panels if Auto-Show Hidden Panels is selected in Interface preferences. It’s
always on in Illustrator. Move the pointer to the edge of the application window (Windows®) or to the edge of the
monitor (Mac
OS®) and hover over the strip that appears.
• (Flash, Dreamweaver, Fireworks) To hide or show all panels, press F4.
Display panel options
❖ Click the panel menu icon in the upper-right corner of the panel.
You can open a panel menu even when the panel is minimized.
18
In Photoshop, you can change the font size of the text in panels and tool tips. In the Interface preferences, choose a
size from the UI Font Size menu.
(Illustrator) Adjust panel brightness
❖ In User Interface preferences, move the Brightness slider. This control affects all panels, including the Control
panel.
Reconfigure the Tools panel
You can display the tools in the Tools panel in a single column, or side by side in two columns. (This feature is not
available in the Tools panel in Fireworks and Flash.)
In InDesign and InCopy, you also can switch from single-column to double-column (or single-row) display by setting
an option in Interface preferences.
❖ Click the double arrow at the top of the Tools panel.
Manage windows and panels
You can create a custom workspace by moving and manipulating Document windows and panels. You can also save
workspaces and switch among them. For Fireworks, renaming custom workspaces can lead to unexpected behavior.
Note: The following examples use Photoshop for demonstration purposes. The workspace behaves the same in all the
products.
Rearrange, dock, or float document windows
When you open more than one file, the Document windows are tabbed.
• To rearrange the order of tabbed Document windows, drag a window’s tab to a new location in the group.
• To undock (float or untab) a Document window from a group of windows, drag the window’s tab out of the group.
Last updated 11/16/2011
Page 25
USING INDESIGN
Workspace
Note: In Photoshop you can also choose Window > Arrange > Float in Window to float a single Document window,
or Window > Arrange > Float All In Windows to float all of the Document windows at once. See tech note
kb405298
for more information.
Note: Dreamweaver does not support docking and undocking Document windows. Use the Document window’s
Minimize button to create floating windows (Windows), or choose Window > Tile Vertically to create side-by-side
Document windows. Search “Tile Vertically” in Dreamweaver Help for more information on this topic. The workflow
is slightly different for Macintosh users.
• To dock a Document window to a separate group of Document windows, drag the window into the group.
• To create groups of stacked or tiled documents, drag the window to one of the drop zones along the top, bottom, or
sides of another window. You can also select a layout for the group by using the Layout button on the Application bar.
Note: Some products do not support this functionality. However, your product may have Cascade and Tile commands
in the Window menu to help you lay out your documents.
• To switch to another document in a tabbed group when dragging a selection, drag the selection over the document’s
tab for a moment.
Note: Some products do not support this functionality.
Dock and undock panels
A dock is a collection of panels or panel groups displayed together, generally in a vertical orientation. You dock and
undock panels by moving them into and out of a dock.
19
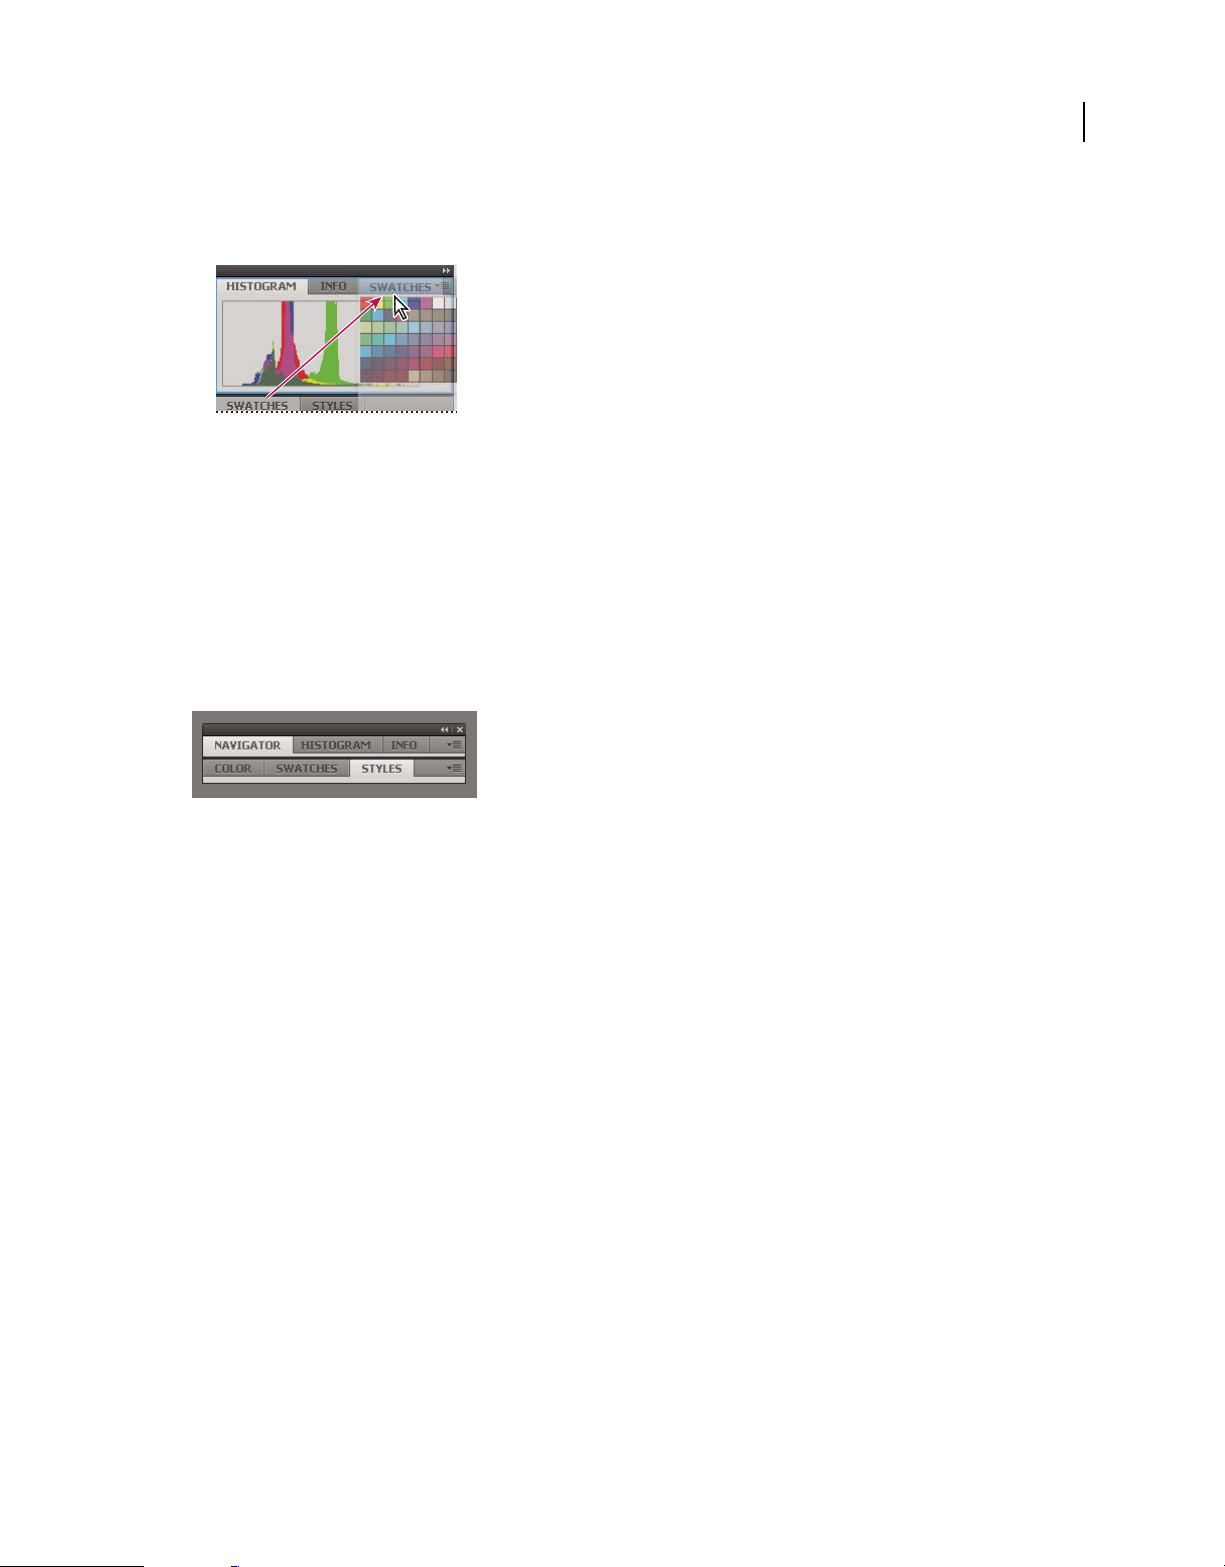
• To dock a panel, drag it by its tab into the dock, at the top, bottom, or in between other panels.
• To dock a panel group, drag it by its title bar (the solid empty bar above the tabs) into the dock.
• To remove a panel or panel group, drag it out of the dock by its tab or title bar. You can drag it into another dock
or make it free-floating.
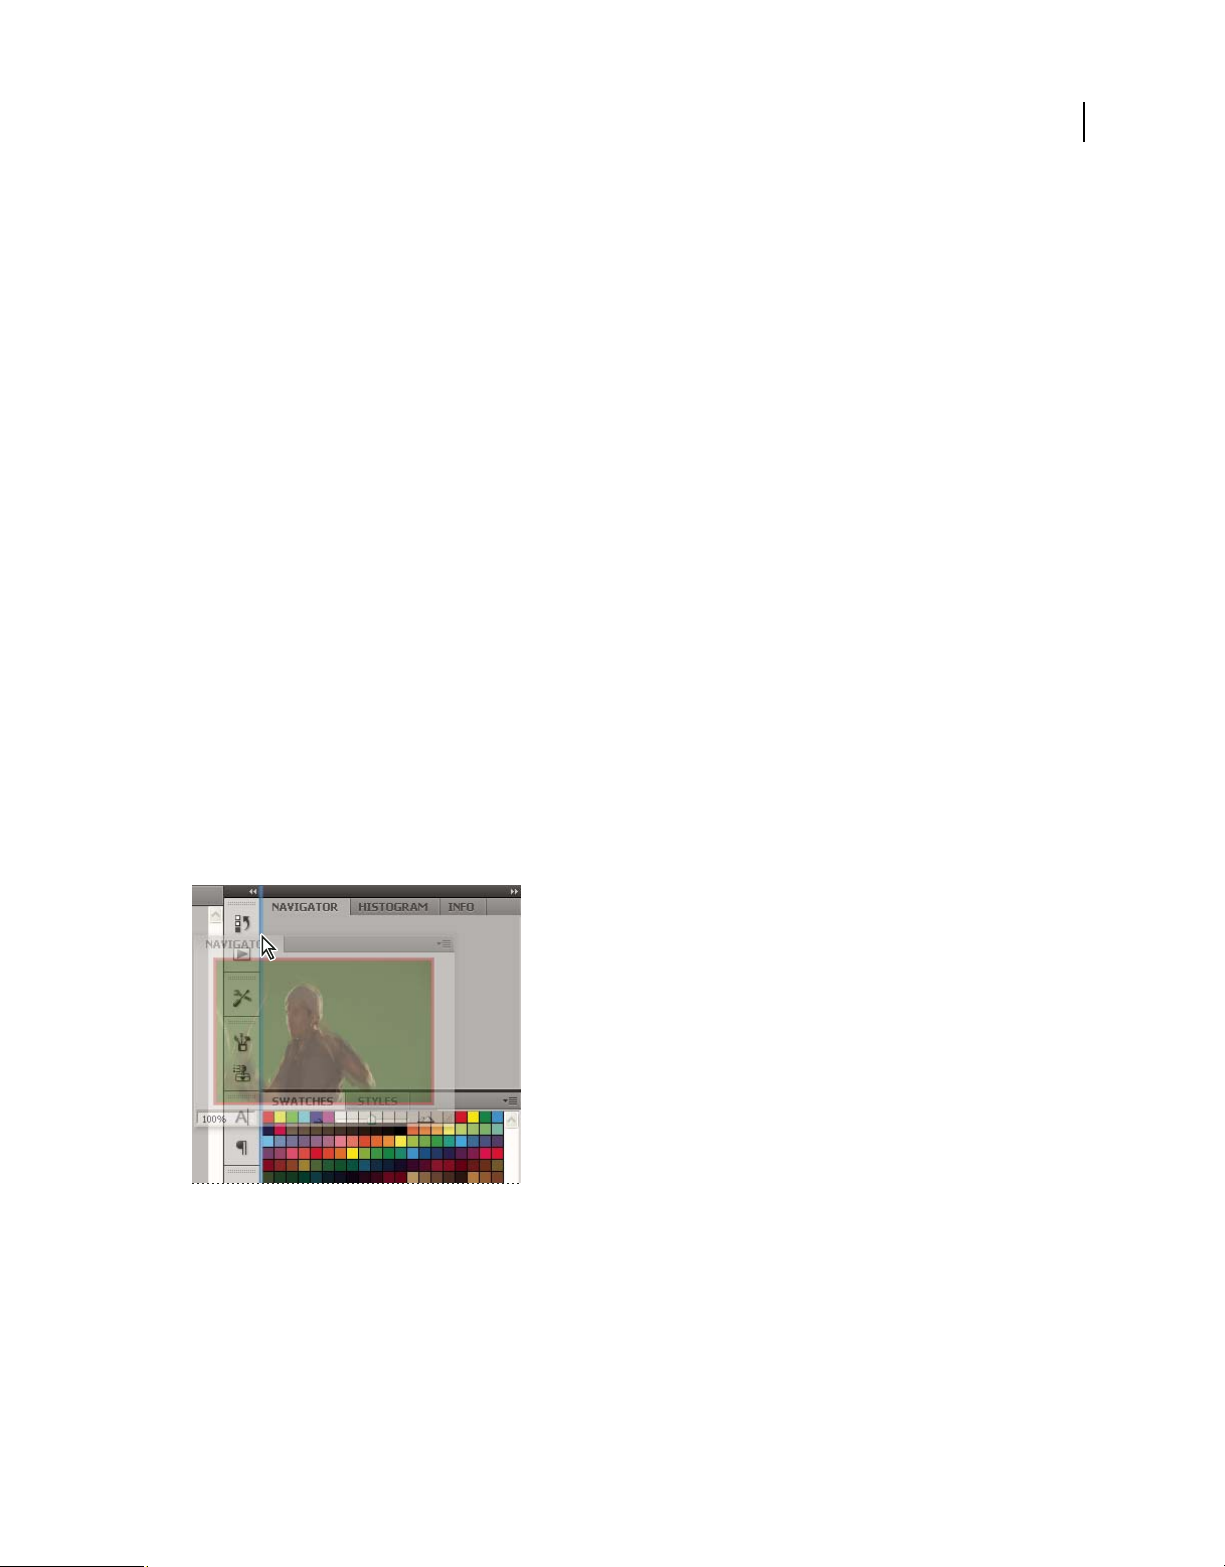
Navigator panel being dragged out to new dock, indicated by blue vertical highlight
Last updated 11/16/2011
Page 26
USING INDESIGN
Workspace
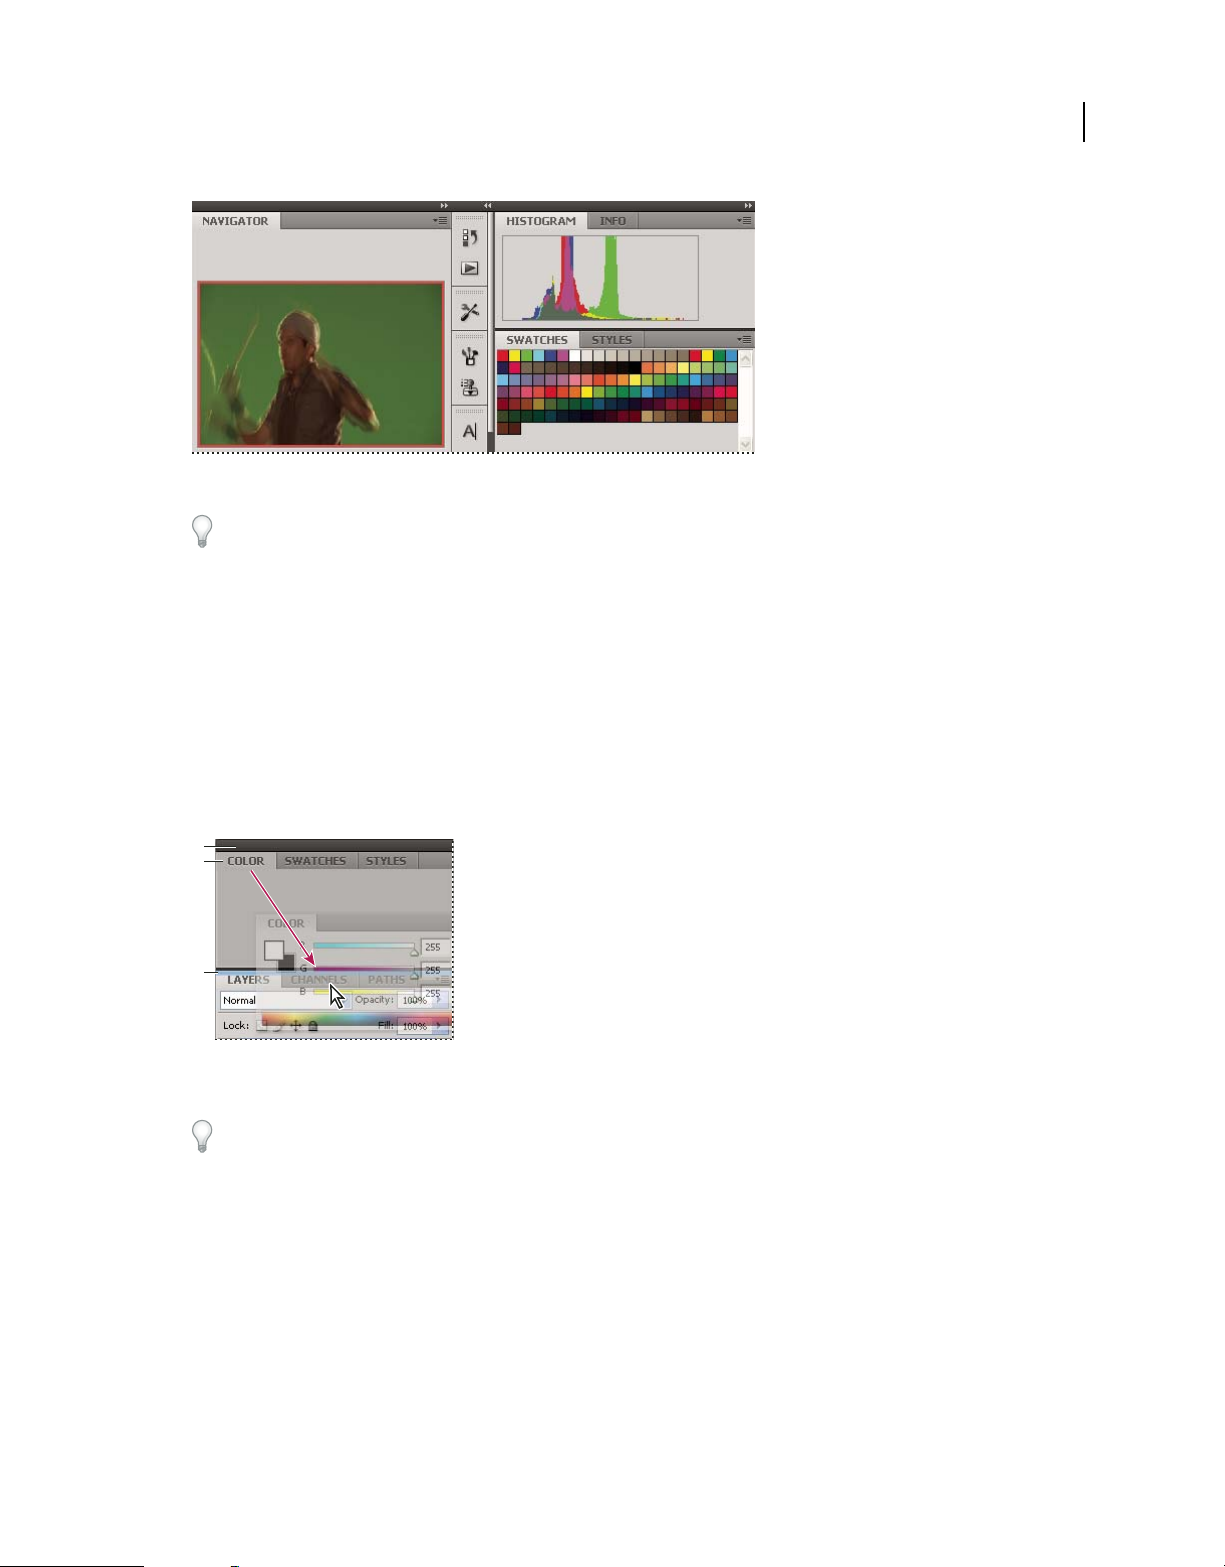
Navigator panel now in its own dock
You can prevent panels from filling all the space in a dock. Drag the bottom edge of the dock up so it no longer meets
the edge of the workspace.
Move panels
As you move panels, you see blue highlighted drop zones, areas where you can move the panel. For example, you can
move a panel up or down in a dock by dragging it to the narrow blue drop zone above or below another panel. If you
drag to an area that is not a drop zone, the panel floats freely in the workspace.
20
Note: The position of the mouse (rather than the position of the panel), activates the drop zone, so if you can’t see the drop
zone, try dragging the mouse to the place where the drop zone should be.
• To move a panel, drag it by its tab.
• To move a panel group, drag the title bar.
A
B
C
Narrow blue drop zone indicates Color panel will be docked on its own above the Layers panel group.
A. Title bar B. Tab C. Drop zone
Press Ctrl (Windows) or Command (Mac OS) while moving a panel to prevent it from docking. Press Esc while
moving the panel to cancel the operation.
Add and remove panels
If you remove all panels from a dock, the dock disappears. You can create a dock by moving panels to the right edge
of the workspace until a drop zone appears.
• To remove a panel, right-click (Windows) or Control-click (Mac) its tab and then select Close, or deselect it from
the Window menu.
• To add a panel, select it from the Window menu and dock it wherever you want.
Last updated 11/16/2011
Page 27
USING INDESIGN
Workspace
Manipulate panel groups
• To move a panel into a group, drag the panel’s tab to the highlighted drop zone in the group.
Adding a panel to a panel group
• To rearrange panels in a group, drag a panel’s tab to a new location in the group.
• To remove a panel from a group so that it floats freely, drag the panel by its tab outside the group.
• To move a group, drag the title bar (the area above the tabs).
Stack floating panels
When you drag a panel out of its dock but not into a drop zone, the panel floats freely. The floating panel allows you
to position it anywhere in the workspace. You can stack floating panels or panel groups so that they move as a unit
when you drag the topmost title bar.
21
Free-floating stacked panels
• To stack floating panels, drag a panel by its tab to the drop zone at the bottom of another panel.
• To change the stacking order, drag a panel up or down by its tab.
Note: Be sure to release the tab over the narrow drop zone between panels, rather than the broad drop zone in a title bar.
• To remove a panel or panel group from the stack, so that it floats by itself, drag it out by its tab or title bar.
Resize panels
• To minimize or maximize a panel, panel group, or stack of panels, double-click a tab. You can also double-click the
tab area (the empty space next to the tabs).
• To resize a panel, drag any side of the panel. Some panels, such as the Color panel in Photoshop, cannot be resized
by dragging.
Collapse and expand panel icons
You can collapse panels to icons to reduce clutter on the workspace. In some cases, panels are collapsed to icons in the
default workspace.
Last updated 11/16/2011
Page 28
USING INDESIGN
Workspace
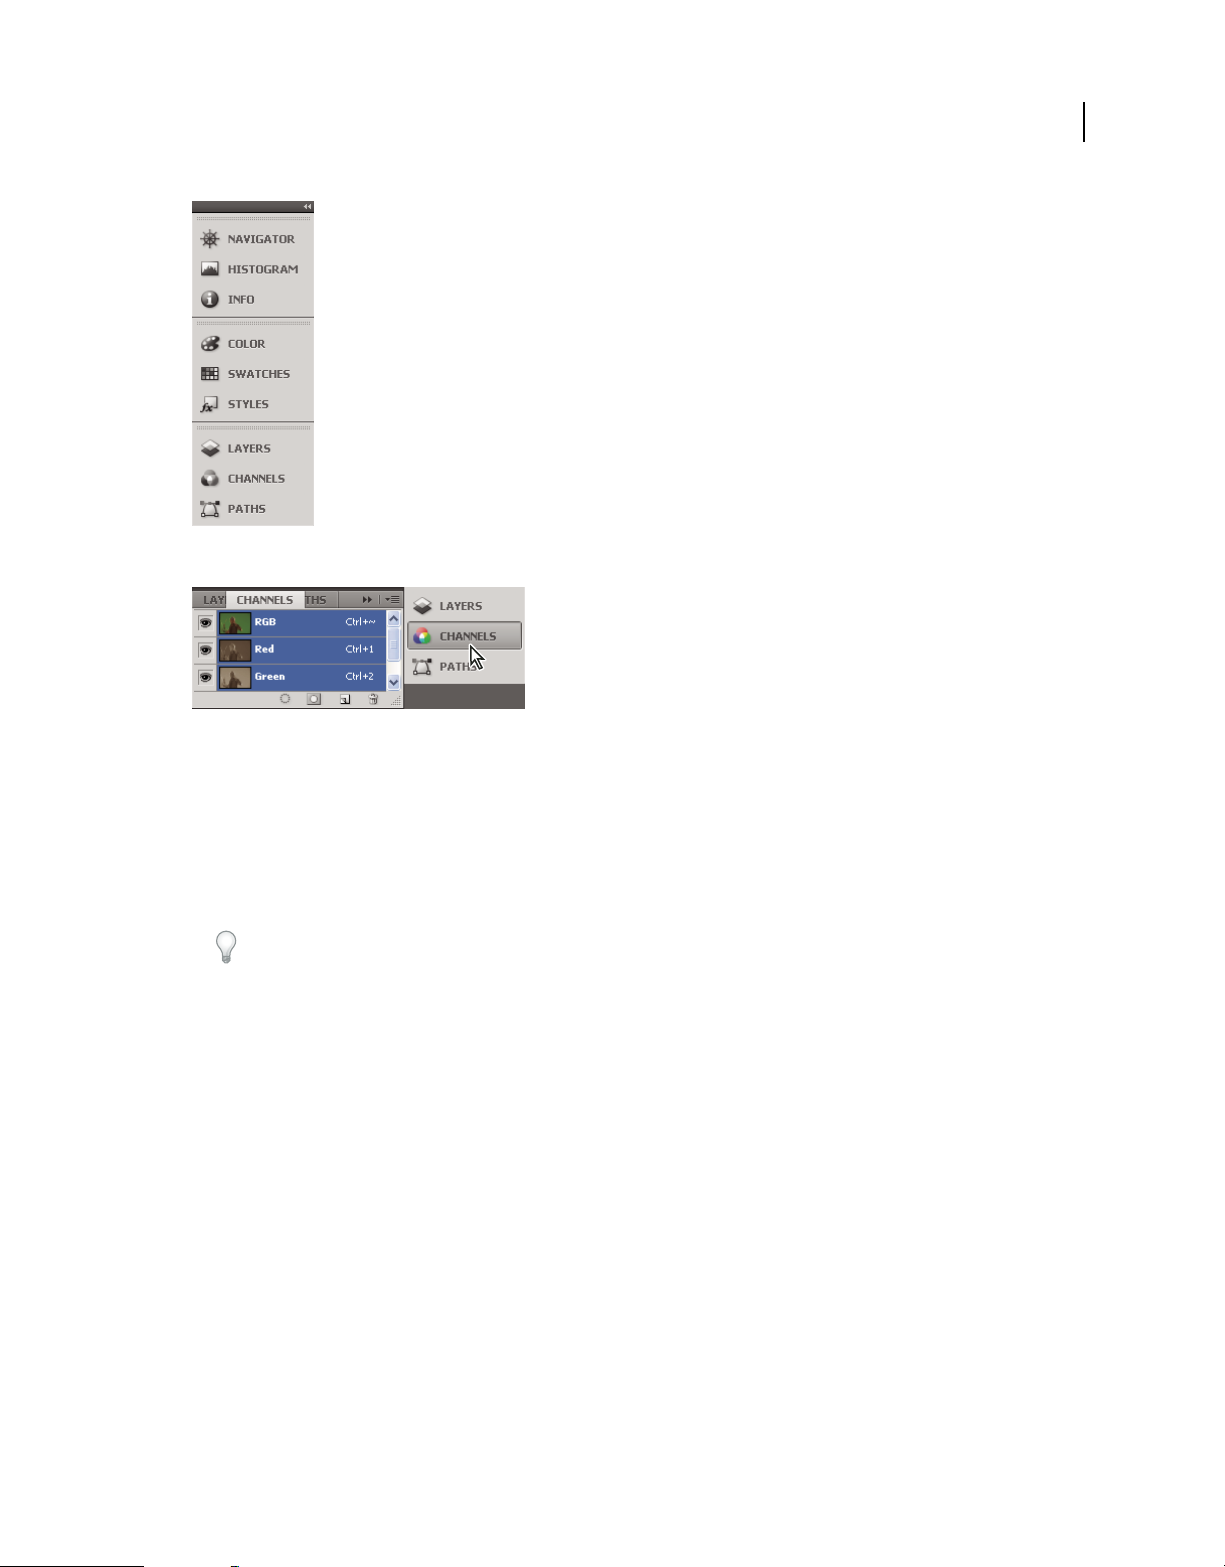
Panels collapsed to icons
22
Panels expanded from icons
• To collapse or expand all panel icons in a column, click the double arrow at the top of the dock.
• To expand a single panel icon, click it.
• To resize panel icons so that you see only the icons (and not the labels), adjust the width of the dock until the text
disappears. To display the icon text again, make the dock wider.
• To collapse an expanded panel back to its icon, click its tab, its icon, or the double arrow in the panel’s title bar.
In some products, if you select Auto-Collapse Icon Panels from the Interface or User Interface Options preferences,
an expanded panel icon collapses automatically when you click away from it.
• To add a floating panel or panel group to an icon dock, drag it in by its tab or title bar. (Panels are automatically
collapsed to icons when added to an icon dock.)
• To move a panel icon (or panel icon group), drag the icon. You can drag panel icons up and down in the dock, into
other docks (where they appear in the panel style of that dock), or outside the dock (where they appear as floating
icons).
Save and switch workspaces
By saving the current size and position of panels as a named workspace, you can restore that workspace even if you
move or close a panel. The names of saved workspaces appear in the workspace switcher in the Application bar.
Save a custom workspace
1 With the workspace in the configuration you want to save, do one of the following:
• (Illustrator) Choose Window > Workspace > Save Workspace.
• (Photoshop, InDesign, InCopy) Choose Window > Workspace > New Workspace.
• (Dreamweaver) Choose Window > Workspace Layout > New Workspace.
Last updated 11/16/2011
Page 29

USING INDESIGN
Workspace
• (Flash) Choose New Workspace from the workspace switcher in the Application bar.
• (Fireworks) Choose Save Current from the workspace switcher in the Application bar.
2 Type a name for the workspace.
3 (Photoshop, InDesign) Under Capture, select one or more options:
Panel Locations Saves the current panel locations (InDesign only).
Keyboard shortcuts Saves the current set of keyboard shortcuts (Photoshop only).
Menus or Menu Customization Saves the current set of menus.
Display or switch workspaces
❖ Select a workspace from the workspace switcher in the Application bar.
In Photoshop, you can assign keyboard shortcuts to each workspace to navigate among them quickly.
Delete a custom workspace
• Select Manage Workspaces from the workspace switcher in the Application bar, select the workspace, and then
click Delete. (The option is not available in Fireworks.)
• (Photoshop, InDesign, InCopy) Select Delete Workspace from the workspace switcher.
• (Illustrator) Choose Window > Workspace > Manage Workspaces, select the workspace, and then click the Delete icon.
• (Photoshop, InDesign) Choose Window > Workspace > Delete Workspace, select the workspace, and then click
Delete.
23
Restore the default workspace
1 Select the Default or Essentials workspace from the workspace switcher in the application bar. For Fireworks, see
the article
http://www.adobe.com/devnet/fireworks/articles/workspace_manager_panel.html.
Note: In Dreamweaver, Designer is the default workspace.
2 For Fireworks (Windows), delete these folders:
Windows Vista \\Users\<username>\AppData\Roaming\Adobe\Fireworks CS4\
Windows XP \\Documents and Settings\<username>\Application Data\Adobe\Fireworks CS4
3 (Photoshop, InDesign, InCopy) Select Window > Workspace > Reset [Workspace Name].
(Photoshop) Restore a saved workspace arrangement
In Photoshop, workspaces automatically appear as you last arranged them, but you can restore the original, saved
arrangement of panels.
• To restore an individual workspace, choose Window > Workspace > Reset Workspace Name.
• To restore all the workspaces installed with Photoshop, click Restore Default Workspaces in the Interface
preferences.
To rearrange the order of workspaces in the application bar, drag them.
Last updated 11/16/2011
Page 30

USING INDESIGN
Workspace
About view modes
You can change the visibility of the document window using the Mode buttons at the bottom of the toolbox or by
choosing commands from the View
select view modes by clicking the current mode button and selecting a different mode from the menu that appears.
Normal Mode Displays artwork in a standard window with all visible grids and guides showing, non-printing
objects showing, and a white pasteboard.
Preview Mode Displays artwork as if it were output, with all non-printing elements suppressed (grids, guides, non-
printing objects), and the pasteboard set to the preview background color defined in Preferences.
Bleed Mode Displays artwork as if it were output, with all non-printing elements suppressed (grids, guides, non-
printing objects), the pasteboard set to the preview background color defined in Preferences, and any printing
elements within the document's bleed area (defined in Document Setup) showing.
Slug Mode Displays artwork as if it were output, with all non-printing elements suppressed (grids, guides, non-
printing objects), the pasteboard set to the preview background color defined in Preferences, and any printing
elements within the document's slug area (defined in Document Setup) showing.
Presentation Mode Displays artwork as if it were a slideshow presentation, with no menus, panels, or tools
displayed. See
“Use Presentation Mode” on page 532.
> Screen Mode menu. When the toolbox is displayed in a single column, you can
24
Using the status bar
The status bar (at the lower left of a document window) shows information about the status of a file and lets you turn
to a different page. Click the status bar menu to do any of the following:
• Show the current file in the file system by choosing Reveal In Explorer (Windows®) or Reveal In Finder (Mac OS®).
• Show the current file in Adobe® Bridge® by choosing Reveal in Bridge.
• Show the current file in Adobe Mini Bridge by choosing Reveal in Mini Bridge.
In Mac OS, you can display the zoom percentage in the status bar by hiding the application bar (Window >
Application Bar). In Windows, you cannot hide the application bar.
More Help topics
“Using Adobe Bridge with InDesign” on page 103
“Adobe Version Cue” on page 103
Control panel overview
The Control panel (Window > Control) offers quick access to options, commands, and other panels related to the
current page item or objects you select. By default, the Control panel is docked to the top of the document window;
however, you can dock it to the bottom of the window, convert it to a floating panel, or hide it altogether.
Options displayed in the Control panel vary depending on the type of object you select:
• When you select a frame, the Control panel displays options for resizing, repositioning, skewing, and rotating the
frame, or applying an object style.
Last updated 11/16/2011
Page 31

USING INDESIGN
Workspace
• When you select text inside a frame, the Control panel displays either character or paragraph options. Click the
paragraph and character icons on the left side of the Control panel to determine whether paragraph or character
options are displayed. If your monitor size and resolution allows, the Control panel displays additional options. For
example, if the character icon is selected, all the character options are displayed, and some paragraph options
appear on the right of the Control panel. If you click the paragraph icon, all paragraph options are displayed, and
some character options appear on the right.
• When you select a table cell, the Control panel displays options for adjusting row and column dimensions, merging
cells, aligning text, and adding strokes.
As the options in the Control panel change, you can get more information about each option by using tool tips—
pop-up descriptions that appear when you hover over an icon or option label with the pointer.
Control panel with tool tip displayed
25
Control panel menu
To open dialog boxes associated with Control panel icons, Alt-click (Windows) or Option-click (Mac OS) as you click
a Control panel icon. For example, when a frame is selected, hold down Alt or Option and click the Rotation Angle
to open the Rotate dialog box.
icon
For a video tutorial on using the Control panel, see www.adobe.com/go/vid0064.
More Help topics
“Keys for the Control panel” on page 701
Control Panel video
Display the panel menu
❖ Click the icon to the right of the Control panel.
Dock or float the Control panel
❖ Do one of the following:
• Drag the vertical bar on the left side of the Control panel until the toolbar is docked to the top or bottom of the
application window (Windows) or screen (Mac
OS).
Last updated 11/16/2011
Page 32

USING INDESIGN
Workspace
• Choose Dock At Top, Dock At Bottom, or Float from the Control panel menu.
Customize the Control panel
1 Choose Customize from the Control panel menu locatedd on the right side of the Control panel.
2 Specify options that you want to display or hide, and then click OK.
About the Navigator panel
If you’re familiar with previous versions of InDesign, you may wonder why you can’t find the Navigator panel. The
Navigator panel does not appear in InDesign CS5. The Power Zoom feature effectively replaces the Navigator panel.
“Use power zoom” on page 36.
See
Use context menus
Unlike the menus that appear at the top of your screen, context-sensitive menus display commands related to the
active tool or selection. You can use context menus as a quick way to choose commonly used commands.
1 Position the pointer over the document, object, or panel.
2 Click the right mouse button.
Note: (Mac OS) If you don’t have a two-button mouse, you can display a context menu by pressing the Control key as you
click with the mouse.
26
Change Interface preferences
1 Choose Edit > Preferences > Interface (Windows) or InDesign > Preferences > Interface (Mac OS).
2 Choose the settings you want to specify, and click OK.
Tool Tips Tool tips appear when you hold the mouse pointer over interface items such as tools in the toolbar and
options in the Control panel. Choose None to turn off tool tips.
Show Thumbnails On Place When you place a graphic, a thumbnail of the image appears in the loaded graphics cursor.
Similarly, a thumbnail of the first few lines of text appears in the loaded text cursor. Deselect this option if you don’t
want thumbnails to appear when placing graphics or text.
Show Transformation Values When you’re creating, sizing, or rotating an object, the cursor displays the [x,y]
coordinates, width and height, or rotation information.
Enable Multi-Touch Gestures Select this option to allow Windows and Mac OS multi-touch mouse gestures to work
in InDesign. For example, when you use the Magic Mouse in Mac OS, the swipe gesture scrolls up or down or moves
to the previous or next page or spread, and the rotate gesture rotates the spread.
Highlight Object Under Selection Tool Select this option to highlight the frame edges of objects when the direct
selection tool is moved over it.
Floating Tools Panel Specify whether the toolbar appears as a single column, double column, or single row.
Auto-Collapse Icon Panels When this option is selected, clicking the document window closes the open panel
automatically.
Auto-Show Hidden Panels When you hide panels by pressing Tab, holding the mouse pointer over the side of the
document window temporarily reveals the panels if this option is selected. If this option is not selected, you must press
Tab again to display panels.
Last updated 11/16/2011
Page 33

USING INDESIGN
Workspace
Open Documents As Tabs When this option is deselected, documents you create or open appear as floating windows
rather than tabbed windows.
Enable Floating Document Window Docking If this option is selected, you can dock floating documents with each
other as tabbed windows. If this option is deselected, floating document windows aren’t docked with other document
windows, unless you hold down Ctrl (Windows) or Command (Mac OS) while dragging.
Hand Tool To control whether to greek text and images when you scroll a document, drag the Hand Tool slider to the
desired level of performance versus quality.
Live Screen Drawing Select an option to determine whether the image redraws as you drag an object. If Immediate is
selected, the image redraws while you drag. If Never is selected, dragging an image moves only the frame, and then
image is moved when you release the mouse button. If Delayed is selected, the image redraws only if you pause before
dragging. Delayed offers the same behavior as in InDesign CS4.
Customize menus and keyboard shortcuts
Customize menus
Hiding and colorizing menu commands is a way to remove menu clutter and emphasize commands you frequently
use. Note that hiding menu commands simply removes the menu command from view; it doesn’t disable any features.
At any time, you can view hidden commands by selecting the Show All Menu Items command at the bottom of a menu,
or you can choose Window
can include customized menus in workspaces you save.
> Workspace > Show Full Menus to show all the menus for the selected workspace. You
27
You can customize the main menu, context menus, and panel menus. Context menus appear when you right-click
(Windows) or Control-click (Mac
panel.
Note: If you select a different workspace, such as Getting Started, some menu commands are hidden. To display menu
commands, choose Show All Menu Items at the bottom of the menu, or choose a different workspace, such as Advanced.
OS) an area. Panel menus appear when you click the icon in the upper right of a
More Help topics
“Save a custom workspace” on page 22
Create a custom menu set
1 Choose Edit > Menus.
You cannot edit the default menu set.
2 Click Save As, type the name of the menu set, and click OK.
3 From the Category menu, choose Application Menus or Context & Panel Menus to determine which menus are
customized.
4 Click the arrows to the left of the menu categories to display subcategories or menu commands. For each command
you want to customize, click the eye icon under Visibility to show or hide the command; click None under Color
to select a color from the menu.
5 Click Save, and then click OK.
Select a custom menu set
1 Choose Edit > Menus.
Last updated 11/16/2011
Page 34

USING INDESIGN
Workspace
2 Choose the menu set from the Set menu, and then click OK.
Edit or delete a custom menu set
1 Choose Edit > Menus.
2 Choose the menu set from the Set menu, and then do one of the following:
• To edit a menu set, change the visibility or color of menu commands, click Save, and then click OK.
• To delete a menu set, click Delete and then click Yes. If you’ve modified the menu set without saving it, you’re
prompted to save the current menu set. Click Yes to save the menu set, or click No to discard changes.
Show hidden menu items
• Choose Window > Workspace > Show Full Menus. This command turns on all menus for the selected workspace.
You can hide the menus again by resetting the workspace.
• Choose Show All Menu Items at the bottom of the menu that includes hidden commands.
Holding down Ctrl (Windows) or Command (Mac OS) and clicking a menu name temporarily displays any menu
commands you’ve hidden by customizing menus.
Missing menu commands
If you can’t find a menu command, it may be hidden. If you select a workspace other than Advanced, some menu
commands are hidden. It’s also possible that you or someone else used the Menus command to hide menu items.
28
If you can’t find a command you’re looking for, try any of these techniques:
• Choose Show All Menu Items at the bottom of the menu.
• Choose Window > Workspace > Show Full Menus.
• Choose Window > Workspace, and select a different workspace (Advanced shows all menu items).
• Choose Edit > Menus, locate the menu command, and make sure it isn’t hidden.
If menu commands are still missing, try restoring preferences.
More Help topics
“Restore all preferences and default settings” on page 41
Use keyboard shortcut sets
Tool tips provide an instantaneous reference for shortcuts. InDesign also provides a shortcut editor in which you can
view and generate a list of all shortcuts, and edit or create your own shortcuts. The shortcut editor includes all the
commands that accept shortcuts, but some of these commands are undefined in the Default shortcut set.
You can also associate keyboard shortcuts with paragraph or character styles (see “Add paragraph and character styles”
on page 199) or scripts.
For a video tutorial on using keyboard shortcuts, see www.adobe.com/go/vid0066.
Mike Witherell provides a reference guide of keyboard shortcuts on Free keyboard shortcuts (English only).
Last updated 11/16/2011
Page 35

USING INDESIGN
Workspace
More Help topics
“Default keyboard shortcuts” on page 692
“Scripting” on page 649
Change the active shortcut set
1 If you want the shortcut set to be active for all documents, make sure that no documents are open.
2 Choose Edit > Keyboard Shortcuts.
3 Select a shortcut set in the Set menu. For example, select Shortcuts for QuarkXPress® 4.0.
4 Click OK.
View shortcuts
1 Choose Edit > Keyboard Shortcuts.
2 For Set, select a shortcut set.
3 For Product Area, select the area containing the commands you want to view.
4 From Commands, select a command. The shortcut is displayed in the Current Shortcut section.
29
Generate a list of shortcuts for printing
1 Choose Edit > Keyboard Shortcuts.
2 For Set, select a shortcut set.
3 Click Show Set.
A text file opens with all current and undefined shortcuts for that set.
Create a new shortcut set
1 Choose Edit > Keyboard Shortcuts.
2 Click New Set.
3 Type a name for the new set, select a shortcut set in the Based On Set menu, and click OK.
Create or redefine a shortcut
1 Choose Edit > Keyboard Shortcuts.
2 For Set, select a shortcut set or click New Set to create a new shortcut set.
Note: You cannot edit the Default or the QuarkXPress shortcut sets. Instead, create a new set based on one of these sets,
and then edit the new set.
3 For Product Area, select the area containing the command you want to define or redefine.
4 In the Commands list, select the command that you want to define or redefine.
5 In the New Shortcut box, press the keys for your new keyboard shortcut. If the key sequence is currently being used
for another command, InDesign displays that command under Current Shortcuts. You can choose to change the
original shortcut also, or try another shortcut.
Note: Do not assign single-key shortcuts to menu commands, because they interfere with the typing of text. If an insertion
point is active when you type a single-key shortcut, InDesign actives the keyboard shortcut instead of inserting the
character in the text.
Last updated 11/16/2011
Page 36

USING INDESIGN
Workspace
6 In the Context list, select the context in which you want the keyboard shortcut to function. The context ensures that
the shortcut performs the way you intended. For example, you can assign Ctrl+G to merge table cells (Table
context) and Ctrl+G to insert special characters (Text context).
Note: Assign shortcuts in the Default context when you want them to function regardless of the current state of the
document. Shortcuts you assign in other contexts, such as Table or Text, override shortcuts assigned in the Default
context.
7 Do one of the following:
• Click Assign to create a new shortcut where none currently exists.
• Click Assign to add another shortcut to a command. Menu commands can have multiple keyboard shortcuts.
8 Click OK to close the dialog box, or click Save to keep the dialog box open while you enter more shortcuts.
Copying keyboard shortcut sets
Keyboard shortcut sets (*.indk) are saved in two locations. The application preset shortcuts appear in the Presets folder
in the main application folder. The shortcut sets you create appear in the Shortcut Sets folder in the following locations:
Windows XP Documents and Settings\[username]\Application Data\Adobe\InDesign\[version]\[language]InDesign
Shortcut Sets
Windows Vista and Windows 7
Users\[username]\AppData\Roaming\Adobe\InDesign\[Version]\[Language]\InDesign Shortcut Sets
30
Mac OS Users/[username]/Library/Preferences/Adobe InDesign/[version]/[language]/InDesign Shortcut Sets
If you created a keyboard shortcut set on one computer and want to use it on a different computer, copy the *.indk file
to the same location on the other computer.
You can move a keyboard set from the custom location to the application folder. Doing so makes the custom shortcuts
available to all the users sharing a computer. However, make sure that you do not have two sets with the same name,
one in each place. Make sure that the application keyboard sets and the custom sets have different names.
Toolbox
Toolbox overview
Some tools in the toolbox are for selecting, editing, and creating page elements. Other tools are for choosing type,
shapes, lines, and gradients. You can change the overall layout of the toolbox to fit your preferred window and panel
layout. By default, the toolbox appears as a single vertical column of tools. You can also set it up as a double vertical
column or as one horizontal row. However, you can’t rearrange the positions of individual tools in the toolbox. You
can drag the top of the toolbox to move it.
Select a tool from the default toolbox by clicking it. The toolbox also contains several hidden tools related to the visible
tools. Hidden tools are indicated by arrows to the right of the tool icons. Select a hidden tool by clicking and holding
the current tool in
The name of the tool and its keyboard shortcut appear when you hold the pointer over the tool—this text is called the
tool tip. You can turn off tool tips by choosing None from the Tool Tips menu in Interface preferences.
the toolbox and then selecting the tool that you want.
Last updated 11/16/2011
Page 37

USING INDESIGN
Workspace
Open the Tool Hints panel (choose Window > Utilities > Tool Hints) to see which shortcut and modifier keys work
with the selected tool.
Toolbox overview
31
A
Selection tools
Selection (V, Escape)*
A
B
C
D
Direct Selection (A)
Page (Shift + P)
Gap (U)
B
Drawing and
Type tools
Type (T)
Type On a Path (Shift+T)
Line (\)
Pen (P)
Add Anchor Point (=)
Delete Anchor Point (-)
Convert Direction
Point (Shift+C)
Pencil (N)
Smooth
Erase
Rectangle Frame (F)
Ellipse Frame
Polygon Frame
Rectangle (M)
Ellipse (L)
Polygon
C
Transformation tools
Scissors (C)
Free Transform (E)
Rotate (R)
Scale (S)
Shear (O)
Gradient Swatch (G)
Gradient Feather
(Shift+G)
D
Modication and
Navigation tools
Note
Eyedropper (I)
Measure (K)
Hand (H)
Zoom (Z)
Indicates default tool * Keyboard shortcuts appear in parenthesis
Display the toolbox
❖ Choose Window > Tools.
Display tool options
❖ Double-click a tool in the toolbox.
This procedure works only for some tools, such as the Eyedropper, Pencil, and Polygon tools.
Display and select hidden tools
1 In the toolbox, position the pointer over a tool that has hidden tools and hold down the mouse button.
2 When the hidden tools appear, select a tool.
Last updated 11/16/2011
Page 38

USING INDESIGN
Workspace
Hidden tools menu
Select tools temporarily
1 When one tool is selected, hold down the keyboard shortcut of a different tool.
2 With the keyboard shortcut still held down, perform an action.
3 Release the keyboard shortcut to return to the previous tool.
For example, if the Gap tool is selected, hold down the V key to temporarily use the Selection tool. When you release
the V key, the Gap tool is selected.
View tool hints
The Tool Hints panel describes how modifier keys work with the selected tool.
32
1 Choose Window > Utilities > Tool Hints to display the Tool Hints panel.
2 Select a tool in the toolbox to view a description of that tool and its modifier keys and shortcuts.
Change the toolbox layout
1 Choose Edit > Preferences > Interface (Windows) or InDesign > Preferences > Interface (Mac OS).
2 Choose a layout option from the Floating Tools Panel menu and click OK.
You can also click the double arrow icon at the top of the toolbox to change the toolbox layout.
Tools overview
Type tools Create and format type in standard or customized blocks or paths. (See “Create text frames” on page 128.)
Drawing tools Draw and style simple and complex objects, including rectangles, ellipses, polygons, freeform shapes.
“Drawing” on page 340.)
(See
Selection tools Select (activate) objects, points, or lines. (See “Selecting objects” on page 402.)
Transform tools Reshape, reorient, and resize objects. (See “Transforming objects” on page 408.)
Navigation tools Move around in, control the view of, and measure distances in a document. (See “Zoom in and out”
on page 35 and “Rulers and measurement units” on page 49.)
The Scissors tool Splits paths and frames. (See “Split a path” on page 356.)
Last updated 11/16/2011
Page 39

USING INDESIGN
Workspace
Gallery of selection tools
33
Selection tool lets you
select entire objects.
Direct Selection tool lets
you select points on a path
or contents within a
frame.
Page tool lets you create
multiple page sizes within
a document.
More Help topics
“Selecting objects” on page 402
Gallery of drawing and type tools
Pen tool lets you draw
straight and curved paths.
Add Anchor Point tool
lets you add anchor points
to a path.
Delete Anchor Point tool
lets you remove anchor
points from a path.
Gap tool lets you adjust
the space between objects.
Convert Direction Point
tool lets you convert
corner points and smooth
points.
Type tool lets you create
text frames and select
text.
Type on a Path tool lets
you create and edit type
on paths.
Pencil tool lets you draw a
freeform path.
Last updated 11/16/2011
Smooth tool lets you
remove excess angles from
a path.
Page 40

USING INDESIGN
Workspace
34
Erase tool lets you delete
points on a path.
Polygon Frame tool lets
you create a multi-sided
shape placeholder.
Line tool lets you draw a
line segment.
Rectangle tool lets you
create a square or
rectangle.
More Help topics
“Understanding paths and shapes” on page 340
Gallery of transformation tools
Rectangle Frame tool lets
you create a square or
rectangle placeholder.
Ellipse tool lets you create
a circle or oval.
Ellipse Frame tool lets you
create a circle or oval
placeholder.
Polygon tool lets you
create multi-sided shape.
Free Transform tool lets
you rotate, scale, or shear
an object.
Rotate tool lets you rotate
objects around a fixed
point.
More Help topics
“Transforming objects” on page 408
Scale tool lets you resize
objects around a fixed
point.
Last updated 11/16/2011
Shear tool lets you skew
objects around a fixed
point.
Page 41

USING INDESIGN
Workspace
Gallery of modification and navigation tools
35
Eyedropper tool lets you
sample color or type
attributes from objects
and apply them to other
objects.
Scissors tool cuts paths at
specified points.
Measure tool measures
the distance between two
points.
Hand tool moves the page
view within the document
window.
Gradient Swatch tool lets
you adjust the beginning
and ending points and
angle of gradients within
objects.
Zoom tool increases and
decreases the view
magnification in the
document window.
Gradient Feather tool lets
you fade an object into the
background.
Note tool lets you add
comments.
Viewing the workspace
Zoom in and out
Use the Zoom tool or the Zoom commands to magnify the size of documents.
More Help topics
“Keys for tools” on page 692
Zoom in or out
• To zoom in, select the Zoom tool and click the area you want to magnify. Each click magnifies the view to the
next preset percentage, centering the display around the point you click. At maximum magnification, the center of
the Zoom tool appears blank. To zoom out, hold down Alt (Windows) or Option (Mac
want to reduce. Each click reduces the view.
• To magnify to the next preset percentage, activate the window you want to view and choose View > Zoom In. To
reduce the view to
the previous preset percentage, choose View > Zoom Out.
• To set a specific magnification level, type or choose a level in the Zoom Level box in the application bar.
Last updated 11/16/2011
OS) and click the area you
Page 42

USING INDESIGN
Workspace
In Mac OS, you can display the zoom percentage in the status bar by hiding the application bar (Window >
Application Bar). In Windows, you cannot hide the application bar.
• To zoom in or out, press Alt (Windows) or Option (Mac OS) while using the mouse scroll wheel or sensor.
• To magnify by dragging, select the Zoom tool and drag around the area you want to magnify.
Use power zoom
Power zoom offers a quick way to scroll through your document pages. Using the grabber hand, you can use zoom in
or out and scroll through your entire document. This feature is especially useful for long documents.
1 Click the Hand tool .
To activate the grabber hand, you can also hold down the spacebar or hold down Alt/Option while in text mode.
2 With the grabber hand active, click and hold down the mouse button.
The document zooms out so that you can see more of the spread. A red box indicates the view area.
3 With the mouse button still held down, drag the red box to scroll through the document pages. Press arrow keys or
use the mouse scroll wheel to change the size of the red box.
4 Release the mouse button to zoom in on the new area of the document.
The document window returns to its original zoom percentage or to the size of the red box.
36
Zoom to Actual Size
• Double-click the Zoom tool.
• Choose View > Actual Size.
• Type or choose a magnification level of 100 in the Zoom Level box in the application bar.
Adjust the view
Focus on the desired area of your document by fitting pages and spreads within the active window and by scrolling the view.
More Help topics
“Keys for viewing documents and document workspaces” on page 698
Fit the page, spread, or pasteboard within the active window
• Choose View > Fit Page In Window.
• Choose View > Fit Spread In Window.
• Choose View > Entire Pasteboard.
Scroll the view
You can easily adjust the degree to which pages or objects are centered in the document window. These techniques are
also useful for navigating between pages.
❖ Do any of the following:
• Select the Hand tool from the Tools panel, and then click and drag in the document window. Holding down Alt
(Windows) or Option (Mac OS) and pressing the spacebar temporarily activates the Hand tool.
• Click the horizontal or vertical scroll bars or drag the scroll box.
Last updated 11/16/2011
Page 43

USING INDESIGN
Workspace
• Press Page Up or Page Down.
• Use the mouse scroll wheel or sensor to scroll up and down. To pan left or right, press Ctrl (Windows) or Command
OS) as you use the mouse scroll wheel or sensor.
(Mac
Turn pages
InDesign makes it easy to jump from page to page in a document. For example, just as most web browsers provide
Back and Forward buttons to navigate through pages you’ve visited, InDesign keeps track of the order in which you’ve
viewed pages in a document.
❖ Do any of the following:
• To move through pages in the order in which you viewed them during the current session, choose Layout > Go
Back or Go Forward.
• To go to the next or previous page, click the Next Page button or Previous Page button at the bottom of
the document window, or choose Layout > Next Page or Previous Page.
• To go to the first or last page, click the First Spread button or Last Spread button at the lower left of
the document window, or choose Layout > First Page or Last Page.
• To go to a specific page, choose Layout > Go To Page, specify the page number, and click OK. Or, click the
downward-facing arrow at the right of the page box, and then choose a page.
37
Choose page from page box to go to specific page
• To go to a master page, click in the page box at the lower left of the document window. Type the first few letters
the master page name, and press Enter (Windows) or Return (Mac OS). Or, in the Pages panel, double-click a
of
master page icon.
Work with additional windows
You can open additional windows for the same document or for other InDesign documents. With additional windows,
you can compare different spreads simultaneously, especially spreads that aren’t adjacent. You can also display
different magnifications of the same page, so that you can work closely on details while watching how the changes
affect the overall layout. In addition, you can display a master page in one window, and pages based on it in other
windows, to see how editing the master page affects various parts of the document.
When you reopen the document, only the last-used window appears.
• To create a new window for the same document, choose Window > Arrange > New Window.
• To cascade or tile windows, choose Window > Arrange > Cascade to arrange all windows into a stack, with each
window offset slightly. Or, choose Window
• To activate a window, click the window tab or title bar. Or, choose the name of the view in the Window menu.
Multiple windows for a document are numbered in the order they were created.
• To close all windows for the active document, press Shift+Ctrl+W (Windows) or Shift+Command+W (Mac OS).
> Arrange > Tile to display all windows equally without overlapping.
Last updated 11/16/2011
Page 44

USING INDESIGN
Workspace
• To close all windows for all open documents, press Shift+Ctrl+Alt+W (Windows) or Shift+Command+Option+W
OS).
(Mac
Use anti-aliasing for smoothing edges
Anti-aliasing smooths the jagged edges of type and bitmap images by softening the color transition between edge pixels
and background pixels. Since only the edge pixels change, no detail is lost.
1 Choose Edit > Preferences > Display Performance (Windows) or InDesign > Preferences > Display Performance
OS).
(Mac
2 From the Adjust View Settings menu, choose the view setting for which you want to turn on anti-aliasing.
You can enable or disable anti-aliasing for each of the view settings. For example, you can enable anti-aliasing for High
Quality view and disable it for Fast view.
3 Select Enable Anti-aliasing.
Greek type
When display capabilities are insufficient to show text at a small size, InDesign displays the text as a dimmed bar. This
behavior is called greeking type. Any type at or below the specified type size is replaced on-screen with non-letterforms
that act as placeholders.
38
1 Choose Edit > Preferences > Display Performance (Windows) or InDesign > Preferences > Display Performance
OS).
(Mac
2 From the Adjust View Settings menu, choose the view setting for which you want to change the Greek Type setting.
You can specify different Greek Type values for each of the view settings.
3 For Greek Type Below, type a value, and then click OK.
To control whether to greek text and images when you scroll a document, open the Interface section of the Preferences
dialog box, drag the Hand Tool slider to the desired level of performance versus quality, and then click
OK.
Calculate values in panels and dialog boxes
You can perform simple math in any numerical edit box. For example, if you want to move a selected object 3 units to
the right using the current measurement units, you don’t have to work out the new horizontal position—simply type
+3 after the current value in the Transform panel.
Panels use the measurement system selected in the Preferences dialog box; however, you can specify values in another
measurement instead.
1 In a text box that accepts numerical values, do one of the following:
• To replace the entire current value with a mathematical expression, select the entire current value.
• To use the current value as part of a mathematical expression, click before or after the current value.
2 Type a simple mathematical expression using a single mathematical operator, such as + (plus), - (minus),
(multiplication), / (division), or % (percent).
*
For example, 0p0+3 or 5mm + 4.
3 Press Enter or Return to apply the calculation.
Last updated 11/16/2011
Page 45

USING INDESIGN
Workspace
In the Control panel and the Transform panel, you can duplicate the selected object and apply the calculation to the
duplicate (instead of the original). Enter the calculation and press Alt+Enter (Windows) or Option+Return
OS).
(Mac
More Help topics
“Enter values in panels and dialog boxes” on page 39
Enter values in panels and dialog boxes
Panels and dialog boxes use the measurement units and increments defined in the Edit > Preferences > Units &
Increments (Windows) or InDesign
specify values using any of the supported measurement units at any time by temporarily overriding the current
preference settings.
❖ Do any of the following:
• Type a value in the box, and then press Enter or Return.
• Drag the slider.
• Drag the dial.
• Click the arrow buttons in the panel to change the value.
• Click in the box and then use the up or down arrow keys on the keyboard to change the value.
• Select a value from the menu associated with the box.
Note: When you make a change using the arrow buttons, arrow keys, or pop-up menus, InDesign applies the change
immediately.
> Preferences > Units & Increments (Mac OS) dialog box. However, you can
39
More Help topics
“Rulers and measurement units” on page 49
“Calculate values in panels and dialog boxes” on page 38
Working with ConnectNow
Adobe® ConnectNow provides you with a secure, personal online meeting room where you can meet and collaborate
with others via the web in real time. With ConnectNow, you can share and annotate your computer screen, send chat
messages, and communicate using integrated audio. You can also broadcast live video, share files, capture meeting
notes, and control an attendee's computer.
You can access ConnectNow directly from the application interface.
1 Choose File > Share My Screen.
2 In the Sign In to Adobe CS Live dialog box, enter your email address and password, and click Sign In. If you don’t
have an Adobe ID, click the Create Adobe ID button.
3 To share your screen, click the Share My Computer Screen button at the center of the ConnectNow application
window.
For complete instructions on using ConnectNow, see Adobe ConnectNow Help.
Last updated 11/16/2011
Page 46

USING INDESIGN
Workspace
For a video tutorial about using ConnectNow, see Using ConnectNow to share your screen (7:12). (This
demonstration is in Dreamweaver.)
Setting preferences
About preferences and defaults
Preferences include settings such as panel positions, measurement options, and display options for graphics and
typography. Preference settings specify how InDesign documents and objects behave initially.
Set general preferences
This section covers preference settings in the General tab of the Preferences dialog box. For information on other
preferences, search for the appropriate setting.
1 Choose Edit > Preferences > General (Windows) or InDesign > Preferences > General (Mac OS), and then choose
the type of preferences you want to specify.
2 In the Page Numbering section, choose a page numbering method from the View menu. (See “Display absolute or
section numbering in the Pages panel” on page 92.)
3 In the Font Downloading and Embedding section, specify a threshold to trigger font subsetting based on the
number of glyphs a font contains. This setting affects font downloading options in the Print and Export dialog
boxes.
4 In the When Scaling section, you can determine how scaled objects are reflected in panels and how the content of
scaled frames behaves.
• Select Apply To Content if you want the point size to change when a text frame is scaled. (See “Scale type” on
page 258.) If this option is selected when a graphics frame is scaled, the percentage size of the image changes, but
the frame reverts its percentage to 100%. (See “Scale objects” on page 419.)
• Select Adjust Scaling Percentage to display the original point size with the new point size in parentheses when you
scale text. If this option is selected when you scale graphics frames, the percentage size of both the frame and image
changes.
5 Click Reset All Warning Dialogs to display all warnings, even the ones you’ve already checked not to display. (As
warnings appear, you can select a check box to prevent the warning from appearing again.)
40
Set defaults
If you change settings when no documents are open, your changes set the defaults for new documents. If a document
is open when you change settings, the changes affect only that document.
Similarly, if you change settings when no objects are selected, your changes set the defaults for new objects.
Change default settings for new documents
1 Close all documents.
2 Change any menu items or panel or dialog box settings.
Last updated 11/16/2011
Page 47

USING INDESIGN
Workspace
If you use the same page size and language for most of your documents, you can change these defaults with no
document open. For example, to change the default page size, close all documents, choose File > Document Setup, and
select a desired page size. To set a default dictionary, close all documents, choose Edit
(Windows) or InDesign
> Preferences > Dictionary (Mac OS), and select an option from the Language menu.
> Preferences > Dictionary
Specify default settings for new objects in a document
1 With document open, choose Edit > Deselect All.
2 Change any menu items or panel or dialog box settings.
Restore all preferences and default settings
When InDesign is behaving erratically, deleting preferences (also referred to as “trashing preferences” or “removing
preferences”) often solves the problem.
It’s a good idea to make a backup copy of the preference files called InDesign Defaults and InDesign SavedData.
Instead of removing your preferences, you can copy these backup files over the problematic corrupt preference files
and not lose any customizations.
Mike Witherell provides a detailed list of which files are affected when you restore preferences in Adobe InDesign
Presets (PDF, English only).
41
❖ Do one of the following:
• (Windows) Start InDesign, and then press Shift+Ctrl+Alt. Click Yes when asked if you want to delete preference
files.
• (Mac OS) While pressing Shift+Option+Command+Control, start InDesign. Click Yes when asked if you want to
delete preference files.
Various program preferences and default settings are stored in the Adobe InDesign preferences files. These files,
including the InDesign Defaults file, are saved each time you exit from InDesign. For manual deletion or renaming,
the locations of the preference files are as follows:
• Mac OS
InDesign SavedData Users/[user]/Library/Caches/Adobe InDesign/Version [version]/InDesign SavedData
InDesign Defaults Users/[user]/Library/Preferences/Adobe InDesign/Version [version]/InDesign Defaults
• Windows XP
InDesign SavedData \Documents and Settings\[username]\Local Settings\Application
Data\Adobe\InDesign\Version [version]\Caches
InDesign Defaults \Documents and Settings\[username]\Application Data\Adobe\InDesign\Version [version]
• Windows Vista or Windows 7
InDesign SavedData Users\[username]\AppData\Roaming\Adobe\InDesign\Version [version]\Caches\InDesign
SavedData
InDesign Defaults C:\Users\[username]\AppData\Roaming\Adobe\InDesign\Version [version]\InDesign
Defaults
About InDesign styles and presets
You can store settings for reuse, including settings for the following items:
• Creating paragraph and character styles. (See “Add paragraph and character styles” on page 199.)
Last updated 11/16/2011
Page 48

USING INDESIGN
Workspace
• Creating object styles. (See “Object styles” on page 213.)
• Creating table and cell styles. (See “Table and cell styles” on page 307.)
• Creating PDF export presets. (See “Customize Adobe PDF presets” on page 505.)
• Creating print presets. All the attributes in the Print dialog box are included in the style. (See “Print a document or
book” on page 598.)
• Creating trap presets. (See “Trapping color” on page 489.)
• Creating transparency flattener presets. (See “Flattening transparent artwork” on page 454.)
• Creating table of contents styles. (See “Create TOC styles for multiple lists” on page 321.)
• Saving the workspace configuration.
• Creating document presets. (See “Define document presets” on page 46.)
• Creating stroke styles. (See “Define custom stroke styles” on page 360.)
In general, change the feature settings in the dialog box, and then save the settings. Styles and presets are stored in the
document in which they are created. You can use the settings from another document by importing or loading the
styles and presets from that document. In addition, most presets can be exported or saved to a separate file and
distributed to other computers.
Mike Witherell provides a detailed list of presets in Adobe InDesign Presets (PDF, English only).
42
You can also share styles and presets across all documents in a book file. For more information, see “Synchronize book
documents” on page 315.
Recovery and undo
Recover documents
InDesign guards your data against unexpected power or system failures using an automatic recovery feature.
Automatically recovered data exists in a temporary file that is separate from the original document file on disk. Under
normal circumstances you don’t need to think about automatically recovered data, because any document updates
stored in the automatic recovery file are automatically added to the original document file when you choose the Save
or Save As command or exit from InDesign normally. Automatically recovered data is important only if you’re unable
to save successfully before an unexpected power or system failure.
Even though these features exist, you should save your files often and create backup files in case of unexpected power
or system failures.
Find recovered documents
1 Restart your computer.
2 Start InDesign.
If automatically recovered data exists, InDesign automatically displays the recovered document. The word
[Recovered] appears after the filename in the title bar of the document window to indicate that the document contains
unsaved changes that were automatically recovered.
Note: If InDesign fails after attempting to open a document using automatically recovered changes, the automatically
recovered data may be corrupted.
Last updated 11/16/2011
Page 49

USING INDESIGN
Workspace
3 Do one of the following:
• To save the recovered data, choose File > Save As, specify a location and a new filename, and click Save. The Save
As command keeps the recovered version that includes the automatically recovered data; the word [Recovered]
disappears from the title bar.
• To discard automatically recovered changes and use the most recent version of the document that was explicitly
saved to disk before the failure occurred, close the file without saving it and open the file on disk, or choose File
Revert.
>
Change the location of recovered documents
1 Choose Edit > Preferences > File Handling (Windows) or InDesign > Preferences > File Handling (Mac OS).
2 Under Document Recovery Data, click Browse (Windows) or Choose (Mac OS).
3 Specify the new location for the recovered document, click Select (Windows) or Choose (Mac OS), and then
OK.
click
Undo mistakes
If necessary, you can cancel a lengthy operation before it’s completed, undo recent changes, or revert to a previously
saved version. You can undo or redo up to several hundred of the most recent actions (the amount is limited by the
amount of RAM available and the kinds of actions you performed). The series of actions is discarded when you choose
the Save As command, close a document, or when you exit from the program.
43
❖ Do one of the following:
• To undo the most recent change, choose Edit > Undo [action]. (You cannot undo certain actions, such as scrolling.)
• To redo an action, choose Edit > Redo [action].
• To undo all changes made since the last time you saved the project, choose File > Revert (InDesign) or File > Revert
Content (InCopy).
• To close a dialog box without applying changes, click Cancel.
Last updated 11/16/2011
Page 50

Chapter 3: Layout
For detailed information and instructions, click the links below.
Creating documents
For detailed information and instructions, click the links below.
Create new documents
Page design begins with the basics: starting a new document, setting up pages, and positioning margins and columns
or changing grid settings.
More Help topics
“Recommended workflow for InDesign documents” on page 100
44
“Use document templates” on page 104
“Add documents to a book file” on page 313
Create a new document
1 Choose File > New > Document.
The New Document dialog box combines the Document Setup and the Margins And Columns dialog boxes, so that
you can set up the page size, margins, and page columns all in one place. You can change these settings at any time.
2 Specify document setup options. (See “New Document options” on page 44.)
To specify the dimensions of the bleed and slug areas, click More Options. The bleed and slug areas extend out from
the edges of the defined Page Size. To make the bleed or slug areas extend evenly on all sides, click the Make All
Settings The Same icon
3 Click OK to open a new document with the settings you specified.
To set default layout settings for all new documents, choose File > Document Setup or Layout > Margins And
Columns, and set options when no documents are open.
.
New Document options
Document Preset Choose a preset that you have saver earlier.
Intent If you are creating a document to be output to PDF or SWF for the web, choosing the Web option changes
several options in the dialog box, such as turning off Facing Pages, changing the orientation from portrait to landscape,
and using a page size based on monitor resolution. You can edit any of these settings, but you cannot change the Intent
setting after the document is created.
Number of pages Specify the number of pages to create in the new document.
Start Page # Specify which number the document starts on. If you specify an even number (such as 2) with Facing
Pages selected, the first spread in the document begins with a two-page spread. See
spread” on page 67.
Last updated 11/16/2011
“Start a document with a two-page
Page 51

USING INDESIGN
Layout
Facing Pages Select this option to make left and right pages face each other in a double-page spread, such as for books
and magazines. Deselect this option to let each page stand alone, such as when you’re printing flyers or posters or when
you want objects to bleed in the binding.
After you’ve created a document, you can use the Pages panel to create spreads with more than two pages or force the
first two pages to open as a spread. (See
Master Text Frame Select this option to create a text frame the size of the area within the margin guides, matching the
column settings you specified. The master text frame is added to the A-Master. (See
“Control spread pagination” on page 66.)
“Using text frames on master
pages” on page 130.)
The Master Text Frame option is available only when you’ve chosen File > New > Document.
Page Size Choose a page size from the menu, or type values for Width and Height. Page size represents the final size
you want after bleeds or other marks outside the page are trimmed.
Orientation Click Portrait (tall) or Landscape (wide). These icons interact dynamically with the dimensions
you enter in Page Size. When Height is the larger value, the portrait icon is selected. When Width is the larger value,
the landscape icon is selected. Clicking the deselected icon switches the Height and Width values.
To specify the dimensions of the bleed and slug areas, click More Options in the New Document dialog box. To make
the bleed or slug areas extend evenly on all sides, click the Make All Settings The Same icon .
Bleed The Bleed area allows you to print objects that are arranged at the outer edge of the defined page size. For a page
of the required dimensions, if an object is positioned at its edge, some white may appear at the edge of the printed area
due to slight misalignment during printing or trimming. For this reason, you should position an object that is at the
edge of the page of the required dimensions a little beyond the edge, and trim after printing. Bleed area is shown by a
red line on the document. You can set bleed area settings from Bleed in the Print dialog box.
45
Slug The slug area is discarded when the document is trimmed to its final page size. The slug area holds printing
information, customized color bar information, or displays other instructions and descriptions for other information
in the document. Objects (including text frames) positioned in the slug area are printed but will disappear when the
document is trimmed to its final page size.
Objects outside the bleed or slug area (whichever extends farther) do not print.
Note: You can also click Save Preset to save document settings for future use.
Document window overview
Each page or spread in your document has its own pasteboard and guides, which are visible in Normal View mode.
(To switch to Normal View, choose View
background when the document is viewed using one of the Preview modes. (See
You can change the color of this preview background and guides in Guides & Pasteboard preferences.
> Screen Mode > Normal.) The pasteboard is replaced with a gray
“Preview documents” on page 604.)
Last updated 11/16/2011
Page 52

USING INDESIGN
Layout
46
A
B
C
Document and guides in Normal View Mode
A. Spread (black lines) B. Page (black lines) C. Margin guides (magenta lines) D. Column guides (violet lines) E. Bleed area (red lines) F. Slug
area (blue lines)
D
E
F
Document window notes:
• Lines of other colors are ruler guides which, when present, appear in the layer color when selected. See “Layers” on
page 78.
• Column guides appear in front of margin guides. When a column guide is exactly in front of a margin guide, it hides
the margin guide.
Create custom page sizes
You can create custom page sizes that appear in the Page Size menu in the New Document dialog box.
1 Choose File > New > Document.
2 Choose Custom Page Size from the Page Size menu.
3 Type a name for the page size, specify page size settings, and then click Add.
The New Doc Sizes.txt file that lets you create custom page sizes in previous version of InDesign is not available in
InDesign CS5.
More Help topics
“Change document setup, margins, and columns” on page 48
Define document presets
You can save document settings for page size, columns, margins, and bleed and slug areas in a preset to save time and
ensure consistency when creating similar documents.
1 Choose File > Document Presets > Define.
2 Click New in the dialog box that appears.
3 Specify a name for the preset and select basic layout options in the New Document Preset dialog box. (See “New
Document options” on page 44 for a description of each option.)
4 Click OK twice.
You can save a document preset to a separate file and distribute it to other users. To save and load document preset
files, use the Save and Load buttons in the Document Presets dialog box.
Last updated 11/16/2011
Page 53

USING INDESIGN
Layout
Create a document using a preset
1 Do one of the following:.
• Choose File > Document Preset > [name of preset]. (Hold down Shift while choosing the preset to create a new
document based on the preset without opening the New Document dialog box.)
• Choose File > New > Document, and then choose a preset from the Document Preset menu in the New
Document dialog box.
The New Document dialog box displays the preset layout options.
2 Make changes to the options (if desired) and click OK.
To skip the New Document dialog box, press the Shift key as you select a preset from the Document Preset menu.
Customize the pasteboard and guides
You can control the colors used to display guides for page margins and columns, as well as the guides for the bleed and
slug areas on the pasteboard. To make it easier to distinguish between the Normal and Preview modes, you can change
the color of the preview background.
InDesign also lets you control how close an object needs to be to snap to a guide, whether guides should be displayed
in front of or behind objects, as well as the size of the pasteboard.
47
1 Choose Edit > Preferences > Guides & Pasteboard (Windows) or InDesign > Preferences > Guides & Pasteboard
OS).
(Mac
2 Under Color, choose the desired colors from each of the following menus, or choose Custom to specify a custom
color using the color picker.
Margins Sets the color of the page margins.
Columns Sets the color of the column guides for the page.
Bleed Sets the color of the bleed area (which is set in the Document Setup dialog box).
Slug Sets the color of the slug area (which is set in the Document Setup dialog box).
Preview Background Sets the color of the pasteboard when in the Preview mode.
3 To set how close an object must be to snap to a guide or grid, specify a value in pixels for Snap To Zone.
4 To display guides behind objects, select Guides In Back.
5 To specify how far the pasteboard extends out from the page or spread (or the bleed or slug area, if specified), enter
values for Horizontal Margins and Vertical Margins.
6 Click OK to close the Preferences dialog box.
You can change the on-screen color of your paper. With no text or objects selected, double-click the Paper color in the
Swatches panel (choose Window > Swatches). The Paper color appears on-screen only and does not affect output; it
is intended only to simulate designing for nonwhite paper.
More Help topics
“Ruler guides” on page 56
Last updated 11/16/2011
Page 54

USING INDESIGN
Layout
Change document setup, margins, and columns
After you create a document, you may change your mind about how you want it set up. For example, you may want
single pages instead of facing pages, or you may want to change the page size or margin settings.
Change document setup
Changing options in the Document Setup dialog box affects every page in the document. If you change page size or
orientation after objects have been added to pages, you can use the Layout Adjustment feature to minimize the amount
of time needed for arranging existing objects. See
1 Choose File > Document Setup.
2 Specify the document options, and then click OK. (See “New Document options” on page 44.)
Change page margin and column settings
You can change column and margin settings for pages and spreads. When you change the column and margin settings
on a master page, you change the setting for all pages to which the master is applied. Changing the columns and
margins of regular pages affects only those pages selected in the Pages panel.
Note: The Margins And Columns dialog box doesn’t alter columns inside text frames. Text frame columns exist only
within individual text frames, not on the page itself. You can set up columns within individual text frames by using the
Text Frame Options dialog box. (See
by the Layout Adjustment feature.
“Add columns to a text frame” on page 131.) Text frame columns can also be affected
“About automatic layout adjustment” on page 86.
48
1 Do one of the following:
• To change margin and column settings for one spread or page, go to the spread you want to change, or select
one spread or page in the Pages panel.
• To change margin and column settings for multiple pages, select those pages in the Pages panel, or select a
master that controls the pages you want to change.
2 Choose Layout > Margins And Columns, specify the following options, and then click OK.
Margins Type values to specify the distance between margin guides and each edge of the page. If Facing Pages is
selected in the New Document or
Document Setup dialog box, the Left and Right margin option names change to
Inside and Outside, so that you can specify additional inside margin space to accommodate binding.
Columns Specify the number of columns.
Create unequal column widths
When you have more than one column on a page, the column guides in the middle appear in pairs. When you drag
one column guide, the pair moves. The space between the column guides is the gutter value you specified; the pair
moves together to maintain that value.
Note: You cannot create unequal column widths for columns in a text frame. Instead, created threaded, side-by-side text
frames with different column widths.
1 Go to the master or spread you want to change.
2 If column guides are locked, choose View > Grids & Guides > Lock Column Guides to deselect it.
3 Using the Selection tool , drag a column guide. You can’t drag it past an adjacent column guide or beyond the
edge of the page.
Last updated 11/16/2011
Page 55

USING INDESIGN
Layout
Dragging a column guide to create unequal column widths
To create columns with unequal gutters, create evenly spaced ruler guides and then drag individual guides to the
desired location. (See “Create ruler guides” on page 56.)
Rulers and measurement units
For detailed information and instructions, click the links below.
Change rulers and measurement units
You can change measurement units for the on-screen rulers and for use in panels and dialog boxes; you can also change
these settings at any
rulers begin measuring from the upper-left corner of a page or spread. You can change this by moving the zero point.
“Change the zero point” on page 51.)
(See
time and temporarily override the current measurement units as you enter a value. By default,
49
Changing the measurement units doesn’t move guides, grids, and objects, so when ruler tick marks change, they might
not line up with objects aligned to the old tick marks.
A
B
C
Rulers in a document window
A. Labeled tick marks B. Major tick marks C. Minor tick marks
You can set up different measurement systems for horizontal and vertical rulers. The system you select for the
horizontal ruler governs tabs, margins, indents, and other measurements. Each spread has its own vertical ruler;
however, all vertical rulers use the same settings you specify in
the Units & Increments preferences dialog box.
The default units of measure for the rulers are picas (a pica equals 12 points). However, you can change custom ruler
units and control where the major tick marks appear on a ruler. For example, if you change the custom ruler units for
the vertical ruler to 12 points, a major ruler increment appears every 12 points (if such display is possible in the current
magnification). The tick mark labels include your customized major tick marks, so when the ruler reads 3 in the same
example, it marks the third instance of the 12-point increment, or 36 points.
Last updated 11/16/2011
Page 56

USING INDESIGN
Layout
Vertical ruler using inches (left), and custom 12-point increments (right)
Setting custom ruler increments in the vertical ruler is useful for lining up a ruler’s major tick marks with a baseline
grid.
More Help topics
“Grids” on page 54
“Keys for selecting and moving objects” on page 693
Show or hide rulers
❖ In Normal View Mode (View > Screen Mode > Normal), choose View > Show Rulers or Hide Rulers.
50
Change measurement units and rulers
1 Choose Edit > Preferences > Units & Increments (Windows) or InDesign > Preferences > Units & Increments
OS).
(Mac
2 To change the origin of the zero point, in the Origin menu under Ruler Units, do one of the following:
• To set the ruler origin at the top-left corner of each spread, choose Spread. The horizontal ruler measures across
the entire spread.
• To set the ruler origin at the top-left corner of each page, choose Page. The horizontal ruler starts at zero for each
page in a spread.
• To set the ruler origin at the center of the spine, choose Spine. The horizontal ruler measures in negative
numbers to the left of the spine and positive numbers to the right of the spine.
3 To change the measurement system used for rulers, dialog boxes, and panels, choose the desired system for
Horizontal and Vertical, or choose Custom and type the number of points at which you want the ruler to display
major tick marks.
If you specify a measurement system other than points, the Increment Every baseline grid value is still displayed in
points. This makes it easier to match text size and leading values, which are displayed in points.
4 To change the value you want used for text size, choose Points or Pixels from the Text Size menu. This option is
especially useful when you’re designing a document for the web.
5 To change the value you want used for stroke weight settings, choose Points, Millimeters, or Pixels from the Stroke
menu. This option is especially useful when you’re designing a document for the web.
6 To change the value you want used for calculating points, specify the desired point size per inch for Points/Inch.
7 Set any of the following Keyboard Increments:
Cursor Key Controls the increment for the arrow keys when nudging objects.
Size/Leading Controls the increment for increasing or decreasing the point size or leading using the keyboard
shortcuts.
Last updated 11/16/2011
Page 57

USING INDESIGN
Layout
Baseline Shift Controls the increment for shifting the baseline using the keyboard shortcuts.
Kerning/Tracking Controls the increment for kerning and tracking using the keyboard shortcuts.
8 Click OK.
You can also change ruler units by right-clicking (Windows) or Control-clicking (Mac OS) a ruler and choosing the
units from the context menu. By right-clicking or Control-clicking at the intersection of the horizontal and vertical
rulers, you can change the ruler units for both rulers at the same time.
Override default measurement units
You can specify a unit of measurement that is different from the default.
❖ Highlight the existing value in a panel or dialog box, and type the new value using the notation in the following
table:
To specify: Type these letters after the value: Examples Result
51
Inches i
in
inch
"
Millimeters mm 48mm 48 millimeters
Centimeters cm 12cm 12 centimeters
Picas p 3p 3 picas
Points pt
p (before value)
Picas and points p (between values) 3p6 3 picas, 6 points
Pixels px 5px 5 pixels
Ciceros c 5c 5 ciceros
Agates ag 5ag agates
5.25i
5.25in
5.25inch
5.25”
6pt
p6
5 1/4 inches
6 points
Change the zero point
The zero point is the position at which the zeros on the horizontal and vertical rulers intersect. By default, the zero
point is at the top left corner of the first page of each spread. This means that the default position of the zero point is
always the same relative to a spread, but may seem to vary relative to the pasteboard.
The X and Y position coordinates in the Control panel, Info panel, and Transform panel are displayed relative to the
zero point. You can move the zero point to measure distances, to create a new reference point for measurement, or to
tile oversized pages. By default, each spread has one zero point at the upper left corner of the first page, but you can
also locate it at the binding spine, or specify that each page in a spread has its own zero point.
Last updated 11/16/2011
Page 58

USING INDESIGN
Layout
Adjust the zero point
When you move the zero point, it moves to the same relative location in all spreads. For example, if you move the zero
point to the top left corner of
other spreads in the document.
❖ Do one of the following:
• To move the zero point, drag from the intersection of the horizontal and vertical rulers to the position on the layout
where you want to set the zero point.
Establishing a new zero point
• To reset the zero point, double-click the intersection of the horizontal and vertical rulers .
• To lock or unlock the zero point, right-click (Windows) or Control-click (Mac OS) the zero point of the rulers, and
choose Lock Zero Point in the context menu.
the second page of a page spread, it will appear in that position on the second page of all
52
Change the default zero point
Using the Origin setting in the Preferences dialog box, you can set the default zero point for rulers as well as the scope
of the horizontal ruler. The scope determines whether the ruler measures across the page, across the entire spread, or,
for multipage spreads, from the center of the spine.
If you set the ruler origin at each spread’s binding spine, the origin becomes locked at the spine. You won’t be able to
reposition the ruler origin by dragging it from the intersection of the rulers unless you choose another origin option.
1 Choose Edit > Preferences > Units & Increments (Windows) or InDesign > Preferences > Units & Increments
OS).
(Mac
2 In the Ruler Units section, in the Origin menu, do one of the following:
• To set the ruler origin at the top-left corner of each spread, choose Spread. The horizontal ruler measures across
the entire spread.
• To set the ruler origin at the top-left corner of each page, choose Page. The horizontal ruler starts at zero for each
page in a spread.
• To set the ruler origin at the center of the spine, choose Spine. The horizontal ruler measures in negative numbers
to the left of the spine and positive numbers to the right of the spine.
You can also change horizontal ruler origin settings using the context menu that appears when you right-click
(Windows) or Control-click (Mac OS) the horizontal ruler.
Measure objects
The Measure tool calculates the distance between any two points in the document window. When you measure from
one point to another, the distance measured is displayed in the Info panel. All measurements except the angle are
calculated in the units of measure currently set for the document.
Last updated 11/16/2011
Page 59

USING INDESIGN
Layout
After you use the Measure tool to measure an item, the line or lines remain visible until you take another measurement
or select a different tool.
Measure the distance between two points
1 Make sure the Info panel is visible (Window > Info).
2 Select the Measure tool . (Click and hold the Eyedropper tool to display the Measure tool.)
3 Click the first point and drag to the second point. Shift-drag to constrain the tool’s motion to multiples of 45°. You
cannot drag beyond a single pasteboard and its spread.
The width and height measurements appear in the Info panel.
Measure angles
1 Make sure the Info panel is visible (Window > Info).
2 Select the Measure tool . (Click and hold the Eyedropper tool to display the Measure tool.)
3 Do one of the following:
• To measure an angle from the x axis, drag the tool.
• To measure a custom angle, drag to create the first line of the angle. Position the tool over either end point of the
measure line. To create the second line of the angle, either double-click and drag, or press Alt (Windows) or Option
OS) and drag.
(Mac
When you measure a custom angle, the Info panel shows the length of the first line as D1 and the length of the second
D2.
line as
53
Info panel overview
The Info panel displays information for selected objects, the current document, or the area below the current tool,
including values for position, size, and rotation. When you move an object, the Info panel displays its position relative
to its starting point as well.
The Info panel is also useful for determining word counts and character counts in stories.
Unlike other InDesign panels, the Info panel is for viewing only; you cannot enter or edit the values it displays. You
can view additional information about a selected object by choosing Show Options from the panel menu.
A
B
C
Info panel
A. Horizontal (X) position of the cursor B. Vertical (Y) position of the cursor C. Distance an object or tool has moved relative to its starting
position D. Width in current units E. Height in current units F. Degree of rotation
Display the Info panel
❖ Choose Window > Info.
To change the current measurement system, click the small triangle next to the plus icon.
Determine the word count
1 Place the insertion point inside a text frame, or select text.
2 Choose Window > Info.
D
E
F
Last updated 11/16/2011
Page 60

USING INDESIGN
Layout
The Info panel displays the number of words and characters in the story or the selected text. If any text is overset, a “+”
sign appears, followed by a number representing the overset characters, words, or lines.
View additional Info panel options
❖ Choose Show Options in the Info panel menu.
Depending on the object or tool selected, you may see the following:
• Values for the fill and stroke colors of the selected object, and information about gradients .
• The names of any swatches. You can display color-space values instead by clicking the small triangle next to the fill
or stroke icon.
• Information about the current document, such as location, last modified date, author, and file size, when nothing
in the document is selected.
• Number of characters, words, lines, and paragraphs when you create a text insertion point or select text using one
of the Type tools. (If any text is overset, a “+” sign appears, followed by a number representing the overset
characters, words, or lines.)
• File type, resolution, and color space when a graphic file is selected. Resolution is displayed as both actual pixels per
inch (the resolution of the native graphic file) and effective pixels per inch (the resolution of the graphic after it has
been resized in InDesign). If color management has been enabled, the ICC color profile is also displayed.
• The shear angle or horizontal and vertical scaling if the Shear tool, Scale tool, or the Free Transform tool is selected.
54
Grids
Use grids
Two kinds of nonprinting grids are available: a baseline grid for aligning columns of text, and a document grid for
aligning objects. On the screen, a baseline grid resembles ruled notebook paper, and a document grid resembles graph
paper. You can customize both kinds of grids.
Baseline grid (left) and document grid (right)
When a grid is visible, you can observe the following characteristics:
• The baseline grid covers entire spreads, but the document grid covers the entire pasteboard.
• Baseline grids and document grids appear on every spread and cannot be assigned to any master.
• The document grid can appear in front of or behind all guides, layers, and objects, but cannot be assigned to any
layer.
Set up a baseline grid
Use Grid Preferences to set up a baseline grid for the entire document.
Last updated 11/16/2011
Page 61

USING INDESIGN
Layout
You can set up a baseline grid for a frame by using the Text Frame Options. (See “Change text frame properties” on
page 131.)
1 Choose Edit > Preferences > Grids (Windows) or InDesign > Preferences > Grids (Mac OS).
2 Specify a baseline grid color by choosing a color in the Color menu. You can also choose Custom in the Color menu.
3 For Relative To, specify whether you want the grid to start at the top of the page or the top margin.
4 For Start, type a value to offset the grid from either the top of the page or the top margin of the page, depending on
the option you choose from the Relative To menu. If you have trouble aligning the vertical ruler to this grid, try
starting with a value of zero.
5 For Increment Every, type a value for the spacing between grid lines. In most cases, type a value that equals your
body text leading, so that lines of text align perfectly to this grid.
A
B
55
Baseline grid in document window
A. First grid line B. Increment between grid lines
6 For View Threshold, type a value to specify the magnification below which the grid does not appear. Increase the
view threshold to prevent crowded grid lines at lower magnifications.
Baseline grid at magnification below view threshold (left) and above view threshold (right)
7 Click OK.
Note: The Snap To Guides command controls both snapping to guides and snapping to the baseline grid.
Set up a document grid
1 Choose Edit > Preferences > Grids (Windows) or InDesign > Preferences > Grids (Mac OS).
2
Specify a document grid color by choosing a color in the Color menu. You can also choose Custom in the Color menu.
3 To set horizontal grid spacing, specify a value for Gridline Every in the Horizontal section of the Document Grid
section, and then specify a value for Subdivisions between each grid line.
4 To set vertical grid spacing, specify a value for Gridline Every in the Vertical section of the Document Grid section,
and then specify a value for Subdivisions between each grid line.
Last updated 11/16/2011
Page 62

USING INDESIGN
Layout
5 Do one of the following, and click OK:
• To put the document and baseline grids behind all other objects, make sure that Grids In Back is selected.
• To put the document and baseline grids in front of all other objects, deselect Grids In Back.
To put guides behind all other objects, you can also choose Guides In Back in the context menu that appears when you
right-click (Windows) or Control-click (Mac OS) an empty area of the document window.
Show or hide grids
• To show or hide the baseline grid, choose View > Grids & Guides > Show/Hide Baseline Grid.
• To show or hide the document grid, choose View > Grids & Guides > Show/Hide Document Grid.
Snapping objects to grids
When snapping is enabled, moving an object within the snap zone of a grid location will cause the object to snap to
that location.
More Help topics
“Ruler guides” on page 56
56
Snap objects to the document grid
1 Choose View > Grids & Guides and make sure that Snap To Document Grid is selected (checked). If it is not
selected, click it.
Note: The Snap to Guides command controls both snapping to guides and snapping to the baseline grid.
2 To specify the snap-to zone, choose Edit > Preferences > Guides & Pasteboard (Windows) or InDesign >
Preferences
is always in pixels.
To snap an object to a grid, drag an object toward a grid until one or more of the object’s edges is within the grid’s
snap-to zone.
> Guides & Pasteboard (Mac OS), type a value for Snap to Zone, and click OK. The Snap to Zone value
Ruler guides
Create ruler guides
Ruler guides are different from grids in that they can be positioned freely on a page or on a pasteboard. You can create
two kinds of ruler guides: page guides, which appear only on the page on which you create them, or spread guides,
which span all pages and the pasteboard of a multiple-page spread. You can drag any ruler guide to the pasteboard. A
ruler guide is displayed or hidden with the layer on which it was created.
New ruler guides always appear on the target spread. For example, if several spreads are visible in the document
window and you drag a new guide into the window, the new guide becomes visible only on the target spread.
Last updated 11/16/2011
Page 63

USING INDESIGN
Layout
A B
Guides in the document window
A. Spread guide B. Page guide
More Help topics
“Layers” on page 78
“Customize the pasteboard and guides” on page 47
Create a ruler guide
1 Make sure that both rulers and guides are visible, make sure the correct spread is targeted, and view the document
in Normal View mode, not Preview mode.
2 If the document contains multiple layers, click a layer name in the Layers panel to target the layer.
3 Do one of the following:
• To create a page guide, position the pointer inside a horizontal or vertical ruler and then drag to the desired location
on the target spread. If you drop the guide onto the pasteboard, it spans the pasteboard and spread; it will act as a
page guide if you later drag it onto a page.
• To create a spread guide, drag from the horizontal or vertical ruler, keeping the pointer in the pasteboard but
positioning the guide at the desired location on the target spread.
• To toggle between horizontal and vertical guides, select the guide and hold down Alt (Windows) or Option (Mac OS).
• To create a spread guide when the pasteboard is not visible (for example, when you’ve zoomed in), press Ctrl
(Windows) or Command (Mac
• To create a spread guide without dragging, double-click a specific position on the horizontal or vertical ruler. If you
want to snap the guide to the nearest tick mark, hold down the Shift key when you double-click the ruler.
• To create vertical and horizontal guides simultaneously, press Ctrl (Windows) or Command (Mac OS) as you drag
from the target spread’s ruler intersection to the desired location.
OS) as you drag from the horizontal or vertical ruler to the target spread.
57
A vertical and horizontal guide created concurrently
To reposition a ruler guide numerically, select the guide and enter values for X and Y in the Control panel.
Last updated 11/16/2011
Page 64

USING INDESIGN
Layout
Create a set of evenly spaced page guides
1 If the document contains multiple layers, click a layer name in the Layers panel to target the layer.
2 Choose Layout > Create Guides.
3 For Number, type a value to specify the number of rows or columns you want to create.
4 For Gutter, type a value to specify the spacing between rows or columns. Start with a low value, such as 1 pica; large
gutters leave little space for columns.
Columns created with the Create Guides command are not the same as those created with the Layout > Margins And
Columns command. For example, columns created using Create Guides cannot control text flow when a text file is
placed. Use the Margins And Columns command to create major column divisions appropriate for autoflow text, and
use the Create Guides command to create column grids and other layout aids.
5 For Fit Guides To, click Margins to create the guides within the page margins, or click Page to create the guides
within the page edges.
58
Ruler guides evenly spaced within page margins (left) and page edges (right)
6 To delete any existing guides (including guides on locked or hidden layers), select Remove Existing Ruler Guides.
7 If you like, select Preview to see the effect of your settings on the page, and then click OK.
Note: The Create Guides command can create page guides only; it cannot create spread guides.
To space existing guides a uniform distance apart, select the guides (by dragging or pressing Shift as you click with the
mouse). Then, select Use Spacing from the Control panel, type the space value in the text box, and press Enter or
Return to confirm. Click either Distribute Horizontal Centers
or Distribute Vertical Centers to the left of the Use
Spacing option.
Show or hide guides
• To show or hide all margin, column, and ruler guides, choose View > Grids & Guides > Show/Hide Guides.
• To show or hide ruler guides on one layer only without changing the visibility of the layer’s objects, double-click
the layer name in the Layers panel, select or deselect Show Guides, and then click
OK.
• To show or hide guides and all other non-printing elements, click the Preview Mode icon at the bottom of the
Toolbox.
Work with ruler guides
You can change the attributes of individual ruler guides, and you can move, cut, copy, paste, or delete multiple ruler
guides simultaneously. Cut or copied ruler guides can be pasted to other pages or documents, but not to other
programs. To change attributes of specific guides, you must select the guides you want to change. When no guides are
selected, the Ruler Guides command sets the defaults for new guides only.
Last updated 11/16/2011
Page 65

USING INDESIGN
Layout
Select ruler guides
Unselected ruler guides appear light blue by default. Selected ruler guides are highlighted in their layer color. When a
guide is selected, the Reference Point icon in the Control panel changes to
or , representing the selected guide.
• To select a single ruler guide, use the Selection tool or the Direct Selection tool and click the guide to highlight
it in its layer color.
If you can’t select a ruler guide and the View > Grids & Guides > Lock Guides command is already deselected, the
guide might be on that page’s master, or on a layer where guides are locked.
• To select multiple ruler guides, hold down Shift as you click guides using the Selection or Direct Selection tool. You
can also drag over multiple guides, as long as the selection marquee doesn’t touch or enclose any other object.
• To select all ruler guides on the target spread, press Ctrl+Alt+G (Windows) or Command+Option+G (Mac OS).
Move ruler guides
❖ Using Selection tool or the Direct Selection tool , do any of the following:
• To move a ruler guide, drag it.
• To move multiple ruler guides, shift-select the guides you want to move, and then drag them.
Move selected guides just as you would any other selected object, including nudging with the arrow keys and using the
Control or Transform panels.
59
• To make a guide snap to a ruler tick mark, press Shift as you drag it. Or select the guide, press and hold down the
Shift key, and then click the mouse button.
• To move a spread guide, drag the part of the guide that’s on the pasteboard, or press Ctrl (Windows) or Command
OS) as you drag the guide from within the page.
(Mac
• To move guides to another page or document, select one or more guides, choose Edit > Copy or Edit > Cut, go to
another page, and then choose Edit
guides’ original page, the guides appear in the same position.
Note: The Paste Remembers Layers option affects the layer on which pasted guides appear.
> Paste. If you’re pasting onto a page of the same size and orientation as the
Delete ruler guides
• To delete individual guides, select one or more ruler guides and then press Delete. (You can also drag ruler guides
and drop them on a ruler to delete them.)
• To delete all ruler guides on the target spread, right-click (Windows) or Ctrl-click (Mac OS) a selected guide or
ruler, and choose Delete All Guides On Spread.
If you cannot delete a guide, it may be locked, it may be on a master page, or it may be on a locked layer.
Customize ruler guides
1 Do one of the following:
• To change options for one or more existing ruler guides, select those ruler guides.
• To set default options for new ruler guides, deselect all guides by clicking in an empty area.
2 Choose Layout > Ruler Guides.
3 For View Threshold, specify the magnification below which ruler guides do not appear. This prevents ruler guides
from appearing too close together at lower magnifications.
4 For Color, choose a color or choose Custom to specify a custom color in the system color picker. Then click OK.
Last updated 11/16/2011
Page 66

USING INDESIGN
Layout
You can set the current magnification as the view threshold for new ruler guides by pressing Alt (Windows) or Option
(Mac OS) as you drag the ruler guides you’ve selected.
Lock or unlock ruler guides
• To lock or unlock all ruler guides, choose View > Grids & Guides > Lock Guides to select or deselect the menu
command.
• To lock or unlock ruler guides on one layer only, without changing the visibility of the layer’s objects, double-click
the layer name in the Layers panel, select or deselect Lock Guides, and then click
OK.
Change ruler guide stacking order
By default, ruler guides appear in front of all other guides and objects. However, some ruler guides may block your
view of such objects as lines with narrow stroke widths. You can change the Guides in Back preference to display ruler
guides in front of or behind all other objects. However, regardless of the Guides in Back setting, objects and ruler
guides are always in front of margin and column guides. Also, although putting guides on different layers organizes
them structurally, it does not affect their visual stacking order—the Guides in Back preference stacks all ruler guides
as a single set in relation to all page objects.
A
B
C
D
60
Default stacking order
A. Ruler guides B. Page objects C. Margin and column guides D. Page
1 Choose Edit > Preferences > Guides & Pasteboard (Windows) or InDesign > Preferences > Guides & Pasteboard
OS).
(Mac
2 Select Guides in Back, and click OK.
Snap objects to guides and grids
To precisely align objects to guides, use the Snap To Guides and Snap To Document Grid commands. Object edges
will snap to (be pulled toward) the nearest grid intersection or guide when you draw, move, or resize the objects.
The exact range within which an object snaps to guides is called the snap-to zone, which you can adjust. When you
select both the Snap To Guides and the Snap To Document Grid commands, the grid takes precedence.
Keep the following guidelines in mind as you align objects to guides and grids:
• To snap an object to a guide, drag an object toward a guide until one or more of the object’s edges is within the
guide’s snap-to zone.
• Guides must be visible for objects to snap to them. However, objects can snap to the document and baseline grids
whether the grids are visible or not.
• Objects on one layer snap to ruler guides visible on any other layer. If you don’t want objects to snap to guides on
a certain layer, hide that layer’s guides.
• For the baselines of text to snap to the baseline grid, press the Align to Baseline Grid button for individual
paragraphs or paragraph styles.
1 Choose View > Grids & Guides and make sure that Snaps To Guides is selected (checked).
Last updated 11/16/2011
Page 67

USING INDESIGN
Layout
Note: The Snap To Guides command controls both snapping to guides and snapping to the baseline grid.
2 To specify the snap-to zone, choose Edit > Preferences > Guides & Pasteboard (Windows) or InDesign >
Preferences
> Guides & Pasteboard (Mac OS), type a value for Snap To Zone, and click OK. The Snap To Zone
value is always in pixels.
Use smart guides
The Smart Guides feature makes it easy to snap objects to items in your layout. As you drag or create an object,
temporary guides appear, indicating that the object is aligned with an edge or center of the page or with another page
item.
By default, the Smart Guides feature is selected. You can turn off smart guides, or you can turn off any of the smart
guide categories:
Smart Object Alignment Smart object alignment allows for easy snapping to page item centers or edges. In addition to
snapping, smart guides dynamically draw to indicate which object is being snapped to.
Smart Dimensions Smart dimension feedback appears when you’re resizing, creating, or rotating page items. For
example, if you rotate one object on your page 24 degrees, a rotation icon appears as you rotate another object close to
24 degrees. This hint lets you snap the object to the same rotation angle of the adjacent object. Similarly, as you resize
an object next to another object, a line segment with arrows at each end lets you snap the object to the same width or
height as the adjacent object.
61
Smart Spacing Smart spacing lets you quickly arrange page items with the help of temporary guides that indicate when
the spacing between objects is even.
Smart Cursors Smart cursor feedback appears in a gray box as X and Y values when you’re moving or resizing object
or as a measurement when you’re rotating values. The Show Transformation Values option in Interface preferences
lets you turn smart cursors on and off.
For a video tutorial on using smart guides, see www.adobe.com/go/lrvid4029_id.
Turn smart guides on or off
❖ Choose View > Grids & Guides > Smart Guides.
Turn smart guide categories on or off
1 Open the Guides & Pasteboard preferences.
2 Indicate whether you want Align To Object Center, Align To Object Edge, Smart Dimensions, and Smart Spacing
turned on or off, and click OK.
To turn off smart cursors, which displays the X and Y values of objects you mouse over, deselect Show Transformation
Values in Interface preferences.
Change the appearance of smart guides
1 Open the Guides & Pasteboard section of the Preferences dialog box.
2 Choose a different color from the Smart Guides menu, and click OK.
Last updated 11/16/2011
Page 68

USING INDESIGN
Layout
Tips for using Smart Guides
❖ Smart Guides take effect only on page items and intersections that are in the current page view. If you have many
objects on a page and are trying to align an object to another object or objects in particular, zoom in on that area
specifically.If you don’t want Smart Guides to snap to column guides, turn off Snap To Guides temporarily by
choosing View > Grids & Guides > Snap To Guides.The Smart Guides feature is accurate regardless of zoom
percentage, so it isn’t necessary to zoom in to see if two objects are really aligned at their left edges, for example.
Pages and spreads
For detailed information and instructions, click the links below.
About pages and spreads
When you select the Facing Pages option in the File > Document Setup dialog box, document pages are arranged in
spreads. A spread is a set of
magazine. Every InDesign spread includes its own pasteboard, which is an area outside a page where you can store
objects that aren’t yet positioned on a page. Each spread’s pasteboard provides space to accommodate objects that
bleed, or extend past the edge of a page.
pages viewed together, such as the two pages visible whenever you open a book or
62
B
A
C
Pages panel
A. Page icons B. Page with master “A” applied C. Selected spread
In a long document, you can move to a page quickly by choosing Layout > Go To Page.
Change the page and spread display
The Pages panel provides information about and control over pages, spreads, and masters (pages or spreads that
automatically format other pages or spreads). By default, the Pages panel displays thumbnail representations of each
page’s content.
1 If the Pages panel isn’t visible, choose Window > Pages.
2 Choose Panel Options in the Pages panel menu.
3 In the Icons section, specify which icons appear next to the page thumbnails in the Pages panel. These icons indicate
whether transparency or page transitions have been added to a spread, and whether the spread view is rotated.
4 In the Pages and Masters sections:
• Select an icon size for pages and masters.
Last updated 11/16/2011
Page 69

USING INDESIGN
Layout
• Select Show Vertically to display spreads in one vertical column. Deselect this option to allow spreads to be
displayed side-by-side.
• Select Show Thumbnails to display thumbnail representations of the content of each page or master. (This
option is not available if certain options are selected for Icon Size.)
5 In the Panel Layout section, select Pages On Top to display the page icon section above the master icon section, or
select Masters On Top to display the master icon section above the page icon section.
6 Choose an option in the Resize menu to control how the sections are displayed when you resize the panel:
• To resize both the Pages and Masters sections of the panel, choose Proportional.
• To maintain the size of the Pages section and resize only the Masters section, choose Pages Fixed.
• To maintain the size of the Masters section and resize only the Pages section, choose Masters Fixed.
Target or select a page or spread
You either select or target pages or spreads, depending on the task you are performing. Some commands affect the
currently selected page or spread, while others affect the target page or spread. For example, you can drag ruler guides
only to the target page or spread, but page-related commands, such as Duplicate Spread or Delete Page, affect the page
or spread selected in the Pages panel. Targeting makes a page or spread active and is helpful when, for example, several
spreads are visible in the document window and you want to paste an object onto a specific spread.
63
❖ In the Pages panel:
• To both target and select a page or spread, double-click its icon or the page numbers under the icon. If the page
or spread is not visible in the document window, it shifts into view.
You can also both target and select a page or spread by clicking a page, any object on the page, or its pasteboard
in the document window.
The vertical ruler is dimmed alongside all but the targeted page or spread.
• To select a page, click its icon. (Don’t double-click unless you want to select it and move it into view.)
• To select a spread, click the page numbers under the spread icon.
Note: Some spread options, such as those in the Pages panel menu, are available only when an entire spread is
selected.
A A A A
1
2–3 4–5
8
6–7
Page 1 is targeted and page 5 is selected (left), and page 1 is targeted and entire spread is selected (right).
A A A A
1
2–3 4–5
8
6–7
Add new pages to a document
❖ Do any of the following:
• To add a page after the active page or spread, click the New Page button in the Pages panel or choose Layout >
> Add Page. The new page uses the same master as the existing active page.
Pages
• To add multiple pages to the end of the document, choose File > Document Setup. In the Document Setup
dialog box, specify the total number of pages for the document. InDesign adds pages after the last page or spread.
• To add pages and specify the document master, choose Insert Pages from the Pages panel menu or choose
> Pages > Insert Pages. Choose where the pages will be added and select a master to apply.
Layout
Last updated 11/16/2011
Page 70

USING INDESIGN
Layout
Create color labels for page thumbnails
You can assign colored labels to the page thumbnails in the Pages panel. For example, you can use color labels to
indicate the status of the pages, such as a green label for complete spreads, a yellow label for spreads being worked on,
and a red label for unstarted spreads.
1 In the Pages panel, select the pages to which you want to apply the color labels.
2 From the Pages panel menu, choose Color Label, and then choose the color to assign.
The color label appears below the thumbnail in the Pages panel.
Applying a color label to master pages affects all pages to which the master is applied. However, when you apply a color
label to individual document pages, the color label for the document pages is used. To use a color label for master pages,
select the document pages you want to change and choose Color Label > Use Master Color from the Pages panel menu.
Move, duplicate, and delete pages and spreads
You can use the Pages panel to freely arrange, duplicate, and recombine pages and spreads. Keep the following
guidelines in mind when adding, arranging, duplicating, or removing pages within a document:
• InDesign preserves the threads between text frames.
• InDesign redistributes pages according to how the Allow Document Pages To Shuffle command is set.
• An object that spans multiple pages stays with the page on which the object’s bounding box covers the most area.
64
More Help topics
“Control spread pagination” on page 66
“Move or copy pages between documents” on page 65
“Copy masters” on page 74
Move pages using Move Pages command
1 Choose Layout > Pages > Move Pages, or choose Move Pages from the Pages panel menu.
2 Specify the page or pages you want to move.
3 For Destination, choose where you want to move the pages, and specify a page if necessary. Click OK.
Move pages by dragging
❖ As you drag, the vertical bar indicates where the page will appear when you drop it. If the black rectangle or bar
touches a spread when Allow Pages to Shuffle is turned off, the page you’re dragging will extend that spread;
otherwise, document pages will be redistributed to match the Facing Pages setting in the File
dialog box.
In the Pages panel, drag a page icon to a new position within the document.
A A A A
1
2–3
B B B
6–7
Moving a page’s position using the Pages panel
B
[
]
4–5
8
A A A A
1
2–3 4–5
6–7
8
> Document Setup
Last updated 11/16/2011
Page 71

USING INDESIGN
Layout
Duplicate a page or spread
❖ In the Pages panel, do one of the following:
• Drag the page range numbers under a spread to the New Page button. The new spread appears at the end of the
document.
• Select a page or spread, and then choose Duplicate Page or Duplicate Spread in the Pages panel menu. The new page
or spread appears at the end of the document.
• Press Alt (Windows) or Option (Mac OS) as you drag the page icon or page range numbers under a spread to a new
location.
Note: Duplicating a page or spread also duplicates all objects on the page or spread. Text threads from the duplicated
spread to other spreads are broken, but all text threads within the duplicated spread remain intact—as do all text threads
on the original spread.
Remove a page from a spread while keeping it in the document
1 Select the spread and deselect Allow Selected Spread To Shuffle in the Pages panel menu.
2 In the Pages panel, drag a page out of the spread until the vertical bar is not touching any other pages.
Delete a page or spread from the document
❖ Do one of the following:
• In the Pages panel, drag one or more page icons or page-range numbers to the Delete icon.
• Select one or more page icons in the Pages panel, and click the Delete icon.
• Select one or more page icons in the Pages panel, and then choose Delete Page(s) or Delete Spread(s) in the Pages
panel menu.
65
Move or copy pages between documents
When you move or copy a page or spread from one document to another, all of the items on the page or spread,
including graphics, links, and text, are copied to the new document. Section markers are preserved. Threaded text
frames are also included, but text that is threaded to pages outside the spread does not transfer. If the page or spread
you are copying contains styles, layers, or masters with the same names as their counterparts in the destination
document, the destination document’s settings are applied to the page or spread.
If you copy a page from a document that has a different size than the document you are copying to, the page and page
item positions may not match exactly.
If you move or copy a spread with a rotated view, the rotated view is cleared in the target document.
If you want to move or copy a multiple-page spread, deselect Allow Document Pages To Shuffle in the destination
document to keep the spread together.
More Help topics
“Copy masters” on page 74
Move or copy pages between documents
1 To move pages from one document to another, open both documents.
2 Choose Layout > Pages > Move Pages, or choose Move Pages from the Pages panel menu.
3 Specify the page or pages you want to move.
Last updated 11/16/2011
Page 72

USING INDESIGN
Layout
4 Choose the destination document name from the Move To menu.
5 For Destination, choose where you want to move the pages, and specify a page if necessary.
6 If you want to remove the pages from the original document, select Delete Pages After Moving.
Note: When you copy pages between documents, their associated masters are copied automatically. If the new document
contains a master with the same name as the master applied to the copied page, however, the master of the new document
is applied to the copied page instead.
Move or copy pages between documents by dragging
1 To move pages from one document to another, make sure that both documents are open and visible.
You can choose Window > Arrange > Tile to display documents side-by-side.
2 Drag the original document’s page icon to the new document.
3 In the Insert Pages dialog box, specify where the pages will be added.
4 If you want to remove the pages from the original document, select Delete Pages After Inserting.
Control spread pagination
Most documents use two-page spreads exclusively. When you add or remove pages before a spread, the pages shuffle
by default. However, you may want to keep certain pages in a spread together. For example, you can create gatefold or
accordion foldouts by creating a multiple-page spread (also called an island spread) and adding pages to it. By not
allowing pages to shuffle, you can ensure that pages are kept in the same spread.
66
A
B
C
Pages panel
A. One-page spread B. Four-page spread, identified by brackets around page numbers C. Entire two-page spread selected
Create a multiple-page spread
1 Do one of the following:
• To keep a single spread together, select a spread in the Pages panel, and then deselect Allow Selected Spread To
Shuffle in the Pages panel
page numbers.
• To allow the creation of spreads of more than two pages in the entire document and to preserve those spreads when
you add, remove, or arrange preceding pages, deselect Allow Document Pages To Shuffle on the Pages panel menu.
InDesign will preserve spreads of more than two pages while letting two-page spreads repaginate normally.
2 Add pages to the selected spread either by using Insert Pages to insert a new page in the middle of a spread or by
dragging an existing page to the spread in the Pages panel. To drag an entire spread, drag its page numbers.
menu. You can identify an island spread in the Pages panel by the brackets around its
Last updated 11/16/2011
Page 73

USING INDESIGN
Layout
67
A A A
1
[2–3]
4–5
6–7 8–9
Adding a page to a spread using the Pages panel
A A A
A
[
2–4
1
9
7–8
]
5–6
Note: You can include up to ten pages in a spread. When you have reached the limit, the black vertical bar will not appear.
Redistribute pages
You can redistribute a spread’s pages to match the Facing Pages setting in the File > Document Setup dialog box.
❖ Do either of the following:
• If an individual spread has been allowed to shuffle, select the spread, and choose Allow Selected Spread To Shuffle
in the Pages panel menu to select it.
• If document pages have been allowed to shuffle and you added pages to a spread, choose Allow Document Pages
To Shuffle from the Pages panel menu to select it. Click No to redistribute pages. If you click Yes to maintain the
multiple-page spreads, brackets surround the numbers on those spreads in the Pages panel, indicating that those
spreads are not allowed to shuffle.
Start a document with a two-page spread
Instead of beginning the document with a single page, you can begin your document with a two-page spread.
1 Do either of the following actions:
• To create a document, choose File > New Document.
• To edit an existing document, choose File > Document Setup.
2 For Start Page #, specify an even number, such as 2, and then click OK.
Rotate the spread view
In some instances, you need to edit rotated content. Instead of turning your head sideways to look at the rotated
content, you can rotate the spread view. This option is especially useful for working on rotated calendars and tables.
Rotating the spread view does not affect printing or output.
Last updated 11/16/2011
Page 74

USING INDESIGN
Layout
68
A B
Rotating the spread
A. Before rotating spread B. Rotated spread view C. Rotate icon in Pages panel
For a video tutorial on rotating the spread view, see www.adobe.com/go/lrvid4031_id.
1 In the Pages panel, select the page or spread that you want to rotate.
2 Do any of the following:
• From the Pages panel menu, choose Rotate Spread View > 90° CW, 90° CCW, or 180°.
• Choose View > Rotate Spread > 90° CW, 90° CCW, or 180°.
A rotation icon appears next to the rotated spread in the Pages panel.
C
Objects you place or create mirror the rotated view. For example, if you create a text frame when the spread view is
rotated 90 degrees, the text frame is also rotated. However, objects you paste are not rotated.
Last updated 11/16/2011
Page 75

USING INDESIGN
Layout
When transforming objects, keep in mind that you’re working on a rotated page view. For example, if you’re editing a
table on a rotated spread view, changing the “left” side of the table will change what appears to be the top of the table
in the rotated view.
Before you output the file or send it to someone else, it’s a good idea to avoid confusion by clearing the spread rotation.
Choose View > Rotate Spread > Clear Rotation.
Use multiple page sizes
You can define different page sizes for pages within a single document. This feature is especially useful when you want
to manage related designs in one file. For example, you can include business card, postcard, letterhead, and envelope
pages in the same document. Using multiple page sizes is also useful for creating gate-fold layouts in magazines.
For video tutorials on creating multiple page sizes in a document, see www.adobe.com/go/lrvid5153_id_en and
http://tv.adobe.com/go/4950/.
A
69
B
C
Multiple page sizes in same document
A. Magazine page B. Gate-fold page C. Spine page
Create different page sizes within a document
Use the Page tool to select the master page or layout page you want to resize, and then use the Control panel to change
the settings. A page inherits its page size from its master page, but you can change the size of a layout page so that it’s
different from the master page applied to it. A master page can be based on another master page of a different size, so
that a range of pages of mixed sizes can share the same master content.
To apply a different page size quickly, select the page in the Pages panel, and then choose a page size from the Edit
Page Size button .
1 Using the Page tool , select one or more master pages or layout pages that you want to resize.
Make sure that the entire page is selected in the layout, not only in the Pages panel.
2 Specify settings in the Control panel to change the page size of the selected pages:
X and Y values Change the Y value to determine the vertical position of the page in relation to other pages in the
spread.
W and H page size values Change the width and height of the selected pages. You can also specify a page size preset
from the menu. To create a custom page size that appears in this list, choose Custom Page Size from the menu,
specify the page size settings, and click OK.
Last updated 11/16/2011
Page 76

USING INDESIGN
Layout
Orientation Select a landscape or portrait page orientation.
Enable Layout Adjustment Select this option if you want the objects on the page to be adjusted automatically when
the page size changes. See
Show Master Page Overlay Select this option to display a master page overlay on top of any page that is selected
with the Page tool.
Objects Move With Page Select this option to make the objects move along with the page when you adjust the X
and Y values.
“About automatic layout adjustment” on page 86.
Use master page overlays
When you use the Page tool to select a page and turn on the Show Master Page Overlay option, a shaded box appears
over the selected page. You can move the master page overlay so that master page items appear in the proper location.
The Show Master Page Overlay option is especially useful if the master page and document page have different page
sizes.
70
Aligning the master page overlay to a smaller layout page
1 Using the Page tool, select a page.
2 In the Control panel, select Show Master Page Overlay.
3 Drag the edge of the master page overlay to position the page items.
Master pages
For detailed information and instructions, click the links below.
About masters, stacking order, and layers
A master is like a background that you can quickly apply to many pages. Objects on a master appear on all pages with
that master applied. Master items that appear on document pages are surrounded by a dotted border. Changes you
make to a master are automatically applied to associated pages. Masters commonly contain repeating logos, page
numbers, headers, and footers. They can also contain empty text or graphic frames that serve as placeholders on
document pages. A master item cannot be selected on a document page unless the master item is overridden.
Masters can have multiple layers, just like pages in your document. Objects on a single layer have their own stacking
order within that layer. Objects on a master page layer appear behind objects assigned to the same layer in the
document page.
If you want a master item to appear in front of objects on the document page, assign a higher layer to the object on the
master. A master item on a higher layer appears in front of all objects on lower layers. Merging all layers will move
master items behind document page objects.
Last updated 11/16/2011
Page 77

USING INDESIGN
Layout
71
A • Section
Master items (top left) appear behind page objects on the same layer (bottom left); moving a master item to a higher layer (top right) moves it
in front of all objects on lower layers (bottom right).
A • Section
8 • Hibiscus
Tips and guidelines for masters
• You can compare alternative design ideas by creating a variety of masters and applying them in turn to sample
pages containing typical content.
• To quickly lay out new documents, you can save a set of masters in a document template, along with paragraph and
character styles, color libraries, and other styles and presets.
• If you change column or margin settings on a master, or apply a new master with different column and margin
settings, you can force objects on the page to adjust to the new layout automatically. (See
“About automatic layout
adjustment” on page 86.)
• Automatic page numbers inserted on a master display the correct page number for each section of the document
to which the master is applied. (See
“Add basic page numbering” on page 88.)
More Help topics
“Override or detach master items” on page 75
Create masters
By default, any document you create has a master page. You can create additional masters from scratch or from an
existing master page or document page. After you apply master pages to other pages, any changes made to the source
master carry forward to the masters and document pages that are based on it. With careful planning, this provides an
easy way to make layout changes to multiple pages across your document.
For a video tutorial on working with master pages, see www.adobe.com/go/vid0069.
More Help topics
Master Pages video
“Apply master pages” on page 73
Create a master from scratch
1 Choose New Master in the Pages panel menu.
2 Specify the following options, and click OK:
• For Prefix, type a prefix that identifies the applied master for each page in the Pages panel. You can type as many
as four characters.
• For Name, type a name for the master spread.
• For Based On Master, choose an existing master spread on which you’ll base this master spread, or choose None.
Last updated 11/16/2011
Page 78

USING INDESIGN
Layout
• For Number Of Pages, type a value for the number of pages you want in the master spread (as many as ten).
Create a master from an existing page or spread
• Drag an entire spread from the Pages section of the Pages panel to the Masters section.
• Select a spread in the Pages panel and choose Save As Master from the Pages panel menu.
Any objects on the original page or spread become part of the new master. If the original page used a master, the new
master is based on the original page’s master.
None
A-Master
None
A-Master B-Master
72
4–5 6–7 8–9
Creating a new master spread based on another page or spread
4–5 6–7 8–9
Base one master on another
You can create a master variation that is based on and updates with another master (called the parent master) within
the same document. The master spreads based on the parent master are called child masters. For example, if your
document has ten chapters that use master spreads that vary only slightly, base all of them on a master spread that
contains the layout and objects common to all ten. This way, a change to the basic design requires editing just the
parent master instead of editing all ten separately. Vary the formatting on your child masters. You can override parent
master items on a child master to create variations on a master, just as you can override master items on document
pages. This is a powerful way to keep a consistent yet varied design up to date.
Original parent and child masters (left); when the parent master is modified, the child masters are automatically updated (right)
❖ To base one master on another, in the Masters section of the Pages panel, do either of the following:
• Select a master spread, and choose Master Options for [master spread name] in the Pages panel menu. For Based
On Master, choose a different master, and click
• Select the name of the master spread you want to use as the base and drag it onto the name of another master to
it.
apply
OK.
[None]
10–11 12–13 14–15
B-Master based on A-Master
AA
[None]
A-Master B-Master A-Master B-Master
10–11 12–13 14–15
Last updated 11/16/2011
Page 79

USING INDESIGN
Layout
Edit the layout of a master
You can edit the layout of master pages at any time; changes you make are automatically reflected on all pages with
that master applied. For example, any text or graphic you add to a master will appear on document pages to which the
master is applied.
Note: When you override or detach a master page object on a particular page, that object may not update to reflect
changes made on the master page.
1 In the Pages panel, double-click the icon for the master you want to edit, or select the master page from the text box
list at the bottom of the document window. The master spread appears in the document window.
2 Make changes to the master.
InDesign automatically updates any pages using that master.
To change the size of the master page, select it using the Page tool, and then use the options in the Control panel to
change the dimension. See
Use multiple views to see the results of master edits. Choose Window > Arrange > New Window, and then choose
Window > Arrange > Tile. Set one view to a page and the other view to the master applied to that page. Then edit the
master and watch the page update.
More Help topics
“Create headers and footers” on page 93
“Use multiple page sizes” on page 69.
73
Change master page options
You can edit master page options to change the name or prefix of the master, base the master on another master, or
change the number of pages in the master spread.
1 In the Pages panel, click the name of a master spread to select the master spread.
2 Choose Master Options For [master name] in the Pages panel menu.
3 Change any option, and then click OK.
Apply master pages
If your document contains custom spreads (such as a 3- or 4-page foldout in a magazine), any master you apply should
contain the same number of pages.
If your master page has a different page size than the layout page, applying the master page changes the size of the
layout page. If the layout page has a custom page size, you can specify whether to keep the custom layout page size or
apply the size of the master page.
Note: Master items on a document page have a dotted border. If you cannot view master items on a document page, the
master item may be hidden on a lower layer or the master items may be hidden. Choose Show Master Items from the
Pages panel menu.
Apply a master to a document page or spread
• To apply a master to one page, drag the master page icon to a page icon in the Pages panel. When a black rectangle
surrounds the desired page, release the mouse button.
• To apply a master to a spread, drag the master page icon to a corner of the spread in the Pages panel. When a black
rectangle surrounds all pages in the desired spread, release the mouse button.
Last updated 11/16/2011
Page 80

USING INDESIGN
Layout
None
A-Master B-Master
None
A-Master B-Master
74
10–11 12–13
Applying a master to a page (left) and applying a master to a spread (right)
14–15
10–11 12–13 14–15
Apply a master to multiple pages
❖ Do one of the following:
• In the Pages panel, select the pages to which you want to apply a new master. Then press Alt (Windows) or Option
(Mac OS) as you click a master.
• Choose Apply Master To Pages from the Pages panel menu, select a master for Apply Master, make sure that the
page ranges in the To Pages option are the ones you want, and click
OK. You can apply a master to multiple pages
at once. For example, you can type 5, 7-9, 13-16 to apply the same master to pages 5, 7-9, and 13-16. (See “Display
absolute or section numbering in the Pages panel” on page 92.)
A A A A
1
2–3 4–5
8
6–7
Applying a master to a discontiguous range of pages
B A B A
1
2–3 4–5
B
8
6–7
B
Unassign masters from document pages
❖ Apply the None master from the Masters section of the Pages panel.
When you unassign a master from a page, its layout and items no longer apply to the page. If a master contains most
of the elements you want, but you need to customize the appearance of a few pages, you can override master items and
edit or modify them on those document pages, instead of unassigning the master.
Copy masters
You can copy masters within the same document or from one document to another to use as the starting point for a
new master. You can also copy masters to other documents when you synchronize documents in a book or import
master pages from another document.
More Help topics
“Synchronize book documents” on page 315
“Import a master from another document” on page 77
Copy a master within a document
❖ In the Pages panel, do one of the following:
• Drag the page name of a master spread to the New Page button at the bottom of the panel.
• Select the page name of a master spread, and choose Duplicate Master Spread [spread name] in the panel menu.
When you copy a master, the page prefix of the copied master becomes the next letter in the alphabet.
Last updated 11/16/2011
Page 81

USING INDESIGN
Layout
Copy or move a master to another document
1 Open the document you want to add the master to. Then open the document with the master you want to copy.
2 In the Pages panel of the source document, do either of the following:
• Click and drag the master spread to the destination document’s window to copy it.
• Select the master you want to move or copy. Choose Layout > Pages > Move Master, and choose the destination
document name from the Move To menu. If you want to remove the page or pages from the source document,
select Delete Pages After Moving, and then click OK.
If the target document already has a master with the same prefix, the moved master is assigned the next available letter
in the alphabet.
Delete a master from a document
1 In the Pages panel, select one or more master page icons.
To select all unused master pages, choose Select Unused Masters in the Page panel menu.
2 Do one of the following:
• Drag a selected master page or spread icon to the Delete icon at the bottom of the panel.
• Click the Delete icon at the bottom of the panel.
• Choose Delete Master Spread [spread name] in the panel menu.
When you delete a master, the [None] master is applied to any document page to which the deleted master was applied.
75
Override or detach master items
When you apply a master page to a document page, all objects on the master, called master items, appear on the
document page. Sometimes you want a specific page to be only slightly different from a master. In this situation you
don’t need to re-create the master layout on the
item, and other master items on the document page will continue to update with the master.
Note the difference between overriding and detaching master items on a document page:
Override master item attributes Overriding a master item puts a copy of it on the document page without breaking its
association with the master page. Once the item itself is overridden, you can selectively override one or more attributes
of the item to customize it. For example, you can change the fill color of the local copy. After that, changes to the fill
color on the master page itself will not update to the local copy. However, other attributes, such as size, will continue
to update because they have not been overridden on the local copy. Overrides can be removed later to make the object
match the master.
Attributes you can override for a master page object include strokes, fills, contents of a frame, and any transformations
(such as rotating, scaling, shearing, or resizing), corner options, text frame options, lock state, transparency, and object
effects.
Detach items from their master On a document page, you can detach (disassociate) a master item from its master. The
item must be overridden on the document page, creating a local copy, before you can detach it. A detached item does
not update with the master because its association with the master page is broken.
More Help topics
“Apply text wrap on master page items” on page 232
page or create a new master. You can override or detach the master
Last updated 11/16/2011
Page 82

USING INDESIGN
Layout
Override a master item
1 Make sure the master item can be overridden.
You can override a master item only if Allow Master Item Overrides On Selection is selected in the Pages panel menu
for that item.
2 Do either of the following:
• To override specific master items on a document page, press Ctrl+Shift (Windows) or Command+Shift (Mac OS)
and click the item (or drag to select multiple items). Change the selected master items as desired. The item can now
be selected like any other page item, but retains its association with the master page.
• To override all master page items on a document spread, target the spread, and then choose Override All Master
Page Items in the Pages panel menu. You can now select and modify any and all master items as you wish.
Once you override any master item, its dotted bounding box becomes a solid line, to show that a local copy has been
created.
Note: If you override a threaded text frame, all visible frames in that thread are overridden, even if they are on a different
page in a spread.
Detach a master item
• To detach a single master item from its master, first override it by pressing Ctrl+Shift (Windows) or
Command+Shift (Mac
in the Pages panel menu.
• To detach all overridden master items on a spread, override the master page items you want to detach, and target
that spread in the document. (Don’t go to the original master page.) Choose Detach All Objects From Master from
the Pages panel menu. If the command isn’t available, there aren’t any overridden objects on that spread.
OS) and clicking the item on a document page. Then choose Detach Selection From Master
76
Prevent a master item from being overridden
In some instances, you want to override all but a few master items. For example, you may want to override master items
such as background images on a document page, but you want to prevent a page-numbering header from being
overridden. By preventing the header from being overridden, you can choose the Override All Master Items option to
override all master items except for the header.
1 On the master page, select the item.
2 Deselect Allow Master Item Overrides On Selection on the Pages panel menu.
Master items that do not allow overrides have no frame edge when displayed on the document page. If you prevent a
threaded text frame from being overridden, all text frames in that thread have the same setting applied.
Reapply master items
If you’ve overridden master items, you can restore them to match the master page. When you do this, the object’s
attributes revert to their state on the corresponding master, and will once again update when you edit the master. The
local copy of the object is removed, and the master item cannot be selected, as indicated by its dotted border. You can
remove overrides for selected objects or all objects on a spread, but not across an entire document at once.
❖ Do one of the following:
• To remove master overrides from one or more objects, select objects that were originally master items. In the Pages
panel, target a spread and choose Remove Selected Local Overrides in the Pages panel menu.
Last updated 11/16/2011
Page 83

USING INDESIGN
Layout
• To remove all master overrides from a spread, in the Pages panel, target the spread (or master spread) from which
you want to remove all master overrides. Choose Edit
> Deselect All to make sure that no objects are selected. In
the Pages panel, choose Remove All Local Overrides in the Pages panel menu.
If you’ve detached master page objects, you cannot restore them to the master page; however, you can delete the
detached objects and reapply the master to the page.
If you reapply a master to a page that contains overridden master page objects, the objects with overrides are detached
and all master page objects reapplied. This may result in two copies of some objects on the page. You’ll need to delete
the detached objects to exactly match the look of the master.
Hide master items
Use the Hide Master Items to hide master page items on one or more pages in your document. Hidden master items
are not printed or output.
1 In the Pages panel, select the pages and spreads on which you’d like the master items to be hidden.
2 From the Pages panel menu, choose Hide Master Items.
To display master items again, select the spreads in the Pages panel and choose Show Master Items from the Pages
panel menu.
77
Import a master from another document
You can import masters from another InDesign document (any version) into the active document. If your destination
document contains master pages that have different names from any master page in the source document, those pages
and their document page overrides will be unchanged.
1 In the Pages panel menu, choose Load Master Pages.
2 Locate and double-click the InDesign document containing the master pages you want to import.
3 Determine what should occur if a loaded master has the same name as a master in the current document.
• Choose Replace Master Pages if you want the masters from the source to override the destination document’s
masters with the same names. If your destination document does not have any overridden items, it is safe to Replace
Master Pages on import.
• Choose Rename Master Pages to change the page prefixes to the next available letter in the alphabet.
Once you have imported masters from a source document, a link is set up between the source document and the
destination document. When you subsequently load masters from the same source document, the association between
overridden items and their parent items on reloaded master pages is maintained. This association lets you keep master
pages in different documents consistent without putting those documents into a book.
If you want to use this method of keeping master pages consistent, you should load the master pages from the source
document before overriding any objects on the master. If your document has overridden items and you have never
imported masters from any source, those overridden items become detached the first time you load from a source
document and replace master pages with the same name as the parent master of the overridden items.
If you subsequently import masters from a different source document, however, and choose Replace Master Pages, the
overridden items may become detached. Any same-named masters from the new source document will be applied to
the document page containing overridden items, creating two sets of objects.
Last updated 11/16/2011
Page 84

USING INDESIGN
Layout
Layers
About layers
Each document includes at least one named layer. By using multiple layers, you can create and edit specific areas or
kinds of content in your document without affecting other areas or kinds of content. For example, if your document
prints slowly because it contains many large graphics, you can use one layer for just the text in your document; then,
when it’s time to proofread the text, you can hide all other layers and quickly print the text layer only. You can also use
layers to display alternate design ideas for the same layout, or versions of advertisements for different regions.
Think of layers as transparent sheets stacked on top of each other. If a layer doesn’t have objects on it, you can see
through it to any objects on layers behind
Additional layer notes:
• Each document layer has a disclosure triangle that can be expanded to reveal the objects and their stacking order
on that layer for the active spread. Groups, buttons, and multi-state objects also have disclosure triangles that can
be expanded to display their contained objects. You can re-order these objects, lock and unlock them, and add or
remove them from groups.
• Objects on masters appear at the bottom of each layer. Master items can appear in front of document page objects
if the master page objects are on a higher layer. (See
• Layers involve all pages of a document, including masters. For example, if you hide Layer 1 while editing page 1 of
your document, the layer is hidden on all pages until you decide to show it again.
• For information on converting layers from Adobe PageMaker® or QuarkXPress, see “Converting QuarkXPress and
PageMaker documents” on page 110.
it.
“About masters, stacking order, and layers” on page 70.)
78
The Layers panel lists layers with the frontmost layer appearing at the top of the panel.
For a video tutorial on using layers, see www.adobe.com/go/lrvid5151_id_en.
Create layers
You can add layers at any time using the New Layer command on the Layers panel menu or the New Layer button at
the bottom of the Layers panel. The number of layers a document can have is limited only by the RAM available to
InDesign.
Last updated 11/16/2011
Page 85

USING INDESIGN
Layout
More Help topics
“Show or hide frame edges” on page 85
Create layers
1 Choose Window > Layers.
2 To create a new layer, do any of the following:
• To create a new layer above the selected layer, click the New Layer button.
• To create a new layer below the selected layer, hold down Ctrl (Windows) or Command (Mac OS) as you click the
New Layer button.
• To create a new layer at the top of the list, hold down Ctrl+Shift (Windows) or Command+Shift (Mac OS) as you
click the New Layer button.
• To create a new layer and open the New Layer dialog box, hold down Alt (Windows) or Option (Mac OS) as you
click the New Layer button.
Specify layer options
1 Choose New Layer in the Layers panel menu, or double-click an existing layer.
2 Specify the layer options, and then click OK.
Color Assign a color to identify the objects on that layer.
79
Show Layer Select this option to make a layer visible. Selecting this option is the same as making the eye icon visible
in the Layers panel.
Show Guides Select this option to make the guides on the layer visible. When this option is not selected for a layer, the
guides cannot be made visible, even by selecting View
Lock Layer Select this option to prevent changes to any objects on the layer. Selecting this option is the same as making
> Show Guides for the document.
the crossed-out pencil icon visible in the Layers panel.
Lock Guides Select this option to prevent changes to all ruler guides on the layer.
Print Layer Select this option to allow the layer to be prevented from printing. When printing or exporting to PDF,
you can determine whether to print hidden and nonprinting layers.
Suppress Text Wrap When Layer Is Hidden Select this option if you want text on other layers to flow normally when
the layer is hidden and it contains objects with text wrap applied.
Assign a layer color
Assigning a color to a layer makes it easier to distinguish the layers of different selected objects. For each layer that
contains a selected object, the Layers panel displays a dot in the layer’s color. On
of its layer in its selection handles, bounding box, text ports, text wrap boundary (if used), frame edges (including the
X displayed by an empty graphics frame), and hidden characters. The layer color does not appear for a deselected frame
if its edges are hidden.
1 In the Layers panel, double-click a layer or select a layer and choose Layer Options for [layer name].
2 For Color, choose a color or choose Custom to specify a color in the system color picker.
the page, each object displays the color
Last updated 11/16/2011
Page 86

USING INDESIGN
Layout
Add objects to layers
Any new object is placed on the target layer, the layer currently displaying the pen icon in the Layers panel. Targeting
a layer also selects it. If multiple layers are selected, targeting one of them doesn’t change the selection, but targeting a
layer outside the selection deselects the other layers.
You can add objects to the target layer by any of the following methods:
• Creating new objects with the Type tool or drawing tools.
• Importing, placing, or pasting text or graphics.
• Selecting objects on other layers, and then moving them to the new layer.
You cannot draw or place a new object on a hidden or locked layer. When you select a drawing tool or the Type
tool, or place a file when the target layer is hidden or locked, the pointer changes to the crossed-out-pencil icon
when it is positioned over the document window. Either show or unlock the target layer, or target a visible,
unlocked layer. If you choose Edit
choice of showing or unlocking the target layer.
When you click a layer in the Layers panel to target it, the pen icon appears on the layer you clicked, and the layer also
highlights to indicate that it is targeted.
> Paste when the target layer is hidden or locked, an alert message gives you the
80
Wild owers
for your gard
from all over
Changing the target layer for the next new object
Wild owers
for your gard
from all over
Select, move, and copy objects on layers
By default, you can select any object on any layer. In the Layers panel, dots mark layers that contain selected objects.
The layer’s selection color helps you identify an object’s layer. To prevent selecting objects on a specific layer, lock the
layer.
❖ Do any of the following:
• To select individual objects on a layer, click the triangle icon next to the layer to display all, and select the target
object. You can also drag the target object to a different location without selecting it.
Last updated 11/16/2011
Page 87

USING INDESIGN
Wild owowowoweererr
s
f
yo
o
uur
u
g
g
g
g
g
g
ggg
g
g
a
dddee
e
from
al o o oveveveve
Layout
81
Wild owers
for your gard
from all over
Dragging objects from one layer to another
• To select all objects on a specific layer, hold down Alt (Windows) or Option (Mac OS) as you click a layer in the
Layers panel.
• To move or copy objects to another layer, use the Selection tool to select one or more objects on a document
page or master. In the Layers panel, drag the colored dot on the right side of the layer list to move the selected
objects to the other layer.
Wild owers
for your gard
from all over
Wild owers
Wild owers
or
for your gard
for your gard
from all over
from all over
Wild owers
for your gard
from all over
Moving an object to a new layer
To move selected objects to a locked layer, hold down Ctrl (Windows) or Command (Mac OS) as you drag the colored
dot. To copy selected objects to another layer, hold down Alt (Windows) or Option (Mac OS) as you drag the colored
dot on the right side of the layer list to the other layer. To copy selected objects to a locked layer, hold down Ctrl+Alt
(Windows) or Command+Option (Mac
OS) as you drag the colored dot.
Paste objects into different layers
The Paste Remembers Layers command affects how objects pasted from other locations interact with existing layers.
If the Paste Remembers Layers command is selected, objects cut or copied from different layers retain their layer
assignments when pasted to the new page or position. If you paste objects to a document that doesn’t have the same
layers as the document from which they were copied, InDesign adds the objects’ layer names to the Layers panel in the
second document, and pastes each object on its layer.
If the Paste Remembers Layers command is deselected, objects cut or copied from different layers are pasted together
on the target layer.
1 Make sure that Paste Remembers Layers is deselected in the Layers panel menu.
Last updated 11/16/2011
Page 88

USING INDESIGN
Layout
2 Select objects and choose Edit > Copy or Edit > Cut.
3 In the Layers panel, click the other layer to target it.
4 Choose Edit > Paste.
Duplicate a layer
When you duplicate a layer, you copy its contents and settings. The duplicate layer then appears above the original
layer in the Layers panel. Any duplicated frames that were threaded to other frames on the layer remain threaded.
Duplicated frames whose originals were threaded to frames on other layers are no longer threaded to those frames.
❖ In the Layers panel, do one of the following:
• Select the layer name and choose Duplicate Layer [layer name] in the Layers panel menu.
• Drag a layer name and drop it on the New Layer button.
Change the order of layers
Change the stacking order of layers in your document by rearranging the layers on the Layers panel. Rearranging layers
changes the order of layers on every page, not just on the target spread.
You can also change the stacking order of objects within a layer by repositioning objects within the layer. See “Arrange
objects in a stack” on page 407.
82
❖ In the Layers panel, drag a layer up or down in the list. You can also drag multiple selected layers.
Wild owers
for your gard
from all over
Reordering layers
Wild owers
for your gard
from all over
Show or hide layers and objects
You can hide or display any layer at any time, and you can hide or display objects on a layer. Hidden layers and objects
can’t be edited, and don’t appear on
following:
• Hide parts of a document that are not meant to appear in the final document.
• Hide alternate versions of a document.
• Simplify the display of a document, to make it easier to edit other parts of the document.
• Prevent a layer from printing.
• Speed up screen redraw when a layer contains high-resolution graphics.
screen or in print. Hiding layers can be useful when you want to do any of the
Last updated 11/16/2011
Page 89

USING INDESIGN
Layout
By default, text continues to wrap around objects on hidden layers. To ignore text wrap settings for hidden objects,
choose Layer Options from the Layers panel menu, and then select the Suppress Text Wrap When Layer Is Hidden
option.
❖ Do any of the following:
• To hide or show one layer at a time, in the Layers panel, click the square at the far left of a layer name to hide or
show the eye icon for that layer.
• To show or hide individual objects in a layer, click the disclosure triangle to view all objects in a layer, and then click
the eye icon to show or hide the object.
• To hide all layers except the selected layer, or to hide all objects on a layer except the selected object, choose Hide
Others in the Layers panel menu. Or, Alt-click (Windows) or Option-click (Mac OS) the square on the far left side
of the layer or object you want to remain visible.
• To show all layers, choose Show All Layers in the Layers panel menu. Or, Alt-click (Windows) or Option-click (Mac
OS) the square on the far left side of a visible layer or object to show all layers or all objects in a layer.
Set a layer as nonprinting
1 Select the layer in the Layers panel.
2 Choose Layer Options from the Layers panel menu.
3 To prevent the layer from being printed, deselect Print Layer, and then click OK.
Note: When you print or export to PDF, you will still have the option of printing hidden and nonprinting layers.
83
Lock or unlock layers
Locking is useful for preventing accidental changes to a layer. A locked layer displays a crossed-out pencil icon in the
Layers panel. Objects on locked layers cannot be selected or edited directly; however, if objects on locked layers have
attributes that can be edited indirectly, they will change. For example, if you edit a tint swatch, objects on locked layers
using that tint swatch will reflect the change. Similarly, putting a series of threaded text frames on both locked and
unlocked layers will not prevent text on locked layers from recomposing.
You can also use the Layers panel to lock or unlock objects in a layer. See “Lock or unlock objects” on page 429.
❖ Do any of the following:
• To lock or unlock one layer at a time, in the Layers panel, click a square in the second column from the left to show
(lock) or hide (unlock) the layer.
• To lock all layers except the target layer, choose Lock Others in the Layers panel menu. Or, Alt-click (Windows) or
Option-click (Mac OS) the the square left of the layer you want to remain unlocked.
• To unlock all layers, choose Unlock All Layers in the Layers panel menu.
Delete layers
Remember that each layer is document-wide—it appears on every page of a document. Before deleting a layer, consider
hiding all other layers first, and then turn to each page of the document to verify that it is safe to delete the remaining
objects.
❖ Do any of the following:
• To delete a layer, drag a layer from the Layers panel to the Delete icon or choose Delete Layer [layer name] from
Layers panel menu.
the
Last updated 11/16/2011
Page 90

USING INDESIGN
Layout
• To delete multiple layers, hold Ctrl (Windows) or Command (Mac OS) while you click the layers to select them.
Then drag the layers from the Layers panel to the Delete icon or choose Delete Layers from the
Layers panel menu.
• To delete all empty layers, choose Delete Unused Layers in the Layers panel menu.
• To delete an object on a layer, select the object in the Layers panel, and then click the Delete icon.
Merge layers in a document
You can reduce the number of layers in a document without deleting any objects by merging layers. When you merge
layers, objects from all selected layers are moved to the target layer. Of the layers you merge, only the target layer
remains in the document; the other selected layers are deleted. You can also flatten a document by merging all
Note: If you merge layers containing a mix of page objects and master items, the master items move to the back of the
resulting merged layer.
1 In the Layers panel, select any combination of layers. Be sure to include the layer you want to target as the merged
layer. If you’re flattening the document, select all layers in the panel.
2 Click any selected layer to make it the target layer, indicated by the pen.
3 Choose Merge Layers in the Layers panel menu.
You can also merge identically named layers for exporting a book to PDF.
layers.
84
More Help topics
“Prepare layers before exporting a book to PDF” on page 502
Laying out frames and pages
For detailed information and instructions, click the links below.
About paths and frames
You can draw objects in a document and use them as paths or as frames. Paths are vector graphics like those you create
in a drawing program such as Adobe Illustrator®. Frames are identical to paths, with only one difference—they can be
containers for text or other objects. A frame can also exist as a placeholder—a container without contents. As
containers and placeholders, frames are the basic building blocks for a document’s layout.
ABC
Paths and frames
A. Path B. Frame as graphic container C. Frame with placed graphic
You can draw both paths and frames using tools in the Toolbox. You can also create frames by simply placing
(importing) or pasting contents into a path.
Note: In QuarkXPress, paths are referred to as lines, and frames are referred to as boxes.
Last updated 11/16/2011
Page 91

USING INDESIGN
Layout
Because a frame is just a container version of a path, you can do anything to a frame that you can do to a path, such as
add a color or a gradient to its fill or stroke, or edit the shape of the frame itself with the Pen tool. You can even use a
frame as a path, or a path as a frame, at any time. This flexibility makes it easy to change your design and provides a
wide range of design choices.
Frames can contain text or graphics. A text frame determines the area to be occupied by text and how text will flow
through the layout. You can recognize text frames by the text ports in their respective upper left and lower right
corners.
A graphics frame can function as a border and background, and can crop or mask a graphic. When acting as an empty
placeholder, a graphics frame displays a crossbar.
Text frame (left) and empty graphics frame (right)
85
If you don’t see the crossbar inside an empty graphics frame, the frame edges display may be turned off.
More Help topics
“Understanding paths and shapes” on page 340
Show or hide frame edges
Unlike paths, you can see the nonprinting strokes (outlines) of frames by default even when the frames aren’t selected.
If the document window is getting crowded, use the Show/Hide Frame Edges command to simplify the screen display
by hiding the frame edges. Doing this also hides the crossbar in a graphics placeholder frame. The display setting for
frame edges doesn’t affect the display of the text ports on text frames.
Note: The frame edge is defined as a frame’s stroke, not the outer edge of the stroke’s weight.
❖ Do any of the following:
• To show or hide frame edges, choose View > Extras > Show/Hide Frame Edges.
• To hide frame edges, click Preview Mode at the bottom of the Toolbox.
Using placeholders to design pages
When your final text and graphics are available, you can simply add them to a document; InDesign automatically
creates frames when you import them (unless you’re importing text or graphics directly into existing frames).
However, when you don’t have the content yet or you want to block out the design before adding text and graphics,
you can use frames as placeholders.
Last updated 11/16/2011
Page 92

USING INDESIGN
Layout
A
B
Types of placeholders
A. Graphics frame placeholder B. Text frame placeholder
For example, you might use any of these strategies:
• Draw text frames using the Type tool, and draw graphics frames using the drawing tools. Thread empty text frames
together so that importing final text takes just one step.
• Draw empty placeholder shapes using drawing tools. When you’re ready to start designating areas for text and
graphics, redefine the placeholders as either text or graphics frames.
• Set frame fitting options for a placeholder frame so that when you place an image in the frame, the image is cropped
and fit accordingly.
86
More Help topics
“Use document templates” on page 104
“Draw a placeholder shape” on page 344
“Set frame fitting options” on page 433
Redefine the purpose of paths and frames
• To use a path or text frame as a graphics placeholder frame, select a path or an empty text frame, and then choose
> Content > Graphic.
Object
• To use a path or graphics frame as a text placeholder frame, select a path or an empty graphics frame, and then
choose Object
> Content > Text.
• To use a text or graphics frame as a path only, select an empty frame, and then choose Object > Content >
Unassigned.
Note: When a frame contains text or graphics, you cannot redefine it using the Object > Content menu. However, if you
replace a graphic with text, the content type is automatically redefined.
About automatic layout adjustment
If you use the Document Setup or Margins and Columns commands to make changes to an existing layout, such as
altering column widths or page orientation, you could spend considerable time and effort in rearranging objects to fit
the new layout. The Layout Adjustment feature can do much of that work automatically. For example, you can quickly
reformat a wide four-column document designed for an A4-size page to a tall two-column format on a U.S. legal-size
page. With Layout Adjustment, text and graphics frames are moved and resized as necessary based on the new relative
positions of column guides, page margins, and page edges.
Note: Dragging column guides does not trigger layout adjustment.
Last updated 11/16/2011
Page 93

USING INDESIGN
Layout
The Layout Adjustment feature produces more predictable results when a layout is tightly based on a framework of
margins, page columns, and ruler guides, and where objects are snapped to guides. Results are less predictable when
objects don’t adhere to margins, columns, and guides, or when extraneous ruler and column guides clutter a page.
Layout adjustment is not affected by the document grid or the baseline grid.
Page designed vertically, for print (left); page orientation changed for on-screen viewing, with layout automatically refitted by the Layout
Adjustment feature (right)
You can modify the rules in the Layout Adjustment dialog box. The Layout Adjustment feature attempts to
approximate the proportions of the old layout in the new layout by doing the following:
• Adding or removing column guides, if the new layout specifies a different number of columns.
• If the page size changes, moving ruler guides to maintain proportional distances from page edges, margins, or
column guides.
• Moving objects already aligned to any margin, column, bleed/slug, or ruler guide, or to any two guides
perpendicular to each other, so that the objects stay with those guides if the guides move during layout adjustment.
Also, objects already aligned to any page edge or to any page edges perpendicular to each other are moved.
• Proportionally resizing objects already aligned to two parallel margin, column, bleed/slug, or ruler guides or to
guides on three sides, so that the objects stay with those guides if the guides move during layout adjustment. Also,
objects aligned to two parallel page edges or to page edges on three sides are moved.
• Maintain the relative position of objects that are anchored to the text as specified in the Anchored Object Options
dialog box.
• Moving objects to keep them in the same relative position on the page, if the page size changes.
Note: Layout Adjustment affects columns inside a text frame differently than it does page columns. If the frame itself is
resized by Layout Adjustment and the Fixed Column Width option is not selected in the Object
> Text Frame Options
dialog box, text frame columns are resized proportionally. If the Fixed Column Width option is selected, columns are
added or removed as necessary.
87
More Help topics
“Use multiple page sizes” on page 69
Set options for layout adjustment
Note that changing options in the Layout Adjustment dialog box does not immediately change anything. Layout
adjustment is triggered only by changes to page size, page orientation, margins, or column settings, or when a new
master is applied. When you want to restore a layout to its previous state, you must undo the action that triggered the
layout adjustment.
1 Choose Layout > Layout Adjustment.
2 Select Enable Layout Adjustment.
3 Specify the layout adjustment options, and click OK.
Last updated 11/16/2011
Page 94

USING INDESIGN
Layout
Layout Adjustment options
Enable Layout Adjustment Select this option so that layout adjustment will occur whenever you change page size, page
orientation, margins, or columns.
Snap Zone Type a value to specify how near an object must be to the closest margin guide, column guide, or page edge
to snap to that element during layout adjustment.
Allow Graphics And Groups To Resize Select this option to let the Layout Adjustment feature scale graphics, frames,
and groups. When deselected, graphics and groups can be moved by Layout Adjustment, but not resized.
Allow Ruler Guides To Move Select this option when you want ruler guides to be repositioned by the Layout
Adjustment feature.
Ignore Ruler Guide Alignments Select this option when ruler guides are not well positioned for layout adjustment.
Objects will still align to column and margin guides and to page edges.
Ignore Object And Layer Locks Select this option when you want the Layout Adjustment feature to reposition objects
that are locked individually, or locked as a result of being on a locked layer.
Numbering pages, chapters, and sections
88
For detailed information and instructions, click the links below.
Add basic page numbering
You can add a current page number marker to your pages to specify where a page number sits on a page and how it will
look. Because a page number marker updates automatically, the page number it displays is always correct—even as you
add, remove, or rearrange pages in the document. Page number markers can be formatted and styled as text.
Add a page number marker to a master page
Page number markers are commonly added to master pages. When master pages are applied to document pages, the
page numbering is updated automatically, similar to headers and footers.
ear, be sure you
r mailing list so
be kept abreast
iting excursions
Page number on master A (left) and page 5 based on same master (right)
If the automatic page number is on a master page, it displays the master page prefix. On a document page, the
automatic page number displays the page number. On a pasteboard, it displays
PB.
1 In the Pages panel, double-click the master page to which you want to add your page number. To create master
pages, see
2 Create a new text frame large enough to hold the longest page number and any text you want to appear next to it.
Position the text frame where you want the page number to appear.
If your document has facing pages, create separate text frames for the left and right master pages.
“Create masters” on page 71.
Last updated 11/16/2011
Page 95

USING INDESIGN
Layout
3 In the page number text frame, add any text that will come before or after the page number (such as “Page “).
4 Position the insertion point where you want the page number to appear, and then choose Type > Insert Special
Character
> Markers > Current Page Number.
5 Apply the master page to the document pages on which you want the page numbering to appear. To apply master
pages, see
“Apply master pages” on page 73.
To remove the page number from the first page in the document, you have two options. Either apply a different or the
None master, or override and delete the master text frame on the document page. Ctrl/Cmd+Shift-click a master text
frame to override it.
Change the page numbering style
By default, pages are numbered using Arabic numerals (1, 2, 3...); however, you can number pages using upper or
lowercase Roman (i, ii, iii...) or alphanumeric (a, b, c...) numbering. You can also number pages using preceding zeros.
Each part of the document that uses a different numbering style is called a section. For more information on sections,
“Define section numbering” on page 91.
see
Use the Numbering & Section Options dialog box to change the page numbering style to use a different format. You
can also use this dialog box to restart page numbering or to start page numbering at a number you specify.
1 In the Pages panel, select the page where you want the new numbering style section to begin.
2 Choose Layout > Numbering & Section Options.
3 Specify options, and then click OK. See “Document numbering options” on page 92.
A section indicator icon appears above the page icon in the Pages panel, indicating the start of a new section.
89
Note: If a number or letter appears before the current page number you inserted, it means a section prefix is included. If
you don’t want this prefix, deselect Include Prefix When Numbering Pages in the Numbering & Section Options dialog box.
Common page numbering tasks
InDesign offers several different features that help you create page numbering effects.
To do this: Do this:
Add page numbering to documents in a book. See “Number pages, chapters, and paragraphs in a book” on page 317.
Add section numbers and chapter numbers. See “Add section and chapter numbering” on page 89.
Create running headers or running footers that use text variables
such as the create date, filename, or the current heading or title.
Create a “Page x of y” effect in which x is the current page and y is
the total number of pages.
Create a “Continued on page x” story jump. See “Add automatic page numbers for story jumps” on page 94.
See “Create headers and footers” on page 93 and “Text variables” on
page 95.
Insert a Current Page Number marker for x, and insert the Last Page
Number text variable for y (choose Type > Text Variables > Insert Variable >
Last Page Number).
Add section and chapter numbering
Determine what kind of numbering you want to use for your document or book. For long documents, you can assign
chapter numbers. Each document can be assigned only one chapter number. If you want to use different numbering
within a document, you can define ranges of pages as sections; these sections can be numbered differently. For
example, the first ten pages of a document (the front matter) might use Roman numerals, and the rest of the document
might use Arabic numerals.
Last updated 11/16/2011
Page 96
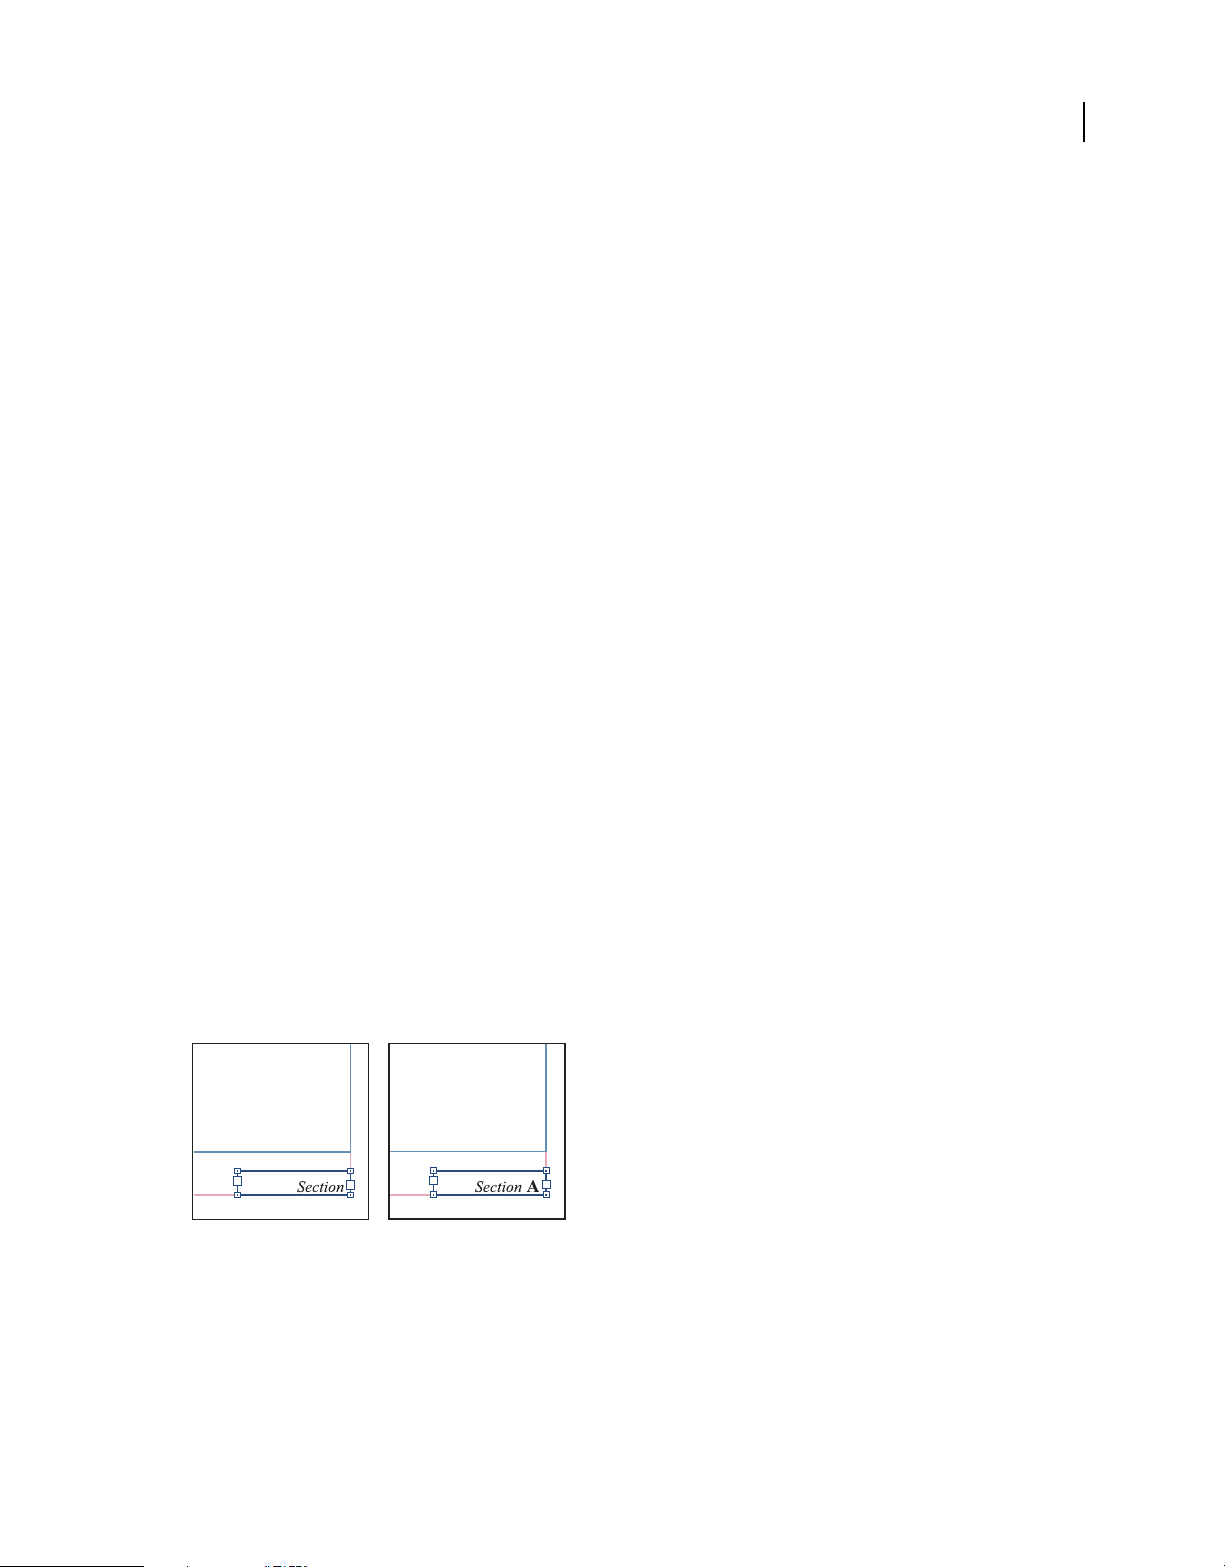
USING INDESIGN
Layout
A single InDesign document can contain up to 9,999 pages, but page numbers can be as large as 99,999. (For example,
you can correctly number a 100-page document that starts on page 9,949.) By default, the first page is a recto (right)
page numbered
1. Odd-numbered pages always appear on the right; if you use the Section Options command to
change the first page number to an even number, the first page becomes a verso (left) page.
For information on creating basic page numbering in a document, see “Add basic page numbering” on page 88.
More Help topics
“Number pages, chapters, and paragraphs in a book” on page 317
Add an automatically updated chapter number
You can add a chapter number variable to your document. Like page numbers, chapter numbers can be updated
automatically and formatted and styled as text. A chapter number variable is commonly used in documents that are
part of a book. A document can have only one chapter number assigned to it; if you want to divide a single document
into chapters, you can create sections instead.
Note: Chapter numbers cannot be included as a prefix in a generated index or table of contents (such as 1-3, 1-4, and so
on). If you want chapter numbers to be included as prefixes, use section prefixes instead of chapter numbers.
1 If necessary, create a text frame where you want a chapter number to appear. If you want a chapter number to
appear on several pages, create the text frame on a master page, and apply that master page to the document pages.
2 In the chapter number text frame, add any text that will come before or after the chapter number.
3 Place the insertion point where you want the chapter number to appear, and then choose Type > Text Variables >
Insert Text Variable
You can update the starting number and format of chapter numbering by choosing Layout > Numbering & Section
Options.
> Chapter Number.
90
Add an automatically updated section marker
1 Define sections in your document. (See “Define section numbering” on page 91.)
2 On a page or master that you’re using in a section, drag the Type tool to create a text frame large enough for the
section marker text, or click in an existing frame.
3 Choose Type > Insert Special Character > Markers > Section Marker.
On master page A, section marker (left) and section marker with page number marker inserted (right)
Change the format of page and chapter numbering
1 Choose Layout > Numbering & Section Options.
2 Under Page Numbering or Document Chapter Numbering, select a new number format for Style. (See “Document
numbering options” on page 92.)
3 Click OK.
Last updated 11/16/2011
Page 97

USING INDESIGN
Layout
Define section numbering
By default, page and chapter numbers in a book are numbered consecutively. Using Numbering & Section Options,
you can restart page numbering at a specified page, add prefixes to page numbers, and change the numbering style of
both pages and chapters.
You can define a section prefix to label section pages automatically. For example, if you specify A– for Section Prefix
on page 16 of a document and include the section prefix, the page will appear in the table of contents or index as A–
16. Text you type for a section marker appears when you choose Type
Marker.
A
B
C
Pages panel
A. Section indicator icon shows start of section B. Page number is changed for new section C. Status bar displays document length
> Insert Special Character > Markers > Section
91
More Help topics
“Add basic page numbering” on page 88
“Number pages, chapters, and paragraphs in a book” on page 317
Define sections in a document
1 In the Pages panel, select the first page in the section you want to define.
2 Choose Layout > Numbering & Section Options, or choose Numbering & Section Options in the Pages panel.
3 If you’re changing the numbering options for any page other than the first page of the document, make sure that
Start Section is selected. This option marks the selected page as the beginning of a new section.
4 As necessary, specify the numbering and section options (see “Document numbering options” on page 92), and
then click OK.
A section indicator icon appears above the page icon in the Pages panel, indicating the start of a new section.
5 To end the section, repeat the section numbering steps on the first page that follows the section.
Edit or remove section numbering
1 In the Pages panel, double-click the section indicator icon that appears above the page icon in the Pages panel.
Or, select a page that uses a section marker, and choose Numbering & Section Options in the Pages panel menu.
2 Do any of the following, and then click OK:
• To change the style or starting number, change section and numbering options.
• To remove a section, deselect the Start Section option.
To quickly identify a section in the Pages panel, position the pointer precisely over any section indicator icon . A
tool tip appears, displaying the starting page number or section prefix.
Last updated 11/16/2011
Page 98

USING INDESIGN
Layout
Display absolute or section numbering in the Pages panel
The Pages panel can display absolute numbering (labeling all pages with consecutive numbers, starting at the first page
of the document) or section numbering (labeling pages by section, as specified in the Section Options dialog box).
Changing the numbering display affects how pages are indicated in the InDesign document, as in the Pages panel and
in the page box at the bottom of a document window. The numbering display also affects how you specify page ranges
when printing and exporting the document. However, the numbering display does not change the appearance of page
numbers on document pages.
1 Choose Edit > Preferences > General (Windows) or InDesign > Preferences > General (Mac OS).
2 For Page Numbering, choose a numbering method in the View menu.
92
A A A
B B
6–7
Pages panel showing absolute numbering (left) and section numbering (right)
B
4–5 iv–1 1 i 2–3 ii–iii
8
A A A
B B
2–3
B
4
Document numbering options
You can change document numbering options when you select a document page (not a master page) and choose
> Numbering & Section Options. You can also change these options when you choose Document Numbering
Layout
Options from the Book panel menu.
Automatic Page Numbering Select if you want the page numbers of the current section to follow the numbering of the
previous section. Using this option, the page numbers in the document or section update automatically when you add
pages prior to
Start Page Numbering At Type the starting number for your document or for the first page of the current section. For
example, if you want to restart the numbering for a section, type
renumbered accordingly.
Note: If you chose a non-Arabic page-numbering style (such as Roman numerals), you still must type an Arabic numeral
in this box.
Section Prefix Type a label for the section. Include the spaces or punctuation you want to appear between the prefix
and the page number (for example, A–16 or A
You cannot enter a blank space by pressing the spacebar—copy and paste a fixed-width space character from the
document window instead. Note that plus
white space characters” on page 182.)
it.
1 . The remaining pages in the section will be
16). The prefix is limited to eight characters.
(+) or comma (,) symbols cannot be used in section prefixes. (See “Insert
Style (Page Numbering)
Section Marker Type a label that InDesign inserts on the page at the location of a section marker character that appears
when you choose Type
Include Prefix When Numbering Pages Select if you want the section prefix to appear when you generate a table of
Choose a page-numbering style from the menu. The style applies to all pages in this section only.
> Insert Special Character > Markers > Section Marker.
contents or index, or when you print pages that contain automatic page numbers. Deselect this option to display the
section prefix in InDesign but hide the prefix in the printed document, index, and table of contents.
Last updated 11/16/2011
Page 99

USING INDESIGN
Layout
B
A
Section prefix in document window
A. Section prefix in the page box at the bottom of the document window B. Section marker and prefix on the page itself
Style (Document Chapter Numbering) Choose a chapter-numbering style from the menu. This chapter style is used
throughout the document.
Automatic Chapter Numbering Select this option to number chapters sequentially in a book.
Start Chapter Numbering At Specify the starting number of the chapter numbering. This option is useful if you don’t
want chapters to be numbered sequentially in the book.
Same As Previous Document In The Book The same chapter number as the previous document in a book is used. Select
this option if the current document is part of the same chapter as the previous document in a book.
93
Create headers and footers
Headers and footers run through the top and bottom of the pages in your document, providing important background
information. To create a simple header or footer that includes page numbering, see
page 88.
Headers and footers can include such items as page, chapter, or section numbers; title or heading text; the author’s
name; and the document’s filename and creation or modification date.
You can add many of these items by using text variables. InDesign includes several preset variables, such as Creation
Date and File Name. You can modify these variables, and you can create your own. For example, you can create a
variable that displays the first use of a Heading paragraph style in the header or footer. Once you create or edit the
variables you need, you assemble them on the master page to create your header and footer, and then you apply the
master page to the appropriate document pages.
Playing to Strengths
A
226
<Footer Date>
1991-2007
<Footer Variable>
*
Playing to Strengths
*
B
“Add basic page numbering” on
A
Using page numbers and variables to create a footer
A. Footer variable inserted on master page B. Variable text on document page that grabs text from the first heading on the page
For a video tutorial on creating headers and footers, see www.adobe.com/go/vid0078.
Last updated 11/16/2011
Page 100

USING INDESIGN
Layout
More Help topics
“Master pages” on page 70
“Text variables” on page 95
Create a header or footer on a master page
1 If necessary, create or edit the variables you want to use in your header or footer. (See “Create variables for running
headers and footers” on page 94.)
2 Go to the master page where you want to add the header or footer.
The header or footer will appear on any document page to which the master page is applied.
3 Create a text frame large enough to include all the header or footer information. Place the text frame above or below
where the content of the document pages will appear.
4 Add text, page numbers, and variables as needed.
5 Apply the master page to document pages where you want the header or footer to appear.
6 If necessary, create headers and footers for additional master pages.
Create variables for running headers and footers
By default, the Running Header variables insert the first occurrence (on the page) of the text to which the specified
style is applied. Running Header variables are especially useful for displaying the current heading or title in the header
or footer.
94
1 If your content is not already formatted, create and apply the paragraph style or character style for the text you want
to appear in the header (such as a title or heading style).
2 Choose Type > Text Variables > Define.
3 Click New, and then type a name for the variable.
4 From the Type menu, choose Running Header (Paragraph Style) or Running Header (Character Style).
5 Specify the following options:
Style Choose the style to display in your header or footer.
Use Decide whether you want the first or last occurrence of the style that’s applied on the page. First On Page is the
first paragraph (or character) that begins on a page. If there is no occurrence of the style on the page, the previous
occurrence of the applied style is used. If there is no previous occurrence in the document, the variable is empty.
Delete End Punctuation If selected, the variable displays the text minus any end punctuation (periods, colons,
exclamation points, and question marks).
Change Case Select this option to change the case of the text that appears in the header or footer. For example, you
may want to use sentence case in your footer, even though the heading on the page appears in title case.
6 Click OK, and then click Done in the Text Variables dialog box.
You can now insert the variable in a header or footer you create on the master page.
Add automatic page numbers for story jumps
You can easily maintain the jump lines of stories that continue to other pages, such as a line that says “Continued on
page 42.” Use a jump line page number to automatically update the number of the page containing a story’s next or
previous threaded text frame when you move or reflow the story’s threaded text frames.
Last updated 11/16/2011
 Loading...