

Page 1

Using
Updated 29 April 2009
ADOBE® INCOPY® CS4
Page 2

Copyright
Updated 29 April 2009
© 2008 Adobe Systems Incorporated and its licensors. All rights reserved.
Using Adobe InCopy
If this guide is distributed with software that includes an end user agreement, this guide, as well as the software described in it, is furnished under license and
may be used or copied only in accordance with the terms of such license. Except as permitted by any such license, no part of this guide may be reproduced, stored
in a retrieval system, or transmitted, in any form or by any means, electronic, mechanical, recording, or otherwise, without the prior written permission of Adobe
Systems Incorporated. Please note that the content in this guide is protected under copyright law even if it is not distributed with software that includes an end
user license agreement.
The content of this guide is furnished for informational use only, is subject to change without notice, and should not be construed as a commitment by Adobe
Systems Incorporated. Adobe Systems Incorporated assumes no responsibility or liability for any errors or inaccuracies that may appear in the informational
content contained in this guide.
Please remember that existing artwork or images that you may want to include in your project may be protected under copyright law. The unauthorized
incorporation of such material into your new work could be a violation of the rights of the copyright owner. Please be sure to obtain any permission required
from the copyright owner.
Any references to company names in sample templates are for demonstration purposes only and are not intended to refer to any actual organization.
This work is licensed under the Creative Commons Attribution Non-Commercial 3.0 License. To view a copy of this license, visit
http://creativecommons.org/licenses/by-nc/3.0/us/
Adobe, the Adobe logo, Adobe Caslon, Adobe Garamond, Adobe Jenson, Acrobat, After Effects, Creative Suite, Dreamweaver, Fireworks, Flash, Illustrator,
InCopy, InDesign, Lithos, Myriad, Photoshop, PostScript, Reader, Trajan, and Version Cue are either registered trademarks or trademarks of Adobe Systems
Incorporated in the United States and/or other countries.
Mac, Macintosh, and Mac OS are trademarks of Apple Inc., registered in the U.S. and other countries. Microsoft, OpenType, Windows, and Wingdings are
trademarks of Microsoft Corporation registered in the U.S and/or other countries. ITC Zapf Dingbats is a registered trademark of International Typeface
Corporation. Symbian and all Symbian based marks and logos are trademarks of Symbian Limited. UNIX is a registered trademark of The Open Group in the
US and other countries. Pantone, Inc. is the copyright owner of color data and/or software which are licensed to Adobe Systems Incorporated to distribute for
use only in combination with Adobe InDesign. PANTONE Color Data and/or Software shall not be copied onto another disk or into memory unless as part of
the execution of Adobe InDesign. Certain trademarks are owned by The Proximity Division of Franklin Electronic Publishers, Inc., and are used by permission.
Merriam-Webster is a trademark of Merriam-Webster, Inc. All other trademarks are the property of their respective owners.
Certain Spelling portions of this product is based on Proximity Linguistic Technology. ©Copyright 1990 Merriam-Webster Inc. ©Copyright 1990 All rights
reserved. Proximity Technology A Division of Franklin Electronic Publishers, Inc. Burlington, New Jersey USA. ©Copyright 2003 Franklin Electronic Publishers
Inc.©Copyright 2003 All rights reserved. Proximity Technology A Division of Franklin Electronic Publishers, Inc. Burlington, New Jersey USA. Legal
Supplement ©Copyright 1990/1994 Merriam-Webster Inc./Franklin Electronic Publishers Inc. ©Copyright 1994 All rights reserved. Proximity Technology A
Division of Franklin Electronic Publishers, Inc. Burlington, New Jersey USA. ©Copyright 1990/1994 Merriam-Webster Inc./Franklin Electronic Publishers Inc.
©Copyright 1997All rights reserved. Proximity Technology A Division of Franklin Electronic Publishers, Inc. Burlington, New Jersey USA ©Copyright 1990
Merriam-Webster Inc. ©Copyright 1993 All rights reserved. Proximity Technology A Division of Franklin Electronic Publishers, Inc. Burlington, New Jersey
USA. ©Copyright 2004 Franklin Electronic Publishers Inc. ©Copyright 2004 All rights reserved. Proximity TechnologyADivision of Franklin Electronic
Publishers, Inc. Burlington,New Jersey USA. ©Copyright 1991 Dr. Lluis de Yzaguirre IMaura ©Copyright 1991 All rights reserved. Proximity Technology A
Division of Franklin Electronic Publishers, Inc. Burlington, New Jersey USA. ©Copyright 1990Munksgaard International Publishers Ltd. ©Copyright 1990 All
rights reserved. Proximity Technology A Division of Franklin Electronic Publishers, Inc. Burlington, New Jersey USA. ©Copyright 1990 Van Dale Lexicografie
bv ©Copyright 1990 All rights reserved. Proximity Technology A Division of Franklin Electronic Publishers, Inc. Burlington, New Jersey USA. ©Copyright 1995
Van Dale Lexicografie bv ©Copyright 1996 All rights reserved. Proximity Technology A Division of Franklin Electronic Publishers, Inc. Burlington, New Jersey
USA. ©Copyright 1990 IDE a.s. ©Copyright 1990 All rights reserved. Proximity Technology A Division of Franklin Electronic Publishers, Inc. Burlington, New
Jersey USA. ©Copyright 1992 Hachette/Franklin Electronic Publishers Inc. ©Copyright 2004 All rights reserved. Proximity Technology A Division of Franklin
Electronic Publishers, Inc. Burlington, New Jersey USA. ©Copyright 1991 Text & Satz Datentechnik ©Copyright 1991 All rights reserved. Proximity Technology
A Division of Franklin Electronic Publishers, Inc. Burlington, New Jersey USA. ©Copyright 2004 Bertelsmann Lexikon Verlag ©Copyright 2004 All rights
reserved. Proximity Technology A Division of Franklin Electronic Publishers, Inc. Burlington, New Jersey USA. ©Copyright 2004MorphoLogic Inc. ©Copyright
2004 All rights reserved. Proximity Technology A Division of Franklin Electronic Publishers, Inc. Burlington, New Jersey USA. ©Copyright 1990 William
Collins Sons & Co. Ltd. ©Copyright 1990 All rights reserved. Proximity Technology A Division of Franklin Electronic Publishers, Inc. Burlington, New Jersey
USA. ©Copyright 1993-95 Russicon Company Ltd. ©Copyright 1995 All rights reserved. Proximity Technology A Division of Franklin Electronic Publishers,
Inc. Burlington, New Jersey USA. ©Copyright 2004 IDE a.s. ©Copyright 2004 All rights reserved. Proximity Technology A Division of Franklin Electronic
Publishers, Inc. Burlington, New Jersey USA. The Hyphenation portion of this product is based on Proximity Linguistic Technology. ©Copyright 2003 Franklin
Electronic Publishers Inc.©Copyright 2003 All rights reserved. Proximity Technology A Division of Franklin Electronic Publishers, Inc. Burlington, New Jersey
USA. ©Copyright 1984WilliamCollins Sons & Co. Ltd. ©Copyright 1988 All rights reserved.Proximity Technology A Division of Franklin Electronic Publishers,
Inc. Burlington, New Jersey USA. ©Copyright 1990 Munksgaard International Publishers Ltd. ©Copyright 1990 All rights reserved. Proximity Technology A
Division of Franklin Electronic Publishers, Inc. Burlington, New Jersey USA. ©Copyright 1997 Van Dale Lexicografie bv ©Copyright 1997 All rights reserved.
Proximity Technology A Division of Franklin Electronic Publishers, Inc. Burlington, New Jersey USA. ©Copyright 1984 Editions Fernand Nathan ©Copyright
1989 All rights reserved. Proximity Technology A Division of Franklin Electronic Publishers, Inc. Burlington, New Jersey USA. ©Copyright 1983 S Fischer
Verlag ©Copyright 1997 All rights reserved. Proximity Technology A Division of Franklin Electronic Publishers, Inc. Burlington,New Jersey USA. ©Copyright
1989 Zanichelli ©Copyright 1989 All rights reserved. Proximity Technology A Division of Franklin Electronic Publishers, Inc. Burlington, New Jersey USA.
©Copyright 1989 IDE a.s. ©Copyright 1989 All rights reserved. Proximity Technology A Division of Franklin Electronic Publishers, Inc. Burlington, New Jersey
USA. ©Copyright 1990 Espasa-Calpe ©Copyright 1990 All rights reserved. Proximity Technology A Division of Franklin Electronic Publishers, Inc.
Burlington,NewJersey USA.©Copyright 1989 C.A. StrombergAB.©Copyright 1989 All rights reserved. Proximity TechnologyADivision of Franklin Electronic
Publishers, Inc. Burlington, New Jersey USA. The Spelling portion of this product is based on Proximity Linguistic Technology.
Color-database derived from Sample Books © Dainippon Ink and Chemicals, Inc., licensed to Adobe Systems Incorporated.
Portions © The Focoltone Colour Systems, and used under license.
This product includes software developed by the Apache Software Foundation (
Portions © 1984-1998 FaircomCorporation. All rights reserved. Portions copyrighted by Trumatch, Inc. and used under license.
PANTONE
PANTONE Color Publications for accurate color. PANTONE
This product contains either BISAFE and/or TIPEM software by RSA Data Security, Inc.
® CS4 for Windows® and Mac OS
www.apache.org).
® Colors displayed in the software application or in the user documentation may not match PANTONE-identified standards. Consult current
® and other Pantone, Inc. trademarks are the property of Pantone, Inc. © Pantone, Inc., 2006.
Page 3

Copyright © 1994 Hewlett-Packard Company. Permission to use, copy, modify, distribute and sell this software and its documentation for any purpose is hereby
Updated 29 April 2009
granted without fee, provided that the above copyright notice appear in all copies and that both that copyright notice and this permission notice appear in
supporting documentation. Hewlett-Packard Company makes no representations about the suitability of this software for any purpose. It is provided “as is”
without express or implied warranty.
Copyright © 1996, 1997 Silicon Graphics Computer Systems, Inc. Permission to use, copy, modify, distribute and sell this software and its documentation for
any purpose is hereby granted without fee, provided that the above copyright notice appear in all copies and that both that copyright notice and this permission
notice appear in supporting documentation. Silicon Graphics makes no representations about the suitability of this software for any purpose. It is provided “as
is” without express or implied warranty.
Video compression and decompression in Adobe
rights reserved.
This product may include software developed by the OpenSymphony Group. (http://www.opensymphony.com)
Portions may be licensed from Nellymoser, Inc. (
Sorenson Spark
http://www.on2.com
™ video compression and decompression technology licensed from Sorenson Media, Inc.
® Flash® Player is powered by On2 TrueMotion video technology. © 1992-2005 On2 Technologies, Inc. All
http://www.nellymoser.com)
MPEG Layer-3 audio compression technology licensed by Fraunhofer IIS and THOMSON multimedia. (
Notice to U.S. Government End Users: The Software and Documentation are “Commercial Items,” as that term is defined at 48 C.F.R. §2.101, consisting of
“Commercial Computer Software” and “Commercial Computer Software Documentation,” as such terms are used in 48 C.F.R. §12.212 or 48 C.F.R. §227.7202,
as applicable. Consistent with 48 C.F.R. §12.212 or 48 C.F.R. §§227.7202-1 through 227.7202-4, as applicable, the Commercial Computer Software and
Commercial Computer Software Documentation are being licensed toU.S.Government end users (a) only as Commercial Items and (b) with only those rights
as are granted to all other end users pursuant to the terms and conditions herein. Unpublished-rights reserved under the copyright laws of the United States.
Adobe agrees to comply with all applicable equal opportunity laws including, if appropriate, the provisions of Executive Order 11246, as amended, Section 402
of the Vietnam Era Veterans Readjustment Assistance Act of 1974 (38 USC 4212), and Section 503 of the Rehabilitation Act of 1973, as amended, and the
regulations at 41 CFR Parts 60-1 through 60-60, 60-250, and 60-741. The affirmative action clause and regulations contained in the preceding sentence shall be
incorporated by reference.
Adobe Systems Incorporated, 345 Park Avenue, San Jose, California 95110, USA.
http://www.iis.fhg.de/amm/)
Page 4

Contents
Updated 29 April 2009
Chapter 1: Resources
Activation and registration
Help and support
Services, downloads, and extras
What’s new
Chapter 2: Workspace
Workspace basics
Viewing stories
Customizing preferences and defaults
Moving through documents
Recovery and undo
Working with ConnectNow
Chapter 3: Working with InCopy documents
Using an InCopy workflow
Stand-alone documents
Saving and exporting
Frames, grids, rulers, and guides
Importing graphics
Transforming graphics
Controlling graphics display
Including metadata in a story
. . . . . . . . . . . . . . . . . . . . . . . . . . . . . . . . . . . . . . . . . . . . . . . . . . . . . . . . . . . . . . . . . . . . . . . . . . . . . . . . . . . . . . . . . . . . . . . . . . . . . . 2
. . . . . . . . . . . . . . . . . . . . . . . . . . . . . . . . . . . . . . . . . . . . . . . . . . . . . . . . . . . . . . . . . . . . . . . . . . . . . . . . . . . . . . . . . . . . . . . . . . . . . . . . . . . 4
. . . . . . . . . . . . . . . . . . . . . . . . . . . . . . . . . . . . . . . . . . . . . . . . . . . . . . . . . . . . . . . . . . . . . . . . . . . . . . . . . . . . . . . . . . . . . . . . . . . . . 9
. . . . . . . . . . . . . . . . . . . . . . . . . . . . . . . . . . . . . . . . . . . . . . . . . . . . . . . . . . . . . . . . . . . . . . . . . . . . . . . . . . . . . . . . . . . . . . . . . . . . . . . 20
. . . . . . . . . . . . . . . . . . . . . . . . . . . . . . . . . . . . . . . . . . . . . . . . . . . . . . . . . . . . . . . . . . . . . . . . . . . . . . . . . . . . . . . . . . . . 1
. . . . . . . . . . . . . . . . . . . . . . . . . . . . . . . . . . . . . . . . . . . . . . . . . . . . . . . . . . . . . . . . . . . . . . . . . . . . . . . . . . . . . . . . 3
. . . . . . . . . . . . . . . . . . . . . . . . . . . . . . . . . . . . . . . . . . . . . . . . . . . . . . . . . . . . . . . . . . . . . . . . . . . . . . . . 27
. . . . . . . . . . . . . . . . . . . . . . . . . . . . . . . . . . . . . . . . . . . . . . . . . . . . . . . . . . . . . . . . . . . . . . . . . . . . . . . . . . . . . . . . . . 28
. . . . . . . . . . . . . . . . . . . . . . . . . . . . . . . . . . . . . . . . . . . . . . . . . . . . . . . . . . . . . . . . . . . . . . . . . . . . . . . . . . . . . . . . . . . . . . . . . . . 30
. . . . . . . . . . . . . . . . . . . . . . . . . . . . . . . . . . . . . . . . . . . . . . . . . . . . . . . . . . . . . . . . . . . . . . . . . . . . . . . . . . . . . . . . . . . 31
. . . . . . . . . . . . . . . . . . . . . . . . . . . . . . . . . . . . . . . . . . . . . . . . . . . . . . . . . . . . . . . . . . . . . . . . . . . . . . . . . . . . . . . . . . . . 33
. . . . . . . . . . . . . . . . . . . . . . . . . . . . . . . . . . . . . . . . . . . . . . . . . . . . . . . . . . . . . . . . . . . . . . . . . . . . . . . . . . . . . . . . . . . . . . 34
. . . . . . . . . . . . . . . . . . . . . . . . . . . . . . . . . . . . . . . . . . . . . . . . . . . . . . . . . . . . . . . . . . . . . . . . . . . . . . . . . . . . . . . . . . . . . . . . . 36
. . . . . . . . . . . . . . . . . . . . . . . . . . . . . . . . . . . . . . . . . . . . . . . . . . . . . . . . . . . . . . . . . . . . . . . . . . . . . . . . . . . . . . 39
. . . . . . . . . . . . . . . . . . . . . . . . . . . . . . . . . . . . . . . . . . . . . . . . . . . . . . . . . . . . . . . . . . . . . . . . . . . . . . . . . . . . . . . . . . . . . . . . . . . 46
. . . . . . . . . . . . . . . . . . . . . . . . . . . . . . . . . . . . . . . . . . . . . . . . . . . . . . . . . . . . . . . . . . . . . . . . . . . . . . . . . . . . . . . . . . . . . . . . 59
. . . . . . . . . . . . . . . . . . . . . . . . . . . . . . . . . . . . . . . . . . . . . . . . . . . . . . . . . . . . . . . . . . . . . . . . . . . . . . . . . . . . . . . . . . 61
. . . . . . . . . . . . . . . . . . . . . . . . . . . . . . . . . . . . . . . . . . . . . . . . . . . . . . . . . . . . . . . . . . . . . . . . . . . . . . . . . . . . . . . . . 63
iv
Chapter 4: Sharing content between InCopy and InDesign
Understanding a basic managed-file workflow
Sharing content
Assignment packages
Working with managed files
Adjusting your workflow
Chapter 5: Text
Adding text
Editing text
Glyphs and special characters
Find/Change
Using text macros
Text variables
Tracking and reviewing changes
Using editorial notes
Footnotes
Hyperlinks
Cross-references
Copyfitting text
. . . . . . . . . . . . . . . . . . . . . . . . . . . . . . . . . . . . . . . . . . . . . . . . . . . . . . . . . . . . . . . . . . . . . . . . . . . . . . . . . . . . . . . . . . . . . . . . . . . . . . 73
. . . . . . . . . . . . . . . . . . . . . . . . . . . . . . . . . . . . . . . . . . . . . . . . . . . . . . . . . . . . . . . . . . . . . . . . . . . . . . . . . . . . . . . . . . . . . . . . 78
. . . . . . . . . . . . . . . . . . . . . . . . . . . . . . . . . . . . . . . . . . . . . . . . . . . . . . . . . . . . . . . . . . . . . . . . . . . . . . . . . . . . . . . . . . 81
. . . . . . . . . . . . . . . . . . . . . . . . . . . . . . . . . . . . . . . . . . . . . . . . . . . . . . . . . . . . . . . . . . . . . . . . . . . . . . . . . . . . . . . . . . . . . 86
. . . . . . . . . . . . . . . . . . . . . . . . . . . . . . . . . . . . . . . . . . . . . . . . . . . . . . . . . . . . . . . . . . . . . . . . . . . . . . . . . . . . . . . . . . . . . . . . . . . . . . . . . . 90
. . . . . . . . . . . . . . . . . . . . . . . . . . . . . . . . . . . . . . . . . . . . . . . . . . . . . . . . . . . . . . . . . . . . . . . . . . . . . . . . . . . . . . . . . . . . . . . . . . . . . . . . . . 94
. . . . . . . . . . . . . . . . . . . . . . . . . . . . . . . . . . . . . . . . . . . . . . . . . . . . . . . . . . . . . . . . . . . . . . . . . . . . . . . . . . . . . . . . 103
. . . . . . . . . . . . . . . . . . . . . . . . . . . . . . . . . . . . . . . . . . . . . . . . . . . . . . . . . . . . . . . . . . . . . . . . . . . . . . . . . . . . . . . . . . . . . . . . . . . . . . . . 109
. . . . . . . . . . . . . . . . . . . . . . . . . . . . . . . . . . . . . . . . . . . . . . . . . . . . . . . . . . . . . . . . . . . . . . . . . . . . . . . . . . . . . . . . . . . . . . . . . . . 124
. . . . . . . . . . . . . . . . . . . . . . . . . . . . . . . . . . . . . . . . . . . . . . . . . . . . . . . . . . . . . . . . . . . . . . . . . . . . . . . . . . . . . . . . . . . . . . . . . . . . . . . 126
. . . . . . . . . . . . . . . . . . . . . . . . . . . . . . . . . . . . . . . . . . . . . . . . . . . . . . . . . . . . . . . . . . . . . . . . . . . . . . . . . . . . . 130
. . . . . . . . . . . . . . . . . . . . . . . . . . . . . . . . . . . . . . . . . . . . . . . . . . . . . . . . . . . . . . . . . . . . . . . . . . . . . . . . . . . . . . . . . . . . . . . . 134
. . . . . . . . . . . . . . . . . . . . . . . . . . . . . . . . . . . . . . . . . . . . . . . . . . . . . . . . . . . . . . . . . . . . . . . . . . . . . . . . . . . . . . . . . . . . . . . . . . . . . . . . . . . 139
. . . . . . . . . . . . . . . . . . . . . . . . . . . . . . . . . . . . . . . . . . . . . . . . . . . . . . . . . . . . . . . . . . . . . . . . . . . . . . . . . . . . . . . . . . . . . . . . . . . . . . . . . . 142
. . . . . . . . . . . . . . . . . . . . . . . . . . . . . . . . . . . . . . . . . . . . . . . . . . . . . . . . . . . . . . . . . . . . . . . . . . . . . . . . . . . . . . . . . . . . . . . . . . . . 148
. . . . . . . . . . . . . . . . . . . . . . . . . . . . . . . . . . . . . . . . . . . . . . . . . . . . . . . . . . . . . . . . . . . . . . . . . . . . . . . . . . . . . . . . . . . . . . . . . . . . . 155
. . . . . . . . . . . . . . . . . . . . . . . . . . . . . . . . . . . . . . . . . . . . . . . . . . . . . . . . . . . . . . . . . . . . . . . . 66
Page 5

USING INCOPY CS4
Updated 29 April 2009
Contents
Checking spelling . . . . . . . . . . . . . . . . . . . . . . . . . . . . . . . . . . . . . . . . . . . . . . . . . . . . . . . . . . . . . . . . . . . . . . . . . . . . . . . . . . . . . . . . . . . . . . . . . . . 156
Using the thesaurus . . . . . . . . . . . . . . . . . . . . . . . . . . . . . . . . . . . . . . . . . . . . . . . . . . . . . . . . . . . . . . . . . . . . . . . . . . . . . . . . . . . . . . . . . . . . . . . . . 163
Chapter 6: Styles
Paragraph and character styles
Drop caps and nested styles
Working with styles
. . . . . . . . . . . . . . . . . . . . . . . . . . . . . . . . . . . . . . . . . . . . . . . . . . . . . . . . . . . . . . . . . . . . . . . . . . . . . . . . . . . . . . . . . . . . . . . . . 181
. . . . . . . . . . . . . . . . . . . . . . . . . . . . . . . . . . . . . . . . . . . . . . . . . . . . . . . . . . . . . . . . . . . . . . . . . . . . . . . . . . . . . . 166
. . . . . . . . . . . . . . . . . . . . . . . . . . . . . . . . . . . . . . . . . . . . . . . . . . . . . . . . . . . . . . . . . . . . . . . . . . . . . . . . . . . . . . . . . 174
Chapter 7: Typography
Formatting text
Using fonts
Leading
Kerning and tracking
Formatting characters
Formatting paragraphs
Aligning text
Tabs and indents
Bullets and numbering
Text composition
. . . . . . . . . . . . . . . . . . . . . . . . . . . . . . . . . . . . . . . . . . . . . . . . . . . . . . . . . . . . . . . . . . . . . . . . . . . . . . . . . . . . . . . . . . . . . . . . . . . . . 183
. . . . . . . . . . . . . . . . . . . . . . . . . . . . . . . . . . . . . . . . . . . . . . . . . . . . . . . . . . . . . . . . . . . . . . . . . . . . . . . . . . . . . . . . . . . . . . . . . . . . . . . . . . 184
. . . . . . . . . . . . . . . . . . . . . . . . . . . . . . . . . . . . . . . . . . . . . . . . . . . . . . . . . . . . . . . . . . . . . . . . . . . . . . . . . . . . . . . . . . . . . . . . . . . . . . . . . . . . . 189
. . . . . . . . . . . . . . . . . . . . . . . . . . . . . . . . . . . . . . . . . . . . . . . . . . . . . . . . . . . . . . . . . . . . . . . . . . . . . . . . . . . . . . . . . . . . . . . . 190
. . . . . . . . . . . . . . . . . . . . . . . . . . . . . . . . . . . . . . . . . . . . . . . . . . . . . . . . . . . . . . . . . . . . . . . . . . . . . . . . . . . . . . . . . . . . . . . 193
. . . . . . . . . . . . . . . . . . . . . . . . . . . . . . . . . . . . . . . . . . . . . . . . . . . . . . . . . . . . . . . . . . . . . . . . . . . . . . . . . . . . . . . . . . . . . . 198
. . . . . . . . . . . . . . . . . . . . . . . . . . . . . . . . . . . . . . . . . . . . . . . . . . . . . . . . . . . . . . . . . . . . . . . . . . . . . . . . . . . . . . . . . . . . . . . . . . . . . . . . 203
. . . . . . . . . . . . . . . . . . . . . . . . . . . . . . . . . . . . . . . . . . . . . . . . . . . . . . . . . . . . . . . . . . . . . . . . . . . . . . . . . . . . . . . . . . . . . . . . . . . . 205
. . . . . . . . . . . . . . . . . . . . . . . . . . . . . . . . . . . . . . . . . . . . . . . . . . . . . . . . . . . . . . . . . . . . . . . . . . . . . . . . . . . . . . . . . . . . . . 211
. . . . . . . . . . . . . . . . . . . . . . . . . . . . . . . . . . . . . . . . . . . . . . . . . . . . . . . . . . . . . . . . . . . . . . . . . . . . . . . . . . . . . . . . . . . . . . . . . . . . 221
v
Chapter 8: Tables
Creating tables
Selecting and editing tables
Formatting tables
Table strokes and fills
Table and cell styles
. . . . . . . . . . . . . . . . . . . . . . . . . . . . . . . . . . . . . . . . . . . . . . . . . . . . . . . . . . . . . . . . . . . . . . . . . . . . . . . . . . . . . . . . . . . . . . . . . . . . . . 226
. . . . . . . . . . . . . . . . . . . . . . . . . . . . . . . . . . . . . . . . . . . . . . . . . . . . . . . . . . . . . . . . . . . . . . . . . . . . . . . . . . . . . . . . . 230
. . . . . . . . . . . . . . . . . . . . . . . . . . . . . . . . . . . . . . . . . . . . . . . . . . . . . . . . . . . . . . . . . . . . . . . . . . . . . . . . . . . . . . . . . . . . . . . . . . . 235
. . . . . . . . . . . . . . . . . . . . . . . . . . . . . . . . . . . . . . . . . . . . . . . . . . . . . . . . . . . . . . . . . . . . . . . . . . . . . . . . . . . . . . . . . . . . . . . . 239
. . . . . . . . . . . . . . . . . . . . . . . . . . . . . . . . . . . . . . . . . . . . . . . . . . . . . . . . . . . . . . . . . . . . . . . . . . . . . . . . . . . . . . . . . . . . . . . . . 243
Chapter 9: Printing
Setting up a printer
Printing stories
. . . . . . . . . . . . . . . . . . . . . . . . . . . . . . . . . . . . . . . . . . . . . . . . . . . . . . . . . . . . . . . . . . . . . . . . . . . . . . . . . . . . . . . . . . . . . . . . . . 249
. . . . . . . . . . . . . . . . . . . . . . . . . . . . . . . . . . . . . . . . . . . . . . . . . . . . . . . . . . . . . . . . . . . . . . . . . . . . . . . . . . . . . . . . . . . . . . . . . . . . . . 250
Chapter 10: PDF
Understanding Adobe PDF
Exporting to Adobe PDF
. . . . . . . . . . . . . . . . . . . . . . . . . . . . . . . . . . . . . . . . . . . . . . . . . . . . . . . . . . . . . . . . . . . . . . . . . . . . . . . . . . . . . . . . . . 254
. . . . . . . . . . . . . . . . . . . . . . . . . . . . . . . . . . . . . . . . . . . . . . . . . . . . . . . . . . . . . . . . . . . . . . . . . . . . . . . . . . . . . . . . . . . . . 255
Chapter 11: XML
Working with XML
Using XML files
Tagging content for XML
. . . . . . . . . . . . . . . . . . . . . . . . . . . . . . . . . . . . . . . . . . . . . . . . . . . . . . . . . . . . . . . . . . . . . . . . . . . . . . . . . . . . . . . . . . . . . . . . . . . 259
. . . . . . . . . . . . . . . . . . . . . . . . . . . . . . . . . . . . . . . . . . . . . . . . . . . . . . . . . . . . . . . . . . . . . . . . . . . . . . . . . . . . . . . . . . . . . . . . . . . . . . 262
. . . . . . . . . . . . . . . . . . . . . . . . . . . . . . . . . . . . . . . . . . . . . . . . . . . . . . . . . . . . . . . . . . . . . . . . . . . . . . . . . . . . . . . . . . . . 262
Structuring documents for XML
Exporting to XML
. . . . . . . . . . . . . . . . . . . . . . . . . . . . . . . . . . . . . . . . . . . . . . . . . . . . . . . . . . . . . . . . . . . . . . . . . . . . . . . . . . . . . . . . . . . . . . . . . . . . 276
Chapter 12: Keyboard shortcuts
Default keyboard shortcuts
. . . . . . . . . . . . . . . . . . . . . . . . . . . . . . . . . . . . . . . . . . . . . . . . . . . . . . . . . . . . . . . . . . . . . . . . . . . . . . . . . . . . . . . . . . 277
. . . . . . . . . . . . . . . . . . . . . . . . . . . . . . . . . . . . . . . . . . . . . . . . . . . . . . . . . . . . . . . . . . . . . . . . . . . . . . . . . . . . . . 268
Index
...............................................................................................................285
Page 6

Chapter 1: Resources
Updated 29 April 2009
Before you begin working with your software, take a few moments to read an overview of activation and the many
resources available to you. You have access to instructional videos, plug-ins, templates, user communities, seminars,
tutorials, RSS feeds, and much more.
Activation and registration
Help with installation
For help with installation issues, see the Installation Support Center at www.adobe.com/go/cs4install.
License activation
During the installation process, your Adobe software contacts Adobe to complete the license activation process. No
personal data is transmitted. For more information on product activation, visit the Adobe website at
www.adobe.com/go/activation.
1
A single-user retail license activation supports two computers. For example, you can install the product on a desktop
computer at work and on a laptop computer at home. If you want to install the software on a third computer, first
deactivate it on one of the other two computers. Choose Help > Deactivate.
Register
Register your product to receive complimentary installation support, notifications of updates, and other services.
❖ To register, follow the on-screen instructions in the Registration dialog box, which appears after you install the
software.
If you postpone registration, you can register at any time by choosing Help > Registration.
Adobe Product Improvement Program
After you use your Adobe software a certain number of times, a dialog box may appear asking whether you want to
participate in the Adobe Product Improvement Program.
If you choose to participate, data about your use of Adobe software is sent to Adobe. No personal information is
recorded or sent. The Adobe Product Improvement Program only collects information about which features and tools
you use and how often you use them.
You can opt in to or out of the program at any time:
• To participate, choose Help > Adobe Product Improvement Program and click Yes, Participate.
• To stop participating, choose Help > Adobe Product Improvement Program and click No, Thank You.
Page 7

USING INCOPY CS4
Updated 29 April 2009
Resources
ReadMe
A ReadMe file for your software is available on-line and on the installation disc. Open the file to read important
information about topics such as the following:
• System requirements
• Installation (including uninstalling the software)
• Activation and registration
• Font installation
• Troubleshooting
• Customer support
• Legal notices
Help and support
Community Help
Community Help is an integrated environment on Adobe.com that gives you access to community-generated content
moderated by Adobe and industry experts. Comments from users help guide you to an answer.
2
Community Help draws on a number of resources, including:
• Videos, tutorials, tips and techniques, blogs, articles, and examples for designers and developers.
• Complete on-line product Help, which is updated regularly by the Adobe documentation team.
• All other content on Adobe.com, including knowledgebase articles, downloads and updates, Developer
Connection, and more.
Choose Help > product name Help in the application to access the Help and Support page, the portal to all of the
Community Help content for your product. You can also use the Help search field in some Creative Suite 4
applications, or press F1 (Windows), to access Community Help for your product.
The sites searched by the default Community Help search engine are hand-selected and reviewed for quality by Adobe
and Adobe Community Experts. Adobe experts also work to ensure that the top search results include a mixture of
different kinds of content, including results from on-line product Help.
For more information on using Community Help, see http://help.adobe.com/en_US/CommunityHelp/.
For a video overview of Community Help, see www.adobe.com/go/lrvid4117_xp.
Product Help
Adobe provides a comprehensive user guide for each product in several formats, including on-line product Help, PDF,
and printed book. Results from on-line product Help are included in your results whenever you search Community Help.
If you’re connected to the Internet, the Help menu within the product opens the product Help and Support page by
default. This page is a portal to all of the Community Help content for the product. If you want to consult or search
on-line product Help only, you can access it by clicking the product Help link in the upper-right corner of the Help
and Support page. Be sure to select the This Help System Only option before you do your search.
Page 8

USING INCOPY CS4
Updated 29 April 2009
Resources
If you’re not connected to the Internet, the Help menu within the product opens local Help, a subset of the content
available in on-line product Help. Because local Help is not as complete or up-to-date as on-line product Help, Adobe
recommends that you use the PDF version of product Help if you want to stay offline. A downloadable PDF of
complete product Help is available from two places:
• The product’s Help and Support page (upper-right corner of the page)
• Local and web Help (top of the Help interface)
For more information on accessing product help, see http://help.adobe.com/en_US/CommunityHelp/.
If you are working in Adobe InDesign, Photoshop, Illustrator, Flash, Fireworks, or Dreamweaver, and you want to turn
off Community Help so that local Help opens by default, do the following:
1 Open the Connections panel (Window > Extensions > Connections).
2 From the Connections panel menu , select Offline Options.
3 Select Keep Me Offline and click OK.
Note: When you disable web services from the Connections panel, all other web services (such as Adobe Kuler and Adobe
ConnectNow) are also disabled.
Printed resources
Printed versions of the complete on-line product Help are available for the cost of shipping and handling at
www.adobe.com/go/store.
3
Support resources
Visit the Adobe Support website at www.adobe.com/support to learn about free and paid technical support options.
Services, downloads, and extras
You can enhance your product by integrating a variety of services, plug-ins, and extensions in your product. You can
also download samples and other assets to help you get your work done.
Adobe creative on-line services
Adobe® Creative Suite® 4 includes new on-line features that bring the power of the web to your desktop. Use these
features to connect with the community, collaborate, and get more from your Adobe tools. Powerful creative on-line
services let you complete tasks ranging from color matching to data conferencing. The services seamlessly integrate
with desktop applications so you can quickly enhance existing workflows. Some services offer full or partial
functionality when you’re offline too.
Visit Adobe.com to learn more about available services. Some Creative Suite 4 applications include these initial
offerings:
Kuler™ panel Quickly create, share, and explore color themes on-line.
Adobe® ConnectNow Collaborate with dispersed working teams over the web, sharing voice, data, and multimedia.
Resource Central Instantly access tutorials, sample files, and extensions for Adobe digital video applications.
For information on managing your services, see the Adobe website at www.adobe.com/go/learn_creativeservices_en.
Page 9

USING INCOPY CS4
Updated 29 April 2009
Resources
Adobe Exchange
Visit the Adobe Exchange at www.adobe.com/go/exchange to download samples as well as thousands of plug-ins and
extensions from Adobe and third-party developers. The plug-ins and extensions can help you automate tasks,
customize workflows, create specialized professional effects, and more.
Adobe downloads
Visit www.adobe.com/go/downloads to find free updates, tryouts, and other useful software.
Adobe Labs
Adobe Labs at www.adobe.com/go/labs gives you the opportunity to experience and evaluate new and emerging
technologies and products from Adobe. At Adobe Labs, you have access to resources such as these:
• Prerelease software and technologies
• Code samples and best practices to accelerate your learning
• Early versions of product and technical documentation
• Forums, wiki-based content, and other collaborative resources to help you interact with like-minded users.
Adobe Labs fosters a collaborative software development process. In this environment, customers quickly become
productive with new products and technologies. Adobe Labs is also a forum for early feedback. The Adobe
development teams use this feedback to create software that meets the needs and expectations of the community.
4
Adobe TV
Visit Adobe TV at http://tv.adobe.com to view instructional and inspirational videos.
Extras
The installation disc contains a variety of extras to help you make the most of your Adobe software. Some extras are
installed on your computer during the setup process; others are located on the disc.
To view the extras installed during the setup process, navigate to the application folder on your computer.
• Windows®: [startup drive]\Program Files\Adobe\[Adobe application]
• Mac OS®: [startup drive]/Applications/[Adobe application]
To view the extras on the disc, navigate to the Goodies folder in your language folder on the disc. Example:
• /English/Goodies/
What’s new
Choose Window > Workspace > [What’s New] to highlight menu commands of new and enhanced features.
For more information on new Adobe InCopy CS4 features, see www.adobe.com/go/ic_newfeatures_en.
Page 10

USING INCOPY CS4
Updated 29 April 2009
Resources
Text and tables improvements
Conditional text
Use conditional text to deliver multiple versions of a document for different users and channels. Create conditions and
apply them to text for audience customization. If you hide conditions, the remaining text and anchored objects reflow
automatically in your layout. See “Use conditional text” on page 99.
Hyperlinks
Use the Hyperlinks panel to create hyperlinks that navigate to external URLs, link to files with supplemental
information, launch an e-mail client, or jump to a page or section of a page within the same or even a different
document. Verify your hyperlinks directly in InCopy CS4. See “Hyperlinks” on page 142.
Cross-references
Insert and edit cross-references. Choose among different formats, or create your own. Cross-references are easily
updated when page numbering changes. See “Cross-references” on page 148.
All language user dictionary
Add a custom word, name, or phrase to a user dictionary and all languages treat the term as correctly spelled. See “Add
words to dictionaries” on page 160.
5
Thesaurus improvement
A selected word is automatically loaded when you open the Thesaurus panel.
Autocorrect editing
Edit entries on your Autocorrect misspelling list without having to delete and add entries.
Tables in Story/Galley view
Tables in the Story View and Galley View display text in sequential columns and rows for easy editing.
Apply changes to cell and table borders without reselecting the stroke proxy borders.
Add notes in tables
Add inline notes in tables to collaborate more effectively. Store alternate text, designer communications, and other
annotations in notes linked to specific text in a table.
Track changes in tables
Changes to text in tables can now be tracked just like text outside tables.
Nested line styles
Use nested line styles to apply complex character formatting through the end of a line. Formatting remains unchanged
when text is edited. See “Create nested line styles” on page 177.
Style creation in context
In dialog boxes where you can select a character or paragraph style, you can create a style without having to exit the
dialog box. This ability is especially useful when you’re generating a table of contents, creating nested styles, or using
Find/Change to change text formatting to a style.
Page 11

USING INCOPY CS4
Updated 29 April 2009
Resources
GREP styles
Apply character styles to any text in a paragraph that matches the GREP expression you specify. See “Create GREP
styles” on page 180.
Text stroke control
Adjust stroke cap, end join, miter limit, and stroke alignment on text without having to convert characters to outlines.
These stroke options are available in paragraph and character styles.
Productivity enhancements
Spread view rotation
Adobe InDesign users can rotate the spread view temporarily at 90- and 180-degree angles. The ability to rotate spread
views is especially important for working on non-horizontal design elements, such as rotated calendar spreads and
tables. InCopy users can view a rotated spread in managed files. InDesign users control whether the spread is rotated
or cleared of its rotation.
Facing Pages option
When creating standalone documents, you can turn off the Facing Pages option to work in a document with singlepage spreads.
6
New XML-based file formats
Many of the filename extensions have changed based on the new markup language.
File type CS3 extension CS4 extension
Assignment files .inca .icma
Content files .incx .icml
Exported files .incx .icml
Package files for InCopy .incp .icap
Package files for InDesign .indp .idap
InCopy template files .inct .icmt
Adobe Services
Adobe community Help Get help from the biggest talent pool out there, quickly, with targeted searches.
ConnectNow Collaborate with clients, colleagues, and vendors by sharing your desktop so that you can quickly
complete group reviews and show your work with ease. Choose File > Share My Screen.
Assignments improvements
New assignment operations are now enabled for unsaved InDesign documents. You are now prompted to save the
document.
The Assignments panel also included different options to update assignments. These options include Selected, Outof-Date, and All. The All option updates all assignments, including those that aren’t out of date, thereby letting you
view design changes that don’t affect the composition of assignment text.
Page 12

USING INCOPY CS4
Updated 29 April 2009
Resources
Edit Original flexibility
Use the Edit With command to choose which application to use to edit a placed item instead of relying on the operating
system to default to the appropriate program. See “Edit original artwork” on page 57.
Integration with Adobe Bridge CS4
Browse, organize, label, and preview graphics and InDesign documents, templates, and snippets in Adobe Bridge.
Drag and drop assets from Adobe Bridge into layouts easily and efficiently. Search for files using metadata that
specifies keywords, fonts, colors, and more. See “About Adobe Bridge” on page 36.
Integration with Adobe Version Cue CS4
Connect to Version Cue Server projects using Adobe Drive. The connected server appears like a hard drive or mapped
network drive in Windows Explorer, Mac OS Finder, and in dialog boxes such as Open and Save As. See “Adobe
Version Cue” on page 38.
Locked story enhancements
If a story is locked, you can still view character and paragraph information for a text selection. It’s no longer necessary
to check out the story or copy and paste to a different story to view this information.
User interface enhancements
7
Versatile Links panel
Find, sort, and organize placed content with the redesigned Links panel. Scan link attributes and click to view details
such as scale, rotation, and resolution. Customize the Links panel to suit your working preferences.
Quickly replace low-resolution images used as placeholders with high-resolution images based on filename. Filename
extensions are ignored. Simply relink to a new folder. See “Links panel overview” on page 52.
Customized workspace enhancements
Select from a number of established task-based workspaces that unclutter your screen and present only the menu
commands and panel arrangements best for the current task. Customize your own menus and workspaces that can be
shared and saved. See “Save and switch workspaces” on page 15.
Tabbed documents
Manage and work across multiple documents by tabbing through open documents to find the one you need without
having to maximize each document individually. See “Manage Document windows” on page 12.
N-up view
Arrange viewing multiple documents in a single window so that you can compare content and drag objects across
documents. Use a button to switch your views side by side, top and bottom, or however you want.
Application frame (Mac OS)
For Mac OS users, you have the option to work with documents and panels in a single window. Move or resize the
window without losing access to panels or other opened documents. See “Workspace overview” on page 9.
Application bar
Use new control buttons in the menu bar to switch to a new workspace, modify the view of a document, perform a
search, or quickly open Adobe Bridge CS4.
Page 13

USING INCOPY CS4
Updated 29 April 2009
Resources
8
More nudge buttons
Use the Up and Down arrow keys to nudge values for paragraph and character styles, find/change formats, color, and more.
Dialog box positioning
Dialog boxes open in the same screen location in which they were closed.
Power zoom
Use the Hand tool to zoom out by holding down your mouse button. Continue to hold, and you can move the zoom
area marquee across pages. Release, and the view returns to your original zoom level in your new location. Increase or
decrease the size of the zoom area marquee using the Up and Down arrow keys or scroll wheel on the mouse. See “Use
power zoom” on page 26.
Page 14

Chapter 2: Workspace
Updated 29 April 2009
The Adobe® InCopy® workspace is arranged to help you focus on writing content. When you first start InCopy, you
see the default workspace, which you can customize to suit your needs.
Workspace basics
Workspace overview
You create and manipulate your documents and files using various elements, such as panels, bars, and windows. Any
arrangement of these elements is called a workspace. The workspaces of the different applications in Adobe® Creative
Suite® 4 share the same appearance so that you can move between the applications easily. You can also adapt each
application to the way you work by selecting from several preset workspaces or by creating one of your own.
Although the default workspace layout varies in different products, you manipulate the elements much the same way
in all of them.
9
Page 15
USING INCOPY CS4
Updated 29 April 2009
Workspace
10
A
E
F
B DC
G
H
Default Illustrator workspace
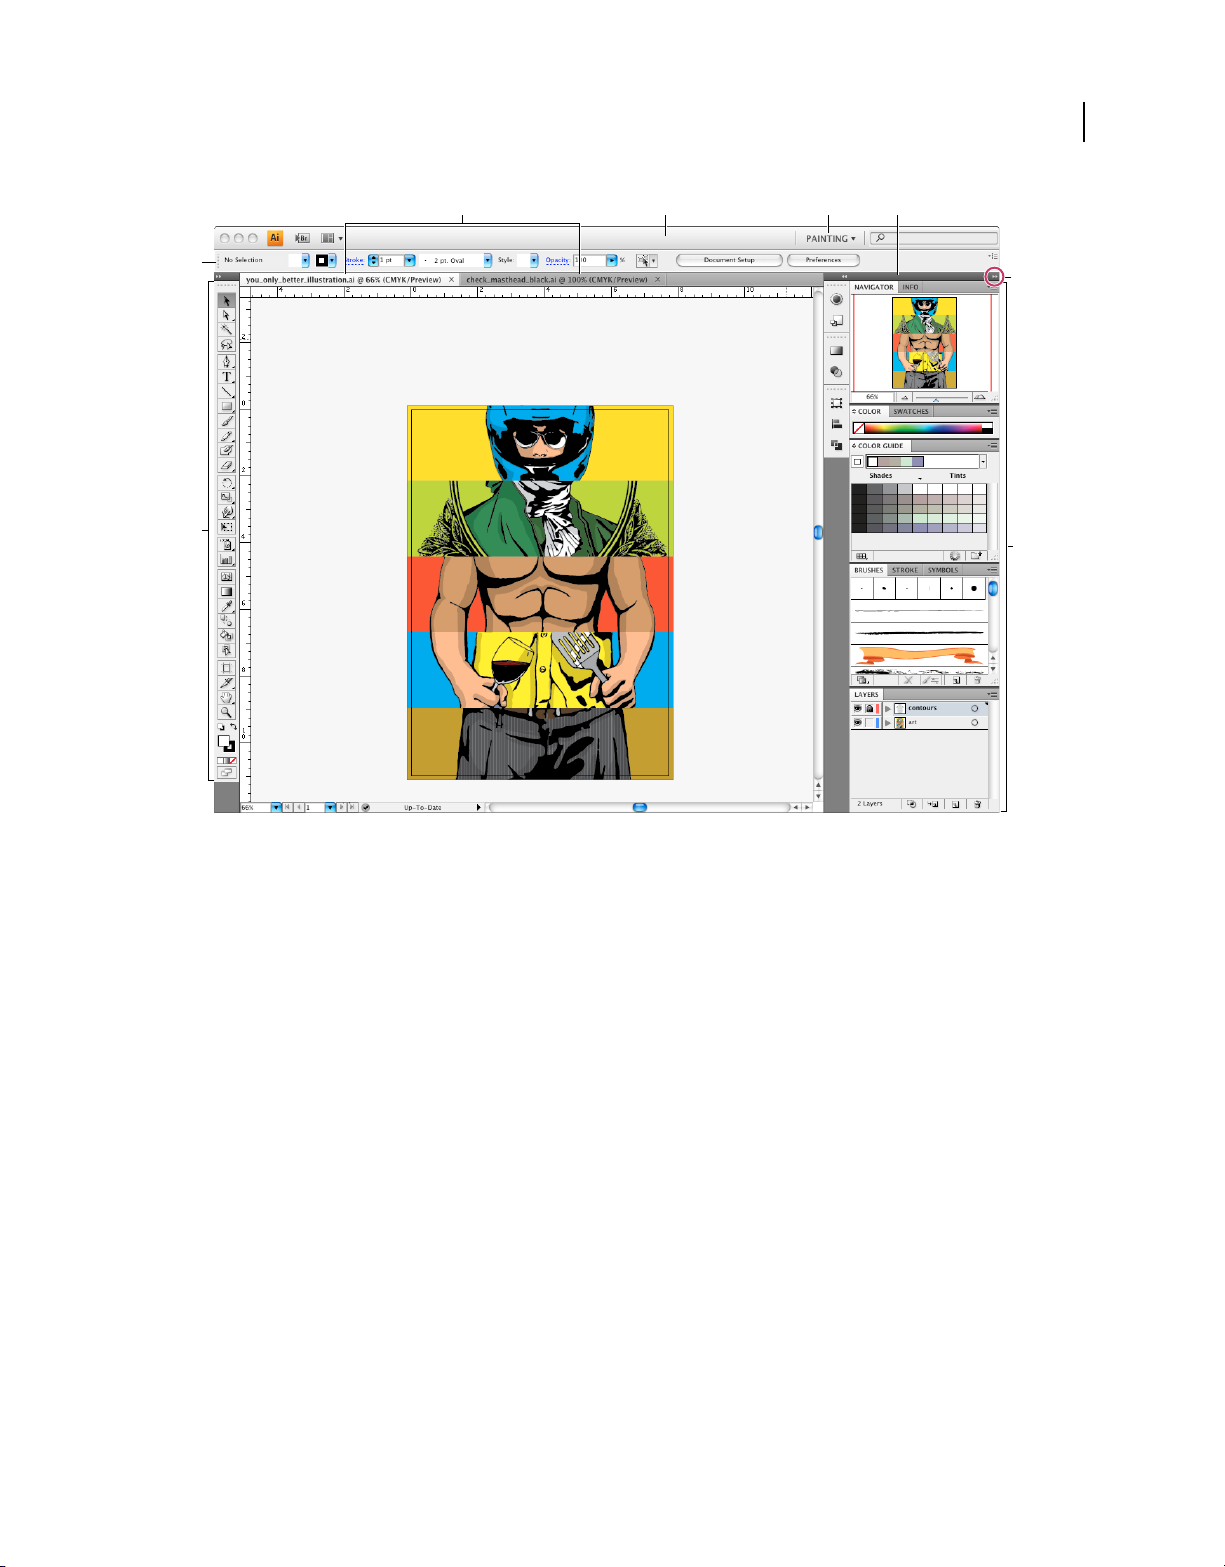
A. Tabbed Document windows B. Application bar C. Workspace switcher D. Panel title bar E. Control panel F. Tools panel G. Collapse To
Icons button H. Four panel groups in vertical dock
• The Application bar across the top contains a workspace switcher, menus (Windows only), and other application
controls. On the Mac for certain products, you can show or hide it using the Window menu.
• The Tools panel contains tools for creating and editing images, artwork, page elements, and so on. Related tools are
grouped.
• The Control panel displays options for the currently selected tool. The Control panel is also known as the options
bar in Photoshop. (Adobe Flash®, Adobe Dreamweaver®, and Adobe Fireworks® have no Control panel.)
• Flash, Dreamweaver, and Fireworks have a Property inspector that displays options for the currently selected
element or tool.
• The Document window displays the file you’re working on. Document windows can be tabbed and, in certain cases,
grouped and docked.
• Panels help you monitor and modify your work. Examples include the Timeline in Flash, the Layers panel in Adobe
Photoshop®, and the CSS Styles panel in Dreamweaver. Panels can be grouped, stacked, or docked.
Page 16

USING INCOPY CS4
Updated 29 April 2009
Workspace
• On the Mac, the Application frame groups all the workspace elements in a single, integrated window that lets you
treat the application as a single unit. When you move or resize the Application frame or any of its elements, all the
elements within it respond to each other so none overlap. Panels don’t disappear when you switch applications or
when you accidentally click out of the application. If you work with two or more applications, you can position each
application side by side on the screen or on multiple monitors. If you prefer the traditional, free-form user interface
of the Mac, you can turn off the Application frame. In Adobe Illustrator®, for example, select Window > Application
Frame to toggle it on or off. (In Flash, the Application frame is on permanently. Dreamweaver does not use an
Application frame.)
Hide or show all panels
• (Illustrator, Adobe InCopy®, Adobe InDesign®, Photoshop, Fireworks)To hide or show all panels, including the
Tools panel and Control panel, press Tab.
• (Illustrator, InCopy, InDesign, Photoshop) To hide or show all panels except the Tools panel and Control panel,
press Shift+Tab.
You can temporarily display hidden panels if Auto-Show Hidden Panels is selected in Interface preferences. It’s
always on in Illustrator. Move the pointer to the edge of the application window (Windows®) or to the edge of the
monitor (Mac OS®) and hover over the strip that appears.
• (Flash, Dreamweaver, Fireworks) To hide or show all panels, press F4.
11
Display panel options
❖ Click the panel menu icon in the upper-right corner of the panel.
You can open a panel menu even when the panel is minimized.
(Illustrator) Adjust panel brightness
❖ In User Interface preferences, move the Brightness slider. This control affects all panels, including the Control
panel.
Reconfigure the Tools panel
You can display the tools in the Tools panel in a single column, or side by side in two columns. (This feature is not
available in the Tools panel in Fireworks and Flash.)
In InDesign and InCopy, you also can switch from single-column to double-column (or single-row) display by setting
an option in Interface preferences.
❖ Click the double arrow at the top of the Tools panel.
Manage windows and panels
You can create a custom workspace by moving and manipulating Document windows and panels. You can also save
workspaces and switch among them.
Note: The following examples use Photoshop for demonstration purposes. The workspace behaves the same in all the
products.
Page 17

USING INCOPY CS4
Updated 29 April 2009
A
B
C
Narrow blue drop zone indicates Color panel will be docked on its own above the Layers panel group.
A. Title bar B. Tab C. Drop zone
In Photoshop, you can change the font size of the text in the Control panel, in the panels, and in tool tips. Choose a
size from the UI Font Size menu in Interface preferences.
Manage Document windows
When you open more than one file, the Document windows are tabbed.
• To rearrange the order of tabbed Document windows, drag a window’s tab to a new location in the group.
• To undock a Document window from a group of windows, drag the window’s tab out of the group.
• To dock a Document window to a separate group of Document windows, drag the window into the group.
Note: Dreamweaver does not support docking and undocking Document windows. Use the Document window’s
Minimize button to create floating windows.
12
Workspace
• To create groups of stacked or tiled documents, drag the window to one of the drop zones along the top, bottom, or
sides of another window. You can also select a layout for the group by using the Layout button on the Application bar.
Note: Some products do not support this functionality. However, your product may have Cascade and Tile commands
in the Window menu to help you lay out your documents.
• To switch to another document in a tabbed group when dragging a selection, drag the selection over the document’s
tab for a moment.
Note: Some products do not support this functionality.
Dock and undock panels
A dock is a collection of panels or panel groups displayed together, generally in a vertical orientation. You dock and
undock panels by moving them into and out of a dock.
Note: Docking is not the same as stacking. A stack is a collection of floating panels or panel groups, joined top to bottom.
• To dock a panel, drag it by its tab into the dock, at the top, bottom, or in between other panels.
• To dock a panel group, drag it by its title bar (the solid empty bar above the tabs) into the dock.
• To remove a panel or panel group, drag it out of the dock by its tab or title bar. You can drag it into another dock
or make it free-floating.
Page 18
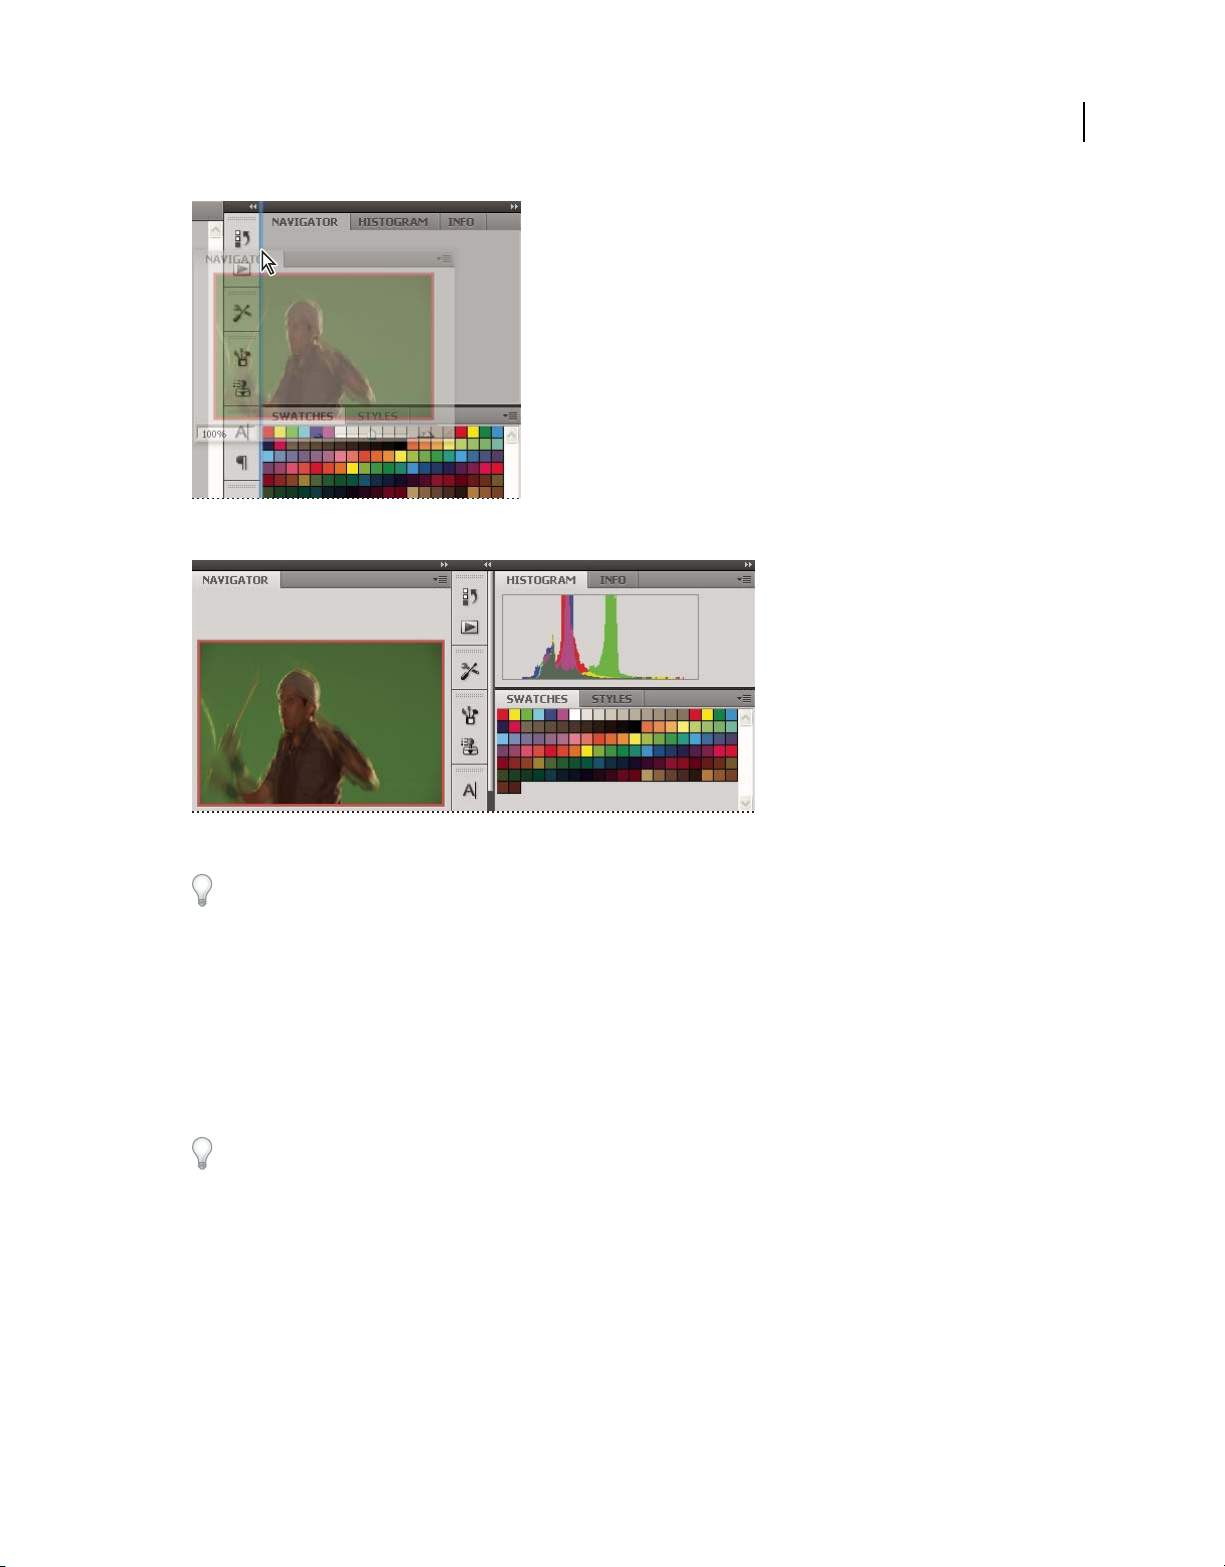
Navigator panel being dragged out to new dock, indicated by blue vertical highlight
Updated 29 April 2009
USING INCOPY CS4
Workspace
13
Navigator panel now in its own dock
You can prevent panels from filling all the space in a dock. Drag the bottom edge of the dock up so it no longer meets
the edge of the workspace.
Move panels
As you move panels, you see blue highlighted drop zones, areas where you can move the panel. For example, you can
move a panel up or down in a dock by dragging it to the narrow blue drop zone above or below another panel. If you
drag to an area that is not a drop zone, the panel floats freely in the workspace.
• To move a panel, drag it by its tab.
• To move a panel group or a stack of floating panels, drag the title bar.
Press Ctrl (Windows) or Command (Mac OS) while moving a panel to prevent it from docking. Press Esc while
moving the panel to cancel the operation.
Note: The dock is stationary and can’t be moved. However, you can create panel groups or stacks and move them
anywhere.
Add and remove panels
If you remove all panels from a dock, the dock disappears. You can create a dock by moving panels to the right edge
of the workspace until a drop zone appears.
• To remove a panel, right-click (Windows) or Control-click (Mac) its tab and then select Close, or deselect it from
the Window menu.
• To add a panel, select it from the Window menu and dock it wherever you want.
Page 19
USING INCOPY CS4
Updated 29 April 2009
Workspace
Manipulate panel groups
• To move a panel into a group, drag the panel’s tab to the highlighted drop zone in the group.
Adding a panel to a panel group
• To rearrange panels in a group, drag a panel’s tab to a new location in the group.
• To remove a panel from a group so that it floats freely, drag the panel by its tab outside the group.
• To move a group, drag the title bar (the area above the tabs).
Stack floating panels
When you drag a panel out of its dock but not into a drop zone, the panel floats freely. The floating panel allows you
to position it anywhere in the workspace. You can stack floating panels or panel groups so that they move as a unit
when you drag the topmost title bar. (Panels that are part of a dock cannot be stacked or moved as a unit in this way.)
14
Free-floating stacked panels
• To stack floating panels, drag a panel by its tab to the drop zone at the bottom of another panel.
• To change the stacking order, drag a panel up or down by its tab.
Note: Be sure to release the tab over the narrow drop zone between panels, rather than the broad drop zone in a title bar.
• To remove a panel or panel group from the stack, so that it floats by itself, drag it out by its tab or title bar.
Resize panels
• To minimize or maximize a panel, panel group, or stack of panels, double-click a tab. You can also single-click the
tab area (the empty space next to the tabs).
• To resize a panel, drag any side of the panel. Some panels, such as the Color panel in Photoshop, cannot be resized
by dragging.
Manipulate panels collapsed to icons
You can collapse panels to icons to reduce clutter on the workspace. In some cases, panels are collapsed to icons in the
default workspace.
Page 20
Panels collapsed to icons
Updated 29 April 2009
USING INCOPY CS4
Workspace
15
Panels expanded from icons
• To collapse or expand all panel icons in a dock, click the double arrow at the top of the dock.
• To expand a single panel icon, click it.
• To resize panel icons so that you see only the icons (and not the labels), adjust the width of the dock until the text
disappears. To display the icon text again, make the dock wider.
• To collapse an expanded panel back to its icon, click its tab, its icon, or the double arrow in the panel’s title bar.
In some products, if you select Auto-Collapse Icon Panels from the Interface or User Interface Options preferences,
an expanded panel icon collapses automatically when you click away from it.
• To add a floating panel or panel group to an icon dock, drag it in by its tab or title bar. (Panels are automatically
collapsed to icons when added to an icon dock.)
• To move a panel icon (or panel icon group), drag the icon. You can drag panel icons up and down in the dock, into
other docks (where they appear in the panel style of that dock), or outside the dock (where they appear as floating,
expanded panels).
Restore the default workspace
• Select the default, Essentials workspace from the workspace switcher in the Application bar.
• (Photoshop) Select Window > Workspace > Essentials (Default).
• (InDesign, InCopy) Select Window > Workspace > Reset [Workspace Name].
Save and switch workspaces
By saving the current size and position of panels as a named workspace, you can restore that workspace even if you
move or close a panel. The names of saved workspaces appear in the workspace switcher in the Application bar.
In Photoshop, the saved workspace can include a specific keyboard shortcut set and menu set.
Page 21

Save a custom workspace
Updated 29 April 2009
1 With the workspace in the configuration you want to save, do one of the following:
• (Photoshop, Illustrator) Choose Window > Workspace > Save Workspace.
• (InDesign, InCopy) Choose Window > Workspace > New Workspace.
• (Dreamweaver) Choose Window > Workspace Layout > New Workspace.
• (Flash) Choose New Workspace from the workspace switcher in the Application bar.
• (Fireworks) Choose Save Current from the workspace switcher in the Application bar.
2 Type a name for the workspace.
3 (Photoshop, InDesign) Under Capture, select one or more options:
Panel Locations Saves the current panel locations.
Keyboard shortcuts Saves the current set of keyboard shortcuts (Photoshop only).
Menus Saves the current set of menus.
4 Click OK or Save.
Display or switch workspaces
❖ Select a workspace from the workspace switcher in the Application bar.
In Photoshop, you can assign keyboard shortcuts to each workspace to navigate among them quickly.
USING INCOPY CS4
Workspace
16
Delete a custom workspace
• Select Manage Workspaces from the workspace switcher in the Application bar, select the workspace, and then
click Delete. (The option is not available in Fireworks.)
• (Photoshop, InDesign, InCopy) Select Delete Workspace from the workspace switcher.
• (Illustrator) Choose Window > Workspace > Manage Workspaces, select the workspace, and then click the Delete icon.
• (InDesign) Choose Window > Workspace > Delete Workspace, select the workspace, and then click Delete.
(Photoshop) Start with the last or default panel locations
When you start Photoshop, panels can either appear in their original default locations, or appear as you last used them.
In Interface preferences:
• To display panels in their last locations on startup, select Remember Panel Locations.
• To display panels in their default locations on startup, deselect Remember Panel Locations.
Change Interface preferences
1 Choose Edit > Preferences > Interface (Windows) or InCopy > Preferences > Interface (Mac OS).
2 Choose the settings you want to specify, and click OK.
Tool Tips Tool tips appear when you hold the mouse pointer over interface items such as tools in the toolbar and
options in the Control panel. Choose None to turn off tool tips.
Show Thumbnails On Place When you place a graphic, a thumbnail of the image appears in the loaded graphics cursor.
Similarly, a thumbnail of the first few lines of text appears in the loaded text cursor. Deselect this option if you don’t
want thumbnails to appear when placing graphics or text.
Page 22
USING INCOPY CS4
Updated 29 April 2009
Workspace
Show Transformation Values When you’re creating, sizing, or rotating an object, the cursor displays the [x,y]
coordinates, width and height, or rotation information.
Floating Tools Panel Specify whether the toolbar appears as a single column, double column, or single row.
Auto-Collapse Icon Panels When this option is selected, clicking the document window closes the open panel
automatically.
Auto-Show Hidden Panels When you hide panels by pressing Tab, holding the mouse pointer over the side of the
document window temporarily reveals the panels if this option is selected. If this option is not selected, you must press
Tab again to display panels.
Open Documents As Tabs When this option is deselected, documents you create or open appear as floating windows
rather than tabbed windows.
Enable Floating Document Window Docking If this option is selected, you can dock floating documents with each
other as tabbed windows. If this option is deselected, floating document windows aren’t docked with other document
windows, unless you hold down the Control key while dragging.
Use toolbars
The basic toolbars contain buttons for many commonly used tools and commands, such as opening, saving, printing,
scrolling, and zooming. Tool tips identify each tool button.
17
Show or hide a toolbar
❖ Choose the toolbar name from the Window menu. A check mark appears next to the toolbar name if it’s currently
visible.
Customize a toolbar
You can specify which tools appear on a toolbar, change the toolbar orientation, and combine or separate toolbars.
❖ Do any of the following:
• To specify which tools appear on a toolbar, click the triangle at the end of the toolbar, select Customize, and select
tools. The menu contains options specific to the toolbar.
• To move a toolbar, drag its title bar.
• To combine toolbars, click the gripper area of a toolbar, and drag the toolbar on top of another or along the same
edge of the application window (Windows®) or screen (Mac OS®).
Gripper area of the toolbar
Combining toolbars
• To switch a toolbar to a floating panel, click the gripper area of the toolbar and drag the toolbar away from the edge
of the application window (Windows) or screen (Mac OS).
Page 23

USING INCOPY CS4
Updated 29 April 2009
Workspace
• To separate a grouped toolbar, click the gripper area of the toolbar, and drag the toolbar away from the group.
Dragging a toolbar out of an existing group creates a new toolbar.
Use context menus
Unlike the menus that appear at the top of your screen, context-sensitive menus display commands related to the
active tool or selection. You can use context menus as a quick way to choose commonly used commands.
1 Position the pointer over the document, object, or panel.
2 Click the right mouse button.
Note: (Mac OS) If you don’t have a two-button mouse, you can display a context menu by pressing the Control key as you
click with the mouse.
Customize menus
Hiding and colorizing menu commands is a way to remove menu clutter and emphasize commands you frequently
use. Note that hiding menu commands simply removes the menu command from view; it doesn’t disable any features.
At any time, you can view hidden commands by selecting the Show All Menu Items command at the bottom of a menu,
or you can choose Window > Workspace > Show Full Menus to show all the menus for the selected workspace. You
can include customized menus in workspaces you save.
18
You can customize the main menu, context menus, and panel menus. Context menus appear when you right-click
(Windows) or Control-click (Mac OS) an area. Panel menus appear when you click the icon in the upper right of a
panel.
See also
“Save a custom workspace” on page 16
Create a custom menu set
1 Choose Edit > Menus.
You cannot edit the default menu set.
2 Click Save As, type the name of the menu set, and click OK.
3 From the Category menu, choose Application Menus or Context & Panel Menus to determine which menus are
customized.
4 Click the arrows to the left of the menu categories to display subcategories or menu commands. For each command
you want to customize, click the eye icon under Visibility to show or hide the command; click None under Color
to select a color from the menu.
5 Click Save, and then click OK.
Select a custom menu set
1 Choose Edit > Menus.
2 Choose the menu set from the Set menu, and then click OK.
Edit or delete a custom menu set
1 Choose Edit > Menus.
Page 24

USING INCOPY CS4
Updated 29 April 2009
Workspace
2 Choose the menu set from the Set menu, and then do one of the following:
• To edit a menu set, change the visibility or color of menu commands, click Save, and then click OK.
• To delete a menu set, click Delete and then click Yes. If you’ve modified the menu set without saving it, you’re
prompted to save the current menu set. Click Yes to save the menu set, or click No to discard changes.
Show hidden menu items
• Choose Window > Workspace > Show Full Menus. This command turns on all menus for the selected workspace.
You can hide the menus again by resetting the workspace.
• Choose Show All Menu Items at the bottom of the menu that includes hidden commands.
Holding down Ctrl (Windows) or Command (Mac OS) and clicking a menu name temporarily displays any menu
commands you’ve hidden by customizing menus.
Use keyboard shortcut sets
InCopy provides keyboard shortcuts for many menu commands, options, scripts, and controls. You can also define
your own keyboard shortcuts. Using the Keyboard Shortcuts dialog box, you can:
• Choose the set you want to use.
• View existing shortcut commands.
• Generate a complete list of shortcuts.
• Create your own shortcuts and shortcut sets.
• Edit current shortcuts.
The Keyboard Shortcuts dialog box also lists all commands that can accept shortcuts but don’t have shortcuts
defined for them in the default shortcut set.
19
See also
“Keyboard shortcuts” on page 277
Change the active shortcut set
1 Choose Edit > Keyboard Shortcuts.
2 Select a shortcut set from the Set menu.
3 Click OK.
View shortcuts
1 Choose Edit > Keyboard Shortcuts.
2 For Set, select a shortcut set.
3 For Product Area, select the area containing the commands you want to view.
4 From Commands, select a command. The shortcut appears in the Current Shortcuts section.
Generate a list of shortcuts
1 Choose Edit > Keyboard Shortcuts.
2 Select a shortcut set from the Set menu.
3 Click Show Set.
Page 25

USING INCOPY CS4
Updated 29 April 2009
Workspace
A text file opens with all current and undefined shortcuts for that set.
Create a new shortcut set
1 Choose Edit > Keyboard Shortcuts.
2 Click New Set.
3 Type a name for the new set, select a shortcut set from the Based On Set menu, and click OK.
Create or redefine a shortcut
1 Choose Edit > Keyboard Shortcuts.
2 For Set, select a shortcut set, or click New Set to create a new shortcut set.
Note: You can make changes to the Default shortcut set, but it’s not recommended. Instead, edit a copy of the Default
shortcut set.
3 For Product Area, select the area containing the command you want to define or redefine.
4 In the Commands list, select the command you want to define or redefine.
5 Click inside the New Shortcut box and press the keys for your new keyboard shortcut. If the key sequence is
currently used for another command, InCopy displays that command under Current Shortcuts. You can change
the original shortcut also, or try another shortcut.
Important: Assigning single-key shortcuts to menu commands interferes with entering text. If an insertion point is active
when you type a single-key shortcut, InCopy carries out the command instead of inserting the character.
20
6 Do one of the following:
• Click Assign to create a new shortcut where none currently exists.
• Click Assign to add another shortcut to the command.
7 Click OK to close the dialog box, or click Save to keep the dialog box open and enter more shortcuts.
Viewing stories
Galley, Story, and Layout view overview
InCopy offers three views of a story: Galley, Story, and Layout. These terms correspond to the terms used in traditional
publishing.
Galley view Displays text with line breaks established in the corresponding Adobe InDesign® document. If text doesn’t
fit into the assigned layout space, an overset indicator marks the point at which the InCopy text exceeds the space.
Although you can use InCopy to apply formatting, such as paragraph indents and font size, these formats don’t appear
in Galley view.
Page 26
Galley view
Updated 29 April 2009
USING INCOPY CS4
Workspace
21
Story view Displays text in a continuous stream, wrapping the text at the document window. Story view doesn’t show
accurate line endings, so you can concentrate on content. However, if text doesn’t fit into the assigned layout space, an
overset indicator marks the point at which the InCopy text exceeds the space. In Story view, the information area
displays only paragraph styles. Line numbers aren’t visible in Story view.
Story view
Story view opens by default when you create a new InCopy story.
To change the default view for new documents, close all documents and select the view you want as the default from
the View menu.
Page 27
USING INCOPY CS4
Updated 29 April 2009
Workspace
Layout view Displays text as it will print, with all formatting. When you use InCopy to synchronize with an InDesign
layout, you can view text in context with all other page elements in the InDesign document—frames, columns,
graphics, and so on.
In Layout view, you can zoom in and out to inspect different aspects of the layout.
22
Layout view
See also
“Layout view overview” on page 24
“Keys for navigating through documents” on page 277
Switch between Galley, Story, or Layout view
❖ Do either of the following:
• Choose the view from the View menu.
• Click the Galley, Story, or Layout tab at the top of the editing area.
About Galley view
Galley view provides an environment for efficient text processing; text is easy to read and annotate. You can also use
Galley view to perform copyfitting and other production-related tasks.
When you open an InDesign document in InCopy, working in Galley view is analogous to working with galley proofs
in traditional typesetting. Within the viewing area, the text wraps exactly as it will in the final InDesign layout, and all
text is displayed in one column, regardless of how many columns exist in the layout. Page breaks, frame breaks, and
column breaks are shown by a line with the words “Page break,” “Frame break,” or “Column break” in the center of
the line.
Note: When multiple breaks are represented by a single boundary, such as a page break coinciding with a frame break,
the break with the highest priority is displayed. Page breaks have the highest priority, and column breaks have the lowest.
Page 28

USING INCOPY CS4
Updated 29 April 2009
Workspace
Galley view includes the Copyfit break feature, which indicates the point at which the InCopy text exceeds the layout
space assigned for it in InDesign.
By default, Galley view displays text at 12 points. You can change the font, size, or spacing to make text easier to read
or edit. You can also change the background and font colors.
Note: The font display size applies to all stories, rather than individual characters, words, or paragraphs.
The Galley & Story Appearance toolbar at the bottom of the workspace controls several settings that you might want
to change frequently when working on a document. These settings include:
• Display font type and size
• Display leading (single space, 150% space, double space, or triple space)
• Show/hide line number and styles columns
• Customize Galley & Story Appearance controls
See also
“Editing overset text” on page 156
Customize Galley and Story views
You can customize Galley and Story views in a variety of ways.
23
Change the Galley view display settings
❖ Select an option from the Galley & Story Appearance toolbar. (If the toolbar is hidden, choose Window > Galley &
Story Appearance. The toolbar appears at the bottom of the application window by default.)
Note: It’s important to understand the difference between changing the font display size and applying text formatting.
Both can be done in Galley view. Changing the font display size doesn’t affect the way text looks in a publication, whereas
applying text formatting does change the text appearance in Layout view and in the published document.
Set Galley view display preferences
1 Choose Edit > Preferences > Galley & Story Display (Windows) or InCopy > Preferences > Galley & Story Display
(Mac OS).
2 In the Text Display Options section, specify the following:
Text Color Controls text color in the viewing area. Black is the default text color.
Background Controls the background color of the viewing area. White is the default background color.
Theme Assigns preset text and background colors.
Override Preview Font Enables you to display one additional font using the correct typeface in the Galley and Story
view. InCopy automatically displays the Symbol, Zapf Dingbats, Webdings, and Wingdings® fonts accurately,
overriding the display font you’ve chosen.
Enable Anti-aliasing Smooths the jagged edges of type and bitmap images by softening the color transition between
edge pixels and background pixels. Because only the edge pixels change, no detail is lost. You can choose the level of
anti-aliasing to apply. The Default option uses shades of gray to smooth text. The LCD Optimized option uses colors,
rather than shades of gray, and works best on light-colored backgrounds with black text. The Soft option uses shades
of gray, but produces a lighter, fuzzier appearance.
Cursor Options Controls the cursor display. Choose from four different cursors. Select or deselect Blink.
Page 29

USING INCOPY CS4
Updated 29 April 2009
Workspace
Note: Any settings made in the Galley & Story Display section apply to both the Galley and Story views.
Show or hide the information column
The information column appears on the left side of the document window in Galley and Story views. This column
contains read-only information about paragraph styles, line numbers, and the vertical depth of text; you cannot type
in this area.
❖ Do one of the following:
• To change the view in the current document only, choose View > Show Info Column or View > Hide Info Column.
• To change the default view in the application, close all documents, and choose View > Show Info Column or View >
Hide Info Column.
Note: Paragraph styles make it much easier to maintain consistency in your publications. Consult any workflow
documentation your team has adopted concerning in-house guidelines for your project.
Set Story view preferences
Use the Galley & Story Display section of the Preferences dialog box to customize the display of the Story view.
1 Choose Edit > Preferences > Galley & Story Display (Windows) or InCopy > Preferences > Galley & Story Display
(Mac OS).
2 Specify the options you want.
3 Click OK.
24
Show or hide paragraph break marks
You can show or hide paragraph break marks in Galley and Story view. An arrow symbol indicates the start of a new
paragraph.
❖ Choose View > Show Paragraph Break Marks or View > Hide Paragraph Break Marks.
Use the vertical depth ruler
When you type text, it’s sometimes useful to know the physical depth of a story as it will appear in Layout view, in
addition to the number of lines. The vertical depth ruler draws a ruler along the left edge of the Galley and Story views.
Each tick mark in the ruler aligns to the bottom of a line of text. A value is displayed every five tick marks to show the
total vertical depth of the text to that point. The depth is updated dynamically when layout composition for the portion
of the document is complete.
The depth measurement uses the vertical units setting in Units & Increments preferences.
Note: To aid in copyfitting, the depth of overset text is also calculated and displayed.
1 Click the Galley or Story tab at the top of the editing area.
2 Do either of the following:
• To show or hide the depth ruler, choose View > Show/Hide Depth Ruler.
• To show or hide the information column, choose View > Show/Hide Info Column.
Layout view overview
In Layout view, you see text and other elements exactly as they are formatted and positioned in an InDesign document.
Stories are laid out in frames, just as they appear in InDesign.
Page 30

USING INCOPY CS4
Updated 29 April 2009
Workspace
If you work with a linked story—a managed story within an open InDesign document or assignment file—you cannot
modify the story layout with InCopy. You can work only with the text and text attributes.
If you work with a stand-alone InCopy document—an individual InCopy document that isn’t within an open InDesign
document or assignment file—you can work with the text and text attributes, and you can change the page size using
the Document Setup command.
Layout view offers more tools and View-menu commands than the other views. You can use the Hand tool, the Zoom
tool, and the Zoom commands to view a spread at various magnifications. You can also use various layout aids, such
as rulers, document grids, and baseline grids.
Note: These viewing options don’t affect formatting. For example, zooming in to enlarge your view of the page doesn’t
change the way the story appears in InDesign or when printed.
About frames
In the Layout view of a document in progress, you see one or more boxes on the page. These nonprinting boxes might
contain text, graphics, or nothing. The boxes represent frames—spaces in the layout reserved for specific elements.
Each frame is defined to contain either text or a graphic. Non-managed stories in an InDesign document or in an
assignment file are dimmed so that they can be identified easily.
Text frames Control which stories appear where, and how much page area they cover. For linked stories, frames are
defined by the InDesign user. If multiple frames are set aside for a story, the frame configuration determines how the
story text flows through the layout.
25
Graphics frames Can function as borders and background, and can crop or mask graphics. You can work with
graphics inside frames in InCopy, and you can see the graphics frames from InDesign layouts when you work with
linked documents. You can also work with the frames of inline graphics (embedded in text), but you cannot work with
other graphics frames. (See “Create an inline graphic” on page 48.)
Empty frames Are placeholders. You can distinguish empty text frames from empty graphics frames by their
appearance. An empty box represents an empty text frame; a box with an X across it indicates an empty graphics frame.
You can add text to an empty text frame only if the frame is associated with the story exported to InCopy from
InDesign. You can also import or paste graphics into an empty graphics frame in InCopy.
Empty text frame (left) and empty graphics frame (right)
Show or hide frame edges
Hiding frame edges also hides the X in an empty graphics frame.
Page 31

USING INCOPY CS4
Updated 29 April 2009
Workspace
Text and graphics frames with frame edges displayed (left) and hidden (right)
❖ In Layout view, choose View > Show Frame Edges or View > Hide Frame Edges.
View documents
Use the Zoom tool or View options to zoom in on or out of documents.
Zoom in or out
In Layout view, you can magnify or reduce the view of a page. The lower left corner of the document window displays
the zoom percentage.
❖ Do any of the following:
• To magnify a specific area, select the Zoom tool and click the area you want to magnify. Each click magnifies
the view to the next preset percentage, centering the display around the point you click. At maximum
magnification, the center of the Zoom tool appears blank. To zoom out, hold down Alt (Windows) or Option
(Mac OS) to activate the Zoom Out tool , and click the area you want to reduce. Each click reduces the view to
the previous preset percentage.
• To magnify the view to the next preset percentage, activate the window you want to view, and choose View > Zoom
In. Choose View > Zoom Out to reduce the view to the previous preset percentage.
• To set a specific magnification level, type or choose a magnification level in the Zoom box in the application bar.
• While pressing Alt (Windows) or Option (Mac OS), use the mouse scroll wheel or sensor to zoom in or out.
26
Use power zoom
Power zoom offers a quick way to scroll through your document pages. Using the grabber hand, you can use zoom in
or out and scroll through your entire document. This feature is especially useful for long documents.
You must be in Layout view to use power zoom.
1 Click the Hand tool .
To activate the grabber hand, you can also hold down the spacebar or hold down Alt/Option while in text mode.
2 With the grabber hand active, click and hold down the mouse button.
The document zooms out so that you can see more of the spread. A red box indicates the view area.
3 With the mouse button still held down, drag the red box to scroll through the document pages. Press arrow keys or
use the mouse scroll wheel to change the size of the red box.
4 Release the mouse button to zoom in on the new area of the document.
The document window returns to its original zoom percentage or to the size of the red box.
Page 32

USING INCOPY CS4
Updated 29 April 2009
Magnify by dragging
1 Select the Zoom tool .
2 Drag to select the area you want to magnify.
To activate the Zoom In tool while using another tool, press Ctrl+spacebar (Windows) or Command+spacebar
(Mac OS). To activate the Zoom Out tool while using another tool, press Ctrl+Alt+spacebar (Windows) or
Command+Option+spacebar (Mac OS).
Zooming in on selection of text
Display the document at 100%
❖ Do any of the following:
• Double-click the Zoom tool .
• Choose View > Actual Size.
• Type or choose a magnification level of 100% in the Zoom box in the application bar.
27
Workspace
Fit the page, spread, or pasteboard within the active window
❖ Do any of the following:
• Choose View > Fit Page In Window.
• Choose View > Fit Spread In Window.
• Choose View > Entire Pasteboard.
Customizing preferences and defaults
About preferences
Preferences include settings such as panel positions, measurement options, and display options for graphics and
typography.
The difference between preferences and defaults is the area to which each applies. Preference settings specify the initial
appearance and behavior of certain InCopy features. Default settings apply to InCopy documents.
Note: InCopy preference settings are fully scriptable. To share a consistent set of preferences across user groups, develop
a script to set the preferences, and then have all users in the group run the script on their computers. Don’t copy and paste
one user’s preferences files onto another computer, as doing so might cause application instability. For more information
about scripting, see the InCopy Scripting Guide on the application DVD.
Page 33

USING INCOPY CS4
Updated 29 April 2009
Workspace
Set defaults
If you change settings when no documents are open, your changes set the defaults for new documents. If a document
is open when you change settings, the changes affect only that document.
Similarly, if you change settings when no objects are selected, your changes set the defaults for new objects.
Change default settings for new documents
1 Close all documents.
2 Change any menu items or panel or dialog box settings.
If you use the same page size and language for most of your documents, you can change these defaults with no
document open. For example, to change the default page size, close all documents, choose File > Document Setup, and
select a desired page size. To set a default dictionary, close all documents, choose Edit > Preferences > Dictionary
(Windows) or InCopy > Preferences > Dictionary (Mac OS), and select an option from the Language menu.
Specify default settings for new objects in a document
1 With document open, choose Edit > Deselect All.
2 Change any menu items or panel or dialog box settings.
28
Restore all preferences and default settings
❖ Do one of the following:
• (Windows) Start InCopy, and then press Shift+Ctrl+Alt. Click Yes when asked if you want to delete the preference
files.
• (Mac OS) While pressing Shift+Option+Command+Control, start InCopy. Click Yes when asked if you want to
delete the preference files.
Reset warning dialog boxes
1 Choose Edit > Preferences > General (Windows) or InCopy > Preferences > General (Mac OS).
2 Click Reset All Warning Dialogs to display all warnings, even the ones you’ve already dismissed. (As warnings
appear, you can select an option to indicate you do not want to see the warning again.)
See also
“Adding text” on page 90
Moving through documents
Scrolling through documents
You can use the scroll bars (along the bottom and right sides of the InCopy window) or scroll with a mouse wheel or
sensor in any view.
Page 34

USING INCOPY CS4
Updated 29 April 2009
Workspace
You can also use the Page Up, Page Down, and arrow keys on the keyboard to move through a story. In Layout view,
pressing Page Up or Page Down shifts to the next or previous page in the layout. In Galley or Story view, Page Up and
Page Down shift the view by one screen; the view doesn’t necessarily go to the next page break. The Up Arrow and
Down Arrow keys move the insertion point within the copy and scroll the view as necessary so that you can always see
the insertion point.
In Layout view only, you can also use the Hand tool to move the document view in any direction.
Move through a document with the Hand tool
Some options for moving around within a story depend on whether you’re working in Galley, Story, or Layout view.
In Galley and Story view, you must use the scroll bars to see text that doesn’t fit in the view. In Layout view, you can
also use the Hand tool, page buttons, and commands.
❖ In Layout view, select the Hand tool , and then drag the document to move it.
29
Dragging to view another part of page
To use power zoom when the Hand tool is selected, hold down the mouse button. This technique offers a quick way to
scroll through multiple document pages.
Go to another page in Layout view
❖ Do one of the following:
• Click the buttons in the status bar, as shown in the following illustration:
A B D EC
Status bar in Layout view
A. First-spread button B. Previous-spread button C. Page number display box D. Next-spread button E. Last-spread button
• Choose the page number from the pop-up menu on the status bar.
See also
“Keys for navigating through documents” on page 277
Page 35

USING INCOPY CS4
Updated 29 April 2009
Workspace
Jump to position markers
You can set a marker at a specific location in the text so that you can easily return to it using a command or shortcut.
A position marker is useful if you change your place in the document to do another action, for example, to verify a fact
in another area of text. A document can have only one position marker per session; inserting a marker deletes a
previously placed marker. Closing a document also deletes a marker.
❖ Choose Edit > Position Marker, and do any of the following:
• To add a marker, place the insertion point in the text and then select Insert Marker.
• To replace an existing marker, select Replace Marker.
• To delete a marker, select Remove Marker.
• To return to a marker, select Go To Marker.
See also
“Keys for navigating through documents” on page 277
Reorder InCopy stories
When you open an assignments file or an InDesign document, you can change the order of the stories in Galley or
Story view. Reordering stories doesn’t affect their layout position.
30
1 Make sure that you are in Galley or Story view.
2 Drag the story’s title to a new location.
Recovery and undo
Recover documents
InCopy guards your data against unexpected power or system failures using an automatic recovery feature.
Automatically recovered data exists in a temporary file that is separate from the original document file on disk. Under
normal circumstances you don’t need to think about automatically recovered data, because any document updates
stored in the automatic recovery file are automatically added to the original document file when you choose the Save
or Save As command or exit from InCopy normally. Automatically recovered data is important only if you’re unable
to save successfully before an unexpected power or system failure.
Even though these features exist, you should save your files often and create backup files in case of unexpected power
or system failures.
See also
“Adobe Version Cue” on page 38
Find recovered documents
1 Restart your computer.
2 Start InCopy .
Page 36

USING INCOPY CS4
Updated 29 April 2009
Workspace
If automatically recovered data exists, InCopy automatically displays the recovered document. The word [Recovered]
appears after the filename in the title bar of the document window to indicate that the document contains unsaved
changes that were automatically recovered.
Note: If InCopy fails after attempting to open a document using automatically recovered changes, the automatically
recovered data may be corrupted.
3 Do one of the following:
• For Adobe InCopy® files linked to an InDesign publication, choose File > Save.
• For stand-alone InCopy files, choose File > Save As, specify a location and a new filename, and click Save. The Save
As command creates a new file that includes the automatically recovered data.
• To discard any automatically recovered changes and use the last saved version of the file, choose File > Revert
Content.
Change the location of recovered documents
1 Choose Edit > Preferences > File Handling (Windows) or InCopy > Preferences > File Handling (Mac OS).
2 Under Document Recovery Data, click Browse (Windows) or Choose (Mac OS).
3 Specify the new location for the recovered document, click Select (Windows) or Choose (Mac OS), and then
click OK.
31
Undo mistakes
If necessary, you can cancel a lengthy operation before it’s completed, undo recent changes, or revert to a previously
saved version. You can undo or redo up to several hundred of the most recent actions (the amount is limited by the
amount of RAM available and the kinds of actions you performed). The series of actions is discarded when you choose
the Save As command, close a document, or when you exit from the program.
❖ Do one of the following:
• To undo the most recent change, choose Edit > Undo [action]. (You cannot undo certain actions, such as scrolling.)
• To redo an action, choose Edit > Redo [action].
• To undo all changes made since the last time you saved the project, choose File > Revert (InDesign) or File > Revert
Content (InCopy).
• To close a dialog box without applying changes, click Cancel.
Working with ConnectNow
Working with ConnectNow
Adobe® ConnectNow provides you with a secure, personal online meeting room where you can meet and collaborate
with others via the web in real time. With ConnectNow, you can share and annotate your computer screen, send chat
messages, and communicate using integrated audio. You can also broadcast live video, share files, capture meeting
notes, and control an attendee's computer.
Page 37

USING INCOPY CS4
Updated 29 April 2009
Workspace
You can access ConnectNow directly from the application interface.
1 Choose File > Share My Screen.
2 In the Share My Screen dialog box, enter your Adobe ID and password, and click Sign In. If you don’t have an
Adobe ID and password, click the Create a Free Adobe ID link at the top of the dialog box.
3 To share your screen, click the Share My Computer Screen button at the center of the ConnectNow application
window.
For complete instructions on using ConnectNow, see
http://help.adobe.com/en_US/Acrobat.com/ConnectNow/index.html.
For a video tutorial about using ConnectNow, see Using ConnectNow to share your screen (7:12). (This
demonstration is in Dreamweaver.)
32
Page 38

Chapter 3: Working with InCopy
Updated 29 April 2009
documents
In Adobe® InCopy®, you can create stand-alone documents, or you can work with documents that are linked to Adobe®
InDesign®. When you work with linked documents, you can have more than one InCopy story in an InDesign file,
depending on your workflow system. Writers, editors, and designers can work simultaneously on the same InDesign
document, without overwriting each other’s work.
Using an InCopy workflow
About InCopy workflows
Tight integration between InCopy and InDesign enables a workflow that lets writers, editors, and designers work
simultaneously on the same InDesign document, without overwriting each other’s work. The workflow system allows
users to check files out and in, thereby preserving file integrity.
33
InCopy users can view their content contributions within the context of layouts without installing InDesign. Using
InCopy, writers and editors can take full control of text, including typesetting functions such as applying formatting
styles (usually imported from InDesign), copyfitting, adjusting line and page breaks, setting hyphenation, kerning, and
so on. InCopy users can import graphics to enhance their stories, and make limited transformations on those graphics,
such as scaling and cropping. After the content is saved in InCopy, the document can be updated in InDesign. In
addition, InDesign users can share design updates with InCopy users, ensuring they are working with the latest layouts.
Typically, a system integrator customizes the interaction between InCopy and InDesign, setting up and defining the
workflow system for the group. The workflow system controls file creation, synchronization (with the master server),
and viewing. InCopy and InDesign work with several different workflow systems, including the built-in system
enabled by the InCopy® LiveEdit Workflow plug-ins for small workgroups. For specific details about your workflow
system, talk to the system integrator.
About linked (managed) documents
A linked InCopy document is a content file (either text or graphics) that is placed in an open InDesign document or
assignment file. The content is associated with an InDesign layout, and therefore managed by the InDesign document.
The InDesign user makes this connection from within InDesign; you cannot create or manage the link from InCopy.
The InDesign connection can be made before the InCopy user starts writing and editing text, while the writing is in
progress, or after the text work is finished. Once the content is linked, the InCopy user can see (but not change) the
page layouts, styles, and so on, as they appear in the InDesign document.
Linked documents have the following additional characteristics:
• With a linked InCopy file, you can do just about anything that concerns the text itself. For example, you can specify
text-formatting options, change fonts, and carry out other editing and copyfitting functions within the design and
formatting limits of the InDesign layout and your workflow system. You cannot, however, change the text or
graphics frames, column layout, threading sequence, or any other design elements; these are set up in InDesign.
Page 39

Working with InCopy documents
Updated 29 April 2009
USING INCOPY CS4
• Linked content is managed by your workflow system, where it is locked for access control. Your system might offer
several options for opening a linked story, such as checking out each InCopy file so that you alone can work on it.
For instructions, see your workflow system documentation or ask your system administrator, or check out content
using InCopy if your workflow uses the InCopy LiveEdit Workflow plug-ins.
Working with multistory files
When you work with linked documents, you can have more than one InCopy story in an InDesign file, depending on
your workflow system. A file with multiple stories must be created in InDesign as either an assignment file or an
InDesign file with linked InCopy content. You cannot use InCopy to create a multistory document. See your workflow
system documentation for details.
Multiple stories are shown and separated in Galley and Story views with a story separator bar. The story separator bar
provides easy access to each story created within an InDesign document.
The story separator bar contains the story title and an expand and collapse button which enables you to show or hide
each story. When a story is collapsed, the text is hidden and the story separator bar remains visible within the edit pane.
A B C
34
The story separator bar
A. Expand and collapse button B. Story name C. Story separator bar
Stand-alone documents
Work with stand-alone documents
An InCopy document that is not associated with an InDesign document is called a stand-alone document. You can set
up and modify the text area, page size, and orientation for stand-alone documents. However, if the story is later linked
to an InDesign document, the InDesign settings override the settings used in InCopy.
Note: You can also click Save Preset to save document settings for future use. When creating a new document, you can
simply choose it from the Document Preset menu and click OK without having to change any settings. If you’re working
in an editorial workgroup, these saved presets can be shared with other members of your team. (See “Define custom
document presets” on page 35.)
Create a stand-alone document
1 Choose File > New.
2 To create a document that does not have facing pages in each spread, deselect Facing Pages.
3 Under Text Area, type values for Width and Depth. Text dimensions provide accurate line break information
without relying on InDesign for copyfit information.
Page 40

Working with InCopy documents
Updated 29 April 2009
USING INCOPY CS4
4 Choose a page size from the list, or type values for Width and Height. Page size represents the final size you want
after bleeds or other marks outside the page are trimmed.
5 Click OK.
Open a stand-alone document
You can open an InCopy content file (.icml) that has been created in InCopy or exported from InDesign. When
opened in InCopy, these InCopy content files will not show the page geometry from the InDesign layout. You can also
open documents from previous versions of InCopy, and you can open InCopy template files (.inct).
You can also open Microsoft® Word and text files directly in InCopy, and then save them as Text Only (.TXT) or Rich
Text Format (.RTF).
1 Choose File > Open.
2 Select the document, and then click Open.
You can also choose File > Open Recent, and select one of the documents you saved recently. To specify how many
recent documents are displayed, choose Edit > Preferences > File Handling (Windows), or InCopy > Preferences > File
Handling, and then specify a number for Number Of Recent Items To Display.
See also
“Save documents” on page 36
35
“Place (import) text” on page 91
Change document layout
1 In any view of a stand-alone document, choose File > Document Setup.
2 Select basic layout options in the dialog box that appears.
3 Click OK.
Define custom document presets
You can create custom document settings and then share them with others in your workgroup to save time and ensure
consistency when creating similar documents.
1 Choose File > Document Presets > Define.
2 Do one of the following:
• To create a new preset, click New and specify a name for the preset.
• To base a preset on an existing one, select a preset from the list and click Edit.
• To use a different set of settings, click Load, open a document settings file (.icst), and then click Edit.
3 Select basic layout options in the dialog box that appears. (See “Work with stand-alone documents” on page 34 for
a description of each option.)
4 Click OK twice.
You can save a document preset to a separate file and distribute it to other users. To save and load document preset
files, use the Save and Load buttons in the Document Presets dialog box.
Linking InCopy files to InDesign
When a stand-alone InCopy story is linked to an InDesign document, the InDesign formatting overrides the InCopy
layout and design settings.
Page 41

Working with InCopy documents
Updated 29 April 2009
USING INCOPY CS4
The link between InCopy files and InDesign layouts can be made a number of ways in InDesign, usually by placing an
InCopy (.icml) file into an InDesign layout.
About Adobe Bridge
Adobe Bridge is a cross-platform application included with Adobe Creative Suite components that helps you locate,
organize, and browse the assets you need to create print, web, video, and audio content. You can start Adobe Bridge
from any Creative Suite component (except Adobe Acrobat® 9), and use it to access both Adobe and non-Adobe asset
types.
From Adobe Bridge, you can:
• Manage image, footage, and audio files: Preview, search, sort, and process files in Adobe Bridge without opening
individual applications. You can also edit metadata for files, and use Adobe Bridge to place files into your
documents, projects, or compositions.
• Perform automated tasks, such as batch commands.
• Synchronize color settings across color-managed Creative Suite components.
• Start a real-time web conference to share your desktop and review documents.
For a video overview on using Adobe Bridge, see www.adobe.com/go/lrvid4011_bri.
36
See also
Adobe Bridge overview video
Browse for files by using Adobe Bridge
Adobe Bridge lets you efficiently organize, browse, and locate the assets you need to create content for print, the web,
and mobile devices.
❖ To open the Adobe Bridge Browser, choose File > Browse In Bridge or click the Adobe Bridge icon in the
application bar.
Scripting in InCopy
Scripting is a great tool for performing a variety of tasks. A script can be as simple as an automated common task or as
complex as an entire new feature. You can create your own scripts, and you can run scripts that other people have
created. Use the Scripts panel (Window > Scripts) to run scripts within InCopy.
For more information about scripting, see the InCopy Scripting Guide on the application DVD or on the Adobe
website.
Saving and exporting
Save documents
❖ Do one of the following:
• To save an existing document under the same name, choose File > Save Content.
• To save a document under a new name, choose File > Save Content As, specify a location and filename, and click
Save. The newly named document becomes the active document.
Page 42

Working with InCopy documents
Updated 29 April 2009
USING INCOPY CS4
• To save a copy of a story or graphic under a new document name, choose File > Save Content Copy, specify a
location and filename, and click Save. The saved copy does not become the active document.
• To save a copy of a document as a template, choose File > Save Content As, specify a location and filename, and
then choose InCopy Template from Save As Type (Windows) or Format (Mac OS).
• To save a copy of a document in a format compatible with InCopy CS3, choose File > Save Content As, specify a
location and filename, and then choose InCopy CS3 Interchange from Save As Type (Windows) or Format
(Mac OS).
• To save a copy of a document in a text format, choose File > Save Content As, specify a location and filename, and
then choose Text Only or Rich Text Format from Save As Type (Windows) or Format (Mac OS).
Note: Saving a managed (linked) document does not update the link in the InDesign file. To update the story on the file
system, follow the process described in your workflow system documentation or ask your system administrator for
information.
InCopy file types
You can work with several different file types in InCopy.
InCopy content files (.icml) This is the default file type when exporting stories or graphics from InDesign, and when
saving or creating new documents using InCopy. This file type appears as InCopy Document in the Export or Save As
dialog box.
37
InCopy CS3 Interchange files (.incx) This is the file type when saving or exporting stories that can be opened using
InCopy CS3.
Assignment files (.icma) These files are a subset of an InDesign document. They display content and styles, as well as
page geometry from the parent InDesign file. Assignment files can display different levels of visual fidelity (wireframe,
assigned spreads, or all spreads). The InDesign user sets these options while creating the assignment file. Only
InDesign users can create assignment files; only InCopy users can open assignment files.
If you create CS3-compatible assignment files, the .inca extension is used.
Assignment package files (.icap) These files are assignment files that have been compressed in InDesign for
distribution. Assignment packages include the assignment file, the assigned story files, and any linked images.
If you create a package with a CS3-compatible assignment, the .incp extension is used.
Template files (.icmt) Templates are useful starting points for stand-alone documents, because you can preset them
with page size dimensions, text area dimensions, styles (paragraph and character), XML tags, swatches, pretagged
sample content, and so on. Template files open as “Untitled” documents and display content and styles, but no page
geometry (layout information from an InDesign document). This file type appears as InCopy Template in the Save As
dialog box.
InDesign files (.indd) When viewed in InCopy, these files provide full fidelity with the InDesign document, including
content, styles, and layout of all page items. InCopy users can edit only those content items made available to them by
InDesign users. Other items can be viewed but not edited.
You can open several different types of text files, including Microsoft Word, RTF, and TXT files, directly in InCopy.
When you do so, the import options for that file type appear.
Page 43

Working with InCopy documents
Updated 29 April 2009
USING INCOPY CS4
Export InCopy documents
You can save all or part of an InCopy document in a different file format. In most cases, each component (for example,
text frames and graphics) in an InCopy document is exported to a separate file. The exception is exporting an InCopy
document to Adobe PDF, which copies all of the text and graphics in a document to a single PDF file.
1 Do one of the following:
• To export text, click in the text with the Type tool .
• To export a graphic, click the graphic with the Position tool .
2 Choose File > Export.
3 Specify a name and location for the exported content, and then select a format under Save As Type.
The XML format appears in the list only if XML tags have been added to the document. If you are exporting text and
don’t see a listing for your word-processing application, you might need to export the text in a format that the
application can import, such as Rich Text Format. If your word-processing application doesn’t support any of the
InCopy export formats, use the Text Only (ASCII) format.
Note: Exporting in ASCII format removes all character attributes from the text. To retain all formatting, use the InCopy
Tagged Text export filter.
4 Click Save to export the content in the format you’ve selected.
38
See also
“Place (import) text” on page 91
“InCopy file types” on page 37
Rename InCopy stories
When a story is exported from InDesign, it is given a document filename with a .icml extension (or .incx for CS3
compatible stories). InCopy automatically uses this filename as the story name that appears in the Assignments panel
and story separator bar. Unlike the filename, the story name is embedded in the file.
1 To change a story name manually, open a story file in InCopy.
2 Choose File > Content File Info.
3 Make sure that the Description tab is selected, and then type a new name for Document Title.
Note: Depending on the workflow processes of your system, an administrator might have to change the story name for
you. If you are unable to rename the story by following the steps above, talk to your workflow administrator.
You can also change the story name in the Assignments panel when the story is checked out. However, the filename is
not changed on disk.
Adobe Version Cue
Adobe Version Cue® CS4 is an asset management system that lets designers work collaboratively on a set of common
files without having to change their workflow significantly. Designers can easily track and manipulate multiple
versions of files.
Version Cue handles the following tasks:
• Creating versions of your files
• Enabling workgroup collaboration (file sharing, version control, the ability to check files in and out)
Page 44

Working with InCopy documents
Updated 29 April 2009
USING INCOPY CS4
• Organizing files into private or shared projects
• Providing thumbnails so you can browse and view files
• Organizing data so you can view and search on file information, version comments, and file status
• Creating and managing user access, projects, and PDF reviews by way of Version Cue Server Administration
Version Cue consists of two pieces: the Adobe Version Cue Server and Adobe Drive.
Adobe Version Cue Server The Version Cue Server can be installed locally or on a dedicated computer. It hosts
Version Cue projects and PDF reviews.
Adobe Drive Adobe Drive connects to Version Cue CS4 servers. The connected server appears like a hard drive or
mapped network drive in Windows Explorer, Mac OS Finder, and dialog boxes such as Open and Save As.
Note: The “Use Adobe Dialog” option that appears in CS3 applications does not appear in CS4 applications. This option
is no longer necessary. Connecting to the Version Cue Server using Adobe Drive lets you view project files from any
application.
Version Cue is included with Adobe Creative Suite 4 Design Premium and Standard, Adobe Creative Suite 4 Web
Premium and Standard, Adobe Creative Suite 4 Production Premium, and Adobe Creative Suite 4 Master Collection.
Version Cue enables versioning and asset management in all applications, but it includes enhanced features for the
following products: Adobe Flash®, Adobe Illustrator®, Adobe InDesign®, Adobe InCopy®, Adobe Photoshop®, and
Adobe Bridge. When you use any of these applications to open a file stored on a Version Cue server, the file is checked
out automatically. For all other applications, use the context menu to check in and check out files manually.
39
For a video on Version Cue, see www.adobe.com/go/lrvid4038_vc. For Version Cue Help, see
www.adobe.com/go/learn_vc_versioncuehelp_cs4.
See also
Version Cue Help
Version Cue video
Frames, grids, rulers, and guides
About frames in InCopy files
As in Adobe InDesign, all InCopy text and graphics appear inside frames. For linked documents, InDesign controls
the frame placement and design for a publication. You can see the frame structure of the InDesign document in
InCopy Layout view.
Modifying frames
You (or someone on your team) must make any changes to frames from within the InDesign document, unless the
frames are for inline graphics. You can move, scale, rotate, or shear inline graphics frames, but not other frames. For
more information, see your workflow documentation.
Threading text
A long story can flow from one frame to other frames that are connected in sequence, or threaded. A threaded story
begins on a particular column of a page and can continue on any other columns and pages of the publication. The
InDesign user always sets up the threading sequence for an InCopy story.
Page 45

Working with InCopy documents
Updated 29 April 2009
USING INCOPY CS4
When you add text to a threaded story, the story flows through each successive frame until all of the assigned frames
are full.
40
1.
2.
1. 2.
Flow of threaded text: Original text in threaded frames (top); after you add text to first frame, text reflows to second frame (bottom)
3.
3.
If the text doesn’t fit in its allotted frame space, the hidden part of the story is called overset text.
See also
“About frames” on page 25
“Copyfitting text” on page 155
Change measurement units and rulers
InCopy includes a vertical depth ruler for copyfitting text in Galley and Story views, as well as horizontal and vertical
rulers in Layout view for measuring layouts. By default, rulers begin measuring from the upper-left corner of a page or
spread. You can change this by moving the zero point.
You can work with several standard measurement units, change these settings at any time, and temporarily override
the current measurement units as you enter a value. Changing the measurement units doesn’t move guides, grids, and
objects, so when ruler tick marks change, they might not line up with objects aligned to the old tick marks.
A
B
C
Rulers
A. Labeled tick marks B. Major tick marks C. Minor tick marks
You can set up different measurement systems for horizontal and vertical rulers. For example, many newspapers
measure horizontal layouts in picas and vertical text stories in inches. The system you select for the horizontal ruler
governs tabs, margins, indents, and other measurements. Each spread has its own vertical ruler; however, all vertical
rulers use the same settings you specify in the Units & Increments section of the Preferences dialog box.
Page 46

Working with InCopy documents
Updated 29 April 2009
USING INCOPY CS4
The default unit of measure for the rulers is picas (a pica equals 12 points). You can change the ruler units and control
where the major tick marks appear on a ruler. For example, if you change the ruler unit for the vertical ruler to 12
points, a major ruler increment appears every 12 points (if such a display is possible in the current magnification). The
tick mark labels include your customized major tick marks, so when the ruler reads 3 in the same example, it marks
the third instance of the 12-point increment, or 36 points.
Vertical ruler using inches (left), and custom 12-point increments (right)
Setting custom ruler increments in the vertical ruler is useful for lining up a ruler’s major tick marks with a baseline
grid.
Specify the measurement units
You can set custom measurement units for the on-screen rulers and for use in panels and dialog boxes. You can also
change these settings at any time and temporarily override the current measurement units as you enter a value.
41
1 Choose Edit > Preferences > Units & Increments (Windows) or InCopy > Preferences > Units & Increments
(Mac OS).
2 For Horizontal and Vertical, choose the measurement system you want to use for horizontal and vertical
dimensions in rulers, dialog boxes, and panels; choose Custom, and type the number of points at which you want
the ruler to display major tick marks. Click OK.
You can also change ruler units by right-clicking (Windows) or Control-clicking (Mac OS) a ruler, and choosing the
units from the context menu.
Override default measurement units
You can specify a unit of measurement that is different from the default.
❖ Highlight the existing value in a panel or dialog box, and type the new value using the notation in the following
table:
To specify: Type these letters after the value: Examples Result
Inches i
in
inch
"
Millimeters mm 48mm 48 millimeters
Centimeters cm 12cm 12 centimeters
5.25i
5.25in
5.25inch
5.25”
5 1/4 inches
Picas p 3p 3 picas
Points pt
p (before value)
6pt
p6
6 points
Page 47

Working with InCopy documents
Updated 29 April 2009
USING INCOPY CS4
To specify: Type these letters after the value: Examples Result
Picas and points p (between values) 3p6 3 picas, 6 points
Ciceros c 5c 5 ciceros
Agates ag 5ag agates
Change the zero point
The zero point is the position at which the zeros on the horizontal and vertical rulers intersect. By default, the zero
point is at the top left corner of the first page of each spread. This means that the default position of the zero point is
always the same relative to a spread, but may seem to vary relative to the pasteboard.
The X and Y position coordinates in the Control panel, Info panel, and Transform panel are displayed relative to the
zero point. You can move the zero point to measure distances, to create a new reference point for measurement, or to
tile oversized pages. By default, each spread has one zero point at the upper left corner of the first page, but you can
also locate it at the binding spine, or specify that each page in a spread has its own zero point.
Adjust the zero point
When you move the zero point, it moves to the same relative location in all spreads. For example, if you move the zero
point to the top left corner of the second page of a page spread, it will appear in that position on the second page of all
other spreads in the document.
42
❖ Do one of the following:
• To move the zero point, drag from the intersection of the horizontal and vertical rulers to the position on the layout
where you want to set the zero point.
Establishing a new zero point
• To reset the zero point, double-click the intersection of the horizontal and vertical rulers .
• To lock or unlock the zero point, right-click (Windows) or Control-click (Mac OS) the zero point of the rulers, and
choose Lock Zero Point or Unlock Zero Point in the context menu.
Change the default zero point
Using the Origin setting in the Preferences dialog box, you can set the default zero point for rulers as well as the scope
of the horizontal ruler. The scope determines whether the ruler measures across the page, across the entire spread, or,
for multipage spreads, from the center of the spine.
If you set the ruler origin at each spread’s binding spine, the origin becomes locked at the spine. You won’t be able to
reposition the ruler origin by dragging it from the intersection of the rulers unless you choose another origin option.
1 Choose Edit > Preferences > Units & Increments (Windows) or InCopy > Preferences > Units & Increments
(Mac OS).
Page 48

Working with InCopy documents
Updated 29 April 2009
USING INCOPY CS4
2 In the Ruler Units section, in the Origin menu, do one of the following:
• To set the ruler origin at the top-left corner of each spread, choose Spread. The horizontal ruler measures across
the entire spread.
• To set the ruler origin at the top-left corner of each page, choose Page. The horizontal ruler starts at zero for each
page in a spread.
• To set the ruler origin at the center of the spine, choose Spine. The horizontal ruler measures in negative numbers
to the left of the spine and positive numbers to the right of the spine.
You can also change horizontal ruler origin settings using the context menu that appears when you right-click
(Windows) or Control-click (Mac OS) the horizontal ruler.
Use grids
In Layout view, you can view (or hide) a framework of grids and guides to show the position and alignment of objects.
In most work systems, a designer working with InDesign sets up the grids and guides for the publication. InCopy users
can see these layout aids after an InCopy story is linked to the InDesign document.
You can create grids within InCopy. But, because InDesign grids override InCopy settings when files are linked, this
feature is more useful for stand-alone documents that you publish directly from InCopy.
These grids and guides are never visible on printed or exported output. One set of rulers and grids exists per page, but
a guide can exist across all pages of a spread or within only a single page.
43
Note: Grids, rulers, and guides are not available in Galley or Story view.
Set up a baseline grid
Use Grid Preferences to set up a baseline grid for the entire document.
1 Choose Edit > Preferences > Grids (Windows) or InCopy > Preferences > Grids (Mac OS).
2 Specify a baseline grid color by choosing a color in the Color menu. You can also choose Custom in the Color menu.
3 For Relative To, specify whether you want the grid to start at the top of the page or the top margin.
4 For Start, type a value to offset the grid from either the top of the page or the top margin of the page, depending on
the option you choose from the Relative To menu. If you have trouble aligning the vertical ruler to this grid, try
starting with a value of zero.
5 For Increment Every, type a value for the spacing between grid lines. In most cases, type a value that equals your
body text leading, so that lines of text align perfectly to this grid.
A
Baseline grid in document window
A. First grid line B. Increment between grid lines
B
6 For View Threshold, type a value to specify the magnification below which the grid does not appear. Increase the
view threshold to prevent crowded grid lines at lower magnifications.
Page 49

Working with InCopy documents
Updated 29 April 2009
Baseline grid at magnification below view threshold (left) and above view threshold (right)
7 Click OK.
USING INCOPY CS4
Set up a document grid
1 Choose Edit > Preferences > Grids (Windows) or InCopy > Preferences > Grids (Mac OS).
2
Specify a document grid color by choosing a color in the Color menu. You can also choose Custom in the Color menu.
3 Do one of the following, and click OK:
• To put the document and baseline grids behind all other objects, make sure that Grids In Back is selected.
• To put the document and baseline grids in front of all other objects, deselect Grids In Back.
To put guides behind all other objects, you can also choose Guides In Back in the context menu that appears when you
right-click (Windows) or Control-click (Mac OS) an empty area of the document window.
44
Show or hide grids
• To show or hide the baseline grid, choose View > Grids & Guides > Show/Hide Baseline Grid.
• To show or hide the document grid, choose View > Grids & Guides > Show/Hide Document Grid.
View ruler guides
Ruler guides are different from grids in that they can be positioned freely on a page or on a pasteboard. InDesign users
can create two kinds of ruler guides: pageguides, which appear only on the page on which they create them, or
spreadguides, which span all pages and the pasteboard of a multiple-page spread. You can view ruler guides if they exist
in the InDesign document or assignment file, but you cannot create them in InCopy.
A B
Guides
A. Spread guide B. Page guide
Show or hide ruler guides
1 Make sure that you are in Layout view; if necessary, click the Layout view tab at the top of the edit pane.
2 Choose View > Grids & Guides > Show/Hide Guides.
Page 50

Working with InCopy documents
Updated 29 April 2009
USING INCOPY CS4
Display ruler guides behind objects
By default, ruler guides appear in front of all other guides and objects. However, some ruler guides may block your
view of objects, such as lines with narrow stroke widths.
You can change the Guides In Back preference to display ruler guides in front of or behind all other objects. However,
regardless of the Guides In Back setting, objects and ruler guides are always in front of margin and column guides.
1 Choose Edit > Preferences > Guides & Pasteboard (Windows) or InCopy > Preferences > Guides & Pasteboard
(Mac OS).
2 Select Guides In Back, and click OK.
Customize the pasteboard and guides
1 In the Edit menu (Windows) or InCopy menu (Mac OS), choose Preferences > Guides & Pasteboard.
2 To change the color of margin or column guides, choose a preset color from a menu, or choose Custom and specify
a color using the color picker.
3 To make the pasteboard bigger or smaller, enter a value for Minimum Vertical Offset.
4 Click OK.
45
Use layers
Layers are like transparent sheets stacked on top of each other. If a layer doesn’t have objects on it, you can see through
it to any objects on layers behind it.
Only InDesign users can create layers. InCopy users can show or hide layers and change layers settings. If the InDesign
user created multiple layers in the document, you can hide layers in InCopy, letting you edit specific areas or kinds of
content in the document without affecting other areas or kinds of content. For example, if your document prints slowly
because it contains many large graphics, you can hide all non-text layers and quickly print the text layer for
proofreading.
Additional layer notes:
• Objects on masters appear at the bottom of each layer. Master objects can appear in front of document page objects
if the master page objects are on a higher layer.
• Layers involve all pages of a document, including masters. For example, if you hide Layer 1 while editing page 1 of
your document, the layer is hidden on all pages until you decide to show it again.
Page 51

The Layers panel lists layers, with the frontmost layer appearing at the top of the panel.
Updated 29 April 2009
Show and hide layers
1 Choose Window > Layers.
2 In the Layers panel, do one of the following:
• To hide a specific layer, click the eye icon to the left of the layer name.
• To show a specific layer, click the space to the left of the layer name.
• To show or hide all layers at once, choose Show/Hide All Layers from the panel menu.
Note: Only visible layers print.
Working with InCopy documents
USING INCOPY CS4
46
Importing graphics
Import graphics
InCopy allows you to import graphics into existing frames. This is especially useful where content is created before the
layout, because you can choose the graphics for your articles as you write.
You can import graphics into existing frames only. Only InDesign users can create graphics frames. In standalone
InCopy documents, you can insert a graphic into the default text frame, making it an inline graphic.
InCopy supports the same wide range of graphics file formats as InDesign, including graphics created using Adobe®
Illustrator® 8.0 and later, bitmap formats such as PDF, PSD, TIFF, GIF, JPEG, and BMP, and vector formats such as
EPS. You can even import InDesign (INDD) pages as images. Other supported formats include DCS, PICT, WMF,
EMF, PCX, PNG, and Scitex CT (.SCT).
Notes on placing graphics in InCopy
When you import graphics into InCopy, keep the following in mind:
• For managed content, you must check out a frame before you can import a graphic into it.
• Once you import a graphic, you can transform (move, scale, rotate, shear) it inside the frame, fit the graphic to the
frame, and control the graphic’s appearance. You can also tag a selected frame for future XML use by selecting
commands from the context menu.
Page 52

Working with InCopy documents
Updated 29 April 2009
USING INCOPY CS4
• When InDesign users create a new frame, they specify whether it is a text, graphics, or unassigned frame. InCopy
users cannot change this frame type within InCopy. Therefore, if you try to import a graphic into a text frame, for
example, it may appear as a large inline graphic.
• You can select and modify the graphics but not the frames in InCopy, unless they are nested or inline frames. Only
InDesign users can modify graphics frames.
• You can place, paste, or drag graphics into an anchored, floating, or inline graphics frame. You can import a graphic
into a text frame only if that frame has an active insertion point or is an inline graphics frame.
• If you import a graphic into a nested frame, the graphic is imported into the deepest-level frame under the pointer.
Nested frames that contain graphics, unlike top-level frames, can be selected with the Position tool. (See “Position
tool overview” on page 59.)
• If an effect, such as transparency, drop shadow, or feathering, is applied to a frame in InDesign, it will be visible in
an assignment file or InDesign (.indd) file open in InCopy. It will not be visible in a linked (.icml) file open in
InCopy.
Place a graphic in an InCopy document
1 Do one of the following:
• To place a graphic in a standalone InCopy document, place the insertion point in the text frame.
• To place a graphic in a linked document, make sure the graphics frame is checked out to you. The Editing icon
appears in the upper left corner of the frame.
2 Choose File > Place and select a graphics file.
3
To set format-specific import options, select Show Import Options to see format-specific settings, and then click Open.
Note: When you place a graphic created in lllustrator 9.0 or later by using the Show Import Options dialog box, the
options are identical to those for PDF files. When you place an Illustrator 8.x graphic, the options are identical to those
for EPS files
47
4 If another dialog box appears, select your import options, and click OK.
5 To import into a frame, click the loaded graphics icon in the frame. To place a specified page of a multipage
PDF document, click the loaded graphics icon in a frame.
If you accidently replace an existing graphic with an image you’re placing, press Ctrl+Z (Windows) or Command+Z
(Mac OS) to return the original image to the frame and display the loaded graphics icon.
Drag a graphic into a frame
❖ Do one of the following:
• To place a graphic in an existing graphics frame, make sure the frame is checked out to you, and then drag the
graphic file’s icon from the file system to the frame.
• To place a graphic at an active text insertion point, drag the graphic file’s icon to any place in the text frame. This
method is available only in Layout view.
Paste a graphic into a frame
1 Make sure the graphics frame is checked out to you. The Editing icon appears in the upper left corner of the
frame.
2 Cut or copy a graphic.
3 Hold the Hand tool over the graphics frame, right-click (Windows) or Control-click (Mac OS), and then choose
Paste Into.
Page 53

Working with InCopy documents
Updated 29 April 2009
USING INCOPY CS4
Create an inline graphic
1 Make sure the text frame is checked out to you. The Editing icon appears in the upper left corner of the frame.
2 Do one of the following:
• To place a graphic in an existing inline graphics frame, use the Place or Cut command to select a graphic. Click the
loaded graphics icon in the frame.
• To place a graphic at an active text insertion point, drag the graphic file’s icon to any place in the text frame, or use
the Place command to import the graphic.
Import options for graphics
The options for importing graphics vary depending on the type of image being imported. To display import options,
make sure that Show Import Options is selected in the Place dialog box.
Encapsulated PostScript (.eps) import options
When you place an EPS graphic (or a file saved with Illustrator 8.0 or earlier) and select Show Import Options in the
Place dialog box, you’ll see a dialog box containing these options:
Read Embedded OPI Image Links This option tells InCopy to read links from OPI comments for images included (or
nested) in the graphic.
48
Deselect this option if you’re using a proxy-based workflow and plan to have your service providers perform the image
replacement using their OPI software. When this option is deselected, InDesign preserves the OPI links but does not
read them. When you print or export, the proxy and the links are passed on to the output file.
Select this option if you’re using a proxy-based workflow and you want InDesign, instead of your service provider, to
perform image replacement when you output the final file. When you select this option, the OPI links appear in the
Links panel.
Also select this option when you import EPS files containing OPI comments that are not part of a proxy-based
workflow. For example, if you import an EPS file containing OPI comments for an omitted TIFF or bitmap image,
you’ll want to select this option so that InDesign can access the TIFF information when you output the file.
Apply Photoshop Clipping Path Regardless of whether this option is selected, a placed EPS file includes a clipping path
in InDesign. However, deselecting this option may result in a different bounding box size.
Proxy Generation This creates a low-resolution bitmap representation of an image when drawing the file to the screen.
The following settings control how the proxy will be generated:
• Use TIFF Or PICT Preview Some EPS images contain an embedded preview. Select this option to generate the proxy
image of the existing preview. If a preview does not exist, the proxy will be generated by rasterizing the EPS to an
offscreen bitmap.
• Rasterize The PostScript Select this option to ignore the embedded preview. This option is typically slower but
provides the highest-quality results.
Note: When you import more than one single file into the same document, all instances share the proxy setting of the first
instance of the imported file.
Bitmap import options
You can apply color-management options to individual imported graphics when using color-management tools with
a document. You can also import a clipping path or an alpha channel saved with an image created in Photoshop. Doing
so lets you directly select an image and modify its path without changing the graphics frame.
Page 54

Working with InCopy documents
Updated 29 April 2009
USING INCOPY CS4
Note: Although Adobe InCopy does not include color-management options, these import options are relevant when the
images you place in InCopy are transferred to InDesign.
When you place a PSD, TIFF, GIF, JPEG, or BMP file and select Show Import Options in the Place dialog box, you’ll
see a dialog box containing these options:
Apply Photoshop Clipping Path If this option isn’t available, the image wasn’t saved with a clipping path, or the file
format doesn’t support clipping paths. If the bitmap image doesn’t have a clipping path, you can create one in
InDesign.
Alpha channel Select an alpha channel to import the area of the image saved as an alpha channel in Photoshop. InCopy
uses the alpha channel to create a transparent mask on the image. This option is available only for images that contain
at least one alpha channel.
Image imported without clipping path (left) and with clipping path (right)
49
Click the Color tab to view the following options:
Profile If Use Document Default is selected, leave this option unchanged. Otherwise, choose a color source profile that
matches the gamut of the device or software used to create the graphic. This profile enables InDesign to properly
translate its color to the gamut of the output device.
Rendering Intent Choose a method for scaling the color range of the graphic to the color range of the output device.
Typically, you’ll choose Perceptual (Images) because it accurately represents colors in photographs. The Saturation
(Graphics), Relative Colorimetric, and Absolute Colorimetric options are better for areas of solid color; they don’t
reproduce photographs well. Rendering Intent options aren’t available for bitmap, grayscale, and index-color mode
images.
Portable Network Graphics (.png) import options
When you place a PNG image and select Show Import Options in the Place dialog box, you’ll see a dialog box with
three sections of import settings. Two sections contain the same options available for other bitmap image formats. The
other section, PNG Settings, contains the following settings:
Use Transparency Information This option is enabled by default when a PNG graphic includes transparency. If an
imported PNG file contains transparency, the graphic interacts only where the background is transparent.
White Background If a PNG graphic does not contain a file-defined background color, this option will be selected by
default. However, it is only enabled if Use Transparency Information is activated. If this option is selected, white is
used as the background color when applying transparency information.
File Defined Background Color If a PNG graphic was saved with a non-white background color, and Use
Transparency Information is selected, this option is selected by default. If you don’t want to use the default background
color, click White Background to import the graphic with a white background, or deselect Use Transparency
Information to import the graphic without any transparency (displaying areas of the graphic that are currently
transparent). Some image-editing programs can’t specify a non-white background color for PNG graphics.
Apply Gamma Correction Select this option to adjust the gamma (midtone) values of a PNG graphic as you place it.
This option lets you match image gamma to the gamma of the device you will use to print or display the graphic (such
Page 55

Working with InCopy documents
Updated 29 April 2009
USING INCOPY CS4
as a low-resolution or non-PostScript printer or computer monitor). Deselect this option to place the image without
applying any gamma correction. By default, this option is selected if the PNG graphic was saved with a gamma value.
Gamma Value This option, available only if Apply Gamma Correction is selected, displays the gamma value that was
saved with the graphic. To change the value, type a positive number from 0.01 to 3.0.
When PNG files are imported, the settings in the Image Import Options dialog box are always based on the selected
file, not on the default or last-used settings.
Acrobat (.pdf) and Illustrator (.ai) import options
The layout, graphics, and typography in a placed PDF are preserved. As with other placed graphics, you cannot edit a
placed PDF page within InCopy . You can control the visibility of layers in a layered PDF. You can also place more
than one page of a multipage PDF.
When you place a PDF that was saved with passwords, you’ll be prompted to enter the required passwords. If the PDF
file was saved with usage restrictions (for example, no editing or printing), but no passwords, you can place the file.
When you place a PDF (or a file saved with Illustrator 9.0 or later) and select Show Import Options in the Place dialog
box, you’ll see a dialog box containing the following options:
Show Preview Preview a page in the PDF before you place it. If you’re placing a page from a PDF that contains multiple
pages, click the arrows, or type a page number under the preview image to preview a specific page.
50
Pages Specify the pages you want to place: the page displayed in the preview, all pages, or a range of pages. For
Illustrator files, you can specify which artboard to place.
If you specify multiple pages, hold down Alt (Windows) or Option (Mac OS) while placing the file to place them all at
the same time, overlapping each other.
Crop To Specify how much of the PDF page to place:
• Bounding Box Places the PDF page’s bounding box, or the minimum area that encloses the objects on the page,
including page marks.
• Art Places the PDF only in the area defined by a rectangle that the author created as a placeable artwork (for
example, clip art).
• Crop Places the PDF only in the area that is displayed or printed by Adobe Acrobat.
• Trim Identifies the place where the final produced page will be physically cut in the production process, if trim
marks are present.
• Bleed Places only the area that represents where all page content should be clipped, if a bleed area is present. This
information is useful if the page is being output in a production environment. Note that the printed page may include
page marks that fall outside the bleed area.
• Media Places the area that represents the physical paper size of the original PDF document (for example, the
dimensions of an A4 sheet of paper), including page marks.
Page 56

A B
Updated 29 April 2009
CD
Working with InCopy documents
USING INCOPY CS4
51
E F
Options for cropping placed PDFs
A. Media B. Content C. Bleed D. Trim E. Crop F. Art
Transparent Background Select this option to reveal text or graphics that fall beneath the PDF page in the InCopy
layout. Deselect this option to place the PDF page with an opaque white background.
If you make the background transparent in a frame containing a PDF graphic, you can make it opaque later by adding
a fill to the frame.
Fit a graphic to its frame
When you place or paste a graphic into a frame, it appears at the upper left corner of the frame by default. If the frame
and its content are different sizes, you can use the Fitting commands to achieve a perfect fit.
1 Select the graphic with the Position tool .
2 Choose Object > Fitting and one of the following options:
Fit Content To Frame Resizes content to fit a frame and allows the content proportions to be changed. The frame will
not change, but the content may appear to be stretched if the content and the frame have different proportions.
Center Content Centers content within a frame. The proportions of the frame and its content are preserved.
Fit Content Proportionally Resizes content to fit a frame while preserving the content proportions. The frame’s
dimensions are not changed. If the content and the frame have different proportions, some empty space will result.
Fill Frame Proportionally Resizes content to fit a frame completely while preserving the content proportions. The
frame’s dimensions are not changed.
Note: The Fitting commands fit the content outer edges to the center of the frame’s stroke. If the frame has a thick stroke
weight, outer edges of the content will be obscured. You can adjust the frame’s stroke alignment to the center, inside, or
outside of a frame edge.
Page 57

Working with InCopy documents
Updated 29 April 2009
USING INCOPY CS4
See also
“Keys for moving and transforming graphics” on page 279
Links panel overview
All files placed in a document are listed in the Links panel. These include both local (on disk) files and assets that are
managed on a server. However, files that are pasted from a website in Internet Explorer do not display in this panel.
In InCopy, the Links panel also displays linked stories. When you select a linked story in the Links panel, the Link Info
section displays information such as the number of notes, the managed status, and the status of tracked changes.
Note: If you’re working with files from an Adobe Version Cue project, the Links panel displays additional file information.
A
B
C
D
E
52
F
Links panel
A. Category columns B. One or more instances modified icon C. Modified icon D. Missing-link icon E. Embedded-link icon F. Show/Hide
Link Information
When the same graphic appears several times in the document, the links are combined under a disclosure triangle in
the Links panel. When a linked EPS graphic or InCopy document contains links, the links are also combined under a
disclosure triangle.
A linked file can appear in the Links panel in any of the following ways:
Up to Date An up-to-date file is blank in the Status column.
Modified This icon means that the version of the file on disk is more recent than the version in your document. For
example, this icon appears if you import a Photoshop graphic into InCopy , and then you or someone else edits and
saves the original graphic in Photoshop.
A slightly different version of the Modified icon appears when a graphic is modified and one or more instances are
updated while others are not.
Missing The graphic is no longer in the location from which it was imported, although it may still exist somewhere.
Missing links can happen if someone deletes the original file or moves it to a different folder or server after it’s been
imported. You can’t know whether a missing file is up to date until its original is located. If you print or export a
document when this icon is displayed, the file may not print or export at full resolution.
Page 58

Working with InCopy documents
Updated 29 April 2009
USING INCOPY CS4
Embedded Embedding the contents of a linked file suspends management operations for that link. If the selected link
is currently in an “edit in place” operation, this option is not enabled. Unembedding the file restores management
operations to the link.
If a linked object does not appear on a specific document page, the following codes indicate where the object appears:
PB (pasteboard), MP (master page), OV (overset text), and HT (hidden text).
For a video tutorial on using the Links panel, see www.adobe.com/go/lrvid4027_id.
See also
“Adobe Version Cue” on page 38
Links panel video
Use the Links panel
• To display the Links panel, choose Window > Links. Each linked file and automatically embedded file is identified
by name.
• To select and view a linked graphic, select a link in the Links panel and then click the Go To Link button ,
click the page number of the link in the Page column, or choose Go To Link in the Links panel menu. InCopy
centers the display around the selected graphic. To view a hidden object, you show the layer (or condition if it’s an
anchored object).
• To expand or collapse nested links, click the triangle icon to the left of the link. Nested links occur when the same
graphic appears several times in the document or when the linked EPS graphic or InCopy document contains links.
• To sort links in the panel, click the category title at the top of the Links panel to sort by that category. Click the same
category again to reverse the order. For example, if you click the Page category, the links appear in their order from
the first page to the last page. If you click Page again, the links are sorted from last page to first. Use Panel Options
to add columns to the Links panel.
53
Work with Links panel columns
You can display additional categories, such as Creation Date and Layer, in the Links panel to display more information
about the graphics. For each category, you can determine whether the information appears as a column in the Links
panel and in the Link Info section at the bottom of the Links panel.
1 Choose Panel Options from the Links panel menu.
2 Select the check boxes under Show Column to add columns in the Links panel.
Folder 0 is the folder that contains the linked file; Folder 1 is the folder that contains Folder 0, and so on.
3 Select the check boxes under Show In Link Info to display the information in the Link Info section at the bottom of
the Links panel.
4 Click OK.
You can change the order of columns by selecting a column and dragging it to a different location. Drag the column
boundaries to change the column width. Click a category title to sort the links by that category in ascending order.
Click again to sort in descending order.
Change the Links panel rows and thumbnails
1 Choose Panel Options from the Links panel menu.
2 For Row Size, select Small Rows, Regular Rows, or Large Rows.
Page 59

Working with InCopy documents
Updated 29 April 2009
USING INCOPY CS4
3 For Thumbnails, determine whether thumbnail representations of the graphics appear in the Name column and in
the Link Info section at the bottom of the Links panel.
4 Click OK.
Display link information
The Link Info section of the Links panel lists information about the selected linked file.
To change the information displayed in the Link Info section of the Links panel, choose Panel Options from the Links
panel menu, and select check boxes in the Show In Link Info column.
❖ Double-click a link, or select a link and click the Show/Hide Link Information icon, which is a triangle on the left
side of the panel.
View metadata via the Links panel
If a linked or embedded file contains metadata, you can view the metadata using the Links panel. You cannot edit or
replace metadata associated with a linked file.
❖ Select a file in the Links panel and choose Utilities > XMP File Info from the panel menu.
Update, restore, and replace links
Use the Links panel to check the status of any link, or to replace files with updated or alternate files.
54
When you update or reestablish (relink) a link to a file, any transformations performed in InCopy are preserved (if
you choose Relink Preserved Dimensions in the File Handling preferences). For example, if you import a square
graphic and rotate it 30°, and then you relink it to an unrotated graphic, InCopy rotates it 30° to match the layout of
the graphic it’s replacing.
Note: Placed EPS files may contain OPI links, which appear in the Links panel. Don’t relink OPI links to files other than
those originally intended by the creator of the EPS file; doing so can cause problems with font downloading and color
separations.
Choose how relinked graphics are scaled
When you relink to replace one graphic with a different source file, you can keep the image dimensions of the file that’s
being replaced, or you can display the incoming file in its actual dimensions.
1 Choose Edit > Preferences > File Handling (Windows) or InCopy > Preferences > File Handling (Mac OS).
2 Choose Preserve Image Dimensions When Relinking if you want images to appear at the same size as the images
they’re replacing. Deselect this option to have relinked images appear at their actual size.
Update modified links
InDesign first looks for a missing link in the folder in which another file has been relinked in the current session. Next,
it looks for a link in the same folder where the document is located. If it’s still not found, it looks in the parent folder
of the document.
Modified links are also called “out of date” links.
❖ In the Links panel, do one of the following:
• To update specific links, select one or more links marked with the modified-link icon . Then click the Update
Link button , or choose Update Link from the Links panel menu.
Page 60

Working with InCopy documents
Updated 29 April 2009
USING INCOPY CS4
• To update all modified links, choose Update All Links from the Links panel menu, or Alt-click (Windows) or
Option-click (Mac OS) the Update Link button.
• To update only one link to a graphic that appears in several places in the document, select only the sublink and
choose Update Link. If you select the “parent” link, you can update all links to the modified graphic.
Replace a link with a different source file
1 Select any link in the Links panel, and click the Relink button or choose Relink from the Links panel menu. If
a “parent” link of multiple instances is selected, choose Relink All Instances Of [Filename] from the Links panel
menu.
Relink is disabled in managed stories unless a story is checked out.
2 In the dialog box that appears, select Search For Missing Links In This Folder if you want InCopy to search the
folder for files that have the same names as other missing linked files. If this option is not selected, only the selected
image is relinked.
3 Choose Show Import Options to control how the new source file is imported.
4 Locate and double-click the new source file.
5 Choose import options if you clicked the Show Import options option. (See “Import options for graphics” on
page 48.)
55
Restore missing links
1 To restore a missing link, select any link marked with the missing link icon in the Links panel, and click the
Relink button .
2 In the dialog box that appears, select Search For Missing Links In This Folder to relink any missing file that appears
in the specified folder. Locate and double-click a file.
Find missing links
By default, InCopy checks for missing links and tries to resolve them when you open a document. Two preference
options let InCopy check for and find missing links automatically when you open a document.
Check Links Before Opening Document If you turn off this option, InCopy opens the document immediately, and the
link statuses remain pending until links are determined to be up-to-date, missing, or modified. If you turn on this
option, InCopy checks for modified or missing links.
Find Missing Links Before Opening Document If you turn off this option, InCopy does not attempt to resolve the
missing links. You may want to turn off this option if links slow performance to a server or if unexpected linkings
occur. This option is dimmed if Check Links Before Opening Document is turned off.
Search For Missing Links Use the Search For Missing Links command to search for and resolve missing links in your
document. This command is useful if you turned off the preferences option that checks for missing links when you
open a document, and now you have missing links. This command is also useful if you mount a server where images
are stored after opening a document.
• To change link settings, open the File Handling section of the Preferences dialog box, and determine whether the
Check Links Before Opening Document and Find Missing Links Before Opening Document options are selected.
•
To let InCopy attempt to resolve missing links, choose Utilities > Search For Missing Links from the Links panel menu.
This command is dimmed if the document contains no missing links.
Page 61

Working with InCopy documents
Updated 29 April 2009
USING INCOPY CS4
Specify a default Relink folder
1 In the Preferences dialog box, select File Handling.
2 From the Default Relink Folder menu, choose either of the following options, and then click OK:
Most Recent Relink Folder This option displays the most recently used folder you selected when relinking, matching
InCopy CS3 behavior.
Original Relink Folder This option displays the original location of the linked file, matching the behavior of InCopy
CS2 and earlier.
Copy links to a different folder
Use the Copy Link(s) To command to copy graphics files to a different folder and redirect the links to the copied files.
This command is especially useful for moving files to a different drive, such as moving files from a DVD to a hard drive.
1 Select the links to the files you want to copy, and choose Utilities > Copy Link(s) To from the Links panel menu.
2 Specify the folder where the linked files will be copied and choose Select (Windows) or Choose (Mac OS).
Relink to a different folder
When you use the Relink To Folder command, you can point to a folder that contains files with the same names as
your out-of-date links. For example, if your current links point to low-resolution images, you can specify a different
folder that contains high-resolution images. You can specify a different extension for the files, allowing you to change
links from .jpg to .tiff, for example.
56
The Relink To Folder command is dimmed in a managed InCopy story unless the story is checked out.
1 Select one or more links in the Links panel.
2 Choose Relink To Folder from the Links panel menu.
3 Specify the location of the new folder.
4 To use a different extension, select Match Same Filename But This Extension, and specify the new extension (such
as AI, TIFF, or PSD).
5 Click Select (Windows) or Choose (Mac OS).
Replace an imported file using the Place command
1 Do one of the following:
• To replace the contents of a graphics frame, such as an imported graphic, use the Position tool to select the image.
• To replace the contents of a text frame, use the Type tool to click an insertion point in a text frame, and choose
Edit > Select All.
2 Choose File > Place.
3 Locate and select the new file.
4 Click Open.
Copy the link pathname
You can copy either the full path of the linked image or the platform style path. Copying the full path of the image is
useful for notifying team members where art is located. For example, you can copy the full path and paste it into an
email message. Copying the platform path is useful for scripting or for specifying image fields in a data merge.
1 Select a link in the Links panel.
Page 62

Working with InCopy documents
Updated 29 April 2009
USING INCOPY CS4
2 From the Links panel menu, choose Utilities > Copy Full Path or Copy Platform Style Path.
3 Paste the path.
Edit original artwork
The Edit Original command lets you open most graphics in the application in which you created them so that you can
modify them as necessary. Once you save the original file, the document in which you linked it is updated with the new
version.
Note: In InDesign, if you check out and select a managed graphics frame (one that has been exported to InCopy), rather
than the graphic itself, the graphic opens in InCopy.
Edit original artwork using the default application
By default, InCopy relies on the operating system to determine which application is used when opening the original.
If you edit artwork using a different application, InCopy uses the most recently used application.
1 Do any of the following:
• In the Links panel, select the link and click the Edit Original button . Alternatively, choose Edit Original from
the panel menu.
• Select the linked artwork on the page, and choose Edit > Edit Original.
2 After making changes in the original application, save the file.
57
Edit original artwork using a different application
1 Select the image.
2 Choose Edit > Edit With, and then specify the application you want to use to open the file. If the application does
not appear, choose Other, and browse to locate the application.
Control layer visibility in imported images
When you import Photoshop PSD files, layered PDFs, and INDD files, you can control the visibility of top-level layers.
Adjusting layer visibility in InCopy lets you vary an illustration depending on context. For example, in a
multilanguage publication, you can create a single illustration that includes one text layer for each language.
You can adjust layer visibility either when you place a file or by using the Object Layer Options dialog box. In addition,
if the Photoshop file contains layer comps, you can display the desired comp.
Set layer visibility
1 Choose File > Place and select a graphics file.
2 Select Show Import Options, and then click Open.
3 In the Image Import Options or Place dialog box, click the Layers tab.
4 To view a preview of the image, click Show Preview.
5 (PDFs only) If you’re placing a page from a multipage PDF, click the arrows, or type a page number under the
preview image to preview a specific page.
6 (Photoshop PSD files only) If the image contains layer comps, choose the layer comp you want to display from the
Layer Comp pop-up menu.
Page 63

Working with InCopy documents
Updated 29 April 2009
USING INCOPY CS4
7 Do one of the following:
• To open or close a layer set, click the triangle to the left of the folder icon.
• To hide a layer or layer set, click the eye icon next to the layer or layer set.
• To display the layer or layer set, click the empty eye column next to the layer or layer set.
• To display only the content of a particular layer or layer set, Alt-click (Windows) or Option-click (Mac OS) its eye
icon. Alt-click or Option-click the eye icon again to restore the original visibility settings of the other layers.
• To change the visibility of multiple items, drag through the eye column.
8 Set the When Updating Link option as desired:
Use Photoshop’s/PDF’s Layer Visibility Matches the layer visibility settings to those of the linked file when you update
the link.
Keep Layer Visibility Overrides Maintains the layer visibility settings as specified in the InCopy document.
9 Click OK.
Set layer visibility for placed AI, PSD, PDF, and INDD files
After you place a Photoshop PSD or layered PDF, an Illustrator AI file, or an InDesign INDD file, you can control the
visibility of its layers by using the Object Layer Options dialog box. If the Photoshop PSD file contains layer comps,
you can choose which comp you want to display. In addition, you can choose whether to maintain the visibility settings
or match the settings of the original file each time you update the link.
58
1 Select the file in the InCopy document.
2 Choose Object > Object Layer Options.
3 To view a preview of the image, select Preview.
4 (Photoshop PSD files only) If the image contains layer comps, choose the layer comp you want to display from the
Layer Comp pop-up menu.
5 Do one of the following:
• To open or close a layer set, click the triangle to the left of the folder icon.
• To hide a layer or layer set, click the eye icon next to the layer or layer set.
• To display the layer or layer set, click the empty eye column next to the layer or layer set.
• To display only the content of a particular layer or layer set, Alt-click (Windows) or Option-click (Mac OS) its eye
icon. Alt-click or Option-click the eye icon again to restore the original visibility settings of the other layers.
• To change the visibility of multiple items, drag through the eye column.
6 Set the Updating Link Options as desired:
Use Layer Visibility Matches the layer visibility settings to those of the linked file when you update the link.
Keep Layer Visibility Overrides Maintains the layer visibility settings as specified in the InCopy document.
7 Click OK.
Importing InDesign (.indd) pages
Using the Place command, you can import pages from one InDesign document into another. You can import a page,
a page range, or all of the pages in the document. The pages are imported as objects (much the same way that PDFs are
imported).
Page 64

Working with InCopy documents
Updated 29 April 2009
USING INCOPY CS4
Add pages in your document to hold the pages you want to import. After you choose File > Place and select an INDD
file, you can choose Show Import Options and then choose which pages to import, which layers to make visible, and
how to crop the imported pages. You can scroll in the Preview window to examine the thumbnail pages closely. The
page or pages you select are loaded in the graphics icon. If you place multiple pages, InCopy loads the graphics icon
with the following page so you can import pages one after the other.
Note: The Links panel lists the names of each page you imported. If a page you imported contains a graphic or other item
that was imported into it, this item is listed as well in the Links panel. The names of these secondary imported items are
listed under a disclosure triangle in the Links panel to distinguish them from imported pages.
See also
“Control layer visibility in imported images” on page 57
Transforming graphics
Position tool overview
Click the Position tool in the toolbox to manipulate selected graphics, either directly, in conjunction with a
Transform command (Object > Transform) or a command on a context menu, or by using keyboard shortcuts to
nudge the graphic within its frame.
59
The Position tool is dynamic, automatically changing to reflect different states:
• When placed directly over an empty graphics frame or frame with unassigned content after using the File > Place
command, it changes to the loaded graphics icon to indicate that you can import the graphic into that frame.
• When it’s placed directly over a graphic, it changes to the Hand tool to indicate that you can select the graphic and
manipulate it within the frame.
• When placed over the bounding box handle of an inline graphic, it changes to the resize arrow to indicate that
dragging will resize the graphic.
• When placed over a graphics frame or the top-level container of nested frames, it changes to the object select
icon to indicate that you can select the graphic or nested frame under the pointer. You cannot select the frame
itself.
• When placed over a text frame, it changes to the I-beam to indicate a text insertion point.
Set Position tool options
When using the Position tool to move a graphic, you can hold down the mouse button for a few seconds to display a
dynamic graphics preview (a ghosted-back image) of any part of the image that is outside the frame. You can control
the display and delay of the preview.
1 Double-click the Position tool in the toolbox.
2 From the Show Masked Portion of Image menu, select the rate at which the entire image will appear while dragging,
or select to turn it off entirely.
Transform graphics
You can use commands to move, scale, rotate, and shear graphics.
Page 65

Working with InCopy documents
Updated 29 April 2009
USING INCOPY CS4
Move a graphic
1 Make sure the frame with the desired object is checked out to you, and then select the object using the Position
tool .
2 Choose Object > Transform > Move.
3 In the Move dialog box, do one of the following:
• Enter the horizontal and vertical distances that you want the graphic to move. Positive values move the object down
and to the right of the x axis; negative values move the object up and to the left.
• To move an object a precise distance and angle, enter the distance and angle for the move. The angle you enter is
calculated in degrees from the x axis. Positive angles specify a counterclockwise move; negative angles specify a
clockwise move. You can also enter values between 180° and 360°; these values are converted to their corresponding
negative values (for example, a value of 270° is converted to –90°).
4 Do one of the following:
• To preview the effect before you apply it, select Preview.
• To move the object, click OK.
Scale a graphic
1 Make sure the frame with the desired object is checked out to you, and then select the object using the Position
tool .
2 Choose Object > Transform > Scale.
3 In the Scale dialog box, make sure the Constrain Proportions icon is selected if you want to preserve the relative
height and width of the object. Deselect this icon if you want to scale the X and Y values separately, which may result
in the image being skewed.
4 Enter the horizontal and vertical scale values as either percentages (such as 90%) or distance values (such as 6p).
The scale values can be negative numbers.
60
5 Do one of the following:
• To preview the effect before you apply it, select Preview.
• To scale the object, click OK.
To scale the graphic in a specific direction, use the Position tool to drag the handle of a selected graphic. Pressing Shift
forces proportional scaling.
Rotate a graphic
1 Make sure the frame with the desired object is checked out to you, and then select the object using the Position
tool .
2 Choose Object > Transform > Rotate.
3 Enter the rotation angle, in degrees, in the Angle text box. Enter a negative angle to rotate the object clockwise; enter
a positive angle to rotate the object counterclockwise.
4 Do one of the following:
• To preview the effect before you apply it, select Preview.
• To rotate the object, click OK.
Page 66

Working with InCopy documents
Updated 29 April 2009
USING INCOPY CS4
Shear a graphic
1 Make sure the frame with the desired object is checked out to you, and then select the object using the Position
tool .
2 Choose Object > Transform > Shear.
3 In the Shear dialog box, enter the new shear angle.
The shear angle is the amount of slant to be applied to the object, relative to a line perpendicular to the shear axis.
(Shear angle is calculated clockwise from the current axis.)
4 Specify the axis along which the object is to be sheared. You can shear an object along a horizontal, a vertical, or an
angled axis.
If you choose an angled axis, enter the angle of the axis that you want, in degrees, relative to the perpendicular axis.
5 Do one of the following:
• To preview the effect before you apply it, select Preview.
• To shear the object, click OK.
Clear transformations to a graphic
1 Make sure the frame with the desired object is checked out to you, and then select the object using the Position
tool .
2 Choose Object > Transform > Clear Transformations.
61
Controlling graphics display
Control graphics’ display performance
You can control the resolution of graphics placed in your document. You can change the display settings for the entire
document or for individual graphics. You can also change a setting that either allows or overrides the display settings
for individual documents.
See also
“Customize the display performance options” on page 63
Change a document’s display performance
A document always opens using the default Display Performance preferences. You can change the display
performance of a document while it is open, but the setting won’t be saved with the document.
If you’ve set the display performance of any images separately, you can override the settings so all objects use the same
settings.
1 Choose View > Layout View.
2 Choose View > Display Performance, and select an option from the submenu.
3 To force objects that you have set individually to display using the document setting, deselect View > Display
Performance > Allow Object-Level Display Settings. (A check mark indicates it is selected.)
Page 67

Working with InCopy documents
Updated 29 April 2009
USING INCOPY CS4
Change an object’s display performance
1 Choose View > Layout View.
2 To preserve the display performance for individual objects when the document is closed and reopened, make sure
Preserve Object-Level Display Settings is selected in Display Performance preferences.
3 Choose View > Display Performance, and make sure Allow Object-Level Display Settings is selected.
4 Select an imported graphic using the Position tool .
5 Do one of the following:
• Select Object > Display Performance, and choose a display setting.
• Right-click (Windows) or Control-click (Mac OS) the image, and choose a display setting from the Display
Performance submenu.
To remove an object’s local display setting, choose Use View Setting in the Display Performance submenu. To remove
local display settings for all graphics in the document, select Clear Object-Level Display Settings in the View > Display
Performance submenu.
Display performance options
These options control how graphics are displayed on the screen, but they do not affect the print quality or exported
output.
62
Use Display Performance preferences to set the default option used to open all documents, and customize the settings
that define those options. Each display option has separate settings for displaying raster images, vector graphics, and
transparencies.
Fast Draws a raster image or vector graphic as a gray box (default). Use this option when you want to quickly page
through spreads that have lots of images or transparency effects.
Typical Draws a low-resolution proxy image (default) appropriate for identifying and positioning an image or vector
graphic. Typical is the default option, and is the fastest way to display an identifiable image.
High Quality Draws a raster image or vector graphic at High Resolution (default). This option provides the highest
quality but the slowest performance. Use this option when you want to fine-tune an image.
Note: Image display options don’t affect output resolution when exporting or printing images within a document. When
printing to a PostScript device, exporting to XHTML, or exporting to EPS or PDF, the final image resolution depends on
the output options you choose when you print or export the file.
Set default display performance
The Display Performance preferences let you set the default display option, which InCopy uses for every document.
You can change a document’s display performance using the View menu, or change the setting for individual objects
using the Object menu. For example, if you work on projects that contain numerous high-resolution photos (such as
a catalog), you may prefer to have all your documents open quickly. You can set the default display option to Fast.
When you want to see the images in more detail, you can switch the document view to Typical or High Quality (leaving
the preference set to Fast).
You can also choose to view or override display settings applied to individual objects. If Preserve Object-Level Display
Settings is selected, any settings applied to objects are saved with the document.
1 Select Edit > Preferences > Display Performance (Windows) or InCopy > Preferences > Display Performance
(Mac OS).
2 For Default View, select Typical, Fast, or High Quality. The display option you choose applies to all documents you
open or create.
Page 68

Working with InCopy documents
Updated 29 April 2009
USING INCOPY CS4
3 Do one of the following:
• To save display settings applied to individual objects, select Preserve Object-Level Display Settings.
• To display all graphics using the default display option, deselect Preserve Object-Level Display Settings.
4 For Adjust View Settings, choose the display option you want to customize, and then move the slider for Raster
Images or Vector Graphics to the desired setting.
5 Click OK.
Each display option has separate settings for raster (bitmap) images, vector graphics, and transparency effects.
Customize the display performance options
You can customize the definitions of each display performance option (Fast, Typical, and High Quality). Each display
option has separate settings for raster (bitmap) images, vector graphics, and transparency effects.
Managed (linked) InCopy stories include low-resolution proxy data for images so that the full-resolution image
doesn’t have to be downloaded from the server whenever the file is checked out.
1 Select Edit > Preferences > Display Performance (Windows) or InCopy > Preferences > Display Performance
(Mac OS).
2 For Adjust View Settings, choose the display option you want to customize.
3 For each display option, move the slider for Raster Images or Vector Graphics to the desired setting:
Gray Out Draws an image as a gray box.
63
Proxy Draws images at proxy resolution (72 dpi).
High Resolution Draws images at the maximum resolution supported by the monitor and current view settings.
4 For each display option, move the slider for Transparency to the desired setting:
Off Displays no transparency effects.
Low Quality Displays basic transparency (opacity and blend modes), and transparency effects (drop shadow and
feather) are shown in a low-resolution approximation.
Note: In this mode, page contents are not isolated from the background; therefore, objects with blend modes other than
Normal might appear different in other applications and final output.
Medium Quality Displays low-resolution drop shadows and feathers. This mode is recommended for most work
unless the document is particularly transparency-heavy, or has many transparency effects.
High Quality Displays higher-resolution (144 dpi) drop shadows and feathers, CMYK mattes, and spread isolation.
Note: When a document’s blending space is CMYK and you have either enabled the overprint preview mode or soft
proofing, opacity matting is done in CMYK rather than RGB. This means that partially transparent CMYK colors display
as tinted CMYK colors.
5 To view anti-aliasing for text, stroke, fill, and other page items, choose Enable Anti-aliasing. If text is converted to
outlines, then the resulting outlines can be anti-aliased (Mac OS only).
6 To set the point size below which text displays as a dimmed bar, type a value for Greek Type Below.
7 Click OK.
To reset all controls back to the original default settings, click Use Defaults.
Page 69

Working with InCopy documents
Updated 29 April 2009
USING INCOPY CS4
Including metadata in a story
Work with metadata
Metadata is a set of standardized information about a file, such as author name, resolution, color space, copyright, and
keywords applied to it. You can use metadata to streamline your workflow and organize your files.
About the XMP standard
Metadata information is stored using the Extensible Metadata Platform (XMP) standard, on which Adobe Bridge ,
Adobe Illustrator, Adobe InDesign, and Adobe Photoshop are built. XMP is built on XML, and in most cases the
metadata is stored in the file. If it isn’t possible to store the information in the file, metadata is stored in a separate file
called a sidecar file. XMP facilitates the exchange of metadata between Adobe applications and across publishing
workflows. For example, you can save metadata from one file as a template, and then import the metadata into other
files.
Metadata that is stored in other formats, such as Exif, IPTC (IIM), GPS, and TIFF, is synchronized and described with
XMP so that it can be more easily viewed and managed. Other applications and features (for example, Adobe Version
Cue) also use XMP to communicate and store information such as version comments, which you can search using
Adobe Bridge.
64
In most cases the metadata remains with the file even when the file format changes, for example, from PSD to JPG.
Metadata is also retained when files are placed in an Adobe document or project.
You can use the XMP Software Development Kit to customize the creation, processing, and interchange of metadata.
For example, you can use the XMP SDK to add fields to the File Info dialog box. For more information on XMP and
the XMP SDK, visit the Adobe website.
Working with metadata in Adobe Bridge and Adobe Creative Suite components
Many of the powerful Adobe Bridge features that allow you to organize, search, and keep track of your files and
versions depend on XMP metadata in your files. Adobe Bridge
the Metadata panel and through the File Info dialog box (InDesign) or the Content File Info dialog box (InCopy).
In some cases, multiple views exist for the same metadata property. For example, a property may be labeled Author in
one view and Creator in another, but both refer to the same underlying property. Even if you customize these views
for specific workflows, they remain standardized through XMP.
provides two ways of working with metadata: through
Add metadata using the File Info dialog box
The File Info dialog box displays camera data, file properties, an edit history, copyright, and author information of the
current document. The File Info dialog box also displays custom metadata panels. You can add metadata directly in
the File Information dialog box. Any information you enter in a field overrides existing metadata and applies the new
value to all selected files.
1 Choose File > File Info (InDesign) or File > Content File Info (InCopy).
2 Select any of the following from the tabs at the top of the dialog box:
Use the Right and Left arrows to scroll the tabs, or click the down-pointing arrow and choose a category from the list.
Description Lets you enter document information about the file, such as document title, author, description, and
keywords that can be used to search for the document. To specify copyright information, select Copyrighted from the
Copyright Status pop-up menu. Then enter the copyright owner, notice text, and the URL of the person or company
holding the copyright.
Page 70

Working with InCopy documents
Updated 29 April 2009
USING INCOPY CS4
IPTC Includes four areas: IPTC Content describes the visual content of the image. IPTC Contact lists the contact
information for the photographer. IPTC Image lists descriptive information for the image. IPTC Status lists workflow
and copyright information.
Camera Data Includes two areas: Camera Data 1 displays read-only information about the camera and settings used
to take the photo, such as make, model, shutter speed, and f-stop. Camera Data 2 lists read-only file information about
the photo, including pixel dimensions and resolution
Video Data Lists information about the video file, including video frame width and height, and lets you enter
information such as tape name and scene name.
Audio Data Lets you enter information about the audio file, including the title, artist, bit rate, and loop settings.
Mobile SWF Lists information about mobile media files, including title, author, description, and content type.
Categories Lets you enter information based on Associated Press categories.
Origin Lets you enter file information that is useful for news outlets, including when and where the file was created,
transmission information, special instructions, and headline information.
DICOM Lists patient, study, series, and equipment information for DICOM images.
History Displays Adobe Photoshop history log information for images saved with Photoshop. The History tab appears
only if Adobe Photoshop is installed.
65
Illustrator Lets you apply a document profile for print, web, or mobile output.
Advanced Displays fields and structures for storing metadata by using namespaces and properties, such as file format
and XMP, Exif, and PDF properties.
Raw Data Displays XMP text information about the file.
3 Type the information to add in any displayed field.
4 Click OK to apply the changes.
Export metadata as an XMP file
You can save metadata in an XMP file to share with other users. These XMP files can be used as templates for
populating InCopy documents and other documents created with XMP-enabled applications. Templates you export
are stored in a shared location that all XMP-enabled applications can access. They also appear in the pop-up menu at
the bottom of the File Info dialog box.
1 Choose File > File Info (InDesign) or File > Content File Info (InCopy).
2 Choose Export from the pop-up menu at the bottom of the dialog box.
3 Type a filename, choose a location for the file, and click Save.
To view metadata templates in Explorer (Windows) or the Finder (Mac OS), click the pop-up menu at the bottom of
the File Info dialog box and choose Show Templates Folder.
Import metadata from an XMP file
When you import metadata into a document from an exported XMP template file, you can specify whether to clear all
metadata in the current document and add the new metadata, keep all but the matching metadata, or add matching
metadata to the existing metadata.
❖ Choose File > File Info (InDesign) or File > Content File Info (InCopy).
• Choose an XMP file from the pop-up menu at the bottom of the dialog box, select an import option, and click OK.
Page 71

Working with InCopy documents
Updated 29 April 2009
USING INCOPY CS4
• Choose Import from the pop-up menu at the bottom of the dialog box, select an import option, and click OK. Then
double-click the XMP template file you want to import.
66
Page 72

Chapter 4: Sharing content between
Updated 29 April 2009
InCopy and InDesign
Adobe InCopy is a professional writing and editing program that integrates tightly with Adobe InDesign. Large-tomedium publishers can acquire powerful editorial solutions based on InCopy and InDesign from systems integrators
and third-party developers. Smaller publishing groups can set up an affordable, flexible editorial workflow system
using a version of InCopy available directly from Adobe.
Understanding a basic managed-file workflow
Sharing content
The Adobe InCopy LiveEdit Workflow plug-ins let writers and editors develop copy in InCopy at the same time as
designers prepare layouts in Adobe InDesign. This workflow includes container files, called assignments, for grouping
related pieces of content, and file-locking and notification tools for sharing and updating files in InCopy or InDesign
over a shared network or in compressed packages that can be distributed via e-mail.
66
In the shared network workflow, InDesign users export text and graphics to a shared location on a file system, where
the files become available to InCopy users who will write and edit the content. Selected text frames and graphics frames
are either exported to the assignment or exported as separate InCopy files, where they become part of the managed
process and are linked to the InDesign document. These shared files are referred to as managed files. When users work
in the assignment file or in the InDesign file on a local server, changes to the associated layout or content are
communicated to all users involved in the workflow for that document.
Multiple InCopy or InDesign users can open the same content file simultaneously, and multiple InCopy users can
open the same assignment file simultaneously. However, only one user at a time can check out the InCopy file for
editing. Others can view the file on a read-only basis. The user who checks out a managed InCopy file can share his or
her work with other users by saving the file to the shared server or by returning the file to the InDesign user; however,
other users can’t make changes to the file until it’s checked back in. This system allows multiple users to access the
same file but prevents users from overwriting each other’s work.
For more information, see the InCopy LiveEdit Workflow guide (PDF) at www.adobe.com/go/learn_liveedit.
See also
“Managed files” on page 69
Ways to work with content in InCopy
Content is either a body of text that flows through one or more frames, or an imported graphic. There are five basic
ways to work on content in InCopy: open an assignment file, open an assignment package, open a linked InCopy file,
open an InDesign file that has linked InCopy files, or compose content entirely in InCopy.
Page 73
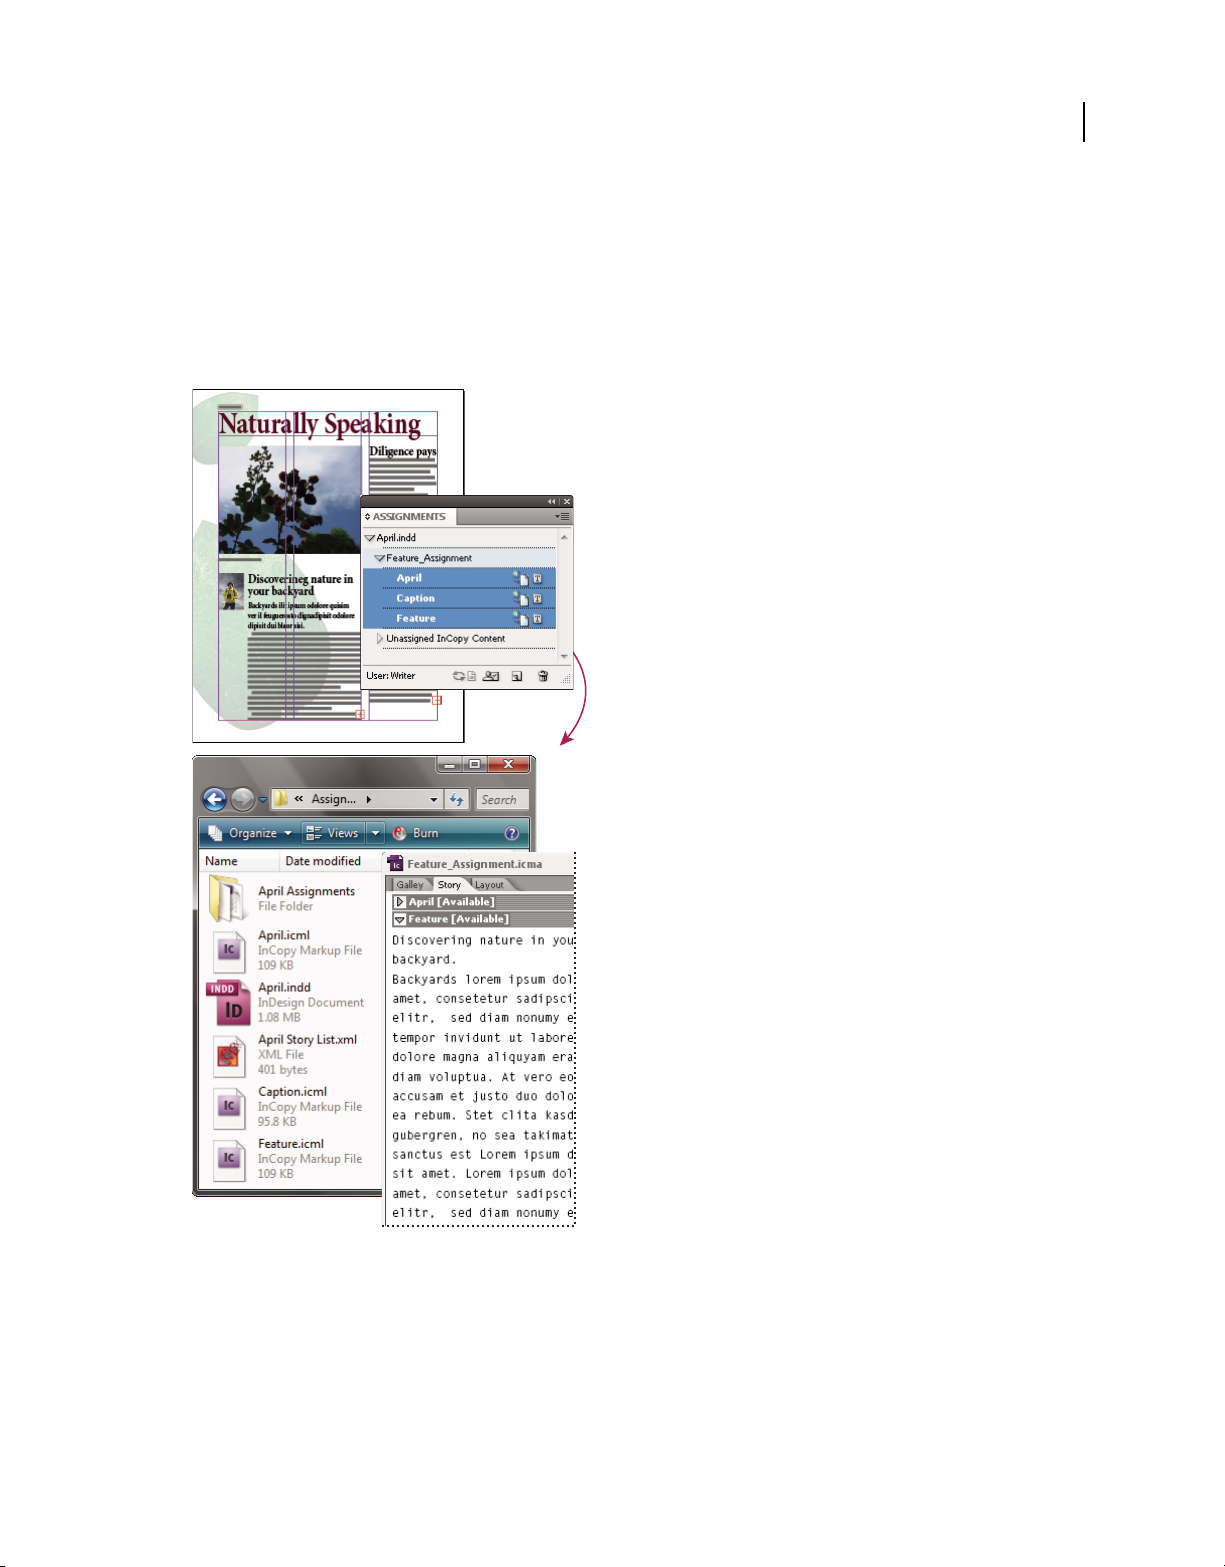
Sharing content between InCopy and InDesign
Updated 29 April 2009
USING INCOPY CS4
Open assignment files created in InDesign
InDesign users can create an assignment file and designate content for sharing. This method lets the InDesign user
associate related components (heading, body, graphics, captions, and so on), and then assign them to different InCopy
users for writing and editing. InCopy users open the assignment file and work on only the components assigned to
them. The live layout view shows how their edited copy relates to the InDesign layout, without opening the entire
InDesign document. However, if the layout changes, the InDesign user must update assignments to notify InCopy
users about the changes. You can share assignment files on a server or through assignment packages.
67
InDesign document (.indd) with assignment file (.icml) composed of three linked content files (.incx). Assignment and its components are listed
in Assignments panel and are opened in InCopy.
Open assignment packages
The assignment packages workflow is especially useful when designers and writers are working on the same project
but don’t have access to a local server. In such cases, the InDesign user can create one or more packages and send the
compressed files to the assigned InCopy users via e-mail. InCopy users can open the assignment packages, edit the
contents, and return the packages to the InDesign user, who can then update the document.
Page 74

Sharing content between InCopy and InDesign
Updated 29 April 2009
USING INCOPY CS4
Open linked InCopy files exported from InDesign
In certain workflows, InDesign users might export text and graphics as separate files, rather than wrapping them inside
an assignment file. Exporting separate files is useful if you work on unrelated graphics or bodies of text. However,
InCopy users aren’t able to see how the content fits within the InDesign layout.
68
InDesign document (.indd) with three linked but unassigned content files (.icml) opened in InCopy
Open InDesign documents that have linked InCopy files
To see all page items in the context of an entire layout, InCopy users can open and edit an InDesign document in
InCopy. This approach can be useful for editing and copyfitting if seeing the overall layout is important, or for editing
most of the stories in a document rather than a few. After the InCopy user edits the stories, the InDesign user can then
update the links to the modified files. If the InDesign user changes the layout, the InCopy user is notified when the
InDesign document is saved.
Compose content entirely in InCopy
You can create content in InCopy that isn’t associated with an InDesign file. In these stand-alone documents, you can
type text, assign fonts and styles, and import graphics from other applications (such as Adobe Illustrator and Adobe
Photoshop) to enhance the text. You can also assign tags for future XML use. This approach is a good option in an
editorial workflow where the content precedes the design. You can also set up and modify the text area, page size, and
orientation for stand-alone InCopy documents. But if the story is later linked to an InDesign document, the InDesign
settings override the settings used in InCopy.
Page 75

Sharing content between InCopy and InDesign
Updated 29 April 2009
USING INCOPY CS4
See also
“Work with stand-alone documents” on page 34
Managed files
For a file to be managed, it must be added to an assignment file, exported from InDesign as InCopy content, or placed
as InCopy content into InDesign. Managed files communicate both content status and ownership. With managed files,
you can:
• Lock and unlock stories to help preserve file integrity.
• Notify InCopy users when the associated InDesign layout is outdated.
• Identify the user working on a file.
• Notify users when an InCopy content file is outdated, being used by someone, or available for editing. Notification
methods include alert messages, frame icons, status icons in the Links panel, and status icons in the Assignments
panel.
Read-only files
Once a content file becomes managed, it’s read-only to all users in the workflow at all times, except to the person who
has checked it out. The software creates a lock file (*.idlk) when a user checks out a content file, giving that user
exclusive editing control. Read-only files have the following characteristics:
69
• An InCopy user cannot manually format the text in it. However, if text has been assigned character or paragraph
styles, an InDesign user can change the definition of those styles, thereby changing the formatting of the text even
when the file is checked out to someone else. These style definition changes are reflected in the text once the
InDesign user updates the file.
• In general, neither an InCopy nor InDesign user can change objects, such as text and applied styles, in locked
InCopy content. Some objects, such as character and paragraph styles, are only used by the content. For example,
you can’t change how a character style is applied to objects in locked content, but you can change the character style
itself, thereby changing the appearance of the text.
• An InDesign user can change the margins and columns of the text content as well as the shape, location, and
number of text frames the story occupies.
• An InDesign user can change the geometry and formatting of a graphics frame without checking out the graphic.
An InCopy user cannot change a graphics frame or any formatting on the frame. However, both InDesign and
InCopy users have to check out the graphics frame in order to modify the graphic itself (for example, to rotate or
scale it).
Best practices for working with managed files
Use the following practices to make sure that you work with the most up-to-date content and don’t overwrite someone
else’s work:
• Store assignment files on a server where all team members have access. If team members don’t have access to a
server, you can create and distribute assignment packages.
• When you create an assignment, a special folder is created to hold the assignment file and the content. Use these
assignment folders to maintain assignment and content files. They simplify managing the shared files across a
workgroup and help ensure that users open the correct files.
Page 76

Sharing content between InCopy and InDesign
Updated 29 April 2009
USING INCOPY CS4
• In InCopy, open the assignment file instead of an individual InCopy story. That way, you can see the copyfit and
layout information in Galley and Layout views. If you export content without using assignment files, you can see
copyfit and layout information only by opening the InDesign file.
• As soon as you open an assignment file, open an InDesign document, or check out content in either InDesign or
InCopy; make sure that frame edges are showing (View > Show Frame Edges) so that you can see the frame icons
when they appear.
• In InDesign, if you must remove files from the workflow (because of a production deadline, for example), you can
unlink them or cancel an assignment package.
See also
“Unlink content files (InDesign)” on page 88
Managed-file workflow examples
When you establish workflow management between InCopy and InDesign, writers and editors can compose, rewrite,
expand, and edit documents at the same time that designers prepare the layout. Common workflows include managing
files on a local server, sharing files via e-mail packages, or using some combination of the two methods.
These workflows assume that you have a basic InDesign template with layout geometries, styles, and placeholder text.
Layout geometries include page dimensions as well as text and graphics frames. InCopy uses these items to show
proper copyfit information.
70
Local server workflow
1. In InDesign, create assignments and add content to them.
This step incorporates exported text and graphics frames into the managed process, where they become available to
InCopy users for writing and editing.
2. Make the assignment files available to InCopy users.
Save the files to a server that all workflow users have access to.
3. In InCopy, open the assignment file, and check out and edit a story or graphic.
In InCopy, the files containing content assigned to you appear in the Assignments panel. Whenever you save the file
on a local server, the changes are saved on the file system and anyone working on that document (the InDesign layout
or another managed content file in the document) receives notification of the changes. Those users can update the
content to view the latest changes. The content remains checked out to you until you check it in.
4. In InDesign, work on the layout.
Regardless of whether the content files are being edited in InCopy, InDesign users can work on the document layout;
they don’t have to check out the document. Whenever the InCopy user saves the checked-out content, the InDesign
user can update that content within the layout to see the latest revisions.
5. In InCopy, continue working.
When finished with your edits, check in the content. Other users are then able to check out the content and work on it.
If a user is modifying the layout in InDesign simultaneously, you can update and view the layout geometry as you work.
Page 77

Sharing content between InCopy and InDesign
Updated 29 April 2009
USING INCOPY CS4
6. In InDesign, make sure that all the content is checked in.
The managed workflow makes it possible to know who has checked out files. After content files are checked in,
InDesign users can check out the files to finalize the layout as necessary.
E-mail package workflow
1. In InDesign, create and send assignment packages.
Create assignment packages and assign contents to the appropriate InCopy users, and then send the packages to the
InCopy users. The packaged files are automatically checked out to help avoid editing conflicts.
2. In InCopy, open the assignment package, and check out and edit a story or graphic.
If you receive an assignment package in e-mail, double-click the package to open it in InCopy. Changes you make to
the file are saved only locally. Other users are not notified when you make changes.
3. In InDesign, work on the layout.
Regardless of whether the content files are packaged, InDesign users can work on the document layout; they don’t have
to check out the document. If you need to update the layout or assignments, you can send an updated package to the
InCopy users.
71
4. In InCopy, return the edited package.
When finished with your edits, check in the content and return the modified package. Other users are then able to
check out the content, view the latest revisions, and work on the file.
5. In InDesign, make sure that all the content is checked in.
The managed workflow makes it possible to know who has checked out files. After assignment packages are returned,
stories in assignment packages are checked in. InDesign users can check out the files to finalize the layout as necessary.
Enter user identification
All users in the workflow must have a user name. This identification reveals who has checked out a particular file and
makes this information available to other users. It’s also required in order to check out a file for editing.
If you’ve already specified a user name and want to change it, you must check in any content you have checked out.
Otherwise, changing user identification during an editing session would forfeit your ability to edit content that you
have checked out—it would be checked out to you under a different name.
User identification is application-specific; no single user can have multiple user identifications per application.
Note: The InCopy Notes and Track Changes features also use the specified name to identify the author of a note or a
tracked change.
1 Do either of the following:
• Choose File > User.
• Choose User from the Assignments panel menu (Window > Assignments).
2 Type a unique name and click OK.
If you forget to specify a user name using this method, you’re prompted to enter one when you attempt your first
workflow action.
Page 78

Sharing content between InCopy and InDesign
Updated 29 April 2009
USING INCOPY CS4
Note: The Color pop-up menu in this dialog box is for identifying editorial notes and tracked changes. You can choose
the color now if you want, but it doesn’t affect anything you do in a managed workflow.
See also
“Track changes” on page 130
“About editorial notes” on page 134
Workflow icons
Icons can appear on text and graphics frames, the Assignments panel, and in the story bar (InCopy only). Edit status
icons appear next to the managed file in the Links panel and Assignments panel, and communicate content status.
Icons appear on frames that contain a linked InCopy story (in the Layout view in both InDesign and InCopy). These
icons also communicate content status and can be used to differentiate between managed and unmanaged content.
The associated tool tip indicates editing status and ownership. To view the frame icons, make sure that frame edges
are showing in InDesign and InCopy (View > Show Frame Edges).
Note: (InDesign) The InDesign document window must be in Normal Mode for the frame edges to show. (Click the
Normal Mode button at the lower left of the toolbox.)
Icon Name Location
72
Available Assignments panel (InDesign and InCopy), text frames, and graphics frames
In Use By [name] Assignments panel, text frames, and graphics frames
Editing Assignments panel, text frames, and graphics frames
Available And Out Of Date Text and graphics frames
In Use By [name] And Out Of Date Text and graphics frames
Editing And Out Of Date Text and graphics frames
Out Of Date Assignments panel
Text Content Out Of Date Assignments panel and text frames
Text Content Up To Date Assignments panel and text frames
Graphics Content Out Of Date Assignments panel and graphics frames
Graphics Content Up To Date Assignments panel and graphics frames
Packaged Content Assignments panel
Note: The Out Of Date icon on the Available, In Use, Editing, Text Content, and Graphics Content icons indicates that
the content is out of date; that is, the version on the file system is newer than the version displayed on your computer.
Page 79

Sharing content between InCopy and InDesign
Updated 29 April 2009
USING INCOPY CS4
Sharing content
Exporting content from InDesign
Exporting content from InDesign to InCopy establishes a link between the two applications. You export InDesign text
frames, graphics frames, and their contents to InCopy using either of two methods:
• Create a container file (*.icma)—called an assignment—and add related groupings of document items (such as the
text and graphics of a story) to the assignment so they can be worked on together. (Assignments compatible with
InDesign CS3 are saved as *.inca files.) Content within assignments is exported as *.icml files. (Content exported
for InCopy CS3 is saved as *.incx files.)
• Export text and graphics frames separately (including placeholder frames) using the Edit > InCopy > Export menu
commands. Exported content is saved as *.icml files. (Content exported for InCopy CS3 is saved as *.incx files.)
After content is exported, small icons appear at the top left of exported frames in InDesign and InCopy, and in the
Assignments panel. A link to the exported file appears in the Links panel. These icons indicate the status of managed
frames and they differentiate managed frames from those that aren’t part of the workflow. All exported content
appears in the Assignments panel. Content exported using the Export menu commands appears in the Unassigned
InCopy Content section of the Assignments panel list. While both methods establish a controlled connection between
InCopy content and an InDesign document, the primary method is to use assignment files.
73
Exporting content makes the content available for users to check out while maintaining a link to the original InDesign
document. (This link is made from within InDesign; you cannot create the link from InCopy.)
Once the content is exported, InCopy users can see (but not change) the page layouts, styles, and so forth as they appear
in the InDesign document.
Note: You can also create text or anchored graphics using InCopy and then place them in InDesign.
See also
“Assignment files” on page 74
“Assignments panel overview” on page 73
“Workflow icons” on page 72
“Placing InCopy files in InDesign documents” on page 88
Assignments panel overview
The primary tool for working with assignments is the Assignments panel (Window > Assignments). The Assignments
panel displays the files exported from the currently active InDesign document, and an icon indicates their status. The
Assignments panel menu also contains commands that control import version and file-management functions
between InCopy and InDesign. When you open an assignment in InCopy, the assignment name and its contents
appear in the Assignments panel. You can double-click text and graphics frames in the Assignments panel to select
them in the document window.
Note: All content exported to InCopy or added to an assignment is also listed in the Links panel. Although you can do
some workflow management tasks, such as checking out and checking in content, the recommended panel for these tasks
is the Assignments panel.
Page 80

Sharing content between InCopy and InDesign
Updated 29 April 2009
USING INCOPY CS4
B
C
D
74
A
H I J K
E
F
G
L
InDesign Assignments panel
A. InCopy content names B. InDesign document name C. Assignment Out Of Date status D. Available And Text Up To Date status E. In Use
And Text Out Of Date status F. Editing And Text Up To Date status G. Unassigned content H. User name I. Update Content button J. Check
Out/Check In Selection button K. New Assignment button L. Delete Selected Assignments/Remove button
B
C
A
GHIJ
D
E
F
G
InCopy Assignments panel
A. InCopy content names B. Assignment Out Of Date status C. Assignment name D. Available And Text Up To Date status E. In Use And
Text Out Of Date status
F. Editing And Text Up To Date status G. User name H. Update Design button I. Update Content button J. Check
Out/Check In Selection button
See also
“Exporting content from InDesign” on page 73
“Assignment files” on page 74
Assignment files
In InDesign, assignment files are containers for organizing collections of page items. For example, you might want to
select all the items in a story (headline, byline, copy, graphics, and captions), and then assign them to one InCopy user.
Adding those items to an assignment provides a convenient way for InCopy users to access only the content for which
they are responsible. Assignment files (*.icma) appear in the file system, in the InCopy story bar, and in status
messages. Only InDesign users can create assignment files; only InCopy users can open them.
When you create an assignment, a folder is created in the same location as the InDesign document by default. This
assignment folder includes the *.icma assignment files and a content subfolder that contains any exported InCopy
story files (in .icml format) that are part of images or other resources. Once the assignment is created, store the project
folder in a location where all users have access to it, or create and distribute an assignment package. If content is
exported before it’s added to an assignment, the files on disk are not moved to the content folder of the assignment file.
Page 81

Sharing content between InCopy and InDesign
Updated 29 April 2009
USING INCOPY CS4
Assignment files include the following:
• Links or pointers to the associated page items, including placeholder frames. These elements let the InCopy user
open a single file in InCopy and have editorial access to multiple page items.
• Any transformations on the graphics included in the assignment, such as moving, scaling, rotating, or shearing.
• Page geometry, so InCopy users can see the layout of the frame and its content that they’re editing without opening
the entire InDesign file.
• Color-coding of assigned frames in the document.
Illustration of page in InCopy showing page geometry and color coding
75
Create assignments and add content (InDesign)
Only InDesign users can create assignments and add content to them. There are several ways to create assignments.
The method you choose usually depends on whether you have content to add at the time you create the assignment.
• Create empty assignment files. From your InDesign document, you can create a series of empty assignments to act
as templates for content to come later.
• Create assignments and add content at the same time.
• Add content to an existing assignment file. You can add linked content—text and graphics that have already been
exported as InCopy content—or you can add selected page items to become linked InCopy content. If one or more
of the selected frames already contain InCopy content files, and none is part of an assignment, you can add them
to a new or existing assignment file.
By default, the assignment folder you create is saved in the same folder as the InDesign document. You can then place
this folder on a server or create and send a package.
Note: If you don’t want InCopy users to place and fit graphics, don’t add graphics frames to an assignment.
See also
“Relink missing assignment files (InDesign)” on page 87
“Best practices for working with managed files” on page 69
Create empty assignment files (InDesign)
1 In InDesign, save the document.
2 In the Assignments panel (Window > Assignments), choose New Assignment from the panel menu.
3 In the New Assignment dialog box, specify assignment file options and click OK.
Page 82

Sharing content between InCopy and InDesign
Updated 29 April 2009
USING INCOPY CS4
Simultaneously create assignments and add content (InDesign)
1 In InDesign, create a document that has one or more text frames, graphics frames, or placeholder items, and then
save the document.
2 Select the text and graphics frames you want to add.
3 Do one of the following:
• From the Assignments panel menu, choose Add To Assignment, and then select New.
• Choose Edit > InCopy > Add [option] To Assignment > New.
4 In the New Assignment dialog box, specify assignment file options and click OK.
The newly created assignment file includes any frames selected in the document window.
Add content to existing assignments (InDesign)
1 Save the InDesign document.
2 Select the text and graphics frames you want to add.
3 Do one of the following:
• From the Assignments panel menu, choose Add To Assignment, and then select the assignment.
• Drag content from the Unassigned InCopy Content section of the Assignments panel into an existing assignment.
• Select page items with the Selection tool and drag them to an existing Assignment in the Assignments panel.
• Choose Edit > InCopy > Add [option] To Assignment, and then select the assignment.
4 Choose Update All Assignments from the Assignments panel menu to make the content files available to InCopy
users.
Note: You can add content only to assignments in the same document. However, you can import the same content into
multiple documents and add it to an assignment in each of those documents.
76
Assignment file options (InDesign)
When you create or modify an assignment file, you can set the following options:
Assignment Name The unique identification of the assignment in the Assignments panel, for example “Ocean article.”
This name must conform to the file naming conventions of the operating system.
Compatibility Choose Optimized For CS4 if the InCopy users in your workgroup are using InCopy CS4. Assignments
are saved as *.icma files. Choose Compatible With CS3 to allow InCopy CS3 users to open the assignment.
Assigned To The unique identification of the user assigned to the files. The user’s name appears in parentheses
following the assignment name in the Assignments panel. Entering a name here is for informational purposes only; it
doesn’t grant special rights or permissions to the user.
Color Displays a list of colors for adding a distinctive highlight to the frames of the current assignment in the
document window, and to the assignment names in the Assignments panel. This color coding differentiates frames
that belong to one assignment from frames that belong to another, and it differentiates from unassigned frames. To
toggle the display of this color coding, choose View > Show/Hide Assigned Frames. In InCopy, the color coding is
visible only in Layout view.
Note: If toggling the display of assigned frames produces unexpected results, those frames might be tagged for XML and
View > Structure > Show Tagged Frames might be enabled. You cannot show assigned frames and tagged frames at the
same time.
Page 83

Sharing content between InCopy and InDesign
Updated 29 April 2009
USING INCOPY CS4
Change Click the Change button to specify the location of the assignments folder. By default, the assignments folder
is created in the same location as the InDesign file.
Placeholder Frames Lets InCopy users see the text and graphics frames in the assignment as well as boxes (or other
shapes) representing all other frames on those InDesign pages. All frames and placeholders accurately reflect the size,
shape, and location of the InDesign originals. Placeholder frames are empty shapes that don’t show any of the content
in the InDesign document. The Placeholder Frames option provides the least amount of fidelity, and therefore
provides the fastest performance. In InCopy, the placeholder frames are visible only in Layout view. InCopy users
cannot check out and edit placeholder frames.
Assigned Spreads Lets InCopy users see all assigned frames, as well as the entire contents of other frames that aren’t
part of the assignment, on the same spread. In InCopy, content in frames outside an assignment isn’t editable and is
visible only in Layout view.
All Spreads Exports all content in the InDesign document to the assignment file. This option provides the maximum
amount of fidelity; it also provides the slowest performance because the assignment file displays the design and layout
of every page, including pages not relevant to the section a user is editing.
Linked Image Files When Packaging Includes a copy of linked images in the assignment package. Selecting this option
gives InCopy users access to images but increases the package’s file size. InCopy users can include images while
returning a package.
77
Export content as separate InCopy files (InDesign)
If your workgroup prefers working with separate files rather than using assignments, you can export InCopy content
without using an assignments file. Compared with creating a single assignment file with references to multiple content
files and layout information, this method creates a separate file (.icml) for each text or graphics frame you specify in
the document. To see the context of the content you are editing, you must also open the associated InDesign document
(.indd).
Cater the InDesign document to suit your workflow needs. For example, if you want all of the editor’s comments to be
exported in a single file, create a layer for the editor to make comments. You can then export all the content on the
selected layer.
Note: A quick way to export content as separate InCopy files is to use the Selection tool to drag selected frames into the
Unassigned InCopy Content in the Assignments panel.
1 In InDesign, create a document with one or more text frames, graphics frames, or placeholder items.
2 Do either of the following:
• Select the text or graphics frame of a single story, or Shift-click to select multiple frames.
• Click an insertion point in a story, or select some text in a text frame.
3 Choose Edit > InCopy > Export, and then choose one of the following options:
Selection Exports all selected text and graphics frames.
Layer Exports all content on the selected layer.
All Stories Exports every story that has not been exported already.
All Graphics Exports every graphic that has not been exported already.
All Graphics And Stories Exports every story and graphic that has not been exported already.
If you export all content in the document, and then add more text or graphics frames to the same document, you can
save time exporting the new ones by using the Export > All Stories (or All Graphics or All Graphics And Stories)
command again. InDesign exports only the new content.
Page 84

Sharing content between InCopy and InDesign
Updated 29 April 2009
USING INCOPY CS4
4 (Optional) In the Export InCopy Content dialog box, choose InCopy CS3 Interchange from the Save As Type
(Windows) or Format (Mac OS) menu to make the exported file compatible with InCopy CS3. This saves the
content as an .incx file rather than an .icml file.
5 Enter a name and location for the files, and then click Save.
The file name you specify is used as a prefix for identifying each exported content file in the file system. If you export
multiple text frames, the first several characters of the text are automatically appended to the file name; for example,
“mystory-Upcoming cycling events.icml.” For multiple graphics frames, the file names are formed as “mystorygraphic,” “mystory-graphic-1,” and so on. The file name appears in the file system, in the InCopy story bar, and in
status messages.
6 When prompted, save your InDesign file.
The InCopy content is now managed, and is available to be checked out and edited by other users in the workflow.
Shared content appears in the Links panel just like imported graphics. If you move a shared file manually, you can use
the Links panel to update its link.
When you export content, you see the Available icon on the text frame (InDesign and InCopy), and in the
Assignments panel (InCopy). The word [Available] appears in the story bar (InCopy).
78
Assignment packages
Create and send packages (InDesign)
Under ideal circumstances, all InDesign and InCopy users on the team have access to a server where assignment files
are stored. However, if one or more users don’t have access to a common server, you can create and distribute
compressed assignment packages. After working on the assignment, the InCopy user repackages the assignment and
returns it to be integrated into the InDesign document. Package files created in InDesign include the .icap extension
(or .incp if the assignment is compatible with CS3). The return package files created in InCopy include the .idap
extension (or .indp if the assignment is compatible with CS3).
There are two commands for packaging files: Package and Package And Email. Use Package to create a compressed
package that you can distribute manually; use Package And Email to create a compressed package that is attached
automatically to an e-mail message.
Create a package for manual distribution
1 Create an assignment and add the content you want to include in the package.
Only content that is checked in can be included in the packaged assignment. If any content is checked out, you’re
prompted to check in content.
2 In the Assignments panel, select the assignment and choose Package For InCopy from the panel menu.
3 Specify a name and location for the package file, and click Save.
You can attach the package file to an e-mail message, upload it to an FTP server, or copy it to a disk or other external
media.
Note: Choosing Edit > Undo after you create a package cancels the package and unlocks the items in the assignment, but
it doesn’t delete the package file from your computer or unsend the e-mail.
Page 85

Sharing content between InCopy and InDesign
Updated 29 April 2009
USING INCOPY CS4
Create a package for e-mail (InDesign)
1 Create an assignment and add the content you want to include in the package.
Only content that is checked in is included in the packaged assignment. If any content is checked out, you’re prompted
to check in content.
2 In the Assignments panel, select the assignment and choose Package For InCopy And Email from the panel menu.
A compressed assignment package is created and attached to an e-mail message of your default e-mail application.
Note: If you want to use a different e-mail application, change the default e-mail application. See your system
documentation for details.
3 Edit the e-mail message by adding a recipient and providing any instructions. Send the message.
All items in the assignment are checked out to the assigned user. However, the contents of the package itself aren’t
locked, so anyone can open the package and edit them.
Cancel a package
In some cases, the package you send isn’t returned. For example, the message may have gotten lost, or the recipient
may no longer work on the project. In such a situation, you can cancel a package.
1 In the Assignments panel, select the packaged assignment, and choose Cancel Package from the panel menu.
2 Click OK to cancel the package.
Canceling a package doesn’t remove the package file from your computer.
79
When a package is cancelled, the package’s contents are available for editing. Be aware that if someone returns a
package that has been cancelled, conflicts may occur.
Update a package
After you create a package, you may want to add, remove, or resize items.
1 Add, remove, or resize one or more stories to the packaged assignment.
2 Do one of the following:
• Choose Update Package from the Assignments panel menu. Specify the name and location of the file. Make the
updated package available to users by placing it on a shared server or by e-mail. Remember to notify InCopy users
that the package has been updated.
• Choose Update Package And Email from the Assignments panel menu, and then send the message.
When InCopy users open the updated package, only new content is added automatically to the assignment; InCopy
users can decide whether to overwrite existing content, allowing them to preserve previous edits.
Receive packages (InCopy)
You may receive a package from an InDesign user who created the package or from an InCopy user who forwarded
the package to you. When you open an assignment package, the package is decompressed, and the contents are copied
to a new subfolder in an InCopy Assignments folder.
See also
“Check in content” on page 85
“Save changes (InCopy)” on page 86
Page 86

Sharing content between InCopy and InDesign
Updated 29 April 2009
USING INCOPY CS4
Open a package (InCopy)
❖ To open an InCopy package (*.icap or *.incp), do any of the following:
• Launch the package using the e-mail application. For example, double-click the attachment file.
• Use Explorer or Finder to open the file. For example, double-click the file or drag it to the InCopy application icon.
• In InCopy, choose File > Open, and double-click the packaged assignment file.
• In InCopy, choose Open Package from the Assignments panel menu, and then double-click the package file.
You can now edit the stories in the package. When you begin editing a story, you’re prompted to check out the contents
of the frame. When you’ve finished editing, save all content and return or forward the package.
Return or forward a package (InCopy)
After you open and edit a package, you can send it to another InCopy user or you can return it to the InDesign user
who created the package. Package files created for other InCopy users include the .icap extension; return package files
created for InDesign users include the .idap extension.
1 Edit and check in the content you want to include in the package.
2 From the Assignments panel menu, choose one of the following:
Forward For InCopy Create a package for another InCopy user. Specify the name and location of the package file, and
then make it available to the InCopy user.
80
Forward For InCopy And Email Create and send a package for another InCopy user via e-mail. The package appears as
an attachment in a new message in your default e-mail application. Specify the recipient, provide instructions, and
send the e-mail message.
Return For InDesign Create a package to return to the InDesign user.
Return For InDesign And Email Create and return a package to the InDesign user by e-mail. The package appears as an
attachment in a new message in your default e-mail application. Specify the recipient, provide instructions, and send
the e-mail message.
Receive return packages (InDesign)
❖ To open an InDesign package (*.idap or *.indp), do any of the following:
• Launch the package using the e-mail application. For example, double-click the attachment file.
•
Use Explorer or Finder to open the file. For example, double-click the file or drag it to the InDesign application icon.
• In InDesign, choose File > Open, and double-click the package file.
• In InDesign, choose Open Package from the Assignments panel menu, and then double-click the package file.
You’re prompted to update all links when opening the package. If a story has been modified since the assignment was
packaged, you can determine whether to update or unlink the content in the InDesign file. When the stories in the files
are returned and checked in, you can check out and edit the content.
See also
“Update assignment files (InDesign)” on page 82
“Unlink content files (InDesign)” on page 88
Page 87

Sharing content between InCopy and InDesign
Updated 29 April 2009
USING INCOPY CS4
Working with managed files
Open shared content
Only InCopy users can open assignment files (.inca). If an InCopy user opens an InDesign file that contains
assignments, the user will have access to all the managed content, regardless of assignments.
❖ Do one of the following.
• In InCopy, choose File > Open, select an assignment file (.icma or .inca), and click Open.
• In InDesign or InCopy, choose File > Open, select an InDesign file (.indd) that contains assigned content, and click
Open.
• Open an assignment package. See “Receive packages (InCopy)” on page 79.
The assignment names and their contents appear in the Assignments panel.
See also
“Assignment files” on page 74
“Managed files” on page 69
81
Check out content
When you check out an item, a hidden lock file (.idlk) is placed on the file system. Once the content is checked out,
you have exclusive control over its content, and others are locked out from making changes. You can check out InCopy
content only; you cannot check out InDesign documents with layout information.
If you attempt to close an InDesign document containing one or more InCopy content files that are checked out to
you, an alert message appears, prompting you to check in all content. If you close the document without checking in
the content files, they will still be checked out to you the next time you open the InDesign document. Saving the
InDesign document automatically saves every editable InCopy content file.
See also
“Managed files” on page 69
Check out content (InDesign)
❖ Do one of the following:
• In the layout, select the text or graphics frames to edit and choose Edit > InCopy > Check Out.
• In the Assignments panel, select the files and choose Check Out from the panel menu.
When you check out available content in InDesign, you see the Editing icon on the InDesign frame. In InCopy, the
In Use icon appears on the InCopy frame and in the Assignments panel if the assignment files are stored on a local
server.
Check out content (InCopy)
1 Do one of the following:
• If the content you want is part of an assignment, choose File > Open and select the assignment file (.icma or .inca).
• If the content you want was exported as individual files, choose File > Open and select the InCopy file (.icml or
.incx). To see the layout so you can do copyfitting, select the InDesign document.
Page 88

Sharing content between InCopy and InDesign
Updated 29 April 2009
USING INCOPY CS4
2 Do one of the following:
• To check out a single InCopy content file, choose File > Check Out.
• To check out all content in an assignment at once, select the assignment in the Assignments panel, and choose
Check Out from the panel menu.
• To check out individual items in an assignment, open the assignments list in the Assignments panel, select an item
or multiple items, and choose Check Out from the panel menu.
The Editing icon appears next to the item or items in the Assignments panel, indicating that the content is checked
out to you for your exclusive use.
3 If prompted to update the content with changes, click OK.
When you check out available content in InCopy, you see the Editing icon on the InCopy frame, and in the
Assignments panel. In InDesign, the In Use icon appears on the InDesign frame.
Opening managed files (InCopy)
Opening a managed content file (.icml or .incx) directly in InCopy and working with it in Story view may be more
appropriate for quick writing and editing. You do not have to check out an individual managed file to edit it; InCopy
automatically checks it out. When you save and close the file, InCopy automatically checks in the content. The Save
commands are different when you open individual files.
82
See also
“Managed files” on page 69
“Save changes (InDesign)” on page 85
Update assignment files (InDesign)
You can save changes to assignments manually or when you close the current document. Updating an assignment file
is the only way to make layout changes available to InCopy users.
❖ Do one of the following:
• To update selected assignments, select them in the Assignments panel and choose Update Selected Assignments
from the Assignments panel menu.
• To update all out-of-date assignments in the current document, choose Update Out-Of-Date Assignments from
the Assignments panel menu. Only assignments that are out of date are updated.
• To update all assignments in the current document, choose Update All Assignments from the Assignments panel
menu.
Note: If an InCopy user has an assignment open when you update the assignment, the Out Of Date icon appears next
to the assignment in the InCopy Assignments panel.
See also
“Update content” on page 83
“Create and send packages (InDesign)” on page 78
Page 89

Sharing content between InCopy and InDesign
Updated 29 April 2009
USING INCOPY CS4
Update content
To make sure that you’re always working on the most up-to-date content, be sure to watch for Out Of Date icons in
the Assignments panel, and then update content accordingly. Updating an InCopy assignment file and its contents or
updating individual content files copies data from the latest file system copy so that the version displayed on your
computer matches the one on the file system. Updating does not require checking in or out and does not give you
editing rights. However, updating can cause problems if another user has deleted your lock.
Note: Updating content does not update content in assignment packages that have not been returned.
A typical updating workflow is as follows:
1 The InCopy user opens an assignment file or checks out an individual content file and edits the content.
2 The InCopy user saves the content file, which updates the copy on the file system, and continues working.
3 The InDesign user sees the Out Of Date icon in both the Assignments panel and the Links panel next to the
selection, and the In Use and Text Content Out Of Date icon or Graphics Content Out Of Date icon
on the associated frame.
83
Assignments panel with In Use and Out Of Date icons (left) and Layout with out-of-date content (right)
4 The InDesign user updates the content.
See also
“Accidentally updating your work” on page 84
“Links panel overview” on page 52
Update content while opening a managed document (InDesign)
1 Choose File > Open, locate the file you want to open, and click Open.
2 Click Yes when prompted to update the document with the modified content on the file system.
3 Do one of the following:
• To let InDesign update the links, click Fix Links Automatically.
• To fix links manually, click Don’t Fix, and then, in the Links panel, select the file to update and choose Update Link
from the panel menu.
Update content while working (InDesign)
❖ Do one of the following:
• Select the text or graphics frames in the layout and choose Edit > InCopy > Update Content.
Page 90

Sharing content between InCopy and InDesign
Updated 29 April 2009
USING INCOPY CS4
• Select the text or graphics frames in the Links panel, and click the Update Link button or choose Update
Link from the Assignments panel menu.
Update content while working (InCopy)
❖ Do one of the following:
• Click an insertion point in the text frame to select it, and then choose File > Update Content.
• Select the content in the Assignments panel, and then click the Update Content button or choose Update
Content from the Assignments panel menu.
You can also update content using the Links panel.
Accidentally updating your work
In most cases, the update commands are disabled for content you have checked out, because that content would always
be up to date. However, an undesirable situation can occur if a different user deletes the lock on checked-out content
(by dragging the lock file [.idlk] to the Recycle Bin [Windows] or Trash [Mac OS]), and modifies the content. In this
case, the update commands can become enabled even while the content is checked out to you, essentially allowing two
people to edit the content at the same time. Updating the content results in lost work. For best results, do not delete
the lock files.
84
Update the InDesign layout
InDesign users can modify the layout (for example, change the size or location of the text frames of a story) and save
the changes while InCopy users are modifying the text of these text frames. In a shared server workflow, the way
InCopy users are notified about layout changes depends on whether they have opened an assignment file or have
checked out individual content files and also opened the linked InDesign file.
Consider the following:
• If an InDesign user changes the layout of frames in an assignment, the user must update the assignment to make
the design changes available to InCopy users. InDesign does not automatically update assignment files when the
document is saved.
• Once the InDesign user updates the assignment stored on a shared server, the Out Of Date icon appears next
to the assignment in the InCopy Assignments panel. The InCopy user must update the design to see the current
layout.
• If an InDesign user changes the layout of exported content that is not part of an assignment, the Out Of Date icon
appears next to the InDesign document name in the Assignments panel, and the document title bar indicates the
layout is out-of-date. InCopy users can update the currently active InDesign document with the latest layout and
style changes.
Updating the layout in InCopy is useful for copyfitting tasks, because the latest appearance and line breaks are visible
in Layout and Galley views.
❖ Do one of the following:
• If you have an assignment file open and the Assignments panel shows the Out Of Date icon next to the
assignment name, click the Update Design button , or choose File > Update Design. You cannot undo this
command.
• If you are not working with assignment files and you have more than one InDesign document open, select the one
you want to make active, and choose File > Update Design.
Page 91

Sharing content between InCopy and InDesign
Updated 29 April 2009
USING INCOPY CS4
Check in content
When you check in a managed content file, you save it to a shared location on a file system where it can be checked
out by others for editing or other changes. Exporting a text or graphics frame from InDesign also checks it in
automatically.
Although a checked-in file is available for editing, it is not actually editable until it is checked out (unless you edit the
content in stand-alone mode in InCopy). Checking in content relinquishes editing control, but does not close the file.
The content remains open on your screen, but in a read-only state.
The LiveEdit Workflow plug-ins do not create multiple file versions. Instead, files are overwritten when updated in
either InCopy or InDesign. (To gain file-versioning capabilities, as well as many other features, use Adobe Version Cue
in InDesign or InCopy with a Version Cue Workspace.)
If you are working on an assignment package, return or forward the assignment package after checking it in.
See also
“Exporting content from InDesign” on page 73
“Work with stand-alone documents” on page 34
“Managed files” on page 69
85
Check in managed content (InDesign)
❖ Do one of the following:
• Select the content in the layout and choose Edit > InCopy > Check In.
• In the Assignments panel, select the content and choose Check In from the panel menu.
Check in managed content (InCopy)
❖ Do one of the following:
• Select the content in Layout view and choose File > Check In.
• In the Assignments panel, select the content and choose Check In from the panel menu.
Note: You can undo the most recent changes before you check in content.
When you check in a file, the Available icon appears on the text or graphics frame in the InDesign layout, in the
InCopy Layout view, in the Assignments panel, and in the story bar (InCopy).
Save changes (InDesign)
As you work on content you have checked out, you can save your changes and update the file-system copy.
❖ Do one of the following:
• To save the selected content without saving changes to the InDesign document or any of its linked files, select the
content in the layout and choose Edit > InCopy > Save Content.
• To save every content file checked out to you, choose File > Save. This type of save does not automatically update
assignment files or checked-out content files in InCopy. However, the checked-out files in InCopy will show the
Out Of Date icon in the Assignments panel.
• To save the InDesign document under a new name with links to any existing InCopy files, choose File > Save As.
This action causes the assignments in the InDesign file to appear as missing until they are updated.
Page 92

Sharing content between InCopy and InDesign
Updated 29 April 2009
USING INCOPY CS4
• To save a copy of the currently active document, choose File > Save A Copy. You can choose to give the copy a new
name and location with links to any existing InCopy files.
Note: If you are working with a file managed by a Version Cue Workspace, a separate Check In command is available.
The Version Cue Workspace feature is available as part of the Adobe Creative Suite.
See also
“Update content” on page 83
Save changes (InCopy)
❖ Do one of the following:
• To save the InCopy file under the same name and location on the file system, choose File > Save Content. The file
is still checked out to you.
• To save the InCopy content file under a new name, choose File > Save Content As. The newly created content file
is not managed in the workflow. The Save Content As command is available only if you have opened the InCopy
content file (.icml or .incx) directly.
• To save a copy of the currently active InCopy content file, choose File > Save Content Copy. You can choose to give
the copy a new name and location. The saved copy is not managed in the workflow. The Save Content Copy
command is available only if you have opened the InCopy content file (.icml or .incx) directly.
• To save all currently open and checked-out InCopy content files, choose File > Save All Content. This saves all files
to their current locations. The Save All Content command is available only if you have opened an assignment or
InDesign file.
Note: The Save A Version command is available only if you are working with a file managed by a Version Cue
Workspace. The Version Cue Workspace feature is available as part of Adobe Creative Suite.
86
Adjusting your workflow
Move content between assignments (InDesign)
InDesign users can move content between existing assignments as well as from the Unassigned InCopy Content
section of the Assignments panel. You can also create a new assignment and move content to it.
1 Save the InDesign document.
2 In the Assignments panel, click the arrow to the left of the assignment name to display the contents of the
assignment.
3 Select an item in an assignment.
4 Do one of the following:
• Drag the content from one assignment to another.
• To move content to an existing assignment, choose Add To Assignment from the Assignments panel menu, and
then select the desired assignment.
• To create a new assignment as you move content, from the Assignments panel menu, choose Add To Assignment >
New, and then specify options in the New Assignment dialog box.
5 Choose Update All Assignments from the Assignments panel menu.
Page 93

Sharing content between InCopy and InDesign
Updated 29 April 2009
USING INCOPY CS4
If the assignment lists are short, you might prefer dragging content items to and from assignments and the Unassigned
InCopy Content section.
See also
“Unlink content files (InDesign)” on page 88
Delete assignments (InDesign)
❖ In the Assignments panel, select one or more assignments and choose Delete Assignment in the panel menu.
Deleting assignments accomplishes the following:
• Removes the assignment data from the document.
• Deletes the assignment file from the file system.
• Removes the assignment name from the list.
• Moves any InCopy content to the Unassigned InCopy Content section in the Assignments panel.
Note: If an InCopy user has an assignment open when it is deleted in InDesign, an alert message notifies the InCopy user
that the assignment has been deleted. However, the content files are not deleted and can be updated without loss of
changes.
87
See also
“Unlink content files (InDesign)” on page 88
Relink missing assignment files (InDesign)
If you move or delete an assignment file from disk, and then open the InDesign document from which it was created,
InDesign won’t know where the assignment file is located. You need to re-create the assignment file so InDesign can
find it.
See also
“Update, restore, and replace links” on page 54
Re-create the assignment file in the original location
❖ In the Assignments panel, do one of the following:
• Select the missing assignment (it will still be listed in the panel) and choose Update Selected Assignments from the
panel menu.
• Choose Update All Assignments from the panel menu.
Change the assignment location
❖ To re-create the assignment file in a new location, do one of the following in the Assignments panel:
• Select the assignment and choose Change Assignment Location from the panel menu. Specify a location and name
for the new file.
• Double-click the assignment name. In the Assignment Options dialog box, click Change and specify a location and
name for the new file.
Page 94

Sharing content between InCopy and InDesign
Updated 29 April 2009
USING INCOPY CS4
Correct mistakes
If you make a mistake, you can discard changes made since the last Save command and restore the content from the
file system.
Because InDesign automatically saves every editable InCopy content file when you save the InDesign document, the
Cancel Checkout command restores only versions since the last time the document was changed.
❖ Do one of the following:
• To undo the most recent change, choose Edit > Undo [action].
• To undo all changes made since the last time you saved the document, choose File > Revert Content.
• To undo changes since the last saved version and remove the lock file, select the content in the Assignments panel
and choose Cancel Check Out from the panel menu. This action makes the content read-only and available for
others to check out.
Overriding locked files (InDesign)
Users might not immediately realize how their actions affect others in the workflow, and might accidentally create
situations where conflicts exist between content status and ownership. If necessary, the InDesign user can resolve
conflicts by unlinking a locked file checked out to a different user and taking control over the file. Unlinking a file
stores the content in the InDesign document, but the content is no longer shared with InCopy.
88
See also
“Unlink content files (InDesign)” on page 88
“Accidentally updating your work” on page 84
Unlink content files (InDesign)
If necessary (because of a production deadline, for example), InDesign users can remove a content file from the
managed workflow and from the Links panel by unlinking it. If you want to make the content available again for
editing, you must reexport it as InCopy content using a different file name. This ensures that the old lock file won’t
prevent users from editing the file.
Note: Unlinking your own checked-out file removes it from the workflow and deletes the lock file from disk. You can reexport the content and overwrite the file name without conflict.
❖ To unlink an InCopy content file, select the file (.icml or .incx extension) in the Links panel and choose Unlink from
the panel menu. Unlinking embeds the content into the document and removes the link to the InCopy file on disk.
To relink the file, choose Edit > Undo Unlink.
You can also unlink by deleting a frame, or using the InDesign Links panel to relink a content file to another file. You
can also select the story in the Assignments panel and drag it to the Trash icon.
Placing InCopy files in InDesign documents
Although a typical workflow begins in InDesign, where the basic layout and text and graphics placeholders are defined
and exported to InCopy, a different workflow can start with a stand-alone InCopy content file (.icml or .incx) that you
place in InDesign using the File > Place command.
Page 95

Sharing content between InCopy and InDesign
Updated 29 April 2009
USING INCOPY CS4
Consider the following dependencies when you place InCopy content files in an InDesign document:
Styles If the InCopy text file has styles applied, they are added to the InDesign list of styles for the document. In the
event of a style-name conflict, InDesign overwrites the imported style with its existing style.
Layout You can create the basic layout geometry for the content in InDesign, and then create or import the text and
styles from a word-processing application. (Text files placed within InCopy are embedded in the InCopy document
and are not linked to any external file.)
Placing/Duplicating If you place an InCopy content file more than once, each instance of the content appears in the
InDesign Links panel, but they are all managed as one content file. The same is true for any exact copies of a content
file (by any means of duplication).
Note: If you copy and paste some, but not all, of the text in a managed InCopy content file, the result is a new content file
that is not connected to the original and has no link to any external file (InCopy or otherwise). The original and the pasted
portions can be edited independently of each other.
Updates/Management Once multiple instances of a managed content file are present in an InDesign document, they
behave as if they were open in two applications. For example, checking out one instance of the content file locks all
other instances so that you can edit only the checked-out instance. In this case, you would use the appropriate Update
command to refresh the other (open) instances of the content.
89
Page 96

Chapter 5: Text
Updated 29 April 2009
Adobe® InCopy® gives you the tools you need to add text to stories with both flexibility and precision.
Adding text
Adding text
You can add text by typing, pasting, or importing text from another file. In general, you use standard word-processing
techniques to work with text in InCopy. Select the Type tool on the toolbox, and then use the techniques described
below. These methods work the same way in Galley, Story, and Layout views, whether or not the content is linked to
Adobe InDesign®.
Note: You can track changes so that added text is highlighted in Galley and Story views. (See “Tracking and reviewing
changes” on page 130.)
Typing Click the insertion point where you want to add text, and begin typing.
90
Selecting Drag, double-click, or triple-click to select individual characters, words, lines, or paragraphs (depending on
the Preferences settings). Or click anywhere in the content, and choose Edit > Select All.
Pasting Copy or cut text, click at the location you want, and choose Edit > Paste. If you want to remove the formatting
of the pasted text, choose Edit > Paste Without Formatting. If you want to add or remove spacing as necessary, select
Adjust Spacing Automatically When Cutting And Pasting Words in the Type section of the Preferences dialog box.
Deleting Select the text you want to delete, and choose Edit > Clear.
You can also import text directly from another text document.
Importing files
You can import text from other InCopy stories, Microsoft® Word, Microsoft Excel, and any application that can export
text in Rich Text Format (RTF) or text-only format. All importable file formats are listed in the InCopy Place dialog
box (in the Files Of Type menu for Windows®, and in the right list pane for Mac OS).
Document formatting and styles
You can import files with or without formatting. If you import the files with formatting, InCopy imports most
character and paragraph formatting attributes from text files, but ignores most page-layout information, such as page
breaks, margins, and column settings (which you can set in InDesign). In general, InCopy imports all formatting
information specified in the word-processing application, except for features not available in InCopy.
If InCopy has an import filter for an application, you can determine which styles are imported, and which formatting
to use if there is a name conflict.
Note: InDesign controls the styles in linked InCopy stories. When you place an InCopy story in InDesign, any imported
styles in the InCopy document are overridden in InDesign if there are conflicting style names.
Page 97

USING INCOPY CS4
Updated 29 April 2009
Text
Saving files for import
If your word-processing application can save files in more than one file format, try using the format capable of
retaining the most formatting—either the application’s native file format or an interchange format such as Rich Text
Format (RTF).
You can import files created in the recent versions of Microsoft Word. If you are placing a file from a different wordprocessing application or from Word 95 for Windows or earlier, such as Word 6, open the file in its original application
and save it in a compatible Word format or in RTF, which preserves most formatting.
See also
“Import graphics” on page 46
Place (import) text
For large amounts of text, the Place command is the most useful way to import content. InCopy supports a variety of
word-processing, spreadsheet, and text file formats. The degree to which the original formatting is preserved depends
on the import filter for the file type and the options you choose as you place the file. You can also open Word, text, and
RTF files directly in InCopy.
1 Using the Type tool , click where you want the text to appear.
2 Choose File > Place.
3 In the Place dialog box, select Show Import Options if you want to display a dialog box containing import options
for the type of file you’re placing.
4 Select the text file you want to place, and then click Open. (If you Shift-click Open, the Import Options dialog box
appears, even if Show Import Options isn’t selected.)
5 Do any of the following:
• If a dialog box displays import options for the type of file you’re placing, select any options you want, and click OK.
• If the document you’re importing contains fonts that aren’t available on your system, a dialog box opens to inform
you of the font substitution. If you prefer to specify other substitution fonts, click Find Font and choose alternatives.
If the text you import into your document includes pink, green, or another color of highlighting, you likely have one
or more composition preference options turned on. Open the Composition section of the Preferences dialog box, and
notice which options are turned on under Highlight. For example, if the placed text is formatted with fonts not available
in InCopy, the text is highlighted in pink.
91
See also
“Work with stand-alone documents” on page 34
Import options
When you import Word, Excel, and tagged text files, you can determine how the files are imported.
Microsoft Word and RTF import options
If you select Show Import Options when placing a Word file or an RTF file, you can choose from these options:
Table Of Contents Text
Index Text Imports the index as part of the text in the story. These entries are imported as text only.
Imports the table of contents as part of the text in the story. These entries are imported as text only.
Page 98

USING INCOPY CS4
Updated 29 April 2009
Text
Footnotes Imports Word footnotes. Footnotes and references are preserved, but renumbered based on the
document’s footnote settings. If the Word footnotes are not imported properly, try saving the Word document in RTF
format and importing the RTF file.
Endnotes Imports endnotes as part of the text at the end of the story.
Use Typographer’s Quotes Ensures that imported text includes left and right quotation marks (“ ”) and
apostrophes (’) instead of straight quotation marks (" ") and apostrophes (').
Remove Styles And Formatting From Text And Tables Removes formatting, such as typeface, type color, and type
style, from the imported text, including text in tables. Paragraph styles and inline graphics aren’t imported if this
option is selected.
Preserve Local Overrides When you choose to remove styles and formatting from text and tables, you can select
Preserve Local Overrides to maintain character formatting, such as bold and italics, that is applied to part of a
paragraph. Deselect this option to remove all formatting.
Convert Tables To When you choose to remove styles and formatting from text and tables, you can convert tables to
either basic, unformatted tables or unformatted, tab-delimited text.
If you want to import unformatted text and formatted tables, import the text without formatting, and then paste the
tables from Word into InCopy .
Preserve Styles And Formatting From Text And Tables Preserves the Word document’s formatting in the InDesign or
InCopy document. You can use the other options in the Formatting section to determine how styles and formatting
are preserved.
92
Manual Page Breaks Determines how page breaks from the Word file are formatted in InDesign or InCopy. Select
Preserve Page Breaks to use the same page breaks used in Word, or select Convert To Column Breaks or No Breaks.
Import Inline Graphics Preserves inline graphics from the Word document in InCopy .
Import Unused Styles Imports all styles from the Word document, even if the styles aren’t applied to text.
Convert Bullets & Numbers To Text Imports bullets and numbers as actual characters, preserving the look of the
paragraph. However, in numbered lists, the numbers are not automatically updated when the list items are changed.
Track Changes For InCopy Selecting this option causes highlighting and strikeout to appear when you edit the
imported text in InCopy while Track Changes is turned on; deselecting this option causes all the imported text to be
highlighted as a single addition. Track Changes can be viewed in InCopy, not in InDesign.
Import Styles Automatically Imports styles from the Word document into the InDesign or InCopy document. If a
yellow warning triangle appears next to Style Name Conflicts, then one or more paragraph or character styles from the
Word document have the same name as an InCopy style.
To determine how these style name conflicts are resolved, select an option from the Paragraph Style Conflicts and
Character Style Conflicts menu. Choosing Use InCopy
Style Definition causes the imported style text to be formatted
based on the InCopy style. Choosing Redefine InCopy Style causes the imported style text to be formatted based on
the Word style, and changes existing InCopy text formatted with the Word style. Choosing Auto Rename causes the
imported Word styles to be renamed. For example, if InCopy and Word have a Subheading style, the imported Word
style is renamed Subheading_wrd_1 when Auto Rename is selected.
Note: InCopy converts paragraph and character styles but not bulleted and numbered list styles.
Customize Style Import Lets you use the Style Mapping dialog box to select which InCopy style should be used for
each Word style in the imported document.
Save Preset Stores the current Word Import Options for later reuse. Specify the import options, click Save Preset, type
the name of the preset, and click OK. The next time you import a Word style, you can select the preset you created
Page 99

USING INCOPY CS4
Updated 29 April 2009
Text
from the Preset menu. Click Set As Default if you want the selected preset to be used as the default for future imports
of Word documents.
Text-file import options
If you select Show Import Options when placing a text file, you can choose from these options:
Character Set Specifies the computer language character set, such as ANSI, Unicode UTF8, or Windows CE, that was
used to create the text file. The default selection is the character set that corresponds to the default language and
platform of InDesign or InCopy.
Platform Specifies whether the file was created in Windows or Mac OS.
Set Dictionary To Specifies the dictionary to be used by the imported text.
Extra Carriage Returns Specifies how extra paragraph returns are imported. Choose Remove At End Of Every Line or
Remove Between Paragraphs.
Replace Replaces the specified number of spaces with a tab.
Use Typographer’s Quotes Ensures that imported text includes left and right quotation marks (“ ”) and
apostrophes (’) instead of straight quotation marks (" ") and apostrophes (').
Microsoft Excel import options
You can choose from these options when importing an Excel file:
93
Sheet Specifies the worksheet you want to import.
View Specifies whether to import any stored custom or personal views, or to ignore the views.
Cell Range Specifies the range of cells, using a colon (:) to designate the range (such as A1:G15). If there are named
ranges within the worksheet, these names appear in the Cell Range menu.
Import Hidden Cells Not Saved In View Includes any cells formatted as hidden cells in the Excel spreadsheet.
Table Specifies how the spreadsheet information appears in the document.
• Formatted Table InCopy tries to preserve the same formatting used in Excel, although the formatting of text
within each cell may not be preserved. If the spreadsheet is linked rather than embedded, updating the link will
override any formatting applied to the table in InCopy .
• Unformatted Table The table is imported without any formatting from the spreadsheet. When this option is
selected, you can apply a table style to the imported table. If you format text using paragraph and characters styles, the
formatting is preserved even if you update the link to the spreadsheet.
• Unformatted Tabbed Text The table is imported as tab-delimited text, which you can then convert to a table in
InDesign or InCopy.
• Formatted Only Once InDesign preserves the same formatting used in Excel during the initial import. If the
spreadsheet is linked rather than embedded, formatting changes made to the spreadsheet are ignored in the linked
table when you update the link. This option isn’t available in InCopy.
Table Style Applies the table style you specify to the imported document. This option is available only if Unformatted
Table is selected.
Cell Alignment Specifies the cell alignment for the imported document.
Include Inline Graphics Preserves inline graphics from the Excel document in InCopy .
Number Of Decimal Places To Include Specifies the number of decimal places of spreadsheet figures.
Page 100

USING INCOPY CS4
Updated 29 April 2009
Text
Use Typographer’s Quotes Ensures that imported text includes left and right quotation marks (“ ”) and
apostrophes (’) instead of straight quotation marks (" ") and apostrophes (').
Tagged-text import options
You can import (or export) a text file capable of taking advantage of InCopy formatting capabilities by using the tagged
text format. Tagged-text files are text files containing information describing the formatting you want InCopy to
apply. Properly tagged text can describe almost anything that can appear in an InCopy story, including all paragraphlevel attributes, character-level attributes, and special characters.
For information on specifying tags, view the Tagged Text PDF at www.adobe.com/go/learn_id_taggedtext_cs4_en
(PDF).
The following options are available when you import a tagged-text file and select Show Import Options in the Place
dialog box.
Use Typographer’s Quotes Ensures that imported text includes left and right quotation marks (“ ”) and
apostrophes (’) instead of straight quotation marks (" ") and apostrophes (').
Remove Text Formatting Removes formatting, such as typeface, type color, and type style, from the imported text.
Resolve Text Style Conflicts Using Specifies which character or paragraph style to apply when there is a conflict
between the style in the tagged-text file and the style in the InDesign document. Select Publication Definition to use
the definition that already exists for that style in the InDesign document. Select Tagged File Definition to use the style
as defined in the tagged text. This option creates another style name, with “copy” appended to it in the Style panel.
94
Show List Of Problem Tags Before Place Displays a list of unrecognized tags. If a list appears, you can choose to cancel
or continue the import. If you continue, the file may not look as expected.
Type Asian text using inline input
1 Choose Edit > Preferences > Advanced Type (Windows) or InCopy > Preferences > Advanced Type (Mac OS).
2 Select Use Inline Input For Non-Latin Text, and then click OK.
You can use a system input method, if available, for adding 2-byte and 4-byte characters. This method is especially
useful for entering Asian characters.
Editing text
Select text
❖ Using the Type tool, do one of the following:
• Drag the I-bar cursor over a character, word, or an entire text block to select it.
• Double-click a word to select it. Spaces next to the word are not selected.
• Triple-click anywhere in a line to select a line. If the Triple Click To Select A Line preferences option is deselected,
triple-clicking selects the entire paragraph.
• If the Triple Click To Select A Line option is selected, quadruple-click anywhere in a paragraph to select the entire
paragraph.
• Quintuple-click to select the entire story, or click anywhere in a story and choose Edit > Select All.
 Loading...