

Page 1
Page 2

© 2001 Adobe Systems Incorporated. All rights reserved.
Adobe After Effects 5.0 User Guide for Windows and Macintosh
If this guide is distributed with software that includes an end-user agreement, this guide, as well as the software described in it, is furnished
under license and may be used or copied only in accordance with the terms of such license. Except as permitted by any such license, no part
of this guide may be reproduced, stored in a retrieval system, or transmitted, in any form or by any means, electronic, mechanical, recording,
or otherwise, without the prior written permission of Adobe Systems Incorporated. Please note that the content in this guide is protected
under copyright law even if it is not distributed with software that includes an end-user license agreement.
The content of this guide is furnished for informational use only, is subject to change without notice, and should not be construed as a commitment by Adobe Systems Incorporated. Adobe Systems Incorporated assumes no responsibility or liability for any errors or inaccuracies
that may appear in the informational content contained in this guide.
Please remember that existing artwork or images that you may want to include in your project may be protected under copyright law. The
unauthorized incorporation of such material into your new work could be a violation of the rights of the copyright owner. Please be sure to
obtain any permission required from the copyright owner.
Any references to company names in sample templates are for demonstration purposes only and are not intended to refer to any actual organization.
Adobe, the Adobe logo, Acrobat, Adobe Premiere, After Effects, Illustrator, and Photoshop are either registered trademarks or trademarks of
Adobe Systems Incorporated in the United States and/or other countries. All references to PostScript on the screen or in this manual are references either to the PostScript interpreter or to the PostScript language. Apple, Macintosh, and Mac OS are trademarks of Apple Computer,
Inc., registered in the U. S. and other countries. FireWire, QuickTime, and the QuickTime logo are trademarks used under license. Microsoft,
Windows, and Windows NT are registered trademarks of Microsoft Corporation in the U.S. and/or other countries. Macromedia and Flash
are trademarks of Macromedia Inc. MPEG Layer 3 audio compression technology is licensed by Fraunhofer IIS and Thompson. All other
trademarks are the property of their respective owners.
Contains an implementation of the LZW algorithm licensed under U.S. Patent 4,558,302.
Notice to U.S. government end users. The software and documentation are “Commercial Items,” as that term is defined at 48 C.F.R. §2.101,
consisting of “Commercial Computer Software” and “Commercial Computer Software Documentation,” as such terms are used in 48 C.F.R.
§12.212 or 48 C.F.R. §227.7202, as applicable. Consistent with 48 C.F.R.. §12.212 or 48 C.F.R. §§227.7202-1 through 227.7202-4, as applicable, the Commercial Computer Software and Commercial Computer Software Documentation are being licensed to U.S. Government end
users (a) only as Commercial items and (b) with only those rights as are granted to all other end users pursuant to the terms and conditions
herein. Unpublished-rights reserved under the copyright laws of the United States. Adobe Systems Incorporated, 345 Park Avenue, San Jose,
CA 94110-2704, USA. For U.S. Government End Users, Adobe agrees to comply with all applicable equal opportunity laws including, if appropriate, the provisions of Executive Order 11246, as amended, Section 402 of the Vietnam Era Veterans Readjustment Assistance Act of
1974 (38 USC 4212), and Section 503 of the Rehabilitation Act of 1973, as amended, and the regulations at 41 CFR Parts 60-1 through 6060, 60-250 ,and 60-741. The affirmative action clause and regulations contained in the preceding sentence shall be incorporated by reference.
Part number: 90027945 (3/01)
Page 3

Contents
iii
Introduction
An Overview of Adobe
After Effects
What’s New in After
Effects 5.0
Working with Projects,
Windows, and Palettes
Registration . . . . . . . . . . . . . . . . . . . . . . . . . . . . . . . . . . . . . . . . . . . . 1
Installing Adobe After Effects . . . . . . . . . . . . . . . . . . . . . . . . . . . 1
Learning Adobe After Effects . . . . . . . . . . . . . . . . . . . . . . . . . . . 1
Using Web resources . . . . . . . . . . . . . . . . . . . . . . . . . . . . . . . . . . . 3
Other learning resources . . . . . . . . . . . . . . . . . . . . . . . . . . . . . . . 5
Customer support . . . . . . . . . . . . . . . . . . . . . . . . . . . . . . . . . . . . . . 5
Superior Adobe product integration . . . . . . . . . . . . . . . . . . . . 9
Powerful masking . . . . . . . . . . . . . . . . . . . . . . . . . . . . . . . . . . . . . 12
2D & 3D compositing . . . . . . . . . . . . . . . . . . . . . . . . . . . . . . . . . . 12
Extensive motion controls . . . . . . . . . . . . . . . . . . . . . . . . . . . . . 13
Leading-edge video and audio effects . . . . . . . . . . . . . . . . . 14
Flexible media handling . . . . . . . . . . . . . . . . . . . . . . . . . . . . . . . 15
Web delivery . . . . . . . . . . . . . . . . . . . . . . . . . . . . . . . . . . . . . . . . . . 18
Production Bundle features . . . . . . . . . . . . . . . . . . . . . . . . . . . . 19
Precise control . . . . . . . . . . . . . . . . . . . . . . . . . . . . . . . . . . . . . . . . 27
Enhanced productivity . . . . . . . . . . . . . . . . . . . . . . . . . . . . . . . . 28
Versatile output options . . . . . . . . . . . . . . . . . . . . . . . . . . . . . . . 31
Chapter 1
Working in a project . . . . . . . . . . . . . . . . . . . . . . . . . . . . . . . . . . . 35
Planning your project . . . . . . . . . . . . . . . . . . . . . . . . . . . . . . . . . 37
Time basics . . . . . . . . . . . . . . . . . . . . . . . . . . . . . . . . . . . . . . . . . . . 41
Setting up a project . . . . . . . . . . . . . . . . . . . . . . . . . . . . . . . . . . . 44
Correcting mistakes . . . . . . . . . . . . . . . . . . . . . . . . . . . . . . . . . . . 46
Selecting 16-bpc color depth (PB only) . . . . . . . . . . . . . . . . . 46
Setting preferences . . . . . . . . . . . . . . . . . . . . . . . . . . . . . . . . . . . 47
Customizing the workspace . . . . . . . . . . . . . . . . . . . . . . . . . . . 48
Using context menus . . . . . . . . . . . . . . . . . . . . . . . . . . . . . . . . . . 49
Using windows . . . . . . . . . . . . . . . . . . . . . . . . . . . . . . . . . . . . . . . . 49
Composition, Layer, and Footage window controls . . . . . . 53
Toolbox . . . . . . . . . . . . . . . . . . . . . . . . . . . . . . . . . . . . . . . . . . . . . . . 61
Info palette . . . . . . . . . . . . . . . . . . . . . . . . . . . . . . . . . . . . . . . . . . . 62
Page 4

CONTENTS
iv
Preparing and Importing
Footage
Building a Composition
Chapter 2
How After Effects works with imported files . . . . . . . . . . . . 65
Preparing a still-image file for import into
After Effects . . . . . . . . . . . . . . . . . . . . . . . . . . . . . . . . . . . . . . . . 65
Importing files into a project . . . . . . . . . . . . . . . . . . . . . . . . . . . 68
Importing a sequence of still-image files . . . . . . . . . . . . . . . 70
Importing footage containing an alpha channel . . . . . . . . 72
Importing Adobe Photoshop files . . . . . . . . . . . . . . . . . . . . . . 74
Importing an Adobe Illustrator, PDF, or EPS file . . . . . . . . . . 77
Importing an After Effects project . . . . . . . . . . . . . . . . . . . . . . 80
Importing Adobe Premiere projects . . . . . . . . . . . . . . . . . . . . 81
Importing 3D-image files . . . . . . . . . . . . . . . . . . . . . . . . . . . . . . 81
Importing an audio file . . . . . . . . . . . . . . . . . . . . . . . . . . . . . . . . 82
Importing Cineon files . . . . . . . . . . . . . . . . . . . . . . . . . . . . . . . . . 82
Preparing motion footage for import . . . . . . . . . . . . . . . . . . 83
Using interlaced video in After Effects . . . . . . . . . . . . . . . . . . 85
Removing 3:2 pulldown from video transferred
from film . . . . . . . . . . . . . . . . . . . . . . . . . . . . . . . . . . . . . . . . . . . 87
Setting pixel aspect ratio . . . . . . . . . . . . . . . . . . . . . . . . . . . . . . 88
Chapter 3
Working with imported footage . . . . . . . . . . . . . . . . . . . . . . . 93
Replacing and substituting footage . . . . . . . . . . . . . . . . . . . . 97
Creating a composition . . . . . . . . . . . . . . . . . . . . . . . . . . . . . . . 101
Understanding basic composition settings . . . . . . . . . . . . 103
Understanding advanced composition settings . . . . . . . 108
Adding footage items to a composition . . . . . . . . . . . . . . . 109
Nesting a composition . . . . . . . . . . . . . . . . . . . . . . . . . . . . . . . 111
Using the Composition window . . . . . . . . . . . . . . . . . . . . . . 112
Using the Timeline window . . . . . . . . . . . . . . . . . . . . . . . . . . . 115
Managing Layers
Chapter 4
Adding layers to compositions . . . . . . . . . . . . . . . . . . . . . . . . 125
Creating new layers . . . . . . . . . . . . . . . . . . . . . . . . . . . . . . . . . . 126
Rearranging layers . . . . . . . . . . . . . . . . . . . . . . . . . . . . . . . . . . . 130
Customizing layer work and views . . . . . . . . . . . . . . . . . . . . 135
Understanding trimming . . . . . . . . . . . . . . . . . . . . . . . . . . . . . 139
Using markers . . . . . . . . . . . . . . . . . . . . . . . . . . . . . . . . . . . . . . . . 142
Page 5

About After Effects Audio/Video switches . . . . . . . . . . . . . 146
Altering appearances on the layer level . . . . . . . . . . . . . . . 148
Using audio layers . . . . . . . . . . . . . . . . . . . . . . . . . . . . . . . . . . . . 153
v
Animating Layers
Chapter 5
About layer properties . . . . . . . . . . . . . . . . . . . . . . . . . . . . . . . 159
Understanding keyframes . . . . . . . . . . . . . . . . . . . . . . . . . . . . 160
Setting keyframes . . . . . . . . . . . . . . . . . . . . . . . . . . . . . . . . . . . . 163
Moving and copying keyframes . . . . . . . . . . . . . . . . . . . . . . . 166
Moving keyframes . . . . . . . . . . . . . . . . . . . . . . . . . . . . . . . . . . . . 166
Determining where to set and modify keyframes . . . . . . 170
Setting layer position . . . . . . . . . . . . . . . . . . . . . . . . . . . . . . . . . 171
Modifying a motion path . . . . . . . . . . . . . . . . . . . . . . . . . . . . . 172
Changing the number of visible motion-path
keyframes . . . . . . . . . . . . . . . . . . . . . . . . . . . . . . . . . . . . . . . . . 175
Using Motion Sketch to draw a motion path . . . . . . . . . . . 175
Smoothing motion and velocity . . . . . . . . . . . . . . . . . . . . . . 177
Creating motion paths with masks . . . . . . . . . . . . . . . . . . . . 178
Setting layer size . . . . . . . . . . . . . . . . . . . . . . . . . . . . . . . . . . . . . 179
Flipping a layer using Scale property keyframes . . . . . . . 179
Setting layer opacity . . . . . . . . . . . . . . . . . . . . . . . . . . . . . . . . . 180
Setting layer rotation . . . . . . . . . . . . . . . . . . . . . . . . . . . . . . . . . 180
Rotating a layer along a motion path . . . . . . . . . . . . . . . . . . 181
Setting and animating an anchor point . . . . . . . . . . . . . . . 182
Understanding parent layers . . . . . . . . . . . . . . . . . . . . . . . . . . 184
Setting and animating a layer property in the
Timeline window . . . . . . . . . . . . . . . . . . . . . . . . . . . . . . . . . . 187
Setting and animating mask properties . . . . . . . . . . . . . . . 188
Setting and animating effects . . . . . . . . . . . . . . . . . . . . . . . . . 188
Setting preview options . . . . . . . . . . . . . . . . . . . . . . . . . . . . . . 189
Setting Video Preview preferences . . . . . . . . . . . . . . . . . . . . 190
Previewing animation . . . . . . . . . . . . . . . . . . . . . . . . . . . . . . . . 191
Page 6

CONTENTS
vi
Fine-tuning Animation
Working with Masks and
Transparency
Chapter 6
Controlling change through interpolation . . . . . . . . . . . . . 199
Comparing interpolation methods . . . . . . . . . . . . . . . . . . . . 201
Changing the interpolation method . . . . . . . . . . . . . . . . . . 204
Using the Value graph to change a layer property
value . . . . . . . . . . . . . . . . . . . . . . . . . . . . . . . . . . . . . . . . . . . . . . 210
Adding keyframes to a Value graph . . . . . . . . . . . . . . . . . . . 211
Factors affecting speed . . . . . . . . . . . . . . . . . . . . . . . . . . . . . . . 211
Controlling speed along a motion path . . . . . . . . . . . . . . . 213
Fine-tuning speed . . . . . . . . . . . . . . . . . . . . . . . . . . . . . . . . . . . . 215
Time-stretching a layer . . . . . . . . . . . . . . . . . . . . . . . . . . . . . . . 222
Using the Time-Reverse Keyframes keyframe
assistant . . . . . . . . . . . . . . . . . . . . . . . . . . . . . . . . . . . . . . . . . . . 224
Reversing the playback direction of a layer . . . . . . . . . . . . 225
About time-remapping . . . . . . . . . . . . . . . . . . . . . . . . . . . . . . . 226
Chapter 7
Using a footage item with an alpha channel . . . . . . . . . . . 238
Working with masks . . . . . . . . . . . . . . . . . . . . . . . . . . . . . . . . . . 238
Creating masks . . . . . . . . . . . . . . . . . . . . . . . . . . . . . . . . . . . . . . . 238
Drawing rectangular and oval masks . . . . . . . . . . . . . . . . . . 240
About Mask Paths . . . . . . . . . . . . . . . . . . . . . . . . . . . . . . . . . . . . 241
Drawing a Bezier mask with the pen tool . . . . . . . . . . . . . . 242
Selecting masks and control points . . . . . . . . . . . . . . . . . . . 244
Scaling and rotating selected masks or points . . . . . . . . . 245
Changing the shape of a mask . . . . . . . . . . . . . . . . . . . . . . . . 247
Feathering mask edges . . . . . . . . . . . . . . . . . . . . . . . . . . . . . . . 249
Adjusting the edges of a mask . . . . . . . . . . . . . . . . . . . . . . . . 250
Adjusting the opacity of a mask . . . . . . . . . . . . . . . . . . . . . . . 250
Specifying which parts of a mask are inside
and outside . . . . . . . . . . . . . . . . . . . . . . . . . . . . . . . . . . . . . . . . 251
Moving a mask and panning a layer behind a mask . . . . 251
Specifying one mask as the target for animation . . . . . . 253
Animating a mask . . . . . . . . . . . . . . . . . . . . . . . . . . . . . . . . . . . . 253
Importing masks from Adobe Illustrator and
Adobe Photoshop . . . . . . . . . . . . . . . . . . . . . . . . . . . . . . . . . 255
Applying effects to a mask . . . . . . . . . . . . . . . . . . . . . . . . . . . . 256
Creating visible lines and solid shapes from masks . . . . 256
Page 7

Controlling how masks in the same layer interact . . . . . . 256
Using mask modes . . . . . . . . . . . . . . . . . . . . . . . . . . . . . . . . . . . 257
Modifying multiple masks . . . . . . . . . . . . . . . . . . . . . . . . . . . . 258
Locking a mask . . . . . . . . . . . . . . . . . . . . . . . . . . . . . . . . . . . . . . . 259
Reusing a mask . . . . . . . . . . . . . . . . . . . . . . . . . . . . . . . . . . . . . . 259
Creating track mattes and traveling mattes . . . . . . . . . . . . 260
Using layer modes . . . . . . . . . . . . . . . . . . . . . . . . . . . . . . . . . . . . 261
Creating transparency using keying . . . . . . . . . . . . . . . . . . . 265
vii
Applying Effects
3D Compositing
Chapter 8
Learning about specific effects . . . . . . . . . . . . . . . . . . . . . . . . 269
Working with effects . . . . . . . . . . . . . . . . . . . . . . . . . . . . . . . . . 269
Changing effect property values . . . . . . . . . . . . . . . . . . . . . . 273
Placing an effect using effect points . . . . . . . . . . . . . . . . . . 274
Changing effects over time . . . . . . . . . . . . . . . . . . . . . . . . . . . 275
Positioning effects on layers . . . . . . . . . . . . . . . . . . . . . . . . . . 275
Applying an effect to several layers with an
adjustment layer . . . . . . . . . . . . . . . . . . . . . . . . . . . . . . . . . . . 276
Changing rendering order . . . . . . . . . . . . . . . . . . . . . . . . . . . . 276
Using audio effects . . . . . . . . . . . . . . . . . . . . . . . . . . . . . . . . . . . 276
Using cameras and lights with effects . . . . . . . . . . . . . . . . . 277
Using Adobe Photoshop layer styles in After Effects . . . 277
Using keying effects . . . . . . . . . . . . . . . . . . . . . . . . . . . . . . . . . . 278
Effects included with After Effects . . . . . . . . . . . . . . . . . . . . . 278
Chapter 9
Understanding 3D . . . . . . . . . . . . . . . . . . . . . . . . . . . . . . . . . . . . 283
Understanding 3D compositing in After Effects . . . . . . . . 284
Working with 3D layers . . . . . . . . . . . . . . . . . . . . . . . . . . . . . . . 284
Understanding 3D Transform properties . . . . . . . . . . . . . . 287
Understanding 3D views . . . . . . . . . . . . . . . . . . . . . . . . . . . . . 291
Using cameras . . . . . . . . . . . . . . . . . . . . . . . . . . . . . . . . . . . . . . . 292
Using lights . . . . . . . . . . . . . . . . . . . . . . . . . . . . . . . . . . . . . . . . . . 298
Using 3D compositing with effects . . . . . . . . . . . . . . . . . . . . 301
Using 3D compositing with masks . . . . . . . . . . . . . . . . . . . . 302
Using third-party files with depth information . . . . . . . . . 302
Previewing 3D . . . . . . . . . . . . . . . . . . . . . . . . . . . . . . . . . . . . . . . 302
3D rendering . . . . . . . . . . . . . . . . . . . . . . . . . . . . . . . . . . . . . . . . . 303
Page 8

viii
CONTENTS
Creating Expressions
Managing Projects
Effectively
Rendering a Movie
Chapter 10
Using expressions . . . . . . . . . . . . . . . . . . . . . . . . . . . . . . . . . . . . 309
Creating expressions . . . . . . . . . . . . . . . . . . . . . . . . . . . . . . . . . 310
Creating expressions with the pick whip . . . . . . . . . . . . . . 312
Writing your own expressions . . . . . . . . . . . . . . . . . . . . . . . . 315
Understanding the expression language . . . . . . . . . . . . . . 317
Using the expression language menu . . . . . . . . . . . . . . . . . 321
Sample expressions . . . . . . . . . . . . . . . . . . . . . . . . . . . . . . . . . . 322
After Effects expression language guide . . . . . . . . . . . . . . 324
Chapter 11
Visualizing organization with Flowchart View . . . . . . . . . 339
Organizing a project using nesting . . . . . . . . . . . . . . . . . . . . 342
Creating animations by nesting compositions . . . . . . . . . 345
Saving time by prerendering nested compositions . . . . 347
Understanding precomposing . . . . . . . . . . . . . . . . . . . . . . . . 348
Reducing the project . . . . . . . . . . . . . . . . . . . . . . . . . . . . . . . . . 350
Chapter 12
Understanding rendering and compression . . . . . . . . . . . 354
Making (rendering) a movie . . . . . . . . . . . . . . . . . . . . . . . . . . 354
Using the Render Queue window . . . . . . . . . . . . . . . . . . . . . 355
Changing render settings . . . . . . . . . . . . . . . . . . . . . . . . . . . . . 358
Creating and using render settings templates . . . . . . . . . 360
Changing output module settings . . . . . . . . . . . . . . . . . . . . 361
Creating and using output module templates . . . . . . . . . 364
Exporting to Macromedia Flash (SWF) format . . . . . . . . . 365
Saving a RAM preview as a rendered movie . . . . . . . . . . . 368
Exporting footage using QuickTime components . . . . . 369
Rendering an item to multiple formats . . . . . . . . . . . . . . . . 369
Choosing compression options . . . . . . . . . . . . . . . . . . . . . . . 370
Exporting a single frame of a composition . . . . . . . . . . . . 373
Creating a filmstrip file for editing in Photoshop . . . . . . . 374
Rendering frames as a sequence of still images . . . . . . . . 375
Rendering cross-platform movies and stills . . . . . . . . . . . . 376
Collecting files in one location . . . . . . . . . . . . . . . . . . . . . . . . 376
Rendering using a watch folder (PB only) . . . . . . . . . . . . . . 378
Page 9

Working with overflow volumes . . . . . . . . . . . . . . . . . . . . . . 383
Rendering movies at different sizes . . . . . . . . . . . . . . . . . . . 384
Creating low-resolution movies for testing motion . . . . 387
Testing the field-rendering order . . . . . . . . . . . . . . . . . . . . . 387
ix
Using Property and
Tracking Controls
(PB only)
Using Motion Math
(PB only)
Using Vector Paint
(PB only)
Chapter 13
Adding randomness . . . . . . . . . . . . . . . . . . . . . . . . . . . . . . . . . . 391
Simulating a zoom lens . . . . . . . . . . . . . . . . . . . . . . . . . . . . . . . 393
About tracking motion . . . . . . . . . . . . . . . . . . . . . . . . . . . . . . . 393
Tracking different types of motion . . . . . . . . . . . . . . . . . . . . 399
Tracking a moving region or object . . . . . . . . . . . . . . . . . . . 404
Stabilizing motion . . . . . . . . . . . . . . . . . . . . . . . . . . . . . . . . . . . . 407
Chapter 14
Using Expressions instead of Motion Math . . . . . . . . . . . . 411
Working in the Motion Math window . . . . . . . . . . . . . . . . . 412
Motion Math scripts included with the
Production Bundle . . . . . . . . . . . . . . . . . . . . . . . . . . . . . . . . . 413
Running and editing existing scripts . . . . . . . . . . . . . . . . . . 414
Writing your own scripts . . . . . . . . . . . . . . . . . . . . . . . . . . . . . . 416
Learning more about Motion Math . . . . . . . . . . . . . . . . . . . 416
Chapter 15
Selecting and modifying paint tools . . . . . . . . . . . . . . . . . . 421
Editing your paint work . . . . . . . . . . . . . . . . . . . . . . . . . . . . . . . 424
Selecting Composite Paint options . . . . . . . . . . . . . . . . . . . . 427
Playing back your painting . . . . . . . . . . . . . . . . . . . . . . . . . . . 430
Setting Wiggle Control options . . . . . . . . . . . . . . . . . . . . . . . 435
Selecting viewing options . . . . . . . . . . . . . . . . . . . . . . . . . . . . 439
Configuring a stylus for Vector Paint . . . . . . . . . . . . . . . . . . 439
Index
. . . . . . . . . . . . . . . . . . . . . . . . . . . . . . . . . . . . . . . . . . . . . . . . 443
Page 10

Page 11

Introduction
elcome to the Adobe® After Effects® 5.0 application, the ultimate software tool
for motion graphics and visual effects. After Effects is widely used for digital
W
Registration
Adobe is confident you will find that its software greatly increases your productivity. So
that Adobe can continue to provide you with the highest quality software, offer technical
support, and inform you about new After Effects software developments, please register
your application.
When you first start the After Effects application, you’re prompted to register online. You
can choose to submit the form directly or fax a printed copy. You can also register by filling
out and returning the registration card included with your software package.
When you register, several additional effects become available from the Adobe Web site,
adobe.com, for download. For information, see “Effects included with After Effects” on
page 278.
postproduction of film, motion graphics, video multimedia, and the Web.
1
Installing Adobe After Effects
You must install the After Effects application from the Adobe After Effects CD onto your
hard drive; you cannot run the program from the CD.
Follow the on-screen installation instructions. For more detailed information, see the
How_to_Install.wri
(Windows) or
How_to_Install.txt
(Mac OS) file on the CD.
Learning Adobe After Effects
Adobe provides a variety of options for you to learn After Effects, including online Help
and tool tips. You can also use the Adobe Web site to easily access a host of continually
updated Web resources for learning After Effects, from tips and tutorials to technical
support information.
Page 12

2
Introduction
Adobe Acrobat® Reader™ software, included on the After Effects CD, makes it possible to
view Adobe PDF files. Many of the files on the Adobe Web site are in PDF format.
The phrase “PB only” means that the feature is available only in the Production Bundle
version of After Effects.
Using online Help
The Adobe After Effects 5.0 application includes complete documentation in an HTMLbased help system. It contains essential information on using all of the After Effects
commands, features, and tools, as well as keyboard shortcuts and full-color illustrations.
The HTML format provides easy navigation online. Individual topics can also be printed
out to provide a handy desktop reference.
The online Help assumes you have a working knowledge of your computer and its
operating conventions, including how to use a mouse and standard menus and
commands. It also assumes you know how to open, save, and close files. For help with any
®
of these techniques, please see your Microsoft Windows
To start online Help:
Do one of the following:
or Mac OS™ documentation.
Choose Help > After Effects Help.
•
Press F1 (Windows).
•
Using tool tips
Use the tool tips feature to display the names of tools, buttons, or controls.
To identify a tool, button, or control:
Position the pointer over a tool, button, or control, and pause. A tool tip appears showing
the name and keyboard shortcut (if any) for the item.
Note:
Tool tips are not available in most dialog boxes.
Page 13

ADOBE AFTER EFFECTS 5.0
Using Web resources
If you have an Internet connection and a Web browser installed on your system, you can
access additional resources for learning After Effects located on the Adobe Systems home
page on the World Wide Web. These resources are continually updated.
To access the Adobe home page for your region:
Open the Adobe U.S. home page at www.adobe.com.
1
From the Adobe Sites menu, choose your geographical region. The Adobe home page
2
is customized for several geographical regions.
Using the After Effects product section of the Adobe Web site
The After Effects product section of the Adobe Web site provides a central source for registered After Effects users to access the latest Web content for After Effects. Here you’ll find
the following:
•
Step-by-step tutorials
•
Quick tips that provide fast answers to common problems
User Guide
3
•
Updates, patches, and plug-ins
After Effects Top Issues, containing the latest After Effects technical support solutions
•
Technical guides
•
A searchable database of answers to technical questions
•
Links to user forums
•
To use the After Effects product section on the Adobe Web site:
1
Go to the Adobe home page and search for After Effects.
Register your copy of After Effects.
2
Once you have completed the registration process, follow the link back to After Effects.
3
Page 14

4
Introduction
Using Adobe Online
Adobe Online provides access to the latest products and features that expand your application’s power, including professional services from Adobe and our partners. Bookmarks
are also included to take you quickly to noteworthy Adobe- and After Effects–related sites.
Adobe Online is constantly changing, so you should refresh before you use it. Refreshing
through Adobe Online updates bookmarks and buttons so you can quickly access the most
current content available. You can use preferences to automatically refresh Adobe Online
daily, weekly, or monthly.
When you set up Adobe Online to connect to your Web browser, Adobe can either notify
you whenever new information for Adobe Online is available or automatically download
that information to your hard disk and install it. If you choose not to use the automatic
download feature, you can still view and download new Adobe Online files whenever they
are available by using the Refresh command.
To use Adobe Online:
In After Effects, choose Help > Adobe Online, or click the icon in the Adobe Online
1
toolbar.
Note:
You must have an Internet connection and an Internet browser installed. Adobe Online
will launch your browser using your default Internet configuration.
Do any of the following:
2
Click Refresh to make sure you have the latest version of the Adobe Online window and
•
its buttons, as well as the latest bookmarks. It is important to refresh the screen so that the
current options are available for you to choose from.
•
Click Preferences to specify connection options. General preferences affect how Adobe
Online interacts with all Adobe products installed on your system, and Application preferences affect how Adobe Online interacts with After Effects. To see an explanation of each
preference option, click Setup and follow the prompts. You also can set up an automatic
refresh using the Update Options.
Page 15

ADOBE AFTER EFFECTS 5.0
•
Click any button in the Adobe Online window to open the Web page to which the button
is linked.
•
Click the bookmark button ( ) to view suggested Web sites related to After Effects and
Adobe. These bookmarks are automatically updated as new Web sites become available.
Click Close to return to After Effects.
•
Other learning resources
Other Adobe learning resources are available but are not included with your application.
User Guide
5
Classroom in a Book
Is the official training series for Adobe graphics and publishing
software. This book is developed by experts at Adobe and published by Adobe Press. The
Adobe After Effects Classroom in a Book
information on purchasing
Adobe After Effects Classroom in a Book
includes lessons about using After Effects. For
, visit the Adobe Web
site or contact your local book distributor.
The Adobe Certification program
Offers users, instructors, and training centers the
opportunity to demonstrate their product proficiency and promote their software skills as
Adobe Certified Experts, Adobe Certified Instructors, or Adobe Authorized Learning
Providers. Certification is available for several different geographical regions. Visit the
Partnering with Adobe Web site at www.partners.adobe.com to learn how you can become
certified.
Customer support
When you register your product, you may be entitled to technical support for up to 90 days
from the date of your first call. Terms may vary depending on the country of residence. For
more information, refer to the technical support card provided with the After Effects
software package.
Page 16

6
Introduction
Customer support on Adobe Online
Adobe Online provides access to FAQs (Frequently Asked Questions) and troubleshooting
information that provides solutions to common problems.
Additional customer support resources
Adobe Systems provides several forms of automated technical support:
See the ReadMe file installed with the program for information that became available
•
after this guide went to press.
•
Explore the extensive customer support information on Adobe’s World Wide Web site
(www.adobe.com). To access the Adobe Web site from After Effects, choose Help > Adobe
Online or click the icon in the Adobe Online toolbar. (See “Using Web resources” on
page 3.)
Page 17

Page 18

Page 19

An Overview of Adobe After Effects
This overview introduces you to the key features of After Effects. If you’re an experienced
After Effects user, you may want to scan this overview and then skip to “What’s New in
After Effects 5.0.”
After Effects is available in two versions. The Standard version provides the core 2D/3D
compositing, animation, and effects tools that motion graphics professionals, Web designers, and video professionals need. The Production Bundle version meets the needs of
visual effects professionals, and includes all of the tools in the Standard Version plus additional keying, motion control, and distortion tools, audio effects, 3D channel effects, 16bit-per-channel color, vector paint, and support for network rendering.
Superior Adobe product integration
After Effects features the award-winning Adobe user interface, familiar to anyone who
®
uses Adobe Photoshop
along with Adobe’s popular tabbed palettes, similar tools, and common keyboard shortcuts—make it possible to work more efficiently and move among the programs with ease.
After Effects, Premiere, and Adobe LiveMotion
moving among the applications is a snap. Productivity-boosting features such as the pen
tool, Align palette, rulers and guides, editing tools, and free transform mode work in After
Effects just as they do in other popular Adobe products.
, Adobe Illustrator®, or Adobe Premiere®. The tabbed windows—
™
use a similar time-based interface, so
9
Page 20
10
An Overview of Adobe After Effects
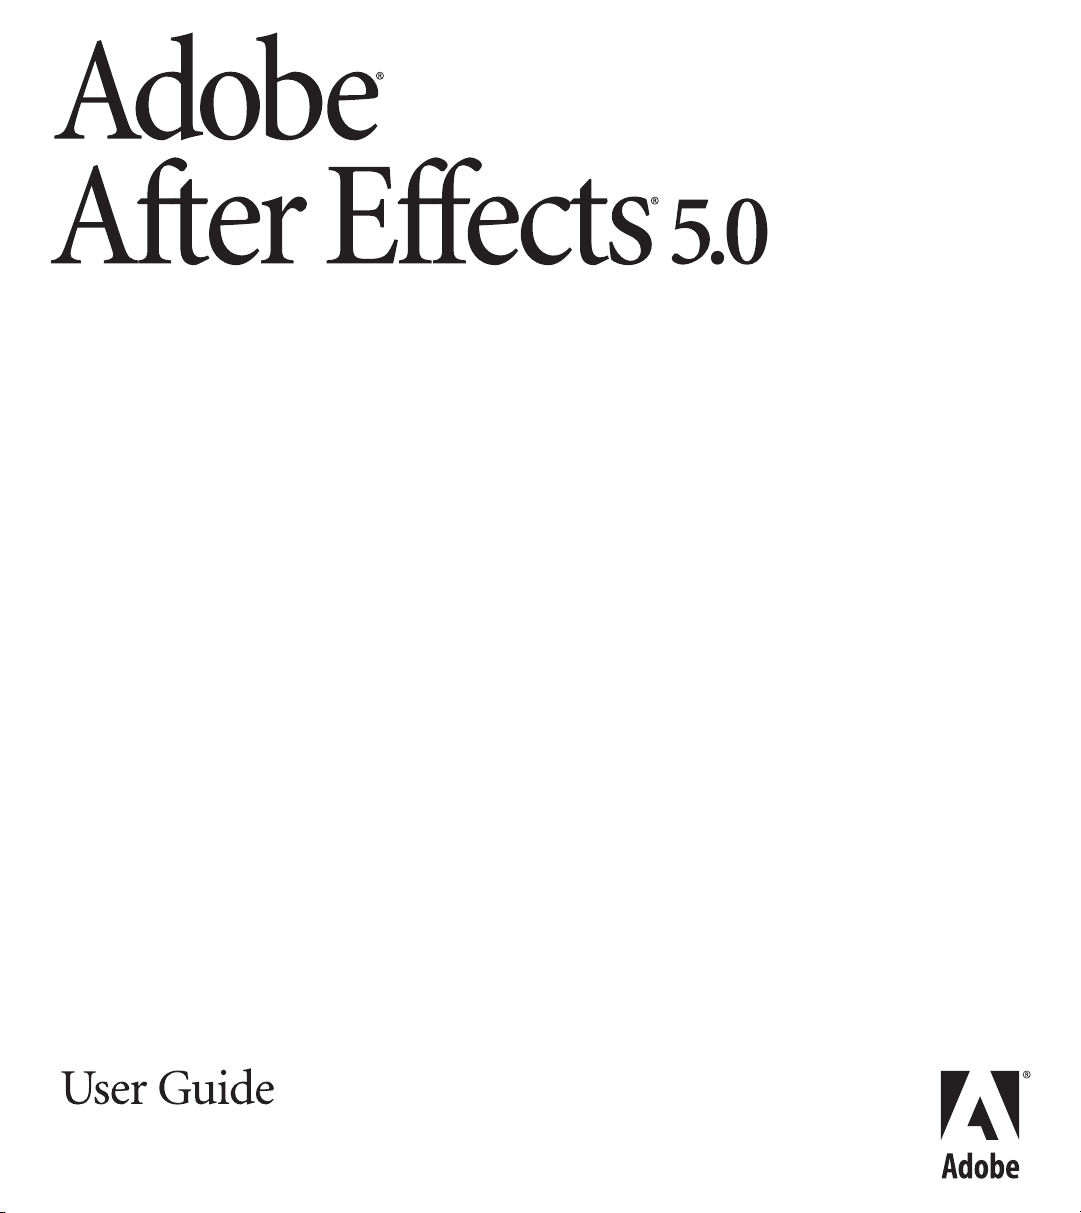
Adobe Photoshop
You can transform layered Photoshop images into animations with complete ease. Import
Photoshop files as compositions one at a time or in batches. After Effects preserves layers,
common layer effects, adjustment layers, alpha channels, transfer modes, vector masks,
and more. You can then apply visual effects to color-correct, stylize, or manipulate each
layer, and animate these layers over time. Use Photoshop paths as mask or motion points.
Move easily between Photoshop and After Effects to complete your work.
When you import a layered Photoshop file as a composition,
After Effects retains layers and other key Photoshop settings.
Adobe Illustrator
Want to add first-rate typography or eye-catching graphics to your motion graphics and
visual effects? Simply import layered files as compositions one at a time or in batches.
Choose whether After Effects preserves the layers or merges them on import. Then resize
the Illustrator layers to any resolution without losing detail, and animate them with
complete control. Copy paths in Illustrator and paste them in After Effects as masks or
motion points. With Illustrator 9 files, you can preserve transparency and transfer modes.
In addition, you can continuously rasterize Illustrator layers in both 2D and 3D.
Page 21

ADOBE AFTER EFFECTS 5.0
Adobe Premiere
After Effects can import Premiere projects as compositions. Each video, audio, and stillimage clip appears on its own layer, arranged in the correct time-based sequence in the
Time Layout window. You can then manipulate these clips to create the sophisticated
effects and animations best produced in After Effects. If you use the After Effects filters
included with Premiere 6, those effects and their associated keyframes are also imported.
In addition, you can embed a link in the After Effects movies you output so that you can
use the Edit Original command in Premiere to open the original project.
Adobe GoLive
When creating a marker in After Effects, you can add a URL link that will be embedded in
rendered movies. When these movies are included in Web pages created by applications
®
such as Adobe GoLive
, the embedded URL is recognized during playback, initiating a
jump to the specified URL. You can even target a specific frame within the Web page.
Adobe LiveMotion
Create elaborate animations in After Effects and then import them into LiveMotion as
™
Macromedia
so moving between the two applications is easy.
Flash™ files. After Effects and LiveMotion use a similar time-based interface,
User Guide
11
Page 22
12
An Overview of Adobe After Effects
Powerful masking
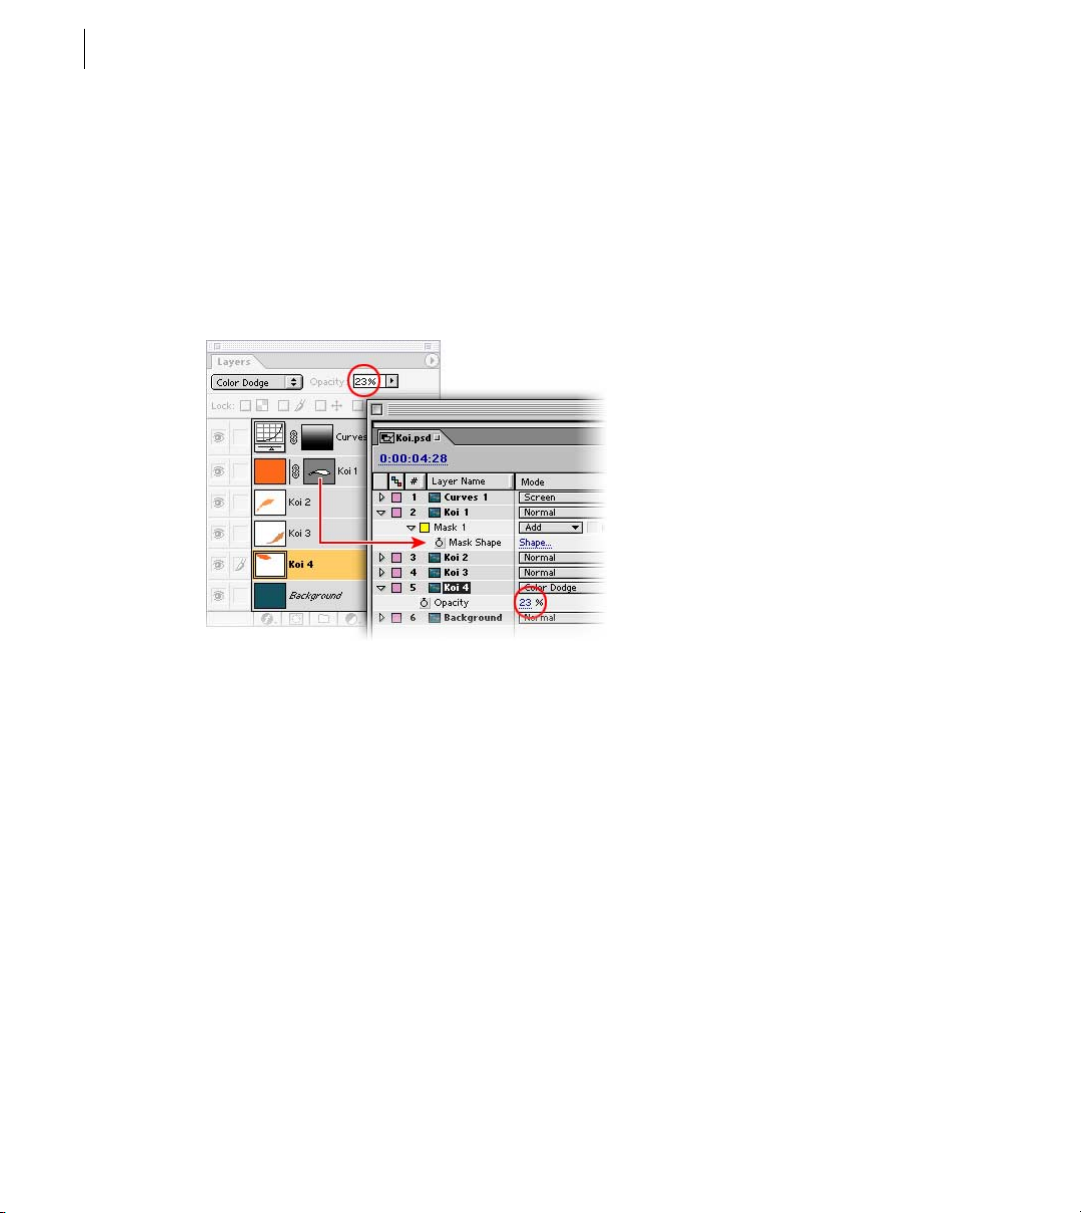
Extensive masking capabilities give you extraordinary control in After Effects. You can
create, edit, and animate as many as 127 masks on every layer. Draw paths to create transparencies or to add new objects to an animation, such as stroked lines—even animate text
along a mask path. Combine paths to make unusual shapes using Boolean operations such
as Add, Subtract, and Intersect. Rotate and scale masks, and apply opacity settings to make
masks appear and disappear over time. Lock masks to protect them from change. You can
even copy and paste masks into your compositions from Adobe Illustrator and Adobe
Photoshop.
After Effects 5 allows multiple masks per layer; you can edit masks
in the Composition window or in Layer windows.
2D & 3D compositing
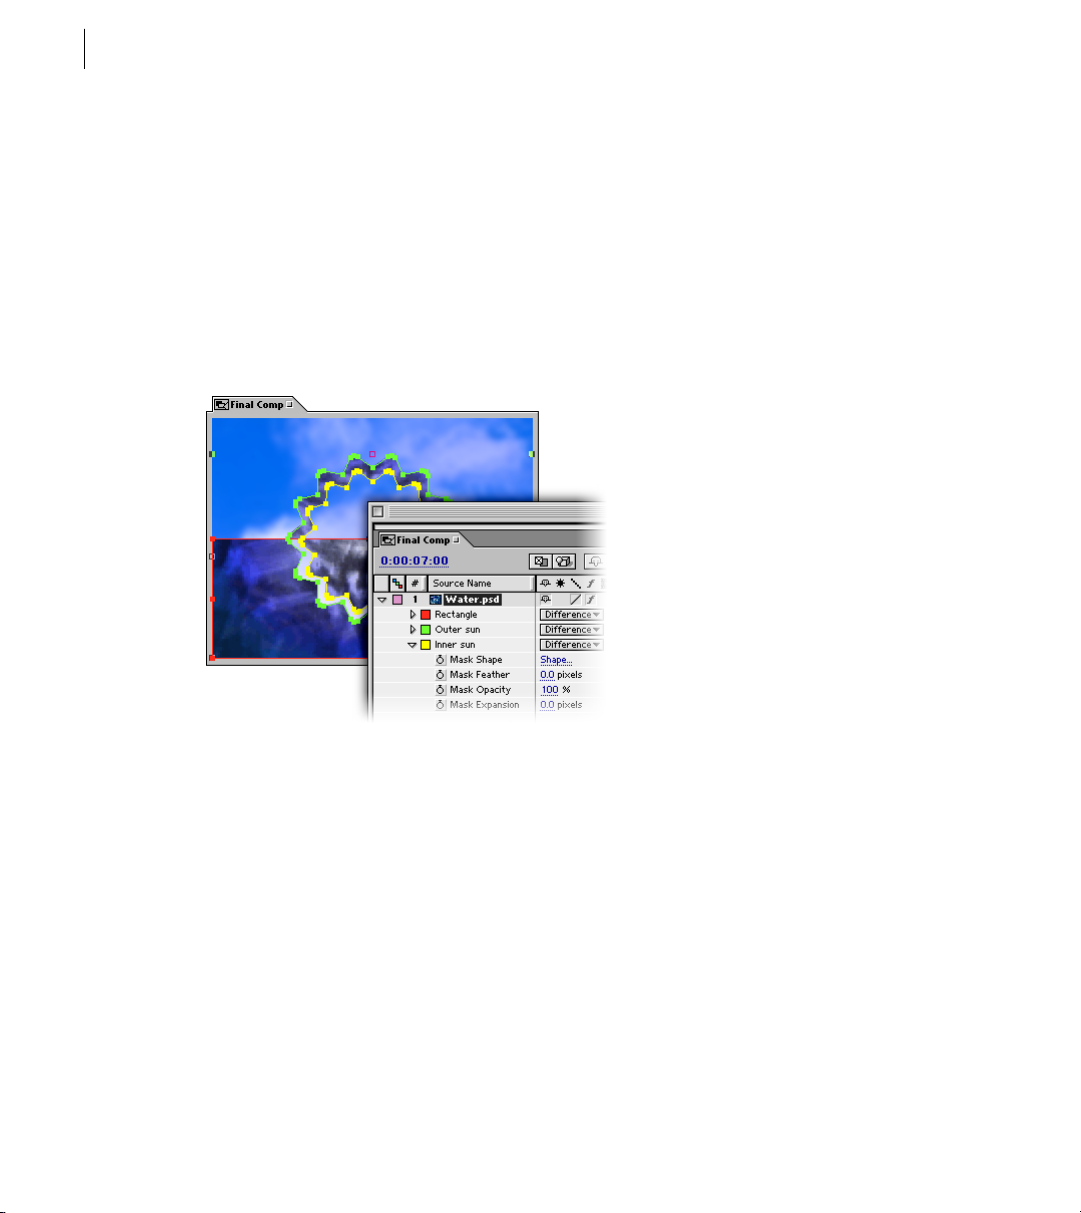
You can work in either 2D or 3D, or mix and match on a layer-by-layer basis. Use the 3D
Layer switch to toggle a layer between 2D and 3D at any time. While both types of layers
can move horizontally or vertically, 3D layers can also animate numerous properties—
such as z-position, xyz-rotation, and orientation—in 3D space while interacting with
lights, shadows, and cameras.
Choose a light type to create a specific look. For example, spot lights provide dramatic
lighting effects by pointing a cone of light at the point you define. Unparalleled shadow
controls determine whether lights cast shadows when they interact with other layers.
Page 23
ADOBE AFTER EFFECTS 5.0
Create as many lights as you need, and then adjust and animate each light’s properties,
controlling its shadow and illumination. Create as many cameras as you need to produce
the results you envision. Enable a Depth of Field setting to automatically change camera
focus between foreground and background information. You can then animate camera
properties such as zoom and focal length, move cameras in space, and cut between cameras.
User Guide
13
Animate layers, cameras, and lights in 3D space.
Extensive motion controls
For impeccable animations, rely on the powerful motion controls in After Effects. Instantly
stagger selected layers over a timeframe with the Sequence Layers Keyframe Assistant. Then
add unlimited keyframes to animate any layer attribute, including position, rotation, scale,
anchor point, and opacity. Position your layers with subpixel accuracy. Refine the look and
movement of your motion paths using roving keyframes. When animating static images,
apply Motion Blur to create more realistic movement. Use Time Remapping to make
frames stutter, play backward, move in slow motion, or freeze. Create sophisticated animations by defining a parent-child relationship between layers. Use expressions to define relationships between parameters so that you can create procedural-type animations without
using keyframes.
Page 24

14
An Overview of Adobe After Effects
Keyframes
Animate layers by setting keyframes for the layer’s properties at different points in time.
Keyframes mark the point in time where you’ve set layer property values. For example,
if you want a layer to expand as the clip plays, you would set two or more keyframes
containing different scale property values.
Motion Sketch and Smoother
Draw animation paths as easily as sketching with a pencil on paper using the Motion
Sketch tool. Simply select the tool and draw the animation path on-screen. Adjust your
drawing speed to vary the velocity of the path. After Effects automatically creates the
keyframes for you. Then use the Smoother tool to smooth the shape of the path and finetune it until the animation moves exactly as you want.
Leading-edge video and audio effects
After Effects delivers powerful, precise tools for creating a limitless range of visual and
audio effects. You can stylize, enhance, and manipulate layers using a wide array of effects
plug-ins; categories include Blur & Sharpen, Channel manipulation, Distortion, Keying,
Perspective, Render, Stylize, Transition, and Audio. Apply an unlimited number of visual
effects to every layer, and animate every control. Save your most frequently used effects
(including keyframes) as Favorites, which you can apply instantly and share with colleagues. Expand your effects toolkit even further with numerous third-party plug-ins.
Use the Path Text effect to move text along a Bezier
path and animate text attributes such as tracking.
Page 25

ADOBE AFTER EFFECTS 5.0
In addition to applying a number of audio effects to your footage files, you can change the
volume levels of audio layers, preview them at a specified quality, and identify and mark
locations. Use the familiar Audio palette to set the volume levels of an audio layer, or use
the Timeline window to view the waveform values and apply time remapping.
Flexible media handling
Take advantage of previewing capabilities in After Effects to see results as you work,
instead of waiting to render movies. With RAM preview, dynamic preview, intelligent
caching, and other preview enhancements, you can specify the quality and speed of your
playback to maximize efficiency.
When you’re ready to convert your final composition for playback on the medium of your
choice, use the versatile Render Queue to render the composition into a finished movie. If
you’re using the Production Bundle version, you can render using a network of computers.
User Guide
15
Page 26
16
An Overview of Adobe After Effects
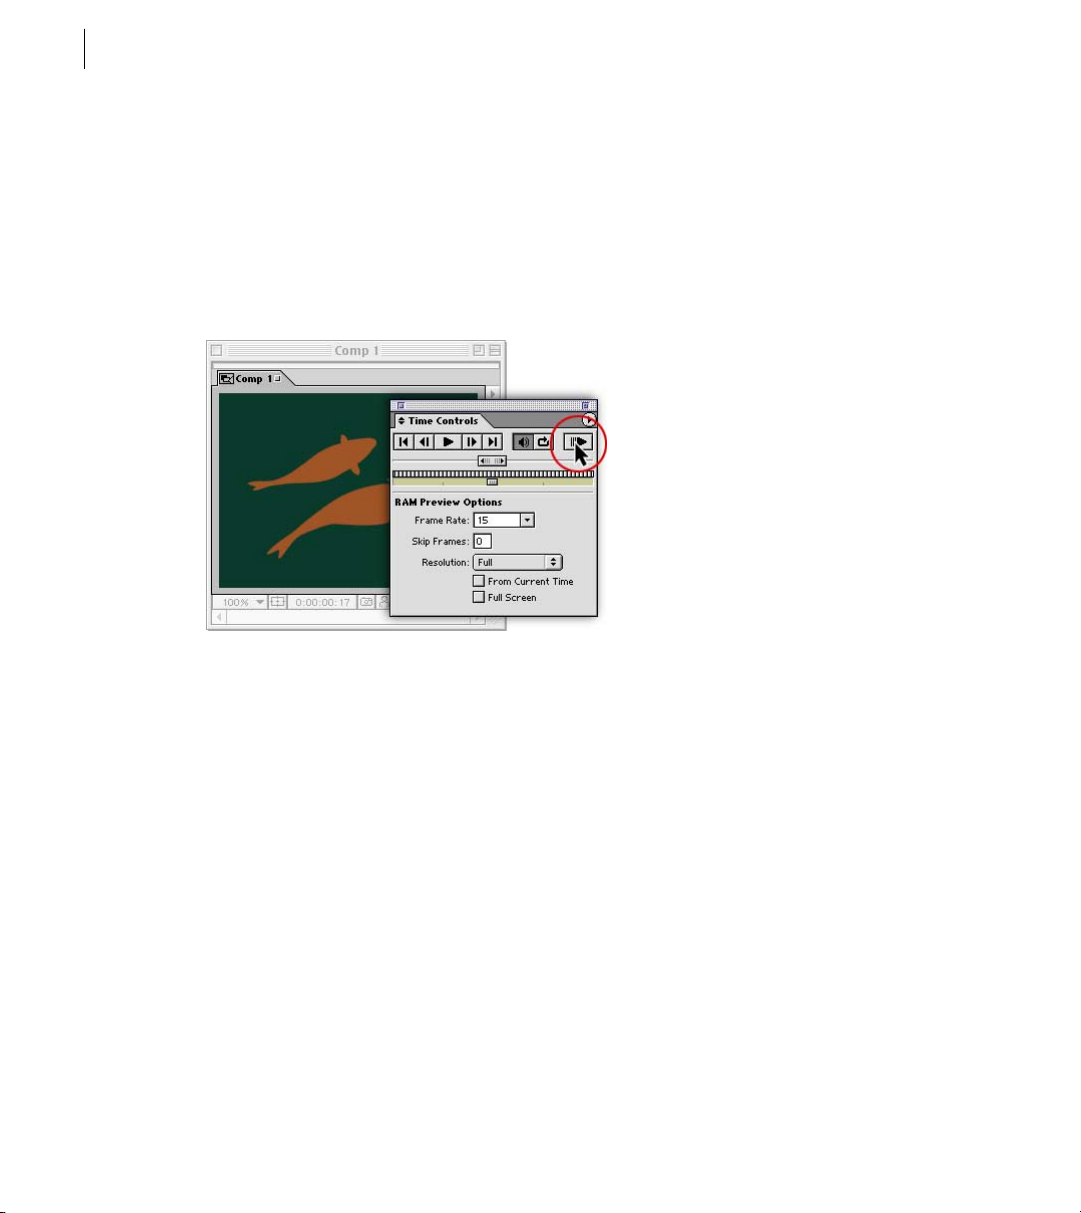
RAM Preview
One of the big challenges in designing motion graphics and visual effects is imagining how
they will look in their final form. Playback controls help, but they don’t really capture the
final experience. That’s what makes the RAM Preview feature so exciting. You can play
back your compositions in real time without having to render them. You can even preview
audio along with the video. If you like the segment that you played back in RAM Preview,
you can save it to a file directly.
RAM Preview lets you play a preview at the frame rate of your
composition, or as fast as your system allows.
To improve performance, you can narrow the region of interest in the Composition
window so that only the specified area of your composition is previewed.
Dynamic preview
Get better visual feedback as you work in the Composition window. Instead of defaulting
to a wireframe view when you move, rotate, scale, or otherwise change elements in a
composition, After Effects transforms layers interactively, displaying results as you make
changes. If the image can’t be updated quickly enough, After Effects temporarily reduces
image resolution to maintain optimal interactivity.
Page 27

ADOBE AFTER EFFECTS 5.0
Intelligent caching
When you view your work in the Composition window—either by scrubbing along the
timeline or using the RAM Preview option—After Effects stores, or caches, frames in memory. Cached frames are saved until you make an edit to the composition that renders them
obsolete, allowing for faster previews. For example, changing a single keyframe now causes
only cached frames between the keyframe you modified and adjacent ones to be invalidated.
A green bar beneath the time scale in the Timeline window indicates cached frames.
Resolution independence
You can mix file resolutions from tiny thumbnails up to 30,000-x-30,000-pixel frames
within a composition. For example, you could import a high-resolution Adobe Photoshop
image into a lower-resolution composition to create a panning background. When you’re
done, you can output files at any resolution—from the small sizes preferred for animated
GIF files to the high-resolution output required for film.
Render queue
Using the Render queue, you can prepare your files once and then output them to film,
video, multimedia, or the Web with equal ease. Perform multiple renders of a composition
in various sizes and formats simultaneously, or batch-render any number of different
compositions. You can even save render templates for future use.
User Guide
17
In addition, the Collect Files command helps you gather files for rendering or archiving.
This command automatically copies a project and all of its associated source footage to a
single location, along with a report that lists the footage, effects, and fonts necessary to
render the project.
Page 28

18
An Overview of Adobe After Effects
Web delivery
After Effects includes several features that optimize output for Web delivery, including Macromedia Flash support, embedded URLs, audio compression, and QuickTime streaming.
Macromedia Flash (SWF) support
Export compositions, including audio, as compact, vector-based Flash (SWF) files for use
on the Web. You can control whether effects are rasterized as JPEG frames or ignored; you
can also generate an HTML report that provides details on the elements that were skipped.
Embed URLs in Web output
Create URL flips in exported Flash files and QuickTime movies by associating an
embedded URL with a layer marker.
Audio compression
Both QuickTime and MP3 audio compression codecs are now supported, so you can
create files that are even quicker to download on the Web.
QuickTime streaming
Instead of using the After Effects Render Queue, you can export items using components
provided by QuickTime. With this QuickTime support, you can prepare streaming video
and audio for Web distribution and export AVI files on Windows and Mac OS platforms.
If you install new QuickTime export components as they become available from Apple or
other third parties, those modules appear on the File > Export submenu in After Effects.
Page 29

ADOBE AFTER EFFECTS 5.0
Production Bundle features
To meet the needs of different audiences, After Effects is available in two versions—the
Standard version and the Production Bundle version.
Visual effects
After Effects offers a variety of exciting types of visual effects including Warping and
Particle Playground. You can warp images over time using Bézier Warp, Mesh Warp,
and Reshape effects; displace pixels from one layer to another using Displacement Map;
or apply the Glow effect to create a diffuse halo along an object’s edge. With Particle
Playground, you can animate a large number of objects (dots, images, or text) so that they
move independently and yet produce consistent group behavior. Use Fractal Noise to create
textures and objects that cannot be described using simple geometric shapes. Other effects
include Corner Pin, Lightning, Scatter, Ripple, Bulge, Wave Warp, Optics Compensation,
and Twirl.
User Guide
19
The Displacement Map effect was applied to the fish’s
shadow to make it move realistically over the ocean floor.
Page 30
20
An Overview of Adobe After Effects
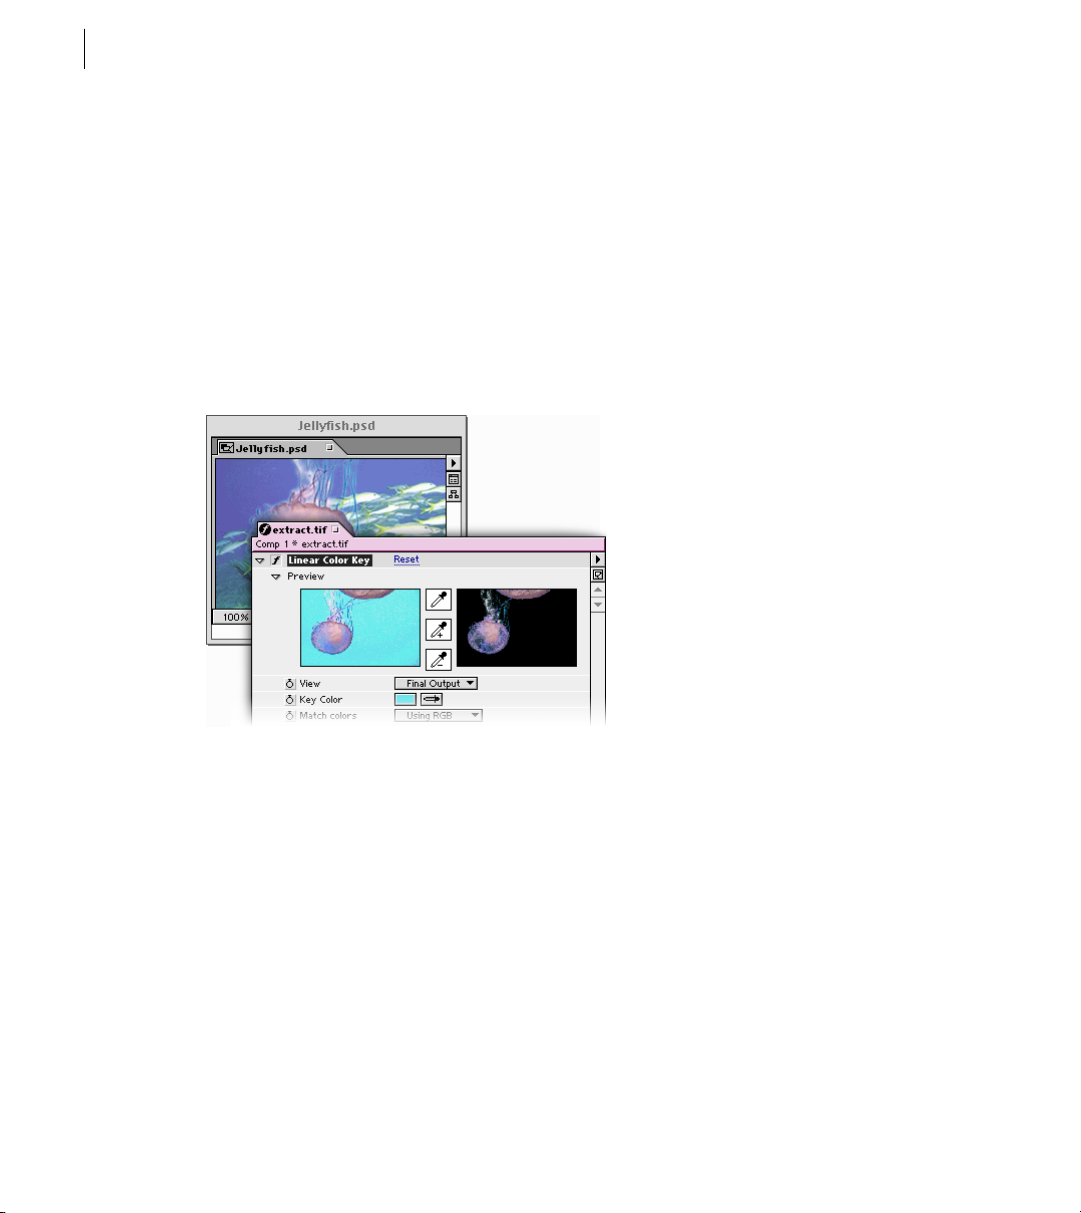
Keying effects
The Production Bundle of After Effects delivers sophisticated keying controls for producing
precise composites. The Linear Color Key uses the RGB, hue, or chroma information you
specify to create transparency from a key color. With the Color Difference key, you can
produce combination mattes to control hard-to-key images such as smoke, shadows, or
glass. The Spill Suppressor makes it easy to remove key-color traces from light reflecting off
a screen and onto your subject. Create clean mattes with the Simple Choker, or choke and
spread the matte to create clean edges with the Matte Choker. The Inner/Outer Key effect
makes it easy to extract an object from its background. And you can perform other specialized keying tasks with the Extract, Difference Matte, Color Range, and Alpha Levels keys.
After Effects color keying lets you isolate objects from a colored
background for compositing with different layers.
Motion tools
From reducing unwanted motion to creating natural-looking zoom effects, After
Effects delivers the tools you need to produce the highest-quality animations. Use the
Motion Tracker to isolate a moving element on one layer and precisely track it to a moving
element on another layer. The Motion Stabilizer tracks a single element on a layer to
stabilize unwanted motion. With the Wiggler, you can simulate more realistic motion by
adding random changes to any property over time.
Page 31

ADOBE AFTER EFFECTS 5.0
Automate the creation of motion and effects by writing custom scripts with the Motion
Math tool—or run the Motion Math scripts included with After Effects. You can even
simulate the accelerating effect of a zoom lens using the Exponential Scale tool, which
converts linear scaling of a layer to exponential scaling.
Audio effects
The Production Bundle expands the range of high-quality audio effects you can incorporate into a composition. Add depth and character to a sound with Flange, or make one
voice or instrument sound like many with Chorus. Apply Parametric EQ to isolate and finetune specific ranges of sound. With Reverb, simulate a spacious, acoustically live interior.
Create simple tonal sounds (such as a doorbell) by applying Tone, or use Modulator to
precisely control audio delay and modulation, creating echo and chorus effects. You can
also enhance sounds by removing high and low frequencies with the High-Low Pass filter.
3D Channel effects
Use the 3D Channel effects to create effects with the auxiliary channel information stored
in imported 3D files, including RLA, Softimage PIC/ZPIC, and ElectricImage EI/EIZ files.
Use the Depth Matte effect to read the z-depth information in a 3D file, and then slice the
image along the z-axis to insert other objects. The Depth of Field Blur effect simulates a
camera that focuses on one area in a 3D scene while allowing other areas to blur. The ID
Matte isolates objects in a 3D scene for editing. The 3D Fog effect applies a fog effect along
the z-axis, so that distant parts of a 3D scene look hazier or even disappear. The 3D
Channel Extract effect makes auxiliary channels visible as either grayscale or multichannel
color images, which you can use as image maps or in other specialized effects.
User Guide
21
The 3D fog effect applies a fog effect along the z-axis of the 3D file.
Page 32

22
An Overview of Adobe After Effects
Render Engine
Take advantage of network rendering using the Render Engine, which includes an unlimited license. Install multiple copies to streamline your rendering process. Each Render
Engine can monitor a Watch folder on a network. If you use the Collect Files command to
copy projects (and their associated footage) to this Watch folder, each Render Engine starts
rendering those projects as soon as they appear. You can monitor the progress using a standard Web browser.
When you save an After Effects project to a Watch folder,
multiple computers can render individual frames
and compositions of the project.
16-bit-per-channel color
Deep color support means that you get higher-quality output. After Effects 5.0 can work
in 16-bit-per-channel mode, making a larger range of colors available. And when you
work with high-resolution images that use a narrow range of colors, such as when you’re
creating film effects or output for HDTV, the difference is easily visible: transitions
between colors are smoother with less visible banding, and more detail is preserved.
Page 33

ADOBE AFTER EFFECTS 5.0
You can choose whether to work in 8-bit-per-channel or 16-bit-per-channel color mode for
each project. You can directly import 16-bit images, including those from Photoshop, and
you can composite and color-correct footage in 16-bit mode; the Info palette displays 16bit color values with exact precision. To optimize performance, quickly rough out a composition in 8-bit color mode, and then finalize and output 16-bit files for maximum quality.
Vector paint tools
The nondestructive vector paint tools in After Effects 5.0 open up a host of new creative possibilities, from strokes that reveal an image over time to animated cartoons and painted textures that change from frame to frame. Use brush controls to specify exactly how the strokes
you paint will look. Characteristics such as brush radius, color, and opacity can be modified
to get the exact desired look. Use the Onion Skin mode to paint strokes frame by frame. Take
advantage of numerous options to control how the paint strokes interact with the layer they
appear on. For more control over the final results, you can also choose whether strokes continuously paint or are recorded to the current frame, to sequential frames, or in real time.
User Guide
23
Vector Paint lets you paint strokes over time.
Page 34

Page 35

Page 36

Page 37

What’s New in After Effects 5.0
After Effects is a powerful upgrade to the award-winning motion graphics and visual
effects software. Its versatile and powerful new features enable a flexible workflow tailored
to your needs.
Precise control
New features such as 3D compositing, layer parenting, vector paint tools, and expressions
open creative possibilities. Masking enhancements and dozens of new effects offer creative
control.
3D compositing
Built-in support for 3D compositing means you can add new depth to your creative ideas.
Mix 2D and 3D layers in a single composition, create and animate lights and cameras,
define shadow characteristics, control how 3D layers interact with light sources, and much
more.
27
Parenting
Animate layers hierarchically by defining a parent-child relationship between any two
layers. The child layer automatically inherits all of the transformations applied to the
parent.
Vector paint tools (Production Bundle only)
Use nondestructive vector paint tools to reveal an image over time, draw animated
cartoons, and much more. Select brush options; choose whether strokes are recorded to
the current frame, to sequential frames, in real time, or continuously; and specify how
strokes are played back. Wiggle controls make it easy to create a hand-animated look or a
variety of special effects.
Page 38

28
What’s New in After Effects 5.0
Expressions
Define relationships between parameters to create procedural animations without using
keyframes. You can now link the behavior of one property in a composition to almost any
other property on any other layer—a powerful new capability that’s also easy to use. You
can also use JavaScript to modify expressions.
New effects
After Effects 5.0 includes powerful new effects that offer new creative options. Use the
Shatter effect to extrude a layer into 3D space and then demolish it in a variety of ways.
Create radio waves, pond ripples, and the like with the Radio Waves effect. Easily extract
an object from its background with the Inner/Outer Key effect (Production Bundle only).
Use the Vegas effect to outline elements with casino-style running lights or flashes. Create
compositions that pulse with color using the Colorama effect. Simulate organic
backgrounds and create fractal-based displacement maps, textures, and mattes with the
Fractal Noise effect (Production Bundle only). Add or remove lens distortions with the
Optics Compensation effect (Production Bundle only).
Masking enhancements
Create masks on the fly by drawing them directly in the Composition window, assign
colors to masks for easy identification, and use the new Mask Expansion property to adjust
the inner or outer feather of a mask by insetting or outsetting the mask edge from the mask
shape.
Enhanced productivity
Smart performance enhancements mean that creating and refining your work is faster
than ever. Dozens of interface enhancements introduce significant improvements that
provide a more efficient and streamlined workflow. Plus, After Effects delivers tighter
integration with Photoshop, Illustrator, and Premiere.
Page 39

ADOBE AFTER EFFECTS 5.0
Intelligent caching
When you make changes to a composition, only the cached frames affected by the edit are
invalidated—so only those frames need to be re-rendered when you preview the composition. This uses RAM more efficiently and results in much faster previewing. A thin green
bar beneath the time scale in the Timeline window indicates cached frames, so you can see
at a glance how many are currently cached.
Dynamic previews
After Effects now previews layers interactively so you see results as you make changes. To
maintain optimal interactivity, After Effects may temporarily drop image resolution.
Improved RAM Previews
Define a Region of Interest that displays just a portion of the composition in order to
create longer previews more quickly. View RAM Previews in the Footage and Layer
windows or in full-screen mode; specify whether to preview a continuous loop, a single
segment, or a palindrome; and define two different sets of RAM Preview options to get the
preview quality most relevant to your work.
User Guide
29
Enhanced integration with Adobe software
Work with vector masks and preserve 16-bit color info when you import Adobe
Photoshop 6 files. When you import Adobe Illustrator 9 files using the PDF file format,
transparency settings and transfer modes can be preserved. Embed a link in the After
Effects movies you output so that you can use the Edit Original command in Adobe
Premiere to open the original project.
Property values are scrubbable hot text
Enter values directly in the Timeline and Effects Control windows or scrub across a value
(scrub hot text) to interactively preview property value settings.
Unified Import dialog
Use a single dialog box for footage, projects, multilayered Photoshop and Illustrator files,
and more.
Page 40

30
What’s New in After Effects 5.0
More flexible composition settings
Specify a different starting timecode for each composition, and save frequently used
composition settings as custom presets. Specify Motion Blur shutter angles up to 720
degrees and set phase controls that determine when the shutter opens relative to the start
of each frame.
Streamlined media management
Manage complex projects with ease. The order in which you select footage in the Project
window now determines the stacking order of layers when you drag items to the Timeline
window, and you can now drag footage into position in the layer stacking order or on the
timeline. Use the new Find command to locate source files in the Project window, and the
new Reveal command to locate source files on disk. Clear unused source files and compositions from the project with the Reduce Project command, and shrink the duration of a
composition to the current work area with the Trim Comp to Work Area command.
New editing tools
Streamline the process of constructing and refining compositions with new Ripple Insert,
Overlay, Lift Work Area, and Extract Work Area commands. Slip-edit a trimmed footage
layer simply by dragging the trimmed portion of the layer left or right.
Easier to learn
Access commands for basic tasks, such as setting keyframes, from the main menus, and
use richer context-sensitive menus. Expanded tool tips and a Tip of the Day help new users
get up to speed fast.
Page 41

ADOBE AFTER EFFECTS 5.0
Versatile output options
After Effects delivers the most versatile motion graphics and visual effects toolkit available
today, so you can produce high-quality output for film, video, multimedia, and the Web.
New 16-bit-per-channel color support (Production Bundle only) ensures the finest
quality for film and HDTV, while support for Macromedia Flash (SWF) export means that
your work can play on the hottest Web sites.
Macromedia Flash (SWF) output
Export compositions as compact, vector-based Flash (SWF) files. Control how images and
QuickTime footage are handled; generate an HTML report with process details.
Embed URLs in Web output
Create URL flips in exported Flash files and QuickTime movies by associating an
embedded URL with a layer marker.
Audio compression
Use QuickTime or MP3 audio compression codecs to create files that download quickly.
User Guide
31
16-bit-per-channel color support (Production Bundle only)
Work in 16-bit-per-channel mode to access a vastly larger range of colors for the highestquality output. Choose to work in 8-bit-per-channel or 16-bit-per-channel color mode on
a project-by-project basis.
Support for third-party technologies
Take advantage of the latest technologies. Import and export Microsoft DirectShow files
directly.
Page 42

Page 43

1
Page 44

Page 45

Chapter 1: Working with
Projects, Windows, and Palettes
dobe After Effects is a powerful tool for 2D and 3D compositing, animation, and
visual effects. You can composite layers in a variety of ways, apply and combine
sophisticated visual and audio effects, and animate both objects and effects.
A
In After Effects, every animation starts as a project—a collection of digital video footage,
still images (such as Adobe Illustrator or Adobe Photoshop files), and audio files, which
you arrange in compositions within the project.
Working in a project
An After Effects project is a single file that stores references to all the footage you use in that
project. It also contains information about how you’ve arranged the footage in compositions, including the details of any effects or animation you applied. Inside a project, you
create one or more compositions. After you have imported source footage into the project,
you can add footage items into the compositions.
35
Where you work with footage items
In a project, you work with footage items using primarily three windows: the Project
window, which lists all the source footage items you import; the Composition window,
which displays images as they relate in space; and the Timeline window, which displays
compositions and animation events in terms of time. Add footage items to a composition
by dragging them from the Project window into either the Composition window or the
Timeline window.
Page 46

CHAPTER 1
36
Working with Projects, Windows, and Palettes
Each Composition window has a corresponding Timeline window. When you edit a
composition in a Composition window, After Effects automatically displays the corresponding Timeline window, and vice versa.
B
A
A. Source footage B. Project window C. Composition window D. Timeline window
D
C
As you work with compositions, you also use three other types of windows: Footage
windows, Layer windows, and Effect Controls windows.
• Footage windows are useful for viewing and evaluating footage items in their original
form (see “Viewing imported footage” on page 93).
• To view a layer’s original source independently of other layers or to trim footage, you can
open a Layer window (see “Composition, Layer, and Footage window controls” on
page 53).
• As you work with effects, you use the Effect Controls window to modify and animate the
effects (see “Working with effects” on page 269).
When you render your compositions into a movie, you work in the Render Queue window
to select rendering options and queue compositions for rendering (see “Using the Render
Queue window” on page 355).
Page 47

ADOBE AFTER EFFECTS 5.0
How you start a project
Starting a project involves two tasks: (1) planning your project based on the formats of the
final output and (2) creating a project file. Once you have planned your project and
learned how to perform some basic tasks related to working in After Effects, you’ll be ready
to start importing footage (see “Importing files into a project” on page 68). You then
create a composition and begin working with your source footage (see “Working with
imported footage” on page 93).
Planning your project
Planning your project before you start importing footage makes your work easier. A
large part of planning is simply determining the best settings for your source footage
based on the media for which you will render your finished project. This step is
essential to achieving optimal image quality. Rendering order and nesting may also be
part of project planning (see “Organizing a project using nesting” on page 342).
Choosing the right media
Before you start importing footage items into your project, decide which media you’ll
use for your finished movies. Then determine the best settings for your compositions
and source material. For example, if you will be rendering your project to videotape,
create footage at an image size, color bit-depth, and frame rate that will produce the best
image quality on videotape. Likewise, if your project is intended for streaming video on
the Web, the image size, color bit-depth, and frame rate may need to be reduced to work
with the data-rate limits of streaming video on the Web. However, any footage item that
can be imported can be used in any composition.
User Guide
37
If you will be rendering a project to more than one media format, always match the
resolution setting for your composition to the highest resolution setting used for your
output. Then set up the Render Queue window to render a separate version of the project
for each format.
Page 48

CHAPTER 1
38
Working with Projects, Windows, and Palettes
For film and video, try to match import and composition settings with settings in the
output module used to render a movie. For example, to ensure smooth playback, the
footage frame rate selected in the Interpret Footage dialog box should match the setting in
the Composition Settings dialog box and the output module in the Render Queue
window. Also, the composition-frame size should be determined by the image size in the
playback medium. However, any footage item that can be imported can be used in any
composition. See “Preparing motion-footage frame rates for final output” on page 84,
“Understanding basic composition settings” on page 103, and “Changing output module
settings” on page 361.
If you will be mixing source footage with different pixel aspect ratios, correctly specify this
ratio for each footage item in the Interpret Footage dialog box. See online Help.
The suggestions that follow will help you select composition settings. However, the best
way to ensure that your project is suitable for a specific medium is to make a test composition and view it using the same type of equipment your audience will use to view it.
Film If you will be rendering for film, consider both the aspect ratio of the frame size you
select for your composition and the frame rate of your source footage. For footage that was
transferred from film to video using the 3:2 pulldown telecine method, you must remove
3:2 pulldown before adding effects. See “Removing 3:2 pulldown from video transferred
from film” on page 87.
CD-ROM When you create a movie that you plan to render for playback from a CD-ROM,
you may need to specify import and composition settings that take into account the wide
range of hardware that your audience may be using, possibly including older single- or
double-speed CD-ROM drives.
To make your final output compatible with older CD-ROM drives, try to reduce the datatransfer rate of your final output by specifying certain settings for footage items:
• Lower the frame rate as far as you can in the Composition Settings dialog box without
making motion seem too jerky. Start at 15 frames per second (fps).
• When rendering your final composition, choose a file type and compressor/decom-
pressor (codec) appropriate for the final media. For example, for a cross-platform CDROM, you might specify a QuickTime codec or a codec designed for low data rates, such
as Indeo, Cinepak, or Sorenson Video. Regardless of which codec you select, however, it
must be available on the system used by your intended audience to ensure successful
playback. Also consider the key frame rate of the codec you have selected. See the Adobe
Web site for more information on QuickTime compressors and codec key frame rates.
Page 49

ADOBE AFTER EFFECTS 5.0
Videotape If your final output will be videotape, set up your composition with a specific
video format in mind, such as NTSC or PAL. Using broadcast-safe colors and maintaining
frame size and compression ratios are also important considerations. These guidelines will
help in setting up a composition intended for videotape:
• Select a frame size in the Composition Settings dialog box that matches the frame size of
the destination video format.
• Use only NTSC-safe colors when adding or changing color in a project.
• If you will be using an MJPEG codec, keep in mind that the frame sizes and resolutions
available for rendering are determined by the specific MJPEG board you are using. Refer
to the specifications for your MJPEG board.
Animated GIF When you render an animated GIF, colors are dithered to an 8-bit palette.
Before rendering your final project, render a test composition so that you can adjust colors
if the results are not what you expected. If any source footage includes an alpha channel,
be sure that you know how it will affect your final project before you start rendering.
Streaming video over the World Wide Web Streaming video resembles a conventional
television signal in that video is sent to the viewer frame by frame, instead of by
downloading a large file to the hard disk. Streaming video on the Web is constrained by
the limited bandwidth (56 Kbps or less) of most consumer modems, which is even lower
than those used for CD-ROM playback. Use the same techniques that are listed for CDROM playback, but adapt them for further reduction in file size and data-transfer rate.
You can export QuickTime streaming directly from After Effects. See “Exporting footage
using QuickTime components” on page 369.
User Guide
39
Downloading video over the World Wide Web If your final output will be downloaded as
a file from the World Wide Web, the main concern is the size of the file, which directly
affects how long it takes to download the file. QuickTime and Microsoft Video for
Windows are formats often used when rendering final output that will be downloaded.
When you render a QuickTime movie, After Effects automatically creates a movie that can
play on both Windows and Mac OS without modification.
Intranet playback An intranet is an in-house or private network that uses Internet
network protocols. Intranets generally use higher-quality communications lines than
standard telephone lines, so they are usually much faster than the Internet. The datatransfer rate for playback can be 100K per second or faster, depending on the speed of your
intranet.
Page 50

CHAPTER 1
40
Working with Projects, Windows, and Palettes
Flash (.swf) files When you export compositions as Flash (.swf) movies, After Effects
maintains vectors as much as possible. However, some items cannot be represented as
vectors in the Flash file. See “Exporting to Macromedia Flash (SWF) format” on page 365.
Considerations for cross-platform projects
After Effects project files are compatible with both the Mac OS and Windows platforms.
You can do several things to ease the process of exchanging projects between platforms.
Project hierarchy When you move a project to a different computer and open it, After
Effects attempts to locate the project’s footage files, first looking in the folder in which the
project file is located, second using the file’s original path or folder location, and third
searching the root of the directory where the project is located.
If you are building cross-platform projects, it is best if the full paths have the same names
on Mac OS and Windows systems. If the footage is on a different volume than the project,
make sure that the appropriate volume is mounted before opening the project, and that
network volume names are the same on both systems.
It helps to store footage in the same folder as the project file or in another folder within
that folder. Here's a sample hierarchy:
c:\newproject\project_file.aep
c:\newproject\source\footage1.psd
c:\newproject\source\footage2.avi
The newproject folder can then be copied in its entirety across platforms, and After Effects
will properly locate all of the footage.
File-naming conventions When possible, name your footage and project files with
Windows-compatible filename extensions, such as .mov for QuickTime movies and .aep
for After Effects projects. If files will be used on the World Wide Web, be sure that
filenames adhere to the appropriate conventions for extensions and paths.
Mac OS file types On Mac OS systems, footage files should have proper Mac OS file types.
Using services for Macintosh in Windows NT Server or Windows 2000 Server, you can set
up explicit extension-to-file-type mappings; see the system’s server documentation. If
footage files are not properly recognized on Mac OS systems, select All Files for Show in
the Import File dialog box to override the Mac OS file types. To open a Windows project
on a Mac OS system, the project must have the correct .aep extension.
Page 51

ADOBE AFTER EFFECTS 5.0
For a list of common extensions and their associated file types, see the Adobe Web
site.
Resources Ensure that all resources are available on both systems. Resources can include
fonts, effects, and compressors.
Time basics
Time is central to many operations in After Effects. You can view, specify, and manage time
in various ways. Whichever way you handle time, there are several specific time concepts
you should understand as you create a project.
Time display
The way you view and specify time in After Effects depends on the display style, or unit of
measure, that you use to describe time. By default, After Effects displays time in Society of
Motion Picture and Television Engineers (SMPTE) timecode: hours, minutes, seconds,
and frames. You can change to another system of time display, such as film frames, or feet
and frames of 16mm or 35mm film. See “Setting time-display options” on page 42.
User Guide
41
Video-editing workstations use SMPTE timecode that is often striped (encoded) onto
videotape for reference. If you are creating video that will be synchronized with video that
uses SMPTE timecode, use the default timecode display style.
Frame rate
Each composition you create can have its own frame rate. The frame rate is the number of
frames the rendered composition produces in every second when played back. The frame
rate you use is generally determined by the type of output you will produce. For example,
video for NTSC television plays at 29.97 frames per second (fps), and PAL plays at 25 fps.
When you set up changes over time, After Effects treats the changes as continuous
throughout a composition timeline. Each frame is rendered as a slice out of the timeline
at the frame rate you specify. Because After Effects treats time continuously, it is possible
to change a composition’s frame rate at any time or override the frame rate of a composition when you render the final movie. See “Setting frame rate” on page 105.
Page 52

CHAPTER 1
42
Working with Projects, Windows, and Palettes
NTSC (29.97) drop-frame timecode
When you work with a composition that is set to a frame rate of 29.97 fps, After Effects
uses SMPTE 30-fps drop-frame timecode by default, making adjustments using the
SMPTE-standard method of renumbering the first two frame numbers of every minute,
except at every tenth minute. For example, the frame after 59:29 is labeled 1:00:02 instead
of 1:00:00. Non-drop-frame timecode is also available. In both cases, frames are not
discarded or skipped; they are merely numbered differently.
After Effects displays drop-frame timecode by using semicolons between the numbers and
displays non-drop-frame timecode using colons between the numbers. In the Project
Settings dialog box, you can choose how 29.97-fps compositions and footage display their
timecode. See “Setting time-display options” on page 42.
Duration
Each video footage item, layer, and composition in a project has its own duration.
Duration determines the beginning and ending times of the timelines in the Footage,
Layer, and Timeline windows. It is important to notice which duration you are viewing
while you edit in multiple windows. See “Understanding trimming” on page 139 and
“Positioning a layer in time” on page 132.
Frames and fields
Each frame in an interlaced video source is made up of fields. It’s important not to
confuse frames with fields. For video, every frame contains two interlaced fields. If
you want to use interlaced video as source footage, you’ll usually want After Effects to
separate the interlaced fields. Separating fields ensures maximum image quality when
you apply animations and effects to video that was originally interlaced. If you’re
producing a movie for videotape, you can render the composition to fields in a
process known as field-rendering. See online Help and “Field rendering” on page 87.
Setting time-display options
After Effects supports several methods of measuring and displaying time. The method you
choose applies to time display in the current project and in any subsequent project you
create. Changing the method does not alter the frame rate of footage or a composition—
it changes only how frames are numbered. You can choose from three time-display
options:
Page 53

ADOBE AFTER EFFECTS 5.0
• Timecode, which counts frames in frames per second (hours, minutes, seconds,
frames).
• Frames, which counts frames of footage without reference to time.
• Feet and Frames, which counts feet of 16mm or 35mm motion-picture film, and
counts fractions of feet in frames; 35mm film has 16 frames per foot, and 16mm film
has 40 frames per foot.
ABC
A. Timecode B. Frames C. Feet and Frames
When working with footage digitized from NTSC video, you usually use the 30-fps, dropframe timecode base. This counts NTSC-created frames using standard drop-frame
timecode for maximum device compatibility. For frames (or feet and frames) timecode,
you can also change the starting frame number to match the time-counting method of
another editing system you may be using.
User Guide
43
To change the time display:
1 Open the project and choose File > Project Settings.
2 Select a time setting:
• To use timecode, click Timecode Base, and then select a frame rate from the Timecode
pop-up menu.
• To use drop-frame time code for footage and compositions with a frame rate of 29.97
fps, click Timecode Base, and then select 30 fps from the Timecode Base pop-up menu and
Drop Frame from the NTSC menu.
• To use non-drop-frame timecode for footage and compositions with a frame rate of
29.97 fps, click Timecode Base and then select 30 fps from the Timecode Base pop-up
menu and Non-Drop Frame from the NTSC menu.
• To use frames for the display style, click Frames.
• To use feet and frames for the display style, click Feet + Frames, and then choose a film
type from the Feet + Frames pop-up menu.
Page 54

CHAPTER 1
44
Working with Projects, Windows, and Palettes
3 If desired, type a value in the Start Numbering Frames At option. This value applies
only when you have chosen Frames or Feet + Frames.
4 Click OK.
To instantly cycle through Timecode, Frames, and Feet + Frames, Ctrl+click (Windows)
or Command+click (Mac OS) the timecode display at the bottom of the Composition
window or at the top of the Timeline window.
Setting up a project
After you create a new project, you import footage into the project. You can also specify
project settings or application-wide preferences.
Creating a new project
By default, After Effects opens a new Project window when you start the application.
When you know the media for your final project, you are ready to create a project by
importing your footage items into a new Project window. You can also open a new Project
window at any time from the File menu. See “Working with the Project window” on
page 51.
To create a new project after closing the current project in After Effects:
Choose File > New > New Project.
Importing footage items
When you import a footage item, After Effects creates only a reference to the file and does
not copy or move the file itself. These references to your source files are displayed in the
Project window.
To import source footage items into an After Effects project:
1 Choose File > Import > File or Multiple Files.
2 Locate and select footage files and click Open.
For details, see “Importing files into a project” on page 68.
Page 55

ADOBE AFTER EFFECTS 5.0
Opening and closing a project
You can have only one project open at a time. If you try to open another project, After
Effects prompts you to save changes in the first project, and then closes the first
project. Closing the Project window closes any associated windows, but palettes
remain open.
To open a project:
Choose File > Open Project, locate the project, and then click Open.
To close a project:
Click the Project window title bar to make it active and choose File > Close.
Saving a project
Save your work frequently as you develop a project.
To save a project:
Choose File > Save.
User Guide
45
To save a project using a different name or location:
Choose File > Save As. Specify a filename and location and click Save.
The project currently open takes the new name and location; the original file remains as
it was.
To save a copy of the project using a different name or location:
Choose File > Save a Copy. Specify a filename and location and click Save.
The project currently open retains its original name and location, and a copy is created but
not opened.
Page 56

CHAPTER 1
46
Working with Projects, Windows, and Palettes
Correcting mistakes
If you change your mind or make a mistake, undo your work. You can undo only those
actions that alter the project; for example, you can undo an edit, but you cannot undo
scrolling a window. Specify the number of levels that can be undone. The default is 20.
Specifying more levels increases memory requirements but may not affect performance.
Note: The Vector Paint effect (PB only) can perform only one level of undo, regardless of the
number of levels you set.
You can also discard changes by reverting to the last saved version of the project. Note that
when you revert to the last saved version, all editing and footage imported since you last
saved are lost. You cannot undo this action.
To undo the most recent change:
Choose Edit > Undo. You can sequentially undo as many as 99 of the most recent changes
made to the program in any After Effects window, depending on how many undo levels
are set in Preferences.
To set the number of undo levels:
1 Choose Edit > Preferences > General.
2 Specify a number for Levels of Undo, and then click OK.
To revert to the last saved version:
Choose File > Revert.
Selecting 16-bpc color depth (PB only)
After Effects can work in 16-bit-per-channel mode, making a larger range of colors
available. When you work with high-resolution images that use a narrow range of colors,
such as when you’re creating subtle gradients for film effects or HDTV output, transitions
between colors are smoother with less visible banding, and more detail is preserved.
Page 57

ADOBE AFTER EFFECTS 5.0
You can choose whether to work in 8-bit-per-channel or 16-bit-per-channel color mode
for each project. Directly import 16-bit images, including those from Photoshop, and
composite and color-correct footage in 16-bit mode. Take advantage of 16-bit color when
performing most After Effects tasks, including layer adjustment, frame blending, 3D, and
Cineon file import. The Info palette displays 16-bit color values with exact precision.
Many effects support 16 bits per channel. If an effect supports only 8 bits, and your project
is set to 16 bits, After Effects displays a warning icon ( ) next to the effect name in the
Effect Controls palette. Using an 8-bit effect in a 16-bit project will result in a loss of detail
for the effect’s layer.
When rendering to output module depths of Trillions of Colors, set the project to 16-bit
color depth to take advantage of the output file’s extra color precision. To optimize performance, rough out a composition in 8-bit color mode, and then finalize and output 16-bit
files for maximum quality.
To specify color depth:
1 Open the project and choose File > Project Settings.
2 For Depth, choose 8 bits per channel or 16 bits per channel, and then click OK.
User Guide
47
Hold down Alt (Windows) or Option (Mac OS) and click the color depth indicator at the
bottom of the project window to toggle between 8- and 16-bits per channel color.
Setting preferences
When you start After Effects for the first time, the default settings are used. You may want
to change some of these default settings so that each time After Effects is opened, it uses
your selections instead of the standard defaults. After changing settings, you can easily
restore the default settings at any time. All After Effects default settings are stored in a
single file.
After Effects saves the location and type of each open window with the project. Palette
positions are saved in the After Effects Preferences file, which applies to all projects. You
can also save custom workspaces; see “Customizing the workspace” on page 48.
To open a preferences dialog box:
1 Choose the preferences command you want from the Edit > Preferences submenu.
Page 58

CHAPTER 1
48
Working with Projects, Windows, and Palettes
2 To switch to another dialog box, do any of the following:
• Choose an option from the menu at the top of the dialog box.
• Click Next to display the next dialog box in the menu list; click Previous to display
the previous dialog box.
For information on a specific option, see the index.
To restore all preferences to their default settings:
1 Make sure that After Effects is not running. If it is, choose File > Exit (Windows) or
File > Quit (Mac OS).
2 Do one of the following:
• (Windows) Search for the “Adobe After Effects 5 Prefs” file (use quotation marks to
narrow the search) and delete it or move it to another folder.
• (Mac OS) Use the Finder to locate the “Adobe After Effects 5 Prefs” file in the
Preferences folder in your System folder and delete it or move it to another folder.
When you start After Effects again, it creates a new preferences file.
Customizing the workspace
Depending on the type of work you are doing, you may want to size and arrange
palettes and windows. This arrangement of windows is called a workspace. You can
save custom workspaces.
To restore default palette and window positions:
Do one of the following:
• Hold down Shift when starting After Effects.
• Choose Window > Workspace > Default.
• Choose Window > Reset Palette Locations.
To save the workspace:
1 Arrange the palettes and windows the way you want them, including size and location.
2 Choose Window > Workspace > Save Workspace.
Page 59

ADOBE AFTER EFFECTS 5.0
3 Type a name for the workspace, and click OK. The new workspace is added to the
Workspace menu.
To select or delete a custom workspace:
1 To select a workspace, choose Window > Workspace, and then choose the name of the
workspace.
2 To delete a workspace, choose Window > Workspace > Delete Workspace, choose a
name, and click OK.
Using context menus
In addition to the menus at the top of your screen, context menus display commands
relative to the active tool or selected item.
To display context menus:
1 Position the pointer over the footage or over a label in a palette or window, such as a
button in the Time Controls palette.
2 Click the right mouse button (Windows) or press Control and hold down the mouse
button (Mac OS).
User Guide
49
Using windows
Many After Effects windows are organized in groups by default. You can customize and
display these windows in certain ways depending on the type of window:
Composition window The title of a Composition window appears as a tab under the
group window’s title bar. By default, Composition windows are grouped into one window.
You can combine Composition windows with Layer and Footage windows.
Layer and Footage windows As with Composition windows, the title of a Layer or
Footage window appears as a tab under the group window’s title bar. By default, Layer and
Footage windows are grouped into one window. They can also be combined with the
Composition windows and other Layer and Footage windows.
Timeline windows Each composition name appears as a tab in the Timeline window. You
can combine Timeline windows only with other Timeline windows.
Page 60

CHAPTER 1
50
Working with Projects, Windows, and Palettes
Effect Controls windows By default, effects you apply to layers are grouped in one Effect
Controls window. You can combine Effect Controls tabs only with other Effect Controls
windows.
Project window You cannot group Project windows with any other windows.
Reorganizing windows
Use the following techniques to reorganize windows:
• To change the default from grouped windows to ungrouped windows, choose Edit >
Preferences > General, deselect Tabbed Windows, and click OK.
• To rearrange or separate a group window, drag the tab for a window.
• To move a window to another group window, drag its tab to that group.
• To group Layer or Footage windows with Composition windows by default, open a Layer
or Footage window and choose Window > Group Tab with Comps.
• To display a window menu, click the triangle in the upper right corner of the palette or
window (not available for all windows or palettes).
• To resize a window, drag any edge (Windows) or drag its lower right corner (Mac OS).
• If a window contains more grouped windows than After Effects can display at once, drag
the slider bar that appears above the tabs.
• To open a Timeline window from its Composition window (and vice versa), select the
tab for the window and then click the Comp Family button above the vertical scroll bar.
• To display a window that is obscured by other windows, select it from the Window
menu.
• If both the Composition and Timeline windows are closed, double-click the compo-
sition’s icon in the Project window to open both windows again.
• When you close a single window in a group, you can make sure that related windows,
such as the Timeline and Composition window for the same composition, are closed at
the same time. To turn on this option, choose Window > Closing in Groups to select it. To
close individual windows without closing related windows, deselect this menu command.
Page 61

ADOBE AFTER EFFECTS 5.0
Working with the Project window
The Project window is a storage area for compositions and references to footage items. In
the Project window you import, identify, replace, remove, and interpret footage items and
compositions. You can organize footage and compositions in the Project window using
folders. The folders you create in the Project window exist only in the Project window. You
can expand a folder to reveal its contents. You can also put folders inside other folders.
User Guide
51
To remove footage from a project:
Do any of the following:
• To eliminate an item from a project, select the item and press Delete.
• To remove all unused footage items from a project, choose File > Remove Unused
Footage.
• To remove all compositions and footage items that are not used in the selected compo-
sition, choose File > Reduce Project.
• To remove all duplicate footage items from a project, Choose File > Consolidate All
Footage.
Page 62

CHAPTER 1
52
Working with Projects, Windows, and Palettes
To organize footage items using folders:
Do any of the following:
• To create a folder in the Project window, choose File > New > New Folder, or click the
create folder icon ( ) at the bottom of the Project window.
• To move a file or folder into a Project folder, drag the file or folder from the Project
window list into a folder.
• To move a file or folder from a folder to the top level of the Project window, drag the file
or folder to the gray information area at the top of the window.
• To show or hide the contents of a folder, click the triangle to the left of the folder icon.
To customize the Project window:
• To resize a panel, drag the bar on the right side of the panel’s heading. Drag left to make
the panel smaller, or right to make it larger.
• To hide a panel, right-click (Windows) or Control-click (Mac OS) any panel heading
and choose Hide This.
• To show a panel, right click (Windows) or Control-click (Mac OS) any panel heading
and choose Panels > panel heading.
• To show or hide a panel, choose Panels > panel heading from the Project window menu.
• To disable thumbnails, choose Edit > Preferences > Display, select Disable Thumbnails
in Project Window, and then click OK.
To create a new composition from the Project window:
Click the create new composition icon ( ) at the bottom of the Project window.
To create a new composition that automatically uses the same dimensions, duration, and
frame-rate settings as a footage item, drag the selected item or items onto the create new
composition icon at the bottom of the Project window.
To manage footage items in the Project window:
Do any of the following:
• To display information about a footage item or composition, select the footage or
composition. Information is displayed at the top of the Project window next to the
thumbnail image.
Page 63

ADOBE AFTER EFFECTS 5.0
• To sort footage items by any column, click the column name in the Project window. For
example, click Type to sort items by footage type.
• To rename a composition or folder, select the composition name or folder, press Enter
(Windows) or Return (Mac OS), type the new name, and then press Enter or Return
again.
• To find footage items in the Project window, choose File > Find, type the name of the
footage item, and click OK. Select Find Missing Footage to locate all footage items that
refer to a file that has been moved, deleted, or renamed.
Composition, Layer, and Footage window controls
Use the Composition, Layer, and Footage windows to preview and edit different parts of a
project. These windows share a set of controls that you can use to view safe zones (the
visible areas of a television screen), view RGB and alpha channels, and change the magnification. These controls function the same way in all three windows.
Displaying After Effects viewing controls in the Footage window
By default, the Footage window displays movie controls for movie footage rather than the
After Effects viewing controls found in the Layer and Composition windows. QuickTime
and Video for Windows controls are fast and familiar tools for playing movie footage, and
they play audio if it’s included in the footage. However, for the preview options discussed
in this section, you must open the footage in a standard After Effects Footage window.
User Guide
53
Note: A standard After Effects Footage window is always used for non–QuickTime and non–
Video for Windows footage.
To display a footage item in the Footage window:
Double-click a footage item in the Project window.
To display .mov or .avi movies in the standard After Effects Footage window:
Press Alt (Windows) or Option (Mac OS) as you double-click a footage item in the
Project window. After Effects Footage windows provide editing commands not
available in Video for Windows or QuickTime Footage windows.
Page 64

CHAPTER 1
54
Working with Projects, Windows, and Palettes
Changing magnification in windows
The lower left corner of a Composition, Layer, or Footage window shows the current
magnification. When you change magnification, you change the appearance of the pixels
in the window, not the actual resolution of the composition.
To zoom in or out:
Do one of the following:
• Using the zoom tool, click inside the window you want to magnify.
• Using the zoom tool, press Alt (Windows) or Option (Mac OS) as you click inside the
window you want to reduce.
• Double-click the zoom tool in the toolbox to view at actual size.
• Choose a magnification from the menu in the lower left corner of a Footage, Layer, or
Composition window.
Viewing safe zones and grids
In Footage, Layer, or Composition windows, you can display safe zones for titles and
action, as well as grids used for aligning layers.
Television sets enlarge a video image and allow some portion of its outer edges to be cut
off by the edge of the screen. This is known as overscan. The amount of overscan is not
consistent across television sets, so you should keep important parts of a video image, such
as action or titles, within margins known as safe zones. When you arrange layers in a
composition, do the following:
• Keep important scene elements, graphics, and actors within the action-safe zone.
• Keep titles and other text within the title-safe zone.
Page 65

ADOBE AFTER EFFECTS 5.0
After Effects also provides grids that you can use to help arrange and align layers. Set the
grid spacing using the Grids & Guides Preferences dialog box.
A
B
C
D
A. Grid B. Title-safe zone C. Action-safe zone D. Overscan
To view safe zones:
In a Footage, Layer, or Composition window, click the safe-zones icon ( ) to show or
hide the safe zones.
User Guide
55
To view a standard grid:
With a Footage, Layer, or Composition window active, choose View > Show Grid or Hide
Grid.
To view a proportional grid:
Press and hold down Alt (Windows) or Option (Mac OS) and click the safe zones icon.
To snap a layer to a grid:
With a Footage, Layer, or Composition window active and the grid shown, choose View >
Snap to Grid and then drag a layer until it snaps to the desired grid lines.
Page 66

CHAPTER 1
56
Working with Projects, Windows, and Palettes
Changing safe-zone margins and grid spacing
You can change the percentage of window area marked as title-safe or action-safe, and you
can change the number of grid cells. Safe-zone margins represent the percentage of image
area not included in the safe area. You can set spacing options for standard grids or
proportional grids. The size of proportional grids increases or decreases when the composition size changes; the size of standard grid squares remains the same regardless of
composition size.
To change safe-zone margins:
Choose Edit > Preferences > Grids & Guides, type values for Action-Safe Margin and
Title-Safe Margin, and click OK.
To change grid spacing:
Choose Edit > Preferences > Grids & Guides, type a value for Gridline Every, type a value
for Subdivisions, and click OK.
To change proportional grid spacing:
Choose Edit > Preferences > Grids & Guides, type Horizontal and Vertical values for
Proportional Grid, and click OK.
Using rulers and guides
You can display rulers along the sides of the Composition, Layer, and Footage windows to
provide a visual guide for positioning and editing your footage. Using the cross hair in the
upper left corner of the rulers, you can change the origin, or zero point, in both rulers.
Changing the zero point makes it easy to measure from a specific point in the image. By
default, rulers are hidden.
For added precision in positioning objects, you can create guide lines. You can also
lock guide lines to prevent them from being repositioned.
Note: Rulers and guide lines are only a reference in the Composition, Layer, and Footage
windows. They do not appear in your rendered movie.
To display or hide rulers:
Choose View > Show Rulers or Hide Rulers.
Page 67

ADOBE AFTER EFFECTS 5.0
To set the zero point in rulers:
Drag the cross hair from the intersection of the two rulers (in the upper left corner) into
the image area.
To create, reposition, lock, hide, or remove a guide line:
Do any of the following:
• Position the pointer inside either ruler and drag where you want to create a guide line.
• In the image area, drag a guide to reposition it.
• To lock or unlock guides, choose View > Lock Guides.
• In the image area, drag a guide line into a ruler to remove it.
• To display or hide all guide lines, choose View > Show Guides or Hide Guides.
• To remove all guide lines, choose View > Clear Guides.
User Guide
57
Viewing color and alpha channels
You can preview the red, green, blue, and alpha channels of a still image or movie in a
Footage window, Layer window, or Composition window. When you view a color channel,
areas with that color are displayed according to the color value of each pixel. For example, if
you view the red channel, areas with high red values are displayed as white.
To see the color values in a color channel displayed in the channel’s own color instead of
white, hold down Shift and click the desired color channel icon.
When you preview the alpha channel, After Effects displays transparent and opaque areas as
black and white to make identification easier. Degrees of opacity appear as shades of gray.
Page 68

CHAPTER 1
58
Working with Projects, Windows, and Palettes
To view a color channel or alpha channel:
1 Open the Composition, Layer, or Footage window to view a channel for a composition,
layer, or footage item, respectively.
2 At the bottom of the window, click the icon that corresponds to the channel you want
to display.
A. Red channel B. Green channel C. Blue channel D. Alpha channel
Taking and viewing a window snapshot
When you want to compare one view to another in the Composition, Layer, or Footage
window, take a snapshot of one view and temporarily replace the window image with the
snapshot. For example, you might want to compare two frames in different locations in a
movie. You can instantly show and hide the snapshot to identify differences between the
views. If you have a sound card installed, you hear a sound when you take a snapshot.
BCD
A
When working with snapshots, here are some tips to keep in mind:
• Snapshots taken in one kind of window can be displayed in another kind. For example,
you can take a snapshot of a Layer window and display the snapshot in the Composition
or Footage window.
• Displaying a snapshot does not replace the content of the window.
• If the snapshot has a different size or aspect ratio than the window in which you display
it, the snapshot is resized to fit the window.
• Choose Edit > Purge > Snapshot to free up memory used by your snapshots.
• Snapshots are for reference only and do not become part of the layer, composition, or
rendered movie.
To take a snapshot:
Click the take-snapshot icon at the bottom of the window, or press Shift+F5.
Page 69

ADOBE AFTER EFFECTS 5.0
To view a snapshot:
Click and hold the display-snapshot icon at the bottom of the window, or press F5.
To take and view multiple snapshots:
Do any of the following:
• Hold down Shift and press F5, F6, F7, or F8 to take separate snapshots.
• Press and hold F5, F6, F7, or F8 to view the corresponding snapshots.
• To purge any snapshot, hold down Ctrl+Shift (Windows) or Command+Shift (Mac OS)
and press F5, F6, F7, or F8.
For more information on using shortcut keystrokes, see the Quick Reference Card.
Viewing a specific frame
The duration of a composition, a layer, or a footage file is represented visually by the time
ruler. On the time ruler, the current-time marker indicates the frame you are viewing or
editing, and the frame appears in the corresponding window. You can view a different
frame by typing a number or by dragging the current-time marker.
User Guide
59
In a Layer or Footage window, the time ruler appears near the bottom of the window. In a
Composition window, the time ruler appears in the corresponding Timeline window.
Keep in mind that the time rulers in different windows represent different durations. The
time ruler in Layer and Footage windows represent the duration of the contents of that
window, in contrast to the time ruler in the Timeline window, which represents the
duration of the entire composition.
Current-time marker in the Timeline window (left) and in the Layer window (right)
Like the Timeline window, Layer and Footage windows include viewing-area markers that
you can use to magnify or shrink the part of the time ruler displayed.
Page 70

CHAPTER 1
60
Working with Projects, Windows, and Palettes
To view a specific frame by dragging:
In the time ruler, drag the current-time marker to a new point in time.
To view a specific frame numerically:
1 Choose View > Go to Time, or click the current-time display in a Footage, Layer,
Composition, or Timeline window.
2 Type a new time and click OK.
To step forward or back a specified number of frames from the Go to Time dialog box,
type + or +- in front of the number, such as +5 or +-5. (If you simply type - in front of
the number, After Effects jumps to a negative time.)
Discontinuing window updates
Press the Caps Lock key to prevent After Effects from updating Footage, Layer, or Composition windows. This is useful for a Layer or Composition window that takes a long time
to update. When Caps Lock is active, all open Footage, Layer, or Composition windows
display the last update you made before pressing Caps Lock, regardless of the changes you
make. As soon as you make a change that would appear in a window, After Effects adds a
red outline to any affected windows, and the windows are not updated. After Effects
continues to update window controls such as motion paths, anchor points, and mask
outlines as you move them. To resume window updates and display all changes made
while Caps Lock was active, press Caps Lock again to deactivate it.
Viewing tool tips
You can turn on or off tool tips that provide descriptions when you hold the mouse
pointer over tools and buttons.
To turn on or off tool tips:
1 Choose Edit > Preferences > General.
Page 71

ADOBE AFTER EFFECTS 5.0
2 Select Show Tool Tips to turn on tool tips, and then click OK.
Toolbox
Use the tools in the toolbox to select, edit, and view layers. You can edit layer properties,
masks, and motion paths graphically, and you can change the view of a Footage, Layer, or
Composition window. The small triangle to the right of a tool indicates that additional
tools are available. Procedures for using these tools are included throughout this book. See
the tool name in the index.
To select a tool:
Do one of the following:
• If the tool is visible, click its icon. To view a tool tip, hold the mouse pointer over a tool.
User Guide
61
CBDE
GFH
A. Selection B. Pen C. Add Point D. Delete Point E. Convert Point
F. Orbit Camera G. Track XY Camera H. Track Z Camera I. Hand
J. Rotation K. Rectangle Mask L. Oval Mask M. Pan Behind N. Zoom
O. Local Axis Mode P. World Axis Mode Q. View Axis Mode
A
I
P
O Q
J
M
N
LK
• If the tool is not visible, position the pointer on the appropriate tool and drag to
highlight the tool you want.
To select a tool quickly, press its shortcut key on the keyboard. These keys are listed on the
After Effects Quick Reference Card.
Page 72

CHAPTER 1
62
Working with Projects, Windows, and Palettes
Info palette
The Info palette describes the area under the mouse pointer as you drag across a footage
frame in the Composition, Layer, or Footage window. This palette displays values for the
pixel color (R,G,B), alpha channel (A), and coordinates of the current position. When you
modify a layer property graphically, the bottom portion of this palette displays precise
values that relate to the layer instead of the pointer. For example, when you drag a layer,
the Info palette displays the coordinates of the layer’s center point and the offset from its
last position. This makes it easy to move a layer by a specific number of pixels in either axis.
During other operations, the Info palette provides context-sensitive information, such as
the progress of rendering a window preview.
The X coordinate represents position in the horizontal axis, and the Y coordinate represents position in the vertical axis. Values for these coordinates are in pixels. The X and Y
coordinates are relative to the origin (0,0), which is fixed at the upper left corner of the
image area. The upper right portion of the Info palette displays the X and Y coordinates
of the pointer. As you drag a layer, the lower portion of the Info palette displays the X and
Y coordinates of the layer’s anchor point. The lower portion of the Info palette also
displays Z coordinates if the layer includes 3D animation.
If the zero point differs from the origin, X' and Y' coordinates appear in the Info palette
below the X and Y coordinates. These values measure the distance from the zero point or
the ruler.
Note: The origin of the image area is different than the origin, or zero point, of the rulers. You
can set the ruler’s zero point to match the origin of the image area, but you cannot change the
origin of the image area.
To change the Info palette RGBA display:
Choose an option such as Percent or Web from the Info palette menu. Selecting Auto
Color Display automatically switches between 8 bits per channel and 16 bits per channel
depending on the project’s color depth. Clicking anywhere on the palette cycles through
the display options.
Page 73

2
Page 74

Page 75

Chapter 2: Preparing and
Importing Footage
footage item is the basic unit in an After Effects project. Before you begin animating,
you need to import footage into After Effects. You can import moving image
A
files, still-image files, still-image sequences, audio files, layered files from Adobe
Photoshop and Adobe Illustrator, and other After Effects projects and projects created in
Adobe Premiere. As you build a project, you can import footage items at any time.
How After Effects works with imported files
When you import files, After Effects does not copy the footage item itself into your project
but creates a reference link in the Project window to the footage item. This saves disk space.
If you delete, rename, or move an imported source file, you break the reference link to that
file. When a link is broken, the name of the source file appears in italics in the Project
window, and the File Path column lists it as missing. If the footage item is available, you
can reestablish the link—usually just by double-clicking the item and selecting the file
again. See “Replacing and substituting footage” on page 97.
65
If you use another application to modify footage that is used in a project, the changes
appear in After Effects the next time you open the project. See “Opening footage in its
original application” on page 95.
When you add a footage item to an After Effects composition, you create a new layer, and
the footage item becomes the source for the new layer. You can replace the source without
affecting any edits you make to the layer properties.
Preparing a still-image file for import into After Effects
Before you import a still image into After Effects, prepare the file as completely as possible.
It is usually easier and faster to prepare a file in its original application; this also reduces
rendering time in After Effects. Consider doing the following before you import stillimage files into After Effects:
Page 76

CHAPTER 2
66
Preparing and Importing Footage
• Set the pixel dimensions to the resolution you will use in After Effects. If you plan to scale
the image over time, set image dimensions that provide enough detail at the largest size
the image has in the project. The maximum resolution you can use in After Effects is
30,000 x 30,000 pixels. For D1 or DV, see “Using square-pixel footage for output to D1 or
DV NTSC” on page 89.
• Specify an even-numbered resolution for files imported into compositions that also use
even-numbered resolution, and odd numbers for compositions using odd-numbered
resolution. See the Adobe Web site for technical papers with more information.
• Crop the parts of the image that you do not want to be visible in After Effects.
• Correct the contrast and color balance for broadcast video, if necessary.
• Create an alpha channel if you want to designate areas as transparent.
• If final output will be broadcast video, avoid using thin lines (such as 1-pixel lines) for
images or text because they may appear to flicker. If you must use thin lines, add a slight
blur so the line or text displays on both video fields instead of flickering between them.
• Save the file using the correct naming convention. For example, if you plan to import the
file to After Effects on a Windows system, save the file using a three-character extension. If
you plan to import the file to a Mac OS, use a name of 31 characters or fewer.
• Make sure that the file format is supported on the operating system you plan to use.
For information on preparing and importing interlaced motion video to After Effects,
see “Preparing motion footage for import” on page 83.
Working with higher image resolutions
After Effects supports a maximum image resolution of 30,000 x 30,000 pixels for importing and rendering files. Resolution refers to the dimensions (width and height) of an
image measured in pixels. When you work with higher resolutions, you can use a wider
variety of formats, such as IMAX frames (4096 x 3002 pixels), full-aperture/silent frames
(4096 x 3112 pixels), and other large-format media.
When working with high-resolution images, consider the following:
• All input and output modules in After Effects support increased resolutions except PICT
(4,000 x 4,000 pixels), BMP (16,000 x 30,000 pixels), and PXR (30,000 x 16,000 pixels).
Page 77

ADOBE AFTER EFFECTS 5.0
• The maximum resolution you can import or export is limited by the amount of physical
RAM available to After Effects. When working with large frame sizes, minimize the RAM
used by the system or other software running on your computer, but be sure to leave at
least 4 MB unused to handle system software requirements for additional RAM.
• The following formula helps you determine the amount of RAM you need based on the
footage: Image Width in Pixels x Image Height in Pixels x 4 Bytes of Memory for 32 bitsper-pixel (bpp) or 8 Bytes of Memory for 64 bpp. For example, a 30,000-x-30,000-pixel
image requires 3.5 GB of RAM to import and display each frame. However, a 30,000-x486-pixel image requires only 60 MB of RAM. Memory requirements for 16 bits-perchannel (bpc) project color depth are approximately double those for 8 bpc.
Changing the default duration of still images
When you add a still image to a composition, its default duration is the duration of the
composition. You can manually trim the duration of a still image and change the default
duration of still footage in the Import Preferences dialog box. See “Understanding
trimming” on page 139.
To change the default duration of still footage:
1 Choose Edit > Preferences > Import.
2 Under Still Footage, do one of the following, and then click OK:
User Guide
67
• Select Length of Composition: sets the same duration for the still image as the compo-
sition into which it is placed.
• Type numbers in the text box for the duration you want to use.
Specifying interpretation rules
The Interpretation Rules.txt file describes how After Effects interprets field order, alpha
channel, frame rate, and pixel aspect ratio when importing footage. You can customize
this file in any text editor and add or delete entries, to save time. When you import, After
Effects reads the file and follows any applicable rules, as long as Interpretation Rules.txt is
stored in the same folder as the After Effects application. You can always override these
interpretations after importing. For more information about specifying interpretation
rules, see online Help.
Page 78

CHAPTER 2
68
Preparing and Importing Footage
Importing files into a project
With After Effects 5.0, you use the same Import File dialog box to import any usable file
into After Effects. To save time and minimize the size and complexity of a project, import
a footage item once and then use it multiple times in a composition. It is occasionally
useful, however, to import a footage item more than once, such as when you want to use
it at two different frame rates.
After Effects supports 24- and 32-bit files using 8 bits per channel (bpc)—including alpha
channel—and the RGB, Grayscale, and Black-and-White color modes. For a list of
supported file formats, see online Help.
Note: The After Effects Production Bundle provides support for 16 bpc.
To import footage into a Project window:
1 Open a project or choose File > New > New Project.
2 With the Project window active, choose File > Import > File.
3 In the Files of Type pop-up menu, choose the setting you want to use:
• All Acceptable Files (the default selection). Shows files that After Effects recognizes as
supported formats.
• All Footage. Shows only supported footage files. Project files are not shown.
• All Files (*.*). Shows all files, whether or not After Effects recognizes them as supported
formats. (This is useful for compatible files transferred from another platform, such as a
Silicon Graphics workstation.) This option requires you to identify the format.
• A specific format. Restricts the files shown to the format you choose from the menu. (Use
this option as a convenience when the files you want are in large folders containing files of
mixed types.)
4 Do one of the following:
• To import a file, locate and select it, and then click Open.
• To import multiple files from the same location, hold down Ctrl (Windows) or Shift
(Mac OS), select the items you want, and then click Open.
• To import all the files in a folder, locate and select the folder, and then click the Import
Folder button.
Page 79

ADOBE AFTER EFFECTS 5.0
The imported footage appears in the Project window. For more information about
importing folder contents, see “Importing a sequence of still-image files” on page 70.
Note: If the Interpret Footage dialog box appears instead, the imported footage item contains
an unlabeled alpha channel, and you’ll need to select a type or click Guess to let After Effects
determine the type. See “Interpreting alpha channels as straight or premultiplied” on page 72.
To search for a file in Mac OS, click Find, type the name of a file or folder, and click OK.
After Effects finds the first file or folder that matches the text.
To import items by dragging:
From the desktop or a folder, select one or more items you want to import and drag them
to the After Effects application icon (on the Windows Explorer or Macintosh Finder) or to
the Project window (in After Effects).
If you import a folder by dragging it from the desktop, the contents of that folder are
imported as a sequence. To import the contents as individual footage files, press Alt
(Windows) or Option (Mac OS) as you drag. (This is the equivalent of clicking the Import
Folder button in step 4 of the previous procedure, “To import footage into a Project
window.”) If you always want the layered footage that you drag into After Effects to be
imported as a composition, you can specify this in your Import Preferences.
User Guide
69
To set default preference for dragging layered footage:
1 Choose Edit > Preferences > Import.
2 In the Default Drag Import As pop-up menu, choose Comp.
Page 80

CHAPTER 2
70
Preparing and Importing Footage
Importing a sequence of still-image files
After Effects can import a sequence of still images with the same numeric or alphabetic
filename pattern and automatically combine them into a single sequence file. In sequence
files, each original file represents one frame. After Effects uses the dimensions and bit depth
of the first image in the sequence. It then imports (in numeric or alphabetic order) all still
images in the folder that have the same filename pattern and file type as the one you selected.
A sequence of still-image files (left) becomes one image sequence when imported into After Effects (right).
To import a sequence of still images:
1 Move all the files in the sequence to the same folder.
2 In After Effects, choose File > Import > File.
3 Locate and select any file in the sequence.
4 Select the file format name Sequence option.
5 If you want to import alphabetically, select Force Alphabetical Order. Then click Open.
Note: You can import a subset of a numbered sequence by using a variation of this procedure.
In step 3, select the first file you want to include, hold down Shift, and select the last file you
want to include. In this case, only the two files you selected appear highlighted in the Import
File dialog box, but all files that fall between those two in the sequence will also be imported.
Page 81

ADOBE AFTER EFFECTS 5.0
To import a folder of still images as a sequence by dragging:
1 Drag the folder from the desktop to the After Effects Project window.
After Effects imports the first sequence that is listed in the folder, based on the filename.
You can also import an existing sequence as individual footage files. There are two ways to
accomplish this.
To import a sequence as individual footage files:
Do either of the following:
• Choose File > Import > File to open the Import File dialog box, locate and select the
folder, and then click the Import Folder button.
• On the desktop, hold down Alt (Windows) or Option (Mac OS) and drag the folder into
either the After Effects icon on the desktop or into the Project window.
When you import a sequence of still images, they assume the frame rate specified in the
Preferences. The default rate is 30 frames per second (fps). You can change the frame rate
for the sequence either before or after importing.
To change the default frame rate for a sequence before importing:
1 Choose Edit > Preferences > Import.
2 Under Sequence Footage, type a new default frame rate, and then click OK.
User Guide
71
To assign a frame rate to a sequence you’ve already imported:
1 In the Project window, select the sequence of still images.
2 Choose File > Interpret Footage > Main.
3 Select Assume This Frame Rate and type the frame rate you want.
Page 82

CHAPTER 2
72
Preparing and Importing Footage
Importing footage containing an alpha channel
The color information in a typical footage item is contained in three channels: red, green,
and blue. In addition, a footage item can include a fourth channel, called an alpha channel,
that contains transparency information for the parts of the image that are partially or
completely transparent. An alpha channel is often used as a matte for creating effects.
When used in After Effects, a matte defines the transparent areas for its own or another
layer. White areas define what is opaque, and black areas define what is transparent. See
“Using a footage item with an alpha channel” on page 238.
Many file formats can include an alpha channel, including Adobe Photoshop,
ElectricImage IMAGE, TGA, TIFF, EPS, PDF, QuickTime (saved at a bit depth of Millions
of Colors+), and Adobe Illustrator. For Adobe Illustrator EPS and PDF files, After Effects
automatically converts empty areas to an alpha channel.
Interpreting alpha channels as straight or premultiplied
When you import a footage file containing an alpha channel, After Effects determines if
it is straight or premultiplied. If the alpha channel is unlabeled, After Effects displays the
Interpret Footage dialog box and prompts you to select Ignore Alpha, Straight (Unmatted),
Premultiplied (Matted with Black), Premultiplied (Matted with White), or Guess. When
you select Guess, After Effects determines the interpretation method. For information on
straight and premultiplied alpha channels, see online Help.
Correctly identifying the type of alpha channel when you import a file can prevent problems, such as undesirable colors at the edge of an image or a loss of image quality at the
edges of the alpha channel. If a color inaccuracy, such as a halo, appears along the edges of
an alpha channel in a composition, try changing the interpretation method.
If a footage item doesn’t have an alpha channel or transparency information, you can
create an alpha channel in After Effects using a layer mask. See “Working with masks” on
page 238.
Choosing an interpretation method for alpha channels
You can change the interpretation method for a file after you import the file. You can also
change the default alpha channel interpretation in the Import Preferences dialog box, in
the Interpret Unlabeled Alpha As pop-up menu. This is especially useful for importing
footage from an application that consistently uses one type of unlabeled alpha channel.
Page 83

ADOBE AFTER EFFECTS 5.0
The interpretation methods include:
Ask User Displays a dialog box containing interpretation options each time you import an
unlabeled alpha channel.
Guess Attempts to determine the type of alpha channel used in the image. If After Effects
cannot guess confidently, it beeps.
Ignore Disregards all transparency data in the file.
Straight (Unmatted) Interprets the alpha channel as straight alpha. If the application you
used to create the footage does not premultiply the alpha channel, select this option.
Premultiplied (Matted with Black) Interprets the alpha channel as premultiplied with black.
Premultiplied (Matted with White) Interprets the alpha channel as premultiplied with white.
To import a footage file containing an alpha channel:
1 Choose File > Import > File. Locate and select the file and click Open.
2 In the Interpret Footage dialog box, select an option for alpha channel type. If you select
Treat As Premultiplied (Matted with Color), you can click the eyedropper and select a color.
3 Click OK.
User Guide
73
To set the alpha channel interpretation method for a file:
1 In the Project window, select a footage item that includes an alpha channel.
2 Choose File > Interpret Footage > Main.
3 In the Alpha section, select an interpretation method.
4 Select Inverted to switch the opaque and transparent areas of the image, and click OK.
To set the default alpha channel interpretation:
1 Choose Edit > Preferences > Import.
2 For Interpret Unlabeled Alpha As, select the interpretation methods you want used by
default, and click OK.
Page 84

CHAPTER 2
74
Preparing and Importing Footage
Importing Adobe Photoshop files
You can import an Adobe Photoshop file directly into an After Effects project with the
option of preserving individual layers, layer masks, and so forth from Adobe Photoshop.
Importing layers makes it easy to prepare still images for animation using the imageediting tools in Adobe Photoshop.
Preparing layered Adobe Photoshop files
Importing layers into After Effects makes it possible to prearrange a composition in Adobe
Photoshop using layers, and preserve those layers in After Effects so that they are ready for
animation. Preserving layers is also useful if you want to use a single Adobe Photoshop file
as a source for both print and dynamic media.
Before you import a layered Adobe Photoshop file, prepare it thoroughly to reduce preview
and rendering time. Avoid problems importing and updating Adobe Photoshop layers by
naming them properly. Before you import them into After Effects, do the following:
• Organize and name layers. If you change a layer name or delete a layer in an Adobe
Photoshop file after you have imported it into After Effects, After Effects is unable to find
the original layer name, and the Project window lists that layer as Missing.
• Make sure that each layer has a unique name, because After Effects manages layers by
their names. Duplicate layer names can cause problems when you update footage.
• If you want to import a composited version of a layered Photoshop file along with a
layered version, select the Include Composited Image With Layered Files option in the
Photoshop Saving Files Preferences dialog box.
Importing layered Photoshop files
After Effects imports attributes that were applied in Adobe Photoshop, including position,
transfer modes, opacity, visibility, transparency (alpha channel), layer masks, adjustment
layers, common layer effects, layer clipping-paths, vector masks, and clipping groups.
You can import a multilayered Adobe Photoshop file in the following ways:
• As a new composition, with each layer in the Adobe Photoshop file becoming a separate
layer in the composition
• As a single still footage item imported from any one layer in the Adobe Photoshop file
Page 85

ADOBE AFTER EFFECTS 5.0
• As a single still footage item imported from all the Adobe Photoshop layers merged
together
When you import a layered Adobe Photoshop file as a composition, all the layers
contained in the composition retain their original positions as set in Adobe Photoshop.
You can open the composition in After Effects and animate the layers.
To import a layered Adobe Photoshop file as a new composition:
1 Choose File > Import > File.
2 In the Import File dialog box, make sure that All Acceptable Files is selected for Files of
Type, and then locate and select the Adobe Photoshop file you want to import.
3 Choose Composition in the Import As pop-up menu, and then click Open.
The original filename is used twice in the Project window: for the file as a composition and
for the folder containing each Adobe Photoshop layer as a separate footage items.
To import an Adobe Photoshop file or one of its layers as a single footage item:
1 Choose File > Import > File.
2 In the Import File dialog box, make sure that All Acceptable Files is selected in the Files
of Type box, and then locate and select the Adobe Photoshop file you want to import.
3 Choose Footage in the Import As pop-up menu, and then click Open. The Interpret
Footage dialog box appears (unless you have set Preferences to skip this dialog box).
4 Select the layer you want to import from the file, or choose Merged Layers to import all
layers in the file as a single layer. Then click OK.
User Guide
75
Note: When you import one Adobe Photoshop layer as a single footage item, its name in the
Project window consists of the layer name followed by the Adobe Photoshop filename.
Using transparent areas and layer masks from Adobe Photoshop
Adobe Photoshop supports a transparent area and one optional layer mask (alpha channel)
for each layer in a file. You can use these layer masks to specify how different areas within a
layer are hidden or revealed. When you import one layer of an Adobe Photoshop file, After
Effects combines the layer mask (if present) with the transparent area and imports it as a
straight alpha channel.
Page 86

CHAPTER 2
76
Preparing and Importing Footage
If you import a layered Adobe Photoshop file as a merged file, After Effects merges the
transparent areas and layer masks of all the layers into one alpha channel that is premultiplied with white. See “Importing layered Photoshop files” on page 74.
If a layered Adobe Photoshop file contains clipping groups, After Effects imports each
clipping group as a composition nested within the main composition. After Effects
automatically applies its Preserve Underlying Transparency option to each layer in the
clipping-group composition, to maintain transparency settings.
When you import a Adobe Photoshop file as a composition, any clipping paths in the
imported layers are converted to After Effects masks. You can then modify and animate
these masks within After Effects.
After Effects also supports any blending modes applied to the file. For more information
on the Preserve Underlying Transparency option, see “Preserving underlying transparency during compositing” on page 261.
Using adjustment layers from Adobe Photoshop
Adjustment layers in Adobe Photoshop versions 4.0 and later change the color and tonal
qualities of an image without permanently modifying the original image. Adobe Photoshop adjustment layers affect the appearance of all layers below them. When you import
an Adobe Photoshop file containing one or more adjustment layers, After Effects directly
converts the Adobe Photoshop adjustment layers to After Effects adjustment layers. Turn
off the Adjustment Layer switch in After Effects to remove the effect and display the layer
as a white solid. To remove the effect and the white solid, either delete the adjustment layer
or turn off the Video switch for the layer. See “Creating an adjustment layer” on page 128
and “About After Effects Audio/Video switches” on page 146.
Using Adobe Photoshop layer effects (styles)
In Adobe Photoshop 5.0 and later, you can use a layer effect (or style) to modify the layer
to which it is applied. When you import an Adobe Photoshop file as a composition, and
one or more of the layers contain layer effects, then After Effects includes the effects and
the layer as two or more separate layers in the Timeline window.
Note: Only some Adobe Photoshop styles (effects) can be imported into After Effects. These
include Drop Shadow, Inner Shadow, Outer Glow, Inner Glow, Bevel and Emboss, and
Color Fill.
Page 87

ADOBE AFTER EFFECTS 5.0
You can edit or remove a layer effect by using either the Timeline window or the Effect
Controls window. You can also animate these Adobe Photoshop layer effects over time.
To edit an Adobe Photoshop layer effect in After Effects:
1 Open the composition containing the layer effect.
2 In the Timeline window, select the layer containing the effect and press E to display the
effect properties.
3 Click the underlined value you want to change and type a new value.
A single Adobe Photoshop layer effect can become up to five layers and effects in After
Effects. You may need to edit multiple copies to achieve the desired result.
Importing an Adobe Illustrator, PDF, or EPS file
You can import Adobe Illustrator, many PDF, and EPS files directly into After Effects.
When you import an Adobe Illustrator file, After Effects converts all text information to
paths, eliminating the need to create outlines in Adobe Illustrator before importing. If you
import a file without creating outlines, make sure that all fonts used in the file are available
to After Effects when you import.
User Guide
77
When you import an Adobe Illustrator file, After Effects automatically makes all empty
areas transparent by converting them into an alpha channel.
After Effects can import Adobe Illustrator CMYK files. However, to maintain accurate
color, convert your CMYK images to RGB images in Adobe Illustrator. When you import
Adobe Illustrator CMYK images, After Effects remaps the CMYK colors to RGB, and may
subtly shift colors.
Page 88

CHAPTER 2
78
Preparing and Importing Footage
Continuously rasterizing an Adobe Illustrator file
You can continuously rasterize an Illustrator file at any time while designing your project.
Whether you choose to continuously rasterize or not, if you view and render a composition
using Best Quality, After Effects anti-aliases (smooths) the art. For general information
about rasterizing, see your Adobe Illustrator documentation or visit the Adobe Web site
and search for rasterize.
Adobe Illustrator file imported and rasterized in After Effects A. Original B. Enlarged with
Continuously Rasterize switch turned off C. Enlarged with Continuously Rasterize switch turned on
To continuously rasterize an Adobe Illustrator file:
1 Select the layer containing the Adobe Illustrator file in the Timeline window.
2 Click the Collapse Transformations/Continuously Rasterize switch so that the “on”
icon ( ) appears for that layer.
A B C
Importing layers from Adobe Illustrator 5.0 and later
You can import a multilayered Adobe Illustrator file in the following ways:
• As a new composition, with each layer in the Adobe Illustrator file becoming a separate
layer in the composition
• As a single still image imported from any one layer in the Adobe Illustrator file
• As a single still image imported from all the Adobe Illustrator layers merged together
To import a layered Adobe Illustrator file as a layered composition:
1 Choose File > Import > File.
2 In the Import File dialog box, make sure that All Acceptable Files is selected in the Files
of Type box; then locate and select an Adobe Illustrator file.
Page 89

ADOBE AFTER EFFECTS 5.0
3 In Import File As, choose Composition, and then click Open.
The original filename is used twice in the Project window: for the file as a composition and
for the folder containing all the layers as separate footage items.
To import an Adobe Illustrator file or one of its layers as a single footage item:
1 Choose File > Import > File.
2 In the Import File dialog box, make sure that All Acceptable Files is selected in the Files
of Type box; then locate and select an Adobe Illustrator file.
3 In Import File As, choose Footage, and then click Open.
4 In the Import Adobe Illustrator dialog box, select a layer to import from the file, or
choose Merged Layers to import all layers in the file as a single layer in After Effects. Then
click OK.
Importing Adobe Illustrator paths as masks
You can use an Adobe Illustrator path as a mask in an After Effects layer composition by
copying the path in Adobe Illustrator and pasting it directly into the Layer or Composition
window in After Effects. After Effects creates a mask for each closed path copied from
Adobe Illustrator. For more information on using masks, see “Working with masks” on
page 238.
User Guide
79
Note: You can also use an copied Adobe Illustrator or Photoshop path as an After Effects
motion path.
Shape drawn in Adobe Illustrator (left) and pasted into After Effects as a mask (right)
Page 90

CHAPTER 2
80
Preparing and Importing Footage
To import an Adobe Illustrator path as a mask:
1 In Adobe Illustrator, create your path, select all of the points along the path, and then
choose Edit > Copy.
2 In After Effects, open the Layer window for the layer into which you want to import
the path.
3 Choose Edit > Paste.
Note: This process works best if your Adobe Illustrator Preferences are set with AICB
Clipboard and Preserve Paths selected.
Importing an After Effects project
You can import one After Effects project into another. Everything from the imported
project, including footage files, compositions, and folders, appears inside a new folder in
the current Project window. When you want to repeat a complicated mask, effect, or animation in a different project, you can import the project containing the effect and simply
replace the source footage, keeping all the effect, composition, and layer settings intact.
See “Importing files into a project” on page 68 for the procedure for importing.
Importing After Effects projects from different platforms
You can open and import an After Effects project from a different operating system as long
as you maintain the filenames, folder names, and either full paths or relative paths (folder
locations) for all files in the project. To maintain relative paths, the source footage must
reside on the same volume as the project file.
If a file format is not supported on the operating system you are using, if the file is missing,
or if the reference link is broken, After Effects substitutes a placeholder item containing
color bars. You can reconnect the placeholder to the appropriate file. You can use the same
process to connect a footage item in the Project window to a different source file.
To relink a reference:
1 Select the placeholder or footage file in the Project window, and choose File > Replace
Footage > File.
2 In the Replace Footage File dialog box, locate and select the footage file you want to use.
Note: You can also open this dialog box by double-clicking the footage item.
Page 91

ADOBE AFTER EFFECTS 5.0
For more information on substituting footage, see “Replacing and substituting footage”
on page 97.
For information about creating projects for both Windows and Mac OS, see “Considerations for cross-platform projects” on page 40.
Importing Adobe Premiere projects
The ability to import Adobe Premiere projects eliminates the need to render the project
before applying visual effects and animations in After Effects. When you import an Adobe
Premiere 5.0 or later project, After Effects imports it into the Project window as both a new
composition containing each Adobe Premiere clip as a layer, and as a folder containing
each clip as an individual footage item. If your Adobe Premiere project contains bins, After
Effects converts them to folders within the Adobe Premiere project folder.
After Effects preserves the order of clips in the Timeline, the footage duration (including all
trimmed In and Out points), and the marker and transition locations. The arrangement of
layers in the Timeline window is based on the arrangement of clips in the Premiere Timeline. After Effects adds Adobe Premiere clips to the Timeline window as layers in the order
they appeared—from the bottom up and from left to right—in the Premiere Timeline.
User Guide
81
Transitions and titles included in your Adobe Premiere project appear in the After Effects
composition as solid layers, maintaining their original location and duration. After Effects
discards all transparency and motion settings. See “Importing files into a project” on
page 68 for the procedure for importing.
Import Adobe Premiere projects in the same way you import footage files: choosing File >
Import > File, and locating the Adobe Premiere project file that you want to import.
Importing 3D-image files
After Effects can import 3D-image files saved in Softimage PIC, RLA, and Electric Image
EI format. These 3D-image files contain red, green, blue, and alpha (RGBA) channels, as
well as auxiliary channels with optional information, such as z depth, object IDs, texture
coordinates, and more. The Standard Version of After Effects reads and displays the RGBA
information.
Page 92

CHAPTER 2
82
Preparing and Importing Footage
With RLA files, all of the auxiliary channels are included in a single file. Softimage PIC files
have a corresponding ZPIC file that contains the z-depth channel information. Although
you can’t import a ZPIC file, you can access the additional channel information as long as
the ZPIC file is stored in the same folder as the imported PIC file.
Similarly, Electric Image (EI) files can now have associated EIZ files with z-depth channel
data. Just as with ZPIC files, you cannot import EIZ files into After Effects; instead, you
store them in the same folder as the EI files. For information about creating EIZ files, see
your Electric Image documentation.
Importing an audio file
You can import a variety of audio file formats directly into After Effects. When you add
audio-only files to a composition, they appear as layers in the Timeline window. You can
adjust the audio preview settings, such as sample rate, in the General Preferences dialog
box. These settings change the quality of audio playback when you preview the composition, not when you render it. For more information, see “Using audio layers” on
page 153.
Importing Cineon files
You can import Cineon 4.5 or Digital Picture Exchange (DPX) files directly into an After
Effects project as individual frames or as a sequence of numbered stills. Once you have
imported a Cineon file, you can use it in a composition and then render the composition
as a Cineon sequence. See “Importing a sequence of still-image files” on page 70.
Cineon files are commonly used to transfer motion-picture film to a digital format. To
preserve the full dynamic range of motion-picture film, Cineon files are stored using logarithmic 10 bits per channel (bpc). However, After Effects internally uses linear 8-bpc color,
(or 16-bpc, for the Production Bundle only). By default, After Effects stretches the attendant logarithmic values to the full range of values available. You can then use the Cineon
Import Options dialog box or the Cineon Converter effect to control the conversion. (If
you are working with a film sequence in which exposure conditions vary over time, you
can vary the conversion over time by setting keyframes.) For information on using the
Cineon converter, see online Help.
Page 93

ADOBE AFTER EFFECTS 5.0
To import a Cineon sequence:
1 Choose File > Import > File.
2 For the file type, select Cineon, and then select Cineon Sequence.
3 Locate and select the first numbered Cineon sequence file.
4 Select the Cineon Sequence option, and then click Open.
The Cineon file or sequence appears in the Project window.
To convert a Cineon sequence from logarithmic to linear:
1 Select the sequence in the Project window, and choose File > Interpret Footage > Main.
2 In the Interpret Footage dialog box, click More Options.
3 In the Cineon Conversion dialog box, select the Logarithmic Conversion option, click
OK, and click OK again.
When you are ready to produce output from the Cineon file, it is important that you
reverse the conversion from logarithmic to linear.
User Guide
83
Preparing motion footage for import
Some of the source footage you use may have been created digitally (for example, in Adobe
Photoshop or Adobe Premiere), but other footage may need to be transferred to the
computer from analog sources, such as film and videotape. When you work with After
Effects, understanding some of the differences among media can help you decide how to
handle footage as you transfer it between digital and analog devices. For information on
the different types of video, see online Help.
Preparing a movie for import when final output is NTSC interlaced video
You can edit and prepare video footage in other applications, such as Adobe Premiere,
before importing it into After Effects. If you want to render the footage from After Effects
as NTSC interlaced video, do not field-render or create interlaced frames when you render
the movie from the other application. It’s acceptable to render interlaced video for temporary files, but 60 progressive gives better quality. Make sure that you keep track of the original field order so you can correctly render it in After Effects. See “Field rendering” on
page 87 and “Testing the field-rendering order” on page 387.
Page 94

CHAPTER 2
84
Preparing and Importing Footage
As long as the footage is on a computer, it should remain noninterlaced. Keeping the
footage in noninterlaced format preserves more image quality and saves you the extra step
of separating fields in After Effects. Once it’s ready to go to your nonlinear editor, such as
Adobe Premiere, it should be interlaced.
When you render the movie from the other application, render it at 60 fps of framerendered (noninterlaced) video. After you integrate it into a composition, After Effects can
render it to high-quality field-rendered (interlaced) frames at 30 fps for videotape.
Preparing motion-footage frame rates for final output
When you import motion footage into After Effects, the file’s frame rate does not change.
If you plan to output your footage to a different frame rate, you can make it conform to
the new frame rate in After Effects. Conforming ensures that frames disperse evenly over
the new output frame rate.
Conforming footage does not alter the original footage, only the reference that is used by
After Effects. When it conforms, After Effects changes the internal duration of frames but
does not change the frame content. If the conformation is a large amount, the footage
plays back at a different speed. For example, if you change the frame rate from 15 fps to 30
fps, the footage plays back faster.
It’s best to make the frame rate the same as the final output frame rate for your project.
This way, After Effects renders each frame, and the final output does not omit or duplicate
frames. However, in order not to drastically change the speed of your motion footage, it
may be beneficial to conform only by a small amount, making the new frame rate divisible
by the output rate. For example, if your original footage has a frame rate of 29.97 fps and
you want to output it for playback on CD-ROM at 10 fps, you can conform to 30 fps. At
30 fps, the frames are divisible by 10, so After Effects can evenly render every third frame.
Note: If you want to output original NTSC footage as PAL or vice versa, you must have access
to hardware that supports each format.
To change the frame rate of a motion footage file:
1 Select the footage file in the Project window.
2 Choose File > Interpret Footage > Main.
Page 95

ADOBE AFTER EFFECTS 5.0
3 Select Conform to Frame Rate, and type a new frame rate in the Frames Per Second box.
Then click OK.
Note: This procedure can change the synchronization of audio and video files. Be sure to check
your files and make any necessary adjustments.
Using interlaced video in After Effects
If you want to use interlaced or field-rendered footage (such as from NTSC video) in an
After Effects project, you will get the best results if you separate the video fields when you
import the footage. After Effects separates video fields by creating a full frame from each
field, preserving all of the image data from the original footage.
When importing interlaced video that was originally transferred from film, you can remove
the 3:2 pulldown that was applied during the transfer from film to video as you separate
fields so that effects you apply in After Effects don’t appear distorted. See “Removing 3:2
pulldown from video transferred from film” on page 87.
Separating fields
Separating fields is critical if you plan to make significant changes to the footage. When
you scale, rotate, or apply effects to interlaced video, unwanted artifacts, such as crossed
fields, are often introduced. By separating fields, After Effects accurately converts the two
interlaced frames in the video to noninterlaced frames, while preserving the maximum
amount of image quality. Using noninterlaced frames allows After Effects to apply edits
and effects consistently and at the highest quality.
User Guide
85
After Effects creates field-separated footage from a single formerly interlaced field by
splitting fields into two independent frames. Each new frame has only half the information of the original frame, so some frames may appear to have a lower resolution than
others when viewed at Draft quality. When you render the final composition, After Effects
reproduces high-quality interlaced frames for videotape. When you render a movie at Best
quality, After Effects interpolates between the scan lines of a field to produce maximum
image quality.
Note: After Effects automatically separates fields for D1 and DV video footage files. You can
manually separate fields for all other types of video footage in the Interpret Footage dialog box.
For more information, see “Specifying interpretation rules” on page 67.
Page 96

CHAPTER 2
86
Preparing and Importing Footage
To separate video fields in imported footage:
1 Select the footage item in the Project window.
2 Choose File > Interpret Footage > Main.
3 Select an option from the Separate Fields pop-up menu.
4 Click Motion Detect to increase image quality in nonmoving areas when the image is
rendered at Best quality. Then click OK.
Interpreting field order
Interlaced video has a field order defining the order in which the two video fields (upper
and lower) are displayed. A system that draws the upper lines before the lower lines is
called upper-field first; one that draws the lower lines before the upper lines is called lower-
field first. The order in which the fields are displayed is important, especially when the
fields contain motion. If you separate video fields using the wrong field order, motion will
not appear smooth.
Some programs, including After Effects and current versions of Media 100, label the field
order when rendering interlaced video files. When you import a labeled video file, After
Effects honors the field order label automatically. You can override the field order using
the Interpretation Rules file. For more information about field order, see “Specifying
interpretation rules” on page 67.
If a file does not contain a field order label, you can match the original field order of your
footage. If you are not sure which field order was used to interlace a footage item, use the
procedure below to find out.
To determine the original field order:
1 Select the item in the Project window.
2 Choose File > Interpret Footage > Main.
3 In the Interpret Footage dialog box, select Upper Field First from the Separate Fields
pop-up menu, and then click OK.
4 In the Project window, press Alt (Windows) or Option (Mac OS) as you double-click
the footage to open it in a Footage window.
5 If the Time Controls palette is not visible, choose Window > Show Time Controls.
6 In the Footage window, find a segment that contains one or more moving areas.
Page 97

ADOBE AFTER EFFECTS 5.0
7 Using the Frame Advance button ( ) on the Time Controls palette, step forward at least
five frames in the Footage window. Moving areas should move consistently in one direction. If the moving areas move backward every other frame, the wrong field-separation
option has been applied to the footage.
Note: Analog capture cards can vary. DV or footage captures from IEEE 1394 FireWire/i.Link
are always lower field first.
Field rendering
When you render a composition containing separated footage, set the Field Rendering
option to the same field order as your video equipment. If you don’t field-render the
composition, or if you field-render with the incorrect settings, the final movie may appear
too soft, jerky, or distorted. See “Testing the field-rendering order” on page 387.
Removing 3:2 pulldown from video transferred from film
When you transfer 24-fps film to 29.97-fps (NTSC) video, you use a process called 3:2
pulldown, in which the film frames are distributed across video fields in a repeating 3:2
pattern. It’s important to remove 3:2 pulldown from video footage that was originally film,
so that effects you add in After Effects synchronize perfectly with the original frame rate of
film. Removing 3:2 pulldown reduces the frame rate by 4/5: from 30 to 24 fps or from 29.97
to 23.976 fps, which also reduces the number of frames you have to change. To remove 3:2
pulldown, you must also indicate the phase of the 3:2 pulldown. For more information on
3:2 pulldown, see online Help.
User Guide
87
Before you remove 3:2 pulldown, separate the fields as either upper-field first or lowerfield first. Once the fields are separated, After Effects can analyze the footage and determine the correct 3:2 pulldown phase and field order. If you already know the phase and
field order, choose them.
Note: If your footage file contains frames from different sources, the phase may not be consistent. If this is the case, import the footage once for each phase. Then, add the footage to your
composition as many times as there are phases and trim each layer to use only the appropriate
frames for each phase.
To remove 3:2 pulldown from video transferred from film:
1 In the Project window, select the footage from which you want to remove 3:2 pulldown.
Page 98

CHAPTER 2
88
Preparing and Importing Footage
2 Choose File > Interpret Footage > Main.
3 In the Fields and Pulldown section, select Upper Field First or Lower Field First from
the Separate Fields pop-up menu.
4 Do one of the following and click OK:
• To have After Effects determine the correct settings, click Guess 3:2 Pulldown.
• If you know the phase of the 3:2 pulldown, choose it from the Remove Pulldown pop-
up menu.
Setting pixel aspect ratio
It is important to set the pixel aspect ratio for a footage file at its original ratio, not the ratio
of the final output. For general information about pixel aspect ratio, see online Help.
Set pixel aspect ratios for footage and compositions with these approximate values:
Square Pixels Uses a 1.0 pixel aspect ratio. Use this setting if your footage has a 640 x 480
or 648 x 486 frame size.
D1/DV NTSC Uses a 0.9 pixel aspect ratio. Use this setting if your footage has a 720 x 480
or 720 x 486 frame size, and your desired result is a 4:3 frame aspect ratio.
D1/DV NTSC Widescreen Uses a 1.2 pixel aspect ratio. Use this setting if your footage has
a 720 x 480 or 720 x 486 frame size, and your desired result is a 16:9 frame aspect ratio.
D1/DV PAL Uses a 1.0666 pixel aspect ratio. Use this setting if your footage has a 720 x 576
frame size, and your desired result is a 4:3 frame aspect ratio.
D1/DV PAL Widescreen Uses a 1.422 pixel aspect ratio. Use this setting if your footage has
a 720 x 576 frame size, and your desired result is a 16:9 frame aspect ratio.
Anamorphic 2:1 Uses a 2.0 pixel aspect ratio. Use this setting if your footage was shot
using an anamorphic film lens.
D4/D16 Standard Uses a 0.948 pixel aspect ratio. Use this setting if your footage has a
1440 x 1024 or 2880 x 2048 frame size, and your desired result is a 4:3 frame aspect ratio.
D4/D16 Anamorphic Uses a 1.896 pixel aspect ratio. Use this setting if your footage has a
1440 x 1024 or 2880 x 2048 frame size, and your desired result is an 8:3 frame aspect ratio.
Page 99

ADOBE AFTER EFFECTS 5.0
To set the pixel aspect ratio for imported footage:
1 Select the footage in the Project window.
2 Choose File > Interpret Footage > Main.
3 Select a ratio from the Pixel Aspect Ratio pop-up menu and click OK.
If you are planning to render to the same pixel aspect ratio as your footage, you also need
to set the pixel aspect ratio for the composition.
To set the pixel aspect ratio for a composition:
1 Open the composition.
2 Choose Composition > Composition Settings.
3 Select a ratio from the Pixel Aspect Ratio pop-up menu and click OK.
In some circumstances, you may need to work on a monitor that doesn’t match the pixel
ratio, so that your working view doesn’t match the final output. You can correct the pixel
aspect for previewing purposes.
To correct pixel aspect distortion (for previewing only):
With the appropriate composition open, click the arrow above the vertical scroll bar in the
Composition window and choose Pixel Aspect Correction.
User Guide
89
Using square-pixel footage for output to D1 or DV NTSC
You can use square-pixel footage in a D1/DV NTSC composition and generate output that
does not appear distorted. Note that the pixel aspect ratio is identical between D1 and DV,
but there is a slight difference in composition frame size. The steps that follow contain
information about issues discussed elsewhere in this guide. For more information on any
of the topics mentioned, see the index.
To use square-pixel footage when outputting to D1 or DV NTSC:
1 Prepare square-pixel footage that fills the entire frame using one of the following
methods:
• If your final output is DV, create and save it at a 720 x 534 frame size.
• If your final output is D1, create and save it at a 720 x 540 frame size.
Page 100

CHAPTER 2
90
Preparing and Importing Footage
2 Import the file into After Effects.
Note: If your square-pixel footage was created and saved at 720 x 486 or 720 x 480, select it
and choose File > Interpret Footage > Main. Then choose Square Pixels from the Pixel Aspect
Ratio pop-up menu and click OK.
3 Choose Composition > New Composition, and then select one of the following:
• If your final output is DV, choose NTSC DV, 720 x 480 for Frame Size, and D1/DV NTSC
for Pixel Aspect Ratio.
• If your final output is D1, choose NTSC D1, 720 x 486 for Frame Size, and D1/DV NTSC
for Pixel Aspect Ratio.
4 Select your other Composition settings as desired, and then click OK.
5 Add your footage to the new composition.
Note: If your footage was created and saved at a frame size other than those noted in step 1,
skip step 6.
6 Select the layer containing the square-pixel footage and apply the Shrink to Fit
command: press Ctrl+Alt+F (Windows) or Command+Option+F (Mac OS).
 Loading...