

Page 1

ADOBE® ACROBAT ® XI HELP
Page 2

Legal notices
Legal notices
For legal notices, see http://help.adobe.com/en_US/legalnotices/index.html.
Last updated 1/14/2015
Page 3

Contents
Chapter 1: What's new
What’s new in Acrobat XI . . . . . . . . . . . . . . . . . . . . . . . . . . . . . . . . . . . . . . . . . . . . . . . . . . . . . . . . . . . . . . . . . . . . . . . . . . . . . . . . . . . . . . . . . . . . . . .1
Chapter 2: Workspace
Workspace basics . . . . . . . . . . . . . . . . . . . . . . . . . . . . . . . . . . . . . . . . . . . . . . . . . . . . . . . . . . . . . . . . . . . . . . . . . . . . . . . . . . . . . . . . . . . . . . . . . . . . . . .9
Viewing PDFs and viewing preferences . . . . . . . . . . . . . . . . . . . . . . . . . . . . . . . . . . . . . . . . . . . . . . . . . . . . . . . . . . . . . . . . . . . . . . . . . . . . . . . . 19
How to use Acrobat XI on touch devices . . . . . . . . . . . . . . . . . . . . . . . . . . . . . . . . . . . . . . . . . . . . . . . . . . . . . . . . . . . . . . . . . . . . . . . . . . . . . . . 27
Keyboard shortcuts . . . . . . . . . . . . . . . . . . . . . . . . . . . . . . . . . . . . . . . . . . . . . . . . . . . . . . . . . . . . . . . . . . . . . . . . . . . . . . . . . . . . . . . . . . . . . . . . . . . 27
Navigating PDF pages . . . . . . . . . . . . . . . . . . . . . . . . . . . . . . . . . . . . . . . . . . . . . . . . . . . . . . . . . . . . . . . . . . . . . . . . . . . . . . . . . . . . . . . . . . . . . . . . 33
Adjusting PDF views . . . . . . . . . . . . . . . . . . . . . . . . . . . . . . . . . . . . . . . . . . . . . . . . . . . . . . . . . . . . . . . . . . . . . . . . . . . . . . . . . . . . . . . . . . . . . . . . . . 37
Display PDF in browser | Acrobat, Reader XI . . . . . . . . . . . . . . . . . . . . . . . . . . . . . . . . . . . . . . . . . . . . . . . . . . . . . . . . . . . . . . . . . . . . . . . . . . . 42
Flash Player needed | Acrobat, Reader XI . . . . . . . . . . . . . . . . . . . . . . . . . . . . . . . . . . . . . . . . . . . . . . . . . . . . . . . . . . . . . . . . . . . . . . . . . . . . . . 49
Grids, guides, and measurements in PDFs . . . . . . . . . . . . . . . . . . . . . . . . . . . . . . . . . . . . . . . . . . . . . . . . . . . . . . . . . . . . . . . . . . . . . . . . . . . . . 49
Working with online accounts . . . . . . . . . . . . . . . . . . . . . . . . . . . . . . . . . . . . . . . . . . . . . . . . . . . . . . . . . . . . . . . . . . . . . . . . . . . . . . . . . . . . . . . . 53
Updating Acrobat and using Adobe Digital Editions . . . . . . . . . . . . . . . . . . . . . . . . . . . . . . . . . . . . . . . . . . . . . . . . . . . . . . . . . . . . . . . . . . . 55
Opening PDFs . . . . . . . . . . . . . . . . . . . . . . . . . . . . . . . . . . . . . . . . . . . . . . . . . . . . . . . . . . . . . . . . . . . . . . . . . . . . . . . . . . . . . . . . . . . . . . . . . . . . . . . . 56
Asian, Cyrillic, and right-to-lefttext in PDFs . . . . . . . . . . . . . . . . . . . . . . . . . . . . . . . . . . . . . . . . . . . . . . . . . . . . . . . . . . . . . . . . . . . . . . . . . . . . 57
Acrobat in Mac OS | Acrobat Pro . . . . . . . . . . . . . . . . . . . . . . . . . . . . . . . . . . . . . . . . . . . . . . . . . . . . . . . . . . . . . . . . . . . . . . . . . . . . . . . . . . . . . . 58
Acrobat in Mac OS | Acrobat Pro . . . . . . . . . . . . . . . . . . . . . . . . . . . . . . . . . . . . . . . . . . . . . . . . . . . . . . . . . . . . . . . . . . . . . . . . . . . . . . . . . . . . . . 59
Adjusting PDF views . . . . . . . . . . . . . . . . . . . . . . . . . . . . . . . . . . . . . . . . . . . . . . . . . . . . . . . . . . . . . . . . . . . . . . . . . . . . . . . . . . . . . . . . . . . . . . . . . . 60
Asian, Cyrillic, and right-to-lefttext in PDFs . . . . . . . . . . . . . . . . . . . . . . . . . . . . . . . . . . . . . . . . . . . . . . . . . . . . . . . . . . . . . . . . . . . . . . . . . . . . 65
Display PDF in browser | Acrobat, Reader XI . . . . . . . . . . . . . . . . . . . . . . . . . . . . . . . . . . . . . . . . . . . . . . . . . . . . . . . . . . . . . . . . . . . . . . . . . . . 66
Flash Player needed | Acrobat, Reader XI . . . . . . . . . . . . . . . . . . . . . . . . . . . . . . . . . . . . . . . . . . . . . . . . . . . . . . . . . . . . . . . . . . . . . . . . . . . . . . 73
Grids, guides, and measurements in PDFs . . . . . . . . . . . . . . . . . . . . . . . . . . . . . . . . . . . . . . . . . . . . . . . . . . . . . . . . . . . . . . . . . . . . . . . . . . . . . 73
Keyboard shortcuts . . . . . . . . . . . . . . . . . . . . . . . . . . . . . . . . . . . . . . . . . . . . . . . . . . . . . . . . . . . . . . . . . . . . . . . . . . . . . . . . . . . . . . . . . . . . . . . . . . . 77
Navigating PDF pages . . . . . . . . . . . . . . . . . . . . . . . . . . . . . . . . . . . . . . . . . . . . . . . . . . . . . . . . . . . . . . . . . . . . . . . . . . . . . . . . . . . . . . . . . . . . . . . . 83
Opening PDFs . . . . . . . . . . . . . . . . . . . . . . . . . . . . . . . . . . . . . . . . . . . . . . . . . . . . . . . . . . . . . . . . . . . . . . . . . . . . . . . . . . . . . . . . . . . . . . . . . . . . . . . . 87
Updating Acrobat and using Adobe Digital Editions . . . . . . . . . . . . . . . . . . . . . . . . . . . . . . . . . . . . . . . . . . . . . . . . . . . . . . . . . . . . . . . . . . . 89
Viewing PDFs and viewing preferences . . . . . . . . . . . . . . . . . . . . . . . . . . . . . . . . . . . . . . . . . . . . . . . . . . . . . . . . . . . . . . . . . . . . . . . . . . . . . . . . 90
Working with online accounts . . . . . . . . . . . . . . . . . . . . . . . . . . . . . . . . . . . . . . . . . . . . . . . . . . . . . . . . . . . . . . . . . . . . . . . . . . . . . . . . . . . . . . . . 98
Workspace basics . . . . . . . . . . . . . . . . . . . . . . . . . . . . . . . . . . . . . . . . . . . . . . . . . . . . . . . . . . . . . . . . . . . . . . . . . . . . . . . . . . . . . . . . . . . . . . . . . . . . . 99
iii
Chapter 3: Creating PDFs
Create PDFs with Acrobat . . . . . . . . . . . . . . . . . . . . . . . . . . . . . . . . . . . . . . . . . . . . . . . . . . . . . . . . . . . . . . . . . . . . . . . . . . . . . . . . . . . . . . . . . . . . 110
How to create mobile-ready PDF files . . . . . . . . . . . . . . . . . . . . . . . . . . . . . . . . . . . . . . . . . . . . . . . . . . . . . . . . . . . . . . . . . . . . . . . . . . . . . . . . 113
How to work with files in the cloud . . . . . . . . . . . . . . . . . . . . . . . . . . . . . . . . . . . . . . . . . . . . . . . . . . . . . . . . . . . . . . . . . . . . . . . . . . . . . . . . . . . 114
Create PDFs with PDFMaker (Windows) . . . . . . . . . . . . . . . . . . . . . . . . . . . . . . . . . . . . . . . . . . . . . . . . . . . . . . . . . . . . . . . . . . . . . . . . . . . . . . 114
Scan documents to PDF . . . . . . . . . . . . . . . . . . . . . . . . . . . . . . . . . . . . . . . . . . . . . . . . . . . . . . . . . . . . . . . . . . . . . . . . . . . . . . . . . . . . . . . . . . . . . 128
Creating PDFs with Acrobat Distiller . . . . . . . . . . . . . . . . . . . . . . . . . . . . . . . . . . . . . . . . . . . . . . . . . . . . . . . . . . . . . . . . . . . . . . . . . . . . . . . . . 134
Adobe PDF conversion settings . . . . . . . . . . . . . . . . . . . . . . . . . . . . . . . . . . . . . . . . . . . . . . . . . . . . . . . . . . . . . . . . . . . . . . . . . . . . . . . . . . . . . . 137
Overview of PDF creation . . . . . . . . . . . . . . . . . . . . . . . . . . . . . . . . . . . . . . . . . . . . . . . . . . . . . . . . . . . . . . . . . . . . . . . . . . . . . . . . . . . . . . . . . . . . 151
Using the Adobe PDF printer . . . . . . . . . . . . . . . . . . . . . . . . . . . . . . . . . . . . . . . . . . . . . . . . . . . . . . . . . . . . . . . . . . . . . . . . . . . . . . . . . . . . . . . . 153
Last updated 1/14/2015
Page 4

ACROBAT XI
Content s
PDF fonts . . . . . . . . . . . . . . . . . . . . . . . . . . . . . . . . . . . . . . . . . . . . . . . . . . . . . . . . . . . . . . . . . . . . . . . . . . . . . . . . . . . . . . . . . . . . . . . . . . . . . . . . . . . 157
Converting web pages to PDF . . . . . . . . . . . . . . . . . . . . . . . . . . . . . . . . . . . . . . . . . . . . . . . . . . . . . . . . . . . . . . . . . . . . . . . . . . . . . . . . . . . . . . . 159
Chapter 4: Editing PDFs
Edit text in PDFs . . . . . . . . . . . . . . . . . . . . . . . . . . . . . . . . . . . . . . . . . . . . . . . . . . . . . . . . . . . . . . . . . . . . . . . . . . . . . . . . . . . . . . . . . . . . . . . . . . . . . 165
How to edit text in a PDF . . . . . . . . . . . . . . . . . . . . . . . . . . . . . . . . . . . . . . . . . . . . . . . . . . . . . . . . . . . . . . . . . . . . . . . . . . . . . . . . . . . . . . . . . . . . 170
How to edit images in PDF files . . . . . . . . . . . . . . . . . . . . . . . . . . . . . . . . . . . . . . . . . . . . . . . . . . . . . . . . . . . . . . . . . . . . . . . . . . . . . . . . . . . . . . 170
Rotate, move, delete, and renumber PDF pages . . . . . . . . . . . . . . . . . . . . . . . . . . . . . . . . . . . . . . . . . . . . . . . . . . . . . . . . . . . . . . . . . . . . . . 170
How to edit a scanned PDF file . . . . . . . . . . . . . . . . . . . . . . . . . . . . . . . . . . . . . . . . . . . . . . . . . . . . . . . . . . . . . . . . . . . . . . . . . . . . . . . . . . . . . . . 177
Edit images or objects in a PDF . . . . . . . . . . . . . . . . . . . . . . . . . . . . . . . . . . . . . . . . . . . . . . . . . . . . . . . . . . . . . . . . . . . . . . . . . . . . . . . . . . . . . . 177
Setting up PDFs for a presentation . . . . . . . . . . . . . . . . . . . . . . . . . . . . . . . . . . . . . . . . . . . . . . . . . . . . . . . . . . . . . . . . . . . . . . . . . . . . . . . . . . . 179
PDFs converted to web pages . . . . . . . . . . . . . . . . . . . . . . . . . . . . . . . . . . . . . . . . . . . . . . . . . . . . . . . . . . . . . . . . . . . . . . . . . . . . . . . . . . . . . . . 182
PDF properties and metadata . . . . . . . . . . . . . . . . . . . . . . . . . . . . . . . . . . . . . . . . . . . . . . . . . . . . . . . . . . . . . . . . . . . . . . . . . . . . . . . . . . . . . . . . 183
PDF layers . . . . . . . . . . . . . . . . . . . . . . . . . . . . . . . . . . . . . . . . . . . . . . . . . . . . . . . . . . . . . . . . . . . . . . . . . . . . . . . . . . . . . . . . . . . . . . . . . . . . . . . . . . . 186
PDF articles . . . . . . . . . . . . . . . . . . . . . . . . . . . . . . . . . . . . . . . . . . . . . . . . . . . . . . . . . . . . . . . . . . . . . . . . . . . . . . . . . . . . . . . . . . . . . . . . . . . . . . . . . 191
Page thumbnails and bookmarks inPDFs . . . . . . . . . . . . . . . . . . . . . . . . . . . . . . . . . . . . . . . . . . . . . . . . . . . . . . . . . . . . . . . . . . . . . . . . . . . . . 193
Optimizing PDFs . . . . . . . . . . . . . . . . . . . . . . . . . . . . . . . . . . . . . . . . . . . . . . . . . . . . . . . . . . . . . . . . . . . . . . . . . . . . . . . . . . . . . . . . . . . . . . . . . . . . 198
Links and attachments in PDFs . . . . . . . . . . . . . . . . . . . . . . . . . . . . . . . . . . . . . . . . . . . . . . . . . . . . . . . . . . . . . . . . . . . . . . . . . . . . . . . . . . . . . . . 203
Geospatial PDFs . . . . . . . . . . . . . . . . . . . . . . . . . . . . . . . . . . . . . . . . . . . . . . . . . . . . . . . . . . . . . . . . . . . . . . . . . . . . . . . . . . . . . . . . . . . . . . . . . . . . . 208
Applying actions and scripts to PDFs . . . . . . . . . . . . . . . . . . . . . . . . . . . . . . . . . . . . . . . . . . . . . . . . . . . . . . . . . . . . . . . . . . . . . . . . . . . . . . . . . 212
Action wizard (Acrobat Pro) . . . . . . . . . . . . . . . . . . . . . . . . . . . . . . . . . . . . . . . . . . . . . . . . . . . . . . . . . . . . . . . . . . . . . . . . . . . . . . . . . . . . . . . . . . 215
Create guided actions to automate repetitive tasks. . . . . . . . . . . . . . . . . . . . . . . . . . . . . . . . . . . . . . . . . . . . . . . . . . . . . . . . . . . . . . . . . . . . 218
iv
Chapter 5: Forms
Filling in PDF forms . . . . . . . . . . . . . . . . . . . . . . . . . . . . . . . . . . . . . . . . . . . . . . . . . . . . . . . . . . . . . . . . . . . . . . . . . . . . . . . . . . . . . . . . . . . . . . . . . . 219
Adding form fields . . . . . . . . . . . . . . . . . . . . . . . . . . . . . . . . . . . . . . . . . . . . . . . . . . . . . . . . . . . . . . . . . . . . . . . . . . . . . . . . . . . . . . . . . . . . . . . . . . . 225
Where has the Typewriter Tool gone . . . . . . . . . . . . . . . . . . . . . . . . . . . . . . . . . . . . . . . . . . . . . . . . . . . . . . . . . . . . . . . . . . . . . . . . . . . . . . . . . 225
How to create forms in FormsCentral desktop app . . . . . . . . . . . . . . . . . . . . . . . . . . . . . . . . . . . . . . . . . . . . . . . . . . . . . . . . . . . . . . . . . . . . 225
How to create EchoSign-aware forms . . . . . . . . . . . . . . . . . . . . . . . . . . . . . . . . . . . . . . . . . . . . . . . . . . . . . . . . . . . . . . . . . . . . . . . . . . . . . . . . 225
How to post forms online with FormsCentral (Acrobat Pro) . . . . . . . . . . . . . . . . . . . . . . . . . . . . . . . . . . . . . . . . . . . . . . . . . . . . . . . . . . . . 225
How to analyze data in FormsCentral . . . . . . . . . . . . . . . . . . . . . . . . . . . . . . . . . . . . . . . . . . . . . . . . . . . . . . . . . . . . . . . . . . . . . . . . . . . . . . . . . 225
How to distribute existing PDF forms . . . . . . . . . . . . . . . . . . . . . . . . . . . . . . . . . . . . . . . . . . . . . . . . . . . . . . . . . . . . . . . . . . . . . . . . . . . . . . . . . 226
Collecting and managing PDF form data . . . . . . . . . . . . . . . . . . . . . . . . . . . . . . . . . . . . . . . . . . . . . . . . . . . . . . . . . . . . . . . . . . . . . . . . . . . . . 226
PDF forms basics . . . . . . . . . . . . . . . . . . . . . . . . . . . . . . . . . . . . . . . . . . . . . . . . . . . . . . . . . . . . . . . . . . . . . . . . . . . . . . . . . . . . . . . . . . . . . . . . . . . . 228
Setting action buttons in PDF forms . . . . . . . . . . . . . . . . . . . . . . . . . . . . . . . . . . . . . . . . . . . . . . . . . . . . . . . . . . . . . . . . . . . . . . . . . . . . . . . . . . 230
Publishing interactive PDF web forms . . . . . . . . . . . . . . . . . . . . . . . . . . . . . . . . . . . . . . . . . . . . . . . . . . . . . . . . . . . . . . . . . . . . . . . . . . . . . . . . 235
PDF form field properties . . . . . . . . . . . . . . . . . . . . . . . . . . . . . . . . . . . . . . . . . . . . . . . . . . . . . . . . . . . . . . . . . . . . . . . . . . . . . . . . . . . . . . . . . . . . 237
PDF form field basics . . . . . . . . . . . . . . . . . . . . . . . . . . . . . . . . . . . . . . . . . . . . . . . . . . . . . . . . . . . . . . . . . . . . . . . . . . . . . . . . . . . . . . . . . . . . . . . . 247
PDF barcode form fields . . . . . . . . . . . . . . . . . . . . . . . . . . . . . . . . . . . . . . . . . . . . . . . . . . . . . . . . . . . . . . . . . . . . . . . . . . . . . . . . . . . . . . . . . . . . . 252
Creating and distributing PDF forms . . . . . . . . . . . . . . . . . . . . . . . . . . . . . . . . . . . . . . . . . . . . . . . . . . . . . . . . . . . . . . . . . . . . . . . . . . . . . . . . . 256
About Forms Tracker . . . . . . . . . . . . . . . . . . . . . . . . . . . . . . . . . . . . . . . . . . . . . . . . . . . . . . . . . . . . . . . . . . . . . . . . . . . . . . . . . . . . . . . . . . . . . . . . 262
Chapter 6: Combining files
Combine files into single PDF . . . . . . . . . . . . . . . . . . . . . . . . . . . . . . . . . . . . . . . . . . . . . . . . . . . . . . . . . . . . . . . . . . . . . . . . . . . . . . . . . . . . . . . . 263
How to manipulate pages in Acrobat . . . . . . . . . . . . . . . . . . . . . . . . . . . . . . . . . . . . . . . . . . . . . . . . . . . . . . . . . . . . . . . . . . . . . . . . . . . . . . . . . 263
Add headers, footers, and Bates numbering to PDFs . . . . . . . . . . . . . . . . . . . . . . . . . . . . . . . . . . . . . . . . . . . . . . . . . . . . . . . . . . . . . . . . . . 263
Rotate, move, delete, and renumber PDF pages . . . . . . . . . . . . . . . . . . . . . . . . . . . . . . . . . . . . . . . . . . . . . . . . . . . . . . . . . . . . . . . . . . . . . . 267
Last updated 1/14/2015
Page 5

ACROBAT XI
Content s
Crop PDF pages . . . . . . . . . . . . . . . . . . . . . . . . . . . . . . . . . . . . . . . . . . . . . . . . . . . . . . . . . . . . . . . . . . . . . . . . . . . . . . . . . . . . . . . . . . . . . . . . . . . . . 274
Create and customize PDF Portfolios . . . . . . . . . . . . . . . . . . . . . . . . . . . . . . . . . . . . . . . . . . . . . . . . . . . . . . . . . . . . . . . . . . . . . . . . . . . . . . . . . 275
Working with component files in a PDF Portfolio . . . . . . . . . . . . . . . . . . . . . . . . . . . . . . . . . . . . . . . . . . . . . . . . . . . . . . . . . . . . . . . . . . . . . 279
Publish and share PDF Portfolios . . . . . . . . . . . . . . . . . . . . . . . . . . . . . . . . . . . . . . . . . . . . . . . . . . . . . . . . . . . . . . . . . . . . . . . . . . . . . . . . . . . . . 281
Overview of PDF Portfolios . . . . . . . . . . . . . . . . . . . . . . . . . . . . . . . . . . . . . . . . . . . . . . . . . . . . . . . . . . . . . . . . . . . . . . . . . . . . . . . . . . . . . . . . . . 283
Combine or merge files into single PDF . . . . . . . . . . . . . . . . . . . . . . . . . . . . . . . . . . . . . . . . . . . . . . . . . . . . . . . . . . . . . . . . . . . . . . . . . . . . . . 290
Add watermarks to PDFs . . . . . . . . . . . . . . . . . . . . . . . . . . . . . . . . . . . . . . . . . . . . . . . . . . . . . . . . . . . . . . . . . . . . . . . . . . . . . . . . . . . . . . . . . . . . . 293
Add backgrounds to PDFs . . . . . . . . . . . . . . . . . . . . . . . . . . . . . . . . . . . . . . . . . . . . . . . . . . . . . . . . . . . . . . . . . . . . . . . . . . . . . . . . . . . . . . . . . . . 295
Chapter 7: Reviews and commenting
Mark up text with edits . . . . . . . . . . . . . . . . . . . . . . . . . . . . . . . . . . . . . . . . . . . . . . . . . . . . . . . . . . . . . . . . . . . . . . . . . . . . . . . . . . . . . . . . . . . . . . 298
Preparing for a PDF review . . . . . . . . . . . . . . . . . . . . . . . . . . . . . . . . . . . . . . . . . . . . . . . . . . . . . . . . . . . . . . . . . . . . . . . . . . . . . . . . . . . . . . . . . . . 300
Commenting in PDFs . . . . . . . . . . . . . . . . . . . . . . . . . . . . . . . . . . . . . . . . . . . . . . . . . . . . . . . . . . . . . . . . . . . . . . . . . . . . . . . . . . . . . . . . . . . . . . . . 303
Starting a PDF review . . . . . . . . . . . . . . . . . . . . . . . . . . . . . . . . . . . . . . . . . . . . . . . . . . . . . . . . . . . . . . . . . . . . . . . . . . . . . . . . . . . . . . . . . . . . . . . . 313
Sharing PDFs . . . . . . . . . . . . . . . . . . . . . . . . . . . . . . . . . . . . . . . . . . . . . . . . . . . . . . . . . . . . . . . . . . . . . . . . . . . . . . . . . . . . . . . . . . . . . . . . . . . . . . . . 315
Participating in a PDF review . . . . . . . . . . . . . . . . . . . . . . . . . . . . . . . . . . . . . . . . . . . . . . . . . . . . . . . . . . . . . . . . . . . . . . . . . . . . . . . . . . . . . . . . 317
Adding a stamp to a PDF . . . . . . . . . . . . . . . . . . . . . . . . . . . . . . . . . . . . . . . . . . . . . . . . . . . . . . . . . . . . . . . . . . . . . . . . . . . . . . . . . . . . . . . . . . . . 320
Tracking and managing PDF reviews . . . . . . . . . . . . . . . . . . . . . . . . . . . . . . . . . . . . . . . . . . . . . . . . . . . . . . . . . . . . . . . . . . . . . . . . . . . . . . . . . 323
Managing comments . . . . . . . . . . . . . . . . . . . . . . . . . . . . . . . . . . . . . . . . . . . . . . . . . . . . . . . . . . . . . . . . . . . . . . . . . . . . . . . . . . . . . . . . . . . . . . . . 327
Importing and exporting comments . . . . . . . . . . . . . . . . . . . . . . . . . . . . . . . . . . . . . . . . . . . . . . . . . . . . . . . . . . . . . . . . . . . . . . . . . . . . . . . . . 332
Approval workflows . . . . . . . . . . . . . . . . . . . . . . . . . . . . . . . . . . . . . . . . . . . . . . . . . . . . . . . . . . . . . . . . . . . . . . . . . . . . . . . . . . . . . . . . . . . . . . . . . 335
How to use webmail in Acrobat . . . . . . . . . . . . . . . . . . . . . . . . . . . . . . . . . . . . . . . . . . . . . . . . . . . . . . . . . . . . . . . . . . . . . . . . . . . . . . . . . . . . . . 337
How to work with comment tools . . . . . . . . . . . . . . . . . . . . . . . . . . . . . . . . . . . . . . . . . . . . . . . . . . . . . . . . . . . . . . . . . . . . . . . . . . . . . . . . . . . . 338
v
Chapter 8: Saving and exporting PDFs
Saving PDFs . . . . . . . . . . . . . . . . . . . . . . . . . . . . . . . . . . . . . . . . . . . . . . . . . . . . . . . . . . . . . . . . . . . . . . . . . . . . . . . . . . . . . . . . . . . . . . . . . . . . . . . . . 339
File format options for PDF export . . . . . . . . . . . . . . . . . . . . . . . . . . . . . . . . . . . . . . . . . . . . . . . . . . . . . . . . . . . . . . . . . . . . . . . . . . . . . . . . . . . 341
Convert or export PDFs to other file formats . . . . . . . . . . . . . . . . . . . . . . . . . . . . . . . . . . . . . . . . . . . . . . . . . . . . . . . . . . . . . . . . . . . . . . . . . . 345
Reusing PDF content . . . . . . . . . . . . . . . . . . . . . . . . . . . . . . . . . . . . . . . . . . . . . . . . . . . . . . . . . . . . . . . . . . . . . . . . . . . . . . . . . . . . . . . . . . . . . . . . 348
How to work with SharePoint and Office 365 . . . . . . . . . . . . . . . . . . . . . . . . . . . . . . . . . . . . . . . . . . . . . . . . . . . . . . . . . . . . . . . . . . . . . . . . . 351
Chapter 9: Security
Enhanced security setting for PDFs . . . . . . . . . . . . . . . . . . . . . . . . . . . . . . . . . . . . . . . . . . . . . . . . . . . . . . . . . . . . . . . . . . . . . . . . . . . . . . . . . . . 352
Securing PDFs with passwords . . . . . . . . . . . . . . . . . . . . . . . . . . . . . . . . . . . . . . . . . . . . . . . . . . . . . . . . . . . . . . . . . . . . . . . . . . . . . . . . . . . . . . . 353
Opening secured PDFs . . . . . . . . . . . . . . . . . . . . . . . . . . . . . . . . . . . . . . . . . . . . . . . . . . . . . . . . . . . . . . . . . . . . . . . . . . . . . . . . . . . . . . . . . . . . . . 358
Setting up security policies for PDFs . . . . . . . . . . . . . . . . . . . . . . . . . . . . . . . . . . . . . . . . . . . . . . . . . . . . . . . . . . . . . . . . . . . . . . . . . . . . . . . . . 358
Security warnings when a PDF opens . . . . . . . . . . . . . . . . . . . . . . . . . . . . . . . . . . . . . . . . . . . . . . . . . . . . . . . . . . . . . . . . . . . . . . . . . . . . . . . . 364
Securing PDFs with certificates . . . . . . . . . . . . . . . . . . . . . . . . . . . . . . . . . . . . . . . . . . . . . . . . . . . . . . . . . . . . . . . . . . . . . . . . . . . . . . . . . . . . . . 366
Securing PDFs with Adobe LiveCycle Rights Management ES . . . . . . . . . . . . . . . . . . . . . . . . . . . . . . . . . . . . . . . . . . . . . . . . . . . . . . . . . 371
Removing sensitive content from PDFs . . . . . . . . . . . . . . . . . . . . . . . . . . . . . . . . . . . . . . . . . . . . . . . . . . . . . . . . . . . . . . . . . . . . . . . . . . . . . . . 371
Protected View feature for PDFs (Windows only) . . . . . . . . . . . . . . . . . . . . . . . . . . . . . . . . . . . . . . . . . . . . . . . . . . . . . . . . . . . . . . . . . . . . . . 377
Overview of security in Acrobat and PDFs . . . . . . . . . . . . . . . . . . . . . . . . . . . . . . . . . . . . . . . . . . . . . . . . . . . . . . . . . . . . . . . . . . . . . . . . . . . . 379
JavaScripts in PDFs as a security risk . . . . . . . . . . . . . . . . . . . . . . . . . . . . . . . . . . . . . . . . . . . . . . . . . . . . . . . . . . . . . . . . . . . . . . . . . . . . . . . . . . 379
Digital IDs . . . . . . . . . . . . . . . . . . . . . . . . . . . . . . . . . . . . . . . . . . . . . . . . . . . . . . . . . . . . . . . . . . . . . . . . . . . . . . . . . . . . . . . . . . . . . . . . . . . . . . . . . . . 380
Choosing a security method for PDFs . . . . . . . . . . . . . . . . . . . . . . . . . . . . . . . . . . . . . . . . . . . . . . . . . . . . . . . . . . . . . . . . . . . . . . . . . . . . . . . . 384
Attachments as security risks in Reader and Acrobat . . . . . . . . . . . . . . . . . . . . . . . . . . . . . . . . . . . . . . . . . . . . . . . . . . . . . . . . . . . . . . . . . . 386
Last updated 1/14/2015
Page 6

ACROBAT XI
Content s
Allow or block links to the Internet in PDFs . . . . . . . . . . . . . . . . . . . . . . . . . . . . . . . . . . . . . . . . . . . . . . . . . . . . . . . . . . . . . . . . . . . . . . . . . . . 387
Password protect PDFs . . . . . . . . . . . . . . . . . . . . . . . . . . . . . . . . . . . . . . . . . . . . . . . . . . . . . . . . . . . . . . . . . . . . . . . . . . . . . . . . . . . . . . . . . . . . . . 388
Chapter 10: Electronic signatures
Signing PDFs with Adobe EchoSign Electronic Signature . . . . . . . . . . . . . . . . . . . . . . . . . . . . . . . . . . . . . . . . . . . . . . . . . . . . . . . . . . . . . . 389
Validating digital signatures . . . . . . . . . . . . . . . . . . . . . . . . . . . . . . . . . . . . . . . . . . . . . . . . . . . . . . . . . . . . . . . . . . . . . . . . . . . . . . . . . . . . . . . . . 393
Manage trusted identities . . . . . . . . . . . . . . . . . . . . . . . . . . . . . . . . . . . . . . . . . . . . . . . . . . . . . . . . . . . . . . . . . . . . . . . . . . . . . . . . . . . . . . . . . . . 401
Certificate-based signatures . . . . . . . . . . . . . . . . . . . . . . . . . . . . . . . . . . . . . . . . . . . . . . . . . . . . . . . . . . . . . . . . . . . . . . . . . . . . . . . . . . . . . . . . . 403
Sign documents electronically . . . . . . . . . . . . . . . . . . . . . . . . . . . . . . . . . . . . . . . . . . . . . . . . . . . . . . . . . . . . . . . . . . . . . . . . . . . . . . . . . . . . . . . 409
Validating certificate-based signatures . . . . . . . . . . . . . . . . . . . . . . . . . . . . . . . . . . . . . . . . . . . . . . . . . . . . . . . . . . . . . . . . . . . . . . . . . . . . . . . 409
Chapter 11: Printing
Basic PDF printing tasks . . . . . . . . . . . . . . . . . . . . . . . . . . . . . . . . . . . . . . . . . . . . . . . . . . . . . . . . . . . . . . . . . . . . . . . . . . . . . . . . . . . . . . . . . . . . . 411
Print Booklets and PDF Portfolios . . . . . . . . . . . . . . . . . . . . . . . . . . . . . . . . . . . . . . . . . . . . . . . . . . . . . . . . . . . . . . . . . . . . . . . . . . . . . . . . . . . . 419
Advanced PDF print settings . . . . . . . . . . . . . . . . . . . . . . . . . . . . . . . . . . . . . . . . . . . . . . . . . . . . . . . . . . . . . . . . . . . . . . . . . . . . . . . . . . . . . . . . . 421
Printing color PDFs (Acrobat Pro) . . . . . . . . . . . . . . . . . . . . . . . . . . . . . . . . . . . . . . . . . . . . . . . . . . . . . . . . . . . . . . . . . . . . . . . . . . . . . . . . . . . . . 428
Printing PDFs in custom sizes . . . . . . . . . . . . . . . . . . . . . . . . . . . . . . . . . . . . . . . . . . . . . . . . . . . . . . . . . . . . . . . . . . . . . . . . . . . . . . . . . . . . . . . . 432
Chapter 12: Accessibility, tags, and reflow
Create and verify PDF accessibility (Acrobat Pro) . . . . . . . . . . . . . . . . . . . . . . . . . . . . . . . . . . . . . . . . . . . . . . . . . . . . . . . . . . . . . . . . . . . . . . 434
Touch Up Reading Order tool for PDFs (Acrobat Pro) . . . . . . . . . . . . . . . . . . . . . . . . . . . . . . . . . . . . . . . . . . . . . . . . . . . . . . . . . . . . . . . . . . 449
Reading PDFs with reflow and accessibility features . . . . . . . . . . . . . . . . . . . . . . . . . . . . . . . . . . . . . . . . . . . . . . . . . . . . . . . . . . . . . . . . . . 456
Editing document structure withthe Content and Tags panels (Acrobat Pro) . . . . . . . . . . . . . . . . . . . . . . . . . . . . . . . . . . . . . . . . . . . 463
Creating accessible PDFs . . . . . . . . . . . . . . . . . . . . . . . . . . . . . . . . . . . . . . . . . . . . . . . . . . . . . . . . . . . . . . . . . . . . . . . . . . . . . . . . . . . . . . . . . . . . 471
Accessibility features in PDFs . . . . . . . . . . . . . . . . . . . . . . . . . . . . . . . . . . . . . . . . . . . . . . . . . . . . . . . . . . . . . . . . . . . . . . . . . . . . . . . . . . . . . . . . 476
vi
Chapter 13: Searching and indexing
Searching PDFs . . . . . . . . . . . . . . . . . . . . . . . . . . . . . . . . . . . . . . . . . . . . . . . . . . . . . . . . . . . . . . . . . . . . . . . . . . . . . . . . . . . . . . . . . . . . . . . . . . . . . . 479
Creating PDF indexes . . . . . . . . . . . . . . . . . . . . . . . . . . . . . . . . . . . . . . . . . . . . . . . . . . . . . . . . . . . . . . . . . . . . . . . . . . . . . . . . . . . . . . . . . . . . . . . . 485
Chapter 14: Multimedia and 3D models
Setting 3D views in PDFs . . . . . . . . . . . . . . . . . . . . . . . . . . . . . . . . . . . . . . . . . . . . . . . . . . . . . . . . . . . . . . . . . . . . . . . . . . . . . . . . . . . . . . . . . . . . 490
Playing video, audio, and multimedia formats in PDFs . . . . . . . . . . . . . . . . . . . . . . . . . . . . . . . . . . . . . . . . . . . . . . . . . . . . . . . . . . . . . . . . 492
Measuring 3D objects in PDFs . . . . . . . . . . . . . . . . . . . . . . . . . . . . . . . . . . . . . . . . . . . . . . . . . . . . . . . . . . . . . . . . . . . . . . . . . . . . . . . . . . . . . . . 494
Interacting with 3D models . . . . . . . . . . . . . . . . . . . . . . . . . . . . . . . . . . . . . . . . . . . . . . . . . . . . . . . . . . . . . . . . . . . . . . . . . . . . . . . . . . . . . . . . . . 497
Displaying 3D models in PDFs . . . . . . . . . . . . . . . . . . . . . . . . . . . . . . . . . . . . . . . . . . . . . . . . . . . . . . . . . . . . . . . . . . . . . . . . . . . . . . . . . . . . . . . 504
Commenting on 3D designs in PDFs . . . . . . . . . . . . . . . . . . . . . . . . . . . . . . . . . . . . . . . . . . . . . . . . . . . . . . . . . . . . . . . . . . . . . . . . . . . . . . . . . 508
Adding multimedia to PDFs . . . . . . . . . . . . . . . . . . . . . . . . . . . . . . . . . . . . . . . . . . . . . . . . . . . . . . . . . . . . . . . . . . . . . . . . . . . . . . . . . . . . . . . . . . 510
Adding 3D models to PDFs (Acrobat Pro) . . . . . . . . . . . . . . . . . . . . . . . . . . . . . . . . . . . . . . . . . . . . . . . . . . . . . . . . . . . . . . . . . . . . . . . . . . . . . 513
Add comments to videos (Acrobat Pro) . . . . . . . . . . . . . . . . . . . . . . . . . . . . . . . . . . . . . . . . . . . . . . . . . . . . . . . . . . . . . . . . . . . . . . . . . . . . . . . 516
Chapter 15: Print production tools (Acrobat Pro)
Print production tools overview(Acrobat Pro) . . . . . . . . . . . . . . . . . . . . . . . . . . . . . . . . . . . . . . . . . . . . . . . . . . . . . . . . . . . . . . . . . . . . . . . . . 517
Printer marks and hairlines (Acrobat Pro) . . . . . . . . . . . . . . . . . . . . . . . . . . . . . . . . . . . . . . . . . . . . . . . . . . . . . . . . . . . . . . . . . . . . . . . . . . . . . 518
Previewing output (Acrobat Pro) . . . . . . . . . . . . . . . . . . . . . . . . . . . . . . . . . . . . . . . . . . . . . . . . . . . . . . . . . . . . . . . . . . . . . . . . . . . . . . . . . . . . . 520
Transparency flattening (Acrobat Pro) . . . . . . . . . . . . . . . . . . . . . . . . . . . . . . . . . . . . . . . . . . . . . . . . . . . . . . . . . . . . . . . . . . . . . . . . . . . . . . . . 524
Color conversion and ink management (Acrobat Pro) . . . . . . . . . . . . . . . . . . . . . . . . . . . . . . . . . . . . . . . . . . . . . . . . . . . . . . . . . . . . . . . . . 529
Trapping color (Acrobat Pro) . . . . . . . . . . . . . . . . . . . . . . . . . . . . . . . . . . . . . . . . . . . . . . . . . . . . . . . . . . . . . . . . . . . . . . . . . . . . . . . . . . . . . . . . . 534
Last updated 1/14/2015
Page 7

ACROBAT XI
Content s
Chapter 16: Preflight (Acrobat Pro)
Viewing preflight results, objects, and resources (Acrobat Pro) . . . . . . . . . . . . . . . . . . . . . . . . . . . . . . . . . . . . . . . . . . . . . . . . . . . . . . . . 542
Preflight reports (Acrobat Pro) . . . . . . . . . . . . . . . . . . . . . . . . . . . . . . . . . . . . . . . . . . . . . . . . . . . . . . . . . . . . . . . . . . . . . . . . . . . . . . . . . . . . . . . 545
Preflight profiles (Acrobat Pro) . . . . . . . . . . . . . . . . . . . . . . . . . . . . . . . . . . . . . . . . . . . . . . . . . . . . . . . . . . . . . . . . . . . . . . . . . . . . . . . . . . . . . . . 547
PDF/X-, PDF/A-, and PDF/E-compliant files (Acrobat Pro) . . . . . . . . . . . . . . . . . . . . . . . . . . . . . . . . . . . . . . . . . . . . . . . . . . . . . . . . . . . . . . 552
Output intents in PDFs (Acrobat Pro) . . . . . . . . . . . . . . . . . . . . . . . . . . . . . . . . . . . . . . . . . . . . . . . . . . . . . . . . . . . . . . . . . . . . . . . . . . . . . . . . . 554
Correcting problem areas with the Preflight tool (Acrobat Pro) . . . . . . . . . . . . . . . . . . . . . . . . . . . . . . . . . . . . . . . . . . . . . . . . . . . . . . . . 555
Automating document analysis with droplets or preflight actions (Acrobat Pro) . . . . . . . . . . . . . . . . . . . . . . . . . . . . . . . . . . . . . . . 559
Analyzing documents with the Preflight tool (Acrobat Pro) . . . . . . . . . . . . . . . . . . . . . . . . . . . . . . . . . . . . . . . . . . . . . . . . . . . . . . . . . . . . 561
Advanced preflight inspections (Acrobat Pro) . . . . . . . . . . . . . . . . . . . . . . . . . . . . . . . . . . . . . . . . . . . . . . . . . . . . . . . . . . . . . . . . . . . . . . . . 564
Additional checks in the Preflight tool (Acrobat Pro) . . . . . . . . . . . . . . . . . . . . . . . . . . . . . . . . . . . . . . . . . . . . . . . . . . . . . . . . . . . . . . . . . . 566
Chapter 17: Color management
Working with color profiles . . . . . . . . . . . . . . . . . . . . . . . . . . . . . . . . . . . . . . . . . . . . . . . . . . . . . . . . . . . . . . . . . . . . . . . . . . . . . . . . . . . . . . . . . . 572
Understanding color management . . . . . . . . . . . . . . . . . . . . . . . . . . . . . . . . . . . . . . . . . . . . . . . . . . . . . . . . . . . . . . . . . . . . . . . . . . . . . . . . . . . 575
Keeping colors consistent . . . . . . . . . . . . . . . . . . . . . . . . . . . . . . . . . . . . . . . . . . . . . . . . . . . . . . . . . . . . . . . . . . . . . . . . . . . . . . . . . . . . . . . . . . . 577
Color settings . . . . . . . . . . . . . . . . . . . . . . . . . . . . . . . . . . . . . . . . . . . . . . . . . . . . . . . . . . . . . . . . . . . . . . . . . . . . . . . . . . . . . . . . . . . . . . . . . . . . . . . 579
Color-managing documents . . . . . . . . . . . . . . . . . . . . . . . . . . . . . . . . . . . . . . . . . . . . . . . . . . . . . . . . . . . . . . . . . . . . . . . . . . . . . . . . . . . . . . . . 581
vii
Last updated 1/14/2015
Page 8
Chapter 1: What's new
What’s new in Acrobat XI
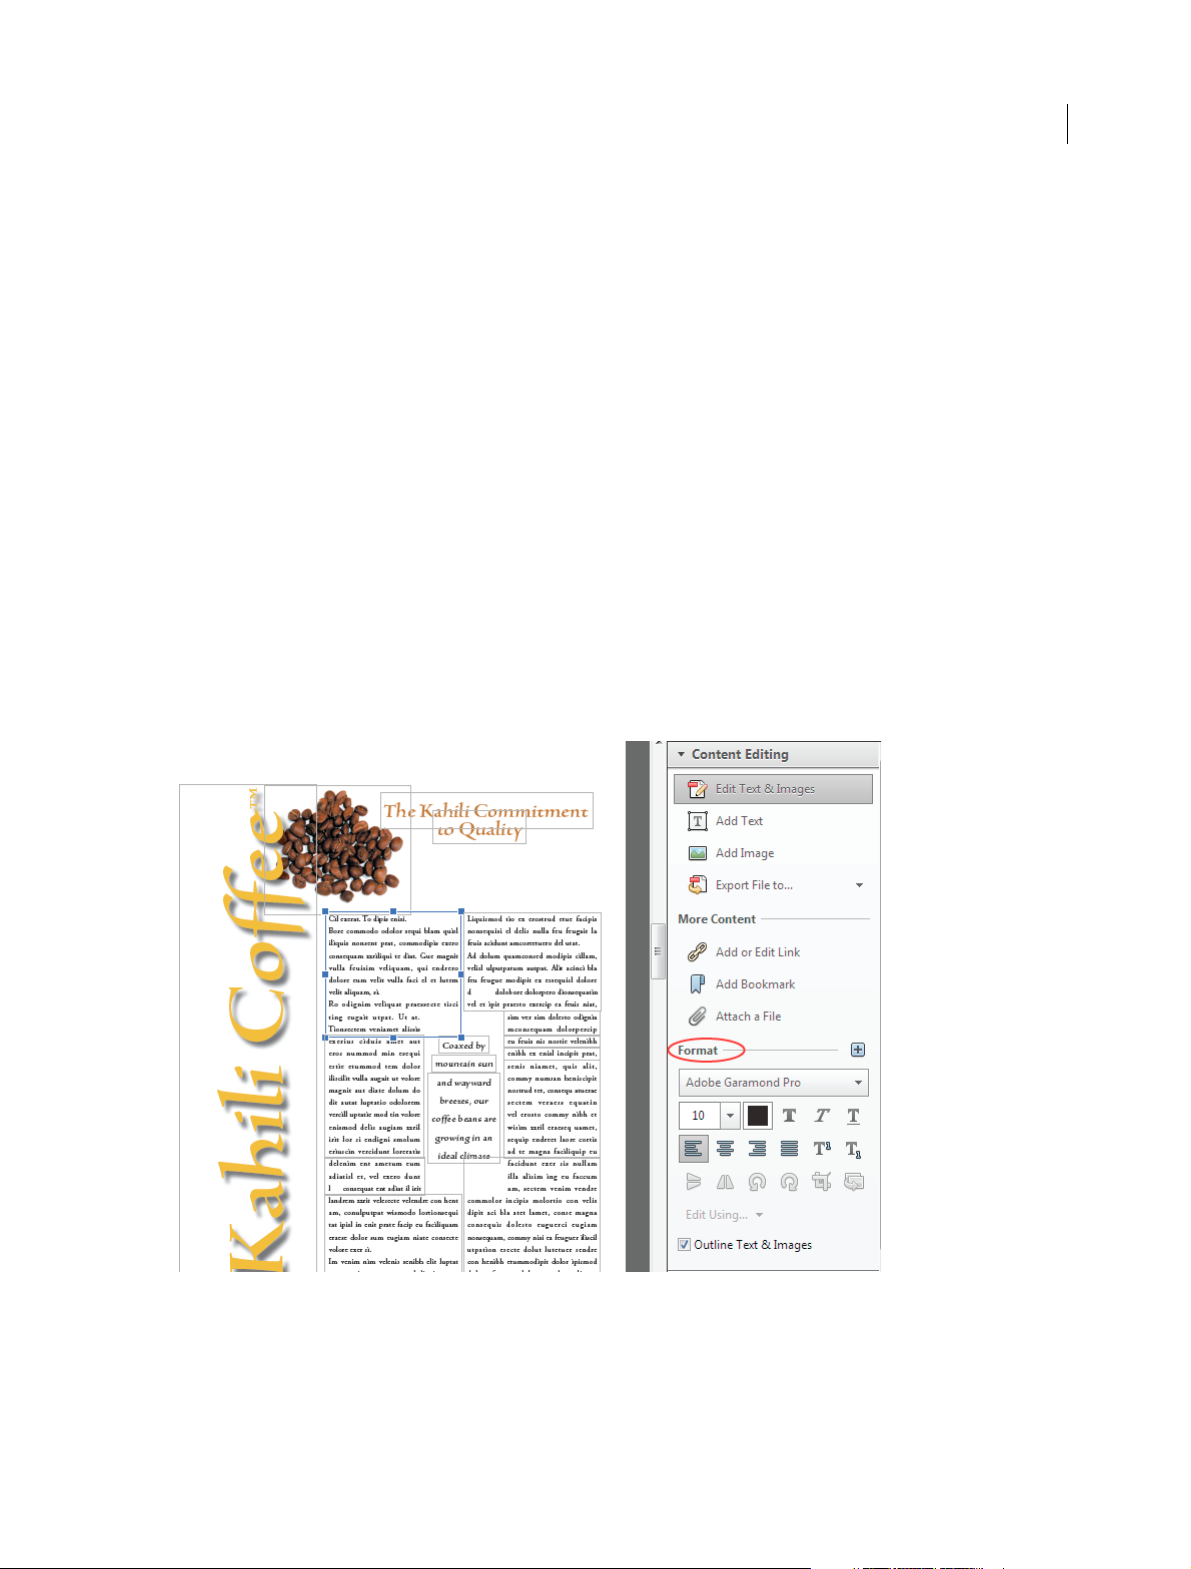
Edit PDFs
Edit text and images
Correct, update, and enhance PDFs using a new point-and-click interface. Add or replace content or images. Change
fonts and typeface size, adjust alignment, or add superscripts or subscripts. Easily flip, rotate, crop, or resize images.
Choose Tools > Content Editing > Edit Text & Images. Outlines identify the text and images you can edit. Select the
text or images you want to edit. Type new text or set options in the Format panel
1
For more information, watch How to edit text in a PDF file and How to edit images in PDF files, or see Edit text in
PDFsor Edit images or objects in a PDF.
Last updated 1/14/2015
Page 9
What's new
Reflow text on a page
Reflow paragraph text on a page by inserting new text or resizing a paragraph with a simple drag. The text in the
paragraph automatically reflows to accommodate the edited content. Choose Tools > Content Editing > Edit Text &
Images to outline the text boxes. Then click where you want to insert text. To resize the text box, place the pointer over
a selection handle. When the cursor changes to the Resize pointer
information, see Move, rotate, or resize a text box.
, drag the handle to resize. For more
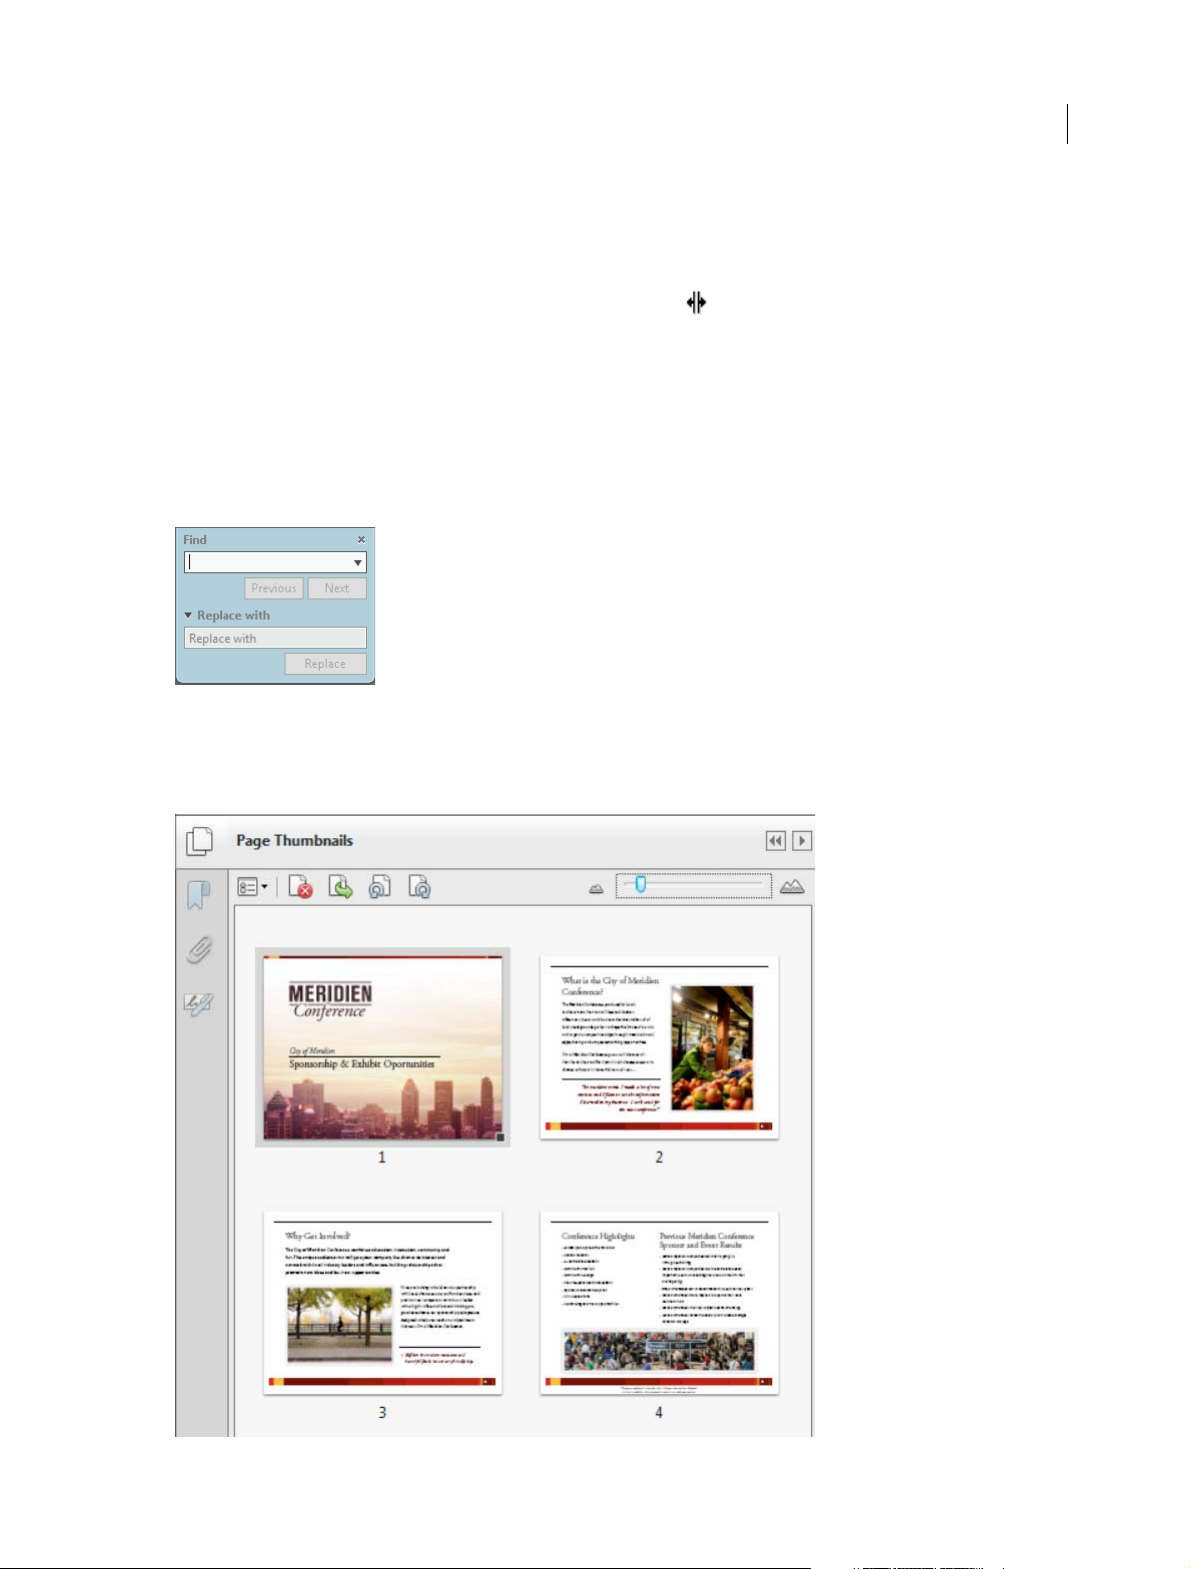
Find and replace
Find and Replace text throughout your document. Replace misspelled, incorrect, or outdated words or phrases using
the enhanced Find tool. Choose Edit > Find to open the Find dialog box. Click Replace With to expose the Replace With
text box. Type the text you want to find and enter the replacement text. Click Next to locate the first instance of the
word or phrase, or click Replace to automatically find and replace the first instance.
2
Rearrange pages
Rearrange, insert, rotate, or delete pages in the improved Page Thumbnails panel. Use the zoom slider to adjust the size
of thumbnails. Easily drag-and-drop pages from one location to another.
Last updated 1/14/2015
Page 10

What's new
For more information, watch How to manipulate pages in Acrobat.
Improved Action Wizard
Simplify routine, multistep tasks using the Action Wizard. Stop, restart, skip, or rerun tasks as needed. Acrobat includes
several actions to automate common tasks, such as archiving, redacting sensitive content, and optimizing for the web.
You can easily customize these actions or set up your own. The Action Wizard lets you run Actions on documents
stored locally or hosted in online repositories, such as SharePoint or Office 365. Choose Tools > Action Wizard to
create, start, or import an action.
For more information, watch How to create and share Actions, or see Action Wizard.
Create and distribute forms
FormsCentral desktop application
Create new PDF forms in minutes with the included Adobe FormsCentral desktop application. Easily customize
templates or start from scratch using the intuitive drag-and-drop form editor. Choose from a wide range of predesigned
form templates to create fillable PDF forms. To open the FormsCentral desktop application, choose Tools > Forms >
Create. In the Create Form dialog box, choose From Scratch Or Template.
3
For more information, watch How to create forms in FormsCentral desktop app, or see Create forms from scratch or
templates (Acrobat Pro).
Last updated 1/14/2015
Page 11
What's new
Distribute and collect form data online
With the Adobe FormsCentral subscription service, you can post forms on the web that users can complete online.
Monitor response data in real time with easy-to-understand tables and charts in FormsCentral. Share and publish
summary reports and customize charts for your needs. Export data to a spreadsheet for further analysis.
For more information, watch How to distribute PDF and web forms and How to analyze data in FormsCentral, or see
Distribute forms and View re s p onses .
Create EchoSign-aware forms
Create EchoSign-ready forms within Acrobat to speed signing processes. Easily drag and drop EchoSign form fields,
such as signatures or initials, configure the fields, and then send for signature with EchoSign.
For more information, watch How to create EchoSign-aware forms , or see Create Forms for EchoSign .
Create and combine PDFs
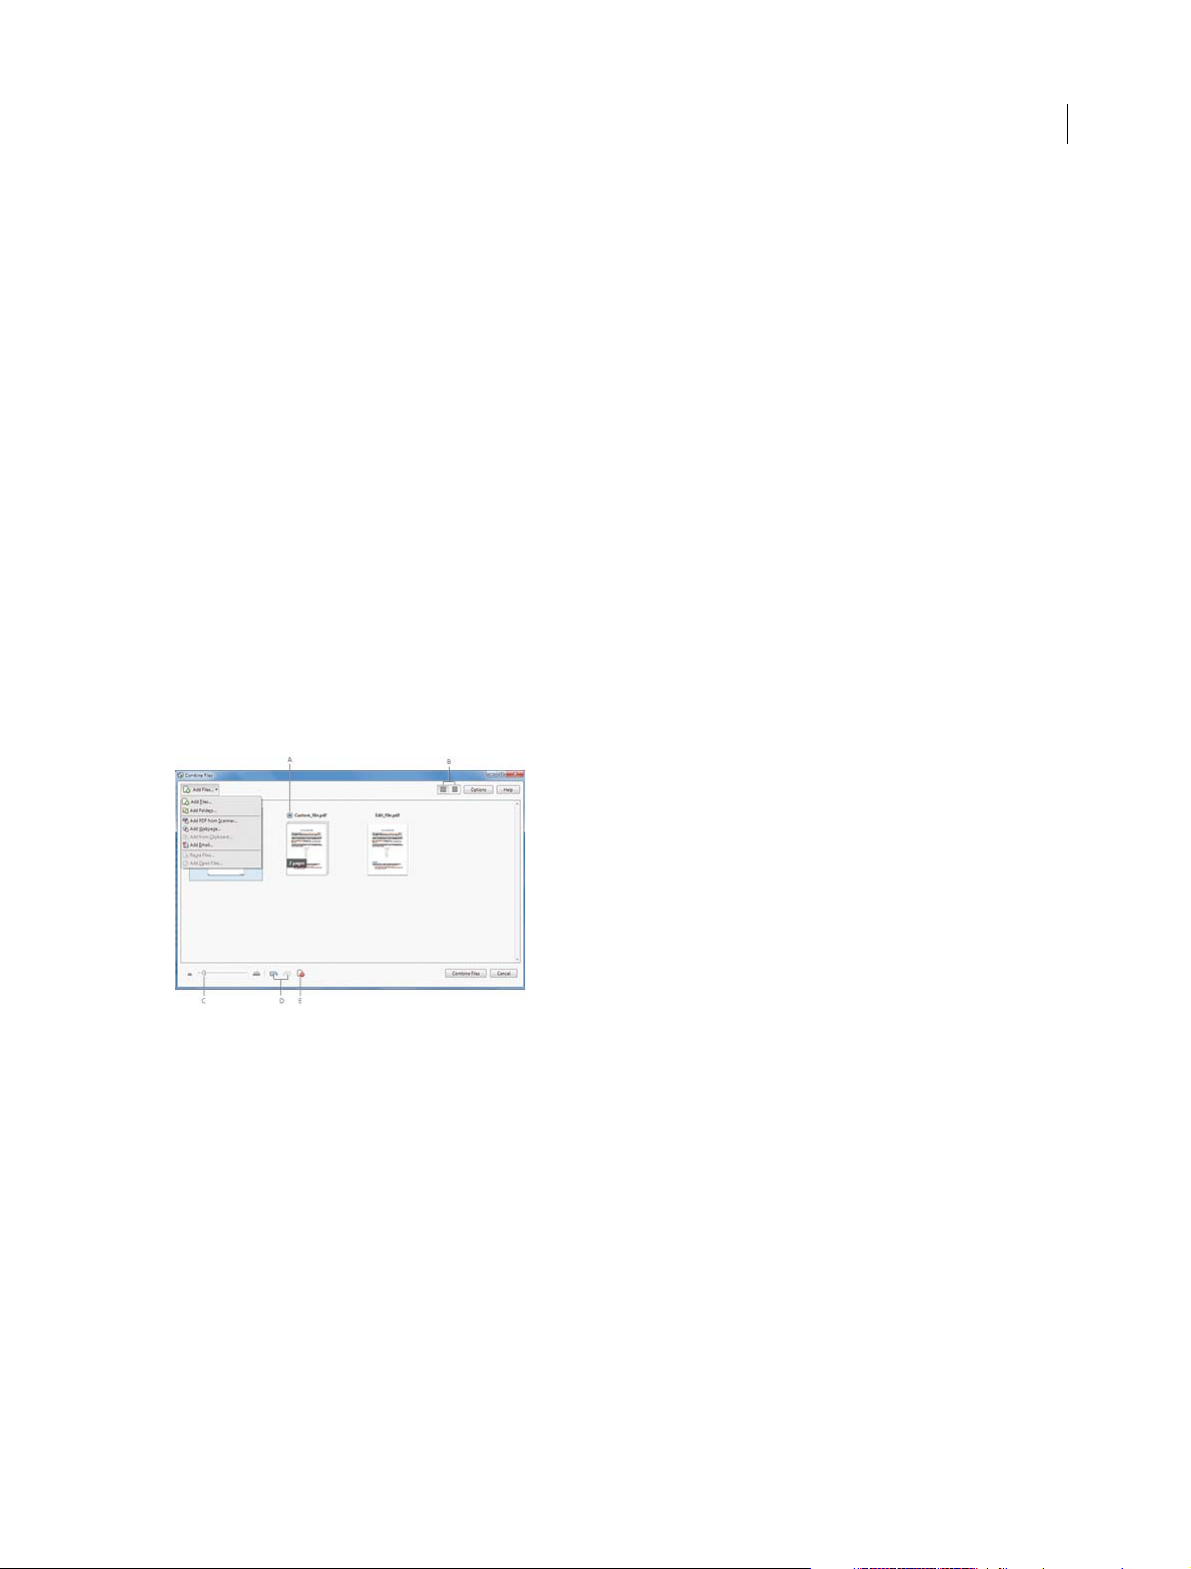
Thumbnail preview for combining files
Use the new thumbnail view to preview and rearrange pages before merging them into a single PDF. Drag-and-drop
fi les and e mai ls dire ctl y into the dia log box . Ex pan d mult ipa ge docum ents to vie w al l it s pa ges. To co mbine file s, c hoo se
Create > Combine Files Into a Single PDF.
4
A Plus sign to display all pages in a document B Thumbnail and list view buttons C Slider to resize thumbnails D Undo and Redo buttons
E
Remove Selected Items button
For more information on combining files, see Merging files into a single PDF.
Microsoft Office 2010
(Windows) Create PDF files with one click from select Microsoft Office 2010 applications for Windows, including 64bit versions of Word, Excel, PowerPoint, and Outlook. Now with enhanced create-and-send options.
For more information, watch Convert Word, Excel, or PowerPoint Files to PDF, or See Convert Microsoft Word,
PowerPoint, and Excel files to PDF.
Working with documents in the cloud
Seamlessly store and retrieve documents from cloud repositories, such as Acrobat.com, Office 365, and SharePoint.
Each Open and Save dialog box includes an option to open or save from an online account.
For more information, watch How to work with files in the cloud and How to work with SharePoint and Office 365.
Last updated 1/14/2015
Page 12
What's new
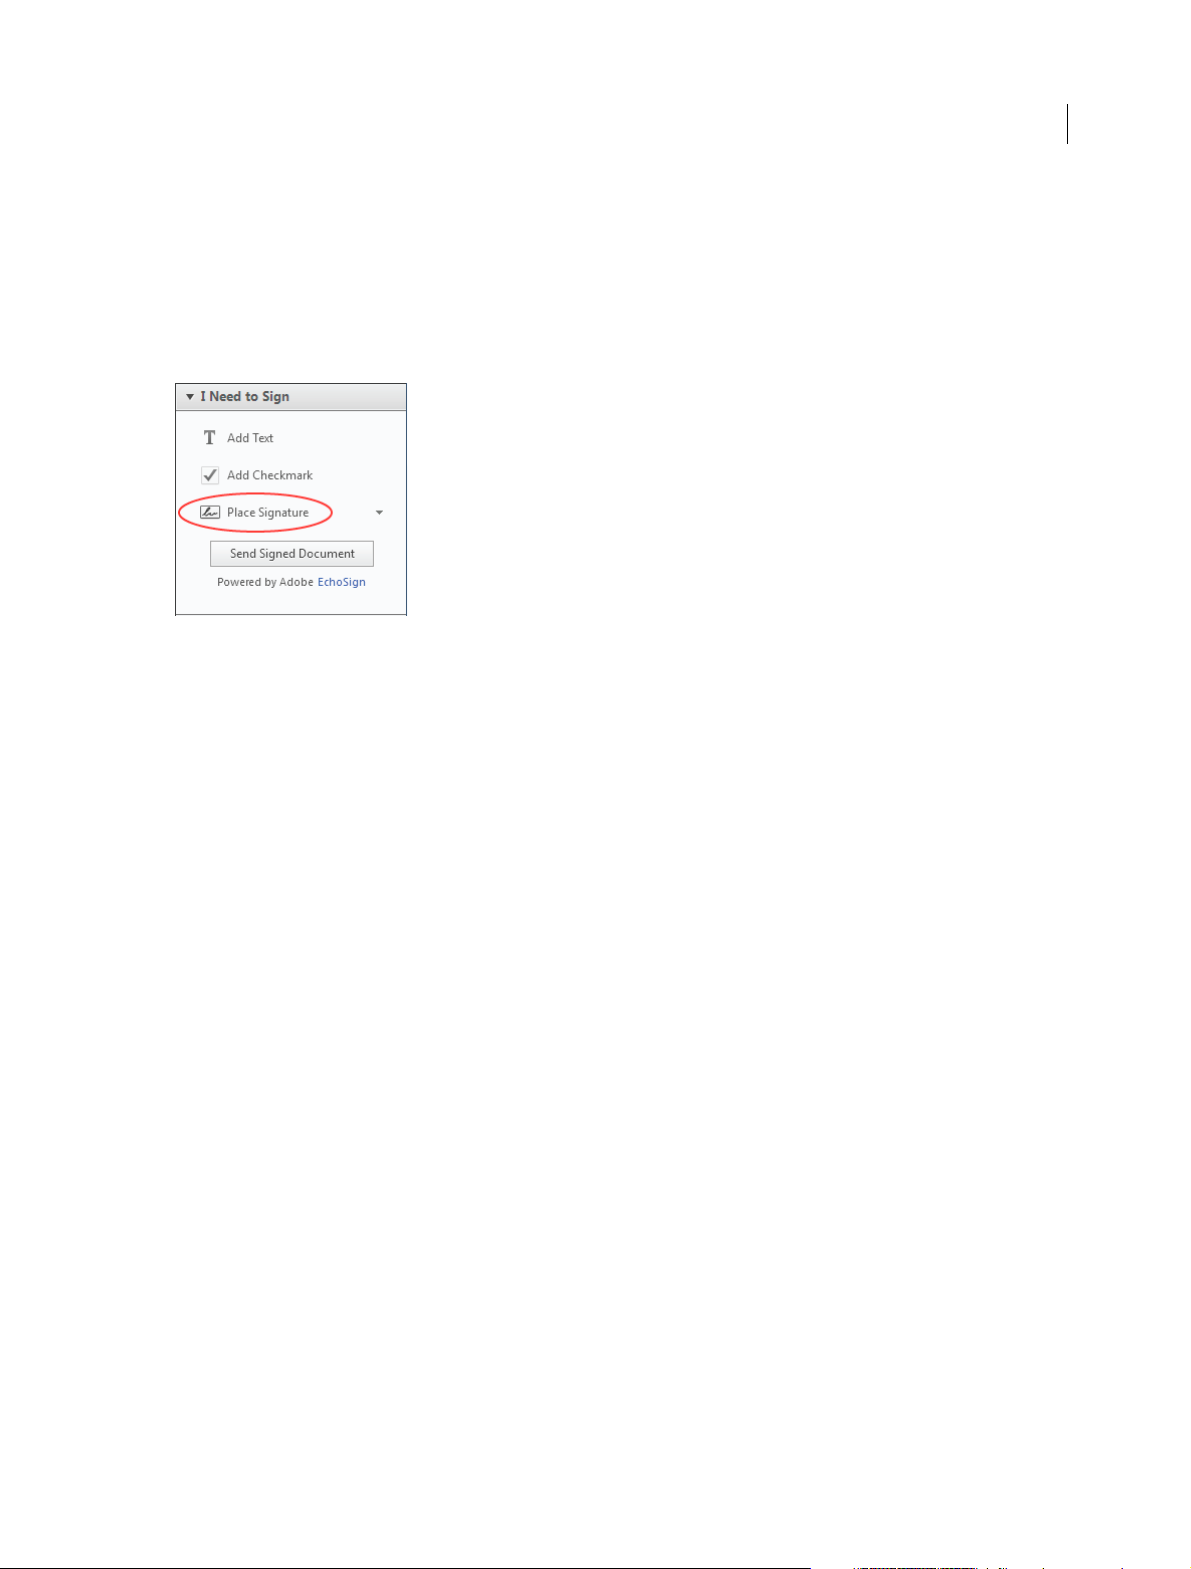
Sign and distribute for signatures
Sign PDFs where you want, how you want
Place your signature anywhere on a PDF. Choose from a typewritten or hand-drawn appearance, or import an image
of your signature. Choose Sign > Place Signature.
For more information, watch Sign PDF files electronically, or see Signing PDFs with Adobe EchoSign Electronic
Signature.
5
Send and track signatures with Adobe EchoSign service
Send documents for signature approval with the Adobe EchoSign online subscription service. Easily keep track of the
signing process. Recipients can sign without downloading a plug-in or creating an EchoSign account.
Long-term validation and ECC-based credentials
Embed long-term validation information automatically when using certificate signatures. Use certificate signatures
that support elliptic curve cryptography (ECC) based credentials.
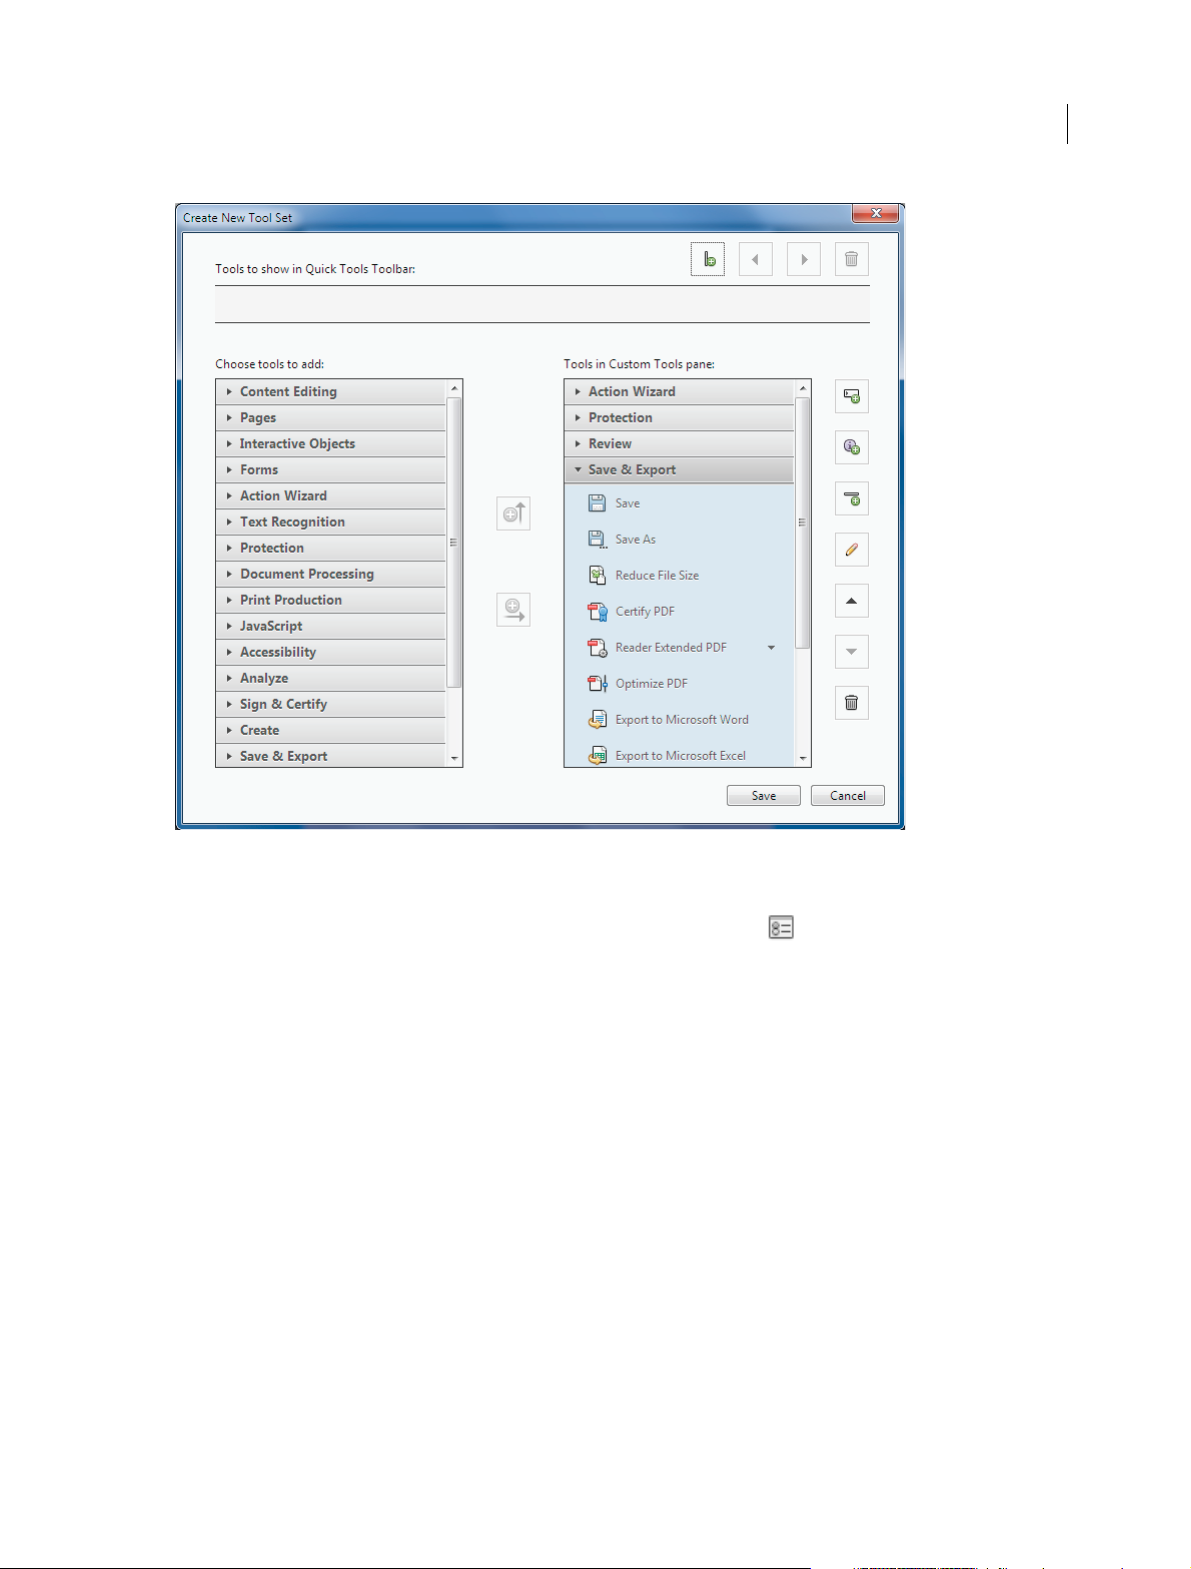
Customize your tools and workspace
Create tool sets
Quickly access the tools and commands you use most with tool sets. Tool sets let you define the tools and panels you
need for different types of tasks, such as creating forms, commenting, or preparing legal documents. Group tools in the
toolbar and customize the task panes to include just the panels you need for each task. To get started, click Customize
> Create New Tool Set in the toolbar. For more information, see
Tool Se t s.
Last updated 1/14/2015
Page 13
What's new
6
Undock the Comments List
Detach the Comments List from the Comments pane. Resize and reposition the Comments List to streamline your
workflow. Choose Comment > Comments List. Then from the Options menu
Undock Comment List. Acrobat remembers the size and position the next time you undock it.
in the Comments List, choose
Touch mode for tablet and mobile devices
Touch mode makes it easier to use Acrobat and Reader on touch devices. Toolbar buttons, panels, and menus shift apart
slightly to accommodate selecting with your fingers. The Touch reading mode optimizes viewing and supports most
common gestures. Acrobat and Reader automatically switch to Touch mode when on a touch-enabled device. You can
display a toolbar button to toggle Touch mode on and off. Choose View > Show/Hide > Toolbar Items > Touch Mode.
For more information, watch How to use Acrobat XI on touch devices, or see Touch mode for tablet and mobile devices.
Protect PDFs
Delete sensitive information
Permanently delete sensitive information from PDF files. Use redaction tools to delete specific text and illustrations.
(Acrob at Pro) Easily sanit ize do cuments by f inding and d eleti ng hidden data w ith a single cli ck. To ac cess t he re daction
tools, choose Tools > Protection.
Last updated 1/14/2015
Page 14
What's new
For more information, watch Remove and Redact Sensitive Information from PDF Files, or see Removing sensitive
content from PDFs.
Add password protection
Prevent others from editing your PDF files without being a security expert. The new Restrict Editing tool lets you add
a password to a PDF. Choose Tools > Protection > Restrict Editing.
For more information, watch Protect PDF Files with Passwords and Permissions, or see Securing PDFs with passwords.
Add passwords when creating PDFs in Microsoft Office
Add password protection to PDFs while creating them from within Microsoft Word, Excel, Outlook, or PowerPoint.
The Protect PDF options helps prevent others from editing your PDF files.
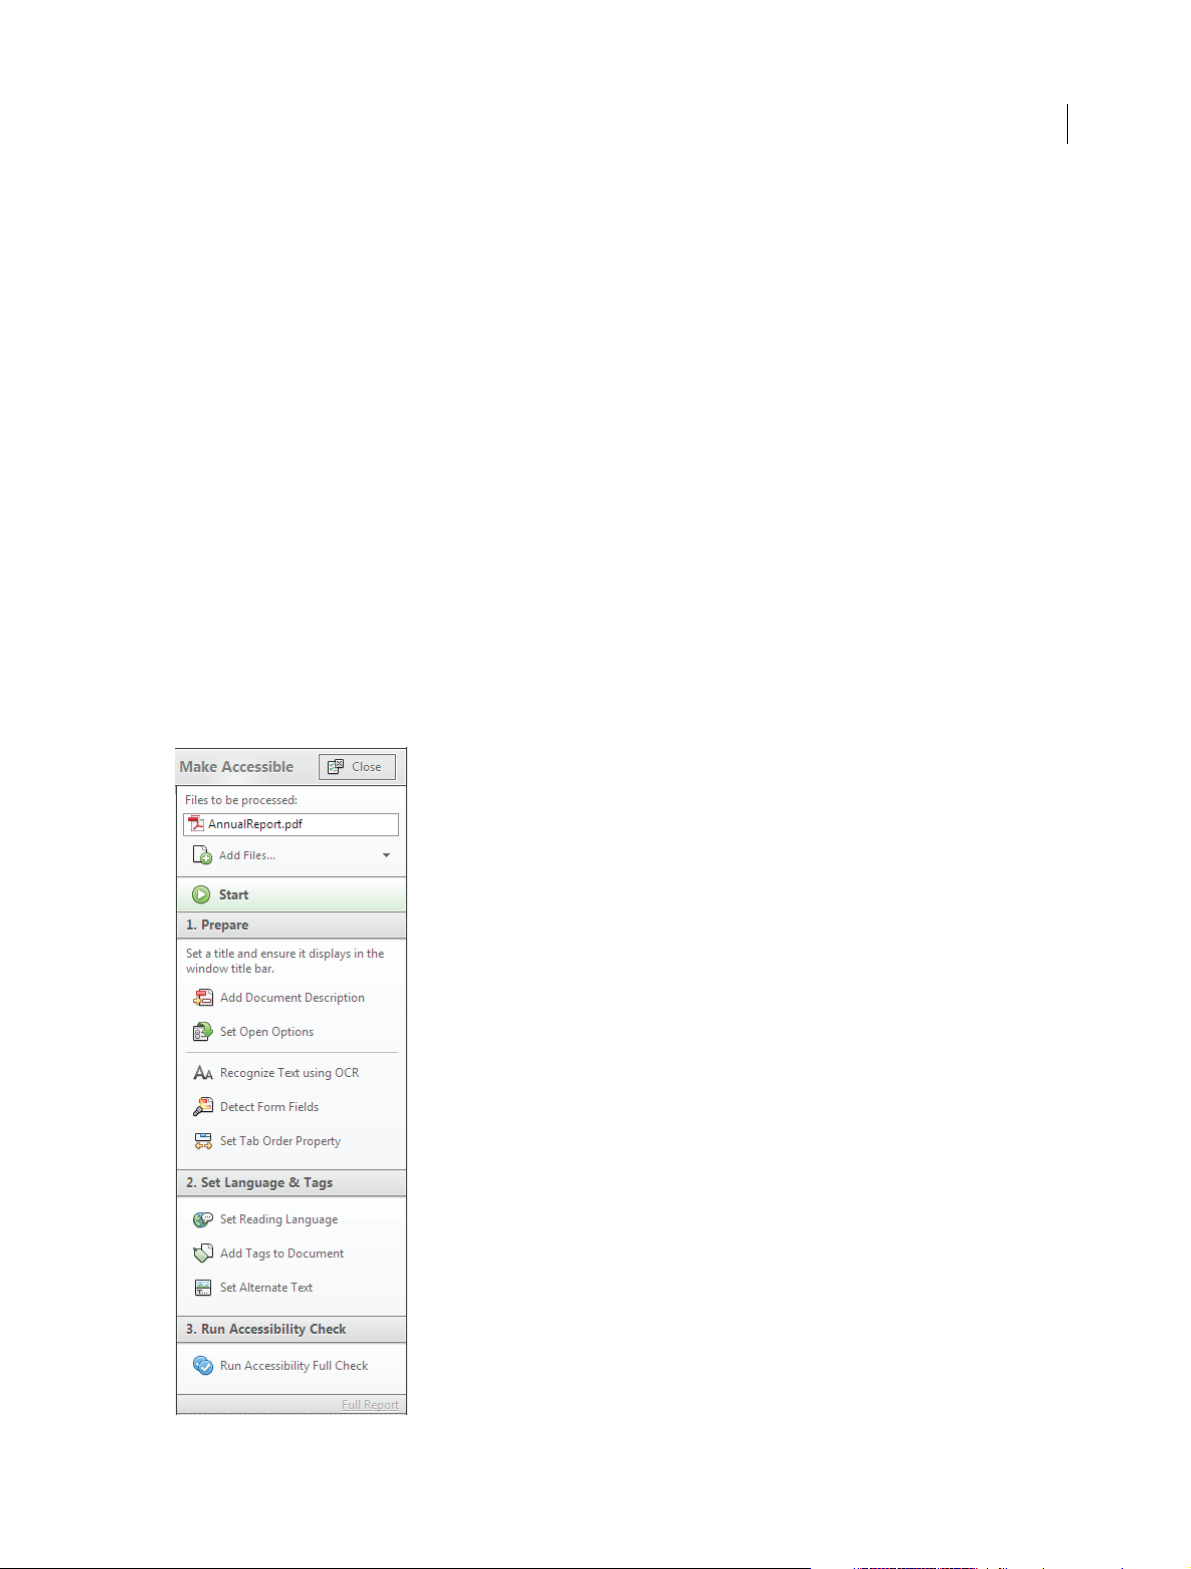
Make PDFs accessible (Acrobat Pro only)
Guided action to create accessible PDFs
Create accessible PDFs for people with disabilities using the Make Accessible guided action. Make Accessible walks you
through the most important steps for making PDFs accessible, then validates the results using the Full Check
Accessibility Checker.
7
For more information, watch Create Accessible PDF Files for People with Disabilities, or see Make PDFs accessible .
Last updated 1/14/2015
Page 15

What's new
Validate the accessibility of a PDF
The Full Check option steps through your PDF to see if it conforms to accessibility standards, such as PDF/UA and
WCAG 2.0. Choose which accessibility issues to analyze and review the results in the Accessibility Checker panel or in
a PDF report. For more information, see
Check Accessibility of PDFs .
Export formats and options
PDF to PowerPoint
(Acrobat Pro) Convert PDF files to fully editable Microsoft PowerPoint files. The PowerPoint files retain the formatting
and layout of the PDF. Easily edit or update bulleted text, tables, objects, master layouts, transitions, and speaker notes.
Select File > Save As Other > Microsoft PowerPoint Presentation.
For more information, watch Convert PDF Files to Microsoft Word, Excel, or PowerPoint.
PDF to HTML web pages
Turn PDF files into single or multiple web pages, complete with editable style elements for quick reformatting. Select
File > Save As Other > HTML Web Page.
8
Export PDF selections
Export selected parts of a file to Microsoft PowerPoint format (Acrobat Pro), as well as Word, Excel, or HTML. Select
any combination of text, images, and tables in your PDF document, then choose an export format from the File > Save
As Other menu.
Last updated 1/14/2015
Page 16

Chapter 2: Workspace
Workspace basics
Workspace overview
Adobe Acrobat XI opens in two different ways: as a stand-alone application, and in a web browser. The associated work
areas differ in small but important ways.
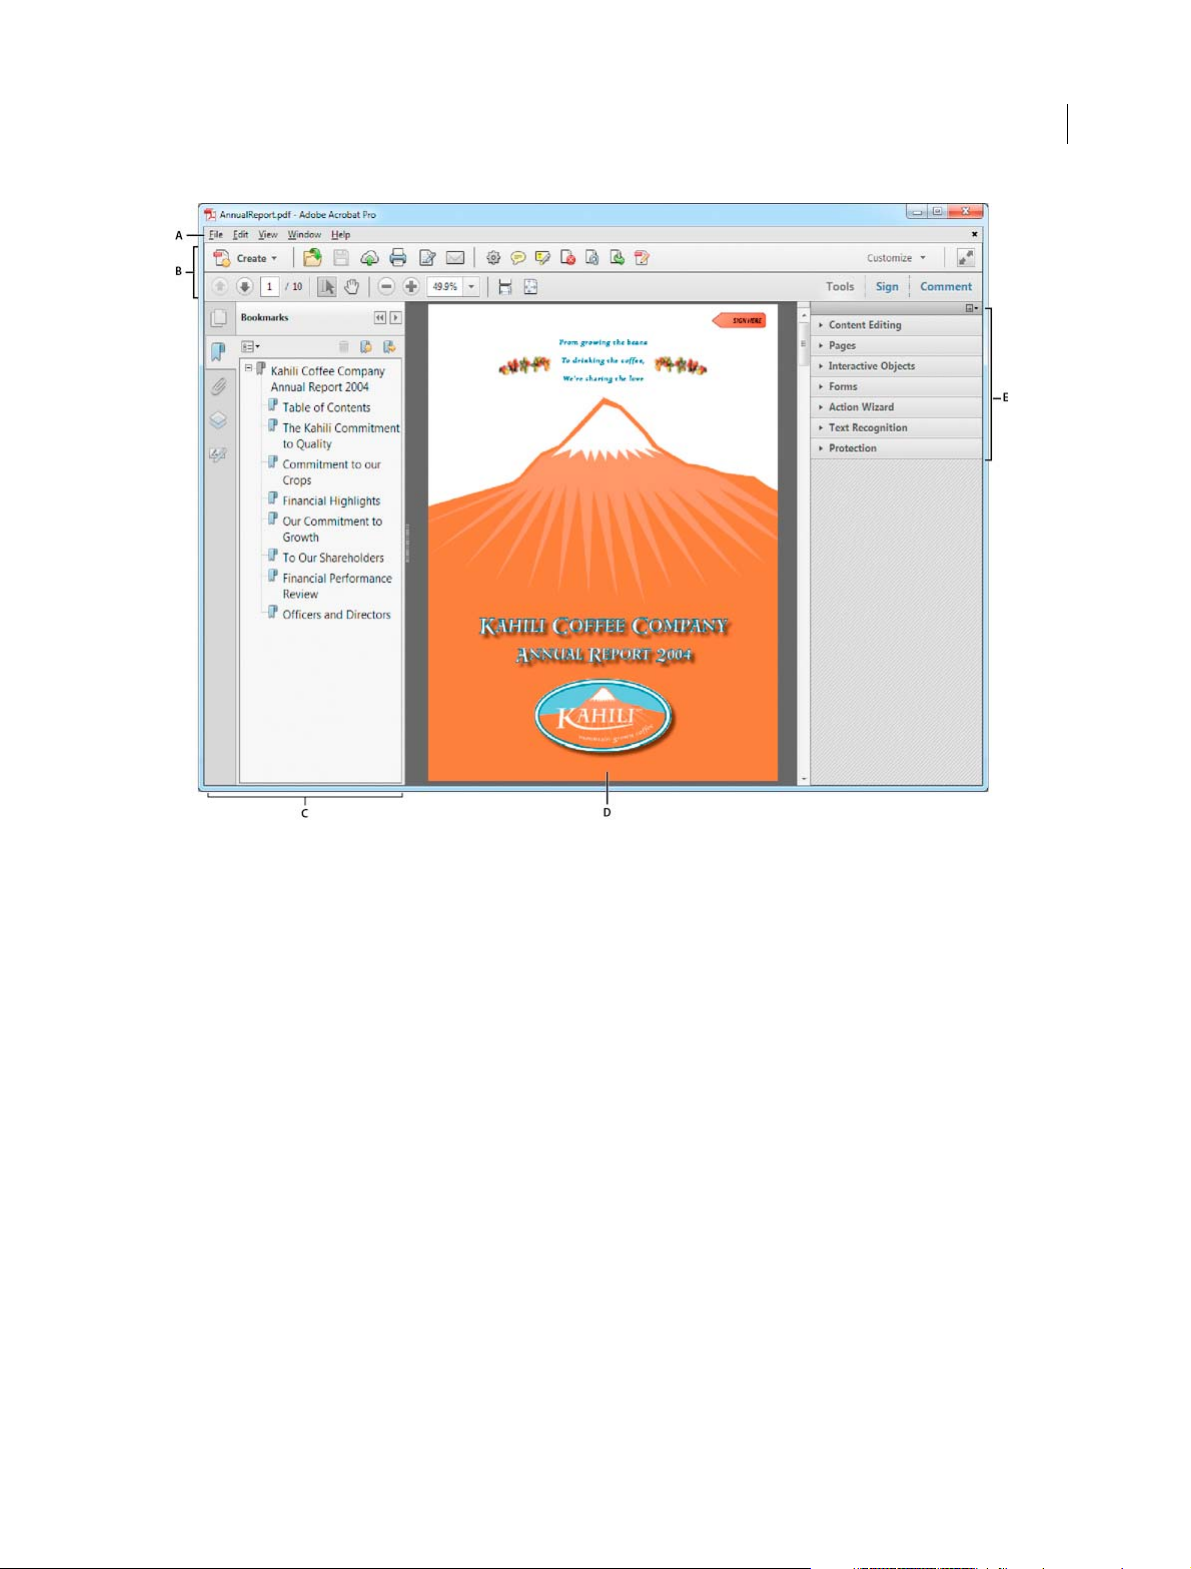
The menu bar and two toolbars are visible at the top of the work area. The work area for the stand-alone application
includes a document pane, a navigation pane, and a group of task panes on the right side. The document pane displays
Adobe® PDFs. The navigation pane on the left side helps you browse through the PDF and perform other options on
PDF files. Toolbars near the top of the window provide other controls that you can use to work with PDFs.
9
When you open a PDF inside a web browser, the toolbars, navigation pane, and task panes are not available. You can
display those items by clicking the Acrobat icon
window.
in the semi-transparent floating toolbar near the bottom of the
Last updated 1/14/2015
Page 17
Workspace
10
A Menu bar B To olbars C Navigation pane (Bookmarks panel displayed) D Document pane E Task panes
Note: Some, but not all, PDFs appear with a document message bar. PDF Portfolios appear with a specialized work area.
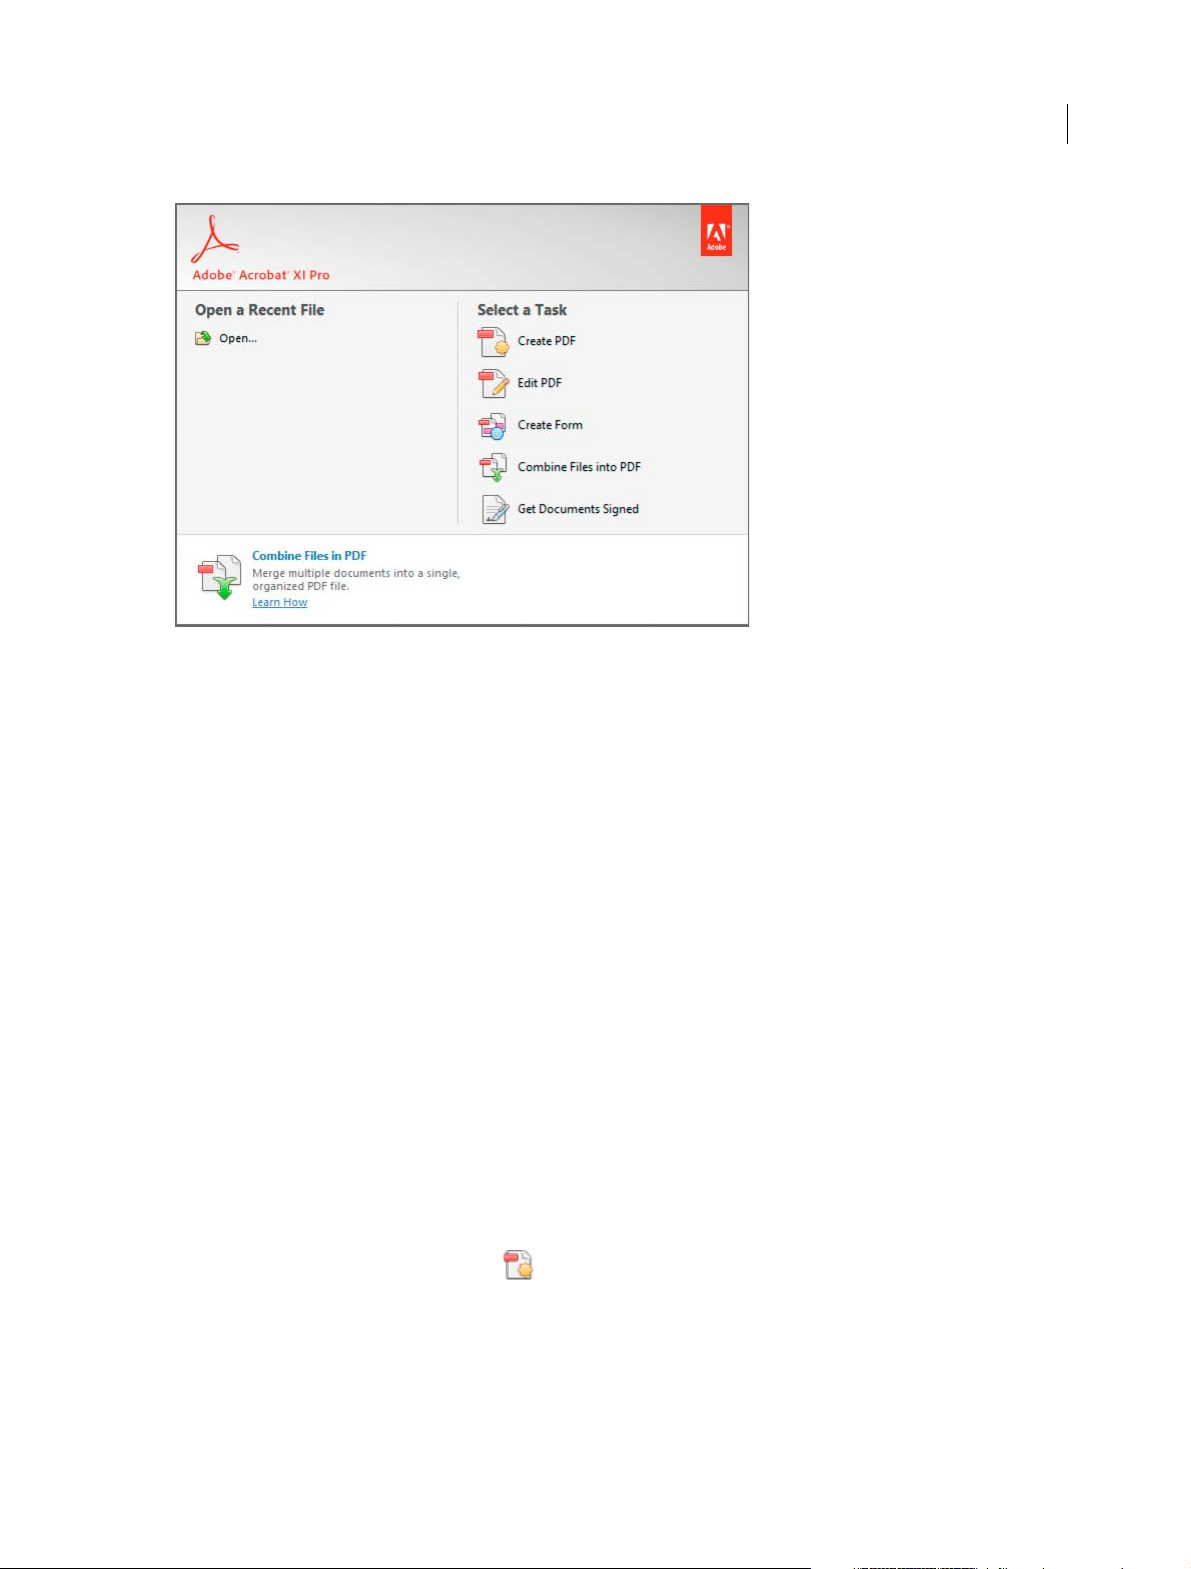
Welcome Screen
The Welcome Screen is a window in the document pane that appears when no document is open. You can quickly
access the recently opened files, open a file, and launch some commonly used workflows with a single click.
Last updated 1/14/2015
Page 18
Workspace
Note: In Mac OS, you can turn off the Welcome Screen by setting a preference. Choose Acrobat/Reader > Preferences. In
the Categories on the left, click General. In the Application Startup section, deselect Show Welcome Screen. There is no
similar option in Windows.
11
Menus and context menus
Ordinarily, it’s a good idea to keep the Acrobat menus visible so that they are available as you work. It is possible to hide
them, using the View > Show/Hide > Menu Bar command. However, the only way to display and use them again is by
pressing F9 (Windows) or Shift+Command+M (Mac OS).
Unlike the menus that appear at the top of your screen, context-sensitive menus display commands related to the active
tool or selection. You can use context menus as a quick way to choose commonly used commands. For example, when
you right-click the toolbar area, that context menu displays the same commands as the View > Show/Hide > Toolbar
Items menu.
1 Position the pointer over the document, object, or panel.
2 Click the right mouse button.
Note: (Mac OS) If you don’t have a two-button mouse, you can display a context menu by pressing the Control key as you
click with the mouse.
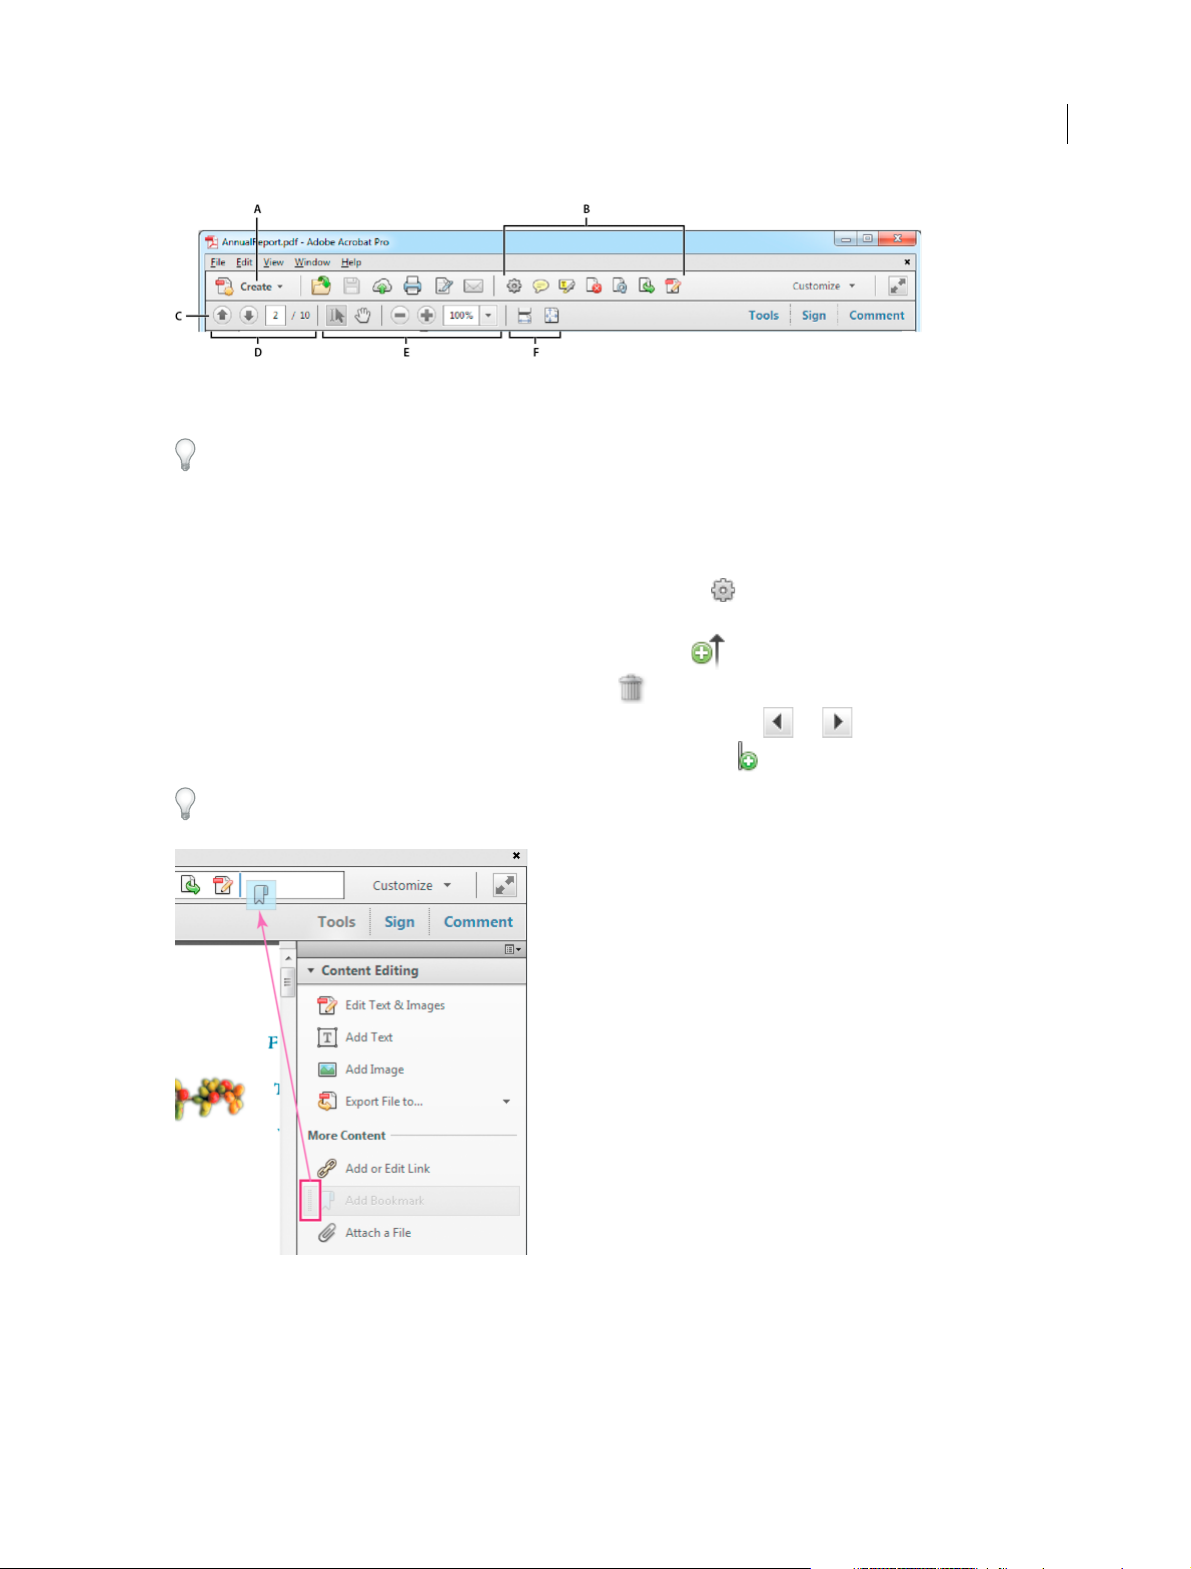
To ol b ar s
The default toolbars—Quick Tools and Common Tools—contain commonly used tools and commands for working
with PDFs. Most available tools are included in the Tools pane at the right side of the window. You can add tools to the
toolbars for easy access.
The toolbars also include the Create button . Click the arrow to the right of the Create button to display a menu of
commands related to creating PDFs.
Last updated 1/14/2015
Page 19
Workspace
A Create button B Quick Tools toolbar C Common Tools toolbar D Page Navigation commands E Select & Zoom commands F Page Display
commands
Position the pointer over a tool to see a description of the tool. All tools are identified by name in the View > Tools menu
and View > Show/Hide > Toolbar Items menu.
Quick tools
You can add tools you use frequently from the Tools and Comment panes to the Quick Tools toolbar.
1 In the Quick Tools toolbar, click the Customize Quick Tools button .
2 Do any of the following:
• To add a tool, select it in the left pane and click the Up Arrow icon.
• To remove a tool, select its icon and click the Delete icon.
• To change a tool’s position in the toolbar, select its icon and click either .or ..
12
• To add a vertical line to separate groups of tools in the toolbar, click .
To quickly add a tool from the Tools or Comment pane, drag the tool’s grabber bar to the location you want on the Quick
Tools toolbar. You can also right-click the tool and select Add to Quick Tools.
Common Tools
You can add tools to the Common Tools toolbar.
1 Right-click an empty space in the toolbar.
2 Select a tool from the menu.
3 To remove a tool from the toolbar, right-click the tool and deselect it from the menu.
Last updated 1/14/2015
Page 20

Workspace
Hide and show toolbars
When your work does not involve using the tools in a toolbar, you can close the toolbar to tidy up the work area. If
several PDFs are open, you can customize the toolbars for each PDF independently. The different customized states
persist as you switch between PDFs.
• To hid e al l to o lb a r s, c h oo s e Vi ew > Show / Hid e > To olb a r Item s > Hi d e To o lba r s.
• To return toolbars to their default configuration, choose View > Show/Hide > Toolbar Items > Reset Toolbars.
If you have hidden all the toolbars, you can show them again by pressing F8.
Select a tool
By default, the Select tool is active when Acrobat opens, because it is the most versatile tool.
❖ Do one of the following:
• Select a tool in a toolbar.
• Choose View > Show/Hide > Toolbar Items > [toolbar name] > [tool].
Switch temporarily to the Zoom In or Hand tool
You can use these tools temporarily, without deselecting the current tool.
13
• To select the Hand tool temporarily, hold down the spacebar.
• To select the Zoom In tool temporarily, hold down Ctrl+spacebar.
When you release the keys, Acrobat reverts to the previously active tool.
Task panes
Most commands are now organized into the Tools, Sign, and Comment task panes on the right side of the application
window. Most tools are now located in these task panes. Click Tools, Sign, or Comment to display the respective task
panels.
You can customize which panels appear in the Tools and Comment panes.
❖ Do any of the following:
• To toggle a panel’s visibility, click the Show Or Hide Panels icon in the upper-right corner of the task pane,
and click a panel. A check mark indicates that the panel is visible.
• To open a panel and add it to the Tools pane, choose View > Tools and select a panel.
• To keep panels open as you select them, choose Allow Multiple Panels Open in the Show Or Hide Panels menu.
By default, an open panel closes when you open a different panel.
Tool sets
Quickly access the tools and commands you use most with tool sets. Tool sets let you define the tools and panels you
need for different types of tasks, such as creating forms, commenting, or preparing legal documents. Group tools in the
toolbar and customize the task panes to include just the panels you need for each task. You can share tool sets with
others and download tool sets directly from AcrobatUsers.com
Last updated 1/14/2015
Page 21
Workspace
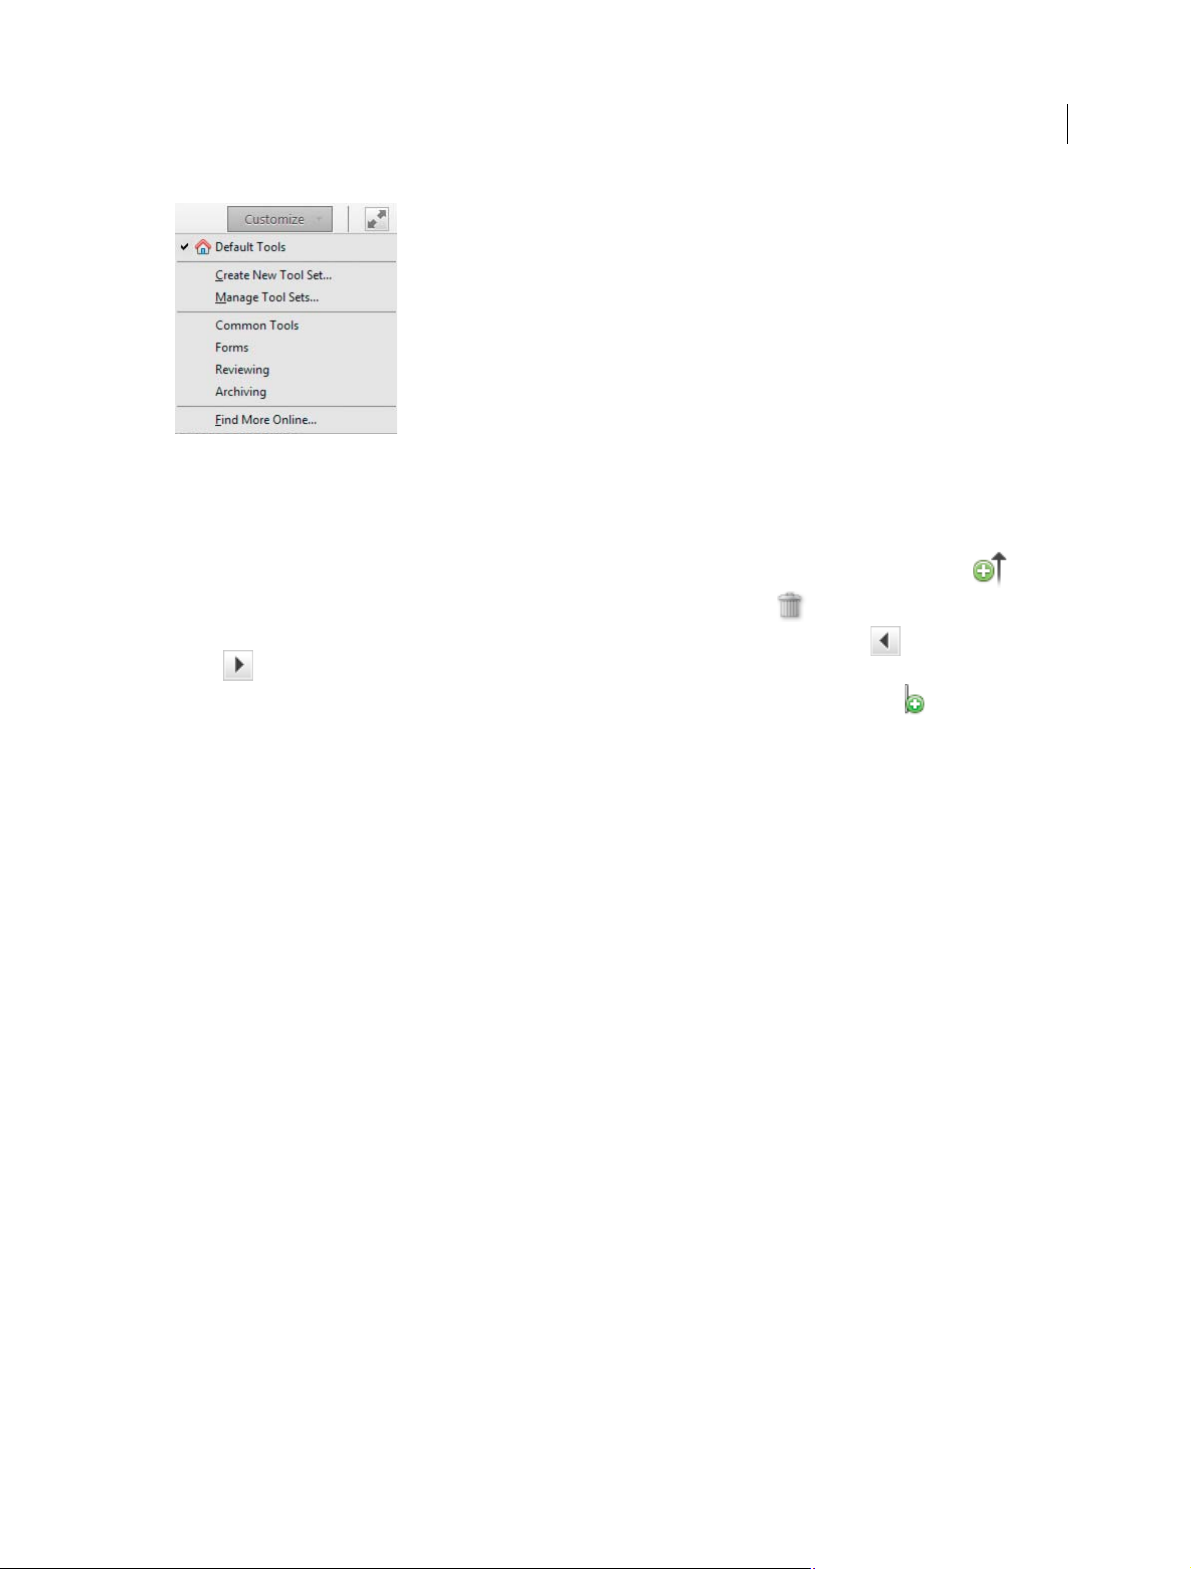
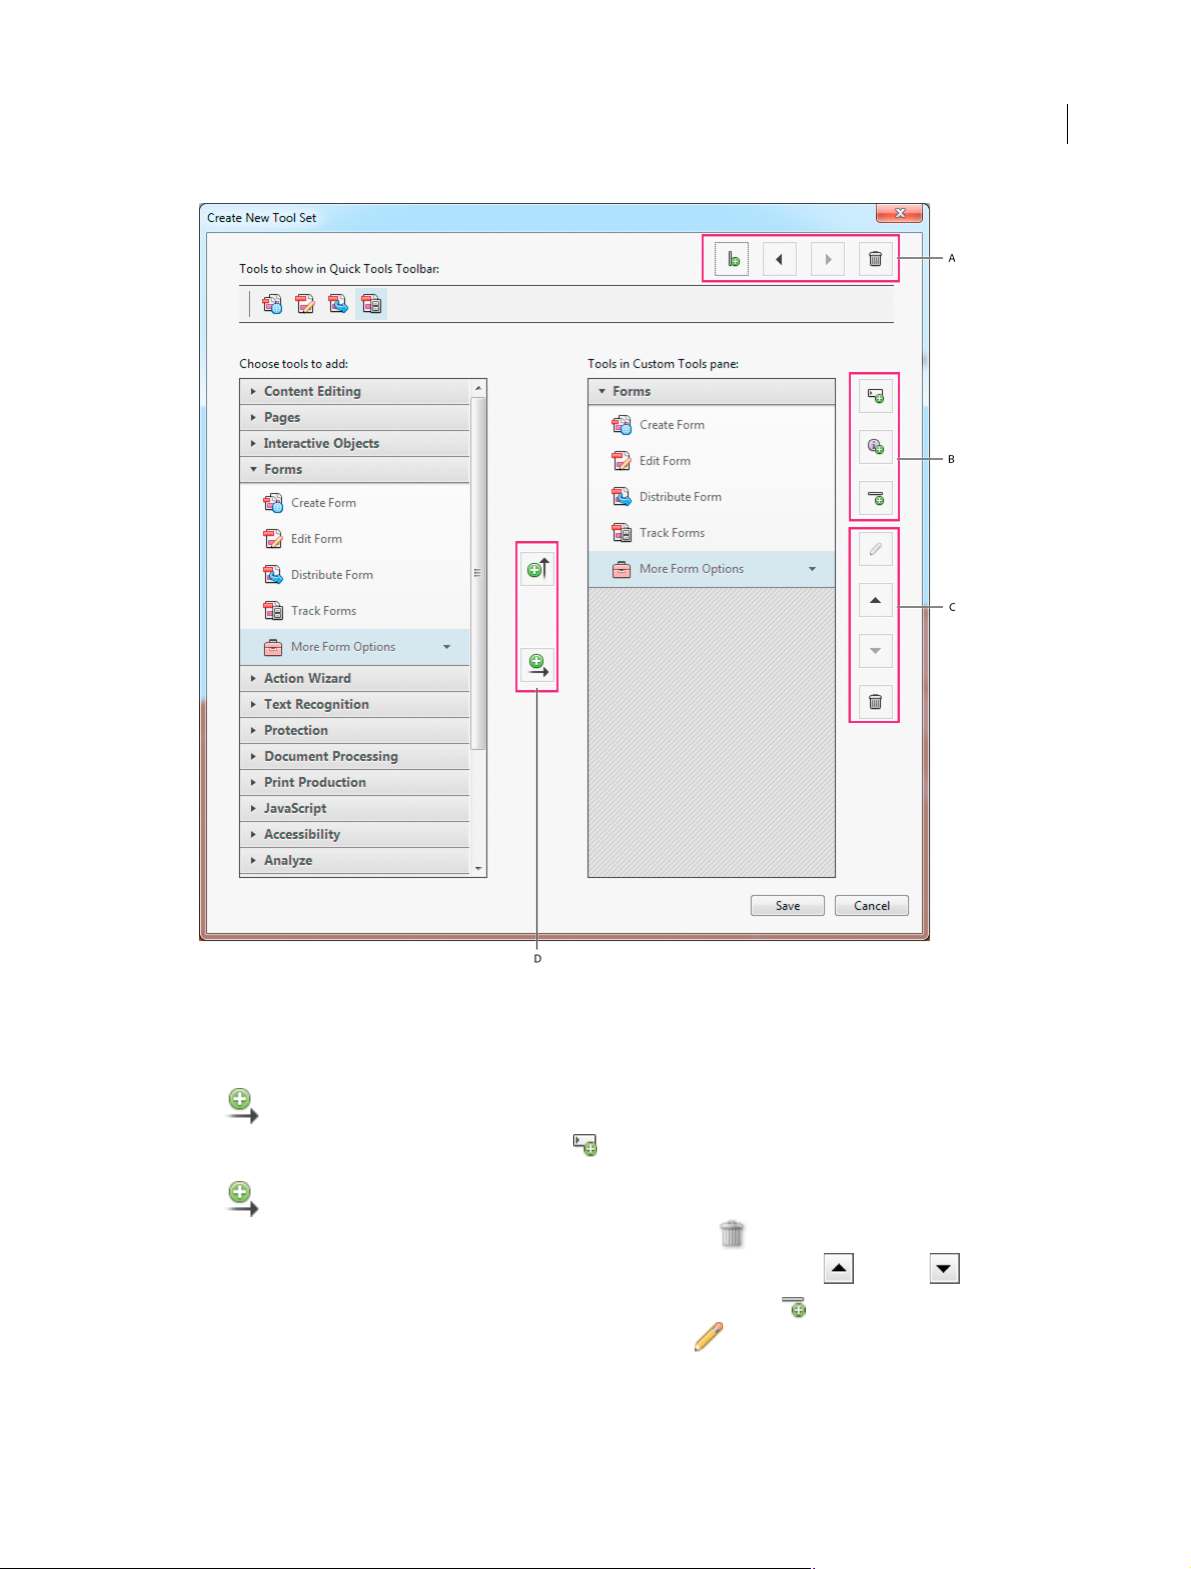
Create a tool set
1 Choose Customize > Create New Tool Set.
2 To cus t omi z e t h e Q u ick Tool s Too l bar, d o any of t he f oll o wi n g :
• To add a tool to the toolbar, click the panel on the left, select the tool, and click the Add To Toolbar icon.
• To remove a tool from the toolbar set, select its icon, and click the Delete icon.
• To change a tool’s position in the toolbar, select its icon, and click either the move left .or move right
.icon.
14
• To add a vertical line to separate groups of tools in the toolbar, click the Add Vertical Line icon.
Last updated 1/14/2015
Page 22
Workspace
15
A Arrange or delete tools in Quick Tools Toolbar B Add custom panels, instructions, or divider line between tools C Rename, arrange, or
delete tools or panels D
3 To customize the Tools pane, do any of the following:
Add to Quick Tools Toolbar above or Custom Tools pane on right
• To add a panel to the Custom Tools pane, click the panel on the left, and then click the Add To Tools Pane
icon.
• To create your own panel, click the Add Panel icon on the right. Give the panel a name, and click Save.
• To add a tool to a panel, select the panel on the right, select the tool on the left, and click the Add To Tools Pane
icon.
• To remove a tool from a panel, select its icon and click the Delete icon.
• To change the position of a tool or panel, select it on the right, and click the Up or Down Arrow icons.
• To add a horizontal line to separate groups of tools, click the Add Divider icon.
• To edit instructions or panel name, select it, and click the Edit icon.
4 When your tool set is complete, click Save, type its name, and click Save again.
Last updated 1/14/2015
Page 23

Workspace
Edit, delete, rename, or share tool sets
Use the Manage Tool Sets dialog box to edit, rename, copy, delete, rearrange, or share tool sets. You can specify the order
the tool sets appear in the Customize menu by moving them up or down in the list. You can share tool sets with your
workgroup using the Import and Export options.
• Choose Customize > Manage Tool Sets.
Navigation pane
The navigation pane is an area of the workspace that can display different navigation panels. Various functional tools
can appear in the navigation pane. For example, the Page Thumbnails panel contains thumbnail images of each page;
clicking a thumbnail opens that page in the document.
When you open a PDF, the nav igat ion pa ne is clo sed by default. Buttons along the left side of th e wor k are a provide easy
access to various panels, such as the Page Thumbnails button
is open but empty (no PDF is open), the navigation pane is unavailable.
Show or hide the navigation pane
1 To open the navigation pane, do one of the following:
• Click any panel button on the left side of the work area to open that panel.
• Choose View > Show/Hide > Navigation Panes > Show Navigation Pane.
2 To close the navigation pane, do one of the following:
and the Bookmarks panel button . When Acrobat
16
• Click the button for the currently open panel in the navigation pane.
• Choose View > Show/Hide > Navigation Panes > Hide Navigation Pane.
Note: The creator of the PDF can control the contents of some navigation panels and may make them empty.
Change the display area for navigation panels
All navigation panels, such as Bookmarks, appear in a column on the left side of the work area.
• To change the width of the navigation pane, drag its right border.
• To view a different panel, on the left side of the navigation pane, select the button for the panel
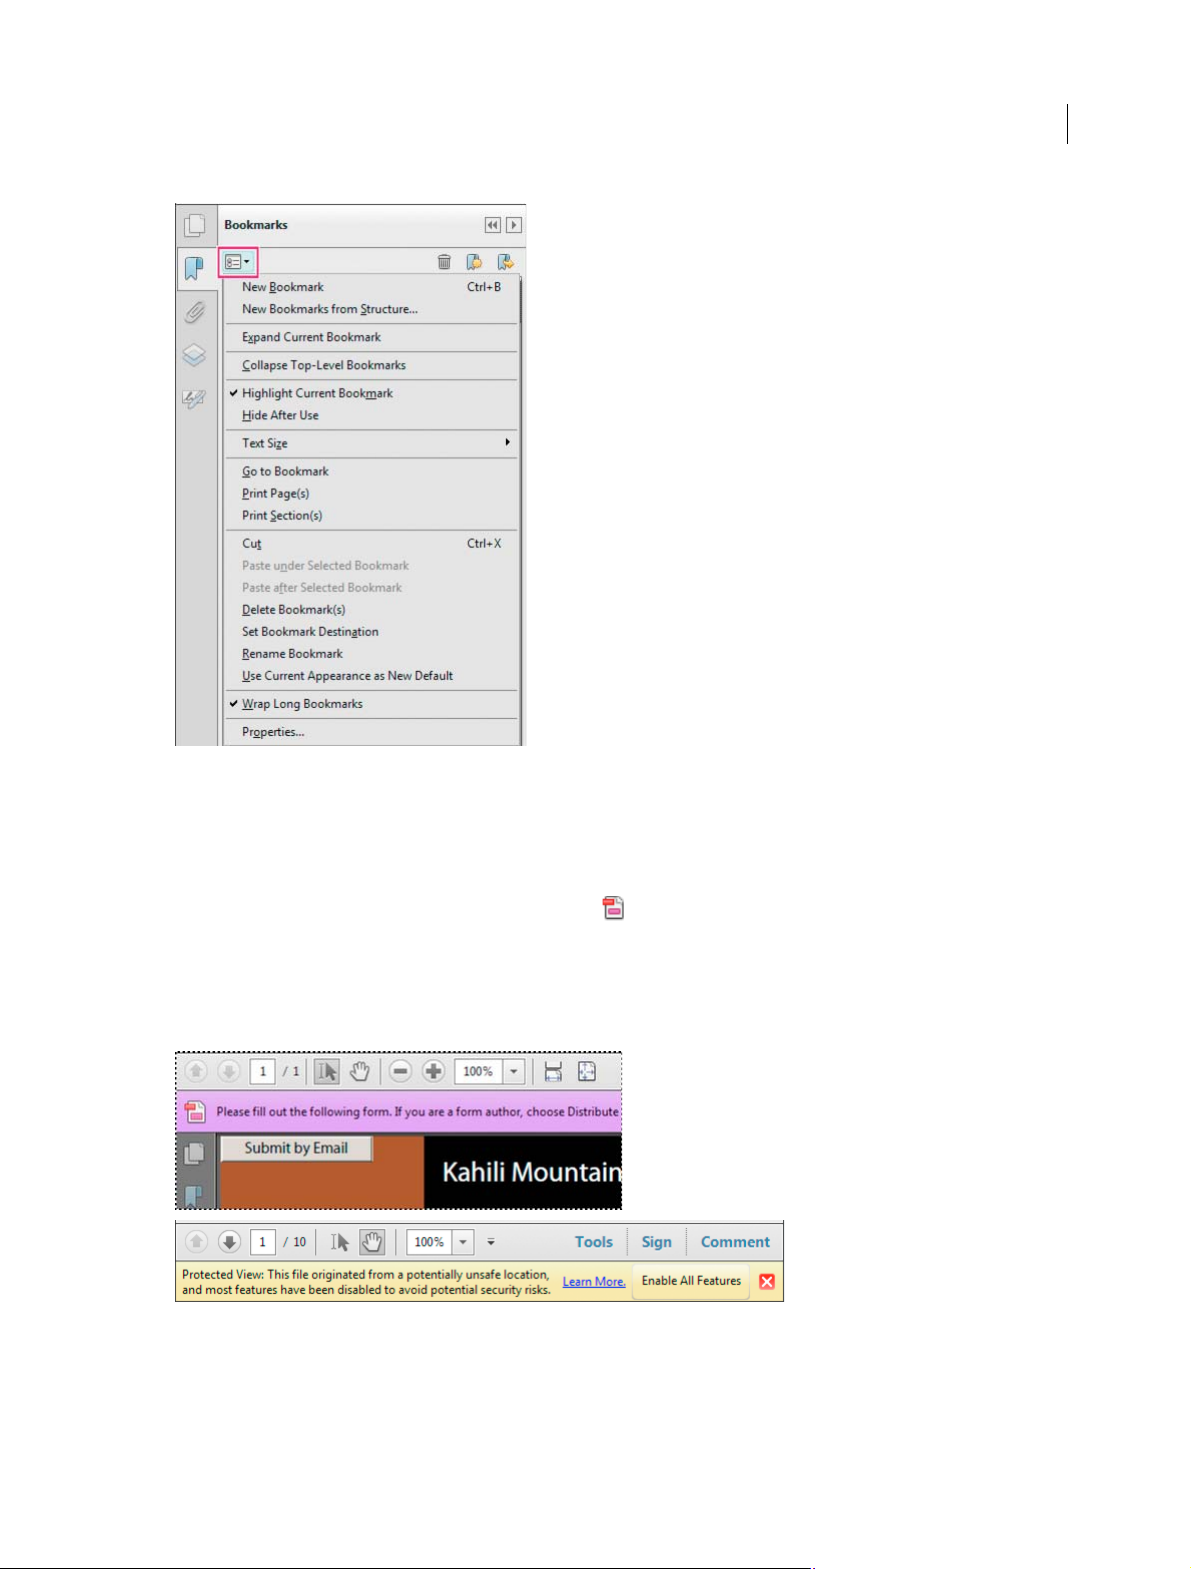
Options in a navigation panel
All navigation panels have an options menu in the upper-left corner. The commands available in these menus
vary.
Some panels also contain other buttons that affect the items in the panel. Again, these buttons vary among the different
panels, and some panels have none.
Last updated 1/14/2015
Page 24
Workspace
17
Document message bar
The document message bar appears only in certain types of PDFs. Typically, you see this area when you open a PDF
form, a PDF that has been sent to you for signing or review, a PDF with special rights or security restrictions, or a PDF
that is compliant with PDF/A standards. The document message bar appears immediately below the toolbar area. To
show or hide the document message bar, click its button
depending on the type of message bar.
Look on the document message bar for instructions on how to proceed and for any special buttons associated with the
task. The bar is color coded: purple for forms, yellow for reviews or security alerts, and blue for certified PDFs, PDF
Portfolios, or PDFs with password security or document restrictions.
on the left side of the work area. The button varies
Last updated 1/14/2015
Page 25

Workspace
Set preferences
Many program settings are specified in the Preferences dialog box, including settings for display, tools, conversion,
signatures, and performance. Once you set preferences, they remain in effect until you change them.
Choose Edit > Preferences (Windows) or Acrobat/Adobe Reader > Preferences (Mac OS).
1 Under Categories, select the type of preference you want to change.
Restore (re-create) preferences
18
Restore the Acrobat Preferences folder (Windows)
Restore the Acrobat Preferences folder to eliminate problems that damaged preferences cause. Most preference
problems are caused by these file-based preferences, although most Acrobat preferences are stored within the registry.
Note: This solution removes custom settings for Collaboration, JavaScripts, Security, Stamps, Color Management, Auto Fill,
Web Capture, an d Up d a t e r.
1 Quit Acrobat.
2 In Windows Explorer, go to the Preferences folder:
• (Windows 7/Vista) C:\Users\[username]\AppData\Roaming\Adobe\Acrobat\[version]
• (XP) C:\Documents and Settings\[username]\Application Data\Adobe\Acrobat\[version]
3 Move the Preferences folder to another location (for example, C:\Temp).
4 Restart Acrobat.
If the problem recurs after you restore the Acrobat Preferences folder, then the problem isn’t related to the Preferences
folder. To restore custom settings, drag the folder you moved in step 2 back to its original location. Then click Yes To
All to replace the new Preferences folder.
Restore the Acrobat preferences files (Mac OS)
Restore the Acrobat preferences files to eliminate problems caused by a damaged preferences file.
Note: Re-creating the Acrobat preferences files restores settings to their defaults.
1 Quit Acrobat.
2 Drag the following files from the Users/[Username]/Library/Preferences folder to the Desktop:
• Acrobat WebCapture Cookies
• com.adobe.Acrobat.Pro.plist or com.adobe.Acrobat.Pro_x86_9.0.plist
• Acrobat Distiller Prefs and com.adobe.Acrobat.Pro.plist (if you are troubleshooting an issue with Distiller)
Last updated 1/14/2015
Page 26

Workspace
• The Acrobat folder, which contains preferences for forms (MRUFormsList), collaboration (OfflineDocs), and
color settings (AcrobatColor Settings.csf)
3 Restart Acrobat
If the problem recurs after you restore the Acrobat preferences files, then the problem isn’t related to preferences files.
To restore custom settings, drag the files you moved in step 2 back to their original location. Then click OK to the alert
“A newer item named ‘[filename]’ already exists in this location. Do you want to replace it with the older one you're
moving?”
More Help topics
PDF Portfolio window overview
Keys for selecting tools
View PDFs in Read mode
Security warnings
Enhanced security
Filling in forms
Commenting
19
Viewing PDFs and viewing preferences
The initial view of the PDF depends on how its creator set the document properties. For example, a document may open
at a particular page or magnification.
Note: The Organizer and Organizer-related commands are not available in Acrobat X and later.
View PDFs in Read mode
When you’re reading a document, you can hide all the toolbars and task panes to maximize the viewing area on your
screen.
The basic reading controls, such as page navigation and zoom, appear in a semi-transparent floating toolbar near the
bottom of the window.
• To open Read mode, choose View > Read Mode, or click the Read Mode button in the upper-right corner of the
toolbar.
• To restore the work area to its previous view, choose View > Read Mode again. You can also click the close button
in the floating toolbar.
Note: Read mode is the default viewing mode when you open a PDF in a web browser.
Last updated 1/14/2015
Page 27

Workspace
View PDFs in Full Screen mode
In Full Screen mode, only the document appears; the menu bar, toolbars, task panes, and window controls are hidden.
A PDF creator can set a PDF to open in Full Screen mode, or you can set the view yourself. Full Screen mode is often
used for presentations, sometimes with automatic page advancement and transitions.
The pointer remains active in Full Screen mode so that you can click links and open notes. There are two ways to
advance through a PDF in Full Screen mode. You can use keyboard shortcuts for navigational and magnification
commands, and you can set a Full Screen preference to display Full Screen navigation buttons that you click to change
pages or exit Full Screen mode.
Set the Full Screen navigation bar preference
1 In the Preferences dialog box under Categories, select Full Screen.
2 Select Show Navigation Bar, then click OK.
3 Select View > Full Screen Mode.
The Full Screen navigation bar contains Previous Page , Next Page , and Close Full Screen View buttons. These
buttons appear in the lower-left corner of the work area.
20
Read a document in Full Screen mode
If the Full Screen navigation bar is not shown, you can use keyboard shortcuts to navigate through a PDF.
Note: If you have two monitors installed, the Full Screen mode of a page sometimes appears on only one of the monitors.
To page through the document, click the screen displaying the page in Full Screen mode.
Choose View > Full Screen Mode.
1 Do any of the following:
• To go to the next page, press the Enter, Page Down, or Right Arrow key.
• To go to the previous page, press Shift+Enter, Page Up, or the Left Arrow key.
2 To close Full Screen mode, press Ctrl+L or Esc. (Escape Key Exits must be selected in the Full Screen preferences.)
To show a Full Screen tool in the Common Tools toolbar, right-click the toolbar area and choose Page Display > Full
Screen Mode. Then click the Full Screen tool to switch to Full Screen mode.
Touch mode for tablet and mobile devices
Touch mode makes it easier to use Acrobat and Reader on touch devices. Toolbar buttons, panels, and menus shift apart
slightly to accommodate selecting with your fingers. The Touch reading mode optimizes viewing and supports most
common gestures. Acrobat and Reader automatically switch to Touch mode when on a touch-enabled device. You can
add a Touch mode toggle button to the toolbar or change the default preference setting for Touch mode.
Display Touch mode button on toolbar
You can display a toolbar button to toggle Touch mode on and off.
❖ Choose View > Show/Hide > Toolbar Items > Touch Mode.
Set Touch Mode preference
You can set how Acrobat enters Touch mode, if at all, for touch enabled-devices.
1 Choose Edit > Preferences (Windows) or Acrobat/Adobe Reader > Preferences (Mac OS).
Last updated 1/14/2015
Page 28

Workspace
2 Under Categories, select General.
3 In Basic Tools, choose the desired default setting from the Touch Mode menu.
Change the PDF/A viewing mode
PDF/A is an ISO standard for long-term archiving and preservation of electronic documents. Documents you scan to
PDF are PDF/A-compliant. You can specify whether you want to view documents in this viewing mode.
When you open a PDF/A compliant document in PDF/A viewing mode, the document is opened in Read mode to
prevent modification. A message is displayed in the document message bar. You will be unable to make changes and
add annotations to the document. If you turn off PDF/A mode, you can edit the document.
1 In the Preferences dialog box under Categories, select Documents.
2 Choose an option for View Documents In PDF/A Mode: Never, or Only For PDF/A Documents.
You can switch in or out of PDF/A viewing mode by changing this preference setting.
For a video on working with PDF/A files, see www.adobe.com/go/learn_acr_pdfa_en.
Display PDFs in Line Weights view
The Line Weights view displays lines with the weights defined in the PDF. When Line Weights view is off, it applies a
constant stroke width (1 pixel) to lines, regardless of zoom. When you print the document, the stroke prints at the true
width.
21
Choose View > Show/Hide > Rulers & Grids > Line Weights. To turn off Line Weights view, choose View > Show/Hide
> Rulers & Grids > Line Weights again.
Note: You cannot turn off Line Weights view when viewing PDFs within a web browser.
Compare a revised PDF to an earlier version (Acrobat Pro)
Use the Compare Documents feature to show the differences between two versions of a PDF. You can customize many
options for displaying the compare results. For a video on comparing PDFs, see
www.adobe.com/go/lrvid_011_acrx_en. (Video applies to both Acrobat X and Acrobat XI.)
1 Choose View > Compare Documents.
2 Specify the two documents to compare. If one or both of the documents is in a PDF Portfolio, select the PDF
Portfolio. Under Package Item, select the component PDF.
3 As needed, specify the page ranges in the documents to compare in the First Page and Last Page boxes.
4 Select the Document Description that best describes the documents you are comparing, and click OK.
Once the two documents are analyzed, a results document appears with the Compare panel open. The new
document is shown with annotations indicating the changes. The first page shows a summary of the comparison
results.
5 From the Compare panel, do any of the following:
• To hide the annotations that display changes, click Hide Results.
• To specify the display options for compare results, click Show Options. You can specify the type of changes to
display, and the color scheme and opacity of the annotations. To return to the page thumbnails, click Hide
Options.
Last updated 1/14/2015
Page 29

Workspace
• To show each of the documents in its own window, from the options menu , choose Show Documents Tiled
or Show Documents Side By Side. To synchronize the relevant pages while showing the documents in their own
windows, from the options menu, choose Synchronize Pages.
• Click a page thumbnail to go directly to that page. To change the size of the page thumbnails, from the options
menu, choose Thumbnail Size > [option].
• Drag the splitter bar at the bottom of the Compare panel up to show thumbnails of the old document. Click a
thumbnail from the old document to open it in a new window.
Document Description options
Reports, Spreadsheets, Magazine Layouts Compares the content as one continuous text body, from end to end.
Presentation Decks, Drawings Or Illustrations Looks at each slide or page as a mini-document, and matches ones that
are similar. Then compares the content of each matching document. Identifies documents that have moved, such as
slides in presentation.
Scanned Documents Creates an image capture of each scanned page and compares pixels. Looks at each scanned page
and matches ones that are similar. Also identifies pages that are in a different order. This option is useful for comparing
images or architectural drawings.
Compare Text Only Use this option with any document type. This option is designed for comparing text in large
documents (250 pages or more). This option also compares text between documents that have background artwork on
each page, which slows processing.
22
• With either the reports or presentation options selected, the Compare Text Only option identifies only the text
differences between two documents.
• With Scanned Documents selected, the text is compared separately from the graphics, and then the results are
combined. In documents containing magazine advertisements that have text on top of background image art, a
reflowed passage is compared in text-only mode. The artwork is compared separately in the background. The
differences (both text and line art and images) are combined into a single results document.
Preferences for viewing PDFs
The Preferences dialog box defines a default page layout and customizes your application in many other ways. For
viewing PDFs, examine the preferences options for Documents, General, Page Display, and 3D & Multimedia.
The preferences settings control how the application behaves whenever you use it; they are not associated with any
particular PDF document.
Note: If you install any third-party plug-ins, set these preferences using the Third-Party Preferences menu item.
Documents preferences
Open Settings
Restore Last View Settings When Reopening Documents Determines whether documents open automatically to the
last viewed page within a work session.
Open Cross-document Links In Same Window Closes the current document and opens the document being linked to
in the same window, minimizing the number of windows open. If the document being linked to is already open in
another window, the current document is not closed when you click a link to the open document. If you do not select
this option, a new window opens each time you click a link to a different document.
Allow Layer State To Be Set By User Information Allows the author of a layered PDF document to specify layer visibility
based on user information.
Last updated 1/14/2015
Page 30

Workspace
Allow Documents To Hide The Menu Bar, Toolbars, And Window Controls Allows the PDF to determine whether the
menu bar, toolbar, and window controls are hidden when the PDF is opened.
Documents In Recently Used List Sets the maximum number of documents listed in the File menu.
Save Settings
Automatically Save Document Changes To Temporary File Every _ Minutes Determines how often Acrobat
automatically saves changes to an open document.
Save As Optimizes For Fast Web View Restructures a PDF document for page-at-a-time downloading from web
servers.
PDF/A View Mode
View Documents In PDF/A Mode Specifies when to use this viewing mode: Never, or Only For PDF/A Documents.
Hidden Information
Searches the PDF for items that may not be apparent, such as metadata, file attachments, comments, and hidden text
and layers. The search results appear in a dialog box, and you can remove any type of item that appears there.
Remove Hidden Information When Closing Document (Not selected by default.)
Remove Hidden Information When Sending Document By Email (Not selected by default.)
23
Redaction
Adjust Filename When Saving Applied Redaction Marks Specifies a prefix or suffix to use when saving a file to which
redaction marks have been applied.
Choose Localization For Search and Redact Patterns Specifies which installed language version of Acrobat to use for
the patterns. For example, if you installed both the English and German versions, then you can choose either language
for the patterns. The Patterns option appears in the Search and Redaction dialog boxes.
Full Screen preferences
Full Screen Setup
Current Document Only Specifies whether the display is limited to a single PDF.
Fill Screen With One Page At A Time Sets the page view to the maximum screen coverage by a single page.
Alert When Document Requests Full Screen Displays a message before going into Full Screen mode. Selecting this
option overrides a previous selection of Do Not Show This Message Again in that message.
Which Monitor To Use Specifies the monitor on which full-screen display appears (for users with multiple-monitor
configurations).
Full Screen Navigation
Escape Key Exits Lets you exit Full Screen mode by pressing the Esc key. If this option is not selected, you can exit by
pressing Ctrl+L.
Show Navigation Bar Shows a minimal navigation toolbar regardless of the document settings.
Left Click To Go Forward One Page; Right Click To Go Back One Page Lets you page through an Adobe PDF document
by clicking the mouse. You can also page through a document by pressing Return, Shift-Return (to go backward), or
the arrow keys.
Loop After Last Page Lets you page through a PDF document continuously, returning to the first page after the last.
This option is typically used for setting up kiosk displays.
Last updated 1/14/2015
Page 31

Workspace
Advance Every _ Seconds Specifies whether to advance automatically from page to page every set number of seconds.
You can page through a document using mouse or keyboard commands even if automatic paging is selected.
Full Screen Appearance
Background Color Specifies the window’s background color in Full Screen mode. You can select a color from the color
palette to customize the background color.
Mouse Cursor Specifies whether to show or hide the pointer when Full Screen mode is in operation.
Full Screen Transitions
Ignore All Transitions Removes transition effects from presentations that you view in Full Screen mode.
Default Transition Specifies the transition effect to display when you switch pages in Full Screen mode and no
transition effect has been set for the document.
Direction Determines the flow of the selected default transition on the screen, such as Down, Left, Horizontal, and so
on. The available options vary according to the transition. If no directional options affect the selected default transition,
this option is not available.
Navigation Controls Direction Mimics the user’s progress through the presentation, such as transitioning from top to
bottom when the user proceeds to the next page and from bottom to top when the user backtracks to the previous page.
Available only for transitions with directional options.
24
General preferences
Basic Tools
Use Single Key Accelerators To Access Tools Enables you to select tools with a single keystroke. This option is
deselected by default.
Create Links From URLs Specifies whether links that weren’t created with Acrobat are automatically identified in the
PDF document and become clickable links.
Make Hand Tool Select Text & Images Enables the Hand tool to function as the Select tool when it hovers over text in
an Adobe PDF.
Make Hand Tool Read Articles Changes the appearance of the Hand tool pointer when over an article thread. Upon the
first click, the article zooms to fill the document pane horizontally; subsequent clicks follow the thread of the article.
Make Hand Tool Use Mouse-wheel Zooming Changes the action of the mouse wheel from scrolling to zooming.
Make Select Tool Select Images Before Text Changes the order in which the Select tool selects.
Use Fixed Resolution For Snapshot Tool Images Sets the resolution used to copy an image captured with the Snapshot
tool.
Touch Mode Sets how Acrobat enters the Touch mode, if at all, for touch enabled-devices. In Touch mode, Toolbar
buttons, panels, and menus shift apart slightly to accommodate selecting with your fingers. The Touch reading mode
optimizes viewing and supports most common gestures.
Wa rn i n gs
Do Not Show Edit Warnings Disables warning boxes that would normally appear when you delete items such as links,
pages, page thumbnails, and bookmarks.
Reset All Warnings Restores default settings for warnings.
Last updated 1/14/2015
Page 32

Workspace
Messages From Adobe
Show Me Messages When I Launch Acrobat Allows in-product marketing messages from Adobe to appear in the
Welcome Screen when you launch the application without a document open. Click a message to get information about
features, updates, or online services, or to open an element in the application, such as a task pane. Deselect the option
to prevent in-product marketing messages from appearing.
Note: Transactional messages, which facilitate the Adobe Online Service, cannot be turned off.
Application Startup
Show Splash Screen (Mac OS) Determines whether the application startup screen appears each time the application
starts.
Use Only Certified Plug-Ins Ensures that only Adobe-certified third-party plug-ins are loaded. The notation Currently
in Certified Mode indicates either Yes or No depending on its status.
Check 2D Graphics Accelerator (Windows only) (Appears only if your computer hardware supports 2D graphics
acceleration.) When selected, allows hardware acceleration usage when the first document is opened. When deselected,
hardware acceleration usage starts after the first document is opened. This option can slow startup time, so it is
deselected by default.
25
Note: This option is available only when the option Use 2D Graphics Acceleration in the Page Display preferences is
selected.
Select Default PDF Handler (Windows only) Specifies which application, Reader or Acrobat, is used to open PDFs. This
setting applies if you have both Acrobat and Reader installed on your computer. In Windows 7 or earlier, a browser uses
this setting only if it is using the Adobe plug-in or add-on for viewing PDF files. In Windows 8, this setting controls
which application is the default PDF application for your system, including in your browser. Windows 8 prompts you
to allow this change before applying it to your system. Once set, Windows 8 also uses the selected PDF application for
tasks related to PDF files, such as previewing, displaying thumbnails, and providing file information.
Page Display preferences
Default Layout And Zoom
Page Layout Sets the page layout used for scrolling when you first open a document. The default setting is Automatic.
The Page Layout setting in File > Properties > Initial View overrides this value.
Zoom Sets the magnification level for PDF documents when they are first opened. The default setting is Automatic.
The Magnification setting in File > Properties > Initial View overrides this value.
Note: Two conditions can affect page layout and zoom. 1) Someone has already set an individual PDF to a different initial
view in File > Properties. 2) You have the option Restore Last View Settings When Reopening Documents selected in Edit
> Preferences > Document category.
Resolution
Use System Setting Uses the system settings for monitor resolution.
Custom Resolution Sets the monitor resolution.
Rendering
Smooth Text Specifies the type of text-smoothing to apply.
Smooth Line Art Applies smoothing to remove abrupt angles in lines.
Smooth Images Applies smoothing to minimize abrupt changes in images.
Last updated 1/14/2015
Page 33

Workspace
Use Local Fonts Specifies whether the application uses or ignores local fonts installed on your system. When
deselected, substitute fonts are used for any font not embedded in the PDF. If a font cannot be substituted, the text
appears as bullets and an error message appears.
Enhance Thin Lines When selected, clarifies thin lines in the display to make them more visible.
Use Page Cache Places the next page in a buffer before the current page is viewed to reduce the time required to page
through a document.
Use 2D Graphics Acceleration (Windows only) (Appears only if your computer hardware supports 2D graphics
acceleration.) Speeds up zooming, scrolling, and redrawing of page content, and speeds the rendering and
manipulation of 2D PDF content. This option is selected by default.
Note: If this option is not availabl e in the Pag e Display preferences, yo u may need to update your GPU card driv er to e nable
this hardware feature. Contact your card vendor or computer manufacturer for an updated driver.
Page Content And Information
Show Large Images Displays large images. If your system is slow to display image-intensive pages, deselect this option.
Use Smooth Zooming (Windows only) When deselected, turns off animation effects, which improves performance.
Show Art, Trim, & Bleed Boxes Displays any art, trim, or bleed boxes defined for a document.
26
Show Transparency Grid Displays the grid behind transparent objects.
Use Logical Page Numbers Enables the Number Pages command for matching the position of the page in the PDF to
the number printed on the page. A page number, followed by the page position in parentheses, appears in the Page
Navigation toolbar and in the Go To Page and Print dialog boxes. For example, i (1 of 1) if the printed number of the
first page is i. If this option is not selected, pages are numbered with arabic numbers starting at 1. Selecting this option
helps prevent unexpected behavior when clicking Back or Go Back in your web browser.
Always Show Document Page Size Displays the page measurements beside the horizontal scroll bar.
Use Overprint Preview Specifies whether Overprint Preview mode is on only for PDF/X files, never on, always on, or
set automatically. When set to Automatic, if a document contains overprints, then Overprint Preview mode is activated.
The Overprint Preview mode lets you see (onscreen) the effects of ink aliasing in the printed output. For example, a
printer or service provider could create an ink alias if a document contains two similar spot colors and only one is
required.
Default Transparency Blending Color Space Sets the default color space, Working RGB or Working CMYK, for
transparency blending.
Reference XObjects View Mode
Show Reference XObject Targets Specifies the type of documents in which reference XObjects can be viewed.
Location Of Referenced Files (Optional) Specifies a location for the referenced documents.
More Help topics
Open a PDF in a web browser
Setting up a presentation
About PDF/X, PDF/E, and PDF/A standards
3D preferences
Multimedia preferences
Last updated 1/14/2015
Page 34

Workspace
Setting accessibility preferences
Change updating preferences
How to use Acrobat XI on touch devices
Learn about the new Touch mode for tablet and mobile devices.
How to use Acrobat XI on touch devices
Keyboard shortcuts
For common keyboard shortcuts you can use with Windows, see http://support.microsoft.com/kb/126449.
Keys for selecting tools
To enable single-key shortcuts, open the Preferences dialog box, and under General, select the Use Single-Key
Accelerators To Access Tools option.
27
To ol Windows/UNIX action Mac OS action
Hand tool H H
Temporarily select Hand tool Spacebar Spacebar
Select tool V V
Marquee Zoom tool Z Z
Cycle through zoom tools: Marquee
Zoom,Dynamic Zoom, Loupe
Temporarily select Dynamic Zoom tool (when
Marquee Zoom tool is selected)
Temporarily zoom out (when Marquee Zoom
tool is selected)
Temporarily select Zoom In tool Ctrl+spacebar Spacebar+Command
Select Object tool R R
Edit Object tool O O
Enter/Exit Forms editing A A
Crop tool C C
Link tool L L
Text Field tool F F
Shift+Z Shift+Z
Shift Shift
Ctrl Option
Cycle through tools in forms authoring mode:
Text Field, Check Box, Radio Button, List Box,
Dropdown Box, Button, Digital Signature,
Barcode
3D tool M M
Shift+F Shift+F
Last updated 1/14/2015
Page 35

Workspace
Tool Windows/UNIX action Mac OS action
Cycle through Multimedia tools: Flash, Video Shift+M Shift+M
Edit Document Text tool T T
Redaction Y Y
28
Cycle through Touch Up tools: Touch Up Text,
Touch Up Reading Order, Touch Up Object
JavaScript Debugger Ctrl+J Command+J
Insert Blank Pages tool Shift+Ctrl+T Shift+Command+T
Insert Files Ctrl+Shift+I
Delete pages Ctrl+Shift+D
Open Output Preview ~ ~
Touch Up Reading Order tool (or if already
selected, return focus to dialog box)
Shift+T Shift+T
Shift+Ctrl+U Shift+Command+U
Keys for working with comments
To enable single-key shortcuts, select the Use Single-Key Accelerators To Access Tools option in General preferences.
Result Windows/UNIX Action Mac OS Action
Sticky Note tool S S
Text Edits tool E E
Stamp tool K K
Current highlighting tool U U
Cycle through highlighting tools:
Highlighter,Underline Text, Cross Out Text
Shift+U (Windows only) Shift+U
Current drawing markup tool D D
Cycle through drawing markup tools: Cloud,
Arrow, Line, Rectangle, Oval, Polygon Line,
Polygon, Pencil Tool, Eraser Tool
Cloud tool Q (Windows only) Q
Tex t Bo x to ol X X
Current Stamp or Attach tool J J
Cycle through Stamp, Attach File, Record
Audio Comment
Move focus to next comment or form field Ta b Ta b
Move focus to previous comment or form field Shift+Tab Shift+Tab
Open pop-up note (or text field in Comments
List) for comment that has focus
Closes pop-up (or text field in Comments List)
for comment that has focus
Shift+D (Windows only) Shift+D
Shift+J Shift+J
Enter Return
Esc Esc
Last updated 1/14/2015
Page 36

Workspace
Keys for navigating a PDF
Result Windows/UNIX Action Mac OS Action
Previous screen Page Up or Shift+Enter Page Up or Shift+Return
Next screen Page Down or Enter Page Down or Return
29
First page Home or Shift+Ctrl+Page Up or Shift+Ctrl+Up
Arrow
Last page End or Shift+Ctrl+Page Down or
Shift+Ctrl+Down Arrow
Previous page Left Arrow or Ctrl+Page Up Left Arrow or Command+Page Up
Next page Right Arrow or Ctrl+Page Down Right Arrow or Command+Page Down
Previous open document Ctrl+F6 (UNIX) Command+F6
Next open document Shift+Ctrl+F6 (UNIX) Shift+Command+F6
Scroll up Up Arrow Up Arrow
Scroll down Down Arrow Down Arrow
Scroll (when Hand tool is selected) Spacebar Spacebar
Zoom in Ctrl+equal sign Command+equal sign
Zoom out Ctrl+hyphen Command+hyphen
Home or Shift+Command+Up Arrow
End or Shift+Command+Down Arrow
Keys for working with PDF Portfolios
These keys are available in the files list of the Details pane.
Result Windows Action Mac OS Action
Move forward or backward among the current
column header selected for sorting, the
current row with focus, and the Go Back
button if in a folder
Tab or S hif t+Tab Tab or Shift+Tab
Move focus to the next or previous row when
in the body of the file list on the left
Selects the next or previous column header
for sorting
If pressed in the body of the file list, navigate
one level up from within a folder
Press the Go Back button in a folder if focus is
on the button.
If pressed when focus is on a row in the file list
representing a subfolder, navigate to a
subfolder, or open an attachment in Preview
mode.
If in the body of the file list, move to the first or
last row
If in the body of the file list, move to the next
or last set of rows to fit the screen
Up Arrow or Down Arrow Up Arrow or Down Arrow
Left Arrow or Right Arrow Left Arrow or Right Arrow
Backspace Delete
Enter or Spacebar Enter or Spacebar
Enter Enter
Home or End Home or End
Page Down or Page Up Page Down or Page Up
Last updated 1/14/2015
Page 37

Workspace
Result Windows Action Mac OS Action
Select or deselect all files Ctrl+A or Shift+Ctrl+A Command+A or Shift+Command+A
30
If in the body of the file list, extend the
selection by adding the next row above or
below the selected row
Change whether the row with focus is in the
selection
Move focus up or down one row without
changing the selection
Reverse the sort order when focus is on a
column header
Shift+Up Arrow or Shift+Down Arrow Shift+Up Arrow or Shift+Down Arrow
Ctrl+Spacebar Command+Spacebar
Ctrl+Up Arrow or Ctrl+Down Arrow Command+Up Arrow or Command+Down
Arrow
Spacebar Spacebar
Keys for navigating task panes
Result Windows Action Mac OS Action
Move focus to the next item among
Document pane, Task panes, Message bar,
and Navigation bar
Move focus to the previous item among
Document pane, Task panes, message bar,
and Navigation bar
Move focus to the next panel in the Task pane Ctrl+Tab Command+Tab
Move focus to the previous panel in the Task
pane
F6 F6
Shift+F6 Shift+F6
Ctrl+Shift+Tab Command+ Shift+Tab
Navigate to the next panel and panel control
within an open Task pane
Navigate to the previous panel and panel
control within an open Task pane
Navigate to the next command button within
a panel
Navigate to the previous command button
within a panel
Expand or collapse panel in focus (press F6 to
move focus to Tools pane, then tab to desired
panel)
Open or close the Task pane Shift+F4 Shift+F4
Close the pane that lists the tasks of an Acti on Ctrl+Shift+F4 Ctrl+Shift+F4
Open the menu and move the focus to the
first menu option when focus is on a
command with a submenu or submenu
element with a flyout
Move the focus back to the parent command
button with a submenu or submenu element
with a flyout
Tab Tab
Shift+Tab Shift+Tab
Down Arrow Down Arrow
Up Arrow Up Arrow
Spacebar or Enter
Left Arrow or Right Arrow
Spacebar or Enter Spacebar or Enter
Esc Esc
Spacebar or Enter
Left Arrow or Right Arrow
Last updated 1/14/2015
Page 38

Workspace
Result Windows Action Mac OS Action
Run the command in focus Spacebar or Enter Spacebar or Enter
31
Navigate to the next item in the active panel
in the Create New Action, Edit Action, Create
New Tool Set, or the Edit Tool Set dialog boxes
Navigate to the previous item in the active
panel in the Create New Action, Edit Action,
Create New Tool Set, and the Edit Tool Set
dialog boxes
Tab Tab
Shift+Tab Shift+Tab
Keys for general navigating
Result Windows/UNIX Action Mac OS Action
Move focus to menus (Windows, UNIX);
expand first menu item (UNIX)
Move focus to toolbar in browser and
application
Move to next open document (when focus is
on document pane)
Move to previous open document (when
focus is on document pane)
Close current document Ctrl+F4 Command+F4
Close all open documents Not available Command+Option+W
Move focus to next comment, link, or form
field in the document pane
F10 Control+F2
Shift+F8 Shift+F8
Ctrl+F6 Command+F6
Ctrl+Shift+F6 Command+Shift+F6
Tab Tab
Move focus to document pane F5 F5
Move focus to previous comment, link, or
form field in the document pane
Activate selected tool, item (such as a movie
clip or bookmark), or command
Open context menu Shift+F10 Control+click
Close context menu F10 Esc
Return to Hand tool or Select tool Esc Esc
Move focus to next tab in a tabbed dialog box Ctrl+Tab Not available
Move to previous search result and highlight it
in the document
Move to next search result and highlight it in
the document
Search previous document (with Search
results displaying multiple files)
Shift+Tab Shift+Tab
Spacebar or Enter Spacebar or Return
Shift + F3 Not available
F3 F3
Alt+Shift+Left Arrow (Windows only) Command+Shift+Left Arrow
Last updated 1/14/2015
Page 39

Workspace
Result Windows/UNIX Action Mac OS Action
32
Search next document (with Search results
displaying multiple files)
Select text (with Select tool selected) Shift+arrow keys Shift+arrow keys
Select next word or deselect previous word
(with Select tool selected)
Alt+Shift+Right Arrow (Windows only) Command+Shift+Right Arrow
Shift+Ctrl+Right Arrow or Left Arrow Not available
Keys for working with navigation panels
Result Windows/UNIX Action Mac OS Action
Open and move focus to navigation pane Ctrl+Shift+F5 Command+Shift+F5
Move focus among the document, message
bar, and navigation panels
Move focus to previous pane or panel Shift+F6 Shift+F6
Move among the elements of the active
navigation panel
Move to previous or next navigation panel
and make it active (when focus is on the panel
button)
Move to next navigation panel and make it
active (when focus is anywhere in the
navigation pane)
Expand the current bookmark (focus on
Bookmarks panel)
F6 F6
Tab Tab
Up Arrow or Down Arrow Up Arrow or Down Arrow
Ctrl+Tab Not available
Right Arrow or Shift+plus sign Right Arrow or Shift+plus sign
Collapse the current bookmark (focus on
Bookmarks panel)
Expand all bookmarks Shift+* Shift+*
Collapse selected bookmark Forward Slash (/) Forward Slash (/)
Move focus to next item in a navigation panel Down Arrow Down Arrow
Move focus to previous item in a navigation
panel
Left Arrow or minus sign Left Arrow or minus sign
Up Arrow Up Arrow
Keys for navigating the Help window
Result Windows/UNIX Action Mac OS Action
Open Help window F1 F1 or Command+?
Close Help window Ctrl+W (Windows only) or Alt+F4 Command+W
Move back to previously opened topic Alt+Left Arrow Command+Left Arrow
Move forward to next topic Alt+Right Arrow Command+Right Arrow
Move to next pane Ctrl+Tab See Help for your default browser
Move to previous pane Shift+Ctrl+Tab See Help for your default browser
Move focus to the next link within a pane Tab Not available
Last updated 1/14/2015
Page 40

Workspace
Result Windows/UNIX Action Mac OS Action
Move focus to the previous link within a pane Shift+Tab Not available
Activate highlighted link Enter Not available
Print Help topic Ctrl+P Command+P
Keys for accessibility
Result Windows Action Mac OS Action
33
Change reading settings for the current
document
Reflow a tagged PDF, and return to
unreflowed view
Activate and deactivate Read Out Loud Shift+Ctrl+Y Shift+Command+Y
Read only the current page out loud Shift+Ctrl+V Shift+Command+V
Read out loud from the current page to the
end of the document
Pause reading out loud Shift+Ctrl+C Shift+Command+C
Stop reading out loud Shift+Ctrl+E Shift+Command+E
Shift+Ctrl+5 Shift+Command+5
Ctrl+4 Command+4
Shift+Ctrl+B Shift+Command+B
Navigating PDF pages
Opening pages in a PDF
Depending on the PDF you open, you may need to move forward through multiple pages, see different parts of the
page, or change the magnification. There are many ways to navigate, but the following items are commonly used:
Note: If you do not see these items, choose View > Show/Hide > Toolbar Items > Reset Toolbars.
Next and Previous The Next Page and Previous Page buttons appear in the Page Navigation toolbar. The text
box next to them is also interactive, so you can type a page number and press Enter to go directly to that page.
Scroll bars Vertical and horizontal scroll bars appear to the right and bottom of the document pane whenever the view
does not show the entire document. Click the arrows or drag to view other pages or different areas of the page.
Select & Zoom toolbar This toolbar contains buttons and controls for changing the page magnification.
Page Thumbnails panel The Page Thumbnails button on the left side of the work area opens the navigation pane to
the Page Thumbnails panel, which displays thumbnail images of each page. Click a page thumbnail to open that page
in the document pane.
Page through a document
There are many ways to turn pages in a PDF. Many people use the buttons on the Page Navigation toolbar, but you can
also use arrow keys, scroll bars, and other features to move forward and backward through a multipage PDF.
Last updated 1/14/2015
Page 41

Workspace
The Page Navigation toolbar opens by default. The default toolbar contains frequently used tools: the Show Next Page
, Show Previous Page , and Page Number. Like all toolbars, the Page Navigation toolbar can be hidden and
reopened by choosing it in the Toolbars menu under the View menu. You can display additional tools on the Page
Navigation toolbar by right-clicking the toolbar and choosing an individual tool, Show All Tools, or More Tools and
then selecting and deselecting tools in the dialog box.
Move through a PDF
❖ Do one of the following:
• Click the Previous Page or Next Page button in the toolbar.
• Choose View > Page Navigation > [location].
• Choose View > Page Navigation > Page, type the page number in the Go To Page dialog box and then click OK.
• Press the Page Up and Page Down keys on the keyboard.
Jump to a specific page
❖ Do one of the following:
• From Single Page or Two-Up page display view, drag the vertical scroll bar until the page appears in the small
pop-up display.
34
• Type the page number to replace the one currently displayed in the Page Navigation toolbar, and press Enter.
Note: If the document page numbers are different from the actual page position in the PDF file, the page’s position within
the file appears in parentheses after the assigned page number in the Page Navigation toolbar. For example, if you assign
numbering for a file that is an 18-page chapter to begin with page 223, the number shown when the first page is active
is 223 (1 of 18). You can turn off logical page numbers in the Page Display preferences. See Renumber pages and
Preferences for viewing PDFs.
Jump to bookmarked pages
Bookmarks provide a table of contents and usually represent the chapters and sections in a document. Bookmarks
appear in the navigation pane.
Last updated 1/14/2015
Page 42

Workspace
A Bookmarks button B Click to display bookmark options menu. C Expanded bookmark
35
1 Click the Bookmarks button, or choose View > Show/Hide >Navigation Panes > Bookmarks.
2 To jump to a topic, click the bookmark. Expand or collapse bookmark contents, as needed.
Note: Depending on how the bookmark was defined, clicking it may not take you to that location but perform some
other action instead.
If the list of bookmarks disappears when you click a bookmark, click the Bookmarks button to display the list again.
If you want to hide the Bookmarks button after you click a bookmark, select Hide After Use from the options menu.
Use page thumbnails to jump to specific pages
Page thumbnails prov ide mi niature previ ews of doc ument pages. You can use thumbnails in the Page Thumbnails panel
to change the display of pages and to go to other pages. The red page-view box in the page thumbnail indicates which
area of the page appears. You can resize this box to change the zoom percentage.
1 Click the Page Thumbnails button or choose View > Show/Hide > Navigation Panes > Page Thumbnails to display
the Page Thumbnails panel.
2 To jump to another page, click its thumbnail.
Automatically scroll through a document
Automatic scrolling advances your view of the PDF at a steady rate, moving vertically down the document. If you
interrupt the process by using the scroll bars to move back or forward to another page or position, automatic scrolling
continues from that point forward. At the end of the PDF, automatic scrolling stops and does not begin again until you
choose automatic scrolling again.
1 Choose View > Page Display > Automatically Scroll.
2 Press Esc to stop scrolling.
Last updated 1/14/2015
Page 43

Workspace
Retrace your viewing path
You can find PDF pages that you viewed earlier by retracing your viewing path. It’s helpful to understand the difference
between previous and next pages and previous and next views. In the case of pages, previous and next refer to the two
adjacent pages, before and after the currently active page. In the case of views, previous and next refer to your viewing
history. For example, if you jump forward and backward in a document, your viewing history retraces those steps,
showing you the pages you viewed in the reverse order that you viewed them.
Choose View > Page Navigation > Previous View.
1 To continue seeing another part of your path, do either of the following:
• Repeat step 1.
• Choose View > Page Navigation > Next View.
Note: You can make the Previous View button and Next View button available in the toolbar area by right-
clicking the Page Navigation toolbar and choosing them on the context menu, or choosing Show All Tools.
Navigate with links
Links can take you to another location in the current document, to other PDF documents, or to websites. Clicking a
link can also open file attachments and play 3D content, movies, and sound clips. To play these media clips, you must
have the appropriate hardware and software installed.
36
The person who created the PDF document determines what links look like in the PDF.
Note: Unless a link was created in Acrobat using the Link tool, you must have the Create Links From URLs option selected
in the General preferences for a link to work correctly.
1 Choose the Select tool.
2 Position the pointer over the linked area on the page until the pointer changes to the hand with a pointing finger. A
plus sign (+) or a w appears within the hand if the link points to the web. Then click the link.
PDFs with file attachments
If you open a PDF that has one or more attached files, the Attachments panel automatically opens, listing the attached
files. You can open these files for viewing, edit the attachments, and save your changes, as permitted by the document
authors.
If you move the PDF to a new location, the attachments automatically move with it.
Article threads
In PDFs, articles are optional electronic threads that the PDF author may define within that PDF. Articles lead readers
through the PDF content, jumping over pages or areas of the page that are not included in the article, in the same way
that you might skim through a traditional newspaper or magazine, following one specific story and ignoring the rest.
When you read an article, the page view may zoom in or out so that the current part of the article fills the screen.
Open and navigate an article thread
1 Click the Hand tool on the Common Tools toolbar.
Choose View > Show/Hide > Navigation Panes > Articles to open the Articles panel.
Note: You cannot open the Articles panel if you are viewing the PDF inside a web browser. You must open the PDF in
Acrobat.
Last updated 1/14/2015
Page 44

Workspace
2 Double-click the Article icon to go to the beginning of that article. The icon changes to the Follow Article pointer
.
Note: If the Articles panel is blank, then the author has not defined any article threads for this PDF.
3 With the article thread open, do any of the following:
• To scroll through the article one pane at a time, press Enter or click in the article.
• To scroll backward through the article one pane at a time, Shift-click in the article, or press Shift+Enter.
• To go to the beginning of the article, Ctrl-click within the article.
4 At the end of the article, click in the article again.
The previous page view is restored, and the pointer changes to the End Article pointer .
Exit a thread before the end of the article
1 Make sure that the Hand tool is selected.
2 Shift+Ctrl-click the page.
The previous page view is restored.
More Help topics
Adjust page magnification
37
About bookmarks
About page thumbnails
Set the page layout and orientation
Links and attachments
Multimedia preferences
Open, save, or delete an attachment
Attachments
Articles
Adjusting PDF views
Adjust page magnification
Tools on the Select & Zoom toolbar can change the magnification of PDF documents. Only some of these tools appear
on the default view of the toolbar. You can see all the tools by right-clicking the Select & Zoom toolbar and choosing
either individual tools, Show All Select & Zoom Tools.
Last updated 1/14/2015
Page 45

Workspace
A Marquee Zoom tool B Continuous Zoom tool C Zoom Out button D Zoom In button E Zoom Value menu button F Ac tual Size butt on G Fit
Width button H
Zoom To Page Level button I Pan & Zoom tool J Loupe tool
• The Marquee Zoom tool works in a few different ways. You can use it to drag a rectangle around a portion of the
page that you want to fill the viewing area. Or, simply clicking the Marquee Zoom tool increases the magnification
by one preset level, centering on the point where you clicked. To decrease the magnification by one preset level, Ctrlclick the Marquee Zoom tool.
• The Continuous Zoom or Dynamic tool zooms in when you drag it up the page and it zooms out when you drag
down. If you use a mouse wheel, this tool zooms in when you roll forward and zooms out when you roll backward.
• Zoom In and Zoom Out buttons change the document magnification by preset levels.
• The Zoom Value option changes the page view according to a percentage you type in or select from a pop-up menu.
• Actual Size displays the page at 100% magnification.
• Fit Width adjusts the magnification so that the PDF fills the document pane horizontally.
• Zoom To Page Level adjusts the magnification so that one page fills the document pane vertically.
• The Pan & Zoom tool adjusts the magnification and position of the view area to match the area in an adjustable
rectangle in the Pan & Zoom window’s thumbnail view of the page.
• The Loupe Tool window displays a magnified portion of the PDF that matches the area in an adjustable rectangle
on the document pane.
38
Resize a page to fit the window
• To resize the page to fit entirely in the document pane, choose View > Zoom > Zoom To Page Level.
• To resize the page to fit the width of the window, choose View > Zoom > Fit Width. Part of the page may be out of
view.
• To resize the page to fit the height of the window, choose View > Zoom > Fit Height. Part of the page may be out of
view.
• To resize the page so that its text and images fit the width of the window, choose View > Zoom >Fit Visible. Part of
the page may be out of view.
To see keyboard shortcuts for resizing the document, open the View > Zoom menu.
Show a page at actual size
❖ Choose View > Zoom > Actual Size.
The actual size for a PDF page is typically 100% , but the document may have been set to another magnif ication level
when it was created.
Change the magnification with zoom tools
❖ Do one of the following:
• Click the Zoom In button or the Zoom Out button in the toolbar.
• Enter a magnification percentage in the Common Tools toolbar, either by typing or choosing from the pop-up
menu.
Last updated 1/14/2015
Page 46

Workspace
• Drag the Marquee Zoom tool to define the area of the page that you want to fill the document pane. (View >
Zoom > Marquee Zoom)
• Drag the Continuous Zoom tool (also called Dynamic Zoom) up to increase the magnification and down to
decrease magnification. (View > Show/Hide > Toolbar Items > Select & Zoom > Dynamic Zoom)
When the Marquee Zoom tool is selected, you can Ctrl-click or Ctrl-drag to zoom out. Holding down Shift switches
temporarily from the Marquee Zoom tool to the Dynamic Zoom tool.
Change the magnification with the Pan & Zoom Window tool
1 Choose View > Zoom > Pan & Zoom, or click the Pan & Zoom tool in the Common Tools toolbar.
2 Do any of the following:
• Drag the handles of the box in the Pan & Zoom window to change the document magnification.
• Drag the center of the box to pan across the area you want to see.
• Click the navigation buttons to move to a different page.
• Enter a value in the zoom text box, or click the plus or minus buttons to increase or decrease the
magnification by preset levels.
Change the magnification with the Loupe tool
Choose View > Zoom> Loupe Tool.
39
1 Click the area of the document you want to view in closer detail. A rectangle appears in the document,
corresponding to the area shown in the Loupe Tool window. You can drag or resize the rectangle to change the
Loupe tool view.
2 To change the magnification of the Loupe tool, do any of the following:
• Drag the slider.
• Click the plus or minus buttons.
• Enter a value in the zoom text box.
You can change the color of the Loupe tool rectangle. Click the Line Color pop-up menu in the lower-right corner of
the Loupe Tool window, and select a new color.
Change the magnification by using a page thumbnail
1 Click the Page Thumbnails button in the navigation pane on the left side of the window.
Last updated 1/14/2015
Page 47

Workspace
2 Locate the thumbnail for the page. Then position the pointer over the lower-right corner of the page-view box until
the pointer changes into a double-headed arrow.
3 Drag the corner of the box to reduce or expand the view of the page.
4 As needed, move the pointer over the zoom box frame within the thumbnail until it changes into a Hand icon. Then
drag the frame to see a different area of the page in the document pane.
Change the default magnification
1 In the Preferences dialog box under Categories, select Page Display.
2 Open the Zoom pop-up menu and choose a default magnification level.
40
Display off-screen areas of a magnified page
When you zoom in to a high magnification, you may be able to see only part of a page. You can shift the view to show
other areas of the page without changing the magnification level.
❖ Do either of the following:
• Use the vertical scroll bars to move up and down the pages or the horizontal scroll bars to move across the page.
• Select the Hand tool in the Common Tools toolbar and drag to move the page, as if moving a piece of paper on
a table.
Set the page layout and orientation
Changing the page layout is especially useful when you want to zoom out to get an overview of the document layout.
Choose View > Page Display, and select any of the following page layouts:
Single Page View Displays one page at a time, with no portion on other pages visible.
Enable Scrolling Displays pages in a continuous vertical column that is one page wide.
Two Page View Displays each two-page spread with no portion of other pages visible.
Two Page Scrolling Displays facing pages side by side in a continuous vertical column.
If a document has more than two pages, you can ensure that the first page appears alone on the right side of the
document pane. Select either Two Page View or Two Page Scrolling. Also select View > Page Display > Show Cover Page
In Two Page View.
Last updated 1/14/2015
Page 48
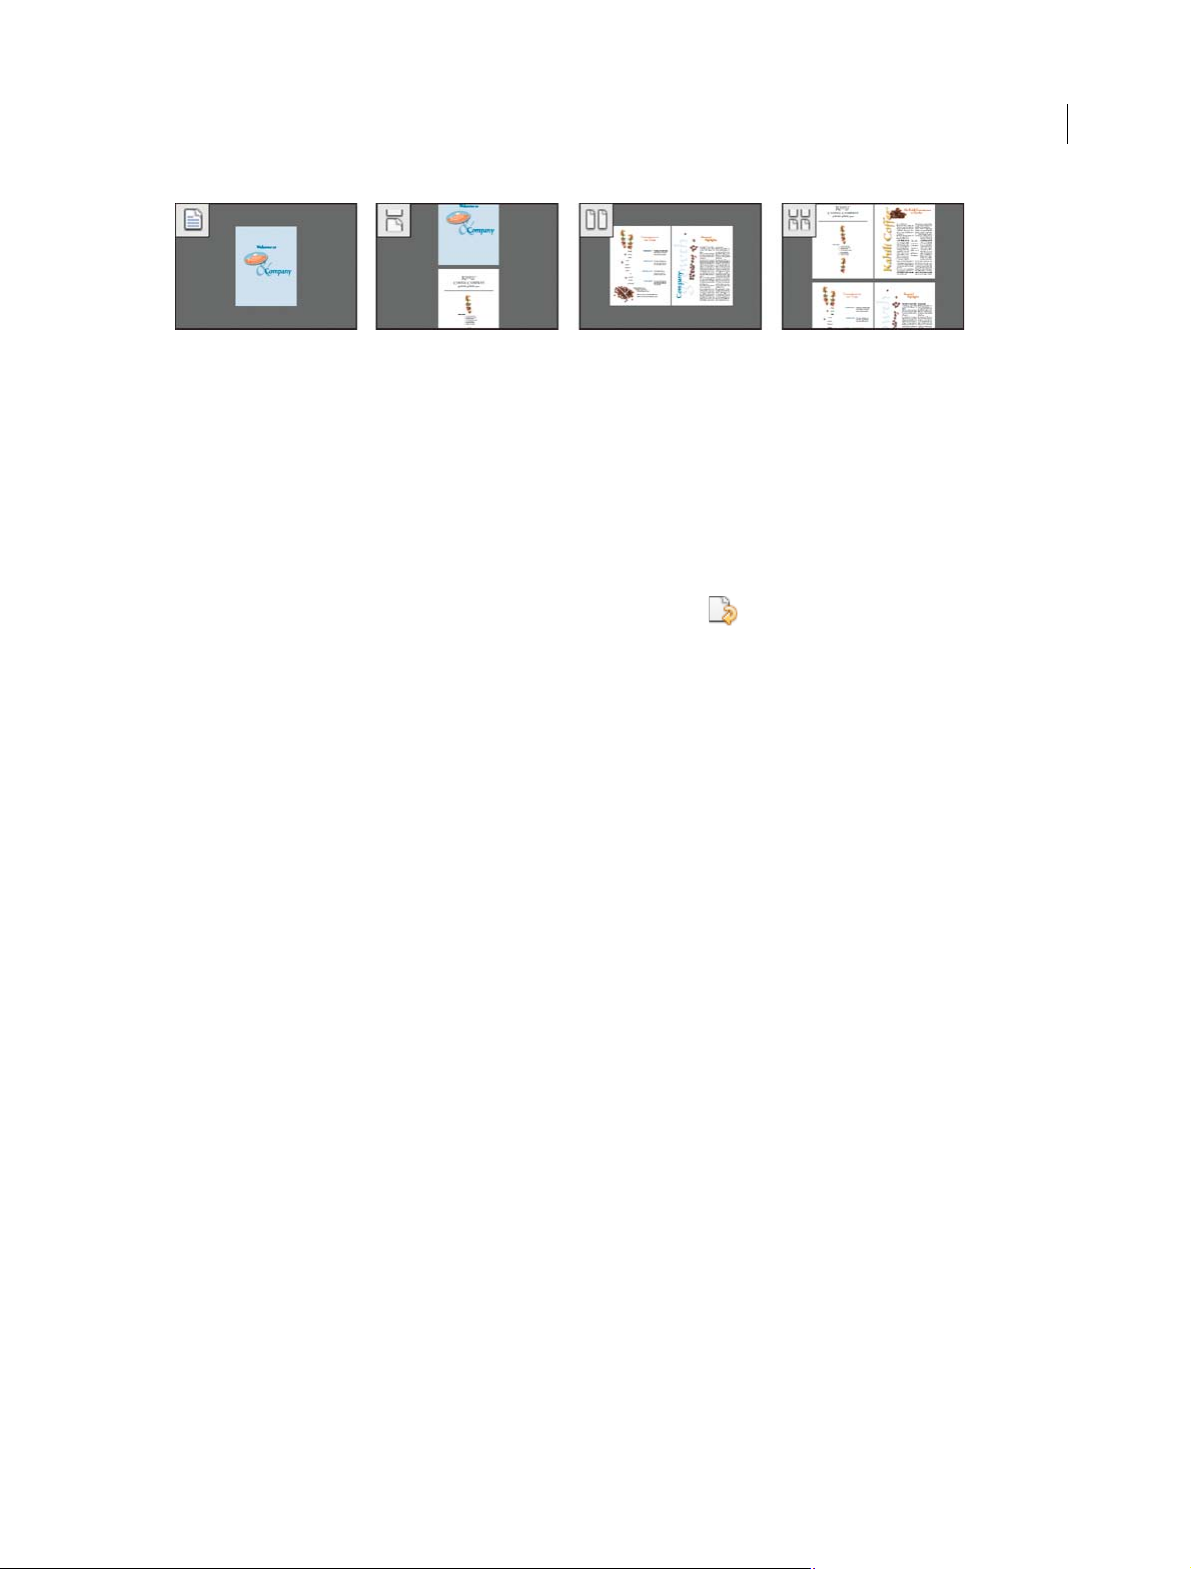
Workspace
You can also display buttons for each of these options in the Quick Tools toolbar by choosing View > > Show/Hide >
Toolbar Items > Page Display, and selecting them in the menu.
Note: In Single Page View, choosing Edit >Select All selects all text on the current page. In other layouts,Select All selects all
text in the PDF.
Rotate the page view
You can change the view of a page in 90-degree increments. This changes the view of the page, not its actual orientation.
• To temporarily rotate the page view, choose View > Rotate View > Clockwise or Counterclockwise. You can’t save
this change.
• To save the rotation with the document, click the Rotate Page button in the Quick Tools toolbar, or choose Tools
> Pages > Rotate.
41
Change the default page layout (initial view)
You specify the default initial view settings in the Preferences dialog box. (See Set preferences.)
1 In the Preferences dialog box under Categories, select Page Display.
2 Open the Page Layout menu and choose Automatic, Single Page, Single Page Continuous, Two-Up, or Two-Up
Continuous.
Note: The PDF opens with the page layout specified in Preferences unless a different page layout is specified in Document
Properties (File > Properties > Initial View). The Document Properties setting overrides the Preferences setting. If using
Document Properties, be sure to save and close the document for the change to take effect. Acrobat users can change the
initial view, unless security settings prevent changes. Reader users cannot change the initial view.
Use split-window view
You can view a PDF with the document pane divided into two panes (Split command) or four panes (Spreadsheet Split
command).
With Split view, you can scroll, change the magnification level, or turn to a different page in the active pane without
affecting the other pane.
The Spreadsheet Split view is useful if you want to keep column headings and row labels visible while scrolling through
a large spreadsheet or table. In this mode, changing the magnification in one pane changes the magnification in all
panes. Also, scrolling is coordinated between the panes. Scrolling a pane horizontally also scrolls the pane above or
below it. Scrolling vertically also scrolls the pane to the left or right of that pane.
1 Start creating the type of split view you want:
• To split the view into two panes, choose Window > Split, or drag the gray box above the vertical scroll bar.
• To split the view into four panes with synchronized scrolling and zoom levels, choose Window > Spreadsheet
Split.
2 Drag the splitter bars up, down, left, or right to resize the panes, as needed.
Last updated 1/14/2015
Page 49

Workspace
3 Adjust the zoom level, as needed:
• In Split view, click a pane to make it active, and change the zoom level for that pane only.
• In Spreadsheet Split view, adjust the zoom level to change the displays in all four panes.
4 Scroll, as needed:
• In Split view, click a pane to make it active, and scroll to change that pane only.
• In Spreadsheet Split view, click a pane, and scroll vertically to change the views in the active pane and the pane
beside it. Scroll horizontally to change the views in the active pane and the pane above or below it.
5 To restore single-pane view, choose Window > Remove Split.
View a document in multiple windows
You can create multiple windows for the same document using the New Window command. New windows have the
same size, magnification, and layout as the original window and open at the same page and on top of the original
window. When you open a new window, Acrobat adds the suffix 1 to the original filename and assigns the suffix 2 to
the new window. You can open multiple windows with the suffix incrementing with each new window. Closing a
window causes the remaining open windows to be renumbered sequentially; that is, if you have five windows open and
you close the third window that you opened, the windows are renumbered with the suffixes 1 to 4.
42
Note: This feature is not available when PDFs are viewed in a browser.
Open a new window
❖ Sele c t Window > New Wi n d ow.
Close a window
❖ Click the close box in the window. You are prompted to save any changes. Closing a window does not close a
document if more than one window is open.
Close all windows for a document
❖ Choose File > Close. You are prompted to save any changes before each window is closed.
More Help topics
About PDF layers
Viewing PDFs and viewing preferences
View document properties
Display PDF in browser | Acrobat, Reader XI
When you click a PDF link on a web page, it can open either within the web browser or directly in Acrobat or Reader.
Ea ch br owser has its own s ettin gs to control how PDFs open from a web page. Acrob at XI and Reader XI do not include
a preference setting to open web-based PDFs. To change the display behavior, follow the instructions below for your
browser, or see the browser documentation on how to control plug-ins or add-ons.
Last updated 1/14/2015
Page 50

Workspace
Internet Explorer 8 and 9
1 Open Internet Explorer, and choose Tools > Manage Add-ons.
2 Under Add-on Types, select Toolbars And Extensions.
3 In the Show menu, select All Add-ons.
43
4 In the list of add-ons, select Adobe PDF Reader.
Note: If you do not see the Adobe PDF Reader add-on, try the other options on the menu. For example, on some systems,
the add-on appears when you select Run Without Permission.
5 Click the Enable or Disable button (it toggles depending on the status of the selected add-on):
Enable sets the Adobe PDF Reader add-on to open PDFs in the browser.
Disable turns off the add-on so it does not open PDFs in the browser.
For more information, see the Internet Explorer help topic Using the Internet Explorer 8 Add-on Manager or How
to manage add-ons in Internet Explorer 9.
Last updated 1/14/2015
Page 51

Workspace
Google Chrome
1 Open Chrome, and go to:
chrome://plugins
2 Locate the Adobe PDF plug-in, and do one of the following:
• To have the Adobe PDF plug-in open PDFs in the browser, click Enable.
• To use the Chrome PDF Viewer instead of the Adobe PDF viewer, click Disable for the Adobe PDF viewer. The
Chrome PDF Viewer becomes enabled.
• To have Chrome download PDFs instead of displaying them in the browser, shift-click Disable for the currently
enabled viewer. This leaves both viewer plug-ins disabled so the PDFs won't display in the browser.
44
For more information, see the Google Chrome help topic Plug-ins.
Mozilla Firefox
1 Choose Tools > Add-ons.
2 In the Add-ons Manager window, click the Plugins tab, then select the Acrobat or Reader plugin.
Last updated 1/14/2015
Page 52

Workspace
3 Click the Enable or Disable button (it toggles depending on the status of the selected add-on):
Enable sets plugin to open PDFs in the browser.
Disable turns off the plugin so it does not open PDFs in the browser.
For more information, see the Mozilla Firefox help topic Using a PDF Reader Plug-in.
45
Apple Safari
Make Acrobat or Reader the default viewer for PDFs
1 In the Finder, select a PDF, and choose File > Get Info.
2 Click the arrow next to Open With to expose the product menu.
3 Choose either Adobe Acrobat or Adobe Reader from the application menu.
Last updated 1/14/2015
Page 53

Workspace
46
4 Click the Change All button.
5 When asked if you want to change all similar documents, click Continue.
Safari browser preferences
1 Launch Safari and go to 'Preferences
Last updated 1/14/2015
Page 54

Workspace
2 In the 'Preferences' window click on 'Security' and then click on 'Website Settings' button under 'Internet plug-ins'
3 Now select 'Adobe Reader' in the list of plugins.
Under the option 'When visiting other Websites', in the drop down list select 'Allow Always' and click on 'Done'
47
Note: This will set the browser to use the 'Adobe Reader' plugin to view pdfs
Disable AdobePDFViewer plug-in
You must have root user p rivil eges to change the Safari plug-ins. To display P DFs using the Sa fari PDF viewe r, you mu st
disable the Adobe PDF Viewer.
1 Quit Safari.
2 Log in as the root user. The root user privileges aren't enabled by default because the root user can change system
files. For more information and instructions, see one of the following Apple documents:
"root" user in Mac OS X or OS X Mountain Lion: Enable and disable the root user.
3 Choose Go > Go To Folder.
Last updated 1/14/2015
Enabling and using the
Page 55

Workspace
4 Type /Library in the Go To The Folder field, and click Go.
48
5 Create a new folder in the Library folder, and name it Internet Plug-ins Disabled.
6 Open the Internet Plug-ins folder, and move both the AdobePDFViewer.plugin and the
AdobePDFViewerNPAPI.plugin into the new Internet Plug-ins Disabled folder.
Note: If both AdobePDFViewer plug-ins are still in the Internet Plug-ins folder, drag them now to the trash. You may be
asked for your name and password.
For more information, see the Apple Safari help topic If you need to remove a plug-in.
Last updated 1/14/2015
Page 56

Workspace
Flash Player needed | Acrobat, Reader XI
Why an alert about Flash Player?
You need Flash Player to view Flash content in PDFs, PDF Portfolios, and other features. Adobe Reader and Acrobat
no longer include Flash Player and features that require Flash now leverage the machine’s local copy of Flash. This new
strategy allows users and administrators to manage Flash Player updates independently of Acrobat product updates.
Note that the Flash Active X component is not enough to display this content. A full Flash player must be installed.
Flash Player installs for end users
1 Right-click and download the Flash Player Installer for Windows (Active X and Plugin) or the Flash Player Installer
for Mac OS.
2 Choose Save Link As or Save Target As to download the installer to your computer.
3 Specify a location for the installer (such as your desktop), and click Save.
4 Browse to the installer
5 Double-click it to begin the installation.
NOTE: For Windows, download both Active X and Plugin.
49
Flash Player installs for IT
Enterprise IT and administrators should download an installer suitable for distibution across their organization by
starting here:
http://www.adobe.com/products/players/flash-player-distribution.html.
System requirements for Flash Player
Wi nd o w s
• 2.33 GHz or faster x86-compatible processor, or Intel® Atom™ 1.6 GHz or faster processor for Netbooks
• Microsoft® Windows® XP (32 bit), Windows Server® 2003 (32 bit), Windows Server 2008 (32 bit), Windows Vista®
(32 bit), Windows 7 (32 bit and 64 bit)
• 128 MB of RAM (1 GB of RAM recommended for Netbooks); 128 MB of graphics memory
Mac OS
• Intel Core™ Duo 1.33 GHz or faster processor
• Mac OS X 10.6, 10.7, or 10.8
• 256 MB of RAM; 128 MB of graphics memory
Grids, guides, and measurements in PDFs
Last updated 1/14/2015
Page 57

Workspace
View grids
Use grids to accurately line up text and objects in a document. When turned on, the grid is visible over the document.
The Snap To Grid option aligns an object with the nearest grid line when you move the object.
View or hide the grid
❖ Choose View > Show/Hide > Rulers & Grids > Grid. A check mark appears next to the command name when the
grid is displayed.
Turn the Snap To Grid option on or off
Choose View > Show/Hide > Rulers & Grids > Snap To Grid. A check mark appears next to the command name when
the option is turned on.
Change the grid appearance
1 In the Preferences dialog box under Categories, select Units & Guides.
2 To change grid settings, do any of the following:
• To change the spacing between grid lines, enter a value for Width Between Lines and Height Between Lines.
• To change the origin of the grid, enter a value for Grid Offset From Left Edge and Grid Offset From Top Edge.
• To change the number of subdivisions within each grid square, enter a value for Subdivisions. Subdivision lines
are lighter than grid lines.
50
• To change the color of the grid lines, click the Grid Line Color square and choose a new color from the Color
panel.
Create ruler guides
Horizontal and vertical rulers let you check the size of objects in your documents. You can also create guides in your
document, which are especially useful for lining up objects, such as form fields. You can change the unit of
measurement and color used in the ruler.
Create new ruler guides
Choose View > Show/Hide > Rulers & Grids > Rulers.
1 Do one of the following:
• D rag down from the ho rizo nta l r ule r to cr eat e a ho rizontal g uide, or d rag to the r ig ht o f th e vert ic al r ul er t o cre ate
a vertical guide.
• Double-click a location on the horizontal ruler to create a vertical guide, or double-click a location on the vertical
ruler to create a horizontal guide.
Show or hide guides
Choose View > Show/Hide > Rulers & Grids > Guides.
Move or delete ruler guides
❖ Click the guide to select it, and then drag it to a new location, or press Delete. To delete all guides, right-click in the
ruler area and choose Clear All Guides or Clear Guides On Page.
Last updated 1/14/2015
Page 58
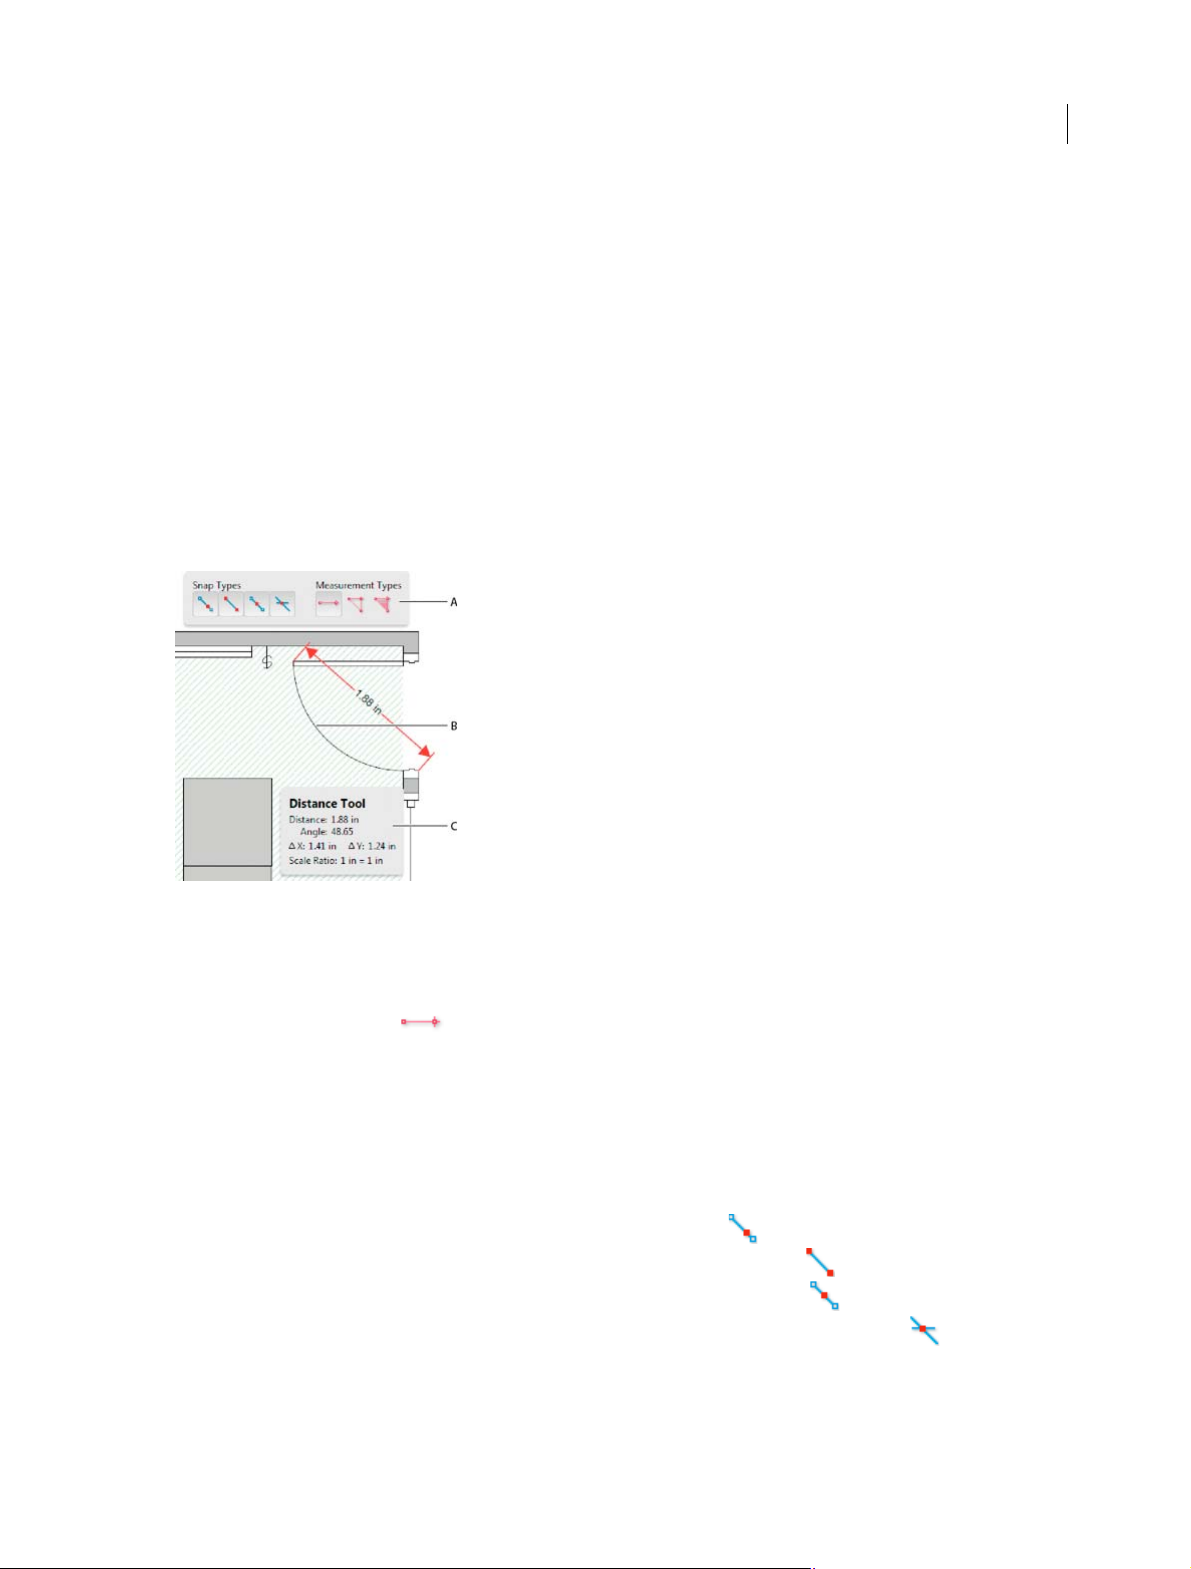
Workspace
Change guide colors
1 In the Preferences dialog box under Categories, select Units & Guides.
2 Click the Guide Color square and choose a new color from the Color pop-up menu.
Measure the height, width, or area of objects
Use the measuring tools to measure distances and areas of objects in PDF documents. The measuring tools are useful
for showing the distances and areas associated with objects in a form or computer-aided design (CAD) drawing. You
can also use these tools to measure certain areas of a document before sending it to a professional printer. The
measuring tools are available to Reader users only if the PDF creator enables measuring functionality.
When you use a measuring tool, the Measurement Info panel shows information about the measurement, such as
current measurement, delta values, and scale ratio. Acrobat inserts comments with the values calculated for distance,
perimeter, or area.
51
A Measuring toolbar B Object being measured C Measurement Info panel
Cho os e Too l s > A nal y ze > Meas u ri n g To o l.
1 To measure areas of your PDF document, select any of the following measurement types:
• Select the Distance tool to measure the distance between two points. Click the first point, move the pointer
to the second point, and click again.
• Select the Perimeter tool to measure a set of distances between multiple points. Click each point you want to
measure. Then, double-click the last point.
• Select the Area tool to measure the area within the line segments that you draw. Click each point you want to
measure. After you have clicked at least two points, click the first point to complete the area measurement.
2 While measuring objects, do any of the following:
• To snap the measurement to the end of a line, select Snap To Paths .
• To snap the measurement to the endpoint of a line, select Snap To Endpoints .
• To snap the measurement to the midpoint of a line, select Snap To Midpoints .
• To snap the measurement to the intersection of multiple lines, select Snap To Intersections
• To constrain the measurement lines to increments of 45º, hold down the Shift key.
• To discontinue a measurement, right-click and choose Cancel Measurement.
• To delete a measurement markup, click it with the Measurement Tool and press Delete.
Last updated 1/14/2015
Page 59

Workspace
Measuring tool options
To set measuring tool options, select the tool, then right-click anywhere in the PDF to view the options.
Change Scale Ratio Change the scaling ratio (such as 3:2) and unit of measurement on the drawing areas.
Change Markup Label Add or change text that appears with the measurement.
Disable/Enable Measurement Markup When enabled, the measurement lines you draw are added to the PDF. When
disabled, the measurement lines disappear when you measure another object or select another tool.
Turn Or tho On /Off When enabled, measurement lines are orthographic only.
Show/Hide Rulers Show or hide vertical and horizontal rulers on the page. (Has the same effect as choosing View >
Show/Hide > Rulers & Grids > Rulers.)
Snap To Page Content/Don’t Snap To Page Content Turn all Snap Enables on or off.
Export Measurement Markup To Excel Save the information for all the measurements in your PDF to a CSV file.
Preferences Open the Measurement (2D) preferences.
Measuring preferences
Change the 2D Measuring preferences to determine how 2D data is measured.
52
Note: In Reader, Measuring preferences apply to PDFs that have commenting enabled.
Use Scales And Units From Document (When Present) When enabled, measurements based on the units generated
from the original document, if present, are used. Deselect this option to specify the units of measurements manually.
Use Orthographic Lines When enabled, measurement lines are orthographic only.
Measuring Line Color Specifies the color or the line that appears while drawing.
Enable Measurement Markup When enabled, the measurement lines you draw are added to the PDF. When disabled,
the measurement lines disappear when you measure another object or select another tool. You can use the default
measurement labels or specify your own label.
Use Default Leader Length (Distance Tool only) When deselected, each time you draw a distance measurement, you
move the mouse to determine the leader length.
Default Line Ending (Distance Tool only) Specifies the appearance of the line endings in distance measurements.
Caption Style (Distance Tool only) Specifies whether the distance measurement caption is Inside or on Top of the
measurement line.
Default Leader Length (Distance Tool only) Specifies the length of the line leader that appears on one side of the
measurement points.
Default Leader Extension Above Line (Distance Tool only) Specifies the length of the leader extension that appears
above the measurement line.
Default Leader Offset From Line Points (Distance Tool only) Specifies the amount of blank space that appears between
the measurement points and the leader.
2D Snap Settings Specify snap behavior. Sensitivity indicates how close the pointer must be to the item being snapped
to. Snap Hint Color specifies the color of the snap line that appears when you hold the pointer over the object.
Last updated 1/14/2015
Page 60

Workspace
View cursor coordinates
The Cursor Coordinates show the coordinate position of the pointer within the document pane. The position
numbering begins in the upper-left corner of the document. Cursor Coordinates also shows the width and height of a
selected object as you resize it.
View x and y coordinates
Choose View > Show/Hide > Cursor Coordinates.
1 Move the pointer to view x and y coordinates.
Change the Cursor Coordinates measurement units
1 In the Preferences dialog box under Categories, select Units & Guides.
2 Choose a different unit of measurement from the Page & Ruler Units menu.
More Help topics
Change the look of your comments
53
Working with online accounts
Acrobat and Reader let you open and save files to online file management services such as Adobe.com, Microsoft Office
365, and Microsoft SharePoint. You can access PDF files hosted on these online services either through their web
interface or directly in Adobe Acrobat or Adobe Reader.
Note: Your SharePoint administrator must configure the SharePoint server to enable editing of PDF documents. See this
Te ch N ot e for details.
Access PDF files in an online account
Acrobat Open and Save dialog boxes let you choose an online account.
To access or save to Office 365 or SharePoint resources, choose New Account from the Open/Save To An Online
Account menu.
Last updated 1/14/2015
Page 61

Workspace
You can specify the URL using the following options:
• (Windows) URL of the repository; for example, http://mysharepointserver/mysite/mydoclib
• (Windows) Complete UNC path; for example, \\mysharepointserver\mysite\mydoclib
• Mapped network drives
Check out a file from SharePoint
The safest way to work on a PDF file that resides on an Office 365 or SharePoint Server is to check out the file. Other
users cannot edit the file while you're working on it.
54
1 To check out a PDF file, do one of the following:
• (Windows) Using Internet Explorer, navigate to the PDF file on the Office 365 or SharePoint portal. Click the
document or choose Edit Document from the file pop-up menu.
• In Acrobat or Reader, choose File > Open, cho ose New Account from the Open An Online Account menu. Then
select either Office 365 or SharePoint, and specify the URL or complete UNC path of the PDF file.
2 A dialog box displays the filename and location. Click one of the following:
• Check Out and Open
• Open, to open the file without checking it out
Note: If you are required to sign in to the SharePoint server, enter your user name and password when prompted.
Cancel checkout
You can discard the checked-out version of a PDF file if you don’t want to save your changes.
1 Choose File > SharePoint/Office 365 Server > Discard Check Out.
2 A confirmation message appears. Click OK.
Note: You cannot edit a document offline.
Prepare document properties
You can specify the document’s Office 365 or SharePoint properties from within Acrobat or Reader.
1 Choose File > SharePoint/Office 365 Server > Prepare Document Properties.
2 Double-click the property to edit. The Edit dialog box appears. Enter a value and click OK.
Last updated 1/14/2015
Page 62

Workspace
Check in
When you complete your edits, you can check the file into the Office 365 or SharePoint server. Other users can see the
changes. If versioning is enabled, Office 365 or SharePoint also manages version history for the file.
1 Choose File > SharePoint/Office 365 Server > Check In. The Check In dialog box appears.
2 If version numbering is enabled, the version information appears. Choose major version, minor version, or
overwrite current version.
3 Enter the Version Comments.
4 Optionally, enable Keep the Document Checked Out After Checking In This Version and click OK.
Updating Acrobat and using Adobe Digital Editions
Updating Acrobat
Acrobat application files and components can be updated in a variety of ways. Some updates are available when you
open a PDF that triggers the updating process automatically. For example, if you open a form that uses Asian-language
fonts, you are asked whether you want to download the fonts. Other updates are available only from the Help menu,
and must be installed manually. Some updates are available both automatically and manually.
55
Manually update the software
❖ Choose Help > Check For Updates, and follow any onscreen instructions.
Change updating preferences
Choose Edit > Preferences (Windows) or Acrobat/Adobe Reader > Preferences (Mac OS).
1 From the Categories on the left, select Updater.
2 In the Check For Updates section, select one of the following options for installing updates:
Automatically install updates (recommended) (Windows) Acrobat regularly checks for important updates,
downloads them, and installs them automatically. When finished, you are alerted via a small message in the system
tray that your software has been updated. This method is the best way to keep Acrobat up-to-date and more secure.
Automatically download updates, but let me choose when to install them Acrobat regularly checks for important
updates and downloads them. Acrobat prompts you to start the installation.
Notify me, but let me choose when to download and install updates Acrobat regularly checks for important
updates and notifies you. You can choose to download and install the updates at your convenience.
Do not download or install updates Acrobat doesn't check for updates. Instead, you check for updates yourself
(Help > Check For Updates). This option is the least secure and recommended only for organizations that deploy
updates using other methods.
Manage security settings
If your organization uses server-based security policies, you can set up Acrobat to regularly check for updates to these
policies. Server-based security is set up by an administrator who provides the URL from which to get security updates.
1 In the Preferences dialog box under Categories, select Security.
Last updated 1/14/2015
Page 63

Workspace
2 In the Security Settings, select Load Security Settings From A Server.
3 Type the server address in the URL field.
4 Select how often you want to check for security updates.
5 Select Ask Before Installing to receive notification before the server is checked for policy updates.
Adobe Digital Editions
Use the free Adobe® Digital Editions software to read and organize eBooks and other publications.Adobe Digital
Editions is a separate web-based rich Internet application (RIA) that replaces the eBooks features in previous versions
of Acrobat.
When you install Adobe Digital Editions, your existing bookshelf items are automatically imported and available
within the new Adobe Digital Editions bookshelf experience. You can also manually import individual PDFs into your
Adobe Digital Editions bookshelf.
Note: When you open an eBook for the first time, the Adobe Digital Editions software is automatically installed on your
computer.
For more information about Adobe Digital Editions and to download the software, see
www.adobe.com/go/learn_acr_digital_en.
56
Opening PDFs
You can open a PDF in many ways: from within the Acrobat application, from your email application, from your file
system, or on a network from within a web browser.
Note: The Organizer and Organizer-related commands are not available in Acrobat X and later.
Open a PDF in the application
❖ Start Acrobat and do one of the following:
• Open a file from the Getting Started window. You can open a recent file or click the Open button to locate a
file.
• Choose File > Open, or click the Open File button in the toolbar. In the Open dialog box, select one or more
filenames, and click Open. PDF documents usually have the extension .pdf.
If more than one document is open, you can switch between documents by choosing the document name from the
Window menu.
Open a PDF from the desktop or within another application
❖ Do one of the following:
• To open a PDF attached to an email message, open the message and double-click the PDF icon.
• To open a PDF linked to an open web page, click the PDF file link. The PDF usually opens in the web browser.
• Double-click the PDF file icon in your file system.
Note: In Mac OS, you sometimes cannot open a PDF created in Windows by double-clicking the icon. Instead, choose
File > Open With > Acrobat.
Last updated 1/14/2015
Page 64

Workspace
Open a PDF in a web browser
When PDFs open in a web page, they open in Read mode. Read mode displays the PDF without the menus, panes, or
toolbars visible. Near the bottom of the window, a floating toolbar appears with basic functionality for viewing
document.
• To show the toolbar, roll your cursor near the bottom of the window.
• To page through the PDF, use the navigation buttons in the toolbar.
• To close Read mode and display the work area, click the Acrobat icon in the toolbar.
• To disable Read mode within the browser, open the Acrobat or Reader Preferences (in Windows, choose Edit >
Preferences, in Mac OS, choose Acrobat/Reader > Preferences). Select Internet from the left pane. Deselect Display
In Read Mode By Default.
Note: If y ou h ave mo re tha n one Adob e PDF ap plicati on o n your computer, you c an spec ify which o ne i s us ed t o op en P DFs.
See the Select Default PDF Handler in General preferences.
About viewing PDFs in a web browser
Options in the web browser control how you view a PDF, either within the browser or directly in Acrobat or Reader. To
change the current display behavior, see the browser documentation on managing add-ons or plug-ins. If you open
PDFs in Acrobat outside the browser, you cannot use the preference Allow Fast Web View in a browser.
57
Because keyboard commands can be mapped to the web browser, some Acrobat shortcuts cannot be available.
Similarly, you may need to use the tools and commands in the Acrobat toolbar rather than the browser toolbar or menu
bar. For example, to print a PDF document, use the Print button in the Acrobat toolbar rather than the Print command
in the browser. (In Microsoft Internet Explorer, you can choose File > Print, Edit > Copy, and Edit > Find On This Page
on the Internet Explorer toolbar.)
Note: Having multiple versions of Acrobat or Adobe Reader installed on the same computer is not recommended. Mixed
versions on your system can prevent you from viewing PDFs in a web browser. Examples include Acrobat XI with Adobe
Reader X, or Acrobat 9 with Reader XI, and so on. For more information about coexisting installations, see this
Te ch N ot e .
Internet preferences
Display In Read Mode By Default Select to display PDFs in the browser without the menus, panes, or toolbars visible.
Allow Fast Web View Select to allow page-at-a-time downloading for PDFs that have been saved with Fast Web View
enabled. With Fast Web View turned on, a web server can send just the requested page, rather than the entire PDF.
Allow Speculative Downloading In The Background Choose to allow the browser to continue downloading PDF pages
from the web, even after the first page displays.
Connection Speed Choose a connection speed from the menu. The connection speed helps Acrobat or other media
provide a smooth display when content is read on the Internet.
Internet Settings [or Network Settings] Click to open the Internet or network connection dialog box or panel for your
computer. For more information, consult your operating system Help, your Internet service provider, or your local
network administrator.
Asian, Cyrillic, and right-to-lefttext in PDFs
Last updated 1/14/2015
Page 65

Workspace
Asian language PDFs
You can use Acrobat to view, search, and print PDF documents that contain Asian text (Traditional and Simplified
Chinese, Japanese, and Korean). You can also use these languages when you fill in forms, add comments, and apply
digital signatures.
Almost all of the Acrobat features are supported for Traditional and Simplified Chinese, Japanese, and Korean text if
you install the respective Asian language font packs.
In Acrobat in Windows, you must install the Asian language support files by using the custom installation and selecting
the Asian Language Support options under Create Adobe PDF and View Adobe PDF.
PDFMaker and the Adobe PDF printer automatically embed most Asian fonts in your file when creating PDF files. You
can control whether Asian fonts are embedded.
In Windows, you may be able to view and print files that contain Asian languages without having the necessary Asian
language support installed on your system. If you try to open a PDF file for which language support is required, you are
automatically prompted to install the required fonts.
Cyrillic, Central European, and Eastern European language PDFs
You can work with Adobe PDF files that contain Cyrillic text (including Bulgarian and Russian), Central European text,
and Eastern European text (including Czech, Hungarian, and Polish) if the fonts are embedded in the PDF files. If the
fonts are embedded, you can view and print the files on any system. Fonts do not need to be embedded to use the Search
feature.
58
Note: If you open a PDF file in which form fields or text boxes contain these languages but the fonts are not embedded and
are not installed on your system, choosing Help > Check For Updates Now automatically prompts you to download and
install the necessary fonts.
Hebrew, Arabic, Thai, and Vietnamese language PDFs
Acrobat supports the entry and display of Thai and Vietnamese text. In Windows only, Arabic and Hebrew are also
supported. By default, Right-To-Left Language Options is enabled under Arabic and Hebrew regional settings (in
Wi nd ow s) .
Enable right-to-left languages
Enabling right-to-left language options displays the user interface elements for controlling paragraph direction, digit
style, and ligature. When this option is selected, you can specify the writing direction (left-to-right or right-to-left) and
type of digits (Western or Arabic-Indic) used for creating and filling out certain form fields, adding digital signatures,
and creating text box markups.
Enable Right-To-Left Language Options is enabled by default under Arabic and Hebrew regional settings.
1 In the Preferences dialog box under Categories, select Language.
2 Select Enable Right-To-Left Language Options.
Acrobat in Mac OS | Acrobat Pro
Generally, Acrobat works the same for Windows and Mac OS. Some exceptions are noted throughout Help. In addition,
be aware of the following differences:
Last updated 1/14/2015
Page 66
Workspace
Common keyboard actions and functions
Windows Mac OS
Right-click Control-click
Alt Option
Ctrl+[character] Command+[character]
Ctrl-click Option-click
Ctrl-drag Option-drag
My Computer [disk name]
Windows Explorer Finder
Open the Preferences dialog box
To open the Preferences dialog box in Mac OS, choose Acrobat > Preferences.
Expand a nested list
Items such as bookmarks sometimes appear in nested lists that can be expanded or collapsed. To expand a list in Mac
OS, click the right-pointing triangle to the left of the icon. Click the down-pointing triangle to collapse the list. To
expand or collapse all items in a multilevel list, Option-click the triangle.
59
PDFMaker
PDFMaker is not available for Mac OS. However, you can still create PDFs from many business applications using the
File > Print command. In the Print dialog box, choose Save AsAdobe PDF from the PDF menu.
More Help topics
Keyboard shortcuts
Acrobat in Mac OS | Acrobat Pro
Generally, Acrobat works the same for Windows and Mac OS. Some exceptions are noted throughout Help. In addition,
be aware of the following differences:
Common keyboard actions and functions
Windows Mac OS
Right-click Control-click
Alt Option
Ctrl+[character] Command+[character]
Ctrl-click Option-click
Ctrl-drag Option-drag
My Computer [disk name]
Windows Explorer Finder
Last updated 1/14/2015
Page 67

Workspace
Open the Preferences dialog box
To open the Preferences dialog box in Mac OS, choose Acrobat > Preferences.
Expand a nested list
Items such as bookmarks sometimes appear in nested lists that can be expanded or collapsed. To expand a list in Mac
OS, click the right-pointing triangle to the left of the icon. Click the down-pointing triangle to collapse the list. To
expand or collapse all items in a multilevel list, Option-click the triangle.
PDFMaker
PDFMaker is not available for Mac OS. However, you can still create PDFs from many business applications using the
File > Print command. In the Print dialog box, choose Save AsAdobe PDF from the PDF menu.
More Help topics
Keyboard shortcuts
Adjusting PDF views
60
Adjust page magnification
Tools on the Select & Zoom toolbar can change the magnification of PDF documents. Only some of these tools appear
on the default view of the toolbar. You can see all the tools by right-clicking the Select & Zoom toolbar and choosing
either individual tools, Show All Select & Zoom Tools.
A Marquee Zoom tool B Continuous Zoom tool C Zoom Out button D Zoom In button E Zoom Value menu button F Ac tual Size butt on G Fit
Width button H
• The Marquee Zoom tool works in a few different ways. You can use it to drag a rectangle around a portion of the
page that you want to fill the viewing area. Or, simply clicking the Marquee Zoom tool increases the magnification
by one preset level, centering on the point where you clicked. To decrease the magnification by one preset level, Ctrlclick the Marquee Zoom tool.
• The Continuous Zoom or Dynamic tool zooms in when you drag it up the page and it zooms out when you drag
down. If you use a mouse wheel, this tool zooms in when you roll forward and zooms out when you roll backward.
• Zoom In and Zoom Out buttons change the document magnification by preset levels.
• The Zoom Value option changes the page view according to a percentage you type in or select from a pop-up menu.
• Actual Size displays the page at 100% magnification.
• Fit Width adjusts the magnification so that the PDF fills the document pane horizontally.
• Zoom To Page Level adjusts the magnification so that one page fills the document pane vertically.
• The Pan & Zoom tool adjusts the magnification and position of the view area to match the area in an adjustable
rectangle in the Pan & Zoom window’s thumbnail view of the page.
Zoom To Page Level button I Pan & Zoom tool J Loupe tool
Last updated 1/14/2015
Page 68

Workspace
• The Loupe Tool window displays a magnified portion of the PDF that matches the area in an adjustable rectangle
on the document pane.
Resize a page to fit the window
• To resize the page to fit entirely in the document pane, choose View > Zoom > Zoom To Page Level.
• To resize the page to fit the width of the window, choose View > Zoom > Fit Width. Part of the page may be out of
view.
• To resize the page to fit the height of the window, choose View > Zoom > Fit Height. Part of the page may be out of
view.
• To resize the page so that its text and images fit the width of the window, choose View > Zoom >Fit Visible. Part of
the page may be out of view.
To see keyboard shortcuts for resizing the document, open the View > Zoom menu.
Show a page at actual size
❖ Choose View > Zoom > Actual Size.
The actual size for a PDF page is typically 100% , but the document may have been set to another magnif ication level
when it was created.
61
Change the magnification with zoom tools
❖ Do one of the following:
• Click the Zoom In button or the Zoom Out button in the toolbar.
• Enter a magnification percentage in the Common Tools toolbar, either by typing or choosing from the pop-up
menu.
• Drag the Marquee Zoom tool to define the area of the page that you want to fill the document pane. (View >
Zoom > Marquee Zoom)
• Drag the Continuous Zoom tool (also called Dynamic Zoom) up to increase the magnification and down to
decrease magnification. (View > Show/Hide > Toolbar Items > Select & Zoom > Dynamic Zoom)
When the Marquee Zoom tool is selected, you can Ctrl-click or Ctrl-drag to zoom out. Holding down Shift switches
temporarily from the Marquee Zoom tool to the Dynamic Zoom tool.
Change the magnification with the Pan & Zoom Window tool
1 Choose View > Zoom > Pan & Zoom, or click the Pan & Zoom tool in the Common Tools toolbar.
2 Do any of the following:
• Drag the handles of the box in the Pan & Zoom window to change the document magnification.
• Drag the center of the box to pan across the area you want to see.
• Click the navigation buttons to move to a different page.
• Enter a value in the zoom text box, or click the plus or minus buttons to increase or decrease the
magnification by preset levels.
Change the magnification with the Loupe tool
Choose View > Zoom> Loupe Tool.
Last updated 1/14/2015
Page 69

Workspace
1 Click the area of the document you want to view in closer detail. A rectangle appears in the document,
corresponding to the area shown in the Loupe Tool window. You can drag or resize the rectangle to change the
Loupe tool view.
2 To change the magnification of the Loupe tool, do any of the following:
• Drag the slider.
• Click the plus or minus buttons.
• Enter a value in the zoom text box.
62
You can change the color of the Loupe tool rectangle. Click the Line Color pop-up menu in the lower-right corner of
the Loupe Tool window, and select a new color.
Change the magnification by using a page thumbnail
1 Click the Page Thumbnails button in the navigation pane on the left side of the window.
2 Locate the thumbnail for the page. Then position the pointer over the lower-right corner of the page-view box until
the pointer changes into a double-headed arrow.
3 Drag the corner of the box to reduce or expand the view of the page.
4 As needed, move the pointer over the zoom box frame within the thumbnail until it changes into a Hand icon. Then
drag the frame to see a different area of the page in the document pane.
Change the default magnification
1 In the Preferences dialog box under Categories, select Page Display.
2 Open the Zoom pop-up menu and choose a default magnification level.
Last updated 1/14/2015
Page 70

Workspace
Display off-screen areas of a magnified page
When you zoom in to a high magnification, you may be able to see only part of a page. You can shift the view to show
other areas of the page without changing the magnification level.
❖ Do either of the following:
• Use the vertical scroll bars to move up and down the pages or the horizontal scroll bars to move across the page.
• Select the Hand tool in the Common Tools toolbar and drag to move the page, as if moving a piece of paper on
a table.
Set the page layout and orientation
Changing the page layout is especially useful when you want to zoom out to get an overview of the document layout.
Choose View > Page Display, and select any of the following page layouts:
Single Page View Displays one page at a time, with no portion on other pages visible.
Enable Scrolling Displays pages in a continuous vertical column that is one page wide.
Two Page View Displays each two-page spread with no portion of other pages visible.
Two Page Scrolling Displays facing pages side by side in a continuous vertical column.
63
If a document has more than two pages, you can ensure that the first page appears alone on the right side of the
document pane. Select either Two Page View or Two Page Scrolling. Also select View > Page Display > Show Cover Page
In Two Page View.
You can also display buttons for each of these options in the Quick Tools toolbar by choosing View > > Show/Hide >
Toolbar Items > Page Display, and selecting them in the menu.
Note: In Single Page View, choosing Edit >Select All selects all text on the current page. In other layouts,Select All selects all
text in the PDF.
Rotate the page view
You can change the view of a page in 90-degree increments. This changes the view of the page, not its actual orientation.
• To temporarily rotate the page view, choose View > Rotate View > Clockwise or Counterclockwise. You can’t save
this change.
• To save the rotation with the document, click the Rotate Page button in the Quick Tools toolbar, or choose Tools
> Pages > Rotate.
Change the default page layout (initial view)
You specify the default initial view settings in the Preferences dialog box. (See Set preferences.)
1 In the Preferences dialog box under Categories, select Page Display.
2 Open the Page Layout menu and choose Automatic, Single Page, Single Page Continuous, Two-Up, or Two-Up
Continuous.
Last updated 1/14/2015
Page 71

Workspace
Note: The PDF opens with the page layout specified in Preferences unless a different page layout is specified in Document
Properties (File > Properties > Initial View). The Document Properties setting overrides the Preferences setting. If using
Document Properties, be sure to save and close the document for the change to take effect. Acrobat users can change the
initial view, unless security settings prevent changes. Reader users cannot change the initial view.
Use split-window view
You can view a PDF with the document pane divided into two panes (Split command) or four panes (Spreadsheet Split
command).
With Split view, you can scroll, change the magnification level, or turn to a different page in the active pane without
affecting the other pane.
The Spreadsheet Split view is useful if you want to keep column headings and row labels visible while scrolling through
a large spreadsheet or table. In this mode, changing the magnification in one pane changes the magnification in all
panes. Also, scrolling is coordinated between the panes. Scrolling a pane horizontally also scrolls the pane above or
below it. Scrolling vertically also scrolls the pane to the left or right of that pane.
1 Start creating the type of split view you want:
• To split the view into two panes, choose Window > Split, or drag the gray box above the vertical scroll bar.
• To split the view into four panes with synchronized scrolling and zoom levels, choose Window > Spreadsheet
Split.
2 Drag the splitter bars up, down, left, or right to resize the panes, as needed.
3 Adjust the zoom level, as needed:
64
• In Split view, click a pane to make it active, and change the zoom level for that pane only.
• In Spreadsheet Split view, adjust the zoom level to change the displays in all four panes.
4 Scroll, as needed:
• In Split view, click a pane to make it active, and scroll to change that pane only.
• In Spreadsheet Split view, click a pane, and scroll vertically to change the views in the active pane and the pane
beside it. Scroll horizontally to change the views in the active pane and the pane above or below it.
5 To restore single-pane view, choose Window > Remove Split.
View a document in multiple windows
You can create multiple windows for the same document using the New Window command. New windows have the
same size, magnification, and layout as the original window and open at the same page and on top of the original
window. When you open a new window, Acrobat adds the suffix 1 to the original filename and assigns the suffix 2 to
the new window. You can open multiple windows with the suffix incrementing with each new window. Closing a
window causes the remaining open windows to be renumbered sequentially; that is, if you have five windows open and
you close the third window that you opened, the windows are renumbered with the suffixes 1 to 4.
Note: This feature is not available when PDFs are viewed in a browser.
Open a new window
❖ Sele c t Window > New Wi n d ow.
Last updated 1/14/2015
Page 72

Workspace
Close a window
❖ Click the close box in the window. You are prompted to save any changes. Closing a window does not close a
document if more than one window is open.
Close all windows for a document
❖ Choose File > Close. You are prompted to save any changes before each window is closed.
More Help topics
About PDF layers
Viewing PDFs and viewing preferences
View document properties
Asian, Cyrillic, and right-to-lefttext in PDFs
65
Asian language PDFs
You can use Acrobat to view, search, and print PDF documents that contain Asian text (Traditional and Simplified
Chinese, Japanese, and Korean). You can also use these languages when you fill in forms, add comments, and apply
digital signatures.
Almost all of the Acrobat features are supported for Traditional and Simplified Chinese, Japanese, and Korean text if
you install the respective Asian language font packs.
In Acrobat in Windows, you must install the Asian language support files by using the custom installation and selecting
the Asian Language Support options under Create Adobe PDF and View Adobe PDF.
PDFMaker and the Adobe PDF printer automatically embed most Asian fonts in your file when creating PDF files. You
can control whether Asian fonts are embedded.
In Windows, you may be able to view and print files that contain Asian languages without having the necessary Asian
language support installed on your system. If you try to open a PDF file for which language support is required, you are
automatically prompted to install the required fonts.
Cyrillic, Central European, and Eastern European language PDFs
You can work with Adobe PDF files that contain Cyrillic text (including Bulgarian and Russian), Central European text,
and Eastern European text (including Czech, Hungarian, and Polish) if the fonts are embedded in the PDF files. If the
fonts are embedded, you can view and print the files on any system. Fonts do not need to be embedded to use the Search
feature.
Note: If you open a PDF file in which form fields or text boxes contain these languages but the fonts are not embedded and
are not installed on your system, choosing Help > Check For Updates Now automatically prompts you to download and
install the necessary fonts.
Last updated 1/14/2015
Page 73

Workspace
Hebrew, Arabic, Thai, and Vietnamese language PDFs
Acrobat supports the entry and display of Thai and Vietnamese text. In Windows only, Arabic and Hebrew are also
supported. By default, Right-To-Left Language Options is enabled under Arabic and Hebrew regional settings (in
Wi nd ow s) .
Enable right-to-left languages
Enabling right-to-left language options displays the user interface elements for controlling paragraph direction, digit
style, and ligature. When this option is selected, you can specify the writing direction (left-to-right or right-to-left) and
type of digits (Western or Arabic-Indic) used for creating and filling out certain form fields, adding digital signatures,
and creating text box markups.
Enable Right-To-Left Language Options is enabled by default under Arabic and Hebrew regional settings.
1 In the Preferences dialog box under Categories, select Language.
2 Select Enable Right-To-Left Language Options.
Display PDF in browser | Acrobat, Reader XI
66
When you click a PDF link on a web page, it can open either within the web browser or directly in Acrobat or Reader.
Ea ch br owser has its own s ettin gs to control how PDFs open from a web page. Acrob at XI and Reader XI do not include
a preference setting to open web-based PDFs. To change the display behavior, follow the instructions below for your
browser, or see the browser documentation on how to control plug-ins or add-ons.
Internet Explorer 8 and 9
1 Open Internet Explorer, and choose Tools > Manage Add-ons.
2 Under Add-on Types, select Toolbars And Extensions.
3 In the Show menu, select All Add-ons.
4 In the list of add-ons, select Adobe PDF Reader.
Last updated 1/14/2015
Page 74
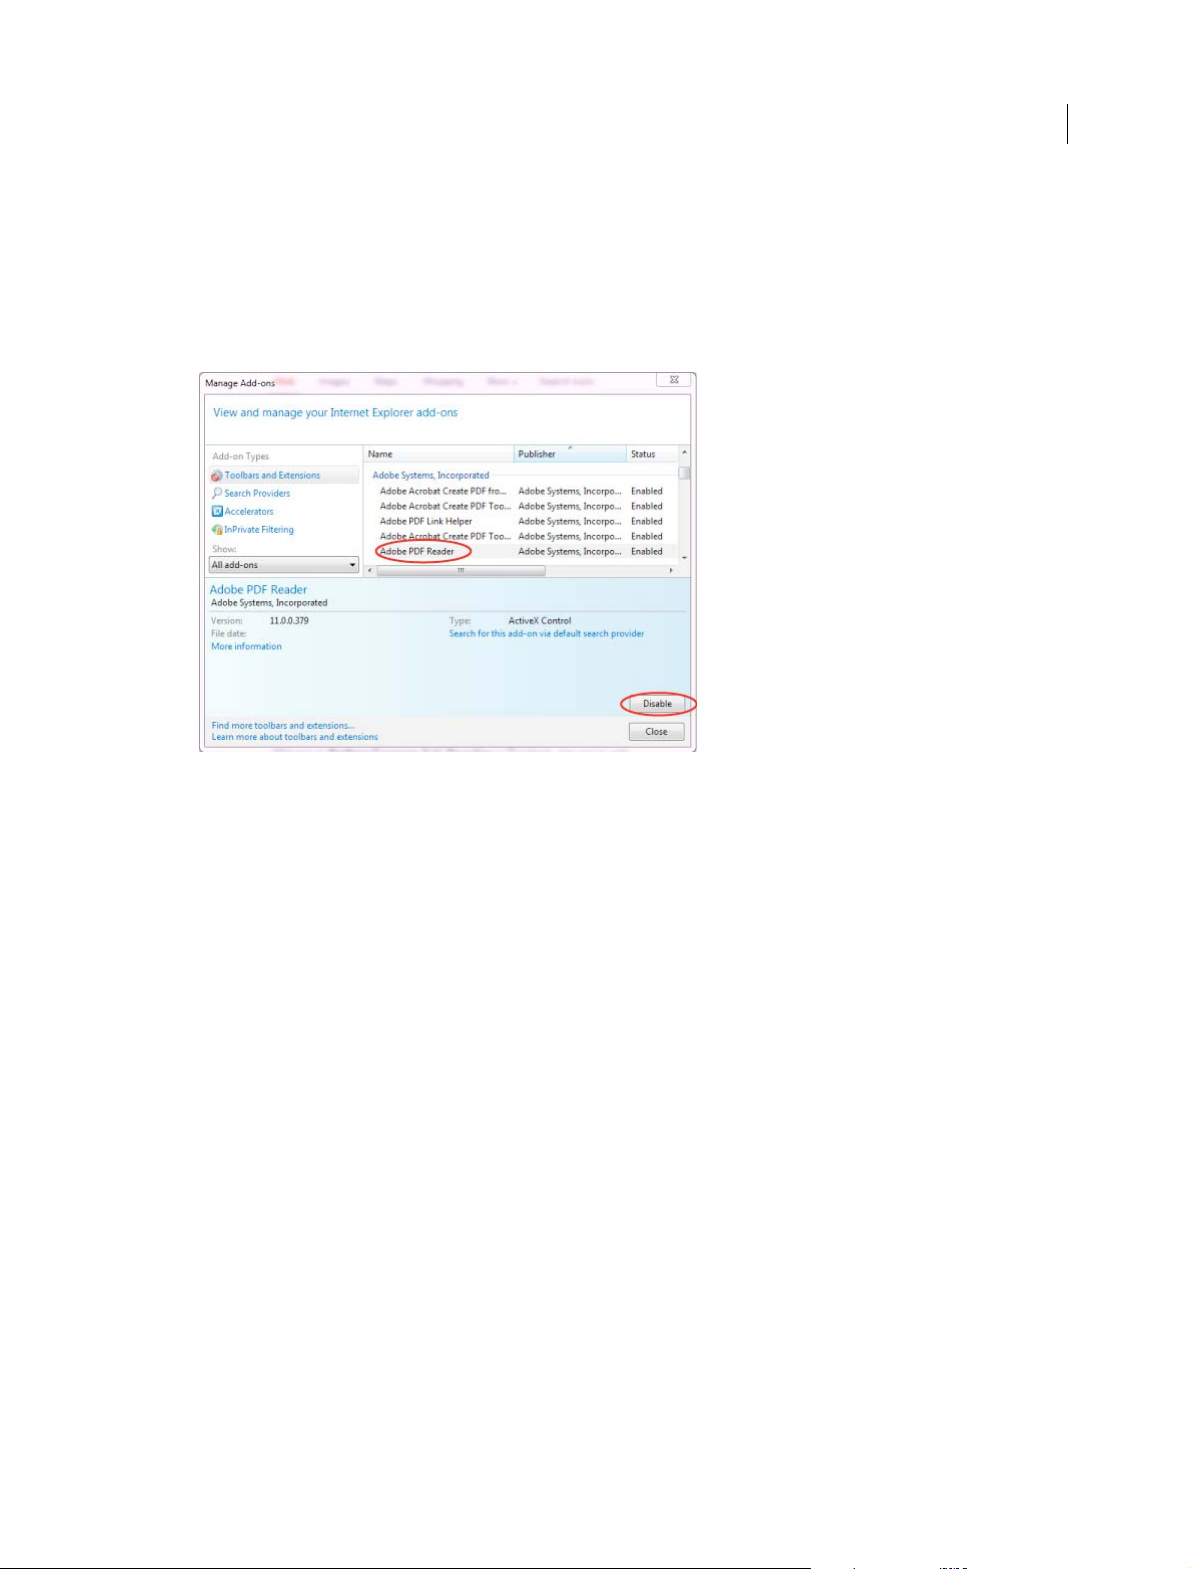
Workspace
Note: If you do not see the Adobe PDF Reader add-on, try the other options on the menu. For example, on some systems,
the add-on appears when you select Run Without Permission.
5 Click the Enable or Disable button (it toggles depending on the status of the selected add-on):
Enable sets the Adobe PDF Reader add-on to open PDFs in the browser.
Disable turns off the add-on so it does not open PDFs in the browser.
67
For more information, see the Internet Explorer help topic Using the Internet Explorer 8 Add-on Manager or How
to manage add-ons in Internet Explorer 9.
Google Chrome
1 Open Chrome, and go to:
chrome://plugins
2 Locate the Adobe PDF plug-in, and do one of the following:
• To have the Adobe PDF plug-in open PDFs in the browser, click Enable.
• To use the Chrome PDF Viewer instead of the Adobe PDF viewer, click Disable for the Adobe PDF viewer. The
Chrome PDF Viewer becomes enabled.
• To have Chrome download PDFs instead of displaying them in the browser, shift-click Disable for the currently
enabled viewer. This leaves both viewer plug-ins disabled so the PDFs won't display in the browser.
Last updated 1/14/2015
Page 75
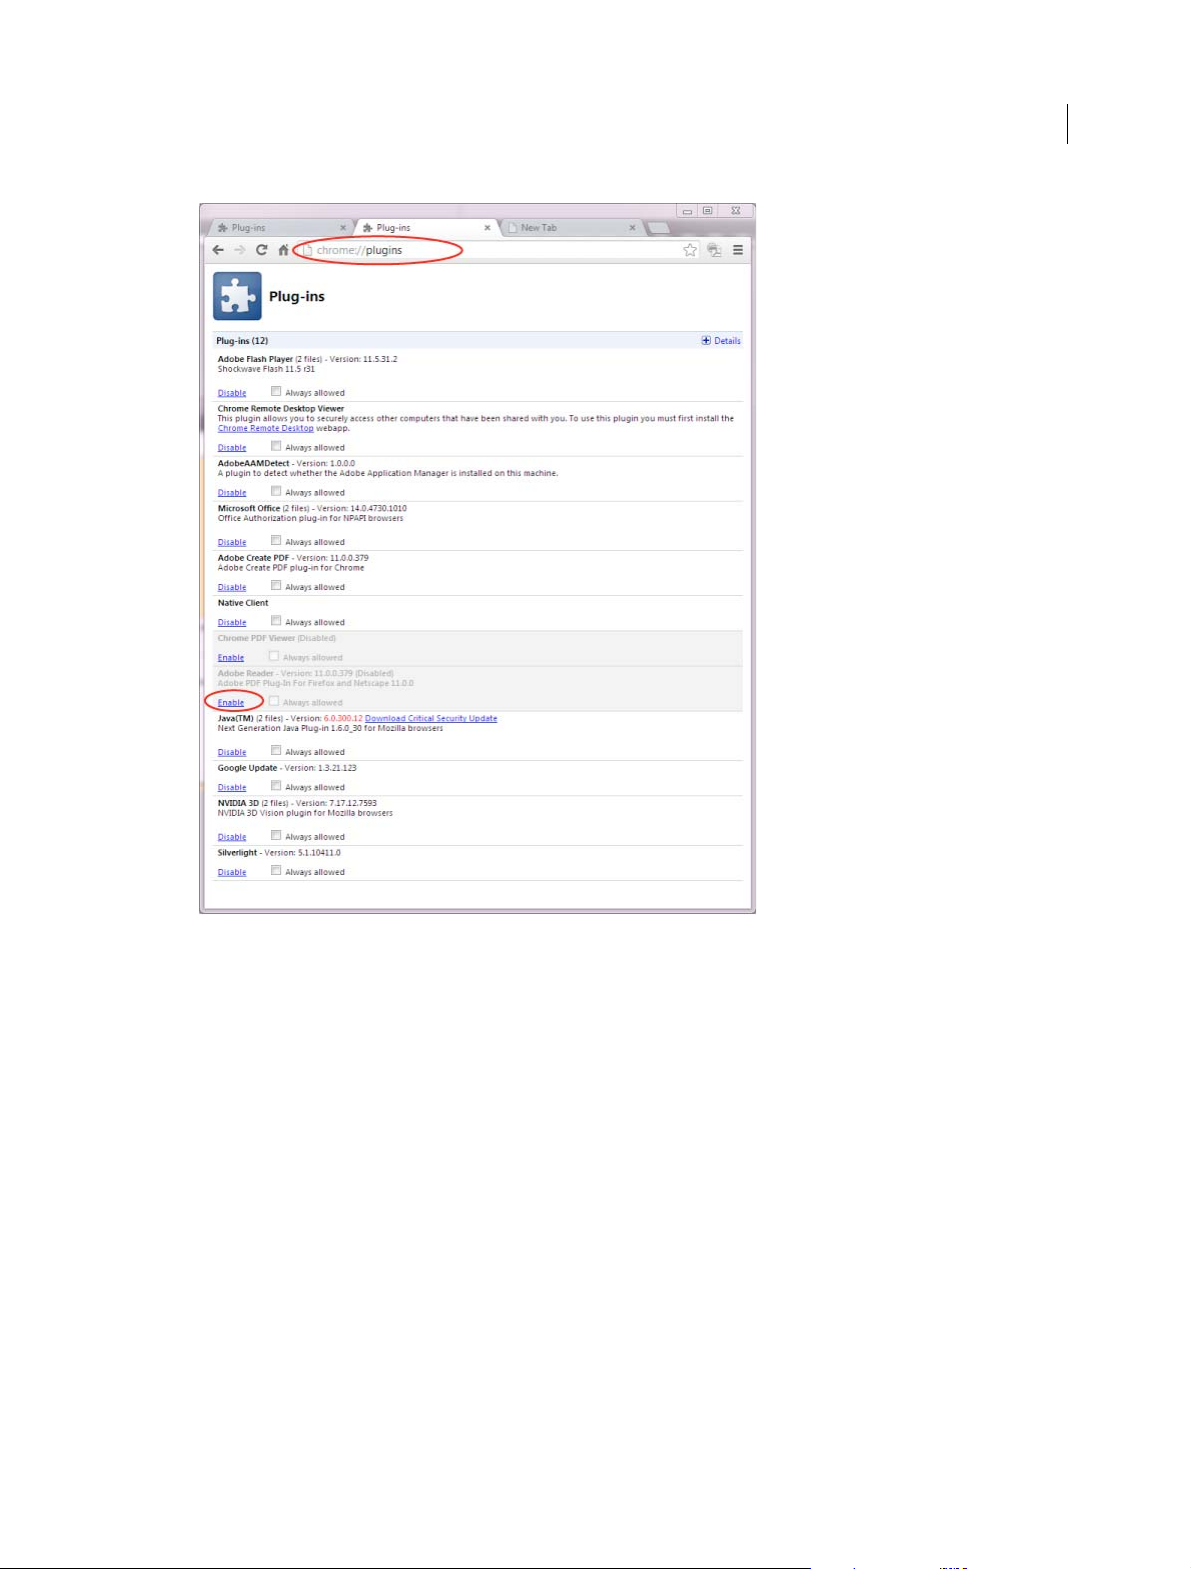
Workspace
68
For more information, see the Google Chrome help topic Plug-ins.
Mozilla Firefox
1 Choose Tools > Add-ons.
2 In the Add-ons Manager window, click the Plugins tab, then select the Acrobat or Reader plugin.
3 Click the Enable or Disable button (it toggles depending on the status of the selected add-on):
Enable sets plugin to open PDFs in the browser.
Disable turns off the plugin so it does not open PDFs in the browser.
Last updated 1/14/2015
Page 76

Workspace
For more information, see the Mozilla Firefox help topic Using a PDF Reader Plug-in.
Apple Safari
Make Acrobat or Reader the default viewer for PDFs
1 In the Finder, select a PDF, and choose File > Get Info.
69
2 Click the arrow next to Open With to expose the product menu.
3 Choose either Adobe Acrobat or Adobe Reader from the application menu.
Last updated 1/14/2015
Page 77

Workspace
70
4 Click the Change All button.
5 When asked if you want to change all similar documents, click Continue.
Safari browser preferences
1 Launch Safari and go to 'Preferences
Last updated 1/14/2015
Page 78
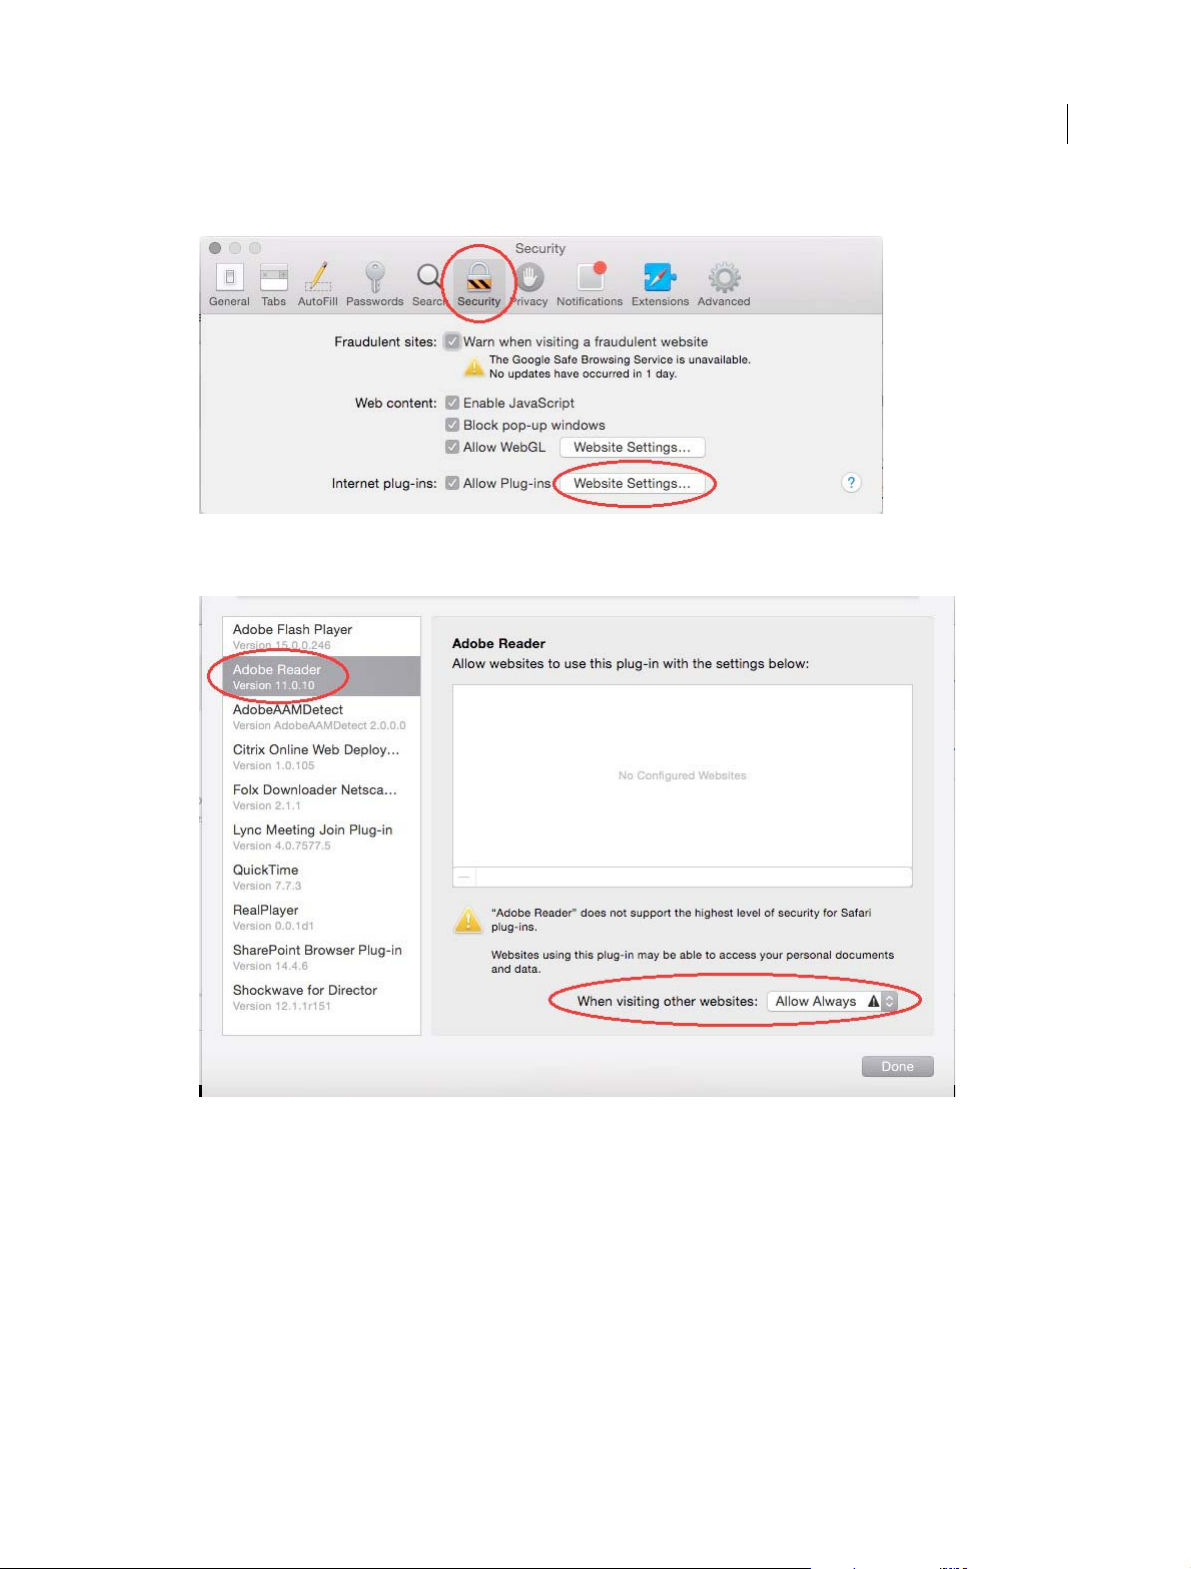
Workspace
2 In the 'Preferences' window click on 'Security' and then click on 'Website Settings' button under 'Internet plug-ins'
3 Now select 'Adobe Reader' in the list of plugins.
Under the option 'When visiting other Websites', in the drop down list select 'Allow Always' and click on 'Done'
71
Note: This will set the browser to use the 'Adobe Reader' plugin to view pdfs
Disable AdobePDFViewer plug-in
You must have root user p rivil eges to change the Safari plug-ins. To display P DFs using the Sa fari PDF viewe r, you mu st
disable the Adobe PDF Viewer.
1 Quit Safari.
2 Log in as the root user. The root user privileges aren't enabled by default because the root user can change system
files. For more information and instructions, see one of the following Apple documents:
"root" user in Mac OS X or OS X Mountain Lion: Enable and disable the root user.
3 Choose Go > Go To Folder.
Last updated 1/14/2015
Enabling and using the
Page 79
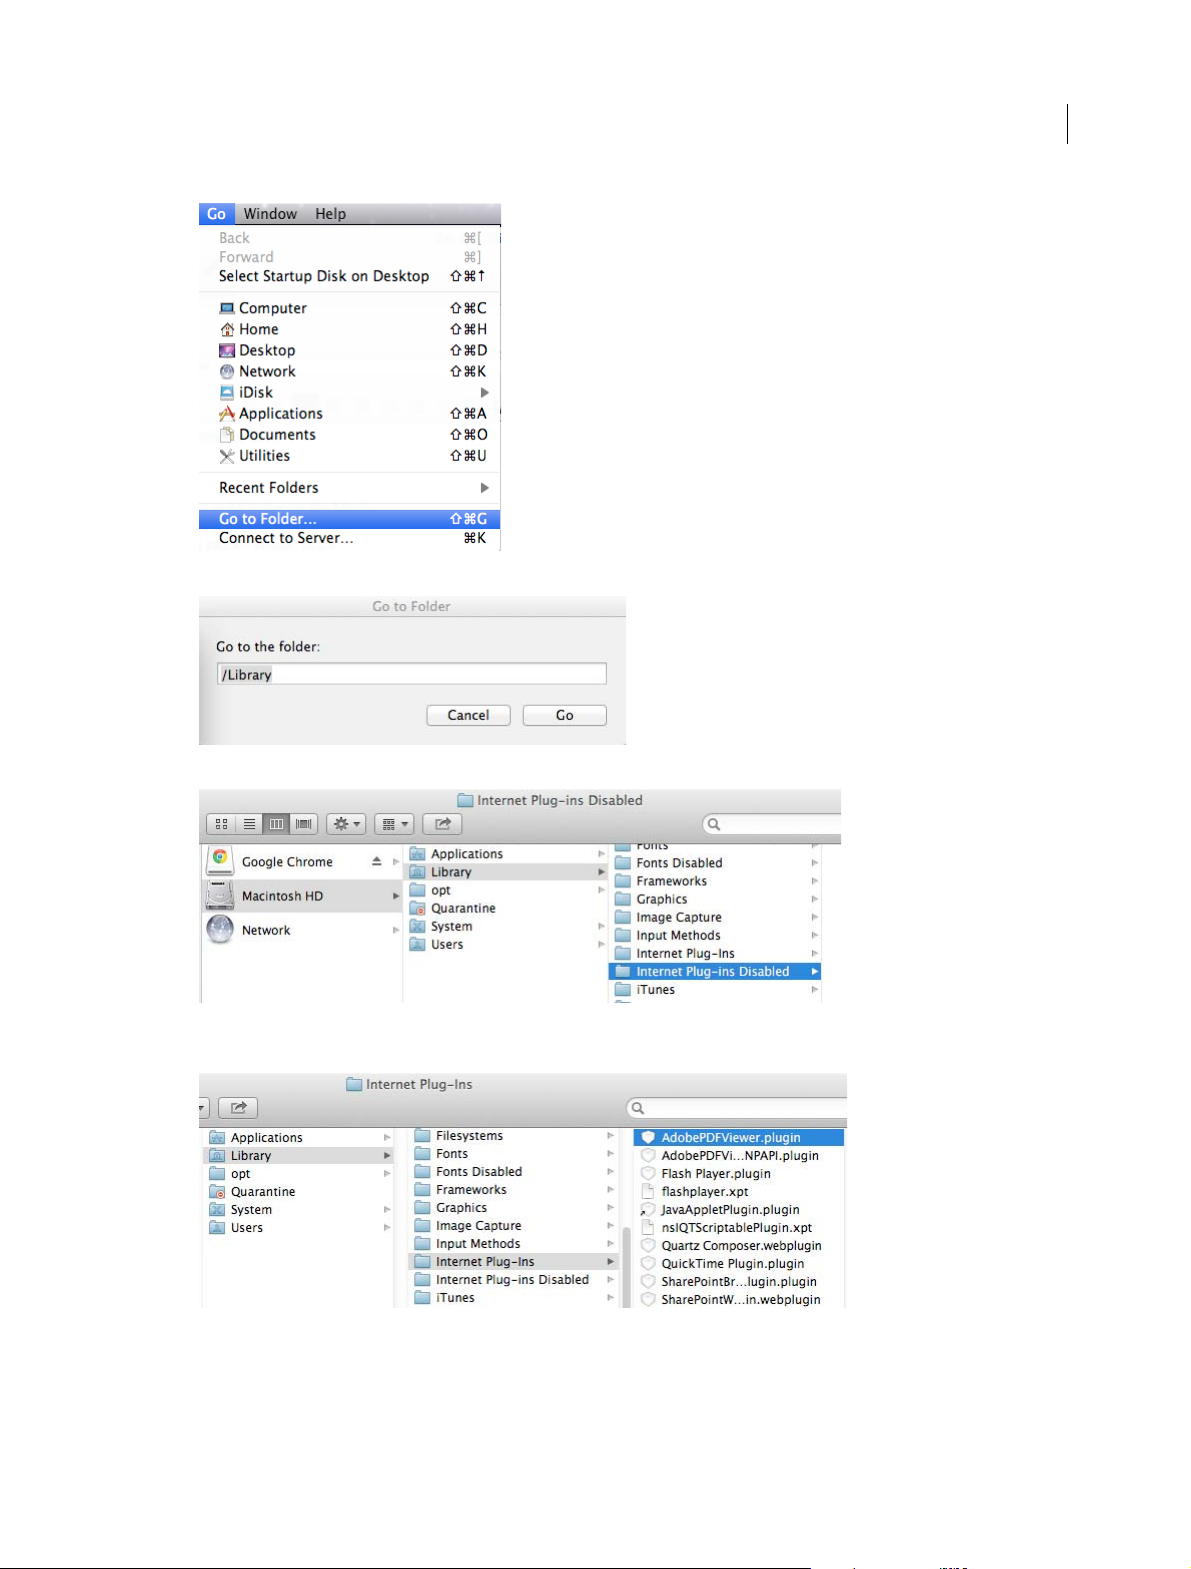
Workspace
4 Type /Library in the Go To The Folder field, and click Go.
72
5 Create a new folder in the Library folder, and name it Internet Plug-ins Disabled.
6 Open the Internet Plug-ins folder, and move both the AdobePDFViewer.plugin and the
AdobePDFViewerNPAPI.plugin into the new Internet Plug-ins Disabled folder.
Note: If both AdobePDFViewer plug-ins are still in the Internet Plug-ins folder, drag them now to the trash. You may be
asked for your name and password.
For more information, see the Apple Safari help topic If you need to remove a plug-in.
Last updated 1/14/2015
Page 80

Workspace
Flash Player needed | Acrobat, Reader XI
Why an alert about Flash Player?
You need Flash Player to view Flash content in PDFs, PDF Portfolios, and other features. Adobe Reader and Acrobat
no longer include Flash Player and features that require Flash now leverage the machine’s local copy of Flash. This new
strategy allows users and administrators to manage Flash Player updates independently of Acrobat product updates.
Note that the Flash Active X component is not enough to display this content. A full Flash player must be installed.
Flash Player installs for end users
1 Right-click and download the Flash Player Installer for Windows (Active X and Plugin) or the Flash Player Installer
for Mac OS.
2 Choose Save Link As or Save Target As to download the installer to your computer.
3 Specify a location for the installer (such as your desktop), and click Save.
4 Browse to the installer
5 Double-click it to begin the installation.
NOTE: For Windows, download both Active X and Plugin.
73
Flash Player installs for IT
Enterprise IT and administrators should download an installer suitable for distibution across their organization by
starting here:
http://www.adobe.com/products/players/flash-player-distribution.html.
System requirements for Flash Player
Wi nd o w s
• 2.33 GHz or faster x86-compatible processor, or Intel® Atom™ 1.6 GHz or faster processor for Netbooks
• Microsoft® Windows® XP (32 bit), Windows Server® 2003 (32 bit), Windows Server 2008 (32 bit), Windows Vista®
(32 bit), Windows 7 (32 bit and 64 bit)
• 128 MB of RAM (1 GB of RAM recommended for Netbooks); 128 MB of graphics memory
Mac OS
• Intel Core™ Duo 1.33 GHz or faster processor
• Mac OS X 10.6, 10.7, or 10.8
• 256 MB of RAM; 128 MB of graphics memory
Grids, guides, and measurements in PDFs
Last updated 1/14/2015
Page 81

Workspace
View grids
Use grids to accurately line up text and objects in a document. When turned on, the grid is visible over the document.
The Snap To Grid option aligns an object with the nearest grid line when you move the object.
View or hide the grid
❖ Choose View > Show/Hide > Rulers & Grids > Grid. A check mark appears next to the command name when the
grid is displayed.
Turn the Snap To Grid option on or off
Choose View > Show/Hide > Rulers & Grids > Snap To Grid. A check mark appears next to the command name when
the option is turned on.
Change the grid appearance
1 In the Preferences dialog box under Categories, select Units & Guides.
2 To change grid settings, do any of the following:
• To change the spacing between grid lines, enter a value for Width Between Lines and Height Between Lines.
• To change the origin of the grid, enter a value for Grid Offset From Left Edge and Grid Offset From Top Edge.
• To change the number of subdivisions within each grid square, enter a value for Subdivisions. Subdivision lines
are lighter than grid lines.
74
• To change the color of the grid lines, click the Grid Line Color square and choose a new color from the Color
panel.
Create ruler guides
Horizontal and vertical rulers let you check the size of objects in your documents. You can also create guides in your
document, which are especially useful for lining up objects, such as form fields. You can change the unit of
measurement and color used in the ruler.
Create new ruler guides
Choose View > Show/Hide > Rulers & Grids > Rulers.
1 Do one of the following:
• D rag down from the ho rizo nta l r ule r to cr eat e a ho rizontal g uide, or d rag to the r ig ht o f th e vert ic al r ul er t o cre ate
a vertical guide.
• Double-click a location on the horizontal ruler to create a vertical guide, or double-click a location on the vertical
ruler to create a horizontal guide.
Show or hide guides
Choose View > Show/Hide > Rulers & Grids > Guides.
Move or delete ruler guides
❖ Click the guide to select it, and then drag it to a new location, or press Delete. To delete all guides, right-click in the
ruler area and choose Clear All Guides or Clear Guides On Page.
Last updated 1/14/2015
Page 82

Workspace
Change guide colors
1 In the Preferences dialog box under Categories, select Units & Guides.
2 Click the Guide Color square and choose a new color from the Color pop-up menu.
Measure the height, width, or area of objects
Use the measuring tools to measure distances and areas of objects in PDF documents. The measuring tools are useful
for showing the distances and areas associated with objects in a form or computer-aided design (CAD) drawing. You
can also use these tools to measure certain areas of a document before sending it to a professional printer. The
measuring tools are available to Reader users only if the PDF creator enables measuring functionality.
When you use a measuring tool, the Measurement Info panel shows information about the measurement, such as
current measurement, delta values, and scale ratio. Acrobat inserts comments with the values calculated for distance,
perimeter, or area.
75
A Measuring toolbar B Object being measured C Measurement Info panel
Cho os e Too l s > A nal y ze > Meas u ri n g To o l.
1 To measure areas of your PDF document, select any of the following measurement types:
• Select the Distance tool to measure the distance between two points. Click the first point, move the pointer
to the second point, and click again.
• Select the Perimeter tool to measure a set of distances between multiple points. Click each point you want to
measure. Then, double-click the last point.
• Select the Area tool to measure the area within the line segments that you draw. Click each point you want to
measure. After you have clicked at least two points, click the first point to complete the area measurement.
2 While measuring objects, do any of the following:
• To snap the measurement to the end of a line, select Snap To Paths .
• To snap the measurement to the endpoint of a line, select Snap To Endpoints .
• To snap the measurement to the midpoint of a line, select Snap To Midpoints .
• To snap the measurement to the intersection of multiple lines, select Snap To Intersections
• To constrain the measurement lines to increments of 45º, hold down the Shift key.
• To discontinue a measurement, right-click and choose Cancel Measurement.
• To delete a measurement markup, click it with the Measurement Tool and press Delete.
Last updated 1/14/2015
Page 83

Workspace
Measuring tool options
To set measuring tool options, select the tool, then right-click anywhere in the PDF to view the options.
Change Scale Ratio Change the scaling ratio (such as 3:2) and unit of measurement on the drawing areas.
Change Markup Label Add or change text that appears with the measurement.
Disable/Enable Measurement Markup When enabled, the measurement lines you draw are added to the PDF. When
disabled, the measurement lines disappear when you measure another object or select another tool.
Turn Or tho On /Off When enabled, measurement lines are orthographic only.
Show/Hide Rulers Show or hide vertical and horizontal rulers on the page. (Has the same effect as choosing View >
Show/Hide > Rulers & Grids > Rulers.)
Snap To Page Content/Don’t Snap To Page Content Turn all Snap Enables on or off.
Export Measurement Markup To Excel Save the information for all the measurements in your PDF to a CSV file.
Preferences Open the Measurement (2D) preferences.
Measuring preferences
Change the 2D Measuring preferences to determine how 2D data is measured.
76
Note: In Reader, Measuring preferences apply to PDFs that have commenting enabled.
Use Scales And Units From Document (When Present) When enabled, measurements based on the units generated
from the original document, if present, are used. Deselect this option to specify the units of measurements manually.
Use Orthographic Lines When enabled, measurement lines are orthographic only.
Measuring Line Color Specifies the color or the line that appears while drawing.
Enable Measurement Markup When enabled, the measurement lines you draw are added to the PDF. When disabled,
the measurement lines disappear when you measure another object or select another tool. You can use the default
measurement labels or specify your own label.
Use Default Leader Length (Distance Tool only) When deselected, each time you draw a distance measurement, you
move the mouse to determine the leader length.
Default Line Ending (Distance Tool only) Specifies the appearance of the line endings in distance measurements.
Caption Style (Distance Tool only) Specifies whether the distance measurement caption is Inside or on Top of the
measurement line.
Default Leader Length (Distance Tool only) Specifies the length of the line leader that appears on one side of the
measurement points.
Default Leader Extension Above Line (Distance Tool only) Specifies the length of the leader extension that appears
above the measurement line.
Default Leader Offset From Line Points (Distance Tool only) Specifies the amount of blank space that appears between
the measurement points and the leader.
2D Snap Settings Specify snap behavior. Sensitivity indicates how close the pointer must be to the item being snapped
to. Snap Hint Color specifies the color of the snap line that appears when you hold the pointer over the object.
Last updated 1/14/2015
Page 84

Workspace
View cursor coordinates
The Cursor Coordinates show the coordinate position of the pointer within the document pane. The position
numbering begins in the upper-left corner of the document. Cursor Coordinates also shows the width and height of a
selected object as you resize it.
View x and y coordinates
Choose View > Show/Hide > Cursor Coordinates.
1 Move the pointer to view x and y coordinates.
Change the Cursor Coordinates measurement units
1 In the Preferences dialog box under Categories, select Units & Guides.
2 Choose a different unit of measurement from the Page & Ruler Units menu.
More Help topics
Change the look of your comments
77
Keyboard shortcuts
For common keyboard shortcuts you can use with Windows, see http://support.microsoft.com/kb/126449.
Keys for selecting tools
To enable single-key shortcuts, open the Preferences dialog box, and under General, select the Use Single-Key
Accelerators To Access Tools option.
To ol Windows/UNIX action Mac OS action
Hand tool H H
Temporarily select Hand tool Spacebar Spacebar
Select tool V V
Marquee Zoom tool Z Z
Cycle through zoom tools: Marquee
Zoom,Dynamic Zoom, Loupe
Temporarily select Dynamic Zoom tool (when
Marquee Zoom tool is selected)
Temporarily zoom out (when Marquee Zoom
tool is selected)
Temporarily select Zoom In tool Ctrl+spacebar Spacebar+Command
Shift+Z Shift+Z
Shift Shift
Ctrl Option
Select Object tool R R
Edit Object tool O O
Enter/Exit Forms editing A A
Crop tool C C
Last updated 1/14/2015
Page 85

Workspace
Tool Windows/UNIX action Mac OS action
Link tool L L
Text Field tool F F
78
Cycle through tools in forms authoring mode:
Text Field, Check Box, Radio Button, List Box,
Dropdown Box, Button, Digital Signature,
Barcode
3D tool M M
Cycle through Multimedia tools: Flash, Video Shift+M Shift+M
Edit Document Text tool T T
Redaction Y Y
Cycle through Touch Up tools: Touch Up Text,
Touch Up Reading Order, Touch Up Object
JavaScript Debugger Ctrl+J Command+J
Insert Blank Pages tool Shift+Ctrl+T Shift+Command+T
Insert Files Ctrl+Shift+I
Delete pages Ctrl+Shift+D
Open Output Preview ~ ~
Touch Up Reading Order tool (or if already
selected, return focus to dialog box)
Shift+F Shift+F
Shift+T Shift+T
Shift+Ctrl+U Shift+Command+U
Keys for working with comments
To enable single-key shortcuts, select the Use Single-Key Accelerators To Access Tools option in General preferences.
Result Windows/UNIX Action Mac OS Action
Sticky Note tool S S
Text Edits tool E E
Stamp tool K K
Current highlighting tool U U
Cycle through highlighting tools:
Highlighter,Underline Text, Cross Out Text
Current drawing markup tool D D
Cycle through drawing markup tools: Cloud,
Arrow, Line, Rectangle, Oval, Polygon Line,
Polygon, Pencil Tool, Eraser Tool
Cloud tool Q (Windows only) Q
Tex t Bo x to ol X X
Current Stamp or Attach tool J J
Cycle through Stamp, Attach File, Record
Audio Comment
Shift+U (Windows only) Shift+U
Shift+D (Windows only) Shift+D
Shift+J Shift+J
Last updated 1/14/2015
Page 86

Workspace
Result Windows/UNIX Action Mac OS Action
Move focus to next comment or form field Ta b Ta b
Move focus to previous comment or form field Shift+Tab Shift+Tab
79
Open pop-up note (or text field in Comments
List) for comment that has focus
Closes pop-up (or text field in Comments List)
for comment that has focus
Enter Return
Esc Esc
Keys for navigating a PDF
Result Windows/UNIX Action Mac OS Action
Previous screen Page Up or Shift+Enter Page Up or Shift+Return
Next screen Page Down or Enter Page Down or Return
First page Home or Shift+Ctrl+Page Up or Shift+Ctrl+Up
Arrow
Last page End or Shift+Ctrl+Page Down or
Shift+Ctrl+Down Arrow
Previous page Left Arrow or Ctrl+Page Up Left Arrow or Command+Page Up
Next page Right Arrow or Ctrl+Page Down Right Arrow or Command+Page Down
Previous open document Ctrl+F6 (UNIX) Command+F6
Next open document Shift+Ctrl+F6 (UNIX) Shift+Command+F6
Scroll up Up Arrow Up Arrow
Scroll down Down Arrow Down Arrow
Home or Shift+Command+Up Arrow
End or Shift+Command+Down Arrow
Scroll (when Hand tool is selected) Spacebar Spacebar
Zoom in Ctrl+equal sign Command+equal sign
Zoom out Ctrl+hyphen Command+hyphen
Keys for working with PDF Portfolios
These keys are available in the files list of the Details pane.
Result Windows Action Mac OS Action
Move forward or backward among the current
column header selected for sorting, the
current row with focus, and the Go Back
button if in a folder
Move focus to the next or previous row when
in the body of the file list on the left
Selects the next or previous column header
for sorting
If pressed in the body of the file list, navigate
one level up from within a folder
Tab or S hif t+Tab Tab or Shift+Tab
Up Arrow or Down Arrow Up Arrow or Down Arrow
Left Arrow or Right Arrow Left Arrow or Right Arrow
Backspace Delete
Last updated 1/14/2015
Page 87

Workspace
Result Windows Action Mac OS Action
80
Press the Go Back button in a folder if focus is
on the button.
If pressed when focus is on a row in the file list
representing a subfolder, navigate to a
subfolder, or open an attachment in Preview
mode.
If in the body of the file list, move to the first or
last row
If in the body of the file list, move to the next
or last set of rows to fit the screen
Select or deselect all files Ctrl+A or Shift+Ctrl+A Command+A or Shift+Command+A
If in the body of the file list, extend the
selection by adding the next row above or
below the selected row
Change whether the row with focus is in the
selection
Move focus up or down one row without
changing the selection
Reverse the sort order when focus is on a
column header
Enter or Spacebar Enter or Spacebar
Enter Enter
Home or End Home or End
Page Down or Page Up Page Down or Page Up
Shift+Up Arrow or Shift+Down Arrow Shift+Up Arrow or Shift+Down Arrow
Ctrl+Spacebar Command+Spacebar
Ctrl+Up Arrow or Ctrl+Down Arrow Command+Up Arrow or Command+Down
Arrow
Spacebar Spacebar
Keys for navigating task panes
Result Windows Action Mac OS Action
Move focus to the next item among
Document pane, Task panes, Message bar,
and Navigation bar
Move focus to the previous item among
Document pane, Task panes, message bar,
and Navigation bar
Move focus to the next panel in the Task pane Ctrl+Tab Command+Tab
Move focus to the previous panel in the Task
pane
Navigate to the next panel and panel control
within an open Task pane
Navigate to the previous panel and panel
control within an open Task pane
Navigate to the next command button within
a panel
Navigate to the previous command button
within a panel
Expand or collapse panel in focus (press F6 to
move focus to Tools pane, then tab to desired
panel)
Open or close the Task pane Shift+F4 Shift+F4
F6 F6
Shift+F6 Shift+F6
Ctrl+Shift+Tab Command+ Shift+Tab
Tab Tab
Shift+Tab Shift+Tab
Down Arrow Down Arrow
Up Arrow Up Arrow
Spacebar or Enter
Left Arrow or Right Arrow
Spacebar or Enter
Left Arrow or Right Arrow
Last updated 1/14/2015
Page 88

Workspace
Result Windows Action Mac OS Action
Close the pane that lists the tasks of an Acti on Ctrl+Shift+F4 Ctrl+Shift+F4
81
Open the menu and move the focus to the
first menu option when focus is on a
command with a submenu or submenu
element with a flyout
Move the focus back to the parent command
button with a submenu or submenu element
with a flyout
Run the command in focus Spacebar or Enter Spacebar or Enter
Navigate to the next item in the active panel
in the Create New Action, Edit Action, Create
New Tool Set, or the Edit Tool Set dialog boxes
Navigate to the previous item in the active
panel in the Create New Action, Edit Action,
Create New Tool Set, and the Edit Tool Set
dialog boxes
Spacebar or Enter Spacebar or Enter
Esc Esc
Tab Tab
Shift+Tab Shift+Tab
Keys for general navigating
Result Windows/UNIX Action Mac OS Action
Move focus to menus (Windows, UNIX);
expand first menu item (UNIX)
Move focus to toolbar in browser and
application
F10 Control+F2
Shift+F8 Shift+F8
Move to next open document (when focus is
on document pane)
Move to previous open document (when
focus is on document pane)
Close current document Ctrl+F4 Command+F4
Close all open documents Not available Command+Option+W
Move focus to next comment, link, or form
field in the document pane
Move focus to document pane F5 F5
Move focus to previous comment, link, or
form field in the document pane
Activate selected tool, item (such as a movie
clip or bookmark), or command
Open context menu Shift+F10 Control+click
Close context menu F10 Esc
Return to Hand tool or Select tool Esc Esc
Move focus to next tab in a tabbed dialog box Ctrl+Tab Not available
Move to previous search result and highlight it
in the document
Ctrl+F6 Command+F6
Ctrl+Shift+F6 Command+Shift+F6
Tab Tab
Shift+Tab Shift+Tab
Spacebar or Enter Spacebar or Return
Shift + F3 Not available
Last updated 1/14/2015
Page 89

Workspace
Result Windows/UNIX Action Mac OS Action
82
Move to next search result and highlight it in
the document
Search previous document (with Search
results displaying multiple files)
Search next document (with Search results
displaying multiple files)
Select text (with Select tool selected) Shift+arrow keys Shift+arrow keys
Select next word or deselect previous word
(with Select tool selected)
F3 F3
Alt+Shift+Left Arrow (Windows only) Command+Shift+Left Arrow
Alt+Shift+Right Arrow (Windows only) Command+Shift+Right Arrow
Shift+Ctrl+Right Arrow or Left Arrow Not available
Keys for working with navigation panels
Result Windows/UNIX Action Mac OS Action
Open and move focus to navigation pane Ctrl+Shift+F5 Command+Shift+F5
Move focus among the document, message
bar, and navigation panels
Move focus to previous pane or panel Shift+F6 Shift+F6
Move among the elements of the active
navigation panel
Move to previous or next navigation panel
and make it active (when focus is on the panel
button)
F6 F6
Tab Tab
Up Arrow or Down Arrow Up Arrow or Down Arrow
Move to next navigation panel and make it
active (when focus is anywhere in the
navigation pane)
Expand the current bookmark (focus on
Bookmarks panel)
Collapse the current bookmark (focus on
Bookmarks panel)
Expand all bookmarks Shift+* Shift+*
Collapse selected bookmark Forward Slash (/) Forward Slash (/)
Move focus to next item in a navigation panel Down Arrow Down Arrow
Move focus to previous item in a navigation
panel
Ctrl+Tab Not available
Right Arrow or Shift+plus sign Right Arrow or Shift+plus sign
Left Arrow or minus sign Left Arrow or minus sign
Up Arrow Up Arrow
Keys for navigating the Help window
Result Windows/UNIX Action Mac OS Action
Open Help window F1 F1 or Command+?
Close Help window Ctrl+W (Windows only) or Alt+F4 Command+W
Move back to previously opened topic Alt+Left Arrow Command+Left Arrow
Move forward to next topic Alt+Right Arrow Command+Right Arrow
Last updated 1/14/2015
Page 90
Workspace
Result Windows/UNIX Action Mac OS Action
Move to next pane Ctrl+Tab See Help for your default browser
Move to previous pane Shift+Ctrl+Tab See Help for your default browser
Move focus to the next link within a pane Tab Not available
Move focus to the previous link within a pane Shift+Tab Not available
Activate highlighted link Enter Not available
Print Help topic Ctrl+P Command+P
Keys for accessibility
Result Windows Action Mac OS Action
83
Change reading settings for the current
document
Reflow a tagged PDF, and return to
unreflowed view
Activate and deactivate Read Out Loud Shift+Ctrl+Y Shift+Command+Y
Read only the current page out loud Shift+Ctrl+V Shift+Command+V
Read out loud from the current page to the
end of the document
Pause reading out loud Shift+Ctrl+C Shift+Command+C
Stop reading out loud Shift+Ctrl+E Shift+Command+E
Shift+Ctrl+5 Shift+Command+5
Ctrl+4 Command+4
Shift+Ctrl+B Shift+Command+B
Navigating PDF pages
Opening pages in a PDF
Depending on the PDF you open, you may need to move forward through multiple pages, see different parts of the
page, or change the magnification. There are many ways to navigate, but the following items are commonly used:
Note: If you do not see these items, choose View > Show/Hide > Toolbar Items > Reset Toolbars.
Next and Previous The Next Page and Previous Page buttons appear in the Page Navigation toolbar. The text
box next to them is also interactive, so you can type a page number and press Enter to go directly to that page.
Scroll bars Vertical and horizontal scroll bars appear to the right and bottom of the document pane whenever the view
does not show the entire document. Click the arrows or drag to view other pages or different areas of the page.
Select & Zoom toolbar This toolbar contains buttons and controls for changing the page magnification.
Page Thumbnails panel The Page Thumbnails button on the left side of the work area opens the navigation pane to
the Page Thumbnails panel, which displays thumbnail images of each page. Click a page thumbnail to open that page
in the document pane.
Last updated 1/14/2015
Page 91

Workspace
Page through a document
There are many ways to turn pages in a PDF. Many people use the buttons on the Page Navigation toolbar, but you can
also use arrow keys, scroll bars, and other features to move forward and backward through a multipage PDF.
The Page Navigation toolbar opens by default. The default toolbar contains frequently used tools: the Show Next Page
, Show Previous Page , and Page Number. Like all toolbars, the Page Navigation toolbar can be hidden and
reopened by choosing it in the Toolbars menu under the View menu. You can display additional tools on the Page
Navigation toolbar by right-clicking the toolbar and choosing an individual tool, Show All Tools, or More Tools and
then selecting and deselecting tools in the dialog box.
Move through a PDF
❖ Do one of the following:
• Click the Previous Page or Next Page button in the toolbar.
• Choose View > Page Navigation > [location].
• Choose View > Page Navigation > Page, type the page number in the Go To Page dialog box and then click OK.
• Press the Page Up and Page Down keys on the keyboard.
Jump to a specific page
❖ Do one of the following:
84
• From Single Page or Two-Up page display view, drag the vertical scroll bar until the page appears in the small
pop-up display.
• Type the page number to replace the one currently displayed in the Page Navigation toolbar, and press Enter.
Note: If the document page numbers are different from the actual page position in the PDF file, the page’s position within
the file appears in parentheses after the assigned page number in the Page Navigation toolbar. For example, if you assign
numbering for a file that is an 18-page chapter to begin with page 223, the number shown when the first page is active
is 223 (1 of 18). You can turn off logical page numbers in the Page Display preferences. See Renumber pages and
Preferences for viewing PDFs.
Jump to bookmarked pages
Bookmarks provide a table of contents and usually represent the chapters and sections in a document. Bookmarks
appear in the navigation pane.
Last updated 1/14/2015
Page 92

Workspace
A Bookmarks button B Click to display bookmark options menu. C Expanded bookmark
85
1 Click the Bookmarks button, or choose View > Show/Hide >Navigation Panes > Bookmarks.
2 To jump to a topic, click the bookmark. Expand or collapse bookmark contents, as needed.
Note: Depending on how the bookmark was defined, clicking it may not take you to that location but perform some
other action instead.
If the list of bookmarks disappears when you click a bookmark, click the Bookmarks button to display the list again.
If you want to hide the Bookmarks button after you click a bookmark, select Hide After Use from the options menu.
Use page thumbnails to jump to specific pages
Page thumbnails prov ide mi niature previ ews of doc ument pages. You can use thumbnails in the Page Thumbnails panel
to change the display of pages and to go to other pages. The red page-view box in the page thumbnail indicates which
area of the page appears. You can resize this box to change the zoom percentage.
1 Click the Page Thumbnails button or choose View > Show/Hide > Navigation Panes > Page Thumbnails to display
the Page Thumbnails panel.
2 To jump to another page, click its thumbnail.
Automatically scroll through a document
Automatic scrolling advances your view of the PDF at a steady rate, moving vertically down the document. If you
interrupt the process by using the scroll bars to move back or forward to another page or position, automatic scrolling
continues from that point forward. At the end of the PDF, automatic scrolling stops and does not begin again until you
choose automatic scrolling again.
1 Choose View > Page Display > Automatically Scroll.
2 Press Esc to stop scrolling.
Last updated 1/14/2015
Page 93

Workspace
Retrace your viewing path
You can find PDF pages that you viewed earlier by retracing your viewing path. It’s helpful to understand the difference
between previous and next pages and previous and next views. In the case of pages, previous and next refer to the two
adjacent pages, before and after the currently active page. In the case of views, previous and next refer to your viewing
history. For example, if you jump forward and backward in a document, your viewing history retraces those steps,
showing you the pages you viewed in the reverse order that you viewed them.
Choose View > Page Navigation > Previous View.
1 To continue seeing another part of your path, do either of the following:
• Repeat step 1.
• Choose View > Page Navigation > Next View.
Note: You can make the Previous View button and Next View button available in the toolbar area by right-
clicking the Page Navigation toolbar and choosing them on the context menu, or choosing Show All Tools.
Navigate with links
Links can take you to another location in the current document, to other PDF documents, or to websites. Clicking a
link can also open file attachments and play 3D content, movies, and sound clips. To play these media clips, you must
have the appropriate hardware and software installed.
86
The person who created the PDF document determines what links look like in the PDF.
Note: Unless a link was created in Acrobat using the Link tool, you must have the Create Links From URLs option selected
in the General preferences for a link to work correctly.
1 Choose the Select tool.
2 Position the pointer over the linked area on the page until the pointer changes to the hand with a pointing finger. A
plus sign (+) or a w appears within the hand if the link points to the web. Then click the link.
PDFs with file attachments
If you open a PDF that has one or more attached files, the Attachments panel automatically opens, listing the attached
files. You can open these files for viewing, edit the attachments, and save your changes, as permitted by the document
authors.
If you move the PDF to a new location, the attachments automatically move with it.
Article threads
In PDFs, articles are optional electronic threads that the PDF author may define within that PDF. Articles lead readers
through the PDF content, jumping over pages or areas of the page that are not included in the article, in the same way
that you might skim through a traditional newspaper or magazine, following one specific story and ignoring the rest.
When you read an article, the page view may zoom in or out so that the current part of the article fills the screen.
Open and navigate an article thread
1 Click the Hand tool on the Common Tools toolbar.
Choose View > Show/Hide > Navigation Panes > Articles to open the Articles panel.
Note: You cannot open the Articles panel if you are viewing the PDF inside a web browser. You must open the PDF in
Acrobat.
Last updated 1/14/2015
Page 94

Workspace
2 Double-click the Article icon to go to the beginning of that article. The icon changes to the Follow Article pointer
.
Note: If the Articles panel is blank, then the author has not defined any article threads for this PDF.
3 With the article thread open, do any of the following:
• To scroll through the article one pane at a time, press Enter or click in the article.
• To scroll backward through the article one pane at a time, Shift-click in the article, or press Shift+Enter.
• To go to the beginning of the article, Ctrl-click within the article.
4 At the end of the article, click in the article again.
The previous page view is restored, and the pointer changes to the End Article pointer .
Exit a thread before the end of the article
1 Make sure that the Hand tool is selected.
2 Shift+Ctrl-click the page.
The previous page view is restored.
More Help topics
Adjust page magnification
87
About bookmarks
About page thumbnails
Set the page layout and orientation
Links and attachments
Multimedia preferences
Open, save, or delete an attachment
Attachments
Articles
Opening PDFs
You can open a PDF in many ways: from within the Acrobat application, from your email application, from your file
system, or on a network from within a web browser.
Note: The Organizer and Organizer-related commands are not available in Acrobat X and later.
Open a PDF in the application
❖ Start Acrobat and do one of the following:
• Open a file from the Getting Started window. You can open a recent file or click the Open button to locate a
file.
• Choose File > Open, or click the Open File button in the toolbar. In the Open dialog box, select one or more
filenames, and click Open. PDF documents usually have the extension .pdf.
Last updated 1/14/2015
Page 95

Workspace
If more than one document is open, you can switch between documents by choosing the document name from the
Window menu.
Open a PDF from the desktop or within another application
❖ Do one of the following:
• To open a PDF attached to an email message, open the message and double-click the PDF icon.
• To open a PDF linked to an open web page, click the PDF file link. The PDF usually opens in the web browser.
• Double-click the PDF file icon in your file system.
Note: In Mac OS, you sometimes cannot open a PDF created in Windows by double-clicking the icon. Instead, choose
File > Open With > Acrobat.
Open a PDF in a web browser
When PDFs open in a web page, they open in Read mode. Read mode displays the PDF without the menus, panes, or
toolbars visible. Near the bottom of the window, a floating toolbar appears with basic functionality for viewing
document.
• To show the toolbar, roll your cursor near the bottom of the window.
88
• To page through the PDF, use the navigation buttons in the toolbar.
• To close Read mode and display the work area, click the Acrobat icon in the toolbar.
• To disable Read mode within the browser, open the Acrobat or Reader Preferences (in Windows, choose Edit >
Preferences, in Mac OS, choose Acrobat/Reader > Preferences). Select Internet from the left pane. Deselect Display
In Read Mode By Default.
Note: If y ou h ave mo re tha n one Adob e PDF ap plicati on o n your computer, you c an spec ify which o ne i s us ed t o op en P DFs.
See the Select Default PDF Handler in General preferences.
About viewing PDFs in a web browser
Options in the web browser control how you view a PDF, either within the browser or directly in Acrobat or Reader. To
change the current display behavior, see the browser documentation on managing add-ons or plug-ins. If you open
PDFs in Acrobat outside the browser, you cannot use the preference Allow Fast Web View in a browser.
Because keyboard commands can be mapped to the web browser, some Acrobat shortcuts cannot be available.
Similarly, you may need to use the tools and commands in the Acrobat toolbar rather than the browser toolbar or menu
bar. For example, to print a PDF document, use the Print button in the Acrobat toolbar rather than the Print command
in the browser. (In Microsoft Internet Explorer, you can choose File > Print, Edit > Copy, and Edit > Find On This Page
on the Internet Explorer toolbar.)
Note: Having multiple versions of Acrobat or Adobe Reader installed on the same computer is not recommended. Mixed
versions on your system can prevent you from viewing PDFs in a web browser. Examples include Acrobat XI with Adobe
Reader X, or Acrobat 9 with Reader XI, and so on. For more information about coexisting installations, see this
Te ch N ot e .
Internet preferences
Display In Read Mode By Default Select to display PDFs in the browser without the menus, panes, or toolbars visible.
Allow Fast Web View Select to allow page-at-a-time downloading for PDFs that have been saved with Fast Web View
enabled. With Fast Web View turned on, a web server can send just the requested page, rather than the entire PDF.
Last updated 1/14/2015
Page 96

Workspace
Allow Speculative Downloading In The Background Choose to allow the browser to continue downloading PDF pages
from the web, even after the first page displays.
Connection Speed Choose a connection speed from the menu. The connection speed helps Acrobat or other media
provide a smooth display when content is read on the Internet.
Internet Settings [or Network Settings] Click to open the Internet or network connection dialog box or panel for your
computer. For more information, consult your operating system Help, your Internet service provider, or your local
network administrator.
Updating Acrobat and using Adobe Digital Editions
Updating Acrobat
Acrobat application files and components can be updated in a variety of ways. Some updates are available when you
open a PDF that triggers the updating process automatically. For example, if you open a form that uses Asian-language
fonts, you are asked whether you want to download the fonts. Other updates are available only from the Help menu,
and must be installed manually. Some updates are available both automatically and manually.
89
Manually update the software
❖ Choose Help > Check For Updates, and follow any onscreen instructions.
Change updating preferences
Choose Edit > Preferences (Windows) or Acrobat/Adobe Reader > Preferences (Mac OS).
1 From the Categories on the left, select Updater.
2 In the Check For Updates section, select one of the following options for installing updates:
Automatically install updates (recommended) (Windows) Acrobat regularly checks for important updates,
downloads them, and installs them automatically. When finished, you are alerted via a small message in the system
tray that your software has been updated. This method is the best way to keep Acrobat up-to-date and more secure.
Automatically download updates, but let me choose when to install them Acrobat regularly checks for important
updates and downloads them. Acrobat prompts you to start the installation.
Notify me, but let me choose when to download and install updates Acrobat regularly checks for important
updates and notifies you. You can choose to download and install the updates at your convenience.
Do not download or install updates Acrobat doesn't check for updates. Instead, you check for updates yourself
(Help > Check For Updates). This option is the least secure and recommended only for organizations that deploy
updates using other methods.
Manage security settings
If your organization uses server-based security policies, you can set up Acrobat to regularly check for updates to these
policies. Server-based security is set up by an administrator who provides the URL from which to get security updates.
1 In the Preferences dialog box under Categories, select Security.
2 In the Security Settings, select Load Security Settings From A Server.
3 Type the server address in the URL field.
Last updated 1/14/2015
Page 97

Workspace
4 Select how often you want to check for security updates.
5 Select Ask Before Installing to receive notification before the server is checked for policy updates.
Adobe Digital Editions
Use the free Adobe® Digital Editions software to read and organize eBooks and other publications.Adobe Digital
Editions is a separate web-based rich Internet application (RIA) that replaces the eBooks features in previous versions
of Acrobat.
When you install Adobe Digital Editions, your existing bookshelf items are automatically imported and available
within the new Adobe Digital Editions bookshelf experience. You can also manually import individual PDFs into your
Adobe Digital Editions bookshelf.
Note: When you open an eBook for the first time, the Adobe Digital Editions software is automatically installed on your
computer.
For more information about Adobe Digital Editions and to download the software, see
www.adobe.com/go/learn_acr_digital_en.
90
Viewing PDFs and viewing preferences
The initial view of the PDF depends on how its creator set the document properties. For example, a document may open
at a particular page or magnification.
Note: The Organizer and Organizer-related commands are not available in Acrobat X and later.
View PDFs in Read mode
When you’re reading a document, you can hide all the toolbars and task panes to maximize the viewing area on your
screen.
The basic reading controls, such as page navigation and zoom, appear in a semi-transparent floating toolbar near the
bottom of the window.
• To open Read mode, choose View > Read Mode, or click the Read Mode button in the upper-right corner of the
toolbar.
• To restore the work area to its previous view, choose View > Read Mode again. You can also click the close button
in the floating toolbar.
Note: Read mode is the default viewing mode when you open a PDF in a web browser.
View PDFs in Full Screen mode
In Full Screen mode, only the document appears; the menu bar, toolbars, task panes, and window controls are hidden.
A PDF creator can set a PDF to open in Full Screen mode, or you can set the view yourself. Full Screen mode is often
used for presentations, sometimes with automatic page advancement and transitions.
Last updated 1/14/2015
Page 98

Workspace
The pointer remains active in Full Screen mode so that you can click links and open notes. There are two ways to
advance through a PDF in Full Screen mode. You can use keyboard shortcuts for navigational and magnification
commands, and you can set a Full Screen preference to display Full Screen navigation buttons that you click to change
pages or exit Full Screen mode.
Set the Full Screen navigation bar preference
1 In the Preferences dialog box under Categories, select Full Screen.
2 Select Show Navigation Bar, then click OK.
3 Select View > Full Screen Mode.
The Full Screen navigation bar contains Previous Page , Next Page , and Close Full Screen View buttons. These
buttons appear in the lower-left corner of the work area.
Read a document in Full Screen mode
If the Full Screen navigation bar is not shown, you can use keyboard shortcuts to navigate through a PDF.
Note: If you have two monitors installed, the Full Screen mode of a page sometimes appears on only one of the monitors.
To page through the document, click the screen displaying the page in Full Screen mode.
91
Choose View > Full Screen Mode.
1 Do any of the following:
• To go to the next page, press the Enter, Page Down, or Right Arrow key.
• To go to the previous page, press Shift+Enter, Page Up, or the Left Arrow key.
2 To close Full Screen mode, press Ctrl+L or Esc. (Escape Key Exits must be selected in the Full Screen preferences.)
To show a Full Screen tool in the Common Tools toolbar, right-click the toolbar area and choose Page Display > Full
Screen Mode. Then click the Full Screen tool to switch to Full Screen mode.
Touch mode for tablet and mobile devices
Touch mode makes it easier to use Acrobat and Reader on touch devices. Toolbar buttons, panels, and menus shift apart
slightly to accommodate selecting with your fingers. The Touch reading mode optimizes viewing and supports most
common gestures. Acrobat and Reader automatically switch to Touch mode when on a touch-enabled device. You can
add a Touch mode toggle button to the toolbar or change the default preference setting for Touch mode.
Display Touch mode button on toolbar
You can display a toolbar button to toggle Touch mode on and off.
❖ Choose View > Show/Hide > Toolbar Items > Touch Mode.
Set Touch Mode preference
You can set how Acrobat enters Touch mode, if at all, for touch enabled-devices.
1 Choose Edit > Preferences (Windows) or Acrobat/Adobe Reader > Preferences (Mac OS).
2 Under Categories, select General.
3 In Basic Tools, choose the desired default setting from the Touch Mode menu.
Last updated 1/14/2015
Page 99

Workspace
Change the PDF/A viewing mode
PDF/A is an ISO standard for long-term archiving and preservation of electronic documents. Documents you scan to
PDF are PDF/A-compliant. You can specify whether you want to view documents in this viewing mode.
When you open a PDF/A compliant document in PDF/A viewing mode, the document is opened in Read mode to
prevent modification. A message is displayed in the document message bar. You will be unable to make changes and
add annotations to the document. If you turn off PDF/A mode, you can edit the document.
1 In the Preferences dialog box under Categories, select Documents.
2 Choose an option for View Documents In PDF/A Mode: Never, or Only For PDF/A Documents.
You can switch in or out of PDF/A viewing mode by changing this preference setting.
For a video on working with PDF/A files, see www.adobe.com/go/learn_acr_pdfa_en.
Display PDFs in Line Weights view
The Line Weights view displays lines with the weights defined in the PDF. When Line Weights view is off, it applies a
constant stroke width (1 pixel) to lines, regardless of zoom. When you print the document, the stroke prints at the true
width.
Choose View > Show/Hide > Rulers & Grids > Line Weights. To turn off Line Weights view, choose View > Show/Hide
> Rulers & Grids > Line Weights again.
92
Note: You cannot turn off Line Weights view when viewing PDFs within a web browser.
Compare a revised PDF to an earlier version (Acrobat Pro)
Use the Compare Documents feature to show the differences between two versions of a PDF. You can customize many
options for displaying the compare results. For a video on comparing PDFs, see
www.adobe.com/go/lrvid_011_acrx_en. (Video applies to both Acrobat X and Acrobat XI.)
1 Choose View > Compare Documents.
2 Specify the two documents to compare. If one or both of the documents is in a PDF Portfolio, select the PDF
Portfolio. Under Package Item, select the component PDF.
3 As needed, specify the page ranges in the documents to compare in the First Page and Last Page boxes.
4 Select the Document Description that best describes the documents you are comparing, and click OK.
Once the two documents are analyzed, a results document appears with the Compare panel open. The new
document is shown with annotations indicating the changes. The first page shows a summary of the comparison
results.
5 From the Compare panel, do any of the following:
• To hide the annotations that display changes, click Hide Results.
• To specify the display options for compare results, click Show Options. You can specify the type of changes to
display, and the color scheme and opacity of the annotations. To return to the page thumbnails, click Hide
Options.
• To show each of the documents in its own window, from the options menu , choose Show Documents Tiled
or Show Documents Side By Side. To synchronize the relevant pages while showing the documents in their own
windows, from the options menu, choose Synchronize Pages.
• Click a page thumbnail to go directly to that page. To change the size of the page thumbnails, from the options
menu, choose Thumbnail Size > [option].
Last updated 1/14/2015
Page 100

Workspace
• Drag the splitter bar at the bottom of the Compare panel up to show thumbnails of the old document. Click a
thumbnail from the old document to open it in a new window.
Document Description options
Reports, Spreadsheets, Magazine Layouts Compares the content as one continuous text body, from end to end.
Presentation Decks, Drawings Or Illustrations Looks at each slide or page as a mini-document, and matches ones that
are similar. Then compares the content of each matching document. Identifies documents that have moved, such as
slides in presentation.
Scanned Documents Creates an image capture of each scanned page and compares pixels. Looks at each scanned page
and matches ones that are similar. Also identifies pages that are in a different order. This option is useful for comparing
images or architectural drawings.
Compare Text Only Use this option with any document type. This option is designed for comparing text in large
documents (250 pages or more). This option also compares text between documents that have background artwork on
each page, which slows processing.
• With either the reports or presentation options selected, the Compare Text Only option identifies only the text
differences between two documents.
• With Scanned Documents selected, the text is compared separately from the graphics, and then the results are
combined. In documents containing magazine advertisements that have text on top of background image art, a
reflowed passage is compared in text-only mode. The artwork is compared separately in the background. The
differences (both text and line art and images) are combined into a single results document.
93
Preferences for viewing PDFs
The Preferences dialog box defines a default page layout and customizes your application in many other ways. For
viewing PDFs, examine the preferences options for Documents, General, Page Display, and 3D & Multimedia.
The preferences settings control how the application behaves whenever you use it; they are not associated with any
particular PDF document.
Note: If you install any third-party plug-ins, set these preferences using the Third-Party Preferences menu item.
Documents preferences
Open Settings
Restore Last View Settings When Reopening Documents Determines whether documents open automatically to the
last viewed page within a work session.
Open Cross-document Links In Same Window Closes the current document and opens the document being linked to
in the same window, minimizing the number of windows open. If the document being linked to is already open in
another window, the current document is not closed when you click a link to the open document. If you do not select
this option, a new window opens each time you click a link to a different document.
Allow Layer State To Be Set By User Information Allows the author of a layered PDF document to specify layer visibility
based on user information.
Allow Documents To Hide The Menu Bar, Toolbars, And Window Controls Allows the PDF to determine whether the
menu bar, toolbar, and window controls are hidden when the PDF is opened.
Documents In Recently Used List Sets the maximum number of documents listed in the File menu.
Last updated 1/14/2015
 Loading...