


 Loading...
B3-A42
Iconia One 10
USER’S MANUAL

2 -
© 2018 All Rights Reserved
Acer Iconia One 10 User’s Manual
Covers: B3-A42
Regulatory Model Number (RMN): A8201
This revision: January 2018
Sign up for an Acer ID and enjoy great benefits
There are three great reasons for you to get an Acer ID:
•Create your own connected world.
•Get the latest offers and product information.
•Register your device for quick, personalized customer support.
For more information, please visit the Acer website: account.acer.com
Important
This manual contains proprietary information that is protected by copyright laws. The information contained in this manual is subject to change without notice. Images provided herein are for reference only and may contain information or features that do not apply to your computer. Acer Group shall not be liable for technical or editorial errors or omissions contained in this manual.
Acer Iconia One 10
Model number: _______________________________________________
Serial number: _______________________________________________
Date of purchase: ____________________________________________
Place of purchase: ___________________________________________
Google, Android, Google Play, YouTube and other marks are trademarks of Google LLC.

Table of contents - 3
TABLE OF CONTENTS
Getting started with your tablet |
4 |
Features and functions ............................ |
4 |
Unpacking your tablet.............................. |
4 |
Getting to know your tablet...................... |
5 |
Using the SIM card slot ........................... |
6 |
Turning on for the first time...................... |
7 |
Charging your tablet |
9 |
Assembling the power adapter ................ |
9 |
Using your tablet |
11 |
Using the touchscreen........................... |
11 |
The Home screen .................................. |
11 |
The virtual keyboard .............................. |
22 |
Editing text............................................. |
23 |
Setting an alarm .................................... |
24 |
Waking your tablet................................. |
25 |
Shutting down your tablet ...................... |
25 |
Connecting devices to your tablet |
26 |
Connecting to AC power........................ |
26 |
Inserting a microSD card ....................... |
26 |
Transferring files between your tablet |
|
and a PC................................................ |
26 |
Connecting a Bluetooth device.............. |
27 |
Accessories ........................................... |
28 |
Going online |
29 |
Managing Wi-Fi connections ................. |
29 |
Data saver (background data) ............... |
29 |
Browsing the internet ............................. |
30 |
Google™ services ................................. |
31 |
Using the camera and video recorder 36 |
|
Camera/video icons and indicators........ |
36 |
Taking a photo ....................................... |
37 |
Recording a video.................................. |
37 |
Camera and video options..................... |
38 |
Advanced settings |
40 |
Wireless & Networks.............................. |
40 |
Device.................................................... |
42 |
Personal................................................. |
44 |
System................................................... |
45 |
Updating your tablet’s operating system 45 |
|
Resetting your tablet.............................. |
45 |
FAQ and troubleshooting |
46 |
Other sources of help ............................ |
47 |
Specifications |
48 |
Guidelines for safe battery usage |
51 |
Battery information................................. |
51 |
Replacing the battery............................. |
52 |
End user license agreement |
53 |
4 - Getting started with your tablet
GETTING STARTED WITH YOUR TABLET
Features and functions
Your new tablet offers leading, easy-to-access multimedia and entertainment features. You can:
•Connect to the Internet via Wi-Fi or 3G.
•Access your email while on the move.
•Keep in touch with your friends with social networking apps.
•Watch movies or listen to music.
•Play games or read a book.
Unpacking your tablet
Your new tablet comes packed in a protective box. Carefully unpack the box and remove the contents. If any of the following items are missing or damaged, contact your dealer immediately:
•Acer Iconia tablet
•Product setup and safety information
•USB cable
•AC adapter
•Warranty card
Note
Before using your tablet for the first time, you need to charge it for at least four hours. After that you can recharge the battery as needed.
Note
If the battery has been depleted for a while, please charge the tablet for at least 30 minutes using the adapter.
Getting started with your tablet - 5
Getting to know your tablet
Views
1 |
2 3 |
4 |
|
|
9 |
5 |
|
|
6 |
|
|
7 |
|
7 |
8 |
|
|
|
|
10 |
|
|
|
|
No. |
Item |
Description |
|
|
|
Long press to turn the tablet on, press |
|
1 |
Power button |
briefly to turn the screen on/off or enter |
|
sleep mode; press and hold to turn the |
|||
|
|
||
|
|
tablet off. |
|
|
|
|

6 - Getting started with your tablet |
|
|||
|
|
|
|
|
|
No. |
Item |
Description |
|
2 |
Volume control key |
Increases and decreases the tablet |
||
volume. |
||||
|
|
|
||
3 |
Microphone |
Receives audio for video chats and |
||
Internet calls. |
||||
|
|
|
||
|
|
Cover for: |
|
|
4 |
microSD card slot |
Insert a microSD card into the slot. |
||
SIM card slot |
Insert a nano SIM card into the slot.see |
|||
|
|
|||
|
|
Inserting a SIM card on page 6 |
||
|
|
|
||
5 |
3.5 mm headphone |
Connects to stereo headphones. |
||
jack |
||||
|
|
|
||
|
|
|
Connects to a computer via a USB cable. |
|
6 |
Micro USB port |
Also serves as the charging port for the |
||
AC adapter. For more information, see |
||||
|
|
|
||
|
|
|
Charging your tablet on page 9. |
|
|
|
|
|
|
7 |
Speakers |
Emits audio. |
||
|
8 |
Touchscreen |
10.1" LED-backlit LCD. |
|
9 |
Front-facing camera |
A 2-megapixel camera for video chats |
||
and selfies. |
||||
|
|
|
||
|
|
|
10 Rear-facing camera |
A 5-megapixel camera for taking high- |
|
resolution images. |
||
|
Using the SIM card slot
Your tablet has a SIM slot for internet access. To take full advantage of your tablet’s Internet capabilities, you should install a SIM card with data subscription before turning on your tablet.
Inserting a SIM card
Warning
Do not force the SIM card. If it does not fit, ensure you have the SIM card properly oriented as illustrated. Trying to force the SIM into the slot when it is incorrectly oriented may damage the SIM and/or your tablet.

Getting started with your tablet - 7
To insert the SIM card, turn the tablet upside down. Insert the SIM card with the gold-colored connectors facing upwards and the cut-out towards the bottom of the tablet (see illustration).
Turning on for the first time
To turn on your tablet, press and hold the power button until you see the Acer logo. Wait a moment for your tablet to boot up. You will then be asked some questions before you can use your tablet.
To start, tap to select your language then tap the arrow. Follow the rest of the instructions as they are displayed.
8 - Getting started with your tablet
If the tablet’s screen turns off, it has entered sleep mode. Briefly press the power button to wake it up. For more information see Waking your tablet on page 25.
Sign in to or create a Google account
If you have Internet access, your tablet allows you to synchronize information with a Google account.
During the start-up process, you may create or sign in to an account, which will be used to synchronize your contact list, email, calendar and other information. If you do not yet have Internet access, or do not want to use this feature, then tap Skip.
Important
You must sign in to a Google Account to use Gmail, Hangouts, Google Calendar, and other Google apps; to download apps from Google Play; to back up your settings to Google servers; and to take advantage of other Google services on your tablet.
If you have multiple Google accounts, such as separate accounts for personal and business contacts, you can access and synchronize them from the Accounts settings section. See Multiple Google accounts on page 44
Note
If Google Play Store is updating apps in the background, opening new apps may consume memory and may affect the performance on your device.

Charging your tablet - 9
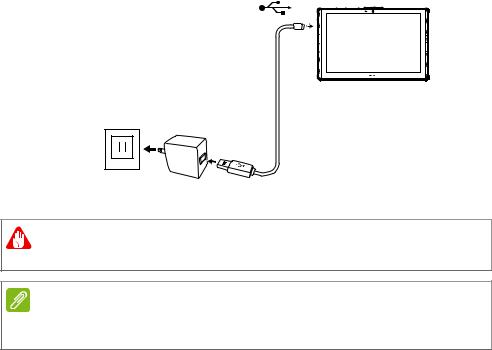
CHARGING YOUR TABLET
Assembling the power adapter
Your tablet is bundled with one of two types of USB power adapters: a fixed-prong type or a removable-prong type. Both types are described in this manual.
Fixed-prong type
The prongs and power adapter body form a complete piece, no assembly required. Simply slide the large end of the USB cable into the power adapter body (it will fit in only one direction). You cannot remove or switch the prongs with this type of adapter.
Removable-prong type
Align arrows on the power adapter head and body. Insert the head onto the power adapter body and turn the head towards "CLOSE" printed on the head until it clicks into place. Simply slide the large end of the USB cable into the power adapter body (it will fit in only one direction).
1 |
2 |
|
OPEN |
10 - Charging your tablet
Connecting power
Connect the power connector to your tablet and plug the AC adapter into any AC outlet.
Warning
Only use an Acer-approved adapter to charge your device.
Note
It is normal for the tablet surface to become warm during charging or long periods of use.
Using your tablet - 11
USING YOUR TABLET
Using the touchscreen
Your tablet uses a touchscreen for selecting items and entering information. Use your finger to tap the screen.
Tap: Touch the screen once to open items and select options.
Swipe: Quickly swipe your finger across the screen to switch screens or open lists of options or information.
Drag: Hold your finger on the screen and drag across the screen to select text and images.
Tap and hold: Tap and hold an item to see a menu of actions for that item.
Scroll: To scroll up or down the screen, simply drag your finger up or down the screen in the direction that you want to scroll.
The Home screen
When you start your tablet, or wake it from power saving, it will display the Home screen. This screen gives you quick access to apps ("applications"), widgets, and folders. See Moving an app or folder on page 19.
Note
When you first see the Home screen, and your tablet is connected to the Internet, it will download a selection of recommended, optional apps. These may be deleted, as with any other downloaded app.
Folders are groups of apps that occupy one space on a Home screen.
See Adding folders to a Home screen on page 20.
Widgets provide special functions, quick shortcuts to special app features, or serve as small apps that display constantly-updated information (like the time and weather). Many apps provide widgets, while some apps provide only a widget, and must be added and used from a Home screen. See Adding widgets to a Home screen on page 21.

12 - Using your tablet
Using the Home screens
The Home screen provides controls and information.
Search |
Status and |
notification bar |
|
|
|
|
|
|
|
|
|
|
|
|
|
|
|
|
|
|
|
|
|
|
|
|
|
|
|
|
|
|
|
|
|
|
|
|
|
|
|
|
|
|
|
|
|
|
|
|
|
|
|
|
|
|
|
|
|
|
|
|
|
Iconia Suite |
|
Favorites bar |
|
|
|
|||||
|
|
|
|
|
||||
|
|
|
|
Navigation |
||||
Note
Bundled apps differ depending on region and configuration.
Swipe the Home screen left to see most apps installed on your tablet. If you need more space, you can extend the Home screen to give you more screens to add app icons or widgets. To add additional screens, tap, hold, and then drag an icon to the right edge of the screen. See Moving an app or folder on page 19 and Adding widgets to a Home screen on page 21.
Note
Removing or moving all apps and widgets from a Home screen will automatically remove that Home screen as well.

Using your tablet - 13
Navigation
To navigate through menus and options,
three (or more) icons are shown at the Back Home Overview bottom of the screen.
Back
Tap this icon to go to the previous page, or to go up one level in a menu. This icon may be replaced with the hide icon in
certain cases (e.g. when the keyboard is displayed. In this Hide case, tapping the icon minimizes the keyboard.
Home
Tap this icon to go directly to the Home screen. Tap and hold to open
Google search.
Overview / Recent
Tap this icon to see recently opened apps in your tablet’s Overview screen. Tap an app to open it. Tap anywhere on the screen to return to the Home screen.
Previous app
Double tap the Overview icon to switch directly to the previously used app.
Split-screen mode
If you are using a compatible app, tap and hold the Overview icon to enter split-screen mode. See Split-screen mode on page 18.
Favorites bar
The Favorites bar is visible on any Home screen and holds apps you frequently use. To remove an app from the bar, simply tap and hold the app and drag it away. To fill the gap with an app of your choice, see Moving an app or folder on page 19.
14 - Using your tablet
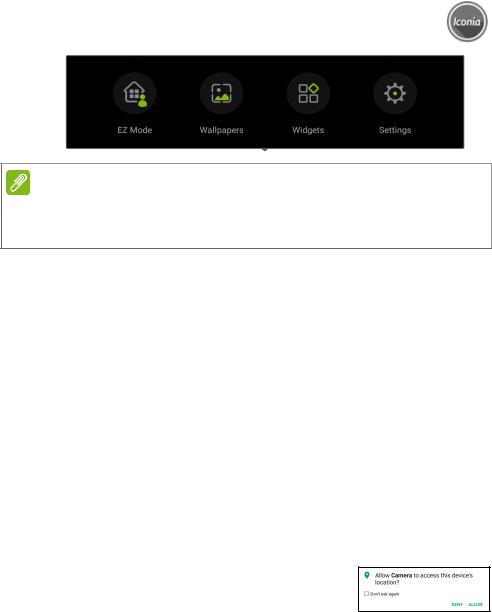
Iconia Suite
The Iconia Suite icon is in the middle of the Favorites bar.
Tap the Iconia icon for more information on installed apps and features.
Note
When you first open the Iconia Suite drawer, you will see a summary of the Iconia apps or features. Swipe left to see all the descriptions or tap Skip to continue. Tap the i in the top-right corner to see the descriptions again.
EZ Mode
Set up your tablet with multiple profiles so you can share your device with your family and friends. EZ Mode helps you to manage and schedule access to apps for each profile.
Wallpapers
Change the image for the screen background. See Changing the wallpaper on page 22.
Widgets
Add a widget to the screen. See Adding widgets to a Home screen on page 21.
Settings
Open Layout settings for your tablet.
Access requests
When you first open some apps, or use certain functions, your tablet will ask for permission to access some features or information.
To allow the app to fully function tap Allow or OK, but if you do not want to share some information you can choose to Cancel or Deny

Using your tablet - 15
access; however this may cause some apps to function incorrectly. To change permissions later, open the app information in Settings > Apps, then tap Permissions to turn permissions on or off.
Search
Search enables you to use a single, quick search to locate a variety of information on the internet and on your tablet. To use Search, simply tap  in the search bar and type your query.
Note
In order to search or browse the internet, you must be connected to a wireless network. See Going online on page 29.
Searching on the internet
As you type, a list displays search suggestions. Based on the words you enter, these suggestions try to help you quickly access what you are looking for and may include the following:
• A previous search you performed on any device while you were logged into your Google account and performed a Google search;
• A new internet search suggesting what you might be looking for;
• A specific website address.
If what you’re looking for appears in the suggestions list, simply tap it. Otherwise, tap  on the keyboard.
Tap a category at the top of the results screen to filter the search results to show just Images, News, or other type of result.
Searching on your tablet
Tablet search results are shown below the internet search suggestions. These suggestions are taken from sources such as the names of apps installed on your tablet, settings, media files from Google Play apps, contacts, bookmarks, and browsing history.
Note
You can choose what information is included in tablet searches. Swipe right from the Home Screen to open the Google App screen and tap the Menu icon  in the top-left corner of the screen. Then tap Settings > Tablet search.
16 - Using your tablet
Voice search and "OK Google"
With voice actions, you can send text messages, place calls, send emails, find directions, search the internet and even send a note to yourself using your voice. Say "OK Google" or swipe left on the Home screen and tap Voice Search. For information on using voice search in the Chrome app, see Voice Search in Chrome on page 32.
Note
Voice Search is available only in selected regions.
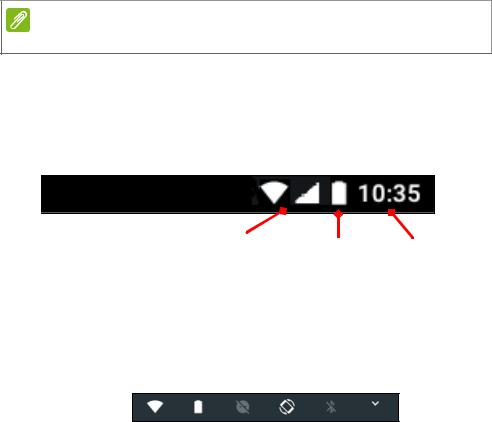
Status and notification area
Status and notification icons are shown at the top of the screen. The top-right corner displays status information such as the time, battery status, and connectivity. The top-left corner displays event notifications, such as new message alerts.
Wi-Fi and cellular signal |
Battery |
Time |
strength |
charge status |
|
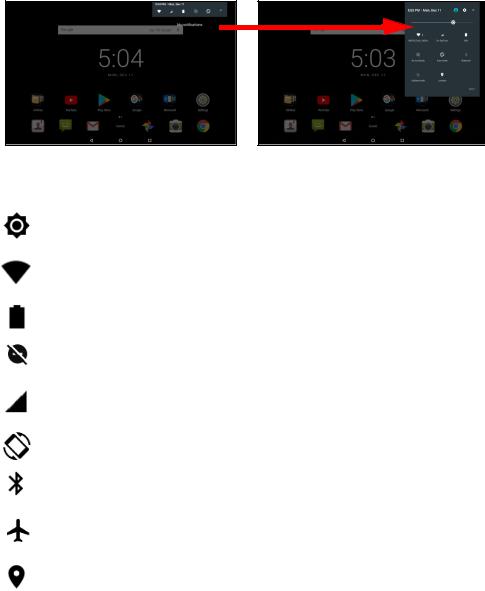
Swipe down from the top of the screen to display Quick Settings shortcuts, and notification details such as current downloads and media controls when music is playing.
Tap a shortcut to see more information, or toggle the feature if more information is not available. Tap and hold a shortcut to open appropriate Settings.
Using your tablet - 17
Swipe down again to display the full list of Quick Settings tiles. To see the Quick Settings tiles with one swipe, swipe down with two fingers.
Quick Settings tiles
|
|
|
Icon Name |
Description |
|
Brightness |
Slide to adjust the screen’s brightness. |
|
|
|
|
|
Tap to toggle Wi-Fi on and display Wi-Fi settings. |
|
Wi-Fi |
Small "up" and "down" arrows mean information |
|
|
is being transmitted. |
|
Battery usage |
Tap to see battery charge levels and access |
|
Battery Saver settings. |
||
|
||
Do not disturb |
Tap to silence some or all notifications or alarms. |
|
|
|
|
SIM (LTE |
Tap to enable and disable the cellular connection. |
|
If Data connection is disabled, you will not be |
||
models only) |
||
able to use cellular networks. |
||
|
||
|
|
|
Auto rotate |
Tap to toggle automatic screen rotation on and |
|
off. |
||
|
||
Bluetooth |
Tap to toggle Bluetooth on and open Bluetooth |
|
settings. |
||
|
||
|
Tap to toggle Airplane mode on and off. When on, |
|
Airplane mode |
wireless connectivity is turned off unless you |
|
|
choose to turn a network on again. |
|
Location |
Tap to toggle your device’s location services on |
|
and off. |
||
|
Loading...