


Acer AT2622, AT3221, AT2621, AT4222, AT4221 User Manual
...Acer LCD TV
AT4221/AT4222
AT3221/AT3222
AT2621/AT2622
User's Guide
Contents
Important safety instructions |
2 |
Disposal instructions |
2 |
Declaration of Conformity |
2 |
First things first |
3 |
Packing checklist |
3 |
Your LCD TV overview |
3 |
Front panel view |
3 |
Rear panel view |
4 |
Remote control |
5 |
General keys |
5 |
Teletext |
5 |
Basic connections |
6 |
Connecting the power cord |
6 |
Setting up the remote control |
6 |
Enjoying analog TV |
6 |
Connecting an antenna/cable |
6 |
Getting started watching your TV |
6 |
Connecting external audio/video devices |
7 |
Connecting a DVD, VCR, STB or audio/video equipment |
7 |
Connecting a camera, camcorder, video game |
8 |
Connecting a PC or notebook computer |
8 |
Selecting the input source |
8 |
OSD navigation |
9 |
Navigating the OSD with the remote control |
9 |
Adjusting the OSD settings |
10 |
Advanced features |
11 |
Lock This Channel |
11 |
Reorder for channels |
12 |
Re-scan for channels |
13 |
Widescreen display mode |
14 |
Troubleshooting |
15 |
PC Input Signal Reference Chart |
16 |
Product specifications |
17 |
Copyright © 2007. Acer Incorporated. All Rights Reserved.
Acer LCD TV User's Guide Original Issue: 5 / 2007
Changes may be made periodically to the information in this publication without obligation to notify any person of such revisions or changes. Such changes will be incorporated in new editions of this manual or supplementary documents and publications. This company makes no representations or warranties, either expressed or implied, with respect to the contents hereof and specifically disclaims the implied warranties of merchantability or fitness for a particular purpose.
Record the model number, serial number, purchase date, and place of purchase information in the space provided below. The serial number and model number are indicated on the label affixed to your device. All correspondence concerning your unit should include the serial number, model number, and purchase information.
No part of this publication may be reproduced, stored in a retrieval system, or transmitted, in any form or by any means, electronically, mechanically, by photocopy, recording, or otherwise, without the prior written permission of Acer Incorporated.
Model Number:
Serial Number:
Purchase Date:
Place of Purchase:
Acer and the Acer Logo are registered trademarks of Acer Inc. Other companies' product names or trademarks are used herein for identification purposes only and belong to their respective companies.
English
Important safety instructions
Read these instructions carefully. Please put them somewhere safe for future reference.
1Follow all warnings and instructions marked on the product.
2Unplug this product from the wall outlet before cleaning. Do not use liquid cleaners or aerosol cleaners. Use a damp cloth for cleaning.
3Do not use this product near water.
4Do not place this product on an unstable cart, stand or table. The product may fall, sustaining serious damage.
5Slots and openings are provided for ventilation; to ensure reliable operation of the product and to protect it from overheating, these openings must not be blocked or covered. The openings should never be blocked by placing the product on a bed, sofa, rug or other similar surface. This product should never be placed near or over a radiator or heat register or in a built-in installation unless proper ventilation is provided.
6This product should be operated from the type of power indicated on the marking label. If you are not sure of the type of power available, consult your dealer or local power company.
7Do not allow anything to rest on the power cord. Do not locate this product where the cord will be stepped on.
8If an extension cord is used with this product, make sure that the total ampere rating of the equipment plugged into the extension cord does not exceed the extension cord ampere rating. Also, make sure that the total rating of all products plugged into the wall outlet does not exceed the fuse rating.
9Never push objects of any kind into this product through cabinet slots as they may touch dangerous voltage points or short-out parts, which could result in a fire or electric shock. Never spill liquid of any kind on the product.
10Do not attempt to service this product yourself, as opening or removing covers may expose you to dangerous voltage points or other risks. Refer all servicing to qualified service personnel.
11Unplug this product from the wall outlet and refer servicing to qualified service personnel under the following conditions:
a.When the power cord or plug is damaged or frayed.
b.If liquid has been spilled into the product.
c.If the product has been exposed to rain or water.
d.If the product does not operate normally when the operating instructions are followed. Adjust only those controls that are covered by the operating instructions.Improper adjustment of other controls could result in damage; extensive work by a qualified technician might then be required to restore the product to normal condition.
e.If the product has been dropped or the case has been damaged.
f.If the product exhibits a distinct change in performance, indicating a need for service.
12Use only the proper type of power supply cord set (provided in your accessories box) for this unit. Always disconnect the power cord from the wall outlet before servicing or disassembling this equipment.
13.Do not overload an electrical AC outlet, power strip, or convenience receptical. The overall system load must not exceed 80% of the branch circuit rating. If power strips are used, the load should not exceed 80% of the power strip input rating.
14Some products are equipped with a three-wire electrical grounding-type plug that has a third pin for grounding. This plug only fits into a grounded electrical outlet. This is a safety feature. Make sure the AC outlet is properly grounded. Do not defeat the safety purpose of the grounding-type plug by trying to insert it
into a non-grounded outlet. If you cannot insert the plug into the outlet, contact your electrician to replace the obsolete outlet.
The grounding pin is an important safety feature. It is possible to receive an electric shock from a system that is not properly grounded
The grounding pin is also providing good immunity ability against unexpected noise that interferes performance of this product and is produced by other nearby electrical devices.
Disposal instructions
Do not throw this electronic device into the rubbish bin / container when discarding. To minimize pollution and ensure utmost protection of the global environment, please recycle.
For more information regarding WEEE, please refer to http://global.acer.com/about/environmental.htm
Declaration of Conformity
Name of Manufacturer: |
Acer Computer (Shanghai) Limited |
Address of Manufacturer: |
3F, No. 168 xizang medium road, Huangpu |
|
District, Shanghai, China |
Declares that product: |
LCD TV Monitor |
Model: |
AT4221 ; AT4222 ; AT3221 ; AT3222 |
|
AT2621 ; AT2622 |
Conforms to the EMC Directive 89/336/EEC as attested by conformity with the following harmonized standards:
EN 55013: 2001+A1: 2003: Sound and television broadcast receivers and associated equipment - Radio disturbance characteristics - Limits and methods of measurement
EN 55020: 2002+A1: 2003: Sound and television broadcast receivers and associated equipment - Immunity characteristics - Limits and methods of measurement
EN55022:1998/A1:2000; AS/NZS CISPR 22: 2002: Limits and methods of measurement of Radio Interference characteristics of Information Technology Equipment.
EN55024: 1998/A1: 2001; AS/NZS CISPR 24: 1997: Information technology equipment-Immunity characteristics-Limits and methods of measurement.
Conforms to the Low Voltage Directive 73/23/EEC as attested by conformity with the following harmonized standard:
EN60065: 1998: Audio, video and similar electronic apparatus-safety requirements.
We, Acer Computer (Shanghai) Limited, hereby declare that the equipment bearing the trade name and model number specified above was tested conforming to the applicable Rules under the most accurate measurement standards possible, and that all the necessary steps have been taken and are in force to assure that production units of the same equipment will continue to comply with the requirements.
June 15, 2007
Easy Lai / Director
Acer Computer (Shanghai) Limited
First things first
We would like to thank you for making this Acer LCD TV your choice. With proper care, your new Acer LCD TV will provide you with years of entertainment and satisfaction.
This User's Guide introduces you to the various features your LCD TV can offer, and provides clear and concise information about the product, so please read it thoroughly and retain it for future reference.
Packing checklist
Your LCD TV package should contain the following accessories, in addition to the accessory box. Please ensure that they are all present. If any of the items is missing, then please contact your retailer.
•Remote control (x1) / AAA batteries (x2)
•Power cord*
•User's Guide / Quick Guide
*The power cord supplied varies according to your region.
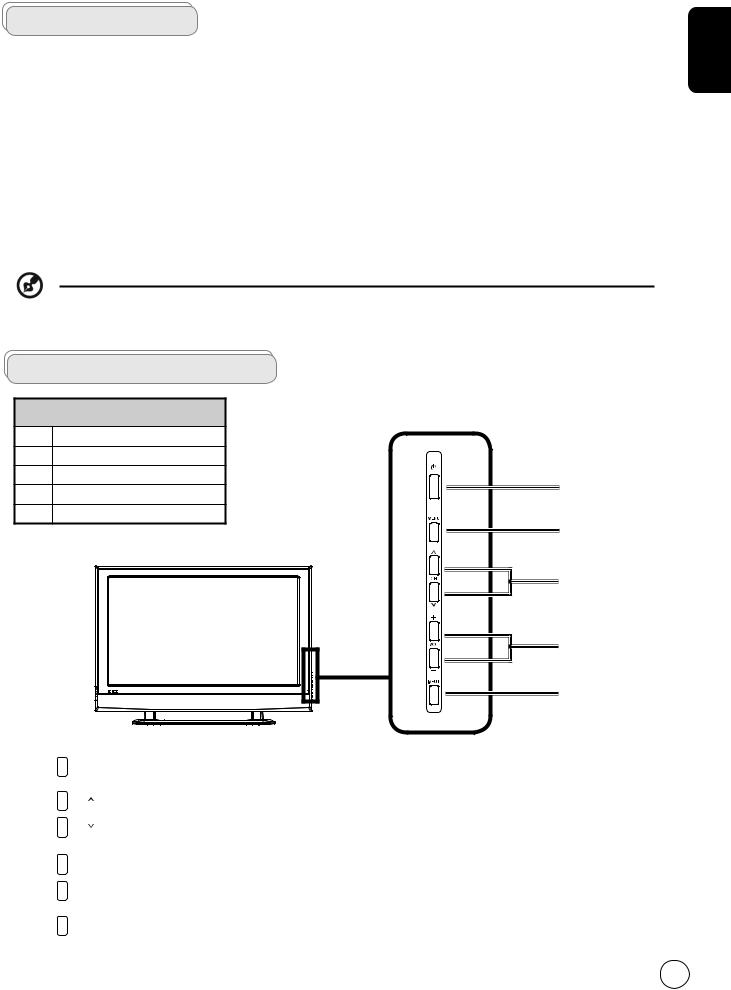
Your LCD TV overview
Front panel view
1 Power On/Off
2 Menu key
3 Channel up/down
4 Volume +/-
1
5 Input key
2
3
4
5
2 |
MENU |
Menu key |
Turns the OSD menu ON and OFF |
|
|
|
|
|
|
|
CH |
Channel up |
When the OSD is on, functions the same as the Up arrow |
|
3 |
CH |
|
|
|
Channel down |
When the OSD is on, functions the same as the Down arrow |
|||
|
||||
|
|
|||
|
|
|
|
|
|
VOL+ |
Volume up |
When the OSD is on, functions the same as the Right arrow |
|
4 |
VOL- |
|
|
|
Volume down |
When the OSD is on, functions the same as the Left arrow |
|||
|
||||
|
|
|||
|
|
|
|
|
5 |
INPUT |
Input key |
When the OSD is on, press this button to confirm selection |
|
|
||||
|
|
|
|
English

English |
Rear panel view |
|
|
|
|
|
|
|
|
|
|
|
|
|
|
|
|
|
|
|
|
|
|
|
|
|
|
||||||||
3 |
HDMI* |
|
|
|
4 |
VGA-in |
|
|
|
|
|
|
|
|
|
||||||||||||||||||||
|
1 |
Power switch |
|
|
|
2 |
AC-in |
|
|
|
|
|
|
|
|
|
|||||||||||||||||||
|
|
|
|
|
|
|
|
|
|
|
|
|
|
|
|
|
|
|
|
|
|
|
|
|
|
|
|
|
|
|
|
|
|
|
|
|
5 |
PC Audio-in |
|
|
|
6 |
AV-Audio L/R + CVBS + COMPONENT** |
|
|
|
|
|
|
|
|
|
|||||||||||||||||||
|
|
|
|
|
|
|
|
|
|
|
|
|
|
|
|
|
|
|
|
|
|
|
|
|
|
|
|
|
|
|
|
|
|
|
|
|
7 |
AV-Audio-out |
|
|
|
8 |
SCART |
|
|
|
|
|
|
|
|
|
|||||||||||||||||||
|
|
|
|
|
|
|
|
|
|
|
|
|
|
|
|
|
|
|
|
|
|
|
|
|
|
|
|
|
|
|
|
|
|
|
|
|
9 |
Analog Tuner |
|
|
|
|
|
|
|
|
|
|
|
|
|
|
|
|
|
|
|
|
|
|
|
|
|
|
|
|
|
||||
|
|
|
|
|
|
|
|
|
|
|
|
|
|
|
|
|
|
|
|
|
|
|
|
|
|
|
|
|
|
|
|
|
|
|
|
|
|
|
|
|
|
|
|
|
|
|
|
|
|
|
|
|
|
|
|
|
|
|
|
|
|
|
|
|
|
|
|
|
|
|
|
|
|
|
|
|
|
|
|
|
|
|
|
|
|
|
|
|
|
|
|
|
|
|
|
|
|
|
|
|
|
|
|
|
|
|
|
|
|
|
|
|
|
|
|
|
|
|
|
|
|
|
|
|
|
|
|
|
|
|
|
|
|
|
|
|
|
|
|
|
|
|
|
|
|
|
|
|
|
|
|
|
|
|
|
|
|
|
|
|
|
|
|
|
|
|
|
|
|
|
|
|
|
|
|
|
|
|
|
2 |
1 |
|
AV |
|
TUNER |
||
|
|
Y |
OUT |
|
|
|
|
|
|
Pb |
|
|
|
Pr |
|
1 |
2 |
3 |
4 |
5 |
6 |
7 |
8 |
9 |
*ATxx21 only support one HDMI interface.
**For AV: Composite and S-Video input use the same audio ports.
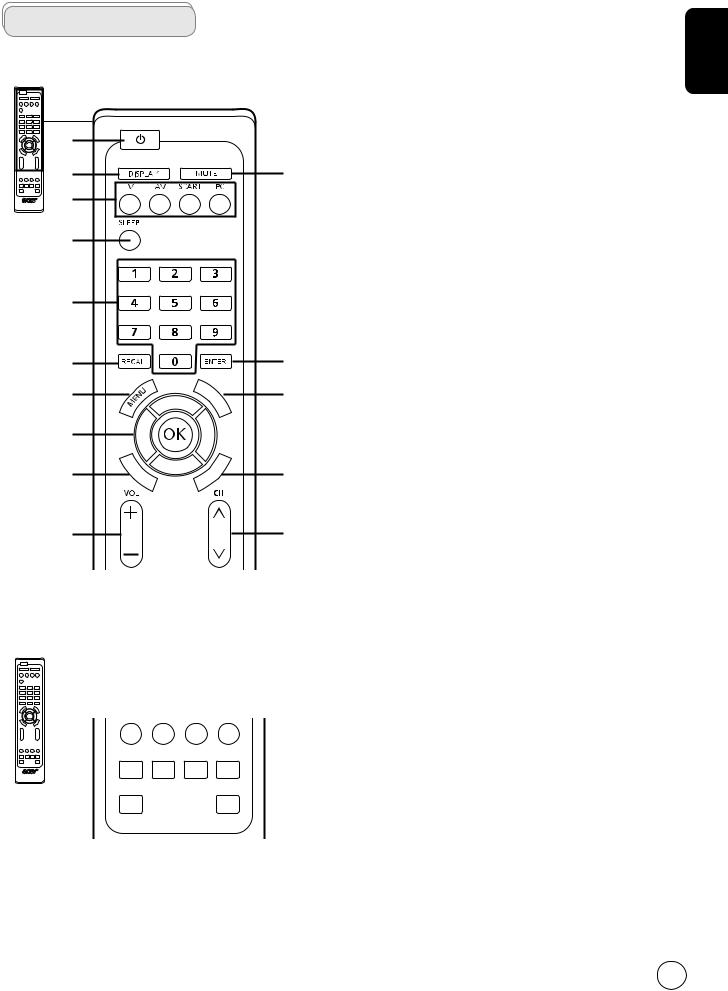
Remote control
General keys
1
2
4
5
6
7
9 |
|
T |
M |
||
|
|
T |
|
|
|
|
|
|
X |
|
|
|
|
|
/ |
|
|
|
|
|
|
I |
|
|
|
|
|
X |
|
11 |
|
|
|
|
|
12 |
W |
|
M |
P |
X |
E |
|
|
|||
|
D |
|
|
|
|
|
I |
|
|
|
|
14 |
|
|
|
|
|
1POWER
Press to turn your TV on/off.
2DISPLAY
Press to display input/channel information (dependent on input/source type).
3MUTE
Press to toggle audio on and off.
4Input buttons (TV/AV/SCART/PC)
Press to select correct input mode.
5SLEEP
3Press to set a time period after which the TV will switch itself to standby (15, 30, 45, 60, 90 or 120 minutes).
|
6 |
Number keys. |
|
7 |
RECALL |
|
|
Press to return to the previous channel. |
|
8 |
ENTER |
|
|
Press to confirm channel number selection. |
|
9 |
MENU |
|
|
Press to open or close the Menu. |
|
10 |
TTX/MIX (TELETEXT/MIX) |
8 |
|
Press to switch from TV/AV to Teletext mode. |
|
Press to overlay teletext page on the TV image. |
|
10 |
11 |
Directional keys/OK |
|
VOL (up/down), CH (up/down) |
12WIDE
Press to toggle scaling mode between Auto, 16:9, 4:3, Panorama and Letterbox 1, 2, 3 modes.
13MPX
13Press to select the sound input, displayed in the top righthand corner (mono, stereo, bilingual).
14 |
VOL (+/-) |
15 |
Press to increase or decrease the volume. |
|
|
15 |
CH (up/down) |
|
Press to sequentially select the TV channel. |
Teletext
|
|
|
|
|
1 |
|
|
|
|
|
1 |
Colour buttons (R/G/Y/B) |
||
|
|
|
|
|
|
|
|
|
|
|
Operates corresponding button on the teletext page. |
|||
|
|
|
|
|
|
|
|
|
|
|
|
|
2 |
INDEX |
|
|
|
|
|
|
|
|
|
|
|
|
|
||
|
|
|
|
|
|
|
|
|
|
|
|
|
|
Press to go to the index page |
|
|
|
|
|
|
|
|
|
|
|
|
|
3 |
SIZE |
|
|
|
|
|
|
|
|
|
|
|
|
|
|
Press once to zoom teletext page to 2X. |
|
|
|
|
|
|
|
|
|
|
|
|
|
|
Press again to resume. |
|
|
|
INDEX |
SUBTITLE |
SUBPAGE REVEAL |
4 |
SUBTITLE |
|||||||
|
|
|
||||||||||||
|
|
|
|
|
|
|
|
|
|
|
|
|
||
|
2 |
|
|
|
|
|
|
|
|
|
|
7 |
||
|
|
|
|
|
|
|
|
|
|
|
|
Press to view subtitles on the screen. |
||
|
|
|
|
|
|
|
|
|
|
|
|
|
|
|
|
|
|
SIZE |
|
|
|
|
HOLD |
5 |
SUBPAGE |
||||
|
|
|
|
|
|
|
|
|
|
|
|
|
||
|
|
|
|
|
|
|
|
|
|
|
|
|
|
Press to access the teletext’s subpages directly. |
|
|
|
|
|
|
|
|
|
|
|
|
|
6 |
HOLD |
|
|
|
|
|
|
|
|
|
|
|
|
|
|
Press to pause the current teletext page in multi-page |
|
|
|
|
|
|
|
|
|
|
|
|
|
|
|
|
3 |
4 |
5 |
6 |
|
|
viewing mode. |
|||||||
|
|
|
|
|
|
|
|
|
|
|
|
|
7 |
REVEAL |
|
|
|
|
|
|
|
|
|
|
|
|
|
|
Press to reveal hidden telext information. |
English
English
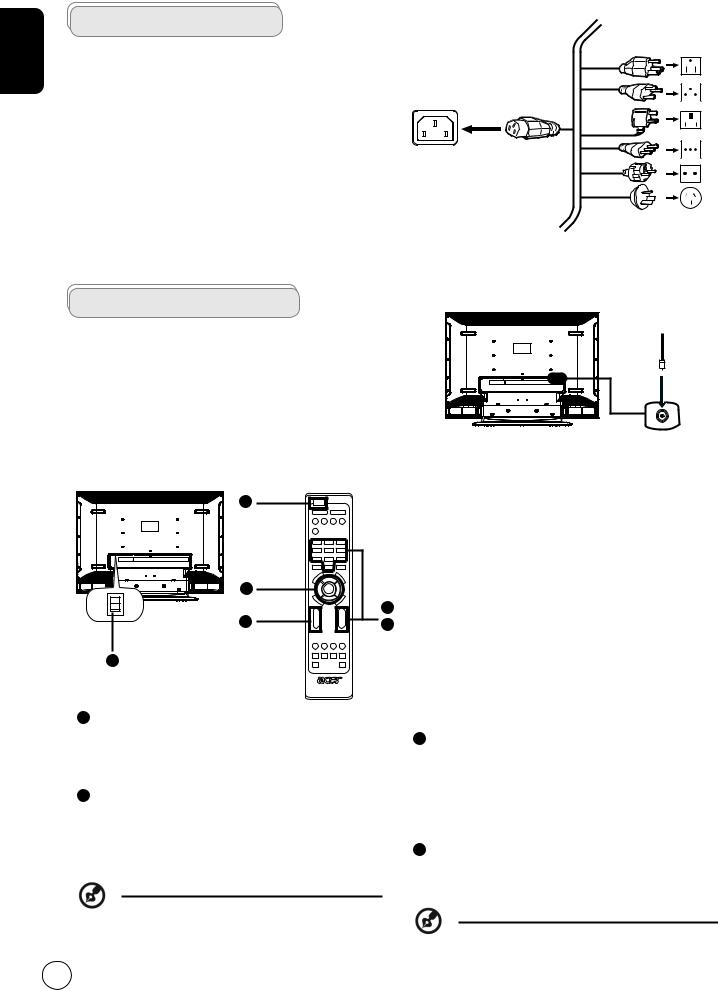
Basic connections
Connecting the power cord
1Connect the AC cord into the AC input on the back of the set.
2Connect the plug to the wall outlet as shown.
Setting up the remote control
1Open the cover on the back of the remote unit.
2Insert two AAA batteries (supplied) to match the polarity indicated inside the battery compartment.
Enjoying analog TV
Connecting an antenna/cable
Connect the antenna cable to the appropriate antenna terminal on the back of the TV set as shown below.
Getting started watching your TV
1 |
|
2 |
|
I |
1 |
O |
|
4 |
3 |
1 |
|
1 Power |
|
a.Turn on the power switch beneath the screen.
b.Press the power button, number keys or channel up / down button on the remote control.
2 Setup Wizard
The first time you switch on the TV, the Setup Wizard will guide you to complete the language selection and channel scanning.
Press the OK key to begin the setup process.
You can also adjust these settings using the front control panel. Please see "Front panel view" on page 3 for details.
Tuner
Step 1. Select the setup language you prefer.
Step 2. Please select country.
Step 3. Ensure that your co-axial cables are connected correctly before proceeding.
Step 4. Scan for analog channels.
Step 5. Setup is now complete. You are ready to begin watching TV.
If you leave the setup process before it is complete, you will be given a choice of options:
1.Resume setup
2.Resume setup wizard at next startup
3.Exit and do not remind me
Select an option and press OK to exit.
3Changing channels
a.Press 0 - 9 on the remote control to select a channel. The channel changes after 2 seconds. Press ENTER to select the channel immediately.
b.Pressing the channel ( CH ) up / down button on the remote control will also change the channel.
4 Adjusting the volume
Adjust the volume level using the ( VOL ) up/down button on the remote control.
Setup may vary due to local broadcast differences.
 Loading...