


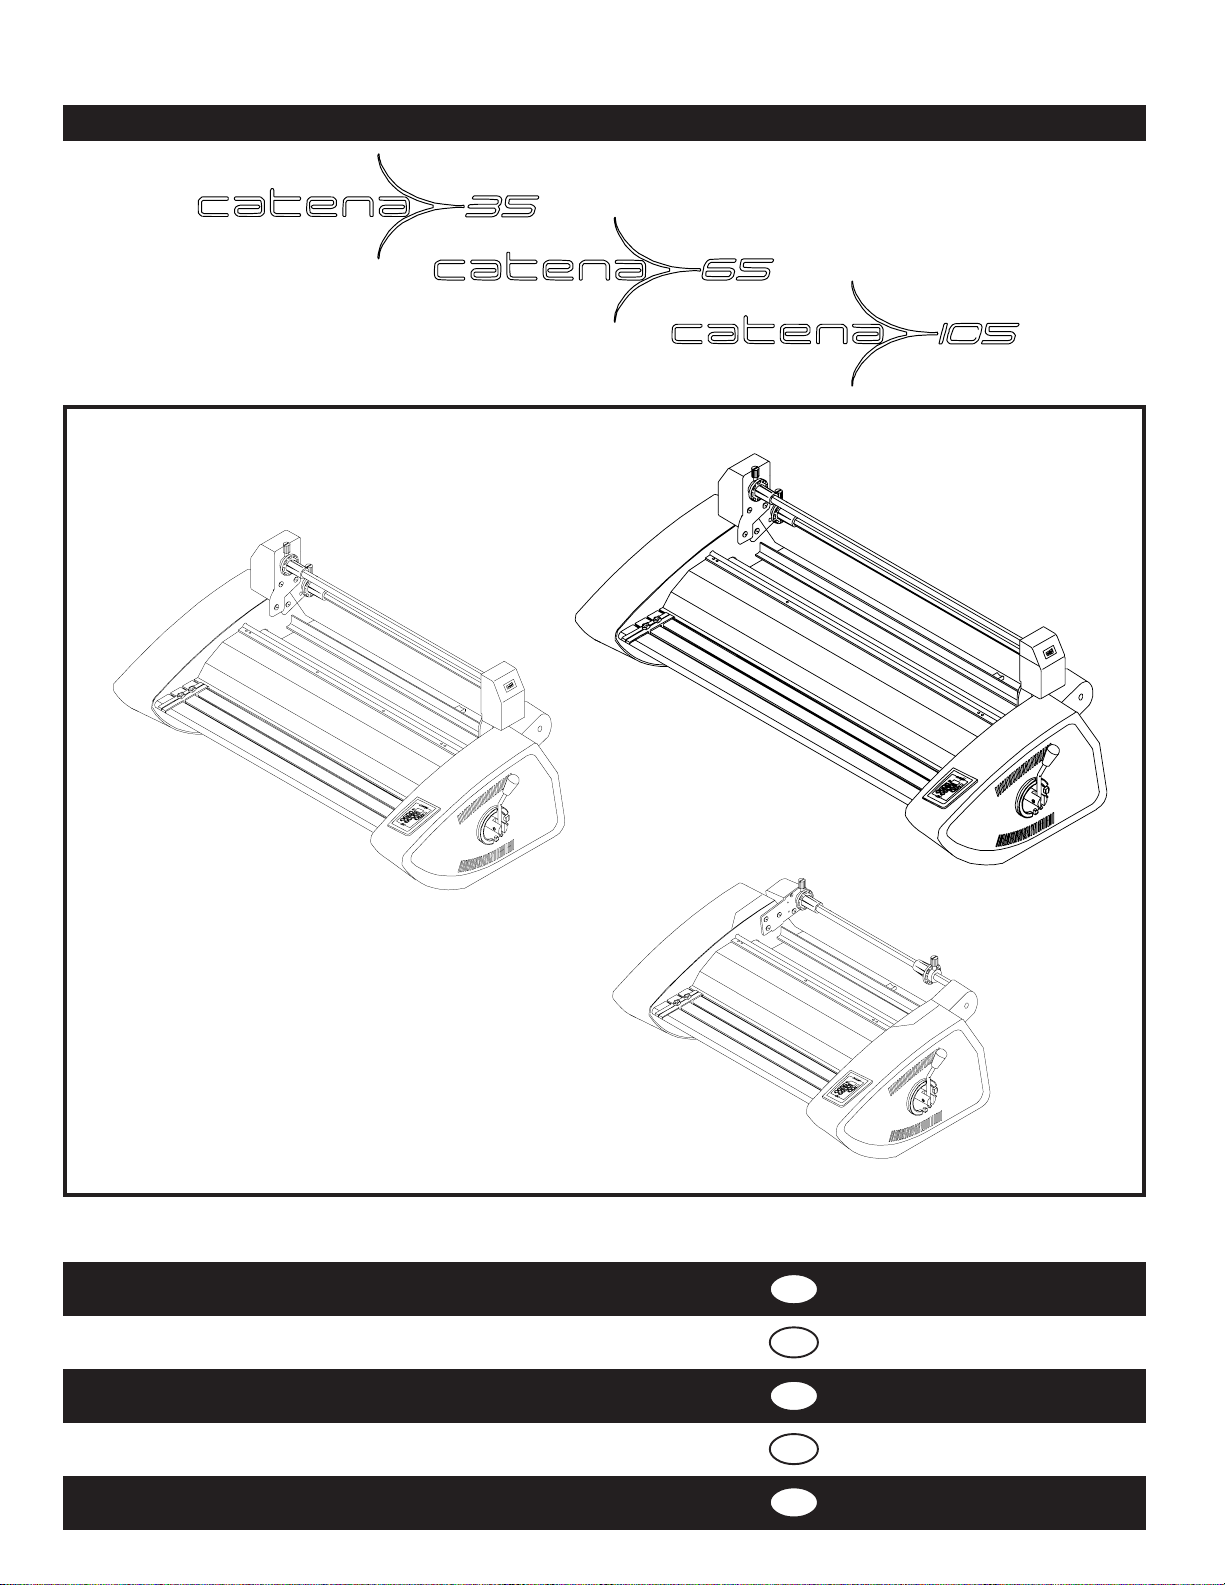
GBC Catena 65
Operating Instructions
I
Istruzioni per l’Uso
D
Bedienungsanleitungen
PART NUMBER: 930-084 A
NL
F
E
Gebruiksaanwijzing
Mode d’Emploi
Manual de Operación


I D
Disclaimer 1
Important Safety Instructions 2
Important Safeguards 4
General 4
Electrical 4
Service 4
Warranty 6
Installation 8
Features Guide 10
Power switch 10
Fan Switch 10
Control panel 10
Feed Table 12
Safety Shield 12
Table Interlock 12
Feed Guide 12
Heat Rollers 14
Idler Bar 14
Pull Rollers 14
Circuit Breaker 14
Film Shaft 14
Core Adaptors 14
Film Web 14
Nip point 16
Pressure Handle 16
Rear Slitter 16
Take-Up Assembly 16
Film Tension 16
Disclaimer 1
Importanti istruzioni di sicurezza 2
Importanti misure di sicurezza 4
Generale 4
Impianto elettrico 4
Manutenzione 4
Garanzia 6
Istallazione 8
Caratteristiche 10
Interruttore di rete 10
Interruttore di ventilazione 10
Pannello di controlol 10
Piano di alimentazione 12
Schermo protetivo 12
Chiusura di sicurezza del piano 12
Guida di alimentazione 12
Rulli di riscaldamento 14
Asta folle 14
Rulli tenditori 14
Interruttore automatico 14
Albero del film 14
Bloccaggio dei rulli 14
Velo del film 14
Punto di presa 16
Maniglia pressione rulli 16
Rotaia di taglio 16
Gruppo Avvolgimento 16
Regolazione tensione film 16
Disclaimer 1
Wichtige sicherheitsvorschriften 2
Wichtige vorsichtsmassnahmen 4
Allgemein 4
Elektrik 4
Wartung 4
Garantie 6
Installation 8
Features Guide 11
Ein/aus-schalter 11
Ventilatorenschalter 11
Steuerfeld 11
Anlegetisch 13
Schutzschild 13
Tischverriegelung 13
Zufuhrhilfe 13
Heisswalzen 15
Leitstange 15
Zugwalzen 15
Leistungsschalter 15
Folienwelle 15
Sicherungsadapter 15
Folienbahn 15
Beruhrungspunkt 17
Walzendruckhebel 17
Abtrennvorrichtung 17
Aufnahme 17
Zugspannung seinstellung 17
Operating Instructions 18
Caring for the Catena 42
Troubleshooting Guide 44
Lamination Guide 50
Catena 35 Parts list 51
Catena 35 Illustrations 54
Catena 65 Parts List 63
Catena 65 Illustrations 67
Catena 105 Parts List 77
Catena 105 Illustrations 81
Istruzioni per l’uso 18
Manutenzione 42
Guida riceraca guasti 45
Lamination Guide 50
Catena 35 Parts list 51
Catena 35 Illustrations 54
Catena 65 Parts List 63
Catena 65 Illustrations 67
Catena 105 Parts List 77
Catena 105 Illustrations 81
Bedienungsanleitungen 19
Pflege des GBC laminiergerats 42
Storungs suche 46
Lamination Guide 50
Catena 35 Parts list 51
Catena 35 Illustrations 54
Catena 65 Parts List 63
Catena 65 Illustrations 67
Catena 105 Parts List 77
Catena 105 Illustrations 81
I

NL F E
Disclaimer 1
Belangrijke veiligheidsvoorschriften 2
Belangrijke veiligheidsmaatregelen 5
Algemeen 5
Elektrisch 5
Service 5
Garantie 7
installatie 9
Functies 11
Stroomschakelaar 11
Ventilaorschakelaar 11
Controlepaneel 11
Invoertafel 13
Beschermkap 13
Tafelvergrendeling 13
Invoergeleider 13
Warmterollers 15
Vrijlooprol 15
Trekrollers 15
Circuit onderbreker 15
Filmkoker 15
Vergrendel-kernadapters 15
Filmbaan 15
Grijpzone 17
Hendel voor roldruk 17
Achterste afnijrand 17
Opneemconstructie 17
Instellen filmspanning 17
Bedieninst instructies 19
Onderhoud van de laminator 43
Leidraad bu storingen 47
Lamination Guide 50
Catena 35 Parts list 51
Catena 35 Illustrations 54
Catena 65 Parts List 63
Catena 65 Illustrations 67
Catena 105 Parts List 77
Catena 105 Illustrations 81
Disclaimer 1
Impotrantes consignes de securite 2
Consignes de securite importantes 5
Consignes généralesl 5
Consignes électriques 5
Service Après-Vente 5
Garantie 7
Installation 9
Caracteristiques 11
Interrupteur marche/ arret 11
Interrupteur de ventilation 11
Panneau de controle 11
Table d’alimentation 13
Capot de protection 13
Verrouillage de la table
d’alimentation 13
Guide de positionnement 13
Rouleax chauffants 15
Barres de transfert 15
Rouleaux d’entrainement 15
Coupe-circuit 15
Axe 15
Adaptateurs de fixation 15
Le de film 15
Point de contact 17
Levier de pression des rouleaux 17
Massicot arriere 17
Dispositif de rembobinage 17
Reglage de tension de film 17
Instructions d’utilization 19
Entretien des plastifieuses 43
Guide de depannage 48
Lamination Guide 50
Catena 35 Parts list 51
Catena 35 Illustrations 54
Catena 65 Parts List 63
Catena 65 Illustrations 67
Catena 105 Parts List 77
Catena 105 Illustrations 81
Disclaimer 1
Instrucciones Importantes de seguridad 2
Pautas de seguridad importantes 5
Precauciones generales 5
Electricidad 5
Servicio 5
Garantia 7
instalacion 9
Caracteristicas 11
Interruptor de corriente 11
Interruptor de ventilacion 11
Tablero de control 11
Plataforma de alimentacion 13
Escudo de seguridad 13
Pestillo de enganche
de la plataforma 13
Barra de topt 13
Rodillos termicos 15
Barra intermedia 15
Rodillos de traccion 15
Interruptor automatico 15
Eje para la pelicula 15
Adaptadores de fijacion de nucleo 15
Rollo de pelicula 15
Punto de contacto 17
Mango de presion del rodillo 17
Tajadera posterior 17
Ensamblaje de enrollamiento 17
Tension de ajuste de la pelicula 17
Instrucciones de operacion 19
Mantenimiento del laminador 43
Guia de resolucion de problemas 49
Lamination Guide 50
Catena 35 Parts list 51
Catena 35 Illustrations 54
Catena 65 Parts List 63
Catena 65 Illustrations 67
Catena 105 Parts List 77
Catena 105 Illustrations 81
II

The information in this publication is provided for reference and is believed to be accurate and complete. GBC is not liable for errors in this publication or for incidental or
consequential damage in connection with the furnishing or use of the information in this publication, including, but not limited to, any implied warranty of fitness or
merchantability for any particular use.
GBC reserves the right to make changes to this publication and to the products described in it without notice. All specifications and information concerning products are
subject to change without notice.
Reference in this publication to information or products protected by copyright or patent does not convey any license under the rights of GBC or others. GBC assumes
no liability arising from infringements of patents or any other rights of third parties.
This publication is copyrighted © 2002 by GBC. All rights reserved. The information contained in this publication is proprietary and may not be reproduced, stored,
transmitted, or transferred, in whole or in part, in any form without the prior and express written permission of GBC.
I
Le informazioni contenute in questo documento sono fornite a titolo di referenza e sono considerate corrette e complete. GBC no si responsabilizza di eventuali errori contenuti
in questo documento, né di danni incidentali o conseguenti relazionati con la fornitura e l’uso delle informazioni in questo documento, includendo senza limitazioni qualsiasi
garanzia d’idoneità o commerciabilità per qualsiasi uso particolare.
GBC si riserva il diritto di effettuare cambi a questo documento e ai prodotti in esso descritti senza preavviso. Tutte le specifiche e le informazioni sui prodotti sono soggette
a cambio senza preavviso.
In questo documento le referenze a informazioni e prodotti protetti da diritti di proprietà intellettuale o brevetti non trasferiscono nessuna licenza alla quale abbiano diritto GBC
o altri. GBC non assume nessuna responsabilità derivante dalla violazione di brevetti o di qualsiasi altro diritto di terzi.
Copyright © 2002 Questo documento è soggetto ai diritti di proprietà intellettuale di GBC. Riservati tutti i diritti. Le informazioni contenute in questo documento sono di proprietà
esclusiva e non possono essere riprodotte, conservate, trasferite, in tutto o in parte ed in modo alcuno, senza la previa autorizzazione espressa e per iscritto di GBC.
D
Die Informationen in dieser Druckschrift werden als Richtlinien zur Verfügung gestellt und sind unseres Wissens richtig und vollständig. GBC lehnt jede Haftung für Fehler in dieser
Druckschrift sowie für Schadenersatz oder Folgeschäden im Zusammenhang mit der Bereitstellung oder Verwendung der hierin enthaltenden Informationen ab, ein- aber nicht
ausschließlich die Gewährleistung für Eignung und handelsübliche Qualität für einen bestimmten Zweck.
GBS behält sich das Recht vor, diese Druckschrift und die darin beschriebenen Produkte ohne Vorankündigung zu ändern. Alle die Produkte betreffenden Leistungsbeschreibungen und
Informationen können jederzeit ohne Vorankündigung geändert werden.
Durch die Bezugnahmen in dieser Druckschrift auf urheberrechtlich oder durch ein Patent geschützte Informationen oder Produkte werden keine Rechte von GBC oder Dritten übertragen.
GBC lehnt jede Haftung für Patentverletzungen sowie für die Verletzung anderer Rechte von Dritten ab.
Diese Druckschrift ist durch GBC urheberrechtlich geschützt (© 2002). Alle Rechte vorbehalten. Die Informationen in dieser Druckschrift sind gesetzlich geschützt und dürfen ohne
vorherige und ausdrückliche schriftliche Genehmigung von GBC in keiner Weise weder ganz noch teilweise vervielfältigt, aufbewahrt, weiter verbreitet oder übertragen werden.
NL
De informatie in deze publicatie geldt slechts ter verwijzing en wordt nauwkeurig en volledig geacht. GBC is niet aansprakelijk voor fouten in deze publicatie of voor incidentele of
voortvloeiende schade in verband met het verschaffen of gebruik van de informatie in deze publicatie, inclusief, maar niet beperkt tot stilzwijgende garanties van geschiktheid voor een
bepaald doel of verkoopbaarheid.
GBC behoudt zich het recht voor om zonder voorafgaande kennisgeving wijzigingen te maken in deze publicatie en in de producten die hierin worden beschreven. Alle specificaties en
informatie m.b.t. producten kunnen zonder voorafgaande kennisgeving gewijzigd worden.
Verwijzingen in deze publicatie naar informatie of producten beschermd door copyrights of patenten houdt geen licenties onder de rechten van GBC of anderen in. GBC is niet aansprakelijk
voor schendingen van patenten of andere rechten van derden.
De publicatie is auteursrechtelijk beschermd, copyright © 2002 door GBC. Alle rechten voorbehouden. De informatie in deze publicatie is eigendom van GBC en mag niet verveelvuldigd,
opgeslagen, overgebracht of overgedragen worden, geheel of gedeeltelijk, in welke vorm dan ook zonder voorafgaande en uitdrukkelijke schriftelijke toestemming van GBC.
F
L’information contenue dans cette publication est fournie à titre de référence et elle est considérée exacte et complète. GBC n’est pas responsable des erreurs contenues dans
cette publication ni des dommages indirects ou consécutifs portant sur l’utilisation ou la présentation de l’information de ce document, y compris, mais sans s’y limiter, toute
garantie implicite de commercialité ou d’adaptation à un usage particulier.
GBC se réserve le droit d’apporter des modifications à cette publication et aux produits qui y sont décrits sans préavis. Toutes les spécifications et l’information au sujet des
produits sont sujettes à changements sans préavis.
Toute référence à l’information ou aux produits protégés par un droit d’auteur ou un brevet présentée dans ce document ne porte aucune licence sous les droits de GBC ou
d’autres parties. GBC n’assume aucune responsabilité découlant de contraventions aux brevets ou à tout autre droit de tierces parties.
Cette publication est protégée par un droit d’auteur © 2002 de GBC. Tous droits réservés L’information contenue dans cette publication est privative et ne peut pas être
reproduite, mise en mémoire, transmise ou transférée, en partie ou en entier, sous quelque forme que ce soit sans la permission écrite préalable et expresse de GBC.
E
La información contenida en esta publicación es proporcionada a título de referencia y se considera que es precisa y completa. GBC no es responsable por errores contenidos en esta
publicación o por daños consecuentes o incidentales relacionados con la disponibilidad o el uso de la información en esta publicación, incluyendo y sin limitarse a, cualquier garantía de
aptitud y comerciabilidad para cualquier uso específico.
GBC se reserva el derecho de hacer cambios en esta publicación y a los productos descritos en la misma sin aviso previo. Todas las características y la información referente a los
productos, están sujetas a cambios sin aviso previo.
Las referencias en esta publicación a información o productos protegidos por derechos de propiedad intelectual o por patentes no otorga ninguna licencia amparada por los derechos de
GBC u otros. GBC no asume ninguna responsabilidad que se derive de la violación de patentes u otros derechos de terceras partes.
Copyright © 2002 Esta publicación está amparada por derechos de propiedad intelectual de GBC. Todos los derechos reservados. La información contenida en este documento es de
propiedad exclusiva y no puede reproducirse, almacenarse, transmitirse o transferirse, en su totalidad o en partes, y de ninguna manera, sin la autorización previa y por escrito de GBC.
1
I D
g
y
q
q
q
g
q
y
g
g
y
q
q
q
q
y
g
y
q
q
q
q
y
IMPORTANT SAFETY INSTRUCTIONS
YOUR SAFETY AS WELL AS THE SAFETY OF
OTHERS IS IMPORTANT T O GBC. IN THIS
INSTRUCTION MANUAL AND ON THE
PRODUCT , YOU WILL FIND IMPORT ANT
SAFETY MESSAGES REGARDING THE
PRODUCT . READ THESE MESSAGES
CAREFULL Y . READ ALL OF THE
INSTRUCTIONS AND SAVE THESE
INSTRUCTIONS FOR LATER USE.
THE SAFETY ALERT SYMBOL
PRECEDES EACH SAFETY MESSAGE IN
THIS INSTRUCTION MANUAL. THE SYMBOL
INDICATES A POTENTIAL PERSONAL
SAFETY HAZARD TO YOU OR OTHERS, AS
WELL AS PRODUCT OR PROPERTY DAMAGE.
THE FOLLOWING WARNINGS ARE FOUND
UPON THE MODELS 35, 65 AND 105.
!
ADVERTENCIA
o de choque
Ries
eléctrico
No abra:
Adent ro no ha
piezas r eparables
por el us uario.
Mant enimiento
solament e por
personal
calific ado
ATTE N TI ON
!
Ris
ue de
secousse
ue.
électri
Ne pas ouvrir.
Pas de pièces
réparables par
l'uti lisateur .
Entretien
seulement par
personnel
ualifié.
THIS SAFETY MESSAGE MEANS THAT YOU
COULD BE SERIOUSL Y HURT OR KILLED IF
YOU OPEN THE PRODUCT AND EXPOSE
YOURSELF TO HAZARDOUS VOLT AGE.
!
ADVERTENCIA
RODILLOS
CALIENTES.
PUNT O DE
PINCHAMIENT O.
Mantener manos
ropa a d istanci a.
!
ATTENTION
ROULEAUX
CHAUDS.
POINT DE
PINCEMENT.
Tenir mains et
vêtements à l'écart.
THIS SAFETY MESSAGE MEANS THAT YOU
COULD BE BURNED AND YOUR FINGERS AND
HANDS COULD BE TRAPPED AND CRUSHED
IN THE HOT ROLLERS. CLOTHING, JEWELRY
AND LONG HAIR COULD BE CAUGHT IN THE
ROLLERS AND PULL YOU INTO THEM.
!
ADVERTENCIA
NAVAJA FILOSA.
Mant ener manos y
dedos a dist ancia.
!
ATTENTION
LAME COUPANT E.
Tenir mains et
doigts à l'écart.
THIS SAFETY MESSAGE MEANS THAT YOU
COULD CUT YOURSELF IF YOU ARE NOT
CAREFUL.
WARNING: DO NOT A TTEMPT T O
SERVICE OR REP AIR THE CA TENA
SERIES LAMINAT OR.
WARNING: DO NOT CONNECT THE
CATENA SERIES LAMINA T OR TO AN
ELECTRICAL SUPPL Y OR ATTEMPT TO
OPERATE THE LAMINA T OR UNTIL YOU HA VE
COMPLETEL Y READ THESE INSTRUCTIONS.
MAINTAIN THESE INSTRUCTIONS IN A
CONVENIENT LOCATION FOR FUTURE
REFERENCE.
WARNING: TO GUARD AGAINST
INJURY , THE FOLLOWING SAFETY
PRECAUTIONS MUST BE OBSERVED IN THE
INSTALLA TION AND USE OF THE
LAMINATOR.
!
WARNING
Elect rical shoc k
hazard.
Do not open.
No user
serv iceable
part s inside.
to
Refer s ervicin
ualified s ervic e
personnel.
!
CAUTION
HOT ROLLS.
PINCH POINT .
Keep hand s and
clot hin
away.
!
CAUTION
SHARP BLADE.
Keep hands and
clot hing away.
IMPORTANTI ISTRUZIONI DI SICUREZZA
LA VOSTRA SICUREZZA E QUELLA DEGLI
ALTRI E’ IMPORTANTE PER LA GBC. IL
PRESENTE MANUALE DI ISTRUZIONE
CONTIENE IMPORTANTI A VVERTENZE DI
SICUREZZA RELATIVE AL PRODOTT O.
LEGGERE ATTENT AMENTE T ALI AVVERTENZE E
CONSERV ARLE PER USO FUTURO.
CIASCUNA AVVERTENZA CONTENUT A
NEL PRESENTE MANUALE E’
PRECEDUTA DA UN SIMBOLO DI PERICOLO.
TALE SIMBOLO INDICA UN POTENZIALE
PERICOLO PER LA SICUREZZA ED INCOLUMITÀ
DEGLI OPERA TORI ED IL RISCHIO DI
DANNEGGIAMENTO DEL PRODOTTO O DI
ALTRI BENI.
LE SEGUENTI AVVERTENZE SONO V ALIDE
PER I MODELLI 35, 65 e 105.
!
ADVERTENCIA
o de choque
Ries
eléctrico
No abra:
Adent ro no ha
piezas r eparables
por el us uario.
Mant enimiento
solament e por
personal
calific ado
QUESTO MESSAGGIO SIGNIFICA CHE
POTRESTE RIMANERE SERIAMENTE FERITI
APRENDO LA MACCHINA E VI POTRESTE
ESPORRE A UN VOLT AGGIO PERICOLOSO.
!
ADVERTENCIA
RODILLOS
CALIENT ES.
PUNT O DE
PINCHAMIENT O.
Mantener manos
ropa a d istanc ia.
QUESTO MESSAGGIO SIGNIFICA CHE
POTRESTE SCOTTARVI E RIMANERE
IMPIGLIATI CON GLI ABITI O CON I CAPELLI
NEI RULLI. IL VESTIARIO, I GIOIELLI ED I
CAPELLI LUNGHI POTREBBERO RIMANERE
IMPIGLIATI NEI RULLI E TIRAR VI DENTRO GLI
STESSI.
!
ADVERTENCIA
NAVAJA FILOSA.
Mantener manos y
dedos a distancia.
QUESTO MESSAGGIO INDICA IL RISCHIO DI
TAGLI ALLE MANI SE NON SI PRESTA
SUFFICIENTE ATTENZIONE.
RIP ARAZIONE SULLA PLASTIFICATRICE
CATENA AD ECCEZIONE DI QUANT O
PREVISTO DALLE PRESENTI ISTRUZIONI
OPERATIVE.
PRIMA DI ALLACCIARE ALLA RETE O
TENTARE DI F AR FUNZIONARE LA
PLASTIFICATRICE SERIE CA TENA. IL
PRESENTE MANUALE DEVE ESSERE
OPPORTUNAMENTE CUSTODITO PER
CONSENTIRE LA SUA CONSULT AZIONE
FUTURA.
OSSERV ARE LE SEGUENTI ISTRUZIONI DI
SICUREZZA DURANTE L’ INST ALLAZIONE E L ’
USO DELLA MACCHINA PLASTIFICA TRICE.
!
ATTE N TI ON
ue de
Ris
secousse
ue.
électri
Ne pas ouvrir.
Pas de pièces
réparables par
l'uti lisateur .
Entretien
seulement par
ualifié.
personnel
!
ATTENTION
ROULEAUX
CHAUDS.
POINT DE
PINCEMENT .
Tenir mains et
vêtements à l'écart.
!
ATTENTION
LAME COUPANT E.
Tenir mains et
doigts à l'écart.
!
ATTENZIONE
Pericolo di sca rica
elett rica.
Nessuna parte
riparabile
dall' ute nte.
Chiamare un
servizio
di riparaz ioni
ualific ato.
ATTENZIONE
!
RULLI CALDI.
PE RICOL O DI
IMPIGLIARSI
Tenere mani e abiti
lont ani.
!
AT TENZIONE
LAMA AFFILATA .
Tenere lontano le
mani.
ATTENZIONE: NON EFFETTUARE
INTERVENTI DI MANUTENZIONE O
ATTENZIONE: L ’UTENTE E’ TENUT O A
LEGGERE IL PRESENTE MANUALE
ATTENZIONE: PER EVIT ARE DANNI
ALLE PERSONE E’ NECESSARIO
WICHTIGE SICHERHEITSVORSCHRIFTEN
IHRE SICHERHEIT SOWIE DIE SICHERHEIT
ANDERER IST FÜR GBC EIN WICHTIGES
ANLIEGEN. IN DEN FOLGENDEN
BEDIENUNGSANLEITUNGEN UND AUF DEM
PRODUKT SELBST SIND WICHTIGE
SICHERHEITSHINWEISE ZU FINDEN. LESEN SIE
DIESE SORGFÄL TIG DURCH. LESEN SIE ALLE
ANWEISUNGEN AND BEWAHREN SIE DIESE
ZUR SPÄTEREN BEZUGNAHME AUF .
JEDER SICHERHEITSHINWEIS IN DEN
FOLGENDEN
BEDIENUNGSANLEITUNGEN IST DURCH
EIN GEFAHRENSYMBOL
GEKENNZEICHNET . DIESES SYMBOL WEIST
AUF EINE MÖGLICHE GEFAHR FÜR SIE UND
ANDERE HIN, SOWIE AUF EINE MÖGLICHE
BESCHÄDIGUNG DES PRODUKTS ODER
WEITERE SACHSCHÄDEN.
DIE FOLGENDEN WARNUNGEN SIND AUF DEN
MODELLEN 35, 65 UND 105 ZU FINDEN.
!
ADVERT ENCIA
o de choque
Ries
eléctrico
No abra:
Adent ro no ha
piezas r eparables
por el usuar io.
Mant enimiento
solament e por
personal
calificado
!
AT TENTION
ue de
Ris
secousse
ue.
électri
Ne pas ouvr ir.
Pas de pièces
réparables par
l'utilisat eur.
Entretien
seulement par
personnel
ualifié.
DIESER SICHERHEITSHINWEIS WARNT VOR
DER GEFAHR SCHWERER VERLETZUNGEN
ODER DEM TOD, WENN SIE DIESES PRODUKT
ÖFFNEN UND SICH DER GEFÄHRLICHEN
SPANNUNG AUSSETZEN.
!
ADVERTENCIA
RODILLOS
CALIENT ES.
PUNT O DE
PINCHAMIENT O.
Mantener manos
ropa a d istanc ia.
!
ATT EN T ION
ROULEAUX
CHAUDS.
POINT DE
PINCEMENT .
Tenir mains et
vêtements à l'écart.
DIESER SICHERHEITSHINWEIS BEDEUTET ,
DASS ES ZU VERBRENNUNGEN KOMMEN
KANN, UND DASS FINGER UND HÄNDE
ZWISCHEN DEN HEIßEN WALZEN
ZERQUETSCHT WERDEN KÖNNTEN.
KLEIDUNGSSTÜCKE, SCHMUCK UND LANGES
HAAR KÖNNTEN SICH IN DEN WALZEN
VERFANGEN UND SIE MIT HINEINZIEHEN.
!
ADVERTENCIA
NAVA JA FIL OSA .
Mantener m anos y
dedos a distanc ia.
!
ATTENTI ON
LAME COUPANTE.
Tenir mains et
doigts à l'écart.
DIESER SICHERHEITSHINWEIS BEDEUTET ,
DASS SCHNITTVERLETZUNGEN
VERURSACHT WERDEN KÖNNTEN, WENN SIE
NICHT VORSICHTIG SIND.
WARNUNG: VERSUCHEN SIE NICHT , DAS
CATENA LAMINIERGERÄT SELBST ZU
WARTEN ODER ZU REP ARIEREN.
WARNUNG: DAS CATENA
LAMINIERGERÄT DARF ERST DANN AN
DEN STROM ANGESCHLOSSEN UND
BENUTZT WERDEN, WENN SIE DIESE
BEDIENUNGSANLEITUNGEN VOLLSTÄNDIG
GELESEN HABEN. BEWAHREN SIE DIE
ANLEITUNGEN ZUR SPÄTEREN
WIEDERVERWENDUNG AN EINEM SICHEREN
ORT AUF .
WARNUNG: ZUM SCHUTZ GEGEN
VERLETZUNGEN MÜSSEN DIE
NACHSTEHENDEN VORSICHTSMAßNAHMEN
BEI DER INSTALLA TION UND BEIM BETRIEB
DES LAMINIERGERÄTS BEACHTET WERDEN.
!
WARNUNG
Spannungsführende
Teile.
Nicht offnen.
..
Ent halt keine vom
..
Endver braucher zu
wart ende Teile.
Für Service, bitte
wenden Sie sich an
ualifiziertes
Serv ice-Per sonal
an.
!
VORSICHT
HEISSE WALZEN
KLEMMSTELLE
Mi t Hä nden und
Kleidern nicht
berühren.
!
VORSICHT
SCHARFE KLINGE
Mit Händen und
Fingern nicht beruhren.
2
NL F E
g
y
q
q
q
g
q
y
g
g
y
q
q
q
g
g
g
y
g
g
y
q
q
q
g
q
y
g
BELANGRIJKE VEILIGHEIDSVOORSCHRIFTEN
UW VEILIGHEID EN DIE VAN ANDEREN IS
BELANGRIJK VOOR GBC. IN DEZE
HANDLEIDING VINDT U BELANGRIJKE
VEILIGHEIDSVOORSCHRIFTEN VOOR HET
PRODUCT .LEES DEZE
VEILIGHEIDSVOORSCHRIFTEN NAUWKEURIG
DOOR.
ELK VEILIGHEIDSVOORSCHRIFT IN
DEZE HANDLEIDING WORDT
VOORAFGEGAAN DOOR EEN
WAARSCHUWINGSSYMBOOL. DIT SYMBOOL
WIJST EROP DAT ER GEVAAR BEST AA T
VOOR LICHAMELIJK LETSEL VOOR U OF
ANDEREN, SCHADE AAN HET APPARAA T OF
ANDERE MATERIËLE SCHADE.
DE VOLGENDE WAARSCHUWINGEN ZIJN TE
VINDEN OP MODEL 35, 65 EN 105.
!
ADVERTENCIA
o de choque
Ries
eléctrico
No abra:
Adent ro no ha
piezas r eparables
por el us uario.
Mant enimiento
solament e por
personal
calific ado
!
ATTE N TI ON
ue de
Ris
secousse
ue.
électri
Ne pas ouvrir.
Pas de pièces
réparables par
l'utilisat eur.
Entretien
seulement par
personnel
ualifié.
DEZE WAARSCHUWING BETEKENT DA T U
ERNSTIG OF ZELFS DODELIJK LETSEL OP
KUNT LOPEN ALS U HET PRODUCT OPENT EN
UZELF BLOOTSTELT AAN GEV AARLIJK
VOLTAGE.
!
ADVERTENCIA
RODILLOS
CALIENT ES.
PUNT O DE
PINCHAMIENT O.
Mantener manos
ropa a d istanc ia.
!
ATTENTION
ROULEAUX
CHAUDS.
POINT DE
PINCEMENT .
Tenir mains et
vêtements à l'écart.
DEZE WAARSCHUWING BETEKENT DA T U
ZICH KUNT BRANDEN EN DAT UW VINGERS
EN HANDEN BEKNELD OF VERBRIJZELD
KUNNEN WORDEN IN DE WARMTEROLLERS.
KLEDING, SIERADEN EN LANG HAAR KUNNEN
IN DE ROLLERS BEKNELD RAKEN EN U
MEETREKKEN.
ADVERTENCIA
!
NAVAJA FILOSA.
Mantener m anos y
dedos a dist ancia.
ATT ENTION
!
LAME COUPAN TE.
Tenir mains et
doigts à l'écart.
DEZE WAARSCHUWING BETEKENT DA T U
ZICHZELF KUNT SNIJDEN ALS U NIET
VOORZICHTIG BENT .
WAARSCHUWING PROBEER NIET DE
CATENA-SERIES LAMINA T OR ZELF TE
REPAREREN OF TE ONDERHOUDEN.
WAARSCHUWING SLUIT DE CA TENA-
SERIES LAMINATOR NIET AAN OP EEN
ELEKTRISCHE VOEDINGSBRON EN PROBEER
NIET DE LAMINAT OR TE GEBRUIKEN
VOORDAT U DEZE HANDLEIDING VOLLEDIG
HEBT GELEZEN. BEWAAR DE HANDLEIDING
OP EEN HANDIGE PLAATS, ZODA T U DEZE
LATER KUNT RAADPLEGEN.
WAARSCHUWING OM LETSEL TE
VOORKOMEN, MOETEN DE VOLGENDE
VEILIGHEIDSMAATREGELEN IN ACHT
WORDEN GENOMEN BIJ INSTALLA TIE EN
GEBRUIK VAN DE LAMINA T OR.
!
WAARSCHUWING
Kans op
elekt rische
schok.
Niet openen
een door
Bevat
ebruiker te
reparer en
onderdelen.
d
Door bev oe
serv ice personeel
laten r epareren
VOORZICHTIG
!
HET E ROLLERS
AFKNIJPPUNT.
Houd handen en
op een
kledin
afs tan d.
VOORZICHTIG
!
!
SCHERP BLAD.
Houdhanden en
vingers op een afs tand.
IMPORTANTES CONSIGNES DE SÉCURITÉ
LA SÉCURITÉ DES UTILISA TEURS EST UNE
PRIORITÉ POUR GBC. VOUS TROUVEREZ,
DANS CE MANUEL UTILISATEUR,
D’IMPORT ANTS MESSAGES SÉCURITÉ
CONCERNANT L’ÉQUIPEMENT. LISEZ-LES
TRÈS A TTENTIVEMENT .
LE SYMBOLE “ATTENTION SÉCURITÉ”
PRÉCÈDE CHAQUE MESSAGE DU
MANUEL OPERA TEUR RELA TIF À LA
SÉCURITÉ. CE SYMBOLE INDIQUE UN RISQUE
POTENTIEL DE BLESSURES CORPORELLES
POUR L’UTILISATEUR OU D’ÉVENTUELS
DOMMAGES POUR L’ÉQUIPEMENT.
LES MESSAGES DE SÉCURITÉ SUIV ANTS SE
TROUVENT SUR LES MODÈLES 35, 65 ET 105.
!
ADVERTENCIA
o de choque
Ries
eléctrico
No abra:
Adent ro no ha
piezas r eparables
por el us uario.
Mant enimiento
solament e por
personal
calific ado
CE MESSAGE DE SÉCURITÉ INDIQUE UN
RISQUE DE BLESSURES SERIEUSES OU
MORT SI VOUS OUVREZ LA PLASTIFIEUSE
ET VOUS EXPOSEZ VOUS MÊME À UN HAUT
VOLTAGE.
!
ADVERTENCIA
RODILLOS
CALIENTES.
PUNT O DE
PINCHAMIENT O.
Mantener manos
ropa a d istanci a.
CE MESSAGE DE SÉCURITÉ INDIQUE QUE
VOUS POURRIEZ BRÛLER VOUS MÊME ET
QUE VOS MAINS ET DOIGTS POURRAIENT
ÊTRE BLOQUÉS ET ÉCRASÉS P AR LES
ROULEAUX CHAUDS. LES VÊTEMENTS, LES
BIJOUX ET LES CHEVEUX LONGS PEUVENT
ÊTRE TIRÉS DANS LES ROULEAUX.
!
ADVERTENCIA
NAVAJA FILOSA.
Mant ener manos y
dedos a dist ancia.
CE MESSAGE DE SÉCURITÉ INDIQUE QUE
VOUS POUVEZ VOUS BLESSER SI VOUS NE
FAITES P AS D’ATTENTION.
PLASTIFIEUSE SÉRIE CA TENA. N’EFFECTUEZ
QUE LES OPERA TIONS MENTIONNÉES DANS
CE MANUEL UTILISATEUR.
L’UTILISEZ PAS A VANT D’A VOIR LU EN
TOTALITÉ CES INSTRUCTIONS. CONSERVEZLES DANS UN ENDROIT APPROPRIÉ AFIN DE
POUVOIR VOUS Y RÉFÉRER SI NÉCESSAIRE.
VOUS AUX CONSIGNES DE SÉCURITÉ LORS
DE L’INST ALLA TION ET DE L ’UTILISA TION DE
LA PLASTIFIEUSE.
!
ATTE N TI ON
ue de
Ris
secousse
ue.
électri
Ne pas ouvrir .
Pas de pièces
réparables par
l'utilisat eur.
Entretien
seulement par
ualifié.
personnel
!
ATTENTION
ROULEAUX
CHAUDS.
POINT DE
PINCEMENT.
Tenir mains et
vêtements à l'écart.
!
ATTENTION
LAME COUPANT E.
Tenir mains et
doigts à l'écart.
!
WARNING
Elect rical shock
hazard.
Do not open.
No user
serv iceable
part s inside.
Refer servicin
ualified s ervic e
personnel.
!
CAUTION
HOT ROLLS.
PINCH POINT .
Keep hand s and
clot hin
away.
!
CAUTION
SHARP BLADE.
Keep hands and
clot hing away.
ATTENTION : NE TENTEZ P AS DE
REPARER VOUS-MÊME LA
ATTENTION : NE BRANCHEZ P AS LA
PLASTIFIEUSE SÉRIE CA TENA ET NE
ATTENTION : POUR PRÉVENIR T OUT
RISQUE DE BLESSURE, CONFORMEZ-
to
INSTRUCCIONES IMPORTANTES DE SEGURIDAD
GBC SE PREOCUPA POR SU PROPIA
SEGURIDAD Y LA SEGURIDAD DE LAS
DEMÁS PERSONAS. USTED ENCONTRARÁ
AVISOS IMPORT ANTES DE SEGURIDAD
SOBRE EL PRODUCTO EN ESTE MANUAL Y
EN SU UNIDAD. LEA CUIDADOSAMENTE
ESTOS AVISOS. LEA TODAS LAS
INSTRUCCIONES Y GUÁRDELAS P ARA
USARLAS COMO REFERENCIA EN EL
FUTURO.
EL SIGNO DE ADMIRACIÓN ANTECEDE
A CADA AVISO DE SEGURIDAD EN
ESTE MANUAL DE INSTRUCCIONES. INDICA
QUE EXISTE UN PELIGRO POTENCIAL DE
SEGURIDAD PERSONAL PARA USTED Y P ARA
OTRAS PERSONAS QUE ADEMÁS PODRÍA
DAÑAR EL PRODUCTO O LA PROPIEDAD
PERSONAL.
LOS MODELOS 35, 65 Y 105 INCLUYEN LAS
SIGUIENTES ADVERTENCIAS.
!
ADVERTENCIA
Ries
o de choque
eléctrico
No abra:
Adent ro no ha
piezas r eparables
por el us uario.
Mant enimiento
solament e por
personal
calif icado
ESTE A VISO DE SEGURIDAD INDICA QUE
USTED SE PUEDE LESIONAR GRAVEMENTE O
MORIR SI ABRE EL PRODUCTO Y SE EXPONE
A LA TENSIÓN PELIGROSA.
!
ADVERTENCIA
RODILLOS
CALIENTES.
PUNT O DE
PINCHAMIENT O.
Mantener manos
ropa a d istanci a.
ESTE A VISO DE SEGURIDAD INDICA QUE
USTED SE PUEDE QUEMAR Y QUE SUS DEDOS O
MANOS SE PUEDEN AT ASCAR Y TRITURAR EN
LOS RODILLOS CALIENTES. LA ROPA, L A
JOYERÍA Y EL CABELLO LARGO PUEDEN
QUEDAR AT ASCADOS EN LOS RODILLOS Y
JALARLO HACIA LOS
!
ADVERTENCIA
NAVAJA FILOSA.
Mant ener manos y
dedos a dist ancia.
RODILLOS.
ESTE A VISO DE SEGURIDAD INDICA QUE
USTED SE PUEDE CORT AR SI NO TIENE
CUIDADO.
UNA TOMA ELÉCTRICA NI INTENTE OPERAR
EL LAMINADOR HASTA HABER LEÍDO
COMPLETAMENTE EST AS INSTRUCCIONES.
MANTENGA ESTAS INSTRUCCIONES EN UNA
UBICACIÓN CONVENIENTE P ARA USARLAS
COMO REFERENCIA EN EL FUTURO.
SER MANTENIDAS AL INSTALAR Y USAR EL
LAMINADOR.
!
ATTE N TI ON
Ris
ue de
secousse
ue.
électri
Ne pas ouvrir.
Pas de pièces
réparables par
l'utilisat eur.
Entretien
seulement par
ualifié.
personnel
!
ATT EN T ION
ROULEAUX
CHAUDS.
POINT DE
PINCEMENT.
Tenir mains et
vêtements à l'écart.
!
ATTENTION
LAME COUPANT E.
Tenir mains et
doigts à l'écart.
!
WARNING
Elect rical shock
hazard.
Do not open.
No user
serv iceable
part s inside.
Refer servicin
ualified serv ice
personnel.
!
CAUTION
HOT ROLLS.
PINCH POINT .
Keep hand s and
away.
clot hin
!
CAUTION
SHARP BLADE.
Keep hands and
clot hing away.
to
ADVERTENCIA: NO INTENTE
SUMINISTRAR SERVICIO O REP ARAR
ESTE LAMINADOR CATENA.
ADVERTENCIA: NO CONECTE EL
LAMINADOR DE LA SERIE CATENA EN
ADVERTENCIA: PARA PROTEGERSE
CONTRA LESIONES, LAS SIGUIENTES
PRECAUCIONES DE SEGURIDAD DEBEN
3
I D
IMPORTANT SAFEGUARDS
General
Keep hands, long hair, loose clothing, and
articles such as necklaces or ties away from
the front of the heat and pull rollers to avoid
entanglement and entrapment.
The heat rollers can reach temperatures over
300° F. Avoid contact with the heat rollers
during operation or shortly after power has
been removed from the laminator. Do not use
the laminator for other than its intended
purpose..
Do not place the laminator on an unstable cart,
stand or table. An unstable surface may cause
the laminator to fall resulting in serious bodily
injury. Avoid quick stops, excessive force and
uneven floor surfaces when moving the
laminator on a cart or stand.
Do not defeat or remove electrical and
mechanical safety equipment such as
interlocks, shields and guards.
Do not insert objects unsuitable for lamination or
expose the equipment to liquids.
Electrical
The laminator should be connected only to a
source of power as indicated in these
instructions and on the serial plate located on
the rear of the laminator. Contact an electrician
should the attachment plug provided with the
laminator not match the receptacles at your
location.
CAUTION: The receptacle must be
located near the equipment and easily
accessible.
Disconnect the attachment plug from the
receptacle to which it is connected and keep
the power supply cord in your possession
while moving the laminator.
Do not operate the laminator with a damaged
power supply cord or attachment plug, upon
occurrence of a malfunction, or after the
laminator has been damaged. Contact GBC’s
Technical Service Department or your dealer/
distributor for assistance.
Service
Perform only the routine maintenance
procedures referred to in these instructions.
WARNING: Do not attempt to service or
repair the laminator. Disconnect the plug
from the receptacle and contact GBC’s
Technical Department or your dealer/distributor
when one or more of the following has
occurred.
- The power supply cord or attachment plug is
damaged.
- Liquid has been spilled into the laminator.
- The laminator is malfunctioning after being
mishandled.
- The laminator does not operate as described
in these instructions.
IMPORTANTI MISURE DI SICUREZZA
Generale
Mantenere mani, capelli lunghi, vestiario ampio ed
articoli come collane o cravatte a distanza dai rulli di
riscaldamento e dai rulli tenditori.
I rulli di riscaldamento possono raggiungere
temperature superiori ai 150° C. Evitare di entrare in
contatto con i rulli di riscaldamento durante il loro
funzionamento o subito dopo che la macchina è stata
spenta.
Non utilizzare la macchina per usi diversi da quelli
previsti.
Non posizionare la plastificatrice su carrelli, banchi o
tavoli instabili. Una superficie instabile potrebbe far
cadere la plastificatrice provocando seri danni alle
persone. Evitare fermate brusche, forza eccessiva o
posizionamento su pavimenti irregolari durante le
operazioni di spostamento della plastificatrice su carrelli
o banchi.
Non escludere o rimuovere meccanismi di sicurezza
elettrici o meccanici come interruttori, schermi o
protezioni.
Non inserire oggetti estranei al processo di
plastificazione o versare liquidi sulla macchina.
Impianto elettrico
La plastificatrice deve essere collegata ad una fonte di
energia elettrica secondo quanto riportato nelle
istruzioni e sulla targa di identificazione posta sul retro
della macchina. Richiedere l’ intervento di un elettricista
qualificato nel caso in cui la spina in dotazione con la
plastificatrice non sia adatta alle prese disponibili sul
posto.
ATTENZIONE:
Una presa di facile accesso
deve essere collocata vicino alla macchina.
Scollegare la spina dalla presa alla quale era collegata e
tenere con sé il cavo di alimentazione durante lo
spostamento della macchina.
Non attivare la macchina in caso di malfunzionamento
o danneggiamento della plastificatrice o se il cavo di
alimentazione o la spina sono danneggiati. Per
assistenza, contattare il servizio di assistenza tecnica
della GBC o il Vostro rappresentante o agente.
Manutenzione
Eseguire solamente le operazioni di manutenzione
ordinaria riportate in queste istruzioni.
ATTENZIONE:
Non tentare di effettuare altre
operazioni di manutenzione o riparazioni sulla
plastificatrice. Togliere la spina dalla presa e contattare
il servizio di assistenza tecnica della GBC o il Vostro
rappresentante/distributore se si verificano una o più
delle seguenti condizioni:
- Il cavo di alimentazione o la spina è danneggiato.
- Del liquido è stato versato accidentalmente sulla
macchina.
- La plastificatrice mostra anomalie a seguito di
manomissione.
- La plastificatrice non funziona come riportato nel
presente manuale.
Allgemein
Zum Ihrem eigenen Schutz achten Sie auf einen
sicheren Abstand zwischen Händen, langem Haar, loser
Kleidung sowie Halsketten, Krawatten, etc. und den
Heiß- und Zugwalzen.
Die Walzen können Temperaturen von über 150ºC
(300° F) erreichen. Vermeiden Sie jeden Kontakt mit den
Heißwalzen, wenn das Laminiergerät in Betrieb ist und
wenn dieses erst kurz vorher ausgeschaltet wurde. Das
Gerät darf nur für den vorgesehenen Zweck verwendet
werden.
Das Laminiergerät darf nicht auf einem unstabilen
Wagen, Gestell oder Tisch stehen, da das Gerät
herunterfallen und schwere Verletzungen verursachen
könnte. Abruptes Anhalten, übermäßige
Kraftanwendung und unebene Fußböden sind zu
vermeiden, wenn das Gerät auf einem Wagen oder
einem Gestell fortbewegt wird.
Elektrische und mechanische Schutzvorrichtungen, wie
Verriegelungen, Schutzschilder, etc. dürfen nicht
ausgeschaltet oder entfernt werden.
Führen Sie keine Gegenstände ein, die zum Laminieren
ungeeignet sind. Das Gerät darf mit keinen
Flüssigkeiten in Berührung kommen.
Elektrik
Das Laminiergerät darf nur an eine in diesen Anleitungen
und auf dem Typenschild an der Rückseite des Geräts
angegebene Stromquelle angeschlossen werden. Wenn
der mit dem Gerät gelieferte Stecker nicht in die
Steckdosen an Ihrem Standort passen sollte, wenden
Sie sich bitte an einen Fachmann.
zugänglich sein.
Wenn das Gerät an einen anderen Standort verlegt
wird, ziehen Sie den Stecker aus der Steckdose und
behalten Sie das Anschlusskabel in der Zwischenzeit
stets bei sich.
Das Laminiergerät darf nicht benutzt werden, wenn das
Anschlusskabel oder der Stecker beschädigt ist, wenn
eine Störung auftritt oder wenn das Gerät beschädigt
ist. Wenden Sie sich an den technischen Kundendienst
von GBC oder an Ihren Fachhändler oder Vertreter.
Wartung
Führen Sie nur die in diesen Anleitungen beschriebenen
routinemäßigen Wartungsarbeiten durch.
reparieren. Wenn eines oder mehrere der nachstehend
aufgeführten Ereignisse eintreten sollten, ziehen Sie
den Stecker aus der Steckdose und setzen Sie sich mit
dem technischen Kundendienst von GBC oder mit
Ihrem Fachhändler oder Vertreter in Verbindung:
- Das elektrische Anschlusskabel oder der Stecker ist
- Eine Flüssigkeit ist über das Laminiergerät
- Das Laminiergerät funktioniert aufgrund
- Das Laminiergerät funktioniert nicht wie in diesen
WICHTIGE VORSICHTSMASSNAHMEN
VORSICHT:
Nähe des Geräts befinden und leicht
WARNUNG:
Laminiergerät selbst zu warten oder zu
beschädigt.
verschüttet worden.
unsachgemäßer Behandlung nicht mehr richtig.
Anleitungen beschrieben.
Die Steckdose muss sich in der
Versuchen Sie nicht, das
4

NL F E
BELANGRIJKE VEILIGHEIDSMAATREGELEN
Algemeen
Houd handen, lang haar, losse kleding, en voorwerpen
als halskettingen en stropdassen weg bij de voorkant
van de warmterollers en de trekrollers om te
voorkomen dat ze daarin vast komen te zitten of
verward raken.
De warmterollers kunnen temperaturen van meer dan
150°C bereiken. Vermijd daarom contact met de
warmterollers tijdens bedrijf en gedurende een bepaalde
periode nadat de voeding van de laminator is
uitgeschakeld. Gebruik de laminator niet voor
oneigenlijke doeleinden.
Plaats de laminator nooit op een onstabiele wagen,
stellage of tafel. Door een onstabiel oppervlak kan de
laminator vallen, waardoor ernstig lichamelijk letsel kan
ontstaan. Vermijd plotselinge onderbrekingen, te ruwe
behandeling en ongelijke vloeroppervlakken wanneer u
de laminator op een wagen of stellage plaatst.
Verwijder nooit een elektrisch of mechanisch
veiligheidsmechanisme, zoals
vergrendelingsschakelaars, beschermkappen en
afdekplaten.
Steek geen voorwerpen in het apparaat die niet
geschikt zijn om te lamineren en mors geen vloeistof
over het apparaat.
Elektrisch
Sluit de laminator alleen aan op een voedingsbron die
voldoet aan de machinespecificaties zoals vermeld in
deze instructie en op de type-aanduiding achterop de
laminator. Raadpleeg een deskundig installateur als de
bijgeleverde stekker niet past in de aanwezige
wandcontactdoos.
VOORZICHTIG:
in buurt van het apparaat te bevinden en
gemakkelijk toegankelijk te zijn.
Haal de stekker uit het stopcontact en houd het
aansluitsnoer bij de hand als u de machine verplaatst.
Activeer de laminator niet als het aansluitsnoer of de
stekker beschadigd is, wanneer een storing optreedt, of
als de laminator beschadigd is. Neem contact op met
GBC’s Technical Service Department of met uw dealer/
distributeur als u hulp nodig hebt.
Service
Voer uitsluitend de routine-onderhoudswerkzaamheden
uit die in deze instructie worden beschreven.
WAARSCHUWING:
zelf te repareren of te onderhouden. Haal de
stekker uit de wandcontactdoos en neem contact op
met GBC’s Technical Service Department of uw dealer/
distributeur indien een van de volgende situaties zich
voordoet:
- De stekker of het snoer is beschadigd.
- Er is vloeistof in de machine
terechtgekomen.
- De laminator werkt niet goed meer na
verkeerde behandeling van het apparaat.
- De laminator werkt niet op de in deze
handleiding beschreven wijze.
Het stopcontact dient zich
Probeer niet de laminator
Consignes générales
Eloignez des rouleaux chauffants et des
rouleaux d’entrainement mains, cheveux longs,
vêtements flottants et tous autres accessoires
tels que colliers ou cravates, pouvant être
happés et entraînés par ces rouleaux.
Les rouleaux chauffants peuvent atteindre une
température supérieure à 150° C. Evitez tout
contact avec ces rouleaux pendant l’utilisation
ou juste après l’arrêt de la plastifieuse. N’utilisez
pas cet équipement pour un usage autre que la
plastification.
N’installez pas la plastifieuse sur un support
instable. Elle pourrait tomber et provoquer des
blessures corporelles. Si vous la déplacez sur
son support, évitez les à-coups, les poussées
brusques et les sols inégaux.
Ne supprimez aucun des dispositifs électriques
ou mécaniques de sécurité tels que
verrouillages, capots et protections.
N’insérez pas d’objets impropres à la
plastification et veillez à ne pas renverser de
liquide dans la plastifieuse.
Consignes électriques
La plastifieuse doit être connectée à une prise
de courant dont le voltage correspond à celui
indiqué dans ce manuel et sur la plaque
d’identification située au dos de l’équipement.
Contactez un électricien qualifié si l’installation
électrique n’est pas conforme.
Débranchez la prise et tenez le cordon
d’alimentation lorsque vous déplacez
l’équipement.
N’utilisez pas la plastifieuse avec un cordon
d’alimentation ou une prise endommagés, si
vous constatez un dysfonctionnement ou si
l’équipement a été endommagé. Contactez votre
Représentant officiel GBC.
Service Après-Vente
N’effectuez que les opérations d’entretien
courantes mentionnées dans ce manuel.
l’équipement et contactez votre Représentant
officiel GBC dans les cas suivants :
- si le cordon d’alimentation ou la prise sont
- si un liquide quelconque a été répandu dans
- si la plastifieuse a subi une mauvaise
- si la plastifieuse ne fonctionne pas comme
CONSIGNES DE SÉCURITÉ IMPORTANTES
ATTENTION: Une prise d’accès facile
doit se trouver près de la plastifieuse.
ATTENTION: Ne tentez pas de réparer
vous-même la plastifieuse. Débranchez
endommagés,
la plastifieuse,
manipulation et fonctionne mal,
spécifié dans ce manuel.
P AUTAS DE SEGURIDAD IMPORTANTES
Precauciones generales
Mantenga las manos, el cabello largo, la ropa floja y los
artículos tales como los collares o corbatas alejados de
la parte frontal de los rodillos térmicos y de tracción
para evitar que queden atascados y atrapados.
Los rodillos térmicos pueden alcanzar la temperatura
de 150° C. Evite el contacto con los rodillos térmicos
durante la operación o poco tiempo después de haber
desconectado el laminador. No use el laminador para
propósitos para los que no fue diseñado.
No coloque el laminador en una carretilla, pedestal o
mesa inestable. Una superficie inestable podría causar
que el laminador se caiga, lo que podría resultar en
lesiones personales graves. Evite las paradas rápidas,
la fuerza excesiva o los pisos de superficie dispareja al
trasladar el laminador sobre una carretilla o pedestal.
No desactive ni quite los dispositivos de seguridad
eléctricos y mecánicos tales como los enclavamientos,
las pantallas y los resguardos.
No inserte objetos inadecuados para la laminación ni
exponga el equipo a sustancias líquidas.
Electricidad
El laminador debe ser conectado únicamente en una
fuente de electricidad como lo indican estas
instrucciones y la placa de serie ubicada en la parte
posterior del laminador. Comuníquese con un
electricista en caso de que el enchufe de conexión que
se suministra con el laminador no armonice con las
tomas disponibles.
PRECAUCIÓN:
ubicado cerca del equipo y tener una acceso
fácil.
Desconecte el enchufe de conexión de la toma en la
que está conectado y agarre el cable eléctrico mientras
traslada el laminador de un lugar a otro.
No opere el laminador con un cable eléctrico o enchufe
que se haya dañado, sea mientras ocurre un
desperfecto o después de que el laminador se haya
dañado. Comuníquese con el Departamento de
Servicio Técnico de GBC o con su concesionario/
distribuidor para que lo asistan.
Servicio
Efectúe únicamente los procedimientos de
mantenimiento rutinarios que se describen en estas
instrucciones.
ADVERTENCIA:
servicio ni de reparar este laminador.
Desconecte el enchufe de la toma y comuníquese con
el Departamento de Servicio Técnico de GBC o con su
concesionario/distribuidor cuando experimente uno de
los siguientes problemas:
- El cable eléctrico o el enchufe de conexión se han
dañado.
- Se ha derramado líquido sobre el laminador.
- El laminador funciona mal después de haber sido
manipulado erróneamente.
- El laminador no opera de la manera descrita en
estas instrucciones.
El receptáculo debe estar
No trate de suministrar
5
I D
WARRANTY
GBC Films Group warrants the equipment to be
free from defects in material and workmanship
for a period of 90 days for parts and labor
from the date of installation. This warranty is
the only warranty made by GBC Films Group
and cannot be modified or amended.
GBC Films Group’s sole and exclusive liability
and the customer’s sole and exclusive remedy
under this warranty shall be, at GBC Films
Group’s option, to repair or replace any such
defective part or product. These remedies are
only available if GBC Films Group’s examination
of the product discloses to GBC Films Group’s
satisfaction that such defects actually exist and
were not caused by misuse, neglect, attempt to
repair, unauthorized alteration or modification,
incorrect line voltage, fire, accident, flood or
other hazard.
Limited Warranty
This warranty specifically does not cover
damage to the laminating rollers caused by
knives, razor blades, other sharp objects,
failure caused by adhesives or improper use of
the machine. Warranty repair or replacement
does not extend the warranty beyond the initial
90 day period from the date of installation.
WARNING: Unauthorized customer
alterations will void this warranty.
THE WARRANTY MADE HEREIN IS IN LIEU OF
ALL OTHER WARRANTIES, EXPRESSED OR
IMPLIED, INCLUDING ANY WARRANTY OF
MERCHANTABILITY OR FITNESS FOR A
PARTICULAR PURPOSE. GBC FILMS GROUP
WILL NOT BE LIABLE FOR PROPERTY
DAMAGE OR PERSONAL INJURY (UNLESS
PRIMARILY CAUSED BY ITS NEGLIGENCE),
LOSS OF PROFIT OR OTHER INCIDENTAL OR
CONSEQUENTIAL DAMAGES ARISING OUT
OF THE USE OR INABILITY TO USE THE
EQUIPMENT.
Exclusions to the Warranty
This warranty specifically does not cover;
1. Damage to the laminating rollers caused by
knives, razor blades, other sharp objects or
failure caused by adhesives.
2. Damage to the machine caused by lifting,
tilting and/or any attempt to position the machine
other than rolling on the installed castors on
even surfaces.
3. Improper use of the machine.
4. Damage due from unqualified person(s)
servicing the machine.
QUALIFIED: Any person(s) trained by GBC to
perform service related work on such
equipment.
GARANZIA
GBC Films Group garantisce che questa
apparecchiatura è priva di difetti sia nel materiale
sia nella lavorazione per un periodo di 90 giorni
per le parti e la manodopera a partire dalla data
dell’installazione. La presente garanzia è l’unica
garanzia esistente da parte di GBC Films Group e
non è possibile modificarla o correggerla.
L’unica ed esclusiva responsabilità di GBC Films
Group e l’unico ed esclusivo rimedio del cliente
in base alla presente garanzia saranno, a scelta
di GBC Films Group, la riparazione o la
sostituzione di eventuali parti o prodotti difettosi.
Questi rimedi sono disponibili soltanto se l’esame
del prodotto da parte di GBC Films Group rivela,
a giudizio di GBC Films Group stesso, che tali
difetti esistono realmente e che non sono stati
provocati da un uso improprio, negligenza,
tentativi di riparazione, alterazioni o modifiche
non autorizzate, tensione di linea non corretta,
incendio, incidente, inondazione o altra
situazione pericolosa.
Garanzia limitata
Questa garanzia non copre, in particolare, i
danni ai rulli di laminazione provocati da
coltelli, lamette di rasoio, altri oggetti affilati,
guasti provocati da adesivi o uso improprio della
macchina. La riparazione o la sostituzione in
garanzia non estendono la garanzia stessa oltre
il periodo dei 90 giorni iniziali a partire dalla
data dell’installazione.
AVVERTENZA: questa garanzia sarà resa
nulla da alterazioni non autorizzate ad
opera del cliente.
LA PRESENTE GARANZIA SOSTITUISCE OGNI
E TUTTE LE ALTRE GARANZIE, ESPLICITE O
IMPLICITE, INCLUSO LE EVENTUALI GARANZIE
DI COMMERCIABILITÀ O IDONEITÀ AD UNO
SCOPO PARTICOLARE. GBC FILMS GROUP
NON SARÀ RESPONSABILE DI DANNI ALLA
PROPRIETÀ O ALLE PERSONE (A MENO CHE
SIANO STATI PROVOCATI PRINCIPALMENTE DA
UNA SUA NEGLIGENZA), PERDITA DI PROFITTI
O ALTRI DANNI INCIDENTALI O CONSEGUENTI
DERIVANTI DALL ’USO O DALLA MANCATA
CAPACITÀ ALL ’USO DELL ’APPARECCHIATURA.
Esclusioni dalla garanzia
In particolare, questa garanzia non copre:
1. Danni ai rulli di laminazione provocati da
coltelli, lamette di rasoio, altri oggetti affilati o
guasti provocati da adesivi.
2. Danni alla macchina provocati da sollevamento, inclinazione e/o eventuali tentativi di
collocare la macchina stessa altrove se non sulle
ruote orientabili rotolanti o superfici piane.
3. Uso improprio della macchina.
4. Danni dovuti ad interventi di assistenza alla
macchina realizzati da persona/e non qualificate.
QUALIFICATO: chiunque sia stato addestrato da
GBC a realizzare interventi relativi all’assistenza
su tale apparecchiatura.
GARANTIE
Die Garantie von GBC Films Group für das Gerät
erstreckt sich auf Material- und Fabrikationsfehler
und gilt für Ersatzteile und Arbeitszeit für eine
Frist von 90 Tagen ab Installation. Dies ist die einzige
von der GBC Films Group gewährte Garantie.
Sie kann weder verändert noch ergänzt werden.
Die einzige und ausschließliche Haftung von GBC
Films Group und die einzige und ausschließliche
Geltendmachung von Garantieansprüchen durch
den Kunden ist eine Reparatur oder der Ersatz
eines solchen fehlerhaften Teils oder Produkts
nach Entscheidung von GBC Films Group. Solche
Leistungen werden nur dann erbracht, wenn eine
Prüfung des Produkts durch GBC Films Group
zufrieden stellend ergibt, dass ein solcher Mangel
tatsächlich besteht, und dass dieser nicht durch
unsachgemäße Verwendung, Fahrlässigkeit, den
Versuch, das Gerät zu reparieren, unbefugte
Veränderung oder unbefugten Umbau, falsche
Betriebsspannung, Brand, Unfall, Überschwemmung
oder eine anderes Risiko verursacht wurde.
Beschränkte Garantie
Im Besonderen sind Beschädigungen der
Laminierwalzen, die durch Messer, Rasierklingen,
oder andere scharfe Gegenstände verursacht
wurden, sowie aufgrund von Klebstoffen oder
Missbrauch des Geräts verursachte Störungen
durch diese Garantie nicht gedeckt. Durch eine
Reparatur oder einen Ersatz unter dieser
Garantie wird die Garantiezeit von 90 Tagen ab
Installation nicht verlängert.
ACHTUNG: Durch unbefugte vom Kunden
vorgenommene Veränderungen wird
diese Garantie ungültig.
DIESE GARANTIE GILT ANSTELLE ALLER
WEITEREN AUSDRÜCKLICHEN UND
STILLSCHWEIGENDEN GARANTIEN,
EINSCHLIESSLICH DIE GARANTIE ZUR
HANDELSÜBLICHEN BRAUCHBARKEIT ODER
DIE FÄHIGKEIT FÜR EINEN BESTIMMTEN
ZWECK. GBC FILMS GROUP LEHNT JEDE
HAFTUNG FÜR SACHSCHÄDEN UND
PERSONENVERLETZUNGEN AB
(AUSGENOMMEN WENN DIESE IN ERSTER
LINIE DURCH FAHRLÄSSIGKEIT VON GBC
FILMS GROUP VERURSACHT WURDEN), SOWIE
FÜR BETRIEBSUNTERBRECHUNGEN UND
WEITEREN SCHADENERSATZ ODER
FOLGESCHÄDEN, DIE AUFGRUND DER
VERWENDUNG ODER DER UNFÄHIGKEIT, DAS
GERÄT ZU VERWENDEN VERURSACHT WURDEN.
Garantieausschlüsse
Im Besonderen wird folgendes durch diese
Garantie nicht gedeckt:
1. Beschädigung der Laminierwalzen durch
Messer, Rasierklingen oder andere scharfe
Gegenstände sowie aufgrund von Klebstoffen
verursachte Störungen.
2. Beschädigung des Geräts durch Hochheben,
Kippen und/oder den Versuch, das Gerät zu
installieren, ohne es auf den vorhandenen Rollen
auf einer flachen Unterlage fortzubewegen.
3. Unsachgemäße Anwendung des Geräts.
4. Schaden aufgrund von Wartungsarbeiten am
Gerät durch eine unqualifizierte Person oder
Personen.
QUALIFIZIERT: Alle Personen, die von GBC zur
Ausführung von Wartungsarbeiten an solchen
Geräten ausgebildet wurden.
6
NL F E
GARANTIE
GBC Films Group garandeert dat de apparatuur
geen defecten in het materiaal en in de
afwerking zal vertonen voor een periode van 90
dagen voor onderdelen en arbeid vanaf de
installatiedatum. Deze garantie is de enige
garantie van GBC Films Group en kan niet
gemodificeerd of gewijzigd worden.
GBC Films Group’s enige en exclusieve
aansprakelijkheid en het enige en exclusieve
rechtsmiddel van de klant onder deze garantie is
dat GBC Films Group, naar eigen goeddunken,
een zodanig defectief onderdeel of product zal
repareren of vervangen. Deze rechtsmiddelen
zijn alleen beschikbaar als uit onderzoek van het
product door GBC Group Films naar GBC Film
Group’s voldoening is gebleken dat het defect
werkelijk bestaat en niet veroorzaakt werd door
misbruik, verwaarlozing, poging tot reparatie,
niet-geautoriseerde wijziging of modificatie,
onjuist voltage, brand, een ongeluk, overstroming
of andere gevaren.
Beperkte garantie
Schade aan de lameringsrollen die veroorzaakt
werd door messen, scheermesjes of andere
scherpe objecten of storing veroorzaakt door
kleefstoffen of onjuist gebruik van de machine
valt uitdrukkelijk niet onder deze garantie.
Reparatie of vervanging is alleen van toepassing
op de eerste 90 dagen vanaf de installatieperiode. Deze periode wordt niet verlengd.
WAARSCHUWING: Niet-geautoriseerde
wijzigingen door de klant maken deze
garantie ongeldig.
DE GARANTIE HIERIN IS IN PLAATS VAN ALLE
ANDERE GARANTIES, UITDRUKKELIJK OF
STILZWIJGEND, INCLUSIEF GARANTIES VAN
VERKOOPBAARHEID OF GESCHIKTHEID VOOR
EEN BEPAALD DOEL. GBC FILMS GROUP IS
NIET VERANTWOORDELIJK VOOR
EIGENDOMSSCHADE OF PERSOONLIJK
LETSEL (TENZIJ HOOFDZAKELIJK VEROORZAAKT DOOR NALATIGHEID VAN GCB FILM
GROUP), WINSTVERLIES OF ANDERE INCIDENTELE OF VERVOLGSCHADE DIE VOORKOMT
UIT HET GEBRUIK VAN D E APPAR ATUUR OF DE
ONMOGELIJKHEID OM DE APPARATUUR TE
GEBRUIKEN.
Uitsluitingen van de garantie
De volgende punten vallen uitdrukkelijk niet
onder deze garantie:
1. Schade aan de lamineringsrollen veroorzaakt
door messen, scheermesjes, andere scherpe
objecten of storing veroorzaakt door kleefstoffen.
2. Schade aan de machine veroorzaakt door
optillen, kantelen en/of pogingen om de
machine op een andere wijze te verplaatsen dan
door de machine te rollen op de geïnstalleerde
zwenkwieltjes op gelijkmatige oppervlakken.
3. Onjuist gebruik van de machine.
4. Schade veroorzaakt door een niet-gekwalifi-
ceerd persoon of personen die onderhoud aan de
machine uitvoert of uitvoeren.
GEKWALIFICEERD: Personen die door GBC
getraind zijn om onderhouds- en
reparatiediensten op dergelijke apparatuur uit te
voeren.
GARANTIE
GBC Films Group garantit que l’équipement sera
libre de défauts de fabrication et de matériaux
pendant une période de 90 jours (pour les
pièces et la main d’œuvre) à partir de la date
d’installation. Cette garantie est la seule garantie
offerte par GBC Films Group et elle ne peut être
ni modifiée ni révisée.
La responsabilité seule et exclusive de
GBC Films Group et le recours unique et exclusif
du client sous cette garantie seront la réparation
ou le remplacement de toute pièce ou de tout
produit défectueux, à la seule discrétion de
GBC Films Group. Ces recours ne sont offerts que
si l’examen du produit par GBC Films Group
révèle, à la satisfaction de GBC Films Group, que
ces défauts existent vraiment et qu’ils n’ont pas
été causés par une mauvaise utilisation, de la
négligence, un essai de réparation, une
modification ou une altération non autorisée,
une mauvaise tension de ligne, un incendie, un
accident, une inondation ou tout autre danger.
Garantie limitée
Cette garantie ne couvre pas spécifiquement les
dommages aux rouleaux de plastification
provoqués par des couteaux, des lames de rasoir,
d’autres objets tranchants, des défaillances
causées par des adhésifs ou la mauvaise
utilisation de l’appareil. La réparation ou le
remplacement sous la garantie ne prolonge pas
la garantie au-delà de la période initiale de 90
jours de la date d’installation.
AVERTISSEMENT : Les modifications du
client qui ne sont pas autorisées
annuleront cette garantie.
LA GARANTIE CONTENUE DANS CE
DOCUMENT REMPLACE TOUTES LES AUTRES
GARANTIES, EXPRESSES OU IMPLICITES, Y
COMPRIS TOUTES LES GARANTIES DE
COMMERCIALITÉ ET D’ADAPTATION À UN
USAGE PARTICULIER. GBC FILMS GROUP NE
SERA PAS TENUE RESPONSABLE DE TOUS
LES DOMMAGES À LA PROPRIÉTÉ OU LES
BLESSURES PERSONNELLES (À MOINS QUE
CELA NE DÉCOULE PRINCIPALEMENT DE SA
NÉGLIGENCE), LES PERTES DE PROFIT OU
LES AUTRES DOMMAGES INDIRECTS ET
CONSÉCUTIFS DÉCOULANT DE L’UTILISATION
OU DE L’INCAPACITÉ D’UTILISER CET
ÉQUIPEMENT.
Exclusions à la Garantie
Cette garantie ne couvre pas spécifiquement :
1. Les dommages aux rouleaux de plastification
provoqués par des couteaux, des lames de rasoir,
d’autres objets tranchants ou des défaillances
causées par des adhésifs.
2. Les dommages à la machine causés en la
soulevant, la penchant et/ou en essayant de
placer la machine en n’utilisant pas les roulettes
installées sur des surfaces uniformes.
3. La mauvaise utilisation de la machine.
4. Les dommages causés par une(des)
personne(s) non qualifiée(e) pour réparer la
machine.
PERSONNEL QUALIFIÉ : Toute personne
formée par GBC pour effectuer l’entretien et la
réparation d’un tel équipement.
GARANTÍA
GBC Films Group garantiza durante un período
de 90 días a partir de la fecha de instalación,
que el equipo está libre de defectos de material
y fabricación. Esta garantía cubre las piezas y la
mano de obra. Esta garantía es la única garantía
realizada por GBC Films Group y no puede ser
modificada ni enmendada.
La única y exclusiva responsabilidad de GBC
Films Group y la única y exclusiva compensación
incluida en esta garantía será, según la opción
de GBC Films Group, reparar o reemplazar la
pieza o el producto defectuoso. Estas
compensaciones sólo están disponibles si el
examen del producto, realizado por parte de
GBC Films Group, revela de acuerdo a la
satisfacción de GBC Films Group, que dichos
defectos existen realmente y no fueron causados
como consecuencia de un uso inadecuado,
negligencia, intento de reparación, alteración o
modificación no autorizada, voltaje incorrecto de
la línea de alimentación, incendio, accidente,
inundación u otro peligro.
Garantía limitada
Esta garantía no cubre específicamente daños a
los rodillos laminadores causados por cuchillos,
hojas de afeitar, otros objetos filosos, fallos
provocados por adhesivos o por un uso
inadecuado de la máquina. La reparación o el
reemplazo cubierto por esta garantía no
prolonga la garantía más allá del período inicial
de 90 días a partir de la fecha de instalación.
ADVERTENCIA: Las alteraciones no
autorizadas realizadas por parte del
cliente anularán esta garantía.
LA GARANTÍA QUE SE REALIZA POR ESTE
MEDIO ESTÁ EN LUGAR DE TODAS LAS
DEMÁS GARANTÍAS, EXPRESAS O IMPLÍCITAS
INCLUYENDO CUALQUIER GARANTÍA DE
COMERCIABILIDAD O IDONEIDAD PARA UN
PROPÓSITO EN PARTICULAR. GBC FILMS
GROUP NO SERÁ RESPONSABLE POR DAÑOS
A LA PROPIEDAD NI POR LESIONES
PERSONALES (EXCEPTO QUE LA CAUSA
PRINCIPAL SEA LA NEGLIGENCIA DE GBC
FILMS GROUP), POR PÉRDIDA DE GANANCIAS
U OTROS DAÑOS INCIDENTALES O
CONSECUENTES QUE SURJAN DEL USO O
IMPOSIBILIDAD DE USO DEL EQUIPO.
Exclusiones de la garantía
Esta garantía no cubre específicamente:
1. Daños a los rodillos laminadores que hayan
sido causados por cuchillos, hojas de afeitar,
otros objetos filosos o fallos provocados por
adhesivos.
2. Los daños causados a la máquina como
consecuencia de levantar, inclinar y/o cualquier
intento de colocar la misma en una posición que
no sea la de rodamiento sobre las ruedas
instaladas en superficies parejas.
3. Uso inadecuado de la máquina.
4. Daño provocado por servicios realizados a la
máquina por parte de una o varias personas no
calificadas.
CALIFICADO: Cualquier persona entrenada por
GBC para realizar trabajos relacionados con el
servicio de dicho equipo.
7

I D
INSTALLATION
1. Shipping damage should be brought to
the immediate attention of the
delivering carrier.
2. Place the GBC Catena Series 35 or 65 on a
stable flat surface capable of supporting at
least 95 lb. (44 kg). The surface should be at
least 30 inches high to assure comfortable
positioning during operation. All four rubber
support feet should be positioned completely
on the supporting surface. The supporting
surface may also be large enough to hold the
material to be laminated.
3. The Catena 105 comes with its own stand.
However, should you wish to put it on a table
the laminator is equipped with rubber feet.
The table should be capable of supporting up
to 170 lb.
(78 kg).
4. The laminator should be located so that
exiting film drops freely to the floor.
Accumulation of laminate immediately behind
the laminator as it exits the equipment may
cause the film to wrap around the pull rollers,
resulting in a “jammed” condition.
5. Avoid locating the laminator near sources of
heat or cold. Avoid locating the laminator in
the direct path of forced, heated or cooled
air.
6. Connect the attachment plug provided with
the laminator to a suitably grounded outlet
only. Avoid connecting other
equipment to the same branch circuit
to which the laminator is connected, as
this may result in nuisance tripping of
circuit breakers or blowing fuses.
Catena 105 Stand Assembly
Please reference the Stand Assembly sheet
provided in the utility bag that is shipped with
the laminator.
ISTALLAZIONE
1. Danni occorsi durante il trasporto
devono essere immediatamente
comunicati al vettore.
2. Posizionare la plastificatrice Catena Serie 35
o 65 della GBC su una superficie piana e
stabile in grado di sopportare almeno 44 kg.
La superficie deve avere un altezza minima
di 76 cm dal pavimento per garantire un
posizionamento agevole durante il suo
funzionamento. Tutti e quattro i supporti in
gomma devono essere posizionati all’interno
del perimetro della superficie di supporto.
Inoltre, la superficie di supporto può avere
dimensioni tali da accomodare anche il
materiale da plastificare.
3. L’Catena 105 è corredata di un proprio
supporto. Tuttavia, se si desidera
posizionarla su un tavolo, la plastificatrice è
dotata di piedini di gomma. Il tavolo dovrebbe
essere in grado di sopportare fino a 78 kg.
4. La plastificatrice deve essere posizionata in
modo tale da consentire al film in uscita di
cadere liberamente sul pavimento.
L’accumulo di materiale plastificato in uscita
dall’attrezzatura subito dietro la plastificatrice
potrebbe causare il riavvolgimento del film sui
rulli tenditori e causare inceppamenti.
5. Evitare di collocare la plastificatrice in
prossimità di sorgenti di calore o gelo. Evitare
di collocare la plastificatrice in
corrispondenza di correnti di aria forzata
calda o fredda.
6. Collegare la spina fornita con la plastificatrice
solamente ad una presa con adeguata
messa a terra. Evitare di collegare altre
attrezzature allo stesso circuito
secondario al quale è collegata la
plastificatrice per evitare di far scattare
interruttori automatici o bruciare
fusibili.
Montaggio del supporto dell’Catena 105
Per il montaggio del supporto, fare riferimento
al foglio di istruzioni contenuto nella borsa
accessori fornita assieme alla plastificatrice.
INSTALLATION
1. Transportschäden müssen dem
Spediteur unverzüglich gemeldet
werden.
2. Stellen Sie das Modell 35 oder 65 der GBC
Catena Serie auf eine stabile, flache
Unterlage mit einem Tragvermögen von
mindestens 44 kg (95 lbs.). Um eine bequeme
Arbeitsstellung zu gewährleisten, sollte die
Unterlage eine Mindesthöhe von ca. 75 cm
aufweisen. Die vier Gummifüße sollten alle
auf der Unterlage stehen. Diese Unterlage
kann so groß sein, dass das zu laminierende
Material darauf gelagert werden kann.
3. Das Modell Catena 105 verfügt über ein
eigenes Gestell. Das Gerät kann jedoch
wahlweise auch auf einen Tisch gestellt
werden, da es auch mit Gummifüßen
ausgerüstet ist. Der Tisch sollte ein
Tragvermögen von bis zu 78 kg (170 lbs.)
haben.
4. Das Laminiergerät sollte so aufgestellt
werden, dass die austretende Folie frei auf
den Boden fallen kann. Eine Anhäufung des
Laminats beim Austreten direkt hinter dem
Gerät kann dazu führen, dass die Folie sich
um die Zugwalzen wickelt und dabei eine
Blockierung verursacht.
5. Das Laminiergerät darf nicht in der Nähe von
Wärme- oder Kältequellen aufgestellt
werden. Das Laminiergerät darf einem
Umwälz-, Heiß- oder Kaltluftstrom nicht direkt
ausgesetzt werden.
6. Schließen Sie den mit dem Laminiergerät
gelieferten Stecker nur an eine entsprechend
geerdete Steckdose an. Schließen Sie
keine weiteren Geräte an dieselbe
Zweigleitung wie das Laminiergerät an,
da dies den Leistungsschalter
unnötigerweise auslösen oder zum
Durchbrennen von Sicherungen führen
kann.
Montage des Gestells für das Modell
Catena 105
Die entsprechenden Montageanleitungen
befinden sich im Beutel mit Hilfsmaterial, der
mit dem Laminiergerät geliefert wird.
8

NL F E
INST ALLATIE
1. Schade door transport dient
onmiddellijk te worden gemeld aan het
transportbedrijf.
2. Plaats de GBC Catena-Series 35 of 65 op
een stabiele, vlakke ondergrond die een
gewicht van ten minste 45 kg kan dragen. De
ondergrond moet ten minste 75-80 cm hoog
zijn voor een comfortabele bediening. De vier
rubberen pootjes moeten in hun geheel op de
ondergrond steunen. De ondergrond kan
eventueel ook groot genoeg zijn om het te
lamineren materiaal op te leggen.
3. De Catena 105 is uitgerust met een aparte
stellage. Als u echter de laminator op een
tafel wilt plaatsen, is het apparaat daartoe
voorzien van rubberen pootjes. De tafel moet
geschikt zijn voor gewichten tot 78 kg.
4. De laminator moet zodanig worden geplaatst
dat naar buiten komende film vrij op de grond
kan vallen. Door ophoping van naar buiten
komend laminaat vlak achter de laminator kan
de film rond de trekrollers gewikkeld raken en
vastlopen.
5. Plaats de laminator niet in de nabijheid van
warmte- of koudebronnen. Plaats de
laminator niet in de directe stromingsroute
van warme of koele ventilatielucht.
6. Sluit de bijgeleverde stekker alleen aan op
een correct geaarde wandcontactdoos.
Sluit geen andere apparatuur aan op
dezelfde elektrische aansluiting als
waarop de laminator is aangesloten,
aangezien dit wellicht kan leiden tot
ongewenste activering van
schakelaars of doorslaan van
zekeringen.
Catena 105 stellage
Raadpleeg hiervoor het specificatieblad
(gedeelte Stand Assembly sheet) dat zich in
het bijgeleverde documentatiepakket bevindt.
INSTALLATION
1. Signalez immédiatement au
transporteur tout dommage subi
durant le transport.
2. Installez la plastifieuse G.B.C. SÉRIE CATENA
35 ou 65 sur une surface plane pouvant
supporter un poids minimum de 44 kg. La
surface doit être d’au moins 76 cm pour
permettre une utilisation confortable. Les
quatre pieds en caoutchouc doivent tous
être correctement positionnés sur le support.
La surface d’installation doit être également
assez spacieuse pour recevoir les matériaux
à plastifier.
3. La plastifieuse Catena 105 est livrée avec sa
propre table support. Cependant, si vous
désirez l’installer sur une autre table, la
plastifieuse est munie de pieds en
caoutchouc. La table utilisée doit être
capable de supporter un poids minimum de
78 kg.
4. Installez l’équipement de façon à ce que le
film retombe librement sur le sol en sortie de
plastifieuse. Une accumulation de film en
sortie de plastifieuse pourrait entraîner un
enroulement autour des rouleaux et
provoquer un bourrage.
5. Evitez d’installer votre plastifieuse près d’une
source ou d’un passage d’air chaud ou d’air
froid.
6. Ne connectez la prise fournie avec la
plastifieuse que sur une source de courant
appropriée. Evitez de brancher, sur le
même circuit électrique, tout autre
équipement pouvant endommager les
fusibles ou provoquer un court-circuit.
Assemblage de la table support Catena
105
Consultez la notice d’assemblage placée
dans le sachet utilitaire fourni avec
l’équipement.
INSTALACIÓN
1. Los daños causados durante el envío
deben ser reportados directamente a
la empresa de transportes que
entregó la unidad.
2. Coloque la unidad modelo 35 ó 65 de la Serie
Catena de GBC en una superficie estable y
plana que pueda soportar un peso de hasta
44 Kg. La superficie debe tener una altura de
por lo menos 77 cm para asegurar una
colocación cómoda durante la operación.
Los cuatro pies de apoyo de hule deben
quedar colocados completamente sobre la
superficie de soporte. La superficie de
soporte también debe ser lo suficientemente
grande como para poder colocar el material
que será laminado.
3. El modelo Catena 105 incluye su propio
pedestal. Sin embargo, en caso de que
desee colocarlo sobre una mesa, el
laminador está equipado con pies de hule. La
mesa debe tener la capacidad de soportar
78 Kg.
4. El laminador debe quedar colocado de modo
que la película existente pueda caer
libremente sobre el piso. La acumulación de
material de laminación inmediatamente atrás
del laminador al salir del equipo puede
causar que la película se enrolle alrededor
de los rodillos de tracción, lo que puede
resultar en atascos.
5. Evite colocar el laminador cerca de fuentes
de calefacción o refrigeración. Evite colocar
el laminador en la trayectoria directa de aire
de ventilación caliente o frío.
6. Conecte el enchufe de conexión que se
suministra con el laminador únicamente en
tomas conectadas a tierra adecuadamente.
Evite conectar otro tipo de equipo en el
mismo circuito derivado con el que
está conectado el laminador, ya que
esto podría resultar en la actuación
indeseada de los interruptores
automáticos o se podrían quemar los
fusibles.
Ensamble del Pedestal del Modelo
Catena 105
Use la página con las Instrucciones de
Ensamble que se suministra en la bolsa de
accesorios que se incluye con el laminador.
9
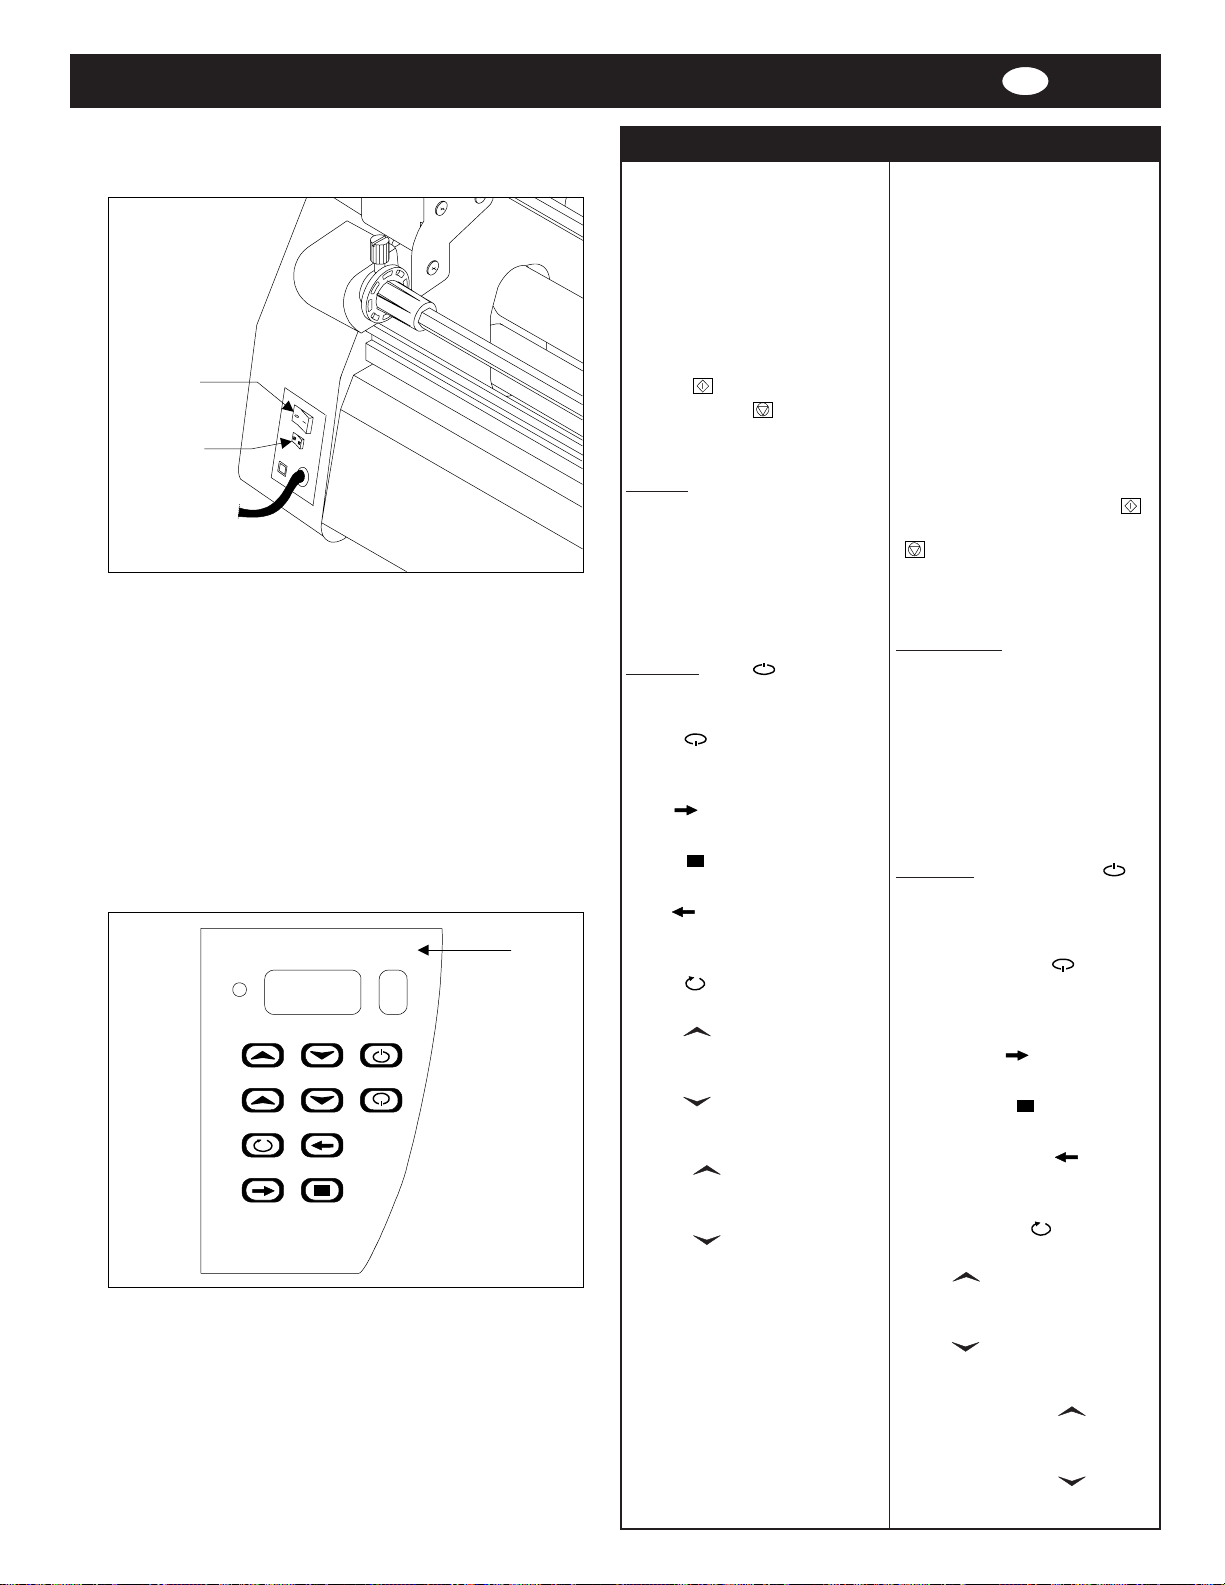
I
10
A
A1
READY
TEMPERATURE
MEAS
RUN
Fig. 1
TEMPERATURE SPEED
HOT
SPEED
COLD
REV
STOP
Fig. 2
FEATURES GUIDE
A. POWER SWITCH: Fig.1. Located
at the back of the machine applies
power to the laminator. The LED
display panel will illuminate when
position marked “l” is pushed. The
off position, marked “O”, removes
power from the laminator.
A1.FAN SWITCH: Fig. 1. Located at
the back of the machine applies
power to the fans when position
marked (
position marked (
) is pushed. The off
) removes
power from the fans.
B. CONTROL PANEL: Fig. 2
Display:
READY:
Indicates when
the laminator has sufficient heat.
Flashes if heat is out of range.
SPEED:
Indicates the speed setting
of the motor.
TEMPERATURE:
Displays the
programmed temperature setting in
either Fahrenheit or Celsius.
Function:
HOT
( ): When
pressed, automatically sets the
temperature to 230 ºF (110 ºC).
COLD
( ): When pressed,
removes power to the heaters for
cold lamination.
RUN
( ): Activates rollers for
normal operation.
STOP
( ): When pressed, stops
the rotation of the rollers.
REV
( ): Reverses roller
movement to clear jams and wrap-
B
ups.
MEAS
( ): Used to read the
current temperature of the rollers.
TEMP
( ): Overrides the preset
temperature, increasing to the
desired setting.
TEMP
( ): Overrides the preset
temperature, decreasing to the
desired setting.
SPEED
( ): When pressed,
increases speed to the desired
setting.
SPEED
( ): When pressed,
decreasing speed to the desired
setting.
A. INTERRUTTORE DI RETE: Figura
1. Posto sulla parte posteriore
destra della macchina, l’interruttore
consente il passaggio di corrente
alla macchina. Quando viene
premuta la posizione
contrassegnata con “I”, il pannello
di visualizzazione a cristalli liquidi si
illuminerà. La posizione
contrassegnata con “O” interrompe
il passaggio di corrente alla
plastificatrice).
A1. INTERRUTTORE DI
VENTILAZIONE: Figura 1.
Posizionato sul retro della
macchina, alimenta i ventilatori
quando si preme la posizione (
La posizione di spento, indicata con
(
ventilatori.
B. PANNELLO DI CONTROLLO:
Fig. 2
Pannello LED:
Indica che la plastificatrice è
sufficientemente riscaldata.
SPEED (VELOCITÁ):
l’impostazione della velocità del
motore.
TEMPERATURE (TEMPERATURA):
Visualizza l’impostazione
programmata di temperatura sia in
gradi Fahrenheit che Celsius.
Funzione:
Quando premuto, imposta
automaticamente la temperatura a
110 ºC (230 ºF).
COLD (FREDDOO)
premuto, toglie l’energia ai rulli di
riscaldamento per la plastificazione
a freddo.
RUN (AVVIO
la plastificazione normale.
STOP (STOP
premuto, ferma la rotazione dei rulli.
REV (INVERSIONE
senso di marcia dei rulli per eliminare
inceppamenti e riavvolgimenti.
MEAS (MISURA
temperatura dei rulli al momento.
TEMP
CARATTERISTICHE
) sospende l’energia ai
READY (PRONTO):
Indica
HOT (CALDO)
( ): Quando
) ( ): Attiva i rulli per
) ( ): Quando
) ( ): Inverte il
) ( ): Indica la
( ): Esclude la
( )
).
:
temperatura preimpostata
aumentandola al valore desiderato.
TEMP
( ): Esclude la
temperatura preimpostata
diminuendola al valore desiderato.
SPEED (VELOCITÀ)
( )
:
Quando premuto, aumenta la
velocità al valore desiderato.
SPEED (VELOCITÀ)
( )
:
Quando premuto, riduce la velocità
al valore desiderato.
DNLF E
BESCHREIBUNG DER MERKMALE
A. EIN/AUS-SCHALTER:
Befindet sich an der Rückseite des
Geräts für die Stromzufuhr zum
Laminiergerät. Die LED Anzeige leuchtet
auf, wenn die mit „1“ bezeichnete Taste
betätigt wird. Die Aus-Position ist mit „O“
bezeichnet. Damit wird die Stromzufuhr
unterbrochen.
A1. VENTILAT ORENSCHAL TER:
Abb.1. Befindet sich auf der
Rückseite des Geräts. Bei
Betätigung der mit (
bezeichneten Position werden die
Ventilatoren eingeschaltet. In der
mit ( ) bezeichneten AusStellung sind die Ventilatoren
ausgeschaltet.
B. STEUERFELD:
Anzeige:
Laminiergerät heiß genug ist. Blinkt,
wenn das Gerät nicht im korrekten
Wärmebereich ist.
Zeigt an, dass das
SPEED (GESCHWINDIGKEIT):
Zeigt die gewählte
Geschwindigkeitsstufe des Motors an.
TEMPERATURE (TEMPERATUR):
Zeigt die programmierte Temperatur in
Fahrenheit oder Celsius an.
Funktion:
Betätigung wird die Temperatur
automatisch auf 110ºC (230ºF) gesetzt.
COLD (KALT)
wird zum Kaltlaminieren die Stromzufuhr
zu den Heizelementen unterbrochen.
RUN (START)
Walzen für den Standardbetrieb.
STOP (STOPP
wird der Umlauf der Walzen gestoppt.
HOT (HEISS)
( ): Bei Betätigung
( )
) ( ): Bei Betätigung
REVERSE (UMKEHR
Walzen werden zur Beseitigung von
Blockierungen und Verwicklungen in der
Gegenrichtung gedreht.
MEASURE (MESSEN
wird die aktuelle Temperatur der Walzen
gemessen.
TEMP
( ): Erhöht die vorgewählte
Temperatur auf die gewünschte Höhe.
TEMP
( ):
Reduziert die
vorgewählte Temperatur auf die
gewünschte Höhe.
SPEED (GESCHWINDIGKEIT
( ): Bei Betätigung wird die
Geschwindigkeit auf die gewünschte
Stufe erhöht.
SPEED (GESCHWINDIGKEIT
( ): Bei Betätigung wird die
Geschwindigkeit reduziert.
)
Fig. 2
:
Aktiviert die
) ( ): Die
) ( ):
Abb.1.
( ): Bei
Damit
)
)
FUNCTIES
A. STROOMSCHAKELAAR:
Bevindt zich op de achterkant van de
machine en schakelt de stroom naar de
laminator in. Het LED-schermpje licht op
wanneer de positie “1” wordt ingedrukt.
De positie uit, aangeduid met een “O”
schakelt de stroom naar de laminator uit.
A1. VENTILT AORSCHAKELAAR:
Afb.1. Bevindt zich op de
achterkant van de machine en past
stroom toe op de ventilators
wanneer de positie (
ingedrukt. De positie ( ) betekent
dat de schakelaar uit is en de
stroom naar de ventilators wordt
uitgeschakeld.
B. CONTROLEPANEEL:
Scherm:
aan wanneer de laminator warm genoeg
is. Knippert als de warmte buiten het
bereik is.
READY (KLAAR):
SPEED (SNELHEID):
snelheidsinstelling van de motor aan.
TEMPERATURE (TEMPERATUUR):
Geeft de geprogrammeerde temperatuurinstelling aan in Fahrenheit of Celsius.
Functie:
ingedrukt, wordt de temperatuur
automatisch op 110 ºC (230 ºF)
ingesteld.
COLD (KOUD)
ingedrukt wordt de stroom naar de
verwarmers uitgezet voor koude
laminering.
RUN (DRAAIEN
rollers voor normale bediening.
STOP (STOPT
draaien van de rollers indien ingedrukt.
REV (ACHTERUIT
beweging van de rollers om zodat
vastzittend of omwikkeld materiaal
vrijgemaakt kan worden
MEAS (METING
gebruikt om de huidige temperatuur van
de rollers af te lezen.
TEMP
ingestelde temperatuur op,
toenemend tot de gewenste
instelling.
TEMP
ingestelde temperatuur op,
afnemend tot de gewenste
instelling.
SPEED
snelheid tot de gewenste instelling
indien ingedrukt.
SPEED
de gewenste instelling indien ingedrukt.
HOT (HEET)
( ): Indien
) ( ):
) ( ):
) ( ): Keert de
) ( ): Wordt
( ): Heft de vooraf
( ): Heft de vooraf
( ): Verhoogt de
( ):
Verlaagt de snelheid tot
) wordt
Afb. 2
Geeft de
( ):
Activeert de
Stopt het
Afb.1.
Geeft
Indien
CARACTÉRISTIQUES
A. INTERRUPTEUR MARCHE/
ARRÊT (figure 1) : situé au dos de
l’équipement. Le panneau de
contrôle s’allume lorsque
l’interrupteur est positionné sur “I”.
Pour arrêter la plastifieuse,
positionnez l’interrupteur sur “O”.
A1. INTERRUPTEUR DE
VENTILATION (figure 1): Situé au
dos de la machine, branche
l’électricité aux ventilateurs en
pressant la position ( ). La
position ( ) coupe l’électricité
aux ventilateurs.
B. PANNEAU DE CONTROLE:
Figure 2
Voyant :
que la température adéquate est
atteinte.
SPEED (VITESSE) :
réglage de vitesse du moteur.
TEMPERATURE (TEMPÉRATURE)
:
programmé en degrés Fahrenheit
ou Celsius.
Fonction :
Règle automatiquement la
témperature à 110º C (230º F)
COLD (FROID)
système de chauffage des
rouleaux pour effectuer la
plastification à froid.
RUN (AVANCE)
la rotation des rouleaux pour un
fonctionnement normal.
STOP (STOP
rotation des rouleaux.
REVERSE (RETOUR
Inverse la rotation des rouleaux
chauffants pour dégager les
bourrages ou les plissements de film.
MEAS (MESURE
lire la température des rouleaux
chauffants.
TEMP (TEMPÉRATURE)
Augmente la température du
réglage pré-sélectionné, jusqu’à la
température désirée.
TEMP (TEMPÉRATURE)
Diminue la température du réglage
pré-sélectionné, jusqu’à la
température désirée.
SPEED (VITESSE)
Augmente la vitesse du réglage
pré-sélectionné jusqu’à la vitesse
désirée.
SPEED (VITESSE)
la vitesse du réglage présélectionné jusqu’à la vitesse
désirée.
READY (PRÊT) :
Affiche le réglage de température
HOT (CHAUD)
( ): Coupe le
( ): Déclenche
) ( ): Stoppe la
) ( ): Permet de
Indique
Indique le
( )
) ( )
:
( )
:
( )
:
( )
:
( ): Diminue
:
CARACTERÍSTICAS
A. INTERRUPTOR DE CORRIENTE:
Figura 1. Ubicado en la parte
posterior de la máquina, el
interruptor activa la corriente para
el laminador. El panel del indicador
LED se iluminará al oprimir la
posición “I”. La posición de
apagado, marcada con una “O”,
desconecta la corriente del
laminador.
A1. INTERRUPTOR DE
VENTILACION: Figura 1. Ubicado
al respaldo del aparato, alimenta los
ventiladores cuando se oprime la
posición ( ). La posición de
apagado indicada con ( ) corta
la alimentación de los ventiladores.
B. TABLERO DE CONTROL: Figura
2
Indicador:
cuando el laminador se ha
calentado lo suficiente.
SPEED (VELOCIDAD):
ajuste de velocidad del motor.
TEMPERATURE (temperatura
Indica el ajuste programado de
temperatura en grados Farenheit o
centígrados.
Función:
Al ser oprimido, este botón ajusta la
temperatura a 110º C (230º F).
COLD (FRÍO)
corriente de las fuentes de calor
para la laminación en frío.
RUN (OPERAR
rodillos para operar normalmente.
STOP (PARAR
para la rotación de los rodillos.
REV (INVERSIÓN
movimiento del rodillo para despejar
atascos y material enrollado.
MEAS (MEDIR
leer la temperatura de los rodillos.
TEMP
previamente establecida, y la
aumenta hasta el ajuste deseado.
TEMP
previamente establecida, y la
disminuye hasta el ajuste deseado.
SPEED (VELOCIDAD)
ser oprimido, este botón aumenta la
velocidad del laminador hasta el
ajuste deseado.
SPEED (VELOCIDAD)
ser oprimido, este botón disminuye
la velocidad del laminador hasta el
ajuste deseado.
READY (LISTO):
HOT (CALIENTE)
( ): Apaga la
) ( ): Activa los
) ( ): Este botón
) ( ): Invierte el
) ( ): Oprima para
( ): Anula la temperatura
( ): Anula la temperatura
Indica
Indica el
):
( )
( ): Al
( ): Al
:
11
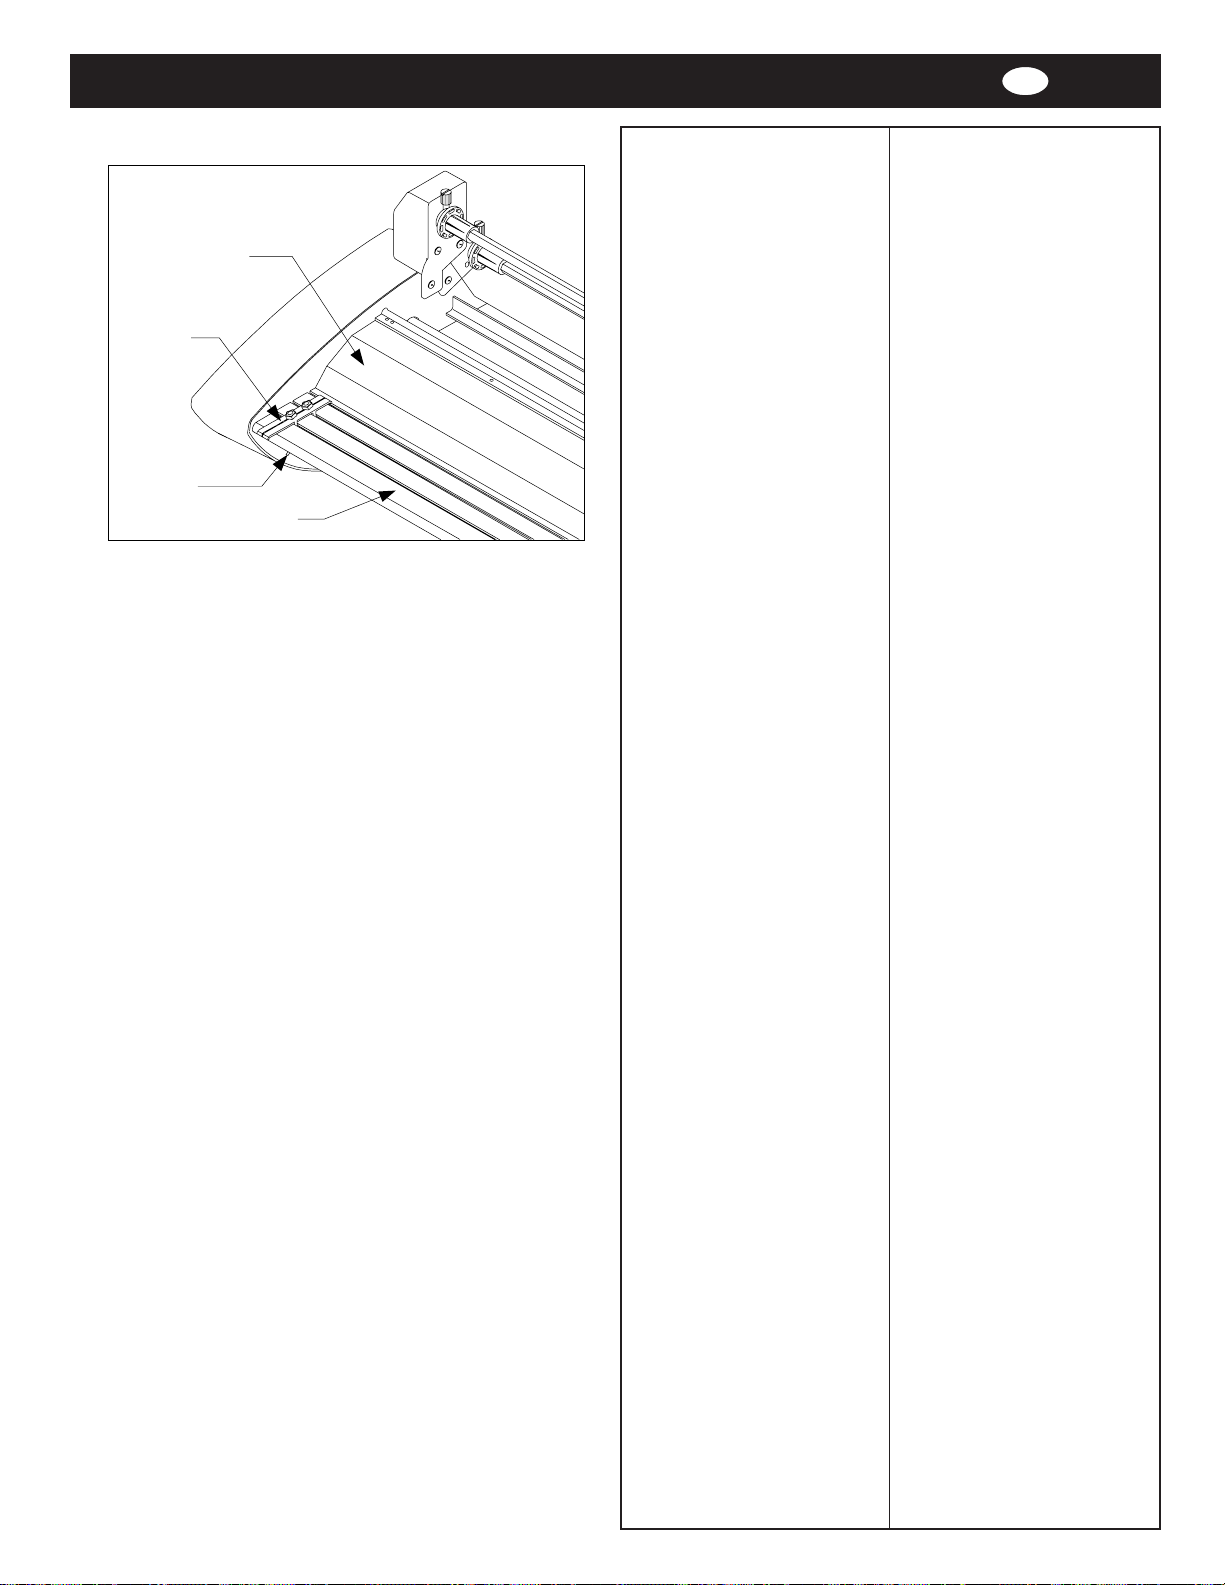
I
C. FEED TABLE: The Feed Table,
Figure 3, is used to position items
for lamination. The laminator will
operate only when the Feed
Table and Feed Table Latch are
D
F
E
C
Fig. 3
properly installed.
D. SAFETY SHIELD: Prevents
entanglement, entrapment and
inadvertent contact with the heat
rollers. The laminator will
operate only when the Safety
Shield is located in the fully
locked position. Power to the
motor is removed when the
shield is removed.
E. TABLE INTERLOCK LA TCH:
Used to lock the Feed Table into
position and activate an interlock
switch. The interlock latch is
located on the left underside of the
Feed Table, (Figure 3). The table
cannot be removed without
retracting the latch to the right
while lifting the table upwards and
away from the laminator. The
laminator will not operate
when the table is removed
and/or the interlock latch is
retracted.
F . FEED GUIDE: The Feed Guide,
Figure 3, permits alignment of the
item(s) to be laminated. To position
the adjustable guide, loosen the
knob on the top of the guide, slide it
to the desired position and tighten
the knob to secure the Feed Guide
in place. The Feed Guide is used to
keep longer items straight. The
Feed Guide may also be used to
feed smaller items side by side by
positioning the guide towards the
center of the Feed Table and
placing smaller items against each
side of the Feed Guide as they are
being introduced into the nip point
of the heat rollers.
C. PIANO DI ALIMENTAZIONE: Il
piano di alimentazione viene
utilizzato per posizionare gli articoli
da plastificare. La plastificatrice
funzionerà solo se il piano di
alimentazione e la chiusura
dello stesso sono installati
correttamente.
D. SCHERMO PROTETTIVO:
Previene aggrovigliamenti,
intrappolamenti e contatti involontari
con i rulli di riscaldamento. La
plastificatrice funzionerà solo
se lo schermo protettivo si
trova nella sua posizione
abbassata. La corrente ai
motori viene interrotta quando
lo schermo viene sollevato.
E. CHIUSURA DI SICUREZZA DEL
PIANO: Viene utilizzata per
bloccare il piano di alimentazione in
posizione ed attivare l’interruttore di
sicurezza. La chiusura di
sicurezza è posta al di sotto del
piano di alimentazione sulla sinistra.
Il piano non può essere smontato
senza ritrarre la chiusura che si
trova sulla destra sollevando
contemporaneamente il piano verso
l’alto e verso l’esterno della
plastificatrice. La plastificatrice
non funzionerà se il piano è
stato smontato e/o la chiusura
di sicurezza è in posizione
retratta.
F . GUIDA DI ALIMENT AZIONE: La
guida di alimentazione (Figura 3)
consente l’allineamento dell’articolo/i
da plastificare. Per posizionare la
guida regolabile allentare la
manopola posta sulla parte
superiore della guida, farla
scorrere sulla posizione desiderata
e stringere la manopola per
bloccare la guida di alimentazione in
posizione. La guida di alimentazione
viene utilizzata per mantenere dritti
articoli lunghi. Essa può inoltre
essere utilizzata per alimentare
articoli più piccoli uno accanto
all’altro, inserendo la guida verso il
centro del piano di alimentazione e
disponendo gli articoli di piccole
dimensioni contro i due lati della
guida di alimentazione mentre
questi vengono introdotti nel punto
di presa dei rulli di riscaldamento.
12

DNLF E
C. ANLEGETISCH: Auf dem
Anlegetisch, Abb. 3, werden die zu
laminierenden Artikel gelagert. Das
Laminiergerät funktioniert nur,
wenn der Tisch und die
entsprechende Verriegelung
ordnungsgemäß installiert
sind.
D. SCHUTZSCHILD: Schützt gegen
verheddern, hängen bleiben und
unabsichtliche Berührung der
Heißwalzen. Das Laminiergerät
funktioniert nur, wenn sich der
Schutzschild in vollständig
eingerasteter Stellung
befindet. Wenn er entfernt
wird, wird die Stromzufuhr
zum Motor unterbrochen.
E. TISCHVERRIEGELUNG: Damit
wird die Position des Anlegetisches
gesichert und ein
Verriegelungsschalter aktiviert. Der
Riegel befindet sich links auf der
Unterseite des Tischs (Abb. 3). Der
Tisch kann nicht entfernt werden,
ohne dass vorher der Riegel nach
rechts geschoben und der Tisch
gleichzeitig angehoben und vom
Laminiergerät weggezogen wird.
Wenn der Tisch entfernt wird
und/oder der Riegel sich in
zurückgezogener Stellung
befindet, ist das Laminiergerät
nicht betriebsbereit.
F . ZUFUHRHILFE: (Abb. 3) Damit
werden der oder die zu
laminierenden Artikel ausgerichtet.
Die Zufuhrhilfe ist verstellbar: Den
Knopf auf der Oberseite lösen, in
die gewünschte Stellung schieben,
den Knopf zur Sicherung wieder
anziehen. Die Zufuhrhilfe dient
dazu, längere Artikel gerade zu
halten. Sie kann auch dazu
verwendet werden, kleinere Artikel
nebeneinander einzuführen. Dazu
wird die Zufuhrhilfe in die Mitte des
Anlegetischs gestellt und kleinere
Artikel an beide Seiten der
Zufuhrhilfe angelegt, von wo sie
zum Berührungspunkt mit den
Heißwalzen geführt werden.
C. INVOERTAFEL: De invoertafel
(zie afb. 3) wordt gebruikt om
documenten in de juiste positie te
brengen voor laminatie. De
laminator werkt alleen als de
invoertafel en de
vergrendeling ervan correct
zijn geïnstalleerd.
D. BESCHERMKAP: Voorkomt
vastzitten, vastlopen en
onopzettelijk contact met de
warmterollers. De laminator
werkt alleen als de
beschermkap volledig naar
beneden is geklapt. Zodra de
kap omhoog wordt bewogen,
wordt de netvoeding
uitgeschakeld.
E. TAFEL VERGRENDELING: Deze
wordt gebruikt om de invoertafel in
de juiste positie vast te zetten en
een vergrendelingsschakelaar te
activeren. De vergrendeling bevindt
zich aan de linkeronderzijde van de
invoertafel, zie afb. 3. De tafel kan
alleen worden verplaatst door de
vergrendeling naar rechts te
trekken en gelijktijdig de tafel op te
tillen, weg van de laminator. De
laminator werkt niet als de
tafel wordt verwijderd en/of
ontgrendeld.
F . INVOERGELEIDER: Met behulp
van de invoergeleider, zie afb. 3,
kan het te lamineren document
precies worden gecentreerd. Om
de afstelbare geleider in de juiste
positie te plaatsen, draait u de knop
bovenop de geleider los, schuift u
hem in de gewenste positie en
draait u de knop weer aan zodat de
invoergeleider zich op zijn plaats
bevindt. De invoergeleider wordt
gebruikt om langere documenten
recht te houden. De invoergeleider
kan ook worden gebruikt om
kleinere documenten naast elkaar in
te voeren; plaats daartoe de
geleider in het midden van de
invoertafel en plaats de kleinere
documenten tegen de zijkanten van
de geleider bij het invoeren tussen
de grijpzone van de warmterollers.
C. TABLE D’ALIMENTATION: la
table d’alimentation (Figure 3) est
utilisée pour positionner les
documents à plastifier. La
plastifieuse ne peut
fonctionner que si la table
d’alimentation est
correctement positionnée et
verrouillée.
D. CAPOT DE PROTECTION:
empêche toute introduction
intempestive ou tout contact
malencontreux avec les rouleaux
chauffants. Le plastifieuse ne
peut fonctionner que si le
capot de protection est
abaissé. L’alimentation est
coupée dès que le capot est
retiré.
E. VERROUILLAGE DE LA TABLE
D’ALIMENTATION: permet de
bloquer la table d’alimentation; le
verrouillage est situé sous la table
d’alimentation Figure 3). Pour retirer
la table, soulevez-la en tirant le
loquet vers la droite. La
plastifieuse ne peut
fonctionner que si la table
d’alimentation est
correctement positionnée et
verrouillée.
F . GUIDE DE POSITIONNEMENT : ce
guide (Figure 3) permet d’aligner les
documents à plastifier. Pour régler
le guide, desserrez le bouton-vis
du guide, faites glisser le guide
jusqu’à la position désirée et
resserrez le bouton-vis pour
maintenir le guide en position. Ce
guide est utilisé pour maintenir les
documents bien alignés. Il peut être
également utilisé pour positionner
de petits documents côte à côte:
placez alors le guide au centre de
la table d’alimentation et alignez les
documents de chaque côté du
guide pour qu’ils soient entraînés
par les rouleaux chauffants.
C. PLA TAFORMA DE
ALIMENTACIÓN: La Plataforma de
Alimentación (Figura 3) se utiliza
para colocar los artículos que van
a ser laminados. El laminador
operará únicamente cuando la
Plataforma de Alimentación y
el Pestillo de la misma estén
instalados apropiadamente.
D. ESCUDO DE SEGURIDAD: Evita
las obstrucciones, los atascos y el
contacto inesperado con los
rodillos térmicos. El laminador
operará únicamente cuando el
Escudo de Seguridad esté
completamente enganchado.
La corriente en el motor se
desconecta el quitar el escudo.
E. PESTILLO DE ENGANCHE DE
LA PLATAFORMA: Se usa para
enganchar la Plataforma de
Alimentación en su lugar y para
activar un interruptor de enganche.
El pestillo de enganche está
ubicado en la parte inferior
izquierda de la Plataforma de
Alimentación (Figura 3). No se
puede quitar la plataforma sin
empujar el pestillo hacia la derecha
mientras se alza la plataforma y se
aleja del laminador. El laminador
no operará después de quitar
la plataforma y/o empujar el
pestillo de enganche.
F . BARRA DE TOPE: La Barra de
Tope (Figura 3) permite el
alineamiento del artículo o artículos
que desea laminar. Para posicionar
la barra ajustable, afloje el botón en
la parte superior de la barra,
deslice la barra a la posición
deseada y apriete el botón para
fijar la Barra de Tope en su lugar.
La Barra de Tope se utiliza para
que los artículos largos se
mantengan derechos. La Barra de
Tope también se puede usar para
alimentar artículos más pequeños
simultáneamente colocándolos lado
a lado, colocando la barra en el
centro de la Plataforma de
Alimentación y colocando dichos
artículos a cada lado de la Barra de
Tope al introducirlos en el punto de
presión de los rodillos térmicos.
13
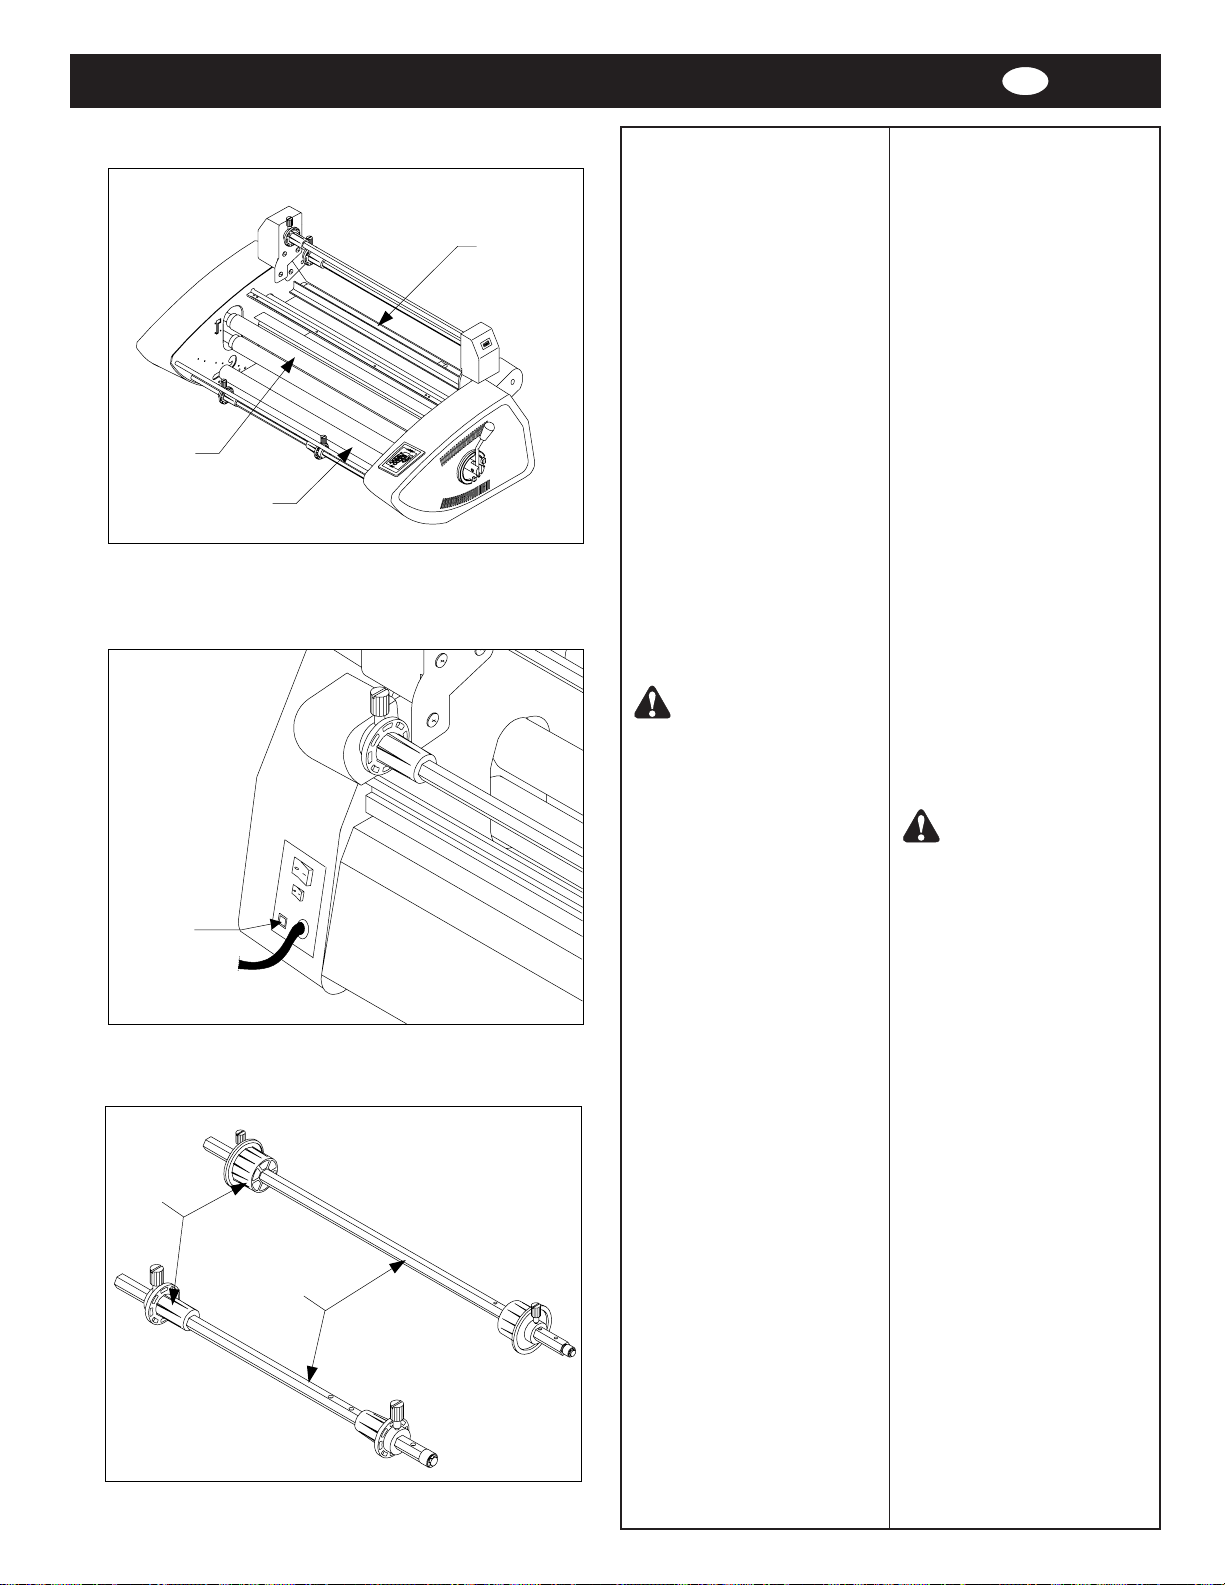
I
G. HEAT ROLLERS: Silicone rubber
coated steel tubes heat the
laminating film and compress the
heated film to the items being
laminated. Heat is provided by an
I
G
H
Fig. 4
internal heating element. The heat
rollers are motor driven for ease of
loading new film (Figure 4).
H. IDLER BAR: The idler bars,
located near each supply roll, are
used to direct the film to the heat
rollers. The bottom Idler Bar is
movable to ease film loading (Figure
4).
I. PULL ROLLERS: The pull rollers,
located at the back of the laminator,
are motor driven. They
simultaneously pull the film and
improve the quality of the laminated
item (Figure 4).
J. CIRCUIT BREAKER: Electrical
safety device, located on the back
of the laminator near the power
cord, can be reset by the operator
if tripped (Figure 5).
WARNING: If the breaker
trips a second time after
being reset, contact your local GBC
Technical Representative or dealer/
distributor for assistance.
G. RULLI DI RISCALDAMENTO:
Tubi di acciaio rivestiti in gomma al
silicone. Utilizzati per riscaldare il
film di plastificazione e far aderire il
film riscaldato sugli articoli da
plastificare. Il calore viene fornito
da una resistenza interna ad
infrarosso. I rulli di riscaldamento
sono azionati a motore per facilitare
il caricamento di nuovo film (Figura
4).
H. ASTA FOLLE: Le aste folli,
poste accanto a ciascuna bobina
vengono utilizzate per orientare il
film verso i rulli di riscaldamento.
L’asta folle inferiore è mobile per
facilitare il caricamento del film
(Figura 4).
I. RULLI TENDITORI: I rulli tenditori,
posti sulla parte posteriore della
plastificatrice sono azionati a
motore. Essi tirano simultaneamente
il film migliorando la qualità
dell’articolo plastificato (Figura 4).
J. INTERRUTTORE AUTOMA TICO:
Se si è disinnestato, questo
dispositivo elettrico di protezione,
posto sul retro della plastificatrice
accanto al cavo di alimentazione,
può essere ripristinato
dall’operatore. (Figura 5).
K. FILM SHAFT: The film shaft
holds the film supply on the
machine,
(Figure 6).
J
Fig. 5
L. LOCKING CORE ADAPTORS:
Hold and lock the rolls of film on the
shafts to prevent side to side
shifting, (Figure 6).
M. FILM WEB: Laminating film
loaded into the machine.
ATTENZIONE: Se
l’interruttore si disinnesta
una seconda volta dopo essere
stato ripristinato, contattare il
tecnico GBC del rappresentante
locale/distributore.
K. ALBERO DEL FILM: L’albero del
film sostiene la bobina sulla
macchina (Figura 6).
L. BLOCCAGGIO DEI RULLI:
Adattatori che trattengono le bobine
di film sugli alberi per evitare che
scivolino lateralmente (Figura 6).
M. VELO DEL FILM: Il film montato
sulla macchina.
L
K
14
Fig. 6

DNLF E
G. HEISSWALZEN: Stahlrohre mit
Silikon-Gummibelag. Diese erhitzen
die Laminierfolie and drücken die
heiße Folie auf die zu laminierenden
Artikel. Die Hitze wird durch ein
eingebautes Heizelement geliefert.
Die Heißwalzen werden motorisch
angetrieben, womit das Einführen
neuer Folien erleichtert wird (Abb.
4).
H. LEITST ANGE: Mit den
Leitstangen, die sich in der Nähe
der Spulen befinden, wird die Folie
zu den Heißwalzen geleitet. Die
untere Leitstange ist beweglich,
womit das Einführen neuer Folien
erleichtert wird (Abb. 4).
I. ZUGWALZEN: Die Zugwalzen
auf der Rückseite des
Laminiergeräts werden motorisch
angetrieben. Sie dienen dazu, die
Folie zu ziehen und gleichzeitig die
Qualität des laminierten Artikels zu
verbessern (Abb. 4).
J. LEISTUNGSSCHALTER:
Elektrische Sicherheitsvorrichtung
auf der Rückseite des
Laminiergeräts in der Nähe des
Anschlusskabels. Kann vom
Benutzer wieder zurückgestellt
werden, wenn es ausgelöst werden
sollte (Abb. 5).
WARNUNG: Wenn der
Schalter nach dem
Rückstellen ein zweites Mal
ausgelöst wird, wenden Sie sich
bitte an den technischen
Kundendienst von GBC in Ihrer
Region oder an Ihren Fachhändler/
Vertreter.
K. FOLIENWELLE: Hält die
Folienzufuhr auf dem Gerät (Abb.
6).
L. SICHERUNGSADAPTER: Damit
werden die Folienspulen auf den
Wellen gehalten und gesichert und
ein seitliches Verschieben
vermieden (Abb. 6).
M. FOLIENBAHN: In das Gerät
eingeführte Laminierfolie.
G. WARMTEROLLERS: Dit zijn
stalen buizen met een coating van
siliconenrubber, die de lamineerfilm
verhitten en deze tegen de te
lamineren documenten drukken. De
warmte wordt geleverd door een
intern verwarmingselement. De
warmterollers worden
aangedreven door een motor, zodat
invoeren van nieuwe film
eenvoudig is (zie afb. 4).
H. VRIJLOOPROL: De vrijlooprollen
die zich bij de toevoerrollen
bevinden, worden gebruikt om de
film naar de warmterollers te leiden.
De onderste vrijlooprol is
uitneembaar om het laden van de
film te vergemakkelijken (zie afb. 4).
I. TREKROLLERS: De trekrollers,
die zich aan de achterzijde van de
laminator bevinden, worden door
een motor aangedreven. Ze zorgen
er voor dat de film door het
apparaat wordt getrokken en de
kwaliteit van het gelamineerde
document wordt verbeterd (zie afb.
4).
J. CIRCUITONDERBREKER: Dit is
een elektrische beveiliging aan de
achterijde van de laminator, vlakbij
het netsnoer; kan na een
onderbreking worden gereset door
de operator
(zie afb. 5).
WAARSCHUWING: Als de
circuitonderbreker nogmaals
onderbreekt na openieuw instellen,
moet men voor assistentie contact
openmen met de plaatselijke
Technische Vertegenwoordiger of
distributeur van GBC.
K. FILMKOKER: De filmkoker houdt
de filmvoorraad vast in de machine
(zie afb. 6).
L. VERGRENDELKERNADAPTERS: Houden de
filmrollen vast en vergrendelen ze
op de filmkoker om zijwaarts
verschuiven te voorkomen (zie afb.
6).
M. FILMBAAN: Lamineerfilm die in
het apparaat wordt ingevoerd.
G. ROULEAUX CHAUFFANTS:
tubes en acier recouverts de
caoutchouc siliconé, utilisés pour
chauffer le film de plastification et
le faire adhérer par pression sur
les documents à plastifier. La
chaleur est dégagée par un
élément chauffant interne. Les
rouleaux chauffants sont actionnés
par un moteur pour faciliter le
chargement de nouvelles bobines
(Figure 4).
H. BARRES DE TRANSFERT : Ces
barres de transfert, situées près
de chaque rouleau d’alimentation,
permettent de diriger le film vers les
rouleaux chauffants. La barre de
transfert inférieure est amovible
pour faciliter le chargement des
bobines de film (Figure 4).
I. ROULEAUX D’ENTRAÎNEMENT:
les rouleaux d’entraînement, situés
à l’arrière de la plastifieuse, sont
actionnés par un moteur. Ils
entraînent le film et améliorent la
qualité de plastification (Figure 4).
J. COUPE-CIRCUIT: dispositif de
sécurité électrique, situé au dos de
la plastifieuse, près du cordon
d’alimentation ; peut être réinitialisé
par l’opérateur après coupure
(Figure 5).
ATTENTION: Si le coupe-
circuit s’enclenche une
seconde fois après avoir été remis
à zéro, contactez votre réparateur
GBC régional ou votre revendeur
distributeur pour toute aide
technique.
K. AXE: l’axe maintient la bobine de
film et les mandrins permettent de
maintenir les bobines de film sur la
machine (Figure 6).
L. ADAPTA TEURS DE FIXA TION:
Tenez et fixez les rouleaux de film
sur les axes afin d’éviter que ces
derniers ne glissent d’un côté ou de
l’autre (Figure 6).
M. LÉ DE FILM: film de
plastification engagé dans la
plastifieuse.
G. RODILLOS TÉRMICOS: Los
tubos de acero con capa de hule
de silicona calientan la película de
laminación y comprimen la película
calentada en los artículos que
están siendo laminados. El calor es
suministrado por un elemento
interno de calentamiento. Los
rodillos térmicos son accionados
por un motor para facilitar la
introducción de película nueva
(Figura 4).
H. BARRA INTERMEDIA: Las
barras intermedias, ubicadas cerca
de cada rollo de suministro, se
utilizan para dirigir la película hacia
los rodillos térmicos. La Barra
Intermedia inferior se puede
desmontar para facilitar la
colocación de película nueva
(Figura 4).
I. RODILLOS DE TRACCIÓN: Los
rodillos de tracción, ubicados en la
parte posterior del laminador, son
accionados por un motor. Dichos
rodillos jalan la película
simultáneamente y mejoran la
calidad del artículo laminado (Figura
4).
J. INTERRUPTOR AUTOMÁTICO:
Este es un dispositivo eléctrico de
seguridad, ubicado en la parte
posterior del laminador cerca del
cable eléctrico, y puede ser
reajustado por el operador si se
vuelca (Figura 5).
ADVERTENCIA: Si el
interruptor automático se
vuelca por segunda vez después
de reajustarlo, comuníquese con su
Representante Técnico Local de
GBC o con el concesionario/
distribuidor para que lo asistan.
K. EJE PARA LA PELÍCULA: El eje
para la película sostiene el
suministro de película en la máquina
(Figura 6).
L. ADAPTADORES DE FIJACIÓN
DE NÚCLEO: Sostienen y fijan los
rollos de película en los ejes para
evitar que se muevan hacia los lados
(Figura 6).
M. ROLLO DE PELÍCULA: Película
de laminación ubicada adentro de la
máquina.
15
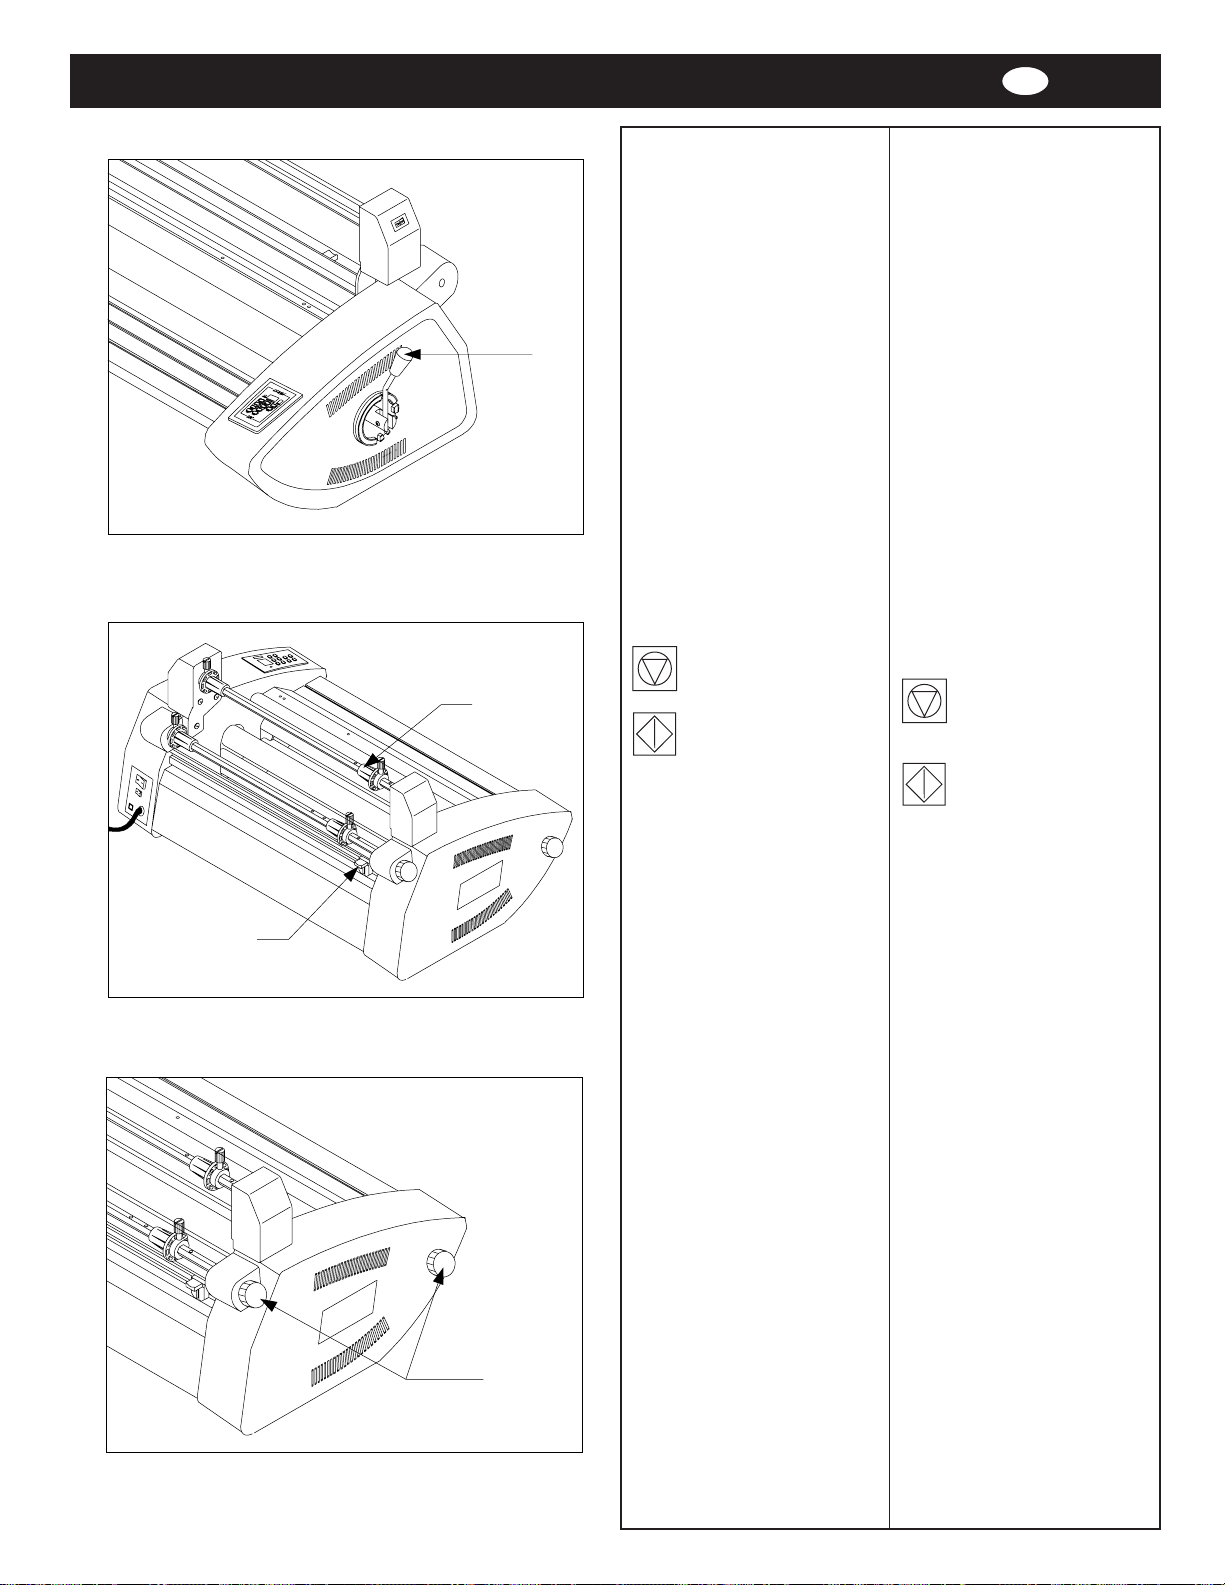
I
N. NIP POINT: The point at which
the top and bottom heat rollers
come into contact and the point at
which the items for lamination are
introduced into the laminator.
O. ROLLER PRESSURE HANDLE:
Adjusts the amount of roller
pressure needed for various
laminating and mounting
applications, (Figure 7).
O
Fig. 7
Q
Laminating: adhere in multiple
layers. Mounting: bond to a frame
or support.
Heavy Gauge: laminating films
thicker than 1.5 mil / 38 mic
P. REAR SLITTER: Used to cut off
the laminated web, (Figure 8).
Q. TAKE UP ASSEMBLY: Rewinds
the release liner of the pressure
sensitive films, mounting films and
used foil. Comes standard on the
Catena 105 and 65 models (Figure
8).
Is the start position of the
take up assembly switch.
Is the stop position of the
take up assembly switch.
R. FILM TENSION ADJUSTMENT :
Allows the operator to increase or
decrease film web tension as
needed to reduce curl and
wrinkles, (Figure 9).
P
N. PUNTO DI PRESA: Punto in cui il
rullo superiore e quello inferiore
entrano in contatto bloccando il
documento da plastificare, che
viene così inserito nella macchina.
O. MANIGLIA PRESSIONE RULLI:
Regola la quantità di pressione dei
rulli richiesta per le differenti
applicazioni di plastificazione e
montaggio (Figura 7).
Plastificare: adesione in vari strati.
Montaggio: montare il documento su
un supporto.
Spessore grosso: plastificare con
film di più di 1,5 mil / 38 mic.
P. ROTAIA DI TAGLIO: Utilizzata
per tagliare il film alla sua uscita sul
retro della plastificatrice (Figura 8).
Q. GRUPPO AVVOLGIMENT O:
Riavvolge il rivestimento di film
autoadesivi, film per montaggio e
film metallico usato. E’ incluso nel
modello Catena 105 ed modelli 65
(Figura 8).
Posizione di partenza
dell’interruttore del gruppo
avvolgitore.
Posizione di stop
dell’interruttore del gruppo
avvolgitore.
R. REGOLAZIONE TENSIONE
FILM: Consente all’operatore di
aumentare o diminuire la tensione
del film per ridurre accartocciamenti
e corrugamenti, (Figura 9).
16
Fig. 8
R
Fig. 9
DNLF E
N. BERÜHRUNGSPUNKT: Der Punkt,
an dem die obere und untere
Heißrolle sich berühren und der
Punkt, an dem die zu laminierenden
Artikel in das Laminiergerät
eingeführt werden.
O. WALZENDRUCKHEBEL: Zum
Einstellen des erforderlichen
Walzendrucks für verschiedene
Laminier- und Aufziehaufgaben (Abb.
7).
Laminieren: Haftung in mehrfachen
Schichten. Aufziehen: Befestigung
auf einem Rahmen oder einer
Unterlage.
Dicke Folien: Laminierfolien mit einer
Stärke von über 1,5 mil / 38 Mikron
P . ABTRENNVORRICHTUNG:
Zum Abtrennen der laminierten
Bahn (Abb. 8).
Q. AUFNAHME: Zum Aufrollen der
ablösbaren Schicht an
selbstklebenden Folien,
Aufziehfolien und verbrauchten
Folien. Standardausrüstung im
Modell Catena 105 und Catena 65
(Abb. 8).
Startposition des Schalters
für die Aufnahme.
Stoppposition des
Schalters für die
Aufnahme.
R. ZUGSPANNUNGSEINSTELLUNG:
Ermöglicht dem Benutzer, die
Straffheit der Folienbahn
wahlweise zu erhöhen oder zu
reduzieren und Wellen und Falten
zu verhindern (Abb. 9).
N. GRIJPZONE (NIP): Het punt
waar de bovenste en onderste
hitterollers met elkaar in contact
komen en de punt de plaats waar
de te lamineren documenten
worden ingevoerd in de laminator.
O. HENDEL VOOR ROLDRUK:
Hiermee wordt de roldruk ingesteld
die nodig is voor verschillende
lamineer- en opplaktoepassingen,
(zie afb. 7).
Laminieren: vastplakken van
meerdere lagen. Bevestigen:
vasthechten aan een frame of
steun.
Zware kwaliteit: lamineerfilm dikker
dan 1,5 mil / 38 mic.
P . ACHTERSTE AFNIJRAND: Deze
wordt gebruikt om de gelamineerde
baan af te snijden (zie afb.8).
Q. OPNEEMCONSTRUCTIE:
Hiermee wordt de losconstructie
van de drukgevoelige films, de
opplakfilms en de gebruikte folie
teruggedraaid. Standard op de
Catena 105 en 65 (zie afb. 8).
is de beginstand van de
schakelaar op de
opneemconstructie.
is de eindstand van de
schakelaar op de
opneemconstructie.
R. INSTELLEN FILMSP ANNING:
Hiermee kan de operator de
spanning op de filmbaan verhogen
of verlagen om opkrullen en
rimpelen te voorkomen (zie afb. 9).
N. POINT DE CONTACT: Le point
de contact des rouleaux
chauffants supérieur et inférieur se
situe exactement au point
d’introduction des documents dans
la plastifieuse.
O. LEVIER DE PRESSION DES
ROULEAUX: permet de régler la
pression des rouleaux en fonction
des divers films et supports utilisés
(Figure 7).
Plastifier: adhésion en plusieurs
couches. Montage: monter le
document sur un support.
Épaisseur gros: plastifier avec un
film de plus de 1,5 mil/38 mic
d’épaisseur.
P . MASSICOT ARRIÈRE: utilisé
pour couper les lés de film
réceptionnés en sortie de
plastifieuse (Figure 8).
Q. DISPOSITIF DE REMBOBINAGE:
permet de rembobiner la feuille
protectrice des films de
plastification à froid, des films de
montage et des feuilles métal.
Fourni avec la plastifieuse Catena
105, en 65 (Figure 8).
Position de mise en
marche de l’interrupteur
d’enroulement.
Position d’arrêt de
l’interrupteur
d’enroulement.
R. RÉGLAGE DE TENSION DE
FILM: permet à l’opérateur
d’augmenter ou de diminuer la
tension du lé de film pour réduire
les risques de courbures ou de
plissements (Figure 9).
N. PUNTO DE CONT ACTO: Punto
en el cual los rodillos térmicos
superior e inferior entran en
contacto, y punto en el cual los
artículos que están siendo
laminados se introducen en el
laminador.
O. MANGO DE PRESIÓN DEL
RODILLO: Ajusta la cantidad de
presión del rodillo, necesaria para
diferentes aplicaciones de
laminación y montaje. (Figura 7).
Laminating (laminación): adherir en
capas múltiples. Mounting
(montaje): ligar con un marco o
soporte.
Heavy Gauge (tamaño espeso):
laminación de películas con un
espesor de más de 1.5 mil / 39 mic.
P . T AJADERA POSTERIOR: Usada
para cortar la cinta laminada
(Figura 8).
Q. ENSAMBLAJE DE
ENROLLAMIENTO: Enrolla
nuevamente el forro de
revestimiento de las películas
sensibles a la presión, las películas
de montaje y las hojas usadas. Se
suministra como característica
estándar en el modelo Catena 105/
Catena 65 (Figura 8).
Es la posición de
encendido del interruptor
del ensamblaje de
enrollamiento.
Es la posición de paro del
interruptor del ensamblaje
de enrollamiento.
R. TENSIÓN DE AJUSTE DE LA
PELÍCULA: Permite que el
operador aumente o disminuya la
tensión de la cinta de película
según sea necesario para reducir
rizos y arrugas (Figura 9).
17
I
18
Main ON/ OFF
Switch
Fig. 10
OPERATING INSTRUCTIONS
1. Turn the laminator on (I) at the
main power switch located at
the back of the machine (Figure
10).
2. CAUTION: Make sure the
safety shield and feed
tray are in their proper
positions.
3. The laminator will automatically
default to the COLD setting
which is used for PSA
(pressure sensitive adhesive)
film. For thermal film press HOT,
when pressed, automatically
sets the temperature to 230 ºF
(110 ºC)The laminator will
automatically set the speed
and temperature for the
respective NAP II film and 20
lb. bond paper (copier
paper). If you are using NAP I
film the heat and speed settings
will be different. Refer to the
Catena Series Lamination Guide
chart in section LAMINATION
GUIDE AND THE ART OF
LAMINATING for these settings.
The settings in the guide are
suggested starting points and
will vary with different types of
items to be laminated.
4. Do not begin laminating until
the READY LED illuminates.
The normal warm-up time is
approx-imately 10 minutes.
5. Position the roller gap handle to
correspond to the gauge of film
laminated.
6. Position the item(s) to be
laminated on the Feed Table.
7. Press RUN. The rollers will begin
to turn. Wait for the heat line to
disappear, then push the item(s)
into the nip point of the heat
rollers. Additional items can be
laminated without stopping and
starting the laminator.
8. Should a jam occur (wrap-up),
press STOP. Refer to the
section CLEARING A FILM JAM
for specific instructions.
9. Stop the laminator when all of
the items have completely exited
the rear of the machine.
10.Allow the laminator to remain
powered if it is anticipated that it
will be used within a short
period of time.
ISTRUZIONI PER L’USO
1.
Agendo sull’interruttore generale
posto sulla parte posteriore della
macchina, fornire tensione alla
plastificatrice (Figura 10).
2.ATTENZIONE:
che lo schermo protettivo ed il
piano di alimentazione siano
posizionati correttamente.
3.
La plastificatrice si stabilirà
automaticamente sui valori standard
per l’impostazione di
(FREDDO)
autoadesivo (PSA). Per film termico,
quando premuto, imposta
automaticamente la temperatura
a 110 ºC (230 ºF)
plastificatrice imposterà
automaticamente la velocità
e la temperatura per il
rispettivo film e per carta da
scrivere da 20 lb. (carta per
fotocopiatrici)
NAP I le impostazioni di calore e
velocità saranno differenti. Per tali
impostazioni, far riferimento al grafico
della guida alla plastificazione della
serie Catena nel capitolo GUIDA
ALLA PLASTIFICAZIONE E
L’ARTE DELLA
PLASTIFICAZIONE
Le impostazioni riportate nella guida
sono punti di partenza consigliati e
varieranno a seconda del tipo di
materiale da plastificare.
4. Non avviare la plastificazione
finché il pannello a cristalli
liquidi READY (PRONTO) non
si illumina.
riscaldamento è di circa 10 minuti.
5.
Regolare la manopola di apertura del
rullo in modo che corrisponda alla
misura del film da plastificare.
6.
Posizionare l’articolo/i da plastificare
sul piano di alimentazione.
7.
Premere il pulsante
rulli inizieranno a girare. Attendere
che la linea del calore sparisca e
spingere l’articolo/i nel punto di presa
dei rulli di riscaldamento. E’ possibile
plastificare altri articoli senza
arrestare e riavviare la macchina.
8.
In caso di inceppamenti
(riavvolgimenti), premere il pulsante
STOP (ARRESTO)
al capitolo
INCEPPATO
dettagliate.
9.
Fermare la plastificatrice una volta
che tutti gli articoli laminati siano
usciti completamente dal retro della
macchina.
10.
Lasciare la plastificatrice accesa se
si prevede di utilizzarla in un breve
arco di tempo.
utilizzata per film
Il normale tempo di
RIPRISTINO FILM
per istruzioni
Assicurarsi
COLD
.
La
. Se si utilizza film
RUN (AVVIO)
. Far riferimento
. I
DNLF E
BEDIENUNGSANLEITUNGEN
1.
Schalten Sie das Laminiergerät mit
dem Hauptschalter auf der Rückseite
des Geräts ein (I) (Abb. 10).
2. VORSICHT:
sich, dass Schutzschild und
Zufuhrbehälter ordnungsgemäß
installiert sind.
3.
Die Standardeinstellung des
Laminiergeräts ist
Diese Einstellung wird für
selbsthaftende Folien verwendet. Bei
Thermofolien bei Betätigung wird die
Temperatur automatisch auf 110ºC
(230ºF) gesetzt..
Laminiergerät stellt die
Geschwindigkeit und
Temperatur automatisch auf
die entsprechende NAP II
Folie und 20 lb. Papier
(Kopierpapier) ein
Folien sind unterschiedliche
Temperatur- und
Geschwindigkeitseinstellungen
erforderlich. Diese sind der Tabelle in
den Richtlinien für die Catena Serie
unter Abschnitt
LAMINIERANLEITUNGEN UND DIE
KUNST DES LAMINIERENS zu
entnehmen. Die Angaben in der
Tabelle sind als allgemeiner Ansatz
zu verstehen und verändern sich in
Abhängigkeit des zu laminierenden
Artikels.
4. Beginnen Sie mit dem
Laminieren erst dann, wenn
auf der LED Anzeige READY
(BETRIEBSBEREIT)
aufleuchtet.
Einlaufzeit beträgt ca. 10 Minuten.
5.
Stellen Sie den Walzenabstand mit
dem entsprechenden Hebel auf die
verwendete Folienstärke ein.
6.
Legen Sie den/die zu laminierende(n)
Artikel auf den Anlegetisch.
7.
Drücken Sie
Walzen beginnen sich zu drehen.
Warten Sie, bis der durch die Hitze
verursachte Streifen verschwindet.
Schieben Sie dann den/die Artikel
zum Berührungspunkt der
Heißwalzen. Weitere Artikel können
laminiert werden, ohne dass das
Gerät angehalten und wieder
gestartet werden muss.
8.
Wenn eine Blockierung (Verwicklung)
eintreten sollte, drücken Sie
(STOPP).
sind dem Abschnitt
zu entnehmen.
9.
Schalten Sie das Gerät aus, wenn alle
Artikel auf der Rückseite des Geräts
vollständig ausgetreten sind.
10.
Wenn das Gerät kurzfristig wieder
verwendet werden soll, lassen Sie die
Stromzufuhr eingeschaltet.
Weitere Anleitungen dazu
Versichern Sie
COLD (KALT)
Das
. Für NAP I
Die normale
RUN (START)
BLOCKIERUNG
. Die
STOP
BEDIENINSTINSTRUCTIES
1.
Schakel de laminator in met behulp
van de netschakelaar die zich bevindt
aan de achterzijde van het apparaat
(zie afb. 10).
2. OP P AS:
beschermkap en de invoerbak
in de juiste positie zijn.
3.
De laminator is automatisch
standaard ingesteld voor
.
(KOUD),
kleeffilm (PSA). Druk voor thermofilm
Indien ingedrukt, wordt de
temperatuur automatisch op 110 ºC
(230 ºF) ingesteld.
stelt automatisch de
snelheid en de temperatuur
in op de gebruikte NAP II
film en op 20 lb.
bankpostpapier
(kopieerpapier).
I film, dan zijn de instellingen voor
warmte en snelheid verschillend.
Raadpleeg de tabel in de CatenaSeries Lamination Guid in het deel
AANWIJZINGEN T.A.V.
SNELHEID/TEMPERATUUR EN DE
KNUST VAN HET LAMINEREN.
De daarin aanbevolen instellingen
variëren al naargelang het type van
het te lamineren document.
4. Begin niet met lamineren
voordat READY (BEREID) op
de LED display oplicht.
normale opwarmtijd bedraagt
ongeveer 10 minuten.
5.
Plaats het handvat over de rollerspleet zodat deze overeenkomt met
de dikte van de gelamineerde film.
6.
Plaats de te lamineren documenten
op de invoertafel.
7.
Druk op de
De rollers gaan nu draaien. Wacht tot
de warmtestreep verdwijnt en duw
dan het document in de grijpzone
tussen de warmterollers. Volgende
documenten kunnen worden
gelamineerd zonder het apparaat uit
te zetten en weer te starten.
8.
Als het apparaat vastloopt, druk dan
op de
STOP-knop.
deel
VERWIJDEREN VAN
VASTLOPERS voor
gedetailleerde instructies.
9.
Zet de laminator uit wanneer alle
documenten er aan de achterzijde
van het apparaat zijn uitgekomen.
10.
Laat de laminator ingeschakeld als u
verwacht deze binnen korte tijd weer
nodig te hebben.
Zorg ervoor dat de
gebruikt voor drukgevoelige
De laminator
Gebruikt u NAP
RUN (DRAAIEN)-knop.
Raadpleeg het
COLD
De
INSTRUCTIONS D’UTILIZA TION
1.
Positionnez l’interrupteur “Marche/
Arrêt” situé au dos de la plastifieuse
sur “Marche” (Figure 10).
2. ATTENTION:
que le capot de protection soit
bien abaissé et la table
d’alimentation correctement
verrouillée.
3.
La plastifieuse sélectionne
automatiquement le réglage
(FROID)
plastification à froid. Si vous utilisez
du film thermique,
automatiquement la témperature
à 110 º C (230º F)
La plastifieuse règle
automatiquement sa
température et sa vitesse
en fonction du film Naplam II
correspondant et d’un
document papier de 20
livres (papier pour
photocopieur).
du film Naplam I, les réglages de
température et de vitesse sont
différents. Dans ce cas, reportezvous au Guide de Plastification Série
Catena, paragraphe “Guide et Art de
la Plastification”. Ces réglages sont
donnés à titre indicatif et peuvent
bien entendu varier en fonction des
différents supports à plastifier.
4. Ne commencez pas la
plastification avant que le
voyant READY (PRÊT) soit
allumé.
chauffage est d’environ 10 minutes.
5.
Placez la poignée du rouleau afin
qu’elle corresponde au calibre du film
plastifié.
6.
Positionnez le(s) document(s) à
plastifier sur la table d’alimentation.
7.
Appuyez sur la touche
(AVANCE).
commencent à tourner. Attendez que
le repère disparaisse et poussez le(s)
document(s) jusqu’au point de
contact des rouleaux chauffants. Il
n’est pas nécessaire d’arrêter et de
redémarrer l’équipement pour
plastifier les documents suivants.
8.
En cas de bourrage, appuyez sur la
touche
paragraphe
BOURRAGES
spécifique.
9.
Arrêtez la plastifieuse une fois que
tous les documents sont ressortis en
totalité à l’arrière de l’équipement.
10.
Vous pouvez laisser votre
plastifieuse branchée si vous avez
d’autres documents à plastifier dans
un délai assez court.
utilisé pour le film de
Le temps normal de pré-
Les rouleaux
STOP.
DÉGAGEMENT DES
Assurez-vous
COLD
règle
.
Si vous utilisez
RUN
Reportez-vous au
pour toute instruction
INSTRUCCIONES DE OPERACIÓN
1.
Encienda el laminador (I) mediante el
interruptor principal ubicado en la
parte posterior de la máquina (Figura
10).
2.PRECAUCIÓN:
de que el escudo de seguridad
y la bandeja de alimentación
estén en la posición correcta.
3.
El laminador se activará
automáticamente en la posición
COLD (FRÍO)
adhesivo sensible a la presión (PSA).
Para película térmica,
oprimido, este botón ajusta la
temperatura a 110º C (230º F).
El laminador ajustará
automáticamente la
velocidad y la temperatura
para película NAP II o para
papel bond de 20 lb. (papel
para copiar).
NAP I, los ajustes de velocidad y
calor serán diferentes. Consulte la
tabla Guía de Laminación para la
Serie Catena en la sección
LAMINACIÓN Y EL ARTE DE
LAMINAR
ajustes que aparecen en la guía son
aquellos que sugerimos como punto
de partida y variarán con los
diferentes tipos de artículos que
serán laminados.
4. No comience a laminar hasta
que se ilumine el indicador
LED READY (LISTO).
normal de calentamiento es de
aproximadamente 10 minutos.
5.
Coloque el mango de escote de
rodillo de modo que corresponda con
el tamaño de la película que va a
laminar.
6.
Coloque los artículos que va a
laminar en la Plataforma de
Alimentación.
7.
Oprima
rodillos comenzarán a girar. Espere
hasta que desaparezca la línea de
calor, y después empuje los artículos
hacia el punto de contacto con los
rodillos térmicos. Se pueden laminar
artículos adicionales sin tener que
parar y encender el laminador.
8.
Si ocurre algún atasco, oprima
STOP (PARAR).
sección
DESOBSTRUIR ATASCOS
instrucciones específicas.
9.
Pare el laminador cuando todos los
artículos hayan salido completamente
por la parte posterior de la máquina.
10.
Deje encendido el laminador si
piensa usarlo dentro de un período
corto de tiempo.
para dichos ajustes. Los
RUN (OPERAR)
MANERA DE
Asegúrese
que se usa para el
al ser
Si utiliza película
GUIA DE
El tiempo
. Los
Consulte la
para las
19
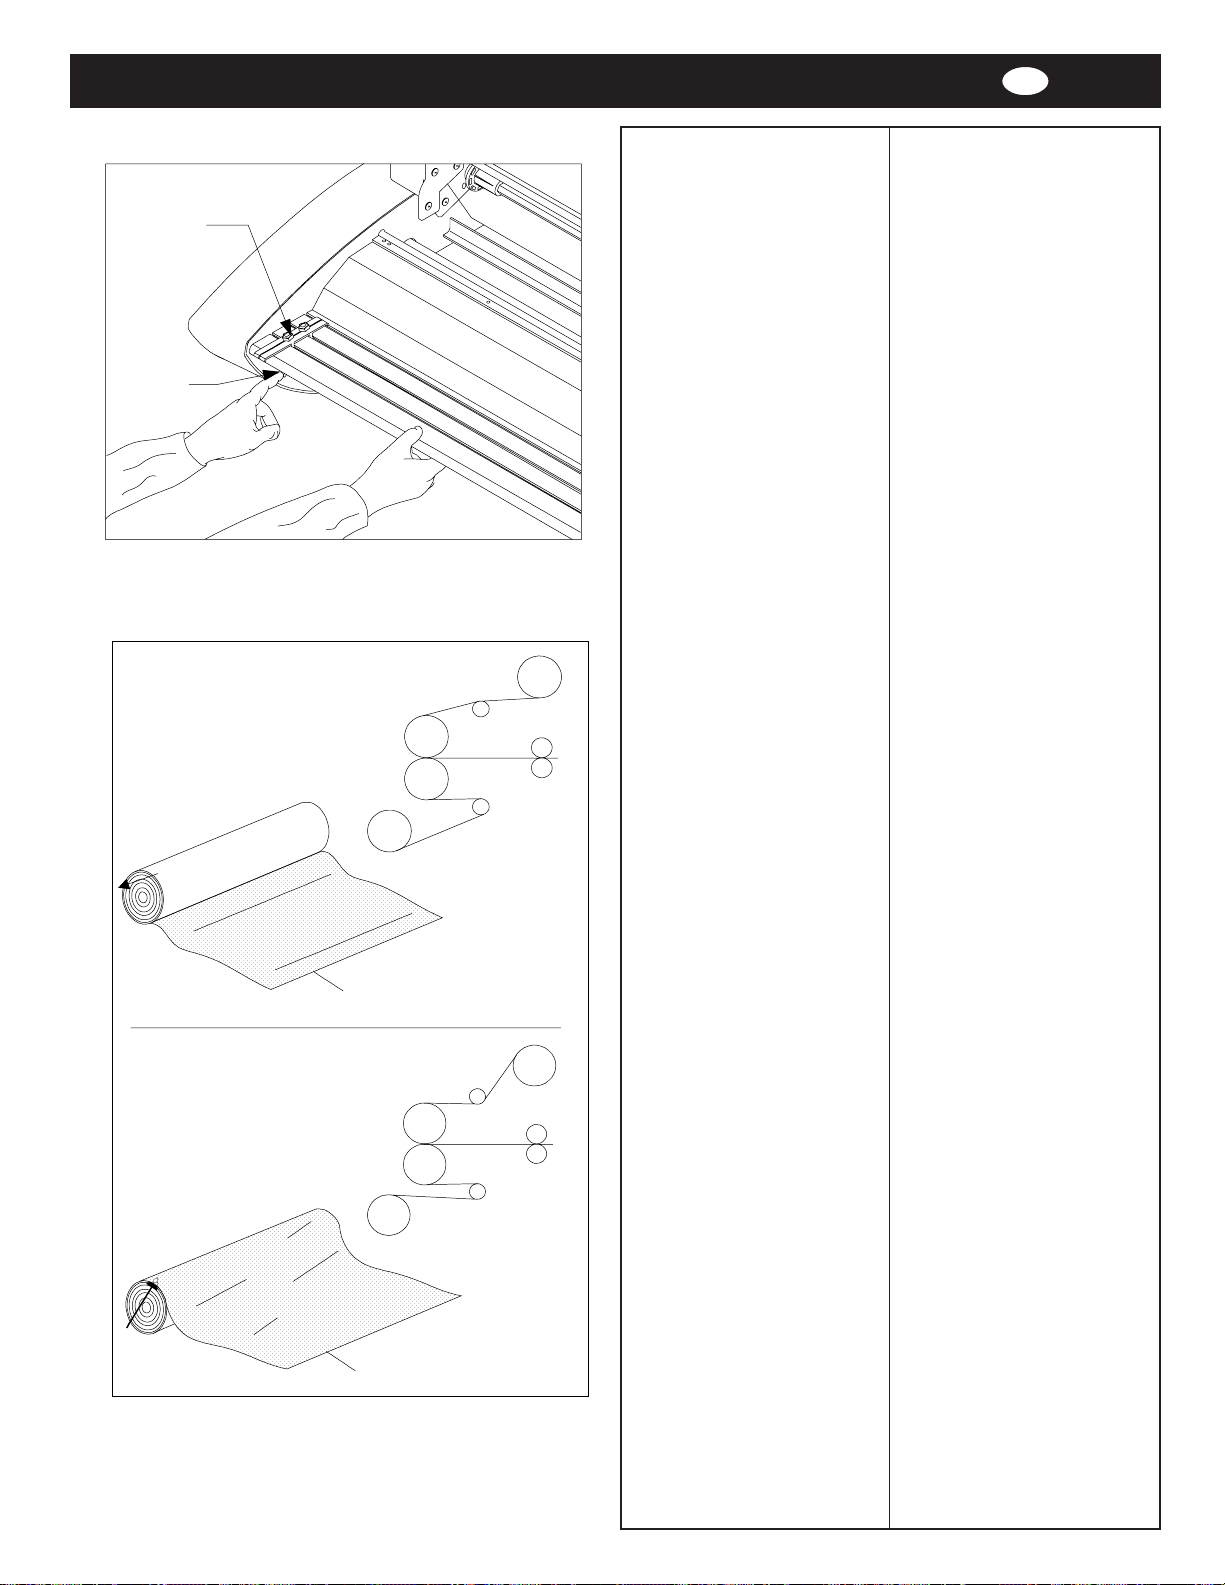
I
Feed guide
Feed table
latch
POLY-IN
POLY-OUT
Poly-in
Poly-out
Fig. 11
Adhesive
surface
Adhesive
Polyester surface
surface
SAFETY SHIELD REMOVAL
1. Lift the shield off.
2. To install reverse the step from
above.
FEED TABLE REMOV AL
Refer to Figure 11 and follow the
procedures to remove the feed
table:
1. Slide the Feed Table latch to the
right.
2. Lift the table upwards and away
from the laminator.
FILM LOADING & THREADING
Refer to Figure 12 or the film
threading diagram on the feed table
of the laminator for illustrations of
properly loaded film.
The Catena 35 and 65 use Poly-In
film on 1" cores. Poly-In means the
adhesive side of the film is on the
inside of the web (Figure 11). The
Catena 105 uses Poly-Out Thermal
films and Poly-In PSA films on 2 1/4"
cores. The shiny side of clear film
must contact the heat rollers. The
dull side of the film contains the
adhesive. Use extreme caution
when loading delustered (matte)
film as both sides appear dull.
The top and bottom rolls of
laminating film must be of the same
width and be present
simultaneously. A small amount of
adhesive will “squeeze out” during
lamination. Hardened adhesive
deposits can damage the heat
rollers. To avoid any damage, rotate
the rollers at slowest speed if the
READY LED is not illuminated. Refer
to the section entitled CARING FOR
THE CATENA SERIES LAMINATOR
for instructions regarding removal
of the accumulated adhesive.
RIMOZIONE SCHERMO DI
PROTEZIONE
1. Rimuovere lo schermo
sollevandolo.
2. Per l’istallazione, seguire le
istruzioni all’inverso.
RIMOZIONE DEL PIANO DI
ALIMENTAZIONE
Per rimuovere il piano di
alimentazione fare riferimento alla
Figura 12 e seguire la procedura
riportata qui di seguito:
1. Far scorrere la chiusura del piano
di alimentazione verso destra.
2. Sollevare il piano verso l’alto e
lontano dalla plastificatrice.
CARICAMENTO ED
INTRODUZIONE DEL FILM
Far riferimento alla Figura 11 o al
diagramma relativo all’introduzione
del film sul piano di alimentazione
della plastificatrice per illustrazioni
riguardanti il corretto caricamento
del film.
I modelli Catena 35 e 65 utilizzano
film Poly-In su nuclei da 1". Poly-In
significa che il lato adesivo del film
si trova sulla parte interna del velo
(Figura 11). L’Catena 105 utilizza
film Termico Poly-Out e film Poly-In
PSA su nuclei da 57 mm. Il lato
lucido del film deve venire in
contatto con i rulli di riscaldamento.
Il lato opaco del film contiene
l’adesivo. Fare particolare
attenzione quando viene caricato
film opaco (matt) in quanto entrambi
i lati sono opachi.
I rulli superiore ed inferiore del film
devono avere la stessa larghezza
ed essere caricati
contemporaneamente. Una piccola
quantità di adesivo verrà “espulso”
durante il processo di
plastificazione. Depositi di adesivo
indurito possono danneggiare i rulli
di riscaldamento. Per evitare
qualsiasi danno, girare i rulli alla
velocità più bassa se il pannello a
cristalli liquidi READY (PRONTO)
non è acceso. Far riferimento al
capitolo MANUTENZIONE DELLA
PLASTIFICATRICE SERIE CATENA
per maggiori informazioni sulla
rimozione di depositi di adesivo.
20
Polyester surface
Fig. 12

DNLF E
SCHUTZSCHILD ENTFERNEN
1. Schutzschild entfernen.
2. Zum Einsetzen sind die oben
beschriebenen Schritte in
umgekehrter Reihenfolge
auszuführen.
ANLEGETISCH ENTFERNEN
Nehmen Sie Abb. 11 zu Hilfe und
gehen Sie wie folgt vor:
1. Den Riegel nach rechts schieben.
2. Den Tisch nach oben anheben
und vom Laminiergerät
wegziehen.
FOLIE EINFÜHREN
Gemäß Abb. 12 oder dem
entsprechenden Schema auf dem
Anlegetisch des Laminiergeräts.
Daraus ist die richtige Einführung
der Folie ersichtlich.
Für die Modelle Catena 35 und 65
werden Poly-In Folien auf Spulen
mit einem Kern von 1 Zoll
verwendet. Poly-In bedeutet, dass
sich die haftende Seite der Folie
auf der Innenseite der Bahn
befindet (Abb. 11). Das Modell
Catena 105 verwendet Poly-Out
Thermofolien und Poly-In
selbsthaftende Folien auf 57 mm
Zoll Kernen. Die glänzende Seite
der Klarfolie ist die Seite, die mit
den Heißwalzen in Kontakt kommen
muss. Die matte Seite der Folie
enthält den Klebstoff. Bei der
Verwendung von entglänzter
(matter) Folie ist äußerste Vorsicht
geboten, da beide Seiten matt
erscheinen.
Die Folienspulen oben und unten
müssen dieselbe Breite aufweisen
und gleichzeitig vorliegen. Bei der
Laminierung wird eine geringe
Menge Klebstoff „ausgepresst“. Die
Heißwalzen können durch
verhärtete Klebstoffreste
beschädigt werden. Zur
Schadensverhütung dürfen die
Walzen nur auf der niedrigsten
Geschwindigkeitsstufe laufen,
wenn READY (BETRIEBSBEREIT)
auf der LED Anzeige nicht
aufleuchtet. Anweisungen, wie
Klebstoffreste zu entfernen sind,
entnehmen Sie bitte dem Abschnitt
PFLEGE DES LAMINIERGERÄTS
DER CATENA SERIE.
VERWIJDEREN VAN DE
BESCHERMKAP
1. Licht de kap eraf.
2. Volg de bovenstaande stappen
in omgekeerde volgorde om de
beschermkap weer te
installeren.
VERWIJDEREN VAN DE
INVOERTAFEL
Zie afb. 11 en volg onderstaande
procedures op:
1. Schuif de vergrendeling van de
invoertafel naar rechts.
2. Til de tafel omhoog en weg van
de laminator.
LADEN EN DOORVOEREN V AN DE
FILM
Zie afb. 12 het filmdoorvoerdiagram
op de invoertafel van de laminator
voor een illustratie van correct
geladen film.
Die Catena 35 en 65 gebruiken
Poly-In film op 1" kern. Poly-In houdt
in dat de kleefkant van de film aan
de bennenkant van de baan zit (zie
afb. 11). De Catena 105 gebruikt
Poly-Out thermische film en Poly-In
PSA film op kernen van 57 mm. De
glimmende zijde van doorzichtige
film moet in contact komen met de
warmterollers. De doffe zijde van
de film bevat de kleefstof. Wees
uiterst voorzichtig bij het gebruik
van matte film, omdat daarbij beide
zijden or dof uitzien.
De bovenste en onderste rol van
de lamineerfilm moeten even zijn en
gelijktijdig aangebracht worden.
Tijdens het lamineren worden kleine
hoeveelheden kleefstof uit het
apparaat ‘geperst’. Geharde resten
kleefstof kunnen de warmterollers
beschadigen. Om schade te
voorkomen, moeten de rollers
worden geroteerd op de laagste
snelheid als READY (BEREID) op de
LED display niet oplicht. Raadpleeg
het deel ONDERHOUD VAN DE
CATENA-SERIES LAMINATOR voor
instructies met betrekking tot het
verwijderen van opgehoopte
kleefstof.
RETRAIT DU CAPOT DE
SÉCURITÉ
1. Soulevez afin de retirer le capot.
2. Pour installer, reprenez les
étapes en sens inverse.
RETRAIT DE LA TABLE
D’ALIMENTATION
Reportez-vous à la figure 11 et
conformez-vous aux instructions
suivantes pour retirer la table
d’alimentation.
1. Relevez à fond le capot de
protection.
2. Soulevez la table d’alimentation
pour la dégager de la
plastifieuse.
INST ALLATION DES BOBINES DE
FILM
Reportez-vous à la figure 12 ou au
schéma situé sur la table
d’alimentation de la plastifieuse.
Les plastifieuses Catena 35 et 65
utilisent du film “Poly-In” en mandrin
de 25 mm. La mention “Poly-In”
signifie que le côté adhésif du film
se trouve sur la face interne du lé
(figure 11). La plastifieuse Catena
105 utilise du film “Poly-Out”
thermique et “Poly-In” PSA en
mandrins de 57 mm. Le côté
adhésif se trouve alors sur la face
externe du lé de film. Le côté
brillant du film doit être en contact
avec les rouleaux chauffants. La
colle se situe sur le côté mat du
film. Soyez très attentif si vous
utilisez du film mat car les deux
côtés du film sont alors mats.
Les bobines de film inférieure et
supérieure doivent être de même
largeur et doivent être chargées
simultanément. Un peu de colle peut
se déposer pendant la
plastification. Des dépôts de colle
durcis peuvent endommager les
rouleaux chauffants. Pour éviter
tout endommagement, faites
tourner les rouleaux à vitesse
réduite en attendant que le voyant
READY (PRÊT) s’allume. Reportezvous au paragraphe ENTRETIEN DE
LA PLASTIFIEUSE SÉRIE CATENA
pour les instructions concernant le
nettoyage des dépôts de colle.
MANERA DE QUIT AR EL ESCUDO
DE SEGURIDAD
1. Alce el escudo para quitarlo.
2. Para instalarlo nuevamente, siga
estos pasos en orden inverso.
MANERA DE QUITAR LA
PLA TAFORMA DE ALIMENT ACIÓN
Consulte la Figura 11 y utilice los
siguientes procedimientos para
quitar la plataforma de alimentación:
1. Deslice el pestillo de la Plataforma
de Alimentación hacia la derecha.
2. Alce la plataforma y aléjela del
laminador.
MANERA DE CARGAR Y
ENROSCAR LA PELÍCULA
Consulte la Figura 12 o el diagrama
de enroscado de película en la
plataforma de alimentación del
laminador para las ilustraciones
sobre la manera correcta de cargar
la película.
Los modelos Catena 35 y 65 usan
película Poly-In en cilindros de
cartón de 2,5 cm de diámetro. PolyIn significa que el lado adhesivo de
la película está en la parte interior de
la cinta (Figura 11). (El modelo
Catena 105 utiliza películas Poly-Out
Thermal y películas Poly-In PSA en
cilindros de cartón de 57 mm. El lado
brillante de la película transparente
debe estar en contacto con los
cilindros térmicos. El lado opaco de
la película es el lado adhesivo. Sea
extremadamente cuidadoso al
cargar películas deslustradas
(matte), puesto que ambos lados
tienen una apariencia opaca.
Los rollos superior e inferior de la
película de laminación deben tener
la misma anchura y deben estar
presentes simultáneamente. Se
esparcirá una pequeña cantidad de
adhesivo durante la laminación. Los
depósitos de adhesivo endurecido
pueden dañar a los rodillos
térmicos. Para evitar este tipo de
daños, gire los rodillos a la
velocidad más baja que le sea
posible si la señal READY no está
iluminada. Consulte la sección
MANTENIMIENTO DEL LAMINADOR
DE LA SERIE CATENA para las
instrucciones para quitar las
acumulaciones de adhesivo.
21
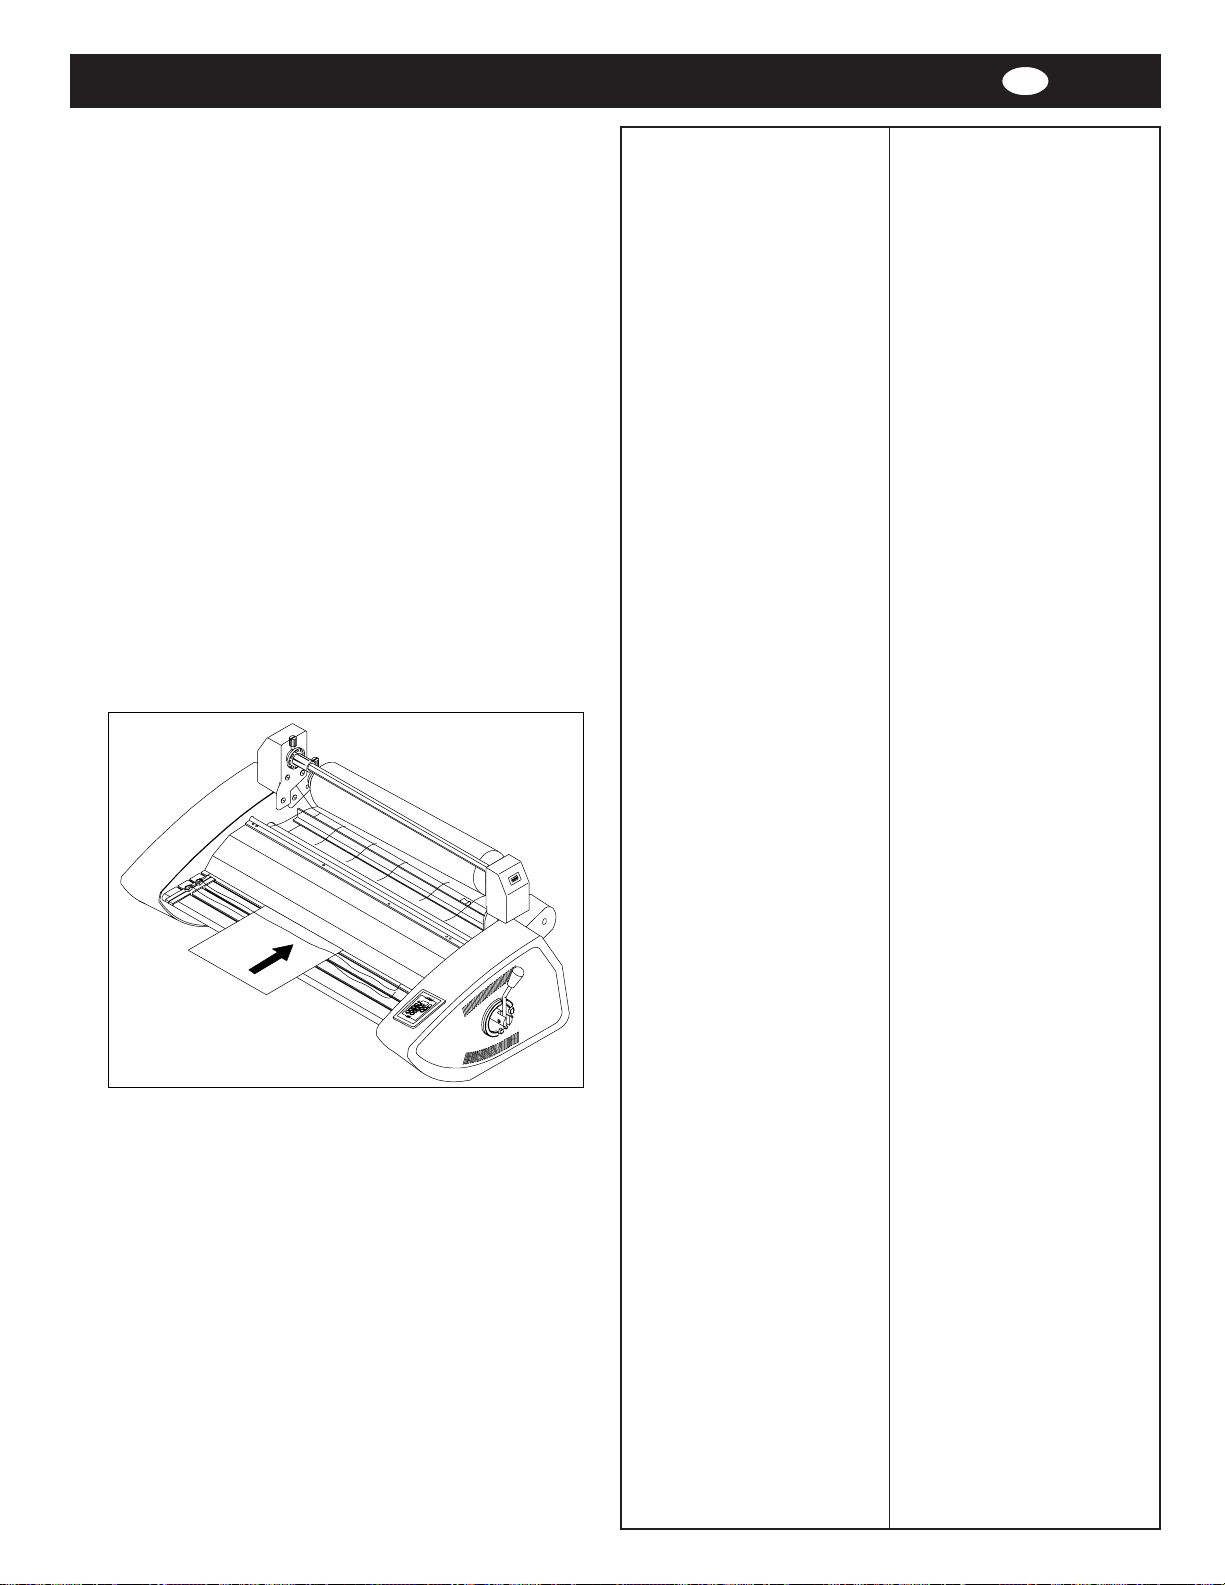
I
22
Threading card
Adhesive will deposit on the rollers
if:
- Only one roll is used.
- Different widths of rolls are
loaded together.
- Either roll is loaded adhesive
side against a heat roller.
- One or both rolls of film are
allowed to run completely off its
core.
Always change the top and bottom
supply rolls at the same time. Near
the end of each roll of GBC
laminating film is a label stating
“Warning-End of Roll”. The
appearance of this label on either
the top or bottom roll requires that
new rolls of film be installed as
soon as the item presently being
laminated completely exits the rear
of the laminator. Do not introduce
any additional items into the
laminator when the warning label is
visible.
Method Using Film Threading
Card
The following procedure uses the
film threading card provided with
new rolls of GBC film. The laminator
should be cool to the touch before
proceeding.
1. Turn the main power switch on
(I). Remove feed table.
2. Cut remaining top and bottom film
webs between supply rolls and
heat rollers. Be careful not to
cut the heat rollers.
3. Remove the safety shield and
pull the top piece of film down.
4. Do not allow remaining film to
pass through the laminator if
there is any exposed liquefied or
tacky adhesive. Liquefied or
tacky adhesive will deposit
on the heat rollers if the
following procedure is not
observed. Grab hold of the
web, (top and bottom film), and
install feed table under the web.
Replace the safety shield and
press SPEED to indicate 3 or
less on the display panel. Hold
down RUN and REVERSE
together and guide the web out
the front of the laminator. Make
certain no exposed adhesive
contacts the heat rollers and the
film completely exits the
laminator.
L’adesivo si depositerà sui rulli se:
- Viene utilizzata solo una bobina
- Bobine di larghezza differente
vengono caricate insieme.
- Una delle due bobine è caricata con il
lato adesivo contro un rullo di
riscaldamento.
- Una o entrambe le bobine di film sono
lasciate terminare completamente fino a
scoprire il nucleo.
Cambiare la bobina superiore e quella
inferiore allo stesso tempo. Verso la fine
di ogni bobina di film laminante GBC
appare un’etichetta riportante l’avvertenza
“Attenzione-Fine della Bobina”. La comparsa
di questa etichetta sulla bobina superiore o
su quella inferiore significa che è
necessario caricare nuove bobine di film
non appena la plastificazione in corso sarà
terminata. Non introdurre nessun altro
articolo nella plastificatrice alla comparsa
di tale etichetta.
Utilizzo del cartoncino di
inserimento film
La seguente procedura utilizza il
cartoncino per l’inserimento del film che
è incluso con le consegne di nuove
bobine di film GBC. Prima di poter
procedere, la plastificatrice deve risultare
fredda al tatto.
1.
Accendere la macchina agendo
sull’interruttore principale. Rimuovere
il piano di alimentazione.
2.
Tagliare i veli residui di film tra le
bobine e i rulli di riscaldamento.
attenzione a non tagliare i
rulli di riscaldamento.
3.
Sollevare lo schermo di protezione
portandolo in posizione di massima
apertura, tirare la parte del film
superiore verso il basso.
4.
Non lasciare che il film residuo passi
attraverso la plastificatrice se è
presente dell’adesivo liquefatto o
appiccicoso.
procedura non viene
rispettata, l’adesivo liquefatto
o appiccicoso si depositerà
sui rulli di riscaldamento.
Afferrare saldamente il velo del film
superiore ed inferiore e montare il
piano di alimentazione sotto al velo.
Riposizionare lo schermo di protezione e
premere il pulsante
(VELOCITÀ)
di visualizzazione indichi 3 o un
valore inferiore. Mantenere premuti
contemporaneamente i pulsanti R
(AVVIO) e REVERSE (MARCIA IN
SENSO OPPOSTO)
fuori dalla plastificatrice da lla parte
anteriore. Assicurarsi che adesivo
esposto non venga in contatto con i rulli
di riscaldamento e che il film
fuoriesca completamente dalla
macchina.
Se la seguente
SPEED
in modo che il pannello
Fare
UN
e guidare il velo

DNLF E
Klebstoffreste bleiben an den Walzen
zurück, wenn:
- nur eine Walze in Betrieb ist,
- Spulen unterschiedlicher Breite
gleichzeitig verwendet werden,
- eine der Spulen mit der Klebstoffseite an
einer Heißwalze anliegt,
- eine oder beide Folienspulen
vollständig abgerollt sind.
Die beiden Spulen müssen stets
gleichzeitig ausgewechselt werden.
Gegen Ende jeder Folienspule von GBC
befindet sich die Aufschrift „Achtung –
Ende der Spule“. Wenn diese Aufschrift
auf einer der beiden Spulen erscheint,
müssen neue Folienspulen eingesetzt
werden, sobald der gegenwärtig
laminierte Artikel vollständig auf der
Rückseite des Geräts ausgetreten ist.
Wenn Sie diese Warnung sehen, dürfen
keine weiteren Artikel in das Gerät
eingeführt werden.
Verfahren mit der
Folieneinführkarte
Das folgende
Verwendung einer Folieneinführkarte
durchgeführt, die mit allen neuen
Folienspulen von GBC geliefert wird.
Dazu muss das Laminiergerät zuerst so
lange abgekühlt werden, bis es von Hand
berührt werden kann.
1.
Hauptschalter einschalten (I) und den
Anlegetisch entfernen.
2.
Die Reste der oberen und unteren
Folienbahnen zwischen Spulen und
Heißwalzen abtrennen.
darauf, dass die Heißwalzen
nicht zerschnitten werden
3.
Schutzschild entfernen und das obere
Folienstück nach unten ziehen.
4.
Wenn freiliegender verflüssigter oder
klebriger Klebstoff vorhanden sein
sollte, darf der Rest der Folie nicht
durch das Laminiergerät laufen.
Wenn die folgenden
Anweisungen nicht beachtet
werden, kann sich
verflüssigter oder klebriger
Klebstoff auf den Heißwalzen
absetzen.
auf (obere und untere Folie) und
setzen Sie den Anlegetisch unter der
Bahn ein. Setzen Sie den Schutzschild
wieder ein, und stellen Sie die
(GESCHWINDIGKEIT)
Steuerfeld auf Stufe 3 oder kleiner.
Drücken und halten Sie
(START) und REVERSE
(UMKEHR)
die Bahn aus der Vorderseite des
Laminiergeräts heraus. Achten Sie
darauf, dass die Heißwalzen nicht mit
freiliegendem Klebstoff in Berührung
kommen, und dass die Folie
vollständig aus dem Gerät
herausgeführt wird.
Verfahren wird unter
Achten Sie
.
Nehmen Sie die Bahn
SPEED
auf dem
RUN
gleichzeitig und führen Sie
Er zal kleefstof op de rollers worden
afgezet als:
- slechts één rol wordt gebruikt;
- rollen van verschillende breedte
tegelijk worden gebruikt;
- een van beide rollen wordt
geladen met de kleefzijde tegen
een warmteroller;
- één of beide filmrollen volledig
van de kern loopt.
De bovenste en onderste toevoerrol
moeten altijd gelijktijdig worden
gewisseld. Als een rol GBC-lamineerfilm
bijna op is, verschijnt een label met
daarop de melding “Warning: End of
Roll”. Als dit label verschijnt op de
bovenste of onderste rol, moeten nieuwe
rollen film worden geïnstalleerd zodra het
laatste document het apparaat aan de
achterzijde heeft verlaten. Voer geen
nieuwe documenten in de laminator als
het waarschuwingslabel zichtbaar is.
Methode voor het doorvoeren
van film met gebruik van de
bijgelverde doorvoerkaart
In de volgende procedure wordt gebruik
gemaakt van de doorvoerkaart die bij
nieuwe GBC-filmrollen wordt geleverd.
De laminator moet zijn afgekoeld tot
aanraaktemperatuur alvoerens verder te
gaan.
1.
Schakel de netspanning in. Verwijder
de invoertafel.
2.
Snijd de film restanten aan de bovenen onderkant tussen toevoerrollen en
warmterollers af.
niet in de warmterollers
snijdt.
3.
Verwijder de beschermkap en trek het
bovenste stuk film naar beneden.
4.
Laat de resterende film niet door de
laminator gaan als er zichtbaar
vloeibare of kleverige kleefstof op
aanwezig is.
kleverige kleefstof zet zich
af op de warmterollers als
de volgende procedure niet
in acht wordt genomen. Pak
de baan vast, (bovenste en
onderste film),
invoertafel onder de baan. Zet de
beschermkap weer op zijn plaats en
druk op
SPEED (SNELHEID)
de display 3 of lager aangeeft. Houd
de knoppen
REVERSE (ACHTERUIT)
ingedrukt en leid de baan aan de
voorzijde uit de laminator. Zorg dat er
geen zichtbare kleefstof in contact
komt met de warmterollers en dat de
film volledig uit de laminator komt.
Let op dat u
Vloeibare of
en installeer de
totdat
RUN (DRAAIEN) en
gelijktijdig
La colle peut se déposer sur les
rouleaux dans les cas suivants:
- si une seule bobine est utilisée,
- si des bobines de largeurs
différentes sont utilisées
simultanément,
- si l’une des bobines a été
positionnée côté adhésif contre
le rouleau chauffant,
- si l’une ou les deux bobines de
film tournent en dehors des
mandrins.
Remplacez toujours simultanément
les bobines inférieure et supérieure.
La fin des bobines de film G.B.C. est
signalée par une étiquette “Attention
- Fin de film”. Dès que vous voyez
apparaître cette étiquette sur la
bobine supérieure ou inférieure,
terminez la plastification en cours et
remplacez les bobines de film. Ne
commencez pas une nouvelle
plastification avant d’avoir remplacé
les bobines.
Utilisation du guide de film
cartonné
Cette procédure décrit l’utilisation du
guide de film cartonné fourni avec
les nouvelles bobines de film G.B.C.
La plastifieuse doit être froide.
1. Positionnez le commutateur sur
“Marche” (ON). Retirez la table
d’alimentation.
2. Coupez le haut et le bas du lé de
film restant entre les rouleaux
d’alimentation et les rouleaux
chauffants. Veillez à ne pas
entailler les rouleaux
chauffants.
3. Retirez le capot de protection,
tirez le film supérieur vers le bas.
4. Ne laissez pas la surface de film
restante passer dans la
plastifieuse si la colle est fluide
ou liquide. Celle-ci risque de
se déposer sur les rouleaux
chauffants et cette
procédure serait alors
impossible à accomplir. Tirez
le lé de film (film supérieur et
inférieur) et installez la table
d’alimentation sous le lé de film.
Repositionnez le capot de
protection et appuyez sur la
touche SPEED (VITESSE) pour
passer en vitesse 3 ou
inférieure. Maintenez
simultanément appuyées RUN
(AVANCE) et REVERSE
(RETOUR) et guidez le lé de film
devant la plastifieuse. Assurezvous qu’il n’y ait pas de résidu de
colle sur les rouleaux chauffants
et que le film est complètement
sorti de la plastifieuse.
El adhesivo se acumulará en los rodillos si:
-Sólo se usa un rollo.
- Se cargan rollos de anchuras diferentes.
- Se carga uno de los dos rollos con el
lado adhesivo contra el rodillo térmico.
- Se permite que uno de los rollos de
película o ambos funcionen al
soltarse completamente del cilindro
de cartón.
Siempre cambie los rollos de material
superior e inferior al mismo tiempo.
Cerca del final de cada rollo de película
de laminación de GBC hay una etiqueta
con la palabras “Warning-End of Roll”
(advertencia: final del rollo). Cuando
aparece esta etiqueta en el rollo superior
o inferior, se deben instalar nuevos rollos
de película tan pronto como el artículo
que está siendo laminado salga
completamente por la parte trasera del
laminador. No introduzca ningún artículo
adicional en el laminador después de que
aparezca la etiqueta de advertencia.
Método Usando la Tarjeta para
Enroscar Película
El siguiente procedimiento utiliza la
tarjeta para enroscar película que se
suministra con los rollos de película de
GBC. El laminador debe estar frío al
tacto antes de proceder.
1.
Encienda el interruptor principal (I).
Quite la plataforma de alimentación.
2.
Corte las cintas de película superior e
inferior restantes entre los rollos de
material y los rodillos térmicos.
Tenga cuidado para no
cortar los rodillos térmicos.
3.
Quite el escudo de seguridad y jale el
extremo superior de película hacia
abajo.
4.
No permita que la película restante
pase a través del laminador si hay
algún adhesivo pegajoso o en estado
líquido.
El adhesivo pegajoso
o en estado líquido se
acumulará en los rodillos
térmicos si no se sigue el
siguiente procedimiento.
Agarre la cinta (parte superior e
inferior de la película), e instale la
plataforma de alimentación debajo de
la cinta. Cierre el escudo de
seguridad y oprima
(VELOCIDAD)
menos en el indicador. Oprima y
sostenga conjuntamente los botones
RUN (OPERAR) y REVERSE
(INVERTIR)
afuera en la parte frontal del
laminador. Asegúrese de que el
adhesivo expuesto que pueda haber
no entre en contacto con los rodillos
térmicos y que la película salga por
completo del laminador.
SPEED
para especificar 3 o
y dirija la cinta hacia
23
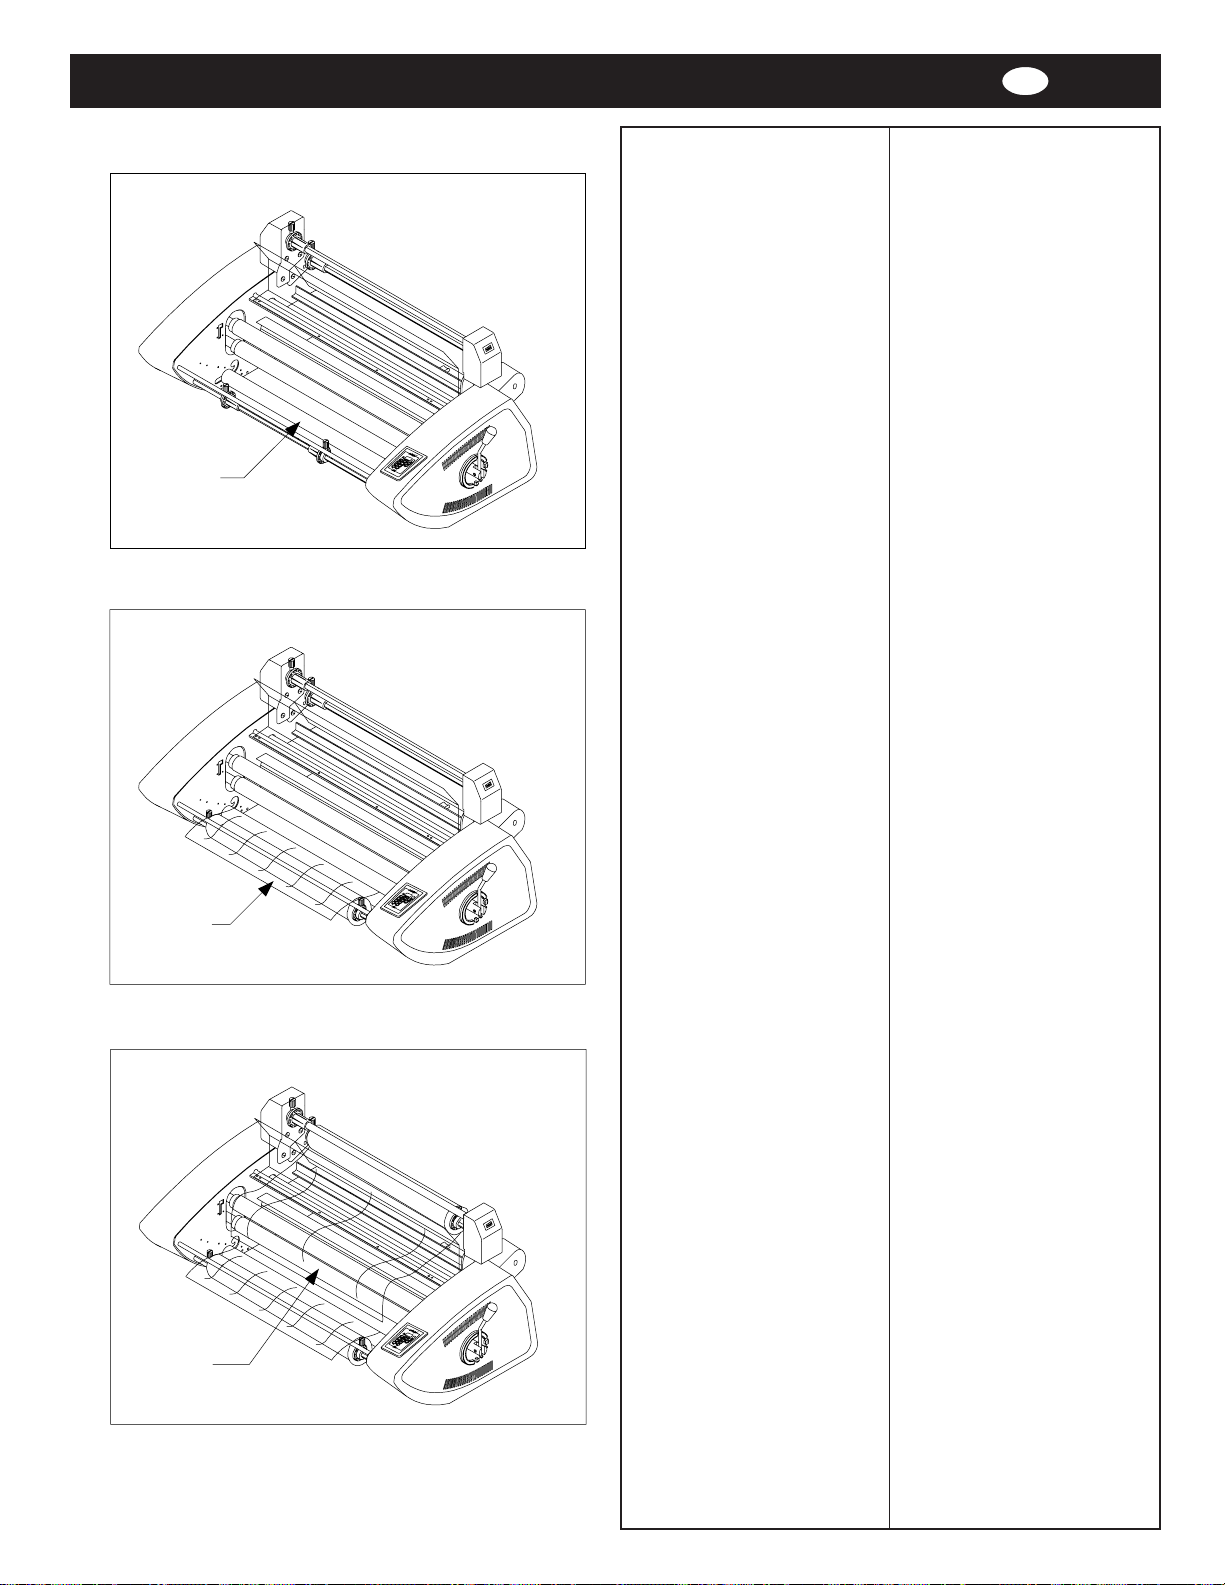
I
Idler bar
Lower roll
of film
Fig. 13
Fig. 14
5. Press STOP after the web has
cleared the heat rollers.
6. Remove the safety shield.
7. Remove the feed table.
8. Lower the bottom idler bar,
(Figure 13).
9. Remove the bottom film shaft by
sliding the shaft to the right until
the left end of the shaft clears
the hex shaped brake hub.
Loosen locking screw on left
retaining collar of film supply
shaft, and slide collar off. Pull
shaft partially out of film tube,
then push back in to knock out
left core adapter. Pull shaft all
the way out and rotate tube 180
degrees. Use shaft to knock out
remaining core adapter.
10. Slide one core adapter into right
side of new roll of film ensuring
that the film will unroll from the
bottom on Poly-In film and from
the top for Poly-Out film. Slide
the film shaft into the core
adapter and tube from the right
side. Place the other core
adapter on the shaft protruding
from the left side then replace
retaining collar. Tighten locking
screw.
11. Unroll 2 ft. (61 cm) of film. Push
the leading edge under and
around bottom film guide. Slide
film guide back into place and
drape film over the front support
for the feed table, (Figure 14).
12. Remove top film supply roll from
laminator. Repeat steps 9 and 10
from above ensuring the film will
unroll from the bottom, for polyin film,and from the top for polyout film, after the film supply
shaft is placed back on the
laminator.
13. Unroll 2 ft. (61 cm) of film.
Drape the film over the top idler
bar for poly-in film and under the
bar for poly-out film. Completely
cover both heat rollers, (Figure
15).
5. Premere STOP (ARRESTO) una
volta che il film sia uscito
completamente dai rulli.
6. Rimuovere lo schermo di
protezione.
7. Rimuovere il piano di
alimentazione.
8. Abbassare l’asta folle inferiore
(Figura 13).
9. Rimuovere il rullo inferiore
facendolo scorrere verso destra
finché la parte sinistra dell’albero
non si sia liberato dal mozzo
esagonale del freno. Allentare la
vite di bloccaggio della ghiera
montata sul lato sinistro
dell’albero del film ed estrarre la
ghiera. Tirare parzialmente fuori
l’albero dalla bobina e quindi
reinserirlo per far uscire
l’adattatore di nucleo di sinistra.
Tirare fuori l’albero
completamente e ruotare il tubo
di 180 gradi. Utilizzare l’albero
per togliere l’altro adattatore di
nucleo.
10. Infilare un adattatore della
nuova bobina assicurandosi che
il film si svolga correttamente dal
basso in caso di film Poly-In e
dall’alto in caso di film Poly-Out.
Infilare l’albero del film
nell’adattatore e nella bobina dal
lato destro. Posizionare l’altro
adattatore sulla sinistra e quindi
rimontare la ghiera. Stringere la
vite di bloccaggio.
11. Svolgere 61 cm di film. Spingere
il bordo di entrata sotto ed
attorno all’asta folle inferiore.
Infilare nuovamente la guida in
posizione e lasciare cadere sul
supporto anteriore del piano di
alimentazione (Figura 14).
12. Rimuovere il rullo di film
superiore dalla plastificatrice.
Ripetere i punti 9 e 10 ,
assicurandosi che il film non si
svolga dalla parte inferiore dopo
che l’albero del film è stato
rimontato sul laminatore.
13. Svolgere 61 cm di film. Lasciar
cadere il film al di sopra dell’asta
folle superiore coprendo
entrambi i rulli di riscaldamento
(Figura 15).
24
Upper roll
of film
Fig. 15

DNLF E
5. STOP (STOPP) drücken, wenn
die Bahn die Heißwalzen
passiert hat.
6. Schutzschild entfernen.
7. Anlegetisch entfernen.
8. Die untere Leitstange absenken
(Abb. 13).
9. Die untere Folienwelle
entfernen, indem diese nach
rechts geschoben wird, bis das
linke Ende der Welle die
sechseckige Bremsnabe
passiert hat. Die
Sicherungsschraube am
Sicherungsansatz auf der linken
Seite der Welle lösen und den
Ansatz entfernen. Die Welle
teilweise aus dem Folienrohr
herausziehen, dann so
zurückstoßen, dass der linke
Adapter heraus gestoßen wird.
Die Welle vollständig
herausziehen und das Rohr um
180 Grad drehen. Mit der Welle
den verbleibenden Adapter
heraus stoßen.
10. Einen der Adapter auf der
rechten Seite einer neuen
Folienspule einführen und
sicherstellen, dass die Folie von
unten abrollt, wenn es sich um
eine Poly-In Folie handelt und
von oben bei einer Poly-Out
Folie. Die Welle von der rechten
Seite her in den Adapter und das
Rohr einschieben. Den anderen
Adapter auf der aus der linken
Seite herausragenden Welle
aufsetzen, den
Sicherungsansatz wieder
einsetzen und die
Sicherungsschraube anziehen.
11. Ca. 60 cm (2 Fuß) der Folie
abrollen. Die Vorderkante unter
und um die untere Folienführung
herum führen. Die Folienführung
wieder in die Ausgangsstellung
zurückschieben und die Folie
über die vordere Stütze des
Anlegetisches hängen (Abb.
14).
12. Die obere Folienspule aus dem
Laminiergerät herausnehmen.
Schritte 9 und 10 wiederholen
und sicherstellen, dass eine
Poly-In Folie von unten, und eine
Poly-Out Folie von oben abrollt,
wenn die Welle wieder im Gerät
eingesetzt ist.
13. Ca. 60 cm (2 Fuß) der Folie
abrollen und diese bei Poly-In
Folien über die obere Leitstange
hängen und bei Poly-Out Folien
unter der Leitstange
durchführen. Beide Heißwalzen
sollen vollständig bedeckt sein
(Abb. 15).
5. Druk op STOP zodra de baan de
warmterollers heeft
gepasseerd.
6. Verwijder de beschermkap.
7. Verwijder de invoertafel.
8. Laat de onderste vrijlooprol
zakken (zie afb. 13).
9. Verwijder de onderste filmkoker
door deze naar rechts te
schuiven totdat de linkerkant van
de koker vrijkomt van de
zeskantige remnaaf. Draai de
borgschroef van de linker
steunkraag van de filmtoevoerrol
los en schuif de kraag eraf. Trek
de koker gedeeltelijk uit de
filmbuis en duw deze daarna
weer naar binnen om de linker
kernadapter eruit te tikken. Trek
de gehele koker uit de filmbuis
en draai de buis 180 graden.
Gebruik de koker om de andere
kernadapter eruit te tikken.
10. Schuif één kernadapter aan de
rechterkant in de nieuwe filmrol
en vergewis u ervan dat de film
afrolt, van onderaf bij Poly-In film
en van bovenaf bij Poly-Out film.
Schuif de filmkoker vanaf rechts
in de kernadapter en de buis.
Plaats de andere kernadapter op
de koker, zodanig dat deze
vanaf links naar buiten steekt en
vervang daarna de steunkraag.
Draai de borgschroef vast.
11. Rol ongeveer 61 cm film af.
Duw de voorste rand onder en
rondom de onderste filmgeleider.
Schuif de filmgeleider terug op
zijn plaats en drapeer de film
over de voorste steun van de
invoertafel (zie afb. 14).
12. Verwijder de bovenste
filmtoevoerrol uit de laminator.
Herhaal stap 9 en 10 en zorg
ervoor dat de film van onderaf
afrolt nadat de filmkoker is
teruggeplaatst in de laminator.
13. Rol ongeveer 61 cm film af.
Drapeer de film over de
bovenste vrijlooprol bij Poly-in
film en onder de balk bij Poly-out
film en zorg dat beide
warmterollers volledig worden
bedekt (zie afb. 15).
5. Appuyez sur la touche STOP
après que le lé soit sorti des
rouleaux chauffants.
6. Retirez le capot de protection.
7. Retirez la table d’alimentation.
8. Abaissez la barre de transfert
inférieure (figure 13).
9. Retirez la bobine de film
inférieure en faisant glisser l’axe
vers la droite pour le libérer du
moyeu de frein. Desserrez la vis
de gauche maintenant le collier
de fixation sur l’axe, faites
glisser le collier pour le dégager.
Sortez partiellement l’axe de la
bobine de film, puis repoussezle pour dégager l’adaptateur de
mandrin gauche. Tirez
complètement l’axe et faites
tourner le tube de 180 degrés.
Utilisez l’axe pour dégager
l’adaptateur de mandrin restant.
10. Insérez un des adaptateurs de
mandrin dans le côté droit d’une
nouvelle bobine de film en vous
assurant que la bobine se
déroule du bas pour du film
“Poly-In” ou du haut pour du film
“Poly-Out”. Glissez, par la droite,
l’axe de chargement de bobine
dans l’adaptateur de mandrin et
le tube. Positionnez l’autre
adaptateur de mandrin sur l’axe
en le dégageant par la gauche
puis replacez le collier de
fixation. Resserrez la vis.
11. Déroulez 61 cm de film.
Poussez le bord du film sous et
autour le guide de film inférieur.
Remettez le guide de film en
place et drapez le film sur le
support frontal de la table
d’alimentation (figure 14).
12. Retirez le rouleau d’alimentation
supérieur. Répétez les étapes 9
et 10 ci-dessus en vous
assurant que le film se déroule
du bas après que l’axe de
bobine de film ait été remis en
place.
13. Déroulez 61 cm de film. Passez
le film au-dessus de la barre de
transfert supérieure pour le film
“Poly-in” et sous la barre pour le
film “Poly-out”. Recouvrez
complètement les rouleaux
chauffants (figure 15).
5. Oprima STOP (PARAR) después
de que la cinta ha atravesado los
rodillos térmicos.
6. Quite el escudo de seguridad.
7. Quite la plataforma de
alimentación.
8. Baje la barra intermedia inferior
(Figura 13).
9. Quite el eje inferior para película
deslizando el eje hacia la derecha
hasta sacar el extremo izquierdo
del eje de la campana de freno
con forma hexagonal. Afloje el
tornillo de fijación a la izquierda,
sosteniendo el collar del eje del
suministro de película, y deslice el
collar para sacarlo. Jale el eje
para sacarlo parcialmente del
tubo de película, y después
reinsértela para hacer salir el
adaptador de núcleo de la
izquierda. Jale el eje hasta sacarlo
completamente y gire el tubo 180
grados. Use el eje para extraer el
otro adaptador de núcleo.
10. Deslice uno de los adaptadores
de núcleo hacia el lado derecho
del nuevo rollo de película,
asegurándose de que la película
se desenrolle desde la parte
inferior de la película Poly-In y
desde la parte superior de la
película Poly-Out. Deslice el eje de
la película hacia el adaptador de
núcleo y tubo desde el lado
derecho. Coloque el otro
adaptador de núcleo en el eje que
sobresale desde el lado izquierdo,
y después coloque nuevamente el
collar de retención. Apriete el
tornillo de fijación.
11. Desenrolle 61 cm de película.
Empuje el borde delantero debajo
del tope de alineamiento de
película inferior y alrededor del
mismo. Deslice nuevamente la
barra de alineamiento de película
hasta colocarla en su lugar y
haga pasar la película sobre el
soporte frontal para la bandeja de
alimentación (Figura 14).
12. Quite el rollo de película superior
del laminador. Repita los pasos 9
y 10 asegurándose de que la
película se desenrolle desde
abajo con la película Poly-In, y
desde arriba con la película PolyOut, después de colocar
nuevamente el eje para la película
en el laminador.
13. Desenrolle 61 cm de película.
Haga pasar la película sobre la
barra intermedia superior con
película Poly-In, debajo de la barra
con película Poly-Out. Cubra
completamente a ambos rodillos
térmicos (Figura 15).
25
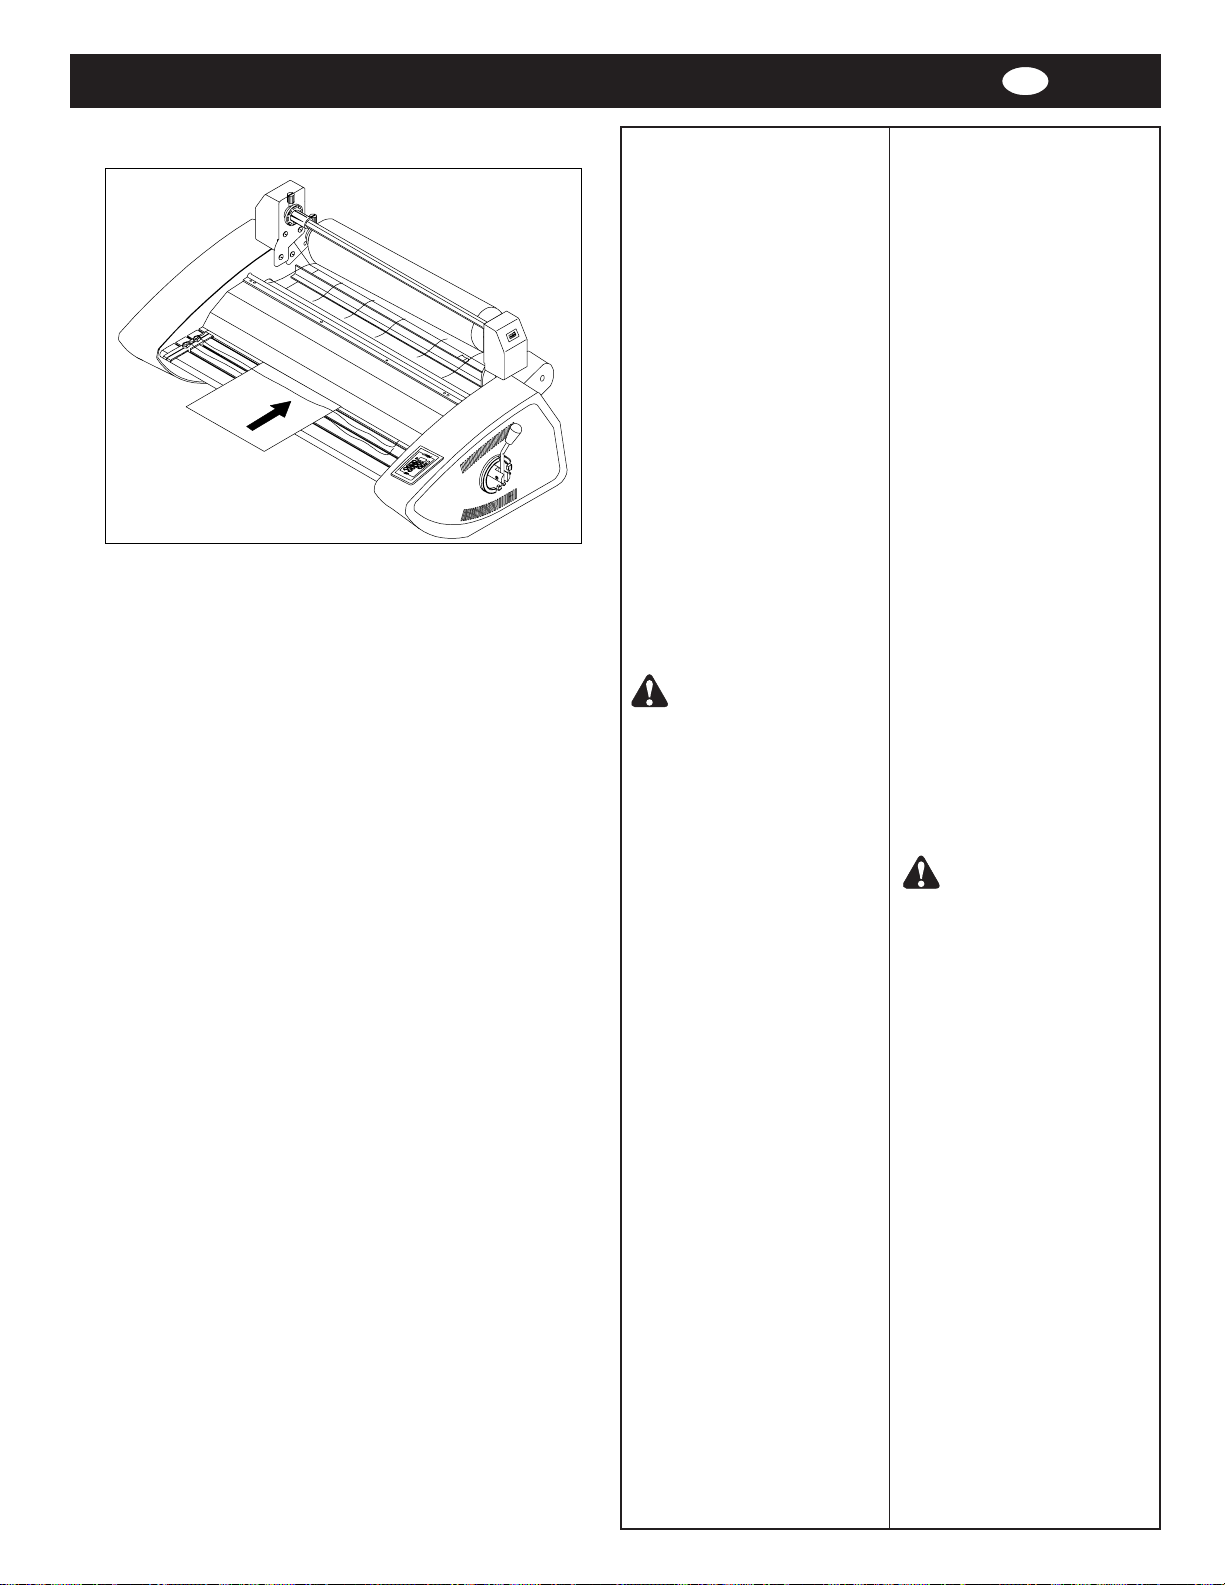
I
Threading card
Fig. 16
14. Slide the feed tray under the
draped bottom roll of film.
Reinstall the feed table so that
the bottom roll of film is resting
on the tray.
15. Slide the threading card
between the feed tray and the
film web lying on the tray, and
gently push into the nip area of
the heat rollers (Figure 16).
16. Replace the safety shield then
push RUN. Watch the leading
edge of the threading card to
ensure that it enters the nip
area of the heat rollers and is
being pulled into the laminator.
The card will guide the web of
both film rolls into the heat
rollers. Push STOP once the
threading card has exited the
rear of the laminator.
17. Check film alignment. See
section entitled FILM ALIGNMENT
PROCEDURE for instructions if
installed film needs alignment.
CAUTION THE FOLLOWING
PROCEDURE IS
PERFORMED WHILE THE
LAMINAT OR IS HOT. USE
EXTREME CAUTION. AVOID
CONTACT WITH THE HEAT
ROLLERS.
Method For Tacking New Film
to Existing Film
The following describes a method
for loading film whereby the
existing film present on the heat
rollers may be used in place of the
threading card to draw the new
film through the laminator. The
adhesive of the existing film must
be tacky or liquefied. Leading
edges of the new film will be
overlapped onto the tacky adhesive
of the old film. The existing film and
the new film will be pulled through
the laminator together.
1. Preheat the laminator. Remove
the feed tray.
2. Cut remaining top and bottom film
webs between the supply rolls
and heat rollers.
3. Remove the safety shield.
14. Inserire il piano di alimentazione
sotto il pezzo di film che è
adagiato al di sopra della bobina di
film inferiore. Rimontare il piano di
alimentazione in modo tale che la
bobina inferiore si appoggi sul
piano.
15. Infilare il cartoncino di inserimento
tra il piano di alimentazione ed il
film posato sul piano. Spingere
delicatamente nella zona di presa
dei rulli di riscaldamento. (Figura
16).
16. Rimontare lo schermo di
protezione e quindi premere il
pulsante RUN (AVVIO).
Controllare il bordo di entrata del
cartoncino di inserimento per
assicurarsi che entri nell’area di
presa dei rulli di riscaldamento e
sia tirato all’interno della
plastificatrice. Il cartoncino
guiderà il film di entrambe le
bobine tra i rulli di riscaldamento.
Quando il cartoncino di
inserimento è fuoriuscito dal retro
della plastificatrice, premere il
pulsante STOP (ARRESTO).
17. Verificare l’allineamento del film.
Vedere il capitolo METODO DI
ALLINEAMENTO DEL FILM per
maggiori istruzioni se il film
montato richiede di essere
allineato.
ATTENZIONE: LA
SEGUENTE PROCEDURA
DEVE ESSERE ESEGUITA QUANDO
LA PLASTIFICATRICE E’ CALDA.
OPERARE CON LA MASSIMA
CAUTELA. EVITARE IL CONTA TTO
CON I RULLI DI RISCALDAMENTO.
Metodo per attaccare una nuova
bobina a quella preesistente
Quanto segue è la descrizione di un
metodo per il caricamento di film
utilizzando film già presente sui rulli di
riscaldamento al posto del cartoncino
di inserimento per alimentare il nuovo
film nella plastificatrice. L’adesivo del
film presente deve essere
appiccicoso o liquefatto. Il bordo di
entrata del nuovo film verrà
sovrapposto all’adesivo appiccicoso
del film anteriore. Il film presente e
quello nuovo verranno tirati insieme
attraverso la plastificatrice.
1. Preriscaldare la plastificatrice.
Rimuovere il cassetto di
alimentazione.
2. Tagliare gli strati di film superiore
ed inferiore rimanenti tra le bobine
ed i rulli di riscaldamento.
3. Rimuovere lo schermo di
protezione.
26
 Loading...