

Page 1

Aastra 5000 Communications Systems
User’s Guide
Aastra 6757
Terminal
Page 2

Contents
Description of the phone . . . . . . . . . . . . . . . . . . . . . . . . . . . . . 7
Overview . . . . . . . . . . . . . . . . . . . . . . . . . . . . . . . . . . . . . . . . . . . . . . . . 7
The navigation keys . . . . . . . . . . . . . . . . . . . . . . . . . . . . . . . . . . . . . . . 9
LEDs associated with the programmable keys . . . . . . . . . . . . . . . . . . . 9
Alphanumeric keypad . . . . . . . . . . . . . . . . . . . . . . . . . . . . . . . . . . . . . 10
Accessories . . . . . . . . . . . . . . . . . . . . . . . . . . . . . . . . . . . . . . . . . . . . . 11
Standard codes . . . . . . . . . . . . . . . . . . . . . . . . . . . . . . . . . . . . . . . . . . 11
Calling modes . . . . . . . . . . . . . . . . . . . . . . . . . . . . . . . . . . . . . 12
Using the hands-free mode . . . . . . . . . . . . . . . . . . . . . . . . . . . . . . . . . 12
Using the headset mode . . . . . . . . . . . . . . . . . . . . . . . . . . . . . . . . . . . 13
Using the group listening mode . . . . . . . . . . . . . . . . . . . . . . . . . . . . . . 14
Use the intercom mode . . . . . . . . . . . . . . . . . . . . . . . . . . . . . . . . . . . . 14
Using the pre-dialling mode . . . . . . . . . . . . . . . . . . . . . . . . . . . . . . . . 15
Adjusting the listening volume level . . . . . . . . . . . . . . . . . . . . . . . . . . 15
Making a call . . . . . . . . . . . . . . . . . . . . . . . . . . . . . . . . . . . . . . 16
Dialling the number . . . . . . . . . . . . . . . . . . . . . . . . . . . . . . . . . . . . . . . 16
Using the programmable keys . . . . . . . . . . . . . . . . . . . . . . . . . . . . . . 16
Use of the LNR function (last number redial) . . . . . . . . . . . . . . . . . . . 17
Calling an attendant (switchboard) . . . . . . . . . . . . . . . . . . . . . . . . . . . 17
Calling a party back . . . . . . . . . . . . . . . . . . . . . . . . . . . . . . . . . . . . . . . 17
To call a party from a directory by name: . . . . . . . . . . . . . . . . . . . . . . 18
Using the automatic redial function . . . . . . . . . . . . . . . . . . . . . . . . . . . 19
Notifying the party . . . . . . . . . . . . . . . . . . . . . . . . . . . . . . . . . . . . . . . . 19
Using the store and redial function . . . . . . . . . . . . . . . . . . . . . . . . . . . 20
Receiving a call. . . . . . . . . . . . . . . . . . . . . . . . . . . . . . . . . . . . 21
Adjusting the ring volume level . . . . . . . . . . . . . . . . . . . . . . . . . . . . . . 21
Interrupting the ringer . . . . . . . . . . . . . . . . . . . . . . . . . . . . . . . . . . . . . 21
Answering a call . . . . . . . . . . . . . . . . . . . . . . . . . . . . . . . . . . . . . . . . . 22
Diverting calls to another extension . . . . . . . . . . . . . . . . . . . . . . . . . . 22
Intercepting a call intended for another extension
. . . . . . . . . . . . . . . . 22
1
Page 3

Contents
During the call . . . . . . . . . . . . . . . . . . . . . . . . . . . . . . . . . . . . . 24
Using the mute function . . . . . . . . . . . . . . . . . . . . . . . . . . . . . . . . . . . .24
Recording the conversation . . . . . . . . . . . . . . . . . . . . . . . . . . . . . . . . .24
Placing the party on hold and resuming the call on the same phone . .25
Placing a party on hold and resuming the call on another phone . . . .25
Transferring a call . . . . . . . . . . . . . . . . . . . . . . . . . . . . . . . . . . . . . . . . .26
Calling a second party . . . . . . . . . . . . . . . . . . . . . . . . . . . . . . . . . . . . .26
Answering a second call . . . . . . . . . . . . . . . . . . . . . . . . . . . . . . . . . . . .27
Switching between two parties . . . . . . . . . . . . . . . . . . . . . . . . . . . . . . .27
Releasing one of the parties . . . . . . . . . . . . . . . . . . . . . . . . . . . . . . . . .27
Setting up a conference call . . . . . . . . . . . . . . . . . . . . . . . . . . . . . . . . .28
Other features available during a call . . . . . . . . . . . . . . . . . . . . . . . . . .28
Viewing the stored numbers . . . . . . . . . . . . . . . . . . . . . . . . . . . . . . . . .30
Outbound call log (LNR) . . . . . . . . . . . . . . . . . . . . . . . . . . . . . 31
Consulting the outbound call log: . . . . . . . . . . . . . . . . . . . . . . . . . . . . .31
Calling a party from the outbound call log . . . . . . . . . . . . . . . . . . . . . .31
Storing the name and/or number in the private directory . . . . . . . . . . .32
Deleting a record from the outbound call log . . . . . . . . . . . . . . . . . . . .32
Deleting all records from the outbound call log . . . . . . . . . . . . . . . . . .33
Private directory. . . . . . . . . . . . . . . . . . . . . . . . . . . . . . . . . . . . 34
Accessing the private directory . . . . . . . . . . . . . . . . . . . . . . . . . . . . . .34
Creating a record in the private directory . . . . . . . . . . . . . . . . . . . . . . .35
Modifying and deleting a record in the personal directory . . . . . . . . . .36
Personalising the titles of t he li sts in the private directory . . . . . . . . . .37
Searching by name in the private directory . . . . . . . . . . . . . . . . . . . . .38
Browsing a list of the private directory . . . . . . . . . . . . . . . . . . . . . . . . .38
Calling from the private directory . . . . . . . . . . . . . . . . . . . . . . . . . . . . .38
Deleting the lists of the private directory . . . . . . . . . . . . . . . . . . . . . . .39
2
Page 4

Contents
Directories of abbreviated numbers . . . . . . . . . . . . . . . . . . . 40
Programming a personal abbreviated number . . . . . . . . . . . . . . . . . . 40
Modifying or deleting a personal abbrevia ted number . . . . . . . . . . . . 41
Calling a personal abbreviated number . . . . . . . . . . . . . . . . . . . . . . . 41
Dialling a common abbreviated number
Inbound call log . . . . . . . . . . . . . . . . . . . . . . . . . . . . . . . . . . . 43
Viewing the incoming call log . . . . . . . . . . . . . . . . . . . . . . . . . . . . . . . 43
Calling a party from the inbound call log . . . . . . . . . . . . . . . . . . . . . . . 44
Storing the name and/or number in the private directory . . . . . . . . . . 44
Deleting a record from the inbound call log . . . . . . . . . . . . . . . . . . . . . 45
Deleting all records from the inbound call log . . . . . . . . . . . . . . . . . . . 45
Information directory . . . . . . . . . . . . . . . . . . . . . . . . . . . . . . . 47
Checking the information directory . . . . . . . . . . . . . . . . . . . . . . . . . . . 47
Making entries in the information directory . . . . . . . . . . . . . . . . . . . . . 47
Internal names directory . . . . . . . . . . . . . . . . . . . . . . . . . . . . 49
. . . . . . . . . . . . . . . . . . . . . . 42
Checking the internal names directory . . . . . . . . . . . . . . . . . . . . . . . . 49
Calling an internal party . . . . . . . . . . . . . . . . . . . . . . . . . . . . . . . . . . . 50
External names directory. . . . . . . . . . . . . . . . . . . . . . . . . . . . 51
Checking the external names directory . . . . . . . . . . . . . . . . . . . . . . . . 51
Calling an external party . . . . . . . . . . . . . . . . . . . . . . . . . . . . . . . . . . . 52
Programmable keys . . . . . . . . . . . . . . . . . . . . . . . . . . . . . . . . 53
Programming a key . . . . . . . . . . . . . . . . . . . . . . . . . . . . . . . . . . . . . . . 53
Deleting, modifying and exiting the programming . . . . . . . . . . . . . . . . 56
Identifying the programmed keys . . . . . . . . . . . . . . . . . . . . . . . . . . . . 57
3
Page 5

Contents
The call forwarding function. . . . . . . . . . . . . . . . . . . . . . . . . . 58
Forwarding a call . . . . . . . . . . . . . . . . . . . . . . . . . . . . . . . . . . . . . . . . .58
Cancelling a forwarding . . . . . . . . . . . . . . . . . . . . . . . . . . . . . . . . . . . .60
Programming forwarding on a programmable key . . . . . . . . . . . . . . . .60
Overriding the call forwarding function . . . . . . . . . . . . . . . . . . . . . . . . .61
Voicemail function . . . . . . . . . . . . . . . . . . . . . . . . . . . . . . . . . . 63
Configuring and customising your voice mailbox . . . . . . . . . . . . . . . . .63
Activating the forwarding of calls to the voice mailbox . . . . . . . . . . . . .64
Calling up new messages . . . . . . . . . . . . . . . . . . . . . . . . . . . . . . . . . .64
Programming the access codes on a programmable key: . . . . . . . . . .65
Multi-key function. . . . . . . . . . . . . . . . . . . . . . . . . . . . . . . . . . . 67
Programming the multi-key fu nction . . . . . . . . . . . . . . . . . . . . . . . . . . .67
Communicating with the multi-key function . . . . . . . . . . . . . . . . . . . . .68
Multi-line function . . . . . . . . . . . . . . . . . . . . . . . . . . . . . . . . . . 70
Programming the multi-line function . . . . . . . . . . . . . . . . . . . . . . . . . . .70
Communicating with the multi-line function . . . . . . . . . . . . . . . . . . . . .73
Supervision function . . . . . . . . . . . . . . . . . . . . . . . . . . . . . . . . 75
Programming the supervision function . . . . . . . . . . . . . . . . . . . . . . . . .75
Communicating with the supervision function . . . . . . . . . . . . . . . . . . .76
Folder function . . . . . . . . . . . . . . . . . . . . . . . . . . . . . . . . . . . . . 77
Programming the folder function . . . . . . . . . . . . . . . . . . . . . . . . . . . . .77
Communication with your privileged parties . . . . . . . . . . . . . . . . . . . . .78
Communication with your non-privileged parties . . . . . . . . . . . . . . . . .80
Filter function . . . . . . . . . . . . . . . . . . . . . . . . . . . . . . . . . . . . . . 81
Programming the filter funct ion . . . . . . . . . . . . . . . . . . . . . . . . . . . . . .81
Communicating with the filter function . . . . . . . . . . . . . . . . . . . . . . . . .83
4
Page 6

Contents
Login/Logout function . . . . . . . . . . . . . . . . . . . . . . . . . . . . . . 85
Restoring your subscriber rights on a general-purpose phone . . . . . . 85
Restoring your subscriber rights on your own phone . . . . . . . . . . . . . 86
Release a phone . . . . . . . . . . . . . . . . . . . . . . . . . . . . . . . . . . . . . . . . . 86
Showing the identity of the subscriber of a phone . . . . . . . . . . . . . . . 87
Agenda function . . . . . . . . . . . . . . . . . . . . . . . . . . . . . . . . . . . 88
Programming the agenda function . . . . . . . . . . . . . . . . . . . . . . . . . . . 88
Consulting your appointments to modify or cancel one of them . . . . . 89
"Do not disturb" function. . . . . . . . . . . . . . . . . . . . . . . . . . . . 90
Using the "Do not disturb" function . . . . . . . . . . . . . . . . . . . . . . . . . . . 90
Overriding the "Do not disturb" function . . . . . . . . . . . . . . . . . . . . . . . 91
Programming the "Do not disturb" function on a programmable key . 91
Other functions. . . . . . . . . . . . . . . . . . . . . . . . . . . . . . . . . . . . 93
Replace function . . . . . . . . . . . . . . . . . . . . . . . . . . . . . . . . . . . . . . . . . 93
The identity presentation function . . . . . . . . . . . . . . . . . . . . . . . . . . . . 94
Notification function . . . . . . . . . . . . . . . . . . . . . . . . . . . . . . . . . . . . . . . 94
Out-of-office fun ction . . . . . . . . . . . . . . . . . . . . . . . . . . . . . . . . . . . . . . 95
The line protection function during data transmission . . . . . . . . . . . . . 96
Locking the phone . . . . . . . . . . . . . . . . . . . . . . . . . . . . . . . . . 97
Activating the phone lock . . . . . . . . . . . . . . . . . . . . . . . . . . . . . . . . . . 97
Calling an external party from the locked phone . . . . . . . . . . . . . . . . . 97
Calling an emergency number from the locked phone . . . . . . . . . . . . 98
Deactivating the phone lock . . . . . . . . . . . . . . . . . . . . . . . . . . . . . . . . 98
Phone settings . . . . . . . . . . . . . . . . . . . . . . . . . . . . . . . . . . . . 99
Selecting and adjusting the phone ringer . . . . . . . . . . . . . . . . . . . . . . 99
Adjusting the screen contrast . . . . . . . . . . . . . . . . . . . . . . . . . . . . . . 100
Adjusting the volume of the beeps heard when a key is pressed . . . 101
Personalising the phone’s secret code . . . . . . . . . . . . . . . . . . . . . . . 101
5
Page 7

Contents
Associating a directory to the call b y name function (ABC key) . . . . .102
Choosing the phone language . . . . . . . . . . . . . . . . . . . . . . . . . . . . . .103
Programming the connection of a headset . . . . . . . . . . . . . . . . . . . . .103
Installation of the terminals in the range . . . . . . . . . . . . . . . 105
Package content . . . . . . . . . . . . . . . . . . . . . . . . . . . . . . . . . . . . . . . . .105
Options . . . . . . . . . . . . . . . . . . . . . . . . . . . . . . . . . . . . . . . . . . . . . . . .105
Marketing Codes . . . . . . . . . . . . . . . . . . . . . . . . . . . . . . . . . . . . . . . .105
Connections . . . . . . . . . . . . . . . . . . . . . . . . . . . . . . . . . . . . . . . . . . . .106
Mounting the phone . . . . . . . . . . . . . . . . . . . . . . . . . . . . . . . . . . . . . .107
Installation of the M670 module on the Aastra 6757 terminal . . . . . . .109
Programmable key equivalence . . . . . . . . . . . . . . . . . . . . . . . . . . . . .110
Tips and safety . . . . . . . . . . . . . . . . . . . . . . . . . . . . . . . . . . . . . . . . . .111
Miscellaneous tools. . . . . . . . . . . . . . . . . . . . . . . . . . . . . . . . 112
Glossary (terms you should know) . . . . . . . . . . . . . . . . . . . . . . . . . . .112
Troubleshooting Check . . . . . . . . . . . . . . . . . . . . . . . . . . . . . . . . . . .113
6
Page 8
Description of the phone
2
4
3
5
17
12
13
14
15
16
6
7
8
9
10
1
2
11
Description of the phone
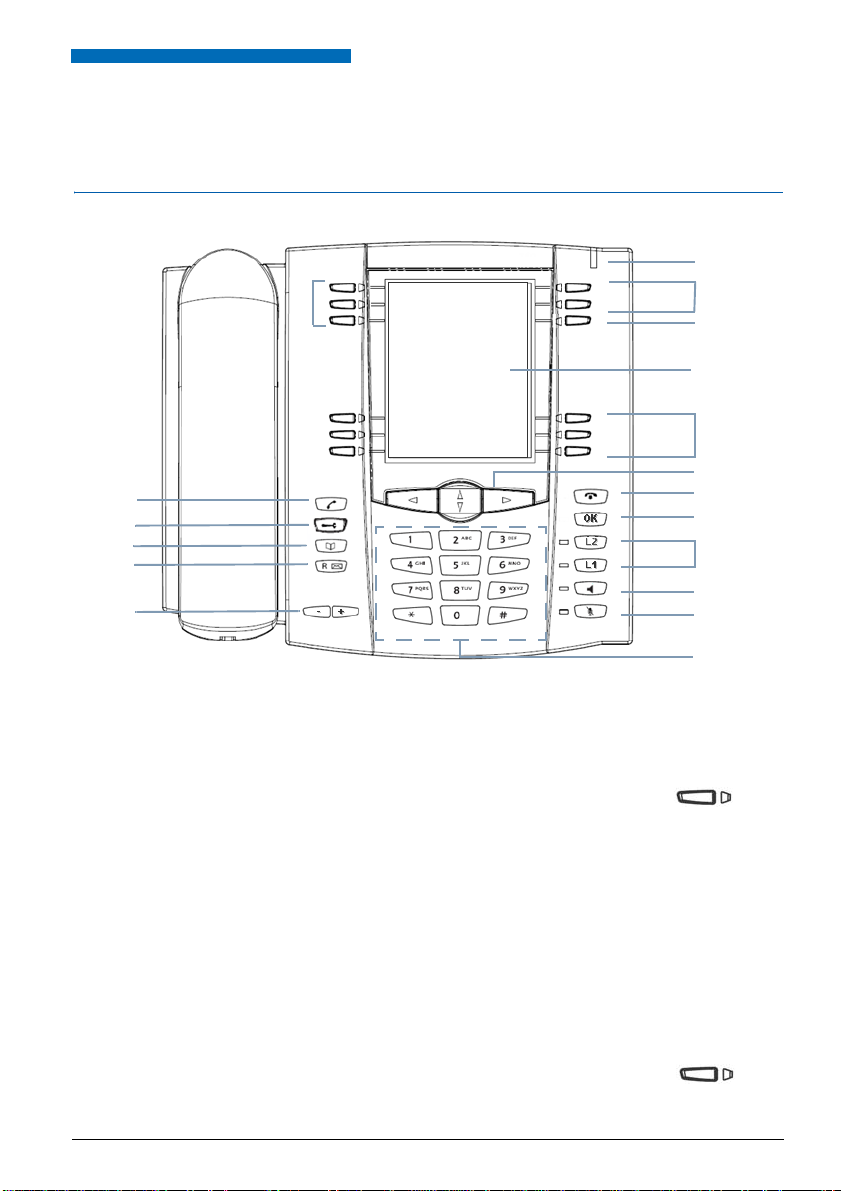
Overview
1 Message indicator
2 5 programmable keys with LED indicators whose
3 Key reserved for pagination (#1 to #4), which can be
4 LCD screen
5 5 interactive keys plus 1 ke y for direct access to the call by
Signalling of incoming calls and message notification
identifiers must be entered via the alphanumeric keypad:
Each of these keys enables you to:
• Store a call number
• Program a feature, a supervision function or a series of
• Use the multi-key function
• Use the multi-line function
used to program 3 times 5 other keys (total of 20 touches
programmable keys).
name function (ABC).
codes…
7
Page 9
Description of the phone
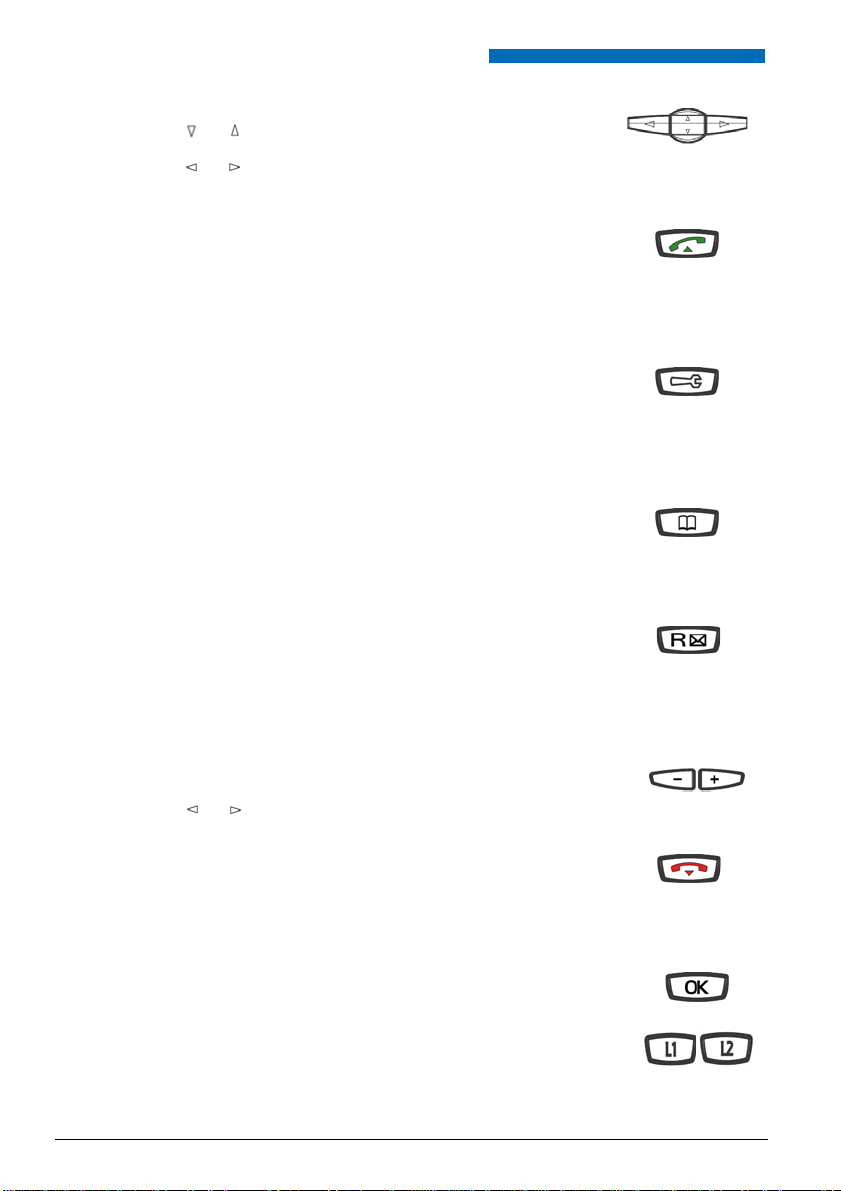
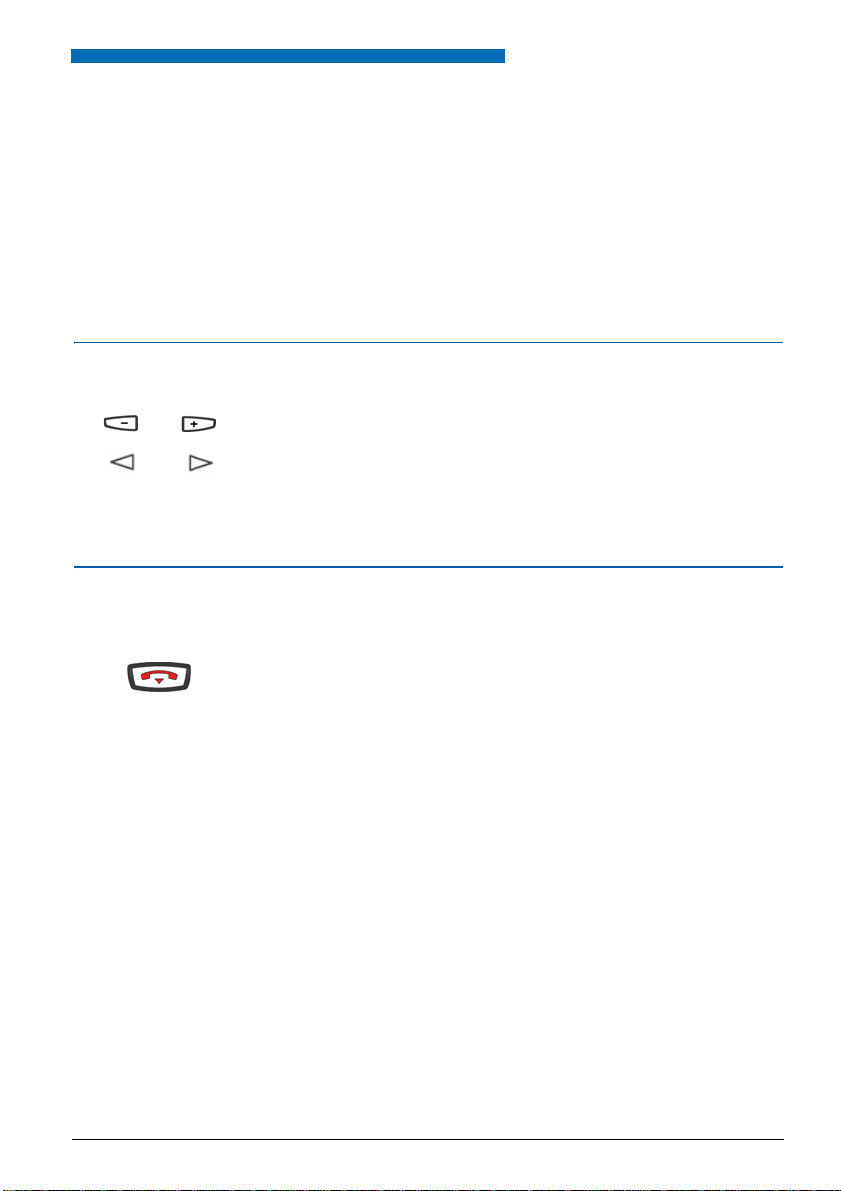
6 Navigation keys:
7 The green key can be used to:
8 The Tools key can be used to access:
9 The Directory key,
10 R key (flashing):
• The or keys can be used to display sections or
records,
• The or keys can be used to display additional
information or to def ine a setting.
• Answer an incoming call in hands-free mode,
• Call again, in standby or in communication, the last
number dialled (redial fu nction), or to access th e outbound
call log,
• Call a displayed number, while consulting logs and
directories.
• The programming of the keys (num be rs and functi ons ),
• The settings of the phone (ringing and contrast),
• The personalisation of the phone (management of
directories/cleari ng of logs),
• Private informatio n,
• The entry of the identifiers of the programmable keys.
communication to
• Consult directories and call logs and make calls from
them,
• To call a party by name,
• To consult the priv ate inform ati on .
• can be used during an ongoing call to dial a number
(e.g. call a second party).
Key for direct access to the voice mailbox:
• can be used in standby for an automatic callback of the
voice mailbox, with or without a message notification.
can be used in standby and in
:
11 + / - keys:
12 The red key can be used to:
13 OK key
14 L1/L2 programmable keys, with associated indicators:
8
• these keys have the same functions as the keys
keys or of the browser.
• They allow to set the ring tone for calls.
• S top the ringing durin g an inbound call (th e message LED
continues to flash),
• Terminate an ongoing call,
• Reset a setting or exit a programming sequence during
programming.
Can be used to validate an option, setting or input.
These keys can be used for the same programming
functions as the keys on the upper part of the phone, but
they have no associated labels.
Page 10
Description of the phone
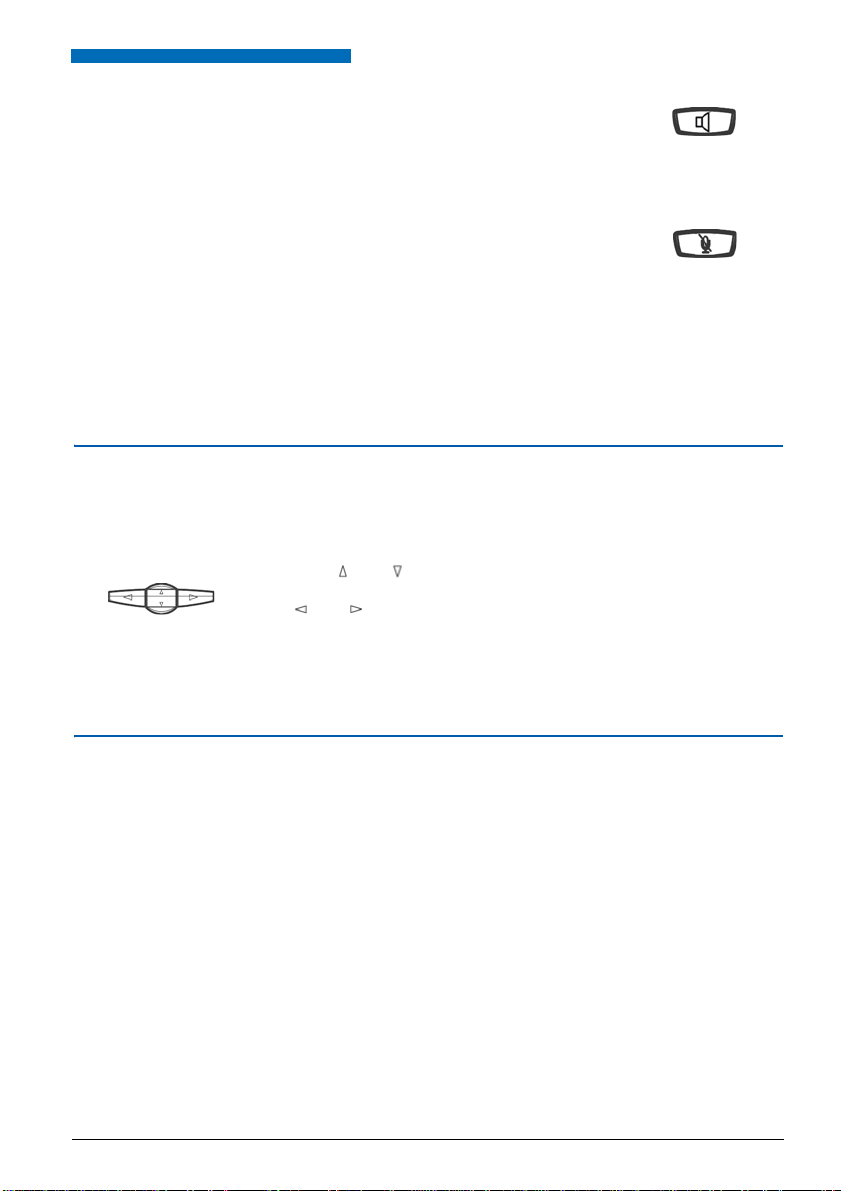
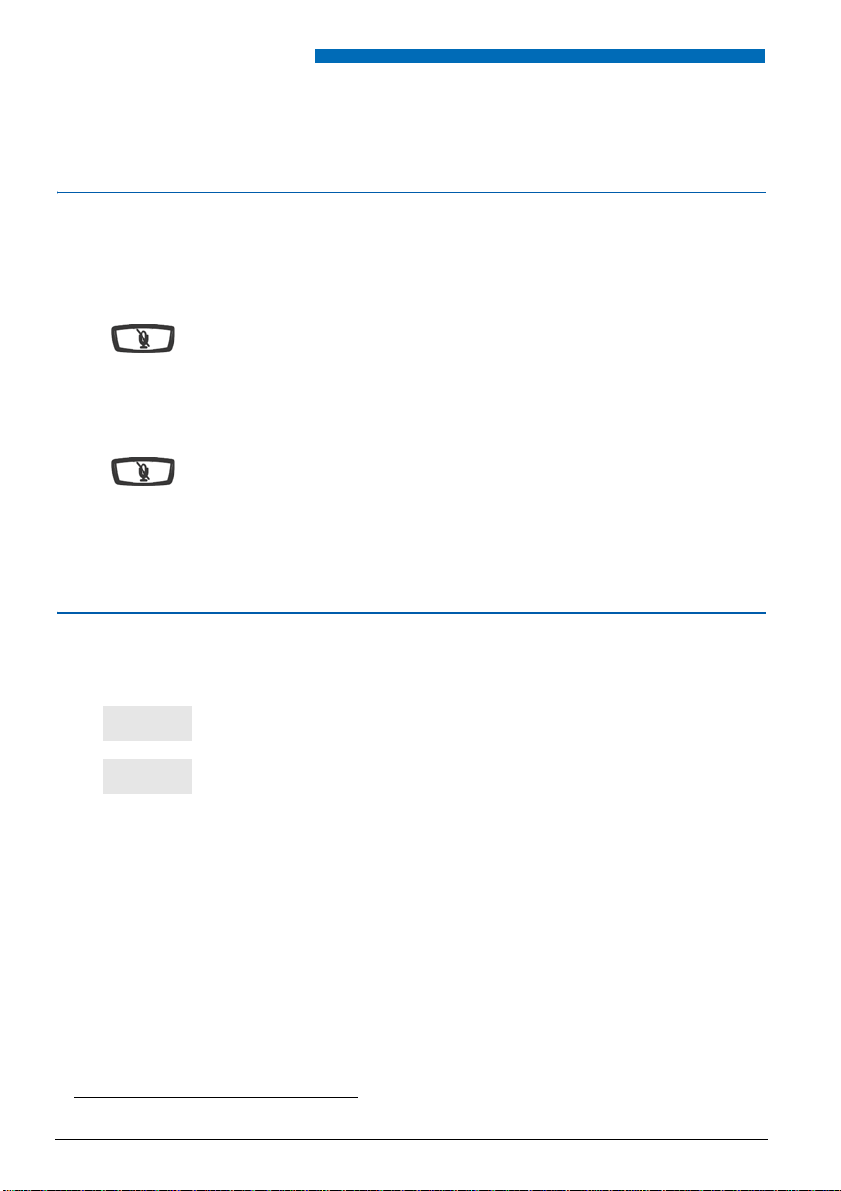
15 The Speaker key, can be used for the following:
16 The Secret key can be used during an ongoing call:
17 Alphanumeric keypad:
• Activate and deactivate the intercom function in standby,
• Answer an incoming call in hands-free mode,
• Activate the group listening and the hands-free mode
during an ongoing call.
The associated ind icator lights up or flashes as appr opriate.
• To cut off the mic (handset, hands-free mode or headset
microphone) during a call for a private conversation.
The associated indicator lights up to indicate that the
function is activated.
• Allows to dial numbers or to enter text.
The navigation keys
The navigation keys are used to scroll through the different sections or records and to
make a selection. The different menu items can be consulted in vertical and in horizontal
direction.
The keys and are used to display:
• A section or a record.
The and keys are used to:
• Make a setting in the selected section,
• Access additional information in a selected section or record.
LEDs associated with the programmable keys
They are used to display the status of the line or programmed function:
• inbound call: indicator flashing slowly,
• party on hold: indicator flashing rapidly,
• phone on line or function activated: indicator continuously lit,
• line free/function deactivated: indicator off.
9
Page 11

Description of the phone
Alphanumeric keypad
The alphanumeric keypad is used to enter letters and digits. The entry is based on the
equivalence of the keys with letters or signs.
To enter a text:
• Select the required character by successively pressing the
corresponding key.
Example:
• On pressing the key 2 once, the letter A is displayed,
• On pressing the key 2 a second time, the letter B is displayed,
• On pressing the key 2 a third time, the letter C is displayed,
• On pressing the key 2 a fourth time, the numeral 2 is displayed.
Key 1 is used to enter the following characters:
• When entering text: - / space : . " , < > = + ? ! % 1
• In call by name mode: - . : 1
Note: In this mode the 0 is used to enter: space and 0; the * key is
sed to enter: ? ! # *.
u
All letters are entered in upper-case only.
When entering text:
• To enter another letter which is located on a different key:
-> Press immediately another key to enter the letter according
to the same principle.
• To enter another letter which is located on the same key:
-> Wait until the cursor flashes at the next position.
Nota: in call by name mode and on previous system
releases, press # before entering the following letter on the
same key.
10
When entering text, you can replace an entry:
1 - press the key or to select the character you want to
replace (place the cursor under the character).
2 - Enter the new character.
In call by name mode, use the keys reserved for the call by name
function (See "To call a party from a directory by name:" on page 18.)
To confirm an entry, press the OK key.
Page 12

Accessories
Description of the phone
Headset
microphone:
Extension module: The extension module is used to equip the phone with 36
This phone can be equipped with a headset microphone. After
connection and programming (see para. Phone settings), the
headset mode substitutes the han ds free mode.
additional programma ble keys ; toget her with the 20 key s on the
phone and the keys L1 and L2, this gives you a total of 58
programmable keys.
Standard codes
This document d escribes the s tanda rd acc ess cod es to the di fferent functi ons, which m ay
be personalised by the sy ste m op erat or. In that case, the operator will indica te to yo u the
specific access codes to enter in the spaces reserved for that purpose (for example:
Dial-out co de
0 or ; enter the personalised code in the frame).
11
Page 13
Calling modes
or
Calling modes
Your phone proposes various call modes to suit your activities.
These options are available in addition to the classic handset mode (discrete mode):
Picking up the handset to answer or make a call, and hanging up the handset again to
finish a call.
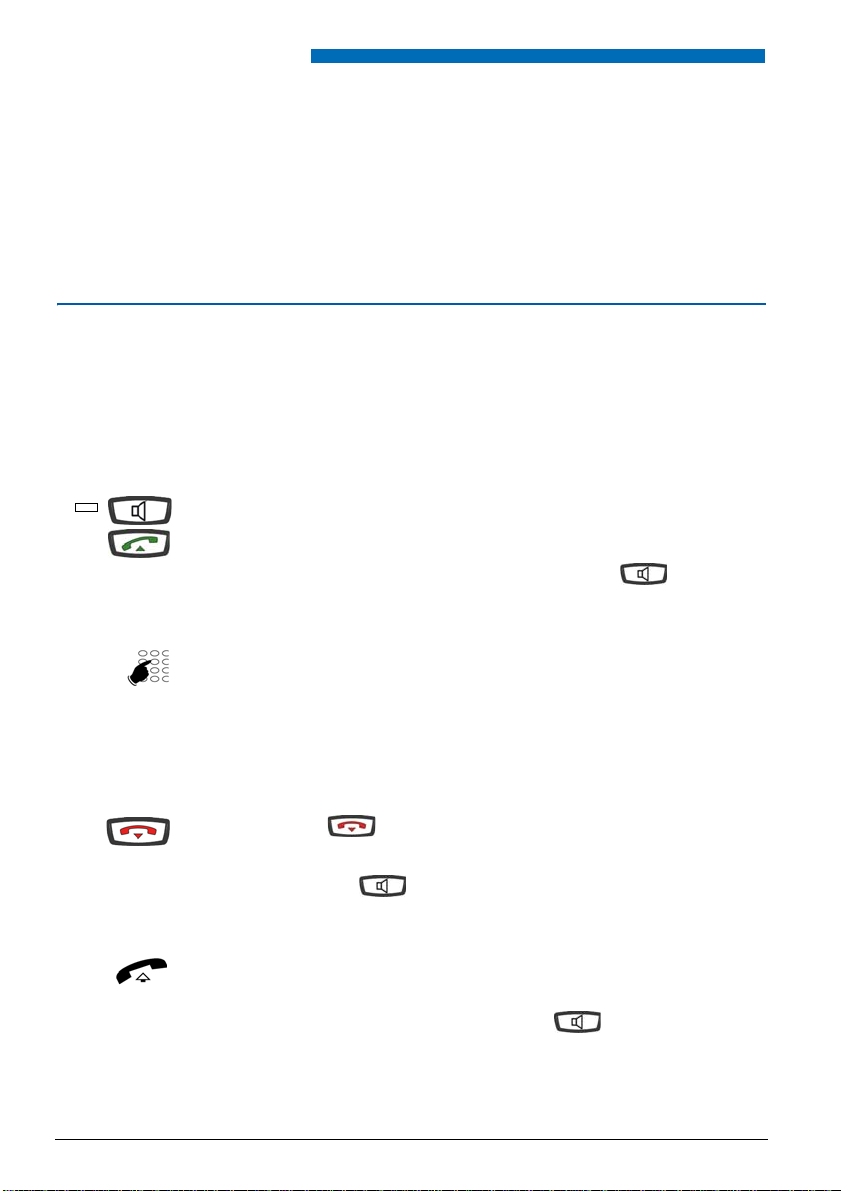
Using the hands-free mode
In hands-free mode, you can make or answer a call without picking up the handset. You
can switch from hands-free mode to handset mode and vi ce v ers a d urin g an on going call.
Caution: When a headset microphone is connected to the phone, the headset mode re-
places the hands-free mode.
To answer a call in hands-free mode:
Press one of the following keys:
• speaker
• Green key
-> Without picking up the handset, you can talk directly in hands-free
mode.
The indicator associated wi th the ke y
To call a party in hands-free mode:
• Dial the number of the party directly on the keypad.
lights up.
-> The dialled number appears in the display as you enter it. Your
phone is automatically in hands-free mode.
As soon as the party calle d answ ers, yo u can t alk in hands -free
mode.
To end a call:
• Press the key .
-> The line is free. The call is ended and the indicator associated
with the key goes off.
To switch from hands-free to handset mode:
You are talking in hands-free mo de:
• Simply pick up the handset.
-> The call is continued in handset mode (or discrete mode).
The indicator associate d with the key goes off. At the end
of the call you have to hang up the handset.
12
Page 14
Calling modes
To switch from handset to hands-free mode:
You are talking in handset mode:
• Press the key and then hang up the handset within 6
seconds (while the indicator of the key is flashing.
-> The call is continued in hands-free mode. The indicator light of
the key lights up steady.
At the end of the call you have to press the key.
Using the headset mode
When a headset m icrophone is conn ected to the p hone, the headse t phone substit utes the
hands-free mode (refer to the paragraph "Phone settings" and ask your system administrator for information about the additional options when using a headset microphone).
To answer a call in headset mode:
Your phone is programmed for headset mode.
When your phone rings:
• Press the speaker key (or the green key).
You can talk in headset mode.
-> The indicator associated with the key lights up.
To switch from headset to hands-free mode:
You are talking in headset mode.
• Press the speaker key.
-> The call is continued in hands-free mode.
To switch from headset to supervision mode:
You are talking in headset mode.
• Another person can pick up the handset to supervise your call.
The handset can be hung up at any moment.
-> The call is continued in headset mode.
To end a call:
• Press the key.
-> The line is free. The call is ende d and the indic ator as socia ted
with the key goes off.
13
Page 15
Calling modes
To call a party:
• Dial the number of the party directly on the keypad.
-> The dialled number appears in the display as you enter it.
As soon as the party called answers, you can talk in headset
mode.
Using the group listening mode
The group listening mode allows you to listen to a contact via the loudspeaker, while the
handset is picked up, in order to enable other persons to listen to the call as well.
During the call:
• Press the speaker key.
-> The group listening mode is activated. The indicator of the
loudspeaker key lights up and then lights steady.
Note: You can still continue to use the handset.
To deactivate the group listening mode:
• Press the speaker key.
-> The group listening mode is deactivated. The indicator of the
loudspeaker key goes off.
Use the intercom mode
The intercom mode is used to communicate with internal parties, without any action on
your part.
Note: The activation of the interc om m ode d oes not in any way af fe ct the ab ility to recei ve
or make external calls.
To activate the intercom mode:
Phone in standby mode:
Press the speaker key to activate the intercom mode.
-> The indicator associated to the speaker key flashes.
• If an internal party calls, after ringing, you can talk directly to it
without any action on your part.
• To call an internal party, dial directly the number and talk to the
party as soon as your call is answered.
As soon as the party hangs up, the phone returns to intercom
mode, and the indicator of the speaker key flashes again.
14
Page 16
Calling modes
Comm
Prenum
Erase
Call
or
or
To deactivate the intercom mode:
To end the communication in intercom mode:
Using the pre-dialling mode
The abbreviated numb ers mode is us ed to enter an d displ ay a numb er in order to be able
to correct it, if nece ss ary , be fore dia lling it (this mode can be use ful for t he dialling of long
numbers, such as interna tional numbers).
Phone in standby mode:
Press the speaker key.
-> The indicator associated with the key goes off.
If the party you have called has the initiative for hanging up, you
do not have to do anything; the phone returns to standby.
If you want to hang up, press the key.
1 - Press the interactive Comm key.
2 - Next, press the interactive Prenum key.
3 - Dial the number of the called party.
-> The dialled number appears in the display as you enter it.
In case of an error , pre ss the inte rac tiv e Erase key and then dial
the digit again.
4 - Press the interactive Call to initiate the call.
As soon as the called party answers, you can talk in hands-free
mode or in headset mode, or pick up the handset.
Adjusting the listening volume level
You can set the level of the listening volume, regardless of the mode used (handset,
hands-free, headset or group listening) (8 levels). The setting is stored.
Volume down:
• Press the - key or the left key in the browser.
Volume up:
• Press the + key or the right key in the browser.
15
Page 17

Making a call
0
Making a call
Several options exist to call a party, depending on whether the party’s number is new or
has already been stored by the phone.
The procedures to call parties store d in the dire ctories or logs are explained in the chapters
that are dedicated to these functions.
When the party answers, you can use any of the modes described above.
Dialling the number
Use the keys of the numeric keypad to dial the party’s number.
To call an internal party:
• Dial the party's extension number.
-> The display shows the number of the party called .*
When the called party answers, you can talk.
To call an external party:
1 - Dial the outside line access code (
2 - Dial the number of the called party.
-> The display shows the number dialled.
When the called party answers, you can talk.
*
0 or ).
Using the programmable keys
The programmable key s on your phone can be assigned to th e numbers of parties that you
call regularly (internal or external).
• Press the programmed key.
->The phone automaticall y calls the party . The displa y shows the
number of the party.
When the called party answers, you can talk.
Note: To program a key, please refer to the chapter "Programming a key", Page 53.
* Depending on the programming performed by the system operator.
16
Page 18
Making a call
9
Redial
Consult
Redial
Use of the LNR function (last number redial)
The LNR function (last number redial) allows you to redial automatically the last number
called.
• Press the green key twice.
The phone automatically calls the party. The display shows the
->
number
When the called party answers, you can talk.
Calling an attendant* (switchboard)
To reach the person who is responsible for the call reception service:
• Dial on the keypad 9 or .
When the attendant answers, you can talk.
Calling a party back
When an internal or external party tries t o reach you, this is shown on the displ ay in standby
mode.
called.
To call back an internal party:
To call an external party back:
* Depending on the programming performed by the system operator.
The display shows the number (or the name) and the time of the call.
1 - Press Redial.
-> The internal party is automatically called back.
The display informs you of an external call.
1 - Press the Consult key.
-> The display shows the number, the date and the time of the
call.
.
2 - Press Redial.
-> The party is automatically called back.
When the called party answers, you can talk.
Note: To return to the standby display without calling the party
back, press the interactive Cancel key.
17
Page 19

Making a call
ABC
Erase
Consult
Call
To call a party from a directory by name:
If you do not know the number of your party, you can access it by entering the party’s name
on the alphanumeric keypad.
The search will be run in the directory chosen by you - See "Associating a directory to the
call by name function (ABC key)" on page 102.
Set idle:
1 - Press the interactive ABC key.
2. Select on the alphanumeric keypad the first letters of the name
of the party you are looking for.
• See "Alphanumeric keypad", Page 10 to enter text.
Nota: on previous system releases, press # key before entering
he following letter on the same key.
t
• Press the interactive Erase key to erase the last selected
character if required.
3. Press the Consult key to display the first match.
• Press successively the Next key until the desired name is
displayed.
• Press the or key to display the first name and the
number associated with the surname.
18
To return to the last name:
• Press the Previous key.
To modify the entry:
• Press the Correct key.
4. Press Call to call the party whose name is displayed.
-> The phone automatically calls the party.
Reminder: Use the red key to cancel or terminate a
sequence.
Page 20

Making a call
Redial
Cancel
Notify
More
Erase
Using the automatic redial function
You are calling an internal party who is busy or do es not answer. You can request the party
to call you back automatically.
To activate the automatic redial function:
Press the interactive Redial key (before hanging up).
As soon as the called p arty in question is free (if the line was bus y)
or has activated his telephone (if out of office), your phone rings.
When you answer , you r call ed p arty's phone that is "in callback"
also rings.
To deactivate the automatic redial function:
If you want to cancel the automatic callback function.
• Press successively the interactive keys Funct., Feature, -->
Memory, Call bk.
-> The display shows the number for automatic callback.
• Press the interactive Cancel key to deactivate the automatic
callback of the number displayed.
*
Notifying the party
When the party yo u wish to reach does not ans w er, you c an se nd a short message to the
display of your party's ph one, prov ided th at the (inter nal or exte rnal) party is connec ted to
a digital interface.
1 - Press the Notify key.
2 - Press successively the interactive More key to select a
• If you need to correct an entry, press the interactive Erase key.
* Depending on the programming performed by the system operator.
-> The display shows the first of the six predefined messages.
different predefined message, or a free message text
(message no. 7).
-> Depending on your choice, y ou have to co mplete the m essage
displayed, or enter a free message text on the alphanumeric
keypad.
19
Page 21

Making a call
Enter
No
3 - Press the interactive Enter key to confirm the sending of the
4 - Press the interactive Yes or No key (example), depe nd ing on
message.
-> The display suggests you to resume the call.
what you want to do.
Note: The predefined messages are directly displayed on the
phone of the ale rted p a r ty. A free message, on the other h and , is
not directly display ed; the party is informed t hat a written message
has arrived and should be viewed.
Using the store and redial function
If your party does not ans wer or is busy, you can request to temporaril y record their number
in order to call them back later (even if you dial other numbers in the meantime).
Contact your syst em operator who will progra m the function on a persona lised key on your
phone.
20
Page 22
Receiving a call
or
Receiving a call
During an inbound call, the phone rings and the message indicator flashes.
When the caller is stored in one of the directories, the display indicates the associated
name.
The parties stored in the private directory are announced by a specific ring tone
(see "Selecting and adju sting the ph one ri nger", Page99). Moreover, if the call ing pa rty is
only known to your private directo ry, the dis pl ay sh ow s the nam e sto red in that directory.
Adjusting the ring volume level
You can adjust the ringer volume level during the ringing phase.
Press successively the -/+ keys or the left/right keys in the browser
to decrease the volume level (8 levels are available, including
ringer off).
->The phone stores the last setting.
Interrupting the ringer
During the ringing pha se , yo u c an c ho ose to c ut t he ri nge r - for t he c al l th at is in prog res s
only.
Press the red key.
-> The phone no longer ring s. The m es sa ge i ndi ca tor c on tinu es to
flash to indicate that you have an inbound call.
Note: Y ou c an restore the ringer by pre ssing the -/+ k eys or the left/
right keys in the browser.
The phone will ring again the next time it is called.
21
Page 23

Receiving a call
or
Divert
Pick-up
Group
Answering a call
*
• Pick up the handset.
-> The conversation with the party takes place in di screet mode.
• Press the speaker key or the green key.
-> Without picking up the handset, you can talk directly in hands
free mode.
Note:
-> If your phone is in intercom mode, you can talk directly to the
internal party without any action on your part.
-> An external call that is not answered within a given time is
transferred to the attendant*.
Diverting calls to another extension
You want to divert the party to another extension without answering the call.
1 - Press the Divert key.
2 - Then dial the number of the phone to which you want to divert
the call.
Note: You can also search an internal name or use the pre-
programmed keys.
-> The phone does not r ing a ny m ore, a nd th e "M essa ge" i ndica tor
goes off.
Intercepting a call intended for another extension
You can intercept calls intended for another extension when its designated user is absent.
To pick up a call meant for a phone in your group:
Y ou ar e part of a ca ll pick-up group, i.e. all the peopl e in this grou p
can quickly recover calls from a ringing phone inside the same
group:
1 - Press the interactive Pick-up key.
2 - Press the interactive Group key.
You can talk to the contact.
* Depending on the programming performed by the system operator.
22
*
Page 24

To pick up a call meant for any phone:
Pick-up
Extens.
Pick-up
G.Ring
You can intercept the call on a phone when its designated user is
absent:
1 - Press the i nteractive Pick-up key.
2 - Press the i nteractive Extens. key.
3 - Dial the extension number.
You can talk to the contact.
Note: If this situation ari se s f requ ently with the same phones , as k
the system operator to become part of the same call group.
*
To pick up a call on general ring
The operator is absent an d you want to recove r a common bell call:
1 - Press the i nteractive Pick-up key.
2 - Press the i nteractive G.Ring key.
You can talk to the contact.
:
Receiving a call
* Depending on the programming performed by the system operator.
23
Page 25
During the call
-->
Record
During the call
Using the mute function
The call is set up with a party an d you want to ha ve a con fidential convers ation with out the
party being able to hear it:
To activate the function:
Press the Secret key.
-> The microphone of the han dset, th e hands free functi on or the
headset is cut off; the indicator associated with the key lights
up. Your party cannot hear you.
To deactivate the function:
Press the Secret key again.
-> The microphone of the han dset, th e hands free functi on or the
headset is in service; the indi ca tor as so ci ated to the key goes
off, indicating that your party can hear you again.
Recording the conversation
Depending on the voi ce mailbox s ystem install ed, you have th e possibili ty to record the o ngoing conversation.
1 - Press the interactive --> key.
2 - Next, press the interactive Record key.
Caution: Recording a call without a person’s knowledge can be
considered as a legal offence.
A recorded conversation can be listened to in the same way as
messages stored in the voice mailbox (See "Voicemail function"
on page 63.).
* Depending on the programming performed by the system operator.
24
*
Page 26

During the call
Recover
Park
Pick-up
Park
Placing the party on hold and resuming the call on the same phone
The call is set up wit h a party and y ou want to put i t on hol d to res ume i t later o n the sam e
phone:
1 - Press the
-> Your party is put on hold and hears beeps or music-on-hold.
2 - Press the interactive Recover key to resume the conversat ion
with your party.
Note: The hold functio n can be progra mmed on a prog rammable
key. If you use this function regularly, consult your system
operator who will get it programmed.
R key.
Placing a party on hold and resuming the call on another phone
The call is set up with a party and you want to continue the c onversation on an other phone
located in another office:
Press the Park key.
-> The phone returns to standby. Your party is put on hold and
hears beeps or music-on-hold.
On the second phone:
1 - Press the interactive Pick-up key
2 - Next, press the interactive Park key.
Note: If thi s phone has no interactive key s, press successivel y the
# 7 0 keys.
3 - Dial the number of the first phone to resume the conver sation
with your party.
-> If the call on hold is not resumed within a give n time, it is routed
to the operator.
25
Page 27
During the call
Comm
Comm
Recover
Prenum
Transferring a call
To transfer the current call to another phone:
1 - Press the interactive Comm key.
2 - Dial the extension number.
Note: Y ou ca n also acce ss a stored number or perf orm a sear ch by
name.
Y ou can wait for the called party to answer or hang up immediately
(or press the red key if you were in hands-free mode or in
headset mode).
Calling a second party
You are in the middle of a call with a party and you want to call a second party, inside or
outside the company.
1 - Press the interactive Com m ke y.
-> Your other party is put on hold and hears an audible signal.
2 - Dial the number of the other party.
Note: You can also press directly the green key (to recall
the last number called) , a program med key or the key to
access one of your abbreviated numbers. The other party is
automatically put on hol d.
• If the called party does not answer, press the interactive
Recover key to go back to the party on hold.
-> The display s hows the number o r the name of th e two parties ;
the identity of the pa rty on hold is displa yed in the second li ne of
the display.
Dialling the number without ending the conversation with the first party:
Y ou w ant to dial a n umber but remain i n comm unicatio n with you r
first partn er.
1 - Press the interactive Prenum key.
26
Page 28

During the call
Call
Wait
Shuttle
Recover
2 - Dial the extension number.
3 - Press the Call key.
-> Only now is your party put on hold and hears an audible
signal.
Answering a second call
While talking with one party, you hear an audible signal: another party is trying to reach
you. You can answer this second call without cutting off the first call.
Press the interactive Wait key.
-> The other party is automatically put on hold.
You can talk to the s ec ond p arty whose identity is displ ay ed o n
the screen.
Note: If you have programmed the multi-key, multi-line or folder
function (for more information see the respective chapters), you
can press the interactive Wait key to display the identity of the
second caller before answering t he call by pressing th e interacti ve
Answer key (or deciding not to answer).
*
Switching between two parties
To successively switch between parties:
• Press the intera ctive Shuttle key.
-> You talk alternately with each party, but they cannot
communicate with one another.
The party displayed in th e second displ ay line is still the pa rty put
on hold.
Releasing one of the parties
To release one of the parties (the one with whom you are talking):
• Press the Recover key.
-> You recover the party who was on hold.
* Depending on the programming performed by the system operator.
27
Page 29
During the call
Conf
Transfer
Duratn.
Previous
-->
Time
Setting up a conference call
You want to talk to both parties at the same time (function grant ed if you made the last call).
• Press the Conf. key.
-> A three-way conferenc e call is set up between you and yo ur two
parties.
If one of them hangs up, you stay on line with the other.
To leave the conference call:
• Press the interactive Transfer key.
You can also simply hang up the handset or press the red key
-> The two parties stay in communication.
Note: If it fails, your phone rings again.
Other features available during a call
To find out the communication duration:
.
Proceed as follow s to find ou t the duration of your communicatio n
(external calls only):
To show the time:
28
• Press the interactive Duratn. key.
-> The display shows informati on about the du ration and poss ibly
the costs of the communication*.
To return to the previous display, press the interactive Previous
key (especially if you want to dial a second number).
Proceed as follows sho w the date and time instead of the party’s
name or number:
1 - Press the interactive --> key.
2 - Press the interactive Time key.
-> The display shows the date and time.
Page 30

Storing the number of the called party:
-->
Memory
-->
Trace
Protect.
Regardless of whe ther y ou are the c allin g or th e cal led p arty, you
can store the number of the other party on a programmable key.
1 - Press successively the interactive --> key.
2 - Press the interactive Memory key.
3 - Press a programmable key.
-> The number is automatica lly sto red, an d can be c alled up from
this programmable key.
To enter the name of the party for the programmed key,
See "Identifying the programmed keys" on page57.).
To use the trace function:
You want the number of the called or calling party (internal or
external) to be written in the logbook, for example to identify a
nuisance call.
During a call:
1 - Press the interactive --> key.
2 - Press the interactive Trace key.
-> The number is auto ma tic all y s tor ed i n the logbook that can be
consulted by the system operator.
During the call
To protect the call:
To protect the phone against any call or intrusion during data
transmission:
• Press the interactive Protect key.
-> An audible signal and the display indicate that the action has
been carried out. During this call, any a ttempt to call the phone
is ignored.
You can return to the previous display by pressing the
interactive Resume key.
29
Page 31

During the call
Funct.
Feature
-->
Memory
Cancel
Viewing the stored numbers
You want to view the stored numbers in the store and redial, LNR or automatic callback
function.
• Press successively the interactive keys Funct., Feature, -->
Memory.
-> The display offers you to access the various stored numbers.
• Press the interactive key:
• Store to access the number stored by the STORE AND REDIAL
function,
• Redial to access the number stored by the LNR function,
• Aut.CB to access the number stored by the CALLBACK
function.
• To cancel the stored number, press the interactive Cancel key.
30
Page 32

Outbound call log (LNR)
Call
Outbound call log (LNR)
The outbound call log can store the records of the last 10 numbers called (internal or external numbers).
When consulting the log, you can automatically call back one of the stored numbers.
When the log is full, a new call will erase the oldest. When a call is repeated several tim es,
only the last one is stored, and the call counter is updated. You can delete a record or all
the records stored.
Consulting the outbound call log:
1 - Press the green key.
-> The first part of the information relating to the last number
called is displayed: Name, date and time of the call.
Notes:
• After deleting the complete log, the display shows
LNR CALL LOG IS EMPTY".
"
• If the name of the party is not known, the display shows the
number instead of the name.
2 - Press the key to display the number of the called party
and the number of calls.
• Press the key to return to the previous information.
3 - Press the or keys to access the other stored
numbers.
Calling a party from the outbound call log
While consulting, you can call the party whose record is presented.
• Press the Call key.
You can also press the green key or the
-> The phone automatically calls the party. The display shows
the number of the party called. When the called party answers,
you can talk.
OK key.
31
Page 33

Outbound call log (LNR)
Create
List 1
Delete
Storing the name and/or number in the private directory
During the consultation (display of the name or number), you can enter in the private directory the coordinates of the party whose record is presented to you.
1 - Press the interactive Create key.
-> The screen proposes to c reate a rec ord in the p rivate dir ectory.
2 - Press the
-> The name and number are automatically recorded in the
private directory.
• If the name is not available in the outb ou nd call lo g, t he dis play
prompts you to enter the name.
-> Enter the name to be associated with the number using the
alphanumeric keypad, then press
• If the same number is already stored with a different name, the
phone outputs warning beeps.
-> The display returns to the record of the outbound call log.
3 - Press the interactive key that matches the desired list
(example: List 1).
4 - Press the OK key to finish.
-> The display returns to the record of the outbound call log.
OK key.
OK to finish.
Deleting a record from the outbound call log
You can delete a record while viewing it (display of the name or number).
1 - Press the interactive Delete key.
2 - Press the
record.
-> An audible signal confirms that the record has been erased.
The list is updated, and the next record appears in the dis pl ay.
OK key to confirm that you want to delete the
32
Page 34

Outbound call log (LNR)
Delete
Deleting all records from the outbound call log
You can delete all the numbers stored in the outbound call log.
1 - Press the Tools key.
-> The display shows "
PROGRAMMING".
2 - Press
-> The display shows "
3 - Press the OK key.
-> The display shows "DELETE LNR CALLS LOG".
4 - Press the Delete key.
-> The screen prompts you to enter your secret code.
5 - Enter you secret code.
-> An audible signal confirms that the record has been erased.
The screen confirms that the complete outbound call log has
been cleared.
Reminder: Use the red key to cancel or terminate a
sequence.
CLEAR LOGS".
33
Page 35

Private directory
Private
Private directory
You can record the internal or external numbers that you use most frequently (up to 100)
in your private directory.
When a party stored in the private directory calls you, the screen displays the name followed by the number. It will also be stored by name in the call log .
A classification of the records (which include the name and number of the party) is suggested; it allows to group into the same li st (4 differen t lists) parti es which bel ong to groups
(management, workgroups etc. depending on your activities). The title of these lists can
also be personalised. The parties grouped in list 4 have the particularity of being presented, when they call, by a distinctive ring tone.
*
Accessing the private directory
You can access the private directory with the phone in standby or when calling.
1 - Press the directory key.
-> The display shows the available directories.
2 - Press the interactive Private key.
-> The name and number of the first record are displayed on the
screen.
The records are classified in alphabetical order.
When the directory is empty, the displ ay shows
PRIVATE DIRECTORY IS EMPTY".
"
3 - Press successively the or keys to access the other
stored records.
* Depending on the programming performed by the system operator.
34
Page 36

Private directory
Create
List 4
Creating a record in the private directory
You can create a new record while consulting the directory.
1 - Press the interactive Create key.
-> The display prompts you to enter the name of the new record.
When the directory is already full, the display shows
PRIVATE DIRECTORY IS FULL".
"
2 - Enter on the alphanumeric keypad the name of the desired
party (14 characters maximum).
See "Alphanumeric keypad ", Page10.
• In case of an error, press the interactive Erase key.
3 - Press the
-> The screen proposes to fill in the number associated with the
name.
4 - Enter the call number , with the di al-out prefix if it i s an external
number (up to 23 digits without separator).
Note: if a name or number is already stored in the directory, the
phone outputs warning beeps.
• If you want to store an access code (example: secret code or
inquiry code), you have to press
Also press
• In case of an error, press the or keys to select the
character you want to replace (place the cursor under the
character), then enter the new character
You can also press the interactive Erase key.
5 - Press the
-> The display prom pt s y ou to ch oos e the list in which the re co rd
will be classified (by default, list 1 is suggested).
6 - You may als o press an i nteractive k ey whic h correspon ds to a
different list (for example list 4).
7 - Press the
-> The display shows the stored name.
OK key to confirm the name.
R before entering the code.
R to insert a separator in this code, if necessary.
OK key to confirm the number.
OK key to finish.
Reminder: Use the red key to cancel or terminate a
sequence.
35
Page 37

Private directory
Modify
Name
Delete
Modifying and deleting a record in the personal directory
When a record has been stored, you can modify or delete it.
To modify a record:
While viewing the record:
1 - Press the interactive Modify key.
-> The display prompts you to modi fy the name, the num ber or the
classification list.
2 - Press the interactive key that corresponds to the section you
want to change (example: Name).
-> The display shows the stored name.
3 - Press the or keys to select the character y ou want to
replace (place the cursor un der th e character), then enter the
new character.
You can also press the interactive Erase ke y.
4 - Press the
OK key to confirm the modification.
To delete a record:
If necessary , m odify the other section s as well (
While consulting a record, when the name or the number you
want to delete is displayed:
1 - Press the interactive Delete key.
-> The display prompts you to confirm the deletion of the
displayed record.
2 - Press
-> An audible signal confirms that the record has been erased.
OK to confirm.
The next record appears on the screen.
Number
and
List
).
36
Page 38

Private directory
List 1
Personalising the titles of the lists in the private directory
You can access th e pers onalis ation of the titles of th e 4 li sts i n the p rivate direc tory; b y default, the titles are: List 1 - List 2 - List 3 - List 4.
1 - Press the Tools key.
-> The display shows "
2 - Press the key twice.
-> The display indicates "
3 - Press the
-> The display shows the first section of the "
OK key.
MANAGEMENT
4 - Press the key.
-> The labels of the lists appear on the disp lay (by d efault: Li st 1 List 2 - List 3 - List 4).
5 - Press the interactive key that matches the desired list
(example: List 1).
-> The title of the selected list appears in the display.
6 - Enter the title on the alphanumeric keypad (maximum 7
characters).
• In case of an error or to modify your entry, press the
or keys to select the character you want to replace
(place the cursor under the character), the n enter the new
character.
You can also press the interactive Erase key.
Press the
-> The phone beeps twice.
OK key to confirm.
PROGRAMMING".
DIRECTORY MANAGEMENT".
DIRECTORY
" menu.
Repeat the operation for each title you want to personalise.
37
Page 39

Private directory
Lists
List 1
Call
Searching by name in the private directory
While consulting the d irectory, you can se arch for a name in all re cords stored in the pri vate
directory.
1 - Press successively th e key of the a lphanumeric keypad whi ch
contains the first le tter of the name yo u are searching, until the
display shows the first letter of this name.
-> The first name that matches the entry appears in the display.
Browsing a list of the private directory
While consulting th e directo ry, yo u can s earch all the reco rds which are clas sified i n alphabetical order in a list.
2 - Press the or keys to browse thro ugh the other name s.
-> The associated names and numbers appear in the display.
1 - Press the interactive Lists key.
-> The available lists are displayed on the screen.
2 - Press the interactive key that matches the desired list
(example: List 1).
-> The first record of the list is presented.
3 - Select the desired record with the or keys.
You can also enter the first lett er of a name to carry out a search
by name.
Calling from the private directory
While accessing the directory, you can call the party whose record is presented.
38
Press the Call key.
You can also press the green key or the
-> The phone automat ic all y dia ls the nu mber. The di sp lay s hows
the number stored in the directory.
OK key.
Page 40

Private directory
List 1
Deleting the lists of the private directory
You can delete a record or all the records stored in the private directory.
Caution: You must h ave personalise d your secret code before ac tivating this function (see
para. Phone settings - Personalising the phone’s secret code).
1 - Press the Tools key.
-> The display shows "PROGRAMMING".
2 - Press the key twice.
-> The display indicates "
3 - Press the
-> The display shows the first section of the "DIRECTORY
MANAGEMENT" menu.
4 - Press the key twice.
-> The display prompts you to select a list or all lists.
5 - Press the interactive key that corresponds to your choice
(example: List 1).
-> The display prompts you to enter your secret code.
6 - Enter you secret code.
-> An audible signal confirms that the record has been erased.
The display confirms that the complete private directory has
been cleared.
Reminder: Use the red key to cancel or terminate a
sequence.
OK key.
DIRECTORY MANAGEMENT".
39
Page 41

Directories of abbreviated numbers
Abbrev#
More
Activ.
Enter
More
Content
Directories of abbreviated numbers
These are directories stored at the system level.
• The personal directory is used to record your most frequently used numbers
(up to 10, numbered from 0 to 9).
• The group directory of abbreviated numbers can be accessed by all the phones
(even those for which outside access is forbidden).
Programming a personal abbreviated number
You want to program a number:
1 - Press the Tools key.
-> The display shows "PROGRAMMING".
2 - Press the
-> The display shows WHAT DO YOU WANT TO
OK key.
PROGRAM?
3 - Press the interactive Abbrev#. key.
-> The display shows the programming status of the number 0.
-> Press successively the interactive More key to display the
status of the other abbreviated numbers.
4 - Press the interactive Activ. key.
-> The display prompts you to dial the numbe r to be programmed.
5 - Dial the party's number (preceded by 0 for an outside party).
-> In case of an error, pres s the interac tiv e Erase key.
Reminder: Use the red key to cancel or terminate a
sequence.
6 - Press the interactive Enter key to finish.
-> The display shows the stored number.
To record a new sequence,
-> press the interactive More key.
To display the first number,
-> press the interactive Content key .
40
Page 42

Directories of abbreviated numbers
Modify
Enter
Cancel
Abbrev.
0 to 9
Modifying or deleting a personal abbreviated number
When a personal abbreviated number has been programmed, you can modify or delete it.
To modify an abbreviated number:
When the abbreviated number you want to modify is displayed.
1 - Press Modify.
2 - Dial again the party's numb er (preceded by 0 for an outside party).
-> In case of an error, press the interactive Erase key.
3 - Press the interactive Enter key to finish.
-> The display shows the stored number.
To cancel an abbreviated number:
When the abbreviated number you want to delete is displayed.
1 - Press the interactive Cancel key.
-> The number is deleted and the d isplay shows "
RECORDED
".
Calling a personal abbreviated number
NO NUMBER
You can call a personal abbreviated number in standby or during a call.
1 - Press the directory key.
-> The first available directory is displayed on the screen.
2 - Press the interactive Abbrev. key.
3 - Dial an abbreviated number 0 to 9.
-> The phone automatically dials the number.
When the called party answers, you can talk.
41
Page 43

Directories of abbreviated numbers
Dialling a common abbreviated number
You will gain time using common abbreviated numbers; consult your system operator to
find out the list.
You can call a common abbreviated number in standby or during a call.
*
1 - Press the as terisk key (*).
2 - Enter an abbreviated number (3xxx).
-> The phone automatically dials the number.
When the called party answers, pick up the handset to talk.
*
42
Page 44

Inbound call log
Log
Inbound call log
The inbound call log can store the records (i.e. all informatio n rel ating to a call) of the last
50 inbound calls, regardless of whether or not they were answered. If the calling party is
stored in your private directory, the name will be displayed in priority instead of the numb er.
When consulting the log, you can automati cally c all bac k the sto red numb er or direc tly create a record in the private directory. You can delete a record or all the records stored.
When the log is full, a new call will erase the oldest. When a call is repeated several tim es,
only the last one is stored.
Viewing the incoming call log
The message indicator informs you when you have received a new message:
• Indicator blinking slowly: There is a new call in the inbound calls log.
• Indicator blinking rapidly: There is a new call in the inbound call log and a message in your
voice mailbox.
• Indicator off: There is now new call in your inbound calls log.
Note:
• Indicator permanently on: There is no new call, but at least one message in your voice
mailbox.
• After clearing the entire log , t he sc ree n d is pla ys "INBOUND CALL LOG IS EMPTY".
You can consult the inbound calls log when the phone is in standby as well as during an
ongoing call:
1 - Press the directory key.
-> The display shows the available directories.
2 - Press the interactive Log key.
-> The display shows the total number of inbound calls and the
number of unread calls.
3 - Press the key to display the last call.
• Press the key to display the oldest call.
-> The first part of th e info rmatio n relat ing to the c all is dis played:
Name, date and time of the call.
43
Page 45

Inbound call log
Call
Create
Notes:
• If the calling party has protected his identity, the screen displays
a series of asterisks instead of the name and number.
• If the calling party is not identified, the screen displays
"UNKNOWN" instead of the name and number.
• If only the number is stored, the number ap pea rs i ns tead of the
name.
• When a call has already been read, the symbol
front of the name.
4 - Press the key to display the second part of the information:
the caller number and the number of calls from this party.
Press the key to return to the previous information.
5 - Press the or keys to display the information
concerning the other stored calls.
Calling a party from the inbound call log
While consulting, you can call the party whose record is presented.
Note: Only the parties whose number is presented can be called back.
> appears in
• Press the Call key.
You can also press the green key or the OK.
-> The phone automatic ally calls the party. The display shows the
number of the party called.
The record remains stor ed in the lo g, an d the s ym bol >> app ears
in front of the name to indicate the redialling.
key.
Storing the name and/or number in the private directory
During the consultatio n, you can store in your private dire ctory the coo rdinates of the pa rty
whose record is presented to you.
1 - Press the interactive Create key.
-> The screen proposes to c reate a rec ord in the p rivate dir ectory.
OK key.
44
2 - Press the
-> The name and number are automatically recorded in the
private directory.
Page 46

Inbound call log
List 1
Delete
• If the name is not available in the inbound call log, the display
prompts you to enter the name.
-> Enter the name to be associated with the number using the
alphanumeric keypa d (up to 14characters), then press
finish.
• If the same number is already stored with a different name, the
phone outp uts warning beeps.
3 - Press the interactive key that matches the desired list
(example: List 1).
4 - Press the
-> The display returns to the record of the inbound call log.
Deleting a record from the inbound call log
To delete the displayed record while viewing it:
1 - Press the interactive Delete key.
-> The display prompts you to confirm the deletion of the record.
2 - Press the
record.
-> The list is updated, and the nex t rec ord ap pea rs in the di spl ay.
OK key to finish.
OK key to confirm that you want to delete the
OK to
Deleting all records from the inbound call log
You can erase all the numbers stored in the outbou nd cal l log.
Caution: You have to personalise your secret code before you activate this function
(See "Personalising the phone’s secret code" on page 101).
1 - Press the Tools key.
-> The display shows "PROGRAMMING".
2 - Press the . key.
CLEAR LOGS".
DELETE INCOMING CALLS LOG".
-> The display shows "
3 - Press the
-> The display suggests the first section.
4 - Press the . key.
-> The display shows "
OK key.
45
Page 47

Inbound call log
Delete
5 - Press the Delete ke y.
-> The screen prompts you to enter your secret code.
6 - Enter you s ecret code.
-> The phone beeps twice.
The screen confirms that the complete call log has been
cleared.
Reminder: Use the red key to cancel or terminate a
sequence.
46
Page 48

Information directory
Info
Information directory
The information directory is used to access the display of the usual various information
about the phone and the owner of the phone concerned.
Checking the information directory
You can call up the information directory when phone is in standby as well as during an
ongoing call.
1 - Press the key.
-> The available directories are displayed on the screen.
2 - Press the interactive Info key.
-> The display shows the first item of infor mation, i.e. the number
of the phone concerned.
3 - Press successively the or keys to access the other
items of information, which include:
•FAX NUMBER,
• CELLULAR NUMBER,
• MOBILE NUMBER,
• MISC NUMBER,
• SET SERIAL NUMBER,
• SET SOFTWARE RELEASE.
Reminder: Use the red key to terminate the consultation.
Making entries in the information directory
In the information directory, you can customise four sections: The FAX number, the CELLULAR number, the MOBILE number, a misc number.
1 - Press the Tools key.
-> The display shows "
2 - Press three times the key until "
displayed.
3 - Press the
To enter the FAX - CELLULAR - MOBILE numbers:
When the display shows one of the three secti ons (FAX NUM BER
or CELLULAR NUMBER or MOBILE NUMBER):
OK key to confirm.
PROGRAMMING".
PRIVATE INFO" is
47
Page 49

Information directory
Name
Number
1 - Press the key.
-> The display prompts you to enter the number.
2 - Enter the number you want to store (23 characters maximum) .
-> In case of an error, pres s the or keys to select the
character you want to replace (place the cursor under the
character), then enter the new character.
You can also press the interactive Erase key.
3 - Press the OK key to confirm.
-> You will hear 2 confirmation beeps.
Repeat the operation for each section you want to enter.
To enter the misc number:
When the display shows the section "
1 - Press the interactive Name key.
2 - Use the alphanumeric keypad to enter the name associated
with the number, or the title of the free number.
-> In case of an error, pres s the or keys to select the
character you want to replace (place the cursor under the
character), then enter the new character.
You can also press the interactive Erase key.
MISC NUMBER":
48
1 - Press the interactive Num ber key.
2 - Press the
-> The display prompts you to enter the name or title of the
number.
3 - Enter the number to be stored.
4 - Press the
-> You will hear confirmation beeps.
OK key to confirm.
OK key to confirm.
Page 50

Internal names directory
-->
Int.Name
Erase
Consult
Next
Previous
Correct
Internal names directory
This is the directory of the names of in ternal pa rties w hich is commo n to all subs cribe rs. It
is programmed by the system operator.
Checking the internal names directory
You can call up the external nam es directory whe n the phon e is in standby as well as during
an ongoing call.
1 - Press the key.
-> The available directories are displayed on the screen.
Press the interactive --> key.
2 - Press the interactive Int.Name key.
-> The display prompts you to enter the first letters of the name
you are searching.
3 - Enter directly on the alphanumeric keypad the first letters of
the party’s name.
• If you need to correct an entry, press the interactive Erase key.
4 - Press the Consult key.
-> The display suggests a name or, if there are several names,
indicates the number of suggestions.
• If necessary, press the interactive Next key until the desired
name is displayed.
• Use the interactive Previous key to go back.
• If necessary, press the interactive Correct key to return to the
entry of letters.
49
Page 51

Internal names directory
Call
Calling an internal party
While consulting, you can call the party whose name is displayed.
Press the Call key.
-> When the called party answers, you can talk.
50
Page 52

External names directory
-->
Ext.Name
Erase
Consult
Next
Previous
Correct
External names directory
This is the directory of the names of external parties which is common to all subscribers. It
is programmed by the system operator.
*
Checking the external names directory
You can call up the external nam es directory whe n the phon e is in standby as well as during
an ongoing call.
1 - Press the key.
-> The available directories are displayed on the screen.
Press the interactive --> key.
2 - Press the interactive Ext.Name key.
-> The display prompts you to enter the first letters of the name
you are searching.
3 - Enter directly on the alphanumeric keypad the first letters of
the party’s name.
• If you need to correct an entry, press the interactive Erase key.
4 - Press the Consult key.
-> The display suggests a name or, if there are several names,
indicates the number of suggestions.
• If necessary, press the interactive Next key until the desired
name is displayed.
• Use the interactive Previous key to go back.
• If necessary, press the interactive Correct key to return to the
entry of letters.
* Depending on the programming performed by the system operator.
51
Page 53

External names directory
Call
Calling an external party
While consulting, you can call the party whose name is displayed.
Press the Call key.
-> When the called party answers, you can talk.
52
Page 54

Programmable keys
Key
Modify
Programmable keys
You call some parties or colleagues several times a day.
You regularly use some te lephone fu nctions s uch as forward ing, supe rvision, filte ring, ca ll
pick-up, etc.
The programmable keys on your phone can be used to store these numbers or functions
and easily access the services offered (See "Description of the phone" on page 7.).
*
Note: if your phone is equipped with an extension module
these additional keys in the same way.
A few programming examples are given below. However, we recommend you to refer to
the chapters that speci fically des cribe these func tions for more in formation on th e features
available.
Programming a key
Regardless of the type of program ming (number or function), the acc ess procedure is identical.
1 - Press the Tools key.
-> The display shows "PROGRAMMING".
, you can program and use
2 - Press the
-> The display shows:
WHAT DO YOU WANT TO PROGRAM?"
"
3 - Press the i nteractive Key key.
-> The display prompts you to select the desired programmable
key.
4 - Press a programmable key .
-> The indicator associa ted with that k ey li ght s up , and the d ispla y
shows the programming status of the key.
5 - Press the i nteractive Modify key.
-> During the programming, the indicator associated to the key
flashes.
You have access to different types of programming, which will be
briefly presented below. We recommend you to refer to the
chapters that specifically describe these functions for more
information on the features available.
* Depending on the programming performed by the system operator.
OK key.
53
Page 55

Programmable keys
Number
Erase
Enter
Tone
N°B.V.#code#
Enter
To program a number:
You can program the number to call an internal or external party.
After selecting the key to be programmed (the associa ted indicator
flashes):
1 - Press the interactive Number key.
-> The display prompts you to enter the number.
2 - Dial the party's number without forgetting the ne twork access
code if it is an external party (0).
• In case of an error, press the interactive Erase key.
3 - Press the interactive Enter key to validate the programming.
-> The display shows the programming of the key.
Therefore, your party will be called by simply pressing this key.
To program a series of codes:
This is to program a series of co des that wi ll be int erpre ted by th e
phone that already has a call in progress. For example, you can
program the sequence to access your voicemail.
After selecting the key to be programmed (the associa ted indicator
flashes):
1 - Press the interactive Tone key.
-> The display prompts you to enter the code.
2 - Dial the sequence.
Example: Dial the num be r of voice mailbox followed by # , th en
the personal access code followed by #.
• In case of an error, press the interactive Erase key.
• To insert a pause between two series of codes, press the
interactive Pause1 or Pause2* key.
3 - Press the interactive Enter key to validate the programming.
-> The display shows the programming of the key.
* Depending on the programming performed by the system operator.
54
Therefore, by simply pressing this key, you give the phone with a
call in progress all the info rmatio n require d and quic kly ac cept th e
required service.
Page 56

To program supervision:
Superv.
Extens.
Other
Enter
Beep
Feature
Forward
Immed.
You can program the supervision function of another phone or of
your own phone.
After selecting the key to be programmed (the ass ociated indicator
flashes):
1 - Press the i nteractive Superv. key.
-> The display prompts you to choose a type of supervision
(voice mailbox, phone or external line).
2 - Press, for example, the interactive Extens. key.
-> The display suggests to supervise your own phone or another
phone.
3 - Press, for example, the interactive Other key to supervise
-> The display prompts yo u to en ter the number of the phone that
you want to supervise.
4 - Dial the number of the phone , then press the interactiv e Enter
-> The display prompts you to select the signal which the
supervised phone will output to you.
5 - Press, for example, the interactive Beep key.
-> The display shows the programming of the key.
Programmable keys
another ph one.
key.
To program a feature:
To make the best possible use of this function, reserve for it the
keys of the first page (#1), or of the extension module if you have
one.
Therefore, you have a continuous view of the supervised phone's
telephone activity and can intervene by simply pressing this key.
You want to program a feature: message, forward, agenda, lock,
absent, filter, mute, protect, …
1 - Press the i nteractive Feature key.
-> The display prompts you to choose a feature.
2 - Press the i nteractive key that corresponds to the desired
feature (Forward for example).
-> The display prompts you to select the type of forwarding.
3 - Press, for example, the interactive Immed. key.
-> The display prompts you to enter the number of the extension to
which the calls will be forwarded immediately.
55
Page 57

Programmable keys
Enter
Filter
Activ.
Enter
Erase
Modify
Start
4 - Dial the number of the phone , t hen p ress the i nteract ive Enter
key.
-> The display shows the programming of the key.
You can now activate one of the features (message, forward,
agenda, lock, …) by simply pressing the programmed key.
To program a filter:
Y ou want to prog ram the filter function for the phone calls of on e of
your colleagues.
1 - Press the interactive Filter key.
-> The display prompts yo u to de cla re w he ther y ou are filtering or
filtered.
2 - For filtering, press the interactive Activ. key, for instance.
-> The display prompts you to select the type of forwarding.
3 - Dial the number of the phone to be filtered.
-> In case of an error, press the interactive Erase key.
4 - Press the interactive Enter key to validate the programming.
-> The display shows the programming of the key.
You can now activate or deactivate the filter function simply by
pressing this key, depending on your activities.
Deleting, modifying and exiting the programming
After having programmed a key, the display shows the
programming status of that key, and offers different options.
1 - Press the interactive Erase key to delete the programming
presented.
2 - Press the interactive Modify key and repeat the procedure
described below to modify the programming displayed.
3 - Press the inter active Start key to return to the start in order to
program another key.
56
Page 58

Programmable keys
End
<Label>
4 - Press the interactive End key to exit the programming.
Reminder: During the programming,
• you can press the red key once to cancel the setting you
are making,
• you can press the red key twice to terminate a
programming sequence.
Identifying the programmed keys
It is a good idea to mark the keys th at you have programmed, so that you can easily identify
their function. The id entifi er must be enter ed so th at it is d ispla yed on the screen opposi te
the key.
1 - Press the Tools key.
2 - Press successively the key to display "
3 - Press
4 - Press the key that you want to identify.
5 - Enter the label using the alphanumeric keypad
6 - Validate your entry by pressing
You can now enter the label of another key.
OK.
(see "Alphanumeric keypad", Page 10).
OK.
LABEL".
57
Page 59

The call forwarding function
Funct.
Feature
Forward
Delayed
Busy
Immed.
all
Extern.
The call forwarding function
If absent or busy, you can forward your calls to another phone, to an external number
(e.g. a GSM number) or to your voice mailbox.
*
Forwarding a call
You want to access the call forwarding function.
1 - Press the interactive Funct. key.
2 - then the interactive Feature key,
3 - then the interactive Forward key.
-> The display offers three types of forwarding.
Note: The display may show the pre vi ous ly act iv ated forw ard ing
status and proposes in this case to press the interactive Cancel
key.
To select the type of forwarding:
You have the choice between three types of forwarding.
• For a forward on no answer, press the interactive Delayed key.
• For a forward on busy, press the interactive Busy key.
• For an immediate forward, press the interactive Immed. key.
-> The display prompts you to state the origin of the calls to be
forwarded.
To select the origin of the calls:
You want to choose the origin of the calls to be forwarded.
• To forward all calls, press the interactive All key.
• To forw ard calls comin g from external lin es, press the inte ractive
Extern. key.
* Depending on the programming performed by the system operator.
58
Page 60

The call forwarding function
Intern.
Extens.
Enter
V Mail
Ext. L.
Enter
• To forw ard call s coming fro m internal lines, p ress the interactiv e
Intern. key.
-> The display shows the forwarding status.
To select the forward destination:
You now want to choose the forward destination.
• To forward calls to an internal phone:
1 - Press the interactive Extens. key.
2 - Dial the extension number.
-> In case of an error, press the interactive Erase key.
3 - Press the interactive Enter key.
• To forward calls to a voice mailbox:
1 - Press the interactive V Mail key.
• To forward calls to an external number:
1 - Press the interactive Ext. L. key.
2 - Dial the external number (with dial-out prefix).
-> In case of an error, press the interactive Erase key.
3 - Press the interactive Enter key.
-> The display indicates that the action has been validated.
Note: if yo u want to modify the programming, pr ess the interactive
Back key to restart the sequence.
59
Page 61

The call forwarding function
More
Cancel
Key
Modify
Feature
Forwarding
Cancelling a forwarding
With the phone in st an dby, proceed as follows to view the st a t e o f
you forwarding settings:
1 - Press the interactive More key.
-> The display shows the status of the forwarding setting.
2 - Press the interactive Cancel key.
-> An audible message and the display ind icate that the action has
been validated.
Programming forwarding on a programmable key
For a repetitive type forwarding operation, we recommend storing the function on a programmable key.
1 - Press the Tools key.
-> The display shows "
PROGRAMMING".
60
2 - Press the
-> The display shows "
PROGRAM?
3 - Press the interactive Key key.
-> The display prompts you to select the desired programmable
key.
4 - Press a pro grammable key.
-> The indicator associated wi th that key lights up, and the displ ay
shows the programming status of the key.
5 - Press the interactive Modify key.
-> The indica tor associated with the key flashes.
6 - Press successively the Feature and Forward keys.
OK key.
WHAT DO YOU WANT TO
."
Page 62

Then repeat the sequence described in this chapter, i.e.:
Forwarding
Forwarding
• You have to choose the type of forwarding, and then enter the
number of the extension to which the calls will be forwarded.
Note: If desired, you can simply store the sequence without the
extension number. Therefore, when activated, you still have the
possibility of entering the extens ion num ber to wh ich yo u want to
forward the call.
To activate forwarding:
You want to activate forwarding of your calls.
• Press the programmed key.
Note: depending on the key programming, the display prompts
you to enter the extension number to which you want to forward
the calls.
-> The forwarding function is activated and the indicator
associated with the key lights up as a reminder.
To deactivate forwarding:
You want to deactivate forwarding of your calls.
• Press the programmed. key.
-> The forwarding function is deactivated and the indicator
associated to the key goes off.
An audible message and the display indicate that activating or
deactivating has been validated.
The call forwarding function
Overriding the call forwarding function
You are trying to reach a pa rty and y ou kn ow tha t their ph one is forwarded . You can force
this forwarding and ring the desired phone.
* 2 9
* Depending on the programming performed by the system operator.
1 - Press successively the following keys: * 2 9 or .
2 - Enter the desired extension number.
Note: This function is subject to a right; contact your system
operator.
*
61
Page 63

The call forwarding function
You can also, if y ou are au thorised for ass istant forward ing (this function is subject to a right),
force this forwarding and ring the desired phone in the following way:
* 2 8
1 - Press successively the following keys: * 2 8 or .
2 - Enter the desired extension number.
Note: A user authorised for assist ant forw arding can thus j oin his
part y by
*29 as well as by *28; contact your system operator.
62
Page 64

Voicemail function
Voicemail function
The voicemail function helps you to manage your calls when you are absent or simply
when you do not want to be disturbed.
For the voicemail s ystem to be a ble to rec ord your m essages , you must c onfigure a nd personalise your voice mailbox, then forward your calls.
Configuring and customising your voice mailbox
You must call the voice mail system to acce ss the menus to co nfigure and personalis e your
voice mailbox.
Press the key for direct access to the voice mailbox.
or
1 - Enter the voicemail number.
You can also su ccessively press the keys
*
* 5 3
-> A voice prompt welcomes you and gives the different
commands to access the main menu.
We recommend that you do the following straight away:
• To customise your access code,
• To record your name,
• Record your greeting message.
If required, cont act your s ystem opera tor for addi tional in formation
on using the voicemail system.
* Depending on the programming performed by the system operator.
63
Page 65

Voicemail function
Funct.
Feature
Forward
Delayed
All
V Mail
Activating the forwarding of calls to the voice m ailbox
To forward your calls to the voice mailbox:
1 - Press successively the interactive keys Funct., Feature,
Forward.
2 - Select the type of forwarding (example: Delayed).
3 - Select the origin of the ca ll s to be forwarded (example: calls of
any origin).
4 - Press the interactive V Mail key.
-> The display confirms the forwardin g of calls to the voice mailbox.
Note: We recommend that you store this function on a
programmable key so that you can easily activate and deactivate
forwarding of your calls to the voice mailbox (See "The call
forwarding function" on page 58.).
Calling up new messages
When a new message has arrived, the display indicates
"
, and the indicator of the message key flashes.
BOX
You want to consult your voicemail:
Press the key for direct access to the voice mailbox.
or
1 - Enter the voicemail number.
You can also successively press the keys
* 5 3
64
"PLEASE
CALL YOUR MAIL-
Page 66

Voicemail function
<No. VMB#code#>
Key
Modify
Tone
<No. VMB#code#>
Enter
-> A voice prompt welcomes you to th e voicemail an d gives you the
different comm ands to access your voi ce mailbox. Simply fol low
the instructions.
2 - Enter the voice mailbox n umber followe d by # and/o r the secret
code followed by # (*).
Note: we recommend storing this sequence on a programmable
key.
-> A voice prompt indicates the number of messages received.
The indicator goes out after the messages have been played.
Programming the access codes on a programmable key:
To make accessing your mailbox even simpler, you can store the codes used to access it
on a programmable key.
1 - Press the Tools key.
-> The display shows "
2 - Press the
-> The display shows:
OK key.
PROGRAMMING".
WHAT DO YOU WANT TO PROGRAM?
3 - Press the i nteractive Key key.
-> The display prompts you to select the desired programmable
key.
4 - Press a programmable key .
-> The indicator associa ted with that k ey li ght s up , and the d ispla y
shows the programming status of the key.
5 - Press the i nteractive Modify key.
6 - Press the i nteractive Tone key.
7 - Enter the sequence (voice mailbox number followed by # and/or
the secret code followed by #)*.
8 - Press the i nteractive Enter key to validate the programming.
65
Page 67

Voicemail function
Access VMbox
To use the programmed key:
Therefore, after calling the mail system, when the voice prompt
asks you to en ter the box n° and or your secret code,
Simply press the programmed key.
-> You are taken directly to the main menu of your voice mailbox.
Note: We strongly recom m end you to pe rso nal is e the ide ntif ier o f
the key in order to av oid t hat a third perso n can consu lt yo ur voice
mailbox without your knowledge.
66
Page 68

Multi-key function
Key
Modify
Superv.
Extens.
Me
Multi-key function
A multi-key programmed se t has onl y one di rectory numbe r, but has person alise d keys to
enable it to process several cal ls at the same time. Therefore, you can answer your parties
as the calls arrive and display the calls on hold.
Note: You have to program one personalised key for each call that you want to make at
the same time. Example: for three simultaneous calls, program the multi-key function on
three keys.
*
Programming the multi-key function
You want to program the multi-key function:
1 - Press the Tools key.
-> The display shows "
2 - Press the
-> The display shows:
OK key.
WHAT DO YOU WANT TO PROGRAM?
3 - Press the i nteractive Key key.
-> The display prompts you to select the desired programmable
key.
4 - Press a programmable key .
PROGRAMMING"
Note: In order to identify a call arriving via that key , we recommend
to use one of the keys of the first page (#1) or of the extension
module, if you have one.
-> The indicator associa ted with that k ey li ght s up , and the d ispla y
shows the programming status of the key.
5 - Press the i nteractive Modify key.
6 - Press the i nteractive Superv. key.
-> The display shows:
WHAT DO YOU WANT TO SUPERVISE?
7 - Press the i nteractive Extens. key.
-> The display suggests to su pervise your p hone or another phone.
8 - Press the i nteractive Me key to supervise your phone.
-> The display shows how many keys are already programmed for
this purpose.
* Depending on the programming performed by the system operator.
67
Page 69

Multi-key function
Add
<-Start
Multi-key1
Multi-key2
Wait
Answer
9 - Press the interactive Add key to validate the n ew programming.
-> The display shows how many keys are already programmed for
this purpose.
10 - Press the interactive <-Start key, and then program the multi-
key function on at least one other programmable key.
Reminder: Use the red key to cancel a setting or return to
standby.
Communicating with the multi-key function
You have programmed the multi-key function on at least two keys.
To answer a call:
When a call arrives on your se t that is mul ti-k ey progra mm ed , the
indicator associated to the personalized key flashes.
• Press that programmed key to talk to the party.
-> The indicator associated to thi s ke y s t ay s pe rma nently on. The
display shows the calling party's identity.
To answer a second call:
If another party tries to reach you, you will hear a beep and the
indicator associated to the second programmed key flashes.
68
1 - Press the interactive Wait key to display the caller’s identity.
2 - Press the interactive Answer key.
You can also press the programmed key whose indicator is
flashing.
While in communication with the second party.
-> The indicator associated w it h tha t key lights up steady, and the
identity of the p arty is disp layed on th e screen w hile the cal l is in
progress.
The other party is put on hold.
-> The indicator associated to this key flashes rapidly.
Page 70

If, after having displayed the identity of the second caller, you do
Divert
Multi-key1
Multi-key2
not want to answer, you can divert the call.
• Press the intera ctive Divert key, then dial the number of the
phone to which you want to divert the call.
-> The indicator associated to that key goes off.
To switch between parties:
You are in communication with one party with another party on
hold.
• Successively press the programm ed key with the r apidly flash ing
indicator to switch from one party to the other.
-> The indicator associated to the key of the p arty you are tal king to
stays permanently on and the display gives his identity.
-> The indicator assoc ia ted t o the ke y of the party on hold flas hes
rapidly.
Note: A multi-key phone is displayed as free as long as there is at
least one position available, i.e. a free programmed key.
Multi-key function
69
Page 71

Multi-line function
Key
Modify
Superv.
Multi-line function
A multi-line phone has several directory numbers*. Each directory number is stored on a
programmable key.
This function is mainly used to program on the same phone:
• a standard number that you give to everyone.
• a private number that you only give to some people; this can also be a backup number.
Example:
For a manager - unfiltered private number
- number filtered by his assistant
For an assistant - private number for his/her own calls
- number intended to receive the manager’s filtered calls.
Note: This function will be programmed by your system operator.
*
Programming the multi-line function
You can program the supervision function for each of the two directory numbers.
1 - Press the Tools key.
-> The disp lay shows "
2 - Press the
-> The disp lay shows:
OK key.
WHAT DO YOU WANT TO PROGRAM?
PROGRAMMING".
3 - Press the interactive Key key.
-> The display prompts you to select the desired programmable
key.
4 - Press a programmable key.
Note: In order to identify a call arrivi ng on that k ey , we recommend
to use one of the keys of the first page (#1) or of the extension
module, if you have one.
-> The indicator associated with that key li ght s up, and the disp lay
shows the programming status of the key.
5 - Press the interactive Modify key.
6 - Press the interactive Superv. key.
-> The disp lay shows:
WHAT DO YOU WANT TO SUPERVISE?
* Depending on the programming performed by the system operator.
70
Page 72

Multi-line function
Extens.
Me
Add
<-Start
Modify
Superv.
Extens.
Me
Add
7 - Press the i nteractive Extens. key.
-> The display suggests to su pervise your p hone or another phone.
8 - Press the i nteractive Me key to supervise your phone.
-> The display shows how m any key s are al read y pro grammed in
supervision mode for this directory number.
9 - Press the interactive Add key to v alidate the new program ming.
-> The programming of the key is confirmed in the display.
10 - Press the interactive <-Start key (to repeat the procedure for
the second directory number).
11 - Press another programmable key.
-> The display shows the programming status of the key.
12 - Press the interactive Modify key.
13 - Press the interactive Superv. key.
14 - Press the interactive Extens. key.
15 - Press the interactive Me key to supervise your phone.
-> The display shows how m any key s are al read y pro grammed in
supervision mode for the first directory number.
16 - Press the interactive Add key to validate the new
programming.
-> The programming of the key is confirmed in the display.
Reminder: Use the red key to cancel a setting or return to
standby.
Caution!
Your system operator has just programmed the multi-line function on your phone.
You can use the featur es a ss ig ned to y our p hon e by as si gni ng them to the directory num-
71
Page 73

Multi-line function
bers that you have, as you require. Each directo ry number can also be programmed in mu lti-key (managing double calls).
A list of 10 personal abbrevia ted numbers is as signed to each directory number. Exa mple:
You have 20 personal abbreviated numbers for two directory numbers.
You have a voice mailbox associated to each directory number. Forwarding is programmed independently and with secret access codes that may be different.
Please note that ce rtain p roc edures d escri bed in this guid e are differe nt w hen y our ph one
is programmed in multi -line mode. An a dditional ope ration is required fo r the programmi ng
of certain features: to select a forwarding line, for instance, you have to press one of the
keys programmed in multi-line mode. In any case, follow the instructions on the display.
72
Page 74

Multi-line function
Multi-line1
Multi-line2
Wait
Divert
Answer
Key 2
Key 1
Communicating with the multi-line function
The multi-line fun ction has bee n stored on at least t wo programm able keys o n your phon e.
To answer a call:
When a call arrives on your phone that is multi-line programmed,
the indicator associated to the personalized key flashes.
• Press the programmed key to talk to the party.
-> The indicator associ ate d to thi s k ey s t ay s pe rma nen tly on. Th e
display shows the calling party's identity.
To answer a second call:
If another par ty trie s to rea ch yo u on th e sec ond li ne, yo u wi ll hea r
a beep and the indicator of a second key flashes.
1 - Press the i nteractive Wait key to display the caller’s identity.
If you do not want to answer,
• press the interactive Divert key,
• then dial the number of the phone to whi ch you want to divert the
call.
2 - Press the i nteractive Answer key.
You can also press the programmed key associated with the
flashing indicator.
While in communication with the se con d party,
-> the indicator associated to that key lights up steady, and the
identity of the party is display on the screen while the call is in
progress.
The other party is put on hold.
-> The indicator associated to this key flashes rapidly.
73
Page 75

Multi-line function
Multi-line1
Multi-line2
To switch between parties:
You are in communication with one party with another party on
hold.
• Successively press the programmed key with the rapid ly flashing
indicator to switch from one party to the other.
-> The indicator associat ed to the key of the p arty you are talking to
stays permanently on and the display gives his identity.
-> The indicator associated to the ke y of the party on hold flashes
rapidly.
74
Page 76

Supervision function
Key
Modify
Superv.
Extens.
Supervision function
When the supervision of a group of phones is programmed on your telephone, you can:
• see the state of supervised phones (free, called, busy),
• quickly pick up calls on these phones,
• call these phones directly.
Note: The supervis ion of an extern al line or network line c an also be prog rammed. In the se
specific cases, we recommend that you consult your system operator.
*
Programming the supervision function
To program the supervision of a phone on a programmable key:
1 - Press the Tools key.
-> The display shows "
2 - Press the
3 - Press the interactive Key key.
-> The display prompts you to select the desired programmable
key.
4 - Press a programmable key.
Note: In order to identify a call arriving on that key, we
recommend to use one of th e keys of th e first p age (#1) or of the
extension module, if you have one.
OK key.
PROGRAMMING".
-> The indicator associated with that key lights up, and the
display shows the programming status of the key.
5 - Press the interactive Modify key.
-> The display shows:
WHAT DO YOU WANT TO PROGRAM?
6 - Press the interactive Superv. key.
-> The display shows:
WHAT DO YOU WANT TO SUPERVISE?
7 - Press the interactive Extens. key.
-> The display suggests to supervise your phone or another
phone.
* Depending on the programming performed by the system operator.
75
Page 77

Supervision function
Other
Enter
Extens. 2
8 - Press the interactive Other key to supervise another phone.
-> The display prompts you to enter the n umber of th e phone that
you want to supervise.
9 - Dial the number of the phone, then press the interacti ve Enter
key.
-> The display prompts you to select the signal which the
supervised phone will output to you.
Communicating with the supervision function
You have programmed the supervision function of a phone on a programmable key.
On your phone, the status of the indicator associated with the programmed key varies
according to the status of the supervised phone.
• When the supervised phone is in standby, the indicator
associated with the key is off.
• When the line of the supervised phone is busy, the indicator
associated with the key is on.
• When a call arrives on the supervised phone, the indicator
associated to the programmed key flashes rapidly and if
programmed, your phone emits an audible signal.
To pick up a call:
The supervised phone is called and you want to pick up the call:
• Press the programmed key then lift the handset to talk to the
party.
-> The indicator associated with the programmed key goes off.
To transfer an inbound call to the supervised phone:
Y ou are in communication with a party and you want to transfer the
call to the supervised phone:
• Press the programmed key and then the i nte rac tiv e Transf. key.
-> The indicator associated to the programmed key lights up.
To call the supervised phone:
You want to call the designated user of the supervised phone:
• Press the programmed key.
-> The indicator associated to the programmed key lights up.
76
Page 78

Folder function
Key
Folder function
The Folder function of a phone allows the user to:
• Always have at one's disposal a conversation circuit with a privileged party,
• Visualize calls coming from that privileged party,
• Call that privileged party by pressing one single key.
Important note:
The two phones – yours and the phone of your privileged party – must be:
• programmed in multi-key mode (supervision of your own phone in order to manage the
non-privileged calls),
• programmed with the folder function (supervision of calls coming from the phone of the
privileged party, and vice versa).
To program the multi-key function:
The procedure for programming this function is described in the chapter "Multi-key function",
Page 67.
Programming the folder function
You want to program the folder function – i.e. the supervision of calls coming from a privileged extension – on a programmable key.
1 - Press the Tools key.
-> The display shows "
2 - Press the
-> The display shows:
OK key.
PROGRAMMING".
WHAT DO YOU WANT TO PROGRAM?
3 - Press the interactive Key key.
-> The display prompts you to select the desired programmable
key.
4 - Press a programmable key.
Note: In order to identify a call arriving on that key, we
recommend to use one of th e keys of th e first p age (#1) or of the
extension module, if you have one.
-> The indicator associated with that key lights up, and the
display shows the programming status of the key.
77
Page 79

Folder function
Modify
Superv.
Extens.
Other
Enter
5 - Press the interactive Modify key.
-> The display shows:
WHAT DO YOU WANT TO PROGRAM?
6 - Press the interactive Superv. key.
-> The display shows:
WHAT DO YOU WANT TO SUPERVISE?
7 - Press the interactive Extens. key.
-> The display suggests to supervise your phone or another
phone.
8 - Press the interactive Other key to supervise another phone.
-> The display shows:
CALLS ON XXXXX COMING FROM:
• If the display does not show this informati on, press Other to call
it up.
9 - Dial the number of the privileged phone, then press the
interactive Enter key.
-> The programming of the key is confirmed in the display.
Note: You have to program one key for each privileged party.
Important: Your privileged party also has to program the
supervision of cal ls coming from your phone in order to be al erted
and to be able to act rapidly.
Communication with your privileged parties
You have programmed t he f older fu nctio n, i.e. superv ision of ca lls comi ng from eithe r on e
ore more privileged parties.
On your phone, the status of the indicator associated with the key programmed for supervision of the privileged party varies according to the status of the phone.
• When the privileged phone is in standby, the indicator
associated with the key is off.
• When a call arrives from the privileged phone, the indicator
associated wit h the key flashe s slowly.
• When the line of the supervised phone is busy
(in communication with yourself), the indicator associated with
the key is on.
78
Page 80

• When the supervised phone is put on hold, the indicator
associated with the key flashes quickly.
To call the privileged phone:
You want to call the privileged party:
Note: You have a privileged access to the programmed phone
at any time, re gardless of w hether you r phone is in sta ndby or in
multi-communication mode (all keys programmed in multi-key
mode are busy).
• Press the programmed key.
-> The indicator associated to the programmed key lights up.
• If you are already in communication, the first party is
automatically put on hold.
-> The indicator associated to this key flashes rapidly.
To answer a call from the privileged phone:
A privileged party calls you:
Note: You have a privileged a ccess to the pr ogramm ed pho ne at
any time, regardless of whether your phone is in standby or in
multi-communication mode (all keys programmed in multi-key
mode are bu sy).
The indicator associated with the programmed key flashes.
• Press the programmed key.
-> The indicator associated to the programmed key lights up.
• If you are already in communication, the first party is
automatically put on hold.
-> The indicator associated to this key flashes rapidly.
Folder function
To transfer an inbound call to the privileged phone:
Y ou a re i n com muni catio n with a ny p ar ty and want to tran sfer th e
call to the privileged phone:
• Press the programmed key and then the interactiv e Transf. key.
-> The indicator associated to the programmed key lights up.
79
Page 81

Folder function
Wait
Answer
Communication with your non-privileged parties
A multi-key programm ed phone has onl y one directory number, but has personalis ed keys
to activate it to process several calls at the same time. Therefore, you can answer your –
non-privileged – parties as the calls arrive and display the calls on hold. You have programmed the multi-key function on at least two keys.
To answer a call:
When a call arrives on your phone that is
the indicator associated with the personalised key flashes.
• Press that programmed key to talk to the party.
-> The indicator associated with the programmed key lights up
steady. The display shows the calling party's identity.
To answer a second call:
If another – non-privileged – party tries to reach you, you will hear a
beep and the indicator of a second key flashes.
1 - Press the interactive Wait key to display the caller’s identity.
2 - Press the interactive Answer key.
You can also press the programmed key whose indicator is
flashing.
-> While in communication with the second party.
The indicator associate d with that key light s up stead y, and the
identity of the part y is displayed on the screen while the c all is in
progress.
-> The other party is put on hold.
The indicator associated to this key flashes rapidly.
multi-key
programmed,
To switch between parties:
You are in communication with one party with another party on
hold.
• Successively press the programmed key with the flashing
-> The indicator associ ated to the key of the part y y ou are talking
-> The indicator associated to the ke y of the party on hold flash es
Note: A multi-key phone is displayed as free for a non-privileged
partner as long as there is at least one position available, i.e. a free
programmed key.
80
indicator to switch from one party to the other.
to stays permanently on and the display gives his identity.
rapidly.
Page 82

Filter function
Key
Modify
Filter
Activ.
Enter
Filter function
This function is used to filter the calls for another person (example: Assistant/Manager).
Two programmable keys must be used on the "Assista nt" phone (filterin g phone) and two
more keys on the "M anager" phone (filtere d phon e), one to a ctivate o r dea ctivat e filte ring,
the other to supervise the calls on the filtered phone.
*
Programming the filter function
1 - Press the Tools key.
-> The display shows "PROGRAMMING".
2 - Press the
-> The display shows:
WHAT DO YOU WANT TO PROGRAM?
3 - Press the interactive Key key.
-> The display prompts you to select the desired programmable
key.
To program the filter function:
4 - Press a programmable key.
-> The display shows the sta tus of the key.
OK key.
5 - Press the interactive Modify key.
6 - Press the interactive Filter key.
-> The display prompts you to declare whether you are fil tering or
filtered.
7 - For filtering, press the interactive Activ. ke y, for instance, at
the left side of the screen.
-> The display prompts you to enter the number of the filtered
phone.
8 - Dial the number of the phone to be filtered.
• In case of an error, press the interactive Erase key.
9 - Press the interactive Enter key to validate the programming.
-> The display confirms the programming status of the key.
* Depending on the programming performed by the system operator.
81
Page 83

Filter function
Modify
Filter
Superv.
Enter
Beep
To program the supervision function:
You now have to program the supervision of the filtered phone.
10 - Press a second programmable key.
Note: In order to identify a call arriving on that key, we
recommend to use one of the ke ys of th e first p age (#1) or of the
extension module, if you have one.
-> The display shows the status of the key.
11 - Press the interactive Modify key.
12 - Press the interactive Filter key.
-> The display shows the message that ap peared already in step
7.
13 - For filtering, press the interacti ve Superv. key , at the l eft side
of the screen.
-> The display prompts you to enter the number of the phone to
be filtered.
14 - Dial the number of the phone, then press the interactive
Enter key.
-> The display prompts you to select the signal which the
supervised phone will output to you.
82
15 - Select the signalling mode (example: beep signal).
Y ou can choose be tween a repeated be eps signal (Re p. Beep), a
ring tone or no signal at all (Mute).
Reminder: Use the red key to cancel or terminate the
programming.
Caution: You have to make the same programming on the
filtered phone, with the following exceptions:
7- Press the interactive Activ. key for being filtered (at the right
side of the screen).
13- Press the interactive Superv. key for being filtered (at the
right side of the screen ).
Page 84

Filter function
Filtering
Superv filtered
Superv filtered
Transf
Superv filtering
Communicating with the filter function
You have programmed the keys for use of the filtering function.
To activate the filter function:
The key programmed with the filter function is used to activate
filtering from the filtered phone or the filtering phone.
• Press the key programmed for filtering.
-> The indicator associated to the programmed key lights up on
the filtered and filtering phones.
-> An audible message and the display indicate that the action
has been validated on the filtered phone.
YOUR ARE FILTERING
To call the filtered phone:
You want to call the designated user of the filtered phone:
• Press the key programmed for supervision.
-> The indicator associated to the programmed key lights up.
To answer the filtered calls:
An inbound call for the filtered phone arrives. The display
indicates that the call was intended for the filtered phone:
• Pick up the handset or press the green key.
To transfer the inbound call to the filtered phone:
You are in communication with a party and you want to transfer
the call to the filtered phone:
• Press the key programmed for supervision and then the
interactive Transf. key (or si mply han g up the h andset or press
the red key .
-> The indicator associated to the programmed key lights up.
Y OU ARE FILTERED
To call the filtering phone:
You want to call the designated user of the filtering phone:
• Press the key programmed for supervision.
-> The indicator associated to the programmed key lights up.
83
Page 85

Filter function
Superv filtering
Filtering
To pick up a call that is meant for you:
A call that was meant for you arrives on the filtering phone. The
indicator associated with the key programmed for filter
supervision on your phone flashes rapidly and if prog ram me d, i t
emits an audible signal*.
• Press the key programmed for supervision to talk to the party.
-> The indicator associated with the programmed key goes off.
To deactivate the filter function:
The key programmed with the filter func tion is used to deac tivate
filtering from the filtered phone or the filtering phone*.
• Press the key programmed for filtering.
-> An audible message and the display indicate that the action
has been validated.
-> The indicator associated to the programmed key goes off on
the filtered and filtering phones.
Note: The deactivation or activation of t he filter function o n one of
the phones (for example the filtered one) is automatically
recorded on the other phone (for example the filtering one).
*
* Depending on the programming performed by the system operator.
84
Page 86

Login/Logout function
Funct.
Subscr.
Enter
Login/Logout function
You are using for the moment an office with a general-purpose phone (not assigned to a
subscriber). The Login fu nction allows you to identify and to rest ore your calls and th e characteristics associated to your subscriber number.
After returning to your o ffice, you will use the s ame proced ure to restore the calls on your own
phone, as well as the phone configuration (forwarding, programmable keys, settings, etc.).
If, however, you w ant your subscripti on to be no longe r asso ciated wi th the tem porary tel ephone when you leave the place, you can perform a Logout on the phone in order to release it. The temporary tel ephone beco mes a general -purpose pho ne again . You can at a
later time restore your subscriber number and the user rights associated with your own
phone by a new identification.
*
Restoring your subscriber rights on a general-purpose phone
1 - Press the interactive Funct. key.
2 - Press the interactive Subsc. key.
3 - Press the interactive Enter key.
Note: this function is only of fered if you are au thorized for it by
the system administrator.
If your phone has no interactive keys, p ress s uc ce ss iv ely th e
*44.
keys
4 - Enter your subscriber number (extension number).
5 - Enter your phone's secret code.
-> The display confirms that the function has been activated.
The calls meant for you now arrive on this phone and you can
access the various features associated to your subscriber
number.
Note: Your phone no longer rings. However, another subscriber
can restore his rights or make emergency calls while you are
absent.
* Depending on the programming performed by the system operator.
85
Page 87

Login/Logout function
Funct.
Subscr.
Enter
Funct.
Subscr.
LOG OFF
Restoring your subscriber rights on your own phone
After returning to your office, you use the same procedure.
1 - Press the interactive Funct. key.
2 - Press the interactive Subscr. key.
3 - Press the interactive Enter key.
4 - Enter your subscriber number (extension number).
5 - Enter your phone's secret code.
-> The display confir ms th at the func tion h as be en ac tivate d, and
the calls that are meant for you will from now on arrive on you r
own phone.
You recover the features associated to your subscriber number.
Note: As a result, the phone you are currently using in your temporary office is no longer
assigned to any subscriber, and automatically becomes a general-purpose phone again.
Release a phone
Before leaving the office, do the following on your temporary phone:
1 - Press the interactive Funct. key.
2 - Press the interactive Subscr. key.
3 - Press the interactive LOG OFF key.
Note: If your phone has no interactive keys, press successively
the keys
-> The display confirms that the function has been deactivated,
Important!
Before leaving a phone, we recommend programming immediate forwarding (for example,
on voicemail) to ensure that your calls are managed while you are absent.
86
#44.
and the phone becomes a general-purpose phone again.
Page 88

Login/Logout function
Funct.
Subscr.
Display
Mask
Showing the identity of the subscriber of a phone
You want the phone to display the number of the subscriber (or user).
1 - Press the interactive Funct. key.
2 - Press the interactive Subscr. key.
3 - Press the interactive Display key.
-> The display shows the name or the number of the subscriber.
Note: to display the other information (for example date
and time), press the interactive Next key.
To mask the identification message:
Y ou do not wan t to d isplay the identi ty of the subsc riber a ny more.
1 - Press the interactive Mask key.
-> The display does not show the subscriber’s identity any more.
87
Page 89

Agenda function
Funct.
Feature
Alarm
More
Activ.
HHMM
Erase
Enter
Mute
Agenda function
This function is use d to prog ram on y our pho ne or m ore appo intme nts. Your phone will remind you of your appointment at the desired time.
Programming the agenda function
1 - Press the interactive Funct. key.
-> The display shows "
2 - Press the interactive Feature key.
3 - Press the interactive Alarm key.
-> If no appointment is programmed, the display shows
APPOINTMENT NOT ACTIVATED", and appointment
"
no. 1 is suggested.
• T o choo se a different order numb er (between 1 and 4), press the
interactive More key.
4 - Press the interactive Activ. key
-> The display prompts you to enter the hour of the appointment.
5 - Enter the time of the appointment, between 0000 and 2359
(for example, 1830 correspon ds to 06:3 0 p.m.).
• In case of an error, press the interactive Erase key.
6 - Press the interactive Enter key to finish.
-> The display indicates that the action has been validated.
CHOOSE A SERVICE".
Appointment reminder:
88
Reminder: Use the red key to cancel or terminate the
programming.
At the time of the appointment, your phone rings and indicates
Appointment reminder".
"
• To stop the appointment reminder ring tone, press the
interactive Mute key.
Page 90

Agenda function
Funct.
Feature
Alarm
More
Modify
HHMM
Enter
Cancel
Consulting your appointments to modify or cancel one of them
To consult the programmed appointments:
1 - Press successively the interactive keys Funct., Feature,
Alarm.
-> The display shows the status of appointment no. 1.
• Press the interactive More key to display the other
appointments.
To modify an appointment:
When the appointment which you want to modify is displayed:
1 - Press the interactive Modify key.
-> The display prompts you to enter the hour of the appointment.
2 - Enter the new time.
To cancel an appointment:
3 - Press the interactive Enter key to finish.
-> The display indicates that the action has been validated.
When the appointment which you want to cancel is displayed:
1 - Press the interactive Cancel key.
-> The display indicates that the action has been validated.
Reminder: Use the red key to cancel or terminate the
programming.
89
Page 91

"Do not disturb" function
Funct.
Feature
-->
D.N.D
Activ.
Cancel
"Do not disturb" function
You may wish not to be disturbed for a certain time and not receive any calls.
Using the "Do not disturb" function
To activate the function:
Phone in standby mode:
1 - Press the interactive Funct. key.
-> The display prompts you to choose a service.
2 - Press the interactive Feature key.
3 - Press the interactive --> key.
4 - Press the interactive D.N.D key
-> The display asks "
DISTURBED?".
5 - Press the interactive Activ. key to finish.
-> The display shows as a reminder "
TO BE DISTURBED".
-> You no longer receive any calls.
To deactivate the function:
With the phone in standby, the display shows "YOU HAVE
ASKED NOT TO BE DISTURBED
• Press the interactive Cancel key.
-> An audible signal and the display indicate that the action has
been validated.
YOU DO NOT WANT TO BE
*
YOU HAV E ASKED NOT
"
You want to receive calls again.
* Depending on the programming performed by the system operator.
90
Page 92

"Do not disturb" function
Modify
Feature
-->
D.N.D
Overriding the "Do not disturb" function
You are trying to reach a party who has programmed the "Do not disturb" function on his
phone. You can force this forwarding and ring the desired phone.
* 2 9
1 - Press successively the * 2 9 keys before dialling the number
of the desired phone.
*
Programming the "Do not disturb" function on a programmable key
If this function is repetitive, you can store it on a programmable key.
1 - Press the Tools key.
-> The display shows "
2 - Press
-> The display shows
OK.
PROGRAM?
3 - Press a programmable key.
4 - Press the interactive Modify key.
5 - Press the interactive Feature key.
PROGRAMMING".
WHAT DO YOU WANT TO
To activate the function:
* Depending on the programming performed by the system operator.
6 - Press the interactive --> key.
7 - Press the interactive D.N.D key
You want to activate the "Do not disturb" function:
• Press the programmed key.
-> An audible message and the display indicate that the action
has been validated.
The indicator associated to the programmed key lights up.
You no longer receive any calls.
91
Page 93

"Do not disturb" function
To deactivate the function:
You want to deactivate the "Do not disturb" function:
• Press the programmed key.
-> An audible message and the display indicate that the action
has been validated.
The indicator associated with the programmed key goes off.
You want to receive calls again.
92
Page 94

Other functions
Funct.
Replace
<Secret code>
Other functions
Replace function
This function is used to temp orar ily reco ver the fea tures and program ming on y our phone
to use them on another phone.
Caution: You have to personalise your secret code before you activate this function
(See "Activating the phone lock" on page97.)
On the phone used temporarily:
1 - Press the interactive Funct. key.
-> The display prompts you to choose a service.
2 - Press the interactive (-->) Replace key .
-> The display prompts you to dial the extension number whose
features you want to recover.
3 - Enter your extension number.
-> The screen prompts you to enter the secret code.
4 - Enter your phone’s secret code.
You can access the various features associated to your phone
number.
Examples:
• You can change the programming of your call forwarding.
• You can access your personal abbreviated numbers.
• If you want to alert a party from this temporary phone, the
suggested messages are personalised to your identity.
93
Page 95

Other function s
Option
Company
Funct.
Notify
Enter
More
The identity presentation function
You can choose t he ide nti ty wh ic h y ou wan t to be sh ow n to t he party you are calling. You
have the choice between the number of your company, the number of your phone or no
number at all.
After having dialled the outside line access code,
1 - Press the interactive Option key.
-> The display offers three types of identity: Phone - Company None.
2 - Press the interactive key that corresponds to your choice
(example: Company).
-> Your choice is confir med on the screen.
You can now dial the party's number.
Note: The validated choice only applies for the following call.
When no choice is defined, the identity programmed by the
system operator is shown.
*
Notification function
This function (also accessible upon a call, See "Notifying t he party" on pa ge 19.) allows the
transmission of a short message to a contact, provided that the contact is connected to a
digital interface
Phone in standby
1 - Press the interactive Funct. key, then the interactive (-->)
Notify key.
2 - Dial the number of the party you want to alert, then press the
interactive Enter key.
-> The display shows the first of the six predefined messages.
3 - Press successively t he inte ract ive More key t o sele ct a nother
predefined message if you want to.
• Depending on your choice, you have to complete the message
displayed, or enter a free message text on the alphanumeric
keypad.
-> You can now dial the party's number.
* Depending on the programming performed by the system operator.
94
Page 96

Other functions
Erase
Enter
Funct.
Feature
-->
-->
Absent
Activ.
Cancel
• If you need to correct an entry, press the interactive Erase key.
4 - Press the interactive Enter key to confirm the sending of the
message.
-> The sending of the message is confirmed on the screen.
Out-of-office function
You want to leave your office while the call forwarding function is active on your phone.
You can use this functio n to temporarily redirect the forwa rded ca lls so that the callers do
not call in vain.
Phone in standby
1 - Press successively the interactive keys
Funct., Feature, -->, -->*.
2 - Press the interactive Absent key.
-> The display informs you that you can receive other calls than
your own.
3 - Press the interactive Activ. key
-> The display informs you that you can receive only your own
calls.
When you return:
• Press the interactive Cancel key.
-> Your request is confirmed on the screen.
You can receive again other calls than your own.
* Depending on the programming performed by the system operator.
95
Page 97

Other function s
The line protection function during data transmission
You want to send data via your telephone line (using a modem or Minitel on the line) and
therefore do not want to be disturbed by a call (i.e., non-presentation of waiting calls).
You can temporarily ac ti vat e th is fun cti on duri ng a call (See "Other features av ail abl e d uring a call" on page 28.).
To have this functi on cont inuousl y activa ted, we rec ommend that you c onsult y our syst em
operator.
Other specific function s that are not desc ribed in this guid e can be used to suit to y our specific requirements. D o not hesitate t o consult your s ystem operator wh o will advise yo u and
carry out the programming required.
96
Page 98

Locking the phone
<Secret code>
Locking the phone
This function is used, for example, to prohibit in your absence outgoing calls from your
phone and access to the logs (outbound and inbound call log) as well as to your private
directory.
Important: Before locking your phone, you must have personalised the secret code on
your phone (See "Personalising the pho ne’s secret code" on page 101.).
Activating the phone lock
Proceed as follows to activate the lock on your phone:
1 - Press and hold down the red key for 3 seconds.
-> A request for confirmation of the phone lock appears on the
display.
2 - Press
-> The display shows "
Calling an external party from the locked phone
You have locked your phone and want to selectively call an external party without deactivating the lock.
OK.
SET LOCKED".
0
1 - Dial the outside line access code (0 or ).
-> The screen prompts you to enter your secret code.
2 - Enter your phone's secret code.
• If you make a mistake, you must repeat the operation.
-> As soon as the code i s va lidate d, out sid e acces s is autho rized.
You can dial the party's number.
When the called party answers, pick up the handset to talk.
At the end of the call, the phone goes back to the locked state.
97
Page 99

Locking the phone
<Secret code>
Calling an emergency number from the locked phone
The phone is locked, but you can call an emergency number:
• Dial the emergency number.
Note: The phone accepts a number that is part of a list of
emergency numbers (ambulance service, fire department...),
programmed by the system operator.
At the end of the call, the phone goes back to the locked state.
Deactivating the phone lock
In standby, the display indicates that the phone is locked:
You want to cancel the phone lock:
1 - Press and hold down the red key for 3 seconds.
2 - Enter your phone's secret code.
-> As soon as the code is validated, th e display return s to standby.
You can access all the phone's functions again.
98
Note: If it fails, you have to repeat the operation.
You can access all the phone's functions again.
Page 100

Phone settings
Phone settings
Selecting and adjusting the phone ringer
You can choose the tune (16 different tunes) and adjust the volume level (8 levels) of the current ring tone. The calls of parties stored in the private directory of your phone are signalled
by a specific ring tone*. You can choose the melody and phone the volume of that ring tone.
1 - Press the Tools key.
-> The display shows "
2 - Press successively the key until "
3 - Press the
-> The display shows the number of the currently chosen tune.
4 - Press successively the or keys to access the different
ring tone settings.
To select and set the current ring tone:
When the display shows
• Press successively the or keys to choose the current
tune.
Note*: By default, the calls of parties stored in the private
directory are signalled by tune no. 8. We therefore recommend
you to choose a different tune as the standard ring tone.
Each time you p ress a k ey, the corresponding tune is pl ayed, an d
its number appears in the display.
• Press the key.
-> The display shows:
OK key.
PROGRAMMING".
RING" is displayed.
RING MELODY: xx
RING VOLUME: x.
• Successively press the or keys to adjust the volume
level of the current ring. The volume level can be adjusted over
8 levels, including ringer off.
Each time a key is pressed, the ring is played with the new
volume and the display indicates this level.
* Depending on the programming performed by the system operator.
99
 Loading...