

Page 1

Aastra 600 c/d series
Aastra 610d, 612d, 620d, 622d, 630d, 632d, 650c
SIP-DECT® Release 5.0
User Guide
Page 2
Welcome
Thank you for choosing an Aastra product. Our product stands for highest quality standards combined with high-quality design.
The following User's Guide will assist you in using your Aastra DECT telephone and provide answers
to all your most important questions. If you should require further technical support or information
about other Aastra products, please contact the person responsible for your system or get in touch
with your local dealer.
You can also find further information about these devices and other products on
our website http://www.aastra.de
We hope you enjoy using your Aastra DECT telephone
About this User's Guide
Your handset can be operated on different communications systems.
This User’s Guide describes the handset and its functions on the SIP-DECT® system. This system is
made up of base stations (also known as RFPs) and controlled using OpenMobilityManager (OMM).
Communication is carried out according to a Session Initiation Protocol (SIP) and provides call control on the Internet.
or http://www.aastra.com .
With the introduction of the system software 2.0 your communication system now features
applications for text messaging and alarm signalling. Please note that the device menu can be
expanded with the menu item Text messages. The relevant descriptions can be found in the
separate Operating Instructions (SIP-DECT® / Message and Alerting Applications), available on
the Aastra website.
As always, your handset is able to control additional external applications, which are also described in a separate User’s Guide. Contact your System Administrator to find out more about these
features.
This User's Guide is valid for:
SIP-DECT® systems, Rel. 4.0
Aastra 610d, 620d, 630d, Rel. 5.0
Aastra 612d, 622d, 632d, 650c Rel. 5.0
Page 3

Contents
General information..................................................................................................................1
Prescribed use / Declaration of Conformity …………………………………………………3
Notes on safety …………………………………………………………………………3
Note for wearers of hearing aids …………………………………………………………4
Communications Regulation Information for Aastra 610d, 612d, 620d, 622d, 630d, 632d ……4
FCC Notices (U.S. Only) …………………………………………………………………4
Health and Safety Information …………………………………………………………4
Industry Canada (Canada only) …………………………………………………………5
Installation ...............................................................................................................................6
Inserting the standard battery ……………………………………………………………6
Inserting the power battery ………………………………………………………………6
Installing/removing a mounting bracket or rotary clip ………………………………………7
Attaching the carrying strap ………………………………………………………………7
Headset connection/Bluetooth® …………………………………………………………8
Aastra 630d/632d - Headset: To remove the sealing cover ………………………………8
USB and external charging connection ……………………………………………………9
Aastra 630d/632d - USB connector: To remove the sealing cover …………………………9
Connecting the charging unit ……………………………………………………………9
Power supply / Power supply unit ………………………………………………………10
microSD card ……………………………………………………………………………10
Important information about the battery …………………………………………………10
Precautions during use ………………………………………………………………11
Commissioning .......................................................................................................................12
Charging and durations …………………………………………………………………12
Battery: Charging states …………………………………………………………………13
Battery warning ………………………………………………………………………13
Registering your handset (log-in)…………………………………………………………13
Registration …………………………………………………………………………14
Subscription …………………………………………………………………………14
Function overview...................................................................................................................15
Displays, softkeys, LEDs and key functions ………………………………………………15
Key assignment (on delivery) …………………………………………………………15
Display arrangement …………………………………………………………………16
Display ………………………………………………………………………………16
Softkey line and idle display……………………………………………………………17
LED …………………………………………………………………………………18
Key functions …………………………………………………………………………19
Navigating in menus ...............................................................................................................22
Example: Setting the language …………………………………………………………22
Example: Personal phone book/Editor ……………………………………………………22
Editors …………………………………………………………………………………24
i
Page 4

Contents
Basic functions ........................................................................................................................25
Switching the handset on/off ……………………………………………………………25
Key lock / Phone lock ……………………………………………………………………25
Switching hands-free operation on/off ……………………………………………………25
Acknowledging an appointment/alarm clock ……………………………………………26
Adjusting the volume of the earpiece during the call ……………………………………26
Switching the ringer on/off ………………………………………………………………26
Switching ringer off at call ………………………………………………………………27
Illumination / display dimming …………………………………………………………27
Activating the display illumination ………………………………………………………27
Changing the brightness/contrast of the display …………………………………………27
Muting the handset ……………………………………………………………………27
Automatic hide / Info window ……………………………………………………………28
Event window and "Info"- Menu …………………………………………………………28
Vibra call (not Aastra 610d, 612d)…………………………………………………………28
Configuring your personal directory ………………………………………………………28
Signalling the alarm clock or an appointment ……………………………………………29
Aastra 600 PC Tool / Phone Book (not Aastra 610d, 612d) …………………………………29
Using abbreviated dialling (Quick call) ……………………………………………………29
Caller list, redial list (local list / system list) ………………………………………………29
Using the Bluetooth® headset (not Aastra 610d, 612d) ……………………………………31
Registration …………………………………………………………………………31
Deregister / rename …………………………………………………………………32
Telephoning via the Bluetooth headset…………………………………………………32
Special key (Hotkey) /VIP list (not Aastra 610d, 612d) ……………………………………33
VIP list (Aastra 610d, 612d) ………………………………………………………………33
Profiles …………………………………………………………………………………33
Adapting to your environment …………………………………………………………34
Special functions ………………………………………………………………………35
Emergency call key (SOS)………………………………………………………………35
Alarm Sensor (Aastra 630d / 632d only)…………………………………………………35
Alarm time settings……………………………………………………………………36
Settings for other alarm parameters ……………………………………………………37
Several alarm types activated simultaneously …………………………………………38
Logged in / Logged out …………………………………………………………………38
Telephoning............................................................................................................................39
Answering a call …………………………………………………………………………39
Making internal / external calls …………………………………………………………40
Calling from the Redial list (local / system) ………………………………………………41
Calling from your Personal phone book (Personal directory) ………………………………41
Calling from the System phone book (Central directory) ……………………………………41
Calling from the local caller list …………………………………………………………42
Calling from the system’s caller list ………………………………………………………43
Ending calls ……………………………………………………………………………43
ii
Page 5

Contents
Options during a call ……………………………………………………………………43
Answering the phone during a call (Call waiting) ………………………………………43
Enquiry / Forwarding calls / Conference ………………………………………………45
Forwarding calls without notification …………………………………………………46
Devices menu ..........................................................................................................................48
Notes on the display symbols in the menu………………………………………………48
Menu structure …………………………………………………………………………48
Overview ………………………………………………………………………………48
Info …………………………………………………………………………………48
Applications …………………………………………………………………………49
Active features ………………………………………………………………………49
Text messages ………………………………………………………………………49
Directories …………………………………………………………………………49
Time/Alarms ………………………………………………………………………49
Audio ………………………………………………………………………………49
Data management / SD Card (Aastra 622d, 632d, 650c only) ……………………………49
Call filter ……………………………………………………………………………49
Call diversion …………………………………………………………………………49
System ………………………………………………………………………………50
System menu …………………………………………………………………………50
Settings ……………………………………………………………………………50
Protection functions …………………………………………………………………50
Profiles ………………………………………………………………………………50
Feature access codes …………………………………………………………………50
"Info" menu …………………………………………………………………………50
"Applications" menu ……………………………………………………………………52
"Active features" menu …………………………………………………………………52
"Text messages" menu …………………………………………………………………52
“Directories” menu ……………………………………………………………………52
"Time/Alarms" menu …………………………………………………………………54
"Audio" menu …………………………………………………………………………56
“Data management / SD Card” menu ……………………………………………………60
"Call filter" menu ………………………………………………………………………60
"Call diversion" menu …………………………………………………………………61
"System" menu …………………………………………………………………………62
"System Menu" menu …………………………………………………………………63
"Settings" menu ………………………………………………………………………63
"Security" menu …………………………………………………………………………67
"Profiles" menu ………………………………………………………………………72
"Feature access codes" menu ……………………………………………………………73
Additional menus for special applications …………………………………………………73
Key programming ...................................................................................................................73
Programming (general) …………………………………………………………………74
iii
Page 6

Contents
Appendix.................................................................................................................................77
Care and Maintenance …………………………………………………………………77
Environmental Characteristics and Disposal ………………………………………………77
Instructions for disposal ………………………………………………………………77
Declaration of Conformity ………………………………………………………………78
Limited Warranty (applicable for sales in USA, Canada) ……………………………………79
Exclusions ……………………………………………………………………………79
Warranty Repair Services ………………………………………………………………79
After Warranty Service…………………………………………………………………80
Limited Warranty (Australia Only) ………………………………………………………80
Exclusions ……………………………………………………………………………80
Warranty Repair Services ………………………………………………………………81
After Warranty Service…………………………………………………………………82
Accessories ……………………………………………………………………………83
Technical specifications …………………………………………………………………85
Menu Structure for all Handsets …………………………………………………………87
“Standard“ setting ………………………………………………………………………87
Menu Structure for Aastra 612d, 622d, 632d, 650c …………………………………………91
“Easy” setting……………………………………………………………………………91
Menu Structure for Aastra 622d, 632d, 650c ………………………………………………95
“Icon” and “Icon R“ setting ………………………………………………………………95
Index……………………………………………………………………………………99
iv
Page 7
General information
General information
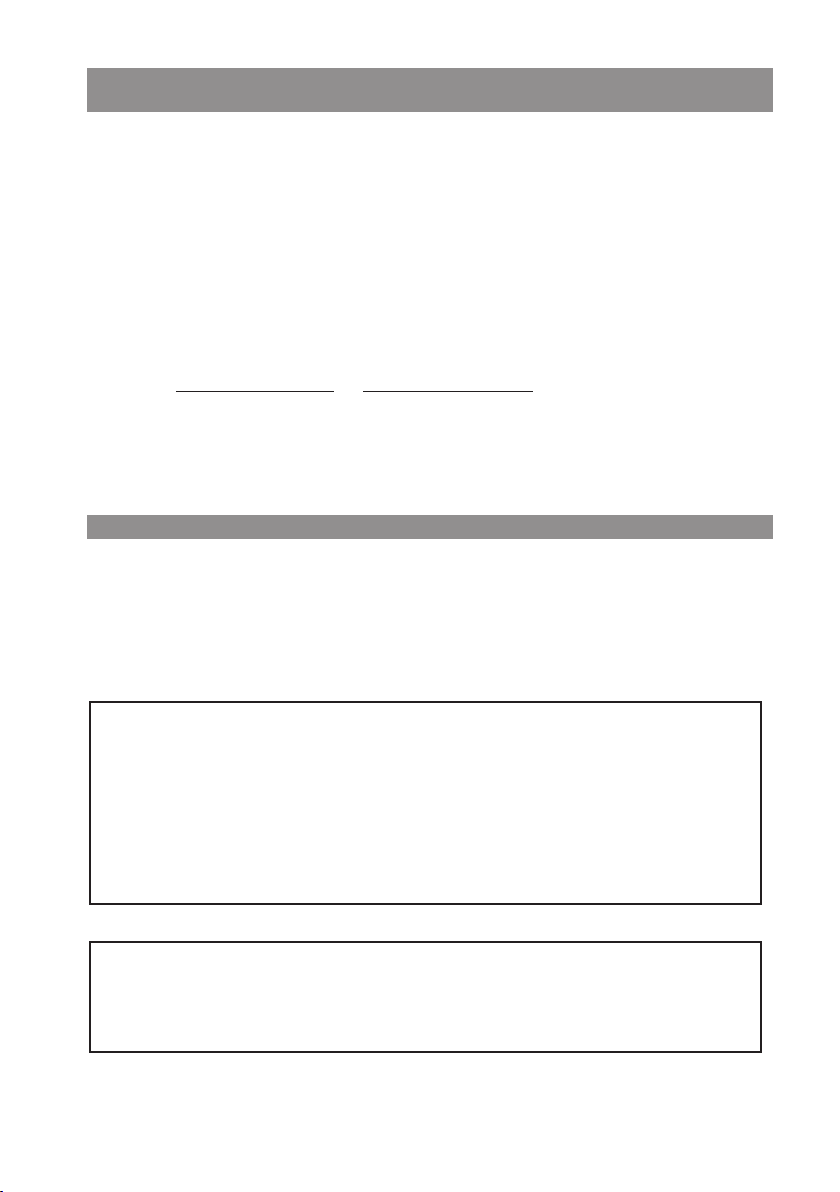
Aastra 610d, 612d
- Aastra 610d : LC-display (2“, 176 x 160 dots, monochrom)
- Aastra 612d: TFT-Colour display (2“, 176 x 220 dots, 65536 colours)
- 3 softkeys (2 of which are programmable) / 2 sidekeys (+/-)
- Caller list for 30 entries
- Redial list for 20 entries
- Local phone book for 200 entries
- Connection socket for headset
- Safety class IP 50
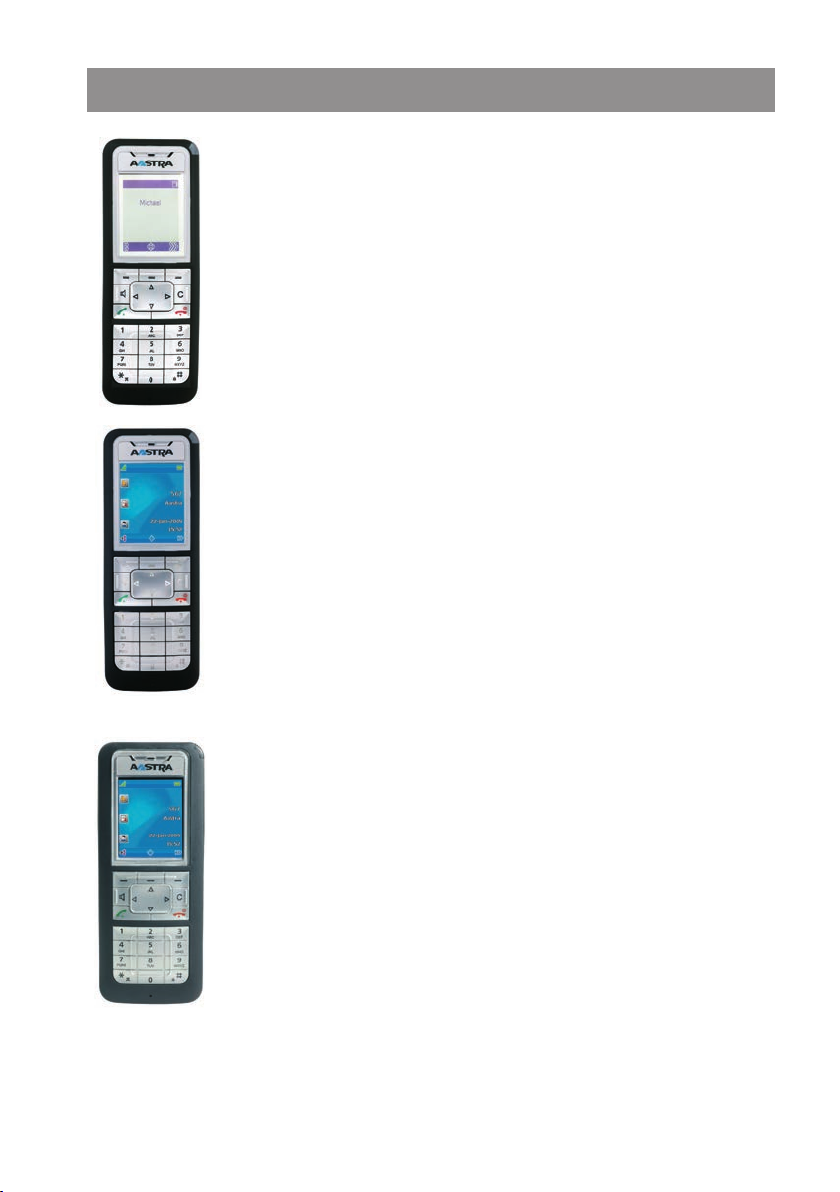
Aastra 620d, 622d
- TFT-Colour display (2“, 176 x 220 dots, 65536 colours)
- 1 hotkey / 3 sidekeys (programmable)
- 3 softkeys (2 of which are programmable)
- 2 programmable navigation keys
- Caller list for 50 entries
- Redial list for 30 entries
- Local phone book for 200 entries
- Headset connection via cable or
- Mini USB connection
- microSD-Card Interface
- Safety class IP 50
Bluetooth
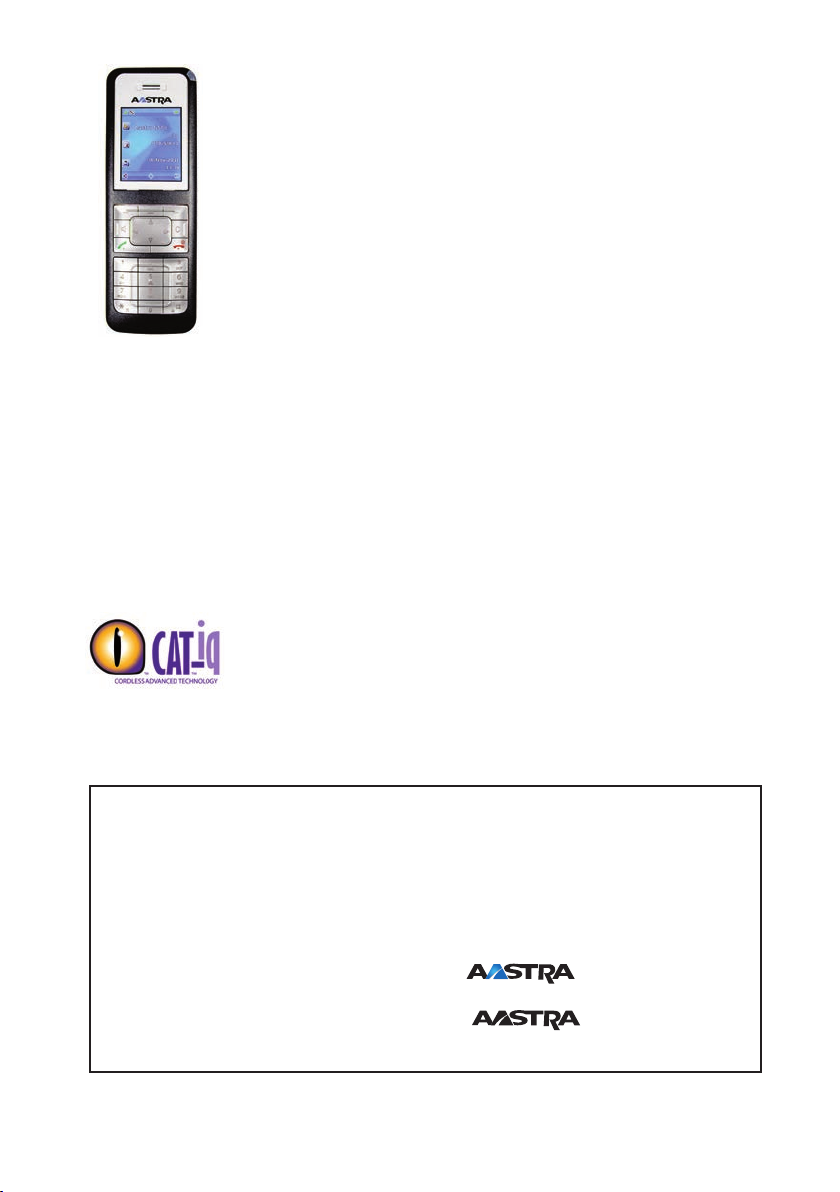
Aastra 630d, 632d
- TFT-Colour display (2“, 176 x 220 dots, 65536 colours)
- 1 hotkey / 3 sidekeys (programmable)
- 3 softkeys (2 of which are programmable)
- 2 programmable navigation keys
- 1 emergency call key (SOS)
- Caller list for 50 entries
- Redial list for 30 entries
- Local phone book for 200 entries
- Sensor for "Mandown", no-movement alarm, escape alarm
- Headset connection via cable or
- Mini USB connection
- microSD-Card Interface
- Safety class IP 65 (dust and water spray protected)
Bluetooth
1
Page 8
General information
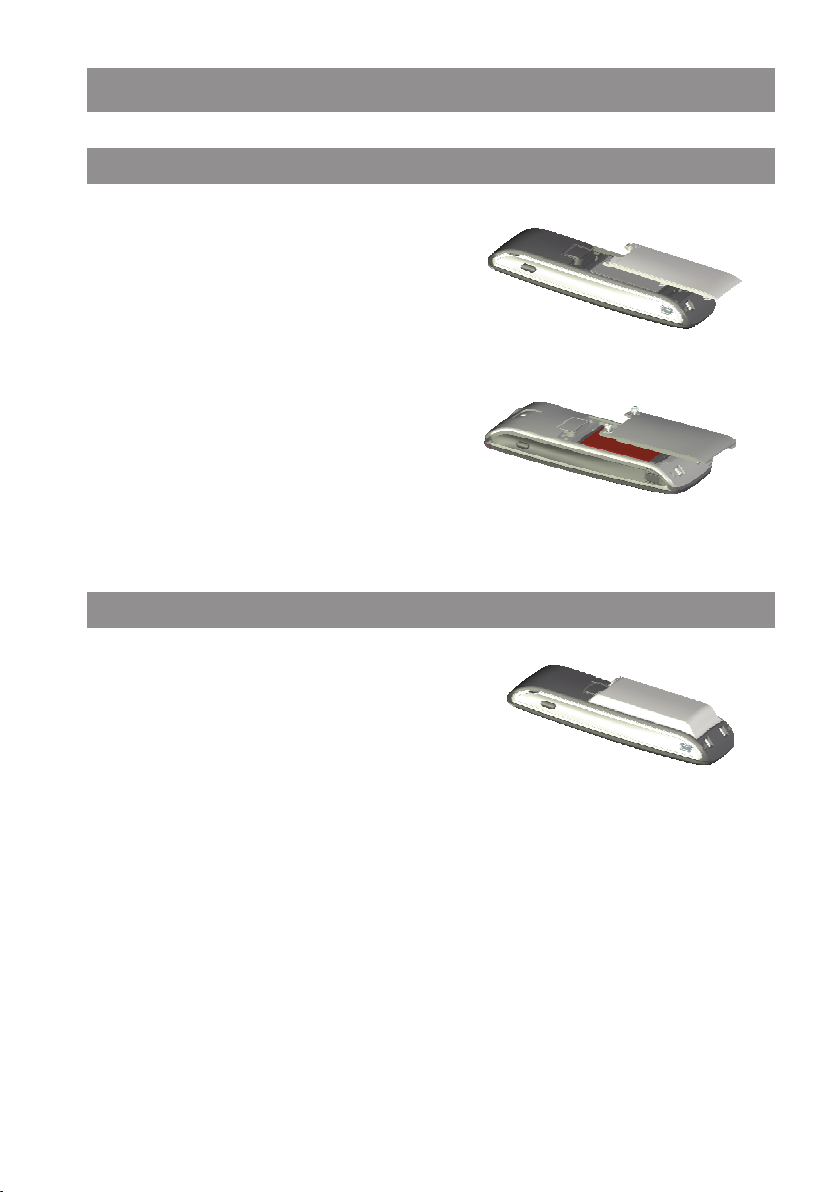
Aastra 650c
- TFT-Colour display (2“, 176 x 220 dots, 65536 colours)
- 1 hotkey / 3 sidekeys (programmable)
- 3 softkeys (of which 2 are programmable)
- 2 programmable navigation keys
- Caller list for 50 entries
- Redial list for 30 entries
- Local phone book for 200 entries
- Headset connection via cable or Bluetooth
- Mini USB connection
- microSD card interface
- Safety class IP 50
- Supports CAT-iq broadband audio
The Aastra 650c telephone supports the new CAT-iq DECT standard. CAT-iq stands for “Cordless
Advanced Technology – internet and quality”, and allows high-quality broadband telephony (compatible with Aastra Hi-Q audio). Significantly larger data rates can be transmitted with CAT-iq thanks
to the G.722 audio codec, which ensures the high audio quality. In order to benefit from this, your
telephone system and DECT transmitter (RFP) – plus the telephone of your call partner – must also
support this codec. The voice connection must be made as before via Internet (IP). The new standard
is supported by Aastra SIP-DECT® systems (as of Release 3.0) and through the use of the latest DECT
transmitters (e.g. RFP 35, 37 and 43) throughout the system.
In contrast to conventional telephones that can also support broadband
telephony, CAT-iq offers the security of being certified by an independent
laboratory. This ensures that all other important components (e.g. loudspeaker, microphone and amplifier) support this improved audio standard in
addition to the codec.
Differences between Aastra 6x0d and 6x2d
Devices of the Aastra 6x2d series (612d, 622d, 632d) are identical in design to those of the older
6x0d series (610d, 620d, 630d). However, 6x2d devices are equipped with state-of-the-art technology; they are quicker at accessing data and have a greater storage capacity for other, future
applications.
Difference in appearance:
Aastra 6x0d have a blue “A” in the Aastra device logo
Aastra 6x2d have a black “A” in the Aastra device logo
2
Page 9

General information
Prescribed use / Declaration of Conformity
This product can be used in all EU member states on a DECT-GAP-compatible communication system. The telephone complies with the radio-specific European harmonised standards for DECT. The
CE mark on the product confirms its conformance with the technical directives for user safety and
electromagnetic compatibility, the relevant declaration of conformity according to European Directive 99/5/EC applies at the date of issue.
The declaration of conformity can be viewed on the Aastra homepage on the Internet.
All devices (except Aastra 650c) are also approved for use in North America (USA and Canada). For
more information on this, read the safety information on page 4.
Please also use the other documentation that was supplied with the parts of your telephone system.
Notes on safety
It is imperative to observe the following instructions when setting up, connecting and using the
telephone.
• Always switch off your handset before removing the battery. Otherwise your settings (e.g.
personal directory) may be deleted.
• Place the charger cradle on a non-slip surface.
• Lay the connection cable so it cannot cause accidents!
• Important instructions for using the battery are given on page 10.
• Do not place the handset or the charger cradle
• close to heat sources
• in direct sunlight
• next to other electrical devices
• Protect your telephone from moisture, dust, aggressive liquids and gases.
• Only use approved accessories.
• Only use the enclosed plug-in power supply unit (23-00-1061-00) on Aastra 610d, 620d and 630d
devices (the plug-in power supply unit 23-00-1089 can be used as a spare part). Only the plug-in
power supply unit 23-00-1089-00 may be used on the Aastra 612d, 622d, 632d and 650c.
• Only use the standard batteries 23-001059-00 or 23-001080-00 or as accessories the power batteries 23-001060-00 or 23-001081-00.
• Always switch off the handset before removing the battery
• Never
• open the charger cradle or the handset (except for the battery compartment cover) yourself!
• touch the plug contacts with pointed metallic objects!
• carry the charger cradle by the connection cable!
• Only clean your telephone with a slightly moist cloth.
• Do not use your telephone in explosive areas.
• Do not use the Aastra 610d, 612d, 620d, 622d and 650c in wet rooms (e.g. bathrooms).
3
Page 10

General information
• Do not hold the handset up to your ear in handsfree mode or when the ringer is ringing as the
volume can be very loud.
• This product’s earcap region (at the front) and the loudspeaker region (at the rear) is slightly magnetic and may pick up metallic objects, such as staples or pins. Please check both regions for
metallic objects before use.
Note for wearers of hearing aids
Before using the handset, users of hearing aids should note that radio signals can affect hearing aids
and, if powerful enough, can cause an unpleasant buzzing sound.
Communications Regulation Information for
Aastra 610d, 612d, 620d, 622d, 630d, 632d
FCC Notices (U.S. Only)
This device complies with part 15 of the FCC Rules. Operation is subject to the following two conditions:
(1) This device may not cause harmful interference, and (2) this device must accept any interference
received, including interference that may cause undesired operation.
Modifications not expressly approved by this company could void the user's authority to operate the
equipment.
NOTE: This equipment has been tested and found to comply with the limits for a Class B digital
device, pursuant to Part 15 of the FCC Rules. These limits are designed to provide reasonable protection against harmful interference in a residential installation. This equipment generates, uses and
can radiate radio frequency energy and, if not installed and used in accordance with the instructions,
may cause harmful interference to radio communications. However, there is no guarantee that interference will not occur in a particular installation. If this equipment does cause harmful interference
to radio or television reception, which can be determined by turning the equipment off and on, the
user is encouraged to try to correct the interference by one or more of the following measures:
• Reorient or relocate the receiving antenna.
• Increase the separation between the equipment and receiver.
• Connect the equipment into an outlet on a circuit different from that to which the receiver is connected.
• Consult the dealer or an experienced radio/TV technician for help.
Health and Safety Information
Exposure to Radio Frequency (RF) Signals:
The wireless phone is a radio transmitter and receiver. It is designed and manufactured not to
exceed the emission limits for exposure to radio frequency (RF) energy set by the Federal Communi-
4
Page 11

General information
cations Commission (FCC) of the U.S. Government. These limits are part of comprehensive guidelines
and establish permitted levels of RF energy for the general population. The guidelines are based on
the safety standards previously set by both U.S. and international standards bodies. These standards
include a substantial safety margin designed to assure the safety of all persons, regardless of age
and health.
This device and its antenna must not be co-located or operating in conjunction with any other
antenna or transmitter.
This EUT has been shown to be capable of compliance for localized specific absorption rate (SAR) for
uncontrolled environment/general population exposure limits specified in ANSI/IEEE Std. C95.11992 and had been tested in accordance with the measurement procedures specified in FCC/OET
Bulletin 65 Supplement C (2001) and IEEE 1528-2003.
Industry Canada (Canada only)
Operation of this device is subject to the following two conditions: (1) this device may not cause
interference, and (2) this device must accept any interference, including interference that may cause
undesired operation of the device.
Privacy of communications may not be ensured when using this telephone.
Exposure to Radio Frequency (RF) Signals:
The wireless phone is a radio transmitter and receiver. It is designed and manufactured not to
exceed the emission limit for exposure to radio frequency (RF) energy set by the Ministry of Health
(Canada), Safety Code 6. These limits are part of comprehensive guidelines and established permitted levels of RF energy for the general population. These guidelines are based on the safety standards previously set by international standard bodies. These standards include a substantial safety
margin designed to assure the safety of all persons, regardless of age and health.
This device and its antenna must not be co-located or operating in conjunction with any other
antenna or transmitter.
This device has been shown to be capable of compliance for localized specific absorption rate (SAR)
for uncontrolled environment / general public exposure limits specific in ANSI/IEEE C95.1-1992 and
had been tested in accordance with the measurement procedures specified in IEEE 1528-2003.
5
Page 12
Installation
Installation
Inserting the standard battery
Aastra 610d, 612d, 620d, 622d, 650c
Push the battery cover downwards until it disengages
from the locking mechanism and lift off. Insert the battery with the contacts downwards. Replace the battery
cover and push upwards until it snaps into place.
Aastra 630d, 632d
Undo the two screws on the back of the handset with a
suitable tool and remove the cover. Insert the battery
with the contacts downwards, close the battery compartment with the cover (insert underneath, press
down from above) and screw back in place. Do not
damage the rubber seal when assembling.
Inserting the power battery
You can order a battery with higher capacity
(power battery) for the Aastra 620d, 622d, 630d ,
632d and 650c as an accessory (see page 83).
This battery has a thicker design so you need another
battery cover that protrudes approx. 6 mm beyond the
rear of the device.
Install the new battery cover as described above.
Please remove any installed fixing bracket before inserting the power battery and securing the battery cover.
6
Page 13
Installation
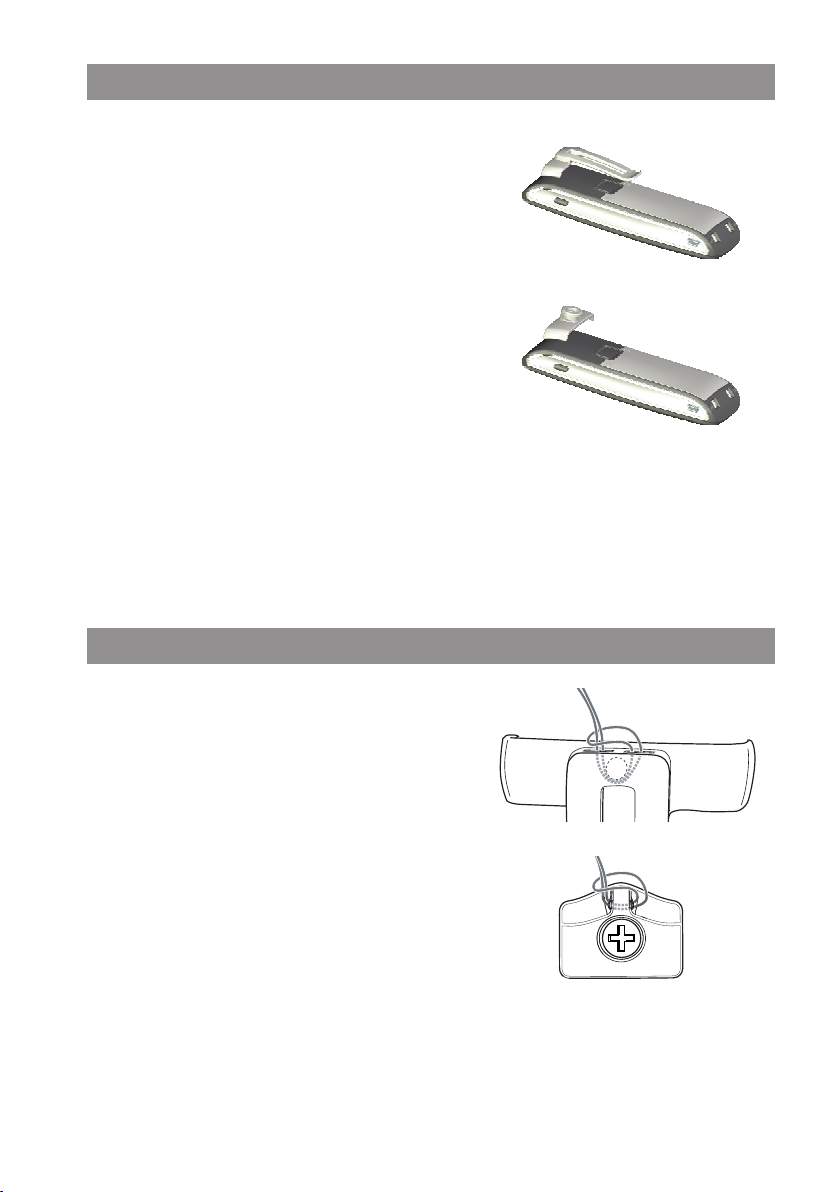
Installing/removing a mounting bracket or rotary clip
Aastra 610d, 612d, 620d, 622d, 650c
Place the supplied fixing bracket on both openings at
the upper end of the handset and snap in place by
pressing downwards. To remove the fixing bracket,
press into the small cutouts at the edge of the bracket
and pull the two sides slightly apart.
All devices can also be fitted with a rotary
clip as an accessory.
Aastra 610d, 612d, 620d, 622d, 650c
Place the supplied fixing bracket on both openings at
the upper end of the handset and snap in place by
pressing downwards. The clip is then pushed onto the
protruding button. To release the handset from the
clip, press the top button.
Aastra 630d, 632d
You have to remove the fixing bracket and replace it
with the supplied rotary swivel.
Attaching the carrying strap
Aastra 610d, 612d, 620d,622d, 650c : There are two
openings in the upper part of the fixing bracket. Feed
the lower end of the carrying strap through these openings (please install with the fixing bracket removed).
Carrying straps are available as accessories (see page
83).
Aastra 630d, 632d: A carrying strap with carrying
strap attachment is available as an accessory. To attach
the holder, replace the screwed-on belt clip by the carrying strap attachment.
7
Page 14

Installation
Headset connection/
All handsets have a 2.5 mm jack plug at the bottom left for connecting a headset. Only use the
recommended headsets (see Accessories page 83).
The Aastra 620d/622d/630d/632d/650c mobile handsets have a
ponding headsets. With a headset only audio data can be transferred via the
Safety information
Headsets (earphones and headphones) can produce very loud and high-pitched feedback. Exposure
to such feedback can damage hearing. Before using a headset, set the volume as low as possible. For
wired headsets, you can adjust the settings in the menu ❯❯❯
the case of Bluetooth headsets, adjust the setting on the device (please consult the User’s Guide for
the device). If you are making a call with the headset, adjust the volume slowly if necessary.
Aastra 630d/632d - Headset: To remove the sealing cover
The opening of the headset connection is closed with a captive cover. If the headset is not in use,
please close the opening so the device can be used in accordance with its protection class.
Remove the sealing cover from the device by pulling it out on the upper edge. Never pull it out on
the bottom edge.
Bluetooth
®
Bluetooth
Audio > Volume > Headset (wire). In
interface (2.0) for corres-
Bluetooth
interface.
8
Page 15
Installation
USB and external charging connection
Not Aastra 610d, 612d: A mini USB connection (2.0) is located at the bottom right. This has two
functions:
• as an interface for connecting to a PC to load data from or to the device, for example. If the handset is connected to a PC, the battery is charged at the same time. The charging process is, however, slower than if the handset is charged in the charging unit.
• as a connection socket for a USB charging device (see Accessories, page 83) to charge the handset
even when it is in a leather pouch. The charging process is also slower here than charging in the
charger cradle.
Only use a shielded USB cable of the type “USB 2.0 A on USB Mini B”.
Aastra 630d/632d - USB connector: To remove the sealing cover
The opening of the USB connection in the Aastra 630d is closed with a captive cover. If the USB cable
is not in use, please close the opening so the device can be used in accordance with its protection
class.
Remove the sealing cover from the device by pulling it out on the upper edge. Never pull it out on
the bottom edge.
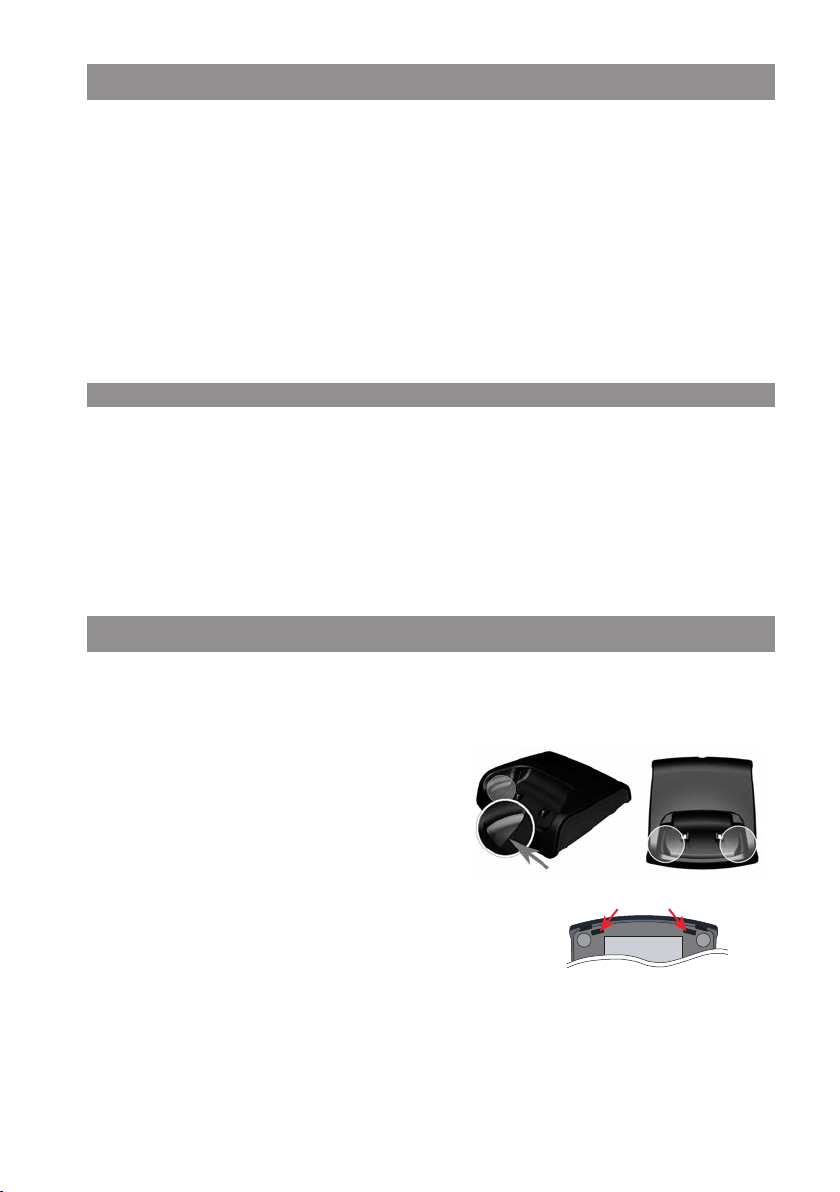
Connecting the charging unit
Aastra 610d, 612d, 620d, 622d, 650c: This handset can be used without any changes to the charger cradle.
Aastra 630d, 632d: To use this handset, you must
remove the two lateral guides in the charger cradle.
They are easy to lift on the inside edge using a fingernail or a paper clip.
The plastic guides can also be removed, by pushing a suitable
screwdriver into the slits on the bottom of the charger.
Connect the plug-in power supply to the charger cradle and place the connection cable through the
cable guide. Place the charger cradle on a non-slip surface. Change the plug of the power supply
unit if necessary (see below).
9
Page 16

Installation
Power supply / Power supply unit
The power supply unit is designed for 100V to 240V AC (50-60 Hz). It is supplied with four change
adapters enabling virtually worldwide use. Where necessary, connect the plug normally used in your
country to the power supply unit. There are two versions of the plug-in power supply unit that are
connected slightly differently:
Version 1: Press the pushbutton switch on the power supply unit and push out the existing plug
upwards. Insert the new plug from above into the power supply unit.
Version 2: Remove any existing plug by pressing OPEN. Then insert the required new plug into the
power supply unit at a slight angle with the label TOP upwards. Press downwards until it snaps into
place.
microSD card
Aastra 620d, 630d (as of device software 4.0) and Aastra 622d, 632d, 650c: Inside your handset
underneath the battery there is space for accommodating an optional microSD card. This special
microSD card stores the handset’s logon data on your communication system, all the main local
device data and the personal directory.
This ensures that, if the device is defective, it is possible to take out the card and use it on a replacement device so operations can be maintained in the shortest possible time and without having to
log on again.
Commercially available microSD cards cannot be used.
Please take note of the User’s Guide supplied with the card and the more detailed descriptions available on the website at http://www.aastra.de or http://www.aastra.com .
Important information about the battery
The devices are powered by a Li-ion battery (both standard and power battery).
It is vital that you read the safety regulations before using the battery for the first time. Keep these
safety regulations and all instructions for use at hand for future reference.
• Dispose of used batteries according to the instructions on page 77.
Failure to heed any of the following precautions when using the battery can lead to overheating, fire
and danger of explosion.
• CAUTION: Risk of explosion if the battery is replaced by an incorrect type.
• Never try to use the battery for the power supply of any device other than these handsets.
• Never use or leave the battery close to a naked flame.
• Never put the battery into a microwave oven, do not throw it into a fire and do not expose it to
high temperatures by any other means.
10
Page 17

Installation
• Never carry or store the battery together with electrically conducting objects (neck chains, pencil
leads, etc.)
• Never attempt to open the battery, never modify it in any way or subject it to severe blows.
• Never immerse the battery in fresh or salt water.
• Never use or leave the battery in direct sunlight, in a vehicle parked in blazing sunlight or in any
other location with high temperatures.
• If you ever notice liquid leaking out, unusual odour, build-up of heat, discolouration, deformation
or any other abnormal condition when you use, charge or store the battery, remove the battery
immediately from the handset and keep it away from naked flames.
• The battery fluid can damage your sight. If at any time battery fluid accidentally gets into your
eyes, rinse your eyes immediately with clean tap water and contact a doctor.
• If the battery is to be used by children, make sure a responsible adult instructs the children in the
precautions and proper handling, and make sure the children handle the battery correctly.
• If battery fluid accidentally gets onto your clothing or skin, rinse the affected place immediately
with pure tap water. Prolonged contact with battery fluid can lead to skin inflammation.
Precautions during use
• The battery is designed for use with these handsets only.
• Only use the charger cradle supplied for charging.
• A new battery is not charged so you need to charge it before using for the first time.
• Using the battery in a cold environment can shorten the expected operating life of a full charge.
Charge the battery at a location with a temperature between 10° C and 35° C. Charging outside
this temperature range can lead to a longer-than-usual charging time or even to failure of the
charging process.
• An extremely short operating time after a full charge indicates that the lifetime of the battery has
expired. Replace the battery.
• Never wipe the battery with thinners, benzene, alcohol, or other volatile substances, or chemically
treated cloths. These can cause deformation of the battery and malfunction.
• If you need to send your handset with an installed li-ion battery or li-ion batteries separately,
make sure you comply with the applicable laws and regulations with regard to the shipment of
hazardous goods.
11
Page 18

Commissioning
Commissioning
Make sure you charge up the battery before you use your handset for the first time as it ships out
with only a low charge level. To do so, place the handset (switched on or off) in the charger cradle. If
the handset is switched off (e.g. after the battery has been inserted for the first time), it will remain
switched off in the charger cradle, but will still be charging. The LED flashes alternately green and
red to indicate this status. If you switch the handset on (see page 25) the handset’s current charge
level is indicated on the display (see page 13).
It takes three to five charge and discharge cycles for the battery to achieve maximum performance.
So make sure you place the handset in the charger cradle regularly to achieve the optimum battery
charge.
Charging and durations
Charging time in the charger cradle (empty battery):
Full capacity: 2,5 hours (standard battery), 5 hours (power battery).
Charging time with USB charging device:
Full capacity: 5 hours (standard battery), 10 hours (power battery).
Talk time:
Standard battery - up to 15 hours (when fully charged) for North America.
Standard battery - up to 12 hours (when fully charged) for other countries.
Power battery - up to 30 hours (when fully charged) for North America.
Power battery - up to 24 hours (when fully charged) for other countries.
Standby time:
Standard battery - up to 105 hours (when fully charged) for North America.
Standard battery - up to 110 hours (when fully charged) for other countries.
Power battery - up to 190 hours (when fully charged) for North America.
Power battery - up to 200 hours (when fully charged) for other countries.
Note
Poor radio signals (far away from the system base station) reduce the handset standby and talk
times. High loudspeaker or ringer volume, frequent key activation and display illumination as well as
active vibration alarm and
and talk times.
12
Bluetooth
operation are features that can specifically shorten standby
Page 19

Commissioning
Battery: Charging states
The charge status of the battery is indicated on the display. The displays mean:
Batteries are 61 - 100 % charged
Batteries are 31 - 60 % charged
Batteries are 11 - 30 % charged
Batteries are 6 - 10 % charged
Batteries are 0 - 5 % charged
Battery charging
• If the handset is placed in the charger cradle when the battery is completely discharged, there is
no indication until a specific charge status is reached. This process can take a few minutes and is
not a malfunction.
• Even when the handset is switched off, the battery slowly discharges.
• When charging, the LED lights orange; when the battery is fully charged, the LED lights green (can
be deactivated in Menu ❯❯❯
Battery warning
When the battery capacity is almost exhausted, a warning sign appears on the display and a series of
warning beeps sounds (can be deactivated in the Menu ❯❯❯
making a call, you have approximately five minutes' talk time left before the handset switches itself
off.
Settings -> Illumination -> LED indications -> Life indication).
Audio -> Attention tones). If you are
Registering your handset (log-in)
Your handset can be operated on up to 10 different communications systems.
To do so, it must be registered or, more precisely, logged in on each station.
Your system administrator will usually register the handset for operation on the telephone system.
The log-in must be enabled for this. Depending on the manufacturer of the system, the enabling can
vary. In most cases the IPEI of the handset is needed (found in Menu ❯❯❯
register the handset itself on the communication system, proceed as described in the "System"
menu. This requires a PARK number sequence and an access code (AC = Authentication Code) from
the system administrator.
System -> Show IPEI). To
13
Page 20

Commissioning
Registration
A registration is stored in the device for each communications system on which the handset has
been logged in. A registration entry also includes a system name (e.g. A, B, C,..).
If you have logged into the system with your handset, this name appears on the display.
Subscription
After the handset is subscribed in one or more communications systems you can use the telephone
to make and receive calls. If the Auto search feature (see page 62) is activated, the handset (in idle
mode) automatically selects the nearest accessible system and logs in there. If you don’t want to use
the Auto search feature, you can use the stored registration entries to carry out a manual log-in on
any system you want.
14
Page 21
Function overview
Function overview
Displays, softkeys, LEDs and key functions
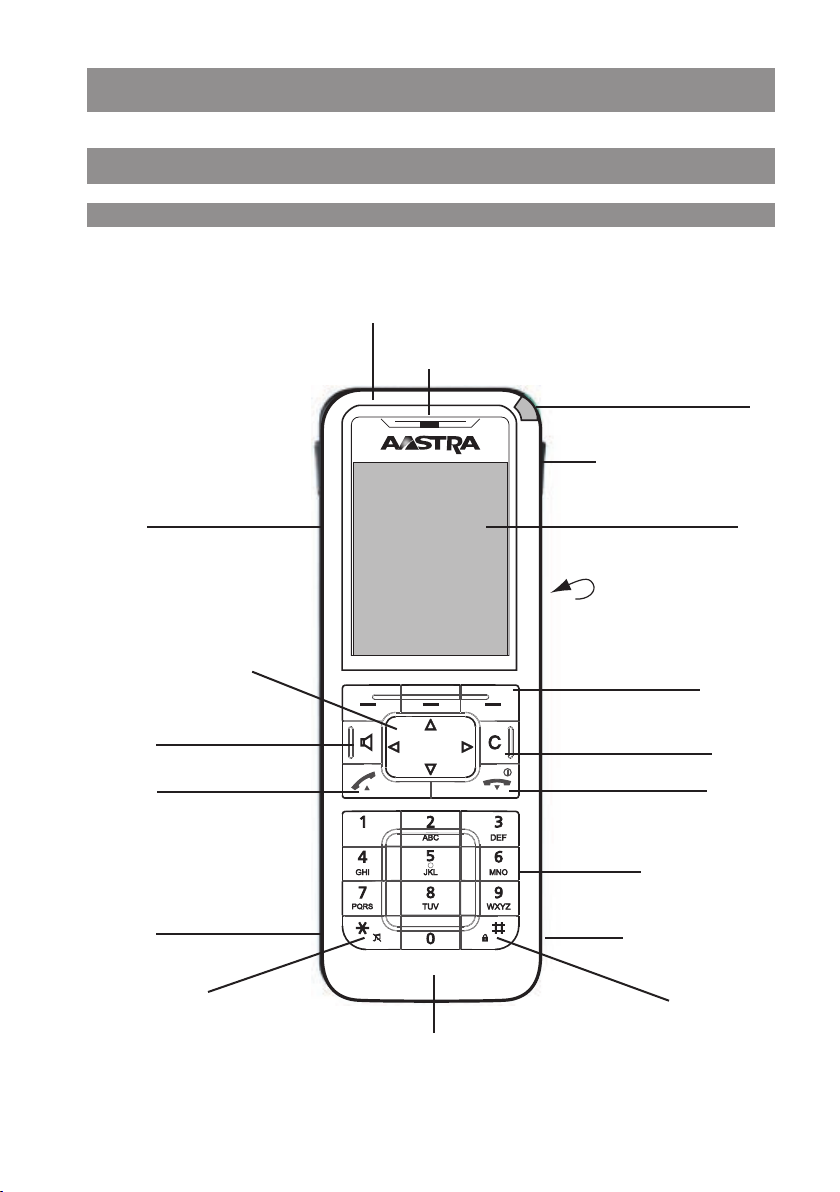
Key assignment (on delivery)
Emergency call key (Aastra 630d, 632d only)
Earpiece
Aastra 610d, 612d:
+/- keys (volume adjustment)
Aastra 620d/622d/630d/
632d/650c:
3 sidekeys (programmable) and
volume adjustment
Navigation keys
(programmable in part)
Open listening/Hands-free
mode
Call key/consultation call key
Headset connection
LEDs
Hotkey (programmable)
(not Aastra 610d, 612d)
Displays
Rear: Loudspeaker
3 softkeys
(programmable in part)
Delete key
Cancel key / Power on/off key
Number/letter keys
Mini USB connection
(not Aastra 610d, 612d)
Ringer on/off
Key lock
Microphone
15
Page 22
Function overview
Display arrangement
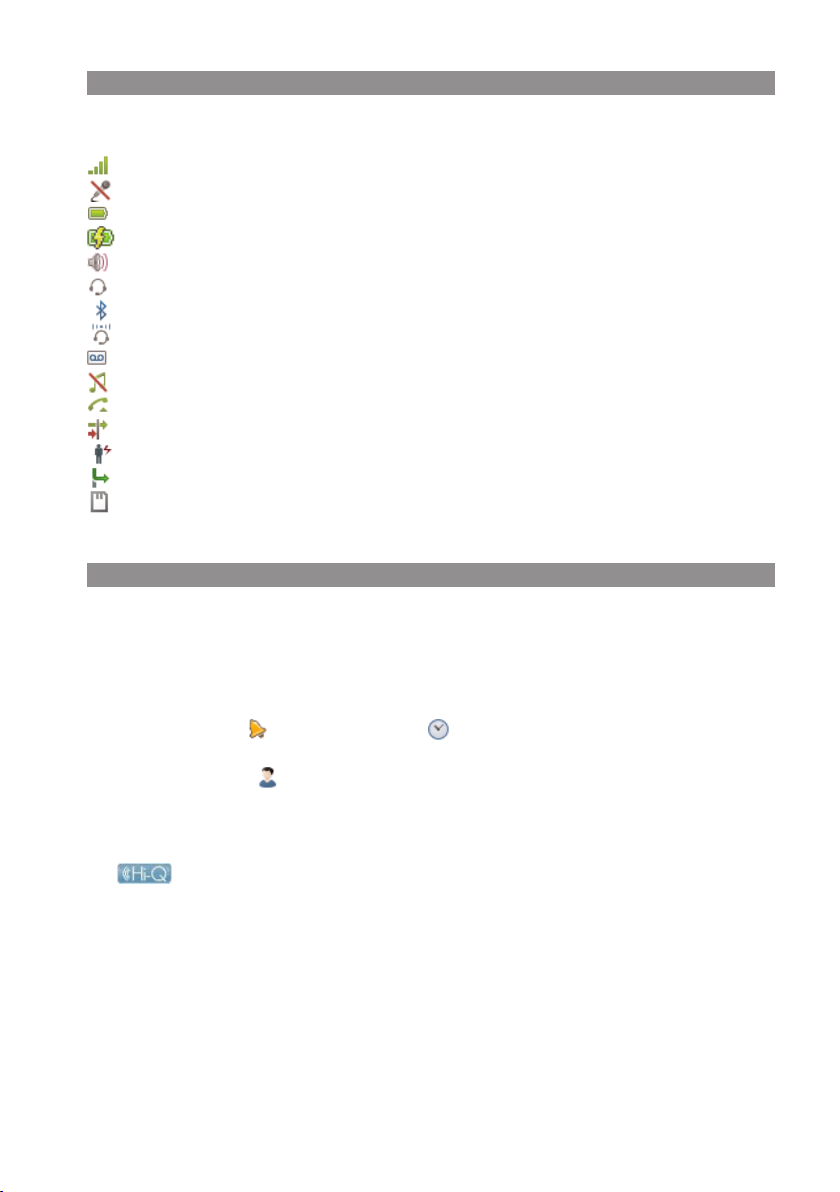
Symbols on the upper display line:
Signal strength
Microphone switched off
Battery charge status
Battery charging
Loudspeaker switched on
Headset active
Bluetooth
Bluetooth
headset ready to use
connection active
Voice box message (if available)
Ringer switched off
Call key pressed
Call filter active
Alarm sensor active (Aastra 630d, 632d only)
Call diversion active
Devices with microSD-Card (not Aastra 610d / 612d)
Display
Information on the current connection status or lists and text
of the menu are shown on the display. In the idle status you will see
• System name with internal call number
• Your programmed user name
• Current time and date
• Any set alarm clock and/or appointment
• Any activated features
• The activated profile
• Symbols for programmed functions
Aastra 650c only
The symbol is displayed when a connection with high speech quality is established (broadband audio).
The time is only displayed if it has been transferred from the system or set by you.
The navigation keys are used to scroll upwards or downwards through selection lists (e.g. phone
book) and the features menu. A selectable entry is highlighted.
16
Page 23

Function overview
Softkey line and idle display
The three keys below the display are called softkeys. The functions assigned to these keys are shown
in the bottom display line. The key function changes automatically according to the operating state
of the handset.
When the handset is delivered the following symbols are shown in the softkey line:
Enables selection from the redial list.
Navigation menu. This is used to call up a selection list with frequently used features.
These include:
π Phone book on the system* or handset
† Handset phone book (personal phone book)
√ Information lists (call list, voice box*, redial) or the programmed function
® Profiles or the programmed function
These functions are also assigned to the navigation keys.
* if available
You can use them to reach the phone menu (see page 48).
Note
Please note that the functions of the left and middle softkeys and of the left/right navigation keys
are programmable and therefore may subsequently be assigned with different functions.
17
Page 24

Function overview
LED
The LED (3-colour/red-orange-green) at the upper corner signals specific events that currently cannot be changed as they are required by the system or can be switched on or off by you (s. page 65).
Please refer to the following table for more details.
Colour Status Description can be switched on/off
Green Flashes quickly Incoming call Yes
Flashes slowly Ready indicator / Within range / Not in Yes
the charger cradle
Lights Hands-free operation switched on Yes
Lights Battery fully charged (if in the charger cradle) Yes
Red Flashes quickly Sensor Alarm (Aastra 630d, 632d only) No
Flashes quickly Outside the system range Yes
Flashes quickly Alarm call / Message No
Flashes slowly New entries in the info panel (e.g. call list) Yes
Flashes slowly Alarm clock / Appointment Yes
Orange Flashes slowly Ready indicator / Within range / Not in Yes
the charger cradle / Battery capacity below 60%
Lights Battery is charging Yes
Green/ alternating Handset switched off and charging No
Red in the charger cradle
18
Page 25
Function overview
Key functions
The following table gives an overview of the various key functions (on delivery).
Key Duration . . . in status Description
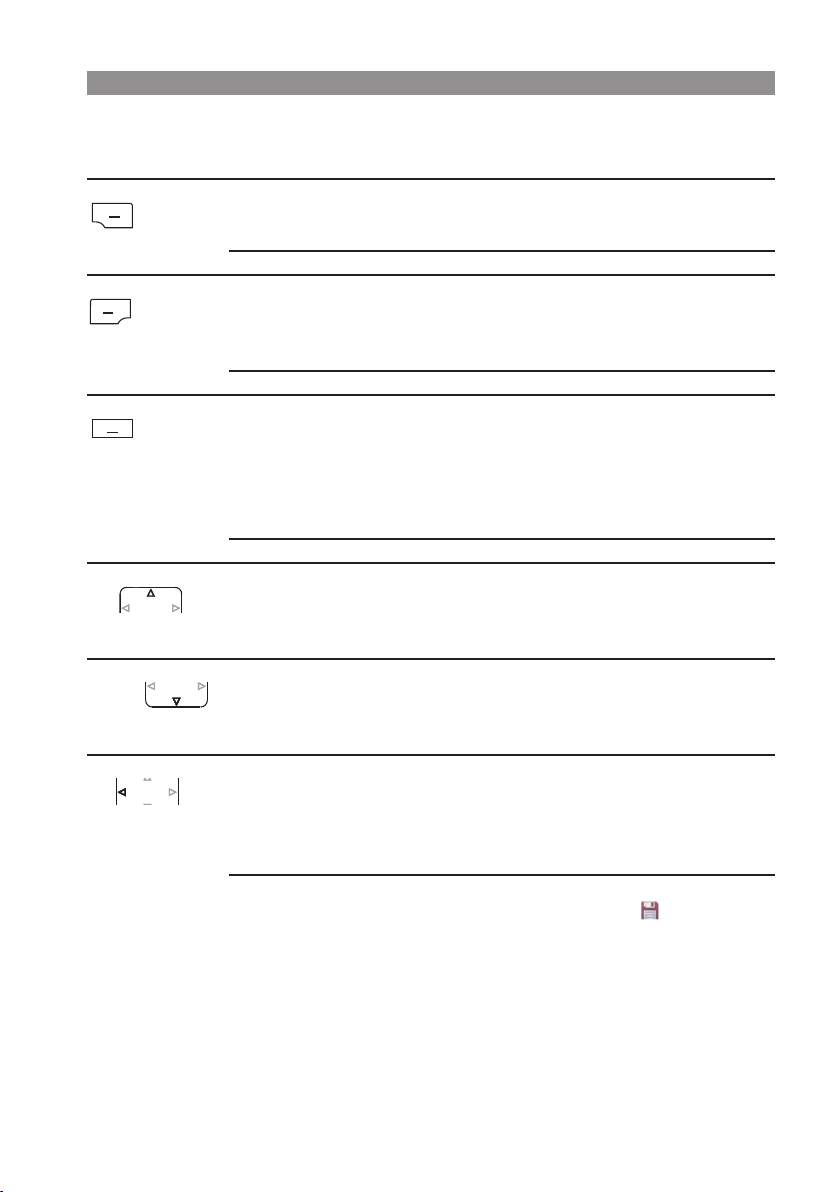
Right softkey short Standby Call up the whole menu
Menus, Lists Call up the respective option menu
or save
long Standby Call up the system menu
Left softkey short Standby Redial (delivery setting) or
call up the programmed function
Menus, Lists Confirmation (Ok)
Connection Option menu during connection
long Standby Programming the key function
Middle softkey short Standby Display of the "Navigation Menu" (list of
the functions that can also be accessed via the
navigation keys) (delivery setting) or
call up the programmed function
Menus, Lists,
Editor Cancel (Esc)
long Standby Programming the key function
Navigation key short Standby, connec- Call up the system phone book
Top tion
Menus, Lists Scroll up
Editor One line up
Navigation key short Standby, connec- Call up the private phone book
Bottom tion
Menus, Lists Scroll down
Editor One line down
Navigation key short Standby, connec- Call up the information list (delivery setting)
left tion or call up the programmed function
Menüs Go back one menu level. Replaces the
Esc softkey (back)
Editor Cursor back one character
long Standby Program the key function
Connection Reduce volume (save with )
Editor Cursor to start of line
19
Page 26
Function overview
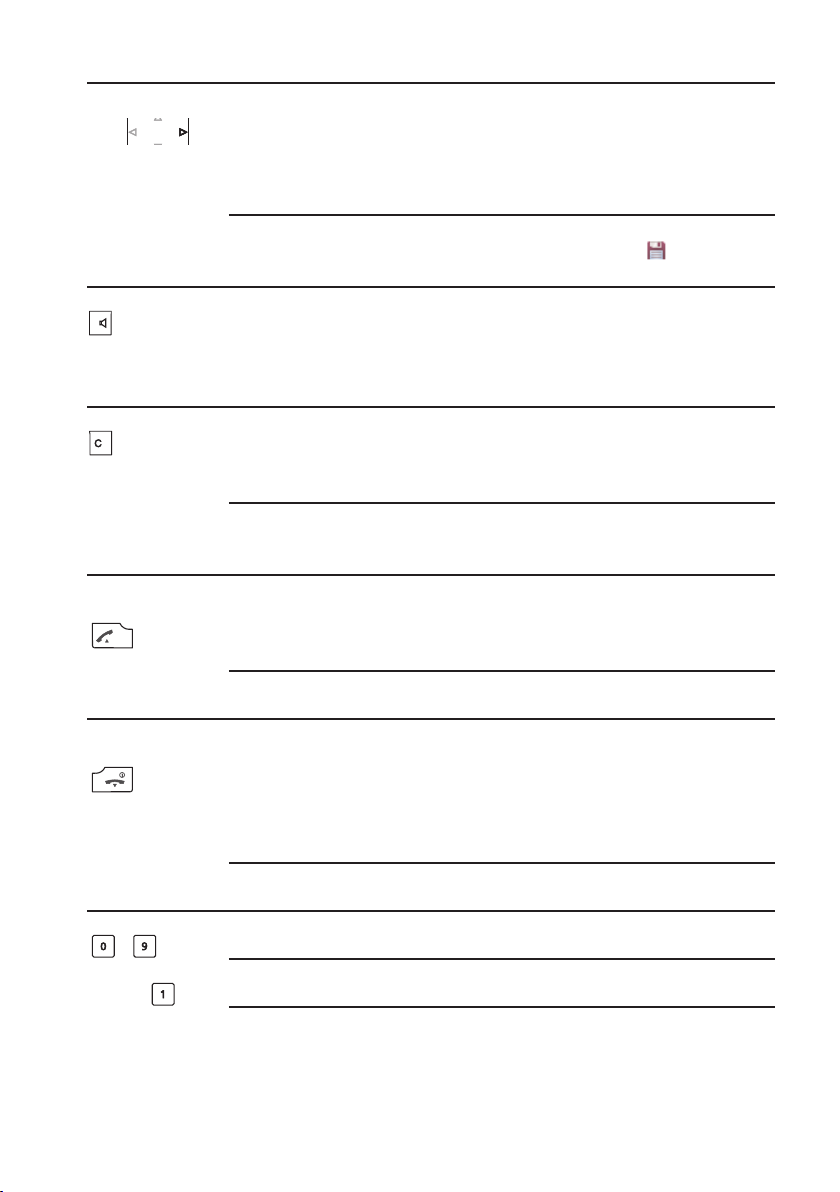
Key Duration . . . in status Description
Navigation key short Standby, connec- Call up the profile settings (delivery setting)
right tion or call up the programmed function
Menüs Go forward one menu level. Usually
replaces the softkey Ok/change
Editor Cursor forward one character
long Standby Programming the key function
Connection Increase volume (save with )
Editor Cursor to end of line
Hands-free short Standby Set up connection with hands-free operation
Connection Switch open listening/hands-free operation
on/off
Lists Set up hands-free connection to selected
entry
Key C short Incoming call Switch off the call signal (for current
call only)*
Lists Delete the corresponding entry**
Editor Delete the character left of the cursor
long Lists Delete the complete list (except phone book)
Menus Return to Standby status
Editor Delete all characters
Call key short Standby Connection set-up
(pick-up), green Connection R-key function
Lists Set up connection to selected
entry
long Standby Select the redial list
Lists Transfer the entry into predial
End key short Standby Off menu
(hang-up), red Connection End connection
Incoming call Reject call (if supported by
system)
Menus/Lists Return to Standby status
Editor Exit Editor without changes
long Every status Switch off handset
Handset switched off Switch on handset
Number keys short Standby Enter number into predial
- Editor Character according to table (see page 24)
Number long Standby Connection to voice box (if available)
* where supported by the system
** not in phone book lists and VIP list
20
Page 27
Function overview
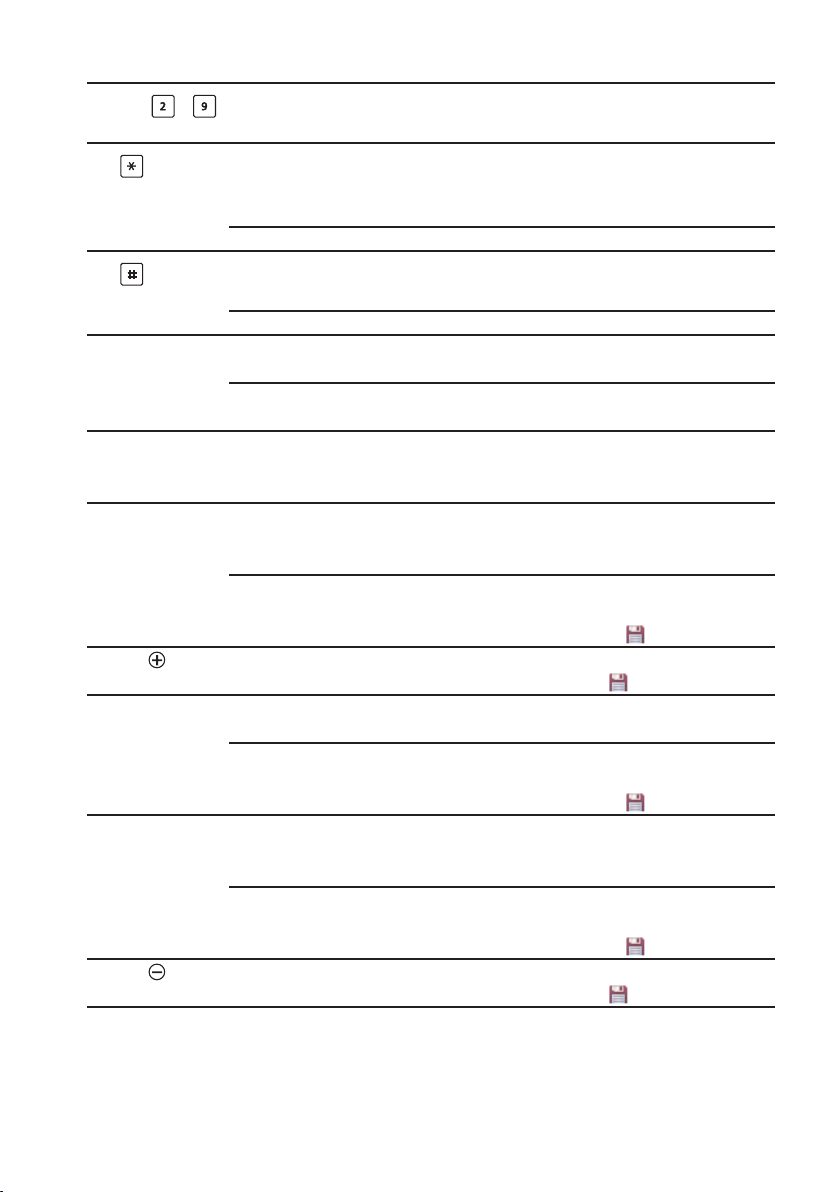
Key Duration . . . in status Description
Number - long Standby Select the corresponding Quick Call
destination (if Quick Call programmed)
Key short Standby Enter * in predial
Editor To switch between upper and lower case
when entering text.
long Standby Switch call signal on/off (permanent)
Key short Standby Enter # in predial
Editor Character according to table (see page 24)
long Standby Key lock on
Hotkey (not 610d, short Standby Select the programmed function (VIP list 612d) delivery setting)
long Standby Programming with the desired
function
SOS key long Standby Make an emergency call (call or message,
(630d, 632d only) Connection depending on the programming and the
telephone system)
Top sidekey (620d, short Standby, connec- Call up the programmed function or
622d, 630d, 632d, tion - in a connection - increase the volume
650c only) (providing the key is not programmed).
long Standby Program the key function
Connection Increase volume - providing the key is
programmed (save with )
Sidekey short Connection Increase volume (for current
(610d, 612d only) connection/save with )
Middle sidekey short Standby, connec- Call up the programmed function
(620d, 622d, 630d, tion
632d, 650c only) long Standby Program the key function
Connection Increase volume - providing the key is
programmed (save with )
Bottom sidekey short Standby, connec- Call up the programmed function or
(620d, 622d, 630d tion - in a connection - reduce the volume
632d, 650c only) (providing the key is not programmed).
long Standby Program the key function
Connection Reduce volume - providing the key is
programmed (save with )
Sidekey short Connection Reduce volume (for current
(610d, 612d only) connection/save with )
21
Page 28

Navigating in menus
Navigating in menus
Example: Setting the language
1. Open the menu - depending on the configuration of your handset, press
- the softkey ❯❯❯
or
- briefly press the end key and select the menu item from the list.
2. Use the navigation keys π/† to select the Settings entry from the list and press the
softkey or the navigation key ®.
3. Use the navigation keys π/† to select the Display entry from the list and press the
softkey or the navigation key ®.
4. Use the navigation keys π/† to select the Language entry from the list and press the
softkey or the navigation key ®.
5. Use the navigation keys π/† to select one of the languages offered from the list and
press the softkey (Save).
6. Exit the menu by pressing the
by actuating the end key.
Esc
softkey several times, the navigation key √, the C key or
Ok
Example: Personal phone book/Editor
1. Open the menu - depending on the configuration of your handset, press
- the navigation key †.
- the softkey ❯❯❯
Ok
or ®.
- one of the function keys to which you have assigned access to the phone book.
and select the entry Directories/Okor ® and Personal directory/
Ok
Ok
2. Select <New entry> and confirm with
3. You will see an overview of the possible entries. Select Name and press the
or enter the character directly from the keypad.
4. Press the key repeatedly to select the character of a key, the character assigned to this key
then appears. The entry position automatically moves forward if you make no immediate
entry or enter a new character. You can correct entries by moving the cursor to the num-
22
Ok
or ®.
Ok
softkey or ®,
Page 29

Navigating in menus
ber/letter to be deleted with the √/® keys and then pressing the C key. You can now add
new characters at this point.
Every word is automatically started with an upper case letter. Press the * key several times
to switch between upper and lower case (A or a is shown) or only upper case at the start of
the word (Aa is shown). Confirm your inputs with
Ok
.
5. Now select the next line from † (e.g. Private) and press
from the keypad.
6. Enter the private call number for the entry and press
7. Select the next line from † (e.g. Business) and press
from the keypad.
8. Enter the business call number for the entry and press
9. Use this method to enter the mobile call number, the email address and the fax number, if
required.
10. After calling up the phone book always the call number stored under Private will be shown
and can be dialed directly. You can alternatively chose one of the other call numbers or
addresses. Procede as follows: After you have finished the aforementioned entries, select
one entry and press the -key. Your assignment can be changed later again, see page 52.
11. If you want to assign a Quick Call number key to the entry, select Quick call and press
®. Select a key 2...9 from the list and press
you can delete or overwrite existing entries.
12. You can assign a special melody to the entry that will signal a call from this call number.
Select Melody and press
selection.
Ok
or ®. Select a melody from the list. Press Okor ® to save your
Ok
or ®. Exit the list with
Ok
or ® or enter the digit directly
Ok
.
Ok
or ® or enter the digit directly
Ok
.
Esc
or √. In the list
Ok
or
13. Press the softkey to save the complete phone book entry.
Note on Quick call
If only one destination (private, business, mobile, email or fax) has been stored under a phone book
entry with abbreviated dialling, that destination can later be dialled directly using a single long keypress of the corresponding abbreviated dialling key 2...9 (see page 29).
23
Page 30
Navigating in menus
Editors
Different Editors are available to let you enter phone numbers and names.
Characters available for phone book entries and text messages*
In the phone book the maximum length is 32 characters for digit inputs (phone numbers) and 24
characters for letter inputs (names). The characters available are as follows:
Key Upper case Lower case
1 ? ! 1 - + * / = & ( ) % ¿ ¡ ? ! 1 - + * / = & ( ) % ¿ ¡
2 A B C 2 Ä Å À Á Ã Æ Ç a b c 2 ä å à á ã æ ç
3 D E F 3 È É Ê Ë d e f 3 è é ê ë
4 G H I 4 ∏∑Í Ì Î Ï g h i 4 πıí ì î ï
5 J K L 5 j k l 5
6 M N O 6 Ñ Ö Ò Ó Ô Õ Ø m n o 6 ñ ö ò ó ô õ ø
7 P Q R S 7 ß Ω p q r s 7 ß µ
8 T U V 8 Ü Ù Ú Û t u v 8 ü ù ú û
9 W X Y Z 9 w x y z 9
0 space , . 0 : ; _ ” ‘ ˆ ˜ space , . 0 : ; _ ” ‘ ˆ ˜
✳ Toggle between digit input and letter Toggle between digit input and letter
input as well as upper case input as well as upper case
and lower case and lower case
Long keypress: input ✳ Long keypress: input ✳
# # @ € $ £ ¥ § < > { | } [ \ ] # @ € $ £ ¥ § < > { | } [ \ ]
When entering digits (call numbers) it may be necessary to enter the R character (for enquiry connections). Press the #-key several times to key in R.
* The character set available may vary depending on the language set (e.g. Russian).
Characters available when selecting phone numbers / names
If your phone system works alongside other communication systems, it may be necessary to allow
letter selection, too. The corresponding character set is specified by your System Administrator. The
characters valid and available in each case are then displayed in a preview window whenever you
key in the characters via the number keypad. Depending on the defined character set, the special
characters specified in the aforementioned character set may not be available. The following keys
are configured differently:
Key 1: - + 1
Key 0: . : _ 0 space
Key #: @ / #
Here, too, you can use the
case.
24
✳-key to toggle between digit and letter input as well as upper and lower
Page 31

Basic functions
Basic functions
Switching the handset on/off
Switching the handset on
To switch on press and hold the End key until the display lights again. This can take up to 10
seconds.
Switching the handset off
Press the End key and hold it down for a moment
or …
Press the End key briefly, select
The handset will switch off after a confirmation prompt.
Note
If the handset is switched off when placed in the charger cradle, it remains switched off but continues to be charged. The LED flashes red/green alternately to indicate that the handset is charging.
For technical reasons the switched-off handset can switch itself on when placed in the charger
cradle if it is removed from the cradle again before the red / green flashing LED is displayed.
Switch off
and press Ok.
Key lock / Phone lock
Switching on the key lock
Press the router key and hold for a moment. The key lock is activated and the symbol appears in the display.
Switching the key lock off
Press the softkey with the symbol and then the router key within 3 seconds.
Releasing the phone lock
If you have locked your telephone against unauthorised use (see page 67), you can release the lock
again by pressing the softkey and entering your PIN.
Switching hands-free operation on/off
Press the loudspeaker key to switch hands-free operation on or off.
The symbol appears on the display if the hands-free operation feature is enabled.
25
Page 32

Basic functions
If you make a call using the handset and place it in the charger cradle, the hands-free operation
feature is automatically activated.
Do not hold the handset up to your ear in handsfree mode or when the ringer is ringing as the
volume can be very loud.
Acknowledging an appointment/alarm clock
You are notified of an appointment or alarm clock by the specified ringer and the LED flashing red
for approx. 45 sec. The display shows the corresponding text. You can acknowledge the signalling
with
Esc
.
Adjusting the volume of the earpiece during the call
Aastra 610d, 612d
Press the +/- sidekeys to increase or reduce the volume of the call currently being made. Alternatively you can also use the navigation keys √ (quieter) and ® (louder). If these keys have been programmed with functions that differ from the factory setting (Info, Profile), you will need a long keypress in each case to access the volume control. You can then adjust the volume by briefly pressing
the key as required.
Aastra 620d/622d/630d/632d/650c
Press the upper or lower sidekey to increase or reduce the volume of the call currently being made. If
the keys are programmed with functions, use a long keypress first. You can then adjust the volume
by briefly pressing the key as required.
Alternatively you can also use the navigation keys √ (quieter) and ® (louder). If these keys have
been programmed with functions that differ from the factory setting (Info, Profile), you will need a
long keypress in each case to access the volume control. You can then adjust the volume by briefly
pressing the key as required.
Note
To save the new setting (i.e. to store it as a menu entry) press the
adjustment.
Ok
softkey when making the
Switching the ringer on/off
Switch off: Press the star key and hold for a moment, the symbol appears on the display.
Switch on: Press the star key again and hold for a moment, the symbol will switch off.
26
Page 33

Basic functions
Switching ringer off at call
If you want to switch off the ringer for a call that has just come in, press the C key or the softkey .
You can still accept the call as long as the caller has not hung up.
Illumination / display dimming
The keyboard and display are lit. The illumination is activated each time a key is pressed or a call is
made; it remains lit for a user-definable amount of time. To prevent the display illumination from
switching itself off completely after that time, you can activate the display dimming. The illumination then (for max. 4 hours) remains lit at a weak level. This setting does however reduce the battery
life. You can make changes in the Menu ❯❯❯
Keyboard/Display/Display dimming .
-> Settings -> Illumination ->
Activating the display illumination
If the display illumination is switched off completely, you can activate it using one of the three keys
below the display (softkeys) without triggering the function stored under that key.
Changing the brightness/contrast of the display
Aastra 610d
Adjust the brightness of the display to your local conditions. Change the contrast in the Menu ❯❯❯
-> Settings -> Display -> Contrast .
Aastra 612d /620d/622d/630d/632d/650c
Adjust the brightness of the display to your local conditions. Change the brightness in the Menu
❯❯❯
-> Settings -> Display -> Brightness.
Muting the handset
If you do not want your call partner to listen in while you talk to someone in the room for instance,
you can temporarily mute your handset.
You are making a call.
Press the softkey. The symbol appears on the top line of the display.
Your call partner on the telephone can no longer hear you.
27
Page 34

Basic functions
Press the softkey once more when you want to talk with your call partner again. Your call partner
on the telephone can hear you again.
Automatic hide / Info window
If you are in a menu or an entry mask when a call comes in, the information relevant to the call appears on the display (caller name/call number etc.). After completing the call you return to the where
you were before the call arrived.
In some settings of the Devices menu information text appears that automatically scrolls if the text is
long. You can also scroll manually by pressing the π / †keys.
Event window and "Info"- Menu
In the idle state of the handset an event window will appear, when e.g. new entries are saved in the
Caller list, the Voice box* or the Message list*. If there is more than one new entry you will see the
topic New Infos.
To access the entries you can open the Info-Menu:
Just press in the idle state the Navigation key √ and choose one menu item. Alternatively you can
also open the Info-Menu by pressing the - key or the -key.
Vibra call (not Aastra 610d, 612d)
The vibration alarm can be switched on/off in the Menu ❯❯❯ -> Audio -> Ringer settings -> Vibra
Call.
Configuring your personal directory
You can store up to 200 names in the personal phone book, with up to 3 call numbers each. You can
assign the entries a ringing melody, an abbreviated dialling number, a fax number and an e-mail
address in the usual way. How to create new entries is described in the "Example" section of the
Phone Book/Editor from page 22.
* If supported by the system
28
Page 35

Basic functions
Signalling the alarm clock or an appointment
With an alarm clock or appointment reminder call (see pages 54 and 55), the ringer is connected for
1 minute and the display indicates any event text that may be stored. To terminate the call completely, use the
it resumes. Instead of
Stop
softkey. Pressing the
Pause
Pause
softkey interrupts the ringer for 5 minutes, after which
you can also press the red End key or the C-key.
Aastra 600 PC Tool / Phone Book (not Aastra 610d, 612d)
The Aastra 600 PC Tool allows you to administer the contact data (private phone book) of the Aastra
via the USB interface (not Aastra 610d, 612d). You can transfer existing data from the device to the
PC, edit it, save it, and then download it again onto a device. You can download the PC Tool (for PCs
running under Windows XP, Vista and 7 (incl. 64-bit versions)) from the Aastra website.
Using abbreviated dialling (Quick call)
When entering call numbers in the private phone book you can assign keys 2...9 to individual entries
as abbreviated dialling keys. To dial such an entry, proceed as follows:
In the idle state use a long keypress on one of the keys 2...9
If several destinations were stored under the phone book entry, the list for that entry is displayed
and you can select an entry using the navigation keys.
If only one destination (private, business, mobile, email or fax) is stored in the phone book and the
menu item Auto quick hook is activated (see page 66), the entry is dialled directly.
Caller list, redial list (local list / system list)
Besides the handsets you can also operate corded system phones on your communication system.
For system phones the caller list and the redial list are administered by the system and sent to the
devices. The handsets have separate lists, which are managed on the handset. To specify whether
you want to use the local list or the system list (PBX), use Menu ❯❯❯
Caller list / Redial list -> Automatic / Local / PBX (see page 65).
Selecting PBX (or Automatic / PBX) makes sense if your handset is operating in parallel with corded
phones. This ensures that both devices have access to the same list and that any changes made are
visible on both devices.
The differences between the lists are as follows:
Settings -> List access ->
29
Page 36

Basic functions
Local caller list
• 50 entries or 30 entries with Aastra 610d, 612d
• The caller list comprises answered and missed calls (but not if busy) in a single list.
• Entries on the list can be added to other menus (e.g. add to VIP list).
• If the handset is connected in parallel with a corded system phone: A callback from the hand -
set's caller list does not delete the entry from the caller list of the parallel system phone.
• A callback from the caller list of the parallel system phone does not delete the entry on the
handset’s caller list.
• The list also displays the names of callers transmitted from the outside.
System caller list
• 50 entries or 30 entries (depending on the system equipment)
• The caller list comprises missed calls and also calls in cases where the subscriber’s own phone is
busy.
• Entries on the list cannot be added to other menus.
Local redial list
• 30 entries or 20 entries with Aastra 620d, 612d
• Entries on the list can be added to other menus (e.g. add to VIP list).
System redial list
• 50 entries or 30 entries (depending on the system equipment)
• Entries on the list cannot be added to other menus.
Editing local lists
The following options are available in the redial list and caller list:
Open the respective list, e.g. in the Info menu, with the √navigation key.
Press ❯❯❯
The following options are available
30
to reach the Options menu.
Dial number …
The previously selected entry is immediately called.
Predial
The previously selected entry is transferred to the predial for calling.
Add to...
The call number of the entry is transferred into your personal phone book, the call filter or the
VIP list.
Details ...
Further information on the entry is displayed.
Page 37

Basic functions
Delete
Deletes the entry.
Delete all
Deletes the entire list.
Edit system lists
The system’s redial list and caller list usually offers you the following options:
Pressing the C-key briefly: Deletes the selected entry.
Pressing and holding down the C-key: Deletes the list.
Pressing
Using the
The
marks by [licensee name] is under license. Other trademarks and trade names are those of their
respective owners.
The
Bluetooth
can be selected for use.
A registered and accessible
connected via cable ( symbol).
If the hands-free operation key is pressed when a headset is being used (
cable), the call is forwarded to the handset loudspeaker.
If the connection between the handset and
ars on the display. You can decide whether you want to continue the call with a headset connected
via cable if necessary, or on the handset itself, or to terminate the call.
Registration
Switch the headset to "Pairing mode". Follow the User's Manual of the headset for this.
Switch on the function in Menu ❯❯❯
Open the Menu ❯❯❯
key.
The headset that is found is shown by its name on the display. Confirm the display with
the PIN of the headset. The headset is now logged in and the symbol appears on the top line of
the display.
You can specify the active headset in the Menu ❯❯❯
Bluetooth
Ok
: Displays details about the entry.
Bluetooth
®
word mark and logos are owned by the Bluetooth SIG, Inc. and any use of such
feature of the handsets allows registration of two
Bluetooth
®
headset
headset ( symbol) has priority over any other headset also
Bluetooth
-> Settings -> Bluetooth -> BT Status die Funktion ein (An).
-> Settings -> Bluetooth -> Subscribe headset and then press the
(not Aastra 610d, 612d)
Bluetooth
headset is lost during a call, a message appe-
-> Settings -> Bluetooth -> Select headset.
headsets, one of which
Bluetooth
or connected via
Ok
New
soft-
and enter
31
Page 38

Basic functions
Deregister / rename
Select in the menu ❯❯❯ -> Settings -> Bluetooth -> Register headset -> [Headset name] ❯❯❯ ->
Delete / Edit.
Telephoning via the
Bluetooth
headset
Answering a call:
Press the "Connect key" on the headset or the green call key on the handset. The symbol is displayed.
Ending a call:
Press the "End key" on the headset or the End key on the handset.
Making a call:
Enter the call number on the handset and press the "Connect key" on the headset or the green call
key on the handset.
Hands-free operation:
If you press the hands-free key to answer a call or during a call,
Bluetooth
operation is interrup-
ted and the handset's loudspeaker/microphone is activated.
Answering a call on the headset:
During a call on the handset: Press the Connect key on the headset.
Transferring a call on the handset:
During a call on the headset: Press ❯❯❯
and select Transfer BT to handset.
For details of additional headset functions, please refer to the User's Guide for the device.
Note
If
Bluetooth
has been programmed on one of the keys, then pressing it carries out the following
functions.
• Handset in idle status: Calls up the Bluetooth menu.
• During a call on the handset: Transfers the connection to the headset or back to the handset.
• If a
Bluetooth
connection is interrupted because you have exceeded its operating range, you can
restore the connection by switching the headset off and back on again (once you are back within range).
32
Page 39

Basic functions
Special key (Hotkey) /VIP list
On delivery the special key (hotkey) at the top right of the handsets is prepared as VIP phone
book/VIP list for saving up to six telephones to be available very quickly (the key can be reprogrammed).
To program your favourite call numbers briefly press the hotkey and select <New Entry>.
Enter the name and the call number.
To dial these call numbers briefly press the hotkey, select the desired entry and press the call key
: the call will be set up.
Calls from call numbers on the VIP list are signalled using the VIP ring tone. The relevant setting is
made in the Menu ❯❯❯
Note
You can also program the VIP list with phone numbers using the Directories menu (see page 53).
VIP list
The programmable keys of the Aastra 610d, 612d can also be assigned with a VIP phone book. To do
so, program one of these keys as described on page 73 and then save the name and phone number
as described in the previous paragraph (or in the Directories menu).
-> Audio -> Volume settings / Melodies.
(Aastra 610d, 612d)
(not Aastra 610d, 612d)
Profiles
Profiles consist of a group of handset settings each assigned to a particular situation or application.
For instance you can switch from “Normal” mode of operation (e.g. in the office) to “Loud” mode of
operation when you enter a different environment (e.g. a factory floor). As a result of the switch,
features such as ringer volume, vibra call, speech quality, LED signalling, etc., adapt to the new environment. Your handset has five profiles.
While they are predefined, they can be changed at any time. If required, change the default settings
to suit your handset applications (see page 72).
Note
If when a profile is activated you change a number of features contained in the profile using the normal menu access (e.g. using ❯❯❯
Audio > Volume settings), the settings are adopted by the profile.
33
Page 40

Basic functions
Adapting to your environment
Your handset has two functions which can be used to adapt the handset to loud environments:
If you activate the function using the menu ❯❯❯
ringer volume is automatically increased in loud ambient noise. Make sure in this case that you have
not set the ringer volume to “Increasing”.
If you activate this feature using the menu ❯❯❯
attempt to improve the speech quality in a loud environment. This applies to connections via the
handset itself and with a wired headset (but not to Bluetooth headsets and the handsfree mode).
Audio > Ringer settings > Noise detection, the
Audio > Loud environment, the handset will
34
Page 41

Basic functions
Special functions
Emergency call key (SOS)
All the devices offer the possibility of storing an SOS emergency-call function under one of the programmable keys (see page 55). To dial an SOS emergency number, all you have to do is briefly press
the programmable key (emergency call key). Whether dialling is possible only in the idle state or
also in the connected state depends on the device and the assigned key type and the system.
If you programmed the SOS emergency call function under the left and middle softkey, the emergency call key is available in the idle state only.
If you program the emergency call function under one of the other keys (left and right navigation
key or sidekeys / Hotkey on the Aastra 620d / 622d / 630d / 632d / 650c), the emergency call key can
also be used in the connection state (depending on the system).
Normally the handset is always switched to handsfree mode when the SOS emergency number is
dialled. On the Aastra 630d / 632d you can set whether the number is dialled in handsfree mode or
in handset operation (see menu item Handsfree in alarm in the event of an alarm under Alarm Sen-
sor).
The Aastra 630d and 632d handset has a separate SOS key on its upper side. You can set the key’s
response in the menu ❯❯❯
Key programming -> [and press the SOS key]. The settings include: SOS call: immediately (the SOS
emergency number is then dialled directly) or SOS call: with confirmation (the SOS emergency
number is dialled only after a safety prompt). The SOS emergency number is always dialled immediately if the key is pressed and then held down.
-> Security -> SOS call -> SOS key or in the menu ❯❯❯ -> Settings ->
You can enter the SOS emergency number in the menu ❯❯❯
This menu item is not displayed if the SOS emergency number is predefined by the system.
Note
On the Aastra 630d and 632d you can also use the upper SOS key when the key lock / phone lock is
activated.
Alarm Sensor (Aastra 630d / 632d only)
The Aastra 630d and 632d handset is equipped with an alarm sensor that permanently determines
the handset’s tilt angle and movement. Various types of alarm can be deduced from these readings,
triggering an automatic alarm call. The only requirement is that you have programmed an alarm
number or SOS emergency number (see previous section) and the Alarm Sensor feature is activated.
The handset supports the following alarms:
• "Mandown"
-> Security -> SOS call -> SOS number.
35
Page 42

Basic functions
• No movement alarm
• Escape alarm
All three alarm types can be activated in parallel. The alarm number is the same for all alarm types. If
no alarm number is stored, the SOS emergency number of the emergency call key / SOS key is used
instead.
The alarm to be signalled is always the first alarm type to be recognised. Activated sensor alarms are
displayed using the symbol on the first line of the display. To check which alarm is activated, use
the Active features menu (among others).
Make sure the handset is worn as freely as possible (on a belt clip, carry-strap, etc.), i.e. not in a
pocket, to ensure that the feature is able to operate reliably.
Mandown
The handset is normally worn more or less vertically, e.g. attached directly to the wearer’s belt clip. A
position check is carried out continuously to verify that the handset is still in the vertical position. If
the handset is detected as being at a certain (adjustable) angle from the vertical, an alarm is triggered after a predefinable amount of time as this may indicate an emergency.
No movement alarm
This alarm is triggered if the handset has been completely still for a user-definable amount of time
(no movement by the handset or the person carrying the handset). The sensor has three sensitivity
settings. To guarantee a reliable operation it is advisable to test the sensitivity of the no movement
alarm with the person to be monitored. The no movement alarm is switched off whenever the handset is being charged in the charger cradle or via the USB socket.
Escape alarm
The escape alarm is triggered if the sensor detects violent handset movements for user-definable
period of time. As with the no movement alarm the sensor has three sensitivity settings. To guarantee a reliable operation it is advisable to test the sensitivity of the escape alarm with the person to
be monitored.
There is a setting for each alarm type to activate / deactivate the sensor supervision in an active call
(Alarm in conversation).
Alarm time settings
All the settings can be found in the menu ❯❯❯ Protection > Alarm Sensor
The alarm times are structured as follows.
Delay
This is the period of time that begins after the triggering event (“mandown”, no movement, escape).
If during this time the triggering event is withdrawn for at least 2 seconds, the delay begins from the
36
Page 43

Basic functions
Incident:
Mandown, no movement
escape identified
Delay Pre-alarm
with/without alarm
tone on the handset
Alarm number is dialed
start (in the case of the No movement alarm, also with any keypress – as of Release 4.01). The delay
can be set separately for each alarm type.
Pre-alarm
This is the period of time during which an alarm tone – where activated – is signalled on the handset before the alarm number is dialled. To deactivate the alarm tone (and therefore deactivate the
alarm), you need to press the
Esc
softkey. During the pre-alarm the display reading indicates the
amount of time remaining before the alarm number is dialled.
If during the pre-alarm the triggering event is withdrawn for at least 4 seconds in the case of "mandown" and for at least 2 seconds in the case of the no movement alarm, the delay starts all over
again.
The escape alarm can only be withdrawn using the
Esc
softkey.
The time setting for the pre-alarm is made for all the alarm types jointly and can also be made using
vibrator call.
Settings for other alarm parameters
Alarm number
If the SOS emergency number is predefined by the system, this menu item is not displayed.
If you always store the SOS emergency number preceded by the R-key feature (enquiry / hold), the
emergency call can also be made during a call (depending on the system / and handset – see
above). To enter the R-key feature, press the #-key three times (see also page 24).
Alarm auto answer
If this function is activated, a call is answered automatically from any call number during the prealarm.
If the function is deactivated and an incoming or existing call is in progress during the pre-alarm, the
alarm call number is dialled at the end of the pre-alarm.
Regardless of the setting, calls from the alarm number or SOS emergency number are answered
automatically and the pre-alarm is terminated.
Alarm tone
The pre-alarm can be sounded with or without an alarm tone on the handset. If the alarm tone is
activated, the signalling volume increases progressively.
37
Page 44

Basic functions
Vibrator
You can set whether the pre-alarm should be made with or without vibrator call (as of Release 4.01).
Repeat alarm
This is the amount of time after which a new pre-alarm is made followed by the dialling of the alarm
call number (for instance because the dialling of the alarm call number was cancelled by the system).
Handsfree in alarm
You can specify whether the alarm call can be made in handsfree or handset operation. This setting
also applies to the emergency call using the SOS / emergency call key.
Several alarm types activated simultaneously
Avoid simultaneously activating the three types of sensor alarm where very short delays and repeats
are set and the pre-alarm is possibly deactivated. As a result of the simultaneous triggering of the
alarm call it may no longer be possible to access the menu (to deactivate an alarm type). In this situation place the handset in the charger cradle and leave it there. Then make the settings.
Logged in / Logged out
With your phone system several users are able to “share” a phone using different call numbers (for
instance in shift operation). Each user simply logs in with a password and is then reachable on his
call number. Then, at the end of his shift for example, he logs out again and the phone becomes
available for another subscriber to use.
Logged in / Logged out can also be used if a phone is in constant use and the battery is running low.
In this instance phone operations can be maintained using the same call number but a different
handset.
Contact your system administrator for full details of the access codes applicable in each case.
Note
Logging in activates any features that may already be enabled (for that call number), e.g. voice box
access and call forwarding. Whenever the user logs out, the caller list, redial list and message lists
stored on the handset are deleted in order to protect private data. The system administrator is able
to specify whether or not the local phone book should also be deleted.
38
Page 45

Telephoning
Telephoning
Do not hold the handset up to your ear in handsfree mode as the volume can be very loud.
Answering a call
Press the Call key.
… or
Reject
… or
Press the
The ringer is deactivated, but you can still answer the call.
Press ❯❯❯
• Accept
• Reject
• Ringer off
• Add to …
Reject
softkey.* The call is rejected. The caller hears the busy signal.
and select from the options that are shown.
The call is answered.
The call is rejected, the caller hears the busy signal.
The ringer is deactivated,but you can still answer the call.
The call number of the caller is transferred to the personal phone book, the call filter
or the VIP list.
* if supported by the system
39
Page 46

Telephoning
Making internal / external calls
If you see the message No record! when dialling a phone number, your phone may be blocked by
the system. If so, please notify your System Administrator.
Briefly press the Call key
and / or
t
… or
key in the internal or external phone number preceded by the code to seize external
lines.
Press the Call key.
Press ❯❯❯
• Caller list
• Redial list
• Personal directory, Central directory
Only on Aastra 622d, 632d, 650c with set icon menu structure
(For menu structure, see page 64)
If you enter the start of a number and press the softkey , then the handset searches
the personal directory for all names and numbers that start with this number sequence.
Select the required entry and press Ok.
Note
Correcting your input during predial
• To delete individual digits, briefly press the C key;
• To delete the entire phone number, press and hold down the C -key.
Toggling between digit and letter input (where supported by the system)
Press the *-key several times.
• Digit input: display reads 123
• Letter input – upper case, then lower case: display reads Aa
• Letter input – upper case: display reads A
• Letter input – lower case: display reads a
Setting the character set
During character input you can change the character set by pressing ❯❯❯
then adopted as the default (inputs begin with either digits or letters). This setting can be reset temporarily during the input by pressing the *-key once again.
and select a phone number from the following lists
. The selected setting is
40
Page 47

Telephoning
Calling from the Redial list (local / system)
Check to see which list (local / PBX) has been set on the display (see page 65). The local list contains
the phone numbers of the last 30 phone numbers dialled (or 20 entries on the Aastra 610d and
612d). If you are using the system (PBX) redial list, the last 30 entries or 50 entries will be displayed,
depending on the system equipment.
Press the softkey .
Use the navigation keys to select an entry.
Press the Call key; the selected entry is called.
Note
You can also call up the Redial feature by pressing and holding down the Call key .
Calling from your Personal phone book
In idle mode press the †navigation key .
t
… or
… or
Note
You can also call up your personal phone book via the Navigation menu (see page 17) or via the
❯❯❯
Enter the first letter(s) of the desired name.
Select an entry with the navigation keys.
You can call up the different call numbers belonging to the name with the
softkey.
Press ❯❯❯
business call number will be displayed.
Press the call key, the selected entry will be called.
menu access when the handset is in idle mode.
and select Sort and a call number category (e.g. Business). All entries with a
Calling from the System phone book
In idle mode, press the π navigation key.
(Personal directory)
(Central directory)
If available on your system: use the navigation keys to select the section of the system
phone book you want.
41
Page 48

Telephoning
t
Note
You can also call up the system phone book via the navigation menu (see page 17) or via the ❯❯❯
menu access when the handset is in idle mode.
Enter the first letter(s) of the desired name and press Ok. If “Refine search” is displayed,
you need to enter more characters to find the entry you want.
Select an entry with the navigation keys.
Press the call key, the selected entry will be called.
Calling from the local caller list
Check to see which list (local / system) has been set on the display (see page 65). Your handset stores the phone numbers of all the answered and missed calls (subject to the phone number being
transmitted). 50 entries can be stored (the entries are limited to 30 on the Aastra 610d and 612d).
In idle mode press the √ navigation key; the Info menu appears.
Select Caller list, followed by the name or the phone number. Pressing displays
additional information about the entry.
The following symbols are used to identify each call type:
Received, answered call
Missed call
Rejected call
Filtered call
Forwarded call
SOS call
Call with automatic accept
Press the call key (green); the selected entry is then called.
Note
You can also call up the Info menu/call list via the Navigation menu (see page 17) or via the Menu
Access ❯❯❯
42
when the handset is in idle mode.
Page 49

Telephoning
Calling from the system’s caller list
Check to see which list (local / system) has been set on the display (see page 65). Depending on
whether or not the phone number is transmitted, your communication system stores the phone
numbers of missed calls or calls made while the phone was busy. 30 entries or 50 entries can be stored depending on the system equipment.
In idle mode press the √ navigation key; the Info menu appears.
Select Caller list, followed by the name or the phone number. Pressing
additional information about the entry.
Press the call key (green); the selected entry is then called.
Note
You can also call up the Info menu/call list via the Navigation menu (see page 17) or via the Menu
Access ❯❯❯
when the handset is in idle mode.
Ok
displays
Ending calls
You can end calls by briefly pressing the End key.
Options during a call
If required you can select a call number from the available lists and dial into an existing connection
(DTMF suffix dialling).
Press ❯❯❯
• Personal directory
• Redial list
• Caller list
and select a call number from the following lists
Answering the phone during a call (Call waiting)
If you don’t want to be disturbed, you can also completely switch off the call waiting function (see
page 63).
43
Page 50

Telephoning
If call waiting is activated, you will hear the ringing tone and see the call in the display. You can answer the waiting subscriber as follows:
Press the R softkey.
or …
Press the Call key.
or …
Press ❯❯❯
In the case of a second connection, the following options are available to you:
Close current connection
Press ❯❯❯
Press ❯❯❯
or …
Press the R softkey or the call key .
Change between the connections: Brokering
Press ❯❯❯
or …
Press the R softkey or the call key .
Forwarding a connection with notification
and select Receive.
and select Release call.
again and select Retrieve.
again and select Brokering.
44
or …
Press ❯❯❯
Press the End key.
again and select Transfer.
Page 51

Telephoning
Enquiry / Forwarding calls / Conference
In the menu (see page 63), you can specify whether you want to receive a reminder for the waiting
subscriber while making an enquiry call. If the function is activated, you will hear a short ringing or
reminder tone during your call after a set time.
You are making a call.
/ Press the R softkey or the green Call key.
On Aastra 622d, 632d, 650c with icon menu setting (if the R softkey is not offered):
Press the green Call key or the Hold softkey, followed by Brok. (Brokering).
Always use the green Call key if you want to call the subscriber using an enquiry call
from the directories.
or …
Press ❯❯❯
The first connection is on hold.
t
or...
Enter the phone number and press the green Call key or Ok.
/ Press the R softkey or the green Call key.
Press ❯❯❯
• Central directory
• Personal directory
• Redial list
• Caller list
If you initiated the enquiry call using the R softkey or the green Call key:
You can also access the system directory using the navigation key and personal
directory using the navigation key.
Note
After selecting an entry in the system phone book dial it by pressing the
After selecting an entry in the other lists (by pressing the softkey once or several
times) dial the entry by pressing the softkey .
and select Brokering.
and select a call number from the following lists:
Ok
softkey.
If the callee does not answer or is busy, press the R softkey or the green Call key. In the
case of a second connection, the following options are available to you:
45
Page 52

Telephoning
Close current connection
or …
or …
or …
Press ❯❯❯
Press ❯❯❯
Press the R softkey or the green Call key .
Change between the connections: Brokering
Press ❯❯❯
Press the R softkey or the green Call key.
On Aastra 622d, 632d, 650c with icon menu setting (if the R softkey is not offered):
Press the green Call key or the Hold softkey, followed by Brok. (Brokering).
Forwarding a connection with notification
Press ❯❯❯
Press the red End key.
and select Release call.
again and select Retrieve.
and select Brokering.
again and select Transfer.
Initiate a Conference Call
During an enquiry call:
Press ❯❯❯
Note
You can invite additional subscribers into an acive conference call: Press R and call ano ther subscriber. When the call is answered, press
Conference calls are only possible, when enabled by your system.
Forwarding calls without notification
You are in the middle of a phone call and want to forward it to another subscriber without advance
notification:
46
again and select 3 party.
Press ❯❯❯
and select Transfer.
❯❯❯
and select 3 party.
Page 53

Telephoning
t
or …
/ Press the R softkey or the green Call key.
t
or …
t
or...
Enter the call number and press Ok.
The other phone is called. Your connection is closed.
On Aastra 622d, 632d, 650c with icon menu setting (if the R softkey is not offered):
Press the green Call key or the Hold softkey, followed by Brok. (Brokering).
Enter the call number and press Ok.
The other phone is called.
Press the red End key.
Press ❯❯❯
Enter the call number and press Ok.
The other phone is called.
Press the red End key.
and select Brokering.
/ Press the R softkey or the green Call key.
On Aastra 622d, 632d, 650c with icon menu setting (if the R softkey is not offered):
Press the green Call key or the Hold softkey, followed by Brok. (Brokering).
Press ❯❯❯
• Central directory
• Personal directory
• Redial list
• Caller list
The other phone is called.
Press the red End key.
If the call is answered, the subscriber which was last called is connected with the
waiting subscriber.
and select a call number from the following lists:
47
Page 54

Devices menu
Devices menu
You can call up the Devices menu in the following ways:
• In Idle mode, press ❯❯❯
• In Idle mode, press and select Menu.
Notes on the display symbols in the menu
Save To make settings in the menu, you must open the respective setting window
Information You can display further information on the entries with the softkey.
Options You can open further submenus (e.g. Delete, Edit) with the softkey.
.
with the
Ok
softkey. Your entry is then saved with the softkey.
Esc
Change
You can cancel entries with the
menu.
With the
ture is on) or off.
You can display submenus for more feature settings.
Change
softkey you can switch the hook in the check box on (fea-
Esc
softkey and/or go one step back in the
Menu structure
The following sections illustrate the device features in the sequence they are displayed in the handset menu. On the Aastra 612d, 622d, 632d, 650c, this applies to the set “Standard” menu structure.
For these devices different arrangements of the menu items can also be set (see page 64). If you
have set a different menu structure (i.e. not “Standard”), then please use the menu trees shown in
the appendix to help you find certain features.
Overview
Info
The menu contains the accesses to the caller list and redial list. The voice box and access to text messaging can also be reached (where supported by the system).
Quick access to this information is also possible on the √ navigation key or via the key (delivery setting).
48
Page 55

Devices menu
Applications
This functions can be configured system specific for each PBX. Please contact your system administrator for more information on the functions.
Active features
You can quickly reach some important settings, such as Bluetooth, Call filter, Profiles, Alarm clock
and Appointment and also Mandown, No movement alarm, and Escape alarm on the Aastra 630d
/ 632d via this menu.
Text messages
This menu is used for messaging and alerting applications. The menu is not available in every system.
Directories
Enables access to the private phone book and the system phone book.
This can also be quickly accessed with the † or π navigation key or via the key.
Time/Alarms
This menu lets you set the date and time, program appointments, alarm times or a timer, and specify the formats for displaying the date and time.
Audio
In this menu you can make settings for the volume, ringer and attention tones.
Data management / SD Card (Aastra 622d, 632d, 650c only)
Menu for data management of the SD card .
Call filter
The call filter* allows you to answer or block incoming calls. You can specify the call numbers and
the filter status in the menu.
Call diversion
Call diversion enables you to forward calls to other internal / external phones. A call can be forwarded immediately, when the connection is busy or after a certain time.
* if supported by the system
49
Page 56

Devices menu
System
In this menu you can specify the active system for your handset and administer registrations to different systems as well as read the IPEI number and information on the status of hardware and software.
System menu
This menu enables you to set automatic call-back and call waiting functions.
Settings
Device settings, such as key lock, key programming, user name, display settings, illumination,
tooth
etc., are available here.
Protection functions
This menu can be accessed via the PIN (Personal Identification Number). On delivery, it is 0-0-0-0 (4 x
zero). Here you can block the handset (lock), change the PIN, program an emergency number, enter
settings for the alarm sensor (in 630d / 632d only) as well as completely or partially reset the handset to its state on delivery.
Profiles
This menu is used to create and administrate user profiles. Five modifiable profiles are preset.
Feature access codes
This menu allows to enter Feature access codes (FAC) to control various functions in your system.
The entry of FAC's will only be offered if supported by your system.
Blue-
"Info" menu
Caller list
Displays the entries in the local caller list or the system’s caller list. If a phone book
entry has been created for a phone number (either on the handset or in the system), the corresponding name is displayed.
50
The ❯❯❯
options available to you with the local caller list are as follows:
Dial number... Dials the phone number.
Predial Transfers the phone number to the predial.
Add to… Adds the phone number to the phone book, the call filter
or the VIP list.
Details… Displays information about the entry.
Page 57

Devices menu
Delete Deletes the entry.
Delete all Deletes the entire list after a confirmation prompt.
The system’s caller lists generally offer the following possibilities:
Pressing the C-key briefly: Deletes the selected entry.
Pressing and holding down the C-key: Deletes the list.
Pressing
Voice box
Displays new messages in the voice box of your communications system
(if available).
Text messages
Jobs These features are only available if supported by your system. For information
about the messaging and alarm applications, please refer to the separate User’s
Guide.
Redial list
Displays the entries in the local redial list or the system’s list. If a phone book entry
has been created for a phone number (either on the handset or in the system), the
corresponding name is displayed.
The ❯❯❯
Ok
: Displays details about the entry.
options available to you with the local redial list are as follows:
Dial number... Dials the phone number.
Predial Transfers the phone number to the predial.
Add to… Adds the phone number to the phone book, the call filter
Details… Displays information about the entry.
Delete Deletes the entry.
Delete all Deletes the entire list after a confirmation prompt.
The system’s redial list usually offers you the following options:
Pressing the C-key briefly: Deletes the selected entry.
Pressing and holding down the C-key: Deletes the list.
Pressing
* if supported by the system
or the VIP list.
Ok
: Displays details about the entry.
51
Page 58

Devices menu
"Applications" menu
When using the communication system in certain areas (e.g. hotels, hospitals), it can be practical to
control the various functions directly from your handset (e.g. door openers, display panels etc.).
These applications are controlled by additional external devices (servers) respectively a XML interface. Please contact your system administrator for more information on the functions.
"Active features" menu
The "Active features" menu provides quick access to a number of selected menu items.
Bluetooth Switch on/off and configure the Bluetooth function - not Aastra 610d , 612d (see
page 67).
Mandown
No movement alarm,
Escape alarm Switch on/off and configure the alarm sensors - Aastra 630d, 632d only (see page
68).
Call filter Access to the filter settings* (see page 60).
Profiles Quick swapping between the various profiles (see page 72).
Alarm clock Switch on/off and configure the alarms 1...3. The respective alarm clock is selected
with the √ and ® keys (see page 55).
Appointment Switching on/off and configuring the appointments 1...3. The respective appoint-
ment is selected with the √ and ® keys (see page 54).
"Text messages" menu
With OpenMobility SIP – DECT® your system can be operated with message and alarm solutions.
Message and alarm management is possible by connecting external alarm servers or by using the
basic functions of the OpenMobility Integrated Messaging & Alerting service (OM IMA). In addition,
the system can be equipped with the “OpenMobility Locating application (OML)” which enables to
locate handsets accordant to the used base stations. The relevant descriptions can be found in the
separate User Guide (SIP-DECT® / Message and Alerting Applications) for this topic, available on the
Aastra website.
“Directories” menu
The “Directories” menu gives you access to the Personal directory, the Central directory and the VIP
list.
Further details for dialling from the phone book and for creating a new entry can be found on
pages 41 and 22.
52
Page 59

Devices menu
You make changes in the phone book as follows:
Personal directory (Personal phone book)
Select an entry from the list.
-> Sort For the next call the entries will be sorted according the
selected call number category (eg. Private, Business, etc.).
Edit The entry can be modified. If you want to change the call
number display (when calling up the phonebook) – see
page 23 – select the entry and press the -key. The
selected entry will be marked with a * .
Press the softkey to save the changes.
New entry Create a new entry.
Add to ... The selected phone number is added to the call filter or the
VIP list.
Send You can send the previously selected entry or all the ent-
ries as a vCard to another Aastra 600d handset and store
it/them in the handset’s personal directory. This feature
can only be used if it is enabled by your System Administrator and/or another phone.
Import An entry from the central directory, the caller list or the
redial list can be copied to your phone book.
Delete The entry will be deleted.
Memory Shows the number of already stored entries.
Central directory (System phone book)
Entries in the system phone book can only be changed by the system administrator.
If you want to select an entry, proceed as follows:
t
VIP list
Shows the entries in the call number list. For a new entry select <New entry>.
Select an entry once a list has been created:
Enter the first letter(s) of the desired name and press Ok.
Select an entry with the † / π navigation keys and press the call key.
Name Enter a name for the call number.
Number Enter the call number.
-> Edit Lets you edit the entry.
Delete Deletes the entry.
53
Page 60

Devices menu
"Time/Alarms" menu
You can move the entry position of all settings with the √ and ® navigation keys and change the
values with the π and † keys.
Date/Time
Time Show the time currently set in the handset.
Change
Date Show the date currently set in the handset.
Change
Note
If the time and the date are transferred from the telephone system, you cannot
make this setting.
Appointment
Shows the list of appointments. Up to three appointments can be entered and activated.
Status: On/Off
Change
Time Show the time set for the appointment.
Change
Date Show the date set for the appointment.
Change
Text Show the text entered for the appointment.
Change
Change the time setting.
Change the date setting.
Activate or deactivate appointment.
Change the time setting.
Change the date setting.
Change/enter the text (max. 32 characters).
54
Note
If the ringer is deactivated, there is also no acoustic signalling to indicate a set
alarm or appointment.
Signalling a set appointment
You can use Pause to interrupt the signalling for an expired appointment
reminder for 5 minutes. When you call up an appointment that has been put on
Pause (interrupted) you are offered Stop (to deactivate) and Pause (to maintain the interruption).
Page 61

Devices menu
Alarm clock
Shows the list of alarms. Up to three alarm times can be entered and activated.
Status: On/Off
Change
Time Show the time set for the alarm.
Change
Text Shows the text entered for the alarm.
Change
Note
If the ringer is deactivated, there is also no acoustic signalling to indicate a set
alarm or appointment.
Signalling a set Alarm-clock call
You can use Pause to interrupt the signalling for an expired alarm call for 5
minutes. When you call up an alarm-clock call that has been put on Pause
(interrupted) you are offered Stop (to deactivate) and Pause (to maintain the
interruption).
Timer
Lets you set a countdown timer (max. 23 hours / 59 minutes). The time remaining until the
signalling occurs (using increasingly loud beep tones) is indicated on the display. The
timer’s ringer cannot be adjusted.
Here you can choose between Once (at the next specified time
with this value), Daily (repeats daily), Weekdays (Monday to Friday), Weekend (Saturday, Sunday) and Off.
Changes the time setting.
Change/enter the text (max. 32 characters).
Format setting
Setting option for the display formats of the date and time.
Time format
Change the time format (24-hour or 12-hour am/pm)
Date format
Change the date format dd.mm.yy, e.g. 27.12.08
mm/dd/yy, e.g. 12/27/08
yy-mm-dd, e.g. 08-12-08
dd-mmm-yyyy, e.g. 27-Dec-2008
55
Page 62

Devices menu
"Audio" menu
Open the menu, select Audio and press Ok.
Volume settings
Change the Volume at the selected menu item with the √ and ® navigation keys. Setting
range for the ringer: Off, Increasing, Level 1 ... 7
Note
Please note: The default settings for the Ringer Loudness ex-factory comply with regulatory
requirements. We recommend that the default setting is retained.
Earpiece Changes the currently set volume of the earpiece.
Handsfree Changes the currently set volume for handsfree operation.
Corded headset
Changes the currently set volume of a corded headset (does not apply to Bluetooth headset).
Internal call
Changes the currently set volume for calls from internal subscribers.
External call
Changes the currently set volume for external calls.
56
Unknown number
Changes the currently set volume for calls without transmitted caller number.
This setting is not supported by your system.
Callback Changes the currently set volume which you receive as a callback. Example: You
have put a connection on "Hold" but – within a certain time – not dialed another call number, you will get a callback that reminds you about the waiting subscriber (see "Hold ringback" Page 63).
Recall Changes the currently set volume for recalls.
This setting is not supported by your system.
VIP call Changes the currently set volume for calls from VIP- call numbers (see page 33
and 53).
Special call Changes the currently set volume for special calls.
This setting is not supported by your system.
SOS call Changes the currently set volume for incoming emergency calls.
Alarm clock
Changes the currently set volume for alarm clock signaling.
Page 63

Devices menu
Appointment
Normal message
Urgent message
Alarm message
Changes the currently set volume for appointment signaling.
Changes the currently set call volume for normal messages (when supported
by your system).
Changes the currently set volume for urgent messages (when supported
by your system).
Changes the currently set volume for alarm messages (when supported
by your system).
The ring tone for alarm messages cannot be switched off.
Note
With the / softkey you can switch the ring ton on off or on (except VIP
call, Special call, SOS call, Alarm message). If the ring tone is switched off,
will be displayed as a reminder. Switching the ring tone off / on can also be
made by pressing and holding down the -key (in the idle state). Attention
tones (see Melodies) will always be signaled with the volume of the Internal
call.
Melodies
Internal call
Changes the currently set melody for calls from internal subscribers.
External call
Changes the currently set melody for external calls.
Unknown number
Changes the currently set melody for calls without transmitted caller number.
This setting is not supported by your system.
Callback Changes the currently set melody which you receive as a callback. Example: You
have put a connection on "Hold" but – within a certain time – not dialed another call number, you will get a callback that reminds you about the waiting subscriber (see "Hold ringback" Page 63).
Recall Changes the currently set melody for recalls.
This setting is not supported by your system.
VIP call Changes the currently set melody for calls from VIP- call numbers (see page 33
and 53).
Special call Changes the currently set melody for special calls.
This setting is not supported by your system.
57
Page 64

Devices menu
SOS call Change of the currently set melody for incoming emergency calls.
Alarm clock
Changes the currently set melody for alarm clock signaling.
Appointment
Changes the currently set melody for appointment signaling.
Normal message
Changes the currently set melody for normal messages (when supported
by your system).
Urgent message
Changes the currently set melody for urgent messages (when supported
by your system).
Alarm message
Changes the currently set melody for alarm messages (when supported
by your system).
Note
You can listen to the melody with the softkey before saving. There is a choice of 44
polyphonic MIDI ringer melodies, 8 normal ringing tones (Basic), 7 alarm tone sequences
and 9 attention tones. At an incoming call, attention tones will be played only once. There
are 5 melodies (6700 … ) additional, which are similar to the ring tones of the devices of the
Aastra 6700 series.
58
Ringer settings
Play once
Select whether the call tone melody should be played once or repeated.
Silent charging
The handset does not give an acoustic signal for any calls when it is in the charger cradle. When you take it out, calls are acoustically signalled again. The calls
are recorded in the call list.
“Silent Charging“ will not apply when the handset is charged via the USB connector. This setting can also be done in the menu Device options.
Ringer Switches all the ringer entries on the list on or off. This setting can also be done
in the menu Volume settings.
Vibra call Select if the call signalling is also made via the vibration alarm (not Aastra 610d,
612d).
Corded headset
Select if the call signalling is also made on the headset.
Page 65

Devices menu
Noise detection
When this function is active, the volume of the ringer is automatically raised if
there is loud background noise. If you want to use this feature, make sure the
ringer volume is not on the “increasing” setting.
Attention tones
Select whether the respective attention tones should be activated or not.
Key click Audible confirmation when a key is pressed.
Confirm tones Confirm successful/unsuccessful settings.
End of menu Alert tone on reaching the end of a menu list.
Battery warning Alert tone if the battery is almost empty.
Only a few minutes are left before the call will be disconnected.
Coverage warning Alert tones if the wireless connection threatens to disconnect.
Alarm tone Aastra 630d, 632d only: This is the alarm tone sounded during the
pre-alarm (triggered by the Alarm sensor). This setting can be done in
parallel in the menu Alarm Sensor.
Loud environment
If the handset is mainly used in a loud environment, the handset attempts to improve the
voice transmission (does not apply to connections made with the Bluetooth headset and in
hands-free mode).
Audio quality (Aastra 650c only)
This menu entry is only available if your system supports Hi-Q audio.
If the handset is used in reflection-prone environments (e.g. metallic workshops), then interference
to the DECT reception may occur. Aastra XQ technology can be used in these areas in order to prevent this interference. However, Hi-Q audio and the XQ mode influence one another. The following
settings can be used to prevent connection failures in XQ areas.
Standard audio Set this (normal) speech quality if interference may occur (e.g. in XQ
areas).
Hi-Q audio Attempts are always made to establish a connection in high speech
quality (Hi-Q audio). In the event of an existing Hi-Q connection in a
XQ area where high speech quality is also supported, then this
quality level is maintained. This is the standard setting.
Automatic Attempts are always made to establish a connection in high speech
quality. If the device is located in a XQ-protected environment, then
incoming or outgoing connections are made in standard speech
quality. Switch on this mode if you switch regularly between areas
(XQ / office) and still wish to use Hi-Q audio in the office.
59
Page 66

Devices menu
Note
You can also program a key for switching between Standard and Hi-Q audio. The key setting has
priority over the menu setting.
“Data management / SD Card” menu
Aastra 622d, 632d, 650c only: This menu is only available when your handset is equipped with an
optional Aastra microSD card (see page 10). Other data can be stored on the card in addition to the
device settings. For more information on the card functions, please refer to the Aastra 600c/d documentation on the Aastra homepage.
"Call filter" menu
The call filter allows you to answer or block incoming calls. The Accept list setting only allows the
call numbers in the call number list to be signalled (no other numbers). The Block list setting means
all calls are signalled except the calls from the call numbers in the list. If Unknown number is activated incoming calls without Caller-ID will also be blocked or signalled. The call number list can contain 10 entries.
Status You can change the filter mode.
List of numbers
60
Accept list
Calls for the call numbers entered in the list are accepted.
Block list
Calls for the call numbers entered in the list are rejected.
Filter off Call filter is deactivated.
Shows the entries in the call number list. For a new entry select <New entry>.
Name Enter a name for the call number.
Number Enter the call number. This entered caller number must correspond
exactly to the call number transferred by the network.
Unknown number
If switched on, also calls without transmitted caller number will be blocked or
signalled.
or …
Select a call number from the list.
Page 67

Devices menu
-> Edit The entry can be modified.
Dial number... The entry will be dialled immediately.
Predial The entry will be transferred to the predial.
Text messages Transfers the call number to send text messages.
Add... Transfers the call number into the personal phone book
or the VIP list.
Details... Shows call number and name.
Delete The entry will be deleted.
Delete all The list will be deleted after a confirmation prompt.
"Call diversion" menu
This menu entry is not available if call forwarding is controlled by other settings (such as code input).
Please ask your system administrator about alternative setting options.
Call diversion enables you to forward calls to other internal / external phones. A call can be forwarded immediately, when the connection is busy or after a certain time. If call diversion is activated,
the symbol is shown on the first display line in idle mode.
Off This is a type of call forwarding. Select one of the available options: “off”, “immedia-
tely”, “busy”, “no answer” or “no answer or busy”.
No ( ) Select whether you want to enter a destination call number with numerical keys or copy
it from one of the phone books: no. from phone book (= personal phone book), main
phone book (= system phone book).
0 [sec] Specify the time delay before the incoming call is forwarded. Select an available time
(0 - 32 seconds).
Save! Press to save the settings. Call diversion is now activated.
Note
Please note that all settings in this menu only take effect when the entries have been confirmed
with Save!.
61
Page 68

Devices menu
"System" menu
New system
Enter the access code and optionally the PARK code. Contact your System Administrator for
more information on this and the protocol setting.
Subscription
Auto search
The handset automatically logs on to the system with the strongest signal currently available. Logon is possible only if the handset has subscribed to the system in question beforehand. Please contact your System Administrator if required.
[System 1…10]
List of systems to which the handset is already subscribed. The selected system
is highlighted.
Use the navigation keys to select a system.
With the handset tries to establish a connection.
Other options can be obtained and set by pressing ❯❯❯
have to be changed. The following settings should only be made by the System
Administrator:
System Name* and Phone number* lets you change / enter the system name
and phone number. This is possible only if no details are supplied by the system
itself.
External call* is used to set the code that identifies external calls (e.g. 0).
Internal call* is used to set the number of digits that make up an internal
phone number. Both settings allow the device to differentiate between internal
and external calls.
Character set is used to set the Editor’s character set.
Protocol* is used to set the transmission protocol. Details shows additional
device data. Delete is used to delete the subscription for the corresponding system.
. As a rule they do not
62
* Not available if the system provides these defaults.
Stop searching
Used to specify that the handset is not present within the system. This feature is
useful in some systems if the system fails to detect that the device is switched
off and in this case activates a call diversion for example.
Show IPEI
The international handset ID is displayed. This may be required for identifying your handset
in the telephone system.
Page 69

Devices menu
Version info
Information concerning the handset hardware and software status is displayed.
"System Menu" menu
Paging, Receive vCard, Locating
These features are only available if supported by your system. Please refer to the separate
User's Guides for more information on the messaging, alarm and server applications.
Hold ringback
You can specify a set time after which you want to be reminded of the connection on
hold or if you want to switch off the function.
Call waiting
Switch the “call waiting” function on and off as required.
"Settings" menu
Key lock
Press
Change
to activate / deactivate the key lock (see also page 25).
Key programming
This menu item allows you to program the softkeys (except for ❯❯❯
hotkeys (not Aastra 610d / 612d). After calling up the function press the key that you want
to program. A selection list of programmable features appears. It is the same selection that
is displayed if the programmable key is pressed and held down in Idle mode. How to proceed is described on page 73 .
), the sidekeys and the
Aastra 630d, 632d: This menu allows you to set the function of the SOS key. After calling up
the menu, press the SOS key and select ...
SOS call: with confirmation
If the SOS key is pressed briefly in an emergency, a prompt asks for confirmation that the emergency call should be made. This prompt prevents emergency
calls from being triggered accidentally. A long keypress allows you to dial the
SOS emergency number immediately.
SOS call: immediately
If the SOS key is pressed in an emergency, the SOS emergency number is dialled
immediately.
User name
You can enter a name here that will be displayed in Idle mode. This is only possible when no
data has been delivered from the system.
63
Page 70

Devices menu
Display
Language Select a display language from the list.
Font settings
(not Aastra 610d) You can select a small, medium or large font for text on the
display.
Colour scheme
(not Aastra 610d) You can choose between five different background colours
for the selection menus.
Menu structure
Aastra 612d, 622d, 632d, 650c only: You can specify different versions of the
menu structure and display contents when idle: Standard is the standard menu
structure on delivery. Easy is a structure where the menu items are usually limited to seven entries. This means that you need to scroll less in order to reach
the desired features. In the Icon setting, the features which are most commonly
used are displayed with icons in the first menu level. Other features are found in
lower levels using the “Expert menu”. With setting Icon you can determine that in the Icon menu the R-key will be used instead of the various softkey
operations e.g. when putting a line on "hold" (see page 45 ff).
Note: The Standard menu structure is described in this User's Guide. In order to
find individual menu items in the Easy and Icon schematic diagrams, please use
the menu trees shown in the appendix. Further descriptions of the features can
then be found in the index.
Note: If the menu structure is modified, the handset automatically carries out a
restart.
64
Brightness (not Aastra 610d) You can change the brightness of the display to match local
lighting conditions.
Contrast (Aastra 610d only) You can change the contrast of the display to match local
lighting conditions.
Illumination
Display dimming
This setting means that the display illumination remains permanently active for
a user-definable time (1 min … 240 mins) even when the device is in Idle mode
or in the charger cradle. This setting reduces the life of the battery.
Display Here you can select for how long the full display illumination (each time a key is
pressed, for instance) remains active (10 ... 240 s).
Keyboard Here you can select for how long the keyboard illumination remains active each
time a key is pressed (1 ... 240 s).
Charger Here you can select for how long the display illumination remains active if the
device is placed in the charger cradle (off, 1... 240 sec.).
Page 71

Devices menu
Conversation
LED indications
To save battery energy, you can use this feature to specify the behaviour of the
display illumination during a call.
If you have selected Light off the display will always be dark during a call. You
can switch on the illumination for a short time by pressing one of the 3 softkeys
(located directly beneath the display).
You can switch the LED indicators on/off according to requirements (see also
page 18).
Life indication Slowly flashing green or orange LED.
Deactivated if the charge indication
(orange or green LED) is also deactivated.
Incoming call Rapidly flashing green or orange LED for
incoming call.
Out of range Rapidly flashing red LED if you are moving out of the
system's radio range
Charge indication LED lights up orange when the battery is being
charged and switches to green when fully charged.
Infos Slowly flashing red LED for a new entry,
e.g. in the call list.
Handsfree Lights green LED when the loudspeaker
is activated.
Appointment Slowly flashing red LED when the appointment
is signalled.
Alarm clock Slowly flashing red LED when the alarm time
is signalled.
List access
The caller list and/or redial list are normally administered on your handset (setting: Local). If
a list is also managed in the communication system (setting: PBX), you can select which list
you want to display. Select Automatic to ensure that the device always uses the list (where
available) from the PBX communication system. If the list is not available, the automatic
selection remains on Local. Selecting PBX (or Automatic / PBX) makes sense if your handset
is operating in parallel with corded phones. This ensures that both devices have access to
the same list and that any changes made are visible on both devices.
Device options
Silent charging
The handset does not give an acoustic signal for any calls when it is in the charger cradle. When you take it out, calls are acoustically signalled again. The calls
are recorded in the call list.
“Silent Charging“ will not apply when the handset is charged via the USB connector.
65
Page 72

Devices menu
Auto. key lock
Charger answer
Auto. answer (call)
If this option is active, the keyboard is automatically locked after approx. 60 sec
if no key is pressed.
If this feature is active, the handset automatically answers a call if it is taken out
of the charger cradle.
With this feature the handset answers a call automatically. Only activate this
feature if your work requires it as it is then possible for the caller to listen in
unnoticed. For safety reasons Auto answer is initiated using 3 attention tones
and its actuation is signalled during the call by the rapidly flashing green LED.
This feature is useful if you need to be informed immediately about important
matters (e.g. when on standby). This feature also simplifies procedures when
operating the handset with a headset. Press
You can set the following options:
Time Sets the amount of time after which Auto answer should be activa-
ted: 0 ... 20 seconds.
Please note: If your device supports the features Text messaging
and/or Paging, do not set any value under 3 seconds.
Handsfree
Allows you to answer the call in handsfree mode (activates the
loudspeaker). The In charger only or Always settings are used to
specify whether the handsfree feature should be activated only
when the handset is on the charger or also when you are carrying
the handset with you.
Change
to activate or deactivate.
66
Microphone
Lets you answer the call automatically with or without activated
microphone. You can also activate the microphone after the call
using the softkey .
LED indication
Lets you activate or deactivate the LED indication during a call.
Attention tone
Lets you activate or deactivate the attention tone at the start of
Auto answer.
Auto quick hook
If this feature is activated, a long keypress on an abbreviated dialling key (see
page 23 and page 29) dials the destination directly. A requirement is that the
relevant phone book entry comprises only one destination (private, business,
mobile, email or fax); if not, the list of entries is provided in call preparation.
Page 73

Devices menu
Voice box
Handsfree You can select if the voice box should answer in the handsfree mode.
Voice messages
Displays the number of stored voice messages. Press
voice box access is also possible if (in idle state) the 1 key is pressed and held
for a moment.
Bluetooth
Status Shows whether Bluetooth is activated or not. Press
vate.
Select headset
Select the subscribed headset you want to use from the list.
Subscribe headset
New
Press
necessary steps on the headset (see User's Manual for the headset).
The handset searches for any
Select an entry, press
ted.
to register a new headset for use on your handset. Also carry out the
Bluetooth
Ok
and enter the PIN of the headset. The "pairing" is star-
devices within range for approx. 30 sec.
Ok
to start the query. This
Change
to activate or deacti-
If you want to change the name or to delete a
-> Edit Change the name of a headset.
Delete The registration data for the respective
headset are deleted after a confirmation
prompt.
Bluetooth
headset, select ...
"Security" menu
You need to enter a PIN to open the "Security" menu. On delivery this is set to 0 0 0 0 (4 x zero).
Phone lock
The phone is locked. Incoming calls only can be accepted. Any programmed emergency call
key or SOS key of the Aastra 630d / 632d can also be used. To remove the phone lock, see
page 25.
Change PIN
You can change the PIN for the "Security" menu. Enter the new PIN and repeat the entry of
the new PIN.
SOS call
SOS number
Enter the phone number to be called during an emergency call. The SOS emergency number is dialled whenever you press the SOS key (Aastra 630d / 632d),
67
Page 74

Devices menu
a programmed emergency key or by the Alarm sensor (Aastra 630d, 632d /provided no Alarm number is programmed). This menu item is not displayed if the
SOS emergency number is predefined by the system.
SOS key
Lets you specify how the SOS key (Aastra 630d / 632d) should respond. The
emergency number is either dialled immediately (SOS call: immmediately) or
only after you have pressed the key a second time (SOS call: with confirma-
tion).
Alarm Sensor (Aastra 630d, 632d only)
Please read the Alarm Sensor descriptions on page 35ff before making the settings.
Alarm number
This menu item is not displayed if the SOS emergency number is predefined by
the system. Enter the alarm number to be called in the event of a sensor alarm.
You can precede the call number with the R key function (enquiry) by
pressing the #-key three times; the alarm call is then also possible
during a call (depending on the system and the handset).
Alarm auto answer
You can specify whether a call from any call number should be answered automatically during the pre-alarm. Regardless of the setting, calls from the alarm
number or SOS emergency number are answered automatically and the prealarm is terminated.
68
Pre alarm Use
Alarm tone The pre-alarm can be sounded with or without an alarm tone on
Vibrator You can set whether the pre-alarm should also be signalled with
Duration You can set the time (10s … 75s) that should elapse before the
Change
to switch the pre-alarm for all alarm types on or off.
the handset. If the alarm tone is activated, the signalling volume
increases progressively.
vibrator call.
emergency number is dialled. An increasingly loud ring tone (alarm
tone) is signalled on the handset during this time (provided it is
activated). The alarm can still be cancelled during the pre-alarm.
During the pre-alarm the alarm can still be cancelled with the following measures:
• With mandown alarm: By pressing
vertical for at least 4 seconds.
• With the escape alarm: By pressing
• With the no movement alarm: By pressing
device sideways for 1 – 2 seconds.
Esc
or holding the handset
Esc
.
Esc
or shaking the
Page 75

Devices menu
Mandown Use
No movement alarm
Change
Alarm in conversation
Delay Allows you to set the amount of time the handset can remain out-
Angle Select the inclination angle of the handset in which the alarm will
Use
Change
Alarm in conversation
Delay Allows you to set the amount of time the handset can remain still
to switch the mandown-alarm on or off.
Switch off this feature to prevent alarm activation by mistake
during an active call.
side the vertical position before a pre-alarm is triggered (1s …
75s).
Please switch Vibra call off in the Ringer settings (see page 72) if
you wish to use the mandown alarm.
be triggered.
Steep: Approximately 45° from the vertical position.
Medium: Approximately 55° from the vertical position.
Flat: Approximately 65° from the vertical position.
The inclination angle will be detected in each axis of the handset.
to switch the no movement alarm on or off.
Switch off this feature to prevent alarm activation by mistake
during an active call.
before a pre-alarm is triggered (1 s … 75 s). To prevent unwanted
alarms, pressing any key on the device resets the delay – e.g. if you
are navigating the menu.
Sensibility
Allows you to set the sensitivity (low, medium, high). This allows
you to adapt the sensor to the different movements (e.g. ways of
walking) of the surveillance personnel:
• Low sensibility means: Slow movements are enough to reset
the delay once again.
• High sensibility means: Only rapid (jolting) movements will
reset the delay.
Please switch Vibra call off in the Ringer settings (see page 72) if
you wish to use the no movement alarm.
69
Page 76

Devices menu
Escape alarm Use
Repeat alarm
Use
Change
Repeat time
Change
to switch the escape alarm on or off.
Alarm in conversation
Switch off this feature to prevent alarm activation by mistake
during an active call.
Delay Allows you to set the amount of time the handset can be in rapid
movement before a pre-alarm is triggered (1 s … 75 s).
Sensibility
Allows you to set the sensitivity (low, medium, high). This allows
you to adapt the sensor to the different movements (e.g. running
movement) of the surveillance personnel:
• Low sensibility means: The alarm is triggered only by rapid or
jolting movements.
• High sensibility means: Slower movements are enough to
trigger the alarm.
Please switch Vibra call off in the Ringer settings (see page 72) if
you wish to use the escape alarm.
to switch the repetition of an alarm on or off.
This is the amount of time after which a new pre-alarm is made followed by the
dialling of the alarm call number, for instance because the dialling of the alarm
call number was cancelled (5 s... 240 s).
Reset to default
70
You can reset different areas of your settings to the status they had on delivery.
Personal directory
You can delete your phone book entries after a confirmation prompt.
VIP list Deletes the VIP list (see page 33).
Inbox/Text messages
If “Text messages” are available on your system, you can delete the inbox list
before you have marked all the messages as “Read” (this is not possible in the
inbox list itself).
New info Deletes the list with new information.
Jobs If “Text messages” are available on your system, you can delete the Jobs list
before you have marked all the messages as “Read” (this is not possible in the
Jobs list itself).
Page 77

Devices menu
All lists All lists (call list, redial list, call list) are deleted after a confirmation prompt.
Key programming
All programmed keys will be reset to the status they had on delivery.
User settings
All the user settings (e.g. language, display settings) are reset to the factory settings after a confirmation prompt.
All The handset is reset to the status it had on delivery after a confirmation
prompt. The registration of the handset on the system and the PIN are not
affected by this.
71
Page 78

Devices menu
"Profiles" menu
When the handset is delivered it has four profiles with characteristic settings pre-programmed for
the "intended purpose". A fifth profile is available for further settings. You can change all profiles
and rename them if required. The activated profile is displayed behind the symbol on the idle
display.
Select
No profile No profile can be used with this setting. The settings you select apply.
Normal Parameters for "normal" use are configured in this profile.
Headset Parameters for using a headset are preset in this profile.
Meeting Parameters for using the handset during a meeting are preset in this profile.
Loud Parameters for use in a particularly loud environment are preset in this profile.
<Profile 05>
This profile is available for your own use.
Settings Choose one of the profiles to make changes.
Profile name
Change the name of the profile if required.
Ringer volume
Set your preferred ringer volume (increasing, 1...7).
Ringer device
Configure where or how the ringer should be signalled (loudspeaker, headset,
vibration alarm).
Play once Select whether the ringer should ring once or repeatedly.
Key click Switch the key click on or off.
Confirm tones
Switch the confirmation tones on or off.
Noise detection
Switch the automatic noise detection for a louder ringer on or off.
72
Page 79

Key programming
Loud environment
Adapt the speech quality in a loud environment.
Silent charging
Switch the "Silent charging" on or off.
LED incoming call
Switch the LED display for an incoming call on or off.
"Feature access codes" menu
This menu is system specific and will only be offered when the functions are supported by your system. It allows the input of certain strings e.g. to park a line or to leave a call back request. Please contact your system administrator for more information on the functions.
Additional menus for special applications
When using the communication system in certain areas, it can be practical to control the various
functions directly from your handset via server / XML interfaces.
Additional menu items are as follows (when available):
The Applications menu, Server menu , Service-Codes and the Presence function.
The transmission and receipt of Text messages and the Locating function are also applications that
have to be activated and licensed.
As the applications may be very different, they are usually explained in a separate User's Guide. Contact your system administrator for more information on the functions.
Key programming
Your handset provides the possibility of assigning frequently used functions to specific keys.
Aastra 610d, 612d
You have the possibility of programming the left and middle softkey below the display and the left
and right navigation keys. The programmed left and right navigation keys can also be used in the
handset’s call connection state (providing their programming differs from the factory setting with
the setting Info and Profile).
Aastra 620d/622d/630d/632d/650c
You have the possibility of programming the left and middle softkey below the display. These programmed keys can only be used in the idle state.
73
Page 80

Key programming
The three sidekeys (left) and the hotkey (right) can be programmed as before. These programmed
keys can be used in the handset’s idle state and call connection state.
A programmed left or right navigation key can also be used in the handset’s call connection state,
but only if their programming differs from the factory setting with the setting Info and Profile.
Once you have programmed the keys, the icon for the programmed function is indicated on the display (does not apply to the Hotkey). All you need to call up the function is a short keypress.
Note
Please note that some functions can only be displayed in the connected state. For instance if you call
up the call list, you can browse through it and edit it, but you cannot dial a call number directly from
the list.
Programming (general)
Press the respective key and hold it for a moment or use the Menu ❯❯❯ -> Settings -> Key programming (see page 63).
The following selection is offered:
If you press the softkey during key programming, you obtain the default key of the factory setting. Press
No function The key is not assigned.
Ok
to accept it.
74
VIP list The key is assigned with a number list (max. 6 entries).
Alarm clock You can program entry to the alarm clock settings.
Appointment You can program entry to the appointment settings.
Profile The selection of profiles is offered.
Info The Info menu (caller list, redial,...) can be programmed.
New info If there are new messages or new calls for example on the caller
list, the list entries are called up directly using the programmed
key.
Caller list The caller list is accessed.
Redial list The redial list is accessed.
Voice box/Voice messages (only on Aastra 650c with Easy / Icon menu structure)
Assigns the key with the selection of the voice memory.
Text messages Assigns the key with access to the menu for text messages (when
available on your system).
Jobs Assigns the key with the Jobs list (where available on your system).
Page 81

Key programming
Inbox/Text messages Assigns the key with the inbox list of text messages (where
available on your system).
Outbox/Text messages Assigns the key with the output list of text messages (where
available on your system).
Pre-defined messages The assigned key calls up the memory for a predefined message
(where available on your system).
New text messages The programmed key lets you call up the input field for new
messages (where available on your system).
Menu The key is assigned with the menu access.
System menu/Main menu (only on Aastra 650c with Easy menu structure)
Programs the key with access to the system menu or main menu.
Server menu Programs a key with access to the Server menu.
Contact your system administrator for more information on the
functions.
Personal directory Access to the phone book is assigned.
Central directory Access to the system phone book is assigned.
Navigation Assigns the key with the alternative access to the functions that lie
on the navigation keys.
SOS call: with confirmation Assigns the key as an SOS emergency call key. Dials the phone
number stored in the menu ❯❯❯
number (after a confirmation prompt).
SOS call: immmediately Assigns the key as an SOS emergency call key. Immediately dials
the phone number stored in the menu ❯❯❯
call -> SOS number (without confirmation prompt).
Aastra 620d / 622d / 630d / 632d / 650c: Do not assign this
function to the middle or left softkey (see page 35) if you want the
SOS emergency call key to be available also in the connection state.
Call diversion Assigns the key with access to call diversion.
Applications The key is assigned with a list of your phone’s special features
(depending on the system equipment). For more information on
the features themselves, contact your System Administrator.
1...10 App 1 ... 10 Individual features from the list of applications can be
programmed to individual keys. For more information on the
features themselves, contact your System Administrator.
-> Security ->SOS call -> SOS
-> Security -> SOS
75
Page 82

Key programming
Data management / SD Card (622d, 632d, 650c with SD card only)
Programms a key with access to the SD Card menu.
Locating Programs a key with access to the Locating function.
Contact your system administrator for more information on the
functions.
Presence Programs a key to call up the Presence feature. For more
information on the features themselves, contact your System
Administrator.
Light Not Aastra 610c , 620d, 630d: Programs a key for switching the
display illumination on and off.
Bluetooth Assigns the key with access to the Bluetooth menu (not Aastra
610d, 612d).
Hi-Q audio Aastra 650c only: Programs a key for switching between standard
audio and Hi-Q audio (see page 59).
Volume Programs a key with access to the volume setting (the
programmed key is not identified by a symbol / icon).
Note
If you have reprogrammed the functions from the status they had on delivery, you can access these
functions through a number of alternatives.
76
Redial … by pressing the Call key and holding it for a moment.
Navigation … by pressing the keys , , ,
Page 83

Appendix
Appendix
Care and Maintenance
Your telephone is a product that meets the highest design and manufacturing standards. It should
therefore be treated with care. The suggestions listed below will help you enjoy this product for a
long time.
Follow all the safety precautions given on page 1. These precautions apply to the handset, the charger cradle and the rechargeable batteries (i.e. the entire telephone) as well as to the accessories.
To clean the telephone, first pull out the adapter plug of the charger cradle from the mains socket.
Wipe the devices first with an antistatic cloth or soft, damp leather rag and then with a dry cloth.
Note: Never spray your telephone with cleaning agents or solvents. Clean the handset and charger
cradle contacts with a lint-free cloth.
Environmental Characteristics and Disposal
(applicable for the European Union)
This product is environmentally friendly and can be recycled. It was manufactured in accordance
with statutory requirements and with the Manufacturers’ Guideline 2002. It was developed with
special focus on low energy consumption, long life, and ease of servicing. The few materials used in
its manufacture are environmentally friendly. Help to extend the life of your communications device
by adhering to the safety instructions, the information on battery lifetime, and the care and maintenance instructions.
Instructions for disposal
To prevent potential consequences to the environment and to health from the disposal of hazardous
substances contained in electrical and electronic devices, the directives of the European Parliament
and the Council with respect to
• Directive 2002/96/EC "Waste electrical and electronic equipment" and
• Directive 2002/95/EC "Restriction of the use of certain hazardous substances in electrical and
electronic equipment"
are nationally and legally regulated in all countries of the EU.
The legislation is aimed primarily at the avoidance of waste from electrical and electronic equipment
as well as at the re-utilization of materials, the final recycling and other forms of recycling such
waste in order to reduce the amount of waste to be disposed of as well as to decrease the entry of
hazardous substances from electrical and electronic equipment into the waste system.
The product you have purchased was developed with a state-of-the-art environmental and recycling
orientation and thus complies with the guidelines of the European directives.
77
Page 84

Appendix
The product is marked with the symbol indicated. When disposal is required, this
symbol obligates the owner of the product to dispose of this product at a collection
point separate from unsorted household waste. Suitable facilities for the return of
electrical and electronic waste have been created for this purpose. Obsolete equipment can be brought free of charge to these public reception points for disposal
(bring system). Please refer to the information from the responsible offices in the
cities and communities for the location of these disposal reception points.
Caution!
Electrical equipment waste does not belong in domestic waste. Bring this type of
waste free of charge to the recognised reception points for disposal.
Declaration of Conformity
(applicable for the European Union)
CE mark
This device complies with the requirements of the EU directive:
1999/5/EU directive on radio and telecommunications terminal equipment and the mutual recognition of their conformity. Conformity to the above-mentioned directive is confirmed by the CE mark
on the device.
78
Page 85

Appendix
Limited Warranty
Aastra warrants this product against defects and malfunctions in accordance with Aastra's authorized, written functional specification relating to such products during a one (1) year period from the
date of original purchase (“Warranty Period”). If there is a defect or malfunction, Aastra shall, at its
option, and as the exclusive remedy, either repair or replace the product at no charge, if returned
within the Warranty Period. If replacement parts are used in making repairs, these parts may be
refurbished, or may contain refurbished materials. If it is necessary to replace the product, it may be
replaced with a refurbished product of the same design and color. If it should become necessary to
repair or replace a defective or malfunctioning product under this warranty, the provisions of this
warranty shall apply to the repaired or replaced product until the expiration of ninety (90) days from
the date of pick up, or the date of shipment to you, of the repaired or replacement product, or until
the end of the original Warranty Period, whichever is later. Proof of the original purchase date is to
be provided with all products returned for warranty repairs.
Exclusions
Aastra does not warrant its products to be compatible with the equipment of any particular telephone company. This warranty does not extend to damage to products resulting from improper
installation or operation, alteration, accident, neglect, abuse, misuse, fire or natural causes such as
storms or floods, after the product is in your possession. Aastra will not accept liability for any damages and/or long distance charges, which result from unauthorized and/or unlawful use.
Aastra shall not be liable for any incidental or consequential damages, including, but not limited to,
loss, damage or expense directly or indirectly arising from the customer’s use of or inability to use
this product, either separately or in combination with other equipment. This paragraph, however,
shall not apply to consequential damages for injury to the person in the case of products used or
bought for use primarily for personal, family or household purposes.
This warranty sets forth the entire liability and obligations of Aastra with respect to breach of warranty, and the warranties set forth or limited herein are the sole warranties and are in lieu of all other
warranties, expressed or implied, including warranties or fitness for particular purpose and merchantability.
(applicable for sales in USA, Canada)
Warranty Repair Services
Should the product fail during the Warranty Period;
• In North America, please call 1-800-574-1611 for further information.
• Outside North America, contact your sales representative for return instructions.
You will be responsible for shipping charges, if any. When you return this product for warranty service, you must present proof of purchase.
79
Page 86

Appendix
After Warranty Service
Aastra offers ongoing repair and support for this product. This service provides repair or replacement of your Aastra product, at Aastra's option, for a fixed charge. You are responsible for all shipping charges. For further information and shipping instructions:
• In North America, contact our service information number: 1-800-574-1611.
• Outside North America, contact your sales representative.
Note: Repairs to this product may be made only by the manufacturer and its authorized agents, or
by others who are legally authorized. This restriction applies during and after the Warranty Period.
Unauthorized repair will void the warranty.
Limited Warranty
The benefits under the Aastra Limited Warranty below are in addition to other rights and remedies
to which you may be entitled under a law in relation to the products.
In addition to all rights and remedies to which you may be entitled under the Competition and Consumer Act 2010 (Commonwealth) and any other relevant legislation, Aastra warrants this product
against defects and malfunctions in accordance with Aastra's authorized, written functional specification relating to such products during a one (1) year period from the date of original purchase
(“Warranty Period”). If there is a defect or malfunction, Aastra shall, at its option, and as the exclusive
remedy under this limited warranty, either repair or replace the product at no charge, if returned
within the Warranty Period.
Repair Notice: To the extent that the product contains user-generated data, you should be aware
that repair of the goods may result in loss of the data. Goods presented for repair may be replaced
by refurbished goods of the same type rather than being repaired. Refurbished parts may be used to
repair the goods. If it is necessary to replace the product under this limited warranty, it may be replaced with a refurbished product of the same design and color.
If it should become necessary to repair or replace a defective or malfunctioning product under this
warranty, the provisions of this warranty shall apply to the repaired or replaced product until the
expiration of ninety (90) days from the date of pick up, or the date of shipment to you, of the repaired or replacement product, or until the end of the original Warranty Period, whichever is later.
Proof of the original purchase date is to be provided with all products returned for warranty repairs.
Exclusions
(Australia Only)
Aastra does not warrant its products to be compatible with the equipment of any particular telephone company. This warranty does not extend to damage to products resulting from improper
installation or operation, alteration, accident, neglect, abuse, misuse, fire or natural causes such as
storms or floods, after the product is in your possession. Aastra will not accept liability for any damages and/or long distance charges, which result from unauthorized and/or unlawful use.
To the extent permitted by law, Aastra shall not be liable for any incidental damages, including, but
not limited to, loss, damage or expense directly or indirectly arising from your use of or inability to
80
Page 87

Appendix
use this product, either separately or in combination with other equipment. This paragraph, however, is not intended to have the effect of excluding, restricting or modifying the application of all or
any of the provisions of Part 5-4 of Schedule 2 to the Competition and Consumer Act 2010 (the ACL),
the exercise of a right conferred by such a provision or any liability of Aastra in relation to a failure to
comply with a guarantee that applies under Division 1 of Part 3-2 of the ACL to a supply of goods or
services.
This express warranty sets forth the entire liability and obligations of Aastra with respect to breach
of this express warranty and is in lieu of all other express or implied warranties other than those conferred by a law whose application cannot be excluded, restricted or modified. Our goods come with
guarantees that cannot be excluded under the Australian Consumer Law. You are entitled to a replacement or refund for a major failure and for compensation for any other reasonably foreseeable loss
or damage. You are also entitled to have the goods repaired or replaced if the goods fail to be of
acceptable quality and the failure does not amount to a major failure.
Warranty Repair Services
Procedure: Should the product fail during the Warranty Period and you wish to make a claim
under this express warranty, please contact the Aastra authorized reseller who sold you this
product (details as per the invoice) and present proof of purchase. You will be responsible for
shipping charges, if any.
Manufacturer: Aastra Telecom Australia Pty Ltd (“Aastra")
Level 12, 45 William Street
Melbourne, Victoria 3000, Australia, ABN: 16 140 787 195
Phone: +61 3 8628 9500
Limitation of Liability for Products not of a kind ordinarily acquired for personal, domestic or
household use or consumption (eg goods/services ordinarily supplied for business-use)
1.1 To the extent permitted by law and subject to clause 1.2 below, the liability of Aastra to you for
any non-compliance with a statutory guarantee or loss or damage arising out of or in connection with the supply of goods or services (whether for tort (including negligence), statute, custom, law or on any other basis) is limited to:
(a) in the case of services:
(i) the resupply of the services; or
(ii) the payment of the cost of resupply; and
(b) in the case of goods:
(i) the replacement of the goods or the supply of equivalent goods; or
(ii) the repair of the goods; or
(iii) the payment of the cost of replacing the goods or of acquiring equivalent goods; or
(iv) the payment of the cost of having the goods repaired.
1.2 Clause 1.1 is not intended to have the effect of excluding, restricting or modifying:
(a) the application of all or any of the provisions of Part 5-4 of Schedule 2 to the Competition
and Consumer Act 2010 (the ACL); or
(b) the exercise of a right conferred by such a provision; or
81
Page 88

Appendix
(c) any liability of Aastra in relation to a failure to comply with a guarantee that applies under
Division 1 of Part 3-2 of the ACL to a supply of goods or services.
After Warranty Service
Aastra offers ongoing repair and support for this product. If you are not otherwise entitled to a
remedy for a failure to comply with a guarantee that cannot be excluded under the Australian Consumer Law, this service provides repair or replacement of your Aastra product, at Aastra's option, for
a fixed charge. You are responsible for all shipping charges. For further information and shipping
instructions contact:
Aastra Telecom Australia Pty Ltd (“Aastra")
Level 12, 45 William Street
Melbourne, Victoria 3000, Australia, ABN: 16 140 787 195
Phone: +61 3 8628 9500
Note: Repairs to this product may be made only by the manufacturer and its authorized agents, or
by others who are legally authorized. Unauthorized repair will void this express warranty.
82
Page 89

Appendix
Accessories
You can obtain the following accessories through your dealer:
Accessories
Aastra 610, 620, 630 Charger with international AC-Adapter 68980
Aastra 600c/d series Charger with international AC-Adapter 80E00005AAA-A
Aastra 610d Handset 68983
Aastra 612d Handset 80E00008AAA-A
Aastra 620d Handset 68982
Aastra 622d Handset 80E00009AAA-A
Aastra 630d Handset 68981
Aastra 632d Handset 80E00010AAA-A
Aastra 650c Handset 68629
Aastra 620d,622d, 630d,
632d, 650c Power-Battery-Pack 68773
Aastra 620d, 622d, 650c Cover for Power Battery Compartment 68772
Aastra 630d, 632d Cover for Power Battery Compartment 68771
Aastra 610d, 612d, 620d, 622d Rotary-Belt Clip (grey / black) 68770
Aastra 630d, 632d Rotary-Belt Clip 68668
Aastra 650c Rotary-Belt Clip (black / black) 80-00003AAA-A
Aastra 610d, 612d, 620d, 622d Leather Pouch 68762
Aastra 630d, 632d Leather Pouch 68761
Aastra 650c Leather Pouch 68625
Aastra 600c/d series Neck Band with Band Holder for
Aastra 630d/632d 68769
Aastra 600c/d series Charger Rack with 8 charger cradles 68774
83
Page 90

Appendix
Headsets
You will find a list of corded headsets and Bluetooth headsets that you can purchase from your dealer on our Internet site. Aastra headsets that comply with the safety requirements of EN60950-1 Item
6.2. are recommended. This does not constitute any appraisal of the acoustic and functional quality
of the headsets of the individual manufacturers.
USB charger
If you want to charge your handset (not Aastra 610d, 612d) with a USB charger, please use one of
the commercially available USB plug-in power supplies with the following data.
Connection type: Mini USB connector
Type: Switching power supply: 100V to 240 V / 50 – 60 Hz
Output power: approx. 5 W
Output voltage: 5 V/DC
Only use a plug-in power supply unit certified by your authorities.
USB cable (68759)
If you require a USB cable, any commercially available USB cable can be used. Always use a shielded
USB cable of the type “USB 2.0 A on USB Mini B”.
A certified cable is also available from Aastra (not available in every country).
microSD card for Aastra 620d, 622d, 630d,632d, 650c (87-00003AAA-A)
You can use the optional microSD card to store the handset’s logon data on your communication
system, the main local device data and the personal directory. This ensures that, if the device is
defective, it is possible to take out the card and use it on a replacement device so operations can be
maintained in the shortest possible time and without having to log on again. Commercially available
microSD cards cannot be used.
84
Page 91

Appendix
Technical specifications
applicable for … USA, Canada All other countries
Standard: DECT / GAP DECT / GAP
No. of channels: 60 duplex channels 120 duplex channels
Frequencies: 1920 MHz to 1930 MHz (UPCS) 1880 MHz to 1900 MHz
Duplex method: Time-division multiplex, Time-division multiplex,
10 ms frame length 10 ms frame length
Channel subdivision: 1728 kHz 1728 kHz
Bitrate: 1152 kbps 1152 kBit / s
Modulation: GFSK GFSK
Voice coding: 32 kpbs 32 kpbs
Output: 5 mW (average output per 10 mW (average output per
active channel) active channel)
Range: up to 980 ft outdoors, up to300 m outdoors,
160 ft indoors up to 50 m indoors
Bluetooth
QD ID Aastra 620d, 630d: B014700 B014700
Bluetooth
QD ID Aastra 622d, 632d: B019461 B019461
Bluetooth
QD ID Aastra 650c: B018604 B018604
Power supply charger cradle: AC 110 – 240 V / 50 /60 Hz AC 110 –240 V / 50 /60 Hz
Handset operating time Standby time / talk time Standby time / talk time
/Standard battery: up to 95 hours / 15 hours up to 100 hours / 12 hours
Handset operating time
/Power battery: Standby time / talk time Standby time / talk time
up to 190 hours / 30 hours up to 200 hours / 24 hours
Standard rechargeable battery: Li-Ion battery, 3.7 V / Li-Ion battery, 3.7 V /
850 (880) mAh / 3.15 (3.3) Wh 850 (880) mAh / 3.15 (3.3) Wh
Power battery (Aastra 620d / 630d): Li-Ion battery, 3.7 V / Li-Ion battery, 3.7 V /
1800 (2030) mAh / 6.66 (7.6) Wh 1800 (2030) mAh / 6.66 (7.6) Wh
Time to charge completely discharged
standard batteries: 2.5 hours 2.5 hours
Permissible ambient temperatures
for operating the handset: 41° F to 104° F 5° C to 40° C
85
Page 92

Appendix
Permissible storage temperature: 23° F to 113° F -5°C to +45°C
Charger cradle dimensions: Length / Width / Height Length / Width / Height
2.99 x 2.95 x 0.94 in 76 x 75 x 24 mm
Handset dimensions: Length / Width / Height Length / Width / Height
Aastra 610d / 612d / 620d / 622d: 5.31 x 1.93 x 0.89 in 135 x 49 x 22.5 mm
Aastra 630d / 632d: 5.31 x 2.08 x 0.89 in 135 x 53 x 22.5 mm
Aastra 650c: 5.72 x 1.93 x 0.89 in 145 x 49 x 22,5 mm
Charger cradle weight: 1.41 oz 40 g
Handset weight: Aastra 610d / 612d / 620d / 622d Aastra 610d / 612d / 620d / 622d
(with battery): (with batt.):
4.48 oz 127 g
Aastra 630d / 632d (with battery): Aastra 630d / 632d (with batt.):
4.9 oz 139 g
Aastra 650c (with battery): Aastra 650c (with batt.):
4.66 oz 132 g
Length of power supply cable: 5 ft 1,5 m
86
Page 93

Appendix
Info Caller list >List<
Voice box
1)
>Call<
Text messages
1)
>List<
Jobs
1)
>List<
Redial list >List<
Applications
1)
Active features Bluetooth
2)
Mandown
4)
No movement alarm
4)
Escape alarm
4)
Call filter
Profiles
Alarm clock
Appointment
Text messages
1)
Outbox
Inbox
Jobs
...
Directories Central directory >List<
Personal directory >List<
VIP list >List<
Time/Alarms Date/Time
7)
Time
Date
Appointment Appointment 1,2,3 Status
Time
Date
Text
Alarm clock Alarm 1, 2, 3 Status Off
Once
Daily
Weekdays
Weekend
Time
Text
Timer
Format settings Time format 24h, 12h am/pm
Date format dd.mm.yy
mm/dd/yy
yy-mm-dd
dd-mmm-yyyy
Audio Volume settings Earpiece
Handsfree
Corded headset
Internal call
External call
Unknown number
Callback
Recall
VIP call
Special call
SOS call
Alarm clock
Appointment
Normal message
1)
Urgent message
1)
Alarm message
1)
Menu Structure for all Handsets “Standard“ setting
87
Page 94

Melodies Internal call
External call
Unknown number
Callback
Recall
VIP call
Special call
SOS call
Alarm clock
Appointment
Normal message
1)
Urgent message
1)
Alarm message
1)
Ringer settings Play once
Silent charging
Ringer
Vibra call
Corded headset
Noise detection
Attention tones Key click
Confirm tones
End of menu
Battery warning
Coverage warning
Alarm tone
4)
Loud environment
Audioquality 5) Standard audio
HI-Q audio
Automatic
Data management / SD Card 6)
Call filter 1) Status
List of numbers >List<
Unknown number
Call diversion 1) Off
No ( )
0 [sec]
Save!
System New system >Auth.Code< Subscription
Enter PARK
Show IPEI
Protocol
Subscription Auto search
[System 1] System name
7)
... Phone number 7)
External call 7)
Internal call
7)
Character set
Protocol 7)
Details ...
Delete
Stop searching
Show IPEI
Version info
System menu Server menu 1)
Paging 1)
Hold ringback
Call waiting
Receive vCard
1)
88
Appendix
Page 95

Settings Key lock
Key programming >Key<
User name
Display Language
Font settings
8)
Color schemes
8)
Menu structure
9)
Standard
Easy
Icon
Icon R
Brightness/Contrast
Illumination Display dimming
Display
Keyboard
Charger
Conversation
LED indications Life indication
Incoming call
Out of range
Charge indication
Info
Handsfree
Appointment
Alarm clock
List access Redial list Automatic
Lokal
PBX
Caller list Automatic
Lokal
PBX
Device options Silent charging
Auto. key lock
Charger answer
Auto. answer (call)
Auto. quick hook
Voice box Handsfree
Voice messages
Bluetooth
2)
BT Status
Select headset
Subscribe headset
Security
3)
Phone lock
Change PIN
SOS call SOS number
7)
SOS key SOS call: with confirmation
SOS call: immediately
Alarm Sensor
4)
Alarm number
Alarm auto answer
Handsfree in alarm
Pre alarm Alarm tone
Vibrator
Duration
Mandown Alarm in conversation
Delay
Angle
No movement alarm Alarm in conversation
Delay
Sensibility
Escape alarm Alarm in conversation
Delay
Sensibility
Repeat alarm Repeat time
Appendix
89
Page 96

Reset to default Personal directory
VIP list
Inbox/Text messages
1)
Jobs
1)
New Info
All lists
Key programming
User settings
All
Profiles Select
Settings No profile
Normal
Headset
Meeting
Loud
<Profil 05>
Locating
1)
Presence
1)
Feature access codes
1)
1)
Only available when supported by the system
2)
Not Aastra 610d, 612d
3)
Available after entering PIN
4)
Aastra 630d, 632d only
5)
Aastra 650c only
6)
Only Aastra 622d, 632d, 650c when an Aastra microSD card is inserted
7)
Not available if the system provides these defaults
8)
Not at Aastra 610d
9)
Not at Aastra 610d, 620d, 630d
Appendix
90
Page 97

Appendix
System menu Feature access codes
1)
Applications 1)
Locating
1)
Presence
1)
Main menu Server menu
1)
Paging
1)
Hold ringback
Call waiting
Receive vCard
1)
Info Caller list >List<
Voice messages
1)
>Call<
Text messages
1)
>List<
Jobs
1)
>List<
Redial list >List<
Active features Bluetooth
7)
Mandown
6)
No movement alarm
6)
Escape alarm
6)
Call filter
Profiles
Alarm
Appointment
Text messages
1)
Outbox >List<
Inbox >List<
Jobs >List<
...
Directories Central directory >List<
Personal directory >List<
VIP list >List<
Data management / SD Card
3)
Call diversion
1)
Off
No ( )
0 [sec]
Save!
Settings Language
User name
Time/Alarms Date/Time
4)
Time
Date
Appointment Appointment 1,2,3 Status
Time
Date
Text
Alarm clock Alarm 1, 2, 3 Status
Time
Text
Timer
Format settings Time format 24h, 12h am/pm
Date format dd.mm.yy
mm/dd/yy
yy-mm-dd
dd-mmm-yyyy
Menu Structure for Aastra 612d, 622d, 632d, 650c “Easy” setting
91
Page 98

yyyy
Audio Volume settings Earpiece
Handsfree
Corded headset
Internal call
External call
Unknown number
Callback
Recall
VIP call
Special call
SOS call
Alarm clock
Appointment
Normal message
1)
Urgent message
1)
Alarm message
1)
Melodies Internal call
External call
Unknown number
Callback
Recall
VIP call
Special call
SOS call
Alarm clock
Appointment
Normal message
1)
Urgent message
1)
Alarm message
1)
Ringer settings Play once
Silent charging
Ringer
Vibra call
Corded headset
Noise detection
Attention tones Key click
Confirm tones
End of menu
Battery warning
Coverage warning
Alarm tone
4)
Loud environment
Audioquality
5)
Standard audio
HI-Q audio
Automatic
Call filter
1)
Status
List of numbers >List<
Number unknown
Profiles Select
Settings No profile
Normal
Headset
Meeting
Loud
<Profil 05>
Appendix
92
Page 99

Bluetooth
7)
BT Status
Select headset
Subscribe headset
Subsciptions New system >Auth.Code< Subscription
Enter PARK
Show IPEI
Protocol
Subscription Auto search
[System 1] System name
4)
... Phone number
4)
External call
4)
Internal call
4)
Character set
Protocol
4)
Details ...
Delete
Stop searching
Show IPEI
Version info
Expert menu Key programming >Key<
Display Font settings
Color schemes
Menu structure Standard
Easy
Icon
Icon R
Brightness
Illumination Display dimming
Display
Keyboard
Charger
Conversation
LED indications Life indication
Incoming call
Out of range
Charge indication
Info
Handsfree
Appointment
Alarm clock
List access Redial list Automatic
Lokal
PBX
Caller list Automatic
Lokal
PBX
Device options Silent charging
Auto. key lock
Auto. answer (call)
Charger answer
Auto. quick hook
Voice box Handsfree
Voice messages
Appendix
93
Page 100

Security
2)
Phone lock
Change PIN
SOS call SOS number
4)
SOS key SOS call: with confimation
SOS call: immediately
Alarm sensor
6)
Alarm number
Alarm auto answer
Handsfree in alarm
Pre alarm Alarm tone
Vibrator
Duration
Mandown Alarm in conversation
Delay
Angle
No movement alarm Alarm in conversation
Delay
Sensibility
Escape alarm Alarm in conversation
Delay
Sensibility
Repeat alarm Repeat time
Reset to default Personal directory
VIP list
Inbox/Text messages
1)
Jobs
1)
New Info
All lists
Key programming
User settings
All
1)
Only available when supported by the system
2)
Available after entering PIN
3)
Only when an Aastra microSD card is inserted
4)
Not available if the system provides these defaults
5)
Only Aastra 650c
6)
Only Aastra 632d
7)
Not at Aastra 612d
Appendix
94
 Loading...