3M CS-400 Installation Manual

3M™ Water Filtration Products
CS-400 Series Water
Filtration Systems
Installation and Instruction Manual
Read, understand, and follow all safety information contained in these instructions prior to installation and use of the 3M™ Water Filtration Products Model CS-400 Series. Retain these instructions for future reference.
Intended use:
The 3M™ Water Filtration Products Model CS-400 Series is intended for use in filtering potable water for food service equipment and has not been evaluated for other uses. The system is intended for indoor installations and must be installed by qualified professional installer according to these installation instructions.
|
EXPLANATION OF SIGNAL WORD CONSEQUENCES |
WARNING |
Indicates a potentially hazardous situation, which, if not avoided, could result in death or serious injury and/or |
|
property damage. |
CAUTION Indicates a potentially hazardous situation, which, if not avoided, may result in property damage.
 WARNING
To reduce the risk associated with ingestion of contaminants.
• Do not use with water that is microbiologically unsafe or of unknown quality without adequate disinfection before or after the system.
CAUTION
To reduce the risk associated with property damage due to water leakage:
•Protect filter from freezing. Drain filter when room temperature drops below 40° F (4.4° C);
•Do not install if water pressure exceeds 120 psi (827 kPa). If your water pressure exceeds 120 psi (827 kPa) you must install a pressure limiting valve. Contact a plumbing professional if you are uncertain how to check your water pressure;
•Do not install on hot water supply lines. Install on cold water lines only. Installed on cold water lines only, maximum temperature 100°F (37.8°C);
•Do not install where water hammer conditions may occur. If water hammer conditions exist, you must install a water hammer arrester. Contact a plumbing professional if you are uncertain how to check for this condition;
•Do not install on hot water supply lines. The maximum operating water temperature of this system is 100° F (37.7° C)
•Read and follow use instructions before installation and use of this system;
•The disposable filter cartridge must be replaced every six months or at the specified service cycle.
•Read and follow Use Instructions before installation and use of this system.
IMPORTANT
•Failure to follow instructions may void warranty;
•Allow minimum of 2 in (5.1 cm) clear space under [the assembly] to facilitate cartridge changes;
•Install with the inlet and outlet ports as labeled. Make sure not to reverse connections.
•Do not use acid base sealers or wicking on plastic filter head.
•Do not use torches or other heat sources near plastic plumbing, as damage may occur;
•Take care when using pliers or pipe wrenches to tighten plastic fittings, as damage may occur;
•On plastic fittings, use thread sealing tape only. Never use pipe sealant or pipe dope on plastic fittings, as damage may occur;
•Do not install this system in direct sunlight.
Installer: Please leave this manual with owner/operator.
End User: Please retain for operation and future maintenance instructions.

3M™ Water Filtration Products
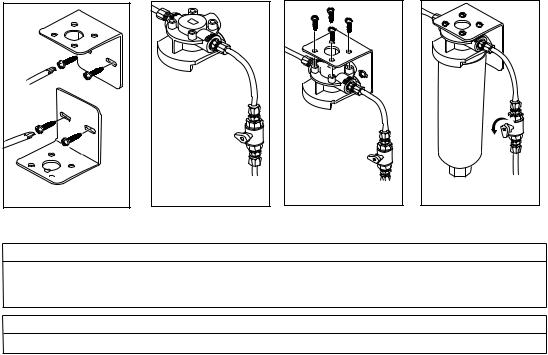
Procedure for Installing CS-400 Series Water Filtration Systems
Before starting, close shut-off valve on cold water line.
Step 1 |
Step 2 |
Step 3 |
Step 4 |
 WARNING
To reduce the risk associated with hazardous voltage:
•Do not install near electric wiring or piping which may be in path of a drilling tool when selecting the position to mount the filter bracket.
IMPORTANT NOTES
• Note adjacent equipment which may interfere with system fastening screws.
Step 1. The Mounting Bracket may be installed with the back of the bracket in the up or down position Screws may be used to attach the bracket to the desired surface or the industrial double-sided tape strip can be cut in half and used to mound the bracket. (Be sure that both the surface of the bracket and the mounting surface are clean. Be sure to allow at least 2” (5 cm) of clearance below the unit.)
Step 2. The filter must be installed with inlet and outlet ports as labeled. Make sure not to reverse the connections. IMPORTANT: ON TOP OF THE FILTER HEAD you will see the numbers 1, 2, and 3 molded into the plastic head.
Port 3 is labeled inlet. Port 1 is labeled outlet.
Port 2 is not an option and is not threaded for fittings
The shut off valve should be located in line somewhere between the incoming water line and the inlet fitting.
Step 3. Attach the head to the bracket with the screws provided. All four screws can be used, or two can be used to mount the bracket to the desired surface.
Step 4. Install cartridge, (see Cartridge Change instructions on next page and follow Steps 3 and 4) and make any required connections. Pressurize the system and check for leaks. Flush system in accordance with Performance Data Sheet. Water may run cloudy but will quickly clear.
2
 Loading...