

Page 1
OWNER'S MANUAL
For use with software version 5.0
March, 2001
Version Key Features
1.0 Initial release
2.0 Support of external removable media
3.0 Short/cut’99 edit features and file translation
4.0 Speed increases in edit features, file copy, import and export
5.0 IDE Internal Drive with optional SCSI adapter card
2000
P R O F E S S I O N A L D I G I T A L A U D I O
Page 2

Page ii
SERIAL NUMBER: ____________
FCC NOTICE
WARNING: This equipment has been tested and found to comply with the limits for a Class A
digital device pursuant to Part 15 of the FCC Rules. These limits are designed to provide
reasonable protection against harmful interference when the equipment is operated in a
commercial environment. This equipment generates, uses and can radiate radio frequency
energy and, if not installed and used in accordance with the instruction manual, may cause
interference to radio communications. Operation of this equipment in a residential area is
likely to cause interference in which case the user will be required to correct the interference at
his own expense.
The user is cautioned that changes made to the equipment without the approval of the
manufacturer could void the user's authority to operate this equipment.
It is suggested that only shielded and grounded cables be used to ensure compliance with FCC
Rules.
Short/cut Owner’s Manual
Edition 5.0, March 2001
Covers features in Software Version 5.0
Copyright 1996 – 2001, 360 Systems
Printed in the United States of America
All rights reserved.
360 Systems
Page 3

Page iii
PRODUCT IMPROVEMENTS AND UPGRADES
360 Systems reserves the right to make changes and/or improvements to its products,
without incurring any obligation to incorporate such changes or improvements in units
previously sold or shipped.
360 Systems may issue Technical Support Bulletins from time to time, advising owners
of record of product enhancements that become available.
TRADEMARKS AND PATENTS
360 Systems Instant Replay
®
Systems
Dolby
are registered trademarks of 360 Systems. Zip® and Jaz® are trademarks of Iomega.
®
is a trademark of Dolby Laboratories Licensing Corporation.
®
, DigiCart®, Shortcut, Personal Audio Editor, and 360
Software contained in this product is copyrighted by 360 Systems, Dolby Laboratories,
Inc and Microware Systems Corp. Designs incorporated in this product are the subject of
current or pending U.S. and foreign patents.
LIMITED WARRANTY
360 Systems' Shortcut audio editor is warranted against defects in material and
workmanship for a period of one year from date of original purchase. This warranty includes
parts and labor. This warranty excludes units that have been modified, repaired by
unauthorized personnel, or damaged by abuse, improper operation, dirt, or static electricity.
360 SYSTEMS ASSUMES NO LIABILITY WHATSOEVER FOR REAL OR CONSEQUENTIAL DAMAGES, LOSS OF PROFITS, INCONVENIENCE OR ANY
OTHER LOSSES DUE TO NON-OPERATION OF ANY OF ITS PRODUCTS.
360 Systems' sole liability under this limited warranty shall be the repair or replacement
of defective products or components. Products being returned under warranty shall be sent to
360 Systems, freight prepaid, in the original or equivalent packaging.
SHIPPING ADDRESS
Please call 360 Systems before shipping any parts or merchandise to receive a Return
Authorization Number. Freight and mail may be sent to 360 Systems at the following address:
360 Systems
5321 Sterling Center Drive
Westlake Village, California 91361
U.S.A.
360 Systems' telephone number is (818) 991-0360. Faxes may be sent to (818)
991-1360. Business hours are from 8:00 AM to 5:00 PM weekdays, Pacific Time.
Visit 360 Systems on the World Wide Web at www.360systems.com.
Shortcut 2000 Editor Owner’s Manual
Page 4

Page iv
Table of Contents
INTRODUCTION ____________________________________ 1
CHAPTER I ________________________________________ 3
CONTROLS AND DISPLAYS
Front Panel of the Shortcut Editor, illustration 3
The Display 4
LCD Display, illustration 4
Zoom In and Zoom Out 4
TRANSPORT CONTROLS............................................................................................................ 4
Record 4
Stop 4
Play 4
Fast Forward 5
Rewind 5
Loop 5
Pause 5
Bleep 5
Hot Keys 5
EDIT KEYS..................................................................................................................................... 6
Mark (Locating Marks) and Zero Mark 6
Go-To Keys 6
Arm Keys 6
Edit In 6
Edit Out 7
Cut 7
Copy 7
Insert 7
Gain Editing 7
Erase 8
Nudge Arrows 8
Undo 8
Soft Keys 8
FILE MANAGEMENT KEYS ....................................................................................................... 9
DIR (Directory Select) 9
Directory Listing, illustration 9
FILES (File Select) 9
Files Menu, illustration 9
Save and Save As 10
Exit 11
Find A File 11
Alphanumeric Keyboard 11
AUDIO CONTROLS .................................................................................................................... 12
Input Levels 12
LED Level Indicators 12
Headphone and Speaker Volume 12
Speakers 12
Solo 12
360 Systems
Page 5

Page v
CHAPTER II ______________________________________ 13
REAR PANEL FEATURES
Rear Panel, illustration 13
Analog Audio Inputs and Outputs 13
Digital Audio Inputs 13
Digital Audio Outputs 13
D-NET File Transfer Ports 13
Power Supply 14
Power Switch 14
Headphone Jack 14
Display Viewing Angle (Contrast Control) 14
Serial Number 14
G.P.I. Inputs and Tally Outputs 14
G.P.I. Connector Pin-Outs 14
Setting LED Current 15
GPI Input Assignment Options 15
Connecting to Telephone Control Systems 16
Using External Sample Rate Synchronization 17
Parallel Connector, SCSI Option and External Disk Drive Support 18
CHAPTER III ______________________________________ 21
RECORDING
Sample Rate 21
Record Mode (Basic) 22
Setting The Record Monitor 22
Setting The Recording Threshold 22
Record Pause 23
Recording Multiple Takes 23
Insert Recording 23
Basic Insert Recording 24
Replacement Insert Recording 24
CHAPTER IV______________________________________ 25
EDITING
EDIT OPERATIONS..................................................................................................................... 25
Waveform Display with Callouts, illustration 25
Location Marks 26
Waveform Display, Showing Marks, illustration 26
The Zero Mark 26
Placing Location Marks During Recording 27
Edit Marks 27
Edit In Mark at Cursor,illustration 28
Edit In/Out Marks set,illustration 28
Play Selected Audio 28
Cut a Selected Segment 28
Cut to Hot Key 29
The Copy Command 29
Copy a Selected Segment of Audio 29
Copy a Selected Portion of a File to a Hot Key 29
Copy an Entire File From Disk to a Hot Key (Assign a Hot-Key) 29
Insert a Cut Or Copy Segment 29
Basic Insert 29
Insert Replace 30
Crossfade Edits 30
Shortcut 2000 Editor Owner’s Manual
Page 6

Page vi
Cut with Crossfade 31
Performing a Crossfade Only Cut 32
Insert with Crossfade 32
Gain Editing 33
Gain Edit Menu - illustration 33
Adjust Level 34
Set Gain Value 35
Fade In and Fade Out 37
Relative Fade 37
Erase 39
Erasing a Highlighted Segment Within a File While Editing 39
Erasing a Hot Key Assignment in the Files Display 39
Erasing an Entire File in the Files Display 39
Erasing an Entire Directory in the Directory Display 39
Saving an Edited File 39
Saving With a New File Name (Save As) 39
Exit 39
Abandoning Edit Operations 40
Bleep File Segment 40
To Bleep a File in Edit Mode 40
To Set the Bleep Output Level 40
To Bleep a File in the Play or Record Mode 40
Undo an Edit Operation 41
To Undo the Last Editing Operation 41
To Undo the Last Transport Operation 41
Solo Buttons 41
Single Track Editing 41
CHAPTER V ______________________________________ 43
MISCELLANEOUS OPERATIONS
DIRECTORY AND FILE ORGANIZATION .............................................................................. 43
Directories 43
Display Screen Showing Directory Listing, illustration 43
Files 44
Display Screen Showing File Listing, illustration 44
USING HOT KEYS ...................................................................................................................... 44
Copy A Selected Segment To A Hot Key 44
Cut A Selected Segment To A Hot Key 45
Assign a File To a Hot Key 45
Determining a Hot Key Assignment 45
Performing an Insert From a Hot Key 45
Playing Audio From A Hot Key 45
Using Hot Keys To Compare Audio Versions 46
Programming A Hot Key To Play Clipboard Contents 46
THE FIND COMMAND............................................................................................................... 46
Finding A File By Title 46
Finding A Time Location 47
Bleep A File Segment 48
Insert Bleep in A File While Stopped 48
To Bleep A File In The Play Or Record Mode 48
To Bleep In The Idle Mode 48
Undo A Bleeped Region Of Audio 48
Passwords 48
Horizontal Waveform Magnification 49
Vertical Waveform Magnification 49
360 Systems
Page 7

Page vii
Display Blanking 49
Power Down 49
Recovering Hard Disk Space 50
Using Virtual Files To Save Disk Space 50
Formatting the Hard Drive 50
CHAPTER VI______________________________________ 51
Using Menus
DIRECTORY MENUS..................................................................................................................52
Quick Reference 52
Setup Menu 52
Erase Directory 52
Rename Directory 53
FILE MENUS................................................................................................................................ 53
Setup Menu 53
Quick Reference 53
Rename File 53
Erase File 54
Directory Preferences 54
EFAULT TITLE
D
SK FOR NEW TITLE
A
IME DISPLAY
T
LEEP SOURCE
B
B
LEEP LEVEL
HANGE PASSWORD
C
Copy File or Directory 56
Export Files to DigiCart/II Plus or Instant Replay 57
Import and Export of Foreign Files 58
D-NET File Transmission 63
EDITOR MENUS.......................................................................................................................... 65
Quick Reference 65
Setup Menu 65
Display Waveforms 66
Waveform Display, split, Illustration 66
Waveform Display, combined, Illustration 66
Output Level 66
Installing Softcode 66
54
54
55
55
55
55
CHAPTER VII _____________________________________ 68
TECHNICAL SPECIFICATIONS
MENU APPENDIX__________________________________ 70
QUICK REFERENCE TO MACHINE FUNCTIONS
Directory Display 70
Files Display 71
Editor 72
LT
Keyboard Functions Using A
Key 74
INDEX ___________________________________________ 75
Shortcut 2000 Editor Owner’s Manual
Page 8

Page 9

Page 1
INTRODUCTION
Thank you for purchasing 360 Systems’ new Short/cut™ Audio Editor. This unique
product provides an unusual mix of capabilities: it serves as a stereo audio recorder, as a highspeed editor, and as a rapid way to access stored audio clips. You will find that Shortcut offers
a faster way to record and edit audio, while being easier to use than earlier workstations. Key
features of Shortcut include:
• Intuitive operation similar to tape recorders
• Scrub editing wheel accurately locates edit points
• Stereo waveform display visually identifies edit points
• Intuitive Cut-Copy-Paste style operation
• Real File names for identification and recall
• Built-in speakers
• True 16-bit linear audio, with analog and digital I/O
• Compact size, ideal for field recording and remote trucks
This manual is divided into chapters, with greater detail in later chapters. If you are in a
hurry, look over the first chapters describing the front and rear panels, followed by the chapters
on specific operations. Come back to the Menu chapter at a later time, when you have a
specific task to perform.
The Table of Contents will help you locate most operational descriptions. There is also
an Index at the back to assist in locating operations by their name.
This book uses S
features, or the name of a menu item. Values in menu items are shown in ALL CAPS.
Shortcut has three different operational modes: Record, Edit and Playback. Each mode
has its own operational characteristics and display messages.
THE RECORD MODE
Audio is recorded into Shortcut in much the same way as a tape recorder. A special
feature is the ability to begin recording with a single key press at any time. This can be done
during edit operations, with work-in-progress left undisturbed. A number of special kinds of
recording are offered by Shortcut.
• Insert Recording
• Replacement Insert Recording
• Recording initiated by an external GPI command
Shortcut 2000 Editor Owner’s Manual
MALL CAPS
to denote the name of a front panel key and other physical
Page 10

Page 2 Introduction
THE EDIT MODE
Most operations will be performed in the Edit mode, also referred to as “the Editor”. The
display shows an audio waveform, a File name and the time location of the Cursor. As with
word processors, selected portions of audio can appear in a highlighted area. A weighted
S
CRUB WHEEL
and waveform display assist with accurate location of edit points. Edit marks
appear on the display to clearly show beginning and end points. Basic editing operations
include:
• Cut To a clipboard, or to a Hot Key & File
• Copy To a clipboard, or to a Hot Key & File
• Insert From a clipboard, a File or a Hot Key
• Erase A selected region
• Play A selected region
• Single or two-track editing
THE PLAYBACK MODES
Since the Shortcut editor is intended for rapid on-air use, a number of different playback
options are provided:
• Play a recording selected in the Files Display
• Play a recording while editing it
• Play a recording stored on one of the 10 Hot Keys.
EXTERNAL STORAGE MEDIA
Shortcut provides a P
ARALLEL
port and an optional SCSI-based E
XPANSION
port allowing
the use of removable media drives to increase storage time and data transport flexibility. Also,
material can be Imported to and Exported from DOS or HFS formatted Zip or Jaz disks in a
®
variety of file formats. We recommend the following Iomega
• Zip
™
250 disks store over 17 minutes of stereo audio in a compact and
products for use with Shortcut:
inexpensive disk. Shortcut can also Export audio to 360 Systems’ DigiCart/II
Plus (100 Mb) and Instant Replay 2.0 format disks for playback.
™
• Jaz
2 Gigabyte disks store over 2 hours of stereo audio for full-length
programs, backup and archiving. (Requires optional SCSI adapter board.)
™
250 Parallel, Zip 100 MB Parallel and Zip™ 100 Plus drives are directly compatible;
Zip
™
SCSI and Jaz™ 2 Gigabyte require the optional Short/cut SCSI adapter board. Zip™ USB
Zip
is not compatible. Performance of Jaz
™
1 Gigabyte drives or the use of 1 Gigabyte cartridges
in 2 Gigabyte drives has not been verified by 360 Systems. Iomega products are available from
most computer supply outlets.
A Zip 100 disk can store 7 minutes of audio at the 48KHz sampling rate. It is possible to use
100 MB disks in 250 MB drives. Note that 250 MB disks are not supported by DigiCart/II
Plus, however material can be Exported to 100 MB DigiCart/II Plus format Zip disks using a
250 MB drive.
360 Systems
Page 11

Controls and Displays Page 3
CHAPTER I
CONTROLS AND DISPLAYS
360 Systems' Shortcut audio editor has an exceptionally clear-cut front panel. It is
sensibly arranged, has a minimum button count, and will make sense to creative staff members
who are familiar with traditional tape editing or modern word processors.
This section offers a brief overview of the front panel controls and displays. Detailed
operating instructions will be found in the following chapters.
FRONT PANEL OF THE SHORTCUT EDITOR
Shortcut 2000 Editor Owner’s Manual
Page 12
Page 4 Controls and Displays
SHORTCUT PROMO
0:00.00
The Display
Shortcut features a backlit LCD display that provides extensive information about
machine operations. The display can show monaural or stereo waveforms, listings with up to
seven lines of text, or a combination of graphics and text. At times the display will become
interactive and show options to assist the user. A control is provided on the rear panel to adjust
the viewing angle (contrast). More detail about the display is presented throughout the manual.
L
R
Zoom In and Zoom Out
While editing, Z
editing. Conversely, Z
available, showing a screen time display of 2, 5, 10 and 20 seconds. Z
OOM IN
OOM OUT
will magnify the waveform display to allow more accurate
expands the time scale. Four levels of resolution are
OOM
operates only in the
Edit mode, not during Record or Play.
Holding the A
key while using the Z
OOM IN
and Z
OOM OUT
keys enlarges the
LT
waveform to show low level signals in greater detail, or reduces magnification so loud signals
are fully displayed.
TRANSPORT CONTROLS
Record
EC
A recording may be started at any time by pressing the R
automatically created, and previously recorded audio is not over-written. The R
illuminated when recording.
Stop
Stops all transport functions, including Record, Playback, Fast Forward and Rewind, and
also cancels Pause mode. When working with menus, S
the Editor to an idle state. The S
TOP
key is illuminated when active.
TOP
Play
For normal playback (any Cut selected from the File Select menu), the highlighted file
will play from its beginning
at normal speed. P
LAY
. In the Edit mode, a file is played from the current Cursor position
is illuminated when active.
Play Selected Audio plays only material between the Edit In and Edit Out points. It is
accessed by holding the A
LT
key and pressing P
LAY
. The E
to indicate that you are playing the selection. If no selection exists (Edit In = Edit Out)
OOP
nothing will play. If L
is on, the selection will play repeatedly with a momentary pause
between plays.
button. A new file is
EC
key is
will exit from the menu and return
DIT IN
and E
DIT OUT
buttons light
360 Systems
Page 13

Controls and Displays Page 5
Fast Forward
In Edit mode,
FF
(fast forward) will play audio at a speed beginning at twice normal, and
increasing in speed after a few seconds. At higher speeds, audio will play in "chunks" like a
CD player. The FF key is illuminated when active.
• Holding P
LAY
and pressing FF will play audio at twice normal speed.
• Pressing FF twice locates immediately to the end of the file.
Rewind
REW
In Edit mode, the
• Press R
EW
(rewind) key performs three functions:
to roll audio backward like a tape recorder. The speed will begin at
twice normal, and increase after a few seconds. At speeds above normal, audio
will play in "chunks" like a CD player. The R
EW
key is illuminated when
active.
• Hold R
• Pressing R
and press P
EW
twice locates immediately to the beginning of the file.
LAY
to play audio in reverse at normal speed.
EW
Loop
When L
OOP
again. When in Play with looping on, the P
L
but Loop remains active.) The L
OOP
is active, Playback will repeat indefinitely. Looping is canceled by pressing
LAY
key flashes. (S
OOP
key is illuminated when active.
Pause
Record or Playback can be temporarily interrupted by pressing P
will continue. Other buttons that will release P
EWIND
R
. The P
AUSE
key is illuminated when active.
AUSE
are P
LAY
, REC, F
Bleep
Audio will be non-destructively replaced with a "bleep" tone when the B
pressed. There are three operating modes:
TOP
will cancel playback,
AUSE
. A second press
AST FORWARD
LEEP
and
button is
LEEP
• In Play mode, the B
button replaces the audio output of the file being
played. It has no effect on the file itself.
• In Record mode the B
LEEP
button replaces incoming audio with a tone. The
tone is recorded to disc along with the original audio. The Bleep can be
removed and the original audio will be restored.
• At the Edit level, an area of audio may be selected on the display and replaced
with the bleep tone by holding I
and pressing B
LEEP
.
NSERT
Hot Keys
The 10 numeric keys of the keyboard have the dual purpose of serving as storage
locations for audio clips called "Hot Keys". A set of 10 Hot Key Assignments is stored with
each Directory, and is recalled whenever the Directory is selected. H
OT KEYS
have two uses:
• Instant playback of pre-selected audio files
• Storage of audio intended for future use during edit operations.
Shortcut 2000 Editor Owner’s Manual
Page 14

Page 6 Controls and Displays
EDIT KEYS
All editing operations in Shortcut are accomplished by first defining a region of audio
with two marks called Edit In and Edit Out. After these marks are placed, the audio waveform
between them appears as a highlighted region. Once a region is defined, it is then possible to
perform other operations such as Cut, Copy, Erase, Insert, etc.
Mark (Locating Marks) and Zero Mark
Locating Marks are used as "bookmarks" to find a particular spot in a recording at a later
MARK
time. They are placed with the
of the display. In practice, a Locating Mark can be placed in a file at any time, even during the
original recording. They can speed up the editing process by marking "keepers" and avoiding a
second review of an entire recording.
Marks are also automatically placed wherever an editing operation took place. It is
therefore possible to return to a location and revise previous work.
There is also a special Zero Mark. It is used to designate a point in a file to return to
immediately, skipping over other marks and edit points. It is placed at the current Cursor
position by holding Mark and pressing the “0” key (H
small triangle below the waveform display. It does not affect the beginning of playback from
the Files Display, or the display of Cursor Position time in the Editor.
key and are shown as a small "tick" at the top and bottom
OT-KEY
0). Its position is marked by a
To return to the Zero Mark, press
REW
press
twice to return from a point later in the file.
FF
twice to move from a point earlier in the file, or
Go-To Keys
The G
keys are used to search for Location Marks within a File. The G
O TO
keys appear above the S
CRUB WHEEL
and look like double arrows. These
O TO
keys move the Cursor
backward to the previous Mark, or forward to the next Mark point. If pressed while a file is
playing, playback will be stopped and the Cursor will jump to the closest Mark in that direction
When a menu screen is active, the G
O TO
Mark buttons act as arrow keys for selecting
menu options.
Arm Keys
RM
The left and right A
operations will be performed. New recordings always use both channels, and the A
keys select the track on which editing and Insert Record
RM
keys
illuminate automatically when entering the Record mode.
Edit In
The E
DIT IN
button places a special mark above the current Cursor position on the
waveform. This Edit In Mark specifies the position of:
1. The beginning of a range of audio to be operated on by an edit operation;
2. The insertion point of new audio;
3. The start point of an Insert Record operation.
360 Systems
Page 15

Controls and Displays Page 7
Edit Out
The E
DIT OUT
button places the Edit Out Mark above the current Cursor position on the
waveform. When the Edit In and Edit Out marks have been placed at different points, the
waveform between them will appear highlighted.
Cut
The Cut function removes highlighted audio between the Edit In and Edit Out marks, and
transfers it to a clipboard memory for possible use in a subsequent Insert operation. After the
Cut operation, the surrounding audio joins together, creating a continuous file.
Cut can also be used with a Crossfade. This causes the material at the Cut point to be
overlapped by the specified Crossfade Time, and then a smooth transition is created between
the overlapped sections. See the section on Editing for more details.
Copy
The Copy function makes a copy of a marked portion of audio, for subsequent transfer to
another destination. Unlike Cut, it does not remove the audio, and the running time of the file
remains the same.
• When used in the File Select display, C
OPY
will call a menu that allows you to
copy a file within the directory, or to a different directory or disk.
• To assign a file to a Hot Key, select the file in the files display, hold
press the desired H
OT KEY
assigned to the Hot Key; press E
• When used in the Directory Select display, C
. The display warns you if another file is already
NTER
to reassign the key.
OPY
will call a menu that allows
you to copy all files in a directory to another directory.
Insert
The Insert function inserts the current clipboard contents (from a Cut or Copy operation)
at the location of the Edit In mark.
• Placing the Edit Out mark at the same point results in a simple insertion,
moving all material after the marked point later in time, directly after the end of
the inserted material.
• Placing Edit Out at a different point permits Insert to overwrite a defined range,
replacing existing material. Unless the operation is Undone, this material is
permanently erased from the file being edited. It will still exist in any copies of
the file. If the file has not been saved since the edit, perform a Save As (A
S
AVE
) to preserve your edits in a new file and then get the replaced material
from the file you were originally editing.
COPY
and
LT +
Insert can also be used in conjunction with Crossfade. See additional information in the
chapter on Editing.
Gain Editing
Gain Editing functions include Adjust Level, Set Gain, Fade In, Fade Out and Relative
Fade. These are accessed by pressing S
OFT KEY
2 while in the Editor. Gain Edits are nondestructive. The gain is adjusted on playback, so the original audio data is unchanged and the
effect of Gain Edits can be removed at any time. See the section on Editing for more details.
Shortcut 2000 Editor Owner’s Manual
Page 16

Page 8 Controls and Displays
Erase
The Erase function wipes any audio from the highlighted area and replaces it with
silence. This operation does not affect the running time of the file. Erase is non-destructive,
and Erased regions can be selected and "un-erased" at any time.
• When used in the File Select display, E
• To clear a Hot Key assignment, hold E
RASE
will delete a file.
RASE
and press the desired H
OT KEY
.
This does not erase the file that was assigned to the Hot Key.
RASE
• When used in the Directory Select display, E
will delete all files in a
Directory, including the file names.
Scrub Wheel
The S
CRUB WHEEL
plays audio forward or backward, at a speed proportional to the rate
at which the wheel is turned. Its operation is similar to locating an edit point with analog tape
recorders by manually rocking the reels back and forth; therefore the term “scrubbing” to a
particular point within a file. The Cursor indicates the position of audio being played by the
CRUB WHEEL
S
When a Menu is active, the S
.
CRUB WHEEL
will scroll the menu up or down.
Nudge Arrows
The L
EFT
and R
IGHT ARROW
buttons at the lower right of the keyboard may be used to
nudge the Cursor by 10 mSec (.01 seconds) of time. In the zoomed-in mode most often used
for detailed editing, this represents one pixel on the waveform display. When zoomed out it can
take multiple presses to see the Cursor move; this is because nudge always works at the finest
resolution available. "Nudge" will often be easier to use than the S
CRUB WHEEL
.
When a menu is active, the A
names, the A
RROWS
move the cursor forward and backward through the text.
RROWS
will select items within the menu. When editing
Undo
The U
NDO
is also used with the M
U
NDO
key reverses the last operation. It is also possible to reverse the last Undo.
ARK
, E
RASE
and B
LEEP
keys to remove marks and restore regions
of audio that have been Erased or replaced with a Bleep.
Soft Keys
Two keys marked S
present, S
K
EY
OFT KEY
2 is programmed to turn the internal speakers on or off. In the Editor it is also used to
1 is programmed to select between digital and analog input sources. S
OFT KEY
1 and S
OFT KEY
2 are provided for future expansion. At
select Gain Editing operations. Press the number corresponding to the selection of Audio
Input, Speaker On/Off status or Gain Edit operation shown in the display. For example,
pressing S
OFT KEY 1
then the number 1 selects the Analog Input. Pressing either S
OFT KEY
second time returns to the previous display without change.
OFT
a
360 Systems
Page 17

Controls and Displays Page 9
INTERNAL DIRECTORIES
48K TIME 3:45:17
5. DIRECTORY 5
6. DIRECTORY 6
7. DIRECTORY 7
8. DIRECTORY 8
9. DIRECTORY 9
P.
PUBLIC DIRECTORY
PUBLIC DIRECTORY
PUBLIC DIRECTORY
48K TIME 3:45:17
A SHORTCUT PROMO
0:36
A SHORTCUT PROMO ORIGINAL
0:52
BOING
[8]
0:02
CAR DOOR
[5]
0:04
CAR PEEL OUT
[7]
0:11
DOG GROWL
[3]
0:06
A SHORTCUT PROMO
EDITED
[1]
FILE MANAGEMENT KEYS
Audio is stored in the Editor as a "File", to which the user may attach an identifying
name. For convenience in organizing a large number of files, ten "Directories" are provided,
and each of these can also be given an identifying name. The user may find it convenient to
store a File in a particular Directory according to project title, who did the work, what show it
is for, or the type of audio.
The following keys are associated with the storage and retrieval of audio files:
DIR (Directory Select)
IR
The D
first select the Directory it is in. Use the S
Directory, then press E
pressing the D
key presents a list of the Directory names present in the Editor. To recall a File,
IR
key.
CRUB WHEEL
NTER
. The Directory listing can be called up from any other display by
or GO TO keys to highlight the desired
DIRECTORY LISTING
The reference to Internal Directories
in the upper left shows whether the directories in
the Internal or External Drive are being displayed.
At the right of the top line, the Sample Rate for the currently selected Directory is shown,
along with the amount of space left on the drive expressed as available recording time at the
current Sample Rate.
FILES (File Select)
When a Directory has been selected, a list of the audio File names within it will appear.
The File listing looks like this:
FILE LISTING
The Directory Name appears in the top line, along with the Sample Rate and Available
Record Time. The File Names appear below, with their length at the right. If a file is assigned
to a H
OT-KEY
, the Hot-Key number appears to the right of the file name enclosed in brackets.
Shortcut 2000 Editor Owner’s Manual
Page 18

Page 10 Controls and Displays
To select a File, use the S
CRUB WHEEL
or GO TO keys to highlight the File name. If there
are more than six files in the directory, the directory will scroll to show the other files as they
are selected. Once you have selected a file:
• Press E
• Press P
• Press C
• Press E
While working at most other tasks in the Editor, pressing the F
NTER
or E
DIT IN
to load the File for an edit session; or
LAY
to hear the File without moving to the Edit level.
OPY
to copy the file.
RASE
to permanently erase the file. (File erasures cannot be undone)
ILES
key will immediately
close the Editor (with a save dialog if the file is not saved) and present a File listing for the
current Directory.
Save and Save As
The S
AVE
key saves a File but does not close it. When changes have been made to a File
AVE
but not yet saved, the S
LT
Holding A
and pressing S
were editing is left as it was when it was opened or when S
key will illuminate.
AVE
results in a prompt for a new File name. The file you
AVE
was last pressed. Subsequent
editing is performed on and saved to the new file. This is useful when saving several versions
of an edited File. It is a good idea to do this at least the first time you save an edited file so that
your original recording is left unaltered. Copies of files use very little disk space, and it is good
insurance in case a mistake is made in editing. Remember to erase all copies of a recording
when clearing disk space for new recordings, as the disk space will be released only when all
files that use that audio have been erased.
Save As can be used to recover from some editing errors, even if no copy of the file
being edited exists. Editing always takes place on a temporary copy of the file you choose.
Edits are not copied back to the file until it is Saved. Save As leaves the original file that you
edited intact; any editing that was done between the last Save and the point at which the error is
detected is saved to a new file. Then the original edit file can be opened and used to retrieve
parts that were deleted in error, which can then be returned to the new file.
When you save a file, you are saving:
1. The data that describes what audio to play in what order.
2. The Location Marks.
3. The position of the Zero Mark.
4. The position of the Edit In and Edit Out marks.
5. The position of the Cursor.
6. The On / Off status of the A
OLO
7. The S
status.
Note that any changes to items 1-3 are considered significant changes and cause the S
button to light. However, you can press S
RM
buttons.
AVE
AVE
to save changes to items 4-7 at any time.
360 Systems
Page 19

Controls and Displays Page 11
Exit
The E
XIT
key performs several functions:
1. E
XIT
will cancel (or abandon) some machine operations;
XIT
2. E
ends an editing session and closes the file. A prompt "SAVE CHANGES?"
will appear if a File has been altered but not saved. The operator may then:
AVE
• Press S
• Press A
• Press E
• Press U
to save to the same file name and exit, or
LT + SAVE
NTER
NDO
to save with a new File name and exit, or
to exit without saving; abandoning all edits since the last Save; or
to cancel the exit operation.
Find A File
PACE BAR
The S
Press F
IND
, type the desired File name, and then E
particular time position within a File that is loaded for editing. Simply press F
desired time position. Detailed information on using the F
doubles as a F
IND
key. This command can locate one File among many.
NTER
. The F
IND
key can also locate to a
IND
and enter the
IND
command will be found in the
General Operations chapter.
Alphanumeric Keyboard
LPHANUMERIC KEYBOARD
The A
is used for titling Files, for Find operations, and to enter
information for certain Menu functions. It also contains some special function keys:
• The ten N
• The A
UMERIC KEYS
LT
key is used in combination with other function keys to give fast access to
specialized operations. The A
R
EFERENCE
menu, appearing in all main menus. It is also reproduced at the end of the
double as audio Hot Keys™.
LT
key combinations will be found in the Q
Menu chapter.
KSP
• The B
• The D
(backspace) key erases the character to the left of the present Cursor position.
EL
(delete) key is used to edit title entries. It erases the character to the right of the
present position.
NS
• The I
(Insert) key toggles on-and-off, and allows characters to be inserted in the
middle of a text string.
• The A
STERISK
key (*) is used with the F
IND
function. The text to be located is entered,
with unknown letters or words replaced by a single asterisk.
UICK
Shortcut 2000 Editor Owner’s Manual
Page 20

Page 12 Controls and Displays
AUDIO CONTROLS
Input Levels
EFT
The L
and R
IGHT
level adjustments set the recording level for the analog inputs. They
do not affect the digital inputs.
LED Level Indicators
Separate Left and Right P
EAK LEVEL
LED bar graphs show the peak recording level.
Level display is based on a normal recording level of 0 dB (corresponding to an output level of
+4 dBu), with headroom of +18 dB (full scale output is +22 dBu) and a minimum level display
of -30 dB.
Headphone and Speaker Volume
This control adjusts the level of the stereo headphone jack and the internal speakers.
Speakers
Built in speakers provide stereo monitoring. Speakers can be turned on or off by a Setup
Menu item, by a GPI input, or by menu selections under S
OFT KEY
2.
Solo
The Left and Right S
just one channel. S
H
OT KEY
. A S
OLO
OLO
key is illuminated when active.
OLO
keys select a single audio track when it is desirable to monitor
is canceled by pressing the illuminated S
OLO
key, or REC, E
XIT
, or any
360 Systems
Page 21
Rear Panel Features Page 13
CHAPTER II
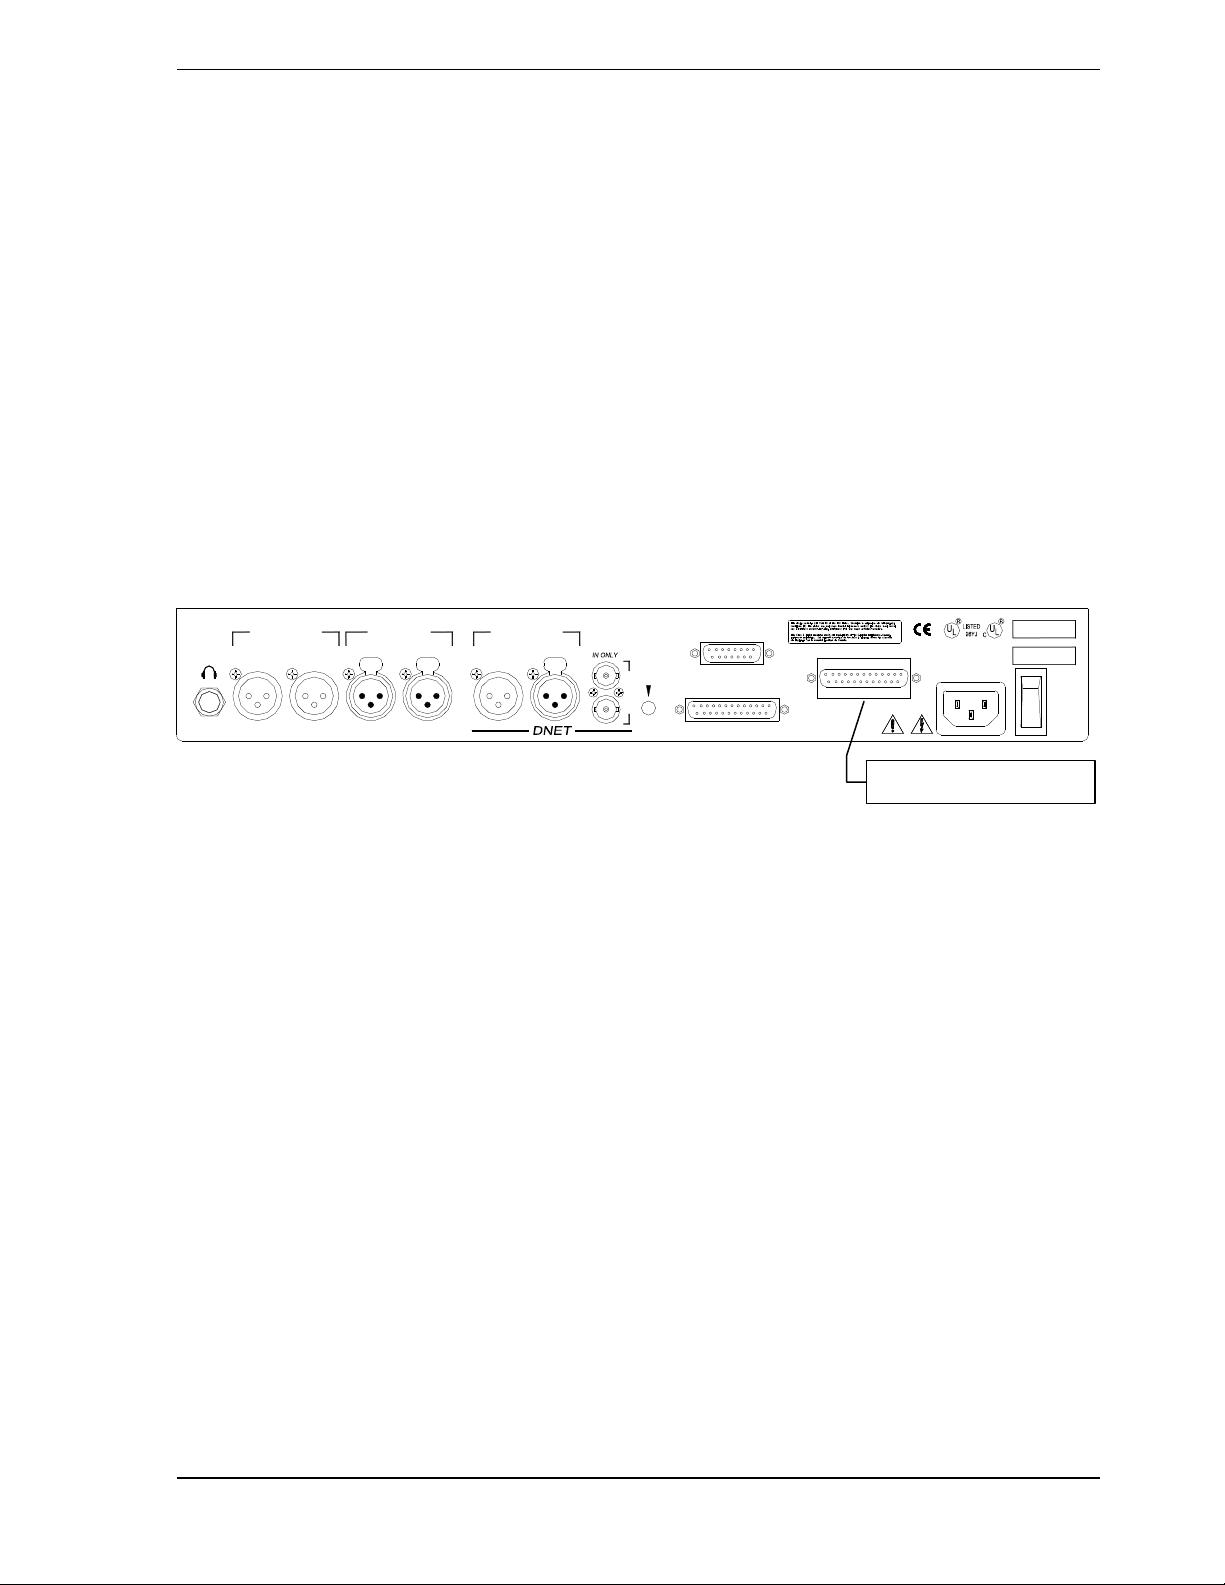
REAR PANEL FEATURES
All connections to the Shortcut Editor are made on the rear panel. Some connectors have
a dual purpose, and are explained in detail in the Recording or General Operations chapter.
1.2A MAX
MODEL #
SERIAL #
I
O
LEFT RIGHT LEFT RIGHT
ANALOG INPUTANALOG OUTPUT
360 SYSTEMS, WESTLAK E VILLAGE, CALIFORNIA, USA
AES/EBU DIGITAL
OUT IN
IEC-958 II
OUT IN
GPI
CONTRAST
AES 75 OHM
PARALLEL
PROFESSIONAL DIGITA L AUDIO EQUIPMENT
EXPANSION
ITE EQUIPMENT
MADE IN USA
115-230VAC, 50-60Hz
REAR PANEL OF SHORTCUT EDITOR
Analog Audio Inputs and Outputs
Analog inputs and outputs are provided on balanced XLR connectors at a nominal level
of +4 dBu. Pin 2 is +, pin 3 is –, pin 1 is shield.
Digital Audio Inputs
A female XLR-3 connector accepts inputs in the AES/EBU format. A BNC connector
accepts inputs in either the consumer IEC-958/II format or the 75-ohm AES3-ID format.
Digital Audio Outputs
A male XLR-3 connector provides a digital output in the AES/EBU format. A BNC
connector provides a 75-ohm output in the professional AES-3ID format. Digital output in the
IEC-958/II format is not provided.
D-NET File Transfer Ports
The XLR and BNC digital outputs may be used as D-NET file transfer ports. D-NET is
an audio network using standard digital audio protocols. It can transfer files with their names
and audio data to 360 Systems DigiCart/II and Instant Replay units. D-NET signals from other
360 Systems devices can be Echoed through the Shortcut by connecting them to either the XLR
or BNC digital inputs.
Shortcut 2000 Editor Owner’s Manual
Page 22
Page 14 Rear Panel Features
Power Supply
The power supply can be used with any voltage between 85 and 260 volts at 50 or 60 Hz.
It is not necessary to switch it when making connection to different voltages. A detachable
IEC mains cable is provided, with a connector appropriate for the destination country.
Power Switch
The power switch is located on the left edge of the rear panel, as viewed from the front of
the Editor. The designation "1" means
and "0" means
OFF
.
ON
NEV ER T UR N TH E POW ER OFF OR DI SCON NECT
THE P OWE R CORD W HEN THE SHOR TC UT E DITO R
IS ACT IVEL Y PERF ORMI NG AN Y TASK.
Headphone Jack
A stereo 1/4” (6.35mm) female jack is provided for headphone monitoring.
Display Viewing Angle (Contrast Control)
A rotary control adjusts the viewing angle of the LCD display.
Serial Number
The serial number of the Shortcut Editor is affixed to the right side of the rear panel, as
viewed from the rear. This coded number also contains the date of manufacture. There is a
space to write the serial number on the inside front cover of the owner's manual.
G.P.I. Inputs and Tally Outputs
GPI inputs for S
TOP, RECORD, PLAY, REWIND, FAST FORWARD
and Speaker Mute, plus
tally lamp outputs, are provided on a 15-pin D connector. These inputs can be reassigned in
various combinations in the Setup Menu, allowing their use with Pause and up to four HotKeys. A contact closure to common will assert a GPI command. A +12 volt source and open
collector outputs are provided for tally LEDs. The connector pinout and assignment options
are presented below. Reassignment procedure is covered on page 51.
G.P.I. Connector Pin-Outs
The Shortcut Editor may be remotely controlled through a 15-pin "D" connector on its
rear panel. Remote functions are asserted through a switch contact to Ground. If desired, a
"tally" indicator light can be wired to show that a function has taken place. The lamp is
controlled through an output on the same connector. For convenience, +12 volts is provided on
the connector. This may be wired through the lamp, and then back to an appropriate pin on the
connector. See page 16 for instructions on interfacing to telephone control systems.
360 Systems
Page 23

Rear Panel Features Page 15
PIN # SIGNAL NAME DESCRIPTION
1 Ground Ground for switch contacts
2 Speaker Mute Switch Mute internal speakers
3 Fast Forward Switch Enter Fast Forward
4 Rewind Switch Enter Rewind
5 Play Switch Enter Play
6 Stop Switch Enter Stop
7 Record Switch Enter Record
8 +12 Volts Power to tally lamps; 150 mA max.
9 N/C Do not connect
10 N/C Do not connect
11 Fast Forward Lamp Open collector to common; 40 mA max.
12 Rewind Tally Lamp Open collector to common; 40 mA max.
13 Play Tally Lamp Open collector to common; 40 mA max.
14 Stop Tally Lamp Open collector to common; 40 mA max.
15 Record Tally Lamp Open collector to common; 40 mA max.
G.P.I. CONNECTOR PIN ASSIGNMENTS
Setting LED Current
The operating current of an external tally LED must be set with a current limiting
resistor. Given a +12 volt source, a resistor of 910Ω or 470Ω to will provide LED current of
10 mA or 20 mA respectively. A ¼-watt resistor is suitable.
GPI Input Assignment Options
The GPI Inputs can be assigned in five configurations. The default is
Play remains Play in all configurations. The second option is
PAUSE,REW,STOP,REC
FF,REW,STOP,REC
which
.
changes the FF input to activate Pause. This can be valuable to allow consecutive recordings in
the same file without editing or insert recording. The third option is
fourth option is
HOT-KEYS
1-3,
STOP
. The fifth option is
HOT-KEYS
-1,HK-2,
1,2,3,4. The Tally outputs
REC,STOP
. The
HK
follow the functions of the reassigned inputs.
FF,REW,STOP,
REC (Standard)
FF P
REW REW HOTK
R
ECORD
S
TOP
S
P
LAY
P
PAUSE,REW,
R
STOP,REC
AUSE
ECORD
TOP
LAY
P
HK-1,HK-2,
REC,STOP
HOTK
R
ECORD
S
EY
1 HOTK
EY
2 HOTK
HOTK
TOP
S
LAY
P
HOT-KEYS 1-3,
STOP
EY
1 HOTK
EY
2 HOTK
EY
3 HOTK
TOP
HOTK
LAY
P
HOT-KEYS 1,2,3,4
EY
1
EY
2
EY
3
EY
4
LAY
GPI INPUT
Pin 3
Pin 4
Pin 7
Pin 6
Pin 5
GPI INPUT ASSIGNMENTS MAP TO FUNCTIONS AND GPI INPUT PINS.
Shortcut 2000 Editor Owner’s Manual
Page 24

Page 16 Rear Panel Features
Connecting to Telephone Control Systems
Recording and editing telephone calls is made quick and easy by connecting a Shortcut
directly to the two most popular digital telephone hybrid systems. Both systems allow you to:
• Instantly open a new Shortcut file and start recording from the hybrid’s desktop
switch control console.
• Record a single call to a single file
• Record multiple calls to a single file
• From the Shortcut you can either accept the default file name or put your own
custom label on each file
Several popular systems are supported:
Gentner: Model TS-612 On Air Phone System.
Telos: Model 1A2 Multiline Telephone System, Model One-X-Six Talk Show System,
and the Direct Interface Module.
Audio connection to each product is different. Refer to your Telos or Gentner owners
manual for suggestions. Below are the diagrams for the necessary control interface cable from
the telephone interface to the Short/cut GPI connector.
Gentner
Shortcut
Telos
Shortcut
Ground
9
Play
1
Stop
4
Record
5
DB9M DB15M
1
5
6
7
Gentner Telos
CONTROL INTERFACE WIRING FOR TELEPHONE CONTROL
6
7
8
DB9M
Ground
Record
Stop
1
7
6
DB15M
360 Systems
Page 25

Rear Panel Features Page 17
Using External Sample Rate Synchronization
In order to use Shortcut with some digital mixers, routers, and multi-track recorders, it is
necessary to reference its sample rate to an outside source. This is accomplished by
connecting a digital audio signal from another unit that is the reference or is synchronized to
the reference.
The reference signal must always be present and stable, and it must be within 4% of the
chosen sample rate for the current directory. (46080-49920 Hz. for 48K, 42336-45864 Hz for
44.1.) Note that some older Shortcut units do not support frequency measurement and
therefore will not detect that the sample rate is out of specification.
The signal is often the same signal that is used to input digital audio to the Shortcut, such
as a buss or master output from a digital mixing console, the audio input feed from a router or
an output of a digital multi-track. Any constant AES format digital audio signal that is derived
from the master or house sync can be used. Shortcut cannot directly sync to word clock or
video references.
The digital audio input used by the External Sync (and D-NET Echo) is selected
independently of the audio input used for recording. To select this input:
1. Press M
2. Press the 8
ENU
twice to select the Setup Menu.
KEY
or
Scroll down to item 8. SYNC/ECHO INPUT using the Scrub Wheel and press
E
NTER
.
3. Use the A
RROW KEYS
or the S
CRUB WHEEL
to select either the XLR or BNC
connectors.
4. Press E
NTER
to confirm your selection.
To set Shortcut to use an external reference:
ENU
1. Press M
2. Press the 7 K
twice to select the S
EY
or
Scroll down to item 7. SYNC SOURCE using the S
NTER
E
.
ETUP MENU
.
CRUB WHEEL
and press
3. Use the Arrow keys or the Scrub Wheel to select either EXTERNAL or
INTERNAL.
4. Press E
If the external reference signal is missing or bad, the S
NTER
to confirm your selection.
TOP
button will flash and the
message “(SYNC INPUT BAD)” will be shown in the top line of the display. It is not possible
to play or record while the unit is in this condition. When the correct signal is applied the unit
will automatically lock to it and clear the error displays.
Note that when recording using the digital inputs, sync is always derived from the digital
input being recorded, even if it is not the one selected for external sync. This only presents a
problem when recording from a device that is not synchronized to the sample rate of the
monitoring system. During the recording, the connection from the Shortcut digital output to the
monitoring system will not be locked to the sync reference. The recording itself will be
unaffected and will sound perfect on subsequent playback. Once the recording is finished, the
sync reference will return to the external reference input for playback.
All other operations are the same as when using internal sync.
Shortcut 2000 Editor Owner’s Manual
Page 26

Page 18 Rear Panel Features
Parallel Connector, SCSI Option and External Disk Drive Support
The P
ARALLEL
connector allows for an external Iomega Zip® 100 or 250 Parallel drive, or
Zip 100 Plus. There is no configuration necessary for Parallel drives.
The optional SCSI adapter card adds an E
®
allows the use of an Iomega Zip
100 or 250 SCSI drive, Zip 100 Plus, or Jaz® 2Gigabyte drive.
XPANSION
connector to the rear panel. This
The drive cable must have a 25 pin male connector to plug into the Shortcut editor’s
XPANSION
E
Apple Macintosh
SCSI Zip
port. This type of connector is known as a DB-25 and is commonly found on
®
computers. This type of connector is supplied as standard equipment with a
®
or Zip® Plus drive. The Jaz® 2G may need an adapter to go from its high-density
connector to the DB-25.
Enable the SCSI termination on the external drive, and set the SCSI ID to 6. When an
external drive is connected, Shortcut automatically turns off its internal terminator.
The Setup Menu contains an item B.
the external drive, P
ARALLEL
or SCSI. If you are using drives on both ports, switch this setting
EXTERNAL DRIVE
to select which port is in use for
only when the Internal Drive is selected. It will not select directly between two external drives.
1. Enter the S
ETUP MENU
2. Select item B.
EXTERNAL DRIVE
.
. (If you used the Scrub Wheel, press E
NTER
to allow
changing the value.)
3. Set the value to SCSI or P
NTER
4. Press E
5. Press E
to confirm the selection.
XIT
to leave the S
ARALLEL
ETUP MENU
.
.
The Shortcut editor will always start up on the Internal Drive. To select the External
Drive press D
K
EY
5 will directly select Menu item 5.) To return to the Internal Drive the process is the
same, and the menu item will read: S
IR
, then M
ENU
, then select item 5 S
ELECT INTERNAL DRIVE
ELECT EXTERNAL DRIVE
.
. (Pressing N
UMERIC
The External drive has ten directories just like the Internal drive. The Parallel drive is
used for copying material to and from the Internal Drive. Zip100 disks can be used in 250 Mb
drives.
With the SCSI option installed, recording, playback and editing can be performed on a
drive connected to the E
XPANSION
port. However, for important recordings and on-air
playback, we recommend using the Internal drive. Zip and Jaz drives have an automatic spin
down feature to save media and drive life. If Playback or Recording is attempted when a drive
is spun down, there will be a delay while the disk spins up again. The E
DIT OUT
button will
flash during this period. You can force a drive to spin up to prepare for playback by pressing
D
IR,
then F
ILES
. You can also press P
P
LAY
again to initiate playback on cue.
LAY
and P
AUSE
to spin up, then release P
AUSE
or press
Zip100 disks can be used in 250 Mb drives, however this mode does not support direct
recording with the SCSI Option.
External drives cannot be password protected.
The Internal drive must be selected before a disk can be ejected.
360 Systems
Page 27

Rear Panel Features Page 19
When a new disk is first used it must be formatted. When the External drive is first
selected (as described above) the Shortcut Editor will recognize that the disk is unformatted
and offer an opportunity to format it, or abandon the operation and return to the internal drive.
There is also a F
ORMAT EXTERNAL DRIVE
command in the Directory Menu to allow reformat to
be used to erase a disk. Note that disks that are write protected in software, such as the Tools
disk that comes with some versions of Zip
drive cannot be formatted in the Shortcut.
When copies of files are made between directories on the same disk, the audio data is not
copied, only the edit lists are. However, when a file is copied from one disk to another, all
audio data is always copied for each file, even if two versions that are largely the same are
transferred to the same directory. This means that two or more files that share audio will take
more disk space when copied to another disk because the shared portions are recreated as
separate data. For more information on Copying files, see page 56
Shortcut 2000 Editor Owner’s Manual
Page 28

Page 20 Rear Panel Features
(This page left blank)
360 Systems
Page 29

Recording Page 21
CHAPTER III
RECORDING
This chapter presents the individual steps in making a recording. Related information will be
found in chapters about the front panel controls, rear panel features, or general operations.
First, prepare for recording by performing these operations:
1. Connect an audio signal to the Shortcut Editor at the rear panel.
2. Select A
M
3. Exit from the menus.
4. Apply audio to the Editor.
5. Press and hold P
6. If the input is analog, adjust the level controls for a suitable reading.
7. If the input is digital, note that a level indication is present.
Sample Rate
The Shortcut Editor can operate at sample rates of 44.1k or 48k samples/second. It is
advisable (though not required) to select a single rate for the entire Editor when possible.
Recordings made at different rates cannot be inter-cut, nor should they be transferred to a
single DAT tape when completed. As a point of reference, the music industry usually works at
44.1 since this is compatible with Compact Disks. The video industry more often operates at
48k, since audio tracks on digital VTRs are recorded at this rate.
NALOG
ENU
. If it is a digital input, further select D
or D
AUSE
IGITAL
input using S
and press R
ECORD
OFT KEY
IGITAL (XLR
1 or item 1 in the S
) or D
IGITAL (BNC
ETUP
)
Sample rates are set on a per-Directory basis. Each Directory must be set to a
single sample rate before any Files are recorded to it. Thereafter only recordings at this
sample rate can be made in the Directory. Though different Directories may be set to
different sample rates, material may only be copied between those set to the same rate.
The LCD display shows the time remaining on the hard disk. This is calculated using the
sample rate for the selected Directory; changing to a Directory at another sample rate will
provide a different value for the time remaining.
Shortcut 2000 Editor Owner’s Manual
Page 30

Page 22 Recording
Record Mode (Basic)
The basic Record mode is used for new recordings. It always uses new space on the hard
disk, and never overwrites existing audio. The maximum length of a recording is limited to the
lesser of 2 hours 10 minutes or to the time remaining on the hard disk.
1. Press the R
2. Press S
may overwrite with a new name. (The D
ECORD
TOP
to exit. The File is automatically given a default title, which the user
key at any time to enter Record mode.
IRECTORY PREFS
item in the F
ILES MENU
allows entry of a default title, and also whether a new title will be asked for at the
completion of each recording.)
3. Press E
NTER
to accept the default File name.
If an edit session was in progress when recording began, the Editor will return to it on
completion of the new recording.
Setting The Record Monitor
Normally the signal being recorded is passed through to the Analog Outputs, the Digital
Outputs, the Headphones and the Speakers. In some applications this is undesirable. For
example, when recording phone calls, if the on air feed is not turned off during recording, the
live call can inadvertently be broadcast. By setting R
EC MONITOR
to OFF, the outputs are
automatically muted during recording. Turning off Record Monitor will also prevent feedback
when recording with an open microphone in the monitoring area.
1. Enter the S
2. Select item A,
ETUP MENU
REC MONITOR
.
. (If you used the Scrub Wheel, press E
NTER
to allow
changing the value.)
3. Press E
4. Press E
NTER
to confirm the selection.
XIT
to leave the S
ETUP MENU
.
Setting The Recording Threshold
It is often desirable to enter Record at the instant audio reaches a significant level. The
Editor provides this capability by providing a "threshold setting" at which recording will begin.
With a suitable setting, low level background noise will not trigger recording; but the downbeat
of music or the first syllable of speech will place the Editor in Record mode. To set a
Recording Threshold:
1. Enter the S
ETUP MENU
2. Select item #3, T
NTER
3. Press E
to confirm the selection.
4. Select item #4, T
W
HEEL
; 6 dB steps are available, ranging from -6 dB to -60 dB referred to full scale.
.
HRESHOLD RECORD
HRESHOLD LEVEL
. Level selections are made by turning the S
. If it is OFF, set it to ON.
CRUB
Generally levels in the range of -18 dB to -42 dB are most useful.
5. Press E
6. Press E
NTER
to confirm the selection.
XIT
to leave the S
ETUP MENU
.
It is often desirable to force the Editor into the Record mode while it is in a "Record
EC
Ready" state, waiting for the preset threshold to occur. Simply press the R
key again to
immediately enter the Record mode.
360 Systems
Page 31

Recording Page 23
Record Pause
AUSE
The P
key has two particularly useful functions when recording:
1. To monitor the audio input, hold P
AUSE
followed by the REC key. Signal sources
will now be reflected in the audio output and can be heard on the speakers. Levels
may be adjusted and tapes cued for transfer. To actually begin recording, simply
press P
2. While in Record mode, the P
press of P
AUSE
or REC; either key will release the Pause function.
AUSE
key will temporarily halt recording. A second
AUSE
(or REC) will continue recording. Judicious use of the Record-Pause
feature can prevent the recording of silence and extraneous material that will have to
be removed in future editing sessions. Many elements of a project can be recorded in
a single File, saving the effort of assembling them later on. You can press M
ARK
during Pause to place a Location Mark at the pause point.
Recording Multiple Takes
The Shortcut Editor offers several ways to speed up the process of recording a series of
individual takes. This is helpful when each performance needs to be maintained as a separate
take, yet the performance cannot wait for the operator to title each File. Two methods are
available:
EC
• When a prompt appears for a File title, ignore it. Just press R
again to immediately
begin a new recording. Shortcut will auto-title the last cut, using a default name. This
may be set by the D
EFAULT TITLE
item in the F
ILES MENU
.
• The prompt for a new title can be turned off. In this case, the Editor is always ready to
start a new recording on completion of the previous one. The last File recorded will
always be titled with the default title. To turn off the title prompt, go to the File level
ILES
(F
key) and select A
Also enter a name in the D
SK FOR NEW TITLE
EFAULT TITLE
menu selection.
under the D
IRECTORY PREFERENCES
section.
• By using P
a single file. You can press M
AUSE
, you can interrupt the recording process and record multiple takes into
ARK
while paused to allow easy identification of the start
of a take. Any parts that need to be made into individual files can be Copied or Cut to
Hot-Keys which creates a new file. You can extract “keeper” takes this way, or you can
edit out bad takes to leave only the desired parts of the total recording.
Insert Recording
Insert Recording is really an editing function; it can only be performed in Edit mode.
The Insert Record mode will record new audio starting at the Cursor position, without the risk
of accidentally over-writing existing audio. A useful special feature of Insert Record is that
recordings are placed in the "clipboard memory" as well as being recorded into the File. If the
new inserted portion is needed at other locations as well, it is only necessary to use the Insert
NDO
command to place it elsewhere. You can U
an Insert Record operation, but the recorded
material will remain on the clipboard. This allows you to reposition it by moving the Edit
NSERT
marks and performing an I
A single track may be selected for an Insert Record operation by using the A
operation. See the next section on Editing
RM
keys.
The keys for selected track(s) will be illuminated.
Shortcut 2000 Editor Owner’s Manual
Page 32

Page 24 Recording
Insert Record may only be entered from the Stop mode. There are two forms of Insert
recording: Basic Insert Recording, and Replacement Insert Recording
Basic Insert Recording
Unlike the video industry use of the term, Insert Recording inserts new audio and "pushes
out" material following this point to make room; it therefore extends the File running time.
1. Place both the E
and E
DIT OUT
marks at the point where the recording is to be
DIT IN
inserted. To extend a recording, place them both at the end of the File.
2. Press one of the A
3. Hold the I
NSERT
4. To exit, press S
RM
keys if it is desired to enable recording on only one track.
button and then press R
TOP
or P
LAY
.
ECORD
.
Replacement Insert Recording
In this operation, a region of audio is replaced with a new recording. First, the region to
be replaced is highlighted by placing the E
DIT IN
mark at the beginning, and the E
DIT OUT
mark
at the end of it. On entering the Insert Record mode, the highlighted audio is deleted, and the
new material is inserted in that space. The ultimate length of the File will depend on whether
the inserted segment is shorter or longer than the audio being replaced.
Insert Recording in this manner is how the Shortcut executes an erase-record or “punchin” record. However, you don’t have to take a running start, and there is no possibility of the
new take running long and erasing good material after the edit. It is as though you cut out the
bad take, and edited in a take from a different piece of tape. If you want to record over
everything after a certain point, simply place the Edit Out mark at the end of the file.
DIT IN
1. Place the E
2. Place the E
3. Press one of the A
4. Hold the I
NSERT
mark at the point to start the new material.
DIT OUT
mark at the end of the region to be replaced.
RM
keys if it is desired to record on only one track.
key and then press R
ECORD
.
5. Record the new audio passage.
TOP
or P
LAY
6. To exit, press S
.
Note that in all other record modes, Shortcut always records both channels.
360 Systems
Page 33
Editing Page 25
SHORTCUT PROMO
0:01.38
ARMED CHANNEL INDI
CATORS
CHAPTER IV
EDITING
Editing is the process of identifying a passage of audio and then performing an operation
such as Cut, Copy, Insert or Erase. In the Shortcut Editor, the present location in the audio
waveform is shown by the vertical C
URSOR
the play mode, showing the audio being heard. The C
CRUB WHEEL
S
during editing operations.
Marks called Edit In and Edit Out are placed on the audio waveform to identify a passage
for an editing operation. These Edit Marks appear as triangular segments at the top of the
waveform. The A
RM
buttons determine which track(s) edit operations will affect. Note that
the Edit In and Edit Out marks are different from Locate Marks.
EDIT OPERATIONS
The Edit screen displays the File title, the time at the present C
Marks that may have been placed, and the audio waveform starting at the head of the File.
The user may select a File for editing as follows:
bar. The C
URSOR
URSOR
moves across the waveform in
may also be positioned with the
URSOR
position, Edit
1. Go to the D
F
ILES
.
2. In the F
3. Press E
ILES
NTER
IRECTORY
display, highlight a File name.
or E
menu, highlight a directory selection, and press E
DIT IN
to load the File for editing.
NTER
The audio being played, together with the waveform display, provide the cues needed to
find edit points. A variety of editing tools move the Cursor through the audio program and
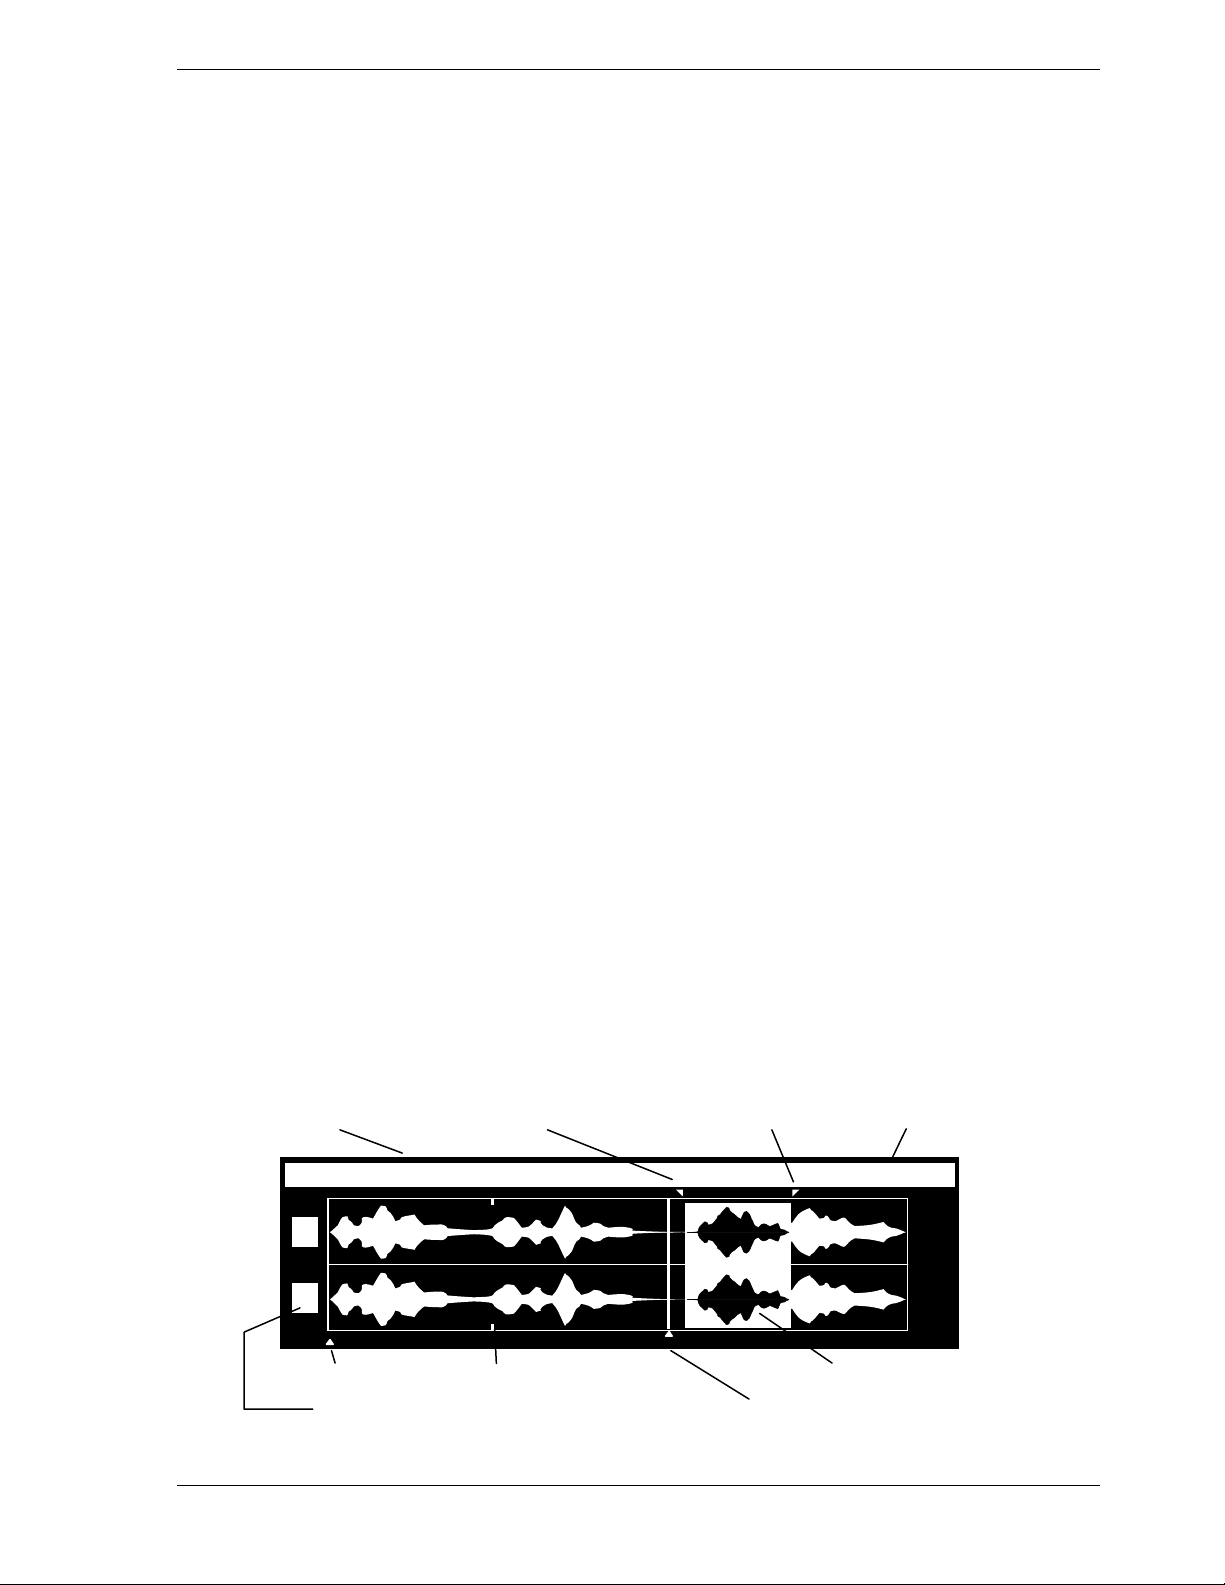
assist in actually performing the edits. When editing, the display has the following features:
FILE NAME
EDIT IN MARK
EDIT OUT MARK
CURSOR TIME
R
ZERO MARK
LOCATION MARKS
CURSOR BAR
HIGHLIGHTED AUDIO
or
Shortcut 2000 Editor Owner’s Manual
Page 34

Page 26 Editing
SHORTCUT PROMO
0:00.00
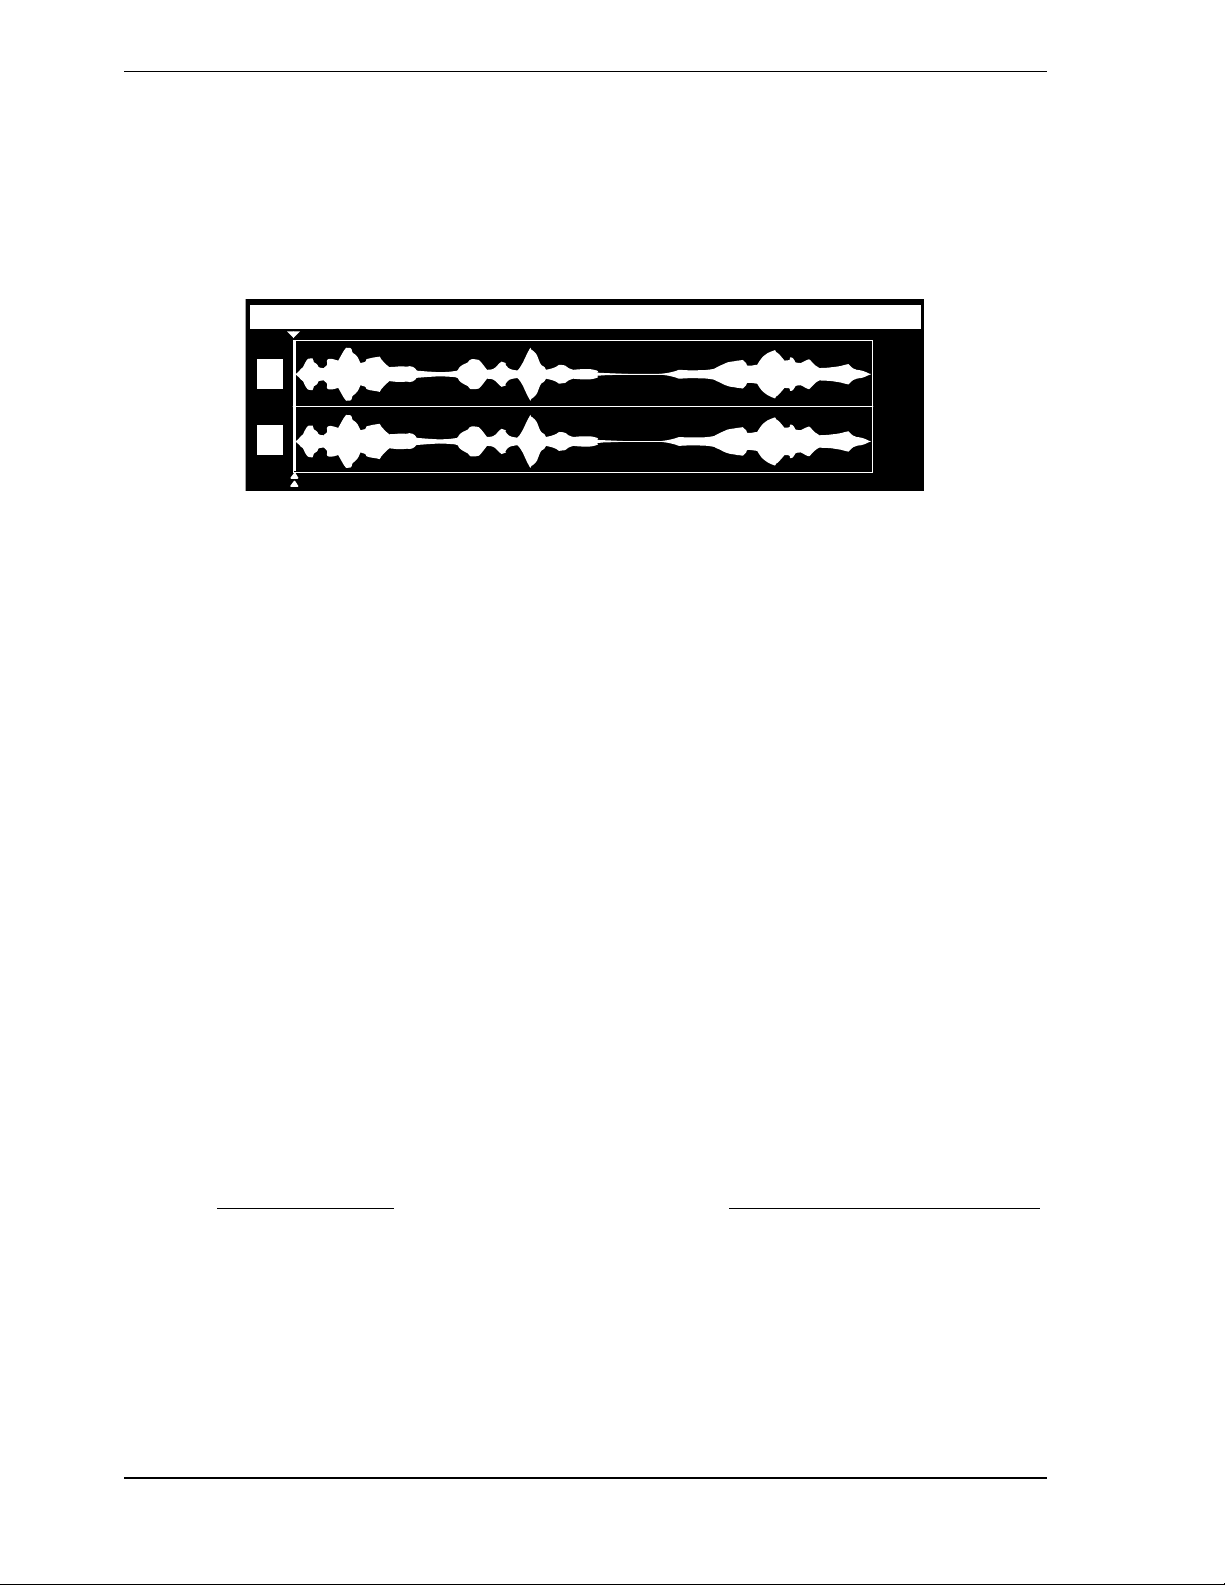
Location Marks
Points of interest may be noted with the M
ARK
key at any time. These Location Marks
are indicated by a small tick above and below each waveform display as shown in the figure
below:
L
R
WAVEFORM DISPLAY SHOWING LOCATION MARKS ON BOTH TRACKS
Location Marks are not the same thing as the Edit Marks, and are used solely to mark a
location so it can be quickly found in the future. Most Edit operations leave Location Marks to
assist in finding past edit positions.
The A
RM
buttons determine on which track the Location Marks will be placed. In stereo
operation, a pair of tick marks will appear above and below the two waveform displays.
Marks are always tied to the audio they are associated with, and not to a time reference.
If a single track is edited, two marks beyond that edit may become displaced from each other;
and in the case of deletion, a mark may disappear along with its audio. Deleting a segment of a
File does not slip the marks with respect to audio.
O TO
The G
keys will quickly "tab" to the next Mark on any armed track. This feature can
be used to advantage. When many Marks have been placed, "disarming" both tracks will limit
the search to only five places: Start of File, the Zero Mark, Edit-In mark, Edit-Out mark, and
End of File. By selectively arming tracks an entirely different set of Location Marks can be
placed on each of the two tracks.
A Location Mark may be removed by locating to it (with the GO TO keys) and pressing
ARK
M
highlighting an area containing the marks, holding the U
again. The Mark symbol will disappear. A range of marks may be removed by
NDO
key, and pressing M
ARK
.
The Zero Mark
Zero Mark allows you to specify a point in the file you are editing that you can
immediately re-locate to. It does not affect the Time Display or the start point of playback in
the Files Display.
The Zero Mark is distinguished as a small triangle at the bottom of the waveform display,
just below where the triangle at the bottom of the Cursor is displayed. It is initially set to the
beginning of the file. A single Zero Mark always exists in every file.
To set the Zero Mark, hold M
ARK
and Press the “0” H
OT KEY
. You can do this while in
any Edit playback mode. (Note that if done “on the fly” during playback or recording, a
ARK
conventional Mark will be also be placed at the point where you initially press M
.)
360 Systems
Page 35

Editing Page 27
To locate to the Zero Mark, press REW twice if the Cursor is later in the file than the Zero
Mark, or FF twice if the Cursor is earlier in the file. (Subsequent R
EW-REW
or FF-FF
operations will locate directly to the end or beginning of the file.)
The Zero Mark is moved by using the same procedure to set it in a different place. To
reset it to the beginning of the file, first locate to its current location or to the beginning of the
file, then hold M
ARK
and press the 0 KEY. Zero Mark leaves a conventional Mark wherever it
has previously been set.
If audio containing the Zero Mark is copied or cut to a Hot-Key, the Zero Mark will
appear in the resulting file at the same point in the audio program. If the Zero mark is Cut from
a file it will be placed at the cut point. The Zero Mark will stay with the audio it is associated
with even if audio earlier in the file is cut or inserted. The Zero Mark in a file being inserted is
ignored to maintain the position of the Zero Mark in the file being edited. Note that if you
NDO
place the Zero mark and then U
before the edit, but its new position will not be restored by Redo (pressing U
a previous edit, the Zero mark will revert to its position
NDO
again.).
Placing Location Marks During Recording
Location marks are not just for use at the Edit level. One of their best uses is to mark
good (or bad) areas of a recording during the recording process. A good example is call-in
editing for radio, where a speaker may not immediately come to the point. By bracketing
"keepers" with location marks, it isn't necessary to ever play the entire File again; just tab
through the marks and immediately edit the good parts.
When placing a Zero Mark during recording, a conventional Mark will be placed at the
point the M
EY
0 K
ARK
is pressed.
key is pressed (and held); the Zero Mark will be placed at the point where the
Edit Marks
A single pair of Edit In/Edit Out marks exists in the File at all times. These marks may
be moved about at will to define the beginning and end of a region of audio on which some
operation will be performed. This may be a Cut, an Erasure, or something else. Whenever the
Edit Marks surround a region of audio, it will appear highlighted. This is a visual indicator of
the area, marked for a future editing action. Highlighted regions appear only on an armed
track. Note that the two marks can be in the same spot, which shows as a triangular symbol at
the top of the display. This is done to indicate the location for an Insert.
If many regions within a File are to be edited, it may be convenient to tag them in
advance with Location Marks, and then return to perform editing operations at another time.
Edit marks may be placed anywhere; they do not need to be placed on top of Location Marks.
Thus, Location Marks can be used for a variety of reasons, and may be placed anywhere close
to where a passage needs editing.
O TO
The G
keys and S
CRUB WHEEL
are used to locate where an Edit Mark is to be
placed. It is also possible to simply play down to a desired edit point and place an Edit Mark.
DIT IN
When an entry point is located, press E
to mark the point; it will appear as a
triangular mark at the top of the display.
Shortcut 2000 Editor Owner’s Manual
Page 36
Page 28 Editing
SHORTCUT PROMO
0:01.44
SHORTCUT PROMO
0:01.71
L
R
EDIT-IN MARK SET AT CURSOR POSITION
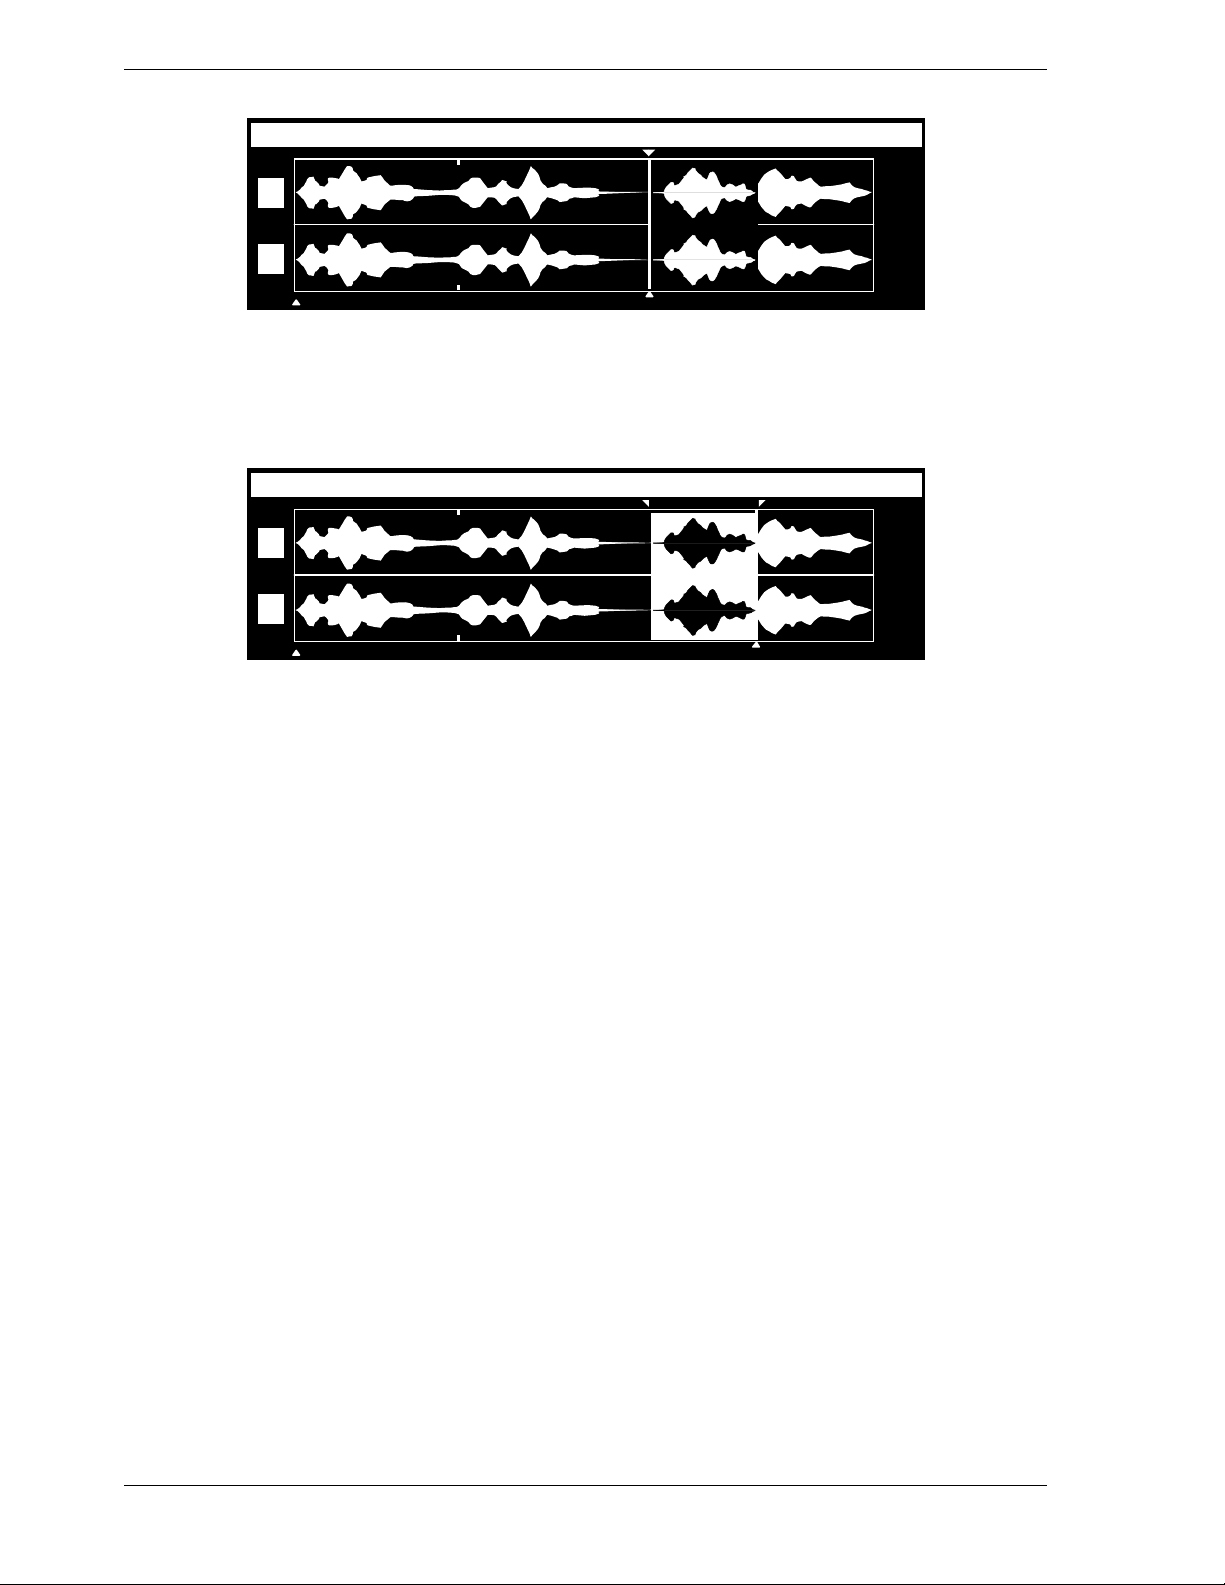
Locate the desired end point, and press E
edit marks. After E
DIT OUT
is pressed, the area between the Edit Marks will appear highlighted
DIT OUT
to finish defining the area between the
on armed tracks. The Edit Marks will be visible at the upper edges of the highlighted area.
L
R
WAVEFORM DISPLAY WITH BOTH EDIT MARKS SET
It is permissible to set the Edit Out mark first, and the Edit In mark next. However, the
Edit In mark must always be placed earlier in the File than the Edit Out mark. If an Edit In
mark is moved to a point later in time than the Edit Out mark position, it will push the Edit Out
mark to the same position. The reverse is also true, if one should attempt to place an Edit Out
mark earlier in time than an Edit In mark.
DIT IN
E
and E
DIT OUT
may be pressed during Record, Playback or at the Edit level. Sub-
sequent presses of either key will override the previous edit point with the newly selected one.
Play Selected Audio
Play Selected Audio plays only material between the Edit In and Edit Out Marks. It is
accessed by holding the A
key and pressing P
LAY
. The E
DIT IN
and E
DIT OUT
buttons light
LT
to indicate that you are playing the selection. If no selection exists (Edit In = Edit Out)
nothing will play. If L
between plays. (For seamless looping,
OOP
is on, the selection will play repeatedly with a momentary pause
COPY
to a HOT-KEY then play the HOT-KEY with L
OOP
on.)
Cut a Selected Segment
The Cut operation removes a portion of audio defined by the position of the edit marks.
There are two reasons a Cut operation might be performed:
• A portion of audio is to be removed, for placement somewhere else.
• A portion of audio is unwanted, and is removed and never used again.
To Cut a highlighted segment, press the
the surrounding audio will join together, forming a seamless transition.
CUT
key; the highlighted area will disappear, and
360 Systems
Page 37

Editing Page 29
SHORTCUT PROMO
0:01.44
L
R
AUDIO WAVEFORM AFTER A "CUT" OPERATION
The removed piece is placed in a temporary or “clipboard” memory (actually a file called
CLIPBOARD
_
), and may now be inserted at another location if desired. Remember that only one
segment can be stored in the clipboard memory. Before making a second Cut, insert the first
piece at the desired location. When multiple clipboard memories are needed, use the Hot Keys.
Cut to Hot Key
A Highlighted Portion of a File May Be Cut, and Transferred to a Hot Key.
• Press C
, and while holding it, press the desired H
OT KEY
.
UT
• Use the keyboard to add a title if desired.
The Copy Command
The Copy operation is similar to the Cut operation, but does not remove the original
piece of audio; the copy is stored in clipboard memory for later use.
Copy a Selected Segment of Audio
OPY
• Press C
• Insert it at another location (or in another file) using the I
and the highlighted segment will be placed in clipboard memory.
NSERT
command.
Copy a Selected Portion of a File to a Hot Key
• Press C
OPY
, and while holding it, press the desired H
OT KEY
.
• Use the keyboard to title if desired.
Copy an Entire File From Disk to a Hot Key (Assign a Hot-Key)
ILES
• Go to the File Select display (F
• Select the desired File using the S
• Ηold C
OPY
and press the desired H
key).
CRUB WHEEL
OT KEY
.
or A
RROW KEYS
.
Insert a Cut Or Copy Segment
The Insert operation transfers audio from the clipboard memory to a new location defined
by the Edit In and Edit Out marks. There are two ways to use the Insert function: Insert at a
Single Point and Insert Replace.
Basic Insert
DIT IN
• Set the E
• Press I
NSERT
and E
.
DIT OUT
marks at the same location.
space and insert the new audio between the marks. It will not overwrite existing audio.
Material previously occupying this space will be shifted later in time, and the File will increase
Shortcut 2000 Editor Owner’s Manual
Because the Edit marks are at the same location, the Insert command will open up a
Page 38

Page 30 Editing
FILES WITH ERRORS:
0
TOTAL FILES:
9
CROSS FADE VALUE / ENABLE
DURATION:
00.00 SEC (OFF)
SPACE BAR TOGGLES ON/OFF
SET OR ADJUST VALUE THEN PRESS ‘ENTER’
in length as a result. "Insert" is similar to the "paste" command used in word processors.
Insert Replace
• Set the E
DIT IN
and E
DIT OUT
marks to surround material to be replaced. A
highlighted region will appear between the marks.
NSERT
• Press I
The highlighted region will be deleted first
.
∗
, and the material from clipboard memory
will then be inserted in that region. Inserted material can of course be shorter, the same length
or longer than the replaced region. In every case an Insert without gaps or overlaps will result,
and the total File length may be shorter, the same, or longer.
Crossfade Edits
Crossfade allows smooth transitions of variable length to occur between edited audio
segments. This can be useful for smoothing edits, or for creative effects. It is analogous to
mixing between the output of two tape machines while recording on a third. Crossfade can be
applied to either Cut or Insert operations.
The Crossfade Time is set in the Edit Menu, Item 6 CROSSFADE : 00.01 (OFF). When
you select it and press E
(or press H
OTKEY
6 to select it directly) the Crossfade Value /
NTER
Enable screen is displayed.
This screen allows the adjustment of the Crossfade Duration with the S
the A
RROW KEYS
second, causing it to adjust in .1 second intervals. The A
second increments. Pressing the S
. The S
CRUB WHEEL
PACE BAR
adjusts by .05 second intervals until the value is over 1
RROW KEYS
while in this screen turns Crossfade ON and OFF.
While in the Editor, Crossfade can be turned on and off by pressing E
allow adjustment in .01
CRUB WHEEL
NTER
. When
or
Crossfade is on, the Crossfade Time is displayed in the top line of the display where the file
name is normally shown.
When Crossfade is off, it can be used on an individual Cut or Insert operation by holding
LT
while pressing CUT or I
A
NSERT
. Insert Hotkey with Crossfade and Cut to Hotkey with
Crossfade must be performed with Crossfade turned on in the normal way.
Crossfades create new recorded material on the disk equal to their length. Crossfades can
be undone with the U
NDO
key, however there is no way to undo them after that. It is strongly
recommended that you make copies of original files before editing them. It takes almost
no disk space, and you will have all the original material available if you need it.
∗
The deleted material is not placed on the clipboard and may be permanently lost unless the operation is Undone or a copy
exists in another file. See page 10 for information about recovering deleted material by renaming the Edit file before saving
over the original File.
360 Systems
Page 39

Editing Page 31
THE RESULTING FILE IS
EQUAL TO THE CROSSFADE TIME
Cut with Crossfade
Crossfades on Cuts are performed using the material before the Edit In point and after the
Edit Out point. If there is not enough material on either side, the duration of the crossfade will
be automatically limited. If there is no material on one side or the other, (i.e. a top or tail trim)
no crossfade will be performed. In all cases, the material in the Clipboard (or Hotkey file) will
be the same regardless of whether crossfade is used.
The first diagram below shows a file that has the Edit Marks set in preparation for a Cut.
When a Cut is performed, the resulting file is represented by the second diagram. This is the
final result of a simple Cut operation. When Cut with Crossfade is used this is only an
intermediate step. The Crossfade process will result in the file represented by the third
diagram.
During the Crossfade time, the two parts of the file are actually overlapped. This results
in the total run time of the file being reduced by the crossfade time. Sometimes you may need
to decrease the amount of material to be removed to compensate for this if you are editing to
reach a specific run time.
EDIT OUT MARKEDIT IN MARK
Diagram 1: Selection to be Cut is Marked
Diagram 2: Selected Audio is Removed and Remaining Audio is Spliced Together
SHORTENED BY AN AMOUNT
CROSSFADE TIME
Diagram 3: Spliced Audio is Overlapped and Crossfaded Between the Two Parts
Shortcut 2000 Editor Owner’s Manual
Page 40

Page 32 Editing
Performing a Crossfade Only Cut
Performing a Cut with Crossfade when the Edit In and Edit Out Marks are in the same
place will generate an error message in the top line of the display,
“ * NOTHING TO CUT * ”
followed by
“APPLY CROSS FADE? (YES=ENTER, NO=EXIT)”
Pressing E
NTER
causes the material on either side of the Edit Marks to be crossfaded by
the amount of time set for the Crossfade Time. This process is effectively illustrated by
diagrams 2 and 3 above. The Run Time of the file is reduced by the Crossfade Duration.
Insert with Crossfade
Crossfades on Inserts can actually create two crossfades. One is between existing
material before the Edit In mark and the material at the head of the piece being inserted. The
other is between the tail of the piece being inserted and the material after the Edit Out mark. If
there is insufficient material in any of these regions the duration of the crossfade will be
limited. If the Edit In mark is at the Beginning of the file, no crossfade will be performed at the
head of the insert. If the Edit Out mark is at the end of the file no crossfade will be performed
at the tail of the insert.
Diagram 4: Edit Marks Placed at the Insertion Point
Diagram 5: New Material Inserted in the File
THE RESULTING FILE
IS SHORTENED BY AN
AMOUNT EQUAL
TO TWICE THE
CROSSFADE TIME
Diagram 6: Crossfades Performed At Head and Tail of Inserted Material
360 Systems
Page 41

Editing Page 33
GAIN EDIT MENU
1.
ADJUST LEVEL
2.
SET GAIN VALUE
3.
FADE IN
4.
FADE OUT
5.
RELATIVE FADE
6.
SPEAKER OFF
The Crossfade Duration applies to both crossfades performed. When appending material
to the end of a file, only the head crossfade is performed, so each insertion can have its own
Duration set. If you need independent control of the times of both ends of an insert (or one end
crossfaded and the other not), first perform a normal Insert operation, then place both Edit
Marks at the first splice and do a Crossfade Only Cut with the desired Crossfade duration.
Next (if necessary), set the Crossfade duration for the second splice, set both Edit Marks there
and do another Crossfade Only Cut.
Gain Editing
Gain Edits are accessed by pressing S
OFT KEY
2 while in the Editor. These include Set
Gain Value, Adjust Level, Fade In, Fade Out, Relative Fade. The direct control for the Speaker
On/Off is still here, moved to item 6. In this menu it is a single item that toggles the speakers
on when they are off, and off when they are on.
Pressing the numeric key associated with any of these items will perform the operation
immediately or display the parameters for the operation. You can also use the S
RROW KEYS
or A
to select an item and press E
NTER
. Operations performed immediately are
CRUB WHEEL
FADE IN, FADE OUT and SPEAKER OFF/SPEAKER ON.
Gain edits in Shortcut are completely non-destructive. Each ten millisecond block of
audio has a Gain Value that can range from +6db to -90db. This Gain Value is applied to the
audio during playback, but does not change the original audio data that was recorded. When a
block is first recorded, its Gain Value is 0db. The level of the recorded audio has no effect on
this, and the actual output level associated with any Gain Value is relative to the recorded level.
All Gain Edits are performed on the selected range of audio between the Edit In and Edit
RM
Out marks, on one or both tracks depending on the state of the A
buttons. The charts below
illustrate Gain Values in a single channel. These charts are for explanation only. The actual
Shortcut display does not show gain values in this format, but gain edits will affect the size of
the displayed waveforms.
There is still the option to adjust the gain both channels of the entire file. This is
ENU
accessed in the Editor by pressing M
value with the S
regardless of the state of the A
CRUB WHEEL
or A
RM
buttons or the E
, selecting item 3. OUTPUT LEVEL, adjusting the
RROW KEYS
, and pressing E
DIT IN
and E
NTER
. The entire file is affected
DIT OUT
marks.
The maximum and minimum Gain Values are enforced on each operation, so it is not
possible to increase gain above +6db in any section through repeated operations or the
combined effect of gain edits and the OUTPUT LEVEL parameter in the Edit Menu.
Shortcut 2000 Editor Owner’s Manual
Page 42

Page 34 Editing
-
0db
+4db
ADJUST LEVEL
1.
ADJUST NOW
2.
ADJUST BY:
+00.0
DB
3.
FADE IN TIME:
00.00
SEC
4.
FADE OUT TIME:
00.00
SEC
Note that increasing gain can cause distortion in audio that is already recorded near full
scale; in this event simply U
NDO
the operation or reduce the gain of only the affected audio.
+6 db maximum
0 db (default)
90 db minimum
EDIT OUT MARKEDIT IN MARK
Adjust Level
Adjust Level allows the gain of a selected range of audio to be increased or decreased
relative to its current Gain Value. This allows the relative levels of gain edits and fades
performed on small regions to be maintained when they are subsequently adjusted as part of a
larger region.
Adjust Level also has the ability to set an in and out fade time. These times occur within
the time defined by the Edit In and Edit Out marks, so their total cannot exceed the length of
the selected range. The graph below shows an Adjust Level operation that adds 4 db, with the
Fade In time set about half the length of the Fade Out time.
Gain Adjust = +4db
on lines 2, 3 and 4. This information is remembered from the last operation, so if you are using
the same values you can simply press E
corresponding to the line number. For instance, pressing 2 selects the A
Fade In Time
The Adjust Level display has four lines:
The first item is A
DJUST NOW
. This executes the operation using the information entered
NTER
. To change the values, press the number
Fade Out Time
DJUST BY
value.
360 Systems
Page 43

Editing Page 35
ADJUST LEVEL
1.
ADJUST NOW
2.
ADJUST BY:
DB
SET OR ADJUST VALUE THEN PRESS ‘ENTER’
3.
FADE IN TIME:
00.00
SEC
4.
FADE OUT TIME:
00.00
SEC
+00.0
0db
+4db
- 4db
FILES WITH ERRORS:
0
TOTAL FILES:
9
SET GAIN VALUE
GAIN VALUE: +00.0
DB
SPACE BAR CHANGES SIGN
SET OR ADJUST VALUE THEN PRESS ‘ENTER’
+00.0
Use the S
CRUB WHEEL
or the A
RROW KEYS
to adjust the value, or set it directly by
entering it with the numeric keys. The Space Bar changes the sign of the Adjust By value.
When you are finished, press E
NTER
, then either press one of the numeric keys 2,3 or 4 to
select another value to adjust, or press 1 to execute the Adjust Level operation.
The F
ADE IN TIME
and F
ADE OUT TIME
can be any value up to the length of the selected
region. Their combined total cannot exceed the length of the region, so if one is set to 1
second, the other can be up to 2 seconds if the range is 3 seconds long.
The graph below illustrates the result of adjusting the gain of a region that has already
been reduced to –4 db. In cases like this, the Adjust By value can go above +6 db because the
limit applies to the Gain Value that results from the operation
Adjust By = +8db
Set Gain Value
Set Gain Value sets the gain of all audio in the selected range to the specified Gain
Value. This is a way to set a known value that discards any previous gain setting
. It is unique
in this regard as the other gain editing methods modify existing Gain Values. (This includes the
OUTPUT LEVEL parameter in the Edit Menu.)
Shortcut 2000 Editor Owner’s Manual
Page 44

Page 36 Editing
It is usually better to use A
DJUST LEVEL
for gain editing, however in cases where there
are no existing gain edits and no fading in or out of the edit is necessary, it can be faster and
easier. A common use is to allow an entire file to be adjusted in only one channel, for example
to adjust the relative level of a caller on the Left track and a DJ on the right.
+5 db
0 db
Set Gain Value: +05.0 DB
0 db
- 5 db
Set Gain Value: -05.0 DB
Performing a Set Gain with a Gain Value of 0db is equivalent to undoing all gain edits
within the selected range.
When using Set Gain it is unnecessary to use U
NDO
to restore the previous value before
trying another Gain value; just repeat the edit with the new value and the specified Gain will be
placed on the selected range. You can also do this with Adjust Level, but the effect is additive,
so if you Adjust Level with an Adjust By value of -1db, then perform the same edit again with
the value -2db, the resulting Gain value in the range will be -3 db. Repeatedly performing
Adjust Level in small amounts can allow you to fine tune the gain of the selected range without
re-entering a Gain value.
360 Systems
Page 45

Editing Page 37
FILES WITH ERRORS:
0
TOTAL FILES:
9
RELATIVE FADE
GAIN VALUE: +00.0
DB
SPACE BAR CHANGES SIGN
SET OR ADJUST VALUE THEN PRESS ‘ENTER’
‘EDIT IN’ SELECTS FADE TO GAIN VALUE
‘EDIT OUT’ SELECTS FADE FROM VALUE
+00.0
Fade In and Fade Out
The selected range can be faded in from silence or out to silence. The length of the fade
equals the length of the range. These operations are performed immediately when selected
from the Gain Edit menu as there are no values to set.
0 db
- 90 db
Fade In
0 db
- 90 db
Fade Out
Relative Fade
Relative Fade creates a linear fade over the duration of the selected range. This can be a
fade to or from the selected Gain Value, and the Gain Adjust value can be either positive or
negative. These two parameters interact to determine the direction (increasing or decreasing)
of the fade.
The Gain Value is always selected, and can be adjusted with the Scrub Wheel or Arrow
Keys, or entered directly using the numeric keys and the Space Bar to change sign.
4444
DIT IN
and E
The E
DIT OUT
keys are used to select whether the fade is going to be
performed to the Gain Value or from the Gain Value. Pressing these keys switches the
highlighted phrase indicating which method will be used. Pressing E
using the currently selected parameters. The diagrams on the following page illustrate four
possibilities using combinations of positive and negative Gain Values with Fade From Value
and Fade To Value.
Shortcut 2000 Editor Owner’s Manual
NTER
performs the Fade
Page 46

Page 38 Editing
0db
-
30db
Fade FROM Value
0db
-
3db
+4db
Fade TO Value
0db
+4db
Fade FROM Value
0db
+2db
Fade TO Value
Gain Value = - 30db
Fading From a Negative Gain Value – Existing Gain = 0db
Gain Value = +7db
Fading To a Positive Gain Value – Existing Gain = -3db
Gain Value = +7db
3db
-
Fading From a Positive Gain Value – Existing Gain = -3db
Gain Value = - 52db
-
Fading To a Negative Gain Value – Existing Gain = +2db
50db
360 Systems
Page 47

Editing Page 39
Erase
The E
RASE
key can perform four different operations:
Erasing a Highlighted Segment Within a File While Editing
RM
• Select a section of audio to be erased. A
• Press E
RASE
. The segment will be replaced with silence, and the running time of the
only one track if desired.
File will remain unchanged.
Note that Erasing is always non-destructive and can be undone immediately with a single
NDO
press of U
performing an Undo Erase by holding U
or at any time by highlighting a segment containing erased audio and
NDO
and pressing E
RASE
.
Erasing a Hot Key Assignment in the Files Display
• Hold E
and press the desired H
OT KEY
. This does not erase the file.
RASE
Erasing an Entire File in the Files Display
• Go to the File Select level (F
ILES
key).
• Select a File name.
RASE
• Press E
to delete the File. A prompt will appear for confirmation of your
intention to erase the File. Note that you cannot Undo a File Erase.
Erasing an Entire Directory in the Directory Display
IR
• Go to the Directory level (D
key).
• Select a Directory name.
• Press E
RASE
to delete all Files in the Directory. You will be prompted for a
confirmation of the Erase command.
Remember: It is not possible to Undo a Directory Erase operation.
Saving an Edited File
Whenever changes have been made to a File but not yet saved, the
AVE
illuminate. The S
key saves a File, but does not close it.
SAVE
key will
Saving With a New File Name (Save As)
LT
+ S
AVE
Press A
the new name; type it in, followed by E
to save edited work with a new File name. The Editor will prompt for
NTER
.
Exit
XIT
The E
key performs several functions:
XIT
1. E
2. E
will cancel (or abandon) some machine operations;
XIT
will abandon a File without saving it. A prompt "
SAVE CHANGES
?" will
appear if a File has been altered but not saved. The operator may then:
• Press S
• Press A
• Press E
• Press U
AVE
to save and exit; or
LT + SAVE
NTER
NDO
to save with a new File name and exit, or
to exit without saving; or
to cancel the exit operation.
Shortcut 2000 Editor Owner’s Manual
Page 48

Page 40 Editing
Abandoning Edit Operations
Occasionally the user will no sooner have pressed some edit key than he will realize this
was a mistake. Certain edit operations can be abandoned: C
When one of these keys is pressed, and before it is released, simultaneously press E
TOP
. This is equivalent to the edit key never having been pressed in the first place; it works
S
UT, COPY, INSERT
and E
RASE
XIT
.
or
because these keys act when released, not when depressed.
XIT
or S
TOP
If any of these four edit keys has already been released, pressing E
NDO
no effect. In this case, use the U
key.
will have
Bleep File Segment
Offensive words within a recording may be censored (bleeped out) by overwriting with a
Bleep tone or silence.
To Bleep a File in Edit Mode
• Use the E
• Hold I
DIT IN
NSERT
and E
DIT OUT
and press B
keys to highlight the offending segment.
LEEP
. The Bleep tone (or silence) will be inserted in place
of the highlighted audio.
A Bleep tone is always non-destructive and may be Undone at any time.
To Set the Bleep Output Level
The level of the Bleep signal can be set to 0 DB, -6 DB, -12 DB, -24 DB or SILENT.
This is a Directory Preference setting, so each Directory can have it’s own value.
• You must be in the Files Display of, or Editing a file within the desired Directory.
• Press M
• Select item 5 DIRECTORY PREFS and press E
ENU
NTER
or
Press the 5
• Select item 6 BLEEP LEVEL and press E
KEY
.
NTER
or
Press the 6
• Select the desired value using the A
• Press E
• Press S
KEY
.
RROW KEYS
NTER
to confirm the choice.
TOP
to return to the Files Display or the Editor.
or
THE SCRUB WHEEL
.
The Bleep Level is not recorded in files, it is a setting that is used when the Bleep is
produced. Therefore the level of all existing occurrences of Bleep in files in the current
Directory will change to the new setting.
To Bleep a File in the Play or Record Mode
LEEP
• Hold down the B
key for the desired duration.
When this is done in Record mode, the Bleep is non-destructively recorded into the file.
In Play, the Bleep sounds while it is pressed but does not change the file.
A 1,000 Hz tone or silence can be selected in the D
IRECTORY PREFS
menu. Further
information on Bleep is presented in the Miscellaneous Operations chapter.
360 Systems
Page 49

Editing Page 41
Undo an Edit Operation
The Undo function will remove the last Edit operation. As such, it is valuable for
fixing mistakes. Remember that only the last edit operation can be Undone. Operations that
can be Undone include: C
UT
, I
NSERT
, B
LEEP
, I
NSERT RECORD
and certain E
RASE
functions.
If uncertain about what the last operation was that will be Undone, hold A
LT + UNDO
display the last type of edit performed. (Erasures of audio within a File can be Undone;
erasures of Files or Directories cannot.) Whenever a mistake has been made, press the U
key before moving ahead.
To Undo the Last Editing Operation
• Press the U
• Press U
NDO
is also used with the M
U
NDO
key.
NDO
a second time to restore the operation.
ARK
, E
RASE
and B
LEEP
keys to remove marks, and regions
of audio that have been Erased or replaced with a Bleep. To perform these functions:
DIT IN
• Use the E
and E
removed; while holding the U
DIT OUT
keys to define the area containing Marks to be
NDO
key, press M
ARK
.
• Select the area containing Erased regions of the File to be restored; while
holding the U
key, press E
RASE
.
NDO
• Select the area containing Bleeped audio that is to be restored; while holding the
U
NDO
key, press B
LEEP
.
To Undo the Last Transport Operation
This allows returning immediately to the Cursor position where the last transport
command was issued. This can be used to repeatedly audition an edit, or recover from
accidentally pressing FF or REW a second time and finding yourself at the beginning or
end of the file.
NDO
• Press and hold the U
• Press P
LAY, REW OR
key.
FF.
to
NDO
Solo Buttons
OLO
The left or right S
keys select a single track of audio, instead of the normal case
where both tracks are heard. It is often desirable to monitor only one channel while doing
single-track editing. For example, it's hard to edit speech if the other track is playing music at
the same time.
Pressing the L
EFT SOLO
key effectively mutes the right channel, and vice-versa. A S
OLO
button is illuminated when active; it is canceled by pressing the illuminated key again. The
Solo keys work only at the Edit level, and their function is canceled when leaving it.
Single Track Editing
All editing operations can be performed on a single track. These include:
• Mark
• Cut
• Copy
• Insert
• Insert Record
• Erase
• Gain Adjust, Set and Fade
• Bleep
Shortcut 2000 Editor Owner’s Manual
Page 50

Page 42 Miscellaneous Operations
L
SHORTCUT PROMO
0:01.95
An individual track is selected with one of the ARM keys. In normal editing, both ARM
keys illuminate when entering the Edit mode. A single track can be de-selected by pressing its
A
RM
key; note that its LED is now
file is saved. This can be used as a “safety” of sorts by turning off both A
OFF
. The state of the ARM buttons is remembered when the
RM
buttons when
saving a finished file.
Editing operations are performed on a single track the same way as on a stereo pair. Note
that Locate Marks and Edit Marks are normally placed on both tracks together; in the case of
single-track operations, it is possible to perform edits that will move these marks apart from
each other, or even erase the mark for one track while leaving the other in place.
R
TIME OFFSET BETWEEN LOCATE MARKS ON THE LEFT
AND RIGHT TRACKS DUE TO SINGLE-TRACK EDITING.
Location Marks can be placed in a single track by placing them with only one track
armed. When one track is armed, the Go To keys will only locate to Marks in the armed track.
If neither track is armed, Go To will only locate to the beginning and end of the file, the Edit In
and Edit Out Marks, and the Zero Mark.
When material is Cut or Copied from a single channel, it will appear as two channel in
the resulting Hot Key or _
CLIPBOARD
file, with the audio only existing in the channel that was
armed when the file was created. However, if it is inserted into a file with the opposite channel
armed, the material will “cross over” to the other channel. This can be used to switch channels
for a short segment, create a two channel mono file from a single channel mono file, or swap
the channels of a stereo file. Remember that you must create the file with a single channel
armed, and Insert the file with the opposite single channel armed.
If you Insert stereo material into a file with only one track armed, the left channel of the
stereo material will be inserted into the left track if it is armed, or the right channel material
will be inserted into the right track if it is armed.
360 Systems
Page 51

Miscellaneous Operations Page 43
INTERNAL DIRECTORIES
48K TIME 3:45:17
5. DIRECTORY 5
6. DIRECTORY 6
7. DIRECTORY 7
8. DIRECTORY 8
9. DIRECTORY 9
P.
PUBLIC DIRECTORY
PUBLIC DIRECTORY
CHAPTER V
MISCELLANEOUS OPERATIONS
Many of the more specialized functions of Shortcut make it a valuable tool for the
broadcast industry. This chapter presents a collection of unrelated features you will find
valuable when using the machine.
DIRECTORY AND FILE ORGANIZATION
Directories
The storage space in the Shortcut editor is divided into ten regions called Directories,
each containing up to 200 Files. Each Directory can be given a unique name, such as
"SPORTS" as a convenient way to segregate recordings for different purposes. These directory
divisions might be for different shows, or for different users within a facility.
Nine Directories can be protected with passwords to prevent unauthorized access. As a
convenience, Shortcut contains one "Public Directory" that is never password protected. The
Public Directory is a preferred place to store new recordings when it is not clear where they
will eventually go.
DIR
Pressing the
name and by a number. A Directory may be selected by using the
or
GO TO
keys to scroll through the list of entries, followed by
key gives access to a listing of the ten Directories. Each is shown by
SCRUB WHEEL, ARROW
ENTER
. Or, you may simply
keys
enter the directory number on the numeric keys for immediate access. Use the letter "P" for the
Public Directory.
Entering the Record mode before a Directory has been opened will open the currently
highlighted name in the Directory Listing, unless it is password protected. In that case, the
Public Directory will be selected and opened.
DISPLAY SCREEN SHOWING DIRECTORY LISTING
Shortcut Audio Editor Owner's manual
Page 52

Page 44 Miscellaneous Operations
PUBLIC DIRECTORY
48K TIME 2:45:16
A SHORTCUT PROMO
0:36
A SHORTCUT PROMO ORIGINAL
0:52
NEWS HOUR
1:00:03
CAR DOOR
[5]
0:04
CAR PEEL OUT
[7]
0:11
DOG GROWL
[3]
0:06
A SHORTCUT PROMO
EDITED
[1]
Files
The term "Files" refers to the individual recordings which always exist within a particular
Directory. A File is always a 2-channel recording and may be up to 130 minutes long, or the
time remaining on the hard disk.
After a Directory is selected, the top line of the display shows the Directory name, the
sample rate selected for the Directory, and the remaining space on the hard disk. The display
presents an alphabetized list of the Files present, including the running time of each File, and in
brackets, the Hot Key to which a File may be assigned. For example: [3].
Use the
SCRUB WHEEL, ARROW
• Press the
• Press the
ENTER
PLAY, COPY
key or
or
keys or
EDIT IN
ERASE
GO TO
keys to scroll through the list of entries.
to select a particular File for Editing.
key to perform an action on a File, without
loading it for Editing.
DISPLAY SCREEN SHOWING FILE LISTING WITHIN A SINGLE DIRECTORY
USING HOT KEYS
Hot Keys are so named because they perform an immediate or "hot" audio playback
function programmed into them. The Shortcut Editor provides 10 Hot Keys. In their most
basic form, an audio "sound bite" can be mapped to a Hot Key for instant playback at a later
time. In addition, the Shortcut Editor provides a number of new Hot Key functions:
• A
HOT KEY
• A highlighted segment of audio can be Cut or Copied from a File being edited,
to a specific
• Any File in the current Directory can be Copied (Assigned) to a
• The audio under a
• A set of 10
Copy A Selected Segment To A Hot Key
A highlighted audio segment can be Copied to a hot key by holding down copy, and
pressing the desired hot key. The audio segment is also saved as a new File. A default File
name will be presented, with an option to rename it. Type in the new name, or accept the
default by pressing E
NTER
When attempting to Copy or Cut to a Hot Key that already has a file assigned to it, you
are warned. If you confirm that you wish to reassign the Hot Key, the name for the new file
created by this operation defaults to the name of the file currently assigned to the Hot Key.
plays audio mapped to that key.
HOT KEY
HOT KEY
. It is also saved to disk as a new File.
HOT KEY
may be Inserted into a File being edited.
assignments is stored with each Shortcut directory.
.
HOT KEY
360 Systems
.
Page 53

Miscellaneous Operations Page 45
Entering a new name causes the creation of a new file, which will not replace the existing file,
only the Hot Key assignment.
NTER
NTER
If you do not enter a new name or edit the default name displayed, when you press E
you are asked if you want to replace the file associated with the Hot Key. Pressing E
again causes the new Hot Key file to overwrite the old one. This operation is like a file erasure
and is not Undoable.
Cut A Selected Segment To A Hot Key
A highlighted audio segment can be Cut to a
pressing the desired
HOT KEY
. "Cut" differs from "Copy" in that the audio segment is actually
HOT KEY
by holding down
CUT
, and
removed from its original location. The cut segment is also saved as a new File; the display
will offer a default name, with a rename option.
Assign a File To a Hot Key
A File from the current Directory can be Copied to a Hot Key.
ILES
• Go to the File select level (F
• Select the File using the S
• Hold the C
• Press
OPY
key down;
the desired H
OT KEY
CRUB WHEEL
.
key);
;
If the Hot Key you choose is already assigned, the display reads:
PRESS ENTER TO REASSIGN, PRESS EXIT TO CANCEL.
Pressing E
NTER
reassigns the Hot Key to the new file.
Determining a Hot Key Assignment
To silently find which File is assigned to a Hot Key, hold A
and press the H
OT KEY
.
LT
Performing an Insert From a Hot Key
To Insert an audio segment into a File during editing:
• Set the Cursor to the desired location on the waveform.
• Press E
• Hold down I
DIT IN
, then E
NSERT
DIT OUT
to set an insertion point for the new segment.
and press the desired audio H
OT KEY
. The selected segment is
inserted into the File, and the File length is extended by the same amount.
If a region of audio was first highlighted within the File, inserting an audio segment will
replace the audio within the highlighted region. If the inserted audio is of different length than
the segment replaced, the playing time of the File will also change.
Playing Audio From A Hot Key
Hot Keys can be played while in the Files menu, or in the Editor.
• To play audio, press the H
• To Clear a Hot Key assignment, hold E
OT KEY
. It will illuminate while playing.
RASE
and press the H
OT KEY
. (This does not
erase the file.)
Shortcut Audio Editor Owner's manual
Page 54

Page 46 Miscellaneous Operations
Using Hot Keys To Compare Audio Versions
Since Hot Keys are operational while editing audio, it is possible to compare the
original version of a File with an edited one. To do this, assign the File to a
editing. As work progresses, the
HOT KEY
can be used to play the unedited version of the file.
HOT KEY
before
Programming A Hot Key To Play Clipboard Contents
It is often important to know what audio is present in the Editor’s “clipboard”. The
UT
or C
OPY
user may have forgotten what the last C
operation was; or wish to compare the
clipboard with other audio to help in decision making.
Shortcut solves these problems by allowing the changing contents of the clipboard to be
assigned to a Hot Key. Pressing the Hot Key will then play the clipboard at any time,
auditioning its audio as editing progresses.
To make this assignment, a File named _
To inspect for this, press the F
ILES
key and see if it is there. (_
CLIPBOARD
must first exist in the Files listing.
CLIPBOARD
is always at the
bottom of the Files list.) If it is not present, create a _clipboard file by Editing any file and
performing a C
Assigning the _
OPY
operation. Exit the Editor.
CLIPBOARD
to a Hot Key is done as a normal Copy to Hot Key
operation:
ILES
• Go to the File select level (F
• Select the _
• Hold
The H
CLIPBOARD
_
OT KEY
file is never erased and the Hot Key is not reassigned, the clipboard contents will
CLIPBOARD
COPY
and press a H
will now reflect the changing contents of the clipboard. As long as the
be played by the assigned H
OT KEY
File.
OT KEY
.
key)
.
THE FIND COMMAND
The F
IND
command will locate a File by title within a specific Directory, without the
IND
need to scroll through a lengthy list. Alternately, the F
a specific time point within a File.
Finding A File By Title
• To find a File by title, go to the File display.
• Press the F
key. (S
PACE BAR
)
IND
• Enter the complete title, or a partial title followed by an asterisk "*".
NTER
• Press E
. The F
ILES
listing will highlight the requested File title.
command can position the Cursor at
(FILES
key)
If the title cannot be found, the display will show file not found. Press E
the File Select listing.
XIT
to return to
360 Systems
Page 55

Miscellaneous Operations Page 47
Finding A Time Location
IND
The F
File name. Further, one may use F
command can locate to a time position within a File, instead of a finding a
IND
to locate an absolute time point, measured from the
beginning of the File; or the command can be used to skip forward or backward by a predetermined time interval. To find a time location within a File, Shortcut must be in the Editor.
To Find an absolute position
• Press the F
key. (S
PACE BAR
)
IND
• Enter the absolute position in hours, minutes or seconds, calculator-style. New
digits will appear in the right column, while previously entered digits move to
the left.
• If a (+) or (-) sign appears in front of the time, press the A
STERISK
(*) key to
clear the sign. See the following section on setting “skip” intervals.
NTER
• Press E
. The Cursor will move to the new position, and the display will
show the time.
Entering a position beyond the end of the File will locate to the actual end of the File.
The
BKSP
and DEL keys will back out the last digit entered. The U
the last change to an entry. E
RASE
will clear the entered value.
NDO
key will undo or redo
Setting skip intervals
The Shortcut editor allows the user to “skip” (or tab) forward or backward by some
convenient interval of time. Relative offsets are useful as a pre-roll when auditioning edits,
and also for rapidly moving through a File. This time offset is entered in the same way as an
absolute time (see above section) but is preceeded with a (+) or (-) sign to denote the direction
of the skip. The following steps show how the direction of skip is established. Also, the
CRUB WHEEL
S
or S
PACE BAR
can be used to alternate between these signs.
To skip forward in time
• Press the F
IND
key.
• Enter the interval to skip.
• Press the R
• Press E
NTER
IGHT ARROW KEY
.
to skip forward.
To skip backward in time
IND
• Press the F
key.
• Enter the interval to skip
• Press the L
• Press E
EFT ARROW KEY
NTER
.
to skip backward.
To repeat a forward/backward skip
IND
• Press the F
• Press the FF (fast forward) or R
key.
EW
(rewind) key.
Shortcut Audio Editor Owner's manual
Page 56

Page 48 Miscellaneous Operations
Bleep A File Segment
Offensive words in a recording may be censored by using the large blue Bleep button to
overwrite them with a "Bleep tone" or silence. This selection is made in the D
P
REFERENCES
LEEP SOURCE
B
menu. There is also a setting to select the Bleep Level. (See the section on
on page 55.) Audio is non-destructively replaced with a Bleep tone while the
IRECTORY
button is depressed.
Insert Bleep in A File While Stopped
• At the Edit level, use the E
DIT IN
and E
DIT OUT
keys to highlight an offending
segment of audio.
• While stopped, hold the I
NSERT
key down and press B
LEEP
. The Bleep tone (or
silence) will be inserted in place of the selected audio.
To Bleep A File In The Play Or Record Mode
LEEP
• Hold down the B
In Play mode, the B
LEEP
button replaces the normal audio output of the File being
button for the desired duration.
played; it has no effect on the File itself.
LEEP
In Record mode the B
button appears to replace incoming audio with a tone. In fact,
the original audio is recorded to disc along with special marks that denote the placement of the
bleep tone. When the File is played back, the bleeped portions are automatically replaced by
the tone. When the File is edited, the bleeped portions appear as areas of constant level with
marks at either end.
While recording, it is sometimes desirable to monitor the input to the Editor instead of
the output. This is because when the recorded audio is replaced by a Bleep tone, the original
audio cannot be heard and it is not possible to tell when the Bleep button can be released.
To Bleep In The Idle Mode
• Press the B
LEEP
button. Although source audio does not pass through the Editor
in this mode, it may be used to generate Bleep tones for external use.
Undo A Bleeped Region Of Audio
Any bleeped region can be restored to the original audio by selecting (highlighting) the
region containing a bleep, holding U
and pressing B
LEEP
.
NDO
Passwords
The Files stored in each Shortcut Directory can be protected from use or erasure by
requiring a password to gain access to a Directory. Directories 1 through 9 can be password
protected, while the Public Directory is always accessible and never requires a password. If the
user attempts to enter a password-protected directory, he will be prompted to enter a password.
The Shortcut Editor is shipped with the passwords feature disabled. This means that no
password is needed to enter any Directory. A designated "System Supervisor" at your facility
can enable passwords (or disable them) by invoking a S
PECIAL
menu. Access to the S
PECIAL
menu is described on a separate colored page that can be removed from the owner's manual to
restrict access to the information. Other features controlled in this manner include formatting
the hard disk. The System Supervisor may also have a master password.
360 Systems
Page 57

Miscellaneous Operations Page 49
Once the passwords feature is enabled, a general user can set a new password for a
Directory (except the Public Directory) providing he has knowledge of the existing password.
Go to the
CHANGE PASSWORDS
selection of the
DIRECTORY PREFS
menu (in
FILES
mode) to
specify a new password. Password protection can also be removed from a Directory by
changing its password to a blank.
Reprogramming A Lost Password
To reprogram a lost Directory password, first disable “passwords” using the S
PECIAL
menu. Then program a new password. (When “passwords” is disabled, the display will not
ask for the existing password.)
The Master password is always freely reprogrammable in the
SPECIAL
menu. Formatting
the hard drive also removes all passwords.
Instructions for accessing the S
PECIAL
menu are included on a separate sheet in the
manual to protect access to this operation. If you do not have this sheet, contact your system
supervisor or facility manager.
Horizontal Waveform Magnification
While editing, the
accurate editing. Conversely,
ZOOM IN
ZOOM OUT
key will magnify the waveform time display for more
expands the time scale. Four zoom levels provide a
"screen time" display of 2, 5, 10 and 20 seconds. At the highest magnification, each pixel on
the screen is 10 mSec wide. At lower magnifications, the editing precision is also 10 mSec; it
just isn't shown on the screen with that degree of detail.
Vertical Waveform Magnification
Some waveforms do not fill the available vertical space of the display, and would be
easier to edit if they were larger. Hold the A
size of the waveform. Conversely, A
LT + ZOOM OUT
key and press Z
will decrease the size of the display.
OOM IN
to enlarge the vertical
LT
These settings are specific to the particular File being edited, and are not stored as a global
machine setup.
Display Blanking
The LCD display used in the Shortcut Editor is blanked after one hour of operation if no
keys have been pressed. Turning the image off protects the display from having a fixed image
burned into it. The Editor will only blank its display while idling; all active uses of the
machine provide continuous display. To unblank the display, press any key. The R
EC
(record)
key is guaranteed to work immediately; a single press will unblank the display and
simultaneously enter the Record mode.
Power Down
NEVER TURN OFF POWER TO THE EDITOR WHILE IT IS PERFORMING ANY
OPERATION. DOING SO CAN RESULT IN LOSS OF SOME OR ALL OF THE
MATERIAL RECORDED ON THE HARD DISK.
When in the Editor, all edits performed since the last Save operation WILL BE LOST
if the power is turned off.
When finishing work, press the DIR key to close all active files, then turn power off.
Shortcut Audio Editor Owner's manual
Page 58

Page 50 Miscellaneous Operations
If you work in an area with frequent power failures, it is advisable to protect Files in the
Shortcut Editor by powering it from an "Uninterruptable Power Source" or "UPS".
Recovering Hard Disk Space
The Shortcut Editor provides several ways to clear disk space for future use. All
methods involve erasing selected audio Files that are no longer needed. Should more space be
required than can be reclaimed without erasing valuable material, some Files must be
transferred off to DAT tape or another medium for safekeeping.
The Files stored in Shortcut are located within 10 Directories. Select Directories one at a
time, and review the Files located in each. Erase unwanted material one File at a time.
Should you decide that all material within a Directory can be discarded, go to the
Directory level, reconfirm that the right Directory is still selected, and press
ERASE
will warn you that continuing will permanently remove all Files in that Directory. Press
EXIT
to erase the entire Directory, or
to cancel the operation. Erase other Directories as needed
. The Editor
ENTER
to free additional disk space.
Using Virtual Files To Save Disk Space
Shortcut employs advanced data management techniques to optimize the amount of
audio that can be stored on a hard disk, while preventing disk fragmentation. When a copy of a
File is made, the audio data is not re-written in its entirety to the new File; only portions that
have been changed are stored. It is possible to produce dozens of edited versions of a File,
each slightly different, without using an appreciable amount of disk space. Each references
parts of the original recording.
For this reason, erasing these "copies" will not release much disk space. It is necessary to
erase all the copies and the original recording to release the space. It is important to keep the
copies in the same Directory, and preferably with related names, so they can be erased as a
group. It is inadvisable to Copy a File to another Directory and rename it, because this
will make it impossible to know what root File it is referenced to. Remember that since Files
in different Directories can have the same names, identical copies of a File made to another
Directory really should have the same names; this way, it is relatively easy to erase all of them
when they are no longer needed.
Note that when files are copied between the Internal Drive and the External Drive, the
audio data is reproduced in each one. If you want to transfer multiple copies of a file between
disks, it will use less disk space if you copy only one of them to the opposite drive, then copy
that file within that drive.
Formatting the Hard Drive
For security reasons, information on formatting the internal hard drive is contained on a
separate colored sheet of paper inserted in this manual, so that it can be retained by the facility
manager. If this paper is not in the manual, contact your facility manager.
360 Systems
Page 59

Using Menus Page 51
CHAPTER VI
Using Menus
The design of the Shortcut Editor places all of the commonly used functions on dedicated
keys. Less-often used tasks are selected through menus; these define global aspects of the
editor's behavior, and perform specialized operations. There are two methods of using menus:
Method 1
• Press the M
• Rotate the S
• Press E
ENU
CRUB WHEEL
NTER
or M
key at any time to make a list appear.
to highlight the desired item.
ENU
to select that item. The variable for that menu selection
will blink, or a sub-menu will appear.
• Rotate the S
• Press E
• Press E
• Press E
CRUB WHEEL
NTER
to confirm the selection, or
XIT
to back out to the main menu list.
XIT
again to exit entirely from the menu operation, and return to your
to select the desired item.
EXIT
to restore the original setting.
previous work screen.
EFT
The L
S
CRUB WHEEL
NTER
of E
and E
-and R
to make menu selections. The E
XIT
IGHT ARROW KEYS
(
) or the
DIT IN
GO TO
and E
keys can be used in place of the
DIT OUT
, unless an audio waveform is on the display.
keys can be used in place
Method 2
All items within the menus are numbered. Press a numeric key to directly select the
menu item. This leads to some shortcuts to finding menu choices. For example:
ENU
M
M
M
, [2] = Show the Quick Reference list
ENU
, [3] = Rename the Directory or File
ENU,
[1] or M
ENU, MENU
= Go to the Setup Menu
The S
TOP
key has an extra function when working with menus. It means "Get me back
to where I was – make all these menus go away." Use S
TOP
if you are in any menu and wish to
immediately abandon what you are doing.
This method is used exclusively by the special “quick menus” for Input Select (S
KEY1) and Speakers On/Off (S
Shortcut 2000 Editor Owner's Manual
OFT KEY
2). For example, S
OFT KEY 1,
[1] = A
OFT
NALOG INPUT
.
Page 60

Page 52
Using Menus
Three primary menus are available, depending on the operating mode of the Editor:
• Directory Menus
• File Menus
• Editor Menus
DIRECTORY MENUS
The menu items in this section are available at the Directory level, and are accessed by
the D
IR
button.
Quick Reference
Commonly used keyboard and button functions are displayed in the QUICK
selection. Also, see the Menu Appendix for a complete listing.
Setup Menu
This selection includes machine features you may want quick access to, regardless of
how you are using the Editor. Setup appears as the first selection in all master menus.
REF menu
MENU FUNCTION CHOICES
AUDIO INPUT ANALOG DIGITAL (BNC) DIGITAL (XLR)
SPEAKERS ON OFF
THRESHOLD RECORD ON OFF
THRESHOLD LEVEL -6 dB -60 dB TEN STEPS
SET DIRECTORY
SAMPLE RATES
GPI ASSIGNMENTS 5 COMBINATIONS SEE PAGE 15
EXTERNAL DRIVE PARALLEL SCSI SEE PAGE 18
REC MONITOR ON OFF SEE PAGE 22
SYNC SOURCE INTERNAL EXTERNAL SEE PAGE 16
SYNC/DNET ECHO
INPUT
DNET ECHO ON OFF
48K 44.1K ONE FOR EACH
DIRECTORY
BNC XLR
SEE PAGE 17
A complete discussion of sample rates will be found in the chapter on Recording.
Erase Directory
This selection is used to erase the entire contents of a Directory. It is a destructive
function, and cannot be reversed with the U
NDO
key.
At the Directory level, a specific Directory is first selected for erasure. When the
DIRECTORY
function is selected, the display shows:
ERASE AL L FI LES IN THI S DIRE CT ORY?
PRE SS 'EN TE R' TO ER ASE
PRE SS 'EX IT ' TO C ANC EL
ERASE
360 Systems
Page 61

Using Menus Page 53
Rename Directory
Each Directory in the Shortcut Editor can have a user-assigned name for convenience.
Prior to the assignment of a custom name, the Editor names each Directory DIRECTORY
through DIRECTORY
ENAME DIRECTORY
the R
9, plus PUBLIC DIRECTORY. A new name can be assigned through
menu selection. When selected, the display shows:
ENT E R NEW DIR E CT ORY NAM E
___ __ ____ __ ____ __ ____ __ ____
PRE SS 'EN TE R' TO CO NTIN UE
1
FILE MENUS
The menu items in this section are available at the Files level, accessed by the
Setup Menu
This selection includes machine features you may want quick access to, regardless of
how you are using the Editor. Setup appears as the first selection in all master menus. Refer to
the chart on page 52.
FILES
key.
Quick Reference
Special keyboard and button functions are displayed in the
QUICK REF
menu selection.
See the Menu Appendix for a complete listing.
Rename File
RENAME FILE
The
menu selection is of particular value when a recording was made with a
default title that is not helpful in locating the File. Also, when several versions of a single
recording exist, it is a good idea to give them meaningful names. Select a File and then select
RENAME
. The display shows:
ENT E R NEW FIL E NAME
(EX ISTI N G F I LE N AM E )
PRE SS 'EN TE R' TO CO NTIN UE
Shortcut 2000 Editor Owner's Manual
Page 62

Page 54
Erase File
Files may be individually erased. First select an unwanted File, then select
You can also select a File and press the
be reversed with the
UNDO
key. The display shows the name of the File to be erased, as well
ERASE
key. This function is destructive, and cannot
as:
ERASE THI S FI L E?
PRE SS 'EN TE R' TO ER ASE
PRE SS EXI T TO CANC E L
Directory Preferences
The following five menu items are sub-menus appearing in the
menu selection:
1. Default Title
2. Ask For New Title
3. Time Display
4. Default Bleep Source
5. Change Password
6. Bleep Level
Using Menus
ERASE FILE
DIRECTORY PREFERENCES
.
EFAULT TITLE
D
The Shortcut Editor will automatically assign a title to a new recording if the user
chooses not to do so. This feature speeds up the recording and editing process, and it catalogs
recordings in a meaningful way.
The Default Title option allows the operator to determine what these titles will be. If
recordings are to be made of an interview with the President, a useful default title might be
PRES. Default titles will then begin with PRES 0001.
The default title may also be left blank. In this case, the Editor will automatically assign
titles consisting only of numbers, starting with 0001.
Titles can be up to 11 characters in length.
ENT E R TITL E (E X CLUD IN G I ND EX NUM BE R)
F I L E ___ __ ____ __ ____ _
PRE SS 'EN TE R' TO CO NTIN UE
A
SK FOR NEW TITLE
This selection determines whether the Editor will stop after a recording and ask the
operator for a new title, or whether it should assign a default title. The difference has only to
do with the speed at which a series of new recordings can be made. The choices are:
AF TE R RE CO RDIN G
NEV ER PRO MPT
360 Systems
Page 63

Using Menus Page 55
T
IME DISPLAY
This selection determines whether the time display during playback is the elapsed time
from the beginning of the File, or the time remaining from the current location to the end of the
recording. Note that the time displayed in the editor is always elapsed time. The menu choices
are:
ELAPS ED
REM AI N ING
LEEP SOURCE
B
LEEP KEY
The B
B
LEEP LEVEL
can provide two possible actions when pressed:
SIL EN CE
TON E
The level of the Bleep when set to TONE is adjusted by this item. The available settings
are:
0 D B
- 6 DB
-12 DB
-18 DB
-24 DB
C
HANGE PASSWORD
Passwords may be used in a broadcast facility to protect valuable Files, and to provide
exclusive use of certain recordings for the staff member who created them. This menu
selection sets a password for access to the currently selected Directory. To change an existing
password, the Editor requires that you first know the currently used password. To provide
security, the actual characters entered are not shown on the display. The display shows:
ENT E R CURR EN T PAS SWO R D FO R DI RE CTOR Y
___ __ ____ __ ____ __ ____ __ __
PRE SS 'EN TE R' TO CO NTIN UE
After entering the correct current password, the display shows:
ENT E R NEW PAS SWO R D FO R DI RECTO RY
___ __ ____ __ ____ __ ____ __ __
PRE SS 'EN TE R' TO CO NTIN UE
After entering a new password twice, the display will confirm your change with the
message "
PASSWORD CHANGED
".
Shortcut 2000 Editor Owner's Manual
Page 64

Page 56
Using Menus
Copy File or Directory
A File may be copied within a Directory, or from its original location to a new
destination Directory on the Internal or External disk. The target Directory must be set to the
same Sample Rate as the source directory or file Select a File or Directory, then select COPY
FILE. You can also select a File and press the C
OPY
key. The display shows:
SEL EC T DESTI NAT IO N D R IVE
(I N TE RN AL )
AN D PRES S 'ENT ER ' TO C ONTI NU E
The center line showing the INTERNAL Drive in this example can be changed to
EXTERNAL if an External Drive is connected. Press the A
W
HEEL
until the desired destination Drive appears then press E
RROW KEYS
NTER
to confirm the selection.
or rotate the S
CRUB
The display then shows:
SEL EC T DESTI NAT IO N D I RECT O RY
(PU BL IC D IREC TO RY )
AN D PRES S 'ENT ER ' TO C ONTI NU E
The center line showing the Public Directory in this example can be changed to indicate
any other Directory. Rotate the S
then press E
UMERIC KEYS
N
NTER
to confirm the selection. A Directory may also be selected using the
to enter the Directory number; a "0" (zero) or "P" may be used for the Public
CRUB WHEEL
until the desired destination Directory appears,
Directory.
If a single file is being copied, the display now prompts for a new name for the File;
however, it is not necessary to change the existing name when copying to a different Directory.
ENT E R DEST IN ATI ON F ILE NAM E
___ __ ____ __ ____ __ ____ __ ____ _
PRE SS 'EN TE R' TO CO PY
Upon pressing E
NTER
, the file will be copied, unless there is already a file with the
specified name in the destination directory. If there is a duplicate, the display will prompt for
another file name for the copy.
If a Directory is being copied, there is a choice of how to handle duplicate filenames
should any be encountered during the copy operation. The display will show:
REP LAC E FI L ES W ITH TH E SAM E NAM E?
PRE SS ‘ER ASE ’ TO R EP LAC E FI LES
PRE SS 'EN TE R' TO SK IP F ILES
360 Systems
Page 65

Using Menus Page 57
Pressing E
directory. The files that are overwritten will be permanently erased. Pressing E
RASE
will result in files from the source directory overwriting files in the target
NTER
will
cause the copy not to be performed if there is a file with the same name in the target directory.
NTER
or E
RASE
Upon pressing E
XIT
will stop the operation in progress. As the Copy operation progresses, the name of the file
E
the Copy operation will begin immediately. Pressing
being copied and status on whether the file is copying or being skipped is displayed. When the
operation is finished, a report of the number of files copied and the number of files skipped is
displayed.
Copy operations do not copy Hot-Key assignments.
Export Files to DigiCart/II Plus or Instant Replay
You can use Shortcut to create Zip disks for playback in DigiCart/II Plus or Instant
Replay 2.0 with an external Zip drive. Always use Zip 100 disks for Digicart II Plus, even if
you have a Zip 250 drive.
Select a file (in the Files display) or directory (in the Directories display) in the
Shortcut’s Internal drive. Press M
ENU
and select item 8 EXPORT FILE TO DIGICART DISK
or EXPORT DIRECTORY TO DIGICART DISK.
The display asks for the directory and index number to put the exported file(s) in. The
first of the four numbers represents the directory number, the last three digits are the index
number. If you are Exporting a directory the index number you enter will be the first index
number used. Other higher numbered indexes will be assigned to other files transferred from
the directory. If you are creating a new disk these numbers don’t matter too much, just use
0.000. Note that for use in an Instant Replay 2.0, the directory number must be 0. For more
information on Index numbers, see the manuals for DigiCart/II Plus and Instant Replay 2.0.
Next you will be asked if you want to replace files in occupied index numbers in the
DigiCart disk, or use the next unused index number. Pressing E
RASE
causes any file occupying
the specified Index number to be overwritten. In the case of a directory transfer, it will
overwrite any indexes it encounters from the specified index to the number of indexes it needs
to accomodate all files in the directory. Files that are overwritten are permanently erased
NTER
Pressing E
available unused index number. If in doubt, use E
leaves existing files on the disk and places the Exported file(s) in the next
NTER
.
You will be prompted to insert a DigiCart disk into the External Drive. You are given
RASE
the opportunity to first Format the disk you insert by pressing E
. This operation creates a
DigiCart/II Plus format disk; the resulting disk will not be readable on the Shortcut.
Shortcut 2000 Editor Owner's Manual
Page 66

Page 58
IMPORT 48K [ROOT DIRECTORY]
<EXPORT TO THIS DIRECTORY>
[MUSIC]
[SOUND EFFECTS]
NEWSCAST.WAV
3:30
PROMO.WAV
:15
PUBLIC SERVICE ANNOUNCEMENT.WAV
:30
Using Menus
Import and Export of Foreign Files
Import and Export provide the ability to convert audio to and from the Shortcut format
and a variety of other file formats, as well as reading and writing those files on a selection of
disk media that use various data and file formats. The currently supported file types are:
.WAV at 44.1KHz or 48KHz sample rate, mono or stereo.
.BWF (Broadcast .WAV) at 44.1KHz or 48KHz sample rate, mono or stereo.
AIFF at 44.1KHz or 48KHz sample rate, mono or stereo.
SDII at 44.1KHz or 48KHz sample rate, mono or stereo. (on HFS format disks only)
The currently supported disk formats are MSDOS (IBM PC and compatibles) and HFS
(Apple Macintosh®).
The currently supported disk types are Iomega Zip 100, Zip 250 and Jaz 1G and 2G.
Note that the Shortcut must be running Softcode to perform these functions. Import and
Export to formats other than DigiCart/II are not supported by the internal (ROM based) code.
For more information see the section on installing Softcode.
Importing Files
1. Place the disk containing the file to be imported in the external drive.
2. Select the Shortcut directory that will receive the files, either by using the Scrub Wheel or
Arrow Keys to highlight it in the Directories display, or by entering the directory.
3. Press M
ENU
and select Item 9. IMPORT FILES, then press E
NTER
or
ENU
Press the M
key and press the 9 KEY.
or
Press D
IR
, then M
ENU
, then the 5 key to log onto the external disk, then press E
NTER
.
4. The display will show:
<IMPORT ENTIRE DIRECTORY>
5. The top line shows the Sample rate of the Shortcut directory you selected in step 1, and the
name of the directory on the external disk that is currently being displayed. This always
starts out as ROOT DIRECTORY as shown. In the example above, lines 3 and 4 of the
display are subdirectories on the external disk, shown as [MUSIC] and [SOUND
EFFECTS]. Below them are three files that are in the Root Directory, each followed by
their Run Time. The second line is a command line, <IMPORT ENTIRE DIRECTORY>.
This allows all of the files in the current directory (but not the subdirectories) to be
imported.
360 Systems
Page 67

Using Menus Page 59
IMPORT 48K
ROOT DIRECTORY
PUBLIC SERVICE ANNOUNCEMENT 44K.WAV
:
WORD PROCESSOR FILE.DOC
:
NEWSCAST.WAV
3:30
PROMO.WAV
:15
PUBLIC SERVICE ANNOUNCEMENT.WAV
:30
IMPORT FILE
ENTER DESTINATION FILE NAME
NEW FILE NAME. WAV _
PRESS
‘ENTER’ TO IMPORT
_______________________________________________
IMPORT FILES
REPLACE FILES WITH THE SAME NAME?
PRESS
‘ERASE’ TO REPLACE FILES
PRESS ‘ENTER’ TO SKIP FILES
6. By using the S
CRUB WHEEL
or the A
RROW KEYS
, lines 2 through 6 of the display can be
selected. If there are more files or subdirectories than can be displayed on the screen, the
screen scrolls down to display them. Files that are not valid sound files, or are of the wrong
sample rate, are shown with dashes in their run time display.
[
WWWV STATION ID.WAV :05
7. • To Import all files, select <IMPORT ENTIRE DIRECTORY> and press E
• To enter a Subdirectory, select the [SUBDIRECTORY] and press E
]
.
--
.
--
NTER
NTER
. The Name of
the Subdirectory will be shown in the top line of the display, and the subdirectories and
files it contains will be displayed in lines 3 to 7. To move back to the previous
XIT
directory, press E
• To Import a file, select it and press E
.
NTER
.
8. If you are Importing a single file, you are presented with a display that allows you to
rename the imported file as it will appear in the Shortcut. You can accept the name as it is
shown by pressing E
NTER
, or you can edit the name and then press E
NTER
.
.
You cannot import a file with a duplicate name. If the file name is unique, the import
process will begin immediately. If the filename you choose already exists in the selected
Shortcut directory, the message
* FILE ALREADY EXISTS *
is displayed momentarily and the previous display reappears to allow you to enter a
new name.
If a Directory Export is being performed, the display will show a screen asking how
to handle files with duplicate names.
Shortcut 2000 Editor Owner's Manual
Page 68

Page 60
FILENAME.WAV
48%
IMPORTING
FILE 7 OF 9
PRESS ‘EXIT’ TO CANCEL
IMPORT FILES
FILES IMPORTED:
7
FILES SKIPPED:
2
FILES IGNORED:
0
FILES WITH ERRORS:
0
TOTAL:
9
PRESS ‘ENTER’ TO CONTINUE
Using Menus
Replace means that Shortcut files on the internal disk in the selected Shortcut
directory will be replaced by files being imported that have the same name. Skip means
that the import process will not import any file that has the same name as one already in the
selected Shortcut directory.
Note that the file’s extension counts as part of the name in Shortcut, so a file name
“NEWS” will not be replaced by a file named “NEWS.WAV”, nor will “NEWS.WAV” be
skipped if “NEWS” already exists in the current directory.
9. The Display will begin counting the percentage of the file that has been converted, and the
number of files to be converted: The operation can be cancelled by pressing E
XIT
.
10. When the process is complete, the display will show how many files were successfully
imported, how many were skipped, and the total of files processed.
If Replace Files with Same Name was chosen, “Files Skipped” in the display above will
be a count of “Files Replaced”. Canceling an Import operation during a replace will not cause
the original file in the Shortcut to be lost.
Files may be ignored for a number of reasons. They may be an incompatible format or
sample rate, a non-audio file or the Shortcut disk may be too full to hold that large a file. If a
file is ignored due to insufficient disk space, the process still continues in case a smaller file is
encountered. Files not imported due to cancellation are also counted as ignored.
Errors are most likely caused by a corrupt file, or a bad disk or cartridge.
The Shortcut titles of the Imported files retain the file extension, such as .WAV or .AIF.
11. Upon pressing E
directory, so that you can select other files or subdirectories to import. Press S
to return to normal operation.
NTER
, the display reverts to the directory display of the chosen external
TOP
or E
360 Systems
XIT
Page 69

Using Menus Page 61
CHOOSE EXPORT AUDIO FORMAT
SELECT AUDIO FORMAT TO USE
PRESS ‘ENTER’ TO CONTINUE
Exporting Files and Directories
Note that when files are exported, features that are specific to the Shortcut that affect the
audio output are applied to the file, but they are no longer editable or undo-able in the exported
file. Erased and Bleeped sections no longer contain their underlying audio and Gain edits
become permanent. All Marks are removed.
1. First select the Shortcut file or directory that you wish to export. You must be in the
Directory display to select and export a directory.
2. Place a disk in the external drive that is formatted for the system you wish to export to. Be
sure that the disk has enough space to accommodate the material you are going to export.
3. Press M
ENU
, select 8.EXPORT FILE TO EXTERNAL DISK (or 8. EXPORT
DIRECTORY TO EXTERNAL DISK if exporting a directory) and press E
or
Press M
4. The Choose Export Audio Format display will appear. Use the S
RROW KEYS
A
ENU
, then H
OTKEY
8.
CRUB WHEEL
to view the available formats. When you see the one you want, press E
.WAV (STEREO) - WAVE
The available choices are:
• .WAV (STEREO) - WAVE
• .WAV (MONO) – WAVE
• .BWF (STEREO) - BROADCAST WAVE
• .BWF (MONO) – BROADCAST WAVE
• .AIFF (STEREO) - AUDIO INTERCHANGE
• .AIFF (MONO) – AUDIO INTERCHANGE
If you are exporting to an HFS format disk, there will also be the choices:
• .SDII (STEREO) – SOUND DESIGNER
• .SDII (MONO) – SOUND DESIGNER
NTER
,
or the
NTER
.
5. Next you will see the Root Directory display of the External disk. The second line,
<EXPORT TO THIS DIRECTORY>, is a command to begin the Export process to this
directory. Lines 3 and 4 of the display are subdirectories on the external disk, shown in the
example below as [MUSIC SUBDIRECTORY] and [SOUND EFFECTS].
Shortcut 2000 Editor Owner's Manual
Page 70

Page 62
EXPORT [ROOT DIRECTORY]
<EXPORT TO THIS DIRECTORY>
[MUSIC SUBDIRECTORY]
[SOUND EFFECTS]
NEWSCAST.WAV
3:30
PROMO.WAV
:15
PUBLIC SERVICE ANNOUNCEMENT.WAV
:30
EXPORT
[
ROOT DIRECTORY
]
PUBLIC SERVICE ANNOUNCEMENT 44K.WAV
:
WORD PROCESSOR FILE.DOC
:
NEWSCAST.WAV
3:30
PROMO.WAV
:15
PUBLIC SERVICE ANNOUNCEMENT.WAV
:30
EXPORT FILES
REPLACE FILES WITH THE SAME NAME?
PRESS
‘ERASE’ TO REPLACE FILES
PRESS ‘ENTER’ TO SKIP FILES
FILENAME.WAV
76%
EXPORTING
FILE 1 OF 3
PRESS ‘EXIT’ TO CANCEL
Using Menus
<EXPORT TO THIS DIRECTORY>
By using the S
CRUB WHEEL
or the A
RROW KEYS
, lines 2 through 6 of the display can be
selected. If there are more files or subdirectories than can be displayed on the screen, the
screen scrolls down to display them. Files that are not valid sound files, or are of the wrong
sample rate, are shown with dashes in their run time display.
.
--
--
.
WWWV STATION ID.WAV :05
6. • To Export to the displayed directory, select <EXPORT TO THIS DIRECTORY> or
one of the files in the directory and press E
• To enter a Subdirectory, select the [SUBDIRECTORY] and press E
NTER
.
NTER
. The Name of
the Subdirectory will be shown in the top line of the display, and the subdirectories and
files it contains will be displayed in lines 3 to 7. To move back to the previous
directory, press E
XIT
.
7. If you are exporting a Directory, the display will show a screen asking how to handle files
with duplicate names. Replace means that the files on the external disk will be replaced by
files about to be exported. Skip means that the export process will not export any file that
has the same name as one already on the external disk.
8. The Display will begin counting the percentage of the file that has been converted, and the
number of files to be converted: The operation can be cancelled by pressing E
XIT
.
360 Systems
Page 71

Using Menus Page 63
EXPORT FILES
FILES EXPORTED:
7
FILES SKIPPED:
2
FILES IGNORED:
0
FILES WITH ERRORS:
0
TOTAL:
9
PRESS ‘ENTER’ TO CONTINUE
WARNING!
Canceling an Export operation during a Replace will cause the file on the external disk to be lost.
9. When the process is complete, the display will show how many files were successfully
exported, how many were skipped, and the total of files processed.
If Replace Files with Same Name was chosen, “Files Skipped” in the display above will
be a count of “Files Replaced”.
Files may be ignored because the External disk is too full or too small to hold that file. If
a file is ignored due to insufficient disk space, the process still continues in case a smaller file
is encountered. Files not exported due to cancellation are also counted as ignored. Errors are
most likely caused by a bad disk or cartridge.
Exported files are given the same name as the Shortcut file with the addition of the file
extension for the chosen format, for example .WAV or .AIF.
10. Upon pressing E
directory, so that you can verify that the files are present. Press S
NTER
, the display reverts to the directory display of the chosen external
TOP
or E
XIT
to return to
normal operation.
D-NET File Transmission
D-NET transmission allows you to send files or entire directories to 360 Systems’
DigiCart/II, DigiCart/II Plus or Instant Replay (Original or 2.0). Files recorded at the 48k
sampling rate can optionally be Dolby
AC-2 encoded prior to transmission.
D-NET uses the digital audio outputs to transmit the file name and data. Both the
AES/EBU XLR-3 and AES/SMPTE BNC outputs are active so either one or both can be used.
Transfers from a Shortcut take approximately real time to complete. Due to extensive
differences between the Shortcut and DigiCart/II file formats used by D-NET, transmission
times are longer than between DigiCart/IIs and Instant Replays. Also, as AC2 is not a native
format in Shortcut, that conversion must be done during the transfer, so the time savings for
AC2 does not apply. Some applications may be better performed using the Export function.
Shortcut does not receive D-NET transmissions. Shortcut can be set to Echo D-NET
transmissions to allow two or more Shortcuts to be able to send transmissions to one or more
Digicart/II or Instant Replay units, or to configure Shortcut as part of a Loop configuration
network. The unit must be idle to echo transmissions.
Shortcut 2000 Editor Owner's Manual
Page 72

Page 64
Using Menus
To turn on D-NET Echo, press M
ENU
, select S
ETUP
, then select item 9 D-NET E
CHO
and
set it to ON. Select the Digital Audio Input to be used for D-NET by selecting item number 8
S
YNC /
D-NET E
Press F
transmitting a Directory. Select the file or directory to be transferred. Press M
menu item 7 DNET FILE
(Alternately, press
CHO INPUT
ILES
if you will be transmitting a single file, or press
ZOOM OUT
and setting it to either XLR-3
or DNET DIRECTORY in the Files or Directories menu.
after selecting the file or directory.)
OR
BNC.
DIR
if you will be
ENU
and select
You will be prompted to supply these specifications:
1. A Destination Receiver Name
2. A Location Type (DIRECT ADDRESS or MAILBOX)
3. If Direct Address was selected, you will enter an ID number for the Drive,
Directory and Index Number where you want to place the transmitted file in the
Receiving unit.
4. If the file or directory you selected is recorded at the 48K sampling rate, you
will be prompted to select Dolby
AC-2 encoding or Linear format.
The Receiver Name is used when more than one receiving unit is on line and you want
the transmission to go to a particular unit. If no Receiver Name is necessary, press E
enter a Receiver Name use the A
LPHANUMERIC KEYS
and then E
NTER
.
NTER
. To
Select a Location Type with the S
CRUB WHEEL
or A
RROW KEYS
and press E
NTER
. Direct
Address allows the transmitting unit to specify where the transmitted material will be placed in
the receiving unit. Mailbox is a designated area in a receiver where received files will be
placed to avoid overwriting existing material on the receiver’s disk.
If Direct Address was selected, you will be asked for the ID number for the location in
the receiving unit to place the transmitted material. The ID number defaults to Drive 1,
Directory 0 (suitable for transmission to an Instant Replay, which has only drive 1, directory
0). The cursor starts out on the first digit of the Index Number. To place the cursor on the
Drive or Directory number, backspace or rotate the S
index number, use the N
UMERIC KEYS
.
CRUB WHEEL
to the left. To enter the
When transmitting a directory to a Direct Address, the index number supplied represents
the first index number to be used. Each file after the first will be placed on the next index
number. These index numbers will be used regardless of whether they contain audio or not, so
it is important to be aware of what a Directory Transfer will overwrite in the receiving unit.
Count the files in the directory to be transferred. Don’t forget to include the _CLIPBOARD
file or delete it before transferring. Then check the receiving unit to see if any important files
exist in the range of Index numbers from the specified Index number to that needed to
accommodate the transferred directory.
If the file or directory you chose to transmit is 48k, you will be given the choice of File
Format (Linear or AC-2). DigiCart/II and Instant Replay 2.0 recorders can receive any format
from a Shortcut: 44.1 linear, 48k linear, or 48k AC-2. Original Instant Replay machines can
only receive 48k AC-2 files; files in Linear formats will be skipped by the Instant Replay.
360 Systems
Page 73

Using Menus Page 65
Pressing E
TOP
ends the process.
S
XIT
at any point in the process returns you to the previous display. Pressing
Once you have entered the transmission specifications, you will see a summary display
NTER
confirming those entries. Pressing E
has begun you can terminate it before completion by pressing E
initiates the transmission process. Once the process
XIT
, then E
NTER
. Any files
already transmitted will still exist in the Receiving unit. The file in progress will not be
transferred.
Both the BNC and XLR-3 digital outputs are always active during D-NET transmission.
For more information about D-NET Receiver operation and the D-NET system in
general, refer to the D-NET section of the manual for the receiving unit.
EDITOR MENUS
The menu items in this section are available only in the Edit Mode. It's always easy to
see when the Edit mode is active; it is the only mode in which a waveform display is presented.
Quick Reference
Special keyboard and button functions are displayed in the
QUICK REF
Also, see the Menu Appendix for a complete listing.
Setup Menu
This menu selection includes machine features you may want quick access to, regardless
of how you are using the Editor. S
ETUP
appears as the first selection in all master menus. Refer
to the chart on page 52.
menu selection.
Shortcut 2000 Editor Owner's Manual
Page 74

Page 66
SHORTCUT PROMO
0:00.00
SHORTCUT PROMO
0:00.00
Using Menus
Display Waveforms
The Shortcut Editor can display audio waveforms in two styles. The first of these is a
conventional dual waveform where the left channel appears on top, and the right channel
appears on the bottom. The menu selection is called
SPLIT
; all of the diagrams shown so far
depict this style of display.
L
R
SPLIT WAVEFORM DISPLAY
An alternative waveform combines the top of the left channel and the bottom of the right
channel, forming a large composite waveform. The main advantage of this display is its size.
The menu selection is called COMBINED.
L
R
COMBINED WAVEFORM DISPLAY
Output Level
The output level of each recording may be adjusted over a range of +6 dB to -60 dB.
These changes are stored with the recording, and become a semi-permanent part of the File.
The display shows a numeric value that may be adjusted in .5 dB steps by rotating The S
W
HEEL,
NTER
E
or in .1 dB steps by using the L
to confirm.
EFT
and R
IGHT ARROWS
or the GO TO keys. Press
CRUB
When Files having different level adjustments are intercut, each retains its own level.
Note that +6 dB is the maximum increase that can be obtained. For example, if you insert a file
with a gain of +4 dB and then increase the gain of the overall file to +5, the +4 dB section will
play back with +6 dB of added gain, not +9 dB.
Installing Softcode
Soft Code allows Shortcut’s operating instructions to be revised or upgraded without
changing memory chips. It also can also support more features than the size of the internal
program memory allows.
Note that the unit always maintains the capability to operate using the internal program
memory chips. Some features may be unavailable, and upgrades and revisions made since the
unit was shipped or the EPROMs were changed will no longer be in effect.
360 Systems
Page 75

Using Menus Page 67
INSTALLATION COMPLETE
TURN POWER OFF THEN ON TO USE SOFT CODE
OR PRESS ‘ENTER’ TO USE SOFT CODE LATER
To determine the current version of code that Shortcut is running, and whether it is
LT
Softcode or ROM code, press Dir, key, then hold the A
key and press V.
Softcode will normally be retained through a Format Internal Hard Disk operation.
Before the Format operation, the Soft Code file is loaded into memory, and is replaced on the
hard drive when the Format is completed. In the event that the internal hard drive must be
replaced, the Softcode will also have to be replaced.
To install Softcode on the Shortcut:
1. Turn off power to the Shortcut. Connect a Zip drive (Zip 100 SCSI, Zip Plus 100 or Zip
250 SCSI) to Shortcut. (If you have used this Zip drive with your Shortcut in its current
configuration, skip to the next step.) The Zip drive must be set to SCSI ID 6 using the
switch on its rear panel. This must be set with the power to the Zip drive turned off.
Termination should be On unless the Shortcut is a unit with a Version 1 main board∗, then
termination should be Off.
2. Turn on power to the Shortcut while holding its S
TOP
key. Continue to hold the S
TOP
key
until the lamp test sequence is finished and the display shows the Special Startup Menu.
NTER
3. Press the 5 key or select the item 5. INSTALL SOFT CODE and press E
NTER
4. Insert the Soft Code disk into the Zip drive and press E
again. Any existing Softcode
.
version will be replaced by the new version.
5. The display will confirm that the operation was successful by displaying:
6. Turn power off, wait 15 seconds and turn power back on. The version number of the newly
installed Soft Code should be displayed during the power up sequence.
Soft Code is a small file that is kept on the hard drive (it only takes up about 2 seconds
worth of audio recording space.) When Shortcut boots up, the setup file is checked to see if
Soft Code is enabled. Then the Soft Code file is loaded into RAM memory, and the normal
operation of the unit is transferred to that copy of the program.
If it is ever necessary to disable Soft Code operation, the Special Startup Menu has an
item 4. DISABLE SOFT CODE that allows this. When Soft Code is disabled, this item
becomes 4. ENABLE SOFT CODE. You must cycle the power after these operations for them
to take effect.
∗
To check the hardware revision number, press the DIR key, then hold the ALT key and press V.
Shortcut 2000 Editor Owner's Manual
Page 76

Page 68
Technical Specifications
CHAPTER VII
TECHNICAL SPECIFICATIONS
Audio Performance
Audio format 2-channel
Recording time @ 48 kHz Approximately 12 hours at 44.1 kHz
Recording medium 3.5” internal hard disk
External media 100 or 250 MB Zip ® disk; 2 GB Jaz® disks with optional SCSI adapter
Frequency response 20 Hz to 20 kHz ±0.2 dB
Sample Rates 48 kHz, 44.1 kHz
Word size and coding 16 bit linear
SNR, A-wtd, 20 kHz BW > -90 dB
THD + N <.004% @ 1 kHz,.full scale
CMRR >-80 dbFS @ 60 Hz
Analog inputs Balanced, input Z = 10K ohm; XLR-3 connectors
Maximum input level +26 dBu
Analog outputs Balanced, XLR-3 connectors
Maximum output level +22 dBu (+4dBu = -18 dBFS Digital)
Digital I/O
2. AES3-ID or D-NET data on 75-ohm BNC
3. IEC-958 Type II on BNC, input only
1. AES/EBU (AES-3) or D-NET data @ 110
-ohm
on XLR-3
General Specifications
Record functions Record, Insert Record, Record with Pause
Edit functions Cut, Copy, Insert, Erase, Bleep, Undo
Edit resolution 10 mSec (± 5 mSec)
Maximum Files per Directory 200
Maximum Files for machine 2,000
Locate Marks 500 maximum per file
Hot-Keys 10, individually programmable in each of ten directories.
Display High Resolution Bit-mapped backlit LCD
Audio Level Metering Peak reading 2 channel LED bar graph display
Waveform display modes Single or dual waveforms variable magnification of 2, 5, 10 or 20 seconds
Remote control GPI inputs: Play, Record, Stop, FF, Rewind, Mute Speaker; all with tally
Audio level metering Peak reading LED bar graph, 2-channel
Panel keys Illuminated, silent action
Headphone outputs Stereo 1/4” (6.35mm) jack. Level control included.
Monitor speakers Two, 4” (100mm) speech range, with level control and GPI on/off.
Dimensions (HWD) 3.7" x 17.25" x 12.8" (94mm x 438mm x 325mm)
Weight 12.5 lb. (5.7 kg)
Power requirements 85 to 260 Volts, 50/60 Hz, 35 Watts
Country of manufacture U.S.A.
Agency approvals FCC, CE
360 Systems
Page 77

Technical Specifications Page 69
LEFT RIGHT LEFT RIGHT
360 SYSTEMS, WESTLAKE VILLAGE, CALIFORNIA, USA
ANALOG INPUTANALOG OUTPUT
Shortcut 2000 Editor Owner's Manual
AES/EBU DIGITAL
OUT IN
OUT IN
IEC-958 II
GPI
CONTRAST
AES 75 OHM
PARALLEL
PROFESSIONAL DIGITAL AUDIO EQUIPMENT
EXPANSION
ITE EQUIPMENT
MADE IN USA
115-230VAC, 50-60Hz
1.2A MAX
MODEL #
SERIAL #
I
O
Page 78

Page 70
Menu Appendix
DIRECTORY LEVEL
Quick Reference to Machine Functions
KEY ACTION
SCRUB WHEEL SELECT ITEM / DIRECTORY
Menu Appendix
>>| SELECT NEXT ITEM
|<< SELECT PREVIOUS ITEM
COPY COPY SELECTED DIRECTORY
EDIT IN GO TO DIRECTORY
EDIT OUT EXIT MENU
ENTER GO TO DIRECTORY
ERASE ERASE DIRECTORY
EXIT EXIT MENU
FILES SHOW FILES IN DIRECTORY
HOT KEY 0 GO TO PUBLIC DIRECTORY
HOT KEY (1-9) GO TO DIRECTORY #1-9
MENU ENTER MENU OR MENU ITEM
SOFT KEY 1 ANALOG/DIGITAL INPUT SELECT
SOFT KEY 2 SPEAKERS ON/OFF
SELECT NEXT ITEM
SELECT PREVIOUS ITEM
P GO TO PUBLIC DIRECTORY
ALT + V SHOW VERSION NUMBER
ZOOM OUT DNET DIRECTORY
360 Systems
Page 79

Menu Appendix Page 71
FILES LEVEL
Quick Reference To Machine Functions
KEY ACTION
SCRUB WHEEL SELECT ITEM / FILE
SELECT NEXT ITEM
>>| SELECT NEXT ITEM
SELECT PREVIOUS ITEM
|<< SELECT PREVIOUS ITEM
BLEEP PLAY BLEEP FILE
COPY COPY FILE
COPY+HOT KEY COPY FILE TO HOT KEY
DIR LEAVE THIS DIRECTORY AND SELECT A NEW ONE
EDIT IN EDIT FILE
EDIT OUT LEAVE THIS DIRECTORY AND SELECT A NEW ONE
ENTER EDIT FILE
ERASE ERASE FILE
ERASE+HOT KEY CLEAR HOT KEY ASSIGNMENT
EXIT LEAVE THIS DIRECTORY AND
SELECT A NEW ONE
FIND FIND A FILE
HOT KEY (0-9) PLAY ASSIGNED FILE
ALT+HOT KEY SHOW ASSIGNED FILE
LOOP LOOP MODE ON/OFF
MENU ENTER MENU OR MENU ITEM
PAUSE PAUSE PLAYBACK / RECORD
PAUSE+PLAY START PLAYBACK PAUSED
PAUSE+REC START RECORDING PAUSED
PLAY PLAY SELECTED FILE
REC RECORD NEW FILE
SOFT KEY 1 DIGITAL/ANALOG INPUT SELECT
SOFT KEY 2 SPEAKER ON/OFF
STOP STOP PLAYBACK / RECORD
ALT + V SHOW VERSION NUMBER
ZOOM OUT DNET FILE
Shortcut 2000 Editor Owner's Manual
Page 80

Page 72
EDITOR
Quick Reference To Machine Functions
KEY ACTION
SCRUB WHEEL SELECT ITEM / FILE
MOVE CURSOR +10 mSec
MOVE CURSOR -10 mSec
>>| GO TO NEXT MARK
|<< GO TO PRECEEDING MARK
ARM OK TO EDIT/REC ON CHANNEL
BLEEP PLAY BLEEP AUDIO
COPY COPY TO CLIPBOARD
Menu Appendix
COPY + HOT KEY COPY TO HOT KEY
CUT CUT TO THE CLIPBOARD
CUT + HOT KEY CUT TO HOT KEY
DIR QUIT EDITING AND SELECT A NEW DIRECTORY
EDIT IN SET EDIT START POINT
EDIT OUT SET EDIT END POINT
ERASE REPLACE WITH SILENCE
ERASE+HOT KEY CLEAR HOT KEY ASSIGNMENT
EXIT QUIT EDITING AND SHOW FILES IN DIRECTORY
FF FAST FORWARD
FF, FF GO TO END (OR TO ZERO MARK)
FILES QUIT EDITING AND SHOW FILES IN DIRECTORY
FIND FIND TIME POSITION
HOT KEY (0-9) PLAY ASSIGNED FILE
ALT + HOT KEY SHOW ASSIGNED FILE
INSERT INSERT FROM CLIPBOARD
INSERT + BLEEP BLEEP SELECTED AUDIO
INSERT+HOT KEY INSERT ASSIGNED FILE
INSERT+RECORD INSERT RECORD
LOOP LOOP MODE ON/OFF
MARK PLACE LOCATE MARK
MARK + ZERO PLACE ZERO MARK
360 Systems
Page 81

Menu Appendix Page 73
MENU ENTER MENU OR MENU ITEM
PAUSE PAUSE PLAYBACK / RECORD
PAUSE + PLAY START PLAYBACK PAUSED
PAUSE + REC START RECORDING PAUSED
PLAY + FF PLAY AT 2X SPEED
PLAY PLAY FROM CURSOR
ALT + PLAY PLAY FROM CURSOR
PLAY + REW PLAY IN REVERSE
REC RECORD NEW FILE
REW REWIND
REW, REW GO TO BEGINNING (OR TO ZERO MARK)
SAVE SAVE EDIT CHANGES
ALT + SAVE SAVE TO NEW FILE
SOFT KEY 1 DIGITAL/ANALOG INPUT SELECT
SOFT KEY 2 SPEAKERS ON/OFF
SOLO LEFT OUTPUT LEFT CHANNEL ONLY
SOLO RIGHT OUTPUT RIGHT CHANNEL ONLY
STOP STOP PLAYBACK / RECORD
UNDO UNDO LAST EDIT
ALT + UNDO SHOW WHAT UNDO WILL DO
UNDO + >>| UNDO PLAY, FF, REW OR GOTO MARK
UNDO + |<< UNDO PLAY, FF, REW OR GOTO MARK
UNDO + BLEEP REMOVE SELECTED BLEEPS
UNDO + ERASE UN-ERASE SELECTED AUDIO
UNDO + FF UNDO PLAY, FF, REW OR GOTO MARK
UNDO + MARK REMOVE SELECTED MARKS
UNDO + PLAY UNDO PLAY, FF, REW OR GOTO MARK
UNDO + REW UNDO PLAY, FF, REW OR GOTO MARK
ALT + V SHOW VERSION NUMBER
ZOOM IN, ADJUST HORIZONTAL ZOOM
ZOOM OUT ADJUST HORIZONTAL ZOOM
ALT + ZOOM IN ADJUST VERTICAL ZOOM
ALT + ZOOM OUT ADJUST VERTICAL ZOOM
Shortcut 2000 Editor Owner's Manual
Page 82

Page 74
Menu Appendix
Keyboard Functions Using ALT Key
LT
Certain functions may be obtained by using the A
key in combination with others.
Most of these functions are also available through standard menus, but some users may find it
faster to use the keyboard. Several functions are marked as being valid only in certain machine
modes.
KEY STROKES RESULTANT FUNCTION
ALT + ZOOM IN INCREASE WAVEFORM DISPLAY AMPLITUDE
(Edit only)
ALT + ZOOM OUT DECREASE WAVEFORM DISPLAY AMPLITUDE
(Edit only)
ALT + HOT KEY SHOW ASSIGNED FILE NAME (Files only)
ALT + UNDO SHOW WHAT UNDO WILL DO (Editor only)
ALT + SAVE SAVE AS (Edit only)
ALT + V SHOW VERSION NUMBER
360 Systems
Page 83

Page 75
INDEX
Abandon a file without saving it .11, 39
Abandoning Edit Operations............. 40
Access by password .......................... 48
Adjust Level................................ 33, 34
AES file protocols............................. 13
AES/EBU Inputs............................... 13
AES3-ID 75 ohm format................... 13
AIFF Files ................................... 58, 61
Alphabetized list of files ................... 44
Alphanumeric Keyboard ................... 11
ALT key............................................ 11
ALT key functions ............................ 74
Analog Audio Inputs......................... 13
Analog Audio Outputs ...................... 13
Arm buttons ...................................... 25
Arm keys........................................... 42
Arm Keys............................................ 6
Arrow Buttons..................................... 8
Arrows keys, left/right....................... 51
Assign file to Hot Key....................... 45
Assign Hot Key................................. 29
Asterisk key....................................... 11
Audio clips.......................................... 5
Audio Controls.................................. 12
Audio In Reverse ................................ 5
Audio networking ............................. 13
Backspace key................................... 11
Basic Insert Recording ...................... 24
Blank password................................. 49
Bleep................................................... 5
Bleep A File Segment ....................... 48
Bleep File Segment ........................... 40
Bleep Output Level ....................... 40
Bleep in play mode ........................... 40
Bleep in record mode ........................ 40
Bleep Level ....................................... 55
Bleep Source ..................................... 55
BNC connectors ................................ 13
Bookmarks .......................................... 6
Censoring with Bleep key ................. 40
Change passwords............................. 49
Channel Swapping ............................ 42
Clear a Hot Key Assignment........... 7, 8
Clipboard ...................................... 7, 29
Compact disks................................... 21
Compare audio versions.................... 46
Connections to the Shortcut Editor ...13
Connector pin-outs ........................... 14
Contact closure ................................. 14
Contrast control ................................ 14
Controls and Displays ......................... 3
Copy.................................................... 7
to Hot Key..................................... 44
Copy.................................................. 29
Copy an entire file to a Hot Key ....... 29
Copy Directory ................................. 56
Copy file ........................................... 56
Copying to a Hot Key ....................... 29
Crossfade Edits ........................... 30–33
Crossfade Duration ....................... 30
Cursor ............................................... 25
Cursor Position ................................... 6
Cut ...................................................... 7
Crossfade Only Cut....................... 32
to Hot Key..................................... 45
with Crossfade .............................. 31
Cut .................................................... 28
Cut to a Hot Key ............................... 29
D connector, 15-pin .......................... 14
Default title ....................................... 22
Default title ....................................... 23
Defining a Region............................... 6
Delete key ......................................... 11
Digital audio inputs........................... 13
Digital audio outputs......................... 13
DIR ..................................................... 9
Directories..................................... 9, 43
Directory Listing................................. 9
Directory menus................................ 52
Disk space, saving............................. 50
Display................................................ 4
Display blanking ............................... 49
Display viewing angle................... 4, 14
Display waveforms............................ 66
D-NET Echo ..................................... 64
D-NET File transfer ports ................. 13
D-NET File Transmission................. 63
Edit In ................................................. 6
Edit In Mark at the Cursor, illustration
........................................................ 28
Edit In/Out Marks set, illustration .... 28
Edit Marks ........................................ 27
Edit mode............................................ 2
Edit Operations ................................. 25
Edit operations on a single track....... 42
Edit Out .............................................. 7
Edit screen ........................................ 25
Editing .............................................. 25
Editor menus..................................... 65
Enabling passwords .......................... 49
Erase ............................................. 8, 39
Erase directory .................................. 52
Erase file........................................... 54
Erasing a directory ............................ 39
Erasing a highlighted segment .......... 39
Erasing a Hot Key assignment .......... 39
Erasing an entire file ......................... 39
Exit ............................................. 11, 39
XPANSION connector........................ 18
E
Export Files to DigiCart.................... 57
Export of Foreign Files ............... 58, 61
External Drive................................... 18
External Storage Media ...................... 2
External synchronization .................. 17
Fade In ........................................ 33, 37
Fade In / Fade Out Time (Adjust Level)
........................................................ 35
Fade Out ..................................... 33, 37
Fast Forward ....................................... 5
FCC Compliance ................................ ii
File Listing.......................................... 9
File mode menus............................... 53
File organization ............................... 43
File Select ........................................... 9
Files .................................................... 9
Find a File......................................... 11
Find command .................................. 46
Find file by title ................................ 46
Find time location in a file ................ 47
Finding a Hot Key assignment.......... 45
Finding edit points............................ 25
formatting external disks................... 19
Formatting the Hard Disk ................. 50
Front Panel ......................................... 3
Gain edit menu - illustration............. 33
Gain editing .............................. 7, 8, 33
Gain Value........................................ 33
Go To keys........................................ 26
Go To Mark ........................................ 6
GPI Input assignment ....................... 15
GPI inputs ......................................... 14
Shortcut 2000 Editor Owner's Manual
Page 84

Page 76
Hard disk Formatting ........................50
Hard disk space, recovering ..............50
Headphone jack .................................14
Headphone monitoring ......................14
Headroom..........................................12
Highlight directory selection .............25
Highlight file selection ......................25
Highlighted..........................................7
Hot Keys..............................................5
HOT KEYS .......................................44
IEC-958/II format..............................13
Import of Foreign Files .....................58
Individual track edits .........................42
Input Levels.......................................12
Insert ...................................................7
from Hot Key.................................45
with Crossfade...............................32
Insert key...........................................11
Insert operation .................................29
Insert Recording ................................23
Insert, basic .......................................29
Insert/replace .....................................30
Insertion Point .....................................6
Instant playback.............................5, 44
Introduction .........................................1
Jaz drive ........................................2, 18
LCD Display .......................................4
LED Bar Graphs................................12
Level Adjustments.............................12
Level indicators .................................12
Line frequency...................................14
Locating marks.................................... 6
Location Marks ...........................26, 27
Loop ....................................................5
Mains cable .......................................14
Mark.................................................... 6
Mark Key ............................................ 6
Marks ................................................25
Maximum length of recording...........22
Menu appendix..................................70
Menus................................................51
Miscellaneous Operations .................43
monitor from a single channel ...........41
Monitor From A Single Channel .......12
Monitoring ........................................12
Multiple Takes ..................................23
Nudge Arrows .....................................8
Numeric keys.................................5, 11
Offensive language............................40
Open collector tally LED outputs ......14
Output level.......................................66
ARALLEL connector ..........................18
P
Passwords..........................................48
changing ..................................49, 55
lost.................................................49
Pause ...................................................5
Play .....................................................4
Play mode............................................ 2
Play Selected Audio .......................... 28
Playing from a Hot Key............... 45, 46
Power down ......................................49
Power failures ................................... 50
Power supply..................................... 14
Power switch .....................................14
Public Directory ................................ 48
Quick reference ................................. 52
Range of Audio ...................................6
Rear Panel ......................................... 13
REC Button ......................................... 4
Record ................................................. 4
Record Mode..................................... 22
Record Monitor .................................22
Record Pause..................................... 23
Recording..........................................21
Recording Level ................................12
Recording Threshold ......................... 22
Recovering deleted material with Save
As ....................................................10
Relative Fade............................... 33, 37
Remote control ..................................14
Removing a locate mark.................... 26
Rename directory .............................. 53
Rename file .......................................53
Repeat .................................................5
Replacement Insert Recording ..........24
Resolution ........................................... 4
Reversing the last operation ................8
Rewind ................................................5
Sample rate........................................21
Save............................................. 10, 39
Save an edited file ............................. 39
Save As ............................................. 10
Save with new name.......................... 39
Scratchpad memory...........................29
Screen Time Display ..................... 4, 49
Scrub Wheel........................................8
Scrubbing ............................................ 8
SCSI Option ...................................... 18
Serial number ....................................14
Set Gain Value ............................ 33, 35
Set sample rate ..................................52
Setup Menu .......................................52
Single Channel Insert Recording.......23
Single track ....................................... 25
Single Track Editing .........................41
Skip forward in time.......................... 47
Soft Key 1 ........................................... 8
Soft Key 2 ........................................... 8
Softcode Installation ......................... 66
Solo ............................................. 12, 41
Speaker Volume................................ 12
Speakers ............................................ 12
Special menu.....................................48
Spin up external drive ....................... 18
Stop ..................................................... 4
Storage space .................................... 43
System supervisor ............................. 48
Table of Contents ...............................iii
Tally lamp outputs ............................ 14
Telephone Control Systems .............. 16
Temporary storage............................... 5
Threshold Level ................................22
Threshold Record.............................. 22
Tick ..................................................... 6
Tick mark on waveform .................... 26
Time at present cursor position .........25
Time offset between marks................42
Time position within a file ................11
Time position, absolute ..................... 47
Time position, relative ......................47
Time remaining ................................. 55
Time remaining on hard disk ............ 22
Time, elapsed .................................... 55
Undo ................................................... 8
Undo edit .......................................... 41
Undo key............................................. 8
Undo last edit operation .................... 41
Undo last transport operation............ 41
Undoing gain edits ............................ 36
Uninterruptible power source (UPS). 50
User-assigned names......................... 53
Viewing angle of LCD display..........14
Virtual files ....................................... 50
Voltages ............................................ 14
Volume Control ................................ 12
Volume, Speaker and Headphone .....12
VTR sample rate ...............................21
Warranty ............................................. ii
WAV Files .................................. 58, 61
Waveform Display with Callouts,
illustration....................................... 25
Waveform Display, combined,
Illustration ...................................... 66
Waveform Display, Showing Marks .26
Waveform Display, split, Illustration 66
Waveform magnification, horizontal. 49
Waveform magnification, vertical.....49
Waveform, split.................................66
Waveform, together........................... 66
XLR Connectors ............................... 13
Zero Mark ..................................... 6, 26
Zip drive........................................ 2, 18
Zoom In............................................... 4
Zoom Out...................................... 4, 49
360 Systems
 Loading...