


NETWORKED DIGITAL AUDIO RECORDER-PLAYER
WITH EDITING
Model DR-600
OWNER'SMANUAL

Warning Symbols
THE FOLLOWING WARNING SYMBOLS ARE USED ON THE PRODUCT IN THIS MANUAL:
ENGLISH |
ATTENTION: REFER TO OWNER’S MANUAL FOR |
|
IMPORTANT INFORMATION. |
|
|
FRANÇAIS |
ATTENTION: VEUILLEZ VOUS RÉFÉRER AU MODE |
|
D’EMPLOI POUR UNE INFORMATION IMPORTANTE. |
|
|
ITALIANO |
ATTENZIONE: FATE RIFERIMENTO AL MANUALE PER |
|
INFORMAZIONI IMPORTANTI. |
|
|
ESPAÑOL |
ATENTCION: FAVOR DE REFERIR AL MANUAL DE |
|
OPERACION POR INFORMACION IMPORTANTE. |
|
|
|
|
ENGLISH |
WARNING: ELECTRICAL SHOCK HAZARD. |
|
|
FRANÇAIS |
AVERTISSEMENT: DANGER DE CHOC ÉLECTRIQUE. |
|
|
ITALIANO |
AVVERTIMENTO: PERICOLO DI SHOCK ELETTRICO. |
|
|
ESPAÑOL |
ADVERTENSIA: PELIGRO DE CHOQUE ELECTRICO. |
|
|
Safety Compliance
Instant Replay II Plus complies with the following safety standards:
•UL 1950, Standard for Safety of Information Technology Equipment, Including Electrical Business Equipment.
•EN 60950, Standard for Safety of Information Technology Equipment, Including Electrical Business Equipment.
EU Declaration of Conformity
Type of Equipment:
Professional Use Audio Equipment.
Conforms to the Following Standards:
EN55103-1 (Emission) (1997) Electromagnetic compatibility – Product family standard for audio, video, audio-visual and entertainment lighting control apparatus for professional use.
EN55103-2 (Immunity) (1997) Electromagnetic compatibility – Product family standard for audio, video, audio-visual and entertainment lighting control apparatus for professional use.
IEC950 2nd Edition, Amendment 1 (1992), Amendment 2 (1993) and Amendment 3 (1995); Safety of Information Technology and Business Equipment.
2

FCC Compliance
This equipment complies with part 15 of the FCC rules. These limits are designed to provide reasonable protection against harmful interference when the equipment is operated in a commercial environment. This equipment generates, uses and can radiate radio frequency energy and if not installed and used in accordance with the owners manual, may cause interference to radio communications. Operation of this equipment in a residential area is likely to cause interference in which case the user will be required to correct the interference at his own expense.
This device will accept any interference received, including interference that may cause undesired operation. The user is cautioned that changes made to the equipment without the approval of the manufacturer could void the user's authority to operate this equipment. It is suggested that only shielded and grounded cables be used to ensure compliance with FCC rules.
Notice
This Class A digital apparatus meets all requirement of the Canadian Interference-Causing Equipment Regulations.
Français:
Cet appariel numérique de la classe A respecte toute les exigences du Reglement sur le matériel brouilleur du Canada.
Company Address & Shipping Information
Freight and mail may be sent to 360 Systems at the following address. Please call for a Returned Material Authorization (RMA) number before returning equipment or parts.
360 Systems
Customer Service
31355 Agoura Rd
Westlake Village, California 91361-4613 USA
Telephone (818) 991-0360, 8:00 AM to 5:00 PM, Pacific Time. Fax: (818) 991-1360
Email: support@360systems.com Visit our web site at www.360systems.com
CAUTION!
Instant Replay contains a hard disk drive. While today’s hard disks are very reliable, they are vulnerable to shock. Handle with care. Please exercise care not to drop or bump Instant Replay – damage to the internal hard disk may result. Be sure power is off before moving the unit.
3

Product Improvements And Upgrades
360 Systems reserves the right to make changes and/or improvements to its products, without incurring any obligation to incorporate such changes or improvements in units previously sold or shipped.
360 Systems may issue Technical Support Bulletins from time to time, advising owners of record of product enhancements that become available. Technical Support Bulletins may also be requested through 360 Systems Customer Service department by telephone at (818) 991-0360 or Facsimile at (818) 991-1360. However, we cannot contact you if you do not return your Warranty Card. Please take a moment now to fill out your Warranty Card and either mail or fax it to 360 Systems. You may also register your warranty with us by telephone.
Trademarks And Patents
360 Systems, 360 Systems Instant Replay, and DigiCart are trademarks of 360 Systems
Software contained in this product is copyrighted by 360 Systems, Microware Systems Corp.
Designs incorporated in this product are the subject of current or pending U.S. and foreign patents.
Limited Warranty
Instant Replay is warranted against defects in material and workmanship for a period of one year from date of original purchase. This warranty includes parts and labor.
This warranty excludes units that have been modified, repaired by unauthorized personnel, or damaged by abuse, improper operation, dirt, or static electricity.
360 Systems assumes no liability whatsoever for real or consequential damages, loss of profits, inconvenience or any other losses due to non-operation of the Instant Replay.
360 Systems' sole liability under this limited warranty shall be the repair or replacement of defective product or components. Products being returned under warranty shall be sent to 360 Systems or one of its foreign service centers, freight prepaid in the original or equivalent packaging.
Printing history:
Software 2.1 February 2000
Software 2.3, October 2000
Software 3.47 April 2007
Copyright 1995-2007 360 Systems
Printed in the United States of America. All rights reserved.
4
TABLE OF CONTENTS |
|
INTRODUCTION .............................................................................................. |
7 |
CHAPTER 1 – OVERVIEW................................................................................ |
8 |
FRONT PANEL CONTROLS ..................................................................................... |
8 |
Hot-Keys ................................................................................................ |
9 |
Transport Control Buttons..................................................................... |
9 |
STOP.................................................................................................. |
9 |
PLAY ................................................................................................. |
9 |
RECORD ........................................................................................... |
9 |
LOOP ................................................................................................. |
9 |
PAUSE................................................................................................... |
9 |
Metering and Level Controls ............................................................... |
10 |
Function Buttons.................................................................................. |
10 |
BANK SELECT .................................................................................... |
10 |
ASSIGN HOT-KEYS ............................................................................ |
10 |
PREVIEW ............................................................................................ |
10 |
Setup and Configuration Buttons......................................................... |
10 |
MENU.................................................................................................. |
10 |
CANCEL .............................................................................................. |
11 |
Scroll Up/Down Arrows....................................................................... |
11 |
FIND.................................................................................................... |
11 |
ENTER................................................................................................. |
11 |
CHAPTER 2 – BASIC OPERATION................................................................ |
12 |
Powering on Instant Replay................................................................. |
12 |
Connecting Instant Replay to External Audio Equipment ................... |
13 |
Recording a Cut................................................................................... |
14 |
Limiting the Record Time of a Cut....................................................... |
15 |
Playing a Cut....................................................................................... |
16 |
Pausing a Cut ...................................................................................... |
16 |
Erasing a Cut....................................................................................... |
17 |
Assigning a Cut to a Hot-Key .............................................................. |
17 |
Using Hot-Key Banks........................................................................... |
18 |
Replacing Cuts with Existing Hot-Key Assignments............................ |
18 |
Locating a Cut using FIND ................................................................. |
18 |
Viewing the Sample Rate and Word Length of a Cut........................... |
18 |
Previewing a Cut ................................................................................. |
18 |
Looping a Cut ...................................................................................... |
19 |
Adjusting Output Gain on a Cut....................................................... |
19 |
Using the Record Sample Rate Converter ........................................... |
19 |
Converting 24 bit material to 16 bits ( Dither )................................... |
20 |
Using the Sample Rate Converter and Dither at the same time........... |
20 |
Using the Playback Sample Rate Converter........................................ |
21 |
CHAPTER 3 – EDITING CUTS ......................................................................... |
22 |
Using Head and Tail Trim................................................................... |
22 |
Setting the Head Trim.......................................................................... |
22 |
Setting the Tail Trim ............................................................................ |
23 |
Setting the Pre-Roll before Setting the Tail Trim............................. |
23 |
Now Set the Tail Trim...................................................................... |
23 |
Fade In ............................................................................................. |
24 |
Fade Out........................................................................................... |
24 |
CHAPTER 4 – USING PLAYLISTS ................................................................. |
26 |
Creating a New Playlist....................................................................... |
26 |
Editing a Playlist ................................................................................. |
27 |
Changing the Playlist Playback Order “On-the-Fly”......................... |
27 |
Playing a Playlist................................................................................. |
28 |
5
CHAPTER 5 – USING THE NETWORK.......................................................... |
29 |
Introduction ......................................................................................... |
29 |
About WAV files................................................................................... |
29 |
File Naming Conventions .................................................................... |
30 |
Supported FTP Clients......................................................................... |
31 |
Initial FTP Setup.................................................................................. |
32 |
Connecting to Instant Replay using FTP............................................. |
33 |
Connecting to Instant Replay using a DOS Client............................... |
34 |
Downloading a file from Instant Replay to your host:......................... |
34 |
Uploading a file from your host computer to Instant Replay.............. |
35 |
Deleting a file from Instant Replay...................................................... |
35 |
Renaming a file on Instant Replay....................................................... |
36 |
Transferring Files with Flash FXP...................................................... |
37 |
Connect to Instant Replay.................................................................... |
37 |
Upload/Download files........................................................................ |
38 |
Renaming or Deleting a File using Flash FXP.................................... |
39 |
CHAPTER 6 – MACHINE SETUP MENU’S.................................................... |
40 |
EDIT Menu .......................................................................................... |
40 |
RECORD SETUP................................................................................. |
40 |
NETWORKING Menu.......................................................................... |
40 |
OPERATIONS Menu............................................................................ |
40 |
HOT-KEYS Menu................................................................................. |
41 |
CHAPTER 7 – THE REAR PANEL .................................................................. |
42 |
ELECTRICAL POWER ........................................................................................... |
42 |
Power Switch ....................................................................................... |
42 |
Fuses.................................................................................................... |
42 |
AUDIO CONNECTIONS ......................................................................................... |
43 |
Audio Inputs......................................................................................... |
43 |
Audio Outputs...................................................................................... |
43 |
Headphone Output............................................................................... |
43 |
DIGITAL AUDIO CONNECTIONS ........................................................................... |
43 |
AES/EBU Input.................................................................................... |
43 |
IEC 958 Type II Input.......................................................................... |
43 |
Digital Audio Interfacing..................................................................... |
44 |
Digital Audio Output ........................................................................... |
44 |
AES/EBU Output ................................................................................. |
44 |
IEC 958 Type II Output ....................................................................... |
45 |
NETWORK CONNECTIONS ................................................................................ |
45 |
Network Port........................................................................................ |
45 |
CHAPTER 8 – MAINTENANCE AND DISK OPERATIONS ...................................... |
46 |
FORMATTING THE INTERNAL HARD DISK......................................................... |
46 |
To Format the Internal Hard Disk....................................................... |
46 |
INDEX ............................................................................................................... |
47 |
6

INTRODUCTION
Thank you for purchasing Instant Replay. The system provides a unique combination of mass storage, direct access to stored audio, network access and ease of operation, all in a professional quality package. Key features include:
Storage of up to 1000 Audio Cuts
At least 100 Hours of Storage
Assignment of Cuts to 50 front panel Hot Keys
Playlists that play a sequence of cuts manually or automatically
16 and 24 bit WAV support
Head and Tail editing
Variable fade in and fade out
FIND function for locating cuts
Familiar tape transport style controls to provide fast and sure operation
Network Connectivity for uploading, downloading renaming and deleting Cuts.
7
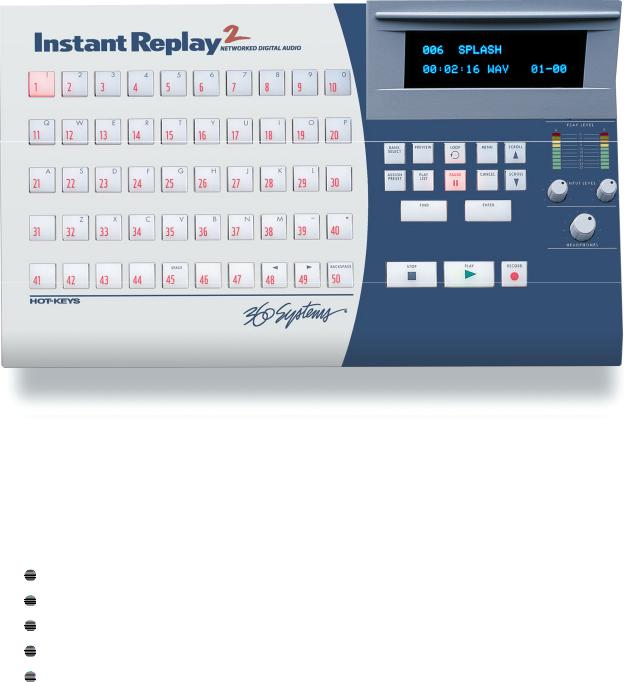
CHAPTER 1 – OVERVIEW
FIGURE 1 - FRONT PANEL LAYOUT
FRONT PANEL CONTROLS
Instant Replay's front panel controls are shown in Figure 1. Most of the buttons include an indicator light to show when they are in use. They are functionally grouped as follows:
Hot-Keys
Transport Control
Metering and Level Control
Function Buttons
Setup and Configuration Control
These controls are described briefly in this section.
8
Hot-Keys
There are three primary uses for Hot-Keys:
1.Triggering playback of assigned Cuts
2.As an alphanumeric keyboard
3.Bank selection, using the top row of keys
The main array of 50 buttons are Hot-Keys numbered 1 through 50. A Hot-Key's primary function is to trigger playback of a Cut assigned to it. Hot-Keys light up whenever their assigned Cut is playing.
In the Bank Select mode, the numbers 1 through 10 on the top row select the corresponding Banks numbered 1 through 10. The banks are like pages of Hot Keys. They extend the number of cuts that can be assigned to Hot Keys to 500 ( 50 Hot Keys times 10 Banks ) and also provide a method for organizing cuts.
Transport Control Buttons
The Transport Controls include STOP, PLAY, PAUSE and RECORD. They perform in the traditional manner of tape recorders.
STOP
STOP Immediately ends recording or playback. STOP will halt some sequential operations, such as Network Transfers.
PLAY
PLAY Starts playback of the currently selected Cut. Note that pressing PLAY initiates playback from the beginning of the selected Cut, even if it is already playing. The exception is when PLAY is used to disengage PAUSE.
RECORD
RECORD Places Instant Replay in Record Ready mode. ( Instant Replay will enter record when the PLAY button is pressed.)
LOOP
LOOP causes a Cut to repeat endlessly until either STOP or LOOP is pressed. STOP ends playback immediately. Pressing LOOP exits from the Loop mode, and allows the current Cut to continue playing to its end. Pressing LOOP while running a Playlist will cause the entire Playlist to loop.
PAUSE
PAUSE interrupts playback of a Cut. When pressed again, playback will resume.
9

Metering and Level Controls
Level Meters
The LEVEL METERS show the current record or playback level.
Input Level Controls
The Left and Right INPUT LEVEL Controls set the levels for recording. Set the levels so that the loudest part of your recording causes the first red segment of the meter to light. When turned all the way down, the input will be muted. The level controls do not apply to digital recording from the AES/EBU inputs.
Headphone Level Control
Sets the level of the HEADPHONE OUTPUT.
Function Buttons
BANK SELECT
The 50 Hot-Keys are further organized into 10 Banks. This allows 500 Cuts to be programmed into Hot-Keys. When you press the BANK SELECT button, it lights and the top row of Hot-Keys flash. The display changes to show the Number and Name of the current Bank; the number of Hot-Key Assignments it contains; and an indication of the presence of a Playlist in the Bank. Pressing HotKeys 1-10 will directly select the corresponding Bank.
ASSIGN HOT-KEYS
The ASSIGN HOT-KEYS button lights when pressed and the display prompts for selection of a HOT- KEY. Pressing a HOT-KEY immediately assigns the Cut shown in the top line of the display to that HOT-KEY, overwriting any previous assignment.
PREVIEW
When PREVIEW is pressed in Stop mode the main audio outputs are muted, so Cuts played subsequently can be auditioned from the headphone output only. Both the analog and digital audio outputs are muted.
Setup and Configuration Buttons
MENU
Pressing the MENU button will bring up all configurable items. As with most menus in equipment of this type, these are organized as nested menus. Once a menu option is selected, pressing ENTER will allow you to select a value for that option. Pressing MENU a second time will exit to normal operation. See Chapter 6, “Machine Setup Menus” for a listing of menu options.
Note: In this manual, MENU navigation is shown using arrows to indicate a new menu level. For example, MENU->CONFIGURATION->PLAYBACK SAMPLE RATE
Is telling the user to press MENU, scroll to the CONFIGURATION option, Press ENTER, then scroll to the PLAYBACK SAMPLE RATE menu item.
10
CANCEL
This button is used to end operations, exit menus, or to answer "no" to display prompts. In Playlist mode, CANCEL deletes the currently selected Step of the Playlist.
Scroll Up/Down Arrows
Used to select Cuts, Banks, Menus, Playlist Steps and adjust parameter values. Cuts can be selected during playback of other Cuts.
FIND
FIND searches for a Cut by Index Number or Name. When you press the FIND button, any previously found Cut name or ID number is displayed. To use that name for the current FIND simply press ENTER. To use a different Name or Index Number, simply type it and press ENTER.
ENTER
Used to enter Menus, initiate operations, confirm choices, and to answer "yes" to display prompts. In Playlist mode, pressing ENTER causes the selected Step to be set as the next Step to play. If the currently selected cut is displayed but not being played, pressing ENTER will momentarily display the sample rate and word length of the cut.
11
CHAPTER 2 – BASIC OPERATION
Instant Replay is an extensively featured, high quality professional audio workstation. However, it is also very simple and intuitive to use. The following sections cover Instant Replay’s basic operation.
Powering on Instant Replay
CAUTION!
CONNECT THIS PRODUCT ONLY TO AN AC POWER SOURCE WITHIN THE VOLTAGE AND FREQUENCY RANGE INDICATED ON THE REAR PANEL. THE PRODUCT IS SUPPLIED WITH A DETACHABLE IEC TYPE AC LINE CORD APPROPRIATE TO THE COUNTRY TO WHICH THE UNIT WAS ORIGINALLY DELIVERED. CHECK TO SEE THAT IT MATCHES THE ELECTRICAL OUTLET YOU WILL BE USING.
•Connect the supplied power connector to the rear panel and plug it into an AC power outlet.
•Turn on the power switch located at the far right of the rear panel.
•Instant Replay will run through a power up sequence that includes lighting each front panel indicator in sequence.
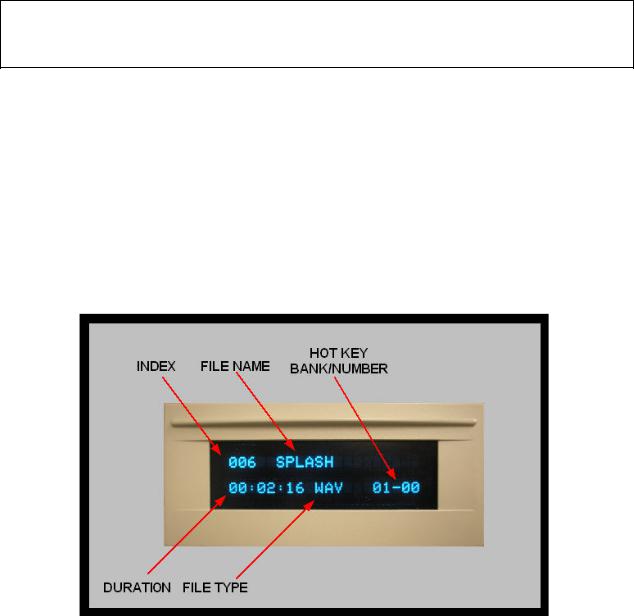
•When it is ready to use, the Display Module will display the current selected Cut per Figure 2 below.
o The Index number is a unique number associated with the file o The Cut Name is the user-supplied Cut Name.
o The File Type indicates if the file is a WAV or DC2 file type.
o The Duration indicates the length of the cut in minutes and seconds.
o The Hot Key Bank/Number indicates the Hot Key Bank and number the cut is assigned to. 01-00 Indicates it has NOT been assigned to a hot key.
FIGURE 2 – THE DISPLAY MODULE
Instant Replay ships with a large number of sample cuts you can use to try it out. If there are no cuts available the Display Module will display:
NO CUTS AVAILABLE
12
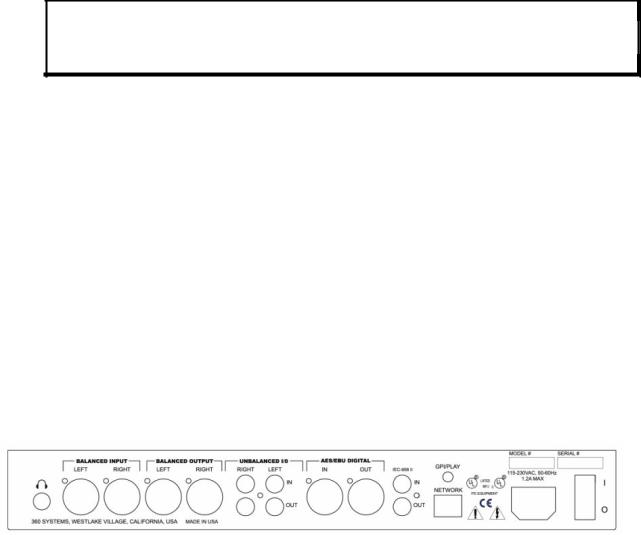
Connecting Instant Replay to External Audio Equipment
The rear panel of the Instant Replay is shown in Figure 3.
Connecting Input Sources
Connect Balanced stereo analog sources to the BALANCED INPUT stereo pair. Connect Un-balanced stereo analog sources to the UNBALANCED IN stereo pair.
Note: These inputs are mixed together internally and are both active whenever the AUDIO Input is set to ANALOG.
Connect a digital AES/EBU source to the AES/EBU DIGITAL IN connection. Connect a digital IEC-958 RCA source to the IEC-958 II RCA jack.
The input source used for recording is selected via the AUDIO INPUT menu under the RECORD SETUP. See Page 14.
Connecting Monitoring Equipment
Connect Balanced stereo analog monitors to the BALANCED OUTPUT stereo pair. Connect Un-balanced stereo analog monitors to the UNBALANCED OUT stereo pair. Connect a digital AES/EBU monitor to the AES/EBU DIGITAL OUT connection. Connect standard stereo headphones to the ¼” headphones jack ( far left ).
Cuts will be played on all outputs at all times with one exception. When the PREVIEW key is lighted, Cuts will be played only to the headphone output.
Refer to Page 43 for technical details about audio connections.
FIGURE 3 - INSTANT REPLAY REAR PANEL
13

Recording a Cut
The Model DR-600 stores at least 130 hours of stereo audio. Total storage capacity varies according to the type of cuts you create. Individual Cuts can be from about 4 hours to about 7 hours long depending on the Recording Format you select.
Table 1 indicates the types of Cuts you can create and their associated durations in hours, minutes and seconds ( HHH:MM:SS ).
Sample Rate |
Word Length |
Format |
|
Max Record Time Per Cut |
Total Record Time |
|
|
|
|
|
|
44.1K |
16 |
WAV |
|
06:45:41 |
216:44:53 |
|
|
|
|
|
|
44.1K |
24 |
WAV |
|
04:30:27 |
142:14:23 |
|
|
|
|
|
|
48K |
16 |
WAV |
|
06:12:44 |
195:12:05 |
|
|
|
|
|
|
48K |
24 |
WAV |
|
04:08:29 |
130:35:50 |
|
|
|
|
|
|
44.1K |
16 |
DC2 |
|
06:45:41 |
216:44:53 |
|
|
|
|
|
|
48K |
16 |
DC2 |
|
06:12:44 |
195:12:05 |
|
|
|
|
|
|
|
|
|
Table 1 |
|
|
|
|
|
|
|
|
|
|
|
|
|
|
Note: The quality of 16 bit WAV and DC2 are identical. The only reason to use DC2 format is for compatibility with the DigiCart E product. 
WARNING
Note that while you can have Cuts recorded in any of the formats stored in the unit, it is best not to mix formats on a particular project. Switching from a 48K Linear to 44.1 will cause the output sample rate to change, causing possible disturbance of equipment monitoring the digital outputs. In most cases, the Playback sample rate converter may be used to maintain a constant output rate regardless of the sample rate of the original Cut. ( See Page 21 ).
NOTE
The Balanced and Unbalanced analog inputs are mixed together. It is not recommended that both be connected at the same time, unless one or the other is muted.
14
To Record A Cut:
Disable the RECORD ERASE LOCKOUT if necessary
Press MENU->RECORD SETUP->RECORD/ERASE LOCKOUT then ENTER
The parameter should be set to OFF.
Select an Input Source
Press MENU->RECORD SETUP->AUDIO INPUT then ENTER
Select ANALOG to use the BALANCED inputs or UNBALANCED I/O inputs. Select AES/EBU XLR-3 To use the digital AES/EBU inputs.
Select IEC-958 TYPE II to use the IEC-958 II Input with Consumer format digital audio sources.
Select AES/SMPTE-75 OHM RCA to use the IEC-958 II Input with Professional format digital audio sources.
Adjust Levels in Record Standby Mode
Press RECORD to enter Record Standby. You can monitor levels and set input level controls (Analog inputs only ) before beginning to record.
Begin Recording
Press PLAY to begin recording. Press STOP to stop recording.
A default cut name, such as NEW001 will be provided. Press ENTER to accept the name or type in a new name using the alphanumeric and scroll keys, then press
ENTER.
Limiting the Record Time of a Cut
You can limit the maximum record time of a cut to 5 minutes, 30 minutes or 1 hour. This is useful if you want to make a longer recording and don’t want to wait for it to finish before stopping the recording. Once the Record Time Limit is set, it will apply to all recordings until it is specifically disabled.
All of the record time limits allow a little extra than the time advertised. For example, a time limit of 5 minutes will actually allow you to record for nearly six minutes.
To set a Record Time Limit:
Press MENU->RECORD SETUP->RECORD TIME LIMIT then ENTER
Select NONE, 5,30 or 60 minutes. Press ENTER.
15
 Loading...