


 Loading...
Whirlpool KEBS247D, KEBS107D, KEBS207D, KEBS147D, KEBS177D User Manual
...
Use and Care Guide
Table of Contents |
|
(complete) .................. |
2 |
A Note to You ................ |
3 |
Oven Safety ................ |
4-5 |
Getting to Know |
|
Your Oven ..................... |
6 |
Using Your Oven .......... |
7 |
Using EASY |
|
CONVECT* |
|
Conversion ............... |
29 |
Caring for Your |
|
Oven............................. |
44 |
Using the |
|
Self-Cleaning Cycle .... |
47 |
Troubleshooting ......... |
52 |
Requesting Assistance or
Service in the U.S.A. .. 54
Requesting Assistance or Service in Canada ... 55
Index ............................ |
58 |
Warranty ...................... |
60 |
In the U.S.A. for assistance or service, call the Consumer Assistance Center:
1-800-422-1230
In Canada for assistance or service, see page 3.
KITCHENAID* Electric Built-In
THERMAL-CONVECTION* Ovens
|
Models: KEBS278D |
KEBS207D |
KEBS277D |
KEBS247D |
4450571 Rev. A |
KEBS208D |
KEBS107D |
KEBS177D |
KEBS147D |

Table of Contents
A Note to You .......................................... |
3 |
Oven Safety .......................................... |
4-5 |
Getting to Know Your Oven ................... |
6 |
Using Your Oven ..................................... |
7 |
Using the electronic oven control ......... |
7 |
Oven settings ..................................... |
12 |
Setting the clock ................................ |
14 |
Using the timer ................................... |
15 |
Baking or convection baking .............. |
16 |
Convection roasting ........................... |
18 |
Cooking tips ....................................... |
20 |
Adjusting oven temperature ............... |
22 |
Using the temperature probe ............. |
23 |
Using convect full meal ...................... |
26 |
Using EASY CONVECT* |
|
Conversion ......................................... |
29 |
Broiling ............................................... |
31 |
Convection broiling ............................ |
34 |
Timed cooking ................................... |
36 |
Dehydrating ....................................... |
41 |
Raising bread ..................................... |
42 |
The oven vent(s) ................................ |
43 |
Caring for Your Oven ............................ |
44 |
Cleaning your oven and controls ....... |
44 |
Removing the oven door..................... |
45 |
Using and replacing the oven lights ... |
46 |
Using the Self-Cleaning Cycle ............. |
47 |
Before you start ................................. |
47 |
Before setting the controls ................. |
48 |
Setting the controls ............................ |
48 |
For best cleaning results .................... |
51 |
How the cycle works .......................... |
51 |
Troubleshooting .................................... |
52 |
Requesting Assistance or Service |
|
in the U.S.A. ............................................ |
54 |
Requesting Assistance or Service |
|
in Canada ................................................ |
55 |
Index ....................................................... |
58 |
Warranty ................................................. |
60 |
2

A Note to You
Thank you for buying a KITCHENAID* appliance!
KITCHENAID designs the best tools for the most important room in your house. To ensure that you enjoy many years of trouble-free operation, we developed this Use and Care Guide. It contains valuable information concerning how to operate and maintain your new appliance properly and safely. Please read it carefully.
Also, please complete and mail the enclosed Product Registration Card (U.S.A. or Canadian, whichever applies to you).
In the U.S.A.
For assistance or service |
1-800-422-1230 |
Call the Consumer Assistance Center toll-free ......................................... |
Throughout Canada for assistance
Call the Consumer Assistance Center toll-free |
......................................... 1-800-461-5681 |
|
8:30 a.m. – 6 p.m. (EST) |
Throughout Canada for service
Call toll-free |
............................................................................................... 1-800-807-6777 |
|
8 a.m. – 6 p.m. (EST) |
If you need assistance or service, first see the “Troubleshooting” section of this book. After checking “Troubleshooting,” additional help can be found be checking the “Requesting Assistance or Service” sections, or by calling one of the telephone numbers above.
When calling, you will need to know your appliance’s complete model number and serial number. You can find this information on the model and serial number plate (see diagram on page 6).
Keep this book and the sales slip together in a safe place for future reference. You must provide proof of purchase or installation date for in-warranty service.
Model Number ________________________ |
Builder/Dealer Name ___________________ |
Serial Number ________________________ |
Address _____________________________ |
Date Installed _________________________ |
Phone _______________________________ |
3

Oven Safety
Your safety is important to us.
This guide contains safety statements under warning symbols. Please pay special attention to these symbols and follow any
instructions given. Here is a brief explanation of the use of the symbol.
This symbol alerts you to hazards such as fire, electrical shock, or other injuries.
IMPORTANT SAFETY INSTRUCTIONS
wWARNING |
To reduce the risk of fire, electrical |
shock, injury to persons, or damage |
|
|
when using the oven, follow basic |
|
|
|
precautions, including the following: |
|
|
General
•Read all instructions before using the oven.
•Install or locate the oven only in accordance with the provided Installation Instructions. The oven must be installed by a qualified installer. The oven must be properly connected to electrical supply and grounded.
•CAUTION: Do not store things children might want above the oven. Children could be burned or injured while climbing on it.
•Do not leave children alone or unattended in area where the oven is in use. They should never be allowed to sit or stand on any part of the oven. They could be burned or injured.
•Do not operate the oven if it is damaged or not working properly.
•Do not use the oven for warming or heating the room. Persons could be burned or injured, or a fire could start.
•Use the oven only for its intended use as described in this manual.
•Do not touch heating elements or interior surfaces of oven. Heating elements may be hot even though they are dark in color. Interior surfaces of an oven become hot enough to cause burns. During and after use, do not touch, or let clothing or other flammable materials contact heating elements or interior surfaces of oven until they have had sufficient time to cool.
Other surfaces of the oven, such as the oven vent opening, the surface near the vent opening, and the oven door and window, could also become hot enough to cause burns.
•Do not wear loose or hanging garments when using the oven. They could ignite if they touch a hot heating element and you could be burned.
•Use only dry pot holders. Moist or damp pot holders on hot surfaces could result in burns from steam. Do not let pot holder touch hot heating elements. Do not use a towel or bulky cloth for a pot holder. It could catch on fire.
•Keep oven vents unobstructed.
4
Oven Safety 


•Do not heat unopened containers. They could explode. The hot contents could cause burns and container particles could cause injury.
•Use only cookware approved for oven use. Follow cookware manufacturer’s instructions, especially when using glass or plastic cookware.
•Do not store flammable materials on or near the oven. The fumes could create an explosion and/or fire hazard.
•Do not repair or replace any part of the oven unless specifically recommended in this manual. All other servicing should be referred to a qualified technician.
•Disconnect the electrical supply before servicing the oven.
When using the oven
•Do not use water on grease fires.
Never pick up a flaming pan. Smother flaming pan by covering with a well-fitting lid, cookie sheet, or flat tray. Flaming grease outside of pan can be extinguished with baking soda or, if available, a multipurpose dry chemical or foam-type extinguisher.
•Always position oven rack(s) in desired location while oven is cool. If a rack must be removed while oven is hot, do not let pot holder contact hot heating elements in oven.
•Use care when opening oven door. Let hot air or steam escape before removing or replacing food.
Care and cleaning
•Small amounts of formaldehyde and carbon monoxide are given off in the Self-Cleaning cycle from fiberglass insulation and food decomposition. Significant exposure to these substances can cause cancer or reproductive harm. Exposure can be minimized by venting with a hood or open window and wiping out excess food spills prior to selfcleaning.
•Do not use oven cleaners. No commercial oven cleaner or oven liner protective coating of any kind should be used in or around any part of the oven.
•Before self-cleaning the oven, remove broiler pan, broiler grid, oven racks, and other cookware.
Do not use your oven to clean miscellaneous parts unless you are instructed to do so in this Use and Care Guide.
•Do not clean door gasket. It is essential for a good seal. Care should be taken not to rub, damage, or move the gasket. Clean only parts recommended in this Use and Care Guide.
– SAVE THESE INSTRUCTIONS –
5
Getting to Know Your Oven
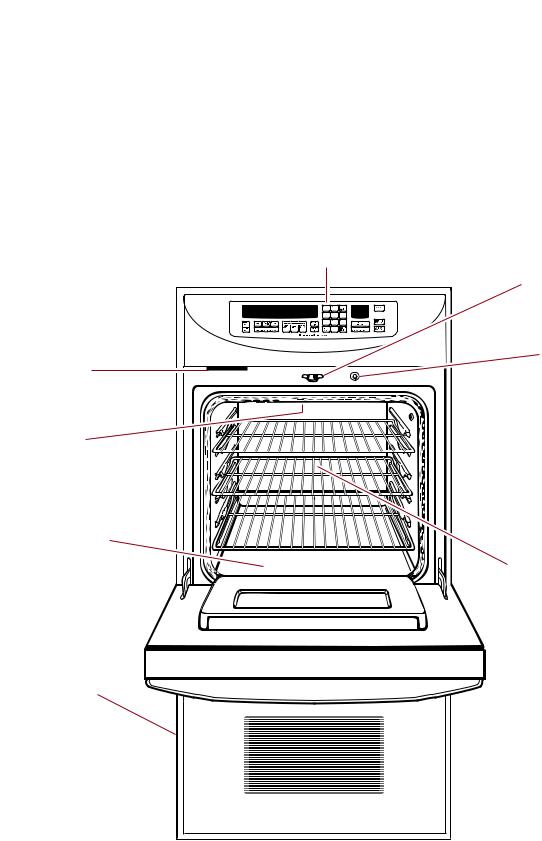
This section tells you what features your oven has and where they are located. Please review this information before using your oven. To help you find information on specific parts or features quickly, page references are included.
Feature locations
(Models KEBS208D and KEBS278D shown)
Oven vent
(above oven door) (p. 43)
Dual broil elements
(p. 12)
Oven light
(on left oven wall) (p. 46)
Bake element
(hidden under oven cavity floor) (p. 12)
Lower oven
(double ovens only)
Electronic
oven control
(p. 7) Oven lock latch
(pp. 49, 50)
FRAISINGBREAD |
|
|
F |
|
DEHYDRATE |
CONVECTION |
|
CLOSE |
HR MIN MIN SEC |
ENTER STANDARD COOK TIME |
|
DOOR |
||
ON COOK TEMP |
CLEAN TIME |
? |
ON LOCKED |
|
Automatic oven light switch
(p. 46)
Temperature
 probe jack
(upper/single
oven only) (p. 24)
Oven light
(on right oven wall)
(p. 46)
Convection fan and element
(not shown) (p. 12)
Model  and serial

 number plate
(on side of door)
6
Using Your Oven
This section tells you, step by step, how to operate all oven functions controlled by the electronic control. Carefully follow these instructions, along with the cooking tips, for successful use of your oven.
NOTE: Displays and command pads shown are from double upper ovens. In some cases, lower oven and single oven displays and command pads may look different than those shown.
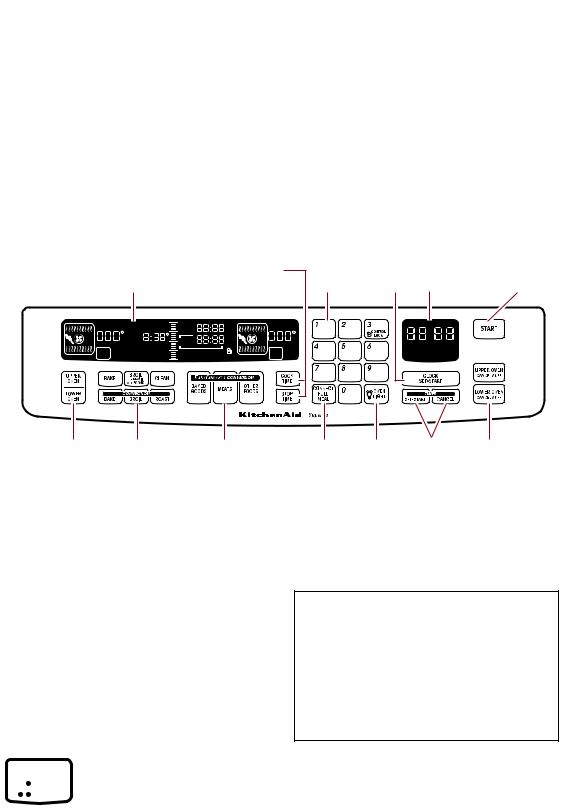
Using the electronic oven control
(double thermal–convection oven shown)
|
|
|
|
Timed and delayed |
|
Clock |
Time of day/ |
Start |
|
|
Oven display |
|
|
set/start |
timer display |
||||
|
|
cooking pads |
Number pad |
(pp. 14 |
pad |
||||
|
(see below) |
|
(pp. 36-40) |
|
pads |
(p. 14) |
and 15) |
(p. 8) |
|
|
DELAY |
|
|
START |
DELAY |
|
|
|
|
|
|
|
|
|
|
|
|
|
|
|
SET PROBE TEMP |
|
TIME |
|
|
|
|
|
|
|
FRAISING |
|
CHECK |
STOP |
F |
|
|
|
|
|
|
TIME |
|
|
|
|
|||
|
BREAD |
|
FOOD AT |
|
|
|
|
|
|
|
DEHYDRATE |
CONVECTION |
|
|
|
HR MIN MIN SEC |
|
||
|
CLOSE CONTROL LOCK |
CLOSE |
|
|
|||||
|
ON ENTER STANDARD COOK TIME |
ON DOOR |
|
|
|
|
|||
EASYCONVECT |
COOK TEMP |
CLEAN TIME |
DOOR LOCKED START ? EASYCONVECT |
LOCKED |
|
|
|
|
|
Oven selector pads |
Oven |
EASY |
(double ovens only) |
setting |
CONVECT* |
(p. 8) |
pads |
conversion |
|
(pp. 12-13) |
pads |
|
|
(p. 29) |
Display/clock
•When you first plug in the oven, a tone will sound, the display will be fully lit for a few seconds, and the display will show the last time set and “PF” (power failure). If, after you set the clock (page 14), the display again shows “PF”, your electricity was off for a while. Reset the clock.
•The display will show “Err” and three short tones will sound if a time or temperature is incorrectly entered.
To set your oven to cook in Celsius instead of Fahrenheit:
PRESS and hold for 5 seconds
BROIL
MAXI
ECONO
You will know you are in Celsius when “F” disappears. To switch back to Fahrenheit, press and hold BROIL again for 5 seconds. (“F” will reappear.)
Convect |
Oven |
Timer |
Cancel/off |
full meal |
light pad |
pads |
pads |
pad |
(p. 46) |
(p. 15) |
(p. 8) |
(p. 26) |
|
|
|
If you need to convert temperatures from Celsius to Fahrenheit or vice versa, you can refer to this chart:
Temperature replacement values
38°C-100°F 163°C-325°F 60°C-140°F 177°C-350°F 66°C-150°F 191°C-375°F 77°C-170°F 204°C-400°F 93°C-200°F 218°C-425°F 121°C-250°F 232°C-450°F 135°C-275°F 246°C-475°F 149°C-300°F 260°C-500°F
7
Using Your Oven
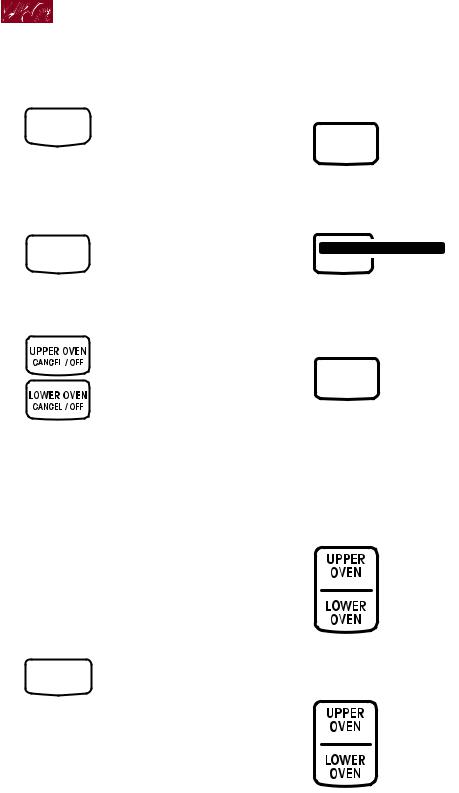
Starting an operation
After programming a function, you must press the Start pad to start
START the function. If you do not press the Start pad within
5 seconds of programming, “START?” will show on the display as a reminder.
To turn on and off end-of-cycle tones and reminder tones (single or double ovens):
PRESS and hold for 5 seconds
COOK
TIME
To turn on and off all reminder tones (single or double ovens):
PRESS and hold for 5 seconds
TIMER
SET•START
To turn on and off all tones (double ovens)/to turn on and off key pad entry tones (single ovens):
PRESS and hold for 5 seconds
STOP
TIME
A short tone will sound and “Snd” and “On” or “OFF” will appear on the display to tell you the signals have been changed. Repeat the step above to turn the signals back on.
Selecting an oven
(double ovens)
To choose the oven you want to use, press the Upper Oven or Lower Oven pad.
Finding out which oven is in use
(on double ovens)
Press the Upper Oven or Lower Oven pad. Upper oven or lower oven information will be displayed and the outer oven cavity symbol for the oven being programmed will flash.
Using the control lock
The control lock prevents unwanted use of the oven by disabling the control panel command pads.
NOTES:
•On double ovens, control lock is only available when oven is not active or set. On single ovens, control lock is available when oven is active, but it is not available only during the Self-Cleaning cycle or the Sabbath mode.
•On single ovens, the Cancel/Off pad will still work during control lock, but you will need to press it for 1 second.
•On both single and double ovens, the control lock will not disable the Timer. On double ovens, the light, timer, and clock are still available during control lock.
•Set control lock when cleaning the control panel to prevent oven from accidentally turning on.
To lock the control panel:
Press and hold the Control Lock pad (Number Pad 3) for 5 seconds.
A single tone will sound and “CONTROL LOCK ” will
appear on the display.
To unlock the control panel:
Press and hold the Control Lock pad (Number Pad 3) for 5 seconds.
A single tone will sound after 5 seconds and
“CONTROL LOCK ” will disappear from the display.
Prompt for start
If “START?” is lit, this means that the Start pad has not been pressed. If you do not press the Start pad, the programmed function will automatically be canceled in 5 minutes.
Using Your Oven
Setting your single oven for the Sabbath†
If you want to set your oven to meet “no work” requirements for the Sabbath, follow these steps:
1.Turn the oven light on or off, as desired, by pressing the Oven Light pad. The oven light will stay turned on or off, whichever you chose, while in the Sabbath mode. Opening the door will not switch the oven light throughout the Sabbath mode.
2.Press BAKE.
BAKE
3.Press Number Pads to set the tempera-
ture you want.
3
2
5
(example for 325°F)
4. Press START.
START
5. Press and hold Number Pad 6 for
5 seconds to go into the Sabbath mode.
NOTE: The Sabbath mode is only available with the Bake function. Before going into the Sabbath mode make sure the timer is off.
Also, make sure you are in an untimed Bake mode with no cook time or stop time specified.
†Star K certification pending. Full certification by Star K is expected near the end of 1996 or early 1997. Information is accurate as of 5/96.
9
Using Your Oven
What your oven will do while in the Sabbath mode:
•The oven will not shut off automatically.
•The temperature displays of the active ovens will show “Sab”.
•To prevent accidental key pad presses, only the 0-9, Start, Upper Oven, and Lower Oven key pads will work. (The Cancel/Off pad will also work, but it must be pressed 1 second longer.)
•No tones will sound.
•No prompts, error messages, or temperature changes will be displayed.
•The ON Indicator Light will light up when the oven is heating and will go off when the oven stops heating.
NOTE: If you open the oven door when the elements are off, the elements will not turn on. Elements will not turn on immediately after the door is closed. If you open the oven door when the elements are on, the elements will turn off after a delay. Again, elements will not turn on immediately after the door is closed.
To change the temperature during the Sabbath mode for holidays:
1.Press a Number Pad and hold for 2 seconds for the desired temperature. Each Number Pad is programmed for a specific set temperature:
NUMBER |
SET |
PAD |
TEMPERATURE |
|
|
1 |
170°F (77°C) |
2 |
200°F (93°C) |
3 |
250°F (121°C) |
4 |
275°F (135°C) |
5 |
300°F (149°C) |
6 |
325°F (163°C) |
7 |
350°F (177°C) |
8 |
375°F (191°C) |
9 |
400°F (204°C) |
0 |
450°F (232°C) |
|
|
2. Press START and hold for 2 seconds.
NOTE: It may take the oven up START to one half hour to reach the
desired temperature.
To end the Sabbath mode:
• Press and hold Number Pad 6 for 5 seconds.
If a power failure occurs during the Sabbath mode:
The oven will automatically return to the Sabbath mode at the desired temperature when power returns.
Setting your double oven for the Sabbath†
If you want to set your oven to meet “no work” requirements for the Sabbath, follow these steps:
1.Press BAKE.
BAKE
2.Press Number Pads to set the tempera-
ture you want.
3
2
5
(example for 325°F)
3. Press START.
START
†Star K certification pending. Full certification by Star K is expected near the end of 1996 or early 1997. Information is accurate as of 5/96.
10
Using Your Oven
4. Press and hold Number Pad 6 for
5 seconds to go into the Sabbath mode.
NOTES:
•The Sabbath mode is only available with the Bake function.
•The Timer will be canceled in the Sabbath mode.
•To use both ovens in the Sabbath mode, both ovens must be in BAKE mode before going into the Sabbath mode. If only one oven is on before entering the Sabbath mode, then the other oven cannot be turned on while in the Sabbath mode.
What your oven will do while in the Sabbath mode:
•The oven will not shut off automatically.
•The temperature displays of the active ovens will show “Sab”.
•To prevent accidental key pad presses, only the 1-9, Start, Upper Oven, and Lower Oven key pads will work.
•Oven lights will stay off. Lights will not turn on when door is opened.
•The indicator will flash for a few seconds to tell you when the elements are about to turn on or off.
•No tones will sound.
•No prompts, error messages, start times, or temperature changes will be displayed.
•The Element Indicator light will light up when the oven is heating and will go off when the oven stops heating.
NOTE: If you open the oven door when the elements are off, the elements will not turn on. Elements will not turn on immediately after the door is closed. If you open the oven door when the elements are on, the elements will turn off after a delay. Again, elements will not turn on immediately after the door is closed.
To change the temperature during the Sabbath mode for holidays:
1.Press upper/lower oven pad.
2.Press a Number Pad for the desired temperature. Each Number Pad is programmed for a specific set temperature:
NUMBER |
SET |
PAD |
TEMPERATURE |
|
|
1 |
170°F (77°C) |
2 |
200°F (93°C) |
3 |
250°F (121°C) |
4 |
300°F (149°C) |
5 |
325°F (163°C) |
6 |
350°F (177°C) |
7 |
375°F (191°C) |
8 |
400°F (204°C) |
9 |
475°F (246°C) |
|
|
3. Press START.
START
NOTE: It may take the oven up to one half hour to reach the desired temperature.
To end the Sabbath mode and turn off oven:
• Press and hold Number Pad 6 for
5 seconds. (You only need to do this step once for both
ovens.)
If a power failure occurs during the Sabbath mode:
The oven will automatically return to the Sabbath mode at the desired temperature when power returns.
11
Using Your Oven
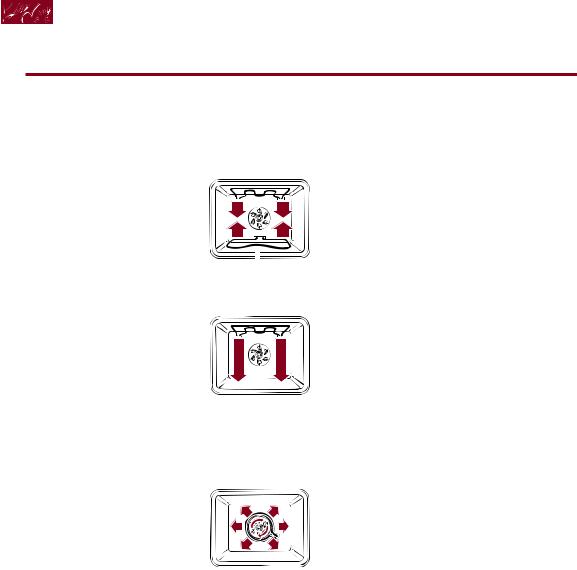
Oven settings
This chart tells you when to use each setting. It also explains which elements heat up for each setting.
SETTING |
DIAGRAM |
SETTING INFORMATION |
||
|
|
|
|
|
BAKE |
|
|
|
• The bottom element and both top |
|
|
|
||
Use this setting for |
|
|
|
elements heat up. |
standard baking and |
|
|
|
• The elements will turn on and off to |
roasting. |
|
|
|
maintain the oven temperature. |
|
|
|
|
• Opening the door during Bake will |
|
|
|
|
|
|
|
|
|
cause the broil elements to turn off |
|
Bake element |
|||
|
immediately and the bake element |
|||
|
(not visible) |
|||
|
to turn off after 2 minutes. |
|||
|
|
|
|
|
|
|
|
|
|
BROIL (MAXI/ECONO) |
|
|
|
• Both top elements heat during |
|
|
|
||
Use this setting for |
|
|
|
Maxi Broil. (Maximum browning |
broiling regular-sized |
|
|
|
coverage.) |
and smaller cuts of |
|
|
|
• Only the inner element heats up |
meat, poultry, and fish. |
|
|
|
during Econo Broil. (Browning |
|
|
|
|
coverage in center only.) |
|
|
|
|
|
|
|
|
|
• The elements will turn on and off to |
|
|
|
|
maintain the oven temperature. |
|
|
|
|
• Opening the door during Broil will cause |
|
|
|
|
the broil elements to turn off immediately. |
|
|
|
|
|
CONVECTION BAKE |
|
|
|
• For faster preheating, the bottom |
|
|
|
||
Use this setting for |
|
|
|
element and both top elements heat up |
delicate foods and for |
|
|
|
until oven reaches desired temperature. |
baking breads and |
|
|
|
After preheat, only the rear element |
cakes. Use also when |
|
|
|
heats up (and in some models the |
baking large quantities |
|
|
|
bottom element heats up). |
|
|
|
||
of food on more than |
|
|
|
• For even heating, the fan at the back of |
one oven rack. |
|
|
|
the oven circulates air in the oven cavity. |
|
|
|
|
• The elements will turn on and off to |
|
|
|
|
maintain the oven temperature. |
|
|
|
|
• Opening the door during Convection |
|
|
|
|
Bake will cause the broil elements, |
|
|
|
|
convection fan, and rear element to turn |
|
|
|
|
off immediately. The bake element will |
|
|
|
|
turn off after 2 minutes. |
|
|
|
|
|
12
Using Your Oven
SETTING |
DIAGRAM |
SETTING INFORMATION |
||
|
|
|
|
|
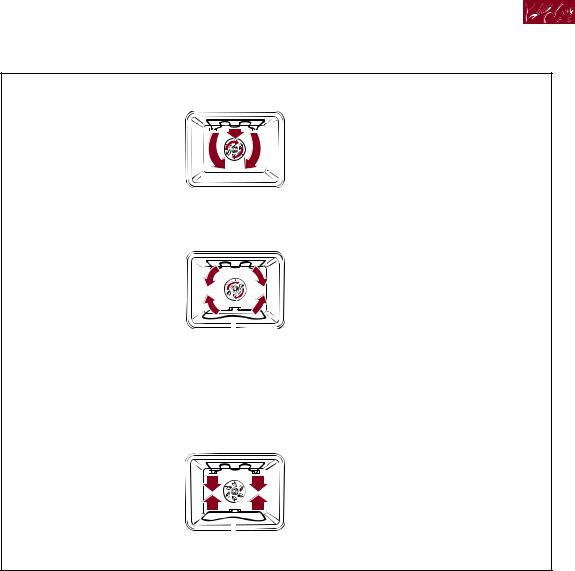
CONVECTION BROIL |
|
|
|
• Both top elements heat up. |
|
|
|
||
Use this setting for |
|
|
|
• For even heating, the fan at the back of |
broiling thick cuts |
|
|
|
the oven circulates air in the oven cavity. |
of meat. |
|
|
|
• The elements will turn on and off to |
|
|
|
|
|
|
|
|
|
maintain the oven temperature. |
|
|
|
|
• Opening the door during Convection |
|
|
|
|
|
|
|
|
|
Broil will cause the broil elements and |
|
|
|
|
convection fan to turn off immediately. |
|
|
|
|
|
CONVECTION ROAST |
|
|
|
• The bottom element and both top |
|
|
|
||
Use this setting for |
|
|
|
elements heat up. |
roasting and baking |
|
|
|
• For even heating and faster cooking, |
on one rack. |
|
|
|
the fan at the back of the oven circulates |
|
|
|
|
air in the oven cavity. |
|
|
|
|
|
|
|
|
|
• The elements will turn on and off to |
|
|
|
|
|
|
Bake element |
|||
|
maintain the oven temperature. |
|||
|
(not visible) |
|||
|
• Opening the door during Convection |
|||
|
|
|
|
|
|
|
|
|
Roast will cause the broil elements and |
|
|
|
|
convection fan to turn off immediately. |
|
|
|
|
The bake element will turn off after |
|
|
|
|
2 minutes. |
|
|
|
|
|
CLEAN |
|
|
|
• The bottom element and both top |
|
|
|
||
Use this setting for |
|
|
|
elements heat up. |
self-cleaning only. |
|
|
|
|
|
|
|
|
|
|
|
|
|
|
|
|
|
|
|
Bake element
(not visible)
13
Using Your Oven
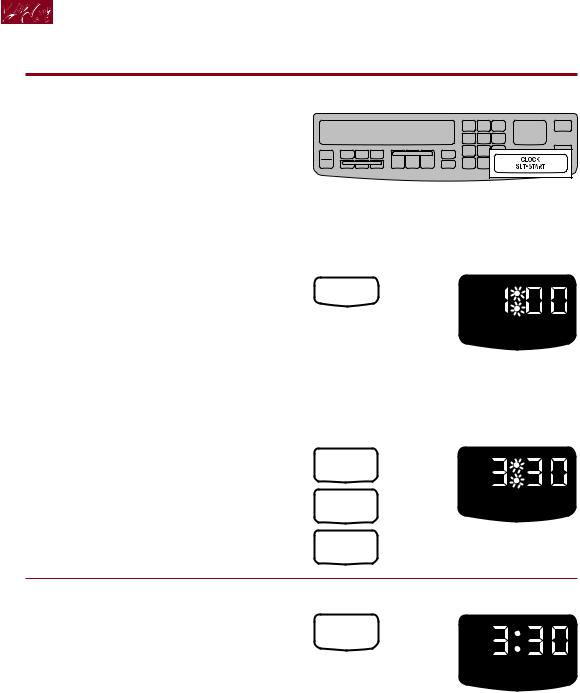
Setting the clock
NOTE: These examples are for double upper ovens only. Other ovens may look slightly different.
NOTE: If a timed oven function is active or programmed, you cannot change the clock. If an untimed oven function is active or programmed, you can change the clock, however the start time will disappear.
1. |
Press Clock Set/Start pad. |
PRESS |
YOU SEE |
|
|
CLOCK |
|
|
|
SET•START |
|
|
|
|
HR MIN MIN SEC |
|
|
|
(last time of day on |
|
|
|
display) (colon is |
|
|
|
flashing) |
|
|
|
|
2. |
Set time. |
PRESS |
YOU SEE |
3
3
0
MIN SEC
3. Start clock. |
PRESS |
YOU SEE |
If time has not been entered correctly, |
START |
|
three short tones will sound and “Err” will |
|
|
be displayed. The display will show the |
|
|
last valid time to appear on the display. |
|
MIN SEC |
Repeat Steps 2 and 3 to re-enter the |
|
|
|
|
|
time of day. |
|
|
|
|
|
To disable the display clock:
You can clear the time of day from the display by pressing and holding CLOCK SET/START for 5 seconds. Repeat to see time of day on display again.
14
Using Your Oven
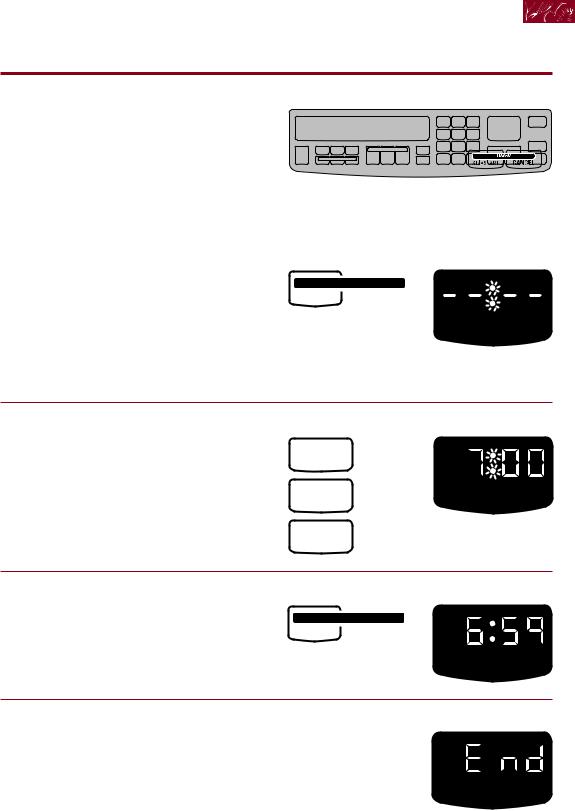
Using the timer
The Timer does not start or stop the oven. It works like a regular kitchen timer. It can be set in hours and minutes up to 99 hours, 59 minutes, or in minutes and seconds up to 99 minutes, 99 seconds.
NOTE: These examples are for double upper ovens only. Other ovens may look slightly different.
1.Press Timer Set/Start pad.
•Once to set hours and minutes
•Twice to set minutes and seconds
|
|
|
|
|
|
|
|
|
|
PRESS |
YOU SEE |
|||
TIMER
SET•START
HR MIN
(example shows hours and minutes timer setting 1)
2. Set time. |
PRESS |
YOU SEE |
7
0
0
HR MIN
(example shows a 7-hour timer setting)
3. Start Timer.
The Timer will begin counting down immediately after you press the Timer Set/Start pad.
PRESS |
YOU SEE |
TIMER
SET•START
HR MIN
4. When time is up, turn off Timer. |
YOU SEE |
When time is up, you will hear four tones unless end-of-cycle tone is disabled. (See page 8.) Press the Timer Cancel pad to clear the display. Also, four tones will sound every minute as an audible reminder unless they are disabled.
(See page 8.)
15

Using Your Oven
To change the timer during its operation:
1. Press Timer Set/Start pad.
2. Enter new desired time.
3. Press Timer Set/Start pad.
To cancel the timer during |
PRESS |
its operation: |
TIMER |
You can cancel the Timer any time during |
CANCEL |
its operation. Press the Timer Cancel pad. |
|
Baking or convection baking
NOTES:
•These examples are for double upper ovens only. Other ovens may look slightly different.
•If you need to convert temperatures from Celsius to Fahrenheit or vice versa,
see page 7.
1. Position racks.
For correct rack placement, see “Rack placement” chart on page 20.
Your upper/single oven has 3 flat racks and 5 rack positions. Your lower oven has either 2 or 3 racks (depending on model) and 5 rack positions. Rack position 5 is the highest position, or farthest from the bottom of the oven. Rack position 1 is the lowest position, or closest to the bottom of the oven.
NOTES:
•Before turning oven on, place oven racks where you need them.
•Be sure the rack(s) is level.
•Use pot holders or oven mitts to protect your hands, if rack(s) must be moved while oven is hot.
•Do not let pot holder or oven mitt touch oven bottom.
•See pages 20 and 21 for additional baking and convection baking tips.
No. 5 
No. 4 


No. 3
No. 2 


No. 1
16
Using Your Oven
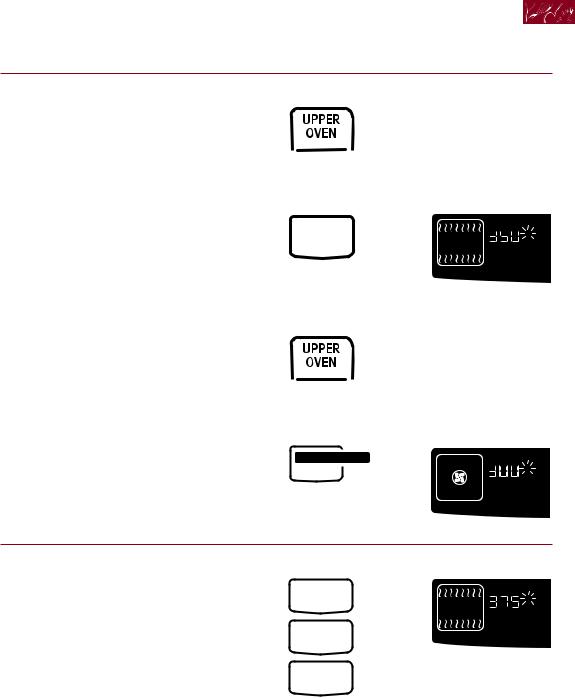
2. Choose baking setting. |
PRESS |
NOTE: On double ovens, the cavity
symbol flashes to tell you which oven you are setting.
to select oven (for double ovens)
PRESS
BAKE
OR
PRESS
to select oven (for double ovens)
PRESS
CONVECTION
BAKE
YOU SEE

 O
O
F
(or 177°C)
YOU SEE

 O
O
F
(or 149°C)
3. Set temperature (optional).
Do this step if you want to set a temperature other than 350°F for Bake or 300°F for Convection Bake.
NOTE: See a reliable cookbook or your convection oven cookbook for temperature recommendations.
PRESS YOU SEE
3 |
O |
|
F |
7 |
|
5 |
(example for Bake |
at 375°F) |
continued on next page
17
Using Your Oven
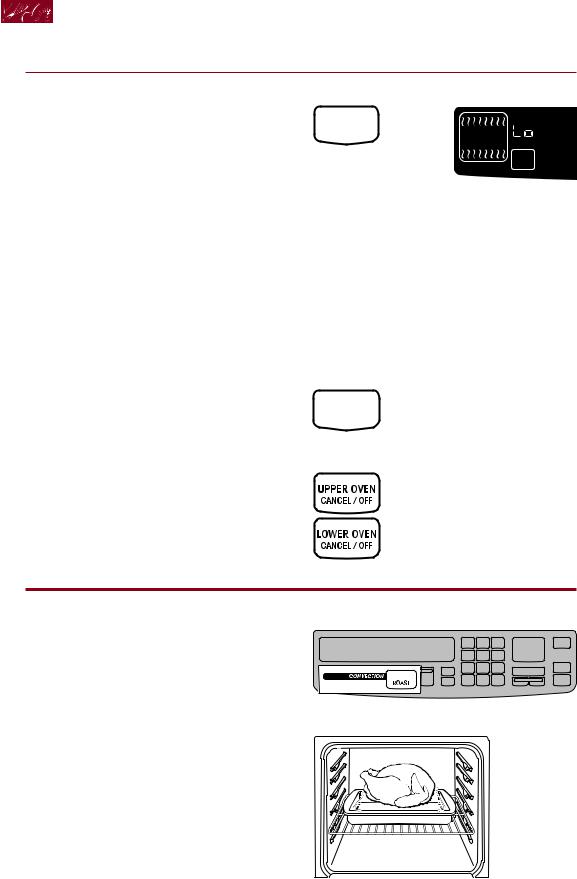
4. Preheat oven. |
PRESS |
YOU SEE |
After the temperature reaches 170°F, the |
START |
|
temperature display will show the actual |
|
|
oven temperature at each 5°F (3°C) |
|
|
increase. It will then stop at the set |
|
ON |
temperature. One long tone will sound |
|
|
when oven is preheated. |
|
(example for Bake) |
|
|
(“Lo” is displayed |
|
|
after 5 seconds if |
|
|
oven temperature is |
|
|
below 170°F) |
|
|
|
5. Put food in oven. |
|
|
NOTE: If you want to change the |
|
|
baking temperature after baking has |
|
|
begun, repeat Steps 2, 3, and 4. |
|
|
|
|
|
6. After cooking, turn off oven. |
PRESS |
YOU SEE |
|
CANCEL |
(display will go blank) |
|
|
OFF
(single ovens)
OR
(double ovens)
Convection roasting
NOTE: These examples are for double upper ovens only. Other ovens may look slightly different.
1. Prepare oven.
Position the rack properly. For correct rack placement, see “Baking or convection baking” on page 16. Place food in the oven. For large roasts and turkeys, place rack in position 1 or 2. (Preheating is not necessary when roasting.)
18
Loading...