Hanna Instruments HI 98703 User Manual
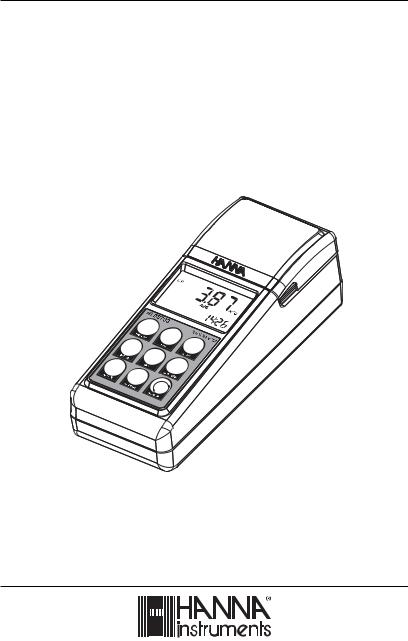
Instruction Manual
HI 98703
Portable Turbidimeter
www.hannainst.com
1

Dear Customer,
Thank you for choosing a Hanna Instruments product. This manual will provide you with the necessary information for correct use of the instrument.
Please read this instruction manual carefully before using the instrument.
If you need additional technical information, do not hesitate to e-mail us at tech@hannainst.com or see the back side of this manual for our worldwide sales and technical service contacts. This instrument is in compliance with 
 directives.
WARRANTY
HI 98703 is warranted for two years against defects in workmanship and materials when used for its intended purpose and maintained according to instructions. This warranty is limited to repair or replacement free of charge.
Damage due to accidents, misuse, tampering or lack of prescribed maintenance is not covered. If service is required, contact the dealer from whom you purchased the instrument. If under warranty, report the model number, date of purchase, serial number and the nature of the failure. If the repair is not covered by the warranty, you will be notified of the charges incurred. If the instrument is to be returned to Hanna Instruments, first obtain a Returned Goods Authorization number from the Technical Service Department and then send it with shipping costs prepaid. When shipping any instrument, make sure it is properly packed for complete protection.
To validate your warranty, fill out and return the enclosed warranty card within 14 days from the date of purchase.
TABLE |
OF CONTENTS |
WARRANTY ........................................................................................................................................................... |
2 |
PRELIMINARY EXAMINATION .................................................................................................................................... |
3 |
GENERAL DESCRIPTION .......................................................................................................................................... |
4 |
TAG IDENTIFICATION SYSTEM .................................................................................................................................. |
5 |
ABBREVIATIONS .................................................................................................................................................... |
5 |
PRINCIPLE OF OPERATION ....................................................................................................................................... |
6 |
MEASUREMENT UNITS ............................................................................................................................................ |
7 |
FUNCTIONAL DESCRIPTION ...................................................................................................................................... |
8 |
SPECIFICATIONS ................................................................................................................................................... |
11 |
GENERAL TIPS FOR AN ACCURATE MEASUREMENT ................................................................................................... |
12 |
MEASUREMENT PROCEDURE ................................................................................................................................. |
19 |
CALIBRATION PROCEDURE .................................................................................................................................... |
22 |
LOGGING ............................................................................................................................................................ |
26 |
GOOD LABORATORY PRACTICE (GLP) ...................................................................................................................... |
29 |
SETUP ................................................................................................................................................................ |
31 |
LCD BACKLIGHT ................................................................................................................................................... |
35 |
TAG INSTALLATION ............................................................................................................................................... |
35 |
LAMP REPLACEMENT ............................................................................................................................................. |
36 |
BATTERIES MANAGEMENT .................................................................................................................................... |
36 |
PC INTERFACE ..................................................................................................................................................... |
38 |
ERROR CODES .................................................................................................................................................... |
38 |
ACCESSORIES ...................................................................................................................................................... |
39 |
RECOMMENDATIONS FOR USERS ........................................................................................................................... |
39 |
2
PRELIMINARY EXAMINATION
Please examine this product carefully. Make sure the instrument is not damaged. If any damage has occurred during the shipment, please notify your dealer.
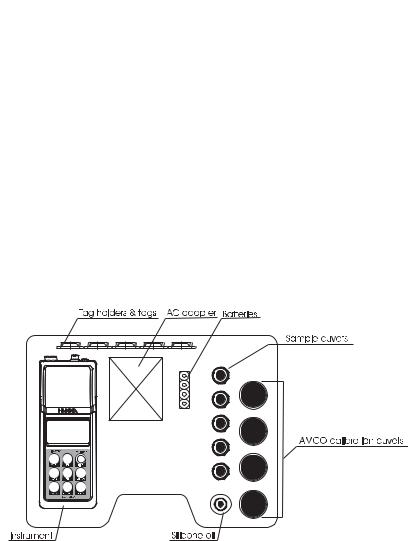
This HI 98703 Portable Turbidimeter is supplied complete with:
•Five Sample Cuvets and Caps
•Calibration Cuvets (HI 98703-11)
•Silicone Oil (HI 93703-58)
•Tissue for wiping the cuvets
•Five Tag holders with Tags (HI 920005)
•Batteries (4 pcs.)
•AC Adapter
•Instruction Manual
•Instrument Quality Certificate
•Rigid carrying case
Note: Save all |
packing material until you are sure that the |
instrument works |
correctly. Any |
defective |
item must be returned in the original packing |
with the supplied |
accessories. |
3

GENERAL DESCRIPTION
HI 98703 is a high accuracy EPA compliant portable turbidimeter that benefits from Hanna’s years of experience as manufacturer of analytical instruments. The HI 98703 meets and exceeds the requirements of the USEPA Method 180.1 for wastewater and Standard Method 2130 B for drinking water.
The instrument is specially designed for water quality measurements, providing a reliable and accurate reading on low turbidity values.
The HI 98703 instrument measures the turbidity of a sample in the 0.00 to 1000 NTU (Nephelometric Turbidity Units) range. An effective algorithm calculates and converts the readings in NTU.
The instrument has an EPA compliance reading mode which rounds the reading to meet EPA reporting requirements.
Depending on the measured probe and needed accuracy, normal measurement, continuous measurement, or signal averaging measurement can be selected.
The instrument is based on a state-of-the-art optical system, which guarantees accurate results. The optical system, consisting in a tungsten filament lamp and two detectors (scattered and transmitted), assures long term stability and minimizes stray light and color interferences. It also compensates for variations in intensity of the lamp, minimizing the need of frequent calibration.
The 25 mm round cuvets made from special optical glass guarantee the repeatability and consistency of the measurements.
Calibration can be easily performed at any time in two, three ot four points (<0.1, 15, 100 and 750 NTU-adjustable calibration points), using the supplied or user prepared standards.
HI 98703 has complete GLP (Good Laboratory Practice) functions that allows traceability of the calibration conditions. The last calibration points, time and date can be checked at any time by a single touch.
HI 98703 has a very user-friendly interface, with an easy to read, large LCD (Liquid Crystal Display). The displayed codes guide the user step by step with routine operation and through calibration. Confirmation and acoustic signals help the user during instrument operation.
The HI 98703 turbidimeter is a truly splash proof portable instrument. It is supplied with a rigid carrying case that offers protection for harsh environments.
One battery set is enough for at least 1500 measurements. The battery charging percentage and low battery condition are displayed on the LCD to avoid unexpected battery failure. In order to save the battery life, the instrument has an auto shut-off feature and will turn off after 15 minutes of non-use. In addition, the instrument is equipped with backlight and the current time is continuously displayed on the LCD.
The instrument also provides a logging function. Up to 200 measurements can be stored in the internal memory and consulted at any time. Data can be downloaded to a PC for storing or further analysis through one of the two available ports: RS232 or USB.
For advanced field applications, the HI 98703 turbidimeter is equipped with Tag Identification System (TIS) that makes data collecting and management simpler than ever.
4

TAG IDENTIFICATION SYSTEM
Hanna is the first manufacturer of turbidity instruments that has decided to add the unique T.I.S. - Tag Identification System to our Portable Turbidimeters, to meet the more restrictive needs of the users and fit all advantages of this system to the turbidity measurements and data management.
The system is designed for scientific and industrial applications, or to prove during safety audits and inspections that samples have been truly taken on pre-established locations.
The system is as easy to install as to operate. Just fix the so-called iButton® tags near your sampling sites that need to be checked often, and with this the T.I.S. is setup. The tag contains a computer chip embedded in a durable stainless steel can. It is designed to withstand the harsh environments, indoors or outdoors. The number of tags that can be installed is practically unlimited, because each tag has a unique identification code.
Immediately after tags installation you can start collecting data. Use the Portable Turbidimeter to take measurements and memorize the test result by pressing the Log-on-Demand key. Then, the instrument will ask for the tag identification. Simply touching the iButton® with the matching connector on the Portable Turbidimeter does identify and authenticate logging, by storing the iButton® serial number, time and date stamp.
The power of the T.I.S. features resides in the PC application. Download all test data to your PC and use our HI 92000 Windows® compatible application software for further data management. You can sort or filter all your collected test data on different criteria like on a specific sampling location, parameter, date and time intervals, or fix range to filter measured values. The data can be plotted in a graph, exported to other common Windows® applications or printed for reporting purpose.
It is also possible to add new tags later on, thus increasing an already existing database. Each time the PC software recognizes a new added tag, it will ask for a description of the new sampling location.
|
ABBREVIATIONS |
|
|
NTU |
Nephelometric Turbidity Units |
JTU |
Jackson Turbidity Units |
FTU |
Formazin Turbidity Units |
USEPA |
US Environmental Protection Agency |
LCD |
Liquid Crystal Display |
RTC |
Real Time Clock |
RH |
Relative Humidity |
TIS |
Tag Identification System |
ID |
Identification |
iButton® is registered Trademark of “MAXIM/DALLAS semiconductor Corp.”
5
PRINCIPLE OF OPERATION
Turbidity of the water is an optical property that causes light to be scattered and absorbed, rather than transmitted. The scattering of the light that passes through a liquid is primarily caused by the suspended solids. The higher the turbidity, the greater the amount of scattered light. Because even the molecules in a very pure fluid scatter light to a certain degree, no solution will have zero turbidity.
The USEPA Method 180.1 specify the key parameters for the optical system to measure turbidity for drinking, saline and surface water in a 0 to 40 NTU range, using the nephelometric method. The HI 98703 Portable Turbidimeter is designed to meet or exceed the criteria specified by the
USEPA Method 180.1 and Standard Method 2130 B.
The light beam that passes through the sample is scattered in all directions. The intensity and pattern of the scattered light is affected by many variables like wavelenght of the incident light, particle size, shape, refractive index and color.
The Hanna’s HI 98703 is based on a state-of-the-art optical system that guarantee both high performance and reliable results.
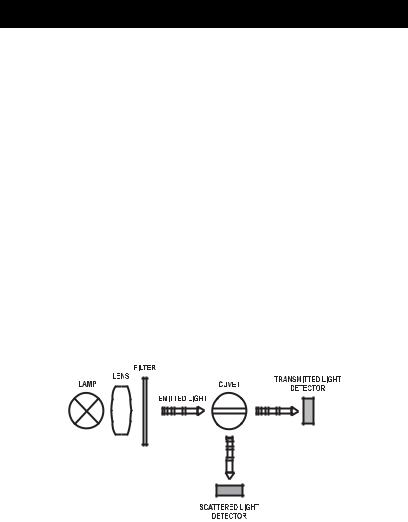
This optical system includes a tungsten filament lamp, a scattered light detector (900) and a transmitted light detector (1800). The microprocessor of the instrument calculates from the signals that reaches the two detectors, the NTU value, using an effective algorithm. This algorithm corrects and compensates for interferences of color, making the HI 98703 turbidimeter color-compensated.
The optical system and measuring technique alow the compensation of lamp intensity fluctuations, minimizing the need of frequent calibration.
The lower detection limit of a turbidimeter is determined by the so called “stray light”. Stray light is the light detected by the sensors, that is not caused by light scattering from suspended particles. The optical system of HI 98703 turbidimeter is designed to have very low stray light, providing accurate results for low turbidity samples. However, special care must be taken when measuring low turbidities (see General Tips for an Accurate Measurement for sample preparation and measuring techniques).
6

MEASUREMENT UNITS
Many methods were used to measure turbidity over the years. The Jackson Candle Turbidimeter was used to measure turbidity as Jackson turbidity units (JTU). The Secchi Disk is commonly used to measure turbidity in lakes and other deep waters (mg/L SiO2). Both methods are visual and are not considered very accurate. To obtain more accurate readings a nephelometer should be used as a turbidity reading instrument.
The HI 98703 turbidimeter reports the measurements only in NTU (Nephelometric Turbidity Units). NTU units are equal to FTU units (Formazine Turbidity Units). The conversion table between these measurement units is shown bellow:
|
JTU |
NTU/FTU |
SiO (mg/L) |
|
|
|
2 |
JTU |
1 |
19 |
2.50 |
|
|
|
|
NTU/FTU |
0.053 |
1 |
0.13 |
|
|
|
|
SiO (mg/L) |
0.4 |
7.5 |
1 |
2 |
|
|
|
7
FUNCTIONAL DESCRIPTION
INSTRUMENT DESCRIPTION
1)Cuvet Lid. Close the cuvet lid prior to start a measurement.
2)Cuvet Holder. Insert the cuvet into the holder with the cuvet mark matching the case mark.
3)Liquid Crystal Display (LCD). The LCD has backlight for better visibility in dark environments.
4)Keypad. Splash proof resistant.
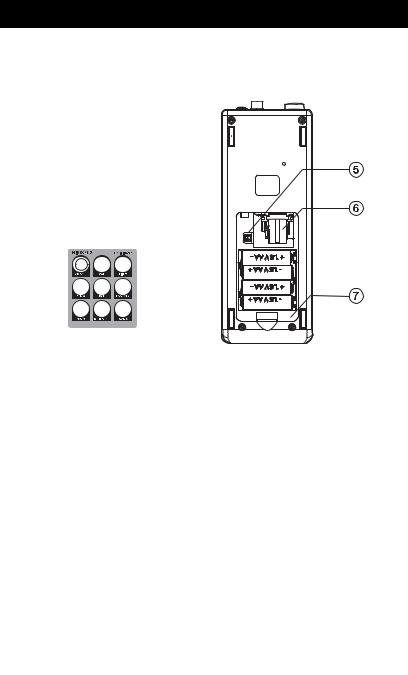
5)Lamp connector. Connect the new lamp using a screwdriver during lamp changing procedure.
6)Lamp. Replacable tungsten lamp.
7)Battery Lid. Remove the battery lid in order to change batteries or replace the lamp.
KEYPAD DESCRIPTION
8
8)ON/OFF, press to turn the instrument ON/OFF. If no key is pressed for more than 15 minutes, the instrument automatically shuts off.
9)GLP  , press to enter/exit GLP feature. In SETUP it is used to increase the set values. In Log Recall it is used to select a newer record (scroll up).
10)AVG  , press to set the average reading mode ON/OFF. In SETUP it is used to decrease the set values. In Log Recall it is used to select an older record (scroll down).
11)CAL, press to enter/exit calibration. During setup it is used to start/stop editing a parameter.
12)LIGHT, press to turn ON/OFF the backlight.
13)RCL, press to enter/exit viewing log content.
14)LOG/CFM, press to save the log records or to confirm the selected option.
15)READ  , press to start a measurement. Press and hold READ to make a continuous measurement. In Log Recall it is used to see the content of a record. In GLP it is used to see all available informations. In SETUP, during date or time editing, it is used to move the focus on the next setting item.
16)SETUP/DEL, press to enter/exit setup. The DEL function is available in Log Recall to delete one or all records. In GLP it is used to delete the user calibration.
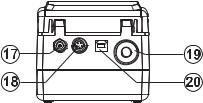
CONNECTORS DESCRIPTION
17)AC adapter connector, used to connect an external AC Adapter.
18)RS232 connector, used to transfer data through the RS232 connection. Use HI 920011 serial cable to connect to the PC.
19)Tag reader connector. Touch the tag with the connector to read the location identification number during logging.
20)USB connector, used to transfer data to the PC.
9

DISPLAY DESCRIPTION
1)Battery icon. When it is ON, it shows that the instrument works on battery. When blinking, the batteries are almost empty and need to be replaced.
2)Wait icon. It is displayed when the instrument performs an internal checkup.
3)Lamp icon. The lamp icon is shown when the lamp is turned on.
4)Measurement icon. The icon shows the measuring scheme of the instrument.
5)Four digit main display. The main display shows the turbidity value after one measurement. Depending on the instrument working mode, other values or messages are displayed.
6)Measurement units. The turbidity is measured in NTU. When average or continuous mode is selected, the “NTU” tag blinks for each new displayed value. For conversions in other units see Measurement Units section.
7)AVG icon. When selected, the measurement will be taken in average mode. The “NTU” tag will blink for each new displayed value.
8)Four digit secondary display. The secondary display shows the current time (if selected) or other values/messages.
BEEPER
A beeper is used to make the user interface more friendly. An error or invalid key press is signaled by a long beep. A confirmation beep is signaled by a short beep. The beeper is selectable as ON or OFF in Setup Menu.
1 0
|
SPECIFICATIONS |
|
|
Range |
0.00 to 9.99 NTU |
|
10.0 to 99.9 NTU |
|
100 to 1000 NTU |
Range Selection |
Automatically |
Resolution |
0.01 NTU from 0.00 to 9.99 NTU |
|
0.1 NTU from 10.0 to 99.9 NTU |
|
1 NTU from 100 to 1000 NTU |
Accuracy |
±2% of reading plus 0.02 NTU |
Repeatibility |
±1% of reading or 0.02 NTU, whichever is greater |
Stray Light |
< 0.02 NTU |
Typical EMC Deviation |
±0.05 NTU |
Light Source |
Tungsten filament lamp |
Lamp Life |
Greater than 100,000 readings |
Light Detector |
Silicon Photocell |
Method |
Ratio Nephelometric signal (90') scatter light ratio transmitted light |
|
Adaptation of the USEPA Method 108.1 and Standard Method |
|
2130 B |
Display |
60 x 90mm LCD with backlight |
Standards |
15, 100 and 750 NTU |
Calibration |
One, two or three point calibration |
LOG Memory |
200 records |
Serial Interface |
RS232 or USB 1.1 |
Environment |
0 to 50°C (32 to 122°F); max 95% RH non-condensing |
Power supply |
4 x 1.5V AA alkaline batteries or AC adapter |
Auto Shut-off |
After 15 minutes of non-use |
Dimensions |
224 x 87 x 77 mm (8.8 x 3.4 x 3.0”) |
Weight |
512 g (18 oz.) |
1 1

GENERAL TIPS FOR AN ACCURATE MEASUREMENT
HI 98703 is a highly accurate turbidimeter. To meet the instrument performance and fully benefit of its properties it is very important that the analyst perform accurate, precise and repeatable readings using proper measurement techniques. Special care must be taken during sample preparation and handling.
The instructions listed below should be carefully followed during measurement and calibration to ensure best accuracy.
CUVET
The cuvet is part of the optical system in all measurements. The light reaches the sample by passing through the cuvet glass. As a result, the measurement can be affected by the glass imperfections, dirt, dust, scratches, or fingerprints present on the cuvet surface.
CUVET HANDLING
The cuvets should be free of scratches or cracks. Any cuvet with visible scratches will be discarded. The cuvets should be periodically washed with acid. After washing, the cuvets should be well rinsed many times with distilled or deionized water. Allow cuvets to air-dry and store them for long periods of time with caps, to avoid dirt entering inside. Always handle the cuvet by touching only the cap or its top side (over the horizontal line).
Always store the cuvets in separate boxes or with separators between them to avoid scratches on the surface.
CUVET PREPARATION
Whenever a cuvet is used, it must be clean inside and outside. When it is placed into the instrument, it must be dry outside, completely free of fingerprints or dirt.
If the cuvet is not indexed, put the cuvet with the factory mark aligned with the sign on the instrument top.
1 2
 Loading...