


DIGITAL Blender
Model Number: 169202
UPC: 681131692021
Customer Assistance
1 877 207 0923 (US)
1 877 556 0973 (Canada)
Thank you for purchasing this GE appliance.
In keeping with the GE ecomagination initiative, please consider the option to recycle the packaging material and donate any appliance you are no longer using.
To read more about GE's ecomagination commitment, visit: ge.ecomagination.com

IMPORTANT SAFEGUARDS
When using electrical appliances, basic safety precautions should always be followed, including the following:
•Read all instructions.
•To protect against risk of electrical shock do not put the cord or the blender’s base in water or other liquid.
•Close supervision is necessary when any appliance is used by or near children.
•Unplug from outlet when not in use, before putting on or taking off parts, and before cleaning.
•Avoid contacting moving parts.
•Do not operate appliance with a damaged cord or plug, or after the appliance malfunctions or is dropped or damaged in any manner. Call our toll-free customer assistance number for information on examination, repair, or adjustment.
•The use of attachments, including jars, not recommended by the manufacturer may cause injury to persons.
•Do not use outdoors or in a damp area.
•Do not let cord hang over edge of table or counter.
•Keep hands and utensils out of container while blending to reduce the risk of severe injury to persons or damage to the blender. A scraper may be used but must be used only when the blender is not running.
•Blades are sharp. Handle carefully.
•Always operate blender with lid in place.
•Do not blend hot liquids.
•Container must be properly in place before operating the appliance.
•Do not use appliance for other than intended use.
Save these instructions!

ADDITIONAL SAFEGUARDS
This appliance is for HOUSEHOLD USE ONLY.
DO NOT OPERATE APPLIANCE IF THE LINE CORD SHOWS ANY DAMAGE OR IF APPLIANCE WORKS INTERMITTENTLY OR STOPS WORKING ENTIRELY.
EXTENSION CORDS
A short power-supply cord is to be provided to reduce the risk resulting from becoming entangled in or tripping over a longer cord. Longer detachable power-supply cords or extension cords are available and may be used if care is exercised in their use. If a longer detachable power-supply cord or extension cord is used,
1)The marked electrical rating of the cord set or extension cord should be at least as great as the electrical rating of the appliance, and
2)The longer cord should be arranged so that it will not drape over the countertop or tabletop where it can be tripped over, snagged, or pulled on unintentionally (especially by children).
POLARIZED PLUG
This appliance has a polarized plug (one blade is wider than the other). To reduce the risk of electric shock, this plug is intended to fit into a polarized outlet only one way. If the plug does not fit fully into the outlet, reverse the plug. If it still does not fit, contact a qualified electrician. Do not attempt to modify the plug in any way.

parts
18
17
16
15
14
13
19 |
20 |
21 |
|
1 |
2 |
3 |
|
|
|
start |
|
|
|
stop |
11 |
|
|
high pulse |
|
|
|
|
10 |
drink |
timer |
4 |
9 |
salsa |
blend |
5 |
|
|
low pulse |
|
|
|
|
start
stop
drink |
timer |
salsa
blend
8 7 6
12
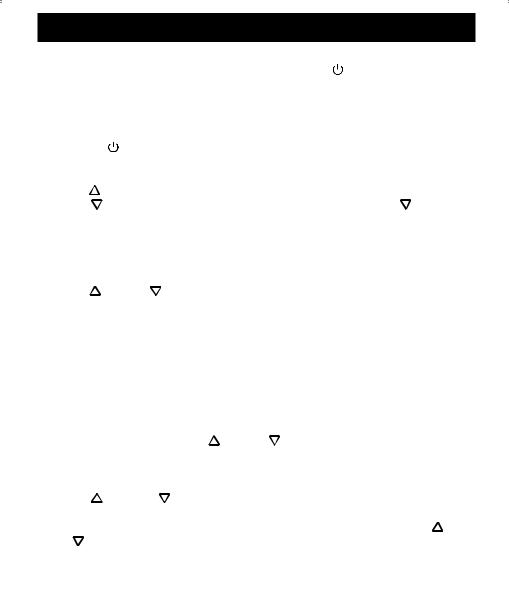
1 |
Power on/off button |
12 |
Power cord with plug |
2 |
LCD display |
13 |
Base |
3 |
start/stop button |
14 |
Wide base |
4 |
high pulse button |
15 |
Stainless steel blades |
5 |
low pulse button |
16 |
Scale |
6 |
Adjust up button |
17 |
Glass jar |
7 |
blend button |
18 |
Mouth |
8 |
Adjust down button |
19 |
Lid |
9 |
salsa button |
20 |
Measuring cup |
10 |
drink button |
21 |
Handle |
11 |
timer button |
|
|

ILLUSTRATIONS
a |
b |
c |
d |
e |
f |
over 140°F / 60°C |
g |
h |
i |
OPERATION
Before first use
•Remove all packaging materials, labels and/or stickers from your blender.
• Clean your blender thoroughly before using for the first time |
Cleaning). |
WARNING: Do not immerse the base (13) in water or any liquids (ill. |
f ). This may cause |
electric shock or damage the appliance. |
|
Operating instructions
Before plugging in the blender, check that the electrical circuit is not overloaded with other appliances.
•Set the base (13) on a flat, even and steady surface.
•Put the prepared ingredients into the glass jar (17) (ill. a ). Cover the jar (17) with the lid (19) (ill. b ). Make sure that the mouth (18) of the jar (17) is firmly covered by the lid (19).
•Insert the measuring cup (20) into the hole of the lid (19). Turn clockwise to lock in place (ill. c ).
Tip: When not following one of the recipes located at the end of this manual, add liquid ingredients into the jar (17) first before adding food pieces. This way all ingredients are mixed evenly. For best results, cut solid food into approximately 0.5 inch (1.3 cm) to 1 inch (2.5 cm) cubes. Cut cheese into pieces no larger than 0.5 inch (1.3 cm).
WARNING: Do not fill the jar (17) with any hot liquid or run the appliance empty (ill. g ). Do not rinse the glass jar (17) with hot water after preparing cold food.
•Put the glass jar (17) onto the base (13) (ill. d ). Fit the wide base (14) onto the top of the base (13).
•Insert the plug (12) into the wall outlet. The  power ON/OFF button (1) lights up blue at 25% of its overall intensity. The blender is in stand-by mode.
•Press the  power ON/OFF button (1) to switch on the blender. The LCD display turns on and blinks blend and shows default speed 12, the highest setting. All other indicators are off.
•The timer is not active, blender works as normal blender. If the user will not set the timer the unit will run for a default time of 2 minutes and then stop automatically.
•To switch off the blender, press  power ON/OFF button (1) again. Disconnect the plug (12) from the wall outlet before you take the jar (17) from the base (13).
OPERATION
Tip: Operate the blender for only as long as needed to reach the right consistency.
Preferably operate for a few seconds at a time |
power ON/OFF button (1) |
|
once the |
is reached. |
|
Blending with countdown timer
The be set with a time between 0:10 seconds and 3:00 minutes.
•power ON/OFF button (1) to switch on the blender.
• Press |
button (3) to start operation. The LCD display |
blinking |
blend |
12. The blender starts with default speed 12. |
|
•up (6) while the blender is running to set the speed to the lowest setting 1.
• |
|
down (8) |
to decrease the speed stepwise, as |
down (8) is |
|
pressed. |
|
|
|
• |
Press |
|
to set the time for which the blender should be activated. |
|
|
The |
display |
timer. |
|
•The LCD display blinks timer and the default time of 1:00 minute. The blend and
|
blinking. |
• |
down (8) button to adjust the time up or down in 10 seconds |
increments or decrements. |
|
Notes • |
The time entry stops after 5 seconds. If button is not pressed, the blender |
|
goes back to speed setting mode. Press timer button (11) again, to enter |
|
time entry mode. |
•The blender is not required to run in order to set the timer. It can be set in stop mode.
•The timer mode is only active after pressing timer button (11). After the
countdown cycle |
timer indicator and time will turn |
off. |
down (8) button to set time or speed |
Press |
|
successively. |
|
• |
Press start/stop button (3) to start operation. The LCD display (2) shows |
time |
|
|
as |
. |
|
• |
|
down (8) during countdown cycle to adjust the speed in |
|
|
operation. |
|
|
• |
Press timer button (11) during countdown cycle and adjust the |
up (6) |
|
|
|
down (8) while in operation. |
|
 Loading...