


Clarion Co., Ltd.
2001/11(A•C) |
All Rights Reserved. Copyright © 2001: Clarion Co., Ltd. |
Printed in China / Imprimé en Chine / Inpreso en China / |
Owner’s manual
Mode d’emploi
Manual de instrucciones
AM/FM CD/CASSETTE PLAYER WITH CD/MD CHANGER CONTROL
•
RADIO CASSETTE AM/FM-LECTEUR CD AVEC COMMANDE DE CHANGEUR CD/MD
•
RADIO DE AM/FM Y REPRODUCTOR DE CD/CASETES CON CONTROL DE CAMBIADOR DE CD/MD
•
PE-2495B 280-7740-00
Thank you for purchasing the Clarion Product.
Please read this owner’s manual in its entirety before operating this equipment.
After reading this manual, be sure to keep it in a handy place (e.g., glove compartment).
Check the contents of the enclosed warranty card and keep it carefully with this manual.
This manual includes the operating procedures of the CD changer, MD changer and TV connected via the CeNET cable. The CD changer, MD changer and TV tuner have their own manuals, but no explanations for operating them are described.
Contents |
|
|
1. |
FEATURES ..................................................................................................................................... |
3 |
2. |
PRECAUTIONS .............................................................................................................................. |
4 |
3. |
CONTROLS .................................................................................................................................... |
5 |
4. |
NOMENCLATURE .......................................................................................................................... |
6 |
|
Names of Buttons and their Functions ........................................................................................... |
6 |
|
Major button operations when external equipment is connected to this unit ................................ |
7 |
|
Display Items ................................................................................................................................... |
8 |
5. |
CAUTIONS ON HANDLING ........................................................................................................... |
9 |
|
Handling Compact Discs ................................................................................................................. |
9 |
|
Handling Cassette Tapes ................................................................................................................ |
9 |
6. |
REMOTE CONTROL .................................................................................................................... |
10 |
|
Inserting the Batteries ................................................................................................................... |
10 |
|
Functions of Remote Control Unit Buttons .................................................................................... |
11 |
7. |
OPERATIONS ............................................................................................................................... |
12 |
|
Basic Operations ........................................................................................................................... |
12 |
|
Radio Operations .......................................................................................................................... |
14 |
|
CD Operations .............................................................................................................................. |
15 |
|
Tape Operations ............................................................................................................................ |
17 |
|
DSP/EQ Operations ...................................................................................................................... |
19 |
|
Operations Common to Each Mode ............................................................................................. |
20 |
8. |
OPERATIONS OF ACCESSORIES ............................................................................................. |
22 |
|
CD/MD Changer Operations ......................................................................................................... |
22 |
|
TV Operations ............................................................................................................................... |
24 |
9. |
IN CASE OF DIFFICULTY ............................................................................................................ |
26 |
10. |
ERROR DISPLAYS ....................................................................................................................... |
27 |
11. |
SPECIFICATIONS ........................................................................................................................ |
28 |
2 ADZ625
Display Items
|
|
|
|
|
: Disc indication |
|
|||
|
|
|
|
|
|
||||
|
|
|
|
|
: Repeat indication |
|
|||
|
|
|
|
|
: Random indication |
|
|||
|
|
|
|
|
: BLS (Blank skip) indication |
|
|||
|
|
|
|
|
|
||||
|
|
|
|
|
|
||||
|
|
|
|
|
|
|
|
|
|
|
|
|
|
|
: Dolby NR (B NR) indication |
|
|
: Loudness indication |
|
|
|
|
|
|
: Manual indication |
|
|
: Stereo indication |
|
|
|
|
|
|
: DSF indication |
|
|
: SUB indication |
|
|
|
|
|
|
|
|
|
||
|
|
|
|
|
: G.EQ indication |
|
|
: MAIN indication |
|
|
|
|
|
|
|
|
|||
|
|
|
|
|
|
|
|
||
|
|
|
|
|
|
|
|
|
|
|
|
|
|
|
: DEMO (SPE-ANA) indication |
|
|||
|
|
|
|
|
|
|
|
|
|
|
|
|
|
|
|
|
|
|
|
|
|
|
|
|
|
|
|
|
|
Preset channel indication (1 to 6)
Disc number indication (1 to 12)
Function mode indication
•The names of modes being selected, etc. are displayed.
Operation status indication
•The frequency, PTY, play time, CT(clock), etc. are displayed.
1.FEATURES
■8-Times Oversampling Digital Filter and Dual 1-Bit D/A Converters
■Zero-Bit DetectorTM Mute Circuit
■Full Logec Tape Transport with True Function / Auto Reverse with Dual Azimuth Adjust
■Dolby® B Noise Reduction
■® FM Reception System
■Controller for Optional TV Tuner Modules
■Capability to Read CD TEXT Data from Clarion Compatible CD Changer
■Built-in 5 Pre-Programmed Digital Sound Field Memories & 4 Pre-Programmed Graphic Equalizer Memories
■CeNET with Balanced Audio Line Transmission and Dynamic Noise Canceling
■High Visibility Multi-Color FL Display
■4-Channel RCA Line Level Output with Fader Control
2. PRECAUTIONS
1.When the inside of the car is very cold and the player is used soon after switching on the heater, moisture may form on the disc or the optical parts of the player and proper playback may not be possible. If moisture forms on the disc, wipe it off with a soft cloth. If moisture forms on the optical parts of the player, do not use the player for about one hour. The condensation will disappear naturally allowing normal operation.
2.Driving on extremely bumpy roads which cause severe vibration may cause the sound to skip.
3.This unit uses a precision mechanism. Even in the event that trouble arises, never open the case, disassemble the unit, or lubricate the rotating parts.
This equipment has been tested and found to comply with the limits for a Class B digital device, pursuant to Part 15 of the FCC Rules.
These limits are designed to provide reasonable protection against harmful interference in a residential installation.
This equipment generates, uses, and can radiate radio frequency energy and, if not installed and used in accordance with the instructions, may cause harmful interference to radio communications. However, there is no guarantee that interference will not occur in a particular installation.
If this equipment does cause harmful interference to radio or television reception, which can be determined by turning the equipment off and on, the user is encouraged to consult the dealer or an experienced radio/TV technician for help.
MODEL
12V GROUND
AM 530-1710kHz/FM 87.9-107.9MHz
 CAUTION
USE OF CONTROLS, ADJUSTMENTS, OR PERFORMANCE OF PROCEDURES OTHER THAN THOSE SPECIFIED HEREIN, MAY RESULT IN HAZARDOUS RADIATION EXPOSURE.
THE COMPACT DISC PLAYER SHOULD NOT BE ADJUSTED OR REPAIRED BY ANYONE EXCEPT PROPERLY QUALIFIED SERVICE PERSONNEL.
CHANGES OR MODIFICATIONS NOT EXPRESSLY APPROVED BY THE MANUFACTURER FOR COMPLIANCE COULD VOID THE USER’S AUTHORITY TO OPERATE THE EQUIPMENT.
INFORMATION FOR USERS:.
CHANGES OR MODIFICATIONS TO THIS PRODUCT NOT APPROVED BY THE MANUFACTURER WILL VOID THE WARRANTY AND WILL VIOLATE FCC APPROVAL.
This device complies with Part 15 of the FCC Rules. Operation is subject to the following two conditions : (1) This device may not cause harmful interference,and (2) This device must accept any interference received, including interference that may cause undesired operation.
This Production complies DHHS Rules 21 CFR subchapter J applicable at date of manufacture.
CLARION CO.,LTD.
50 KAMITODA , TODA-SHI, SAITAMA-KEN, JAPAN.
MANUFACTURED:
Dolby noise reduction manufactured under license from Dolby Laboratories Licensing Corporation.
“DOLBY” and the double-D symbol are trademarks of Dolby Laboratories Licensing Corporation.
051 |
722 |
877 |
|
|
|
286- |
|
SERIAL No. |
|
Clarion Co.,Ltd. |
|
PE- |
|
MADE IN |
Bottom View of Source Unit |
|
|
|
Be sure to unfold and read the next page.
Veuillez déplier et vous référer à la page suivante.
Cerciórese de desplegar y de leer la página siguiente.
8 |
ADZ625 |
ADZ625 |
3 |
ADZ625 |
4 |

3. CONTROLS/LES COMMANDES/CONTROLES/
Source unit / Appareil pilote / Unidad fuente / 
|
|
|
|
[CD IN] |
|
|
|
[ISR] |
|
|||||||
|
|
|
|
|
|
|||||||||||
|
|
|
[TAPE IN] |
|
|
|
|
|
|
|
|
[TAPE EJECT] |
|
|||
|
|
|
|
|
|
|
|
|
|
|||||||
|
[REMOTE] |
|
[SPE/ANA] |
|
|
|
|
|
|
|
|
|
|
|
[CD EJECT] |
|
|
|
|
|
|
|
|
|
|
|
|
|
|
|
|||
|
|
|
|
|
|
|
|
|
|
|
|
|||||
|
|
|
|
|
|
|
|
|
|
|
|
|||||
[EQ] |
|
|
|
[DSP] |
[A] |
|
|
|
[T] |
[RESET] |
|
|
|
|
|
|
|
|
[M] |
[ |
] |
|
|
[PRESET] |
|
[VOLUME] |
|
|
[DISP] |
|
[MUTE] |
|
|
[BND] |
|
[FNC] |
|
[RDM] |
|
|
[ |
],[ |
] |
[RPT] |
|
|
|
|
[SCN] |
Note: Be sure to unfold this page and refer to the front diagrams as you read each chapter.
Remarque: Veuillez déplier cette page et vous référer aux schémas quand vous lisez chaque chapitre.
Nota: Cuando lea los capítulos, despliegue esta página y consulte los diagramas.
4. NOMENCLATURE
Note:
• Be sure to read this chapter referring to the front diagrams of chapter “3. CONTROLS” on page 5 (unfold).
Names of the Buttons and their Functions
[REMOTE]
• Receiver for remote control unit.
[SPE/ANA] button
• Press to change the spectrum analyzer display.
[TAPE IN]
• Cassette tape insertion slot.
[CD IN]
• CD insertion slot.
[ISR] button
•Recalls ISR radio station in memory.
Press and hold for 2 seconds or longer: Stores current station into ISR memory (radio mode only).
[TAPE EJECT] button
• Ejecting a tape.
[CD EJECT] button
• Ejecting a CD.
[DSP] button
•Press to select the DSP menu, and to set DSP effects to ON/OFF.
[T] button
•Use the button to input a title in the CD mode.
•Press and hold the button for 1 second or longer to enter the adjust mode.
[M] button
•Use to change and store items in preset memory.
[PRESET] knob
•Stores a station into memory or recall it directly while in the radio mode.
•In DSP/EQ mode, use to select menu.
•In adjust modes, use to select items for
adjustment.
Note:
To operate [PRESET] knob:
•Turn knob about 30 deg. (adjust item will change).
•Release finger (knob will return to original position).
•Turn knob again (adjust item will change).
[DISP] button
•Switches the display indication (Main display,sub display,clock display).
[BND] button
•Switches the band, or seek tuning or manual tuning while in the radio mode.
•Plays a first track while in the CD mode.
•In tape mode, changes the side played
(direction of tape travel).
[RDM] button
•Performs random play while in the CD mode.
•Select Dolby noise reduction while in the tape mode.
[RPT] button
•Plays repeatedly while in the CD mode.
•In the tape mode, enables repeat play. When held depressed for one second or more, enables blank-skip mode.
[SCN] button
•Performs preset scan while in the radio mode.
When the button is pressed and held, auto store is performed.
•Performs scan play for 10 seconds for each track while in the CD mode.
[ |
], [ |
] buttons |
•Selects a station while in the radio mode or selects a track when listening to a CD. These buttons are used to make various settings.
[FNC] button
•Press the button to turn on the power.
Press and hold the button for 1 second or longer to turn off the power.
•Switches the operation mode among the radio mode, etc.
[MUTE] button
• Turns mute on and off.
[VOLUME] knob
•Adjust the volume by turning the knob clockwise or counterclockwise.
•Use the knob to perform various settings.
[ |
|
] button |
|
•Plays or pauses a CD while in the CD mode.
•After selecting various setting options, press this button to confirm the settings.
[RESET] button
•Press under the following conditions.
1.Nothing happens when buttons are pressed.
2.Display is not accurate.
[A] button
•Press and hold the button for 1 second or longer to turn the loudness on or off.
•Use the button to switch to the audio mode
(bass/mid/treble, balance/fader adjustment)
[EQ] button
•Press to select EQ menu or and to set EQ effects to ON/OFF.
Major button operations when external equipment is connected to this unit
●When the CD/MD changer is connected
For details, see the section “CD/MD Changer Operations”.
[SCN] button
•Performs scan play for 10 seconds for each track. Disc scan play is performed when the button is pressed and held.
[RPT] button
•Performs repeat play. When this button is pressed and held, disc repeat play is performed.
[RDM] button
•Performs random play. Also performs disc random play when the button is pressed and held.
[PRESET] knob
•Use to select the number of the disc loaded, and to start play.
[DISP] button
•Switches the disc titles or track titles while in the MD changer mode.
•Switches the user titles or track titles etc. while in the CD changer mode.
[T] button
•Use the button to input a title in the CD changer mode.
•Use the button to scroll the title during CD-text play or MD changer play in the CD changer mode.
[ |
|
] button |
|
• Plays or pauses a CD or MD.
[ |
], [ |
] buttons |
• Selects a track when listening to a disc.
[BND] button
• Plays a first track.
●When the TV is connected
For details, see the section “TV Operations”.
[SCN] button
•Performs preset scan while in the TV mode. When the button is pressed and held, auto store is performed.
[PRESET] knob
• Stores a station into memory or recall it directly.
[ |
], [ |
] buttons |
• Selects a station.
[BND] button
•Switches the band, or seek tuning or manual tuning.
5 |
ADZ625 |
6 |
ADZ625 |
ADZ625 |
7 |
5. CAUTIONS ON HANDLING
Handling Compact Discs
Use only compact discs bearing the
 mark.
mark.
Do not play heart-shaped, octagonal, or other specially shaped compact discs.
Handling
•New discs may have some roughness around the edges. If such discs
are used, the player may not work or the sound may skip. Use a ball-point pen or the like to remove any roughness from the edge of the disc.
•Never stick labels on the surface of the compact disc or mark the surface with a pencil or pen.
•Never play a compact disc with any cellophane tape or other glue on it or with peeling off marks.
If you try to play such a compact disc, you may not be able to get it back out of the CD player or it may damage the CD player.
•Do not use compact discs that have large scratches, are misshapen, cracked, etc. Use of such discs may cause misoperation or damage.
•To remove a compact disc from its storage case, press down on the center of the case and lift the disc out, holding it carefully by the edges.
Handling Cassette Tapes
•Do not use commercially available CD protection sheets or discs equipped with stabilizers, etc. These may damage the disc or cause breakdown of the internal mechanism.
Storage
•Do not expose compact discs to direct sunlight or any heat source.
•Do not expose compact discs to excess humidity or dust.
•Do not expose compact discs to direct heat from heaters.
Cleaning
•To remove fingermarks and dust, use a soft cloth and wipe in a straight line from the center of the compact disc to the circumference.
•Do not use any solvents, such as commercially available cleaners, anti-static spray or thinner to clean compact discs.
•After using special compact disc cleaner, let the compact disc dry off well before playing it.
Using any of the following types of cassette tapes can cause malfunctions.
•Cassette tapes with low recording levels
•Cassette tapes in which the unrecorded section between songs is shorter than 4 seconds
•Cassette tapes with noise or the like recorded between songs
•Cassette tapes on which there are long unrecorded sections in the middle of a song
Handling precautions
• Slack in the tape can cause malfunctions. In particular for prerecorded 
cassette tapes and 90minute tapes, take up any slack in the tape before inserting it into the
cassette player.
•Avoid using cassettes of 120 minutes or longer. (Such cassettes have extremely thin tape, so the tape can become stretched or cut.)
•Periodically play a cleaning cassette in the player to clean the head.
•Keep magnets, screwdrivers, and other iron and steel and magnetic items away from both cassette tapes and the tape head in the player.
•Do not oil the cassette mechanism.
•Do not use any cassette tapes with peeling labels or deformed cases. Such cassette tapes can cause breakdowns.
•When not using the player, always take the cassette out of the mechanism. Exposing a cassette to direct sunlight, extreme temperatures, or high humidity can damage the cassette.
ADZ625 9
6. REMOTE CONTROL
Receiver for remote control unit
Operating range: 30˚ in all directions
 Signal transmitter
Remote control unit
[FUNC]
[


 ]
]
[  ],[
],[  ]
]
[ ],[
],[  ] [BAND]
[ISR]
[MUTE] 

 [DISP] [PS/AS]

 [RDM]
[RDM]
[RPT]
Inserting the Batteries
1.Turn the remote control unit over, then slide the rear cover in the direction of the arrow.
2.Insert the AA (SUM-3, IECR-6/1.5V) batteries that came with the remote control unit facing in the directions shown in the figure, then close the rear cover.
Notes:
Using batteries improperly can cause them to explode. Take note of the following points:
•When replacing batteries, replace both batteries with new ones.
• Do not short-circuit, disassemble or heat batteries. |
Rear side |
•Do not dispose of batteries into fire or flames.
•Dispose of spent batteries properly.
AA (SUM-3, IECR-6/1.5V)
Batteries
Rear cover
10 ADZ625
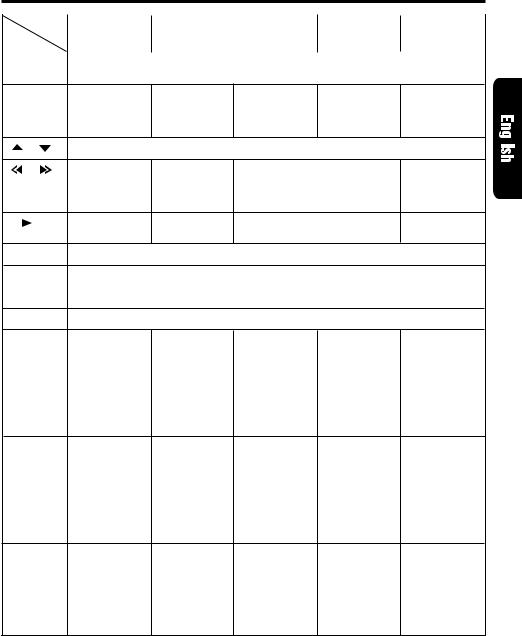
Functions of Remote Control Unit Buttons
|
|
Mode |
Radio |
Tape |
|
CD |
CD/MD |
TV |
|
|
||||
Button |
|
|
changer |
|
|
|||||||||
|
|
|
|
|
|
|
|
|||||||
|
|
|
|
|
|
|
|
|
||||||
[FUNC] |
|
Switches among radio, CD, Tape, CD changer, MD changer and TV. |
|
|
|
|||||||||
[BAND] |
|
Switches |
Switches the |
Plays the first |
Moves the next |
Switches |
|
|||||||
|
|
|
|
|
|
|
reception band. |
side of the tape. |
track. |
disc in |
reception band. |
|
||
|
|
|
|
|
|
|
|
|
|
Top play. |
increasing order. |
|
|
|
[ |
] , [ |
|
] |
Increases and decreases volume (in all modes). |
|
|
|
|
||||||
|
|
|
|
|
||||||||||
|
|
|
|
|||||||||||
[ |
] , [ |
|
] |
Moves preset |
Fast-forward and |
Moves tracks up and down. |
Moves preset |
|
||||||
|
|
|
|
|
|
|
channels up and |
rewinds tape. |
When pressed and held for 1 sec- |
channels up and |
|
|||
|
|
|
|
|
|
|
down. |
APC fast-forward |
ond: |
|
down. |
|
||
|
|
|
|
|
|
|
|
and rewind. |
Fast-forward/fast-backward. |
|
|
|
||
[ |
|
|
|
|
] |
|
No function. |
Switches between |
Switches between playback and |
No function. |
|
|||
|
|
|
|
|||||||||||
|
|
|
|
|
|
|
|
playback and pause. |
pause. |
|
|
|
|
|
[MUTE] |
|
Turns mute on and off. |
|
|
|
|
|
|||||||
|
[ISR] |
|
Recalls ISR radio station in memory. |
|
|
|
|
|
||||||
|
|
|
|
|
|
|
Press and hold for 2 seconds or longer: Stores current station into ISR memory |
|
||||||
|
|
|
|
|
|
|
(radio mode only). |
|
|
|
|
|
|
|
[DISP] |
|
Switches among main display, sub display and clock (CT) display. |
|
|
|
|||||||||
[SCN] |
|
Preset scan. |
Fast-forward |
Scan play. |
Scan play. |
Preset scan. |
|
|||||||
|
|
|
|
|
|
|
When pressed |
scan. |
|
When pressed |
When pressed |
|
||
|
|
|
|
|
|
|
and held for 2 |
|
|
|
and held for 1 |
and held for 2 |
|
|
|
|
|
|
|
|
|
seconds: Auto |
|
|
|
second: Disc |
seconds: Auto |
|
|
|
|
|
|
|
|
|
store. |
|
|
|
scan play. |
store. |
|
|
[RPT] |
No function |
Repeat play. |
Repeat play. |
Repeat play. |
No function. |
|
|
When pressed |
|
When pressed |
|
|
|
and held for 1 |
|
and held for 1 |
|
|
|
second: |
|
second: Disc |
|
|
|
Blank tape skip |
|
repeat play. |
|
|
|
function turns |
|
|
|
|
|
on and off. |
|
|
|
[RDM] |
No function |
Select Dolby |
Random play. |
Random play. |
Switches |
|
|
Noise Reduc- |
|
When pressed |
between TV and |
|
|
tion mode. |
|
and held for 1 |
VTR. |
|
|
|
|
second: Disc |
|
|
|
|
|
random play. |
|
* Some of the corresponding buttons on the main unit and remote control unit have different functions.
ADZ625 11
7. OPERATIONS
Basic Operations |
Note: Be sure to read this chapter referring to the front diagrams of |
chapter “3. CONTROLS” on page 5 (unfold). |
 CAUTION
Be sure to lower the volume before switching off the unit power or the ignition key. The unit remembers its last volume setting. If you switch the power off with the volume up, when you switch the power back on, the sudden loud volume may hurt your hearing and damage the unit.
The clock is displayed when the ignition key is turned to the ACC (accessory) or IGN (igni- tion-on) position even when the unit power is off. In some cars, the clock may momentarily disappear when the ignition key is turned to the START position. The clock will reappear after the engine has started and the ignition key is released to the IGN (ignition-on) position.
Turning on/off the power
Notes:
•Be careful about using this unit for a long time without running the engine. If you drain the car’s battery too far, you may not be able to start the engine and this can reduce the service life of the battery.
•System check
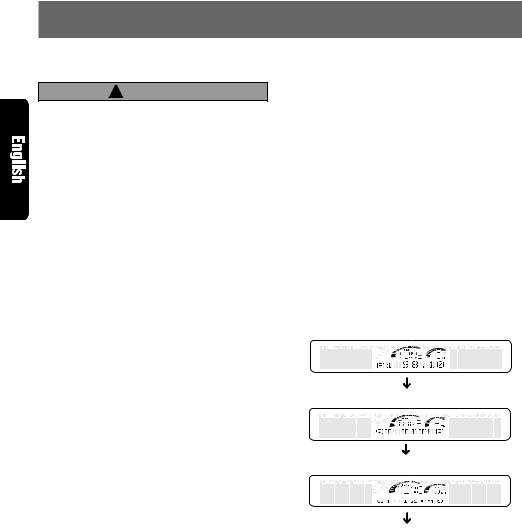
This unit checks what external equipment is connected to the CeNET. The first time the ACC/Ignition is turned on (initialization), “SYSTEM” and “Push PWR” alternately blink in the display. Press the [FNC] button to start the system check. When complete, press the [FNC] button again to activate the unit then the unit appears CHECKING COMPLETE.
Radio mode CD mode Tape mode
CD changer mode MD changer mode
TV mode AUX mode Radio mode...
External equipment not connected with CeNET is not displayed.
Adjusting the volume
Turn the [VOLUME] knob clockwise to increase the volume, or turn the [VOLUME] knob counterclockwise to decrease the volume.
The volume level is from 0 (minimum) to 33 (maximum).
Switching the display
Press the [DISP] button to select the desired display.
Each time you press the [DISP] button, the display switches in the following order:
Main display
Sub (title) display
Clock(CT) display
1.Press the [FNC] button.
2.The illumination and display on the unit light up. The unit automatically remembers its last operation mode and will automatically switch to display that mode.
3.Press and hold the [FNC] button for 1 second or longer to turn off the power for the unit.
Selecting a mode
1.Press the [FNC] button to change the mode of operation.
2.Each time you press the [FNC] button, the mode of operation changes in the following order:
Main display
Once selected, the preferred display becomes the display default. When a function adjustment such as volume is made, the screen will momentarily switch to that function’s display, then revert back to the preferred display several seconds after the adjustment.
When you have entered a title in a CD, it appears in the sub display. If you have not entered a title, “NO-TTL” appears in the title display instead. For information on how to enter a title, refer to the subsection “Entering titles” in the “Operations Common to Each Mode”.
You can adjust the way of scrolling a title. For the details on it, refer to the subsection “Adjusting the way of scrolling” in the “Operations Common to Each Mode”.
12 ADZ625

Basic Operations
Adjusting the bass
1.Press the [A] button and select “BASS”.
2.Turn the [VOLUME] knob clockwise to emphasize the bass, or turn the [VOLUME] knob counterclockwise to attenuate the bass.
The factory default setting is “0”. (Adjustment range: −6 to +6)
3.When the adjustment is complete, press the [A] button several times until the function mode is reached.
Adjusting the treble
1.Press the [A] button and select “TREB”.
2.Turn the [VOLUME] knob clockwise to emphasize the treble, or turn the [VOLUME] knob counterclockwise to attenuate the treble.
The factory default setting is “0”. (Adjustment range: −6 to +6)
3.When the adjustment is complete, press the
[A] button several times until the function mode is reached.
Turning on/off the loudness
The loudness effect emphasizes the bass and treble to create a natural sound tone. When you are listening to music at a low volume, it is recommended to use the loudness effect.
1.Press and hold the [A] button for 1 second or longer to turn on the loudness effect. When the loudness effect is turned on, “LOUD” lights in the display.
2.Press and hold the [A] button for 1 second or longer to turn off the loudness effect. “LOUD” goes off in the display.
Adjusting the balance
1.Press the [A] button and select “BAL”.
2.Turn the [VOLUME] knob clockwise to emphasize the sound from the right speaker, or turn the [VOLUME] knob counterclockwise to emphasize the sound from the left speaker.
The factory default setting is “0”. (Adjustment range: L13 to R13)
3.When the adjustment is complete, press the [A] button several times until the function mode is reached.
Adjusting the fader
1.Press the [A] button and select “FAD”.
2.Turn the [VOLUME] knob clockwise to emphasize the sound from the front speakers, or turn the [VOLUME] knob counterclockwise to emphasize the sound from the rear speakers.
The factory default setting is “0”. (Adjustment range: F12 to R12)
3.When the adjustment is complete, press the [A] button several times until the function mode is reached.
ADZ625 13
Radio Operations
FM reception
For enhanced FM performance the


 ® tuner includes signal actuated stereo control and Multipath noise reduction circuits.
Changing the reception area
This unit is initially set to USA frequency intervals of 10kHz for AM and 200kHz for FM. When using it outside the USA, the frequency reception range can be switched to the intervals below.
Setting the reception area
1.Press the [FNC] button and select the radio mode (FM or AM).
2.While pressing the [DISP] button, each time you press and hold the [SPE/ANA] button for 2 seconds or longer, the reception area switches from inside the USA to outside the
USA or from outside the USA to inside the USA.
Any station preset memories are lost when the reception area is changed.
Listening to the radio
1.Press the [FNC] button and select the radio mode.
2.Press the [BND] button and select the radio band. Each time the button is pressed, the radio reception band changes in the following order:
FM1 FM2 FM3 AM FM1...
3. Press the [ |
] button or the [ |
] button to |
tune in the desired station. |
|
|
Tuning
There are 3 types of tuning mode available, seek tuning, manual tuning and preset tuning.
Seek tuning
1.Press the [BND] button and select the desired band (FM or AM).
If “MANU” is lit in the display, press and hold the [BND] button for 1 second or longer. “MANU” in the display goes off and seek tuning is now available.
2. Press the [ |
] button or the [ |
] button to |
|
automatically seek to the next station. |
|||
When the [ |
] button is pressed, the sta- |
||
tion is sought in the direction of higher fre- |
|||
quencies; if the [ |
] button is pressed, the |
||
station is sought in the direction of lower frequencies.
Manual tuning
There are 2 ways available: Quick tuning and step tuning.
When you are in the step tuning mode, the frequency changes one step at a time. In quick tuning mode, you can quickly tune the desired frequency.
1.Press the [BND] button and select the desired band (FM or AM).
If “MANU” is not lit in the display, press and hold the [BND] button for 1 second or longer. “MANU” lights in the display and manual tuning is now available.
2.Tune into a station.
Quick tuning:
Press and hold the [ ] button or the [ ] button for 1 second or longer to manually tune to the desired frequency.
Step tuning: |
|
|
Press the [ |
] button or the [ |
] button to |
manually tune one step at a time to the desired frequency.
Storing a preset station
A total of 24 preset positions (6-FM1, 6-FM2, 6-
FM3, 6-AM) exists to store individual radio stations in memory.
Manual memory
1.Select the desired station with seek tuning, manual tuning or preset tuning.
2.Press the [M] button.
“CH” is lit in the display.
3.Turn the [PRESET] knob either clockwise or counterclockwise to select the desired preseet memory.
4.Press and hold the [M] button for 2 seconds or longer to store that station into preset memory.
Auto store
Auto store selects up to 6 stations and automatically stores them into preset memory. If auto store cannot tune in all six stations, then it stores the strongest stations into memory and the other presets untouched.
1.Press the [BND] button and select the desired band (FM or AM).
2.Press and hold the [SCN] button for 2 seconds or longer. The stations with good reception are stored automatically to the preset memory.
14 ADZ625
Radio Operations
Recalling a preset station
Turn the [PRESET] knob either clockwise or counterclockwise to recall the stored radio frequency automatically.
1.Press the [BND] button and select the desired band (FM1, FM2, FM3 or AM).
2.Turn the [PRESET] knob either clockwise or counterclockwise to recall the stored station.
Preset scan
Preset scan receives the stations stored in preset memory in order. This function is useful when searching for a desired station in memory.
1.Press the [SCN] button.
2.When a desired station is tuned in, press the [SCN] button again to continue receiving that station.
Note:
•Be careful not to press and hold the [SCN] button for 2 seconds or longer, otherwise the auto store function engages and the unit starts storing stations.
Instant station recall (ISR)
Instant station recall is a special radio preset that instantly accesses a favorite radio station at a touch of a button. The ISR function even operates with the unit in other modes.
● ISR memory
1.Select the station that you wish to store in ISR memory.
2.Press and hold the [ISR] button for 2 seconds or longer.
● Recalling a station with ISR
In any mode, press the [ISR] button to turn on the radio function and tune the selected radio station. “ISR” appears in the display. Press the [ISR] button again to return to the previous mode.
CD Operations
Loading a CD
Insert a CD into the center of the insertion slot with the label side facing up. The CD plays automatically after loading.
Notes:
•Never insert foreign objects into the CD insertion slot.
•When a CD is loaded in the unit, never try to insert another CD in this case.
•Discs not bearing the
 mark and CD-ROMs cannot be played by this unit.
•Some CDs recorded in CD-R mode may not be usable.
•Even when recorded in CD-RW mode, some CDs not be usable.
Listening to a CD already inserted
Press the [FNC] button to select the CD mode.
Play starts automatically. If no CD is loaded in the unit, “NO DISC” appears in the display.
Pausing play
1. |
Press the [ |
|
] button to pause play. |
||
|
“PAUSE” appears in the display. |
|
|
||
2. |
To resume CD play, press the [ |
|
] button |
||
|
|||||
|
again. |
|
|
|
|
Displaying CD titles
This unit can display title data for user titles input with this unit.
Press the [DISP] button to display the title.
Notes:
•Titles of CD-text CDs cannot be displayed with this unit.
•If the CD playing is a CD-text CD or no user title has been input, “T NOTTL” appears in the display.
Ejecting a CD
Press [CD EJECT] button to eject the CD. Take it out from the ejected position.
If a 5" CD (12 cm) is left in the ejected position for 15 seconds, the CD is automatically reloaded (Auto reload).
3" CDs (8 cm) are not auto reloaded. Be sure to remove it when ejected.
Notes:
•If you force a CD into before auto reloading, this can damage the CD.
The radio mode is selected automatically 4 seconds after the [CD EJECT] button is pressed.
ADZ625 15

CD Operations
Selecting a track |
Repeat play |
● Track-up
1.Press the [ ] button to move ahead to the beginning of the next track.
2.Each time you press the [ ] button, the track advances ahead to the beginning of the next track.
● Track-down
1.Press the [ ] button to move back to the beginning of the current track.
2.Press the [ ] button twice to move to the beginning of the previous track.
Fast-forward/fast-backward
● Fast-forward
Press and hold the [ ] button for 1 second or longer.
● Fast-backward
Press and hold the [ ] button for 1 second or longer.
The repeat play continuously plays the current track. This function continues automatically until it is canceled.
1.Press the [RPT] button. “T-REPEAT” lights in the display and the current track is repeated.
2.To cancel the repeat play, press the [RPT] button again. “T-REPEAT” goes off from the display and normal play resumes.
Random play
The random play selects and plays individual tracks on a disc in no particular order. This function continues automatically until it is canceled.
1.Press the [RDM] button. “T-RANDOM” lights in the display, an individual track is selected randomly and play begins.
2.To cancel the random play, press the [RDM] button again. “T-RANDOM” goes off from the display and normal play resumes.
Top function
The top function resets the CD player to the first track of the disc. Press the [BND] button to play the first track (track No. 1) on the disc.
Scan play
The scan play locates and plays the first 10 seconds of each track on a disc automatically. This function continues on the disc until it is canceled.
The scan play is useful when you want to select a desired track.
1.Press the [SCN] button to start track scanning. “T-SCAN” lights in the display.
2.To cancel the scan play, press the [SCN] button again. “T-SCAN” goes off from the display and the current track continues to play.
16 ADZ625

Tape Operations
Loading a tape
Load a tape into the cassette tape insertion slot.
“LOADING” appears in the display and starts playing.
When a metal or chrome bias (70 sec) tape is inserted, the metal bias setting is selected automatically.
The cassette tape slot door shuts automatically after inserting or ejecting a tape (“Auto shut door function”). It protects the tape mechanism from any dust.
Listening to a tape already inserted
Press the [FNC] button to select the tape mode. Play starts automatically. If no tape is loaded in the unit, “NO CASS” appears in the display.
Pausing play
1.Press the [  ] button to pause play.
“PAUSE” appears in the display.
2. To resume tape play, press the [ |
] button |
again. |
|
Ejecting a tape
Press the [TAPE EJECT] button to eject a tape.
Take it out from the ejected position.
The radio mode is selected automatically 4 seconds after the [TAPE EJECT] button is pressed.
Switching to the other side of the tape
Press the [BND] button to change tape direction and playback.
The tape mechanism automatically reverses direction and engage playback at the end of the tape (auto reverse).
Fast-forward/fast-backward
● Fast-forward
Press the [ |
|
] button. |
● Fast-backward |
||
Press the [ |
|
] button. |
● Canceling FF/REW |
||
Press the [ |
|
] button. |
|
||
●Listening to another source while using FF or REW (“monitor mode”)
To listen to the CD, CD/MD changer or AM/FM tuner while the mechanism searches, press the [FNC] button to select the desired mode. The mechanism will stop automatically when the end of the tape is reached.
Note:
•Use the [FNC] button and select the tape function to resume tape playback.
APC (Auto Program Control) function
The APC function allows the tape to skip forward to the beginning of the next track or rewind to the start of the current track.
●Skipping forward to the next track (“APCFF”)
During tape playback, press the [ ] button twice to fast-forward to the next track. The next track stars playing.
●Skipping backward to the current track (“APC-REW”)
During tape playback, press the [ ] button twice to rewind to the start of the current track.
The current track plays from the beginning.
● Canceling FF/REW APC to resume playback
Press the [
 ] button.
●Listening to another source while using APC (“monitor mode”)
To listen to the CD, CD/MD changer or AM/FM tuner while the mechanism searches, press the [FNC] button to select the desired mode. The mechanism will stop automatically when it finds the next track (in FF APC) or the start of the current track (in REW APC).
Note:
•Use the [FNC] button and select the tape function to resume tape playback.
Dolby noise reduction system
The Dolby noise reduction system increases the volume level of high frequency sounds during recording and sets it back to their original level during play. This system reduces hissing noise which is typical of cassette tapes.
Dolby noise reduction manufactured under license from Dolby Laboratories Licensing Corporation. Dolby and the double-D symbol are trademarks of Dolby Laboratories Licensing Corporation.
Press the [RDM] button to select Dolby noise reduction. “B NR” lights in the display. Each time you press the [RDM] button, the Dolby toggles between B NR and OFF.
ADZ625 17

Tape Operations
Intro tape scan play
The intro tape scan allows the first 10 seconds of all the tracks on the tape to be played. This function continues on the tape until it is canceled.
1.Press the [SCN] button to start Intro tape scan.
“SCAN” lights in the display.
2.To cancel the intro tape scan, press the [SCN] button again. “SCAN” goes off from the display and the current track continues to play.
When the end of the tape is reached during the intro tape scan, the tape mechanism automatically reverses direction and continues the intro tape scan.
If you select another mode during the intro tape scan, the mechanism automatically makes the intro tape scan stop when it finds the next track (APC function).
Tape repeat play
The tape repeat continuously plays the current track. This function continues automatically until it is canceled.
1.Press the [RPT] button. “REPEAT” lights in the display and the current track is repeated.
2.To cancel the repeat play, press the [RPT] button again. “REPEAT” goes off from the display and normal play resumes.
Blank tape skip
The blank tape skip allows you to skip blank sections of tape that are over 12 seconds long.
1.Press and hold the [RPT] button for 1 second or longer. “BLS” lights in the display and the mechanism fastforward to the next track selection.
2.To cancel the blank tape skip, press and hold the [RPT] button again. “BLS” goes off and normal play resumes.
Notes:
The APC, intro tape scan, tape repeat and blank skip may not work properly with tapes of the following qualities:
•Tapes on which the recording level is too low.
•Tapes on which there is much noise between selections.
•Tapes on which there are long pauses in the middle of selections.
•Tapes on which there are less than 4 seconds of blank space between selections.
18 ADZ625

DSP/EQ Operations
Select DSP Menu
About DSP functions:
The Digital Sound Processor use digital signal processing to allow the creation of simulated audio environments inside your car, without degradation of the sound.
1.Press the [DSP] button. The DSF indicator will flash.
2.Turn the [PRESET] knob either clockwise or counterclockwise to select the DSP menu.
● DSP menus
STADIUM : Large stadium without roof or walls.
HALL |
: Large concert hall. |
CLUB |
: Club with strong bass. |
CHURCH : Church with a vaulted ceiling.
L-ROOM : Listening room in a home.
3.Press the [DSP] button to return to the original mode.
To set DSP effects to ON/OFF
Hold the [DSP] button depressed for 1 second or more.
Each time the [DSP] button is held depressed, the function alternates between ON and OFF.
When the DSP function is ON, the DSF indicator lights.
To adjust EFFECTS
About sound effects:
“Effects” refers to the characteristic reverberations and echoes that occur when sound is bounced off walls or other surfaces. This unit allows the amount of echo or reverberation to be adjusted.
1.Press the [DSP] button. The DSF indicator flashes.
2.Turn the [PRESET] knob either clockwise or counterclockwise to select the desired DSP menu adjust item.
3.Hold the [T] button depressed for 1 second or more.
4.Turn the [VOLUME] knob either clockwise or counterclockwise to adjust the effect.
•The amount of effect added can be adjusted within the range 0-70%.
5.Press the [T] button to return to the DSP menu. The selected DSP menu will appear.
6.Press the [DSP] button to return to the original mode.
Selecting the EQ menu
About the EQ function:
The Equalizer allows correction and modification of the frequency response for selected frequency ranges, thus allowing the creation of your own unique sound.
1.Press the [EQ] button.
2.Turn the [PRESET] knob either clockwise or counterclockwise to select the desired EQ menu.
● EQ menus
IMPACT : Low and high frequencies emphasized.
B-BOOST : Low frequencies emphasized.
ACOUSTIC : Medium frequencies (vocals)
|
emphasized. |
FLAT |
: Original sound. |
3.Press the [EQ] button to return to the original mode.
Setting EQ effects to ON/OFF
Hold the [EQ] button depressed for 1 second or more.
Each time the [EQ] button is held depressed in this way, the function alternates between ON and
OFF. When the EQ function is enabled (ON), the
G.EQ indicator lights.
ADZ625 19
Operation Common to Each Mode
Setting the clock
1.Press and hold the [T] button for 1 second or longer to switch to the adjustment selection display.
2. |
Press the [ |
|
|
|
] button or the [ |
] button to |
|
select “CLOCK_ _E”. |
|
||||
3. |
Press the [ |
|
|
|
] button. |
|
|
|
|
||||
4. |
Press the [ |
|
|
|
] button or the [ |
] button to |
select the hour or the minute.
5.Turn the [VOLUME] knob either clockwise or counterclockwise to set the correct time.
The clock is displayed in 12-hour format.
6. Press the [ |
] button to store the time into |
memory. |
|
7.Press the [T] button to return to the previous mode.
Note:
•You cannot set the clock when it is displayed with only the ignition on. If you drain or remove the car’s battery or take out this unit, the clock is reset. While setting the clock, if another button or operation is selected, the clock set mode is canceled.
Switching the spectrum analyzer display patterns
You can select one out of 8 patterns or set it to off.
The factory default setting is “PATTERN 1”.
Each time you press the [SPE/ANA] button, the spectrum analyzer display pattern changes in the following order:
PATTERN 1 PATTERN 2 PATTERN 3
PATTERN 4 PATTERN 5 PATTERN 6
PATTERN 7 SCAN OFF PATTERN 1...
Note:
The spectrum analyzer display is unavailable during these operations below;
•Seek tuning and auto store in radio mode.
•Mute or pause.
•When “NO DISC” or an error message appears in the display.
Setting the sensitivity of the spectrum analyzer
The factory default setting is “MID”.
1.Press and hold the [T] button for 1 second or longer to switch to the adjustment selection display.
2. Press the [ ] button or the [ ] button to select “ANA SENS”.
3.Turn the [VOLUME] knob either clockwise or counterclockwise to set the sensitivity of the spectrum analyzer.
You can choose one of “LOW”, “MID” or “HIGH” for the sensitivity of the spectrum analyzer.
4.Press the [T] button to return to the previous mode.
Setting the speed of the spectrum analyzer display
The factory default setting is “HIGH”.
1.Press and hold the [T] button for 1 second or longer to switch to the adjustment selection display.
2.Press the [ ] button or the [
 ] button to select “ANA SPD”.
3.Turn the [VOLUME] knob either clockwise or counterclockwise to set the speed of the spectrum analyzer display.
You can choose one of “LOW”, “MID” or
“HIGH” for the speed of the spectrum analyzer display.
4.Press the [T] button to return to the previous mode.
Entering titles
Titles up to 10 characters long can be stored in memory and displayed for radio or TV stations and CDs. The numbers of titles that can be entered for each mode are as follows.
Mode |
Number of titles |
Radio mode |
30 titles |
CD mode |
100 titles |
TV mode |
15 titles |
CD changer mode |
Number of titles |
CDC655z connected |
60 titles |
CDC655Tz connected |
100 titles |
CDC1255z connected |
50 titles |
1.Press the [FNC] button to select the mode you want to enter a title. (radio, CD, CD changer or
TV)
Titles cannot be entered for MDs with this unit.
2.Select and play a CD or a CD in the CD changer, or tune to an appropriate TV or radio station.
3.Press the [DISP] button and display the title.
4.Press the [T] button. “TITL” appears in the display and the cursor position flashes.
20 ADZ625
Operation Common to Each Mode
5. Press the [ |
] button or the [ |
] button to |
move the cursor. |
|
|
6.Press the [DISP] button to select a character. Each time you press the [DISP] button, the character changes in the following order:
Capital letters Small letters Numbers/ Symbols Capital letters...
7.Turn the [VOLUME] knob either clockwise or counterclockwise to select the desired
character. Pressing the [ ] button moves the cursor to the next character; pressing the
[ ] button moves the cursor to the previous character.
8.Repeat steps 5 to 7 to enter up to 10 characters for the title.
9. Press and hold the [ 
 ] button for 2 seconds or longer to store the title into memory and cancel title input mode.
Clearing titles
1.Play a CD or a CD in a CD changer, or tune a radio station or TV station that you want to clear the title for.
2.Press the [DISP] button and display the subtitle.
3.Press the [T] button. “TITL” appears in the display and the display switches to the title input display.
4.Press the [BND] button.
5. Press and hold the [ 
 ] button for 2 seconds or longer to clear the title and cancel the title input mode.
Clock function
Time matching
Regarding the “CLOCK INDICATION”...
The unit indicates the clock when the car engine is running (when ACC is ON).
The clock is of 12-hour indication.
1.Press the [T] button continuously (for about 1 second). “ANA_SENS” is indicated.
2. |
Press the [ |
|
] button or the [ |
] button |
|
|
|||||
|
and select “CLOCK_ _E” |
|
|
||
3. |
Press the [ |
|
] button to indicate the clock. |
|
|
|
|
||||
The clock indicates “AM 12:00” and turns to the “time setting” mode.
4. |
Press the [ |
|
] button or the [ |
] button |
|
and select “HOUR” or “MINUTE” may adjust |
|||
|
items which are flashing. |
|
||
5. |
Press the [ |
|
] button or the [ |
] button |
|
and match the time. |
|
||
6. |
Press the [ |
|
] button. |
|
|
|
|||
7.Press the [T] button.
The unit returns to the original indication.
Triggered audio mute for cellular telephones
This unit requires special wiring to mute the audio signal automatically when a cellular telephone rings in the car.
This function is not compatible with all cellular telephones. Contact your local authorized Clarion dealer for information on proper installation and compatibility.
Message display
When the unit is powered on or off, a message is displayed. The user can turn this message display on or off.
The factory default setting is “ON”.
1.Press and hold the [T] button for 1 second or longer to switch to the adjustment selection display.
2. Press the [ ] button or the [ ] button to select “MESSAGE”.
3.Turn the [VOLUME] knob clockwise to set the message display to “ON”, or turn the [VOLUME] knob counterclockwise to set the message display to “OFF”.
4.Press the [T] button to return to the previous mode.
Adjusting the way of title scrolling
There are 3 ways for scrolling a title in the display. You can select the way you prefer.
The factory default setting is “AUTO”.
1.Press and hold the [T] button for 1 second or longer to switch to the adjustment selection display.
2. Press the [ ] button or the [ ] button to select “SCROLL”.
3.Turn the [VOLUME] knob to change the display. Each time the [VOLUME] knob is turned either clockwise or counterclockwise, the display changes between the 2 display methods available.
4.Press the [T] button to return to the previous mode.
ADZ625 21

8. OPERATIONS OF ACCESSORIES
CD/MD Changer Operations
CD/MD changer functions
When an optional CD/MD changer is connected through the CeNET cable, this unit controls all
CD/MD changer functions. This unit can control a total of 2 changers (MD and/or CD).
Press the [FNC] button and select the CD(MD) changer mode to start play. If 2 CD(MD) changers are connected, press the [FNC] button to select the CD(MD) changer for play.
If “NO MAGA” appears in the display, insert the magazine into the CD changer. “CHECK” appears in the display while the player loads (checks) the magazine.
If “NO DISC” appears in the display, eject the magazine and insert discs into each slot. Then, reinsert the magazine back into the CD changer.
If “NO DISC” appears in the display, load MDs into the MD changer.
•If a CD-text CD is not input its disc title or a track title, “TEXTDTTL” or “TEXTTTTL” appears in the display.
Switching disc titles and track titles (MD)
This unit can display disc titles and track titles already entered on MDs. Titles up to 128 characters long can be displayed by scrolling the titles.
Titles cannot be entered for MDs with this unit.
1.Press the [DISP] button to display the title.
The disc title or track title is displayed.
2.Each time you press and hold the [DISP] button for 1 second or longer, the display toggles between the disc title and the track title.
Note:
•If an MD is not input its disc title or a track title,“D TITLE” or “T TITLE” appears in the display.
 CAUTION
CD-ROM discs and CD-R discs cannot be played in the CD changer.
Pausing play
1.Press the [
 ] button to pause play. “PAUSE” appears in the display.
2.To resume play, press the [
 ] button again.
Displaying CD titles
This unit can display title data for CD-text CDs and user titles input with this unit.
Title data for CD-text CDs can be displayed with this unit only when it is connected to CDC655Tz.
● When connected to CDC655z or CDC1255z
Press the [DISP] button to display the title.
● When connected to CDC655Tz
1.Press the [DISP] button to display the title.
2.Each time you press and hold the [DISP] button for 1 second or longer, the title display changes in the following order:
User title (disc) CD-text title (disc) CD-
text title (track) user title (disc)...
Notes:
•If the CD playing is not a CD-text CD or no user title has been input, “USER TTL” appears in the display.
Procedure to scroll a title
Set “AUTO SCROLL” to “AUTO” or “OFF”. (The factory default setting is “AUTO”. Refer to subsection “Adjusting the way of title scrolling” in section “Operations Common to Each Mode”.)
● When set to “AUTO”
The title is automatically kept scrolling.
● When set to “OFF”
Press the [T] button to scroll the title.
Selecting a CD/MD
Turn the [PRESET] knob either clockwise or counterclockwise to select a CD or MD.
Use to select the number of the disc loaded, and to start play.
Selecting a track
● Track-up
1.Press the [ ] button to move ahead to the beginning of the next track.
2.Each time you press the [ ] button, the track advances ahead to the beginning of the next track.
● Track-down
1.Press the [ ] button to move back to the beginning of the current track.
2.Press the [ ] button twice to move to the beginning of the previous track.
22 ADZ625

CD/MD Changer Operations
Fast-forward/fast-backward |
Disc repeat play |
● Fast-forward
Press and hold the [ ] button for 1 second or longer.
● Fast-backward
Press and hold the [ ] button for 1 second or longer.
Scan play
The scan play locates and plays the first 10 seconds of each track on a disc automatically. This function continues on the disc until it is cancelled.
After all the tracks on the current disc have been played, the disc repeat play automatically replays the current disc over from the first track. This function continues automatically until it is cancelled.
1.Press and hold the [RPT] button for 1 second or longer. “


 ” and “D-REPEAT” light in the display and the disc repeat play starts.
2.To cancel the disc repeat play, press and hold the [RPT] button again. “


 ” and “D- REPEAT” go off from the display and normal play resumes on the current track.
The scan play is useful when you want to select a desired track.
1.Press the [SCN] button to start track scanning. “T-SCAN” lights in the display.
2.To cancel the scan play, press the [SCN] button again. “T-SCAN” goes off from the display and the current track continues to play.
Disc scan play
The disc scan play locates and plays the first 10 seconds of the first track on each disc in the currently selected CD/MD changer. This function continues automatically until it is cancelled.
The disc scan play is useful when you want to select a desired CD/MD.
1.Press and hold the [SCN] button for 1 second or longer. “


 ” and “D-SCAN” light in the display and the disc scan play starts.
2.To cancel the disc scan play, press the [SCN] button again. “


 ” and “D-SCAN” go off from the display and the current track continues to play.
Random play
The random play selects and plays individual tracks on the disc in no particular order. This function continues automatically until it is cancelled.
1.Press the [RDM] button. “T-RANDOM” lights in the display and the random play begins.
2.To cancel the random play, press the [RDM] button again. “T-RANDOM” goes off from the display and normal play resumes.
Disc random play
The disc random play selects and plays individual tracks or discs automatically in no particular order. This function continues automatically until it is cancelled.
1.Press and hold the [RDM] button for 1 second or longer. “


 ” and “D-RANDOM” light in the display and the disc random play starts.
2.To cancel the disc random play, press and hold the [RDM] button again. “


 ” and “D- RANDOM” go off from the display and normal play resumes from the current track.
Repeat play
The repeat play continuously plays the current track. This function continues automatically until it is cancelled.
1.Press the [RPT] button. “T-REPEAT” lights in the display and the current track is repeated.
2.To cancel the repeat play, press the [RPT] button again. “T-REPEAT” goes off from the display and normal play resumes.
ADZ625 23
TV Operations
TV tuner functions
When an optional TV tuner is connected through the CeNET cable, this unit controls all TV tuner functions. To watch TV requires a TV tuner and monitor.
Watching a TV
1.Press the [FNC] button and select the TV mode.
2.Press the [BND] button to select the desired
TV band (TV1 or TV2). Each time the button is pressed, the input selection toggles between TV1 and TV2.
3.Press the [ ] button or the [
 ] button to tune in the desired TV station.
Watching a video
The TV tuner has a VTR input terminal to which
1 external device can be connected. Connect a 12 V video cassette player (VCP) or video cassette recorder (VCR) to the TV tuner input terminal.
1.Press the [RDM] button to select VTR.
2.To return to the TV broadcast, press the [RDM] button.
Tuning
There are 3 types of tuning mode available, Seek tuning, manual tuning and preset tuning.
Seek tuning
1.Press the [BND] button and select the desired
TV band (TV1 or TV2).
If “MANU” is lit in the display, press and hold the [BND] button for 1 second or longer. “MANU” in the display goes off and seek tuning is now available.
2.Press the [ ] button or the [
 ] button to automatically seek a station. Press the [
 ] button to automatically tune up the frequency band to the next available TV station; press the [
 ] button to automatically tune down.
Manual tuning
There are 2 ways available: Quick tuning and step tuning.
When you are in the step tuning mode, the frequency changes one step at a time. In quick tuning mode, you can quickly tune the desired frequency.
1.Press the [BND] button and select the desired band (TV1 or TV2).
If “MANU” is not lit in the display, press and hold the [BND] button for 1 second or longer. “MANU” lights in the display and manual tuning is now available.
2.Tune into a station.
● Quick tuning:
Press and hold the [ ] button or the [ ] button for 1 second or longer to tune in a station.
● Step tuning:
Press the [ |
] button or the [ |
] button to |
manually tune in a station. |
|
|
Recalling a preset station
A total of 12 TV stations can be stored (6-TV1 and 6-TV2). This allows you to select your favorite TV stations and store them in memory for later recall.
1.Press [BND] button and select the desired TV band (TV1 or TV2).
2.To recall a stored TV station, turn the [PRESET] knob either clockwise or counterclockwise to select that station.
Manual memory
1.Select the desired station with seek tuning, manual tuning or preset tuning.
2.Press the [M] button.
“CH” is lit in the display.
3.Turn the [PRESET] knob either clockwise or counterclockwise to select the desired preseet memory.
4.Press and hold the [M] buttos for 2 seconds or longer to store that station into preset memory.
24 ADZ625
TV Operations
Auto store
Auto store selects 6 TV stations automatically and stores each one into a preset memory.
If there are not 6 stations with good reception, stations previously stored in memory remain and only the strong stations are stored into memory.
1.Press the [BND] button and select the desired
TV band (TV1 or TV2).
2.Press and hold the [SCN] button for 2 seconds or longer. The stations with good reception are stored automatically to the preset memory.
Preset scan
Preset scan allows the user to view each preset position before it automatically advances to the next preset. This function is useful for searching for desired TV station in memory.
1.Press the [SCN] button.
2.When the desired station is found, press the
[SCN] button again to remain tuned to that station.
Note:
•Do not press and hold the [SCN] button for 2 seconds or longer. Doing so will trigger the auto store function and start storing stations into memory.
Setting the TV diver
You can change the reception setting for the TV antenna connected to the TV tuner.
1.Press and hold the [T] button for 1 second or longer to switch to the adjustment selection display.
2.Press the [ ] button or the [
 ] button to select “TV DIVER”.
3.Turn the [VOLUME] knob clockwise to set to “ON” or counterclockwise to set to “OFF”.
● ON:
Sets reception emphasizing the visual.
● OFF:
Sets the diver setting to OFF.
4.Press the [T] button to return to the previous mode.
ADZ625 25
9. IN CASE OF DIFFICULTY
General
CD
Tape
Problem |
Cause |
|
|
Measure |
|||||||
Power does not turn |
Fuse is blown. |
Replace with a fuse of the same amperage. If |
|||||||||
on. |
|
the fuse blows again, consult your store of pur- |
|||||||||
(No sound is pro- |
|
chase. |
|||||||||
duced.) |
|
|
|
|
|
|
|
|
|
|
|
Incorrect wiring. |
Consult your store of purchase. |
||||||||||
|
|||||||||||
|
|
|
|
|
|
|
|
||||
No sound output |
Power antenna lead is shor- |
1. Turn the unit off. |
|||||||||
when operating the |
ted to ground or excessive |
2. Remove all wires attached to the power anten- |
|||||||||
unit with amplifiers or |
current is required for re- |
na lead. Check each wire for a possible short |
|||||||||
power antenna at- |
mote-on the amplifiers or |
to ground using an ohm meter. |
|||||||||
tached. |
power antenna. |
3. Turn the unit back on. |
|||||||||
|
|
4. Reconnect each amplifier remote wire to the |
|||||||||
|
|
power antenna lead one by one. If the amplifi- |
|||||||||
|
|
ers turn off before all wires are attached, use |
|||||||||
|
|
an external relay to provide remote-on voltage |
|||||||||
|
|
(excessive current required). |
|||||||||
|
|
|
|
|
|
|
|
||||
Nothing happens |
The microprocessor has |
Press the reset button with a thin rod. |
|||||||||
when buttons are |
malfunctioned due to noise, |
|
|
|
|
|
|
|
|
|
|
pressed. |
etc. |
|
|
|
|
|
|
|
|
|
|
Display is not accu- |
|
|
Reset button |
||||||||
rate. |
|
|
|
|
|
|
|
|
|
|
|
|
|
|
|
|
|
|
|
|
|
|
|
|
|
|
|
|
|
|
|
|
|
|
|
|
|
|
|
|
|
|
|
|
|
|
|
|
|
|
|
|
|
|
|
|
|
|
|
|
Compact disc cannot |
Another compact disc is al- |
Eject the compact disc before loading the new |
|
be loaded. |
ready loaded. |
one. |
|
|
|
|
|
Sound skips or is noi- |
Compact disc is dirty. |
Clean the compact disc with a soft cloth. |
|
sy. |
|
|
|
|
|
|
|
|
Compact disc is heavily |
Replace with a compact disc with no scratches. |
|
|
scratched or warped. |
|
|
|
|
|
|
Sound is bad directly |
Water droplets may form on |
Let dry for about 1 hour with the power on. |
|
after power is turned |
the internal lens when the |
|
|
on. |
car is parked in a humid |
|
|
|
place. |
|
|
Sound quality is poor. |
Playback head is dirty. |
Use a cleaning tape, etc., to clean the head. |
|
|
|
|
|
|
[RDM] button is not pres- |
When listening to a tape recorded with Dolby |
|
|
sed. |
NR, press [RDM] button and select B NR. |
26 ADZ625

10. ERROR DISPLAYS
If an error occurs, one of the following displays is displayed.
Take the measures described below to eliminate the problem.
|
Error Display |
Cause |
Measure |
|
|
|
|
|
|
|
|
|
ERROR 2 |
A CD is caught inside the CD deck and is |
This is a failure of CD deck’s mechanism |
|
|
|
|
not ejected. |
and consult your store of purchase. |
|
|
|
|
|
|
|
|
|
ERROR 3 |
A CD cannot be played due to scratches, |
Replace with a non-scratched, |
|
|
CD |
|
etc. |
non-warped-disc. |
|
|
|
|
|
|
|
|
|
|
|
|
|
|
|
ERROR 6 |
A CD is loaded upside-down inside the |
Eject the disc then reload it properly. |
|
|
|
|
CD deck and does not play. |
|
|
|
|
|
|
|
|
|
|
ERROR 1 |
Tape cannot be played due to defective |
Eject the tape then replace it with a new |
|
|
|
|
tape such as cut tape. |
one. |
|
|
|
|
|
|
|
|
|
ERROR 2 |
Tape is caught and cannot be played. |
Remove the caught or wound tape. |
|
|
Tape |
|
|
|
|
|
ERROR 4 |
Tape mode cannot be detected. |
This is a failure of tape mechanism and |
|
|
|
|
|
|
|||
|
|
|
consult your store of purchase. |
|
|
|
|
|
|
|
|
|
ERROR 8 |
Tape is caught and cannot be ejected. |
Eliminate the reason for which the tape is |
|
|
|
|
|
caught. |
|
|
|
ERROR 2 |
A CD inside the CD changer is not |
This is a failure of CD changer’s |
|
|
|
|
loaded. |
mechanism and consult your store of |
|
|
changer |
|
|
purchase. |
|
|
|
|
|
|
|
|
ERROR 3 |
played due to scratches, etc. |
warped disc. |
|
|
|
|
A CD inside the CD changer cannot be |
Replace with a non-scratched, non- |
|
|
|
CD |
|
|
|
|
|
ERROR 6 |
A CD inside the CD changer cannot be |
Eject the disc then reload it properly. |
|
|
|
|
|
|
|||
|
|
played because it is loaded upside-down. |
|
|
|
|
|
|
|
|
|
|
ERROR H |
Displayed when the temperature in the |
Lower the surrounding temperature and |
|
|
|
|
MD changer is too high and playback has |
wait for a while to cool off MD changer. |
|
|
|
|
been stopped automatically. |
|
|
|
|
|
|
|
|
|
|
ERROR 2 |
An MD inside the MD changer is not |
This is a failure of MD changer’s |
|
|
changer |
|
loaded. |
mechanism and consult your store of |
|
|
|
|
purchase. |
|
|
|
|
|
|
|
|
|
|
|
|
|
|
|
|
ERROR 3 |
An MD inside the MD changer cannot be |
Replace with a non-scratched, non- |
|
|
MD |
|
played due to scratches, etc. |
warped disc. |
|
|
|
|
|
|
|
|
|
ERROR 6 |
An MD inside the MD changer cannot be |
Eject the disc then reload it properly. |
|
|
|
|
played because it is loaded upside-down. |
|
|
|
|
|
|
|
|
|
|
|
Displayed when a non-recorded MD is |
Load a pre-recorded MD in the MD |
|
|
|
|
loaded in the MD changer. |
changer. |
|
|
|
|
|
|
|
|
If an error display other than the ones described above appears, press the reset button. If the problem persists, turn off the power and consult your store of purchase.
ADZ625 27

11. SPECIFICATIONS
FM Tuner
Frequency Range:
87.9 MHz to 107.9 MHz
Usable Sensitivity:
11 dBf
50dB Quieting Sensitivity:
17 dBf
Alternate Channel Selectivity:
75 dB
Stereo Separation (1 kHz):
35 dB
Frequency Response (±3 dB):
30 Hz to 15 kHz
AM Tuner
Frequency Range:
530 kHz to 1710 kHz
Usable Sensitivity:
25 V
CD Player
Frequency Response (±1 dB):
10 Hz to 20 kHz
Signal to Noise Ratio (1 kHz):
100 dB
Dynamic Range (1 kHz):
95 dB
Harmonic Distortion:
0.01%
Audio
Maximum Power Output:
200 W (50 W × 4 ch) (JEITA)
Continuous Average Power Output:
16 W × 4, into 4 Ω, 20 Hz to 20 kHz, 1%THD
Bass Control Action (30 Hz):
±13 dB
Treble Control Action (10 kHz):
±10 dB
Line Output Level (CD 1kHz):
1.8 V
General
Power Supply Voltage:
14.4 V DC (10.8 to 15.6 V allowable), negative ground
Current Consumption:
Less than 15 A
Speaker Impedance:
4 Ω (4 Ω to 8 Ω allowable)
Weight / Source unit: 5.7 lb. (2.6 kg)
Weight / Remote control unit:
1 oz. (30 g) (including battery)
Dimensions / Source unit:
7" (Width) × 3-15/16" (Height) × 6-1/8" (Depth) [178 (W) × 100 (H) × 155 (D) mm]
Dimensions / Remote control unit:
1-3/4" (Width) × 4-5/16" (Height) × 1-1/8" (Depth) [44 (W) × 110 (H) × 27 (D) mm]
Tape Deck
Wow & Flutter (WRMS):
0.06 %
Channel Separation (1 kHz):
45 dB
Frequency Response (±3 dB)
120µs (normal): 30 Hz to 18 kHz
70µs (CrO2,FeCr, Metal): 30 Hz to 20 kHz
Signal to Noise Ratio
70µs (CrO2,FeCr, Metal): 58 dB
Dolby B NR: 67dB
Notes:
•Specifications comply with JEITA Standards.
•Specifications and design are subject to change without notice for further improvement.
28 ADZ625

Nous vous remercions d’avoir acheté ce produit Clarion.
Lisez tout le mode d’emploi avant de mettre l’appareil en service.
Après avoir lu ce manuel, conservez-le dans un endroit pratique (par ex. dans la boîte à gants).
Lisez le contenu de la carte de garantie jointe et conservez-la précieusement avec ce manuel.
Ce manuel comprend les procédures de fonctionnement du changeur CD, du changeur MD et du tuner de télévision raccordés via le câble CeNET. Le changeur CD, le changeur MD et le tuner de télévision possèdent leur propre mode d’emploi, mais non les explications sur le fonctionnement.
Table des matières |
|
|
1. |
CARACTÉRISTIQUES .................................................................................................................. |
30 |
2. |
PRÉCAUTIONS ............................................................................................................................ |
31 |
3. |
LES COMMANDES ......................................................................................................................... |
5 |
4. |
NOMENCLATURE DES TOUCHES ............................................................................................. |
32 |
|
Nom des Touches et Leurs Fonctions ........................................................................................... |
32 |
|
Principales opérations des touches lorsqu'un appareil externe est raccordé à l'appareil ............. |
33 |
|
Rubriques d’affichage .................................................................................................................... |
34 |
5. |
PRÉCAUTIONS DE MANIEMENT ................................................................................................ |
35 |
|
Manipulation des disques compacts .............................................................................................. |
35 |
|
Manipulation des cassettes ........................................................................................................... |
35 |
6. |
TÉLÉCOMMANDE ........................................................................................................................ |
36 |
|
Installation des piles ...................................................................................................................... |
36 |
|
Fonctions des touches de la télécommande ................................................................................. |
37 |
7. |
FONCTIONNEMENT ..................................................................................................................... |
38 |
|
Fonctionnement de base ............................................................................................................... |
38 |
|
Fonctionnement de la radio ........................................................................................................... |
40 |
|
Fonctionnement des disques compacts ........................................................................................ |
42 |
|
Fonctionnement de la cassette ...................................................................................................... |
43 |
|
Fonctionnement DSP/EQ .............................................................................................................. |
45 |
|
Démarches communes à chaque mode ........................................................................................ |
46 |
8. |
FONCTIONNEMENT DES ACCESSOIRES ................................................................................. |
48 |
|
Fonctionnement du changeur de CD/MD ...................................................................................... |
48 |
|
Fonctionnement du téléviseur ....................................................................................................... |
50 |
9. |
EN CAS DE DIFFICULTÉ ............................................................................................................. |
52 |
10. |
AFFICHAGE DES ERREURS ....................................................................................................... |
53 |
11. |
SPÉCIFICATIONS ......................................................................................................................... |
54 |
ADZ625 29

1.CARACTÉRISTIQUES
■Filtre numérique à suréchantillonnage octuple et doubles convertisseurs N/A 1 bit
■Circuit de silencieux Zero-Bit Detector™
■Entraînement de la bande entièrement logique avec fonction True/inversion automatique avec ajustement bidirectionnel de l’azimut
■Réduction de bruit Dolby® B
■ |
Système de réception FM |
® |
|
■Contrôleur pour modules de tuner TV en option
■Capacité de lecture des données CD-TEXT des changeurs CD Clarion compatibles
■5 mémoires de champ sonore numérique préprogrammées et 4 mémoires d’égaliseur graphique préprogrammées incorporées
■Liaison CeNET avec transmission de ligne symétrique et annulation dynamique du bruit
■Affichage FL multi-couleurs à haute visibilité
■Sortie de niveau de ligne RCA 4 canaux avec commande de balance avant-arrière
30 ADZ625
2. PRÉCAUTIONS
1.Lorsque l’habitacle de la voiture est très froid et que le lecteur est utilisé juste après la mise en route du chauffage, de l’humidité risque de se former sur le disque ou sur les pièces optiques du lecteur et d’empêcher le bon fonctionnement de la lecture. Si de l’humidité s’est formée sur le disque, essuyez le disque avec un chiffon doux. Si de l’humidité s’est formée sur les pièces optiques du lecteur, attendez environ une heure avant d’utiliser le lecteur pour que l’humidité puisse s’évaporer naturellement et permettre un fonctionnement normal.
2.Une conduite sur routes mauvaises provoquant de fortes vibrations peut entraîner des interruptions du son.
3.L’appareil utilise un mécanisme de précision.
Même en cas d’anomalie, n’ouvrez jamais le coffret, ne démontez pas l’appareil et ne lubrifiez pas les pièces rotatives.
L’appareil a été testé et jugé conforme aux limites des appareils numériques de classe B, aux termes de la section 15 de la Réglementation FCC.
Ces limites ont pour but d’assurer une protection raisonnable contre les interférences parasites dans une installation résidentielle.
Cet appareil engendre, utilise et peut émettre une énergie radioélectrique et, s’il n’est pas installé et utilisé en stricte conformité avec ces instructions, il peut provoquer des interférences parasites dans les liaisons radiophoniques. Ceci ne garantit pas pour autant qu’une installation particulière n’émettra aucune interférence.
Si l’appareil engendre des interférences parasites avec la réception radio ou télévision, ce qui pourra
être déterminé en éteignant puis en rallumant l’appareil, il est conseillé à l’utilisateur de consulter son magasin ou un technicien radio/télévision expérimenté.
 PRECAUTION
L’UTILISATION |
DE |
COMMANDES |
ET |
L’EXÉCUTION |
DE |
RÉGLAGES |
OU |
D’OPÉRATIONS AUTRES QUE CEUX SPÉCIFIÉS DANS CETTE BROCHURE RISQUENT D’ENTRAÎNER UNE EXPOSITION À UN RAYONNEMENT DANGEREUX.
LES RÉGLAGES ET LES RÉPARATIONS DU LECTEUR DE DISQUES COMPACTS SERONT CONFIÉS EXCLUSIVEMENT À UN TECHNICIEN QUALIFIÉ.
LES ALTÉRATIONS OU MODIFICATIONS NON EXPRESSÉMENT APPROUVÉES PAR LE FABRICANT RISQUENT DE RETIRER À L’UTILISATEUR LE DROIT D’UTILISER L’APPAREIL.
INFORMATIONS AUX UTILISATEURS:
LES ALTÉRATIONS OU MODIFICATIONS APPORTÉES À L’APPAREIL ET NON EXPRESSÉMENT APPROUVÉES PAR LE FABRICANT ANNULENT LA GARANTIE ET PEUVENT CONSTITUER UNE INFRACTION À LA RÉGLEMENTATION FCC.
MODEL
12V GROUND
AM 530-1710kHz/FM 87.9-107.9MHz
This device complies with Part 15 of the FCC Rules. Operation is subject to the following two conditions : (1) This device may not cause harmful interference,and (2) This device must accept any interference received, including interference that may cause undesired operation.
This Production complies DHHS Rules 21 CFR subchapter J applicable at date of manufacture.
CLARION CO.,LTD.
50 KAMITODA , TODA-SHI, SAITAMA-KEN, JAPAN.
MANUFACTURED:
Dolby noise reduction manufactured under license from Dolby Laboratories Licensing Corporation.
“DOLBY” and the double-D symbol are trademarks of Dolby Laboratories Licensing Corporation.
051 |
722 |
877 |
|
|
286- |
SERIAL No. |
|
Clarion Co.,Ltd. |
PE- |
|
MADE IN |
Vue du dessous de l’appareil pilote Bottom View of Source Unit
ADZ625 31

4. NOMENCLATURE DES TOUCHES
Remarque:
•Lisez bien le chapitre relatif aux schémas de la façade, au chapitre “3. LES COMMANDES”, à la page 5 (dépliante).
Nom des Touches et Leurs Fonctions
[REMOTE]
• Récepteur de télécommande
Touche [SPE/ANA]
•Appuyez pour changer l’affichage d’analyseur de spectre.
[TAPE IN]
• Fente d’insertion de la cassette
[CD IN]
• Fente d’insertion de CD
Touche [ISR]
•Rappel d’une station de radio ISR mémorisée.
Mémorisation de la station en cours dans la mémoire ISR (mode radio uniquement) quand vous maintenez appuyé pendant 1 seconde.
Touche [TAPE EJECT]
• Ejection d’une cassette
Touche [CD EJECT]
• Ejection d’un disque
Touche [DSP]
•Appuyez pour sélectionner le menu DSP et pour mettre les effets DSP en/hors service.
Touche [T]
•Utilisez cette touche pour entrer un titre en mode CD.
•Maintenez la touche enfoncée pendant 1 seconde ou plus pour passer au mode de réglage.
Touche [M]
•Pour changer et stocker les articles dans la mémoire de préréglage.
Bouton [PRESET]
•Enregistre une station dans la mémoire ou rappelle la station directement en mode radio.
•En mode DSP/EQ, utilisez le menu de sélection.
•En mode de réglage, utilisez pour sélectionner les articles de réglage.
Remarque:
Pour utiliser le bouton [PRESET]:
•Tournez le bouton d’environ 30 degrés (l’article de réglage changera).
•Retirez les doigts (le bouton reviendra à sa position originale).
•Tournez à nouveau le bouton (l’article de réglage changera).
Touche [DISP]
•Commute les données de l’affichage (affichage principal, affichage de l’horloge).
Touche [BND]
•Sélectionne la gamme, ou commute sur la syntonisation automatique ou à la syntonisation manuelle en mode radio.
•Lit la première plage en mode CD.
•En mode bande, change la face reproduite
(sens de défilement de la bande).
Touche [RDM]
•Effectue une lecture aléatoire en mode CD.
•Sélection du mode de réduction de bruit Dolby en mode cassette.
Touche [RPT]
•Effectue une lecture répétée en mode CD.
•En mode bande, effectue une lecture répétée.
Enfoncée pendant une seconde ou plus, valide le mode de saut de passage vierge.
Touche [SCN]
•Effectue un balayage préréglé en mode radio.
Lorsque vous maintenez la touche enfoncée, elle effectue une mémorisation automatique.
•Lit les 10 premières secondes de chaque plage en mode CD.
Touches [ ], [ |
] |
•Sélectionne une station en mode radio ou sélectionne une plage pendant la lecture d’un CD. Ces touches servent également à effectuer différents réglages.
Touche [FNC]
•Appuyez sur cette touche pour mettre l’appareil sous tension.
Maintenez la touche enfoncée pendant 1 seconde ou plus pour mettre l’appareil hors tension.
•Commute le mode de fonctionnement entre le mode radio, etc.
Touche [MUTE]
• Mise en et hors service du silencieux.
Bouton [VOLUME]
•Réglez le volume en tournant le bouton dans le sens des aiguilles d’une montre ou dans le sens inverse.
•Utilisez ce bouton pour effectuer différents réglages.
32 ADZ625

Touche [
 ]
]
•Lit le CD ou effectue une pause en mode CD.
•Après sélection des diverses options de réglage, appuyez sur cette touche pour vérifier vos réglages.
Touche [RESET]
• Appuyez dans les conditions suivantes:
1.Rien ne se passe quand on appuie sur les touches.
2.L’affichage est incorrect.
Touche [A]
•Maintenez la touche enfoncée pendant 1 seconde ou plus pour mettre la compensation physiologique en ou hors service.
•Utilisez cette touche pour passer au mode audio (réglage des graves/médiums/aigus, de balance/fader).
Touche [EQ]
•Appuyez pour sélectionner le menu EQ et/ou pour mettre les effets EQ en/hors service.
Principales opérations des touches lorsqu'un appareil externe est raccordé à l'appareil
●Si l’appareil raccordé est un changeur de CD/MD
Pour les détails, voyez la section “Fonctionnement du changeur de CD/MD”.
Touche [SCN]
•Lit les 10 premières secondes de chaque plage.
Effectue un balayage des disques si vous maintenez la touche enfoncée.
Touche [RPT]
•Effectue une lecture répétée. Effectue une lecture répétée des disques si vous maintenez la touche enfoncée.
Touche [RDM]
•Effectue une lecture aléatoire. Effectue
également une lecture aléatoire de tous les disques si vous maintenez la touche enfoncée.
Bouton [PRESET]
•Pour sélectionner le numéro du disque chargé et lancer sa lecture.
Touche [DISP]
•Si vous maintenez la touche enfoncée, commute sur les titres de disque ou les titres de plage en mode changeur de MD.
•Si vous maintenez la touche enfoncée, commute sur les titres utilisateur ou les titres de plage, etc. en mode changeur de CD.
Touche [T]
•Utilisez cette touche pour entrer un titre en mode changeur de CD.
•Utilisez cette touche pour faire défiler le titre pendant la lecture d’un CD-texte ou la lecture d’un changeur de MD en mode changeur de CD.
Touche [ |
] |
• Lit le CD ou le MD ou effectue une pause.
Touches [ ], [ |
] |
•Sélectionne une plage pendant la lecture d’un disque.
Touche [BND]
• Lit la première plage.
●Si l’appareil raccordé est un téléviseur
Pour les détails, voyez la section “Fonctionnement du téléviseur”.
Touche [SCN]
•Effectue un balayage préréglé en mode téléviseur.
Si vous maintenez la touche enfoncée, effectue une mémorisation automatique.
Bouton [PRESET]
•Enregistre une station dans la mémoire ou rappelle la station directement.
Touches [ ], [ |
] |
• Sélectionne une station.
Touche [BND]
•Sélectionne la gamme.
•Si vous maintenez la touche enfoncée, elle commute sur la syntonisation automatique ou la syntonisation manuelle.
ADZ625 33
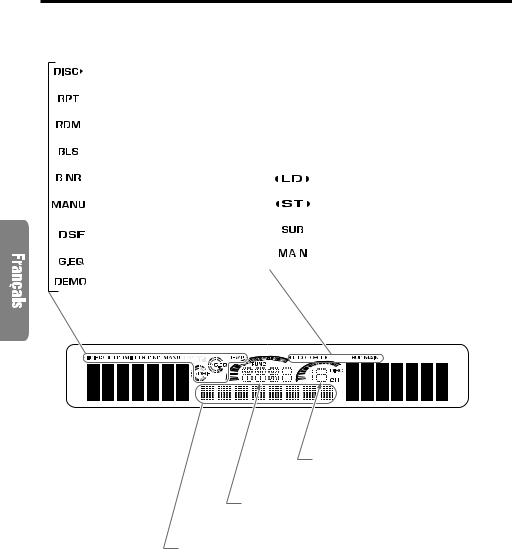
Rubriques d’affichage
: Indication de disque
: Indication de répétition
: Indication de lecture aléatoire
: Indication de saut des intervalles vierges (BLS)
: Indication de réduction de bruit |
|
|
: Indication de compensation |
|
Dolby (B NR) |
|
|
physiologique |
|
: Indication de fonctionnement |
|
|
: Indication stéréo |
|
manuel |
|
|
|
|
: Indication DSF |
|
|
: Indication SUB (auxiliaire) |
|
|
|
|
||
: Indication G.EQ |
|
|
: Indication MAIN (principal) |
|
|
|
|||
|
|
|||
|
|
|
||
|
|
|
|
|
: Indication DEMO (SPE-ANA) |
|
|||
|
|
|
|
|
|
|
|
|
|
Indication de canal préréglé (1 à 6)
Indication de numéro de disque (1 à 12)
Indication du mode de fonctionnement
•Le nom des modes sélectionnés, etc. s’affiche.
Indication d’état de fonctionnement
•La fréquence, le PTY, le temps de lecture, l’horloge (CT), etc. s’affichent.
34 ADZ625
 Loading...