

Page 1
©
Zoom Corporation
Reproduction of this manual, in whole or in part, by any
means, is prohibited.
Installation Manual
SIB-01
Supplemental Manual
MRS-1044 ver 1.2
Thank you for selecting the ZOOM SIB-01 (hereafter
called the "SIB-01"). The SIB-01 is a SCSI interface board
designed for installation in the ZOOM MultiTrak Recording
Studio MRS-1044 (hereafter called "MRS-1044"). To
ensure correct use of this product, please read and follow
all instructions contained in this manual.
Safety Precautions
•••••••••••••••••••••••••••••••••••••
2
Installing the SIB-01
•••••••••••••••••••••••••••••••••••
3
Updating the MRS-1044 to Version 1.2
••••••••••••••••
5
MRS-1044 Version 1.2 Features
•••••••••••••••••••••••
7
Connection of External SCSI Devices
••••••••••••••••
8
Compatible drives
••••••••••••••••••••••••••••••
8
Connection of SCSI Devices
•••••••••••••••••••••
8
Creating an Audio CD
•••••••••••••••••••••••••••••••••
10
V-takes that can be written on an audio CD
•••••••
10
About CD-R/CD-RW discs
•••••••••••••••••••••
11
Recording a V-take on a CD-R/CD-RW Disc
•••••
12
Playing an Audio CD
••••••••••••••••••••••••••
14
Finalizing a CD-R/CD-RW Disc
••••••••••••••••
17
Erasing a CD-RW Disc
••••••••••••••••••••••••
18
Storing a Project on External Media
(Project Backup)
••••••••••••••••••••••••••••••••••••••
20
Reading a Stored Project from External Media
(Project Restore)
••••••••••••••••••••••••••••••••••••••
26
Deleting Backup Data
•••••••••••••••••••••••••••••••••
32
Formatting an External Storage Device
•••••••••••••
34
Changing the Length of a V-take (Trimming)
••••••••
35
Troubleshooting
•••••••••••••••••••••••••••••••••••••••
38
Contents
Page 2

Installing the SIB-01
Safety Precautions
In this manual, important information that
is intended to prevent the danger of injury
to persons and damage to equipment is
marked with special symbols. The
meaning of these symbols is explained
below.
Disregarding instructions
printed here incurs the risk
of death or severe injury
to persons.
Disregarding instructions
printed here incurs the risk
of injury to persons and/or
damage to peripheral
equipment.
Please observe the following safety tips
and precautions to ensure hazard-free use
of the SIB-01.
■ Handling
•
Before installing the SIB-01 in
the MRS-1044, be sure to turn the
MRS-1044 off and disconnect the
AC adapter from the outlet.
• Before handling the SIB-01,
touch a grounded metal surface
or take other measures to
discharge any buildup of static
electricity. Otherwise static
discharge can damage the SIB01 or MRS-1044.
• The SIB-01 is a precision
product. Do not subject it to
strong force when installing it
in the MRS-1044. To prevent
the possibility of damage, take
care not to drop it and protect it
from shocks.
•
Only install the SIB-01 according
to the instructions in this manual.
Any damage or malfunction
arising from improper installation
is not covered by the warranty.
• Never attempt to modify this
product in any way. Any
damage or malfunction arising
from modification attempts is
not covered by the warranty
■ Malfunction
If there is any malfunction or other sign
of a problem, immediately turn off the
MRS-1044, disconnect the AC adapter
from the outlet, and remove the SIB-01.
Note the model number, serial number,
symptoms, as well as name of the dealer
where the product was purchased, and
contact Zoom Corporation, providing
your name, address, and telephone
number.
Please keep this manual in a
convenient place for future reference.
Warning
Caution
Warning
Caution
Caution
Caution
Caution
Safety Precautions
Installing the SIB-01
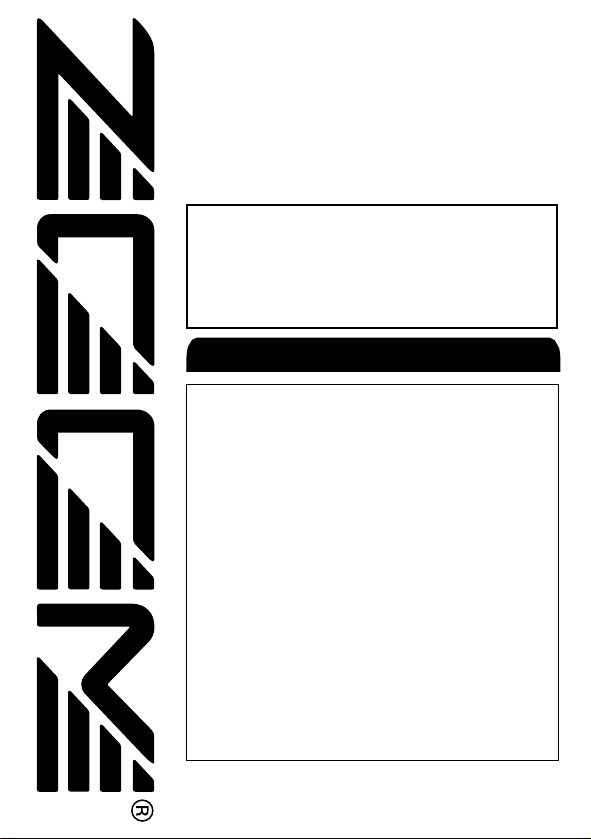
The SIB-01 is designed for installation in the side panel slot of the
MRS-1044.
Before installing the SIB-01 in the MRS-1044, be
sure to turn the MRS-1044 off and disconnect the
AC adapter from the outlet.
1.
Remove the two screws that fasten the cover of the side panel
slot, and remove the cover.
These screws will be used to fasten the SIB-01.
2.
With the populated side of the SIB-01 board (the side with IC
chips and other components) facing downwards, push the
SIB-01 fully into the slot.
Align the board with the rails of the slot, and make sure that it clicks
into place. If the board does not go all the way in, check whether the
SIB-01 has not been inserted upside down, and whether it is properly
aligned with the rails.
Warning
3
ZOOM SIB-01
2
ZOOM SIB-01
Page 3
Updating the MRS-1044 to Version 1.2
3.
Use the screws removed in step 1 to fasten the SIB-01.
The SIB-01 works only in the MRS-1044 if the system is Version
1.2 and later. If your MRS-1044 is Version 1.0, you must update
your system as described on the next page.
NOTE
Correct
Incorrect
Installing the SIB-01
Updating the MRS-1044 to Version 1.2
In order to use the SIB-01, the MRS-1044 system must be updated to
Version 1.2. Perform this update using the "Version Update" CD-ROM
supplied with the SIB-01.
• To perform the update, a SCSI compatible CD-R/CD-RW drive or CDROM drive is required. If you do not have a suitable drive, please
consult your dealer or contact ZOOM Corporation.
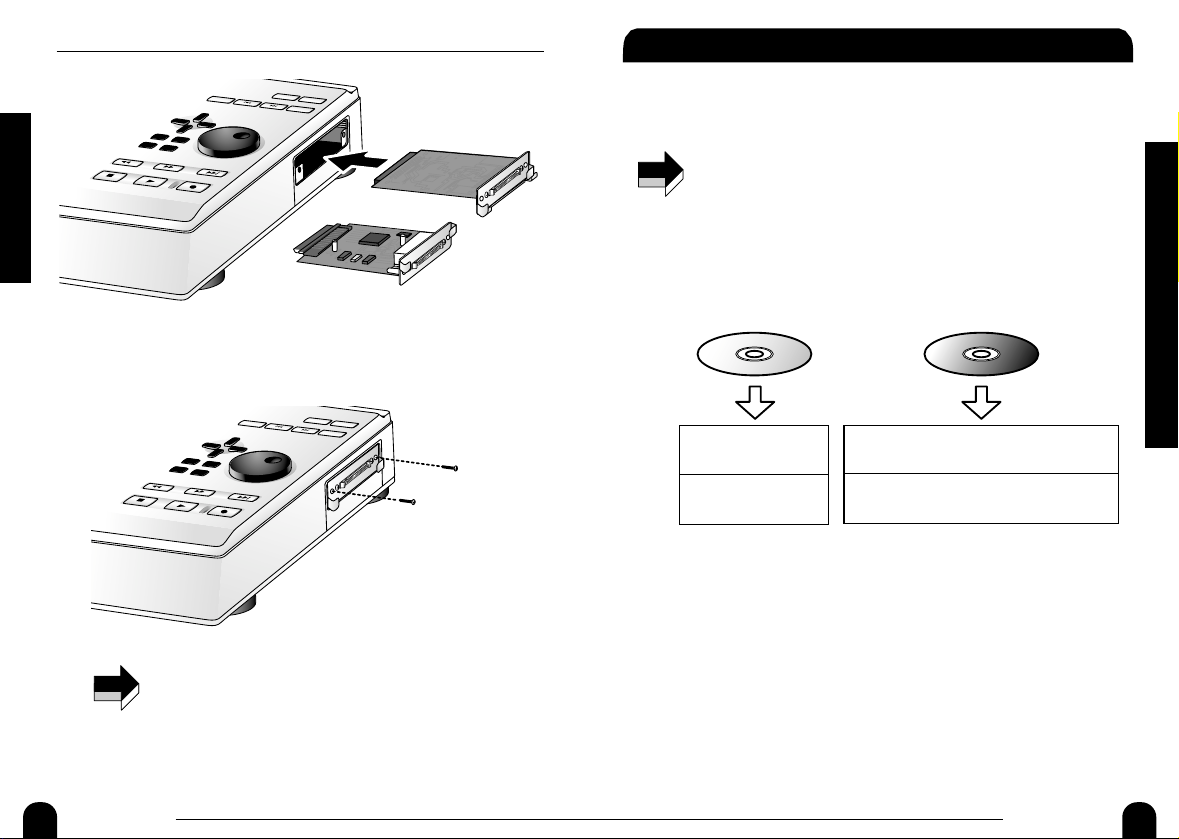
• The SIB-01 comes with two CD-ROMs: a "Version Update Disc"
(green label) for updating the system and a "Recovery Disc" (red label)
for restoring the hard disk of the MRS-1044 to the factory default
condition. Be careful not to mix up these discs.
If you use the "Recovery Disc" and perform the steps described
below, all user projects will be deleted.
1.
Connect the SCSI connector on the MRS-1044 (with SIB-01
installed) to the SCSI connector of the CD-R/CD-RW (CDROM) drive, using a SCSI cable.
Before performing this step, make sure that power to both components
is turned off. For details regarding the SCSI connection, refer to page
8.
2.
Turn power to the CD-R/CD-RW (CD-ROM) drive on, insert the
"Version Update Disc" (green label), and then turn power to
the MRS-1044 on.
Green label Red label
Version Update Disc
Only updates the
system.
Projects created by
user are retained.
Recovery Disc
!
Caution
!
Restores hard disk to factory default
condition. System will be Version 1.2.
All projects created by
user will be deleted.
NOTE
5
ZOOM SIB-01
4
ZOOM SIB-01
Page 4

MRS-1044 Version 1.2 Features
When power is turned on in this sequence, the MRS-1044 reads a
program from the CD-ROM and starts up in a special mode called
"CD-ROM mode". When the MRS-1044 starts in this mode, the
indication "Ver Up to 1.20?" appears on the display.
If power is turned on in the reverse sequence, the MRS-1044 will
start up in normal mode, and system update is not performed.
3.
Press the [ENTER] key of the MRS-1044.
The display now shows the indication "Ver Up Sure?".
4.
To perform the update, press the [ENTER] key once more.
The system update process begins. When the process is completed, the
indication "Ver Up Done" appears on the display.
5.
When the update process is complete, remove the "Version
Update Disk" from the CD-R/CD-RW (CD-ROM) drive, and
then turn power off in the sequence MRS-1044 ➔CD-R/CDRW (CD-ROM) drive.
When you next turn the MRS-1044 on again, it will start up in normal
mode.
The same procedure can also be performed if you insert the
"Recovery Disc" instead of the "Version Update Disk" into the CDR/CD-RW (CD-ROM) drive. Note that this will delete all projects
created by the user and restore the MRS-1044 to the factory
default condition. Be careful not to mix up these discs.
NOTE
Ver Up
Done
Ver Up
Sure?
NOTE
Ver Up
to 1.20?
Updating the MRS-1044 to Version 1.2
MRS-1044 Version 1.2 Features
This section describes additional features of the MRS-1044 which are
available in Version 1.2.
●
Audio CD creation
Using a CD-R/CD-RW drive connected to the SCSI connector of the
MRS-1044 (with SIB-01 installed), you can create an audio CD. Audio
data for up to 99 songs can be stored on a single CD-R/CD-RW disc,
provided there is enough space on the disc.
An audio CD created in this way can also be played on a regular CD
player after the finalizing operation has been performed.
●
Project backup/restore
You can copy any project of the MRS-1044 to a CD-R/CD-RW drive,
ZIP drive, MO drive, hard disk or other device connected to the SCSI
connector of the MRS-1044 (with SIB-01 installed). This is convenient
for creating backups of important projects. A backed-up project can be
restored to the MRS-1044 at any time. When using a drive with
removable media such as MO or ZIP, or a CD-R/CD-RW drive, large
projects can be split up to span multiple media for backup and restore.
●
V-take trimming
A new option is added to the track edit menu, allowing fine adjustment
of V-take start position and end position. For example, when creating an
audio CD, silent passages at the start or end of the V-take can be cut.
7
ZOOM MRS-1044 ver 1.2
6
ZOOM SIB-01
Page 5
8 9
ZOOM MRS-1044 ver 1.2 ZOOM MRS-1044 ver 1.2
Connection of External SCSI Devices
This section describes the types of SCSI devices that can be connected to
the MRS-1044 (with SIB-01 installed), and gives information about the
connection procedure.
Compatible drives
Specifications for SCSI devices that can be connected to the MRS-1044 are
as follows.
●
Type
CD-R/CD-RW drive, MO (Magneto-optical disc) drive (128 MB, 230 MB,
540 MB), ZIP drive (100 MB, 250 MB), hard disk drive
●
Interface
SCSI-2
●
Confirmed models
CD-R/CD-RW drive: PLEXTOR PX-W1210TSE
For a list of other models, please visit the ZOOM Corporation web site
(http://www.zoom.co.jp).
●
Available functions
• "Confirmed" refers to the fact that normal operation was confirmed
with a production unit purchased by ZOOM Corporation. An
assurance that all functions will operate is not given.
• ZOOM Corporation does not accept any responsibility whatsoever for
any kind of damage arising from the use of the above SCSI devices,
whether direct or indirect or from any third parties.
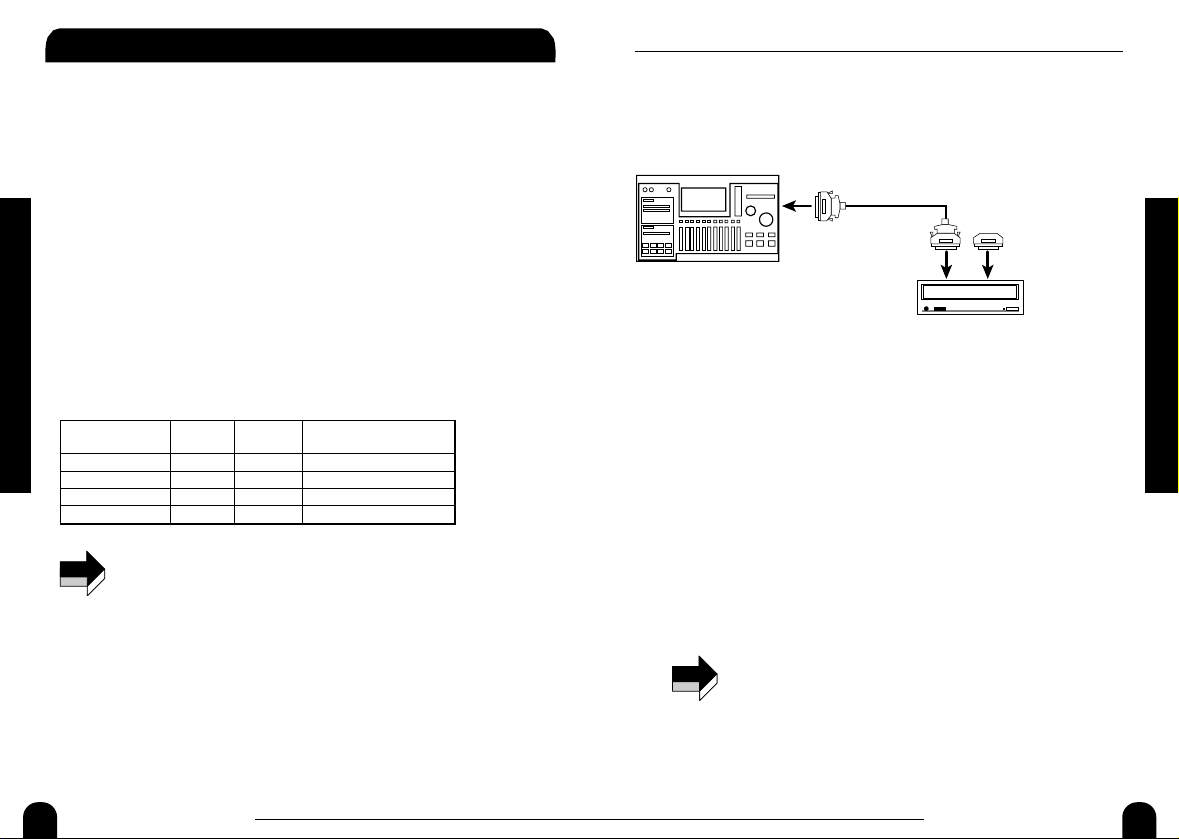
Connection of SCSI Devices
To connect the MRS-1044 (with SIB-01 installed) to a SCSI device,
proceed as follows.
1.
Make sure that power to the MRS-1044 and the external SCSI
device is turned off. Then connect the SCSI connector on the
SIB-01 to the SCSI connector of the CD-R/CD-RW (CD-ROM)
NOTE
CD-R/CD-RW drive Yes Yes Yes
MO drive No Yes Yes
ZIP drive No Yes Yes
Hard disk No Yes No
Backup/
restore
Create
audio CD
Backup/restore over
multiple media volumes
Connection of External SCSI Devices
Connection of External SCSI Devices
drive, using a SCSI cable.
The SCSI cable should be a high-impedance type and should be as
short as possible. The use of an inferior cable can lead to malfunction
and damage.
2.
Mount the terminator on the external SCSI device.
The "terminator" is a special resistor that must be present on the last
device in a SCSI chain. Some devices have a terminator built in. In
such a case, set the switch for the terminator to ON.
3.
Set the SCSI ID of the external device to any number from 0 – 6.
The "SCSI ID" is a number from 0 to 7 that serves to identify a device
in a SCSI chain. Because the SCSI ID of the MRS-1044 (SIB-01) is
fixed to "7", the setting range for an external SCSI device connected
to the MRS-1044 is 0 - 6.
4.
Turn power on in the sequence external SCSI device ➔ MRS-1044.
5.
When turning power off, proceed in the sequence MRS-1044
➔
external SCSI device.
• While a SCSI device is connected, make sure that its power is
turned on when using the MRS-1044. Otherwise, operation of
the MRS-1044 may become instable.
• It is in principle possible to connect up to two SCSI devices
(CD-R/CD-RW drive x 1 and other SCSI device x 1) to the
MRS-1044 (SIB-01). In such a case, make sure that the SCSI ID
is not duplicated. However, to assure stable operation, it is
highly recommended to connect only one SCSI device.
NOTE
MRS-1044
D-sub half-pitch 50-pin cable
SCSI connector
on SIB-01
SCSI connector SCSI connector
SCSI device
Terminator
Page 6
10 11
ZOOM MRS-1044 ver 1.2 ZOOM MRS-1044 ver 1.2
Creating an Audio CD
This section describes how you can write V-takes recorded on the
MRS-1044 onto a disc in a CD-R/CD-RW drive connected to the
MRS-1044, to create an audio CD.
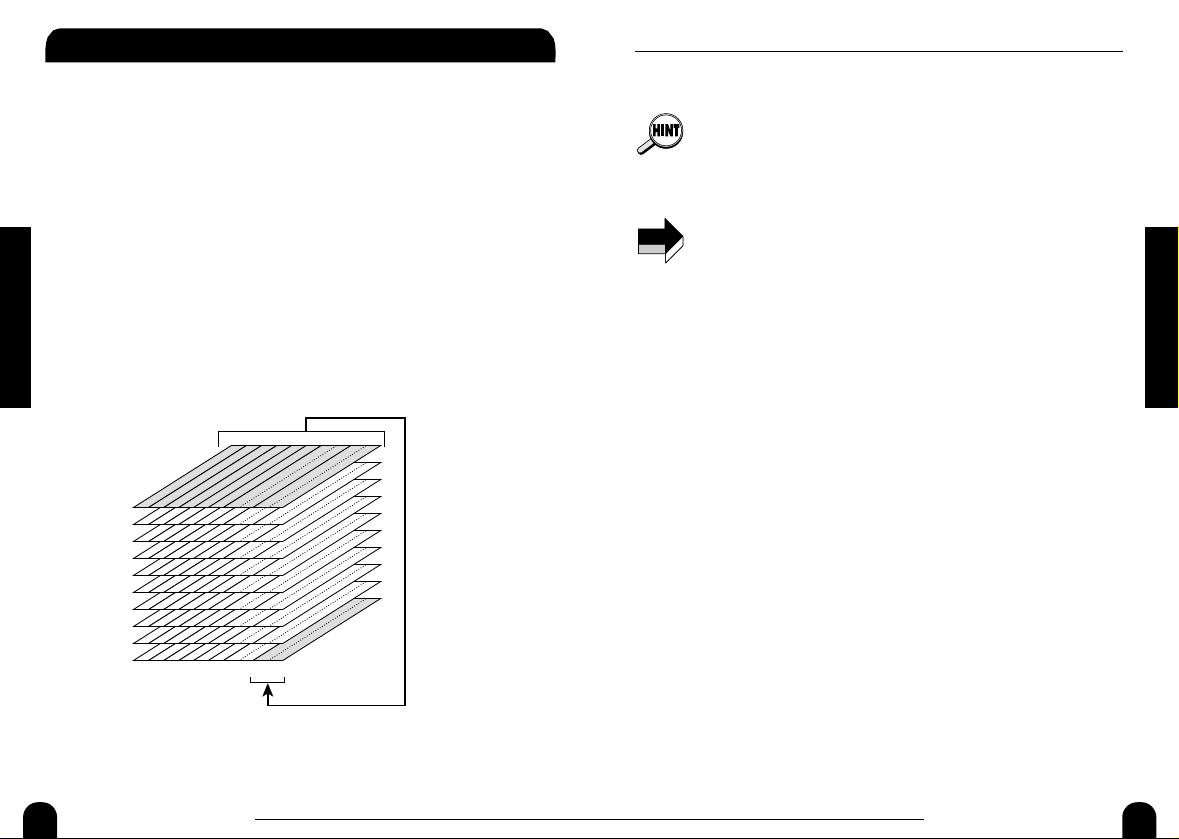
V-takes that can be written on an audio
CD
Only the V-takes 10 of tracks 9/10 can be used for writing to an audio CD.
Therefore it is necessary to first make sure that these V-takes contain the
desired material. This can be achieved in one the following ways.
●
Perform playback on an external DAT or MD recorder which
contains the project mixdown, and record it on V-takes 10 of
tracks 9/10
●
Bounce the entire project onto the V-takes corresponding to
V-takes 10 of tracks 9/10
Only one project can be written at a time. However, as long as the
CD-R/CD-RW disc has not been finalized, it is possible to call up another
project and add audio data.
Creating an Audio CD
Creating an Audio CD
(Provided there is room on the media, up to 99 songs can be recorded.)
• For information on how to use the bounce function, refer to the
instruction manual of the MRS-1044 (p. 37).
• "Finalizing" an audio CD refers to the procedure of making it playable
on an ordinary CD player. After it has been finalized, no more data can
be added to a CD-R/CD-RW disc.
• The waveform data of V-takes 10 of tracks 9/10 are recorded as is on
the audio CD. Note that fader, EQ, effects, and panning have no effect
on the recorded data.
• It is not possible to specify just a portion of a V-take for recording. If
necessary, use the trimming function (p. 35) to cut unneeded sections
before and after the desired portion.
About CD-R/CD-RW discs
When a CD-R/CD-RW drive is connected to the MRS-1044 for creating an
audio CD, you can select either CD-R or CD-RW discs as media. The
features of the two disc types are described below.
●
CD-R
This media type allows only one-time recording or adding of data. Once
data have been written, they cannot be changed or erased. CD-R discs
are available in 650 MB and 700 MB capacities.
To newly write a V-take of the MRS-1044 to disc, a blank CD-R is
required. As long as the disc has not been finalized, it is possible to add
further audio data up to the maximum capacity of the disc.
●
CD-RW
This media type allows recording, adding, and bulk-erasing of data.
CD-RW discs are also available in 650 MB and 700 MB capacities.
To newly write a V-take of the MRS-1044 to disc, a blank or
completely erased CD-RW is required. (For information on how to
erase a CD-RW, refer to page 18.) As long as the disc has not been
finalized, it is possible to add audio data up to the maximum capacity of
the disc.
NOTE
V-take
1
2
3
4
5
6
7
8
9
10
1
3 4 5 6 7/8 9/10
2
Track
Bounce
Page 7

12 13
ZOOM MRS-1044 ver 1.2 ZOOM MRS-1044 ver 1.2
Creating an Audio CD
Recording a V-take on a CD-R/CD-RW
Disc
V-takes 10 of tracks 9/10 in the currently selected project can be written to
a CD-R/CD-RW disc, to create an audio CD.
1.
Verify that the CD-R/CD-RW drive is properly connected to the
MRS-1044 and that a suitable disc is inserted.
To newly write audio data, use a blank CD-R/CD-RW or a completely
erased CD-RW.
To add audio data, use a CD-R/CD-RW which has not been finalized.
2.
Select the project on the MRS-1044 that is to be used as write
source.
Verify that V-takes 10 of tracks 9/10 contain the stereo data to be
written as audio data to the disc. If necessary, use the trimming
function (p. 35) to cut unneeded sections before and after the desired
portion of the V-take.
3.
In the main screen, press the [PROJECT/UTILITY] key.
The display will indicate "PROJECT".
4.
Use the cursor [E]/[R] keys to make the display indicate
"UTILITY CD-R/RW", and then press the [ENTER] key.
If the above menu does not appear, the MRS-1044 has not
properly recognized the CD-R/CD-RW drive. Check the power
on/off condition of the drive and the SCSI connection.
5.
Use the cursor [E]/[R] keys to make the display indicate
"CD-R/RW BURN CD", and then press the [ENTER] key.
The duration of the source V-takes is shown at the bottom of the
display in hours (H), minutes (M), seconds (S), and milliseconds
(MS).
NOTE
Creating an Audio CD
6.
To check the remaining write capacity of the disc, press the
cursor [W] key.
The indication at the bottom of the display changes to show the
remaining capacity of the disc. Pressing the cursor [Q] key returns to
the previous display.
7.
To audition the source V-takes, press the PLAY [R] key. To
stop playback, press the STOP [P] key.
8.
Press the [ENTER] key twice.
The display indication changes as follows.
9.
To carry out the write process, press the [ENTER] key.
Writing to the CD-R/CD-RW disc begins. During the write process,
the indication "wait..." is shown on the display. On the lower part of
the display, you can check the progress of the write operation.
When the write process is finished, the display indication changes to
"COMPLETE".
CDtrk01
WRITE?
Number of track on disc to be written
CDtrk01
SURE?
BURN CD
REMAIN
BURN CD
TIME
Page 8

14 15
ZOOM MRS-1044 ver 1.2 ZOOM MRS-1044 ver 1.2
Creating an Audio CD
• If you press the [EXIT] key instead of the [ENTER] key, the
display returns to the condition of the previous step.
• The fastest writing speed supported by the connected
CD-R/CD-RW drive will automatically be selected.
10.
When writing is complete, press the [EXIT] key.
The system returns to the condition of step 5. To add more audio data, select
the project with the desired source data and then repeat the above steps.
• When a new track is added, a pause of 2 seconds is created
automatically.
• As long as the CD-R/CD-RW disc has not been finalized, the
disc cannot be played on an ordinary CD player. (For information
on how to audition a non-finalized CD-R/CD-RW disc, refer to
the next section.)
11.
To terminate the write process and return to the main screen,
press the [EXIT] key several times.
Playing an Audio CD
To play an audio CD inserted in the CD-R/CD-RW drive, proceed as
follows. This method can also be used to audition a CD-R/CD-RW disc to
which audio data were written.
A non-finalized CD-R/CD-RW disc cannot be played by any other
method.
1.
Verify that the CD-R/CD-RW drive is properly connected to the
MRS-1044 and that a suitable disc is inserted.
2.
In the main screen, press the [PROJECT/UTILITY] key.
3.
Use the cursor [E]/[R] keys to make the display indicate
"UTILITY CD-R/RW", and then press the [ENTER] key.
If the above menu does not appear, the MRS-1044 has not
properly recognized the CD-R/CD-RW drive. Check the power
on/off condition of the drive and the SCSI connection.
NOTE
NOTE
Creating an Audio CD
4.
Use the cursor [E]/[R] keys to make the display indicate
"CD-R/RW PLAYER", and then press the [ENTER] key.
The display indicates the following information.
(1)Track number
Indicates the number of the track on the audio CD or CD-R/CD-RW
disc.
(2)Playback method
Indicates the currently selected audio CD playback method. "D" stands
for digital playback and "A" for analog playback.
(3)Finalize status
When a "*" symbol is shown here, a non-finalized CD-R/CD-RW disc
is inserted.
(4)Current location
The location in the current track is shown here in hours (H), minutes
(M), and seconds (S).
5.
Use the FF [Y] key and REW [T] key to select the track to be
played.
While the above indication is shown, the FF [Y] and REW [T] keys
can be used to select the track on the CD. The FF [Y] key selects the
next track and the REW [T] key selects the previous track.
6.
Use the cursor [Q]/[W] keys to select the playback method.
Each push of the cursor [Q]/[W] keys toggles between the following
two methods.
●
D (Digital playback)
The digital audio signal of the CD is read into the MRS-1044 and
PLAYER
TRK01 D
(1)(2)(3)
(4)
Page 9

16 17
ZOOM MRS-1044 ver 1.2 ZOOM MRS-1044 ver 1.2
Creating an Audio CD
becomes available at the rear panel [OUTPUT] jacks (DIGITAL,
PHONES, MASTER L/R). (Default setting)
●
A (Analog playback)
The audio signal of the CD is reproduced via the headphone and line
outputs of the CD-R/CD-RW drive.
During audio CD playback, the fader, EQ, reverb, chorus, and
panning settings of the MRS-1044 have no effect. However, when
"D" is selected, the MASTER fader can be used to adjust the CD
volume.
7.
To control CD playback/stop, use the transport section keys
of the MRS-1044.
While the above indication is shown, the transport section keys of the
MRS-1044 operate as follows.
●
PLAY [R] key
Playback of the selected track starts. Pressing the key during analog
playback sets the system to pause mode.
●
STOP [P] key
Playback stops, and the system returns to the beginning of the current
track.
●
FF [Y] key
Playback stops, and the system jumps to the beginning of the next track.
●
REW [T] key
Playback stops, and the system jumps to the beginning of the previous
track.
During audio CD playback, the playback method (digital/analog)
cannot be switched. If one of the cursor [W]/[Q] keys is pressed,
only the indication "STOP PLAYER" is shown and the key press is
ignored.
8.
To return to the main screen, press the [EXIT] key several
times.
NOTE
NOTE
Creating an Audio CD
Finalizing a CD-R/CD-RW Disc
"Finalizing" a CD-R/CD-RW to which audio data were written refers to the
procedure of making it playable on an ordinary CD player.
After a CD-R/CD-RW disc has been finalized, no more tracks can be
added to it. Perform the following operation with care.
1.
Verify that the CD-R/CD-RW drive is properly connected to the
MRS-1044 and that a suitable disc is inserted.
2.
In the main screen, press the [PROJECT/UTILITY] key.
3.
Use the cursor [E]/[R] keys to make the display indicate
"UTILITY CD-R/RW", and then press the [ENTER] key.
If the above menu does not appear, the MRS-1044 has not
properly recognized the CD-R/CD-RW drive. Check the power
on/off condition of the drive and the SCSI connection.
4.
Use the cursor [E]/[R] keys to make the display indicate
"CD-R/RW FINALIZE", and then press the [ENTER] key.
The display indicates the following information.
(1)Total tracks
Indicates the total number of tracks on the CD-R/CD-RW disc.
(2)Play time
Indicates the total playing time of all tracks on the CD-R/CD-RW disc
(including pauses) in hours (H), minutes (M), and seconds (S).
FINALIZ
TRACKS08
(1)
(2)
NOTE
NOTE
Page 10

18 19
ZOOM MRS-1044 ver 1.2 ZOOM MRS-1044 ver 1.2ZOOM SIB-01
Creating an Audio CD
4.
Use the cursor [E]/[R] keys to make the display indicate
"CD-R/RW CDRW ERS", and then press the [ENTER] key.
The display indication changes to "CdrwErs NORMAL".
5.
Use the cursor [W]/[Q] keys to select one of the following two
CD-RW erase methods.
●
NORMAL (Default setting)
Information from all areas of the disc is erased. This operation takes
longer than the QUICK erase operation, but all contents of the disc are
reliably erased. This method is recommended. (Required time is max.
74 minutes for a 650 MB disc and 80 minutes for a 700 MB disc.)
●
QUICK
Only the track information on the CD-RW disc is erased. The operation
takes a few minutes.
6.
Press the [ENTER] key.
The display now shows the indication "CdrwErs SURE?".
7.
To carry out the erase process, press the [ENTER] key once
more.
The erase process starts. During the operation, the display shows
"CdrwErs wait...".
When the erasing process is finished, the display indication changes to
"CdrwErs COMPLETE".
8.
To return to the main screen, press the [EXIT] key several
times.
CdrwErs
NORMAL
Creating an Audio CD
5.
Press the [ENTER] key.
The display now shows the indication "FINALIZ SURE?".
6.
To carry out the finalizing process, press the [ENTER] key
once more.
The finalizing process starts. During the operation, the display shows
"FINALIZ wait...".
When the finalizing process is finished, the display indication changes
to "FINALIZ COMPLETE".
The CD-R/CD-RW disc can now be played on an ordinary CD player.
However, no more tracks can be added to it.
By erasing the entire disc, a CD-RW disc can be used again also
after finalizing. Refer to the explanation in the next section.
7.
To return to the main screen, press the [EXIT] key several
times.
Erasing a CD-RW Disc
The entire information on a CD-RW disc (audio data or backup data) can be
erased, thereby returning the disc to the blank state.
1.
Verify that the CD-R/CD-RW drive is properly connected to the
MRS-1044 and that a suitable CD-RW disc is inserted.
2.
In the main screen, press the [PROJECT/UTILITY] key.
3.
Use the cursor [E]/[R] keys to make the display indicate
"UTILITY CD-R/RW", and then press the [ENTER] key.
If the above menu does not appear, the MRS-1044 has not
properly recognized the CD-R/CD-RW drive. Check the power
on/off condition of the drive and the SCSI connection.
NOTE
Page 11

20 21
ZOOM MRS-1044 ver 1.2 ZOOM MRS-1044 ver 1.2
Storing a Project on External Media (Project Backup)
backup, make sure that a suitable disc is inserted.
3.
In the main screen, press the [PROJECT/UTILITY] key.
4.
Use the cursor [E]/[R] keys to make the display indicate
"UTILITY BACKUP", and then press the [ENTER] key.
If the above menu does not appear, the MRS-1044 has not
properly recognized the SCSI device. Check the power on/off
condition of the device and the SCSI connection.
5.
Use the cursor [E]/[R] keys to make the display indicate
"BACKUP SAVE", and then press the [ENTER] key.
The screen for selecting the project for backup appears.
If a CD-R/CD-RW drive and another SCSI device are connected at the
same time, a screen for selecting the target device appears after
pressing the [ENTER] key in step 5.
Use the cursor [E]/[R] keys to select "CD-R/RW" (when backing up
onto a CD-R/CD-RW drive) or "ExtDRV" (when backing up on
another SCSI device).
6.
Turn the dial to select a project, and press the [ENTER] key.
The required storage capacity for backing up that project is shown on
the display (in MB).
SAVE
CD-R/RW
2
SAVE
FireZone
NOTE
ZOOM SIB-01
Storing a Project on External Media (Project Backup)
You can store any project on an external SCSI device for backup. The
following types of SCSI devices can be used.
●
CD-R/CD-RW drive
●
MO (Magneto-optical disc) drive (128 MB, 230 MB, 540 MB)
●
ZIP drive (100 MB, 250 MB)
●
Hard disk
Depending on the type of media used for backup, you can have a large
project span several media volumes, or add backup data for a separate
project on one media volume. The following table shows the available
backup methods for various media.
*1 Only possible with blank disc
*2 Possible with blank disc or bulk erased disc
*3 Only possible with disc formatted in MRS-1044. (For information on
formatting media, refer to page 34.) Even if the media already contains
a MRS-1044 backup, you can add more if there is still capacity on the
disc.
For a list of compatible drive brands and models, please visit the ZOOM
Corporation web site (http://www.zoom.co.jp).
1.
Verify that the SCSI device is properly connected to the
MRS-1044 and that the drive is turned on.
2.
When using a CD-R/CD-RW drive, MO drive, or ZIP drive for
Storing a Project on External Media
(Project Backup)
Adding backup data
CD-R (*1) No Yes
CD-RW (*2) No Yes
MO (*3) Yes Yes
ZIP (*3) Yes Yes
Hard disk (*3) Yes No
Backup/restore spanning
several volumes
Page 12

22 23
ZOOM MRS-1044 ver 1.2 ZOOM MRS-1044 ver 1.2
Storing a Project on External Media (Project Backup)
■ Backing up to a hard disk
9.
To execute the backup, press the [ENTER] key. If you wish to
cancel the process, press the [EXIT] key instead.
While the backup is in progress, the indication "SAVE wait..." is
shown on the display. When the backup is finished, the display
indication changes to "SAVE COMPLETE".
If the hard disk becomes full before the end of the backup
process, the indication "SAVE FULL" appears on the display and
the backup is aborted. Press the EXIT] key to return to the
previous screen.
10.
To return to the main screen, press the [EXIT] key several
times.
■ Backing up to CD-R/CD-RW drive
9.
To execute the backup, press the [ENTER] key. If you wish to
cancel the process, press the [EXIT] key instead.
When backup starts, the disc number and the indication "wait..."
appear on the display.
When the project size is larger than the capacity of one CD-R/CD-RW
media volume, the disc will be ejected after it has been filled up, and a
message prompting the user to insert the next CD-R/CD-RW disc
appears.
10.
When the above message appears, insert a new CD-R/CD-RW
disc, and press the [ENTER] key.
CHANGE
DISC002
DISC001
wait...
Disc number
NOTE
Storing a Project on External Media (Project Backup)
When the target device is a hard disk and the capacity of the hard
disk is smaller than the project size, backup cannot be carried out.
7.
Press the [ENTER] key.
The name of the directory to be used for backup appears.
The "directory" (also called "folder") is a hierarchical unit that will be
created on the backup media when the backup is executed. All data for
the project are stored in that directory.
In the default condition, the directory name is "PROJxxx" (where xxx
is the project number). This can be changed as desired. (The currently
flashing character can be edited.)
8.
If required, use the cursor [E]/[R] keys and the dial to edit
the directory name, and then press the [ENTER] key.
The display now shows the indication "SAVE SURE?".
For details on the editing procedure and allowable characters,
refer to page 36 of the MRS-1044 operation manual.
The subsequent screens and operation steps are slightly different,
depending on which kind of drive is selected as backup target.
DirName
PROJ001
Directory name
NOTE
PRJ SIZ
1230MB
Size of project (required for backup)
Page 13

24 25
ZOOM MRS-1044 ver 1.2 ZOOM MRS-1044 ver 1.2
Storing a Project on External Media (Project Backup)
message prompting the user to insert the next ZIP disc appears.
10.
When the above message appears, insert a new ZIP disc, and
press the [ENTER] key.
The backup operation resumes. The new disc number and the
indication "wait..." appear on the display.
To cancel the operation, press the [EXIT] key to bring up the
indication "CANCEL?" on the screen, and then press the ENTER key.
• When a backup spans several media volumes, be sure to note
the disc number on the case and label.
• During restore, ZIP discs must be inserted in the same order as
during backup. Otherwise correct restore is not possible.
11.
Repeat the above steps until the entire project is backed up.
When the backup is finished, the display indication changes to "SAVE
COMPLETE".
12.
To return to the main screen, press the [EXIT] key several
times.
NOTE
CHANGE
DISK002
Storing a Project on External Media (Project Backup)
The backup operation resumes. The new disc number and the
indication "wait..." appear on the display.
To cancel the operation, press the [EXIT] key to bring up the
indication "CANCEL?" on the screen, and then press the ENTER key.
• When a backup spans several media volumes, be sure to note
the disc number on the case and label of the disc.
• During restore, CD-R/CD-RW discs must be inserted in the
same order as during backup. Otherwise correct restore is not
possible.
11.
Repeat the above steps until the entire project is backed up.
When the backup is finished, the display indication changes to "SAVE
COMPLETE".
12.
To return to the main screen, press the [EXIT] key several
times.
■ Backing up to ZIP or MO drive
9.
To execute the backup, press the [ENTER] key. If you wish to
cancel the process, press the [EXIT] key instead.
When backup starts, the disc number and the indication "wait..."
appear on the display.
When the project size is larger than the capacity of one ZIP media
volume, the disc will be ejected after it has been filled up, and a
DISK001
wait...
Disc number
NOTE
DISC002
wait...
Page 14

26 27
ZOOM MRS-1044 ver 1.2 ZOOM MRS-1044 ver 1.2
Reading a Stored Project from External Media (Project Restore)
shown on the display.
When restoring a project, the MRS-1044 automatically allocates a
new project number. This prevents accidentally deleting or
overwriting an existing project on the hard disk, even if it has the
same name.
• If the backup spans several volumes, make sure that the first
disc inserted is the disc number 1. If the disc number is different,
correct restore will not be possible.
• To change the restore source disc, press the [EXIT] key and
repeat the procedure from step 4.
6.
If you wish to check the restore source directory, press the
cursor [W] key.
The display indication changes to the directory name. Pressing the
cursor [Q] key returns to the previous display.
7.
Press the [ENTER] key.
The indication "LOAD SURE?" appears on the display, to verify the
restore process.
8.
To execute the restore process, press the [ENTER] key. If you
wish to cancel the process, press the [EXIT] key instead.
When restore starts, the indication "LOAD wait..." appears on the
display.
When the project backup spans several CD-R/CD-RW discs, a
25
DirName
PROJ001
Directory name
NOTE
25
LOAD
FireZone
Project name Project number
Reading a Stored Project from External Media (Project Restore)
You can read any project that was stored on an external SCSI device back
into the hard disk of the MRS-1044.
The screens and operation steps are slightly different, depending on which
kind of drive is used as restore source.
■ Restoring from a CD-R/CD-RW drive
1.
Verify that the CD-R/CD-RW drive is properly connected to the
MRS-1044.
2.
In the main screen, press the [PROJECT/UTILITY] key.
3.
Use the cursor [<]/[>] keys to make the display indicate
"UTILITY BACKUP", and then press the [ENTER] key.
If the above menu does not appear, the MRS-1044 has not
properly recognized the CD-R/CD-RW drive. Check the power
on/off condition of the drive and the SCSI connection.
4.
Use the cursor [E]/[R] keys to make the display indicate
"BACKUP LOAD", and then press the [ENTER] key.
The indication "LOAD InsDisc1" appears on the display.
If a CD-R/CD-RW drive and another SCSI device are connected at the
same time, a screen for selecting the restore source appears after
pressing the [ENTER] key in step 4.
Use the cursor [E]/[R] keys to select "CD-R/RW".
5.
Insert the CD-R/CD-RW disc (disc number 1) with the stored
project into the drive, and press the [ENTER] key.
The name of the project to be restored and the new project number are
LOAD
CD-R/RW
NOTE
Reading a Stored Project from
External Media (Project Restore)
Page 15

28 29
ZOOM MRS-1044 ver 1.2 ZOOM MRS-1044 ver 1.2
Reading a Stored Project from External Media (Project Restore)
"UTILITY BACKUP", and then press the [ENTER] key.
If the above menu does not appear, the MRS-1044 has not
properly recognized the ZIP or MO drive. Check the power on/off
condition of the drive and the SCSI connection.
4.
Use the cursor [E]/[R] keys to make the display indicate
"BACKUP LOAD", and then press the [ENTER] key.
The indication "LOAD InsDisc1" appears on the display.
If a CD-R/CD-RW drive and another SCSI device are connected at the
same time, a screen for selecting the restore source appears after
pressing the [ENTER] key in step 4.
Use the cursor [E]/[R] keys to select "ExtDRV".
5.
Insert the ZIP or MO disc (disc number 1) with the stored
project into the drive, and press the [ENTER] key.
The name of the project to be restored and the new project number are
shown on the display.
If you wish to check the restore source directory, press the cursor [W]
key.
• If the backup spans several volumes, make sure that the first
disc inserted is the disc number 1. If the disc number is different,
correct restore will not be possible.
• To change the restore source disc, press the [EXIT] key and
repeat the procedure from step 4.
NOTE
25
LOAD
FireZone
LOAD
ExtDRV
LOAD
InsDisk1
NOTE
Reading a Stored Project from External Media (Project Restore)
message prompting the user to insert the next disc appears after data
from the first disc have been read.
9.
When the above message appears, insert the next CD-R/CDRW disc, and press the [ENTER] key.
The restore operation resumes. The new disc number and the
indication "wait..." appear on the display.
To cancel the operation, press the [EXIT] key to bring up the
indication "CANCEL?" on the screen, and then press the ENTER key.
When a backup spans several media volumes, be sure to insert
the discs in the same order as during backup. Otherwise correct
restore is not possible.
10.
Repeat the above steps until the entire project is restored.
When the restore operation is finished, the display indication changes
to "LOAD COMPLETE".
11.
To return to the main screen, press the [EXIT] key several
times.
■ Restoring from a ZIP or MO drive
1.
Verify that the ZIP or MO drive is properly connected to the
MRS-1044.
2.
In the main screen, press the [PROJECT/UTILITY] key.
3.
Use the cursor [E]/[R] keys to make the display indicate
NOTE
DISC002
wait...
CHANGE
DISC002
Page 16

30 31
ZOOM MRS-1044 ver 1.2 ZOOM MRS-1044 ver 1.2
Reading a Stored Project from External Media (Project Restore)
times.
■ Restoring from a hard disk
1.
Verify that the hard disk is properly connected to the
MRS-1044.
2.
In the main screen, press the [PROJECT/UTILITY] key.
3.
Use the cursor [E]/[R] keys to make the display indicate
"UTILITY BACKUP", and then press the [ENTER] key.
If the above menu does not appear, the MRS-1044 has not
properly recognized the hard disk. Check the power on/off
condition of the hard disk and the SCSI connection.
4.
Use the cursor [E]/[R] keys to make the display indicate
"BACKUP LOAD", and then press the [ENTER] key.
The name of the project to be restored and the new project number are
shown on the display. If you wish to check the restore source
directory, press the cursor [W] key.
5.
Turn the dial to select a restore source project, and press the
[ENTER] key.
The indication "LOAD SURE?" appears on the display, to verify the
restore process.
6.
To execute the restore process, press the [ENTER] key. If you
wish to cancel the process, press the [EXIT] key instead.
When restore starts, the indication "LOAD wait..." appears on the
display. When the restore operation is finished, the display indication
changes to "LOAD COMPLETE".
7.
To return to the main screen, press the [EXIT] key several
times.
25
LOAD
FireZone
NOTE
Reading a Stored Project from External Media (Project Restore)
6.
Turn the dial to select a restore source project, and press the
[ENTER] key.
The indication "LOAD SURE?" appears on the display, to verify the
restore process.
7.
To execute the restore process, press the [ENTER] key. If you
wish to cancel the process, press the [EXIT] key instead.
When restore starts, the indication "LOAD wait..." appears on the
display.
When the project backup spans several ZIP or MO discs, a message
prompting the user to insert the next disc appears after data from the
first disc have been read.
8.
When the above message appears, insert the next ZIP or MO
disc, and press the [ENTER] key.
The restore operation resumes. The new disc number and the
indication "wait..." appear on the display.
To cancel the operation, press the [EXIT] key to bring up the
indication "CANCEL?" on the screen, and then press the ENTER key.
When a backup spans several media volumes, be sure to insert
the discs in the same order as during backup. Otherwise correct
restore is not possible.
9.
Repeat the above steps until the entire project is restored.
When the restore operation is finished, the display indication changes
to "LOAD COMPLETE".
10.
To return to the main screen, press the [EXIT] key several
NOTE
DISK002
wait...
CHANGE
DISK002
Page 17

32 33
ZOOM MRS-1044 ver 1.2 ZOOM MRS-1044 ver 1.2
Deleting Backup Data
display.
When the delete operation is finished, the display indication changes
to "DELETE COMPLETE".
8.
To return to the main screen, press the [EXIT] key several
times.
• When wishing to delete backup data spanning several media
volumes, repeat the above procedure for each volume.
• Always verify the directory name, to make sure that you do not
accidentally delete another project.
NOTE
Deleting Backup Data
You can delete backup data (directories) from the media used for backup,
if the data are no longer needed.
Once a directory has been deleted, it cannot be restored. Take care not
to accidentally delete a directory that you may still need.
1.
Verify that the SCSI device is properly connected to the
MRS-1044.
2.
When using a MO drive, or ZIP drive, make sure that the
correct disc is inserted.
3.
In the main screen, press the [PROJECT/UTILITY] key.
4.
Use the cursor [E]/[R] keys to make the display indicate
"UTILITY BACKUP", and then press the [ENTER] key.
If the above menu does not appear, the MRS-1044 has not
properly recognized the SCSI device. Check the power on/off
condition of the device and the SCSI connection.
5.
Use the cursor [E]/[R] keys to make the display indicate
"BACKUP DELETE", and then press the [ENTER] key.
The screen for selecting the project to delete appears.
6.
Turn the dial to select the project to be deleted, and press the
[ENTER] key.
The indication "DELETE SURE?" appears on the display, to verify
the delete process.
7.
To execute the delete process, press the [ENTER] key. If you
wish to cancel the process, press the [EXIT] key instead.
When delete starts, the indication "DELETE wait..." appears on the
DELETE
PROJ001
NOTE
NOTE
Deleting Backup Data
Page 18

34 35
ZOOM MRS-1044 ver 1.2 ZOOM MRS-1044 ver 1.2
Changing the Length of a V-take (Trimming)
The start position and end position of a recorded V-take can be adjusted, to
cut unneeded waveform data. This is useful for example to remove silent
portions from a V-take before writing it to CD-R/CD-RW disc.
1.
In the main screen, press the [PROJECT/UTILITY] key.
2.
Use the cursor [E]/[R] keys to make the display indicate
"UTILITY TR EDIT", and then press the [ENTER] key.
The track edit menu appears.
3.
Use the cursor [E]/[R] keys to make the display indicate
"TR EDIT TRIM", and then press the [ENTER] key.
The screen for selecting the track/V-take appears.
4.
Use the dial and the cursor [E]/[R] keys to select the
track/V-take for trimming.
In the indication "TR xx- yy", "xx" stands for the track number and
"yy" for the V-take number. Use the dial to select the track number (1
– 10) and the cursor [E]/[R] keys to select the V-take number (1 –
10).
Turning the dial further to the right when track 10 is selected brings
up the following indication.
This screen serves for selecting dual odd/even tracks (1/2, 3/4, 5/6,
7/8, 9/10). When dual tracks are selected, the currently selected V-take
for each track is automatically selected for trimming.
TrimSrc
TR1/2
TrimSrc
TR 1- 1
Formatting an External Storage Device
The MRS-1044 can format a connected hard disk or media in a connected
ZIP or MO drive. This is required before using ZIP or MO media or a hard
disk for the first time.
When formatting is carried out, all data present on the media are lost
and cannot be restored. Take care not to accidentally format a disc
which contains data that you wish to keep.
1.
Verify that the SCSI device is properly connected to the
MRS-1044.
2.
When using a MO or ZIP drive, make sure that a suitable disc
is inserted.
3.
In the main screen, press the [PROJECT/UTILITY] key.
4.
Use the cursor [E]/[R] keys to make the display indicate
"UTILITY BACKUP", and then press the [ENTER] key.
If the above menu does not appear, the MRS-1044 has not
properly recognized the SCSI device. Check the power on/off
condition of the device and the SCSI connection.
5.
Use the cursor [E]/[R] keys to make the display indicate
"BACKUP FORMAT", and then press the [ENTER] key.
The indication "FORMAT SURE?" appears on the display, to verify
the formatting process.
6.
To execute the formatting process, press the [ENTER] key. If
you wish to cancel the process, press the [EXIT] key instead.
When formatting starts, the indication "FORMAT wait..." appears on
the display.
When formatting is finished, the display indication changes to
"FORMAT COMPLETE".
7.
To return to the main screen, press the [EXIT] key several
times.
NOTE
NOTE
Formatting an External Storage Device
Changing the Length of a V-take (Trimming)
Page 19

36 37
ZOOM MRS-1044 ver 1.2 ZOOM MRS-1044 ver 1.2
Changing the Length of a V-take (Trimming)
The indication "TrTrim SURE?" appears on the display, to verify the
trimming process.
Also after the start point and end point have been specified, the
original audio data are still available until the [ENTER] key is
pressed in step 9. By pressing the [EXIT] key you can move back
through the steps one by one and make corrections if needed.
9.
To execute the trimming process, press the [ENTER] key. If
you wish to cancel the process, press the [EXIT] key instead.
When you press the [ENTER] key, data outside of the specified start
point to end point range are deleted.
When the trimming operation is finished, the display indication
changes to "COMPLETE".
When the start point was moved back, the entire V-take is shifted
to the front.
10.
To return to the main screen, press the [EXIT] key several
times.
NOTE
New start point New end point
Selected V-take
Changing the Length of a V-take (Trimming)
5.
Press the [ENTER] key.
The screen for specifying the V-take start point appears.
6.
Move the start point back as required, and press the [ENTER]
key.
The screen for specifying the V-take end point appears.
For details on how to specify the position, refer to page 39 of the
MRS-1044 operation manual.
7.
In the same way, move the end point forward as required, and
press the [ENTER] key.
By pressing the PLAY [R] key in the transport section of the
MRS-1044, you can play the range from the specified start point to the
specified end point.
The start point cannot be moved forward from the original position,
and the end point cannot be moved backward from the original
position.
8.
When the end point has been specified, press the [ENTER]
key.
NOTE
05
TrimSrc
END
02
TrimSrc
START
Page 20

38 39
ZOOM MRS-1044 ver 1.2 ZOOM MRS-1044 ver 1.2
Troubleshooting
■ When trying to execute a command, one of the
following messages appears.
[MO drive, ZIP drive, or hard disk related]
●
EMPTY ••••••••• Directory does not exist.
●
FULL ••••••••••• Hard disk does not have sufficient space.
●
NO DATA •••••• No applicable data exist.
●
NO DISK ••••••• No disc inserted in ZIP/MO drive
●
SAME DIR •••••• Directory with the same name already exists.
[CD-R/CD-RW drive related]
●
FULL ••••••••••• CD-R/CD-RW disc does not have sufficient space.
●
NO AUDIO ••••• Disc other than audio CD is inserted in CD-R/CD-RW
drive.
●
NO DATA •••••• No applicable data exist.
●
NO DISC ••••••• No disc inserted in CD-R/CD-RW drive.
●
NotBLANK ••••• CD-R/CD-RW disc is not blank.
●
NOT CD-R ••••• Disc inserted in CD-R/CD-RW drive is not a
CD-R/CD-RW disc.
[MRS-1044 related]
●
HDD FULL ••••• Internal hard disk of MRS-1044 is full.
●
PRJ FULL •••••• No more projects can be created on internal hard disk
of MRS-1044.
Troubleshooting
If there are problems during MRS-1044 or SCSI device operation, check
the following points first.
■ MRS-1044 does not recognize SCSI device
●
Check whether SIB-01 is correctly installed.
●
Check whether MRS-1044 system has been upgraded to version
1.2.
●
Check whether SCSI cable is correctly connected, and whether
SCSI device is powered.
●
Check whether SCSI ID setting is appropriate.
●
Check whether terminator is installed in the last device, or internal
terminator has been set to ON. In rare cases, removing the
terminator may improve operation stability.
■ Audio CDs created with the MRS-1044 cannot be
played on an ordinary CD player
●
Check whether the disc was finalized.
●
Check whether the CD player is an old model.
On some old CD players, CD-R/CD-RW discs will not play properly as
audio CDs, even if the disc was finalized.
■ Audio data cannot be written to the CD-R/CD-RW
media
●
Check whether the disc has already been finalized.
■ Backup cannot be performed
●
Check whether the disc already contains other audio data.
●
Check whether the hard disk has enough capacity.
■ A backup spanning multiple volumes cannot be
restored
●
Was the number one disc inserted in the drive first?
Troubleshooting
Page 21

ZOOM CORPORATION
NOAH Bldg., 2-10-2, Miyanishi-cho, Fuchu-shi, Tokyo 183-0022,
Japan
PHONE: +81-42-369-7116 FAX: +81-42-369-7115
Web Site: http://www.zoom.co.jp
Printed in Japan SIB-01-5000-1
 Loading...