

Page 1
Multi-Effects Processor
Quick Guide
You must read the Usage and Safety Precautions before use.
The Operation Manual can be downloaded from the ZOOM website (www.zoom.jp/docs/g11).
This page has les in PDF and ePub formats.
The PDF le format is suitable for printing on paper and reading on a computer.
The ePub format can be read with electronic document readers and is designed for reading on smart-
phones and tablets.
© 2020 ZOOM CORPORATION
Copying or reprinting this manual in part or in whole without permission is prohibited.
Product names, registered trademarks and company names in this document are the property of their respective companies.
You might need this manual in the future. Always keep it in a place where you can access it easily.
The contents of this manual and the specifications of the product could be changed without notice.
Windows® is a trademark or registered trademark of Microsoft® Corporation. Mac and iPad OS are trademarks or registered
trademarks of Apple Inc. iOS is a trademark or registered trademark of Cisco Systems, Inc. and used under license.
Page 2
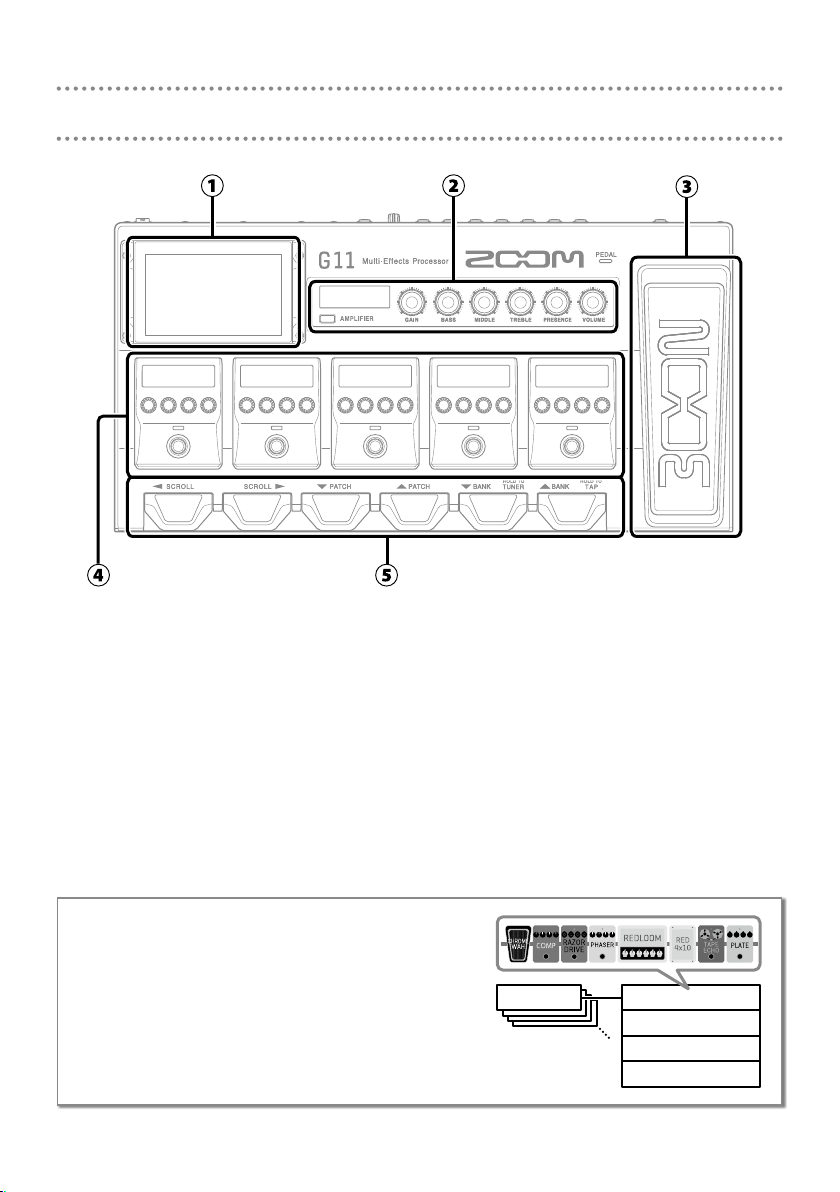
Functions of parts
① Touchscreen
This shows the G11 functions as icons. While looking at the screen, touch it to select patch memories and banks or make settings, for example.
② Amplier section
Use the dedicated knobs and the touchscreen to make adjustments as on a real amp.
③ Expression pedal
Use this pedal to adjust the volume or a wah effect, for example.
④ Effects section
Turn effects on and off and adjust them like using stomp boxes.
⑤ Footswitches
Use these to select patch memories and banks and to turn the tuner on and off.
• Patch memories
These store the effects used, their order, on/off states
and parameter setting values. Effects are saved and
recalled in patch memory units.
Banks
•
These are groups of 4 patch memories.
2
Bank A
Patch memory 001
Patch memory 002
Patch memory 003
Patch memory 004
Page 3
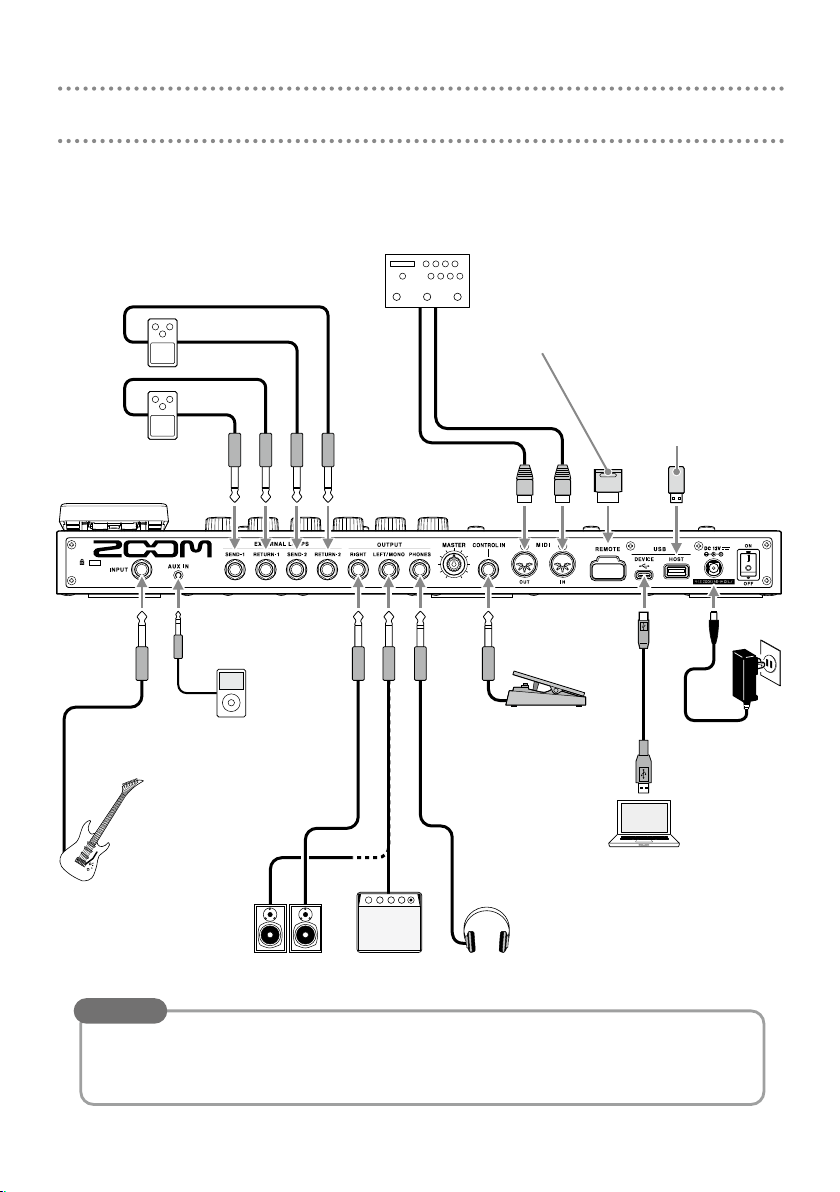
Making connections
External effects (2 loops)
Connect the SEND 1/2 jack to the
input jack on the effect and connect
the RETURN 1/2 jack to the output
jack on the effect.
External MIDI device
Connect MIDI cables here.
can be used in coordination
The
G11
with an external MIDI device.
ZOOM BTA-1 or other
dedicated wireless adapter
This enables wireless control of
the
G11
Guitar Lab app.
using the iOS/iPadOS
USB ash drive
(USB 2.0/3.0)
Use to import IR data and
update the rmware.
Portable music
player, etc.
Adjust the volume on the
connected device.
Guitar
AmpMonitor speakers
Expression pedal
(ZOOM FP02M)
A pedal can be used to
control effects.
Computer (Mac/Windows)
Connect a USB cable (Type-C).
The
interface and with Guitar Lab.
Headphones
can be used as an audio
G11
HINT
The computer or iOS/iPadOS Guitar Lab app can be used to manage patch memories and
to edit and add effects. Guitar Lab can be downloaded from the ZOOM website (www.zoom.
co.jp).
3
AC adapter
(ZOOM AD-19)
Page 4
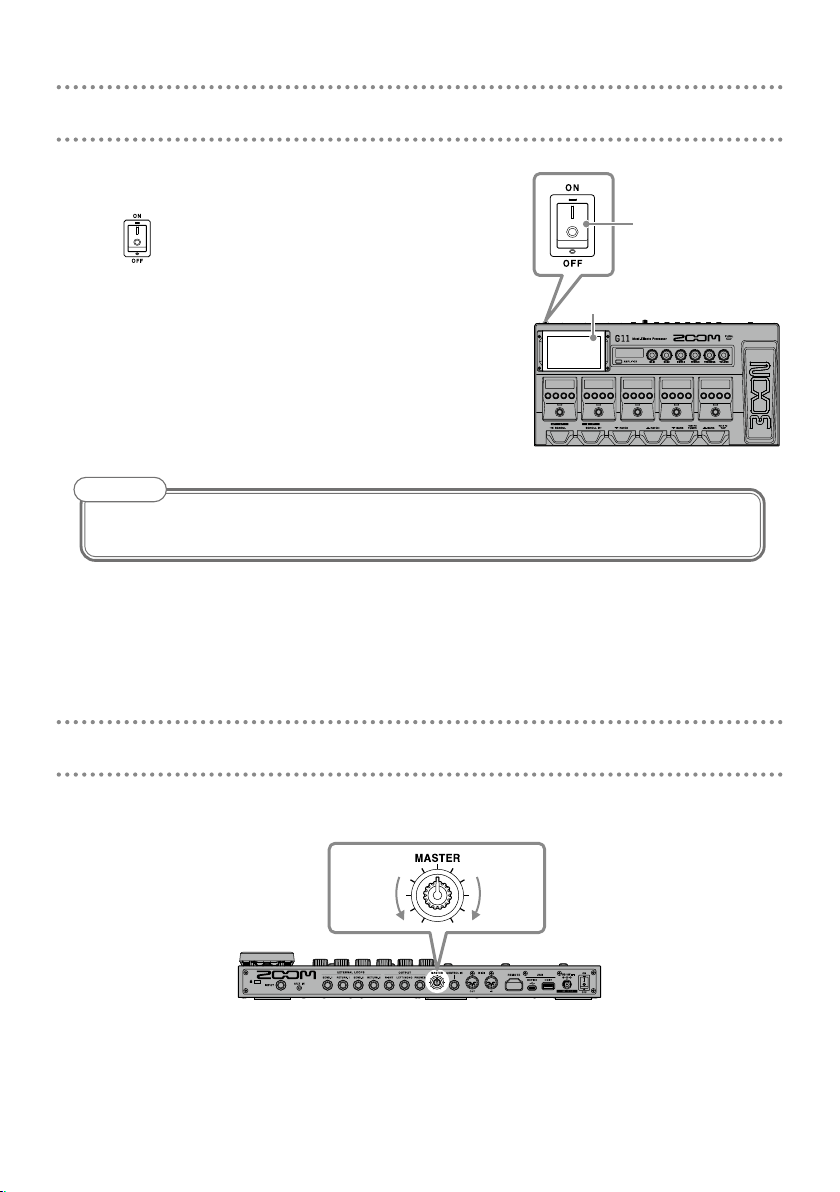
Turning the power on
Minimize the volume of the amp/monitor speakers.
1.
Set to ON.
2.
This turns the
on the touchscreen.
Raise the volume of the amp/monitor speakers.
3.
NOTE
By default, ECO mode setting is ON, so the power will automatically turn off if no use occurs
for 10 hours. ECO mode can also be turned OFF.
power on and opens the Home Screen
G11
Touchscreen
2
Adjusting the master level
The volume output from the G11 can be adjusted.
Lower
4
Raise
Page 5
Using the touchscreen
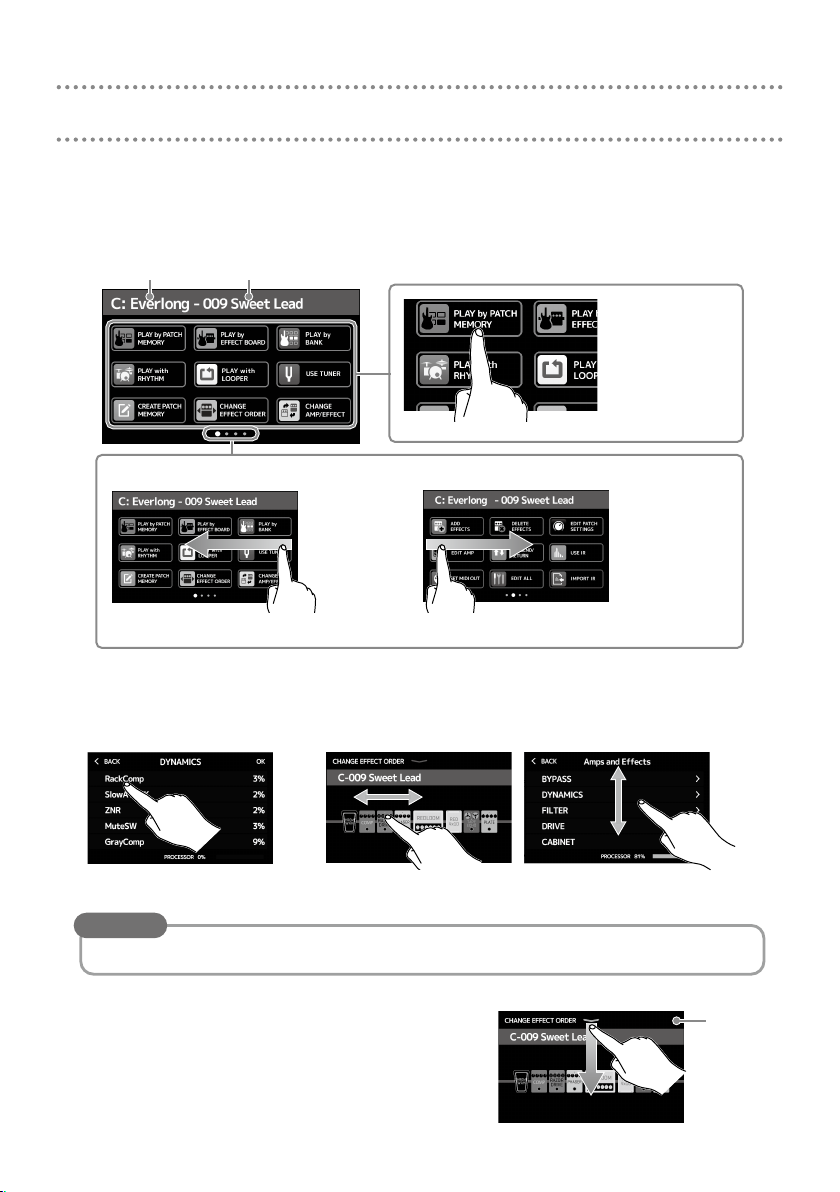
Home Screen overview
■
This is the screen that appears on the touchscreen when the G11 power is turned on. All the
functions are arranged as icons, so each one can easily be accessed by touch.
Current bank
The Home Screen has four pages. This shows which page is currently open.
Current patch memory
Touch an icon to
select a function to
set or adjust.
To open the next page, swipe
left from the right edge.
Using the screens
■
To open the previous page, swipe
right from the left edge.
Touch and drag to operate.
Touch an item to select it.
Drag an item to move or adjust it (slide nger any direction while touching).
HINT
Icons on the Home Screen can be dragged to reorder them.
Returning to the Home Screen
■
To return to the Home Screen from a function
screen, swipe down from the toolbar at the top
edge of the touchscreen.
5
Toolbar
Page 6

Showing the patch memory name while performing
The name of the selected patch memory can be shown in large letters for easy conrmation.
Touch
Selecting patch memories with the touchscreen
■
Swipe down to select the previous patch memory.
•
Swipe up to select the next patch memory.
•
on the Home Screen.
Showing the entire effects chain while performing
The touchscreen allows all the effects and the amp being used in the patch memory to be
seen at a glance.
Touch
When six or more effects are being used, press
or to change the effects that are shown and can
be operated in the effects section.
The G11 comes with patch memories prepared to enable quick experimentation with a
variety of guitar sounds. Patch memories are organized in banks of four. Choose a patch
memory that you like and try playing guitar with it.
on the Home Screen.
Effects shown in the effects section
Press or .
1.
Select banks.
Press or .
2.
Select patch memories.
12
6
Page 7

Adjusting the amp
Use the amp section to adjust the amp selected with the patch memory.
Press .
1.
This turns the amp ON/OFF. (It lights when ON.)
The name of the selected amp is shown on the
AMPLIFIER section display.
Turn .
2.
These knobs adjust, from the left, the gain, bass
frequencies, middle frequencies, treble frequencies, presence and volume.
When adjusting the amp, parameter values are
shown on the AMPLIFIER section display.
HINT
When the AUTO SAVE function is ON, changes to patch memories will be automatically
saved. (This function is ON by default.)
1 21, 2
Adjusting the amp with the touchscreen
■
Touch on the Home Screen.
Amp name
Drag a knob up and down
to adjust it.
The parameters that can be adjusted and set depend on the amp type. (Some parameters can
•
only be adjusted and set using the touchscreen.)
Adjustments to the values of settings made in the AMPLIFIER section are reected on the touch-
•
screen.
Touch a switch to change
its setting.
7
Page 8

Turning effects ON/OFF and adjusting them
Use the effects section to turn ON/OFF and adjust the individual effects used in a patch
memory.
Category Effect type
Press .
1.
This turns the effect ON/OFF.
The effect indicator lights when it is ON.
Turn to adjust an effect parameter.
2.
The knob adjusts the parameter shown above it on the
display.
Parameters that can
be adjusted and their
current settings
Changing the effect order
■
2
1
1
Touch on the Home Screen.
1.
This opens the effect reordering screen on the touchscreen.
Drag an effect you want to move.
2.
This moves the effect.
8
Page 9

Adding effects
■
Touch on the Home
1.
Screen.
This opens the effect addition screen on the
touchscreen.
Drag to the position where you
2.
want to add the effect.
Touch an effect type to select it. Then,
5.
touch OK.
This adds the effect.
Touch .
3.
Touch a category to select it.
4.
HINT
Drag the scrollbar on the right edge to
scroll the list.
Deleting effects
■
Touch on the Home
1.
Screen.
This opens the effect deletion screen on the
touchscreen.
Touch the for the effect that you
2.
want to delete.
That effect will be deleted.
9
Page 10

Changing effects
■
Touch on the Home
1.
Screen.
This opens the amp/effect changing screen
on the touchscreen.
Touch the effect that you want to
2.
change.
HINT
To change to an effect in another category, touch BACK, select the category and then
•
select the effect.
See Guitar Lab for the explanations of each effect.
•
Touch an effect type to select it. Then,
3.
touch OK.
That effect will be changed.
Using the pedal
If an effect in the PEDAL category is selected in a patch
memory, the amount of the effect can be controlled with
the expression pedal.
Pressing the front of the pedal turns the pedal effect ON/
OFF. (When ON, the pedal indicator lights.)
Check the effects section for the effect that can be
adjusted with the pedal.
HINT
When an external pedal is connected, two effects from the PEDAL category can be used.
The PEDAL category contains pedal effects.
10
Expression pedal
Pedal indicator
Page 11

Using the tuner
Use this to tune the connected guitar.
Touch on the Home
1.
Screen or press and hold .
This opens the tuner on the touchscreen.
Play the open string that you want to tune and
2.
adjust its pitch.
Touch to mute the sound.
This shows the tuner type and standard pitch.
Touch this to open the SET TUNER screen.
(See below.)
• The nearest note name and pitch detuning will be shown.
• When the pitch is accurate, the left and right indicators will become green.
• Different tuner types can be shown by swiping right and left.
2
1
Making specic tuner settings
■
Touch to return to the USE TUNER screen.
Touch to select
the tuner type.
Touch to use
at tuning.
•
Touch
on the Home Screen to open the SET TUNER screen.
Drag to change the standard pitch.
11
Page 12

Using rhythms
You can play along with built-in rhythms.
Touch on the Home Screen.
1.
This opens the rhythm control screen on the touchscreen.
Make rhythm settings on the rhythm control screen.
2.
Use to adjust the
rhythm tempo.
Use to select the
rhythm pattern.
Use to turn the count ON/OFF
when recording with the looper.
Start/stop rhythm playback.
3.
Use to adjust the
rhythm volume.
• Start playback: Press
• Stop playback: Press
1, 2
3
Rhythm patterns
■
No. Name Time Sig. No. Name Time Sig. No. Name Time Sig. No. Name Time Sig.
1 GUIDE 4/4 18 Emo 4/4 35 NewWave 4/4 52 Bossa2 4/4
2 8Beats1 4/4 19 TomTomBt 4/4 36 OneDrop 4/4 53 Samba1 4/4
3 8Beats2 4/4 20 Funk1 4/4 37 Steppers 4/4 54 Samba2 4/4
4 8Beats3 4/4 21 Funk2 4/4 38 Rockers 4/4 55 Breaks1 4/4
5 16Beats1 4/4 22 FunkRock 4/4 39 Ska 4/4 56 Breaks2 4/4
6 16Beats2 4/4 23 JazzFunk 4/4 40 2nd Line 4/4 57 Breaks3 4/4
7 16Beats3 4/4 24 R&B1 4/4 41 Country 4/4 58 12/8 Grv 12/8
8 Rock1 4/4 25 R&B2 4/4 42 Shuffle1 4/4 59 Waltz 3/4
9 Rock2 4/4 26 70's Soul 4/4 43 Shuffle2 4/4 60 JzWaltz1 3/4
10 Rock3 4/4 27 90's Soul 4/4 44 Blues1 4/4 61 JzWaltz2 3/4
11 ROCKABLY 4/4 28 Motown 4/4 45 Blues2 4/4 62 CtWaltz1 3/4
12 R'n'R 4/4 29 HipHop 4/4 46 Jazz1 4/4 63 CtWaltz2 3/4
13 HardRock 4/4 30 Disco 4/4 47 Jazz2 4/4 64 5/4 Grv 5/4
14 HeavyMtl 4/4 31 Pop 4/4 48 Fusion 4/4 65 Metro3 3/4
15 MtlCore 4/4 32 PopRock 4/4 49 Swing1 4/4 66 Metro4 4/4
16 Punk 4/4 33 IndiePop 4/4 50 Swing2 4/4 67 Metro5 5/4
17 FastPunk 4/4 34 EuroPop 4/4 51 Bossa1 4/4 68 Metro
12
Page 13

Using the looper
You can record your playing and create stereo loop phrases that are up to 5 minutes long.
Touch on the Home Screen.
1.
This opens the looper control screen on the touchscreen.
Use the looper.
2.
Press when stopped
This starts recording. If a loop has
already been recorded, it starts playing back.
Press when recording
Recording stops and the loop plays
back.
Press when playing back
This starts overdubbing the playing loop.
Press twice when playing back
This erases the last overdub (UNDO).
Press twice again to restore the erased overdub (REDO).
Press when recording
This cancels recording.
Press when playing back
This stops playback.
Press and hold when stopped
This deletes the loop.
1, 2
2
This shows the looper status.
• READY: No loop recorded yet
• RECORD: Now recording
• PLAY: Playing back
• STOPPED: Playback stopped
• UNDO: Erase last recorded
overdub
• REDO: Restore overdub erased
by UNDO
Touch to open the looper settings screen.
The UNDO function can be
turned ON/OFF and the stopping method and the looper
position can be set
Used to adjust the looper
volume.
This sets the recording time.
• MANUAL: Press
• ♩× 1–64: Set the recording time in quarter notes.
to stop recording.
13
Page 14

Setting list
This is a list of the functions shown when icons on the Home Screen are touched.
Icon Explanation
PLAY by PATCH MEMORY
PLAY by EFFECT BOARD
PLAY by BANK Use the footswitches to select the four patch memories in the bank.
PLAY with RHYTHM Use the rhythm function.
PLAY with LOOPER Use the looper.
USE TUNER Use the tuner.
CREATE PATCH MEMORY Create patch memories.
CHANGE EFFECT ORDER Change the order of effects in patch memories.
CHANGE AMP/EFFECT Change amps and effects in patch memories.
ADD EFFECTS Add effects to patch memories.
DELETE EFFECTS Remove effects from patch memories.
EDIT PATCH SETTINGS Set patch memory names, patch levels and MIDI OUT settings.
EDIT AMP Adjust the amp.
USE SEND/RETURN Makes send/return settings.
USE IR Use impulse responses (IR).
SET MIDI OUT Make patch memory MIDI output settings.
EDIT ALL Edit all patch memory settings.
IMPORT IR Load impulse response (IR) data.
CREATE BANK Create banks.
CHANGE BANK ORDER Change the order of banks.
CHANGE PATCH MEMORY ORDER
DELETE BANK Delete banks.
DELETE PATCH MEMORY Delete patch memories.
SAVE PATCH MEMORY Save patch memories.
SET OUTPUT Set the output level to INST or LINE.
SET TEMPO Set the tempo used for the effects, rhythms and looper.
SET TUNER Make specic tuner settings.
SET USB AUDIO Make USB audio settings.
SET MIDI Make MIDI settings.
SET PEDAL Make specic pedal settings.
SET SYSTEM SETTINGS Change and check system settings.
SET AUTO SAVE Turn the automatic saving function ON/OFF.
SET POWER DISPLAY
Show large patch memory names on the touchscreen for selection.
Show the effects used in the patch memory on the touchscreen.
Change the order of patch memories.
Adjust the brightness and contrast of each screen and turn eco mode ON/OFF.
HINT
See the Operation Manual for detailed information about all the functions.
14
Page 15

Specications
Maximum number of
simultaneous effects
User patches 240
Sampling frequency 44.1 kHz
A/D conversion 24-bit 128× oversampling
D/A conversion 24-bit 128× oversampling
Signal processing 32-bit
Frequency characteristics 20 Hz – 20 kHz (+1 dB/−2 dB) (10kΩ load)
Displays 5" TFT color LCD (800×480)
Inputs INPUT Standard mono phone jack
RETURN Standard mono phone jacks (2)
AUX IN Stereo mini jack
Outputs Left/Right Standard mono phone jack
PHONES Standard stereo phone jack
SEND Standard mono phone jacks (2)
Input S/N 123 dB
Noise oor
(residual noise)
MIDI IN/OUT 5-pin DIN jacks
Control input FP02M input
Power AC adapter: 12V DC, center plus, 2000 mA (ZOOM AD-19)
USB DEVICE Connector: USB2.0 Type-C / Supported cable: Type-C cable
USB HOST Connector: USB2.0 Type-A / Standard: USB 2.0 High Speed
REMOTE ZOOM BTA-1 or other dedicated wireless adapter
External dimensions 253 mm (D) × 495 mm (W) × 64 mm (H)
Weight 2.8 kg
• 0 dBu = 0.775 V
Left/Right INST/LINE −99.5 dBu/−92.5 dBu
SEND -99.0 dBu
Amplier + 9 effects
Dot-matrix LCDs (128×32) (6)
Rated input level: -20 dBu
Input impedance (line): 500 kΩ
Rated input level: -20 dBu
Input impedance (line): 1 MΩ
Rated input level: -10 dBu
Input impedance (line): 10 kΩ
Maximum output level:
INST/LINE +11.4 dBu/+19 dBu (when output impedance 10 kΩ or higher)
Maximum output level:
Line +11.4 dBu (when output impedance 10 kΩ or higher)
Headphones 24 mW + 24 mW (at 32Ω load)
Maximum output level:
Line +11.4 dBu (when output impedance 10 kΩ or higher)
GuitarLab: USB1.1 Full Speed
Audio Interface: USB2.0 High Speed, 44.1 kHz/32-bit 4in 4out
• Use cables for data transfer. USB bus power notsupported.
• Use a USB thumb drive.
15
Page 16

ZOOM CORPORATION
4-4-3 Kanda-surugadai, Chiyoda-ku, Tokyo 101-0062 Japan
www.zoom.co.jp
Z2I-3839-03
 Loading...