

Page 1
®
CAL
(A)
(B)
CAL
(A) (C)(B)
“
PWRCAL
LASER
¤
CAL
PWR
“
“
PWRCAL
LASER
¤
CAL
PWR
1
2
3
4
5
6
7
8
LASERVISION
X
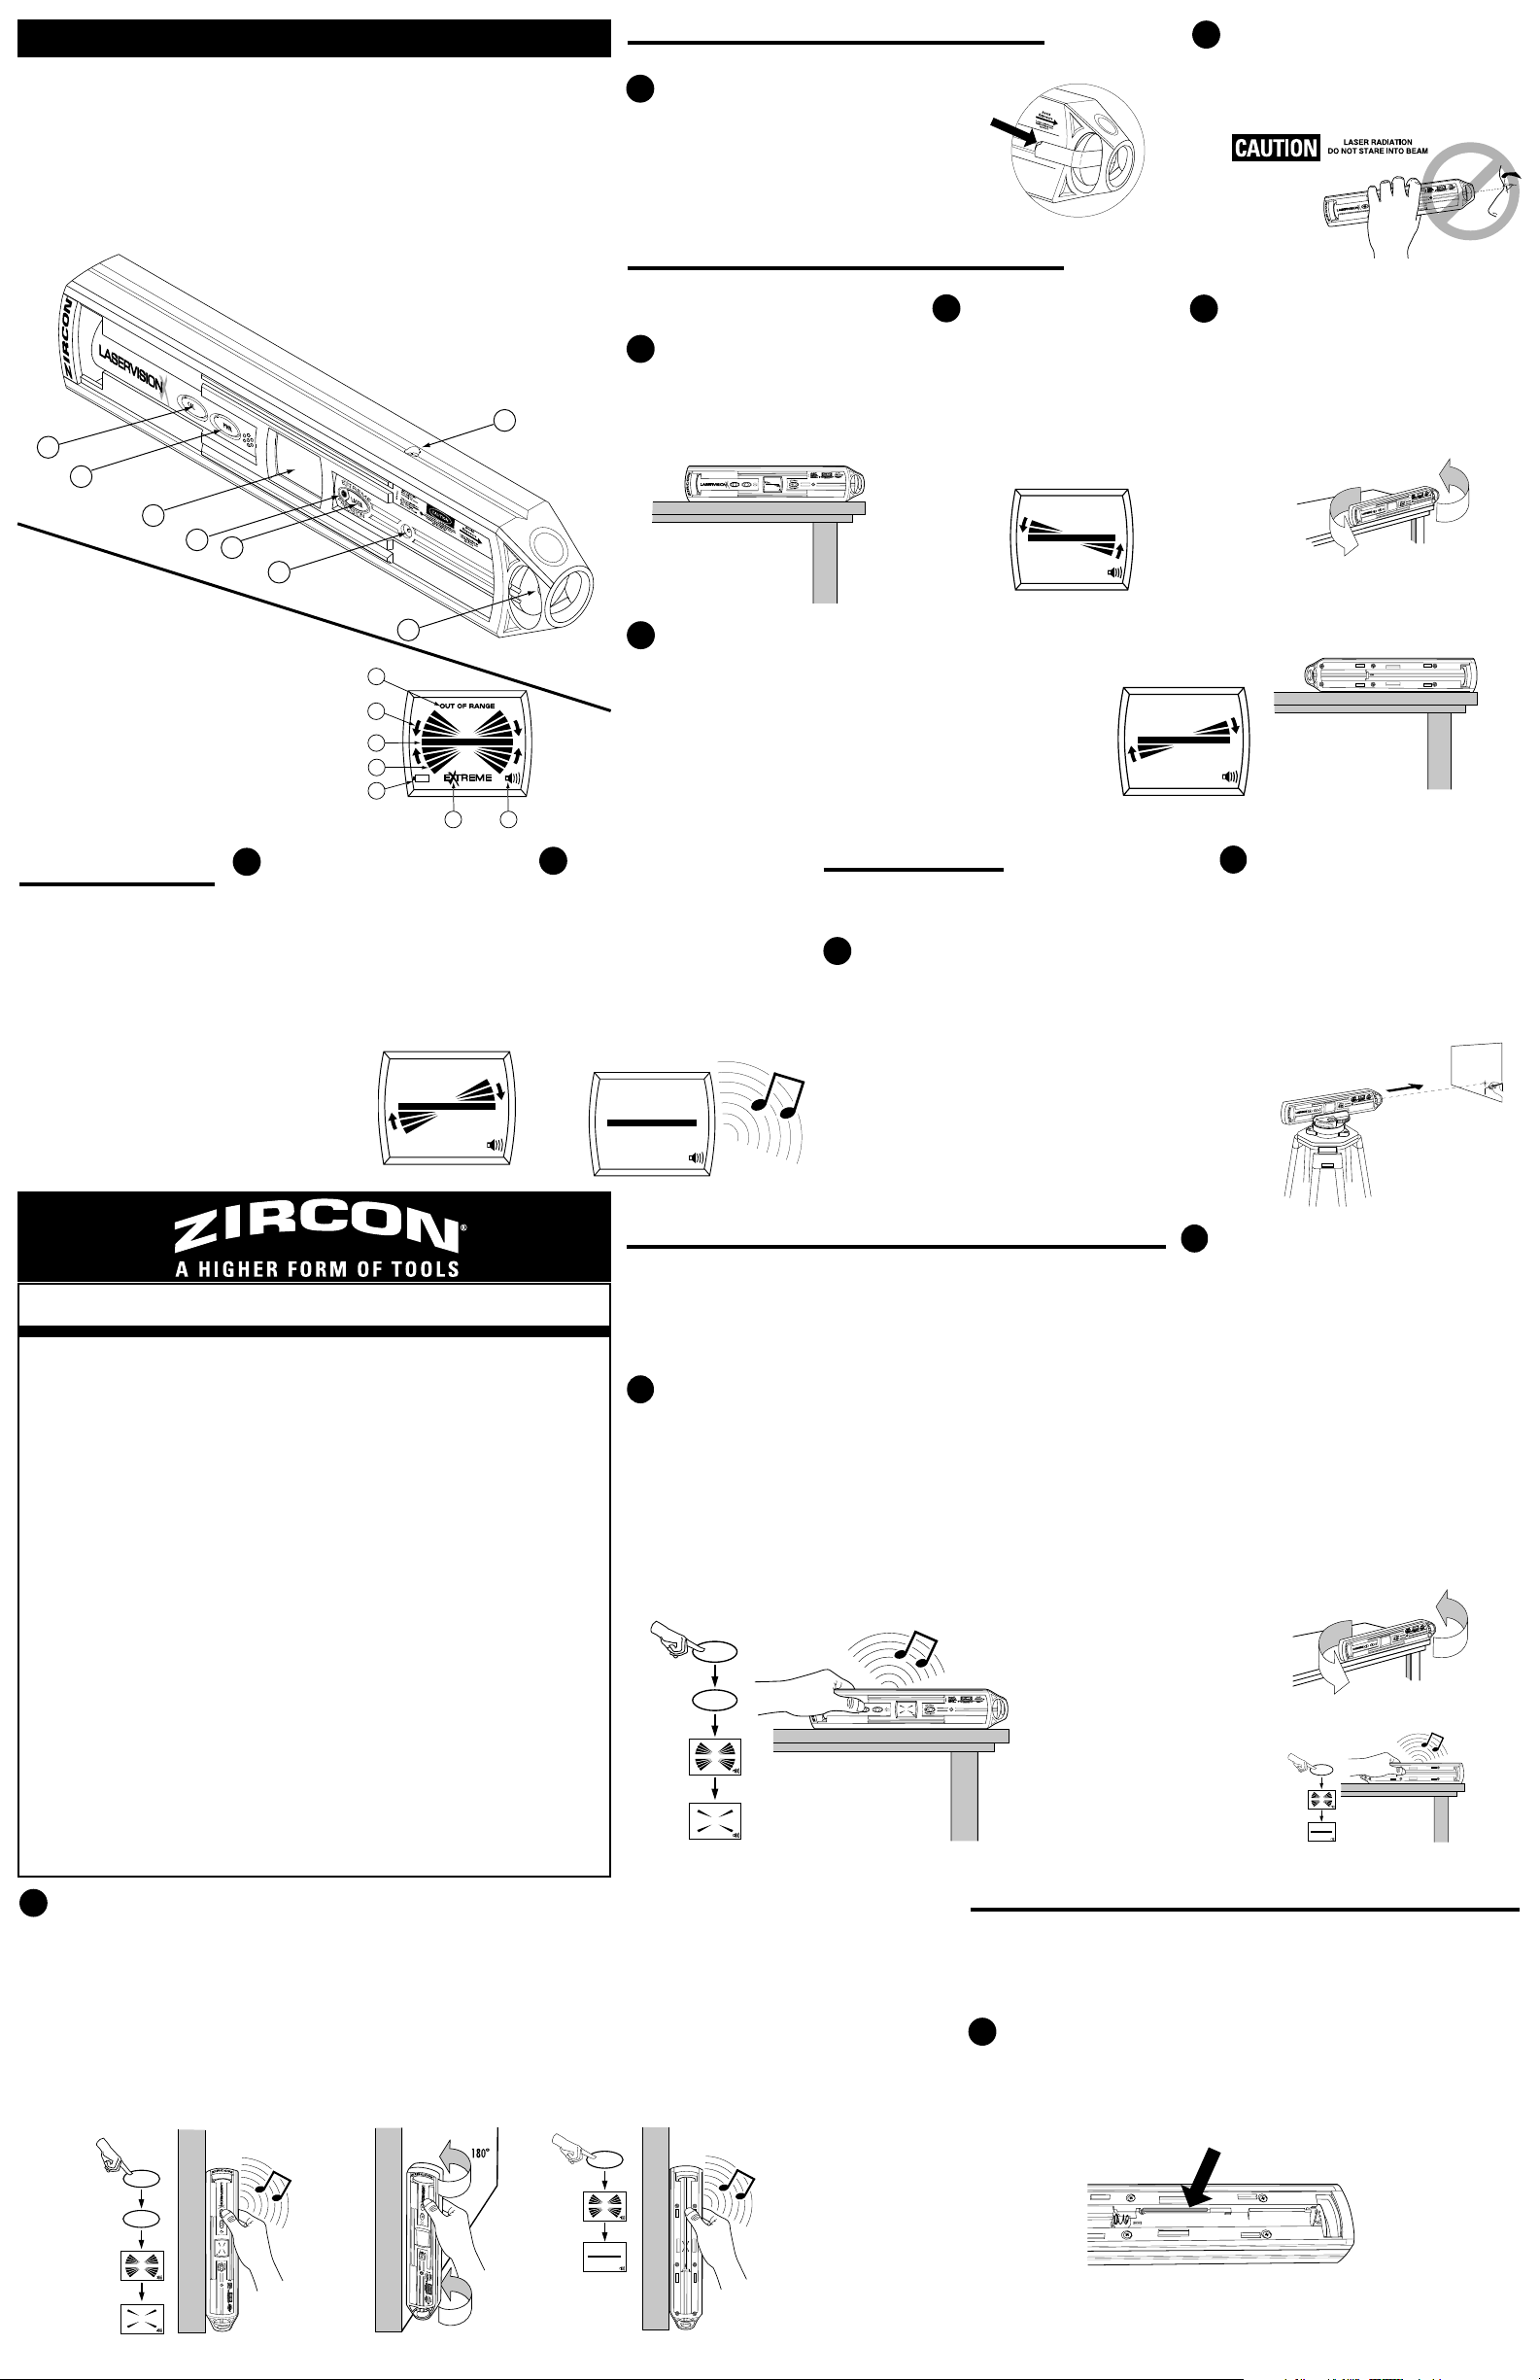
The Zircon LaserVision®X is a high-precision electronic level that simplifies the timeconsuming task of laying out a job. It allows you to mark reference points up to 150 ft.
away. LaserVision X features an integrated laser and an electronic LCD that indicates
relative deviation from level or plumb and the rotational direction needed to achieve them.
El LaserVision® X de Zircon es un nivel electrónico de alta precisión que simplifica la tarea
de trazar un trabajo, tarea que demanda mucho tiempo. Le permite marcar puntos de
referencia a una distancia máxima de 150 pies. LaserVision X se compone de un láser
integrado y una pantalla electrónica de cristal líquido que indica la desviación relativa del
nivel o plomada y el sentido rotativo necesario para alcanzarlo.
PREPARING THE LASERVISION X FOR USE
PREPARACIÓN DEL LASERVISION X PARA USO
For safety reasons, the LaserVision X laser has
1
been covered. Carefully peel off the entire
"REMOVE FOR USE" protective sticker to leave
a clear path for the laser beam.
Por razones de seguridad, el láser del
LaserVision X viene cubierto. Retire el adhesivo
de protección que indica "REMOVE FOR USE"
(RETIRAR ANTES DE USAR) a fin de liberar la vía
del haz de láser.
Warning: Never shine laser spot directly into
2
eyes. The Class II laser can cause serious eye
injury.
Advertencia: No dirija el proyector láser
directamente a los ojos. El láser Clase II
puede causar graves lesiones en la vista.
R
E
M
O
F
V
O
E
R
U
S
E
1. Calibration (CAL) Button • Botón de Calibración (CAL)
2. Level Power (PWR) Button • Botón de Activado de Nivel (PWR)
3. LCD • Pantalla de Cristal Líquido
4. LASER Button LED • Indicador de LASER
5. LASER Power Button •. Botón de Activado de LASER
6. Horizontal Laser Adjustment Screw • Tornillo de Ajuste
LCD Components
Componentes de la pantalla de Cristal Líquido
1. Out of Range Indicator
Indicador de Fuera de Alcance
2. Directional Rotation Arrow
Flecha de Rotación Direccional
3. Level/Plumb Bar
Barra de Nivel/Plomada
4. Segmented Bars
Barras Segmentadas
5. Low Battery Indicator
Indicador de Batería Baja
6. Extreme Precision Mode Indicator
Indicador del Modo de Extrema Precisión
7. Sound Indicator
Indicador de Sonido
FINDING LEVEL AND
PLUMB
7
PARA HALLAR EL
NIVEL Y LA
PLOMADA
The LaserVision X features two precision
modes. Regular Mode uses the level
feature only. Extreme Precision Mode
uses both the level and laser features,
providing four times more accuracy
than Regular Mode.
El LaserVision X tiene dos modos de
precisión. El Modo Regular (Regular
Mode) utiliza sólo la función de nivel. El
Modo de Extrema Precisión (Extreme
Precision Mode) utiliza tanto las
funciones de nivel como de láser y
ofrece cuatro veces la precisión del
Modo Regular.
Horizontal de Láser
7. Laser Exit Hole • Orificio de Salida de Láser
8. Vertical Laser Adjustment Screw • Tornillo de
Ajuste Vertical de Láser
1
2
3
4
5
6 7
The LCD screen displays four
segmented bars that indicate how far
off the unit is from level or plumb. The
arrows on either side indicate which
way to rotate the unit to reach level or
plumb.
En la pantalla de cristal líquido se
presentarán cuatro barras segmentadas
que indican lo distante que se halla la
unidad del nivel o plomada. Las flechas
a cada lado señalan el sentido de
rotación del
LaserVision X
para alcanzar el
nivel o la
plomada.
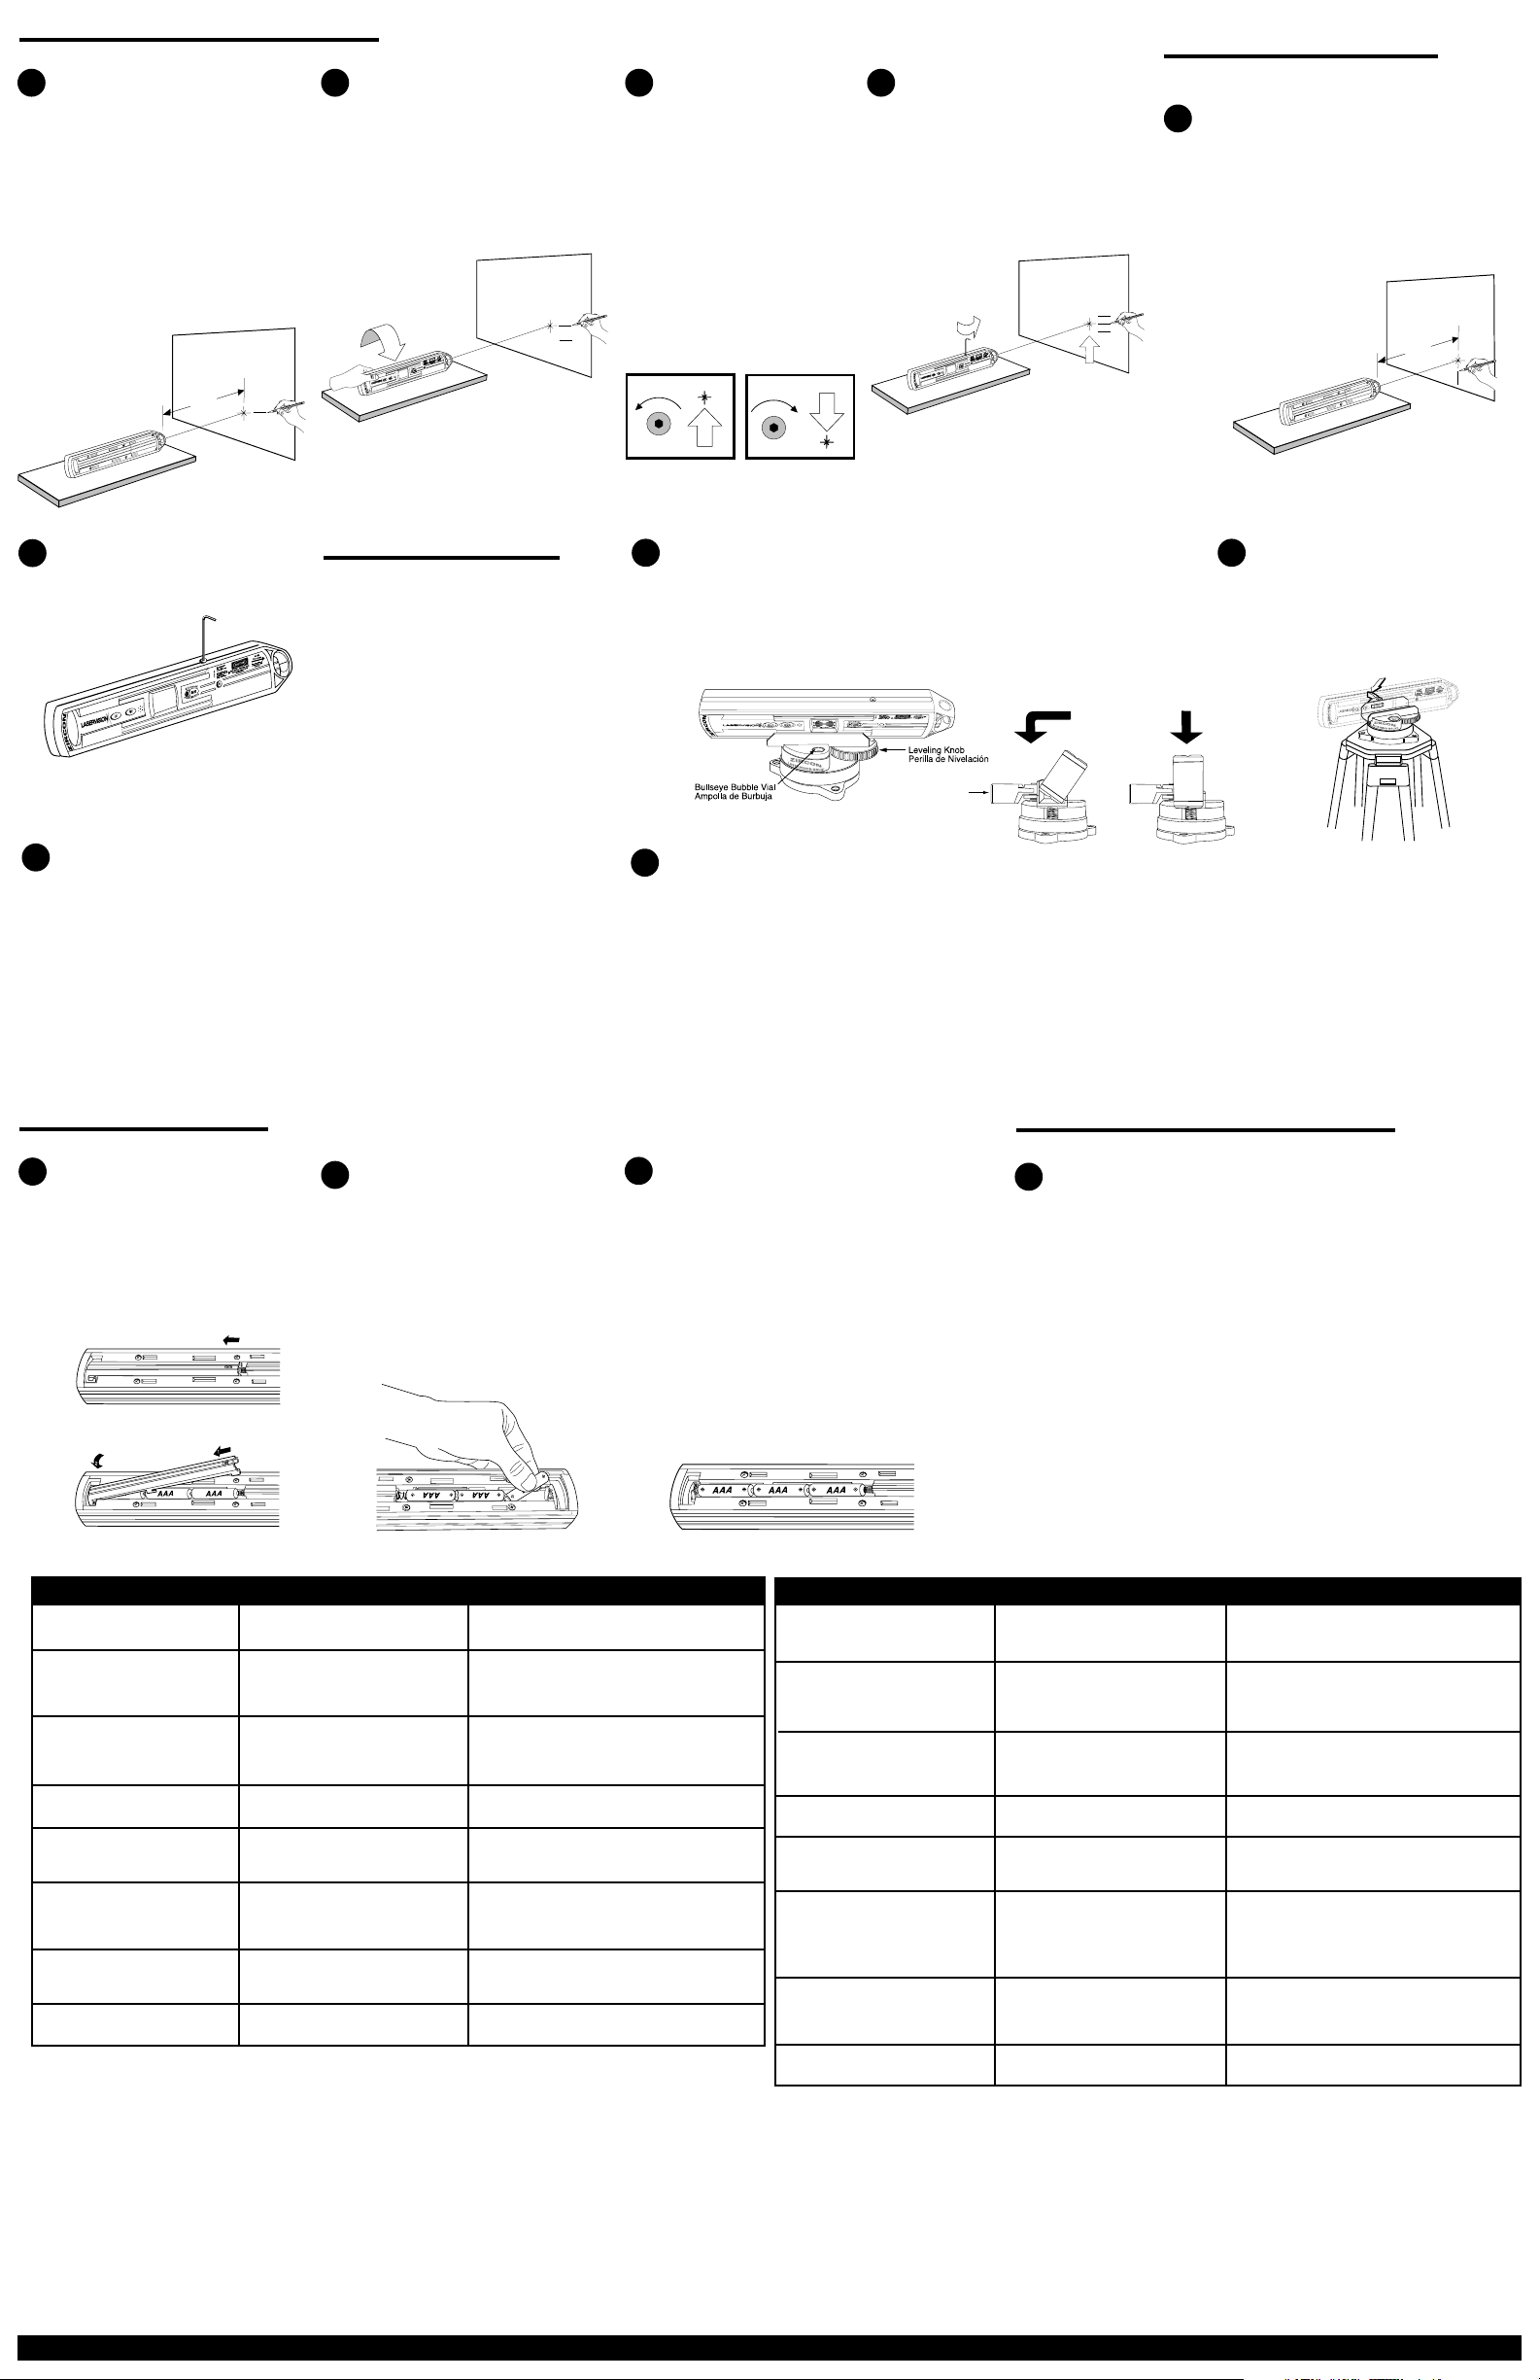
CHECKING FOR PROPER CALIBRATION
VERIFICACIÓN DE LA CALIBRACIÓN ADECUADA
Prior to using any level, you should check its calibration.
Previo al uso de cualquier nivel, verifique la calibración.
Place LaserVision X on a horizontal
3
surface and try to align it with an edge
or line on the surface. Turn on unit.
Coloque el LaserVision X en una
superficie horizontal y trate de alinearlo
con un borde o línea sobre dicha
superficie. Encienda la unidad.
The display should show same end of surface as higher, plus or
6
minus a bar. Because the level has been turned around, however,
the position of the bars above and below the center should be
opposite of the LCD in your first reading. If not, the level is out
of calibration and should be recalibrated.
La pantalla debe indicar el mismo extremo de superficie más
alto, más o menos una barra. Debido a que se ha girado el nivel,
la posición de las barras arriba y debajo de la línea media deberá
ser opuesta a la pantalla de cristal líquido, en su primera lectura.
De lo contrario, el nivel quedará fuera de calibración y deberá
volver a calibrarse.
When level or plumb is found, the
8
LCD displays a single bar and the
unit beeps. When not used for 60
seconds, power automatically shuts
off to save batteries.
Cuando se encuentra el nivel o
plomada, en la pantalla de cristal
líquido aparece una sola barra y la
unidad emite una señal audible.
Cuando no se usa durante 60
segundos, se interrumpe
automáticamente la alimentación
para ahorrar batería.
Note which end of the
4
surface appears higher, and
by how many bars above the
center, as depicted on the
LCD.
Observe qué lado de la
superficie parece ser más alto
Rotate the level end for end so the same
5
surface of the level touches the same flat
surface, along the same edge or line.
Haga girar el nivel de un extremo a otro a
fin de que la misma superficie del nivel
entre en contacto con la misma superficie
plana, junto con el mismo borde o línea.
y a cuántas barras por
encima de la línea media se
encuentra, según lo indicado
“
¤
LASER
PWRCAL
USING THE LASER
USO DEL LÁSER
Al usar el láser, LaserVision X entra automáticamente en el Modo de Extrema
Precisión.
Because the accuracy is four times better in Extreme
9
Precision Mode than in Regular Mode, it is difficult to
get a steady level indication. To assist you, Zircon
recommends using the LaserVision X with the
LaserVision mount (See figures 22 and 23).
Por que en el Modo de Extrema Precisión hay una
exactitud cuatro veces mejor que en el Modo Regular,
en la pantalla.
When using the laser, LaserVision X
automatically goes into the Extreme
Precision Mode.
Press the LASER button and point
10
LaserVision X in the desired direction.
Adjust to level or plumb by turning
leveling knob on mount, then marking
the position of the laser spot.
Pulse el botón LASER y posicione el
LaserVision X en la dirección deseada.
Ajuste el nivel o la plomada haciendo
girar la perilla de nivelación que se
encuentra en el soporte de montaje; a
continuación, marque la posición del
proyector láser.
es difícil obtener una indicación de nivel constante. A
los efectos de asistirlo, Zircon recomienda el uso de
LaserVision X con el soporte de montaje LaserVision
(vea la figura 22 y 23).
LASERVISION® X
LIMITED 1 YEAR WARRANTY
Zircon Corporation, ("Zircon") warrants this product to be
free from defects in materials and workmanship for one
year from the date of purchase. Any in-warranty defective
product returned to Zircon*, freight prepaid with proof of
purchase date and $5.00 to cover postage and handling,
will be repaired or replaced at Zircon’s option. This
warranty is limited to the electronic circuitry and original
case of the product and specifically excludes damage caused
by abuse, unreasonable use or neglect. This warranty is in
lieu of all other warranties, express or implied, and no
other representations or claims of any nature shall bind or
obligate Zircon. Any implied warranties applicable to this
product are limited to the one year period following its
purchase.
IN NO EVENT WILL ZIRCON BE LIABLE FOR ANY SPECIAL,
INCIDENTAL OR CONSEQUENTIAL DAMAGES RESULTING
FROM POSSESSION, USE OR MALFUNCTION OF THIS
PRODUCT.
In accordance with government regulations, you are
advised that:
(i) some states do not allow limitations on how long an
implied warranty lasts and/or the exclusion or limitation of
incidental or consequential damages, so the above
limitations and/or exclusions may not apply to you, and
further (ii) this warranty gives you specific legal rights and
you may also have other rights which vary from state to
state.
Return product freight prepaid with proof of purchase date
(dated sales receipt) and $5.00 to cover postage and
handling, to:
Be sure to include your name and return address. Out of
warranty service and repair, where proof of purchase is not
provided, shall be returned with repairs charged C.O.D.
Customer Service, 800/245-9265 or 408/866-8600
U.S. Patent #5083383, 5259118, 5313713, 5479715, and
Patent Pending.
Canada Patent #2085623
European Patent #0547904, 0464145
©2002 Zircon Corporation • P/N 57985 • Rev C (01/02)
Zircon Corporation
*Attn: Returns Department
2390 Boswell Road, Suite 300
Chula Vista, CA 91914-3510 USA
Allow 4 to 6 weeks for delivery.
E-mail: customer.service@zircon.com
GARANTÍA LIMITADA DE 1 AÑO
Zircon Corporation ("Zircon") garantiza este producto como
libre de defectos en materiales y mano de obra por un año
a partir de la fecha de compra. Cualquier producto
defectuoso dentro de la garantía enviado a Zircon* con el
envio pagado, comprobante de fecha de compra y $5,00
para cubrir porte y manejo, se reparará o reemplazará a
opción de Zircon. Esta garantía se limita a los circuitos
electrónicos y a la caja original del producto y excluye
específicamente los daños provocados por uso indebido, uso
no razonable o descuido. Esta garantía está en lugar de
todas las demás garantías, expresas o implícitas, y ninguna
otra declaración o reclamación de cualquier naturaleza será
obligatoria para Zircon. Cualquier garantía implícita
aplicable para este producto se limita al periodo de un año
inmediato a su compra.
EN NINGÚN CASO, ZIRCON SERÁ RESPONSABLE DE NINGÚN
DAÑO ESPECIAL, INCIDENTAL O RESULTANTE DE LA
POSESIÓN, USO O MAL FUNCIONAMIENTO DE ESTE
PRODUCTO.
De conformidad con las reglamentaciones
gubernamentales, se le notifica que:
(i) en algunos estados no se permiten limitaciones del
tiempo de vigencia de una garantía implícita y/o de la
exclusión o limitación de daños incidentales o consecutivos;
así que las limitaciones y/o exclusiones anteriores tal vez no
se apliquen para usted, y además, (ii) esta garantía le
otorga derechos legales específicos y usted tal vez tenga
otros derechos que varían de estado en estado.
Devuelva el producto con envio pagado y comprobante
fecha de compra (recibo de venta fechado) y $5,00 para
cubrir el porte y el manejo, a:
Asegúrese de incluir su nombre y dirección. El servicio y
reparación fuera de garantía donde no se incluya el
comprobante de compra se regresará con cargos de
reparación C.O.D. Permita de 4 a 6 semanas para la entrega.
Servicio a clientes: 800/245-9265 ó 408/866-8600
Patentes de EE.UU. #5083383, 5259118, 5313713, 5479715, y
Patente Impendo. Canada Patente #2085623
European Patente #0547904, 0464145
©2002 Zircon Corporation • P/N 57985 • Rev C (01/02)
Zircon Corporation
*Attn: Returns Department
2390 Boswell Road, Suite 300
Chula Vista, CA 91914-3510 USA
A la dirección de correo electrónico:
customer.service@Zircon.com
CALIBRATING LEVEL FEATURE OF LASERVISION X
CALIBRACIÓN DE LA FUNCIÓN DE NIVEL DEL LASERVISION X
The level feature of the LaserVision X can be easily recalibrated to original factory specifications. For
best results, align the level with an edge or line on a solid, flat surface when calibrating.
La función de nivel del LaserVision X puede volverse a calibrar fácilmente de acuerdo con las
especificaciones del fabricante. Para obtener óptimos resultados, alinee el nivel con un borde o línea sobre
una superficie sólida y plana al efectuar la calibración.
Calibrating to Level
11
Place the LaserVision X on a flat, horizontal surface with the
LCD facing you. Turn on the unit, and press the CAL button.
Two beeps will sound and the bars on the LCD screen will begin
moving up and down. Wait for the bars to stop moving and a
tone to sound.
Calibración a Nivel
Coloque el LaserVision X en una superficie horizontal y plana
con la pantalla hacia usted. Encienda la unidad y pulse el botón
CAL. Se escucharán dos señales audibles y se empezarán a
mover hacia arriba y hacia abajo las barras de la pantalla de
cristal líquido. Espere a que éstas se detengan y a que se
escuche una señal audible.
Rotate the level so the LCD is facing away
12
from you but placed in the same location.
Press the CAL button again. Wait for the bars
to stop moving and a tone to sound.
This level axis is now calibrated.
Flip the LaserVision X over and calibrate its
opposite surface by following the same
procedure. Both top and bottom level surfaces
should now be calibrated.
Haga girar el nivel a fin de que la pantalla de
cristal líquido quede opuesta a usted, aunque
posicionado en el mismo lugar. Pulse
nuevamente el botón CAL. Espere a que las
barras dejen de moverse y a que se escuche
una señal audible.
El eje de este nivel ya está calibrado. Mueva el
LaserVision X para calibrar su superficie
opuesta siguiendo el mismo procedimiento a
fin de calibrar las superficies superior e
inferior.
Calibrating to Plumb
13
Hold the LaserVision X against a vertical (plumb) surface, such
as a door frame. Turn on the unit and press the CAL button. Two
beeps will sound and the bars on the LCD screen will begin
moving up and down. Wait for the bars to stop moving and a
tone to sound.
Roll the level over (keeping the same end up) and place in the
same location. Press the CAL button again. Wait for the bars to
stop moving and a tone to sound. This first plumb axis is now
calibrated. Turn the other end up and calibrate the other plumb
direction by following the same procedure. Both plumb surfaces
should now be calibrated.
Calibración a Plomada
Coloque el LaserVision X contra una superficie vertical (plomada),
como el marco de una puerto. Encienda la unidad y pulse el
botón CAL. Se escucharán dos señales audibles y las barras de la
pantalla de cristal líquido se empezarán a moverse hacia arriba y
hacia abajo. Espere a que éstas se detengan y a que se escuche
una señal audible.
Dé vuelta el nivel (con el mismo extremo hacia arriba) y
colóquelo en el mismo lugar. Pulse nuevamente el botón CAL.
Espere a que las barras dejen de moverse y a que se escuche un
tono. Se acaba de calibrar este primer eje de la plomada. Dé
vuelta el otro extremo hacia arriba y efectúe la calibración del
otro sentido de la plomada siguiendo el mismo procedimiento.
Las dos superficies de la plomada ya están calibradas.
RECALIBRATING LASER FEATURE OF LASERVISION X
RECALIBRACIÓN DE LA FUNCIÓN LASER DEL LASERVISION X
The laser feature of the LaserVision X can also be easily recalibrated to original factory
specifications.
La función láser del LaserVision X puede calibrarse nuevamente y de manera sencilla de acuerdo con
las especificaciones originales del fabricante.
If you need to adjust the laser for horizontal and vertical alignment,
14
you'll need the Allen wrench stored in the battery compartment.
De ser necesario ajustar el láser para alineación horizontal y vertical, podrá
hacerlo utilizando la llave Allen que se encuentra en el compartimento de la
batería.
Page 2
~50ft.
P1
~50ft.
P1
P2
P1
CW
CCW
ADJUSTING THE VERTICAL ALIGNMENT
P3
P2
P1
Holding
clamp
Abrazadera
de Soporte
AJUSTE DE LA ALINEACIÓN VERTICAL
Place LaserVision X on a flat, stable
15
surface (need not be level) with a
target area located approximately 50
ft. (15 m) or more away. Turn on the
laser and mark the position of the
center of the laser spot on the remote
target.
Coloque el LaserVision X sobre una
superficie estable y plana (no es
necesario que esté nivelada) con un
área objetivo localizada a
aproximadamente 50 pies (15 m) o
más. Encienda el láser y marque la
posición del centro del proyector láser
sobre el objetivo remoto.
16
Turn the level over. Return to the
target area and mark the position
of the center of the spot.
Dé vuelta el nivel. Vuelva al área
objetivo y marque la posición del
centro del proyector.
If the two marks don’t match,
17
use the Allen wrench to turn
the calibration screw to move
the laser up or down until the
laser spot is halfway between
the two marks.
Si las dos marcas no
coinciden, utilice la llave
Allen para hacer girar el
tornillo de calibración que
mueve el láser hacia arriba o
hacia abajo hasta que el
proyector láser quede en el
medio de las dos marcas.
Turn the level upside down again
18
and check the spot location.
Repeat the previous steps until
there is no change when the level
is turned over.
Coloque nuevamente el nivel hacia
abajo y verifique la ubicación del
proyector. Repita los pasos
anteriores hasta que no se
observen cambios al dar vuelta el
nivel.
ADJUSTING THE HORIZONTAL
ALIGNMENT
AJUSTE DE LA ALINEACIÓN
HORIZONTAL
Place LaserVision X on its side on a flat, stable
19
surface, which need not be level. Follow the
same procedure as for vertical adjustment.
Coloque el LaserVision X con el costado sobre
una superficie estable y plana. No es necesario
que esté nivelada. Siga el mismo procedimiento
que para el ajuste vertical.
Adjust with Allen wrench if necessary.
20
De ser necesario, ajuste con la llave
Allen.
Level the mounting surface of the
23
tripod as close as possible by eye
using the bullseye bubble vial on the
mount as a guide. When the bubble is
in the center circle of the vial the
tripod is very close to level.
Nivele visualmente la superficie de
montaje del trípode utilizando como
guía la ampolla de burbuja que se
encuentra en el soporte. Cuando la
burbuja se encuentre en el círculo
central de la ampolla, el trípode se
hallará prácticamente a nivel.
REPLACING THE BATTERIES
REEMPLAZO DE BATERÍAS
Have your new batteries ready. Slide
25
the door away from the laser end.
Press down on the battery door end
and remove the door.
Tenga sus baterias nuevas listas y
deslice la tapa en sentido opuesto al
extremo del láser. Presione sobre el
extremo de la tapa de las baterías para
retirarla.
LASERVISION MOUNT
MONTAJE DE LASERVISION
The LaserVision Mount is specifically
designed for use with LaserVision X. It can
be used with any tripod with a standard
5/8-11 mounting screw. It can also be used
on any photo tripod with 1/4-20 threads,
useful for work in plumb.
El soporte de montaje LaserVision ha sido
específicamente diseñado para uso con el
LaserVision X. Tambien puede ser usado en
cualguier trípode con rosca de 1/4-20. Util
para trabajos en plomada. Puede utilizarse
con cualquier trípode que tenga un tornillo
de fijación estándar de 5/8-11.
Note: If the leveling knob of the LaserVision Mount
runs out of range before the LaserVision indicates
level, readjust the leveling of the tripod (See
"LaserVision Mount").
Nota: Si la perilla de nivelación del Soporte de
Montaje LaserVision quedare fuera de alcance antes
de la indicación de nivel del LaserVision, reajuste la
nivelación del trípode (Consulte "Montaje de
LaserVision").
Remove the dead batteries and
26
insert 3 new AAA batteries with
the flat side (negative end)
against the spring and the tip
(positive end) against the flat
contact.
Retire las baterías agotadas y
coloque 3 baterías nuevas tipo
AAA con el lado plano (polo
negativo) contra el resorte y la
punta (polo positivo) contra el
contacto plano.
Ensure that mount is on a solid, stable surface or on a tripod. Roll LaserVision
21
X into the mount with the LCD window facing away from the holding clamp
and the groove.
Asegúrese de colocar el soporte de montaje sobre una superficie estable y
sólida o sobre un trípode. Haga girar el LaserVision X para introducirlo en el
soporte de montaje de manera tal que la pantalla de cristal líquido quede
opuesta a la abrazadera de soporte y a la muesca.
Shoot laser beam at desired target and adjust knob
24
on mount to reach level reading. Mark target as
needed. To move the laser spot to a different
location, turn LaserVision X until it points to the
new locations and re-adjust leveling knob. If tripod
is not moved, the same level plane is maintained.
Apunte el haz de láser al objetivo deseado y ajuste
la perilla que se encuentra en el soporte de
montaje a fin de alcanzar una lectura de nivel.
Marque el objetivo según sea necesario. Para
mover el proyector láser a un lugar diferente, haga
girar el LaserVision X hasta que señale a los lugares
nuevos y reajuste la perilla de nivelación. Si el
trípode no es movido, se mantiene el mismo plano
nivelado.
TURNING THE SOUND ON AND OFF
ACTIVADO Y DESACTIVADO DEL SONIDO
Replace the battery door and slide it towards the
27
laser end. Calibration is stored for at least 2
minutes when batteries are removed, as long as
the PWR button is not pressed. Batteries should
last approximately 24 hours with continuous use
of the laser in the level position. With limited use,
the batteries can last up to 1 year.
Vuelva a colocar la tapa de las baterías y deslícela
hacia el extremo del láser. La calibración queda
almacenada durante un mínimo de 2 minutos
cuando se sacan las baterías, siempre que no se
pulse el botón PWR. Las baterías tienen una
duración de aproximadamente 24 horas de uso
continuo del láser en la posición de nivel. Si el uso
es limitado, la duración de las baterías puede
extenderse hasta 1 año.
The audio tone sounds at level or plumb, which is useful in "blind"
28
situations. It is activated when a single level bar is on the LCD.
When using the level only, the sound can be turned off by quickly
pressing the PWR button twice. When the sound is off, the sound icon
found on the bottom right of the LCD disappears. To reactivate the
sound, turn the LaserVision X off and on again.
Sound is turned off automatically when you press the LASER button. To
keep the sound on, quickly press the LASER button twice when turning
on the laser.
El tono audible suena en el nivel o plomada; lo cual resulta de utilidad
en situaciones cuando se trabaja "a ciegas". Se activa cuando hay una
sola barra de nivel en la pantalla de cristal líquido.
Al utilizar solamente el nivel, puede desactivarse el sonido pulsando
rápidamente el botón PWR dos veces; en cuyo caso, desaparecerá el
icono de sonido que se encuentra en la parte inferior derecha de la
pantalla de cristal líquido. Para reactivar el sonido, apague el
LaserVision X y vuelva a encenderlo.
El sonido se desactiva automáticamente al pulsar el botón LASER. Para
mantener activado el sonido, cuando encienda el láser pulse
rápidamente el botón LASER dos veces.
22
With the LCD screen centered over the
mount, push the clamp toward the
LaserVision X to secure it.
Con la pantalla de cristal líquido
centrada sobre el soporte de montaje,
empuje la abrazadera hasta
introducirla en el LaserVision X para
fijarla.
HELPFUL HINTS
Situation
"Out-of-Range" appears on
LCD during calibration.
"Out-of-Range" appears on
LCD at other times.
Desire to cancel calibration.
Not sure if laser spot is
absolutely accurate.
Can't maintain the same level
point using the LaserVision X
Mount.
The laser spot, the red LED in
the LASER button, and the word
"EXTREME" on the LCD are all
flashing at the same rate.
The laser and LCD are flashing
slowly, much more slowly than
the Off-Level flashing.
Low Battery Indicator.
Probable Causes
• Not turning level in correct direction
for second calibration reading.
• LaserVision X level has lost its
calibration, typically after the
batteries have been dead or
removed for longer than 2 minutes.
• CAL button accidentally pressed.
• Laser spot gets larger as it gets
further from the LaserVision X.
• LaserVision X Mount was turned or
moved.
• LaserVision X is not level.
• Battery is low.
• Battery has less than 10 hours of
continuous use left.
• Refer to instructions and start again.
• Replace batteries, if necessary.
• Recalibrate all four axes before use.
• Press any other button twice when calibration
indicators have stopped moving. LaserVision X
level will continue to use calibration it has
stored in memory.
• Always mark the center of the spot.
• Readjust the leveling knob each time the mount
is rotated.
• LaserVision X must be precisely level or plumb
for these elements to stay on continuously.
• Raise or lower the laser end of LaserVision X
until flashing stops.
• Replace battery to maintain sensitivity.
• Replace battery to maintain sensitivity.
General Information
1. The Zircon LaserVision X is shock resistant, but it should be treated as a precision instrument. If the LaserVision
X is dropped it may need to be recalibrated. Refer to the section "Checking for Proper Calibration" for further
instructions.
2. While the LaserVision X is water resistant, it is not waterproof and should be handled accordingly.
FCC Part 15 Class B Registration Warning
This equipment has been tested and found to comply with the limits for a Class B digital device, pursuant to Part 15 of FCC
Rules. These limits are designed to provide reasonable protection against harmful interference when the equipment is
operated in a residential installation. This equipment generates, uses, and can radiate radio frequency energy and, if not
installed and used in accordance with the instructions, may cause harmful interference to radio communications. However,
there is no guarantee that interference will not occur in a particular installation. If this equipment does cause harmful
interference to radio or television reception, which can be determined by turning the equipment off and on, the user is
encouraged to try to correct the interference by one or more of the following measures:
(1) Reorient or relocate the receiving antenna.
(2) Increase the separation between the equipment and receiver.
(3) Connect the equipment into an outlet on a circuit, different from that which the receiver is connected (if applicable).
(4) Consult the dealer or an experienced radio/TV technician for help.
Solutions
CONSEJOS ÚTILES
Situación
Durante la calibración, en la pantalla
de cristal líquido se presenta "Outof-Range" (Fuera de Alcance).
En la pantalla de cristal líquido se
presenta "Out-of-Range" (Fuera de
Alcance) en otras ocasiones.
Desea cancelar la calibración.
No está seguro si el proyector de
láser es absolutamente exacto.
No puede mantener el mismo punto
de nivel que utiliza el soporte de
montaje del LaserVision X.
El proyector láser, el indicador de
color rojo en el botón LASER y la
palabra "EXTREME" (Extrema) en la
pantalla de cristal líquido titilan a la
misma velocidad.
El láser y la pantalla de cristal líquido
parpadean lentamente, mucho más
lentamente que el indicador titilante
de fuera de nivel (Off-Level).
Indicador de Poca Batería.
Causas Probables
• No hacer girar el nivel en la dirección
correcta para una lectura de la
segunda calibración.
• El nivel LaserVision X está fuera de
calibración; típicamente, después de
agotadas las baterías o de retiradas
durante más de 2 minutos.
• Se pulsó accidentalmente el botón
CAL.
• El proyector láser se agranda cuanto
más se aleja del LaserVision X.
• Se giró o movió el soporte de montaje
del LaserVision X.
• El LaserVision X no está nivelado.
• Hay poca batería.
• A la batería le queda menos de 10
horas de uso continuo.
• Remítase a las instrucciones y comience
nuevamente.
• Vuelva a calibrar los cuatro ejes antes de usar el
equipo.
• De ser necesario, cambie las baterías.
• Pulse cualquier otro botón dos veces cuando
dejen de moverse los indicadores de calibración.
El nivel del LaserVision X continuará utilizando la
calibración que está almacenada en la memoria.
• Marque siempre el centro del proyector.
• Reajuste la perilla de nivelación cada vez que
haga girar el soporte de montaje.
• El LaserVision X debe estar exactamente a nivel
o plomada para que estos elementos
permanezcan en esa posición continuamente.
• Eleve o haga descender el extremo del láser del
LaserVision X hasta que deje de titilar.
• Reemplace la batería para mantener la
sensibilidad.
• Reemplace la batería para mantener la
sensibilidad.
Información General
1. El LaserVision X de Zircon es resistente a los golpes, aunque deberá manipularse como un instrumento de
precisión. Si el LaserVision X sufriera una caída, es probable que sea necesario volver a calibrarlo. Refiérase a la
sección "Verificación de la Calibración Adecuada" para recibir instrucciones detalladas.
2. Si bien el LaserVision X es resistente al agua, no es impermeable y deberá manipularse en consecuencia
Advertencia de registro de la FCC, Sección 15, Clase B
Este equipo se ha probado y se encontró que cumple con los límites para un dispositivo digital Clase B, conforme a la Sección 15 de las Reglas de
la FCC. Estos límites se diseñaron para ofrecer una protección razonable contra la interferencia dañina cuando el equipo se opere en una
instalación residencial. Este equipo genera, usa y puede radiar energía de radio frecuencia y, si no se instala y utiliza en conformidad con las
instrucciones, puede provocar interferencia dañina a las comunicaciones de radio. Sin embargo, no hay garantía de que no ocurrirá interferencia
en una instalación en particular. Si este equipo provoca interferencia dañina a la recepción de radio o televisión, lo cual puede determinarse
encendiendo y apagando el equipo, se exhorta al usuario a tratar de corregir la interferencia mediante una o más de las siguientes medidas:
(1) Reoriente o reubique la antena de recepción.
(2) Incremente la separación entre el equipo y el receptor.
(3) Conecte el equipo en una toma eléctrica en un circuito diferente al que se conectó el receptor (si aplica).
(4) Consulte al distribuidor o a un técnico experimentado en radio y televisión para recibir ayuda.
Soluciones
Questions? Check our Web site at www.zircon.com and click “Product Support.” Preguntas? Visite nuestro sitio Web www.zircon.com y presione “Product Support.”
 Loading...